Embed Size (px)
Citation preview
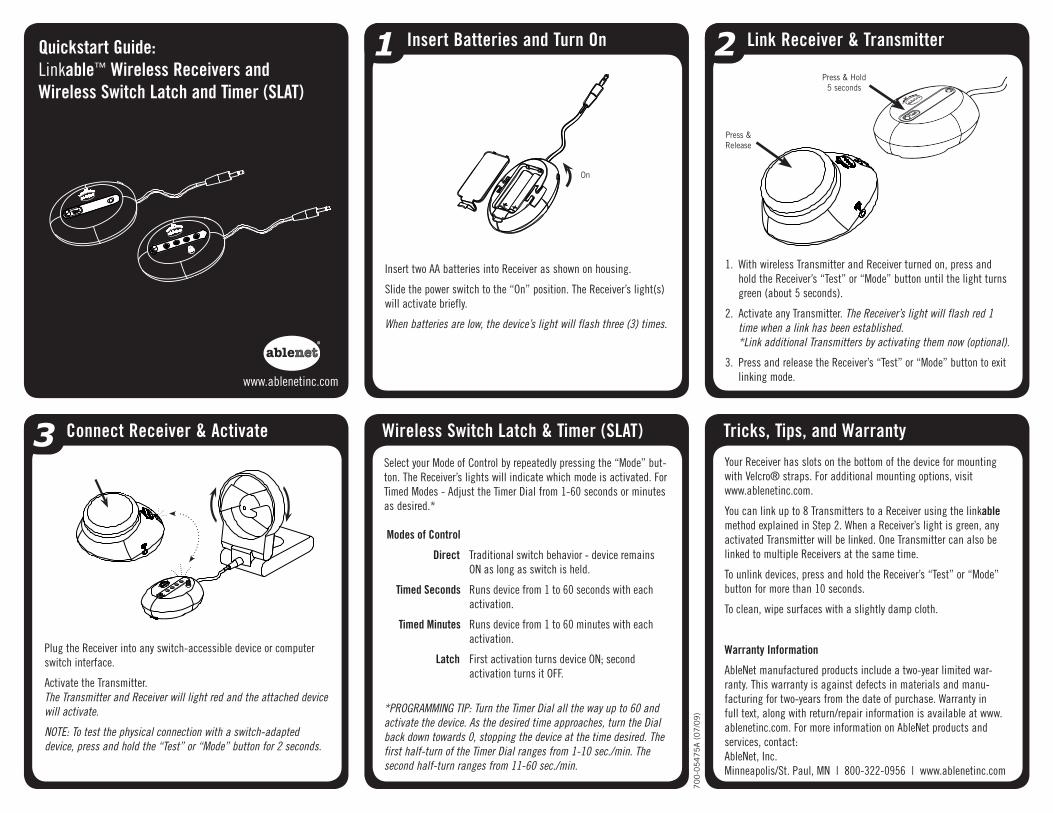
2 Link Receiver & Transmitter1
3
Insert Batteries and Turn On
Connect Receiver & Activate Wireless Switch Latch & Timer (SLAT) Tricks, Tips, and Warranty
Insert two AA batteries into Receiver as shown on housing.
Slide the power switch to the “On” position. The Receiver’s light(s) will activate briefly.
When batteries are low, the device’s light will flash three (3) times.
Select your Mode of Control by repeatedly pressing the “Mode” but-ton. The Receiver’s lights will indicate which mode is activated. For Timed Modes - Adjust the Timer Dial from 1-60 seconds or minutes as desired.*
Modes of Control
Direct Traditional switch behavior - device remains ON as long as switch is held.
Timed Seconds Runs device from 1 to 60 seconds with each activation.
Timed Minutes Runs device from 1 to 60 minutes with each activation.
Latch First activation turns device ON; second activation turns it OFF.
*PROGRAMMING TIP: Turn the Timer Dial all the way up to 60 and activate the device. As the desired time approaches, turn the Dial back down towards 0, stopping the device at the time desired. The first half-turn of the Timer Dial ranges from 1-10 sec./min. The second half-turn ranges from 11-60 sec./min.
Your Receiver has slots on the bottom of the device for mounting with Velcro® straps. For additional mounting options, visit www.ablenetinc.com.
You can link up to 8 Transmitters to a Receiver using the linkable method explained in Step 2. When a Receiver’s light is green, any activated Transmitter will be linked. One Transmitter can also be linked to multiple Receivers at the same time.
To unlink devices, press and hold the Receiver’s “Test” or “Mode” button for more than 10 seconds.
To clean, wipe surfaces with a slightly damp cloth.
Warranty Information
AbleNet manufactured products include a two-year limited war-ranty. This warranty is against defects in materials and manu-facturing for two-years from the date of purchase. Warranty in full text, along with return/repair information is available at www.ablenetinc.com. For more information on AbleNet products and services, contact: AbleNet, Inc. Minneapolis/St. Paul, MN | 800-322-0956 | www.ablenetinc.com
Plug the Receiver into any switch-accessible device or computer switch interface.
Activate the Transmitter. The Transmitter and Receiver will light red and the attached device will activate.
NOTE: To test the physical connection with a switch-adapted device, press and hold the “Test” or “Mode” button for 2 seconds.
1. With wireless Transmitter and Receiver turned on, press and hold the Receiver’s “Test” or “Mode” button until the light turns green (about 5 seconds).
2. Activate any Transmitter. The Receiver’s light will flash red 1 time when a link has been established. *Link additional Transmitters by activating them now (optional).
3. Press and release the Receiver’s “Test” or “Mode” button to exit linking mode.
Press & Hold 5 seconds
Press & Release
On
Quickstart Guide: Linkable™ Wireless Receivers and Wireless Switch Latch and Timer (SLAT)
www.ablenetinc.com
70
0-0
54
75
A (
07
/09
)

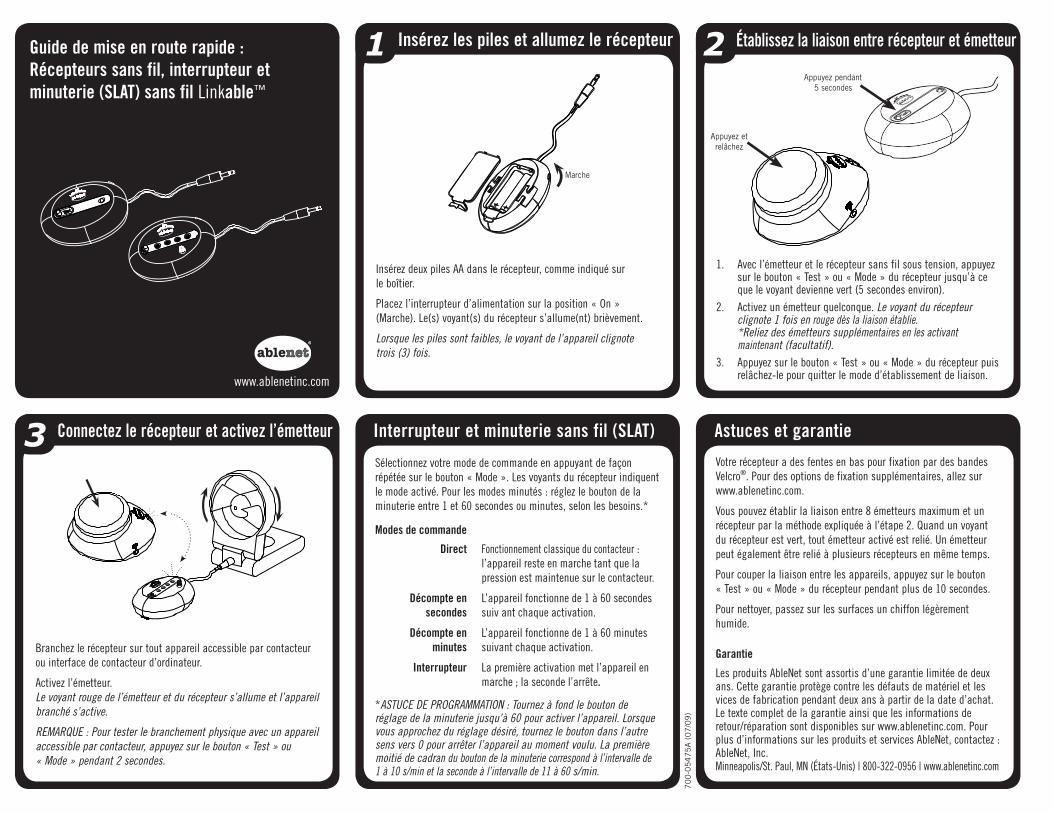
2 Enlace el receptor y el transmisor1
3
Inserte las pilas y encienda el receptor
Conecte el receptor y active el transmisor Conmutador inalámbrico con traba y temporizador (SLAT) Trucos, recomendaciones y garantía
Inserte dos pilas AA en el compartimento del receptor, tal y como se muestra.
Mueva el interruptor de encendido a la posición de encendido (“On”). La(s) luz (luces) del receptor se encenderá(n) brevemente.
Cuando la carga de las pilas esté baja, la luz del dispositivo parpadeará tres (3) veces.
Seleccione su modalidad de control presionando repetidamente el botón de modalidad (Mode). Las luces del receptor indicarán la modalidad activada. Para las modalidades con temporizador: ajuste el dial del temporizador de 1 a 60 segundos o minutos, según se desee.*
Modalidades de control
Directo Comportamiento de conmutador tradicional: el dispositivo permanece ENCENDIDO durante el tiempo que se mantenga presionado el conmutador.
Programación de Hace funcionar el dispositivo de 1 a 60 segun segundos dos con cada activación.
Programación de Hace funcionar el dispositivo de 1 a 60 minutos minutos con cada activación.
Traba La primera activación ENCIENDE el dispositivo; la segunda activación lo APAGA.
*RECOMENDACIÓN DE PROGRAMACIÓN: Gire completamente el dial del temporizador hasta la posición de 60 y active el dispositivo. A medida que se aproxima el tiempo deseado, vuelva a girar el dial hacia la posición de 0 y deténgalo en la posición correspondiente al tiempo deseado. La primera media vuelta del dial del temporizador va de 1 a 10 segundos/minutos. La segunda media vuelta va de 11 a 60 segundos/minutos.
El receptor tiene ranuras en la parte inferior del dispositivo para su montaje con tiras de Velcro®. Para obtener opciones de montaje adicionales visite www.ablenetinc.com.Puede enlazar hasta 8 transmisores a un receptor usando el método de enlace descrito en el Paso 2. Cuando la luz de un receptor sea verde, todos los transmisores activados estarán enlazados. Un transmisor también puede enlazarse a múltiples Receptores al mismo tiempo.Para desenlazar dispositivos, mantenga presionado el botón “Test” (prueba) o “Mode” (modalidad) del receptor durante más de 10 segundos.Para limpiarlos, pase un paño ligeramente humedecido sobre su superficie.
Información sobre la garantíaLos productos fabricados por AbleNet tienen una garantía limitada de dos años. Esta garantía los cubre contra defectos en los materiales y la fabricación durante dos años a partir de la fecha de compra. El texto completo de la garantía, junto con la información sobre devoluciones y reparaciones, se puede obtener en www.ablenetinc.com. Para obtener más información sobre los productos y servicios de AbleNet, póngase en contacto con:AbleNet, Inc.Minneapolis/St. Paul, MN | 800-322-0956 | www.ablenetinc.com
Enchufe el receptor en cualquier dispositivo accesible por conmutador o interfaz de conmutación de computadora.
Active el transmisor.La luz roja del transmisor y del receptor se iluminará y el dispositivo acoplado se activará.
NOTA: Para comprobar la conexión física con un dispositivo adaptado con un conmutador, mantenga presionado el botón “Test” (prueba) o “Mode” (modalidad) durante 2 segundos.
1. Con el transmisor y el receptor inalámbricos encendidos, mantenga presionado el botón “Test” (prueba) o “Mode” (modalidad) hasta que la luz cambie al color verde (aproximadamente 5 segundos).
2. Active cualquier transmisor. La luz del receptor parpadeará en color rojo una vez cuando se haya establecido el enlace.
*Para enlazar más transmisores, actívelo ahora (opcional).
3. Presione y suelte el botón “Test” (prueba) o “Mode” (modalidad) para salir de la modalidad de enlace.
Mantenga presionado durante 5 segundos
Presione y suelte
Encender
Guía de inicio rápido:Receptores inalámbricos y conmutador con traba y temporizador inalámbricos (SLAT) Linkable™
www.ablenetinc.com
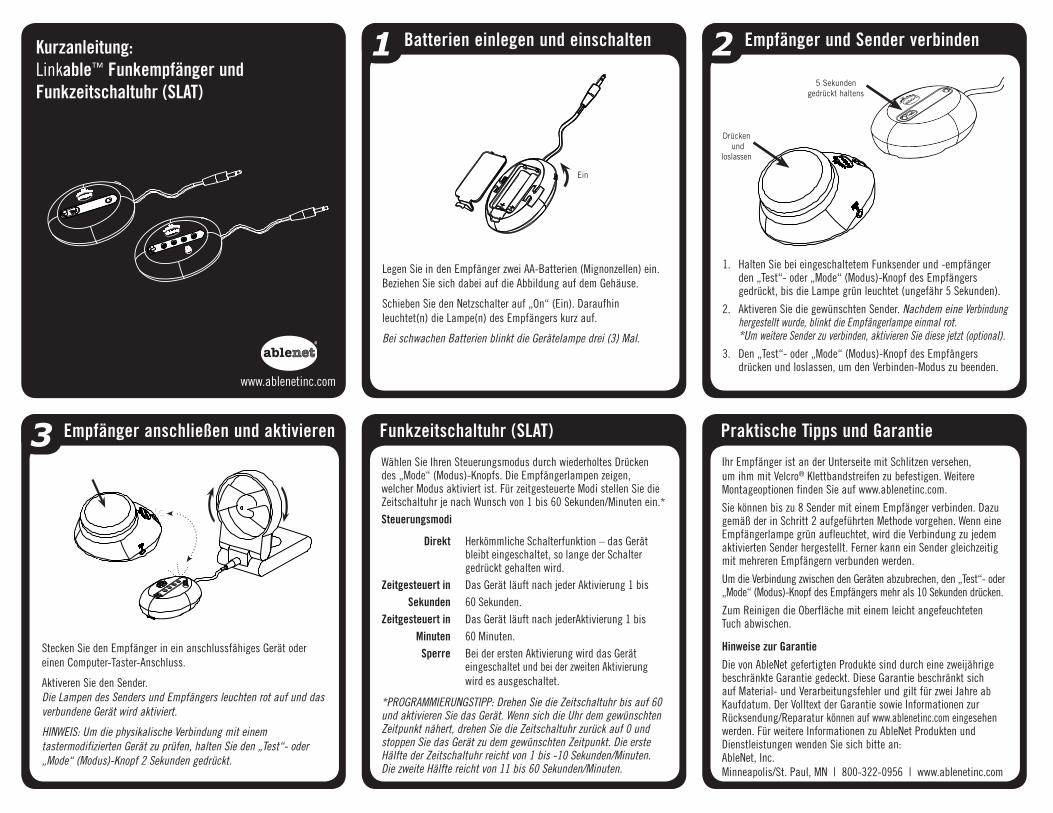
2 Établissez la liaison entre récepteur et émetteur1
3
Insérez les piles et allumez le récepteur
Connectez le récepteur et activez l’émetteur Interrupteur et minuterie sans fil (SLAT) Astuces et garantie
Insérez deux piles AA dans le récepteur, comme indiqué sur le boîtier.
Placez l’interrupteur d’alimentation sur la position « On » (Marche). Le(s) voyant(s) du récepteur s’allume(nt) brièvement.
Lorsque les piles sont faibles, le voyant de l’appareil clignote trois (3) fois.
Sélectionnez votre mode de commande en appuyant de façon répétée sur le bouton « Mode ». Les voyants du récepteur indiquent le mode activé. Pour les modes minutés : réglez le bouton de la minuterie entre 1 et 60 secondes ou minutes, selon les besoins.*
Modes de commande
Direct Fonctionnement classique du contacteur : l’appareil reste en marche tant que la pression est maintenue sur le contacteur.
Décompte en L’appareil fonctionne de 1 à 60 secondes secondes suiv ant chaque activation.
Décompte en L’appareil fonctionne de 1 à 60 minutes minutes suivant chaque activation.
Interrupteur La première activation met l’appareil en marche ; la seconde l’arrête.
*ASTUCE DE PROGRAMMATION : Tournez à fond le bouton de réglage de la minuterie jusqu’à 60 pour activer l’appareil. Lorsque vous approchez du réglage désiré, tournez le bouton dans l’autre sens vers 0 pour arrêter l’appareil au moment voulu. La première moitié de cadran du bouton de la minuterie correspond à l’intervalle de 1 à 10 s/min et la seconde à l’intervalle de 11 à 60 s/min.
Votre récepteur a des fentes en bas pour fixation par des bandes Velcro®. Pour des options de fixation supplémentaires, allez sur www.ablenetinc.com.
Vous pouvez établir la liaison entre 8 émetteurs maximum et un récepteur par la méthode expliquée à l’étape 2. Quand un voyant du récepteur est vert, tout émetteur activé est relié. Un émetteur peut également être relié à plusieurs récepteurs en même temps.
Pour couper la liaison entre les appareils, appuyez sur le bouton « Test » ou « Mode » du récepteur pendant plus de 10 secondes.
Pour nettoyer, passez sur les surfaces un chiffon légèrement humide.
Garantie
Les produits AbleNet sont assortis d’une garantie limitée de deux ans. Cette garantie protège contre les défauts de matériel et les vices de fabrication pendant deux ans à partir de la date d’achat. Le texte complet de la garantie ainsi que les informations de retour/réparation sont disponibles sur www.ablenetinc.com. Pour plus d’informations sur les produits et services AbleNet, contactez :AbleNet, Inc.Minneapolis/St. Paul, MN (États-Unis) | 800-322-0956 | www.ablenetinc.com
Branchez le récepteur sur tout appareil accessible par contacteur ou interface de contacteur d’ordinateur.
Activez l’émetteur.Le voyant rouge de l’émetteur et du récepteur s’allume et l’appareil branché s’active.
REMARQUE : Pour tester le branchement physique avec un appareil accessible par contacteur, appuyez sur le bouton « Test » ou « Mode » pendant 2 secondes.
1. Avec l’émetteur et le récepteur sans fil sous tension, appuyez sur le bouton « Test » ou « Mode » du récepteur jusqu’à ce que le voyant devienne vert (5 secondes environ).
2. Activez un émetteur quelconque. Le voyant du récepteur clignote 1 fois en rouge dès la liaison établie.*Reliez des émetteurs supplémentaires en les activant maintenant (facultatif).
3. Appuyez sur le bouton « Test » ou « Mode » du récepteur puis relâchez-le pour quitter le mode d’établissement de liaison.
Appuyez pendant 5 secondes
Appuyez et relâchez
Marche
Guide de mise en route rapide :Récepteurs sans fil, interrupteur et minuterie (SLAT) sans fil Linkable™
www.ablenetinc.com
70
0-0
54
75
A (
07
/09
)
2 Empfänger und Sender verbinden1
3
Batterien einlegen und einschalten
Empfänger anschließen und aktivieren Funkzeitschaltuhr (SLAT) Praktische Tipps und Garantie
Legen Sie in den Empfänger zwei AA-Batterien (Mignonzellen) ein. Beziehen Sie sich dabei auf die Abbildung auf dem Gehäuse.
Schieben Sie den Netzschalter auf „On“ (Ein). Daraufhin leuchtet(n) die Lampe(n) des Empfängers kurz auf.
Bei schwachen Batterien blinkt die Gerätelampe drei (3) Mal.
Wählen Sie Ihren Steuerungsmodus durch wiederholtes Drücken des „Mode“ (Modus)-Knopfs. Die Empfängerlampen zeigen, welcher Modus aktiviert ist. Für zeitgesteuerte Modi stellen Sie die Zeitschaltuhr je nach Wunsch von 1 bis 60 Sekunden/Minuten ein.* Steuerungsmodi
Direkt Herkömmliche Schalterfunktion – das Gerät bleibt eingeschaltet, so lange der Schalter gedrückt gehalten wird.
Zeitgesteuert in Das Gerät läuft nach jeder Aktivierung 1 bis Sekunden 60 Sekunden.Zeitgesteuert in Das Gerät läuft nach jederAktivierung 1 bis Minuten 60 Minuten. Sperre Bei der ersten Aktivierung wird das Gerät
eingeschaltet und bei der zweiten Aktivierung wird es ausgeschaltet.
*PROGRAMMIERUNGSTIPP: Drehen Sie die Zeitschaltuhr bis auf 60 und aktivieren Sie das Gerät. Wenn sich die Uhr dem gewünschten Zeitpunkt nähert, drehen Sie die Zeitschaltuhr zurück auf 0 und stoppen Sie das Gerät zu dem gewünschten Zeitpunkt. Die erste Hälfte der Zeitschaltuhr reicht von 1 bis -10 Sekunden/Minuten. Die zweite Hälfte reicht von 11 bis 60 Sekunden/Minuten.
Ihr Empfänger ist an der Unterseite mit Schlitzen versehen, um ihm mit Velcro® Klettbandstreifen zu befestigen. Weitere Montageoptionen finden Sie auf www.ablenetinc.com.
Sie können bis zu 8 Sender mit einem Empfänger verbinden. Dazu gemäß der in Schritt 2 aufgeführten Methode vorgehen. Wenn eine Empfängerlampe grün aufleuchtet, wird die Verbindung zu jedem aktivierten Sender hergestellt. Ferner kann ein Sender gleichzeitig mit mehreren Empfängern verbunden werden.
Um die Verbindung zwischen den Geräten abzubrechen, den „Test“- oder „Mode“ (Modus)-Knopf des Empfängers mehr als 10 Sekunden drücken.
Zum Reinigen die Oberfläche mit einem leicht angefeuchteten Tuch abwischen.
Hinweise zur Garantie
Die von AbleNet gefertigten Produkte sind durch eine zweijährige beschränkte Garantie gedeckt. Diese Garantie beschränkt sich auf Material- und Verarbeitungsfehler und gilt für zwei Jahre ab Kaufdatum. Der Volltext der Garantie sowie Informationen zur Rücksendung/Reparatur können auf www.ablenetinc.com eingesehen werden. Für weitere Informationen zu AbleNet Produkten und Dienstleistungen wenden Sie sich bitte an:AbleNet, Inc. Minneapolis/St. Paul, MN | 800-322-0956 | www.ablenetinc.com
Stecken Sie den Empfänger in ein anschlussfähiges Gerät oder einen Computer-Taster-Anschluss.
Aktiveren Sie den Sender.Die Lampen des Senders und Empfängers leuchten rot auf und das verbundene Gerät wird aktiviert.
HINWEIS: Um die physikalische Verbindung mit einem tastermodifizierten Gerät zu prüfen, halten Sie den „Test“- oder „Mode“ (Modus)-Knopf 2 Sekunden gedrückt.
1. Halten Sie bei eingeschaltetem Funksender und -empfänger den „Test“- oder „Mode“ (Modus)-Knopf des Empfängers gedrückt, bis die Lampe grün leuchtet (ungefähr 5 Sekunden).
2. Aktiveren Sie die gewünschten Sender. Nachdem eine Verbindung hergestellt wurde, blinkt die Empfängerlampe einmal rot.
* Um weitere Sender zu verbinden, aktivieren Sie diese jetzt (optional).3. Den „Test“- oder „Mode“ (Modus)-Knopf des Empfängers
drücken und loslassen, um den Verbinden-Modus zu beenden.
5 Sekunden gedrückt haltens
Drücken und
loslassen
Ein
Kurzanleitung:Linkable™ Funkempfänger und Funkzeitschaltuhr (SLAT)
www.ablenetinc.com