Embed Size (px)
Citation preview
003–3805–082010C
Nautilus, Inc., (800) NAUTILUS / (800) 628-8458, www.NautilusInc.com - Customer Service: North America (800) 605-3369, [email protected] | Asia Pacific & Latin America+01-360-859-5180, [email protected] | Patent information: This product may be covered by US and Foreign Patents and Patents Pending. See Product for more information. | Printed in China |© 2010 Nautilus, Inc., All rights reserved. ™ and ® indicate a trademark or registered trademark. Nautilus, Inc. (www.NautilusInc.com) trademarks include NAUTILUS®, BOWFLEX®, SCHWINN® andUNIVERSAL® and respective logos. Other trademarks are the property of their respective owners.
TTTooo validatevalidatevalidate warrantywarrantywarranty support,support,support, keepkeepkeep thethethe originaloriginaloriginal proofproofproof ofofof purchasepurchasepurchase andandand recordrecordrecord thethethe followingfollowingfollowing information:information:information: SerialSerialSerial NumberNumberNumber _______________________________________________________________DateDateDate ofofof PurchasePurchasePurchase ____________________________________________________________
TTTooo registerregisterregister youryouryour productproductproduct warrantywarrantywarranty ,,, gogogo to:to:to: wwwwwwwww.schwinnfitness.com/register.schwinnfitness.com/register.schwinnfitness.com/register
OrOrOr callcallcall 111 (800)(800)(800) 605–3369.605–3369.605–3369.
Para obtener este manual en Español Latino Americano vaya a: http://www.schwinnfitness.com.
TTTableableable ofofof ContentsContentsContents
Important Safety Instructions 3 Operations 9
Safety Warning Labels and Serial Number 3 Changing Unit Measures 10
Specifications 4 Maintenance 11
Features 4 Leveling Your Bike 13
Console Features 5 Moving Your Bike 13
Contact Heart Rate Sensors 6 Troubleshooting 13
222
ImportantImportantImportant SafetySafetySafety InstructionsInstructionsInstructions
This icon means a potentially hazardous situation which, if not avoided, could result in death or serious injury.
BeforeBeforeBefore usingusingusing thisthisthis equipment,equipment,equipment, obeyobeyobey thethethe followingfollowingfollowing warnings:warnings:warnings:
• Read and understand the complete Owner’s Manual. Keep Owner’s Manual for future reference.• Read and understand all warnings on this machine. If at any time the Warning stickers become loose, unreadable or dislodged, contact Nautilus® Customer Service
for replacement stickers.• Children must not be let on or near to this machine. Moving parts and other features of the machine can be dangerous to children.• Not intended for use by anyone under 14 years of age.• Consult a physician before you start an exercise program. Stop exercising if you feel pain or tightness in your chest, become short of breath, or feel faint. Contact your
doctor before you use the machine again. Use the values calculated or measured by the machine’s computer for reference purposes only.• Before each use, examine this machine for loose parts or signs of wear. Do not use if found in this condition. Monitor the Seat, Pedals, and Crank Arms closely.
Contact Nautilus® Customer Service for repair information.• Maximum user weight limit: 275 lbs. (125 kgs). Do not use if you are over this weight.• This machine is for home use only.• Do not wear loose clothing or jewelry. This machine contains moving parts. Do not put fingers or other objects into moving parts of the exercise equipment.• Set up and operate this machine on a solid, level, horizontal surface.• Make the Pedals stable before you step on them. Use caution when you step on and off the machine.• Disconnect all power before servicing this machine.• Do not operate this machine outdoors or in moist or wet locations. Keep the foot pedals clean and dry.• Keep at least 19.7" (0.5 m) on each side of the machine clear. This is the recommended safe distance for access and passage around and emergency dismounts from
the machine. Keep third parties out of this space when machine is in use.• Do not over exert yourself during exercise. Operate the machine in the manner described in this manual.• Correctly adjust and safely engage all Positional Adjustment Devices. Make sure that the Adjustment Devices do not hit the user.
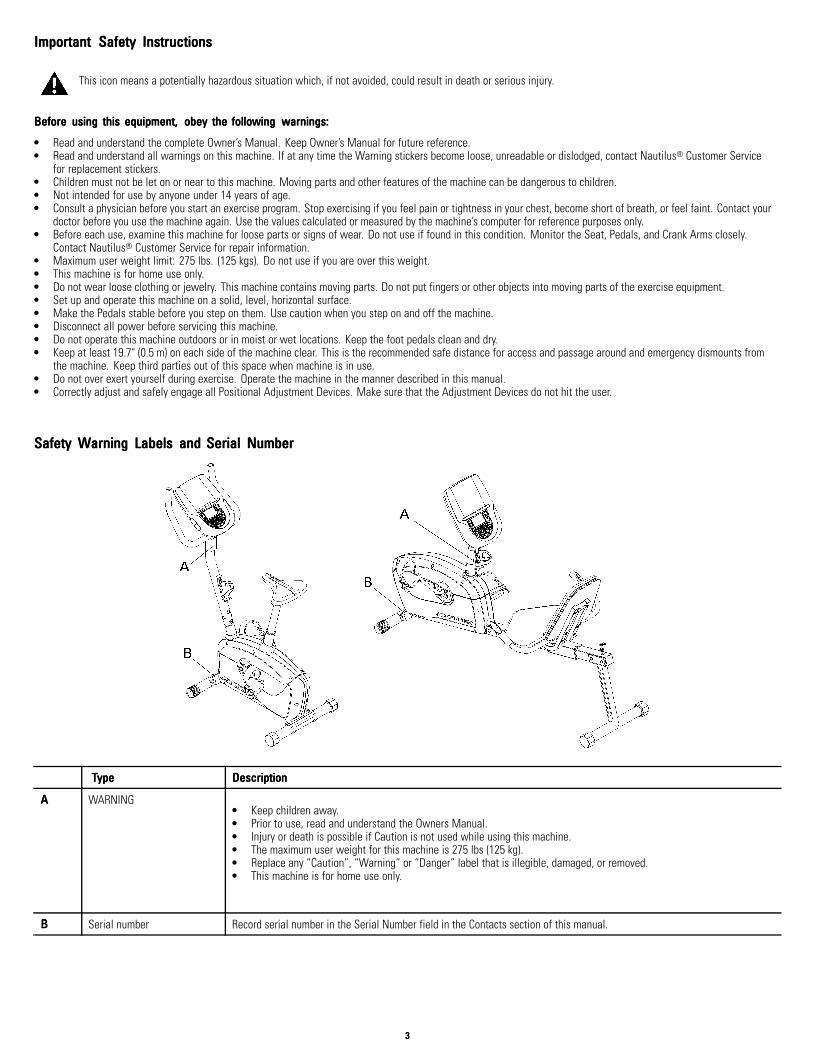
SafetySafetySafety WWWarningarningarning LabelsLabelsLabels andandand SerialSerialSerial NumberNumberNumber
TTTypeypeype DescriptionDescriptionDescription
AAA WARNING• Keep children away.• Prior to use, read and understand the Owners Manual.• Injury or death is possible if Caution is not used while using this machine.• The maximum user weight for this machine is 275 lbs (125 kg).• Replace any “Caution”, “Warning” or “Danger” label that is illegible, damaged, or removed.• This machine is for home use only.
BBB Serial number Record serial number in the Serial Number field in the Contacts section of this manual.
333

SpecificationsSpecificationsSpecifications
PowerPowerPower RequirementsRequirementsRequirements 4 D Batteries (LR20) – not included
Operational Voltage 6VDC
RegulatoryRegulatoryRegulatory ApprovalsApprovalsApprovals Optional AC Power Adapter: UL listed, CSAcertified (or equivalent), Rated 120V60Hz Input,9VDC, 0.5A Output. Class 2 or LPS.
FeaturesFeaturesFeatures
A Console E Fully Shrouded Flywheel I Pedals M Contact Heart Rate (CHR)Sensors
B Handlebars, Upright F Levelers J Handlebars, Side N Power Connector
C Adjustable Seat G Stabilizers K Water Bottle Holder O Battery Bay
D Adjustment Knob H Transport Rollers L Fan P Magazine/MP3 Holder
444
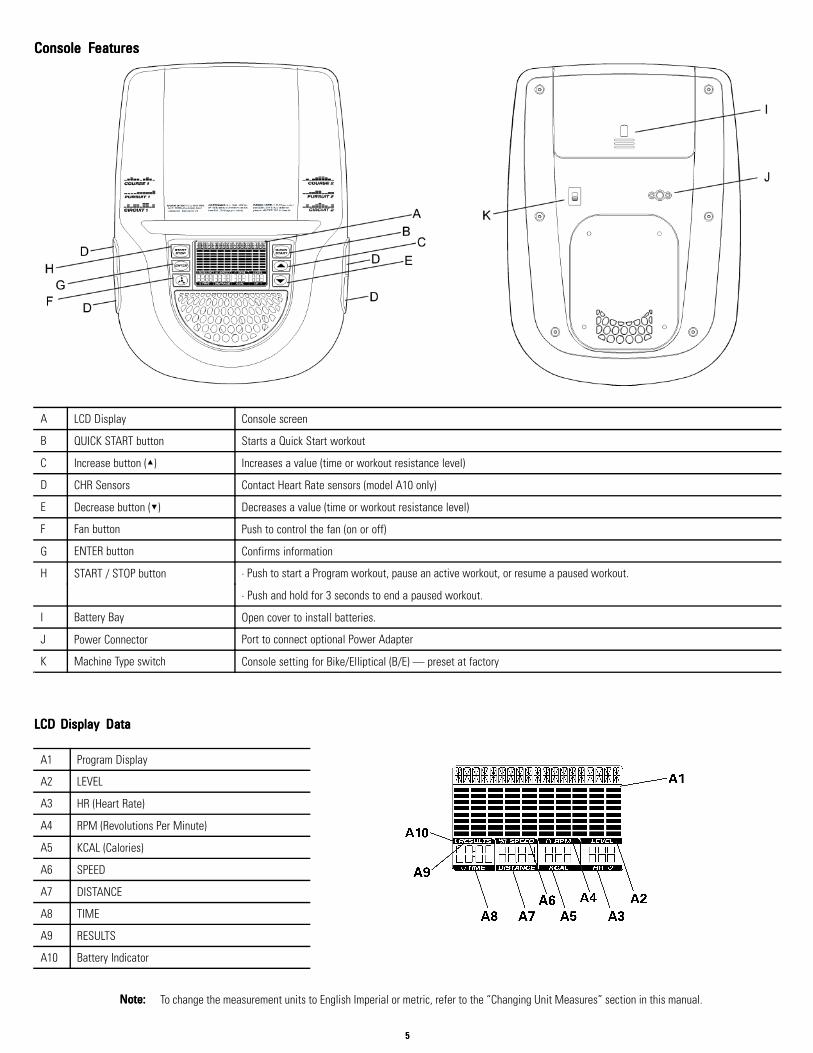
ConsoleConsoleConsole FeaturesFeaturesFeatures
A LCD Display Console screen
B QUICK START button Starts a Quick Start workout
C Increase button (▲) Increases a value (time or workout resistance level)
D CHR Sensors Contact Heart Rate sensors (model A10 only)
E Decrease button (▼) Decreases a value (time or workout resistance level)
F Fan button Push to control the fan (on or off)
G ENTER button Confirms information
H START / STOP button · Push to start a Program workout, pause an active workout, or resume a paused workout.
· Push and hold for 3 seconds to end a paused workout.
I Battery Bay Open cover to install batteries.
J Power Connector Port to connect optional Power Adapter
K Machine Type switch Console setting for Bike/Elliptical (B/E) — preset at factory
LCDLCDLCD DisplayDisplayDisplay DataDataData
A1 Program Display
A2 LEVEL
A3 HR (Heart Rate)
A4 RPM (Revolutions Per Minute)
A5 KCAL (Calories)
A6 SPEED
A7 DISTANCE
A8 TIME
A9 RESULTS
A10 Battery Indicator
Note:Note:Note: To change the measurement units to English Imperial or metric, refer to the “Changing Unit Measures” section in this manual.
555
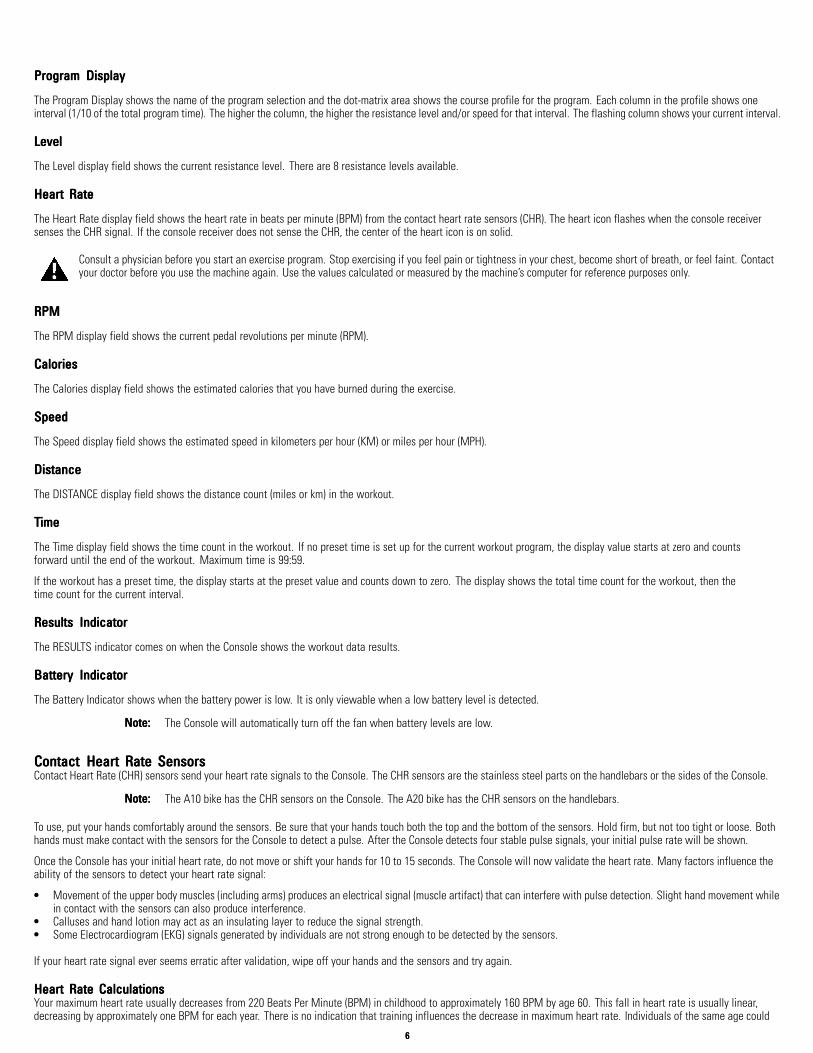
ProgramProgramProgram DisplayDisplayDisplay
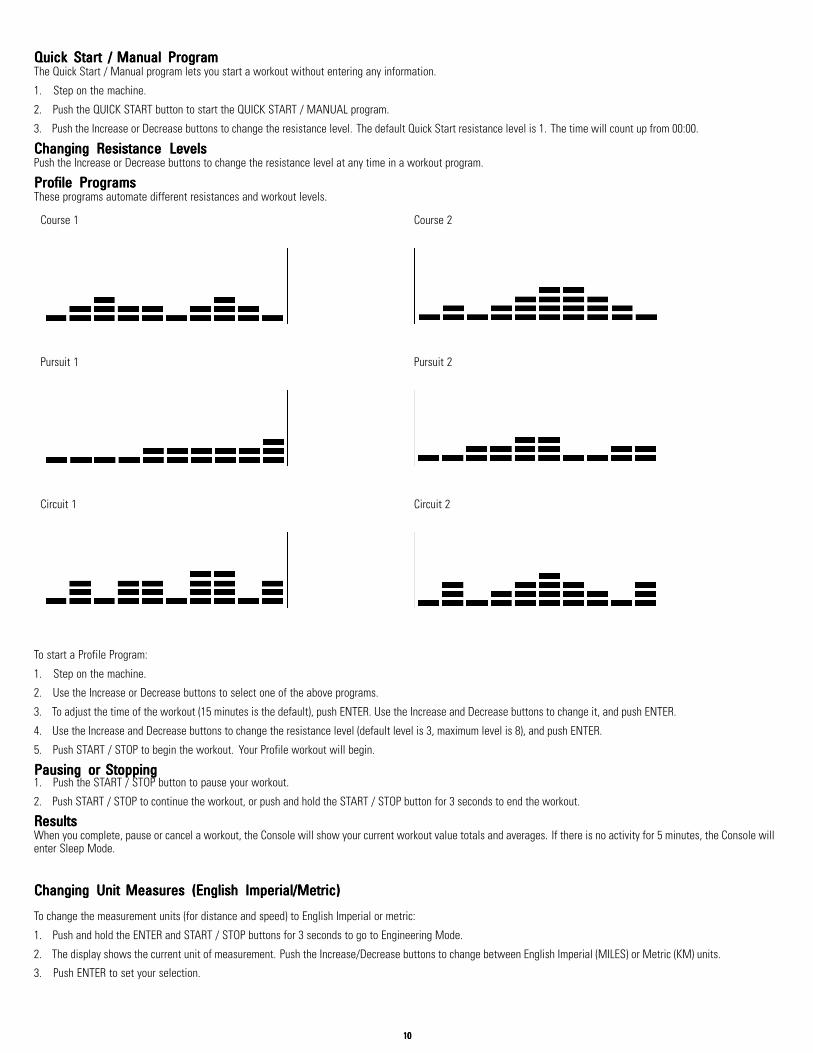
The Program Display shows the name of the program selection and the dot-matrix area shows the course profile for the program. Each column in the profile shows oneinterval (1/10 of the total program time). The higher the column, the higher the resistance level and/or speed for that interval. The flashing column shows your current interval.
LevelLevelLevel
The Level display field shows the current resistance level. There are 8 resistance levels available.
HeartHeartHeart RateRateRate
The Heart Rate display field shows the heart rate in beats per minute (BPM) from the contact heart rate sensors (CHR). The heart icon flashes when the console receiversenses the CHR signal. If the console receiver does not sense the CHR, the center of the heart icon is on solid.
Consult a physician before you start an exercise program. Stop exercising if you feel pain or tightness in your chest, become short of breath, or feel faint. Contactyour doctor before you use the machine again. Use the values calculated or measured by the machine’s computer for reference purposes only.
RPMRPMRPM
The RPM display field shows the current pedal revolutions per minute (RPM).
CaloriesCaloriesCalories
The Calories display field shows the estimated calories that you have burned during the exercise.
SpeedSpeedSpeed
The Speed display field shows the estimated speed in kilometers per hour (KM) or miles per hour (MPH).
DistanceDistanceDistance
The DISTANCE display field shows the distance count (miles or km) in the workout.
TTTimeimeime
The Time display field shows the time count in the workout. If no preset time is set up for the current workout program, the display value starts at zero and countsforward until the end of the workout. Maximum time is 99:59.
If the workout has a preset time, the display starts at the preset value and counts down to zero. The display shows the total time count for the workout, then thetime count for the current interval.
ResultsResultsResults IndicatorIndicatorIndicator
The RESULTS indicator comes on when the Console shows the workout data results.
BatteryBatteryBattery IndicatorIndicatorIndicator
The Battery Indicator shows when the battery power is low. It is only viewable when a low battery level is detected.
Note:Note:Note: The Console will automatically turn off the fan when battery levels are low.
ContactContactContact HeartHeartHeart RateRateRate SensorsSensorsSensorsContact Heart Rate (CHR) sensors send your heart rate signals to the Console. The CHR sensors are the stainless steel parts on the handlebars or the sides of the Console.
Note:Note:Note: The A10 bike has the CHR sensors on the Console. The A20 bike has the CHR sensors on the handlebars.
To use, put your hands comfortably around the sensors. Be sure that your hands touch both the top and the bottom of the sensors. Hold firm, but not too tight or loose. Bothhands must make contact with the sensors for the Console to detect a pulse. After the Console detects four stable pulse signals, your initial pulse rate will be shown.
Once the Console has your initial heart rate, do not move or shift your hands for 10 to 15 seconds. The Console will now validate the heart rate. Many factors influence theability of the sensors to detect your heart rate signal:
• Movement of the upper body muscles (including arms) produces an electrical signal (muscle artifact) that can interfere with pulse detection. Slight hand movement whilein contact with the sensors can also produce interference.
• Calluses and hand lotion may act as an insulating layer to reduce the signal strength.• Some Electrocardiogram (EKG) signals generated by individuals are not strong enough to be detected by the sensors.
If your heart rate signal ever seems erratic after validation, wipe off your hands and the sensors and try again.
HeartHeartHeart RateRateRate CalculationsCalculationsCalculationsYour maximum heart rate usually decreases from 220 Beats Per Minute (BPM) in childhood to approximately 160 BPM by age 60. This fall in heart rate is usually linear,decreasing by approximately one BPM for each year. There is no indication that training influences the decrease in maximum heart rate. Individuals of the same age could
666
have different maximum heart rates. It is more accurate to find this value by getting a stress test than by using an age related formula.
Your at rest heart rate is influenced by endurance training. The typical adult has an at rest heart rate of approximately 72 BPM, where as highly trained runners mayhave readings of 40 BPM or lower.
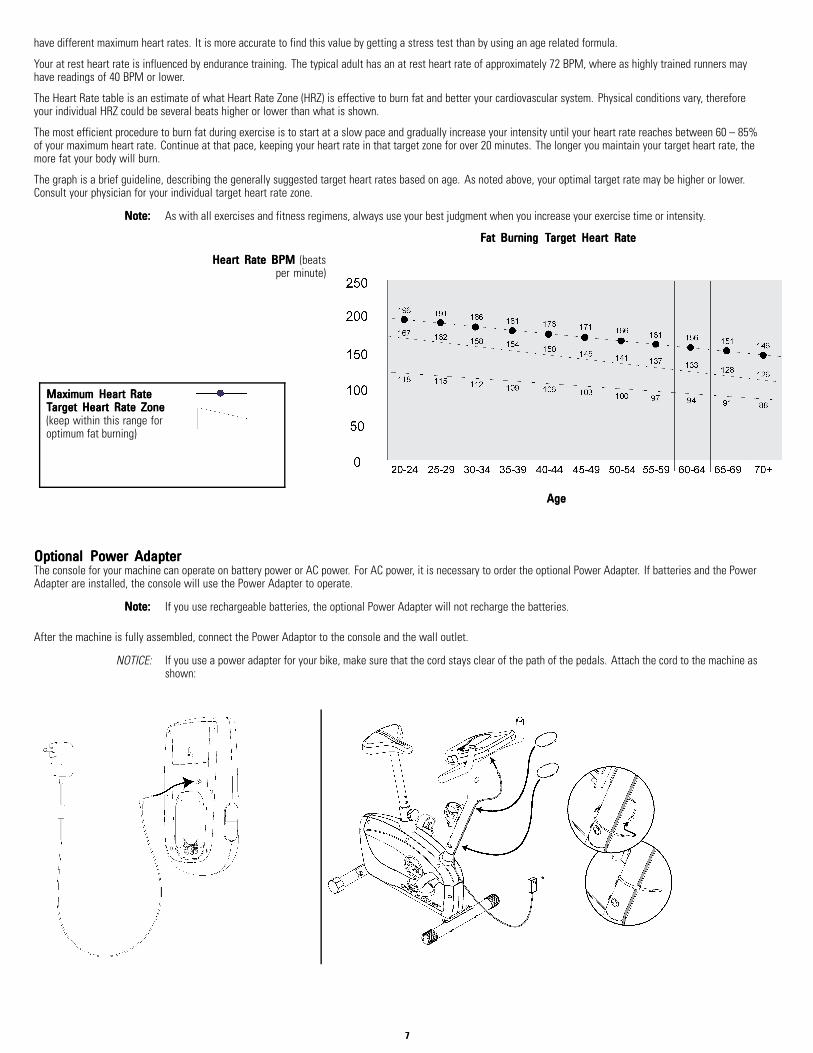
The Heart Rate table is an estimate of what Heart Rate Zone (HRZ) is effective to burn fat and better your cardiovascular system. Physical conditions vary, thereforeyour individual HRZ could be several beats higher or lower than what is shown.
The most efficient procedure to burn fat during exercise is to start at a slow pace and gradually increase your intensity until your heart rate reaches between 60 – 85%of your maximum heart rate. Continue at that pace, keeping your heart rate in that target zone for over 20 minutes. The longer you maintain your target heart rate, themore fat your body will burn.
The graph is a brief guideline, describing the generally suggested target heart rates based on age. As noted above, your optimal target rate may be higher or lower.Consult your physician for your individual target heart rate zone.
Note:Note:Note: As with all exercises and fitness regimens, always use your best judgment when you increase your exercise time or intensity.
FatFatFat BurningBurningBurning TTTargetargetarget HeartHeartHeart RateRateRate
HeartHeartHeart RateRateRate BPMBPMBPM (beatsper minute)
MaximumMaximumMaximum HeartHeartHeart RateRateRateTTTargetargetarget HeartHeartHeart RateRateRate ZoneZoneZone(keep within this range foroptimum fat burning)
AgeAgeAge
OptionalOptionalOptional PowerPowerPower AdapterAdapterAdapterThe console for your machine can operate on battery power or AC power. For AC power, it is necessary to order the optional Power Adapter. If batteries and the PowerAdapter are installed, the console will use the Power Adapter to operate.
Note:Note:Note: If you use rechargeable batteries, the optional Power Adapter will not recharge the batteries.
After the machine is fully assembled, connect the Power Adaptor to the console and the wall outlet.
NOTICE: If you use a power adapter for your bike, make sure that the cord stays clear of the path of the pedals. Attach the cord to the machine asshown:
777
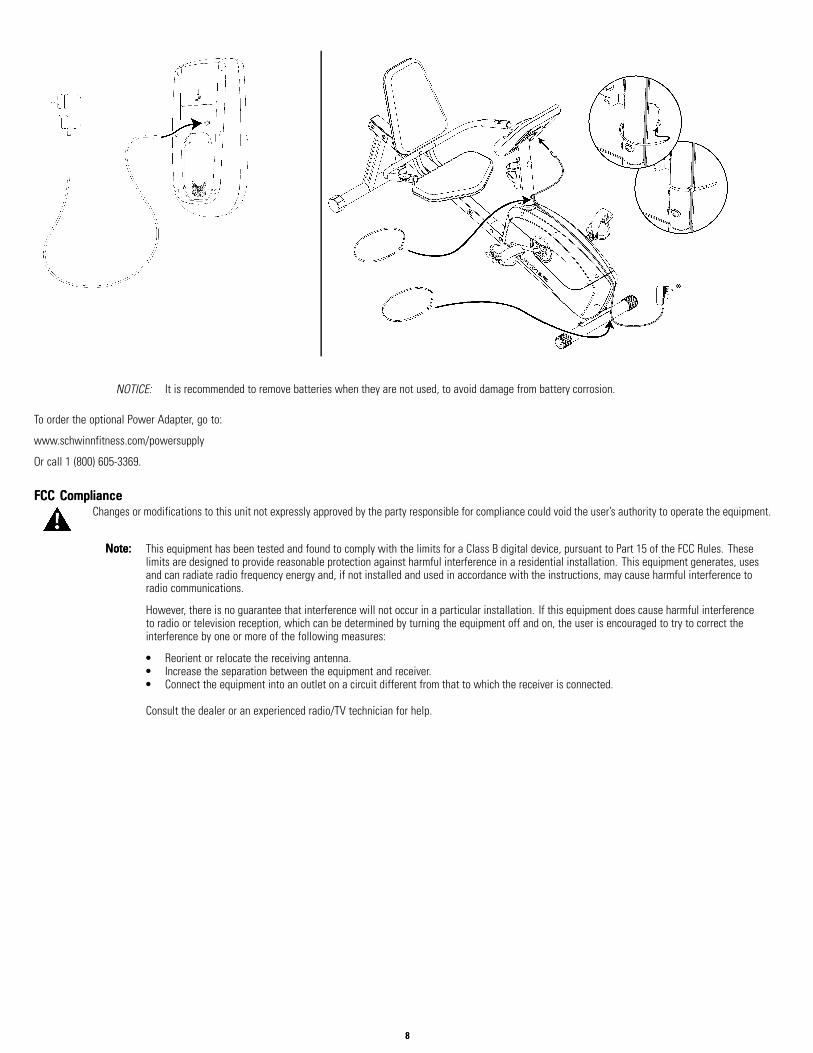
NOTICE: It is recommended to remove batteries when they are not used, to avoid damage from battery corrosion.
To order the optional Power Adapter, go to:
www.schwinnfitness.com/powersupply
Or call 1 (800) 605-3369.
FCCFCCFCC ComplianceComplianceComplianceChanges or modifications to this unit not expressly approved by the party responsible for compliance could void the user’s authority to operate the equipment.
Note:Note:Note: This equipment has been tested and found to comply with the limits for a Class B digital device, pursuant to Part 15 of the FCC Rules. Theselimits are designed to provide reasonable protection against harmful interference in a residential installation. This equipment generates, usesand can radiate radio frequency energy and, if not installed and used in accordance with the instructions, may cause harmful interference toradio communications.
However, there is no guarantee that interference will not occur in a particular installation. If this equipment does cause harmful interferenceto radio or television reception, which can be determined by turning the equipment off and on, the user is encouraged to try to correct theinterference by one or more of the following measures:
• Reorient or relocate the receiving antenna.• Increase the separation between the equipment and receiver.• Connect the equipment into an outlet on a circuit different from that to which the receiver is connected.
Consult the dealer or an experienced radio/TV technician for help.
888
OperationsOperationsOperations
WhatWhatWhat tototo WWWearearearWear rubber-soled athletic shoes. You will need the appropriate clothes for exercise that allow you to move freely.
HowHowHow OftenOftenOften ShouldShouldShould YYYououou ExerciseExerciseExerciseConsult a physician before you start an exercise program. Stop exercising if you feel pain or tightness in your chest, become short of breath, or feel faint. Contactyour doctor before you use the machine again. Use the values calculated or measured by the machine’s computer for reference purposes only.
• 3 times a week for 30 minutes each day.• Schedule workouts in advance. Try to work out even when you do not want to.
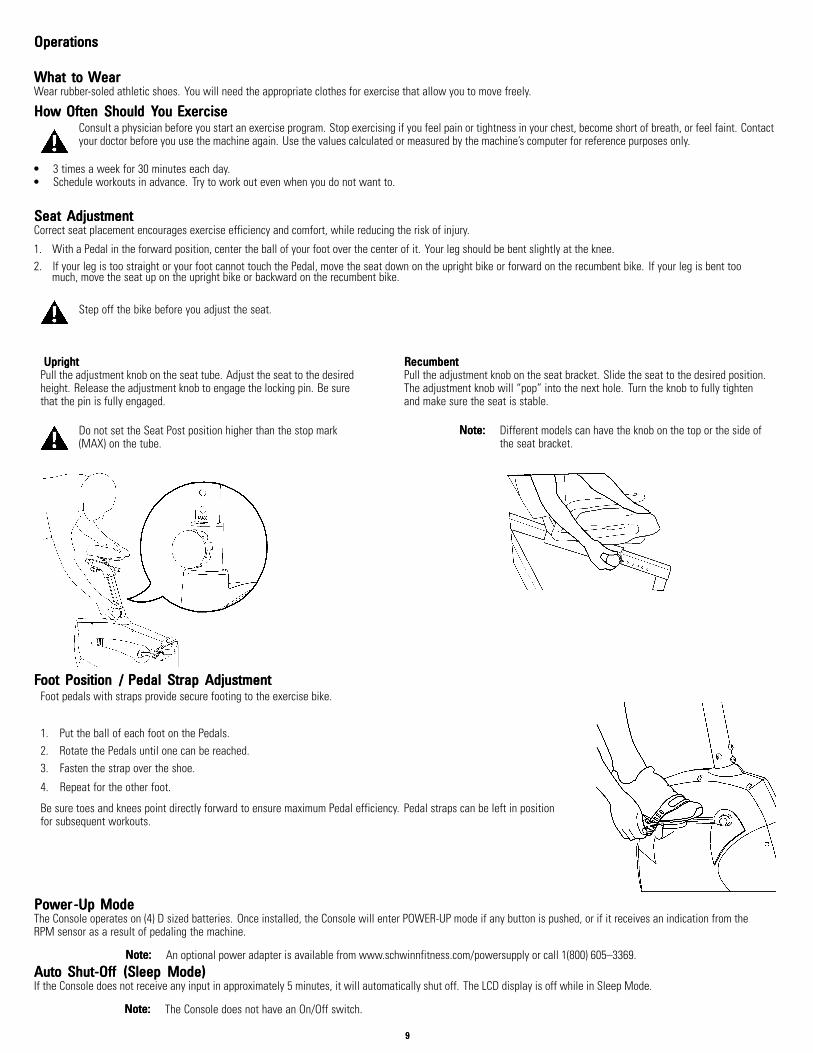
SeatSeatSeat AdjustmentAdjustmentAdjustmentCorrect seat placement encourages exercise efficiency and comfort, while reducing the risk of injury.
1. With a Pedal in the forward position, center the ball of your foot over the center of it. Your leg should be bent slightly at the knee.2. If your leg is too straight or your foot cannot touch the Pedal, move the seat down on the upright bike or forward on the recumbent bike. If your leg is bent too
much, move the seat up on the upright bike or backward on the recumbent bike.
Step off the bike before you adjust the seat.
UprightUprightUprightPull the adjustment knob on the seat tube. Adjust the seat to the desiredheight. Release the adjustment knob to engage the locking pin. Be surethat the pin is fully engaged.
RecumbentRecumbentRecumbentPull the adjustment knob on the seat bracket. Slide the seat to the desired position.The adjustment knob will “pop” into the next hole. Turn the knob to fully tightenand make sure the seat is stable.
Do not set the Seat Post position higher than the stop mark(MAX) on the tube.
Note:Note:Note: Different models can have the knob on the top or the side ofthe seat bracket.
FootFootFoot PositionPositionPosition /// PedalPedalPedal StrapStrapStrap AdjustmentAdjustmentAdjustmentFoot pedals with straps provide secure footing to the exercise bike.
1. Put the ball of each foot on the Pedals.2. Rotate the Pedals until one can be reached.3. Fasten the strap over the shoe.
4. Repeat for the other foot.
Be sure toes and knees point directly forward to ensure maximum Pedal efficiency. Pedal straps can be left in positionfor subsequent workouts.
PowerPowerPower-Up-Up-Up ModeModeModeThe Console operates on (4) D sized batteries. Once installed, the Console will enter POWER-UP mode if any button is pushed, or if it receives an indication from theRPM sensor as a result of pedaling the machine.
Note:Note:Note: An optional power adapter is available from www.schwinnfitness.com/powersupply or call 1(800) 605–3369.AutoAutoAuto Shut-OffShut-OffShut-Off (Sleep(Sleep(Sleep Mode)Mode)Mode)If the Console does not receive any input in approximately 5 minutes, it will automatically shut off. The LCD display is off while in Sleep Mode.
Note:Note:Note: The Console does not have an On/Off switch.
999
QuickQuickQuick StartStartStart /// ManualManualManual ProgramProgramProgramThe Quick Start / Manual program lets you start a workout without entering any information.
1. Step on the machine.
2. Push the QUICK START button to start the QUICK START / MANUAL program.
3. Push the Increase or Decrease buttons to change the resistance level. The default Quick Start resistance level is 1. The time will count up from 00:00.
ChangingChangingChanging ResistanceResistanceResistance LevelsLevelsLevelsPush the Increase or Decrease buttons to change the resistance level at any time in a workout program.
ProfileProfileProfile ProgramsProgramsProgramsThese programs automate different resistances and workout levels.
Course 1 Course 2
Pursuit 1 Pursuit 2
Circuit 1 Circuit 2
To start a Profile Program:
1. Step on the machine.
2. Use the Increase or Decrease buttons to select one of the above programs.
3. To adjust the time of the workout (15 minutes is the default), push ENTER. Use the Increase and Decrease buttons to change it, and push ENTER.
4. Use the Increase and Decrease buttons to change the resistance level (default level is 3, maximum level is 8), and push ENTER.
5. Push START / STOP to begin the workout. Your Profile workout will begin.
PausingPausingPausing ororor StoppingStoppingStopping1. Push the START / STOP button to pause your workout.
2. Push START / STOP to continue the workout, or push and hold the START / STOP button for 3 seconds to end the workout.
ResultsResultsResultsWhen you complete, pause or cancel a workout, the Console will show your current workout value totals and averages. If there is no activity for 5 minutes, the Console willenter Sleep Mode.
ChangingChangingChanging UnitUnitUnit MeasuresMeasuresMeasures (English(English(English Imperial/Metric)Imperial/Metric)Imperial/Metric)
To change the measurement units (for distance and speed) to English Imperial or metric:
1. Push and hold the ENTER and START / STOP buttons for 3 seconds to go to Engineering Mode.
2. The display shows the current unit of measurement. Push the Increase/Decrease buttons to change between English Imperial (MILES) or Metric (KM) units.
3. Push ENTER to set your selection.
101010
MaintenanceMaintenanceMaintenance
Equipment must be regularly examined for damage and repairs. The owner is responsible to make sure that regular maintenance is done. Worn or damagedcomponents must be replaced immediately or the equipment removed from service until the repair is made. Only manufacturer supplied components can beused to maintain and repair the equipment.
This product, its packaging, and components contain chemicals known to the State of California to cause cancer, birth defects, or reproductive harm. This Noticeis provided in accordance with California’s Proposition 65. If you would like additional information, please refer to our Web site at www.nautilus.com/prop65
To reduce the risk of electrical shock, always unplug the power cord and wait 5 minutes before cleaning, maintaining or repairing this machine.
DailyDailyDailyBefore each use, examine the exercise machine for loose, broken, damaged, or worn parts. Do not use if found in this condition. Repair orreplace all parts at the first sign of wear or damage. After each workout, use a damp cloth to wipe your machine and Console free of sweat.
Note:Note:Note: Avoid excessive moisture on the Console.
WWWeeklyeeklyeeklyCheck for smooth seat slider operation. Clean the machine to remove any dust, dirt, or grime from the surfaces. If needed, sparingly applya thin coating of silicone lube to ease operation.
Note:Note:Note: Do not use petroleum based products.
MonthlyMonthlyMonthlyCheck pedals and crank arms and tighten as necessary. Make sure all bolts and screws are tight. Tighten as necessary.
YYYearlyearlyearlyReplace the console batteries every 1 year (as necessary).
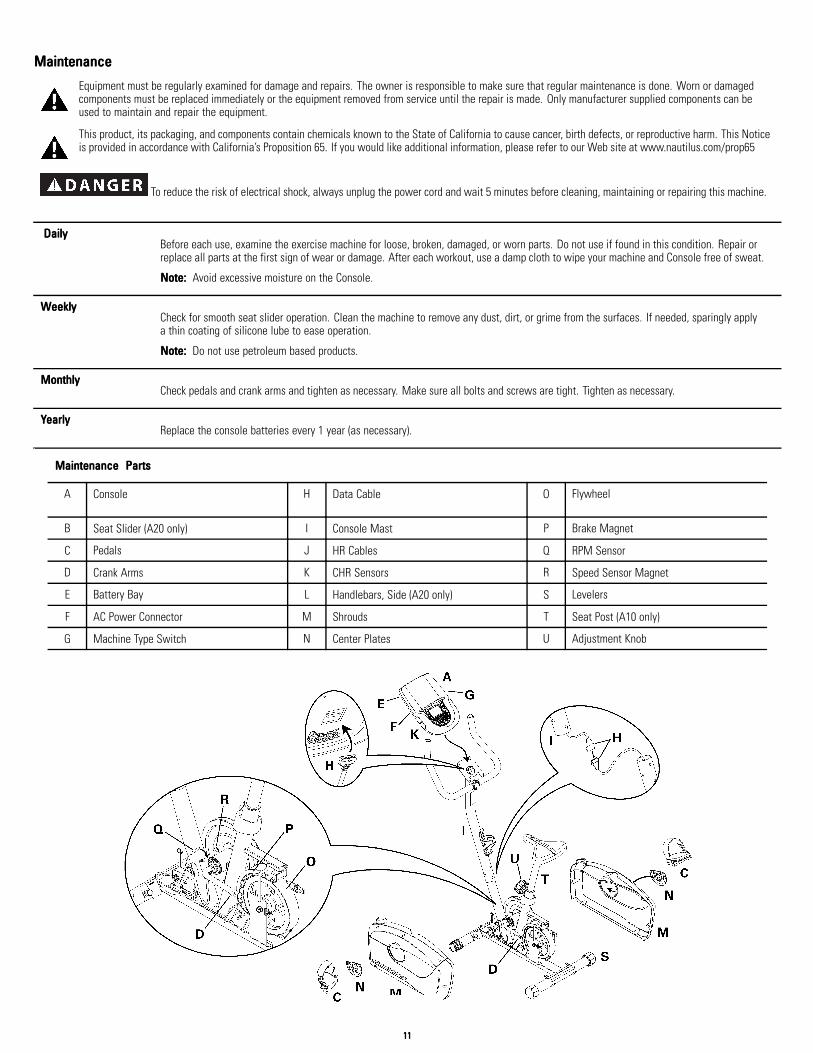
MaintenanceMaintenanceMaintenance PartsPartsParts
A Console H Data Cable O Flywheel
B Seat Slider (A20 only) I Console Mast P Brake Magnet
C Pedals J HR Cables Q RPM Sensor
D Crank Arms K CHR Sensors R Speed Sensor Magnet
E Battery Bay L Handlebars, Side (A20 only) S Levelers
F AC Power Connector M Shrouds T Seat Post (A10 only)
G Machine Type Switch N Center Plates U Adjustment Knob
111111
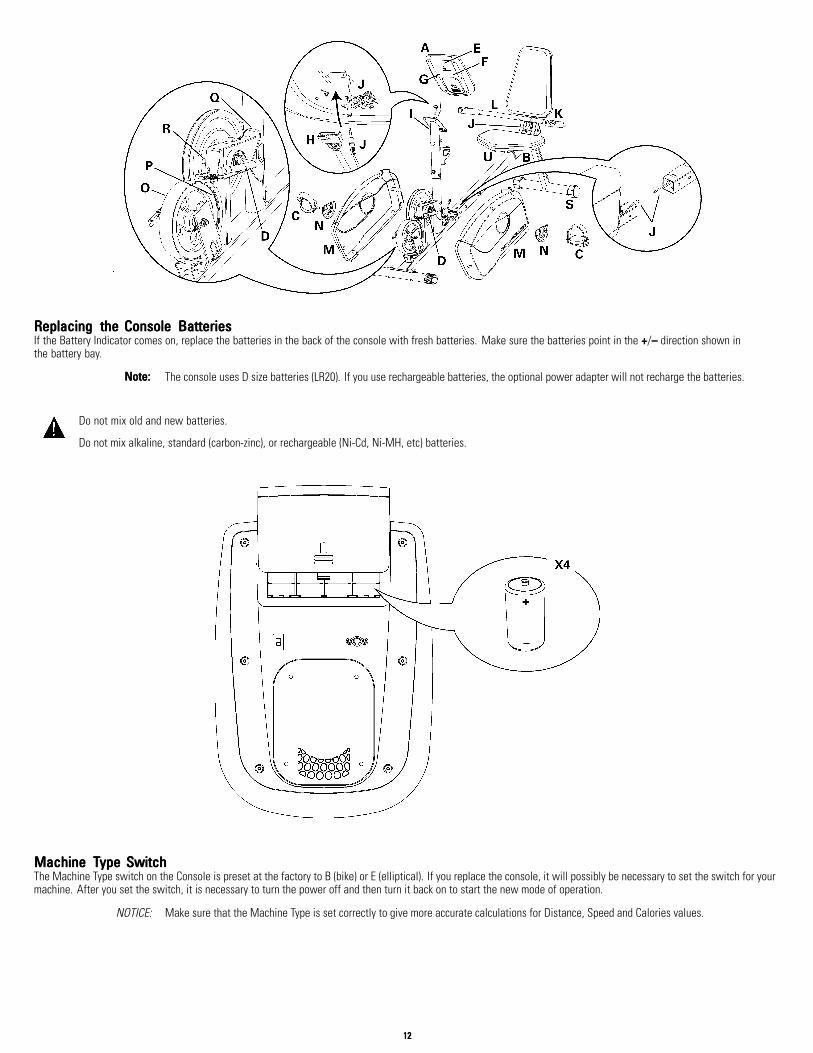
ReplacingReplacingReplacing thethethe ConsoleConsoleConsole BatteriesBatteriesBatteriesIf the Battery Indicator comes on, replace the batteries in the back of the console with fresh batteries. Make sure the batteries point in the +++/––– direction shown inthe battery bay.
Note:Note:Note: The console uses D size batteries (LR20). If you use rechargeable batteries, the optional power adapter will not recharge the batteries.
Do not mix old and new batteries.
Do not mix alkaline, standard (carbon-zinc), or rechargeable (Ni-Cd, Ni-MH, etc) batteries.
MachineMachineMachine TTTypeypeype SwitchSwitchSwitchThe Machine Type switch on the Console is preset at the factory to B (bike) or E (elliptical). If you replace the console, it will possibly be necessary to set the switch for yourmachine. After you set the switch, it is necessary to turn the power off and then turn it back on to start the new mode of operation.
NOTICE: Make sure that the Machine Type is set correctly to give more accurate calculations for Distance, Speed and Calories values.
121212
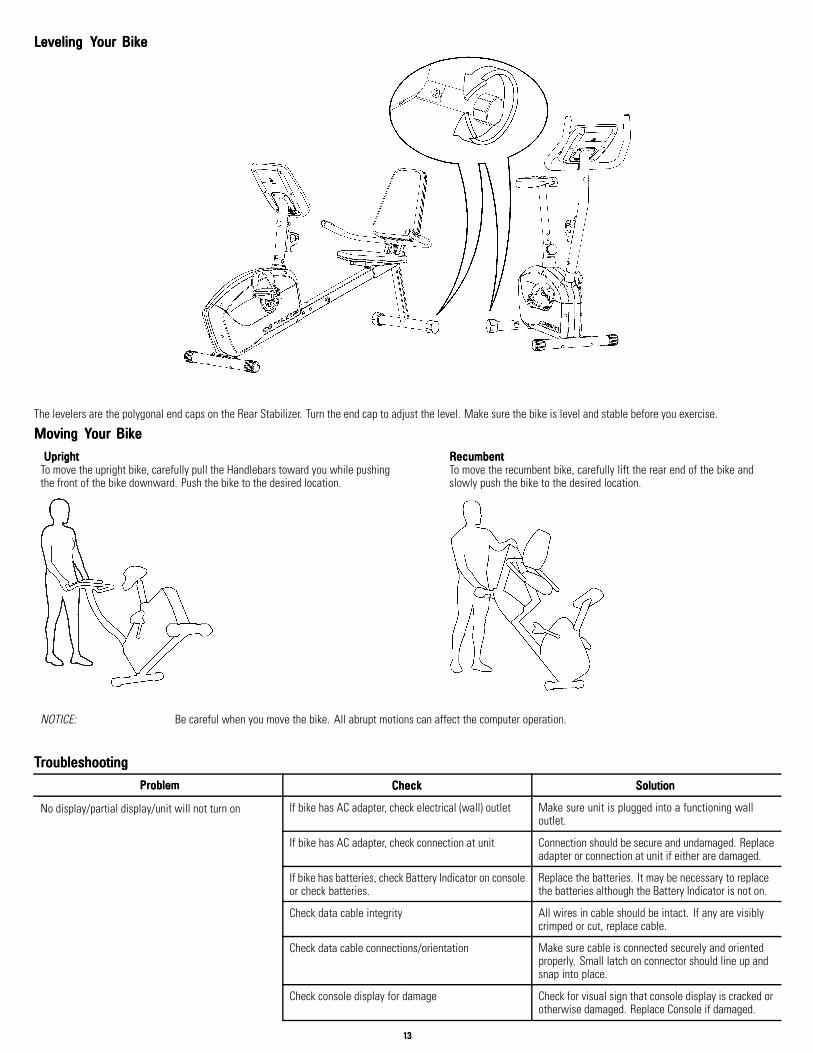
LevelingLevelingLeveling YYYourourour BikeBikeBike
The levelers are the polygonal end caps on the Rear Stabilizer. Turn the end cap to adjust the level. Make sure the bike is level and stable before you exercise.
MovingMovingMoving YYYourourour BikeBikeBikeUprightUprightUpright
To move the upright bike, carefully pull the Handlebars toward you while pushingthe front of the bike downward. Push the bike to the desired location.
RecumbentRecumbentRecumbentTo move the recumbent bike, carefully lift the rear end of the bike andslowly push the bike to the desired location.
NOTICE: Be careful when you move the bike. All abrupt motions can affect the computer operation.
TTTroubleshootingroubleshootingroubleshootingProblemProblemProblem CheckCheckCheck SolutionSolutionSolution
If bike has AC adapter, check electrical (wall) outlet Make sure unit is plugged into a functioning walloutlet.
If bike has AC adapter, check connection at unit Connection should be secure and undamaged. Replaceadapter or connection at unit if either are damaged.
If bike has batteries, check Battery Indicator on consoleor check batteries.
Replace the batteries. It may be necessary to replacethe batteries although the Battery Indicator is not on.
Check data cable integrity All wires in cable should be intact. If any are visiblycrimped or cut, replace cable.
Check data cable connections/orientation Make sure cable is connected securely and orientedproperly. Small latch on connector should line up andsnap into place.
Check console display for damage Check for visual sign that console display is cracked orotherwise damaged. Replace Console if damaged.
No display/partial display/unit will not turn on
131313
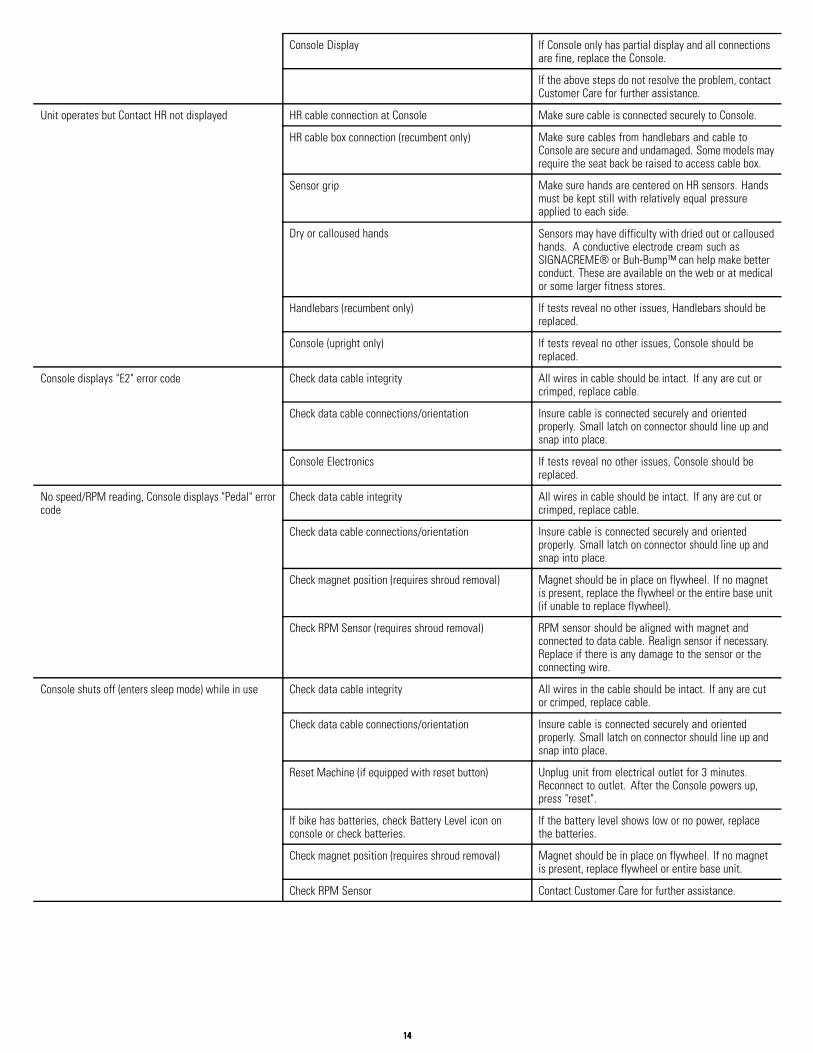
Console Display If Console only has partial display and all connectionsare fine, replace the Console.
If the above steps do not resolve the problem, contactCustomer Care for further assistance.
HR cable connection at Console Make sure cable is connected securely to Console.
HR cable box connection (recumbent only) Make sure cables from handlebars and cable toConsole are secure and undamaged. Some models mayrequire the seat back be raised to access cable box.
Sensor grip Make sure hands are centered on HR sensors. Handsmust be kept still with relatively equal pressureapplied to each side.
Dry or calloused hands Sensors may have difficulty with dried out or callousedhands. A conductive electrode cream such asSIGNACREME® or Buh-Bump™ can help make betterconduct. These are available on the web or at medicalor some larger fitness stores.
Handlebars (recumbent only) If tests reveal no other issues, Handlebars should bereplaced.
Unit operates but Contact HR not displayed
Console (upright only) If tests reveal no other issues, Console should bereplaced.
Check data cable integrity All wires in cable should be intact. If any are cut orcrimped, replace cable.
Check data cable connections/orientation Insure cable is connected securely and orientedproperly. Small latch on connector should line up andsnap into place.
Console displays "E2" error code
Console Electronics If tests reveal no other issues, Console should bereplaced.
Check data cable integrity All wires in cable should be intact. If any are cut orcrimped, replace cable.
Check data cable connections/orientation Insure cable is connected securely and orientedproperly. Small latch on connector should line up andsnap into place.
Check magnet position (requires shroud removal) Magnet should be in place on flywheel. If no magnetis present, replace the flywheel or the entire base unit(if unable to replace flywheel).
No speed/RPM reading, Console displays "Pedal" errorcode
Check RPM Sensor (requires shroud removal) RPM sensor should be aligned with magnet andconnected to data cable. Realign sensor if necessary.Replace if there is any damage to the sensor or theconnecting wire.
Check data cable integrity All wires in the cable should be intact. If any are cutor crimped, replace cable.
Check data cable connections/orientation Insure cable is connected securely and orientedproperly. Small latch on connector should line up andsnap into place.
Reset Machine (if equipped with reset button) Unplug unit from electrical outlet for 3 minutes.Reconnect to outlet. After the Console powers up,press "reset".
If bike has batteries, check Battery Level icon onconsole or check batteries.
If the battery level shows low or no power, replacethe batteries.
Check magnet position (requires shroud removal) Magnet should be in place on flywheel. If no magnetis present, replace flywheel or entire base unit.
Console shuts off (enters sleep mode) while in use
Check RPM Sensor Contact Customer Care for further assistance.
141414
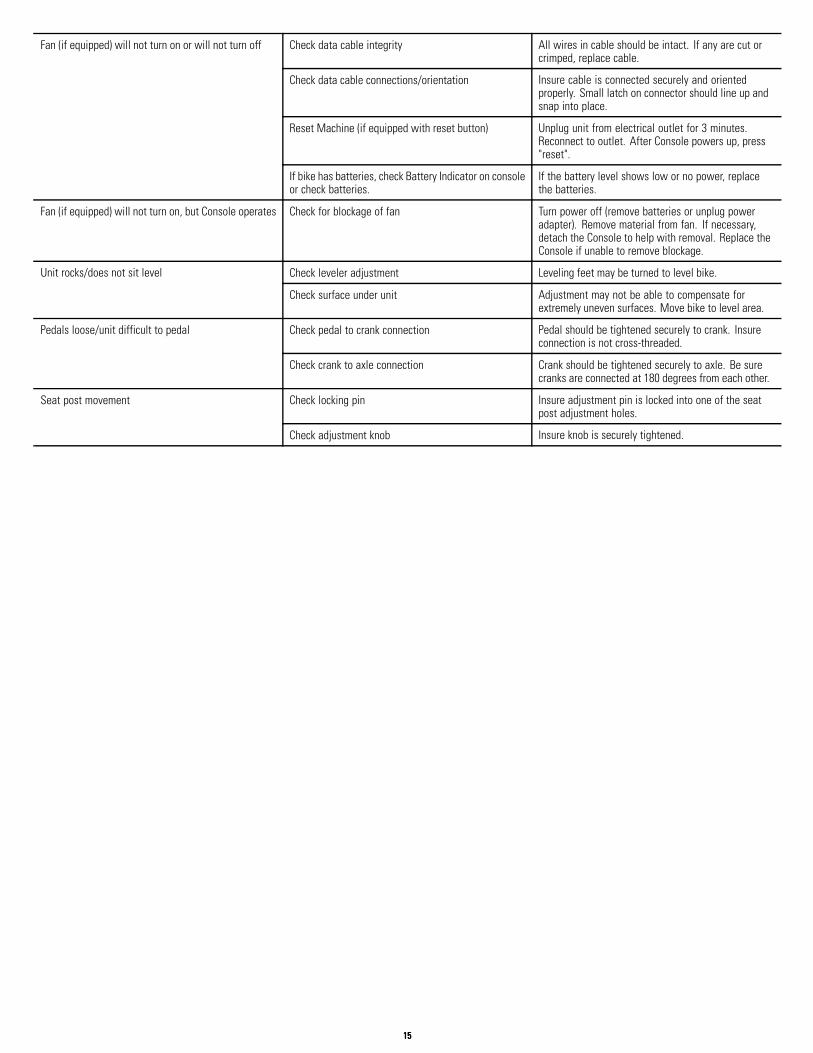
Check data cable integrity All wires in cable should be intact. If any are cut orcrimped, replace cable.
Check data cable connections/orientation Insure cable is connected securely and orientedproperly. Small latch on connector should line up andsnap into place.
Reset Machine (if equipped with reset button) Unplug unit from electrical outlet for 3 minutes.Reconnect to outlet. After Console powers up, press"reset".
Fan (if equipped) will not turn on or will not turn off
If bike has batteries, check Battery Indicator on consoleor check batteries.
If the battery level shows low or no power, replacethe batteries.
Fan (if equipped) will not turn on, but Console operates Check for blockage of fan Turn power off (remove batteries or unplug poweradapter). Remove material from fan. If necessary,detach the Console to help with removal. Replace theConsole if unable to remove blockage.
Check leveler adjustment Leveling feet may be turned to level bike.Unit rocks/does not sit level
Check surface under unit Adjustment may not be able to compensate forextremely uneven surfaces. Move bike to level area.
Check pedal to crank connection Pedal should be tightened securely to crank. Insureconnection is not cross-threaded.
Pedals loose/unit difficult to pedal
Check crank to axle connection Crank should be tightened securely to axle. Be surecranks are connected at 180 degrees from each other.
Check locking pin Insure adjustment pin is locked into one of the seatpost adjustment holes.
Seat post movement
Check adjustment knob Insure knob is securely tightened.
151515

Printed in China