Embed Size (px)
Citation preview
Digital Resources
6. Microsoft Office: Word
Index
6. Cover page and index.6.1 Adding a picture to a document. Pg.26.2 Adding other images to a document? Pg.36.3 Closing a document. Pg.36.4 Open an existing document. Pg.4 6.5 Printing a document. Pg.5-66.6 Saving a document. Pg. 66.7 Starting a new Word document. Pg. 76.8 Word formatting. Pg. 8-106.9 Word processing window element. Pg. 11-14
1
6.1 Adding a picture to a documentYou can add many types of images to a Word document. It may be a drawing, photograph, picture or clip art from Microsoft Office clip art gallery.
Clip art is a feature which allows you to access a number of ready-made pictures straight into your Word document. These pictures are copyright free therefore you can use them in your document without asking permission.
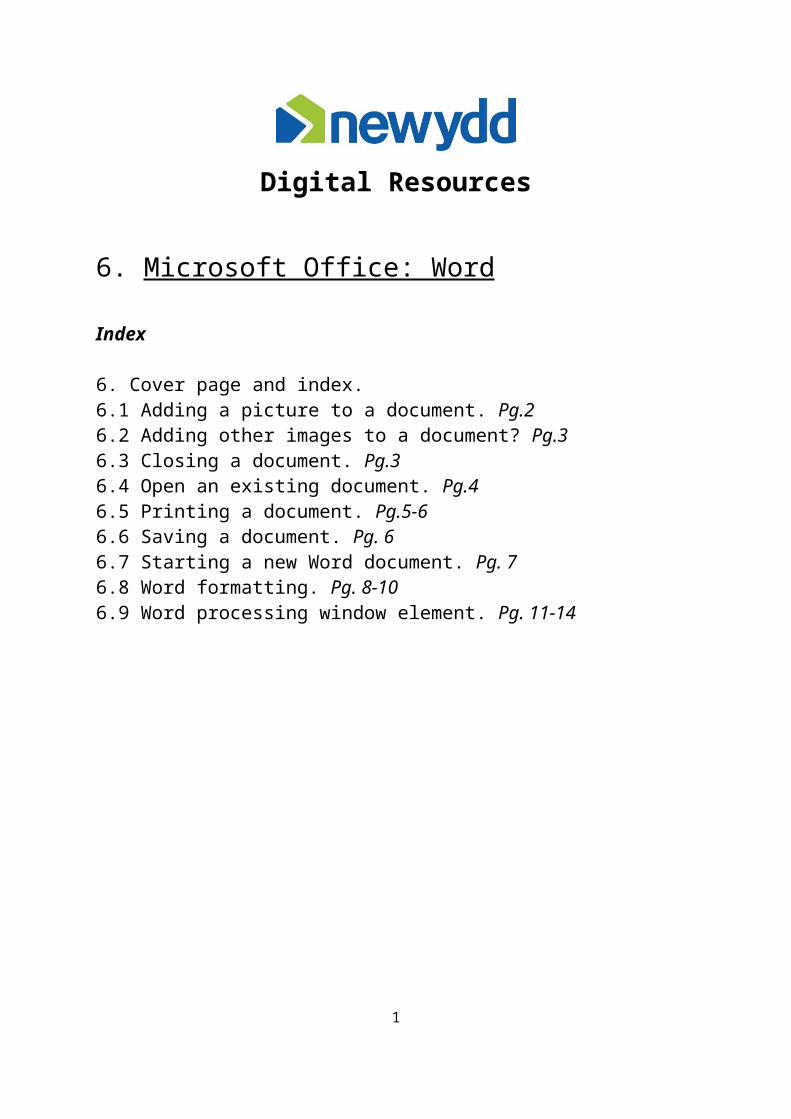
To add a picture from Clip Art firstly click where you would like the picture to appear then click Insert tab > Clip Art
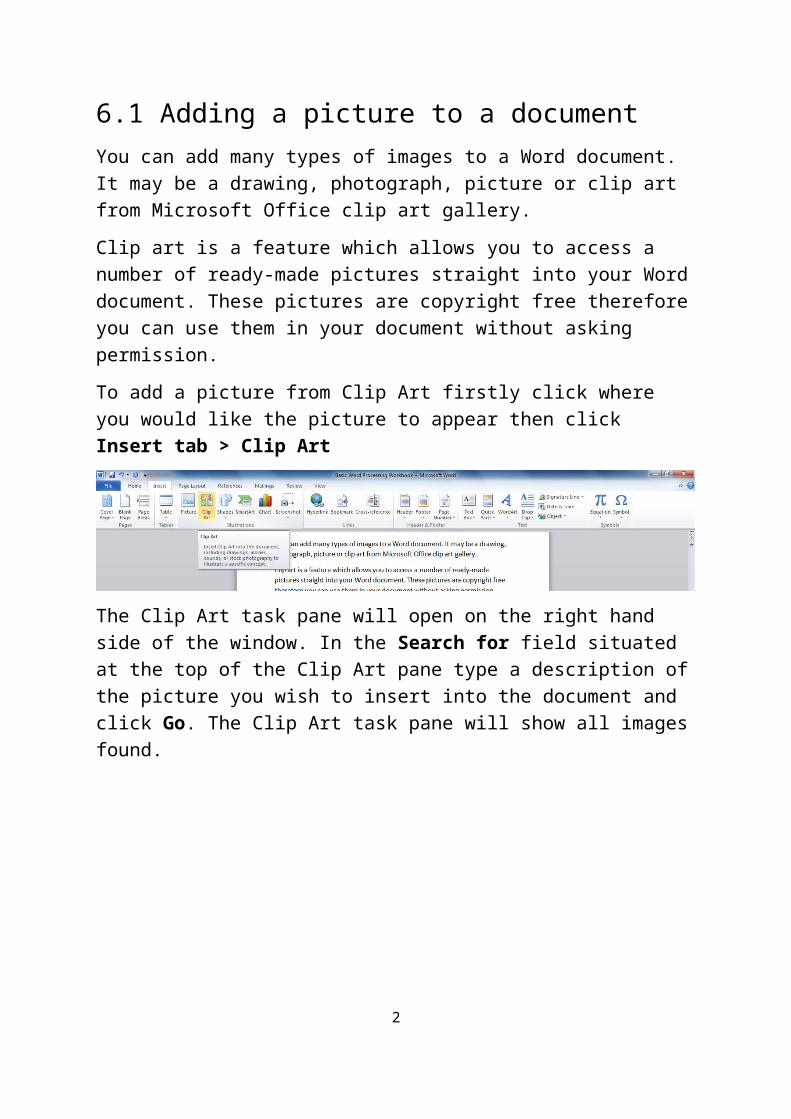
The Clip Art task pane will open on the right hand side of the window. In the Search for field situated at the top of the Clip Art pane type a description of the picture you wish to insert into the document and click Go. The Clip Art task pane will show all images found.
To add one of the pictures to the Word document, just click on it.
2
6.2 Adding other imagesYou can also add different types of images, such as digital photos, pictures you have scanned in or pictures you have created on the computer.
To add a picture from your computer firstly click where you would like the picture to appear then click then click Insert tab > Picture. This opens a dialogue box for you to locate the picture you want. The first time you do this, it opens the folder Pictures, but you can move to a different location. Once you have selected the picture you want to use click Insert.
6.3 Closing a documentTo close a document, choose File > Close or click the Close icon on the Microsoft Word window , this icon is the X in the red box.
If more than one Microsoft Word window is open, each window looks like the sample shown below. Closing one of these windows will leave the other Microsoft windows open.
If the document has not been saved since the last change, a message box isdisplayed. Choose whether to save or discard your changes.
Save: The document is saved and then closed. Discard: The document is closed, and all modifications since the last save are
lost. Cancel: Nothing happens, and you return to the document.
3

6.4 Opening an existing Word document
When no document is open, the desktop start menu will provide an icon for opening an existing document or choosing from a list of recently edited documents.
You can also open an existing document in one of the following ways. If a document is open in Microsoft Word, the second document will open in a new window.
- Click File > Open…- Press and hold the Control key and press the O key
In each case, the open dialog box appears. Select the file you want and then click Open.
4

6.5 Printing a document
- Quick Printing: Clicking the Office button > Print or file > Print depend-ing on what version of Microsoft Word you are on will take you to the print dialog box, alternatively you can press and hold the Control key and press the P key.
- Controlling Printing: For more control over printing use the dialog box.
The print dialog box has eight sections, from which you can choose a range of options:
Printer
Printer: This tab will allow the user to select the printer you wish to print too (from the printers available).
Settings
Print all pages: This tab will allow the user to select the option to print all, or a selection of pages.
Pages
Print one sided: This tab will allow the user to change from continuously printing on one side of the printed paper to printing the document on both sides of the printed paper.
Collated: This tab will allow the user to collate (1,2,3 1,2,3 1,2,3,) or uncol-late (1,1,1 2,2,2 3,3,3) a printed document.
Portrait orientation: This tab will allow the user to choose between printing the document in landscape or portrait.
5

A4: This tab will allow the user to choose the print size of the document e.g. A4, A5 etc.
Normal Margins: This tab will allow the user to change the margin paramet-ers of the document between Normal, Narrow, Moderate, Wide, Mirrored
1 page per sheet: This tab will allow the user to select the number of pages to print to one printed page between.
6.6 Saving a documentTo save a new document, do one of the following:
- Click the Office button > Save or File > Save depending on what version on Microsoft Windows you have.
- Press and hold the control key and press the S key.
- Click the save button in the quick access toolbar.
When the Save As dialog appears; select where you wish to save the document, enter the file name, and click save.
To save an open document with the current file name, click Office button > Save or File > Save depending on what version on Microsoft Windows you have or Press and hold the control key and press the S key. This will overwrite the last saved state of the file.
6
6.7 Starting a new Word documentYou can start a new, blank document in Microsoft Word in several ways:
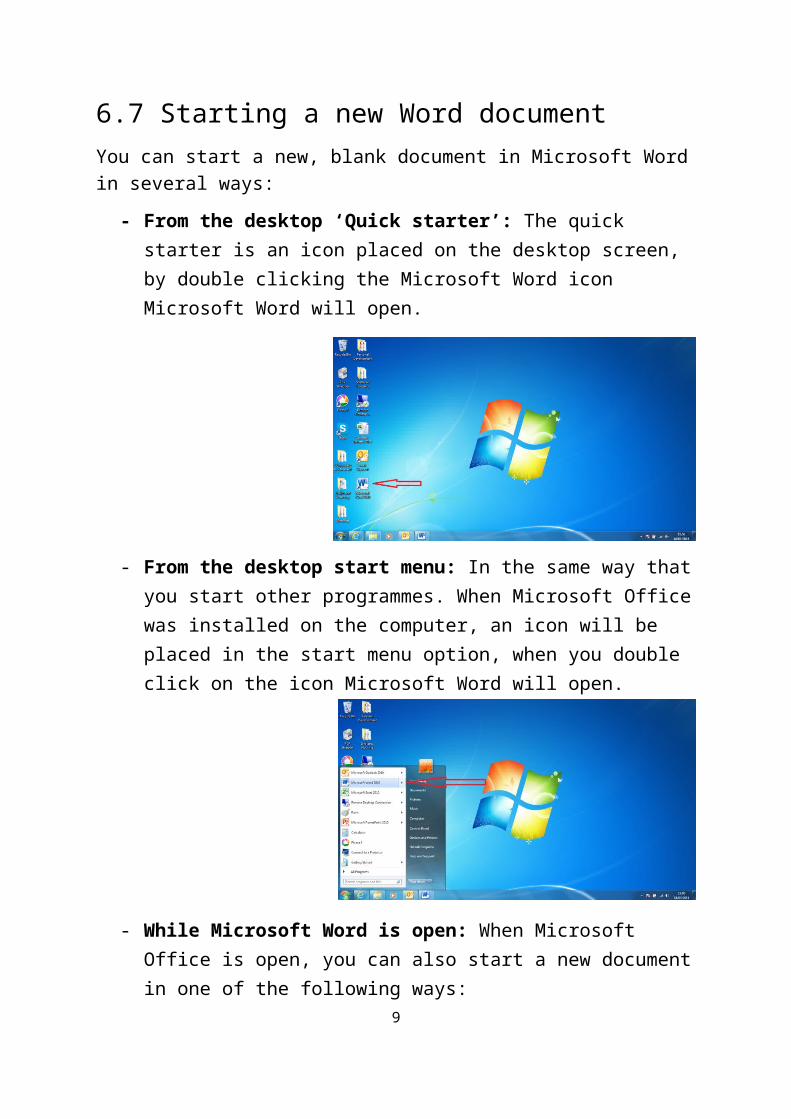
- From the desktop ‘Quick starter’: The quick starter is an icon placed on the desktop screen, by double clicking the Microsoft Word icon Microsoft Word will open.
- From the desktop start menu: In the same way that you start other pro-grammes. When Microsoft Office was installed on the computer, an icon will be placed in the start menu option, when you double click on the icon Microsoft Word will open.
- While Microsoft Word is open: When Microsoft Office is open, you can also start a new document in one of the following ways:
Press and hold the Control key and press the N key Click File > New > Blank document > Create
7
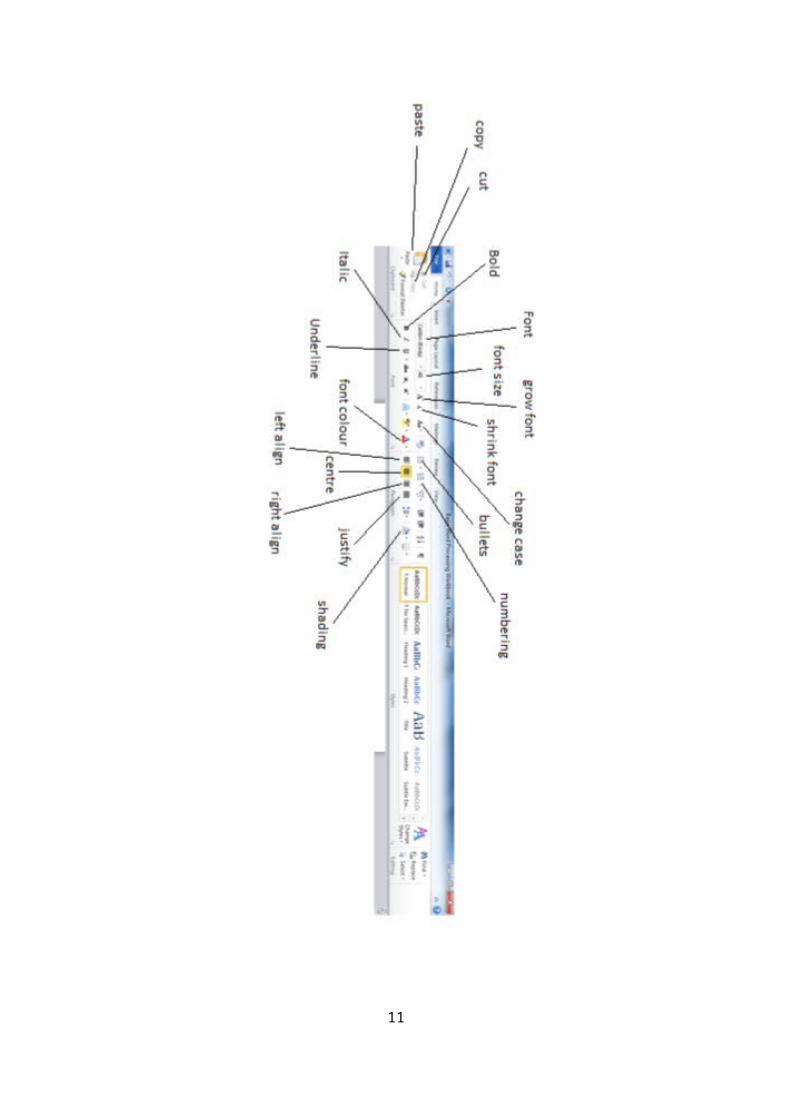
6.8 Word Formatting
8
- Font: Clicking the arrow will bring up a dialog box which will allow the user to change the font face.
- Font Size: Clicking the arrow will bring up a dialog box which will allow the user to change the font size.
- Grow Font: Clicking this field will allow the user to increase the font size.- Shrink font: Clicking this field will allow the user to decrease the font
size.- Change case: Clicking this field will bring up a dialog box which will allow
the user to change all the selected text to UPPERCASE, lowercase, or other common capitalisations.
- Bullets: Clicking this field will start a bullet list, clicking on the arrow will allow the user to choose different bullet styles.
- Numbering: Clicking this field will start a numbered list, clicking on the arrow will allow the user to choose different numbered format.
- Shading: Clicking the arrow will bring up a dialog box which will allow the user to colour the background behind the selected text or para-graph.
- Justify: Clicking this field will allow the user to align the text to both the left and right margins, adding extra space between words as necessary. This creates a clean look along the left and right side of the page.
- Right align: Clicking this field will allow the user to align the text to the right. Alternatively the user can press and hold the control key and press the R key.
- Centre: Clicking this field will allow the user to align the text to the centre. Alternatively the user can press and hold the control key and press the E key.
- Left align: Clicking this field will allow the user to align the text to the left. Alternatively the user can press and hold the control key and press the L key.
- Font colour: Clicking the arrow will bring up a dialog box which will allow the user to change the text colour.
- Underline: Clicking this field will allow the user to underline the selected text. Alternatively the user can select the text and press and hold the control key and press the U key.
9
- Italic: Clicking this field will allow the user to italicize the selected text. Alternatively the user can select the text and press and hold the control key and press the U key.
- Paste: Clicking this field will allow the user to paste the contents of the clipboard. Alternatively the user can select the text and press and hold the control key and press the V key.
- Copy: Clicking this field will allow the user to copy the selection and put it on the clipboard. Alternatively the user can select the text and press and hold the control key and press the C key.
- Cut: Clicking this field will allow the user to cut the selection and put it on the clipboard. Alternatively the user can select the text and press and hold the control key and press the X key.
- Bold: Clicking this field will allow the user to make the selected text Bold. Alternatively the user can select the text and press and hold the control key and press the B key.
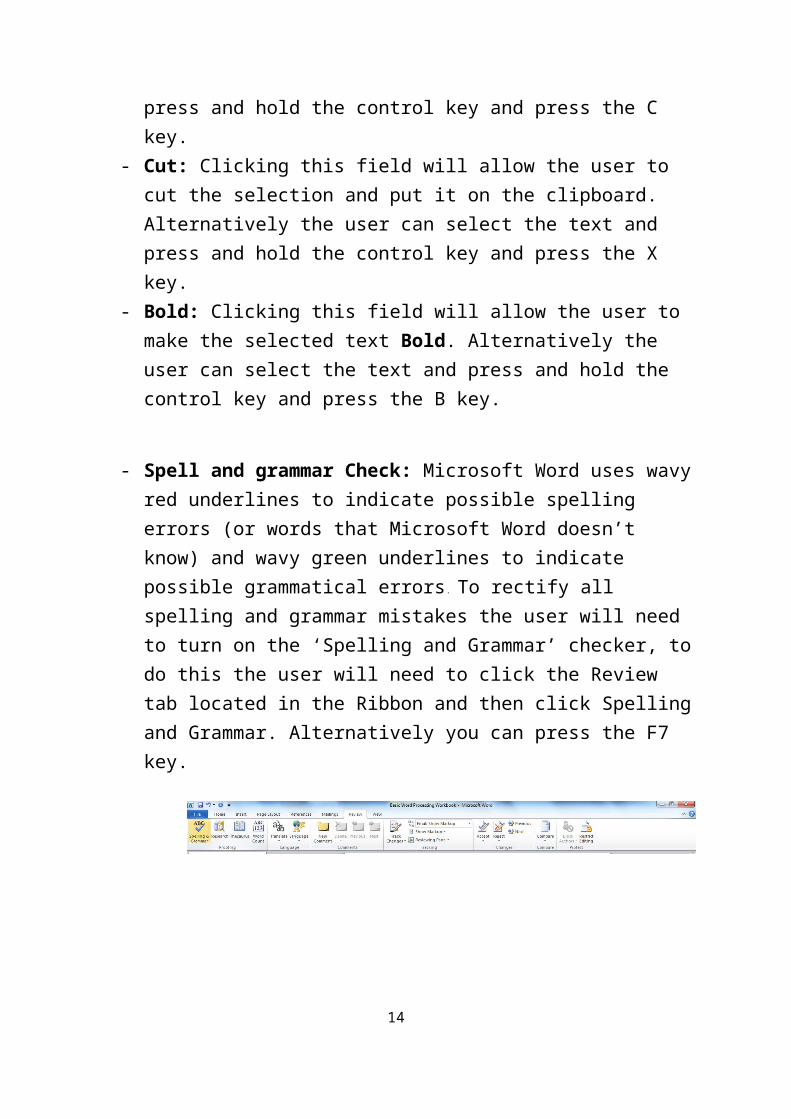
- Spell and grammar Check: Microsoft Word uses wavy red underlines to indicate possible spelling errors (or words that Microsoft Word doesn’t know) and wavy green underlines to indicate possible grammatical er-rors. To rectify all spelling and grammar mistakes the user will need to turn on the ‘Spelling and Grammar’ checker, to do this the user will need to click the Review tab located in the Ribbon and then click Spelling and Grammar. Alternatively you can press the F7 key.
10
6.9 Word processing window elementsWhen you launch Microsoft Word, its programme window appears on screen. A screenshot of this window is shown below with all the screen elements labelled.
11
- The Title Bar shows the name of the document on screen. When a new document is started, Microsoft Word will give it a generic name like ‘Document 1’ and this is displayed on the title bar. When you save the document with a name, the generic name on the title bar is replaced by the given name.
- Quick Access toolbar is located in the top left corner of the Microsoft Word window, the Quick Access Toolbar contains some of the most fre-quently used commands like Save, Undo, Redo. You can add more com-mands to the Quick Access Toolbar as per your need. This toolbar helps you to perform Word tasks speedily by providing one-click access to oft used commands.
- Windows controls are a set of three buttons in the top right corner of the program window:
The right button, displaying , is the Close button . On clicking, this button closes the current document.
The left button is the Minimize button which minimizes the program win-dow to the taskbar.
The middle button, sporting a rectangle is the Maximize button, which, on clicking, maximizes the window and the button image changes to a pair of rectangles . Another click restores the program window to its previous size and the button image to a single rectangle.
- You can think of the Ribbon as a collection of seven horizontal tabbed toolbars arranged on top of each other. These toolbars are accessed through their tabs. Each toolbar has command buttons, menus and input boxes arranged within them. Some groups has dialog launchers (repres-ented by a downward pointing arrow) which, when clicked, display a dia-log box related to that group.
At any given time, only one tabbed toolbar is visible. When Microsoft Word is launched, the Home tab is current and the toolbar attached to it is at the top, enabling you to access its commands by clicking them. When any other tab is clicked, its toolbar comes to the top and you can use the commands stored on it.
12
- Clicking the Office button, or File on other Microsoft Word versions re-veals a drop-down menu showing commands for file operations. Some of the key commands are described below in brief.
New: When you click this button, the 'New Document' window comes up dis-playing three panes. The first pane shows a list of templates types, the second pane shows the templates available for the template type selected in the first pane and the third pane shows a preview of the template selected in second pane. You can start a new document based on a template selected from amongst these. By default, the blank document template is chosen. Clicking the Create button starts a new document based on the selected template. Notice that Word 2007 offers a wide variety of templates from the Microsoft Office Online.
Open: Starts the Open dialog where you can navigate to your documents folder, select an existing (i.e. previously saved) document and open it in Word window.
Save: Clicking Save button saves the current document if it has been given a name and saved earlier, otherwise it launches the Save As dialog.
Save As: Opens the Save As dialog. Here you can assign a name to a new doc-ument and save it. You may also rename a document saved earlier and save it with the new name.
Print: This command is used for printing the current document. Send: You may use this command to email a document or to fax it via inter-
net. Close: You can close the current document using this button. However, the
Microsoft Word program will keep running. Exit: Clicking this option closes the Microsoft Word programme together with
all open documents.
- The Help button is located below the Window Controls in the top right corner of Word window and once clicked will bring up the Word Help window.
- The horizontal ruler is used to set tabs and indent text. You may use the vertical ruler to set vertical location of text in the document. If the rulers are not visible, click the View Ruler button immediately below the Rib-bon on the extreme right.
The rulers show measurements in inches or centimetres, depending on the units of measure specified in Word Options.
13
- Repeated clicking the Tab Selector shows five tab markers and two in-dent markers. By choosing the desired tab or indent marker and clicking on the horizontal ruler, you can set tabs or indent text.
- The status bar displays information on the Microsoft Word document:
Document Information is situated on the left hand side of the Word docu-ment and includes information such as the current page number and total number of pages, word count, proofing error notification, etc.
The View buttons are situated on the right hand side of the Word document and provides five different document views: Print layout view shows the doc-ument as it will look when it is printed, Full screen reading view shows the document on full screen to make reading your document more comfortable, Web layout view enables you to see your document as it would appear in a browser such as Internet Explorer, Outline view displays the document in out-line form in which headings could be displayed without the text. When you move a heading, the accompanying text will move with it and Draft view can be used to edit a document.
The Zoom slider situated on the far right of the status bar lets you zoom out or zoom in the current document. The zoom range is from 10% to 500%. The current zoom level is displayed on the taskbar immediately left of the slider. Clicking the zoom level opens the Zoom dialog where you can specify the de-sired zoom level.
- The vertical scroll bar is located at the extreme right of the Microsoft Word window while the horizontal scroll bar is at the bottom of the win-dow just above the status bar. Vertical scroll bar is always visible while the horizontal scroll bar appears only when the document width exceeds the screen width.
The scroll bars let you scroll the document up-down vertically or left-right horizontally. To scroll, you need to click and drag the scroll box showing three vertical/horizontal lines. The document moves in the same direction you move the scroll box.
- Framed between the rulers and the scroll bars is a large area looking like a blank sheet of paper. This is the text area where you type the text of the document. You will see a blinking vertical line in the top left corner. This is the Cursor. The typed characters appear at its location. As a char-acter appears at its location, the cursor moves to its immediate right.
14
15


![SiSiB SILICONES - Power Chemical€¦ · SiSiB® PC9710 [CAS 675-62-7] SiSiB® PC9711 [CAS 358-67-8] (3,3,3-Trifluoropropyl)methyldichlorosilane Si Cl Cl C CH2 CH2 CH3 F F F (3,3,3-Trifluoropropyl)methyldimethoxysilane](https://img.pdfslide.us/doc/110x75/6054085576daa474b751fa04/sisib-silicones-power-sisib-pc9710-cas-675-62-7-sisib-pc9711-cas-358-67-8.jpg)