Embed Size (px)
Citation preview
AUDIO SLIDESHOW ASSIGNMENTDue Date: Monday, October 26Points Possible: 100Duration: 2:00-3:30 minutes
The Audio Slideshow is a combination of text and images. The Audio Slideshow should be a first-person POV of someone whose slice of life story represents a larger story. The assignment includes the finished video, a Project Brief, a source list and a completed script. Students must publish their Audio Slideshow online and link it to their blog. Students must hand in the following:
Your completed audio slideshow, uploaded to YouTube or Vimeo and linked to your blog.
A completed project brief, handed in to the professor. A script of your audio slideshow. The script format is available on the blog under
ESSENTIAL DOCUMENTS.
Some general considerations for the format of your audio slideshow:
The length should be between 2 minutes and 3:30 minutes. Generally speaking, audio slideshows are produced in a way that lets sources tell
their own stories. Often the audio slideshow is told as a first-person narrative from the perspective of the source. If additional context is needed, some journalists and media producers do narrate their own voice-over passages, but sometimes they use text instead of their own voice. You can narrate your own audio slideshow, but as we saw in the examples, the most effective ones are told from the source’s POV.
Remember to vary the angles and style of your photographs.
WORKFLOW FOR AUDIO SLIDESHOWS
Pre-Production
Come up with an idea for an audio slideshow. Contact potential sources for the audio slideshow. Write down a list of questions for your audio slideshow sources. You don’t have to
ask every question, and you may come up with other questions to ask on the day of the interview, but you should at least have an idea of some of the things you want to ask.
Create a shot list of possible images for your audio slideshow. Some stories naturally have strong visual possibilities, like a parade or a performance. For many other stories you must think carefully about ways to visualize your narrative. Try to get some “action shots,” even if the action consists of someone talking on the phone. Go for detail shots. Give us people, lots of people shots. Your instructor can help you come up with some shot ideas.
Production
Test and double-check your equipment before arriving at the scene. Is the camera working? Is the audio recorder working? Do you have enough battery life, do you have extra batteries, have you checked the audio cables, have you tested the recorder, do you have room on your camera flash card?
Take a lot of photos. Most camera flash cards hold a lot of photos and it is easy to delete the ones you don’t want to use. Shoot a wide variety of subjects. Remember to take shots from different angles.
Be more judicious with your use of the audio recorder. It is easier to edit shorter bursts of audio rather than a long and extended interview. Shut the recorder off when your source is not talking to you.
Don’t forget to record sixty seconds of “room” noise. You may need to add moments of silence or audio transitions, and these work much more smoothly when you have some room noise to work with.
Before you start recording audio, listen for ambient noises that will distract from your interview. Humans can edit out rumbles from heaters, computers, air conditioners or street noise from everyday life, but microphones pick up and enhance these sounds. If there is a source of distracting ambient noise, see if you can eliminate it (ie – turn off the air conditioner). If you can’t eliminate it, then be sure to record your interview with the microphone pointed away from the source of the noise. The microphone will pick up noise directly in its path.
Don’t forget to test your recorder before you begin – there is nothing worse than pressing record, interviewing a subject, and then finding out that your recording did not work.
Make sure your audio recorder is set to record at HQ (high quality). Don’t forget to wear headphones while you are recording audio.
Audio Post-Production
Download your audio flies to your computer. If your audio recorder recorded files into a .wma format you may need to convert
these files to .aiff or .wav before editing them in Audacity. You can use Media.io (http://media.io), a free audio converter, to convert them.
Edit your files in Audacity. Do all of your layering and editing first. Then, when you are done, mix the tracks down to stereo and normalize the audio.
Import the audio into Final Cut Pro Express.
Photo Post-Production
Download your images to your computer. Select the images you may want to use. Edit them (color correct, tone, crop) in
PhotoShop, but DON’T resize them. Save them in one folder. When you are done editing the images, there are three things you can do to make
the transition to Premiere better:o Boost the contrast of the images slightly by going to the IMAGE menu,
selecting ADUSTMENTS and then BRIGHTNESS/CONTRAST. Boost the contrast by about 10 units (or more, if the increased contrast improves the image).

Put all of the jpg images into one folder. Import the images into Premiere.
Premiere Settings
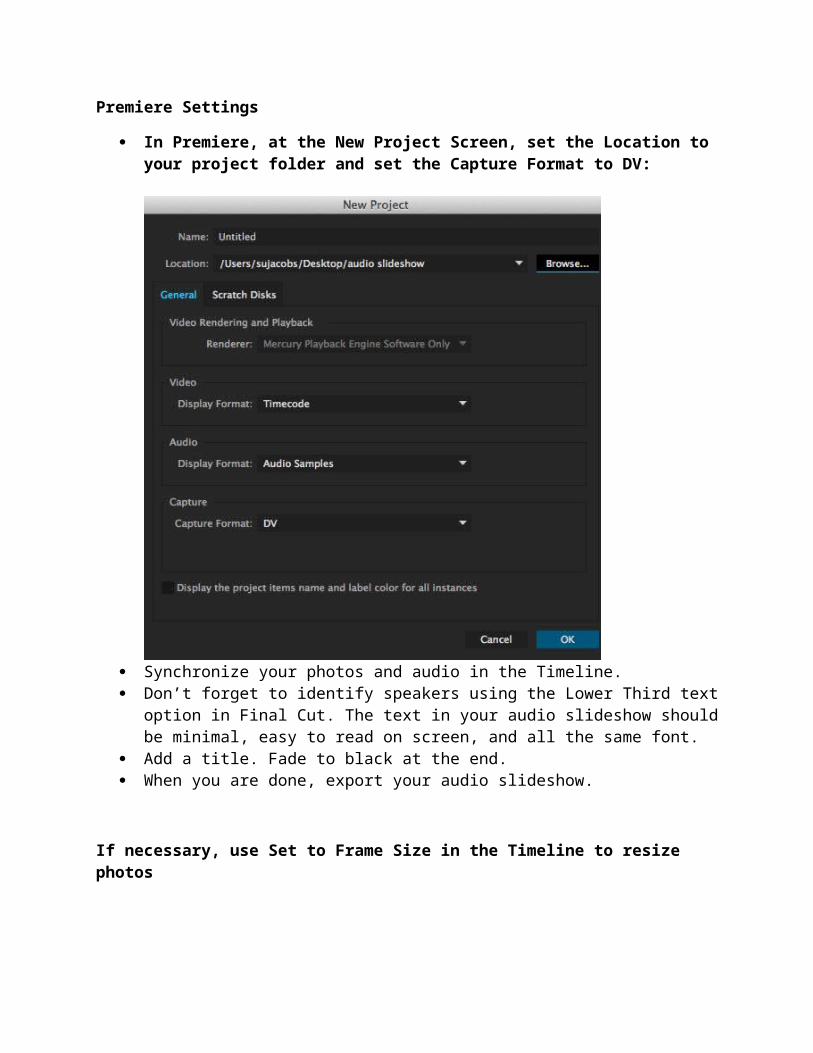
In Premiere, at the New Project Screen, set the Location to your project folder and set the Capture Format to DV:
Synchronize your photos and audio in the Timeline. Don’t forget to identify speakers using the Lower Third text option in Final Cut. The
text in your audio slideshow should be minimal, easy to read on screen, and all the same font.
Add a title. Fade to black at the end. When you are done, export your audio slideshow.
If necessary, use Set to Frame Size in the Timeline to resize photos
Photos in your audio slideshow can come in many shapes and sizes. Sometimes this results in the photos cropping or stretching to match the shape of the video frame, for example, when a vertical image expands to fit the horizontal dimensions of the video frame. To keep this from happening, select your photo in the Timeline, press the CONTROL key and click on your photo. A hidden menu appears. Scroll down towards the bottom and select Set to Frame Size. This should size your photos proportionally within the video frame.
Export Your Audio Slideshow from Premiere
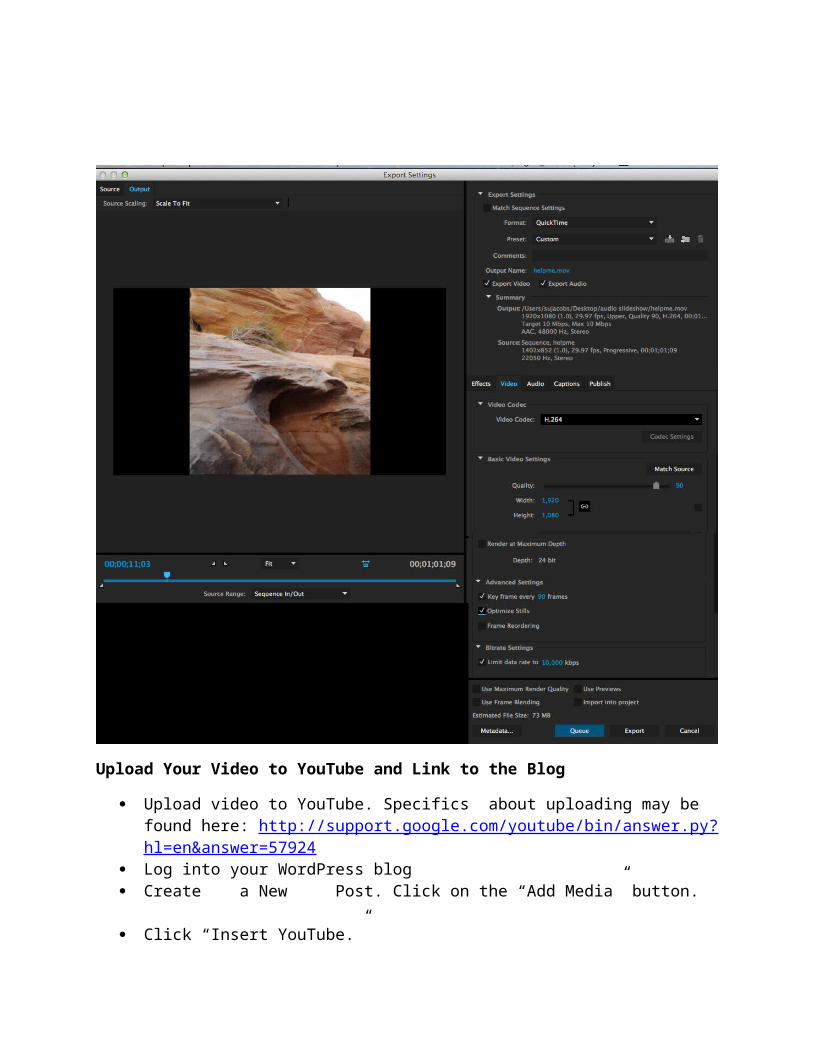
In Premiere, select Export>Media. At the Export Settings box, select the following options:
o Format is Quicktimeo Export both Video and Audio (check both)o Under the Video tab, set the Video Codec to H.264o Under Advanced Settings, click on Optimize Stills

Upload Your Video to YouTube and Link to the Blog
Upload video to YouTube. Specifics about uploading may be found here: http://support.google.com/youtube/bin/answer.py?hl=en&answer=57924
Log into your WordPress blog Create a New Post. Click on the “Add Media” button. Click “Insert YouTube.” Enter your YouTube username Select the video you want to upload to your blog Click “Insert into Post.” You will see a text command in your WordPress post. Click Publish to see your post
published to your blog.
Audio Slideshow Grading Rubric
Selection and quality of images. Quality of image editing. – 30 points Quality of audio recording and editing – 30 points Technical conformance to maintaining aspect ratios, use of type, quality of exported
audio slideshow, success in linking audio slideshow to blog – 10 points Overall aesthetic quality of storytelling and sequencing. – 10 points Adherence to journalistic standards – 10 points Project brief, script, performance as a crew buddy – 10 points