Embed Size (px)
Citation preview

Email Settings
Account Types: POP3, IMAP
POP3- Pops the email off the server onto the email program you are using. IMAP- Syncs all email programs together. If you delete a email off one email program it will
delete on all programs the email is installed on.*If you do not have any accounts set up as IMAP then you should use POP3*
Setting Email on Apple Mail Client/Mac
1. Click on the Apple Mail Client(Stamp Icon)
2. Click on “Mail” at the top next to the Apple Logo.
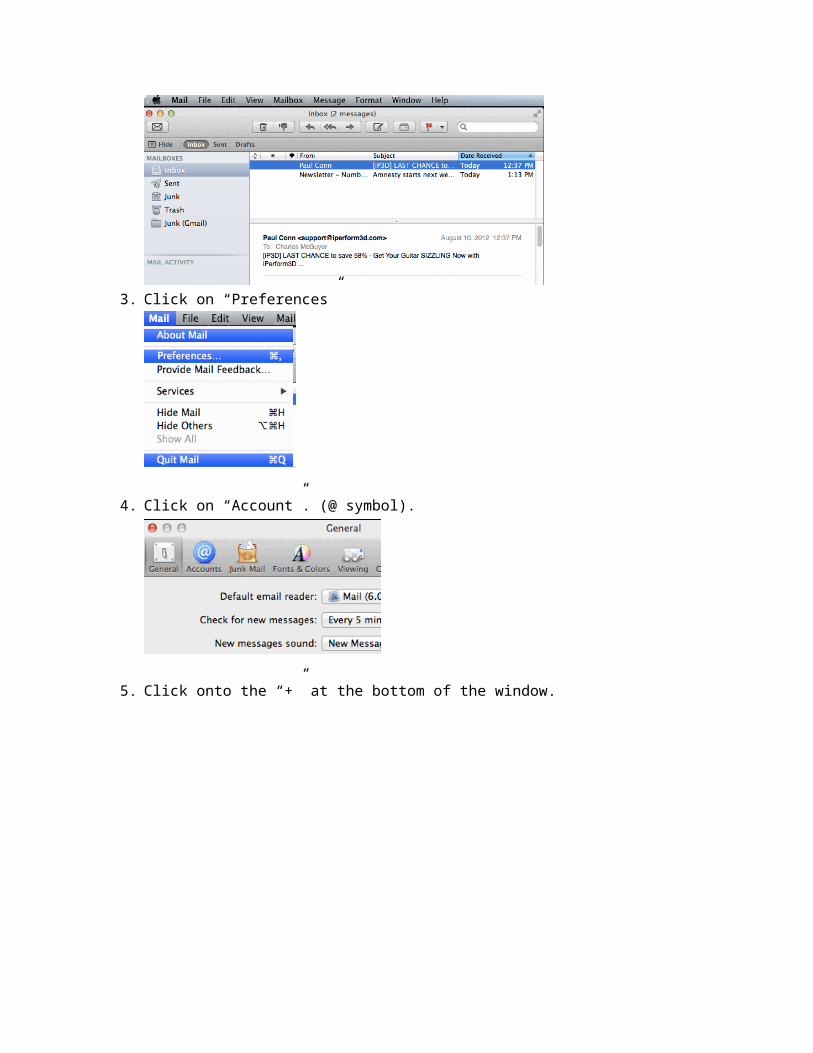
3. Click on “Preferences”
4. Click on “Account”. (@ symbol).
5. Click onto the “+” at the bottom of the window.
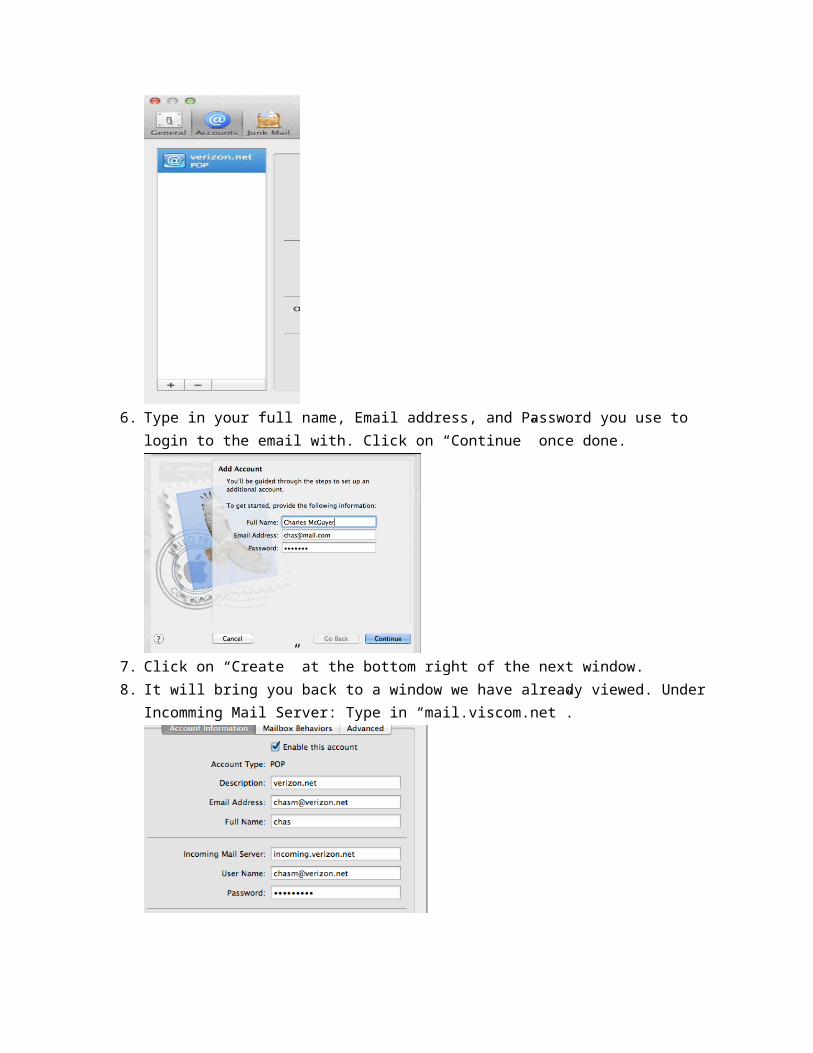
6. Type in your full name, Email address, and Password you use to login to the email with. Click on “Continue” once done.
7. Click on “Create” at the bottom right of the next window.8. It will bring you back to a window we have already viewed. Under Incomming Mail Server: Type
in “mail.viscom.net”.
9. Click into the box next to “Outgoing Mail Server (SMTP):”. In the drop down box click onto “Edit SMPT Server List”.
10. On the next window under “server Name” type “smpt.viscom.net” then click on “advance” above.
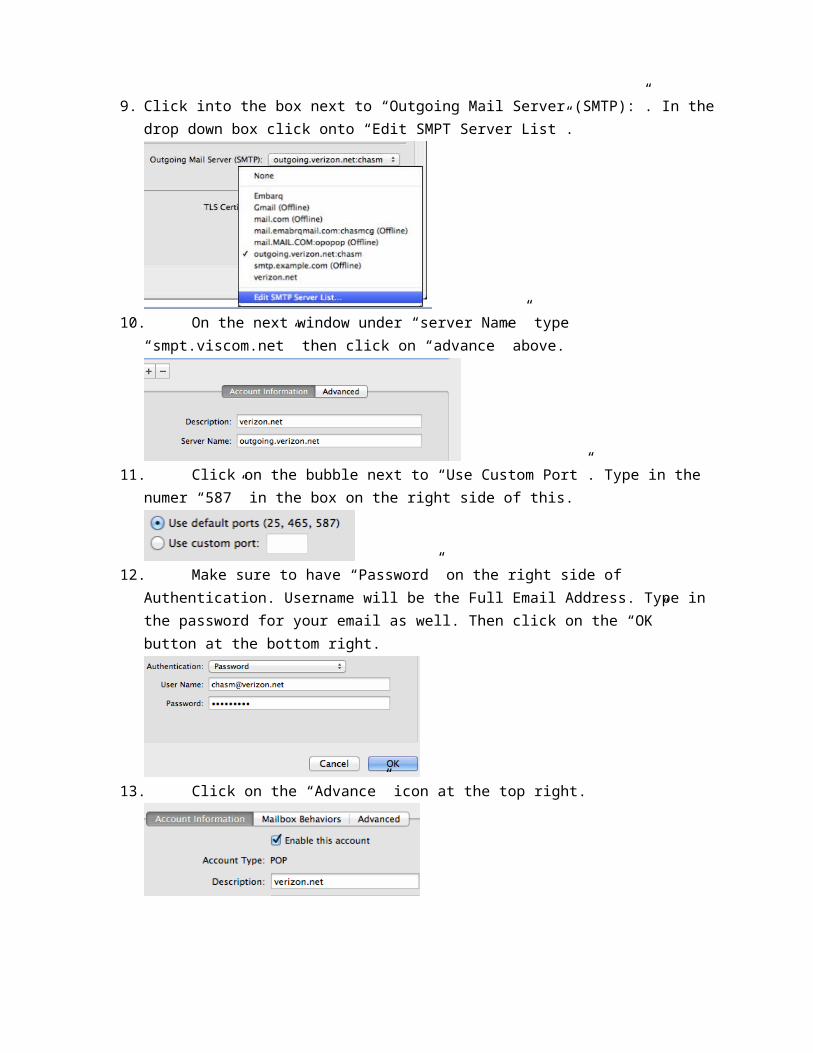
11. Click on the bubble next to “Use Custom Port”. Type in the numer “587” in the box on the right side of this.
12. Make sure to have “Password” on the right side of Authentication. Username will be the Full Email Address. Type in the password for your email as well. Then click on the “OK” button at the bottom right.
13. Click on the “Advance” icon at the top right.
14. The box on the right side of the word “Port” should have the number “110”. Authentication should have “Password” on the right side of it as well.
15. You can hit the Red bubble at the top left of the window and the email should start downloading. Setup is now complete for Apple Client Mail/Mac.
Setting Email on IncrediMail.
1. Open the IncrediMail on the computer.2. Click on “Tools”. Click on “Email Accounts” in the drop down menu.

3. Click on the “Add” button on the right side. 4. Click on the bubble next to “Let me configure settings myself. Then click “next” at the bottom
right.
5. Click onto the “other” tab for email account.
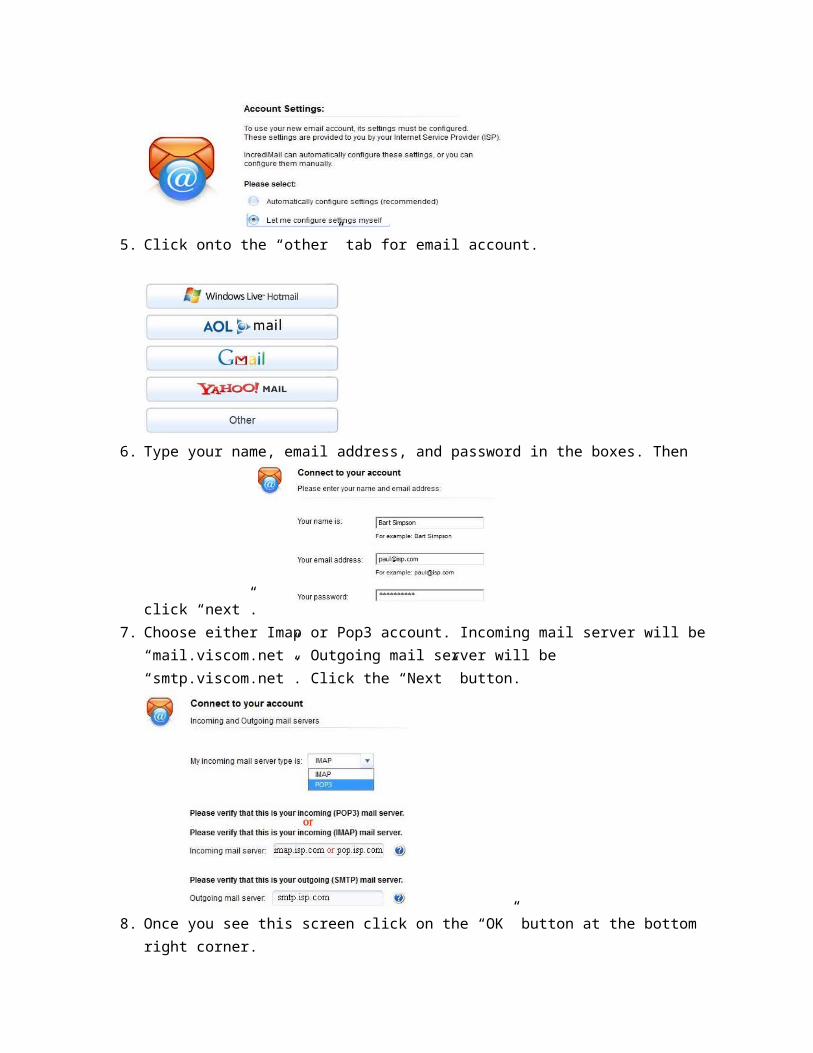
6. Type your name, email address, and password in the boxes. Then click “next”.
7. Choose either Imap or Pop3 account. Incoming mail server will be “mail.viscom.net”. Outgoing mail server will be “smtp.viscom.net”. Click the “Next” button.
8. Once you see this screen click on the “OK” button at the bottom right corner.
9. You will see this screen again. Left click once on the newly added account to highlight it. Then click “Properties”.
10. Click on the “Servers” tab. Make sure the box next to “My server requires authentication” is checked.

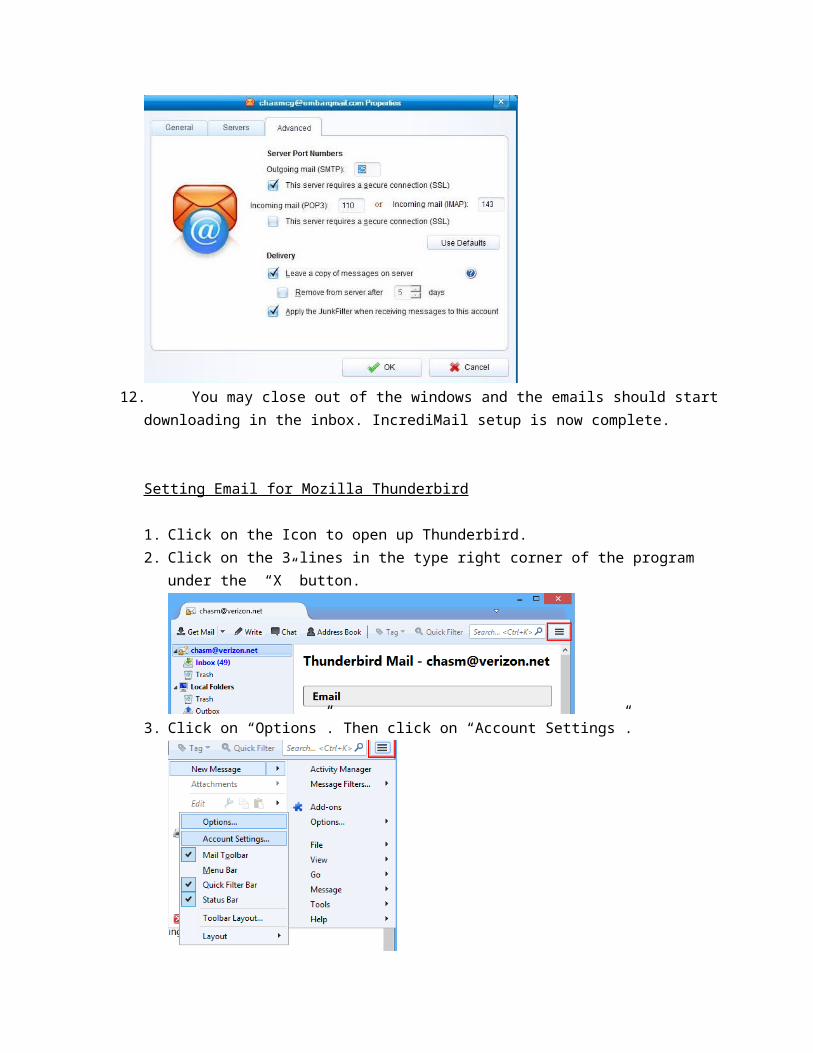
11. Click on “Advanced” tab. The port number next to “Outgoing mail(SMPT)” should be “587”. If you are using a Imap account put a check mark next to “This server requires a secure connection(SSL). Incoming mail(POP3) port number should be “110”. If using imap account put a check mark next to “This server requires a secure connection(SSL)”. If using POP3 then leave it unchecked. Click “OK” at the bottom of the window.
12. You may close out of the windows and the emails should start downloading in the inbox. IncrediMail setup is now complete.
Setting Email for Mozilla Thunderbird
1. Click on the Icon to open up Thunderbird.
2. Click on the 3 lines in the type right corner of the program under the “X” button.
3. Click on “Options”. Then click on “Account Settings”.
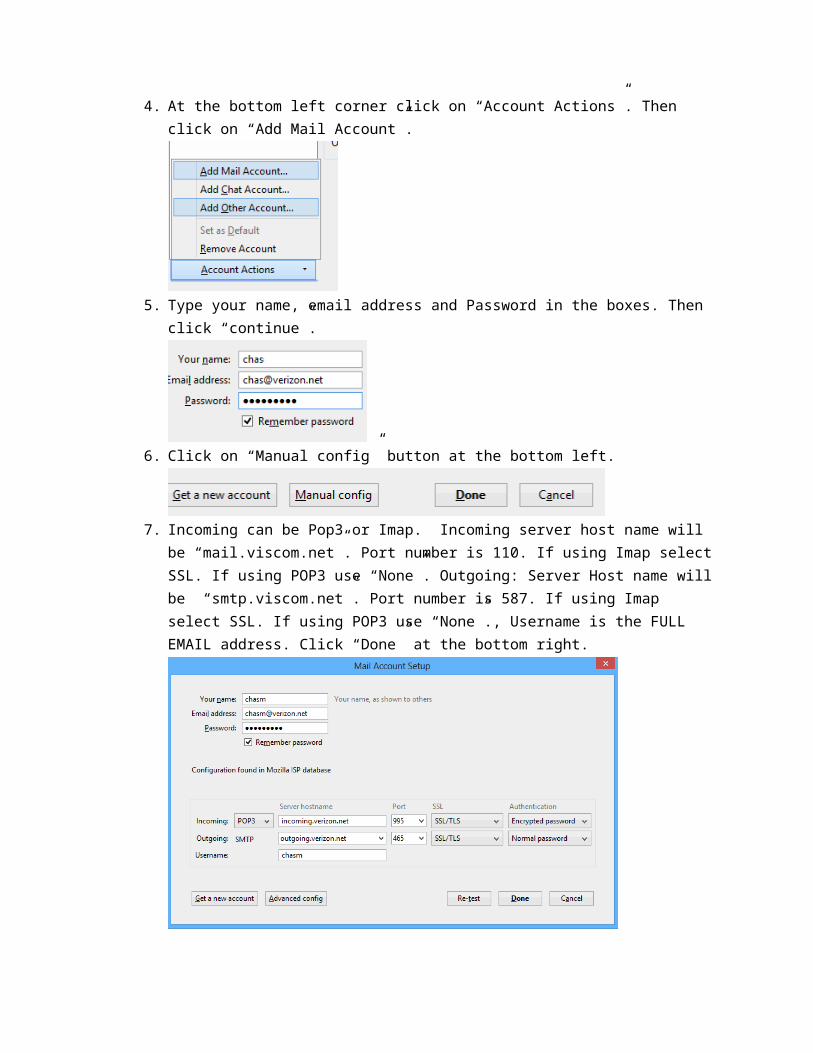
4. At the bottom left corner click on “Account Actions”. Then click on “Add Mail Account”.
5. Type your name, email address and Password in the boxes. Then click “continue”.
6. Click on “Manual config” button at the bottom left.
7. Incoming can be Pop3 or Imap. Incoming server host name will be “mail.viscom.net”. Port number is 110. If using Imap select SSL. If using POP3 use “None”. Outgoing: Server Host name will be “smtp.viscom.net”. Port number is 587. If using Imap select SSL. If using POP3 use “None”., Username is the FULL EMAIL address. Click “Done” at the bottom right.
8. Click “OK”. Emails should start to download into the inbox. IncrediMail setup is now complete.
Setting Email for Outlook 2003
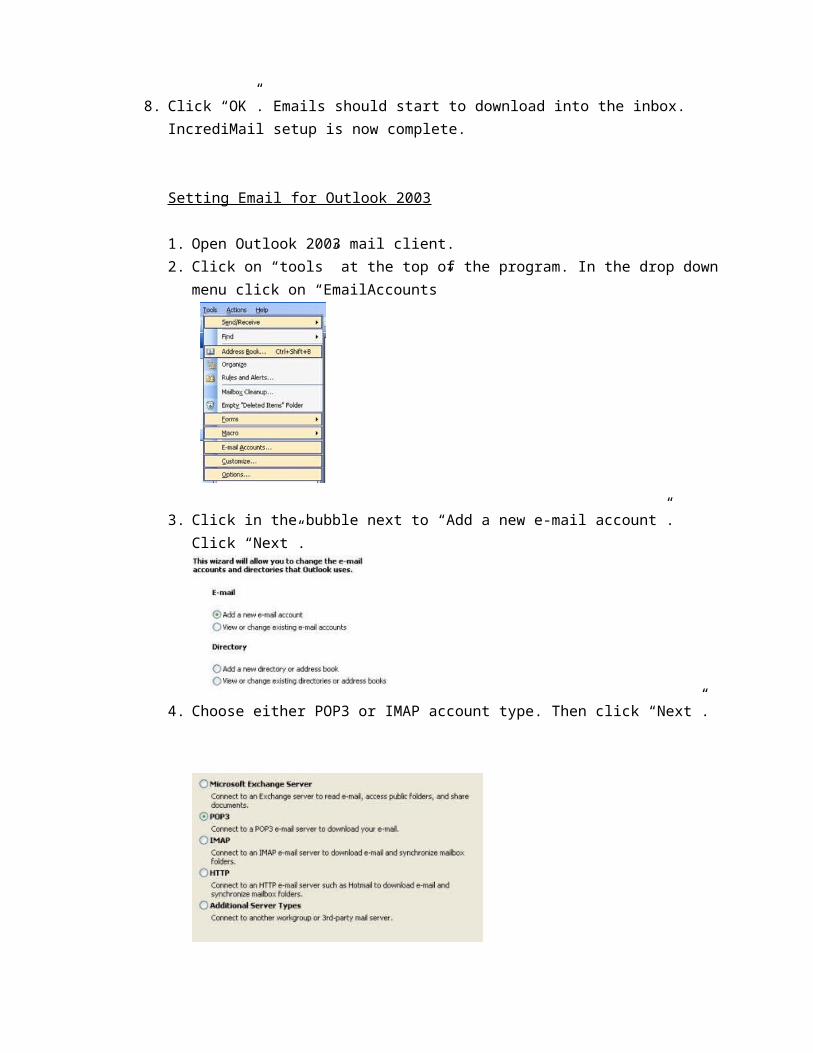
1. Open Outlook 2003 mail client.2. Click on “tools” at the top of the program. In the drop down menu click on
“EmailAccounts”
3. Click in the bubble next to “Add a new e-mail account”. Click “Next”.
4. Choose either POP3 or IMAP account type. Then click “Next”.
5. Fill in your name, email address, username(full email address), Password. Incoming mail server(POP3) will be “mail.viscom.net”. Outgoing mail server(SMTP) will be “smtp.viscom.net”. Make sure the box next to “Log on using Secure Password Authentication(SPA) is NOT checked. Click on the “More Settings” button.
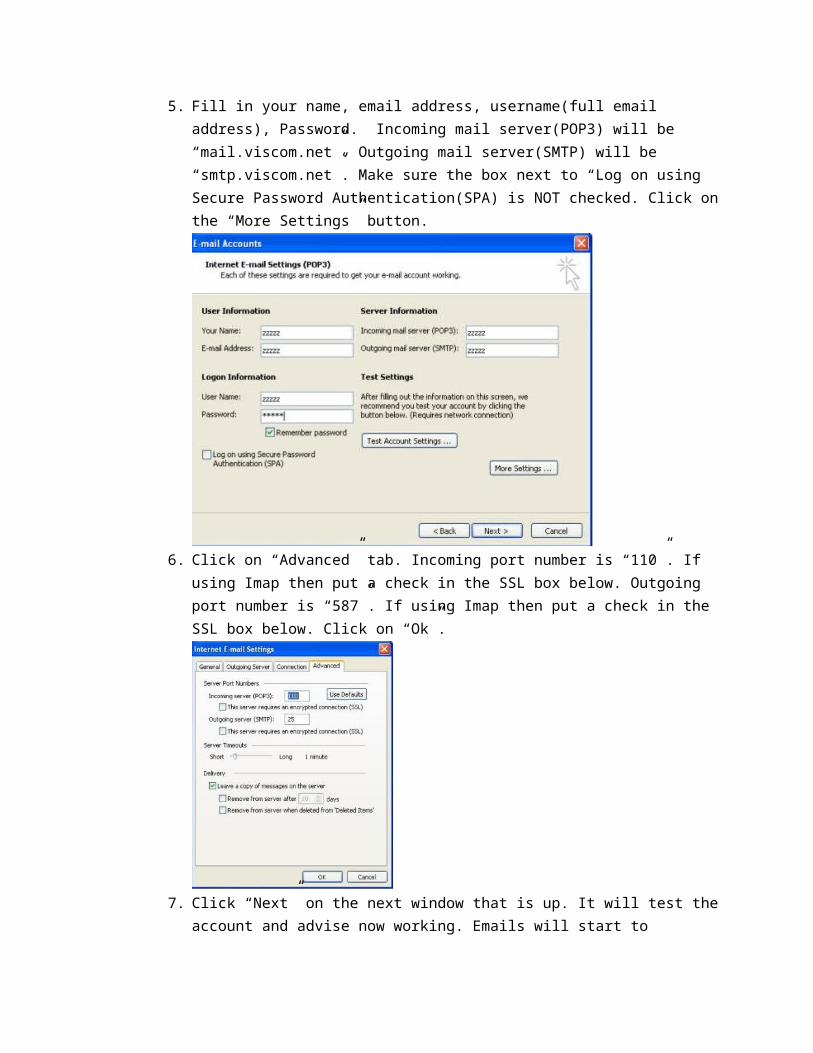
6. Click on “Advanced” tab. Incoming port number is “110”. If using Imap then put a check in the SSL box below. Outgoing port number is “587”. If using Imap then put a check in
the SSL box below. Click on “Ok”. 7. Click “Next” on the next window that is up. It will test the account and advise now
working. Emails will start to download into your inbox. Setting up email on Outlook 2003 is now complete.
Setting Email on Outlook 2007
1. Open up Outlook 2007 on the computer.2. Click on “Tools”. In the drop down menu click on “Account Settings…”.

3. Click on the “New” icon.
4. On the next window click the “next” button.5. On the next window DO NOT start typing in the information. Click on the box next to
“Manually configure server settings or additional server types”. Click “Next”.
6. Click on the bubble next to “Internet E-mail”. Click “Next”.

7. Type your name, email address. Select either POP3 or Imap account type. Incoming mail server is “mail.viscom.net”. Outgoing mail server will be “smtp.viscom.net”. The username will be the FULL email address. Type the password as well for the email. Make sure the box next to “Log on using Secure Password Authentication(SPA) is NOT checked. Click on “More Settings”.
8. Click on “Advanced” tab. Incoming port number is “110”. If using Imap then put a check in the SSL box below. Outgoing port number is “587”. If using Imap then put a check in the SSL box below. Click on “Ok”.
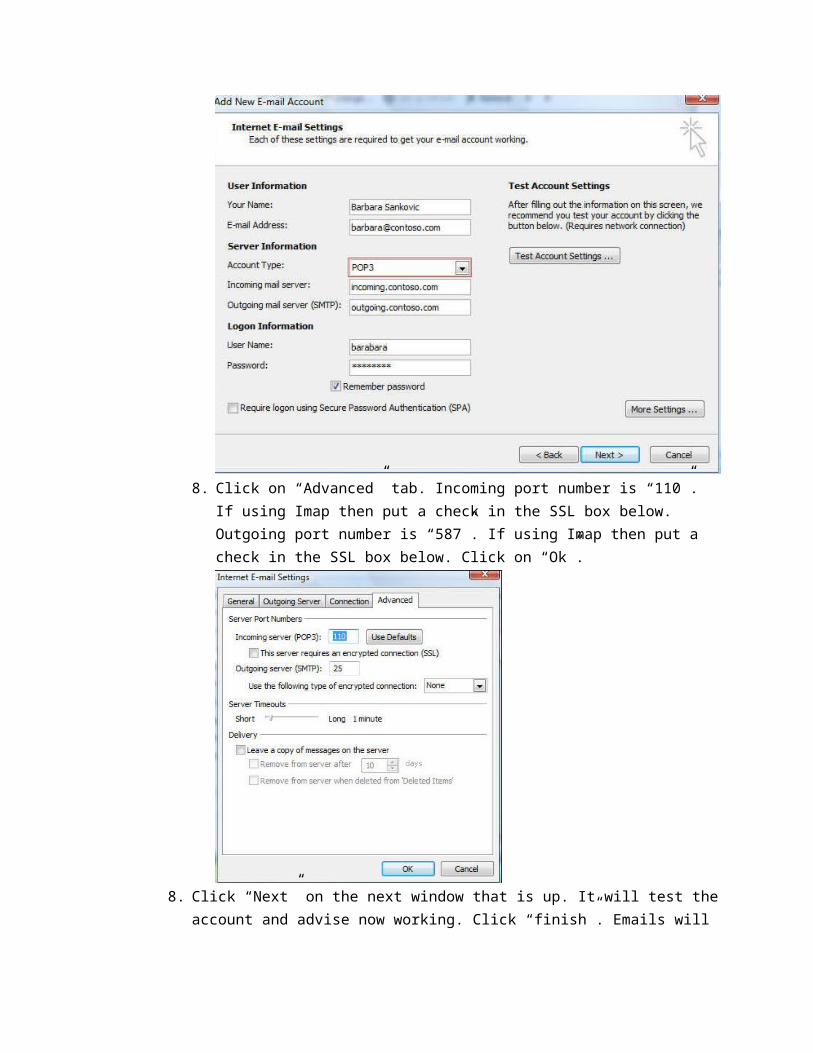
8. Click “Next” on the next window that is up. It will test the account and advise now working. Click “finish”. Emails will start to download into your inbox. Setting up email on Outlook 2007 is now complete.
Setting Email for Outlook Express
1. Open Outlook Express mail program on the computer.2. Click on “Tools”. In the drop down menu click on “Account “.
3. Click on the “Add” button on the right side of the window.

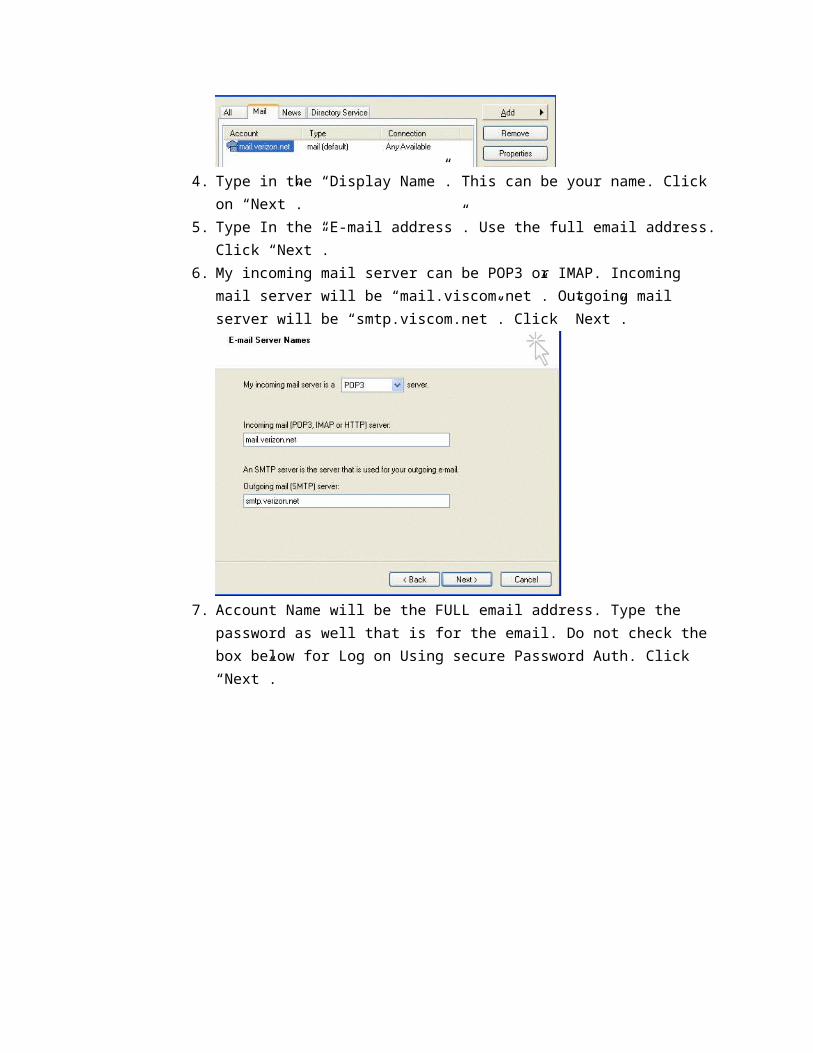
4. Type in the “Display Name”. This can be your name. Click on “Next”.5. Type In the “E-mail address”. Use the full email address. Click “Next”.6. My incoming mail server can be POP3 or IMAP. Incoming mail server will be
“mail.viscom.net”. Outgoing mail server will be “smtp.viscom.net”. Click ”Next”.
7. Account Name will be the FULL email address. Type the password as well that is for the email. Do not check the box below for Log on Using secure Password Auth. Click “Next”.
8.Click “Finish”.
9. You will see this screen again. Left click once on the newly added account to highlight it. Then click“Properties”.
10. Click on “Advanced” tab. Incoming port number is “110”. If using Imap then put a check in the SSL box below. Outgoing port number is “587”. If using Imap then put a check in the SSL box below. Click on “Ok”.
11. Click “Next” on the next window that is up. It will test the account and advise now working. Click “finish”. Emails will start to download into your inbox. Setting up email on Outlook Express is now complete.
Setting Email for Windwos Live Mail
1. Open Windows Live Mail program on the compute.2. Click on “Account” then click on “Email”.

3. Type the email address, password, and name in the boxes. Put a check mark in the box next to “Manually configure server settings”. Click “Next”.
4. Select either POP3 or Imap account type. Incoming mail server is “mail.viscom.net”. Outgoing mail server will be “smtp.viscom.net”. The username will be the FULL email address. Type the password as well for the email. Incoming port number is “110”. Outgoing port number is “587”. Check the box next to “Requires authentication”. Click “Next”.

5. Click “Finish” on the next window that is up. It will test the account and advise now working. Emails will start to download into your inbox. Setting up email on Windows Live Mail is now complete.