Embed Size (px)
Citation preview
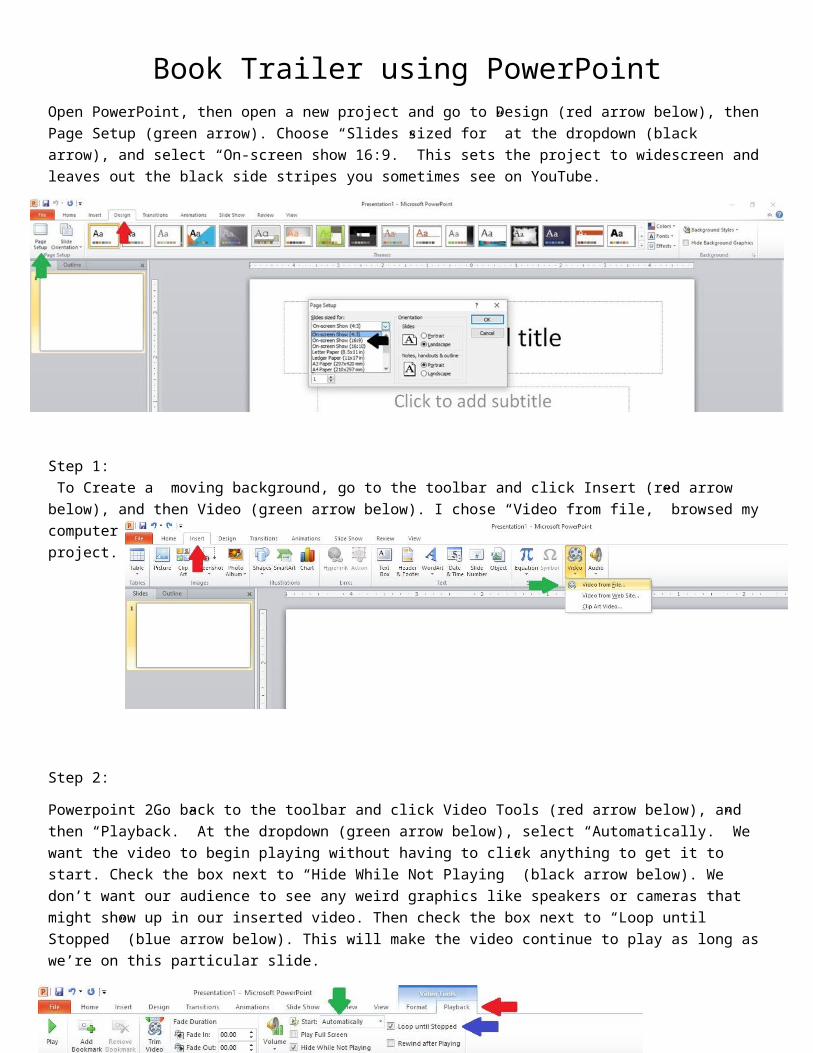
Book Trailer using PowerPointOpen PowerPoint, then open a new project and go to Design (red arrow below), then Page Setup (green arrow). Choose “Slides sized for” at the dropdown (black arrow), and select “On-screen show 16:9.” This sets the project to widescreen and leaves out the black side stripes you sometimes see on YouTube.
Step 1: To Create a moving background, go to the toolbar and click Insert (red arrow below), and then Video (green arrow below). I chose “Video from file,” browsed my computer find the video downloaded, and double clicked to insert it into my project.
Step 2:
Powerpoint 2Go back to the toolbar and click Video Tools (red arrow below), and then “Playback.” At the dropdown (green arrow below), select “Automatically.” We want the video to begin playing without having to click anything to get it to start. Check the box next to “Hide While Not Playing” (black arrow below). We don’t want our audience to see any weird graphics like speakers or cameras that might show up in our inserted video. Then check the box next to “Loop until Stopped” (blue arrow below). This will make the video continue to play as long as we’re on this particular slide.
Step 3:
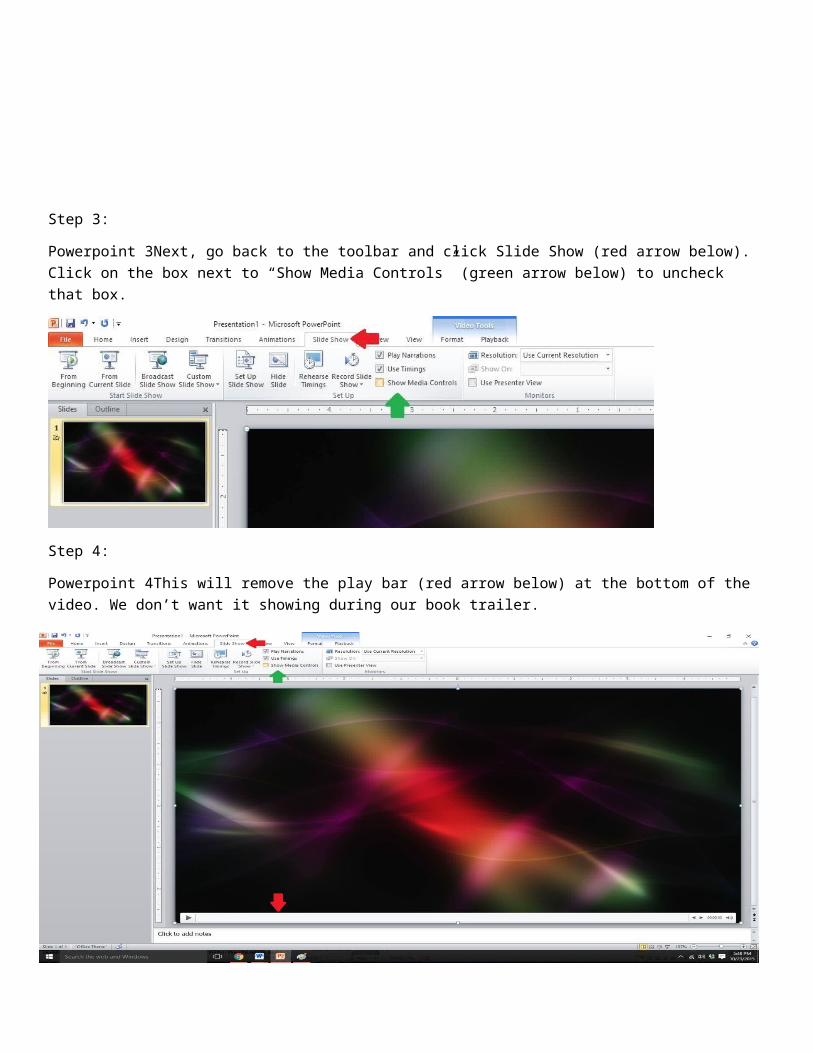
Powerpoint 3Next, go back to the toolbar and click Slide Show (red arrow below). Click on the box next to “Show Media Controls” (green arrow below) to uncheck that box.
Step 4:
Powerpoint 4This will remove the play bar (red arrow below) at the bottom of the video. We don’t want it showing during our book trailer.
Step 5:Powerpoint 5Next, we need music. Go to the Technology Weblinks page and download the music to my computer, go back to my PowerPoint project, and chose Insert (red arrow below) again on the toolbar. Instead of “Video,” this time I chose “Audio” (green arrow below), and “Audio from file” (black arrow below). I searched my computer for the audio file and double-clicked to insert it into my project.
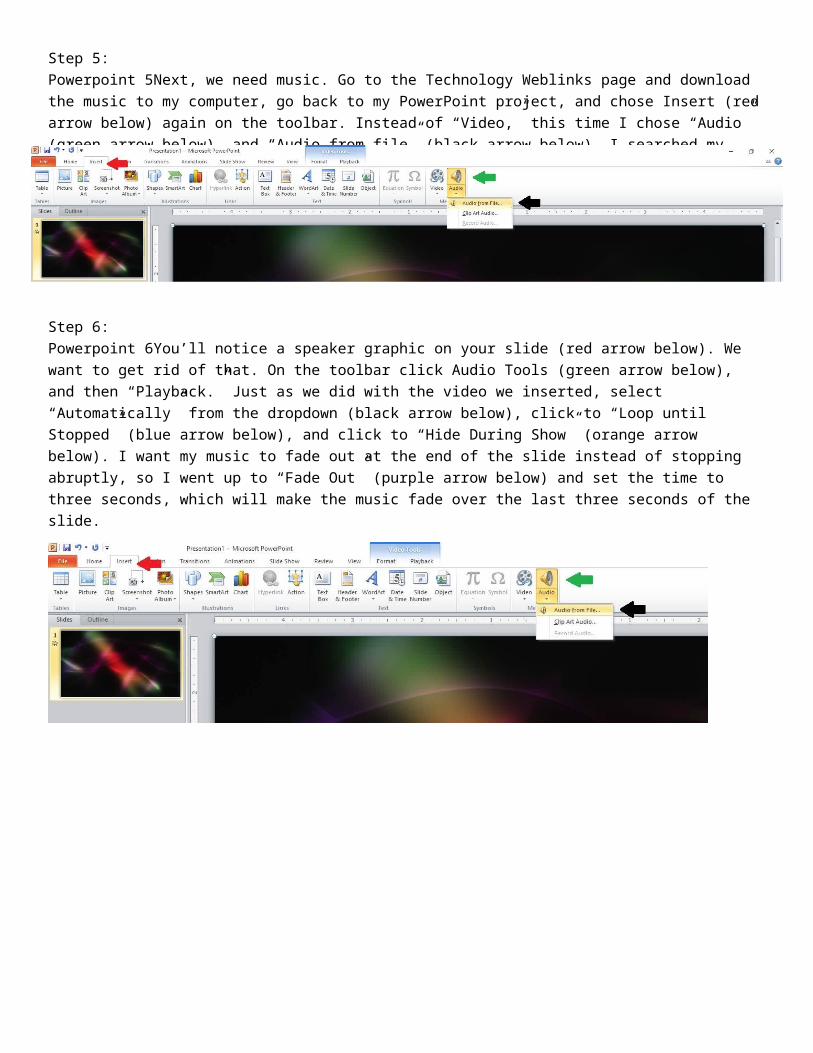
Step 6:Powerpoint 6You’ll notice a speaker graphic on your slide (red arrow below). We want to get rid of that. On the toolbar click Audio Tools (green arrow below), and then “Playback.” Just as we did with the video we inserted, select “Automatically” from the dropdown (black arrow below), click to “Loop until Stopped” (blue arrow below), and click to “Hide During Show” (orange arrow below). I want my music to fade out at the end of the slide instead of stopping abruptly, so I went up to “Fade Out” (purple arrow below) and set the time to three seconds, which will make the music fade over the last three seconds of the slide.
Step 7:
Powerpoint 7Now we’re ready to insert words and graphics. Right click anywhere on the slide and a menu will pop up. From that menu, click “Send to Back” (red arrow below). That will send our video to the back of the slide so we can insert words and graphics on top of it. It will also bring up the two textboxes that were on our blank slide in the beginning. I want the top textbox further towards the top, so I click on the corner of it and drag it there. I want the bottom textbox lower on the slide, so I click and drag it lower. When you click in one of the textboxes and go to Home on the toolbar, you’ll see all the text options you see in Word: font styles, colors, size, etc. Choose whichever attributes
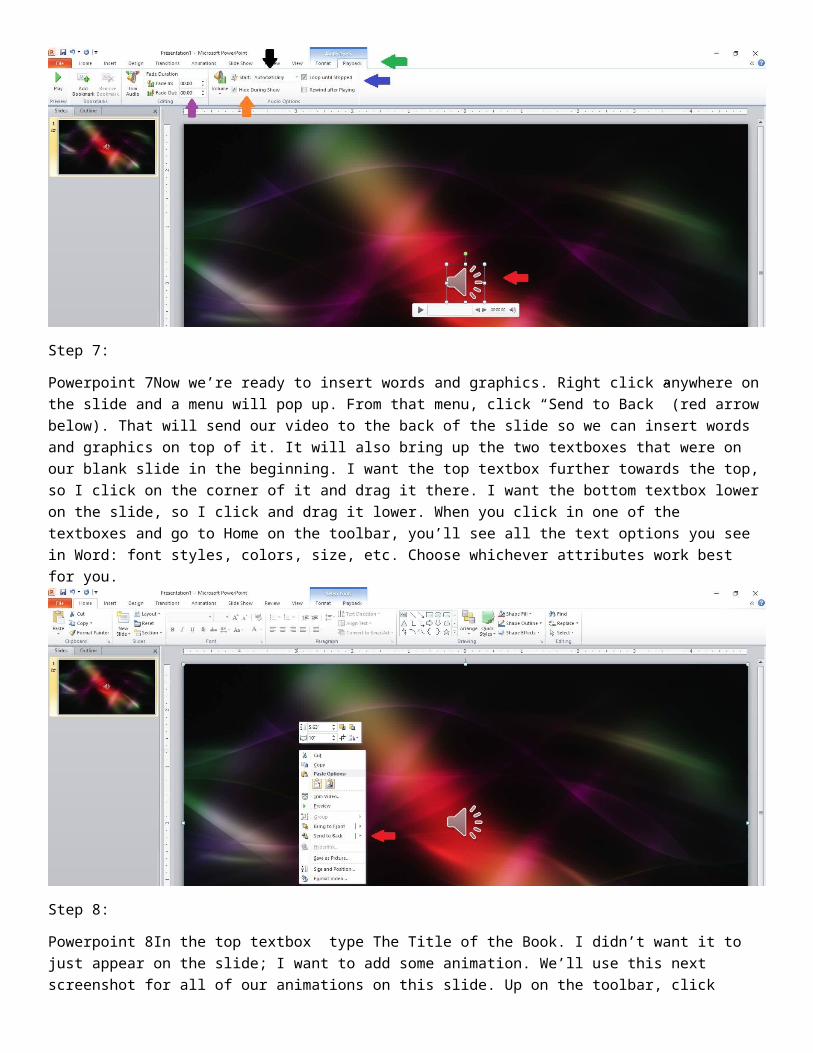
work best for you.
Step 8:
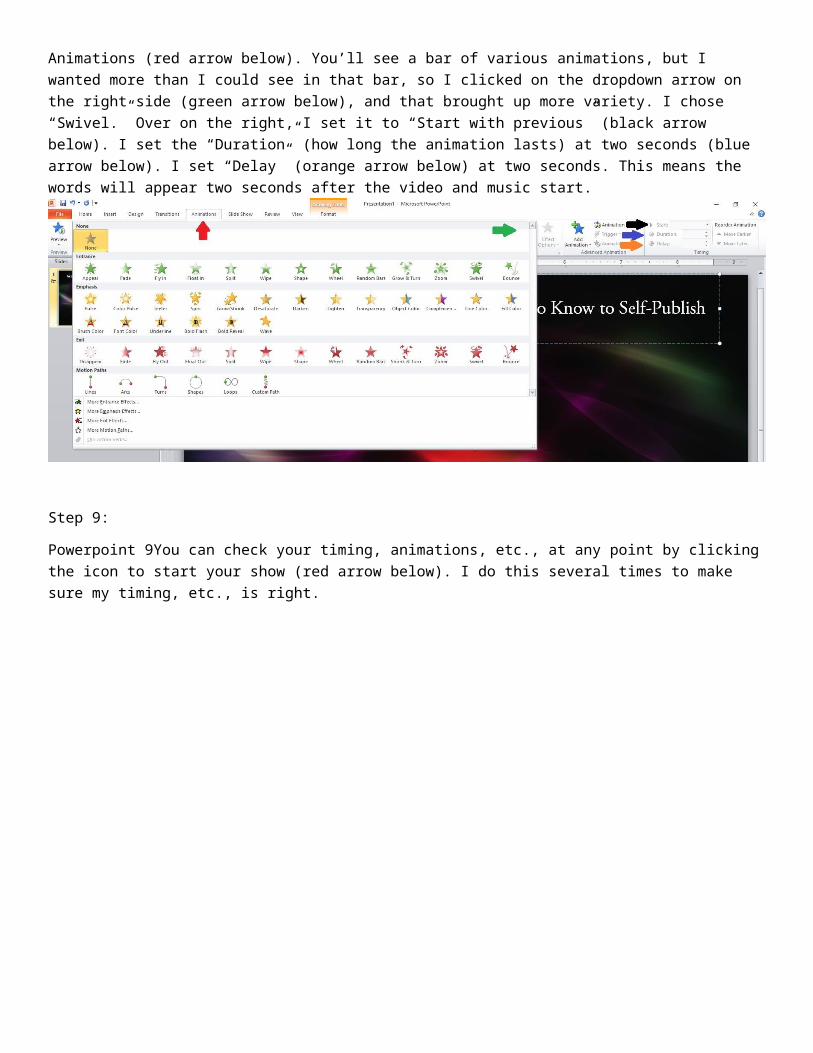
Powerpoint 8In the top textbox type The Title of the Book. I didn’t want it to just appear on the slide; I want to add some animation. We’ll use this next screenshot for all of our animations on this slide. Up on the toolbar, click Animations (red arrow below). You’ll see a bar of various animations, but I wanted more than I could see in that bar, so I clicked on the dropdown arrow on the right side (green arrow below), and that brought up more variety. I chose “Swivel.” Over on the right, I set it to “Start with previous” (black arrow below). I set the “Duration” (how long the animation lasts) at two seconds (blue arrow below). I set “Delay” (orange arrow below) at two seconds. This means the words will appear two seconds after the video and music start.
Step 9:
Powerpoint 9You can check your timing, animations, etc., at any point by clicking the icon to start your show (red arrow below). I do this several times to make sure my timing, etc., is right.
Step 10:
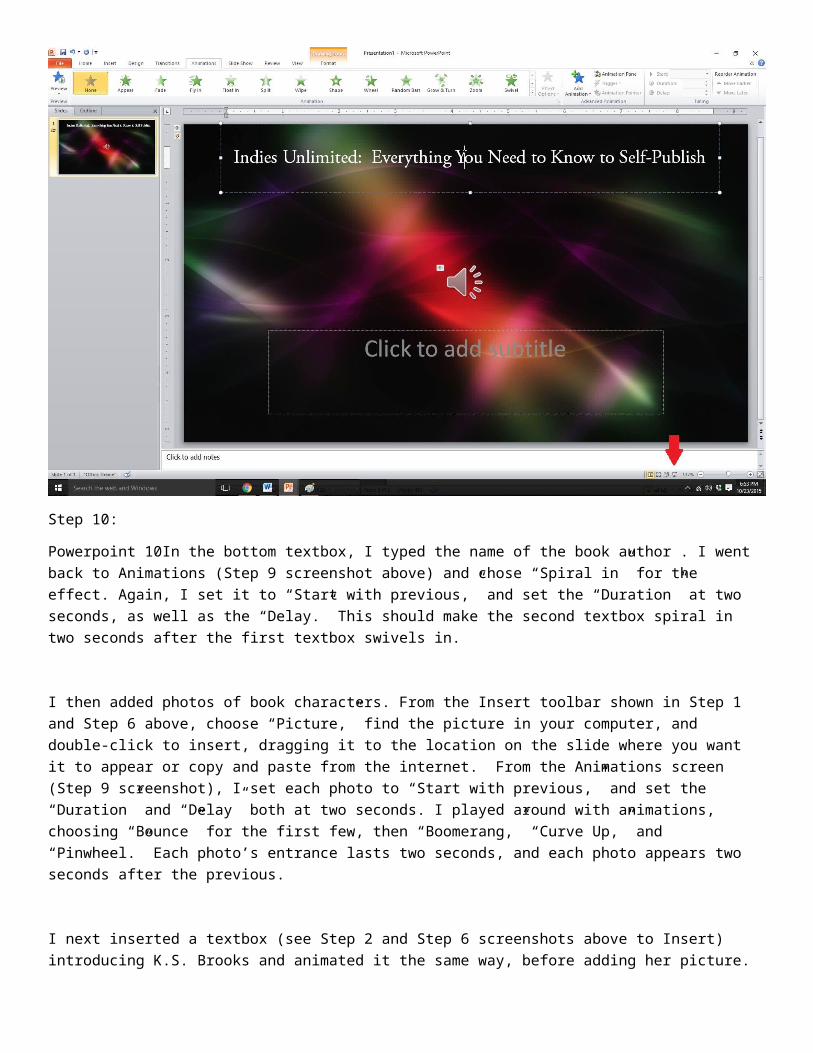
Powerpoint 10In the bottom textbox, I typed the name of the book author . I went back to Animations (Step 9 screenshot above) and chose “Spiral in” for the effect. Again, I set it to “Start with previous,” and set the “Duration” at two seconds, as well as the “Delay.” This should make the second textbox spiral in two seconds after the first textbox swivels in.
I then added photos of book characters. From the Insert toolbar shown in Step 1 and Step 6 above, choose “Picture,” find the picture in your computer, and double-click to insert, dragging it to the location on the slide where you want it to appear or copy and paste from the internet. From the Animations screen (Step 9 screenshot), I set each photo to “Start with previous,” and set the “Duration” and “Delay” both at two seconds. I played around with animations, choosing “Bounce” for the first few, then “Boomerang,” “Curve Up,” and “Pinwheel.” Each photo’s entrance lasts two seconds, and each photo appears two seconds after the previous.
I next inserted a textbox (see Step 2 and Step 6 screenshots above to Insert) introducing K.S. Brooks and animated it the same way, before adding her picture. I did the same for Stephen Hise. My last animation for this slide was a textbox, also animated, giving credit for the video and the audio.
I almost left it there, but realized I should show how to add another slide. Over in the slides screen to the left, right-click at the bottom of the slide you’ve been working on (red arrow below) and choose to add a new slide. This will be for the Works Cited page. Be sure to insert a text box with your name and list the website used to create your project:
https://www.indiesunlimited.com/2015/11/09/create-a-book-trailer-using-microsoft-offices-powerpoint/
https://www.ignitemotion.com/
https://www.bensound.com/royalty-free-music/5
and any websites used for Book images etc.
Step 11:
Powerpoint 11I wanted a design style that matched my first slide, so I went to Design, then went to “Colors,” and chose the palate that best matched. (Step 12.)
I wanted to transition the slide in a nice way, so I went to Transitions on the toolbar (red arrow below) and chose “Ripple” (green arrow below). I set the “Duration” to 1.40 seconds (black arrow below). This should make the transition from our first slide to our second slide appear as a ripple in water.