Embed Size (px)
Citation preview
How to Set-up and Administer your Alumni Survey via LimeSurvey
1. First, you must gain access to LimeSurvey. To obtain an account, send an email to [email protected] with the subject "create survey.westmont.edu username."
2. Once you have received your access information, then you can go to this link to sign-in: https://survey.westmont.edu/admin
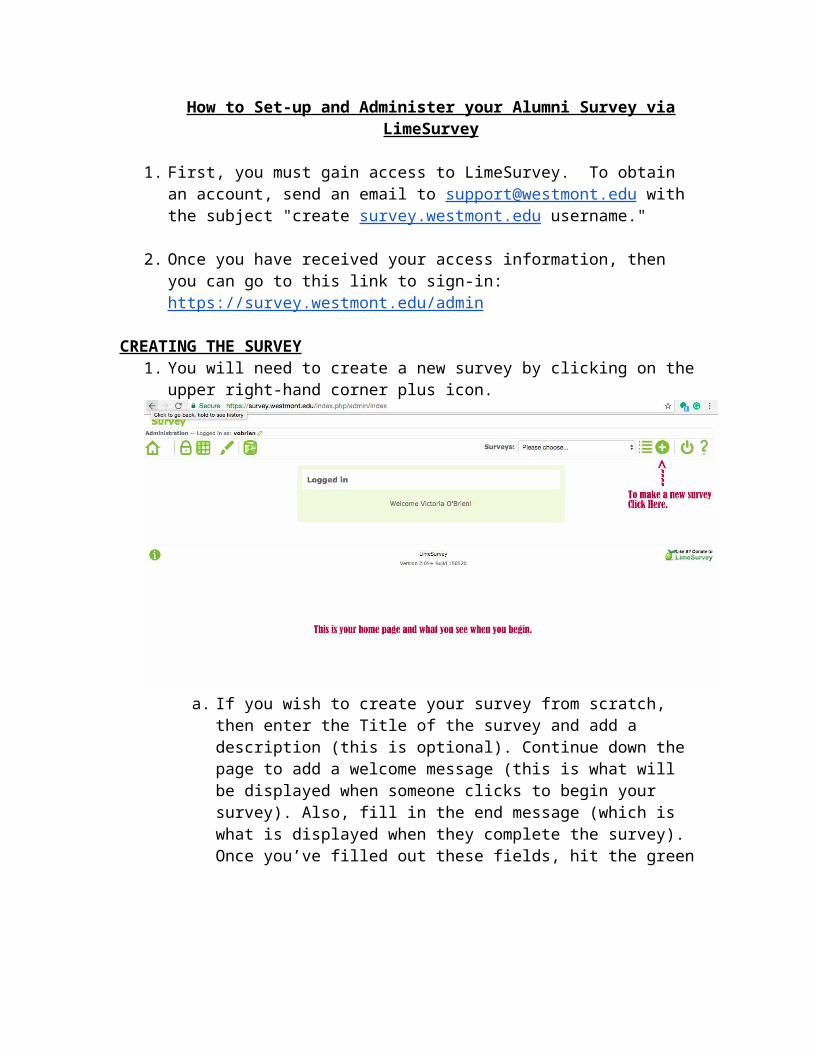
CREATING THE SURVEY1. You will need to create a new survey by clicking on the upper right-hand
corner plus icon.
a. If you wish to create your survey from scratch, then enter the Title of the survey and add a description (this is optional). Continue down the page to add a welcome message (this is what will be displayed when someone clicks to begin your survey). Also, fill in the end message (which is what is displayed when they complete the survey). Once you’ve filled out these fields, hit the green “Save” button at the end of
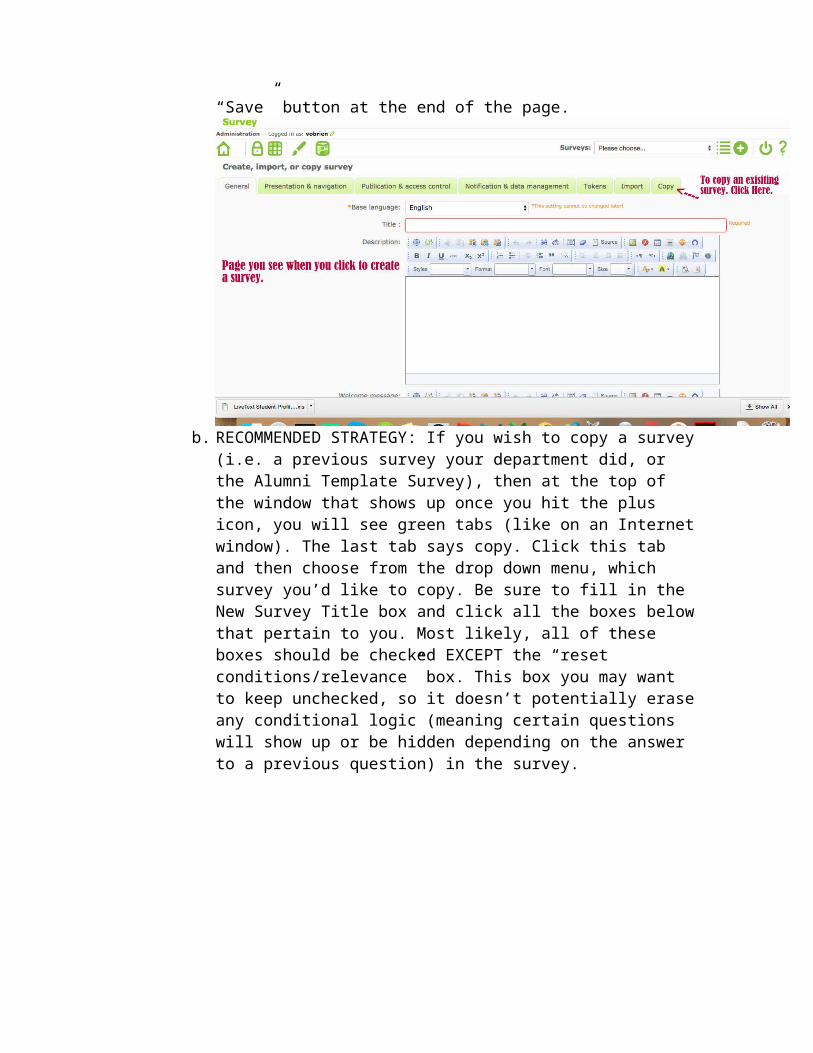
the page.
b. RECOMMENDED STRATEGY: If you wish to copy a survey (i.e. a previous survey your department did, or the Alumni Template Survey), then at the top of the window that shows up once you hit the plus icon, you will see green tabs (like on an Internet window). The last tab says copy. Click this tab and then choose from the drop down menu, which survey you’d like to copy. Be sure to fill in the New Survey Title box and click all the boxes below that pertain to you. Most likely, all of these boxes should be checked EXCEPT the “reset conditions/relevance” box. This box you may want to keep unchecked, so it doesn’t potentially erase any conditional logic (meaning certain questions will show up or be hidden depending on the answer to a previous question) in the survey.
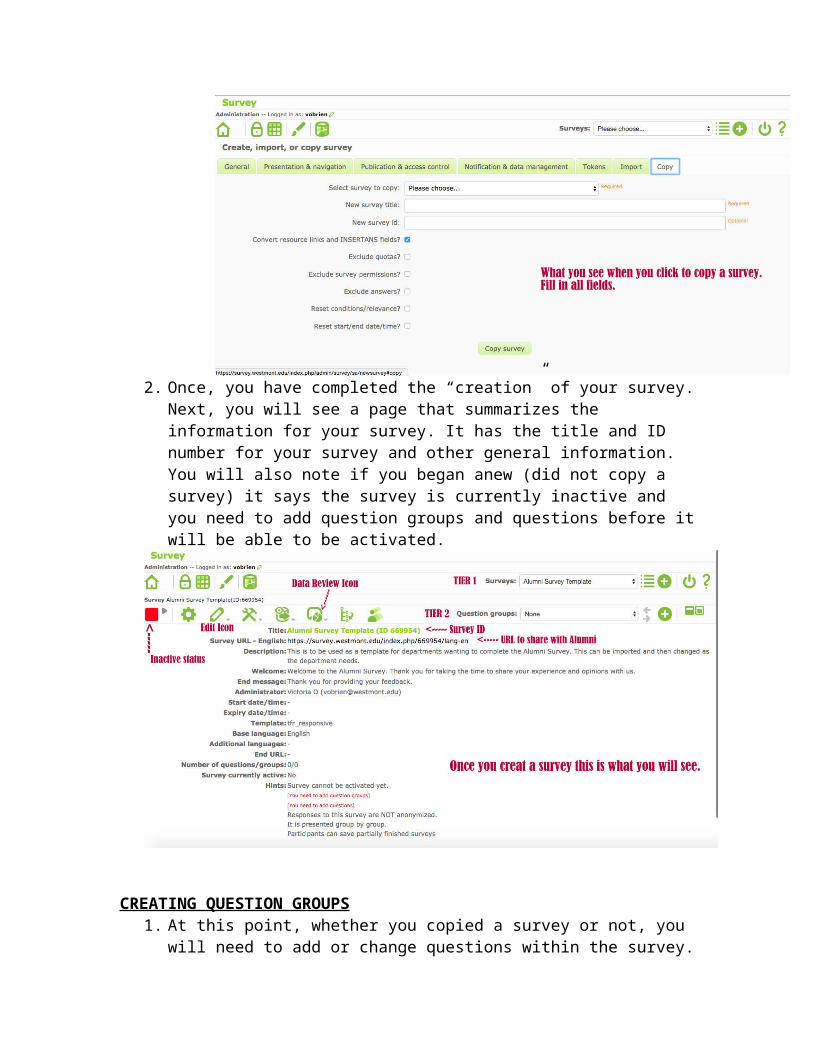
2. Once, you have completed the “creation” of your survey. Next, you will see a page that summarizes the information for your survey. It has the title and ID number for your survey and other general information. You will also note if you began anew (did not copy a survey) it says the survey is currently inactive and you need to add question groups and questions before it will be able to be activated.
CREATING QUESTION GROUPS1. At this point, whether you copied a survey or not, you will need to add or
change questions within the survey. If you copied the survey, then scroll down to Section: Adding a New Question or Changing/Editing a Section depending on what you need.
2. If you did not copy a survey, then you will need to Add/Create questions for your survey. But, first you must add Question Groups. In LimeSurvey, there are different “tiers” that look like Internet window boxes stacked below each other. These different tiers give you access to different things within your survey and you’re your survey organization.
3. The Question Groups tier is where you will create the categories or groupings you want to put your questions into, such as Demographics, Major/Program Specific, General, etc. You will see a plus sign icon toward the top right corner and the drop down menu next to “Question Groups.”
4. Before creating your groupings, you need to decide what “groupings” your survey questions fall into. If you have a Word document or other document where your survey has been typed out, you should print a copy to write on. This can be helpful for categorizing groupings and inputting the survey
questions into Lime Survey. Decide what Question groups you want (i.e. Demographics, Major Specific, etc.) and label them.
5. Now, click the green plus icon in the upper right corner of the second tier. It will be next to the “Question Groups” box. A new window will pop up and you will need to fill it in. Put the label of the group (i.e. demographics) and a description if you want (this is not necessary) and click Save Group. You will be able to see this group in the drop down menu next to the “Questions Groups” box. Also, a new “tier” will also show up titled “Questions” (this title is next to the drop down menu box toward the upper right side of this tier).
6. Continue adding Question Groups to the “Question Groups” tier (this can be tricky as it is now the “second tier” displayed and not the last one. Be aware of which green plus icon you are clicking. Add groupings until all have been added and all are visible in the drop down menu.
a. NOTE: If you copied a survey, but want your questions separated into more groups or different groups, create the new groups you want and then scroll below to see how to Move Questions, which is found under the Section: Changing/Editing Questions.
7. Once you have your Question Groups set you are ready to put your questions into the survey. Choose which grouping you want to work in first. Choose this by clicking on the “Question Groups” tier drop down menu and select the Question Group you wish to make a question in.
8. The last tier, the “Questions” tier, is where you will begin working on creating the questions. Use the plus icon to the right side of the drop down menu to add questions.

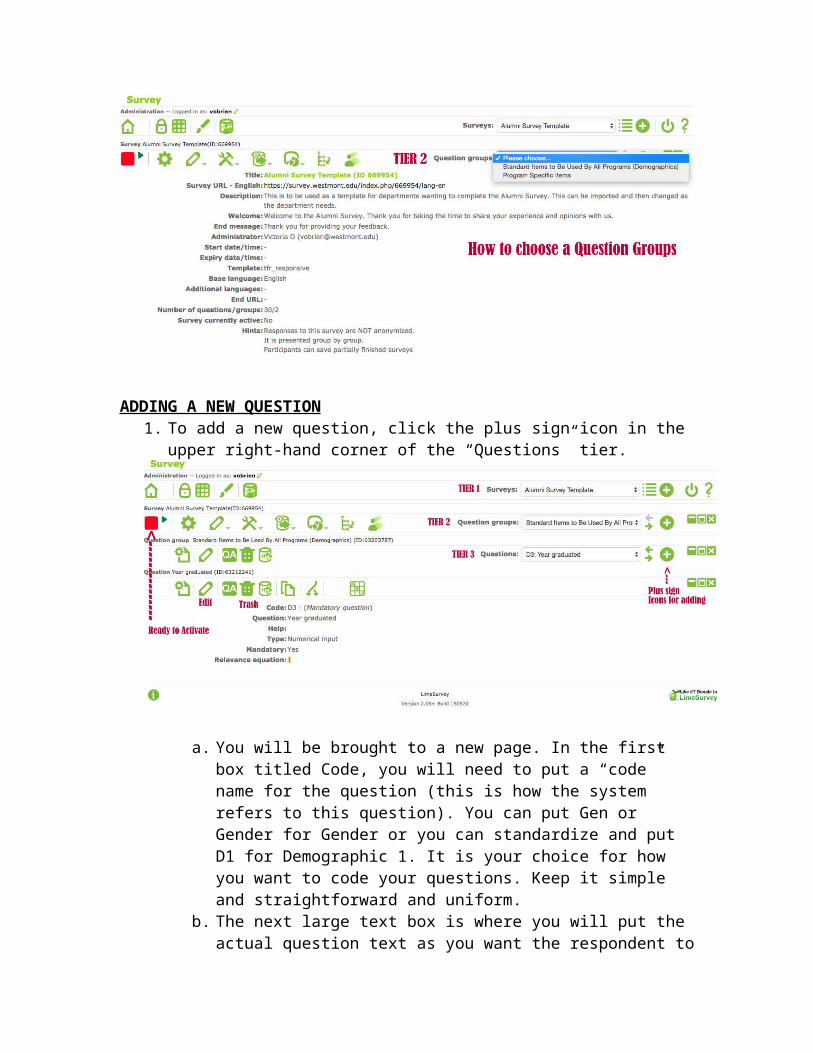
ADDING A NEW QUESTION1. To add a new question, click the plus sign icon in the upper right-hand corner
of the “Questions” tier.
a. You will be brought to a new page. In the first box titled Code, you will need to put a “code” name for the question (this is how the system refers to this question). You can put Gen or Gender for Gender or you can standardize and put D1 for Demographic 1. It is your choice for how you want to code your questions. Keep it simple and straightforward and uniform.
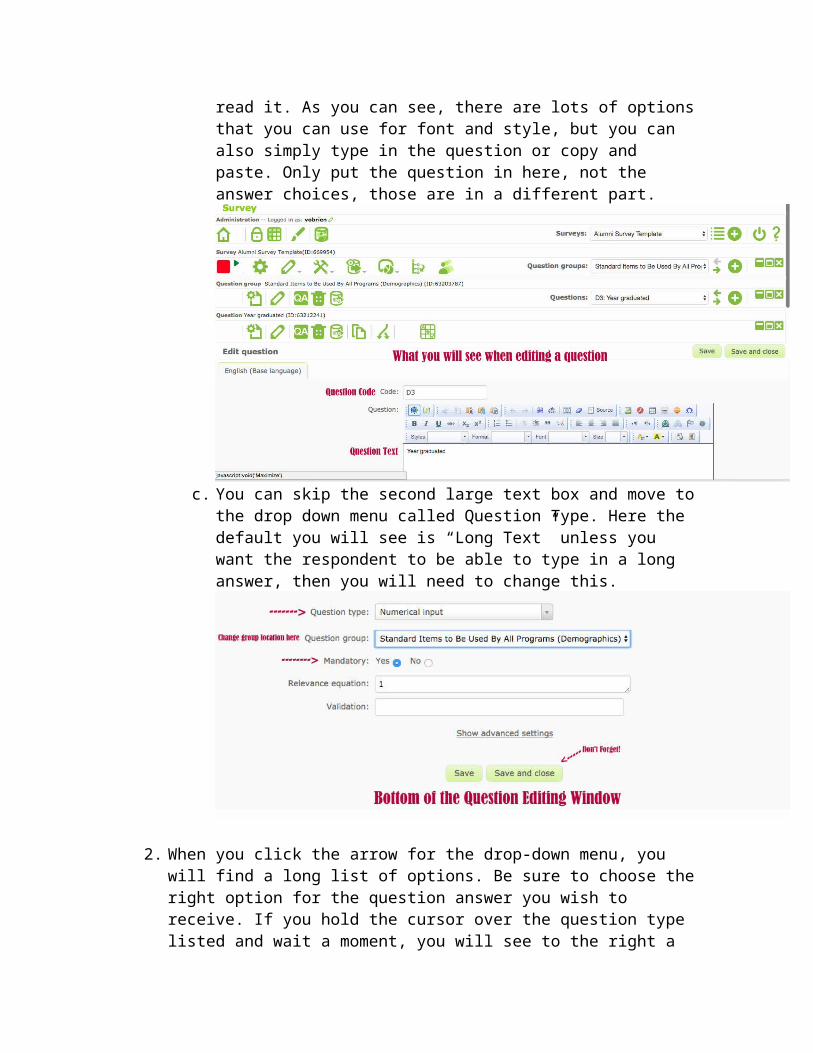
b. The next large text box is where you will put the actual question text as you want the respondent to read it. As you can see, there are lots of options that you can use for font and style, but you can also simply type in the question or copy and paste. Only put the question in here, not the answer choices, those are in a different part.
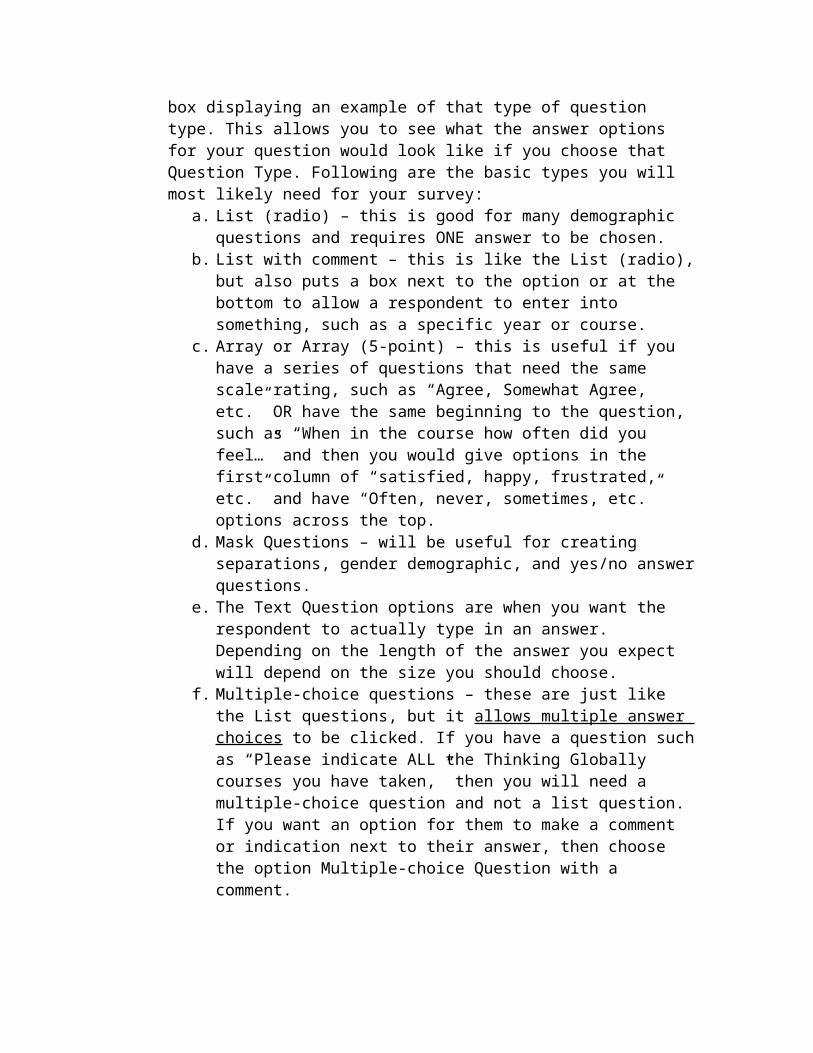
c. You can skip the second large text box and move to the drop down menu called Question Type. Here the default you will see is “Long Text” unless you want the respondent to be able to type in a long answer, then you will need to change this.
2. When you click the arrow for the drop-down menu, you will find a long list of options. Be sure to choose the right option for the question answer you wish to receive. If you hold the cursor over the question type listed and wait a moment, you will see to the right a box displaying an example of that type of question type. This allows you to see what the answer options for your question would look like if you choose that Question Type. Following are the basic types you will most likely need for your survey:
a. List (radio) – this is good for many demographic questions and requires ONE answer to be chosen.
b. List with comment – this is like the List (radio), but also puts a box next to the option or at the bottom to allow a respondent to enter into something, such as a specific year or course.
c. Array or Array (5-point) – this is useful if you have a series of questions that need the same scale rating, such as “Agree, Somewhat Agree, etc.” OR have the same beginning to the question, such as “When in the course how often did you feel…” and then you would give options in the first column of “satisfied, happy, frustrated, etc.” and have “Often, never, sometimes, etc.” options across the top.
d. Mask Questions – will be useful for creating separations, gender demographic, and yes/no answer questions.
e. The Text Question options are when you want the respondent to actually type in an answer. Depending on the length of the answer you expect will depend on the size you should choose.
f. Multiple-choice questions – these are just like the List questions, but it allows multiple answer choices to be clicked. If you have a question such as “Please indicate ALL the Thinking Globally courses you have taken,” then you will need a multiple-choice question and not a list question. If you want an option for them to make a comment or indication next to their answer, then choose the option Multiple-choice Question with a comment.
3. After choosing the question type you want, then decide if you want the question to be mandatory. Making demographics mandatory will enable you to gain a full sampling for valuable cross-section data. Be sure to make any specific questions your department is researching mandatory as well.
4. Re-ordering or Moving Questions - You will also see the option of where to put this question in the survey. It is a drop-down menu allowing you to choose where in the order you wish the question to be. If you are adding them to the survey in order, then just leave this box with “The End, ” and it will add the question automatically to the end of the cue. Otherwise, select from the drop down menu where you want the question to go.
5. Once you’ve filled all these pieces in, click the green “Add Question” button at the bottom of the screen. You will see a summary of the items you filled out for this question on the Questions tier once you’ve hit this button. If you did not choose a question type that has automatic answers built in (i.e. gender or yes/no), then you will need to click on the red icon in the error message that looks like an excel grid " in order to add your answer options to the question. You can also click the same looking large green icon in the icon list toward the upper left side of the “Questions” tier window. If you are adding answer options, choose the icon with the shaded boxes on across the top. If you are adding pieces of a question, then click the icon with the shaded boxes down the side. If you are confused, hold your cursor over any of the icons for a moment and an explanation for that icon will show up.
6. Continue adding in your questions, paying attention to which Questions Group you are adding them to and the Question Type for your answer options. Be sure to add in the answer options when you need to.
7. If you need to fix or change a question, choose the “Question Groups” it is found in and then choose the question itself from the “Questions” tier drop-down menu. Click the pencil icon on the left upper corner of lowest tier window to edit the question. If you need to edit the answer options for the question, then choose the question click the Excel grid icon to edit the answer options.
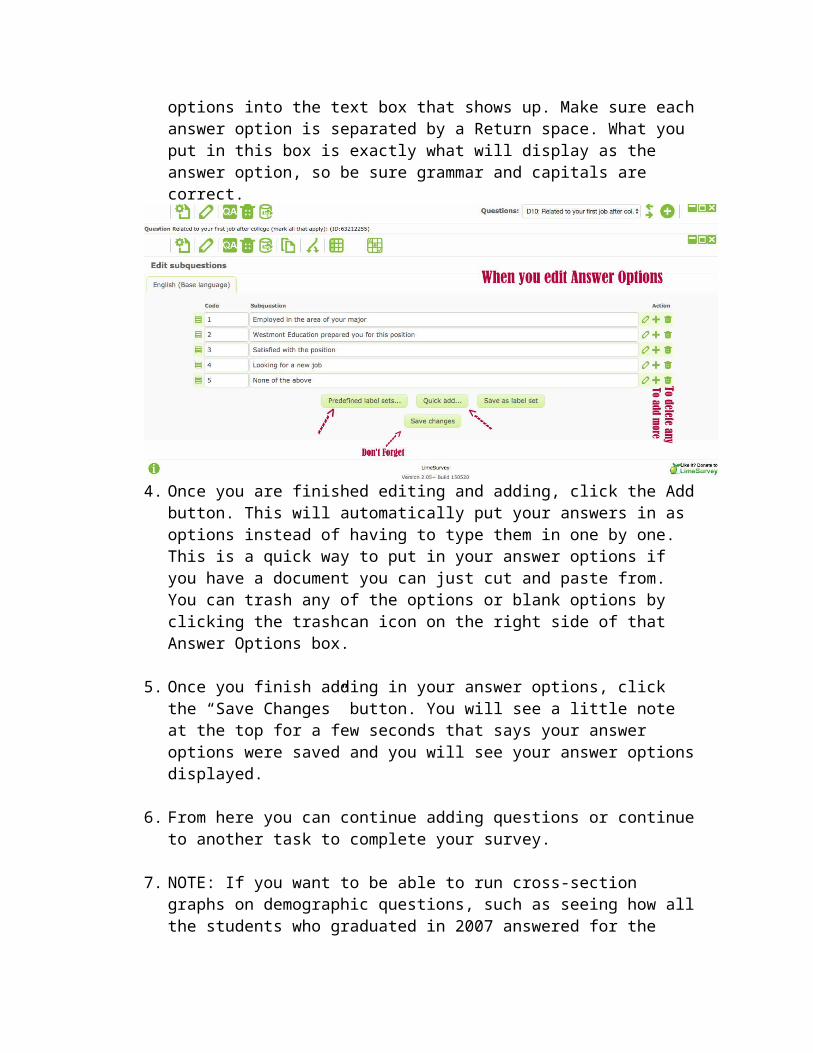
ADDING ANSWER OPTIONS1. When you click the Excel grid icon, you will see a “code” box, which will be
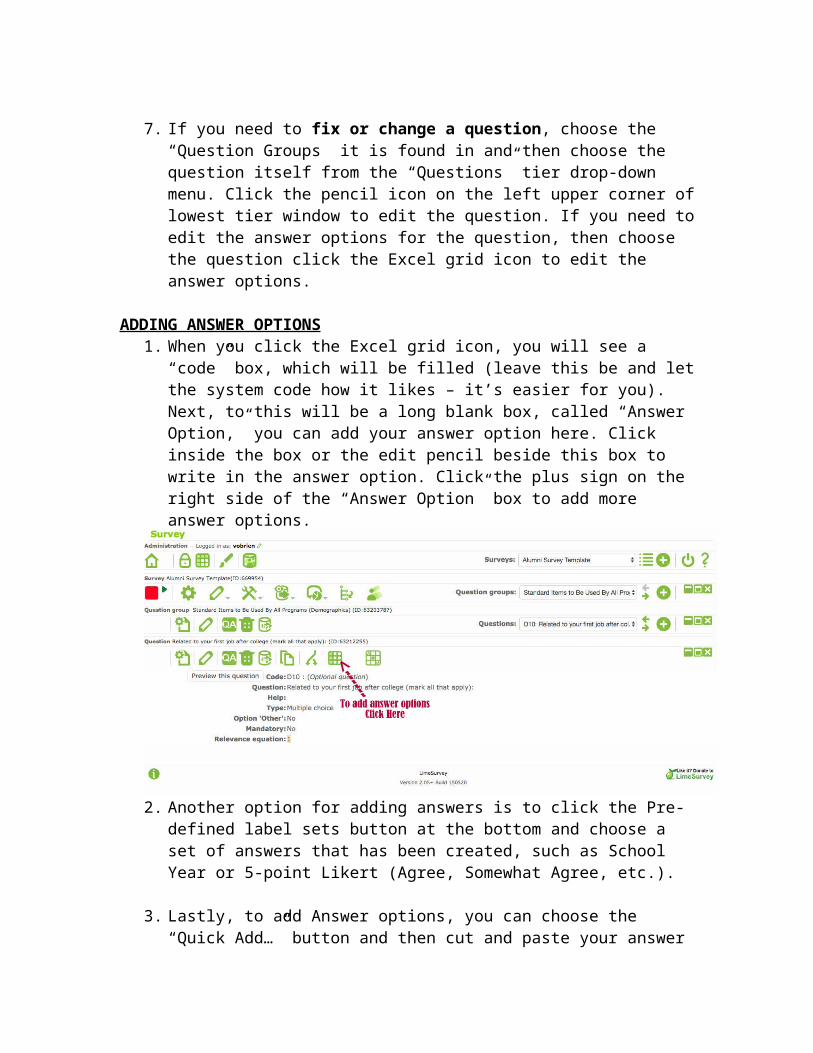
filled (leave this be and let the system code how it likes – it’s easier for you). Next, to this will be a long blank box, called “Answer Option,” you can add your answer option here. Click inside the box or the edit pencil beside this box to write in the answer option. Click the plus sign on the right side of the “Answer Option” box to add more answer options.
2. Another option for adding answers is to click the Pre-defined label sets button at the bottom and choose a set of answers that has been created, such as School Year or 5-point Likert (Agree, Somewhat Agree, etc.).
3. Lastly, to add Answer options, you can choose the “Quick Add…” button and then cut and paste your answer options into the text box that shows up. Make sure each answer option is separated by a Return space. What you put in this box is exactly what will display as the answer option, so be sure grammar and capitals are correct.
4. Once you are finished editing and adding, click the Add button. This will automatically put your answers in as options instead of having to type them in one by one. This is a quick way to put in your answer options if you have a document you can just cut and paste from. You can trash any of the options or blank options by clicking the trashcan icon on the right side of that Answer Options box.
5. Once you finish adding in your answer options, click the “Save Changes” button. You will see a little note at the top for a few seconds that says your answer options were saved and you will see your answer options displayed.
6. From here you can continue adding questions or continue to another task to complete your survey.
7. NOTE: If you want to be able to run cross-section graphs on demographic questions, such as seeing how all the students who graduated in 2007 answered for the satisfaction of their program, then you MUST provide answer choices for them, not a fill-in text box answer. Just be aware of this for the Year Graduated question, specific major, second major, etc. type questions.
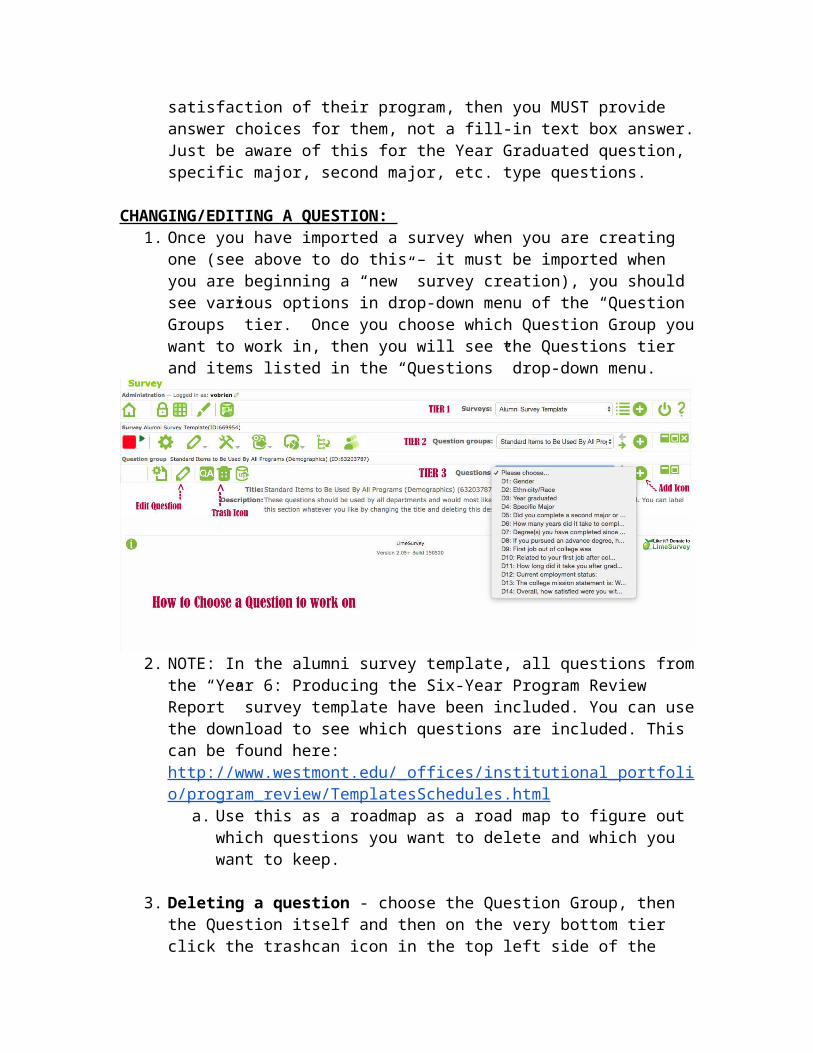
CHANGING/EDITING A QUESTION: 1. Once you have imported a survey when you are creating one (see above to do
this – it must be imported when you are beginning a “new” survey creation), you should see various options in drop-down menu of the “Question Groups” tier. Once you choose which Question Group you want to work in, then you will see the Questions tier and items listed in the “Questions” drop-down menu.
2. NOTE: In the alumni survey template, all questions from the “Year 6: Producing the Six-Year Program Review Report” survey template have been included. You can use the download to see which questions are included. This can be found here: http://www.westmont.edu/_offices/institutional_portfolio/program_review/TemplatesSchedules.html
a. Use this as a roadmap as a road map to figure out which questions you want to delete and which you want to keep.
3. Deleting a question - choose the Question Group, then the Question itself and then on the very bottom tier click the trashcan icon in the top left side of the last tier window. This will delete the question completely from the survey.
4. Change the wording or the answer type - choose the Question Group, then the Question and then click the pencil icon in the upper left side. This brings you to the page, where you can change the wording of the question or the question code. You can also change answer type and if you want the question to be mandatory or not. Make sure to click “Save and Exit” once you are done and ready to go on to the next question you want to edit. See the image under “Adding a New Question” for reference.
5. Change the answer options - choose the Question Group, the Question, and then you will see in the upper icon bar, second from the farthest right icon, an Excel grid icon that is shaded in the top three squares. If you put your cursor, over this icon, it will show what it does “edit answer options for this question.” Click this, and you will see the codes and answer options. Edit the answer options as you need or delete them if you need or click a plus icon next to one of the answer option boxes to add another option in. Make sure to save changes by clicking that green “Save and Exit” icon when you are finished. See the image under “Adding Answer Options” for reference.
6. Add in an “other” option - click the pencil icon for the question and scrolling to the very bottom of the page and clicking that choice. It will only show up or allow this option for certain answer types. For instance, if you have an array type of answer, then it will not give you this option because it doesn’t fit with the answer type formatting you choose.
7. Add in your own question or set of questions - you can easily do this (detailed explanations are found above in this document in the Sections titled “Creating Question Groups” and “Adding a New Question”).
a. Briefly, to make a new category for a set of questions, choose the plus icon next to the Questions Groups drop-down menu box on the right side of the page. This will allow you to create a new group. Once you have done that or just want to add a new question, then click the plus icon next to the “Questions” drop-down menu box and follow the instructions above for “Adding a New Question.” Before you Save and Exit, be sure to change the location of the question if you don’t’ want it just added to the end of the line. In the Position drop down menu, you will see all the questions listed by a code name (which should coincide with the group it is located in i.e. D1 for Demographics 1 question). Choose which question you want your new question to follow and choose that, so the order of your survey is congruent.
ADMINISTERING YOUR SURVEY1. After all the questions have been entered into the survey, you can test it. This
will let you see exactly what the respondents will see once the survey is live. To test the survey, click the gear icon found toward the left side of Tier 2.
2. Be sure to check questions for logic functions (meaning choose answers that are supposed to make the extra questions show-up) to be sure that everything is working correctly, reads correctly and looks the way you want it. Have a few people test the survey out if possible. Make corrections if need
be. You can refer to the section above titled “Changing/Editing a Question” for guidance.
3. Once, you are happy with the survey; you need to make it “live.” To do this, click the little arrow next to the bright red box in the upper left-hand corner of your screen. If you hover your cursor over this arrow, it will read “Activate this survey.”
4. Read the warning carefully! Choose the answers you want for the questions that follow. All of those can be marked yes. Anonymized responses and Date Stamp should definitely be marked yes. Then, click “Save/Activate Survey.”
5. Write an email to the Alumni recipients you wish to participate and be sure to include the survey URL that is on the main survey page. You can find this page by clicking on the little house icon in the upper left-hand corner of the screen and finding your survey under the Active surveys listed or by finding it in the drop-down menu in Tier 1.
6. Once you are done collecting data, you can deactivate your survey by clicking that arrow near the (now green box) in upper left corner. It will give you options to deactivate and not allow any more responses to be recorded.
7. To analyze your data or get the data in charts and graphs form, you will want to click the pie chart in a square icon. A menu will show up. Choose “Responses and Statistics.”
8. Within this you have a few options, be sure to check all the question boxes, choose “complete responses only” from the first drop-down menu, and click show “in-line text” (this will show the open-ended or text box responses in the data sheets). Have it export to a PDF; this will be easiest for you to read and analyze. There are more complicated ways to analyze this data depending on what your department is looking for. Contact Tatiana Nazarenko, Dean of Curriculum and Educational Effectiveness, or her assistant for more help or information regarding these possibilities.