Embed Size (px)
Citation preview
http://www.instructables.com/id/Renault-Scenic-Grand-Scenic-2-II-Drivers-Side-Fron/
Renault Scenic Grand Scenic 2 II Drivers Side Front Windscreen Wiper ArmRepair Kit Bearings Installation Instruction Guideby x8rltd on July 24, 2015
Intro: Renault Scenic Grand Scenic 2 II Drivers Side Front Windscreen Wiper Arm Repair Kit Bearings InstallationInstruction GuideThe Problem
The OEM bearings within the wiper arms fail and cause the symptoms noted.
The OEM bearings in the drivers side wiper arm wear and fail prematurely causing wiper issues. The OEM bearings are poor quality and are incorrectly sealed and arenot suitable for the application. It is a common fault for both bearings to fail on the drivers side wiper arm. Previously it was only possible to replace the entire wiper armat the cost of £100+ from the vehicle manufacturer, unfortunately a new OEM arm features the same bearings which would just fail again over time.
Symptoms of the fault
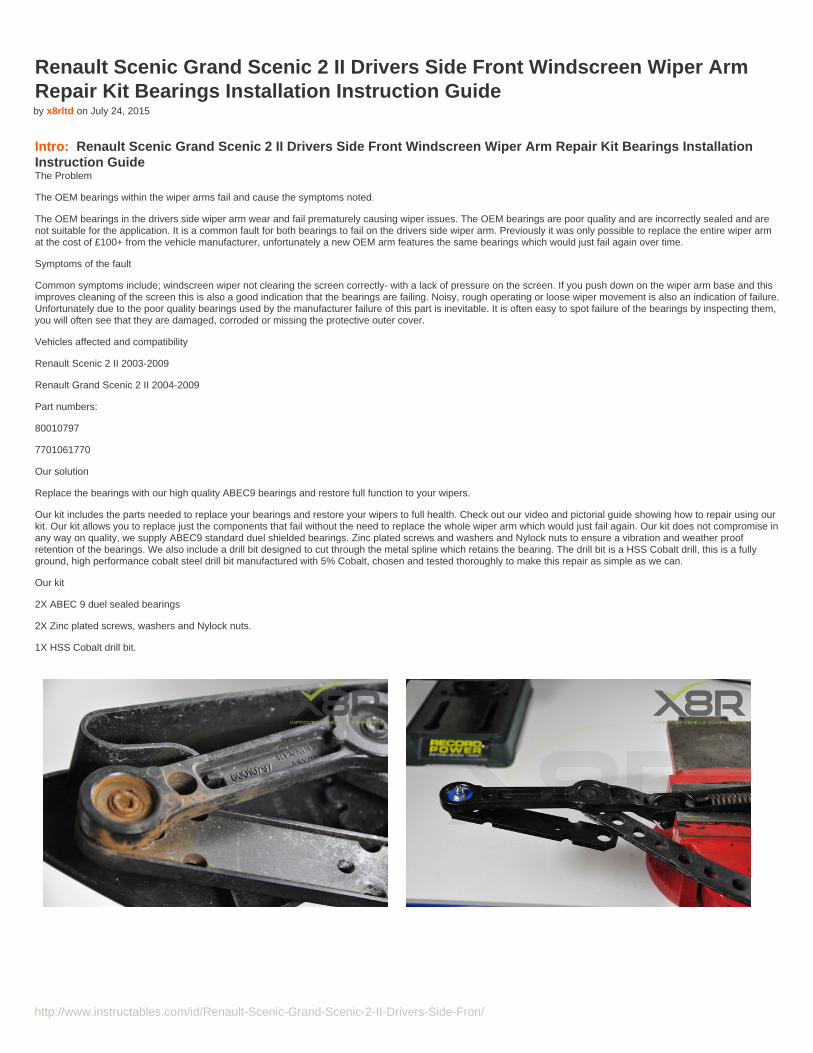
Common symptoms include; windscreen wiper not clearing the screen correctly- with a lack of pressure on the screen. If you push down on the wiper arm base and thisimproves cleaning of the screen this is also a good indication that the bearings are failing. Noisy, rough operating or loose wiper movement is also an indication of failure.Unfortunately due to the poor quality bearings used by the manufacturer failure of this part is inevitable. It is often easy to spot failure of the bearings by inspecting them,you will often see that they are damaged, corroded or missing the protective outer cover.
Vehicles affected and compatibility
Renault Scenic 2 II 2003-2009
Renault Grand Scenic 2 II 2004-2009
Part numbers:
80010797
7701061770
Our solution
Replace the bearings with our high quality ABEC9 bearings and restore full function to your wipers.
Our kit includes the parts needed to replace your bearings and restore your wipers to full health. Check out our video and pictorial guide showing how to repair using ourkit. Our kit allows you to replace just the components that fail without the need to replace the whole wiper arm which would just fail again. Our kit does not compromise inany way on quality, we supply ABEC9 standard duel shielded bearings. Zinc plated screws and washers and Nylock nuts to ensure a vibration and weather proofretention of the bearings. We also include a drill bit designed to cut through the metal spline which retains the bearing. The drill bit is a HSS Cobalt drill, this is a fullyground, high performance cobalt steel drill bit manufactured with 5% Cobalt, chosen and tested thoroughly to make this repair as simple as we can.
Our kit
2X ABEC 9 duel sealed bearings
2X Zinc plated screws, washers and Nylock nuts.
1X HSS Cobalt drill bit.
http://www.instructables.com/id/Renault-Scenic-Grand-Scenic-2-II-Drivers-Side-Fron/
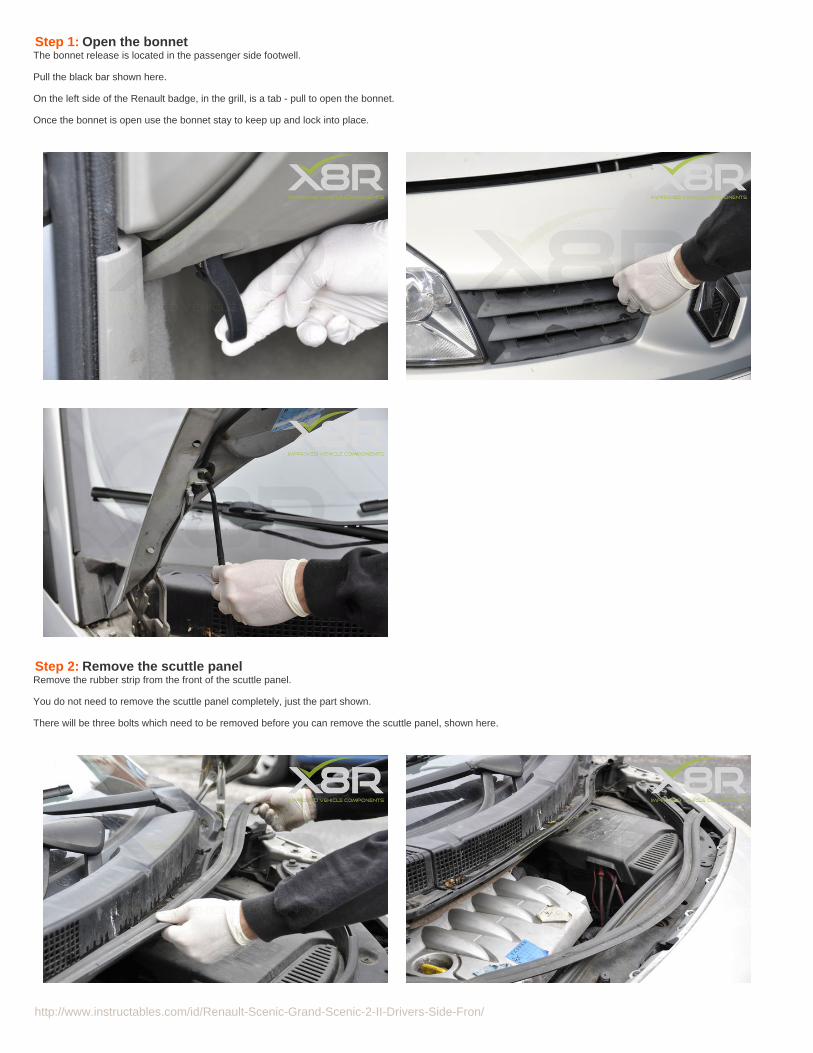
Step 1: Open the bonnetThe bonnet release is located in the passenger side footwell.
Pull the black bar shown here.
On the left side of the Renault badge, in the grill, is a tab - pull to open the bonnet.
Once the bonnet is open use the bonnet stay to keep up and lock into place.
Step 2: Remove the scuttle panelRemove the rubber strip from the front of the scuttle panel.
You do not need to remove the scuttle panel completely, just the part shown.
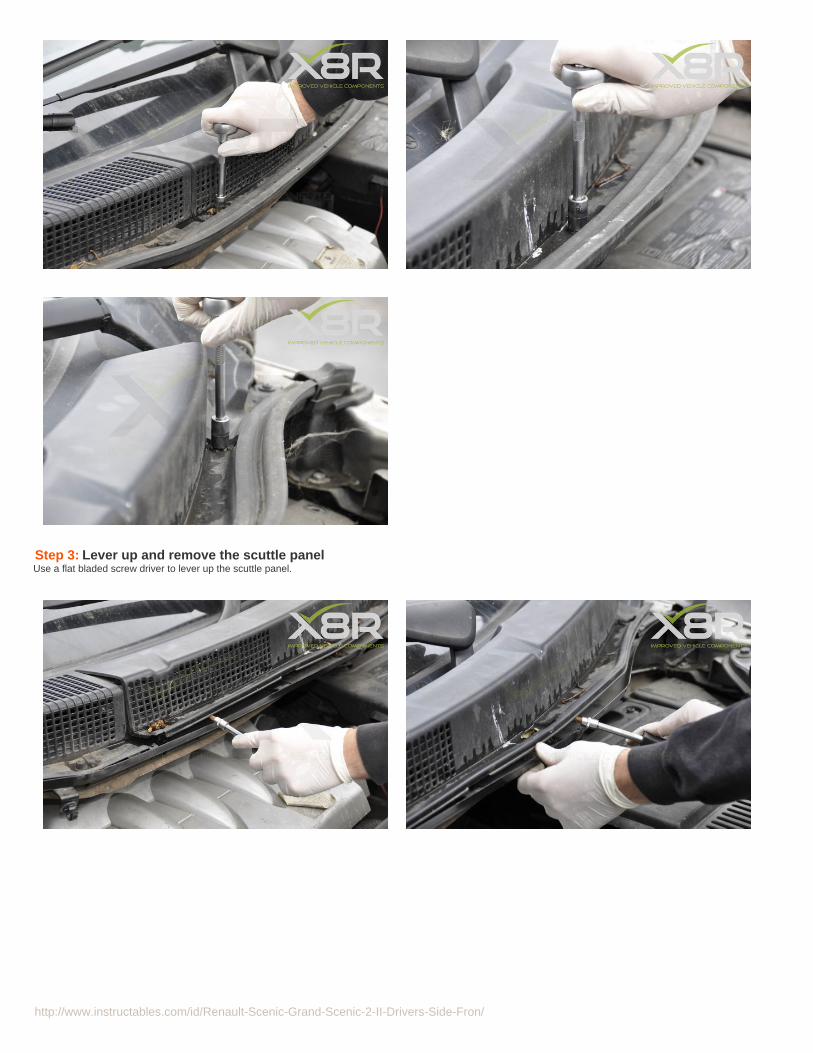
There will be three bolts which need to be removed before you can remove the scuttle panel, shown here.
http://www.instructables.com/id/Renault-Scenic-Grand-Scenic-2-II-Drivers-Side-Fron/
Step 3: Lever up and remove the scuttle panelUse a flat bladed screw driver to lever up the scuttle panel.
http://www.instructables.com/id/Renault-Scenic-Grand-Scenic-2-II-Drivers-Side-Fron/
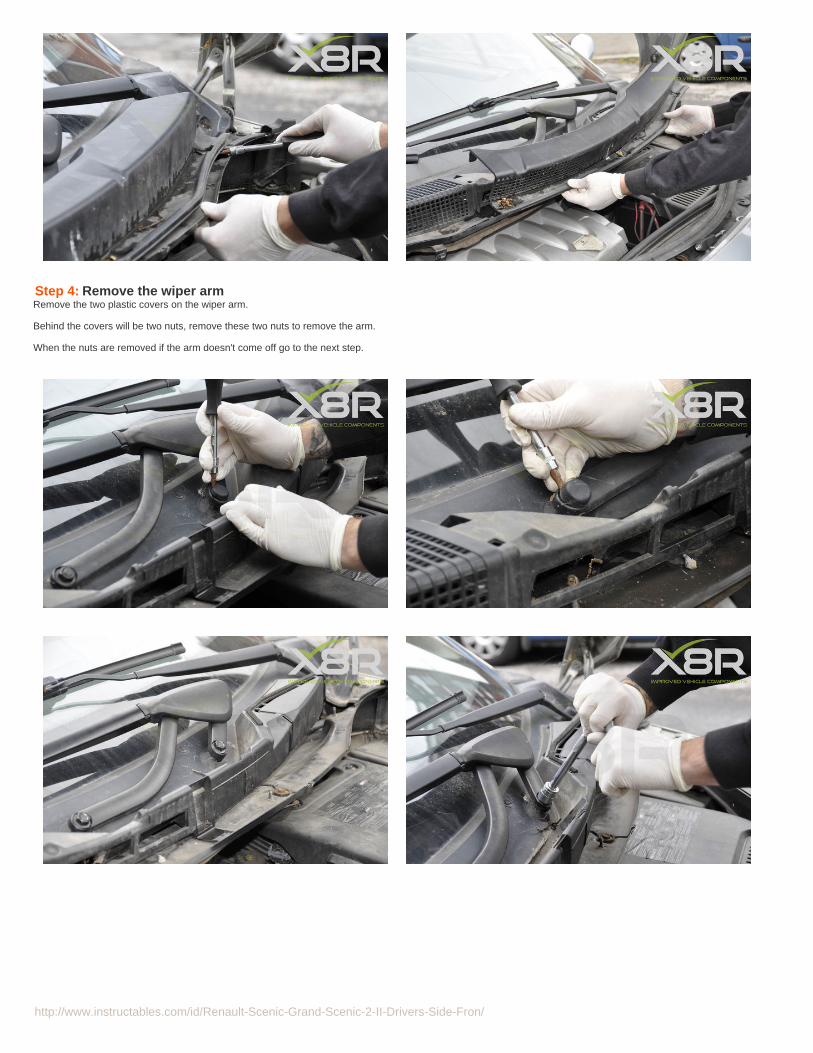
Step 4: Remove the wiper armRemove the two plastic covers on the wiper arm.
Behind the covers will be two nuts, remove these two nuts to remove the arm.
When the nuts are removed if the arm doesn't come off go to the next step.
http://www.instructables.com/id/Renault-Scenic-Grand-Scenic-2-II-Drivers-Side-Fron/
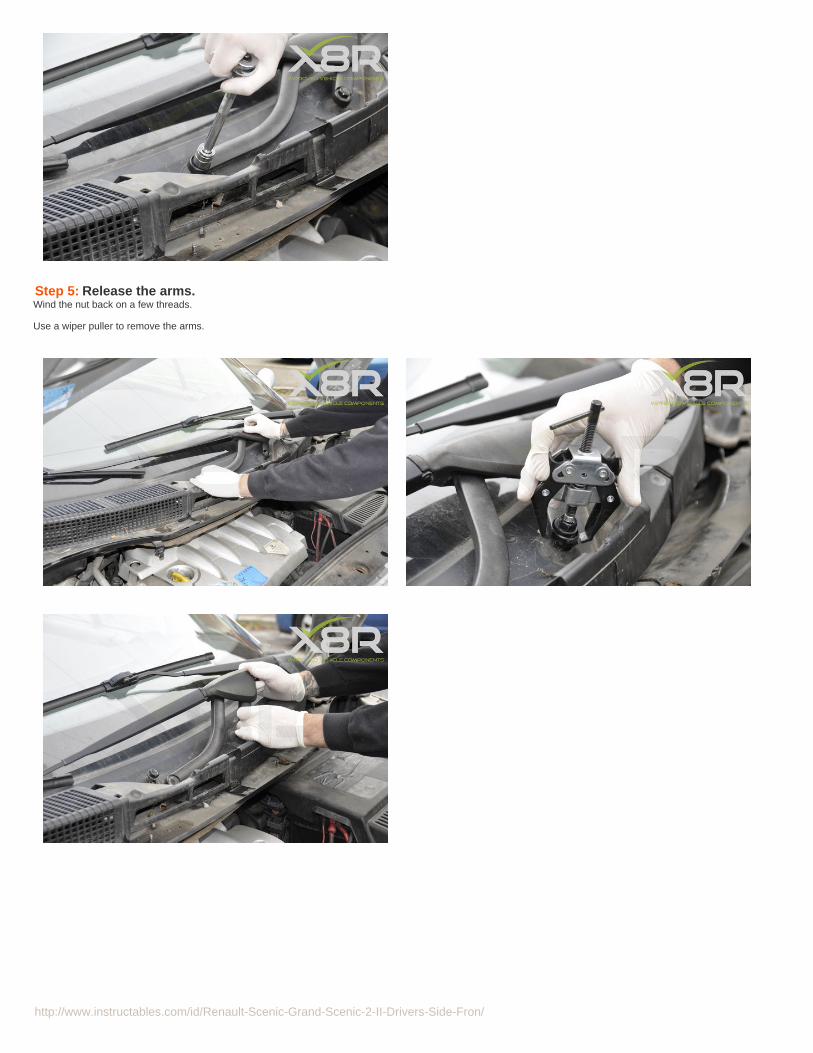
Step 5: Release the arms.Wind the nut back on a few threads.
Use a wiper puller to remove the arms.

http://www.instructables.com/id/Renault-Scenic-Grand-Scenic-2-II-Drivers-Side-Fron/
Step 6: Remove the plastic covers from the wiper arm.There are 3 covers on the wiper mechanism:
On the under side of the arm will be a small tab, push the tab down to align it with the hole in the arm.
Turn the arm over and lift the cover up. This will now allow you to lift it away from the wiper arm.
On the smaller cover, on the under side of this will be a small tab.
At the lower part of the cover, lever this back using a small flat blade screwdriver.
This will allow the cover to drop, now you'll be able to slide the cover back.
http://www.instructables.com/id/Renault-Scenic-Grand-Scenic-2-II-Drivers-Side-Fron/
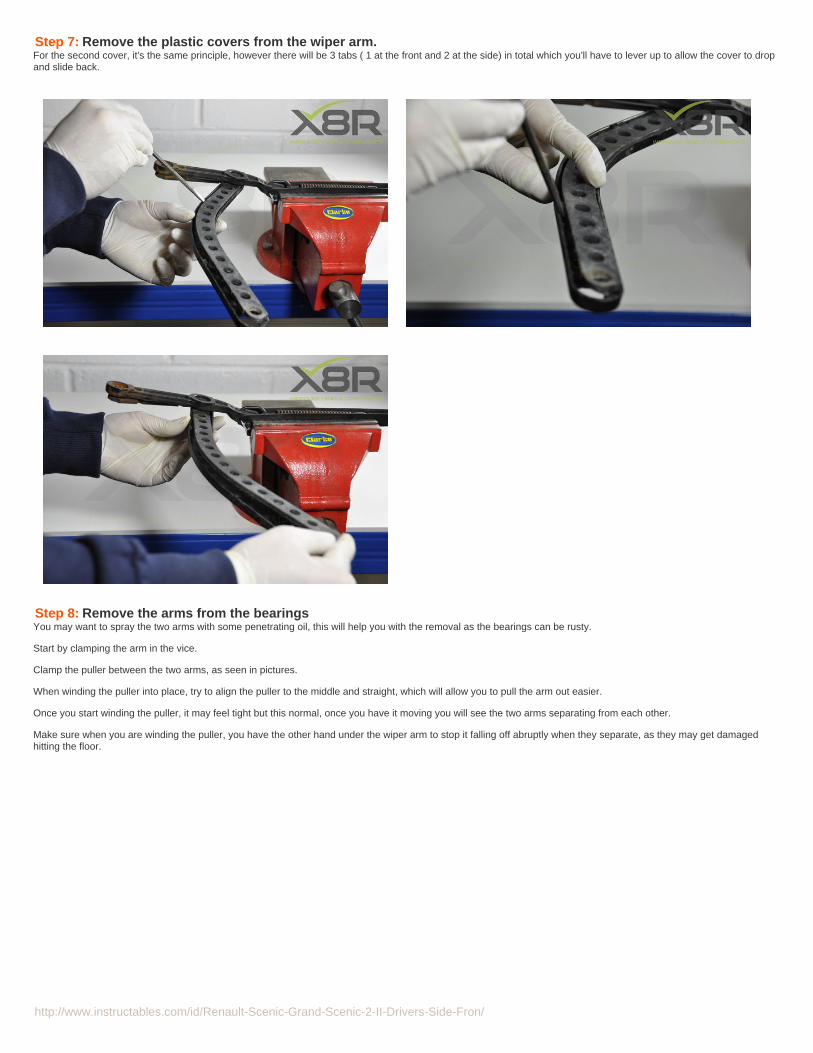
Step 7: Remove the plastic covers from the wiper arm.For the second cover, it's the same principle, however there will be 3 tabs ( 1 at the front and 2 at the side) in total which you'll have to lever up to allow the cover to dropand slide back.
Step 8: Remove the arms from the bearingsYou may want to spray the two arms with some penetrating oil, this will help you with the removal as the bearings can be rusty.
Start by clamping the arm in the vice.
Clamp the puller between the two arms, as seen in pictures.
When winding the puller into place, try to align the puller to the middle and straight, which will allow you to pull the arm out easier.
Once you start winding the puller, it may feel tight but this normal, once you have it moving you will see the two arms separating from each other.
Make sure when you are winding the puller, you have the other hand under the wiper arm to stop it falling off abruptly when they separate, as they may get damagedhitting the floor.
http://www.instructables.com/id/Renault-Scenic-Grand-Scenic-2-II-Drivers-Side-Fron/
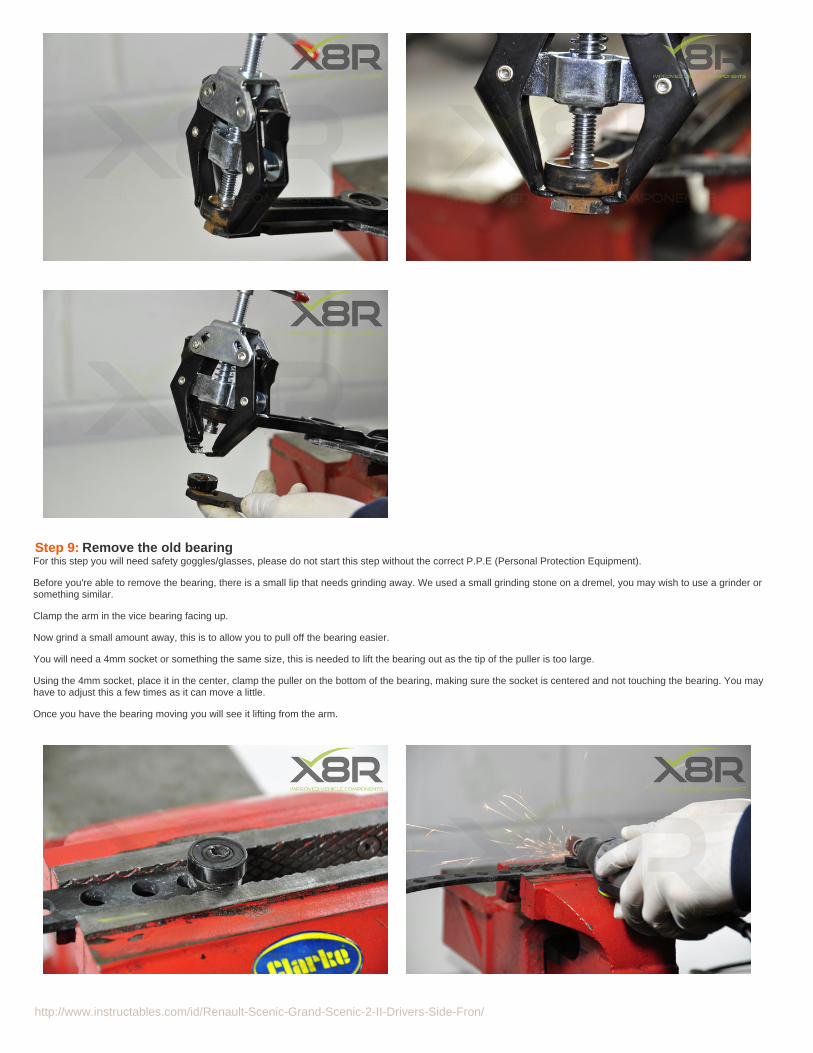
Step 9: Remove the old bearingFor this step you will need safety goggles/glasses, please do not start this step without the correct P.P.E (Personal Protection Equipment).
Before you're able to remove the bearing, there is a small lip that needs grinding away. We used a small grinding stone on a dremel, you may wish to use a grinder orsomething similar.
Clamp the arm in the vice bearing facing up.
Now grind a small amount away, this is to allow you to pull off the bearing easier.
You will need a 4mm socket or something the same size, this is needed to lift the bearing out as the tip of the puller is too large.
Using the 4mm socket, place it in the center, clamp the puller on the bottom of the bearing, making sure the socket is centered and not touching the bearing. You mayhave to adjust this a few times as it can move a little.
Once you have the bearing moving you will see it lifting from the arm.
http://www.instructables.com/id/Renault-Scenic-Grand-Scenic-2-II-Drivers-Side-Fron/
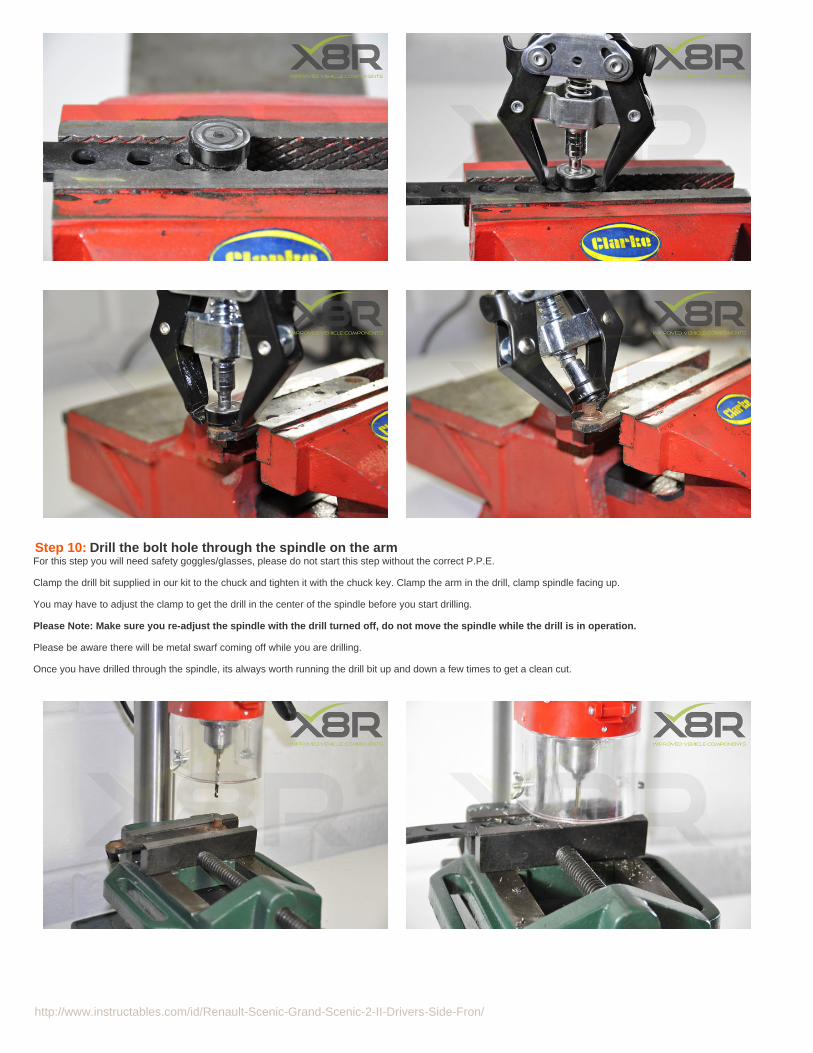
Step 10: Drill the bolt hole through the spindle on the armFor this step you will need safety goggles/glasses, please do not start this step without the correct P.P.E.
Clamp the drill bit supplied in our kit to the chuck and tighten it with the chuck key. Clamp the arm in the drill, clamp spindle facing up.
You may have to adjust the clamp to get the drill in the center of the spindle before you start drilling.
Please Note: Make sure you re-adjust the spindle with the drill turned off, do not move the spindle while the drill is in operation.
Please be aware there will be metal swarf coming off while you are drilling.
Once you have drilled through the spindle, its always worth running the drill bit up and down a few times to get a clean cut.
http://www.instructables.com/id/Renault-Scenic-Grand-Scenic-2-II-Drivers-Side-Fron/
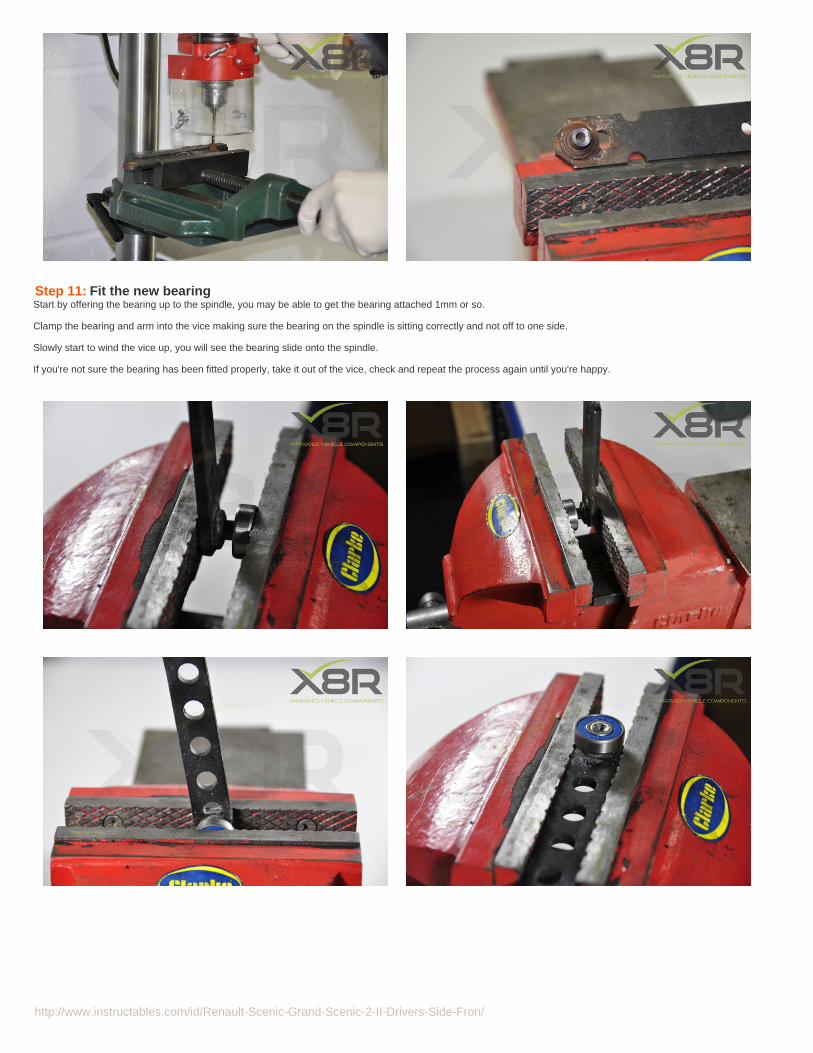
Step 11: Fit the new bearingStart by offering the bearing up to the spindle, you may be able to get the bearing attached 1mm or so.
Clamp the bearing and arm into the vice making sure the bearing on the spindle is sitting correctly and not off to one side.
Slowly start to wind the vice up, you will see the bearing slide onto the spindle.
If you're not sure the bearing has been fitted properly, take it out of the vice, check and repeat the process again until you're happy.
http://www.instructables.com/id/Renault-Scenic-Grand-Scenic-2-II-Drivers-Side-Fron/
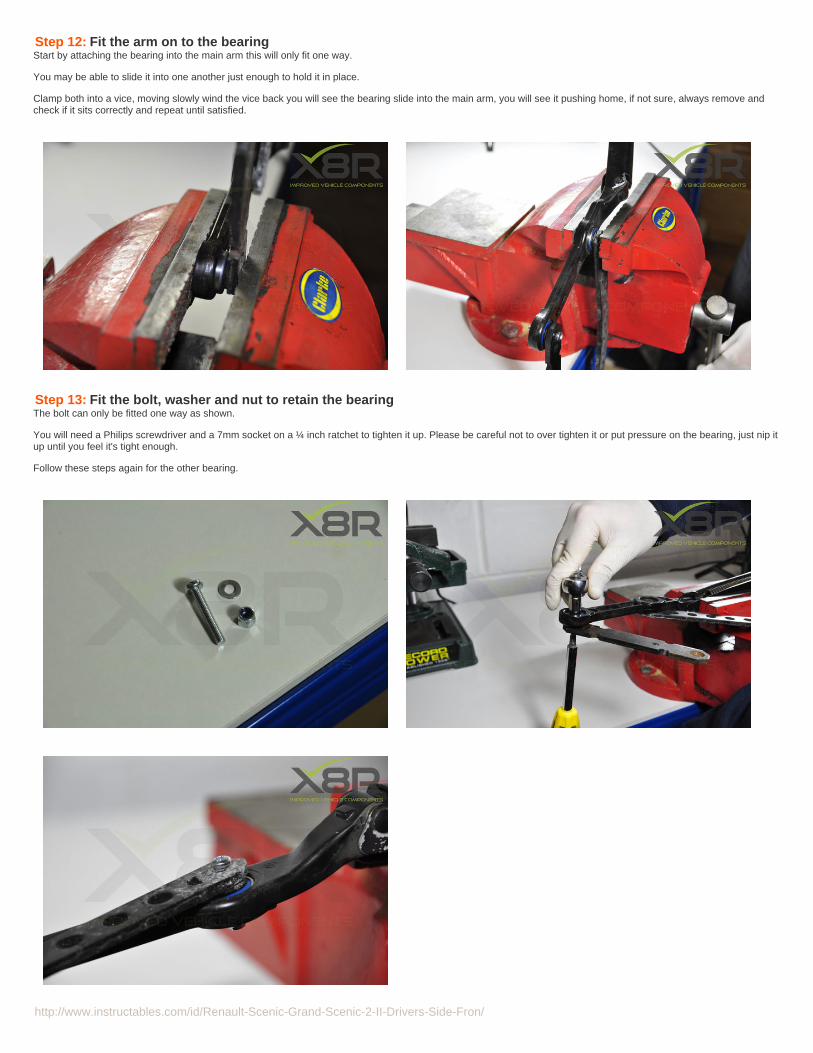
Step 12: Fit the arm on to the bearingStart by attaching the bearing into the main arm this will only fit one way.
You may be able to slide it into one another just enough to hold it in place.
Clamp both into a vice, moving slowly wind the vice back you will see the bearing slide into the main arm, you will see it pushing home, if not sure, always remove andcheck if it sits correctly and repeat until satisfied.
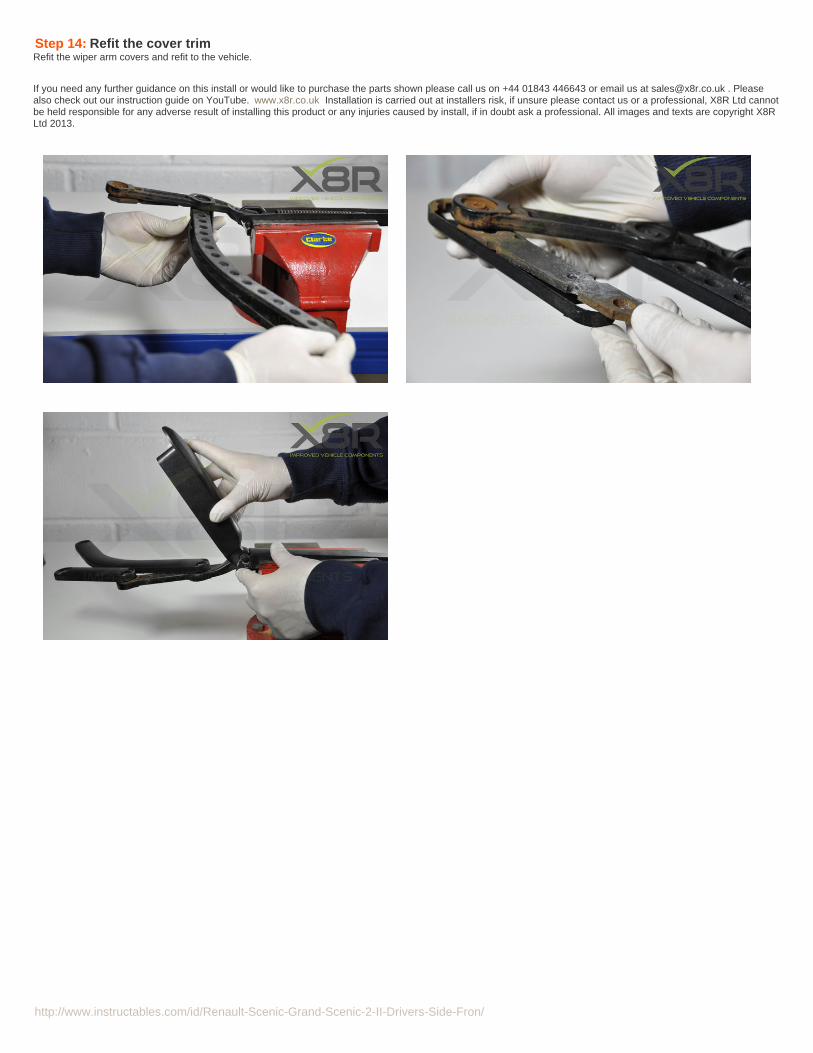
Step 13: Fit the bolt, washer and nut to retain the bearingThe bolt can only be fitted one way as shown.
You will need a Philips screwdriver and a 7mm socket on a ¼ inch ratchet to tighten it up. Please be careful not to over tighten it or put pressure on the bearing, just nip itup until you feel it's tight enough.
Follow these steps again for the other bearing.
http://www.instructables.com/id/Renault-Scenic-Grand-Scenic-2-II-Drivers-Side-Fron/
Step 14: Refit the cover trimRefit the wiper arm covers and refit to the vehicle.
If you need any further guidance on this install or would like to purchase the parts shown please call us on +44 01843 446643 or email us at [email protected] . Pleasealso check out our instruction guide on YouTube. www.x8r.co.uk Installation is carried out at installers risk, if unsure please contact us or a professional, X8R Ltd cannotbe held responsible for any adverse result of installing this product or any injuries caused by install, if in doubt ask a professional. All images and texts are copyright X8RLtd 2013.
Advertisements


![RENAULT SCENIC II, GRAND SCENIC II [2003-2009] Towbar System... · 31080 • 1.0 • 11/12/2013 2 31080 renault scenic ii, grand scenic ii renault megane 3-5 porte 3-5 doors [2003-2009]](https://img.pdfslide.us/doc/110x75/5b95fcbb09d3f2ea5c8cb042/renault-scenic-ii-grand-scenic-ii-2003-2009-towbar-system-31080-10.jpg)


![RENAULT SCENIC II, GRAND SCENIC II [2003-2009] · RENAULT SCENIC II, GRAND SCENIC II [2003-2009] RENAULT MEGANE [2002-2008] 3-5 porte 3-5 doors 31080 umbrarimorchi@umbrarimorchi.it](https://img.pdfslide.us/doc/110x75/5e6d7582b6f4b9615d4ce0c1/renault-scenic-ii-grand-scenic-ii-2003-2009-renault-scenic-ii-grand-scenic-ii.jpg)