Embed Size (px)
Citation preview
PortaBilling Handbook:
Maintenance Release 20
Porta Billing100TM
PORTAONE
www.portaone.com
Converged Services
PortaBilling Handbook: Converged Services
Copyright Notice & Disclaimers Copyright © 2000-2009 PortaOne, Inc. All rights reserved PortaSwitch Handbook: Converged Services, August 2009 Maintenance Release 20 V1.20.7 Please address your comments and suggestions to: Sales Department, PortaOne, Inc. Suite #408, 2963 Glen Drive, Coquitlam BC V3B 2P7 Canada. Changes may be made periodically to the information in this publication. Such changes will be incorporated in new editions of the guide. The software described in this document is furnished under a license agreement, and may be used or copied only in accordance with the terms thereof. It is against the law to copy the software on any other medium, except as specifically provided in the license agreement. The licensee may make one copy of the software for backup purposes. No part of this publication may be reproduced, stored in a retrieval system, or transmitted in any form or by any means, electronic, mechanical, photocopied, recorded or otherwise, without the prior written permission of PortaOne Inc. The software license and limited warranty for the accompanying products are set forth in the information packet supplied with the product, and are incorporated herein by this reference. If you cannot locate the software license, contact your PortaOne representative for a copy. All product names mentioned in this manual are for identification purposes only, and are either trademarks or registered trademarks of their respective owners.
© 2000-2009 PortaOne, Inc. All rights Reserved. www.portaone.com
1
PortaBilling Handbook: Converged Services
Table of Contents
Preface ............................................................................................................................ 4
Prepaid WiFi Services ............................................................................5
Typical Prepaid WiFi Service Scenario ................................................................. 6 Setting Up Your Network Components................................................................ 7 Checklist........................................................................................................................ 13 Initial Configuration of PortaSwitch .................................................................... 14 Create Destination .................................................................................................... 14 Create Nodes .............................................................................................................. 15 Create Tariff ................................................................................................................ 16 Enter Rates .................................................................................................................. 19 Create Product............................................................................................................ 21 Create Vendors........................................................................................................... 23 Define Connections................................................................................................... 25 Create Customer........................................................................................................ 26 Generate Accounts.................................................................................................... 28 Verify Wireless Internet Event History for Account ...................................... 32 Common Symptoms/Problems ............................................................................. 34 Provisioning Prepaid Accounts.............................................................................. 34
IPTV Services ......................................................................................... 37
IPTV Service Scenario.............................................................................................. 38 Checklist........................................................................................................................ 41 Set up the Kasenna LivingRoom™ Server........................................................ 41 Configure PortaBilling .............................................................................................. 41 Create Subscriptions ................................................................................................ 42 Create Products.......................................................................................................... 43 Create Customer and Account.............................................................................. 45 Check Results on LivingRoom Server................................................................. 48
Broadband Services ............................................................................. 49
Examples of Broadband Packages ...................................................................... 50 Checklist........................................................................................................................ 51 Initial Configuration of PortaSwitch .................................................................... 53 Create Destination .................................................................................................... 53 Create Services .......................................................................................................... 54 Create Nodes .............................................................................................................. 56 Create Tariff ................................................................................................................ 58 Enter Rates .................................................................................................................. 60 Create Subscriptions ................................................................................................ 63 Create a Destination Group Set ........................................................................... 65 Define a Destination Group ................................................................................... 66 Assign Prefix to Destination Group ..................................................................... 67 Create a Volume Discount Plan............................................................................ 68 Define Discounts within Volume Discount Plan.............................................. 70 Create Product............................................................................................................ 73 Create Vendor............................................................................................................. 78 Define a Connection ................................................................................................. 79
© 2000-2009 PortaOne, Inc. All rights Reserved. www.portaone.com
2

PortaBilling Handbook: Converged Services
Create Customer........................................................................................................ 80 Create Accounts ......................................................................................................... 82 Check Current Volume Discount Statistics for Account ............................... 84 Verify Broadband Event History for Account ................................................... 86
© 2000-2009 PortaOne, Inc. All rights Reserved. www.portaone.com
3
PortaBilling Handbook: Converged Services
© 2000-2009 PortaOne, Inc. All rights Reserved. www.portaone.com
4
Preface This document provides PortaBilling100 users with step-by-step instructions and examples for setting up various prepaid and postpaid services on a VoIP network.
Where to Get the Latest Version of This Guide
The hard copy of this guide is updated at major releases only, and does not always contain the latest material on enhancements occurring between minor releases. The online copy of this guide is always up to date, and integrates the latest changes to the product. You can access the latest copy of this guide at: www.portaone.com/support/documentation/
Conventions
This publication uses the following conventions: Commands and keywords are given in boldface Terminal sessions, console screens, or system file names are displayed
in fixed width font The exclamation mark draws your attention to important information or actions.
NOTE: Notes contain helpful suggestions about or references to materials not contained in this manual.
Timesaver means that you can save time by performing the action described in the paragraph. Tips provide information that might help you solve a problem.
Prepaid WiFi Services
Prepaid WiFi Services
Prepaid WiFi services enable Internet telephony service providers (ITSP) to offer wireless access services that customers can pay for in advance. The market for prepaid services includes tourists, immigrant communities, mobile populations such as military personnel, and people with limited credit histories. These users can all gain immediate access to WiFi services at key locations such as hotels, cafes by using prepaid WiFi cards (“access codes”) purchased at supermarkets and other types of retail outlets. Prepaid WiFi access is a single “purchase” transaction – so at the moment of the authorization all available funds are withdrawn from the account and converted into the WiFi access time. Please refer to the PortaBilling100 Web Reference Guide PDF for detailed instructions on how to navigate and operate the web interface, along with detailed explanations of particular fields.
© 2000-2009 PortaOne, Inc. All rights Reserved. www.portaone.com
5
Prepaid WiFi Services
Typical Prepaid WiFi Service Scenario In an ITSP internal network infrastructure, prepaid services are implemented through a debit card application and work in conjunction with the following: Mikrotik RouterBoard 532 with RouterOS 2.9 installed PortaBilling100
This combination of services enables a carrier to authorize prepaid WiFi access and debit individual user accounts in real time.
Customer interaction:
Customer selects the WiFi network Customer clicks “Connect” Customer opens her web browser Customer opens WiFi gateway authorization page Customer enters the login and password Customer starts her work
© 2000-2009 PortaOne, Inc. All rights Reserved. www.portaone.com
6
Prepaid WiFi Services
Setting Up Your Network Components
Mikrotik Configuration Guidelines
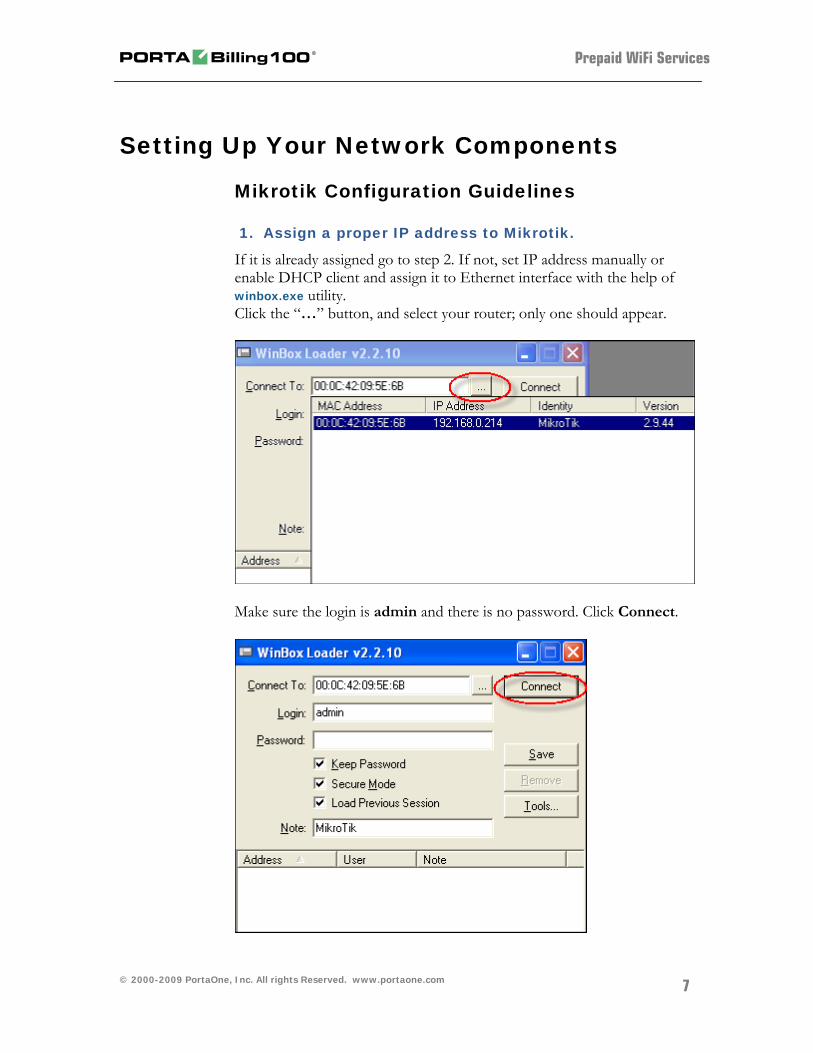
1. Assign a proper IP address to Mikrotik.
If it is already assigned go to step 2. If not, set IP address manually or enable DHCP client and assign it to Ethernet interface with the help of winbox.exe utility. Click the “…” button, and select your router; only one should appear.
Make sure the login is admin and there is no password. Click Connect.
© 2000-2009 PortaOne, Inc. All rights Reserved. www.portaone.com
7
Prepaid WiFi Services
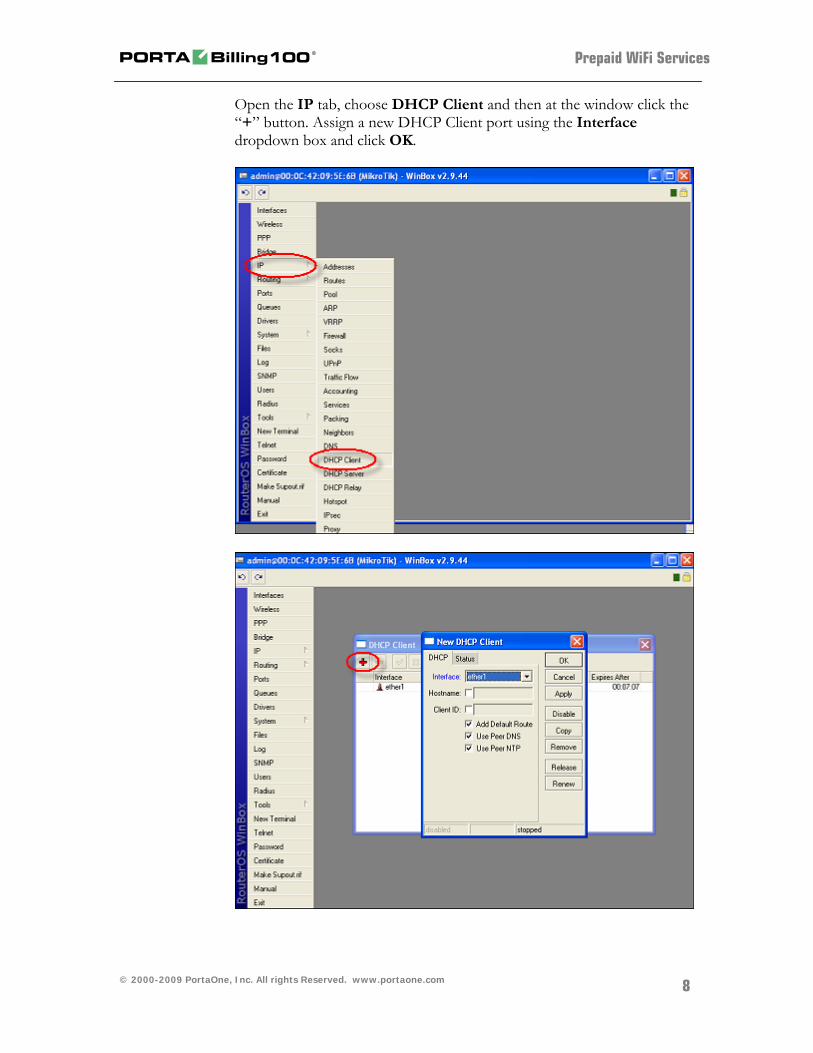
Open the IP tab, choose DHCP Client and then at the window click the “+” button. Assign a new DHCP Client port using the Interface dropdown box and click OK.
© 2000-2009 PortaOne, Inc. All rights Reserved. www.portaone.com
8
Prepaid WiFi Services
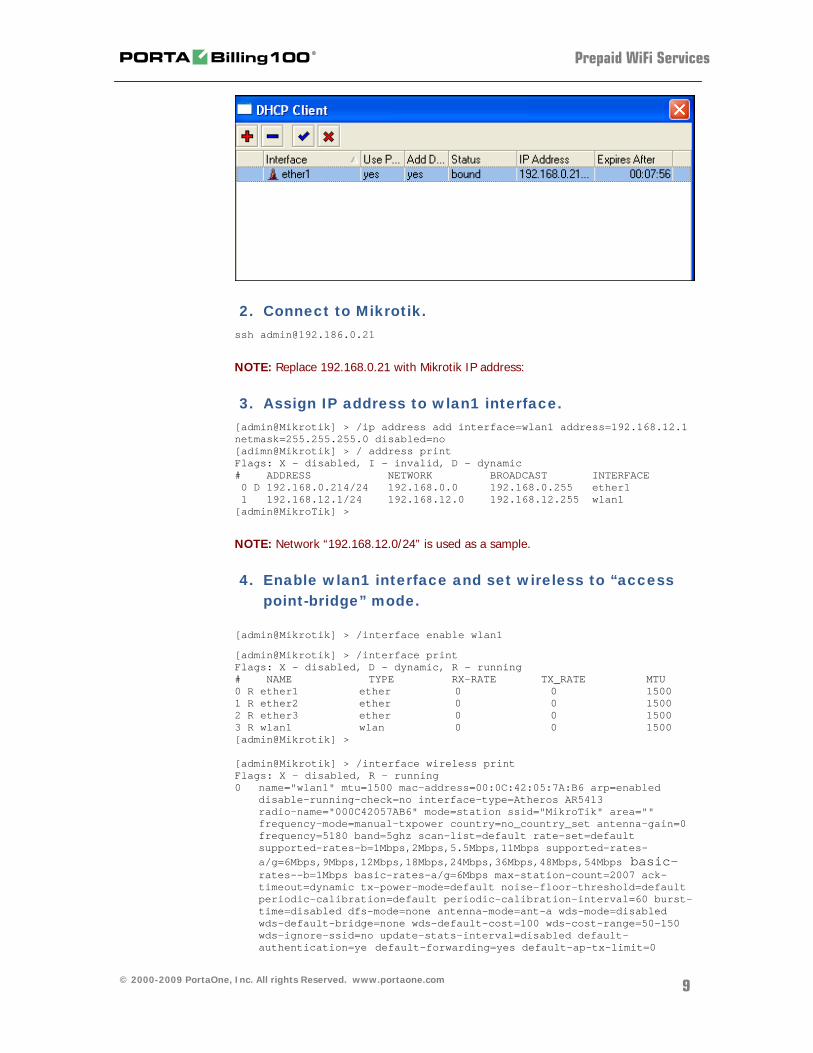
2. Connect to Mikrotik. ssh [email protected]
NOTE: Replace 192.168.0.21 with Mikrotik IP address:
3. Assign IP address to wlan1 interface. [admin@Mikrotik] > /ip address add interface=wlan1 address=192.168.12.1 netmask=255.255.255.0 disabled=no [adimn@Mikrotik] > / address print Flags: X – disabled, I – invalid, D – dynamic # ADDRESS NETWORK BROADCAST INTERFACE 0 D 192.168.0.214/24 192.168.0.0 192.168.0.255 ether1 1 192.168.12.1/24 192.168.12.0 192.168.12.255 wlan1 [admin@MikroTik] >
NOTE: Network “192.168.12.0/24” is used as a sample.
4. Enable wlan1 interface and set wireless to “access point-bridge” mode.
[admin@Mikrotik] > /interface enable wlan1
[admin@Mikrotik] > /interface print Flags: X – disabled, D – dynamic, R - running # NAME TYPE RX-RATE TX_RATE MTU 0 R ether1 ether 0 0 1500 1 R ether2 ether 0 0 1500 2 R ether3 ether 0 0 1500 3 R wlan1 wlan 0 0 1500 [admin@Mikrotik] > [admin@Mikrotik] > /interface wireless print Flags: X – disabled, R – running 0 name="wlan1" mtu=1500 mac-address=00:0C:42:05:7A:B6 arp=enabled
disable-running-check=no interface-type=Atheros AR5413 radio-name="000C42057AB6" mode=station ssid="MikroTik" area="" frequency-mode=manual-txpower country=no_country_set antenna-gain=0 frequency=5180 band=5ghz scan-list=default rate-set=default supported-rates-b=1Mbps,2Mbps,5.5Mbps,11Mbps supported-rates-a/g=6Mbps,9Mbps,12Mbps,18Mbps,24Mbps,36Mbps,48Mbps,54Mbps basic-rates--b=1Mbps basic-rates-a/g=6Mbps max-station-count=2007 ack-timeout=dynamic tx-power-mode=default noise-floor-threshold=default periodic-calibration=default periodic-calibration-interval=60 burst-time=disabled dfs-mode=none antenna-mode=ant-a wds-mode=disabled wds-default-bridge=none wds-default-cost=100 wds-cost-range=50-150 wds-ignore-ssid=no update-stats-interval=disabled default-authentication=ye default-forwarding=yes default-ap-tx-limit=0
© 2000-2009 PortaOne, Inc. All rights Reserved. www.portaone.com
9
Prepaid WiFi Services
default-client-tx-limit=0 proprietary-extensions=post-2.9.25 hide-ssid=no security-profile=default disconnect-timeout=3s on-fail-retry-time=100ms preamble-mode=both compression=no allow-sharedkey=no
[admin@Mikrotik] > /interface wireless set 0 mode=”ap-bridge” [admin@Mikrotik] > /interface wireless print Flags: X – disabled, R – running 0 name=”wlan1”...
mode=ap-bridge … …
[admin@Mikrotik] >
5. Configure DHCP-SERVER for WiFi.
5.1. Add IP pool which will be used for WiFi; [admin@Mikrotik] >/ip pool add name=wifi-pool ranges=192.168.12.2-192.168.12.255 [admin@Mikrotik] >/ip pool print # NAME RANGE 0 wifi-pool 192.168.12.2-192.168.12.255 [admin@Mikrotik] >
5.2. Add dhcp network; [admin@Mikrotik] > /ip dhcp-server network add address=192.168.12.0/24 dns-server=192.168.0.1,213.186.192.2 gateway=192.168.12.1 comment="wifi network" [admin@Mikrotik] > /ip dhcp-server network print # ADDRESS GATEWAY DNS-SERVER WINS-SERVER DOMAIN 0 ;;; wifi network 192.168.12.0/24 192.168.12.1 192.168.0.1 213.186.192.2 [admin@Mikrotik] > NOTE: Network «192.168.12.0/24» used for sample, replace it with real network address and set correct dns-server address(es).
5.3. Add dhcp server; [admin@Mikrotik] > /ip dhcp-server add interface=wlan1 address-pool=wifi-pool lease-time=3d00:00:00 disabled=no [admin@Mikrotik] >/ip dhcp-server print Flags: X – disabled, I – invalid # NAME INTERFACE RELAY ADDRESS-POOL LEASE-TIM ADD-ARP 0 dhcp1 wlan1 wifi-pool 3d [admin@Mikrotik] >
6. Configure RADIUS client. [admin@Mikrotik] > /radius add address=111.11.11.11 secret="mikrotik" service="hotspot" [admin@Mikrotik] > /radius print Flags: X – disabled # SERVICE CALLED-ID DOMAIN ADDRESS SECRET 0 hotspot 111.11.11.11 mikrotik [admin@Mikrotik] > NOTE: 111.11.11.11 – IP of Master (Radius) Server, secret – RADIUS Key
© 2000-2009 PortaOne, Inc. All rights Reserved. www.portaone.com
10

Prepaid WiFi Services
7. Configure HOTSPOT server.
7.1. Add profile for RADIUS AAA; [admin@Mikrotik] > /ip hotspot profile add name="wi-fi AAA" use-radius=yes [admin@Mikrotik] > /ip hotspot profile print Flags: * - default 0 * name="default" hotspot-address=0.0.0.0 dns-name="" html-directory=hotspot rate-limit="" http-proxy=0.0.0.0:0 smtp-server=0.0.0.0 login-by=cookie,http-chap http-cookie-lifetime=3d split-user--domain=no use-radius=no 1 * name="wi-fi AAA" hotspot-address=0.0.0.0 dns-name="" html-
directory=hotspot rate-limit="" http-proxy=0.0.0.0:0 smtp-server=0.0.0.0
login-by=cookie,http-chap http-cookie-lifetime=3d split-user-domain=no use-radius=yes radius-accounting=yes radius-interim-update=received nas-port-type=wireless-802.11 radius-default-domain="" radius-location-id="" radius-location-name="" [admin@Mikrotik] >
7.2. Add HOTSPOT server; [admin@Mikrotik] > /ip hotspot add name="WiFi" interface=wlan1 address-pool="wifi-pool" profile="wi-fi AAA" [admin@Mikrotik] > /ip hotspot print Flags: X – disabled, I – invalid, S – HTTPS # NAME INTERFACE ADDRESS-POOL PROFILE IDLE-TIMEOUT 0 X WiFi wlan1 wifi-pool wi-fi AAA 5m [admin@Mikrotik] > /ip hotspot enable 0 [admin@Mikrotik] > /ip hotspot print Flags: X – disabled, I – invalid, S – HTTPS # NAME INTERFACE ADDRESS-POOL PROFILE IDLE-TIMEOUT 0 WiFi wlan1 wifi-pool wi-fi AAA 5m [admin@Mikrotik] > NOTE: The name of the HOTSPOT server should be WiFi (the same as the special destination for WiFi service in PortaBilling).
8. Connect to WiFi router.
Select the WiFi network and click Connect.
© 2000-2009 PortaOne, Inc. All rights Reserved. www.portaone.com
11
Prepaid WiFi Services
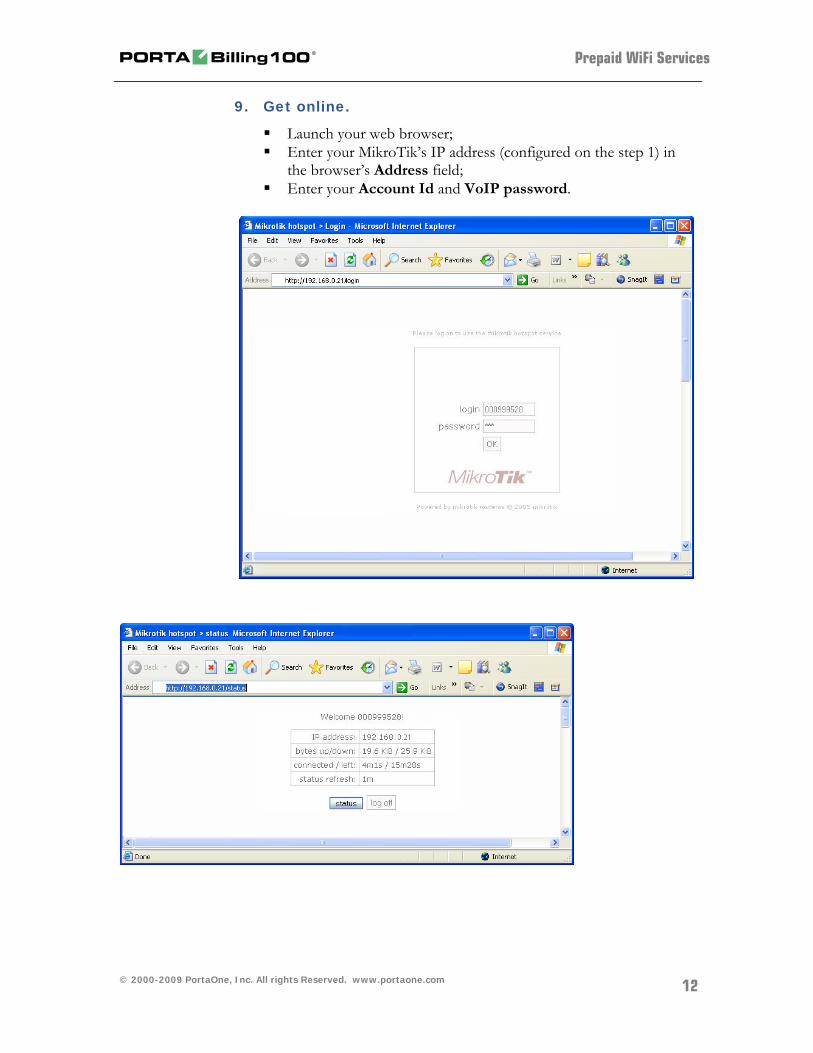
9. Get online.
Launch your web browser; Enter your MikroTik’s IP address (configured on the step 1) in
the browser’s Address field; Enter your Account Id and VoIP password.
© 2000-2009 PortaOne, Inc. All rights Reserved. www.portaone.com
12
Prepaid WiFi Services
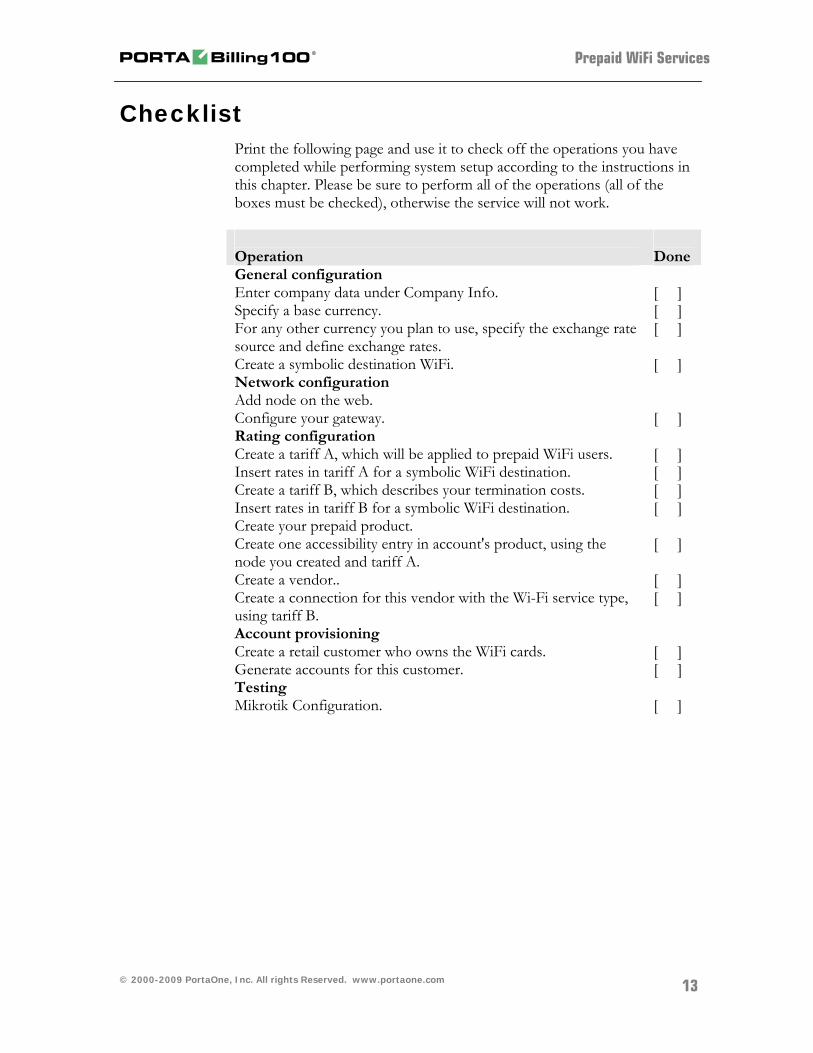
Checklist Print the following page and use it to check off the operations you have completed while performing system setup according to the instructions in this chapter. Please be sure to perform all of the operations (all of the boxes must be checked), otherwise the service will not work. Operation
Done
General configuration Enter company data under Company Info. [ ] Specify a base currency. [ ] For any other currency you plan to use, specify the exchange rate source and define exchange rates.
[ ]
Create a symbolic destination WiFi. [ ] Network configuration Add node on the web.
Configure your gateway. [ ] Rating configuration Create a tariff A, which will be applied to prepaid WiFi users. [ ] Insert rates in tariff A for a symbolic WiFi destination. [ ] Create a tariff B, which describes your termination costs. [ ] Insert rates in tariff B for a symbolic WiFi destination. [ ] Create your prepaid product. Create one accessibility entry in account's product, using the node you created and tariff A.
[ ]
Create a vendor.. [ ] Create a connection for this vendor with the Wi-Fi service type, using tariff B.
[ ]
Account provisioning Create a retail customer who owns the WiFi cards. [ ] Generate accounts for this customer. [ ] Testing Mikrotik Configuration. [ ]
© 2000-2009 PortaOne, Inc. All rights Reserved. www.portaone.com
13
Prepaid WiFi Services
Initial Configuration of PortaSwitch TIP: When the system has just been installed, use username pb-root and password pb-root to login. The following steps are normally performed only once, after the system is installed: Visit Company Info on the main menu. Enter information about your company and set up a base currency. Naturally, this does not limit your operations to this currency only. However, on cost/revenue reports and the like different currencies will be converted to the one you specify here.
NOTE: Once you set up a base currency it cannot be changed. If you make a mistake, you will have to start with a new PortaBilling environment.
From the main menu, choose Users and create login entries for users who will be working with the system. It is not recommended that the default PortaBilling root user (pb-root) be used for any operations other than initial set-up. Make sure you are able to login as the newly-created user and change the password for the pb-root user. If you plan to do billing in multiple currencies, define these in the Currencies section and specify exchange rates in Exchange Rates.
Create Destination You need to create the same destination as the name of HOTSPOT server you specified in step 7 above (Configure HOTSPOT server.) when you set up your network components; in this case it will be WiFi. 1. In the Management section of Admin-Index, choose Destination. 2. Click on the Add button. 3. Fill in the required information. The country subdivision is optional.
You can use the Description column to store some extra information about the destination.
© 2000-2009 PortaOne, Inc. All rights Reserved. www.portaone.com
14
Prepaid WiFi Services
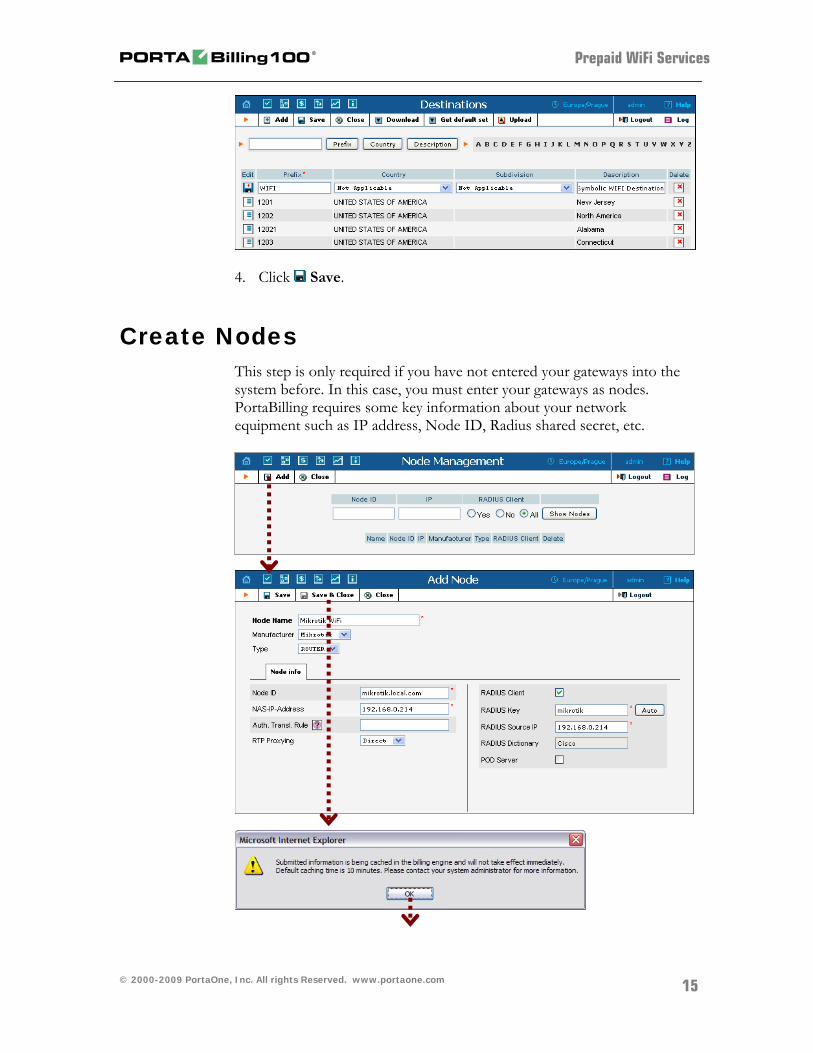
4. Click Save.
Create Nodes This step is only required if you have not entered your gateways into the system before. In this case, you must enter your gateways as nodes. PortaBilling requires some key information about your network equipment such as IP address, Node ID, Radius shared secret, etc.
© 2000-2009 PortaOne, Inc. All rights Reserved. www.portaone.com
15
Prepaid WiFi Services
1. In the Networking section of the Admin-Index page, choose Nodes. 2. In the Node management window, click the Add icon. 3. Fill in the New Node form:
o Node Name – A short descriptive name for this node (will be used in the select menus).
o Manufacturer - Select Mikrotik. o Type – VoIP node type; select ROUTER. o Node ID – Mikrotik server host name (recommended
hostname.domainname). o NAS-IP-Address – IP address of the gateway. o Auth. Translation rule – Leave this empty for now; see the
Translation Rules section of the PortaBilling Administrator Guide.
o RTP Proxying – Leave the default selection (Optimal); this parameter is not used for the WiFi Internet access service.
o Radius Client – Check this box, since this node will be communicating with the billing system.
o Radius Key – Enter the shared secret here; it must be the same as that configured in NAS as a key in the radius server configuration.
o Radius Source IP – See the Node ID, NAS IP address, and Radius source IP section of the PortaBilling Administrator Guide. Unless your gateway has multiple network interfaces, the value here should be the same as the NAS-IP-Address.
o POD Server – this checkbox relates to ISP billing. Leave it unchecked for now.
4. Click Save&Close. 5. Repeat steps 2-4 until all of your nodes have been entered.
NOTE: There is some propagation delay between the database and the Radius server configuration file, but no more than 15 minutes.
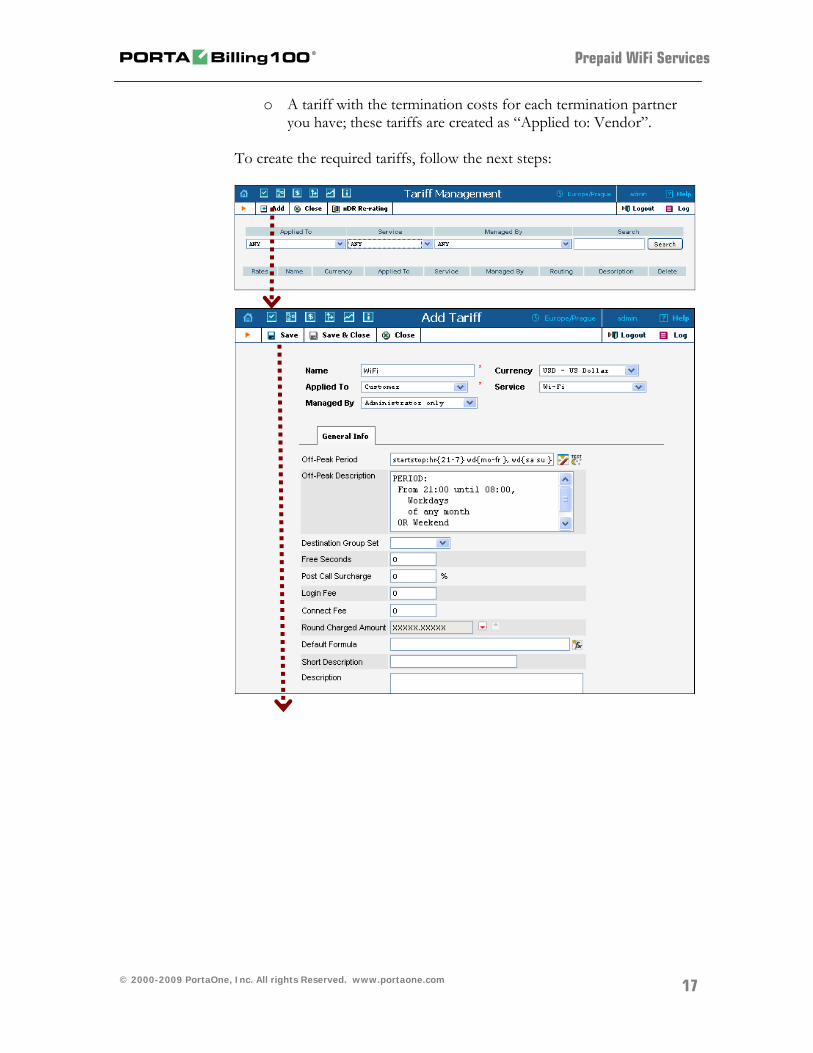
Create Tariff The tariff is a single price list for the use of WiFi services. At least two tariffs should be created to provide WiFi services successfully:
o A tariff for each account’s billing scheme, these tariffs are created as “Applied to: Customer”;
© 2000-2009 PortaOne, Inc. All rights Reserved. www.portaone.com
16
Prepaid WiFi Services
o A tariff with the termination costs for each termination partner you have; these tariffs are created as “Applied to: Vendor”.
To create the required tariffs, follow the next steps:
© 2000-2009 PortaOne, Inc. All rights Reserved. www.portaone.com
17
Prepaid WiFi Services
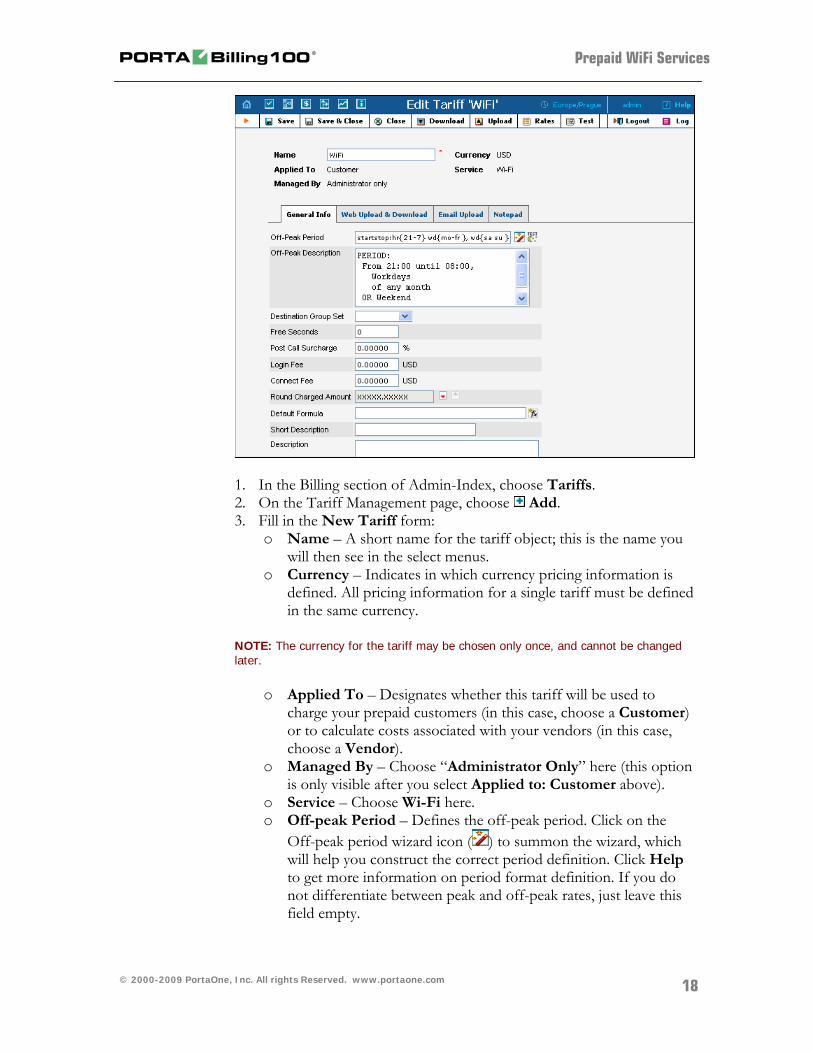
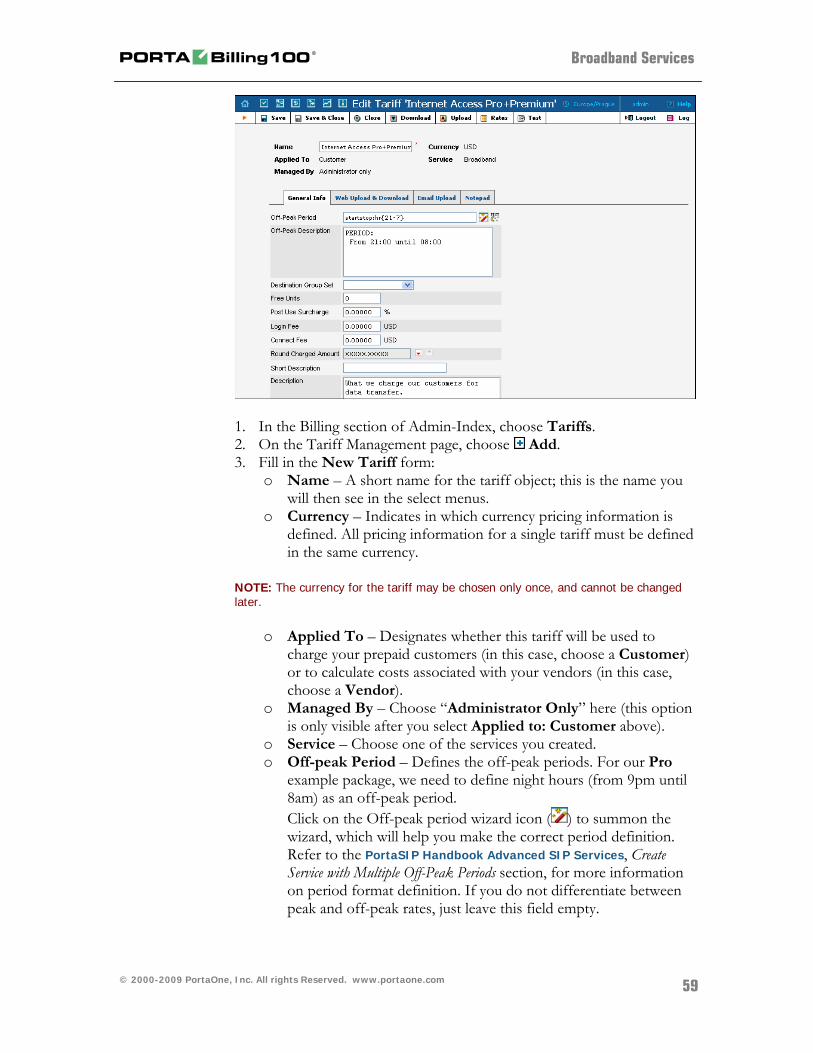
1. In the Billing section of Admin-Index, choose Tariffs. 2. On the Tariff Management page, choose Add. 3. Fill in the New Tariff form:
o Name – A short name for the tariff object; this is the name you will then see in the select menus.
o Currency – Indicates in which currency pricing information is defined. All pricing information for a single tariff must be defined in the same currency.
NOTE: The currency for the tariff may be chosen only once, and cannot be changed later.
o Applied To – Designates whether this tariff will be used to charge your prepaid customers (in this case, choose a Customer) or to calculate costs associated with your vendors (in this case, choose a Vendor).
o Managed By – Choose “Administrator Only” here (this option is only visible after you select Applied to: Customer above).
o Service – Choose Wi-Fi here. o Off-peak Period – Defines the off-peak period. Click on the
Off-peak period wizard icon ( ) to summon the wizard, which will help you construct the correct period definition. Click Help to get more information on period format definition. If you do not differentiate between peak and off-peak rates, just leave this field empty.
© 2000-2009 PortaOne, Inc. All rights Reserved. www.portaone.com
18
Prepaid WiFi Services
o Off-peak Description – A description of the off-peak period, automatically filled in by the off-peak period wizard; thus you do not have to fill in this field.
o Login Fee – Amount to be charged immediately after the first user authentication (i.e. after the user enters his PIN).
o Connect Fee – Amount to be charged for each connected session (with a non-zero duration).
o Short Description – A short tariff description. This will be shown in the rate lookup on the admin interface and the self-care pages for your accounts and customers.
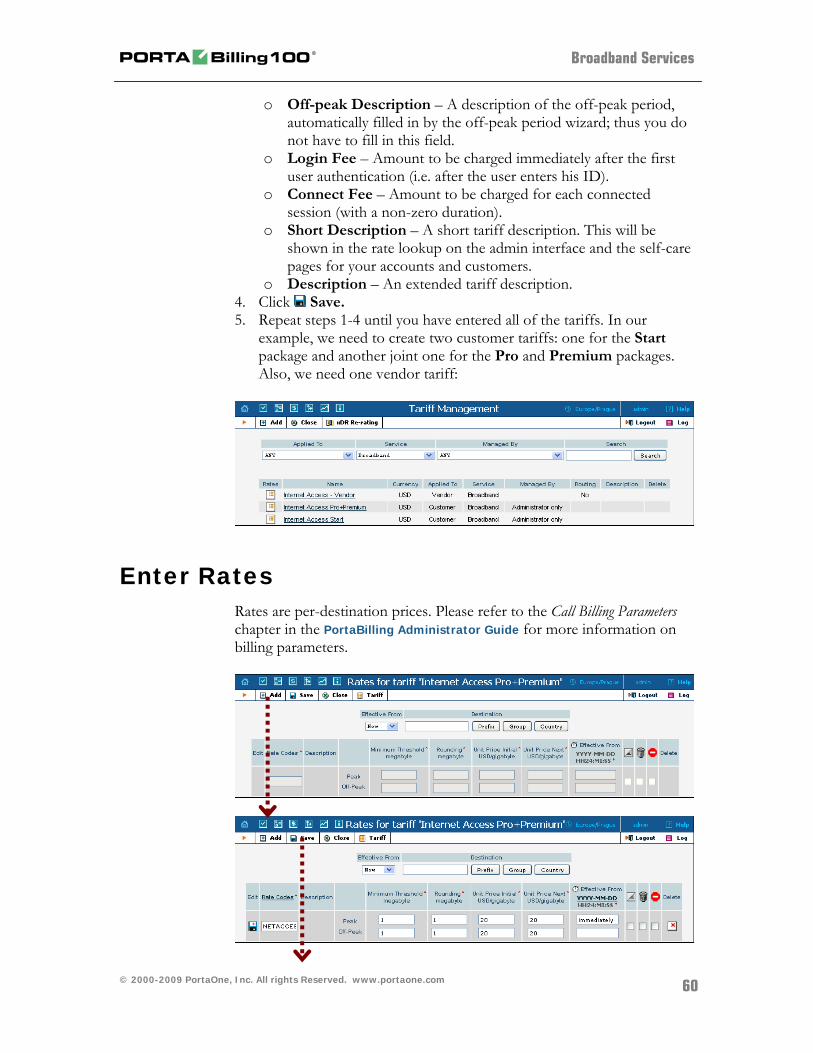
o Description – An extended tariff description. 4. Click Save. 5. Repeat steps 1-4 until you have entered all of the tariffs.
Enter Rates Rates are per-destination prices. Please refer to the Call Billing Parameters chapter in the PortaBilling Administrator Guide for more information on billing parameters.
Managing Rates Online
Managing rates online is very convenient for maintaining existing rate tables, as well as for reference purposes. For new price lists or major updates, an offline method is better.
© 2000-2009 PortaOne, Inc. All rights Reserved. www.portaone.com
19
Prepaid WiFi Services
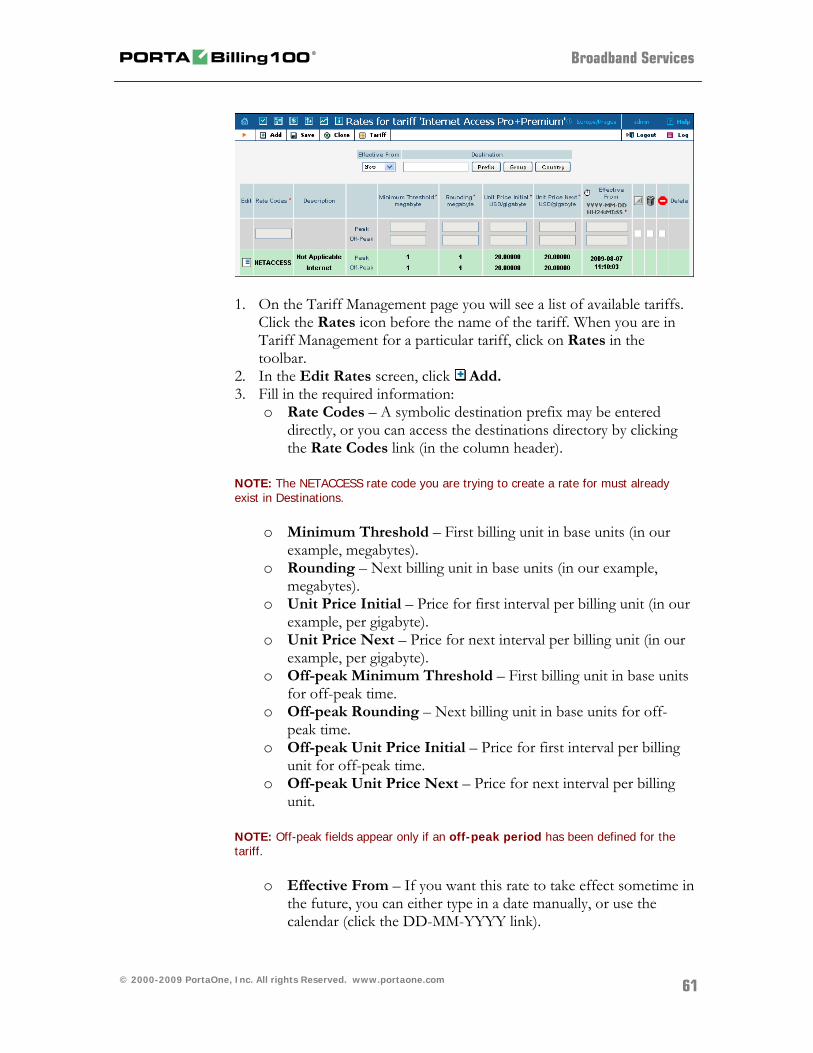
1. On the Tariff Management page you will see a list of available tariffs.
Click the Rates icon before the name of the tariff. When you are in Tariff Management for a particular tariff, click on Rates in the toolbar.
2. In the Edit Rates screen, click Add. 3. Fill in the required information:
o Destination – A symbolic destination prefix may be entered directly, or you can access the destinations directory by clicking the Destination link (in the column header).
NOTE: The phone prefix you are trying to create a rate for must already exist in Destinations.
o Interval First – first billing unit in seconds. o Interval Next – next billing unit in seconds. o Price First – per-minute price for first interval. o Price Next – per-minute price for next interval. o Off-peak Interval First– first billing unit in seconds for off-peak
time. o Off-peak Interval Next – next billing unit in seconds for off-
peak time. o Off-peak Price First – per-minute price for first interval for off-
peak time. o Off-peak Price Next – per-minute price for next interval for
off-peak time.
NOTE: Off-peak fields appear only if an off-peak period has been defined for the tariff.
o Effective From – If you want this rate to take effect sometime in the future, you can either type in a date manually, or use the calendar (click the DD-MM-YYYY link).
NOTE: When using the calendar, you can specify that the date you are entering is in a different time zone than your present one. PortaBilling will then automatically adjust the time.
© 2000-2009 PortaOne, Inc. All rights Reserved. www.portaone.com
20
Prepaid WiFi Services
o Rate Formula Wizard – launches the wizard for creating a custom rating formula
o Hidden, Forbidden or Discontinued flags are optional. 4. Click the Save button in the toolbar, or the icon on the left side
of the row.
Create Product Account for accessing your prepaid WiFi services will be issued for a specific product. Products are a powerful feature that defines different ways to bill an account. Product definition is always done in two steps: product definition and creation of an accessibility list.
In the Billing section of the Admin-Index page, choose Products. 1. On the Product management page, click the Add icon. 2. Fill in the “Add product” form:
o Product name – product object name. o Currency – product currency; only tariffs which have the same
currency will be permitted in the accessibility list.
© 2000-2009 PortaOne, Inc. All rights Reserved. www.portaone.com
21
Prepaid WiFi Services
o Managed by – If you want this product to be used for your reseller’s accounts, so the reseller himself can change the parameters of this tariff and create new accounts using this product, choose a customer name from the menu. Otherwise, choose Administrator only here.
General Info tab
o Breakage – Leftover balance which is considered “useless” (for statistical purposes). Accounts with a balance below breakage will be counted as depleted. This does not affect account authentication or authorization, so the account can still access wireless services if there is enough money left to cover at least the first interval.
o Account Default ACL – The access level assigned by default to new accounts created with this product. The ACL determines which operations may be performed by accounts on the self-care pages. The default value is “Account self-care” (pre-defined ACL), which allows all possible operations.
o Default Discount Plan – Leave None as the selected entry, since discount plans are typically used for postpaid services. Please refer to the description of volume-based discounts in the PortaBilling Administrator Guide for more details.
o Info URL – If you have an external server with a description of product features, enter the URL here (e.g. http://www.myproduct.com). Your customers will be able to go there from their self-care page.
o Description – your comments about the intended use of this product.
Maintenance tab
The Maintenance Fees functionality has been replaced by the Subscriptions module. Please use subscription plans to apply periodic charges for the WiFi service to your customers.
3. Click Save. 4. Click on the Accessibility tab to edit this product’s accessibility.
Enter Node and Tariff into Product’s Accessibility List
The accessibility list has two functions: it defines permitted access points (nodes and access numbers) and specifies which tariff should be used for billing in each of these points.
© 2000-2009 PortaOne, Inc. All rights Reserved. www.portaone.com
22
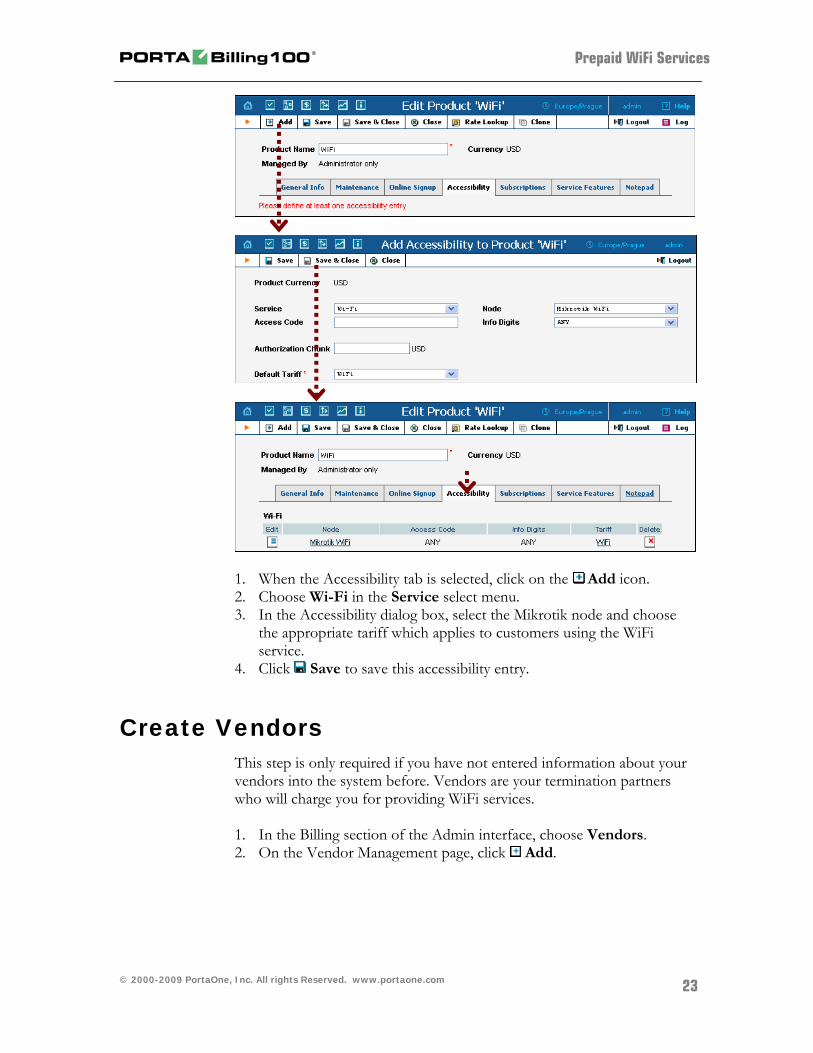
Prepaid WiFi Services
1. When the Accessibility tab is selected, click on the Add icon. 2. Choose Wi-Fi in the Service select menu. 3. In the Accessibility dialog box, select the Mikrotik node and choose
the appropriate tariff which applies to customers using the WiFi service.
4. Click Save to save this accessibility entry.
Create Vendors This step is only required if you have not entered information about your vendors into the system before. Vendors are your termination partners who will charge you for providing WiFi services. 1. In the Billing section of the Admin interface, choose Vendors. 2. On the Vendor Management page, click Add.
© 2000-2009 PortaOne, Inc. All rights Reserved. www.portaone.com
23
Prepaid WiFi Services
© 2000-2009 PortaOne, Inc. All rights Reserved. www.portaone.com
24

Prepaid WiFi Services
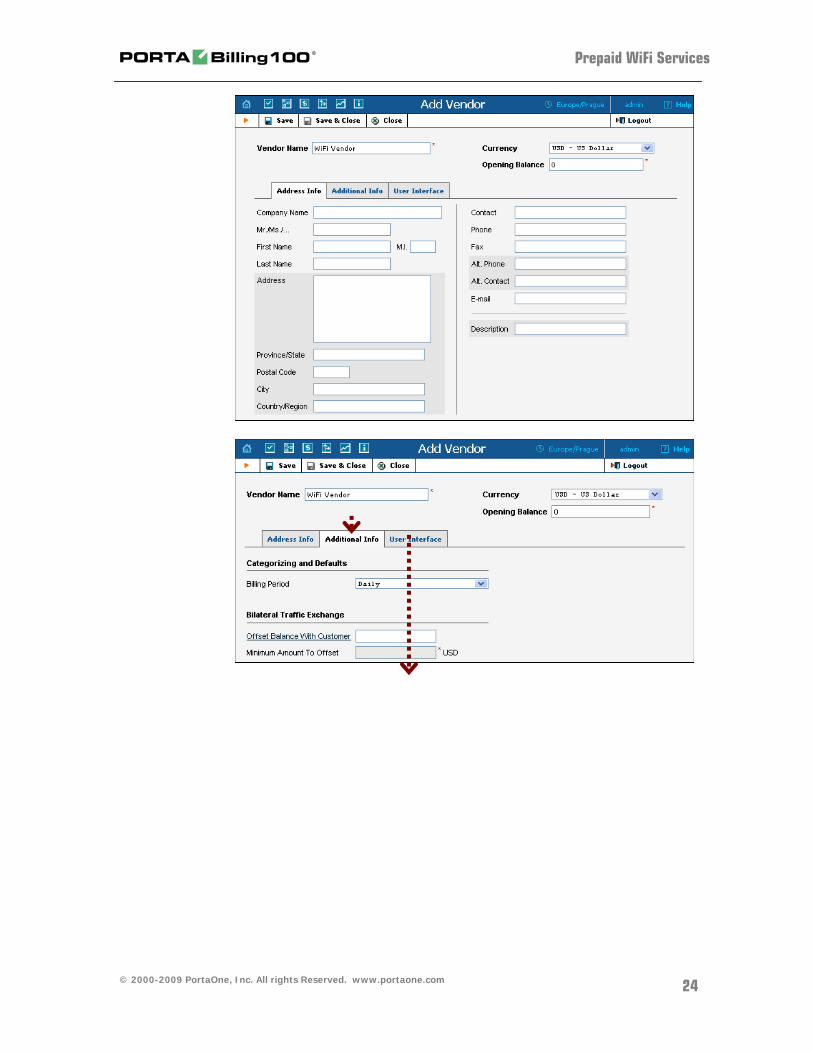
3. Fill in the Add Vendor form. Please note that there are three tabs
available on the screen. The most important fields are:
Main form (top)
o Vendor Name – short name for the Vendor object; this will be used on the web interface.
o Currency – the currency in which this vendor charges you. o Opening balance – starting balance for the vendor; the default
is zero.
Additional info
o Billing period – split period for vendor statistics.
User-Interface
o Time zone – the time zone that the vendor uses for his billing period. Statistics will be split into periods in this time zone, so your statistics will match the vendor’s.
4. Click Save&Close. 5. Repeat steps 2-4 to add all of your vendors.
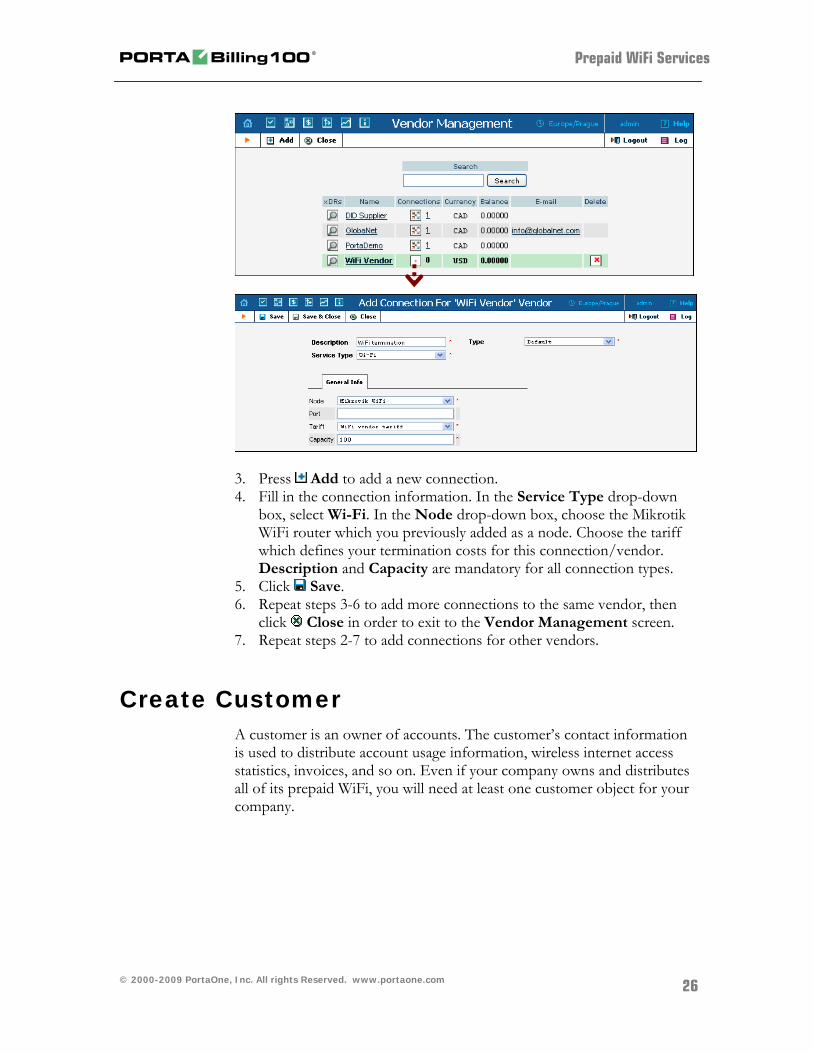
Define Connections Connections are points at which data leave or enter a network and are directed to or from vendors, whereby costing occurs. 1. In the Management section of the admin interface, choose Vendors. 2. Click on the Connections icon next to the vendor name.
© 2000-2009 PortaOne, Inc. All rights Reserved. www.portaone.com
25
Prepaid WiFi Services
3. Press Add to add a new connection. 4. Fill in the connection information. In the Service Type drop-down
box, select Wi-Fi. In the Node drop-down box, choose the Mikrotik WiFi router which you previously added as a node. Choose the tariff which defines your termination costs for this connection/vendor. Description and Capacity are mandatory for all connection types.
5. Click Save. 6. Repeat steps 3-6 to add more connections to the same vendor, then
click Close in order to exit to the Vendor Management screen. 7. Repeat steps 2-7 to add connections for other vendors.
Create Customer A customer is an owner of accounts. The customer’s contact information is used to distribute account usage information, wireless internet access statistics, invoices, and so on. Even if your company owns and distributes all of its prepaid WiFi, you will need at least one customer object for your company.
© 2000-2009 PortaOne, Inc. All rights Reserved. www.portaone.com
26
Prepaid WiFi Services
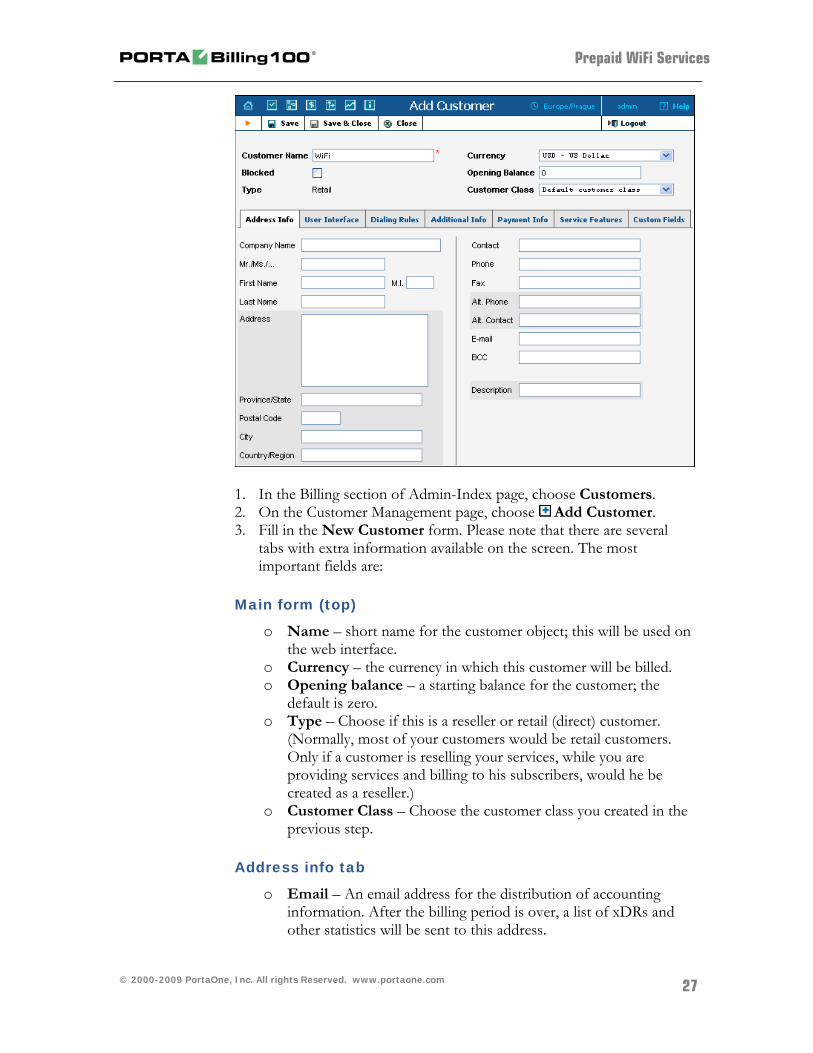
1. In the Billing section of Admin-Index page, choose Customers. 2. On the Customer Management page, choose Add Customer. 3. Fill in the New Customer form. Please note that there are several
tabs with extra information available on the screen. The most important fields are:
Main form (top)
o Name – short name for the customer object; this will be used on the web interface.
o Currency – the currency in which this customer will be billed. o Opening balance – a starting balance for the customer; the
default is zero. o Type – Choose if this is a reseller or retail (direct) customer.
(Normally, most of your customers would be retail customers. Only if a customer is reselling your services, while you are providing services and billing to his subscribers, would he be created as a reseller.)
o Customer Class – Choose the customer class you created in the previous step.
Address info tab
o Email – An email address for the distribution of accounting information. After the billing period is over, a list of xDRs and other statistics will be sent to this address.
© 2000-2009 PortaOne, Inc. All rights Reserved. www.portaone.com
27
Prepaid WiFi Services
o Bcc – Delivery to the specified email address of your account representative a copy of every outgoing email sent to the customer; this may be used for debug and archiving purposes.
o Send Statistics – Summary only – Distribute an event summary only, and do not attach a details file. Other options are full statistics (attach a complete list of xDRs) or do not send (no not deliver event statistics to this customer via email at all).
Additional info tab
o Billing period – Frequency of distribution of accounting information. For more details about different available billing periods, see the PortaBilling Administrator Guide.
Payment info tab
o Credit limit – if left empty, then there is no credit limit for this customer.
User Interface tab
o Time zone – the time zone in which the customer will see his xDRs and also that defines his billing period. For example, if you choose America/New_York here and the billing period is Monthly, this means the billing period will start on the first day of the month at 00:00 New York time.
o Web Interface Language – language to be used on the customer self-care web interface.
4. Click Save&Close.
Generate Accounts NOTE: Before generating accounts for a production system, read the section on “Provisioning prepaid accounts”.
1. Go to the Customers screen (the screen which contains a list of customers). It should look like the screenshot below:
© 2000-2009 PortaOne, Inc. All rights Reserved. www.portaone.com
28
Prepaid WiFi Services
2. Next to the customer name, click on the Account or icon (the
one in the Accounts column), which will take you to the account management for that customer.
3. Click on the Account generator. 4. Fill in the “Account generator” form:
o Number of accounts – number of accounts to be generated. o Product – choose the product which you would like your
accounts to have. o Blocked – It is normal practice to generate all your prepaid WiFi
cards as blocked, so they cannot be misused before being sold to the dealer or end customer. You can always activate the whole batch of cards or an individual card later.
o Opening balance – the initial balance on the card.
© 2000-2009 PortaOne, Inc. All rights Reserved. www.portaone.com
29
Prepaid WiFi Services
Account Info tab
o Type – Account type; select Debit for prepaid service. o Generation method – Choose Random here; this will assign
every account a unique, randomly-generated PIN. o ID prefix – If you would like all of the generated accounts to
start with the same digit string (e.g. 98), enter it here. Thus, if you enter 98 and an ID length of 10, account IDs (PINs) will look like this: 98NNNNNNNN, where N = random digits.
o ID length – All account IDs (PINs) will be numerical and of the specified length. In order to avoid problems with the prepaid card print-shop, PortaBilling will not generate account numbers with a leading zero. Also, PortaBilling will only allow generation of a batch with feasible parameters, e.g. it is impossible to generate a batch of 1,000 accounts with ID length 4 and ID starting at 55.
o Starting ID – Only available in Sequential generation and is always numeric.
o Service Password – To improve security, you can use an account password during authentication, in addition to a PIN; this is highly recommended for the WiFi service. If you choose Empty, no password will be assigned to the account, and the password check will be switched off during authentication (so the customer can supply any password).
o Batch – A batch is a management unit for accounts. The batch name is alphanumeric. You can type a new name here, or use the existing name in order to generate more accounts for the same batch.
User Interface tab
o Login – If you choose Account ID (default), your customer will use his account ID (PIN) to login to the self-care pages. If you choose Empty, the account owner will not be able to use the self-care pages at all until a login has been assigned for his account.
o Password – Auto-generated means that a random password for web access will be assigned for each account (these passwords will be included in the .CSV file with the account information). Empty means that no password will be assigned, so account owners will be able to login to the web interface simply by providing their account ID (PIN).
o Time Zone – When an account owner accesses the web self-care pages to see a list of his active sessions, the time will be shown in the time zone most appropriate for him.
o Web Interface Language – The language to be used on the account self-care web interface.
© 2000-2009 PortaOne, Inc. All rights Reserved. www.portaone.com
30
Prepaid WiFi Services
Additional Info tab
o E-Commerce Enabled – If checked, this will allow your debit card owners to make online payments via the PortaBilling web interface. (Leave unchecked.)
o Discount Plan – Applies a specific discount plan to this group of accounts. (Leave as Product Default.)
Life Cycle tab
o Activation Date – Account activation date. o Expiration Date – Account expiration date. o Life Time – Relative expiration date; account will expire on
“first usage date” + “life time” days. If you do not want to use this feature, leave the field blank.
NOTE: Account generation tasks are executed every few minutes, and it may take a while to generate large numbers of accounts.
Notification about the generated cards will be sent by email to the user who created them. A CSV file with information about the new accounts will be attached.
Tip: In case the original email message was lost or accidentally deleted, the file containing generated accounts is stored on the slave PortaBilling server in the user porta-admin home directory, sub-directory cards.
© 2000-2009 PortaOne, Inc. All rights Reserved. www.portaone.com
31
Prepaid WiFi Services
Verify Wireless Internet Event History for Account
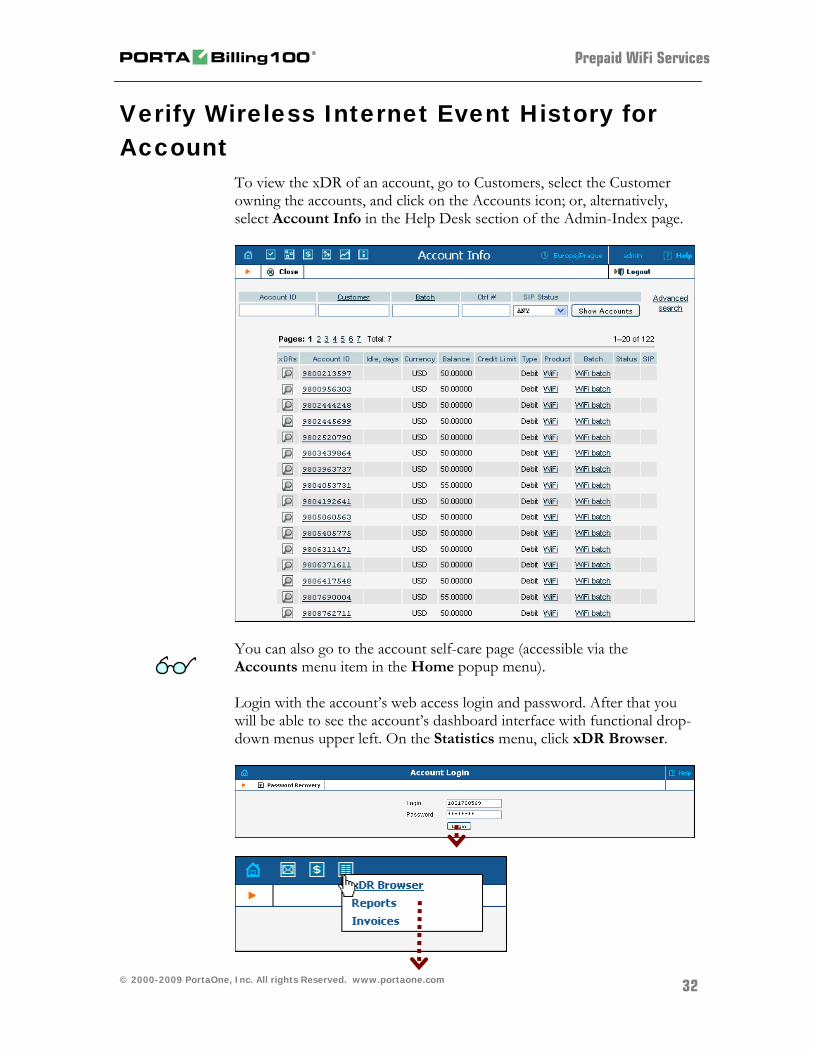
To view the xDR of an account, go to Customers, select the Customer owning the accounts, and click on the Accounts icon; or, alternatively, select Account Info in the Help Desk section of the Admin-Index page.
You can also go to the account self-care page (accessible via the Accounts menu item in the Home popup menu). Login with the account’s web access login and password. After that you will be able to see the account’s dashboard interface with functional drop-down menus upper left. On the Statistics menu, click xDR Browser.
© 2000-2009 PortaOne, Inc. All rights Reserved. www.portaone.com
32

Prepaid WiFi Services
Choose the date range for which you want to see a list of wireless internet accesses, and click Show xDRs. In the results table you will see the charges and other fees, such as maintenance fees or refunds (if any). The report can be also downloaded by clicking the icon.
© 2000-2009 PortaOne, Inc. All rights Reserved. www.portaone.com
33
Prepaid WiFi Services
Common Symptoms/Problems Common Symptom/Problem Description/Solution
Debug on GW shows requests, but PortaBilling Radius debug does not.
There are several reasons why communication may be unsuccessful: 1. Wrong radius server IP
configuration in GW. Verify and correct.
2. Wrong radius port(s) configuration in GW. Verify and correct.
3. IP network problems. Verify that your network is configured correctly, including cables and firewalls.
PortaBilling Radius debug shows requests arriving but says “request from unknown client”.
Verify and correct Node IP address in PortaBilling. Consider any propagation delay, which may require 15 minutes.
Arriving PortaBilling Radius debug showing requests displays a “failed to decrypt” message.
Verify if PortaBilling Node Radius key configuration is the same as GW radius key (shared secret).
PortaBilling replies with authentication reject.
Verify product accessibility list and account status.
Debug session looks normal but GW hangs up (or says nothing) after receiving authentication confirmation.
The most common reason for this is the lack of a particular prompt on IVR prompt servers. This situation may occur only for specific monetary or time values.
Account balance not decreased after successful session, and session does not appear in wireless internet access history.
Verify that the GW is transmitting stop accounting records. Set accountingtype 2 for Quintum or gw-accounting h323 vsa for Cisco.
Provisioning Prepaid Accounts PortaBilling account management is based on batches and control numbers. A batch is a named set of accounts. By giving descriptive names to batches you can keep your accounts well organized. Accounts in each batch are automatically numbered by control numbers, starting with one. If you are generating more accounts for an existing batch, PortaBilling will continue control number assignment from the next available number in the sequence.
© 2000-2009 PortaOne, Inc. All rights Reserved. www.portaone.com
34
Prepaid WiFi Services
Available account management options: Single account Whole batch batch + list of control numbers batch + range of control numbers
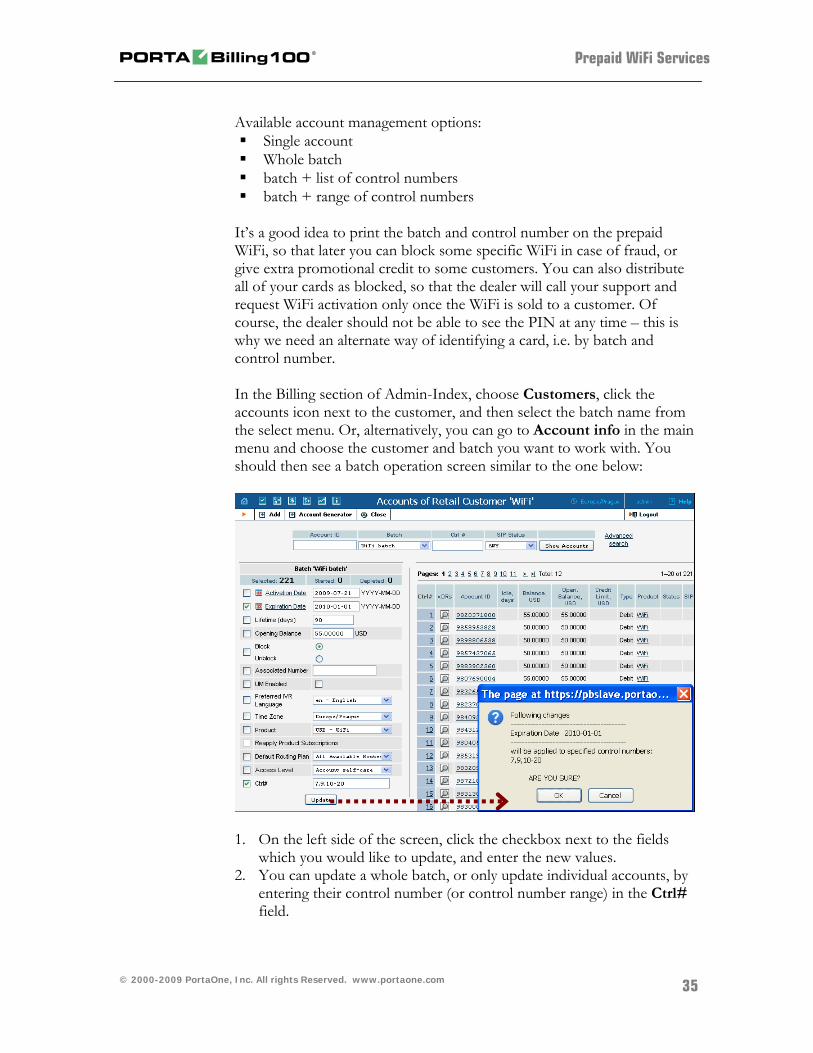
It’s a good idea to print the batch and control number on the prepaid WiFi, so that later you can block some specific WiFi in case of fraud, or give extra promotional credit to some customers. You can also distribute all of your cards as blocked, so that the dealer will call your support and request WiFi activation only once the WiFi is sold to a customer. Of course, the dealer should not be able to see the PIN at any time – this is why we need an alternate way of identifying a card, i.e. by batch and control number. In the Billing section of Admin-Index, choose Customers, click the accounts icon next to the customer, and then select the batch name from the select menu. Or, alternatively, you can go to Account info in the main menu and choose the customer and batch you want to work with. You should then see a batch operation screen similar to the one below:
1. On the left side of the screen, click the checkbox next to the fields
which you would like to update, and enter the new values. 2. You can update a whole batch, or only update individual accounts, by
entering their control number (or control number range) in the Ctrl# field.
© 2000-2009 PortaOne, Inc. All rights Reserved. www.portaone.com
35
Prepaid WiFi Services
© 2000-2009 PortaOne, Inc. All rights Reserved. www.portaone.com
36
TIP: If you click on the control number (leftmost column), it will be automatically inserted into the Ctrl# field. 3. Let us assume you would like to unblock accounts and add $5 to their
balance. You should then click the checkboxes next to Opening Balance and Block/Unblock, enter the balance adjustment value, and pick the new account status.
4. Click the Update button. 5. Confirm OK in the popup window.
NOTE: Balance adjustment will be reflected in wireless internet access history as a separate line.

IPTV Services
IPTV Services This highly customizable IPTV solution enables PortaOne customers to generate additional revenue, raise profits, and increase customer satisfaction by delivering advanced television services.
© 2000-2009 PortaOne, Inc. All rights Reserved. www.portaone.com
37
IPTV Services
IPTV Service Scenario In a PortaSwitch-based network infrastructure, IPTV services are implemented by means of a LivingRoom module. They work in conjunction with the following:
Kasenna LivingRoom™ Server (below: LivingRoom server) PortaBilling PortaOne LivingRoom Module (below: LivingRoom module)
This combination of services enables carriers to offer customers a wide portfolio of billable IPTV services, such as:
TV user interface Broadcast TV Personal video recorder (PVR) services
In subsequent PortaBilling releases we plan to implement the following features:
Video on demand (VOD) Pay per view (PPV) Music on demand
KasennaLivingRoom Server
Porta Billing
Invoice
Package 1
Package 2
Package 3
LivingRoom Module
In conjunction with LivingRoom, PortaBilling offers you the ability to:
set up periodic and per-event charges for IPTV services in PortaBilling;
view charge records and subtotals for IPTV services on the web interface and the customer's invoice.
© 2000-2009 PortaOne, Inc. All rights Reserved. www.portaone.com
38
IPTV Services
Kasenna LivingRoom — PortaBilling Interaction
1. An IPTV service in LivingRoom is activated for the subscriber when a credit account is created in PortaBilling.
2. PortaBilling terminates services in LivingRoom when the account, or the customer who owns it, is suspended or terminated.
3. PortaBilling adds information on services provided and charges incurred to the customer's bill.
The following diagram explains the relationship between basic concepts in PortaBilling and LivingRoom:
An account in PortaBilling corresponds to a subscriber in LivingRoom.
A PortaBilling product is similar to a LivingRoom service plan. A package or set of channels in LivingRoom corresponds to a
subscription in PortaBilling. A service region in LivingRoom describes a geographical region,
and the same package may represent a different set of channels for each region.
LivingRoom
Service Plan
ProductAccount
Subscriber
Subscription
Service Region Package
Porta Billing
Thus the combination of service plan plus service region corresponds to a PortaBilling product, while the combination of service region plus package corresponds to a PortaBilling subscription.
Consider the following example: An IPTV provider uses LivingRoom with the following assets:
2 service regions called “Bonaire” and “Rincon”; 3 packages: Basic, Expanded, Premium; 2 service plans: “Basic Choice”, containing the Basic package, and
“Full”, containing all available packages. Thus four products should be created in PortaBilling using the naming convention <Service Plan>/<Service Region>, as follows:
Basic Choice/Bonaire Full/Bonaire
© 2000-2009 PortaOne, Inc. All rights Reserved. www.portaone.com
39
IPTV Services
Basic Choice/Rincon Full/Rincon
We will also use two different subscription types to charge subscribers for IPTV services:
1. Subscriptions for configuring LivingRoom services. The LivingRoom module will recognize such subscriptions by
the slash in their name. The naming convention for these subscriptions is <Package>/<Service Region>.
In our example, we need four subscriptions. If necessary, we can add them later to existing accounts: o Expanded/Bonaire o Expanded/Rincon o Premium/Bonaire o Premium/Rincon
Please note that there is no need to create a subscription for the Basic package, since both service plans already include it.
2. Subscriptions for charging accounts in PortaBilling.
We will use the naming convention <Service Plan> (Service Region) so that the LivingRoom module will ignore such subscriptions. You may also use your own method of naming, as long as it does not use the slash character.
In our example, we need four subscriptions: o Basic Choice (Bonaire) o Basic Choice (Rincon) o Full (Bonaire) o Full (Rincon)
Please note that obligatory subscriptions (assigned to an account through a product) are always ignored by the LivingRoom module. Subscriptions assigned directly to an account will only affect the configuration if the LivingRoom server conforms to the convention. The LivingRoom module will ignore all other subscriptions.
© 2000-2009 PortaOne, Inc. All rights Reserved. www.portaone.com
40
IPTV Services
Checklist Print the following page and use it to check off the operations you have completed while performing system setup according to the instructions in this chapter. Please be sure to perform all of the operations (all of the boxes must be checked), otherwise the service will not work. Operation
Done
Set up Kasenna LivingRoom server. [ ] Configure PortaBilling. [ ] Network configuration Create corresponding subscriptions. [ ] Create corresponding products. [ ] Account provisioning Create a retail customer. [ ] Generate accounts for this customer. [ ] Testing Login to Kasenna LivingRoom server and check for subscribers. [ ]
Set up the Kasenna LivingRoom™ Server Please refer to Espial for guidelines on how to set up the LivingRoom server. You should complete the steps for all the components, except for the Subscribers section.
Configure PortaBilling The following code must be added to the configuration file located in /home/porta-admin/etc/porta-admin.conf on the Slave server.
[LivingRoom] Env=<LivingRoomEnv> EMail=<EMailToReportErrors> # Bcc=<BccToReportErrors> # Delay between sessions, sec Delay=30 #LogFile=/var/log/porta/living_room.log #LockFile=/home/porta-admin/run/living_room.lock
The PortaBilling LivingRoom module works in a single environment, whose name should be set for the Env variable. Error and alert messages will be distributed to email and BCC addresses. The delay corresponds to the frequency (in seconds) of checks for changes in the database. All module activities are logged.
© 2000-2009 PortaOne, Inc. All rights Reserved. www.portaone.com
41
IPTV Services
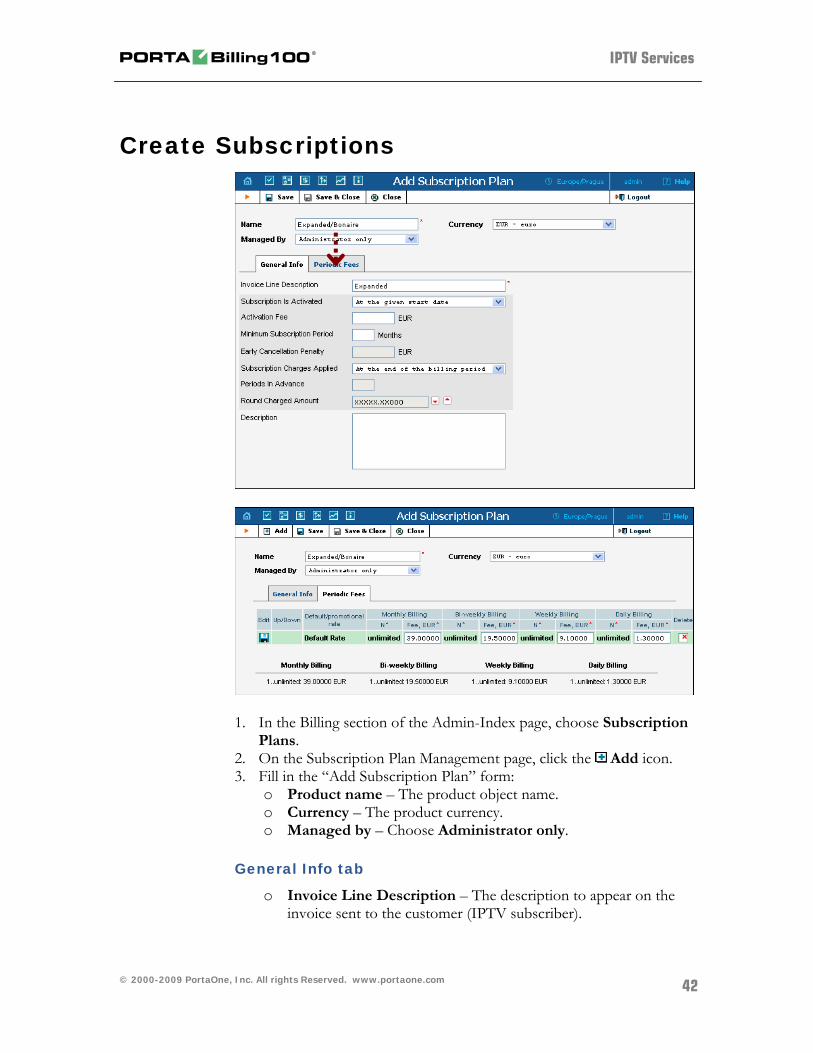
Create Subscriptions
1. In the Billing section of the Admin-Index page, choose Subscription Plans.
2. On the Subscription Plan Management page, click the Add icon. 3. Fill in the “Add Subscription Plan” form:
o Product name – The product object name. o Currency – The product currency. o Managed by – Choose Administrator only.
General Info tab
o Invoice Line Description – The description to appear on the invoice sent to the customer (IPTV subscriber).
© 2000-2009 PortaOne, Inc. All rights Reserved. www.portaone.com
42
IPTV Services
Periodic Fees tab
o Click the Edit icon and enter the rates for periodic billing. PortaBilling will auto-fill the form after the rate for monthly billing has been entered. You can edit rates or add new rates for the same subscription.
o Click Save. 4. Repeat the above procedure for all eight subscriptions:
Create Products
© 2000-2009 PortaOne, Inc. All rights Reserved. www.portaone.com
43
IPTV Services
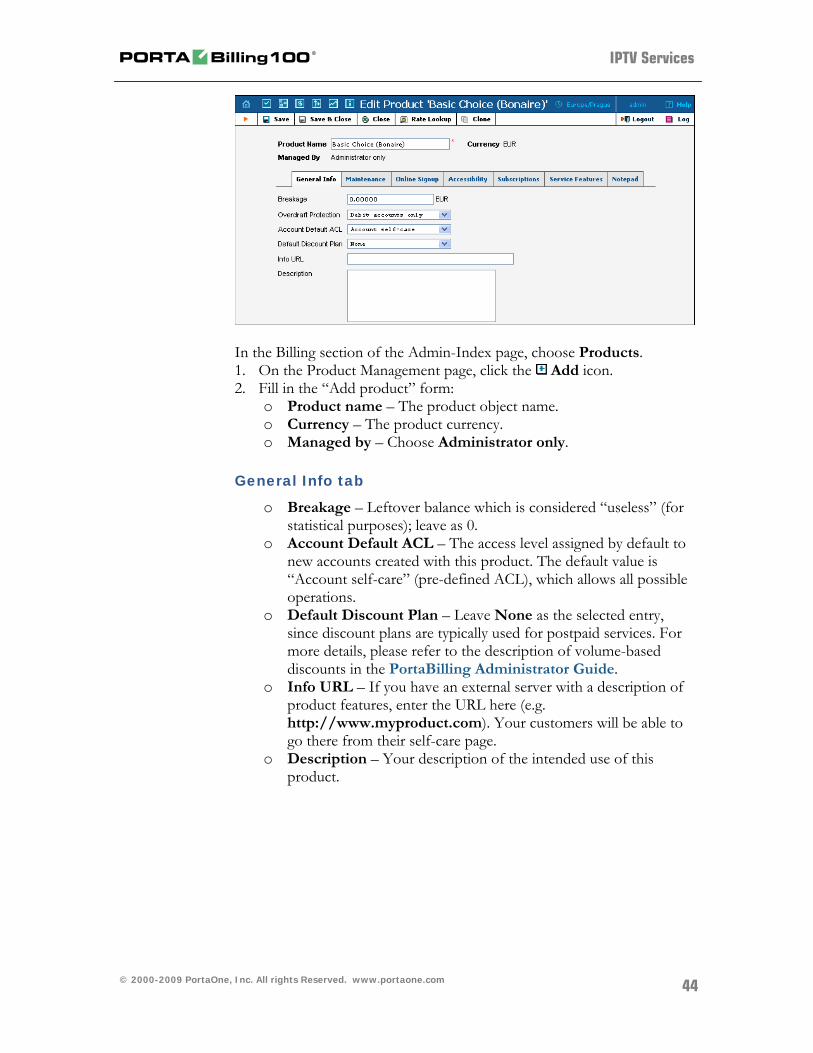
In the Billing section of the Admin-Index page, choose Products. 1. On the Product Management page, click the Add icon. 2. Fill in the “Add product” form:
o Product name – The product object name. o Currency – The product currency. o Managed by – Choose Administrator only.
General Info tab
o Breakage – Leftover balance which is considered “useless” (for statistical purposes); leave as 0.
o Account Default ACL – The access level assigned by default to new accounts created with this product. The default value is “Account self-care” (pre-defined ACL), which allows all possible operations.
o Default Discount Plan – Leave None as the selected entry, since discount plans are typically used for postpaid services. For more details, please refer to the description of volume-based discounts in the PortaBilling Administrator Guide.
o Info URL – If you have an external server with a description of product features, enter the URL here (e.g. http://www.myproduct.com). Your customers will be able to go there from their self-care page.
o Description – Your description of the intended use of this product.
© 2000-2009 PortaOne, Inc. All rights Reserved. www.portaone.com
44
IPTV Services
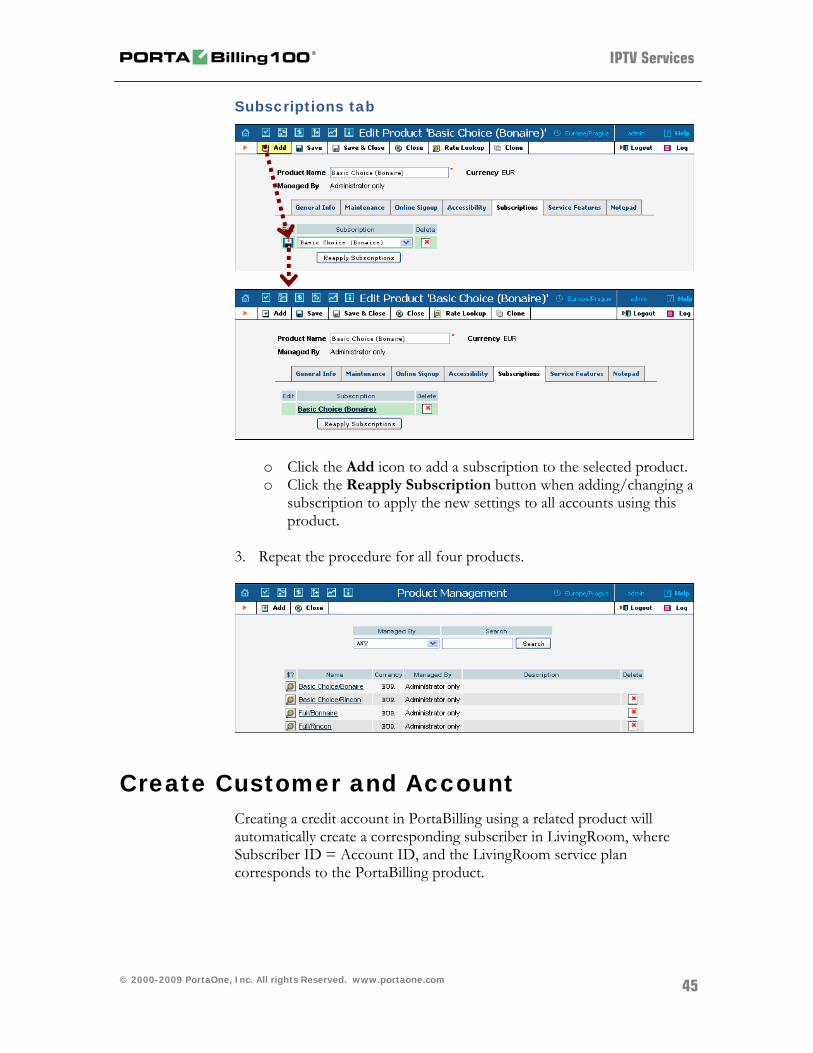
Subscriptions tab
o Click the Add icon to add a subscription to the selected product. o Click the Reapply Subscription button when adding/changing a
subscription to apply the new settings to all accounts using this product.
3. Repeat the procedure for all four products.
Create Customer and Account Creating a credit account in PortaBilling using a related product will automatically create a corresponding subscriber in LivingRoom, where Subscriber ID = Account ID, and the LivingRoom service plan corresponds to the PortaBilling product.
© 2000-2009 PortaOne, Inc. All rights Reserved. www.portaone.com
45
IPTV Services
© 2000-2009 PortaOne, Inc. All rights Reserved. www.portaone.com
46
IPTV Services
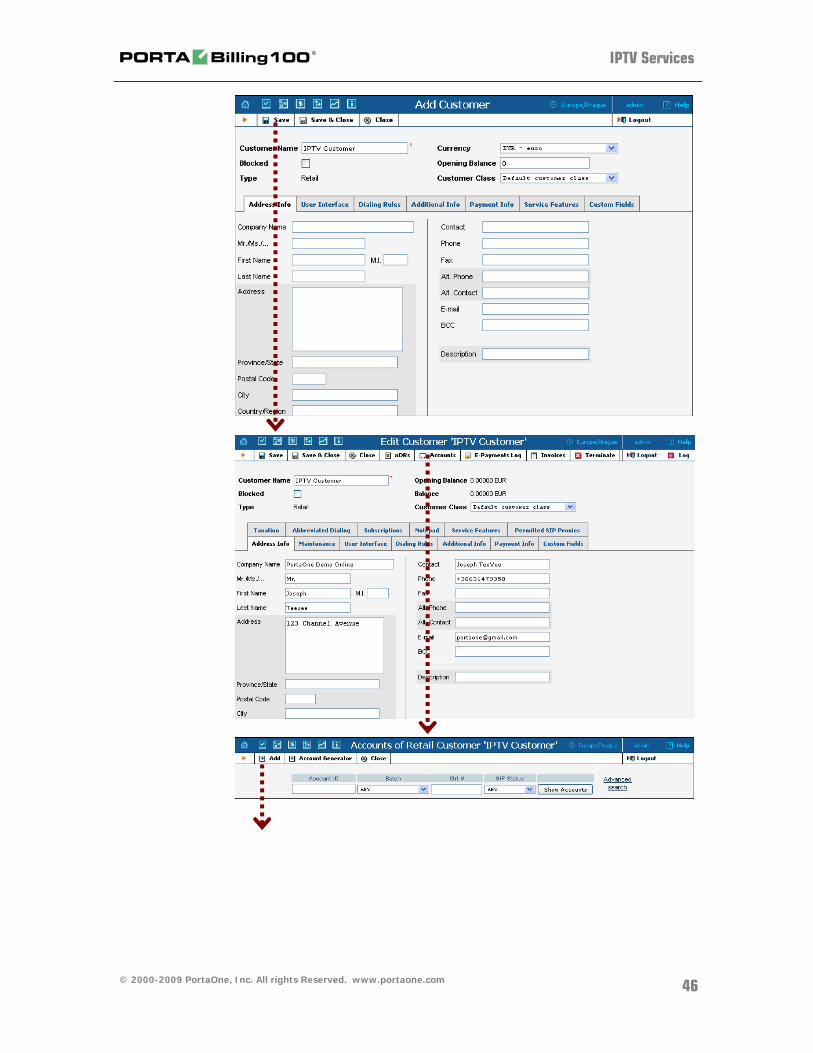
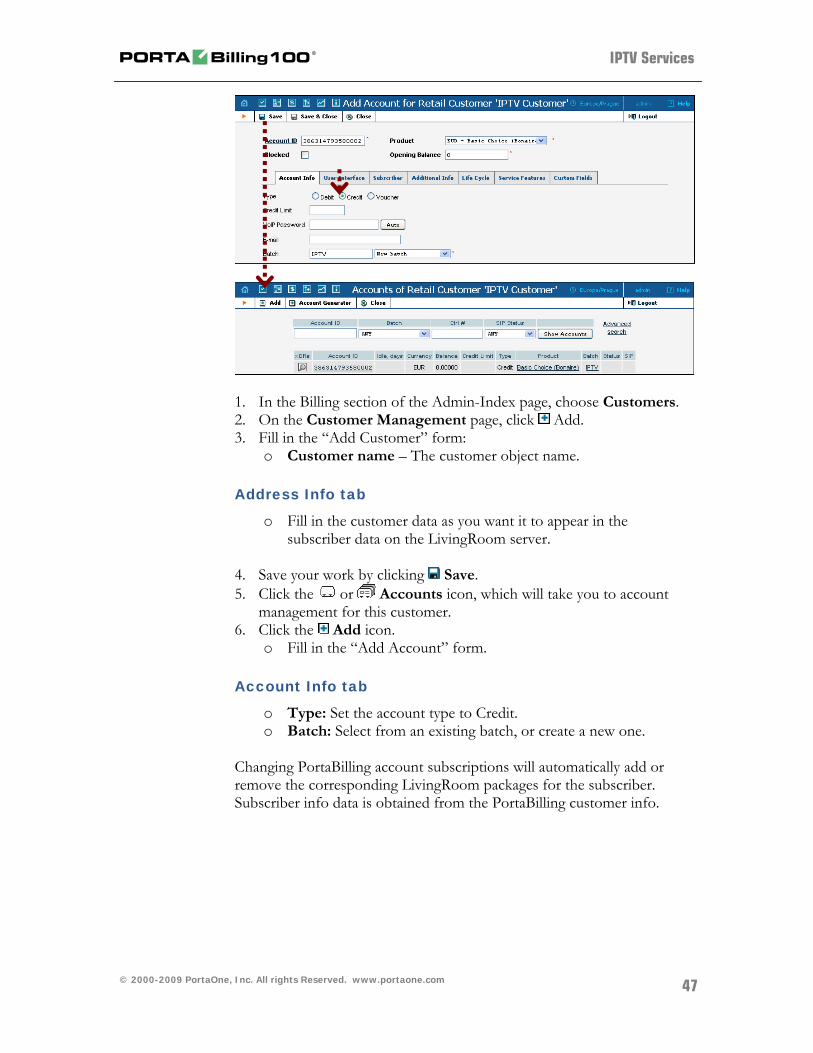
1. In the Billing section of the Admin-Index page, choose Customers. 2. On the Customer Management page, click Add. 3. Fill in the “Add Customer” form:
o Customer name – The customer object name.
Address Info tab
o Fill in the customer data as you want it to appear in the subscriber data on the LivingRoom server.
4. Save your work by clicking Save. 5. Click the or Accounts icon, which will take you to account
management for this customer. 6. Click the Add icon.
o Fill in the “Add Account” form.
Account Info tab
o Type: Set the account type to Credit. o Batch: Select from an existing batch, or create a new one.
Changing PortaBilling account subscriptions will automatically add or remove the corresponding LivingRoom packages for the subscriber. Subscriber info data is obtained from the PortaBilling customer info.
© 2000-2009 PortaOne, Inc. All rights Reserved. www.portaone.com
47
IPTV Services
© 2000-2009 PortaOne, Inc. All rights Reserved. www.portaone.com
48
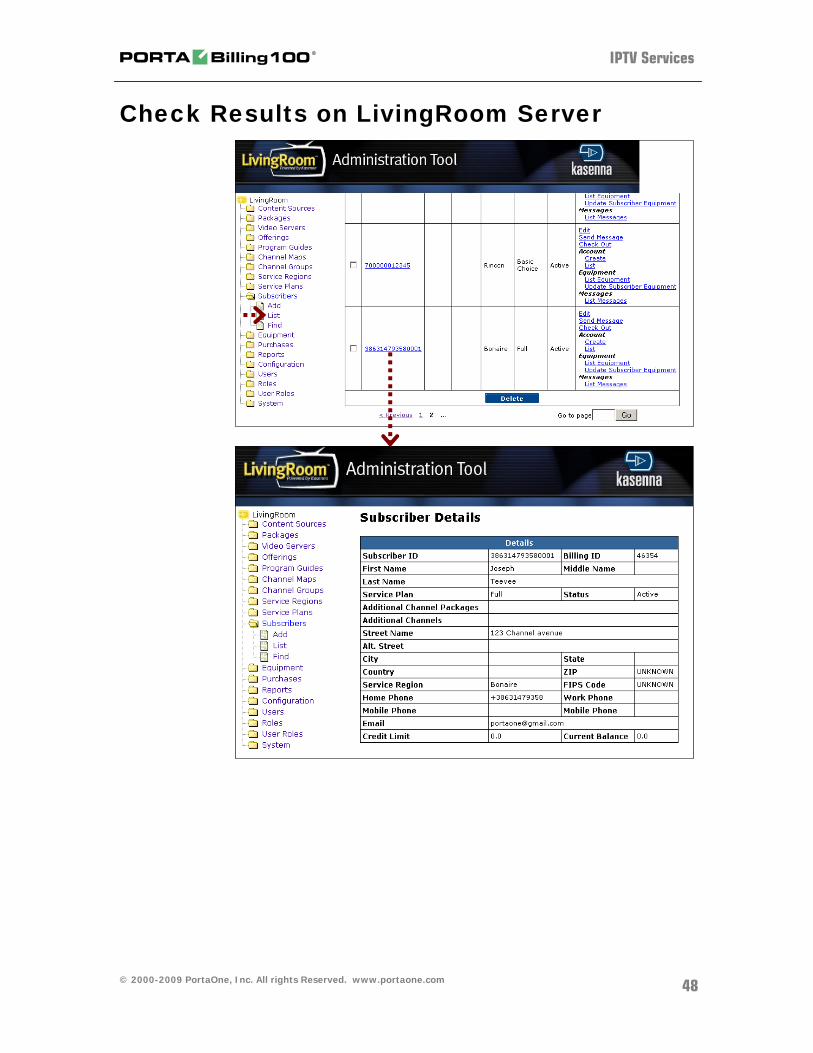
Check Results on LivingRoom Server
Broadband Services
Broadband Services This chapter describes how you can use PortaBilling to provision and define rates for broadband Internet access services (such as DSL, ADSL, cable, etc.) The most typical broadband package types you can offer your clients include:
Fixed bandwidth (download and/or upload) and unlimited data transfer, for a fixed monthly fee.
Fixed bandwidth (download and/or upload) and a limited total data transfer amount, for a fixed monthly fee.
A pay-as-you-go plan, where the customer is charged based on the amount of data transferred (per kilobyte, megabyte or gigabyte).
In this chapter we will show you how to:
charge data transfers using tariffs; implement packages with a fixed monthly fee using
subscriptions assigned to products; limit bandwidth for a product and/or an account; limit data transfers using discount plans.
You will also learn how to assign a static IP to an account and restrict the number of simultaneous Internet sessions with the same Account ID.
© 2000-2009 PortaOne, Inc. All rights Reserved. www.portaone.com
49
Broadband Services
Examples of Broadband Packages As an example, we will create three packages with the following specifications:
1. Start: 128 kbps upload and 512 kbps download bandwidth, unlimited data transfer, $15.00 monthly.
2. Pro: 512 kbps upload and 2 Mbps download bandwidth, 5 GB of data transferred during peak hours and 20 GB of data transferred during night hours, $30.00 monthly. Data transfer above these thresholds is charged at $20 per gigabyte.
3. Premium: 256 kbps upload and 1 Mbps download bandwidth, data transfer up to 10 GB, $40.00 monthly. When the data transfer exceeds this threshold, the amount of available bandwidth will be severely reduced.
Please refer to the PortaBilling100 Web Reference Guide PDF for detailed instructions on how to navigate and operate the web interface, as along with detailed explanations of particular fields.
© 2000-2009 PortaOne, Inc. All rights Reserved. www.portaone.com
50

Broadband Services
Checklist Print the following page and use it to check off the operations you have completed while performing system setup according to the instructions in this chapter. Please be sure to perform all of the operations (all of the boxes must be checked), otherwise the service will not work.
© 2000-2009 PortaOne, Inc. All rights Reserved. www.portaone.com
51
Broadband Services
Operation
Done
General configuration Enter company data under Company Info. [ ] Specify a base currency. [ ] For any other currency you plan to use, specify the exchange rate source and define exchange rates.
[ ]
Create the symbolic destination NETACCESS. [ ] Create services. [ ] Network configuration Add a Cisco gateway as a node on the web. [ ] Rating configuration Create a tariff A which will be applied to Internet users. [ ] Insert rates in tariff A for the symbolic NETACCESS destination.
[ ]
Create a tariff B, which describes your termination costs. [ ] Insert rates in tariff B for the symbolic NETACCESS destination.
[ ]
Create subscriptions. [ ] Create a destination group set. [ ] Create a destination group. [ ] Assign the NETACCESS prefix to this destination group. [ ] Create a volume discount plan. [ ] Define discounts within this discount plan. [ ] Create a product. [ ] Assign this discount plan as the default one for the product. [ ] Create one accessibility entry in the account's product, using the node you created and tariff A.
[ ]
Apply a subscription to the product. [ ] Set a bandwidth limit for the product. [ ] Create a vendor. [ ] Create a connection for this vendor with the Internet Access service type, using tariff B.
[ ]
Account provisioning Create a customer. [ ] Create accounts for this customer. [ ] Assign a static IP and restrict the number of simultaneous sessions for accounts.
[ ]
Set a bandwidth limit for accounts. [ ]
© 2000-2009 PortaOne, Inc. All rights Reserved. www.portaone.com
52
Broadband Services
Initial Configuration of PortaSwitch TIP: When the system has just been installed, use username pb-root and password pb-root to login. The following steps are normally performed only once, after the system is installed: Visit Company Info on the main menu. Enter information about your company and set up a base currency. Naturally, this does not limit your operations to this currency only. However, on cost/revenue reports and the like different currencies will be converted to the one you specify here.
NOTE: Once you set up a base currency it cannot be changed. If you make a mistake, you will have to start with a new PortaBilling environment.
From the main menu, choose Users and create login entries for users who will be working with the system. It is not recommended that the default PortaBilling root user (pb-root) be used for any operations other than initial set-up. Make sure you are able to login as the newly-created user and change the password for the pb-root user. If you plan to do billing in multiple currencies, define these in the Currencies section and specify exchange rates in Exchange Rates.
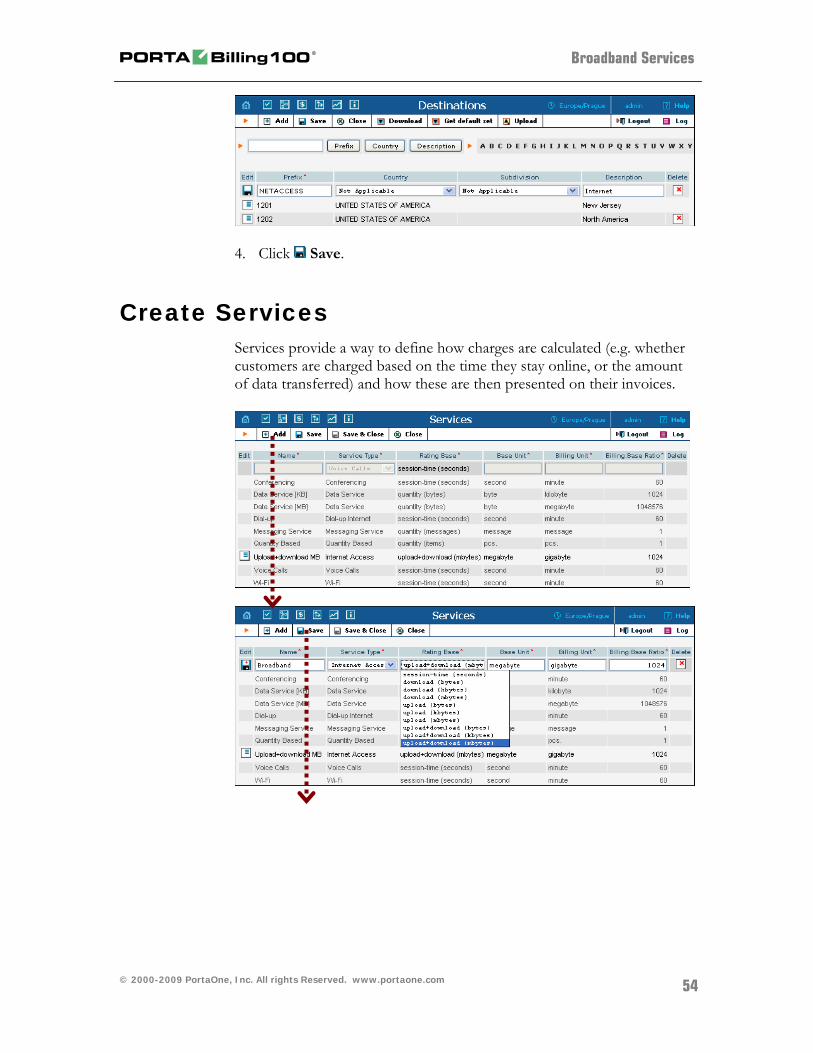
Create Destination This step is only required if you have not defined the necessary destination before. If not, you will need to create a symbolic NETACCESS destination. 1. In the Management section of Admin-Index, choose Destination. 2. Click on the Add button. 3. Fill in the required information. In the Description column, enter
some useful information about the service being provided (e.g. Internet), since this is what your clients will see on their xDR History pages.
© 2000-2009 PortaOne, Inc. All rights Reserved. www.portaone.com
53
Broadband Services
4. Click Save.
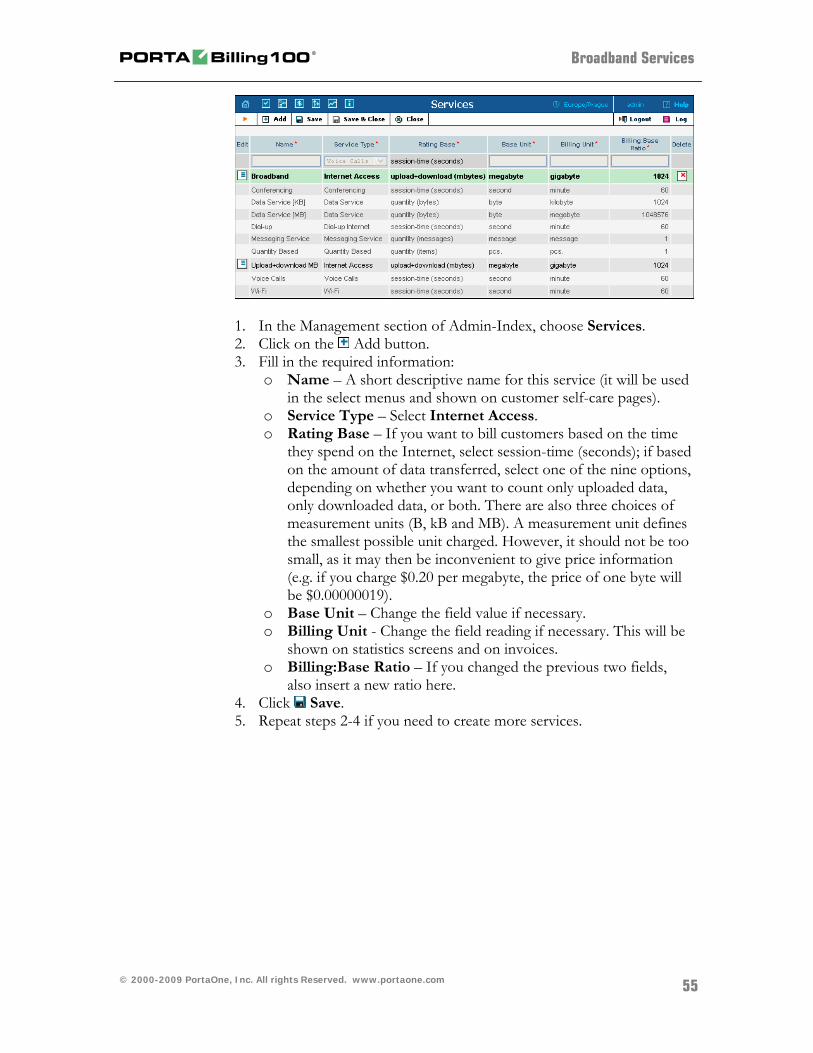
Create Services Services provide a way to define how charges are calculated (e.g. whether customers are charged based on the time they stay online, or the amount of data transferred) and how these are then presented on their invoices.
© 2000-2009 PortaOne, Inc. All rights Reserved. www.portaone.com
54
Broadband Services
1. In the Management section of Admin-Index, choose Services. 2. Click on the Add button. 3. Fill in the required information:
o Name – A short descriptive name for this service (it will be used in the select menus and shown on customer self-care pages).
o Service Type – Select Internet Access. o Rating Base – If you want to bill customers based on the time
they spend on the Internet, select session-time (seconds); if based on the amount of data transferred, select one of the nine options, depending on whether you want to count only uploaded data, only downloaded data, or both. There are also three choices of measurement units (B, kB and MB). A measurement unit defines the smallest possible unit charged. However, it should not be too small, as it may then be inconvenient to give price information (e.g. if you charge $0.20 per megabyte, the price of one byte will be $0.00000019).
o Base Unit – Change the field value if necessary. o Billing Unit - Change the field reading if necessary. This will be
shown on statistics screens and on invoices. o Billing:Base Ratio – If you changed the previous two fields,
also insert a new ratio here. 4. Click Save. 5. Repeat steps 2-4 if you need to create more services.
© 2000-2009 PortaOne, Inc. All rights Reserved. www.portaone.com
55
Broadband Services
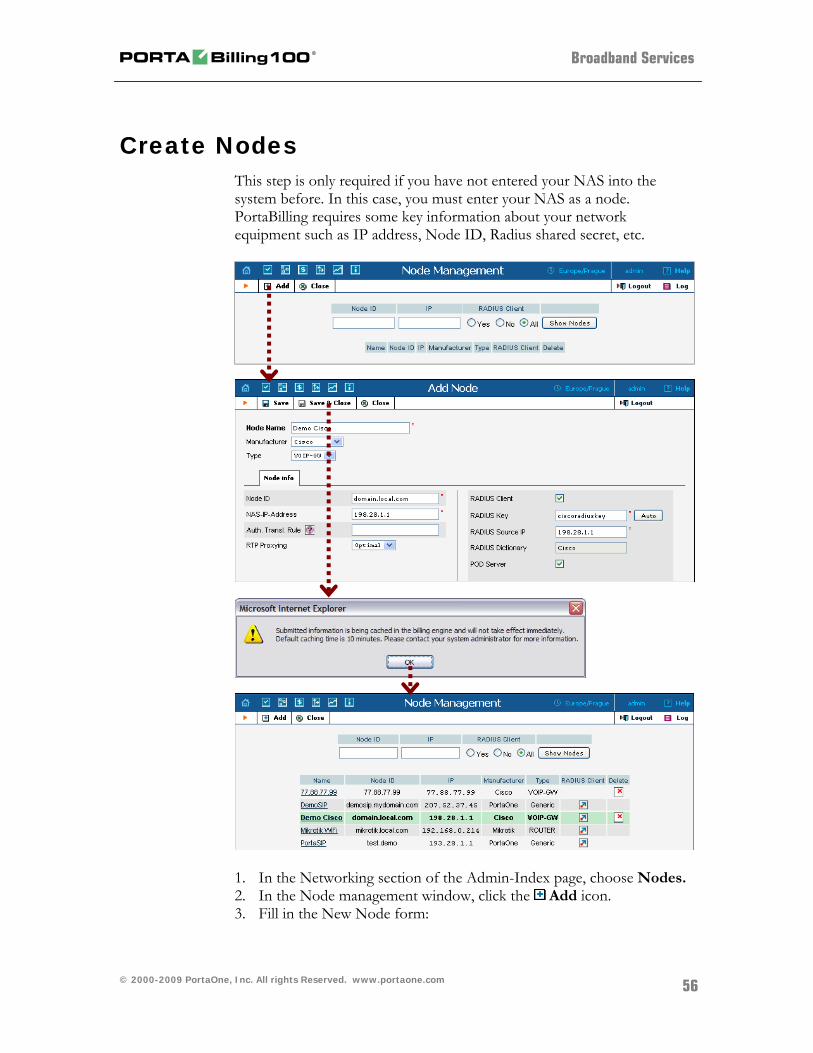
Create Nodes This step is only required if you have not entered your NAS into the system before. In this case, you must enter your NAS as a node. PortaBilling requires some key information about your network equipment such as IP address, Node ID, Radius shared secret, etc.
1. In the Networking section of the Admin-Index page, choose Nodes. 2. In the Node management window, click the Add icon. 3. Fill in the New Node form:
© 2000-2009 PortaOne, Inc. All rights Reserved. www.portaone.com
56
Broadband Services
o Node Name – A short descriptive name for this node (will be used in the select menus).
o Manufacturer - Select Cisco. o Type – VoIP node type; select VOIP-GW. o Node ID – Cisco server host name (recommended
hostname.domainname). o NAS-IP-Address – IP address of the gateway. o Auth. Translation rule – Leave this empty for now; see the
Translation Rules section of the PortaBilling Administrator Guide. o RTP Proxying – Leave the default selection (Optimal); this
parameter is applicable only if you use this node for VoIP services.
o Radius Client – Check this box since this node will be communicating with the billing system.
o Radius Key – Enter the shared secret here; must be the same as that configured in NAS as a key in the radius server configuration.
o Radius Source IP – See the Node ID, NAS IP address, and Radius source IP section of the PortaBilling Administrator Guide. Unless your gateway has multiple network interfaces, the value here should be the same as the NAS-IP-Address.
o POD Server – Make sure to check this box to enable interaction with this server on NAS. The system will send a special command to this server if an account runs out of balance, exceeds its data transfer limit, or expires. The POD server will then terminate the Internet session(s) opened by this account.
4. Click Save&Close. 5. Repeat steps 2-4 until all of your nodes have been entered.
NOTE: There is some propagation delay between the database and the Radius server configuration file, but no more than 15 minutes.
© 2000-2009 PortaOne, Inc. All rights Reserved. www.portaone.com
57
Broadband Services
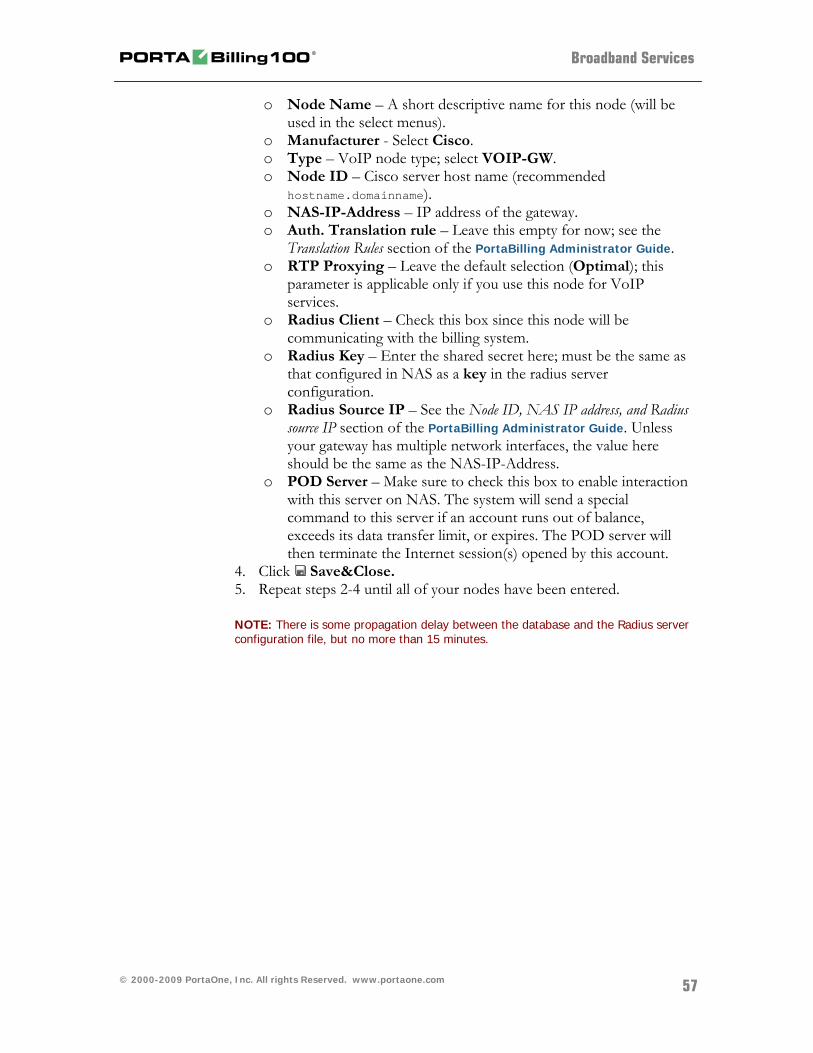
Create Tariff The tariff is a single price list for the use of internet access services. At least two tariffs should be created to provide internet access services successfully:
o A tariff for each account’s billing scheme, these tariffs are created as “Applied to: Customer”;
o A tariff with the termination costs for each termination partner you have; these tariffs are created as “Applied to: Vendor”.
To create the required tariffs, follow the next steps:
© 2000-2009 PortaOne, Inc. All rights Reserved. www.portaone.com
58
Broadband Services
1. In the Billing section of Admin-Index, choose Tariffs. 2. On the Tariff Management page, choose Add. 3. Fill in the New Tariff form:
o Name – A short name for the tariff object; this is the name you will then see in the select menus.
o Currency – Indicates in which currency pricing information is defined. All pricing information for a single tariff must be defined in the same currency.
NOTE: The currency for the tariff may be chosen only once, and cannot be changed later.
o Applied To – Designates whether this tariff will be used to charge your prepaid customers (in this case, choose a Customer) or to calculate costs associated with your vendors (in this case, choose a Vendor).
o Managed By – Choose “Administrator Only” here (this option is only visible after you select Applied to: Customer above).
o Service – Choose one of the services you created. o Off-peak Period – Defines the off-peak periods. For our Pro
example package, we need to define night hours (from 9pm until 8am) as an off-peak period. Click on the Off-peak period wizard icon ( ) to summon the wizard, which will help you make the correct period definition. Refer to the PortaSIP Handbook Advanced SIP Services, Create Service with Multiple Off-Peak Periods section, for more information on period format definition. If you do not differentiate between peak and off-peak rates, just leave this field empty.
© 2000-2009 PortaOne, Inc. All rights Reserved. www.portaone.com
59
Broadband Services
o Off-peak Description – A description of the off-peak period, automatically filled in by the off-peak period wizard; thus you do not have to fill in this field.
o Login Fee – Amount to be charged immediately after the first user authentication (i.e. after the user enters his ID).
o Connect Fee – Amount to be charged for each connected session (with a non-zero duration).
o Short Description – A short tariff description. This will be shown in the rate lookup on the admin interface and the self-care pages for your accounts and customers.
o Description – An extended tariff description. 4. Click Save. 5. Repeat steps 1-4 until you have entered all of the tariffs. In our
example, we need to create two customer tariffs: one for the Start package and another joint one for the Pro and Premium packages. Also, we need one vendor tariff:
Enter Rates Rates are per-destination prices. Please refer to the Call Billing Parameters chapter in the PortaBilling Administrator Guide for more information on billing parameters.
© 2000-2009 PortaOne, Inc. All rights Reserved. www.portaone.com
60
Broadband Services
1. On the Tariff Management page you will see a list of available tariffs.
Click the Rates icon before the name of the tariff. When you are in Tariff Management for a particular tariff, click on Rates in the toolbar.
2. In the Edit Rates screen, click Add. 3. Fill in the required information:
o Rate Codes – A symbolic destination prefix may be entered directly, or you can access the destinations directory by clicking the Rate Codes link (in the column header).
NOTE: The NETACCESS rate code you are trying to create a rate for must already exist in Destinations.
o Minimum Threshold – First billing unit in base units (in our example, megabytes).
o Rounding – Next billing unit in base units (in our example, megabytes).
o Unit Price Initial – Price for first interval per billing unit (in our example, per gigabyte).
o Unit Price Next – Price for next interval per billing unit (in our example, per gigabyte).
o Off-peak Minimum Threshold – First billing unit in base units for off-peak time.
o Off-peak Rounding – Next billing unit in base units for off-peak time.
o Off-peak Unit Price Initial – Price for first interval per billing unit for off-peak time.
o Off-peak Unit Price Next – Price for next interval per billing unit.
NOTE: Off-peak fields appear only if an off-peak period has been defined for the tariff.
o Effective From – If you want this rate to take effect sometime in the future, you can either type in a date manually, or use the calendar (click the DD-MM-YYYY link).
© 2000-2009 PortaOne, Inc. All rights Reserved. www.portaone.com
61
Broadband Services
NOTE: When using the calendar, you can specify that the date you are entering is in a different time zone than your present one. PortaBilling will then automatically adjust the time.
o Rate Formula Wizard – launches the wizard for creating a custom rating formula
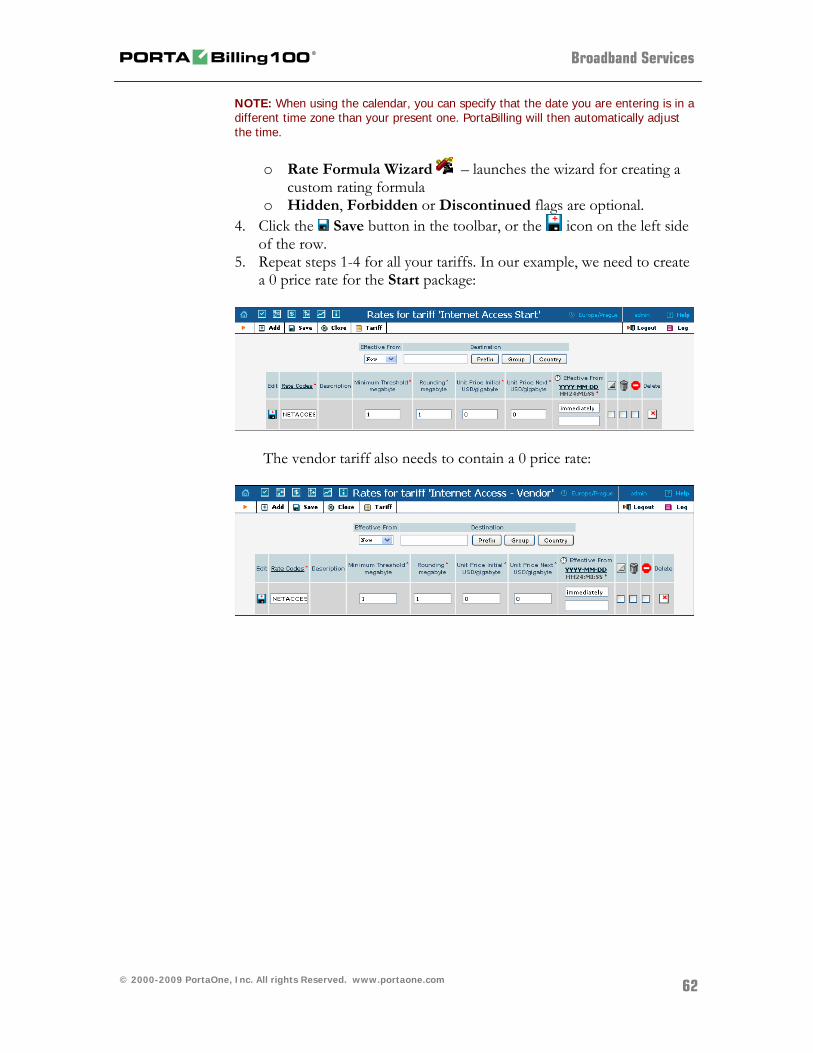
o Hidden, Forbidden or Discontinued flags are optional. 4. Click the Save button in the toolbar, or the icon on the left side
of the row. 5. Repeat steps 1-4 for all your tariffs. In our example, we need to create
a 0 price rate for the Start package:
The vendor tariff also needs to contain a 0 price rate:
© 2000-2009 PortaOne, Inc. All rights Reserved. www.portaone.com
62
Broadband Services
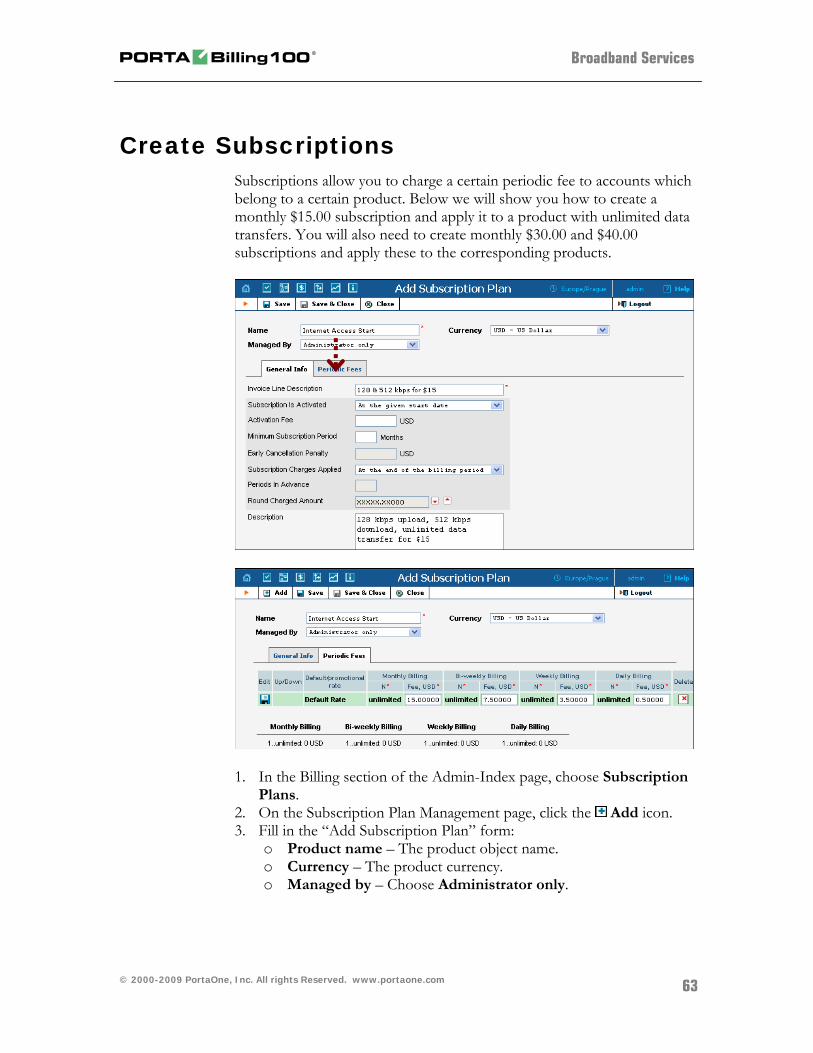
Create Subscriptions Subscriptions allow you to charge a certain periodic fee to accounts which belong to a certain product. Below we will show you how to create a monthly $15.00 subscription and apply it to a product with unlimited data transfers. You will also need to create monthly $30.00 and $40.00 subscriptions and apply these to the corresponding products.
1. In the Billing section of the Admin-Index page, choose Subscription Plans.
2. On the Subscription Plan Management page, click the Add icon. 3. Fill in the “Add Subscription Plan” form:
o Product name – The product object name. o Currency – The product currency. o Managed by – Choose Administrator only.
© 2000-2009 PortaOne, Inc. All rights Reserved. www.portaone.com
63
Broadband Services
General Info tab
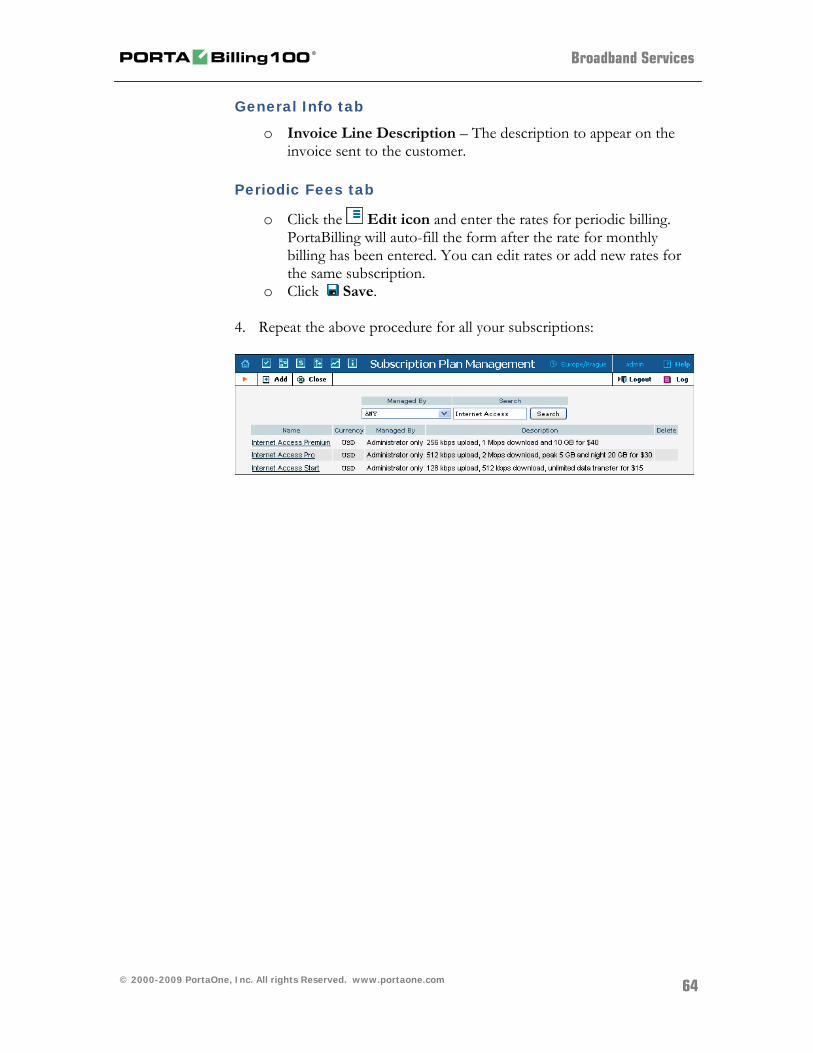
o Invoice Line Description – The description to appear on the invoice sent to the customer.
Periodic Fees tab
o Click the Edit icon and enter the rates for periodic billing. PortaBilling will auto-fill the form after the rate for monthly billing has been entered. You can edit rates or add new rates for the same subscription.
o Click Save. 4. Repeat the above procedure for all your subscriptions:
© 2000-2009 PortaOne, Inc. All rights Reserved. www.portaone.com
64
Broadband Services
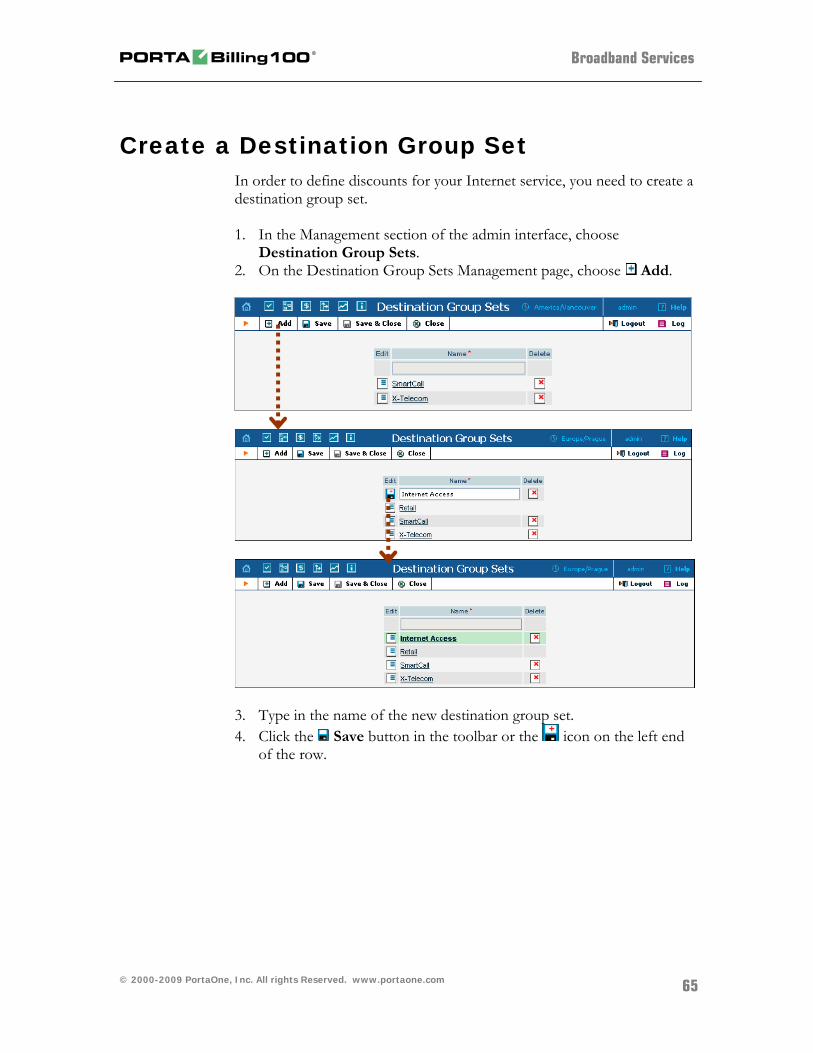
Create a Destination Group Set In order to define discounts for your Internet service, you need to create a destination group set. 1. In the Management section of the admin interface, choose
Destination Group Sets. 2. On the Destination Group Sets Management page, choose Add.
3. Type in the name of the new destination group set. 4. Click the Save button in the toolbar or the icon on the left end
of the row.
© 2000-2009 PortaOne, Inc. All rights Reserved. www.portaone.com
65
Broadband Services
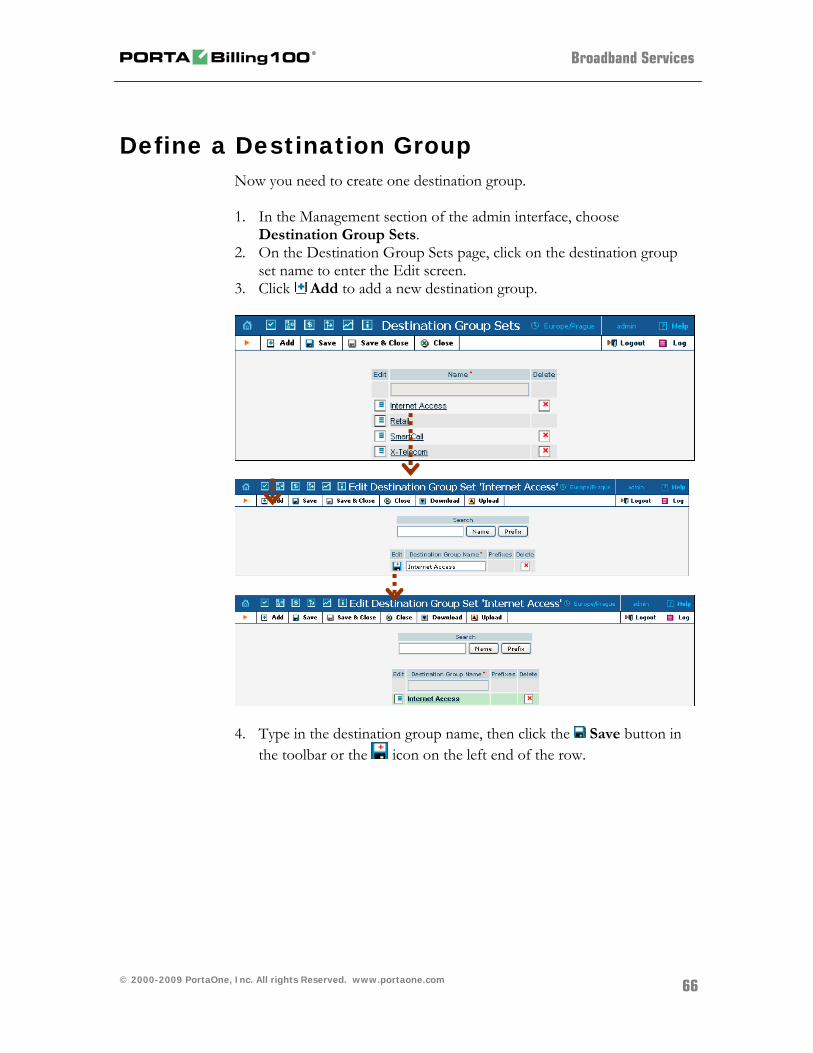
Define a Destination Group Now you need to create one destination group. 1. In the Management section of the admin interface, choose
Destination Group Sets. 2. On the Destination Group Sets page, click on the destination group
set name to enter the Edit screen. 3. Click Add to add a new destination group.
4. Type in the destination group name, then click the Save button in
the toolbar or the icon on the left end of the row.
© 2000-2009 PortaOne, Inc. All rights Reserved. www.portaone.com
66
Broadband Services
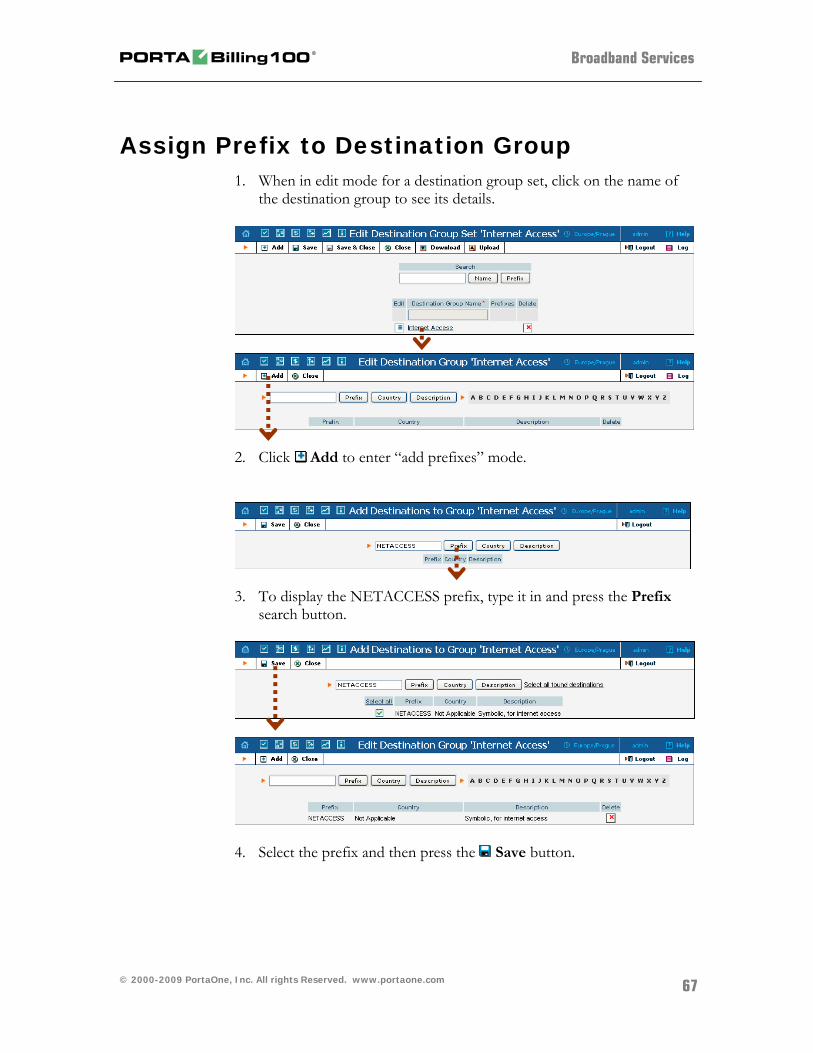
Assign Prefix to Destination Group 1. When in edit mode for a destination group set, click on the name of
the destination group to see its details.
2. Click Add to enter “add prefixes” mode.
3. To display the NETACCESS prefix, type it in and press the Prefix
search button.
4. Select the prefix and then press the Save button.
© 2000-2009 PortaOne, Inc. All rights Reserved. www.portaone.com
67
Broadband Services
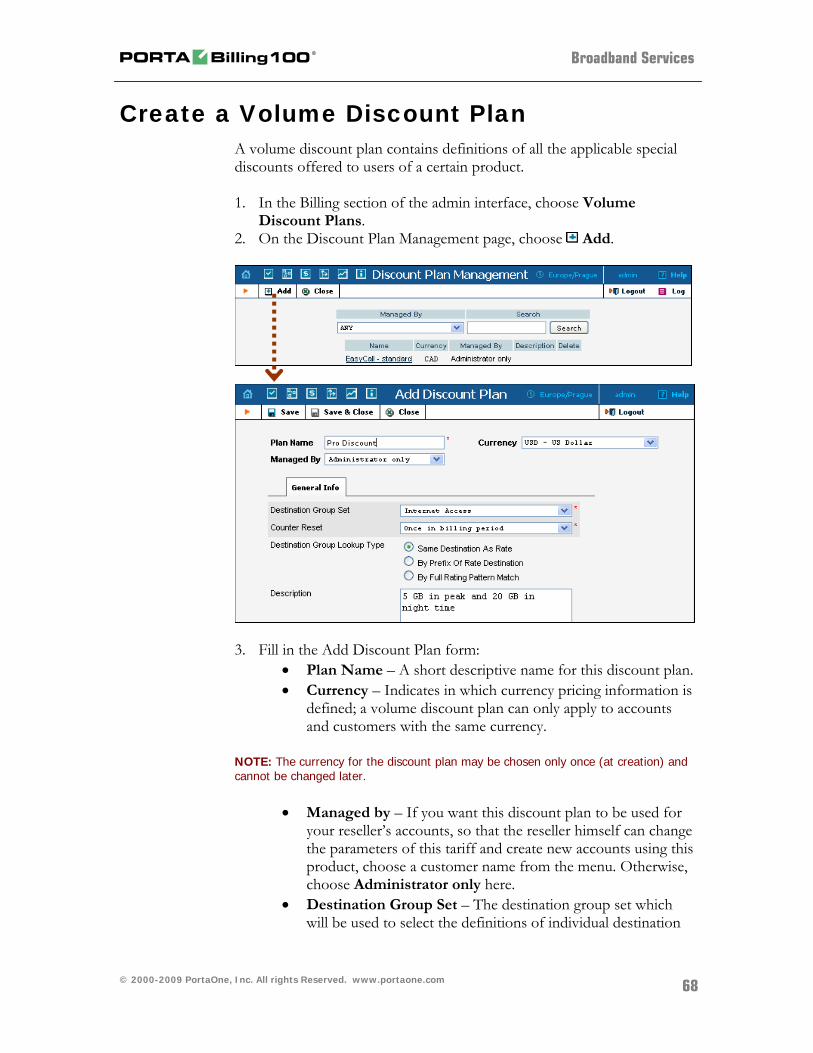
Create a Volume Discount Plan A volume discount plan contains definitions of all the applicable special discounts offered to users of a certain product. 1. In the Billing section of the admin interface, choose Volume
Discount Plans. 2. On the Discount Plan Management page, choose Add.
3. Fill in the Add Discount Plan form:
Plan Name – A short descriptive name for this discount plan. Currency – Indicates in which currency pricing information is
defined; a volume discount plan can only apply to accounts and customers with the same currency.
NOTE: The currency for the discount plan may be chosen only once (at creation) and cannot be changed later.
Managed by – If you want this discount plan to be used for your reseller’s accounts, so that the reseller himself can change the parameters of this tariff and create new accounts using this product, choose a customer name from the menu. Otherwise, choose Administrator only here.
Destination Group Set – The destination group set which will be used to select the definitions of individual destination
© 2000-2009 PortaOne, Inc. All rights Reserved. www.portaone.com
68

Broadband Services
groups. Choose the destination group set you created in the previous steps.
Counter Reset – Select the default option Once in billing period, meaning that in every billing period the counters are set to zero and the process starts all over again, e.g. every month the customer is entitled to 500 free MB.
Description – An extended discount description. 4. Click Save.
© 2000-2009 PortaOne, Inc. All rights Reserved. www.portaone.com
69
Broadband Services
Define Discounts within Volume Discount Plan
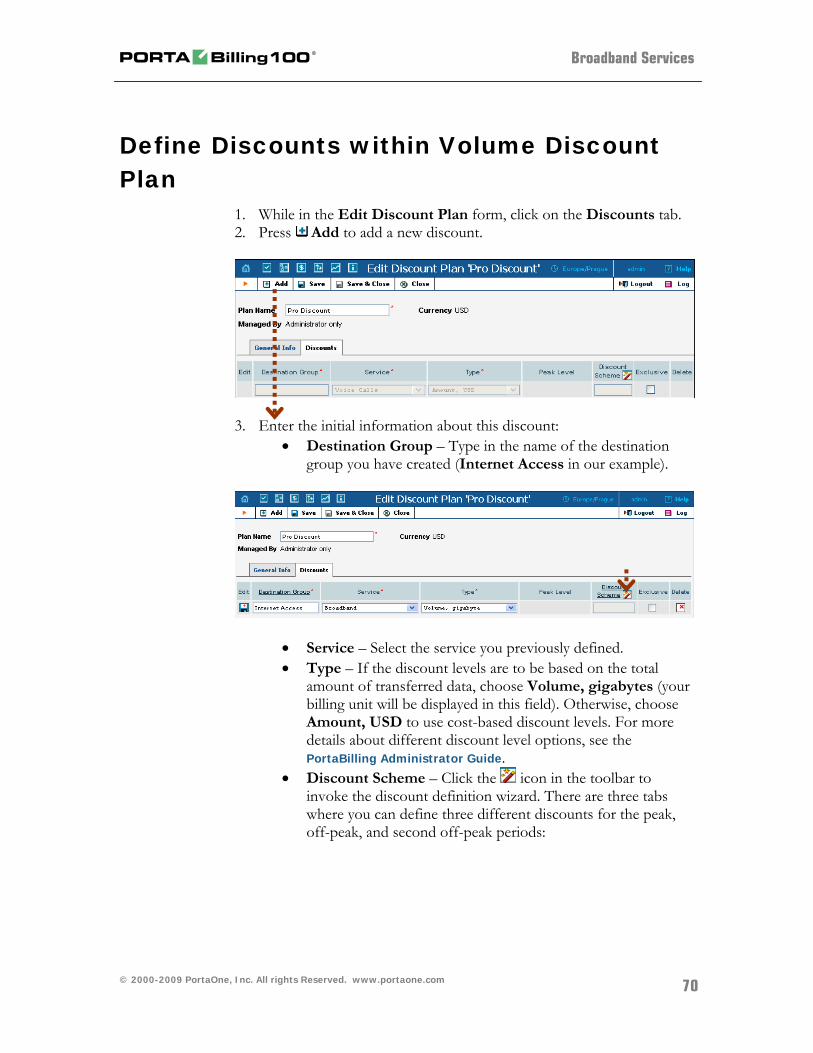
1. While in the Edit Discount Plan form, click on the Discounts tab. 2. Press Add to add a new discount.
3. Enter the initial information about this discount:
Destination Group – Type in the name of the destination group you have created (Internet Access in our example).
Service – Select the service you previously defined. Type – If the discount levels are to be based on the total
amount of transferred data, choose Volume, gigabytes (your billing unit will be displayed in this field). Otherwise, choose Amount, USD to use cost-based discount levels. For more details about different discount level options, see the PortaBilling Administrator Guide.
Discount Scheme – Click the icon in the toolbar to invoke the discount definition wizard. There are three tabs where you can define three different discounts for the peak, off-peak, and second off-peak periods:
© 2000-2009 PortaOne, Inc. All rights Reserved. www.portaone.com
70
Broadband Services
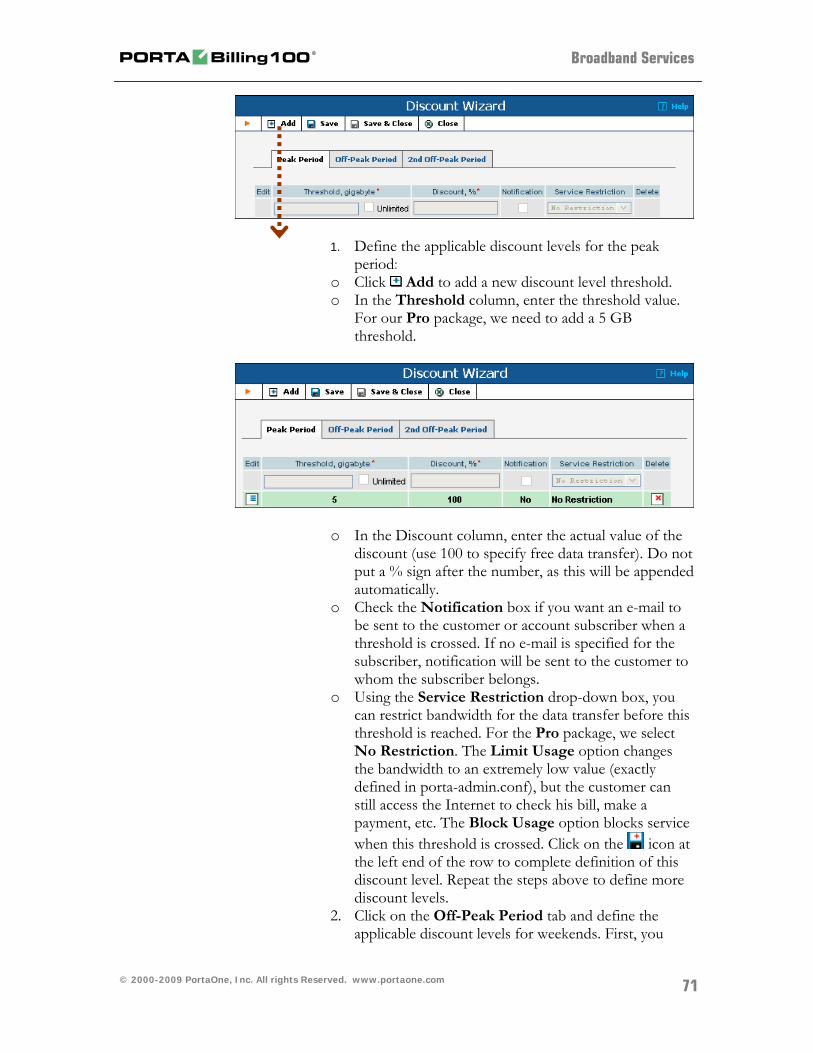
1. Define the applicable discount levels for the peak period:
o Click Add to add a new discount level threshold. o In the Threshold column, enter the threshold value.
For our Pro package, we need to add a 5 GB threshold.
o In the Discount column, enter the actual value of the discount (use 100 to specify free data transfer). Do not put a % sign after the number, as this will be appended automatically.
o Check the Notification box if you want an e-mail to be sent to the customer or account subscriber when a threshold is crossed. If no e-mail is specified for the subscriber, notification will be sent to the customer to whom the subscriber belongs.
o Using the Service Restriction drop-down box, you can restrict bandwidth for the data transfer before this threshold is reached. For the Pro package, we select No Restriction. The Limit Usage option changes the bandwidth to an extremely low value (exactly defined in porta-admin.conf), but the customer can still access the Internet to check his bill, make a payment, etc. The Block Usage option blocks service when this threshold is crossed. Click on the icon at the left end of the row to complete definition of this discount level. Repeat the steps above to define more discount levels.
2. Click on the Off-Peak Period tab and define the applicable discount levels for weekends. First, you
© 2000-2009 PortaOne, Inc. All rights Reserved. www.portaone.com
71
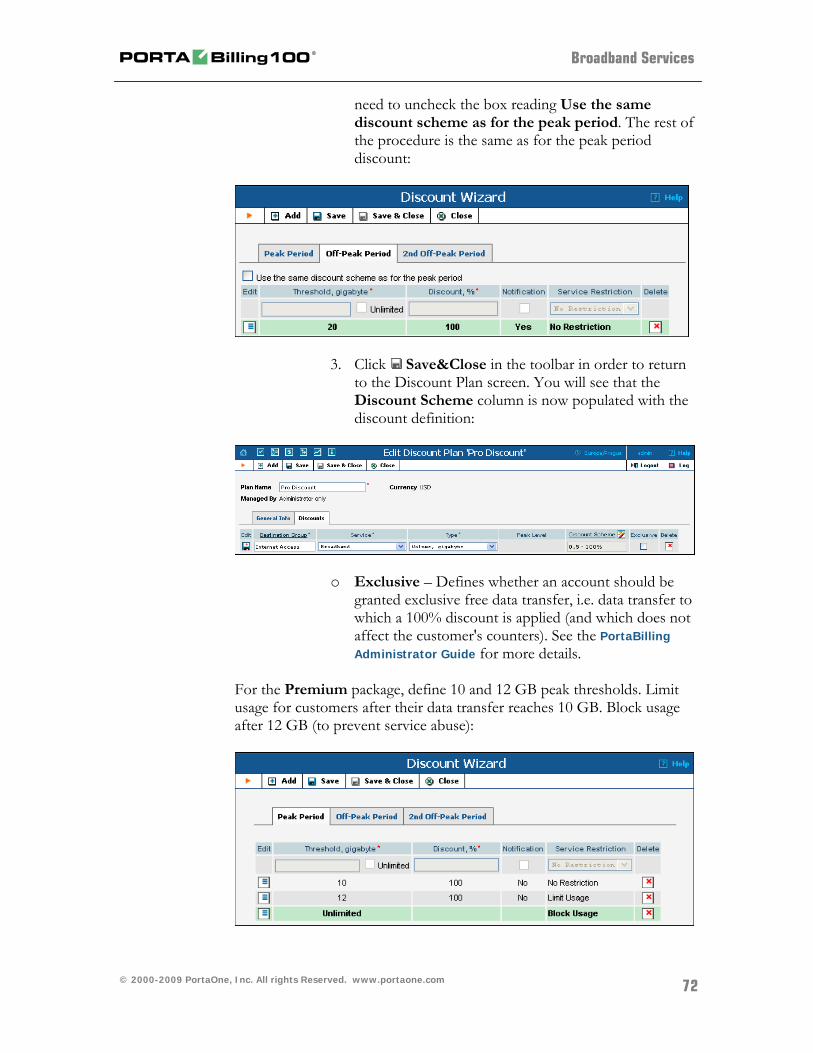
Broadband Services
need to uncheck the box reading Use the same discount scheme as for the peak period. The rest of the procedure is the same as for the peak period discount:
3. Click Save&Close in the toolbar in order to return to the Discount Plan screen. You will see that the Discount Scheme column is now populated with the discount definition:
o Exclusive – Defines whether an account should be granted exclusive free data transfer, i.e. data transfer to which a 100% discount is applied (and which does not affect the customer's counters). See the PortaBilling Administrator Guide for more details.
For the Premium package, define 10 and 12 GB peak thresholds. Limit usage for customers after their data transfer reaches 10 GB. Block usage after 12 GB (to prevent service abuse):
© 2000-2009 PortaOne, Inc. All rights Reserved. www.portaone.com
72
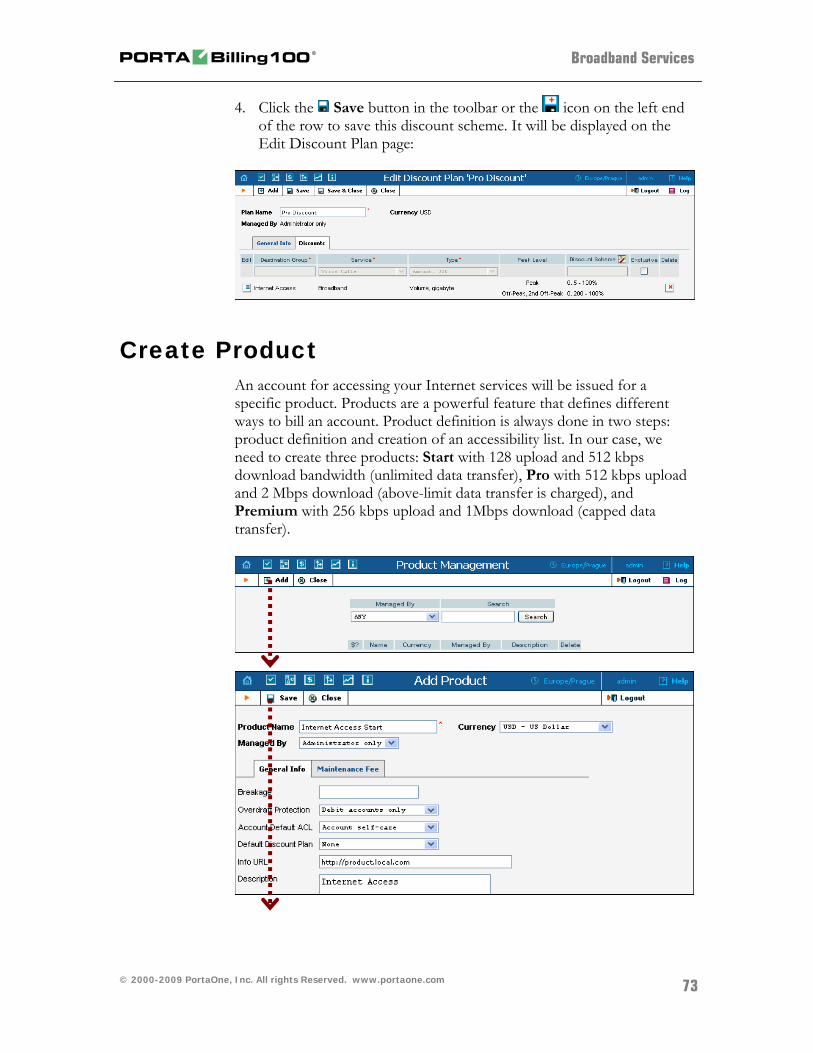
Broadband Services
4. Click the Save button in the toolbar or the icon on the left end of the row to save this discount scheme. It will be displayed on the Edit Discount Plan page:
Create Product An account for accessing your Internet services will be issued for a specific product. Products are a powerful feature that defines different ways to bill an account. Product definition is always done in two steps: product definition and creation of an accessibility list. In our case, we need to create three products: Start with 128 upload and 512 kbps download bandwidth (unlimited data transfer), Pro with 512 kbps upload and 2 Mbps download (above-limit data transfer is charged), and Premium with 256 kbps upload and 1Mbps download (capped data transfer).
© 2000-2009 PortaOne, Inc. All rights Reserved. www.portaone.com
73
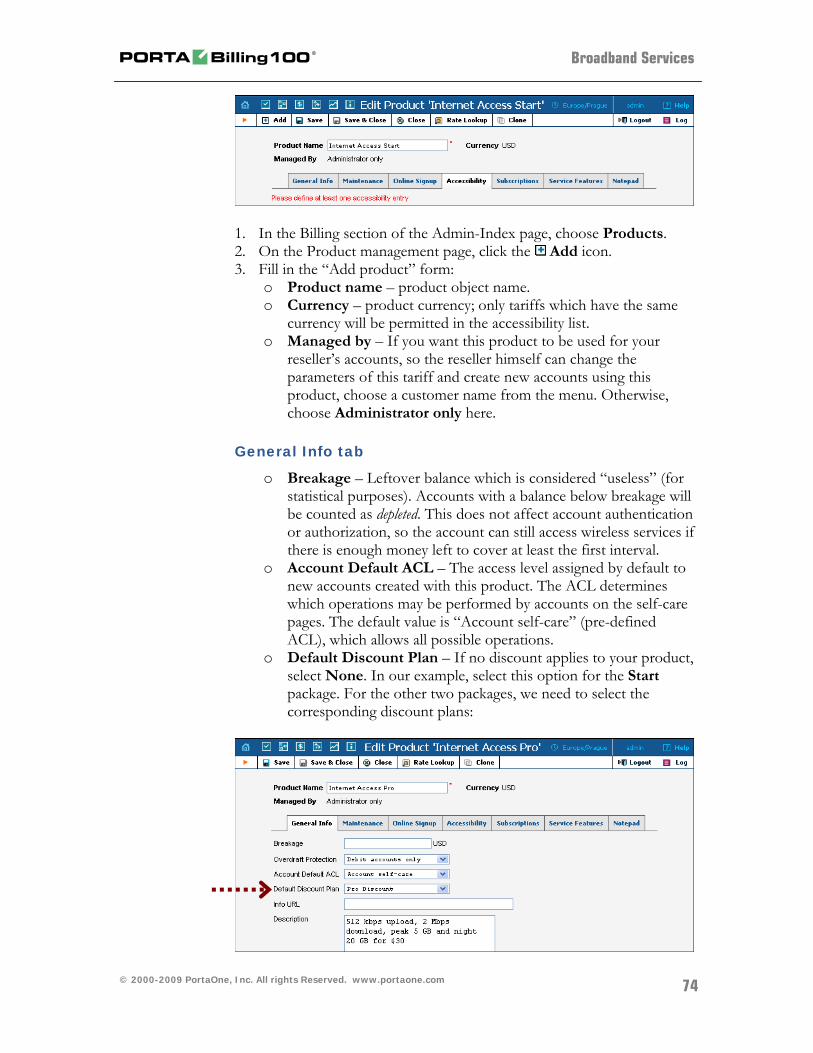
Broadband Services
1. In the Billing section of the Admin-Index page, choose Products. 2. On the Product management page, click the Add icon. 3. Fill in the “Add product” form:
o Product name – product object name. o Currency – product currency; only tariffs which have the same
currency will be permitted in the accessibility list. o Managed by – If you want this product to be used for your
reseller’s accounts, so the reseller himself can change the parameters of this tariff and create new accounts using this product, choose a customer name from the menu. Otherwise, choose Administrator only here.
General Info tab
o Breakage – Leftover balance which is considered “useless” (for statistical purposes). Accounts with a balance below breakage will be counted as depleted. This does not affect account authentication or authorization, so the account can still access wireless services if there is enough money left to cover at least the first interval.
o Account Default ACL – The access level assigned by default to new accounts created with this product. The ACL determines which operations may be performed by accounts on the self-care pages. The default value is “Account self-care” (pre-defined ACL), which allows all possible operations.
o Default Discount Plan – If no discount applies to your product, select None. In our example, select this option for the Start package. For the other two packages, we need to select the corresponding discount plans:
© 2000-2009 PortaOne, Inc. All rights Reserved. www.portaone.com
74
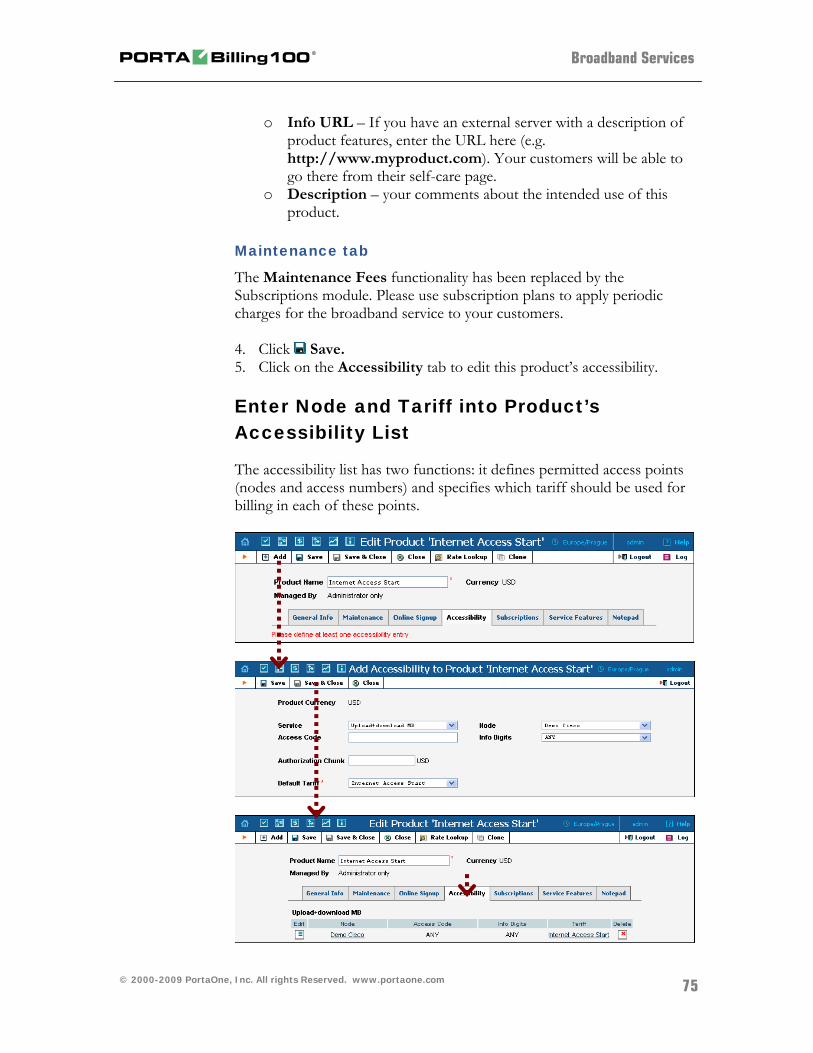
Broadband Services
o Info URL – If you have an external server with a description of
product features, enter the URL here (e.g. http://www.myproduct.com). Your customers will be able to go there from their self-care page.
o Description – your comments about the intended use of this product.
Maintenance tab
The Maintenance Fees functionality has been replaced by the Subscriptions module. Please use subscription plans to apply periodic charges for the broadband service to your customers.
4. Click Save. 5. Click on the Accessibility tab to edit this product’s accessibility.
Enter Node and Tariff into Product’s Accessibility List
The accessibility list has two functions: it defines permitted access points (nodes and access numbers) and specifies which tariff should be used for billing in each of these points.
© 2000-2009 PortaOne, Inc. All rights Reserved. www.portaone.com
75
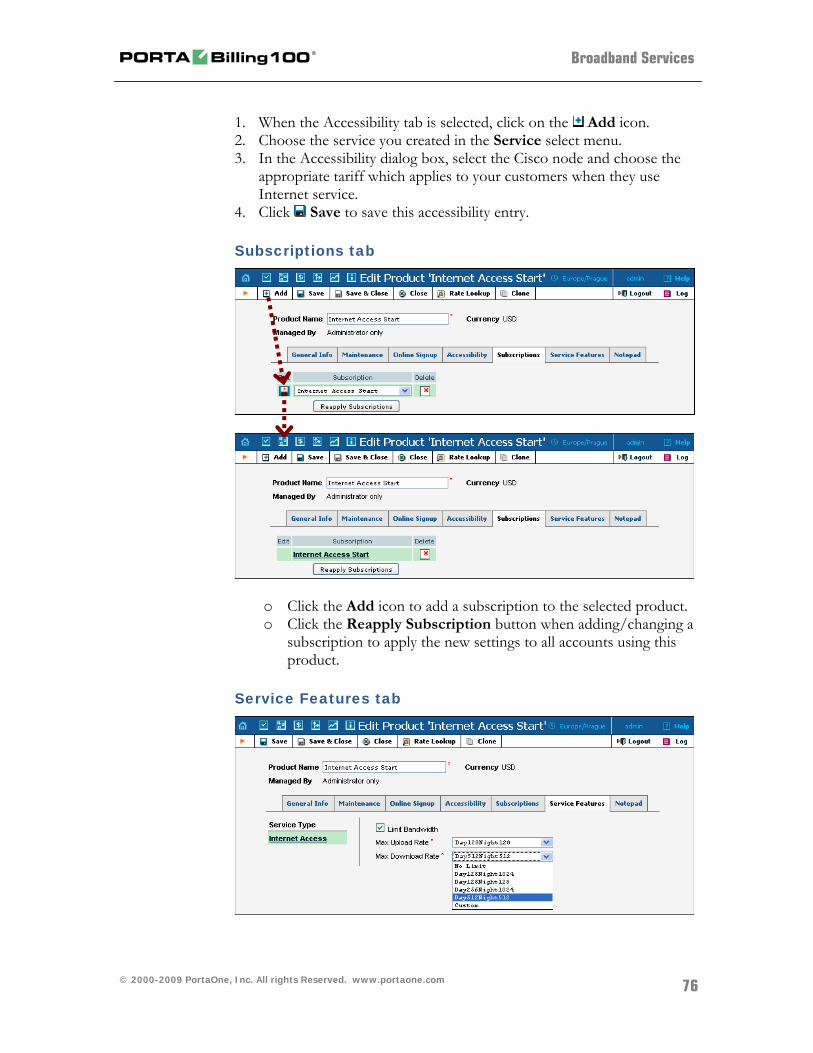
Broadband Services
1. When the Accessibility tab is selected, click on the Add icon. 2. Choose the service you created in the Service select menu. 3. In the Accessibility dialog box, select the Cisco node and choose the
appropriate tariff which applies to your customers when they use Internet service.
4. Click Save to save this accessibility entry.
Subscriptions tab
o Click the Add icon to add a subscription to the selected product. o Click the Reapply Subscription button when adding/changing a
subscription to apply the new settings to all accounts using this product.
Service Features tab
© 2000-2009 PortaOne, Inc. All rights Reserved. www.portaone.com
76
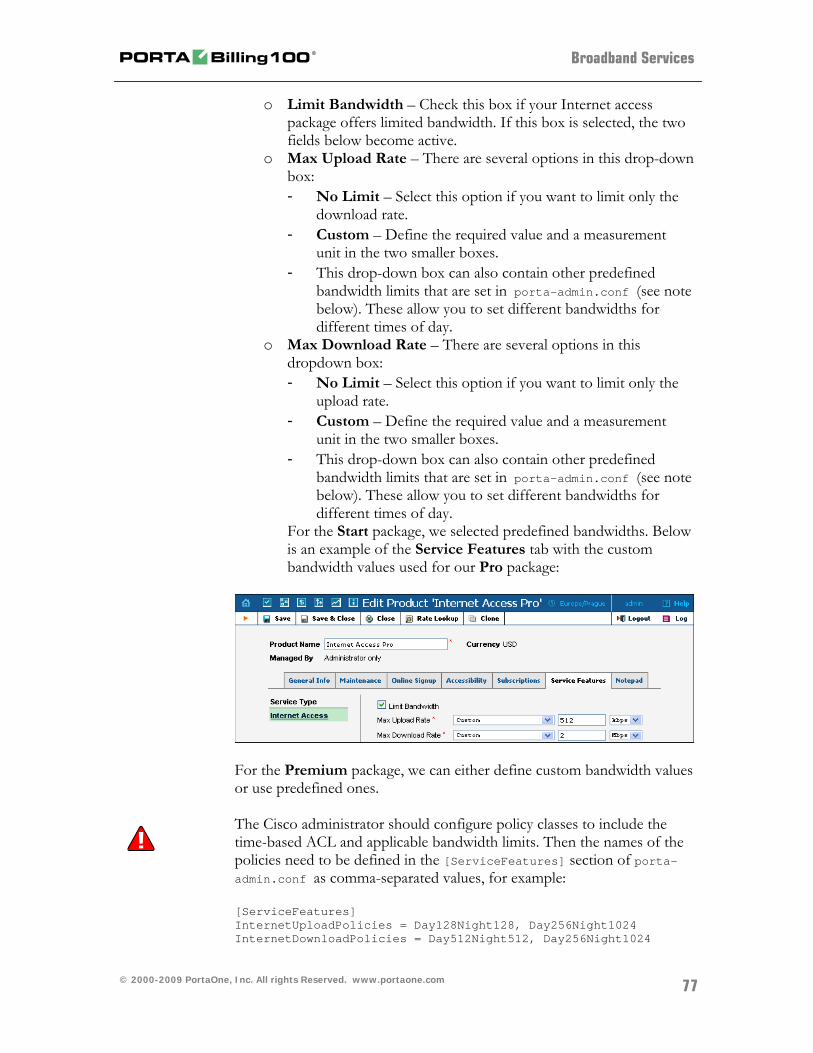
Broadband Services
o Limit Bandwidth – Check this box if your Internet access package offers limited bandwidth. If this box is selected, the two fields below become active.
o Max Upload Rate – There are several options in this drop-down box: - No Limit – Select this option if you want to limit only the
download rate. - Custom – Define the required value and a measurement
unit in the two smaller boxes. - This drop-down box can also contain other predefined
bandwidth limits that are set in porta-admin.conf (see note below). These allow you to set different bandwidths for different times of day.
o Max Download Rate – There are several options in this dropdown box: - No Limit – Select this option if you want to limit only the
upload rate. - Custom – Define the required value and a measurement
unit in the two smaller boxes. - This drop-down box can also contain other predefined
bandwidth limits that are set in porta-admin.conf (see note below). These allow you to set different bandwidths for different times of day.
For the Start package, we selected predefined bandwidths. Below is an example of the Service Features tab with the custom bandwidth values used for our Pro package:
For the Premium package, we can either define custom bandwidth values or use predefined ones. The Cisco administrator should configure policy classes to include the time-based ACL and applicable bandwidth limits. Then the names of the policies need to be defined in the [ServiceFeatures] section of porta-admin.conf as comma-separated values, for example: [ServiceFeatures] InternetUploadPolicies = Day128Night128, Day256Night1024 InternetDownloadPolicies = Day512Night512, Day256Night1024
© 2000-2009 PortaOne, Inc. All rights Reserved. www.portaone.com
77
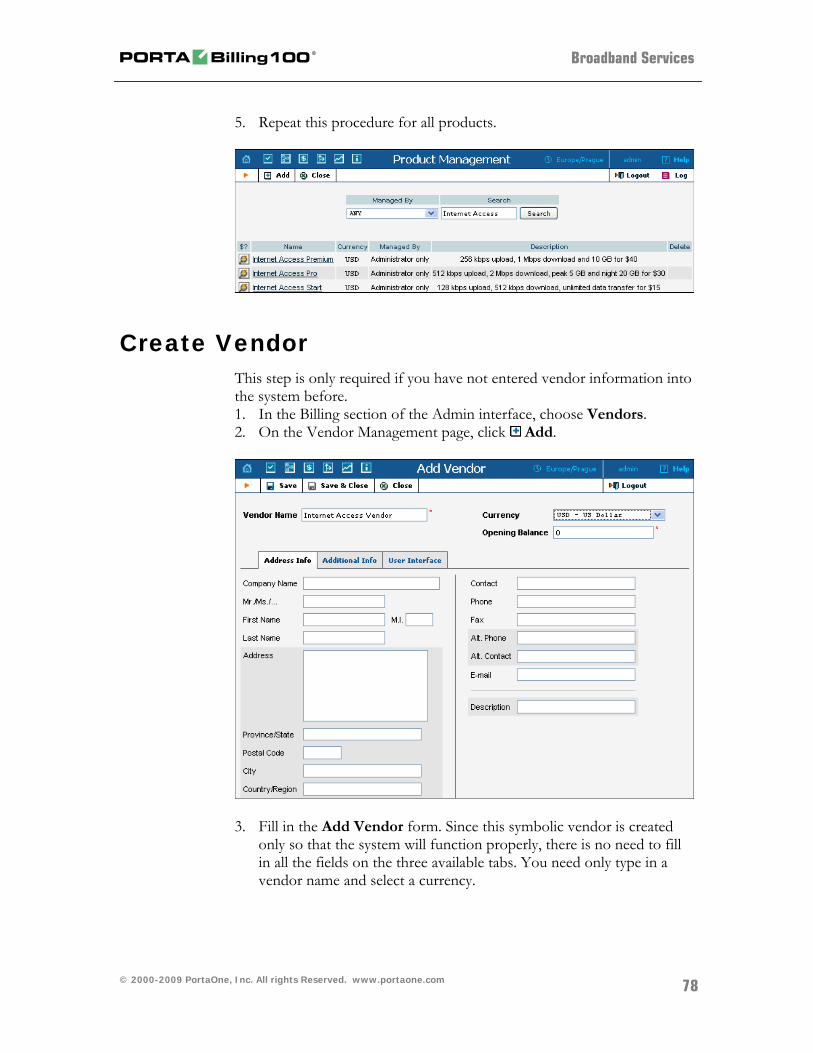
Broadband Services
5. Repeat this procedure for all products.
Create Vendor This step is only required if you have not entered vendor information into the system before. 1. In the Billing section of the Admin interface, choose Vendors. 2. On the Vendor Management page, click Add.
3. Fill in the Add Vendor form. Since this symbolic vendor is created
only so that the system will function properly, there is no need to fill in all the fields on the three available tabs. You need only type in a vendor name and select a currency.
© 2000-2009 PortaOne, Inc. All rights Reserved. www.portaone.com
78
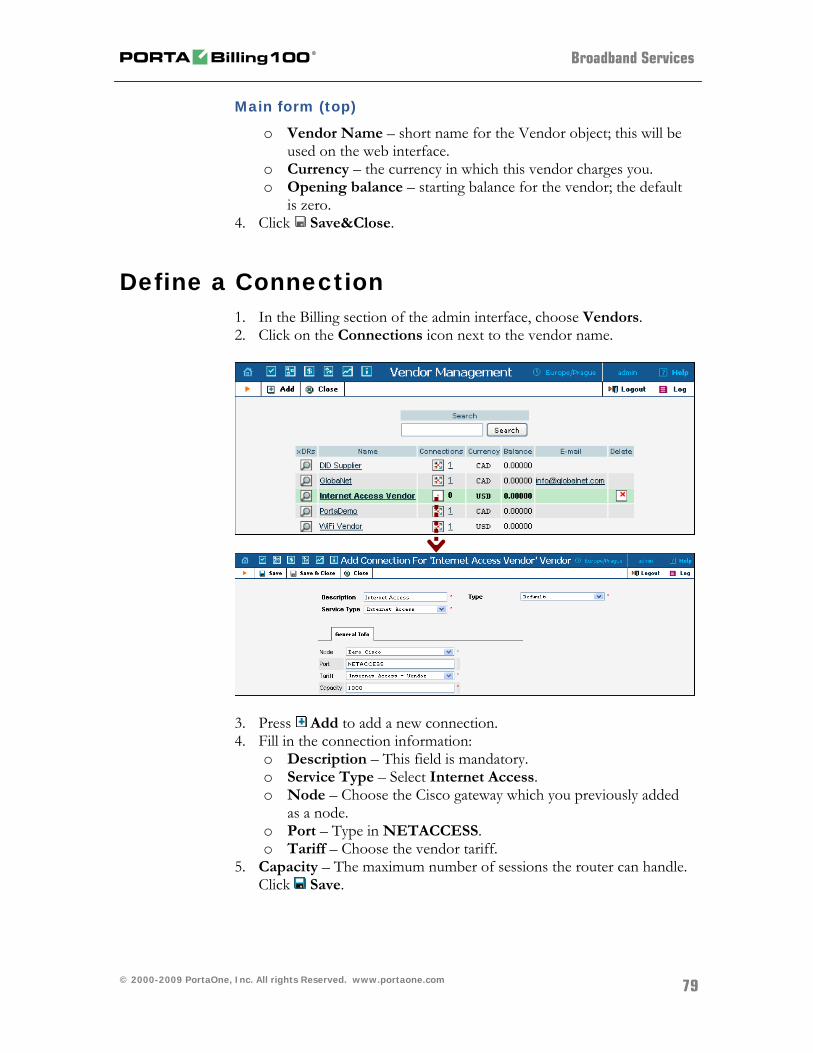
Broadband Services
Main form (top)
o Vendor Name – short name for the Vendor object; this will be used on the web interface.
o Currency – the currency in which this vendor charges you. o Opening balance – starting balance for the vendor; the default
is zero. 4. Click Save&Close.
Define a Connection 1. In the Billing section of the admin interface, choose Vendors. 2. Click on the Connections icon next to the vendor name.
3. Press Add to add a new connection. 4. Fill in the connection information:
o Description – This field is mandatory. o Service Type – Select Internet Access. o Node – Choose the Cisco gateway which you previously added
as a node. o Port – Type in NETACCESS. o Tariff – Choose the vendor tariff.
5. Capacity – The maximum number of sessions the router can handle. Click Save.
© 2000-2009 PortaOne, Inc. All rights Reserved. www.portaone.com
79
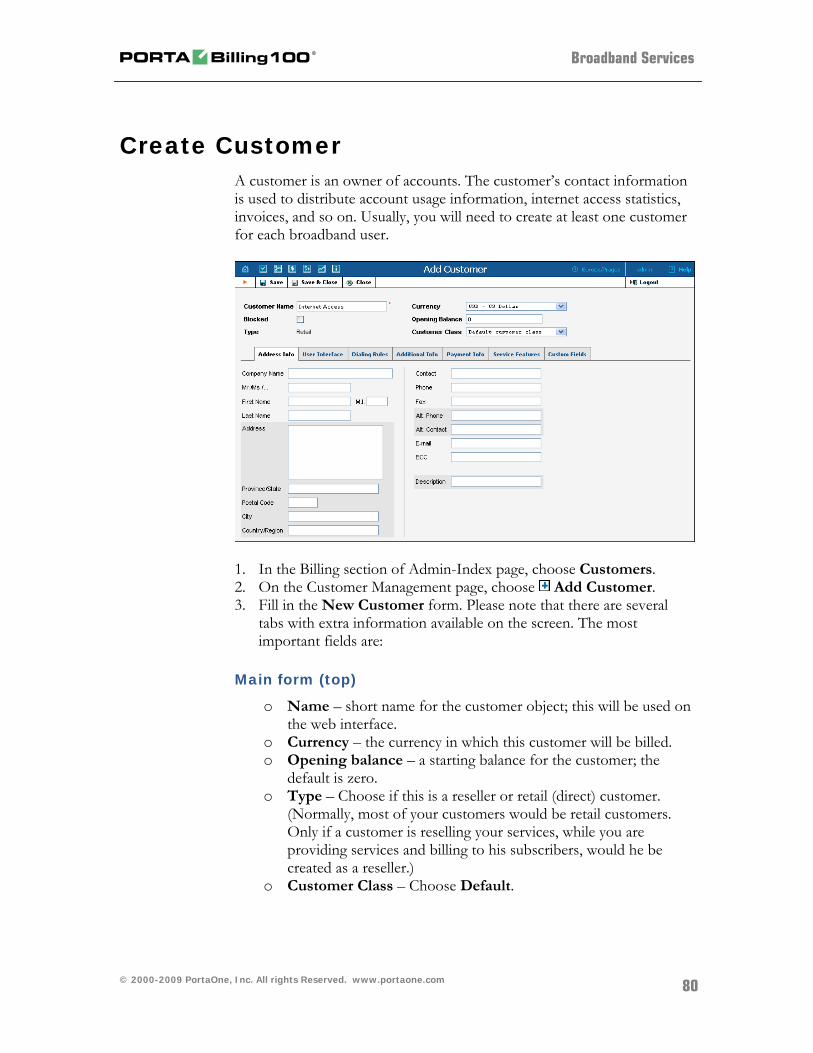
Broadband Services
Create Customer A customer is an owner of accounts. The customer’s contact information is used to distribute account usage information, internet access statistics, invoices, and so on. Usually, you will need to create at least one customer for each broadband user.
1. In the Billing section of Admin-Index page, choose Customers. 2. On the Customer Management page, choose Add Customer. 3. Fill in the New Customer form. Please note that there are several
tabs with extra information available on the screen. The most important fields are:
Main form (top)
o Name – short name for the customer object; this will be used on the web interface.
o Currency – the currency in which this customer will be billed. o Opening balance – a starting balance for the customer; the
default is zero. o Type – Choose if this is a reseller or retail (direct) customer.
(Normally, most of your customers would be retail customers. Only if a customer is reselling your services, while you are providing services and billing to his subscribers, would he be created as a reseller.)
o Customer Class – Choose Default.
© 2000-2009 PortaOne, Inc. All rights Reserved. www.portaone.com
80
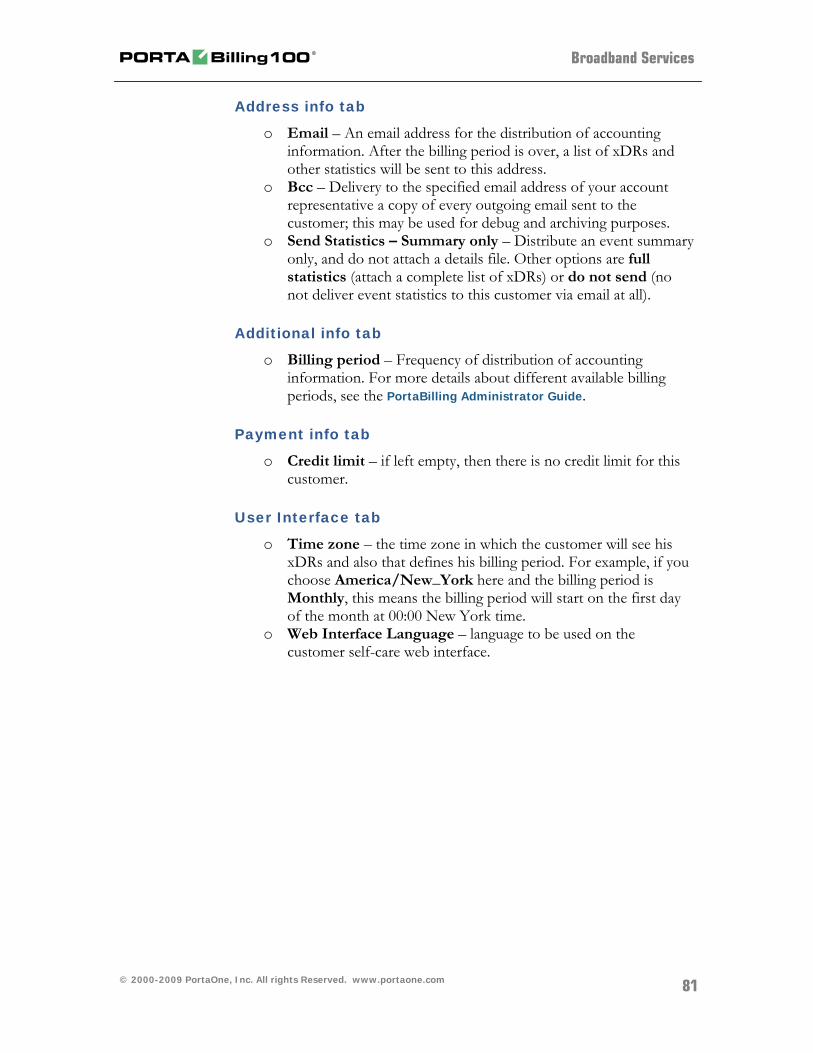
Broadband Services
Address info tab
o Email – An email address for the distribution of accounting information. After the billing period is over, a list of xDRs and other statistics will be sent to this address.
o Bcc – Delivery to the specified email address of your account representative a copy of every outgoing email sent to the customer; this may be used for debug and archiving purposes.
o Send Statistics – Summary only – Distribute an event summary only, and do not attach a details file. Other options are full statistics (attach a complete list of xDRs) or do not send (no not deliver event statistics to this customer via email at all).
Additional info tab
o Billing period – Frequency of distribution of accounting information. For more details about different available billing periods, see the PortaBilling Administrator Guide.
Payment info tab
o Credit limit – if left empty, then there is no credit limit for this customer.
User Interface tab
o Time zone – the time zone in which the customer will see his xDRs and also that defines his billing period. For example, if you choose America/New_York here and the billing period is Monthly, this means the billing period will start on the first day of the month at 00:00 New York time.
o Web Interface Language – language to be used on the customer self-care web interface.
© 2000-2009 PortaOne, Inc. All rights Reserved. www.portaone.com
81
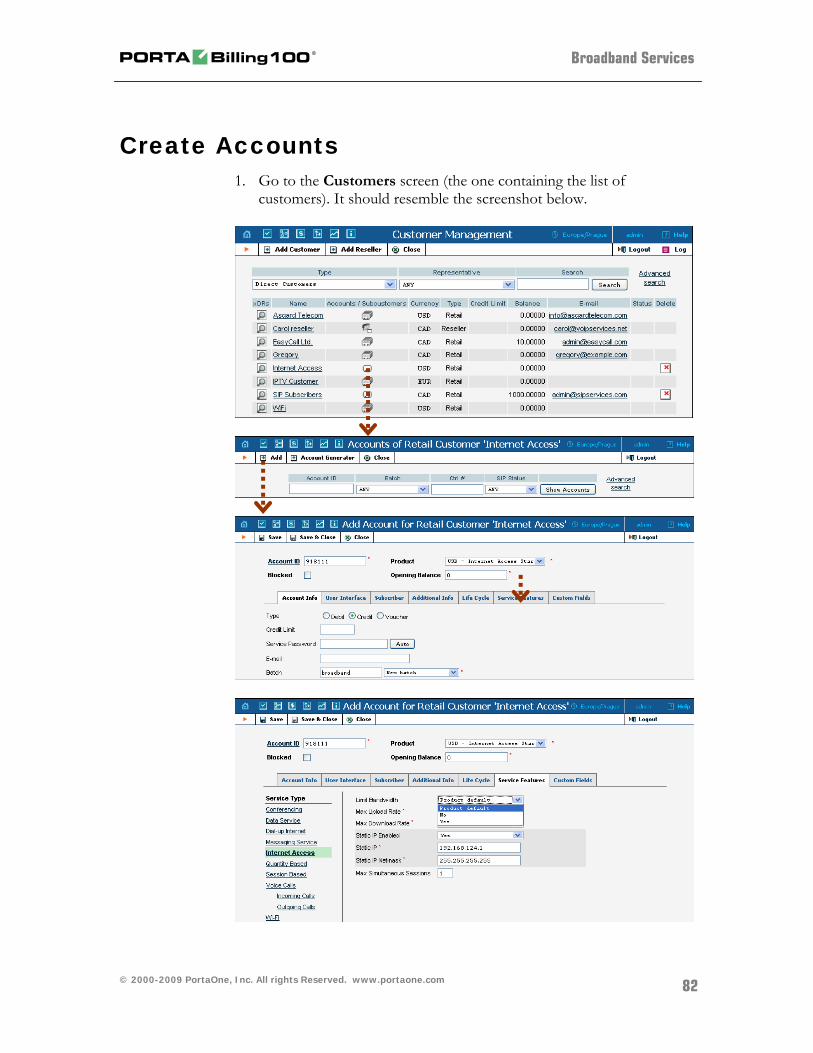
Broadband Services
Create Accounts 1. Go to the Customers screen (the one containing the list of
customers). It should resemble the screenshot below.
© 2000-2009 PortaOne, Inc. All rights Reserved. www.portaone.com
82
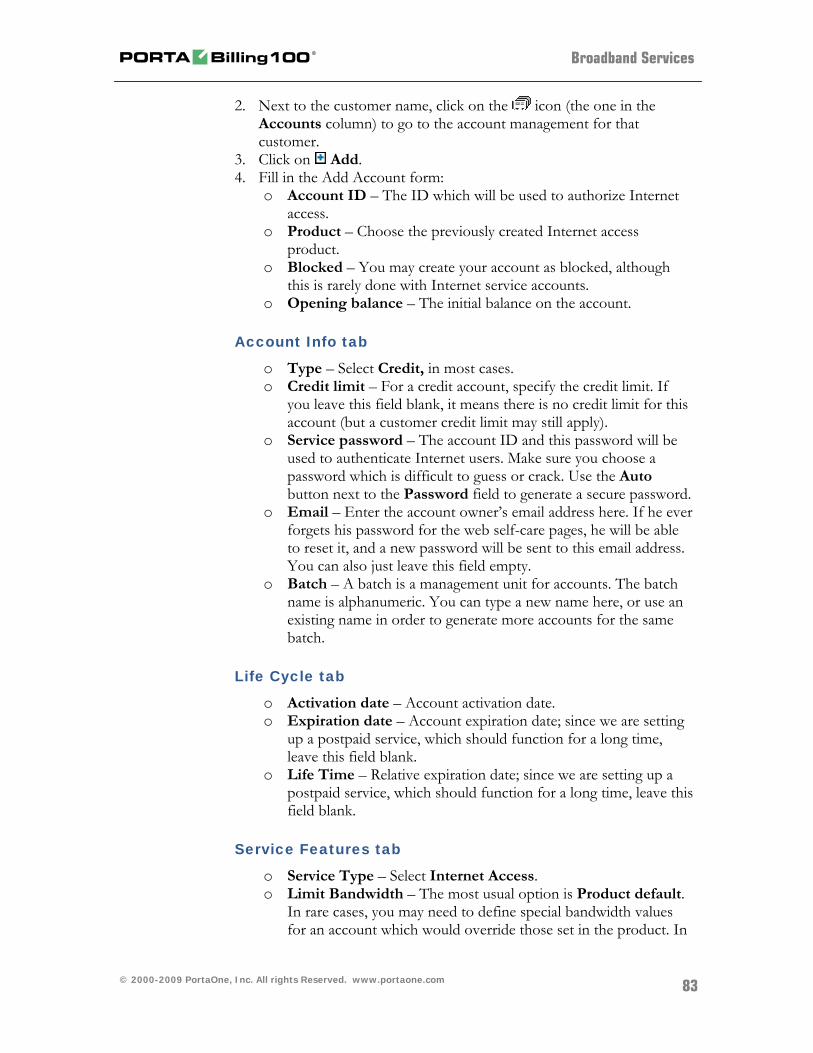
Broadband Services
2. Next to the customer name, click on the icon (the one in the Accounts column) to go to the account management for that customer.
3. Click on Add. 4. Fill in the Add Account form:
o Account ID – The ID which will be used to authorize Internet access.
o Product – Choose the previously created Internet access product.
o Blocked – You may create your account as blocked, although this is rarely done with Internet service accounts.
o Opening balance – The initial balance on the account.
Account Info tab
o Type – Select Credit, in most cases. o Credit limit – For a credit account, specify the credit limit. If
you leave this field blank, it means there is no credit limit for this account (but a customer credit limit may still apply).
o Service password – The account ID and this password will be used to authenticate Internet users. Make sure you choose a password which is difficult to guess or crack. Use the Auto button next to the Password field to generate a secure password.
o Email – Enter the account owner’s email address here. If he ever forgets his password for the web self-care pages, he will be able to reset it, and a new password will be sent to this email address. You can also just leave this field empty.
o Batch – A batch is a management unit for accounts. The batch name is alphanumeric. You can type a new name here, or use an existing name in order to generate more accounts for the same batch.
Life Cycle tab
o Activation date – Account activation date. o Expiration date – Account expiration date; since we are setting
up a postpaid service, which should function for a long time, leave this field blank.
o Life Time – Relative expiration date; since we are setting up a postpaid service, which should function for a long time, leave this field blank.
Service Features tab
o Service Type – Select Internet Access. o Limit Bandwidth – The most usual option is Product default.
In rare cases, you may need to define special bandwidth values for an account which would override those set in the product. In
© 2000-2009 PortaOne, Inc. All rights Reserved. www.portaone.com
83
Broadband Services
such cases, select Yes to define these values, or select No if you do not want to limit bandwidth for this account.
o Max Upload Rate – This field becomes active only if you have chosen Yes in the previous field.
o Max Download Rate – Same as for the preceding field. o Static IP Enabled – Select Yes if you want to assign a static IP
to this account (the default setting is No). o Static IP – If you have selected Yes for the previous field, type
in an IP. o Static IP Netmask – Type in a netmask, or leave the default
value 255.255.255.255 o Max Simultaneous Sessions – By default this field is blank,
which is equal to 1 (only one user will be able to log in with this account ID and use the Internet). If the account credentials are somehow hacked, no sessions will be initiated from other locations. Change this value if there is a real need to do so and the customer is aware of the risks.
5. After clicking Save&Close, you will see a confirmation screen
announcing that a new account has been created. 6. Repeat steps 3-5 to create more accounts for the customer. For
instance, a company to which you supply broadband services may have several Internet users.
Check Current Volume Discount Statistics for Account
1. Go to the Customers screen (the one containing a list of customers). 2. Next to the customer name, click the icon (the one in the
Accounts column) to enter account management for this customer. 3. Perform an account search and, when the required account is
displayed, click on the account ID. 4. On the Account Info page, click on the Volume Discounts tab.
© 2000-2009 PortaOne, Inc. All rights Reserved. www.portaone.com
84
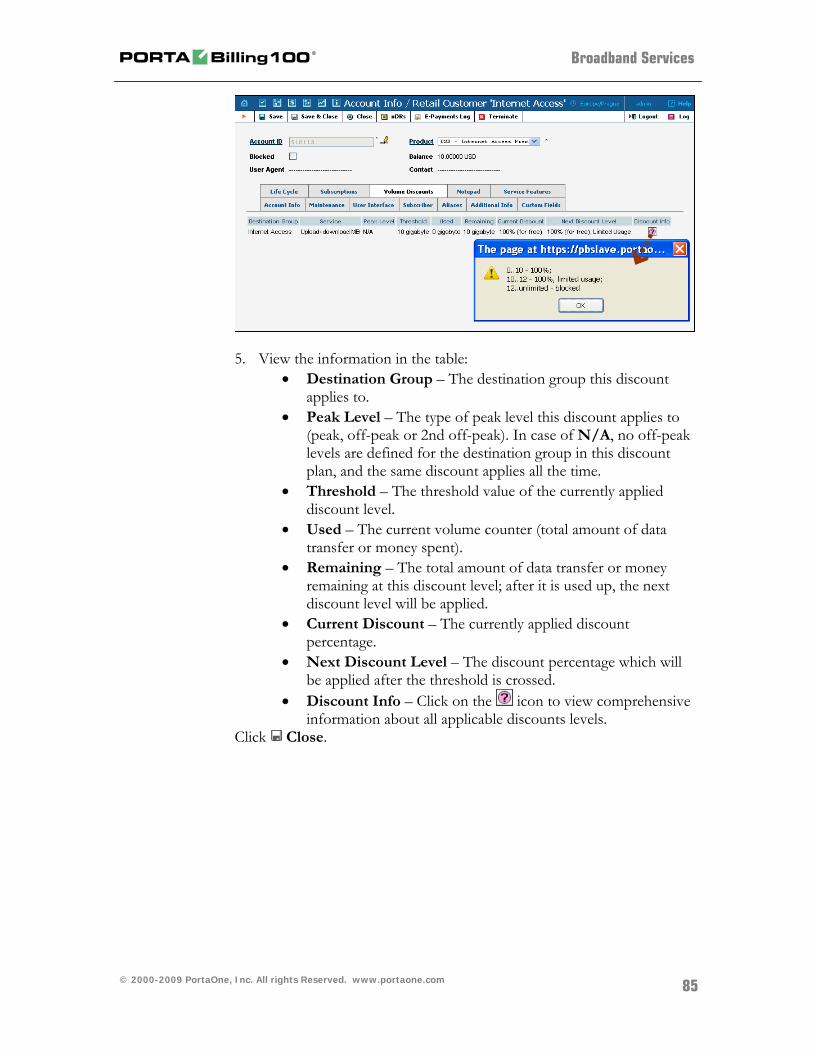
Broadband Services
5. View the information in the table:
Destination Group – The destination group this discount applies to.
Peak Level – The type of peak level this discount applies to (peak, off-peak or 2nd off-peak). In case of N/A, no off-peak levels are defined for the destination group in this discount plan, and the same discount applies all the time.
Threshold – The threshold value of the currently applied discount level.
Used – The current volume counter (total amount of data transfer or money spent).
Remaining – The total amount of data transfer or money remaining at this discount level; after it is used up, the next discount level will be applied.
Current Discount – The currently applied discount percentage.
Next Discount Level – The discount percentage which will be applied after the threshold is crossed.
Discount Info – Click on the icon to view comprehensive information about all applicable discounts levels.
Click Close.
© 2000-2009 PortaOne, Inc. All rights Reserved. www.portaone.com
85
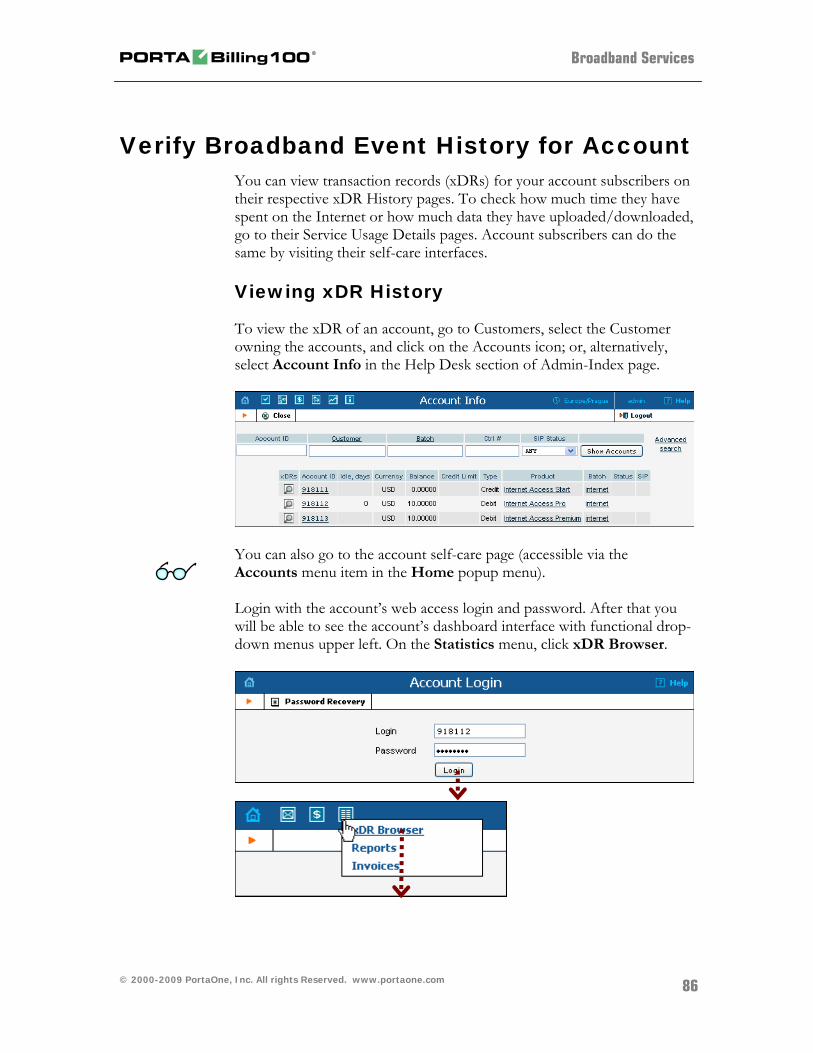
Broadband Services
Verify Broadband Event History for Account You can view transaction records (xDRs) for your account subscribers on their respective xDR History pages. To check how much time they have spent on the Internet or how much data they have uploaded/downloaded, go to their Service Usage Details pages. Account subscribers can do the same by visiting their self-care interfaces.
Viewing xDR History
To view the xDR of an account, go to Customers, select the Customer owning the accounts, and click on the Accounts icon; or, alternatively, select Account Info in the Help Desk section of Admin-Index page.
You can also go to the account self-care page (accessible via the Accounts menu item in the Home popup menu). Login with the account’s web access login and password. After that you will be able to see the account’s dashboard interface with functional drop-down menus upper left. On the Statistics menu, click xDR Browser.
© 2000-2009 PortaOne, Inc. All rights Reserved. www.portaone.com
86
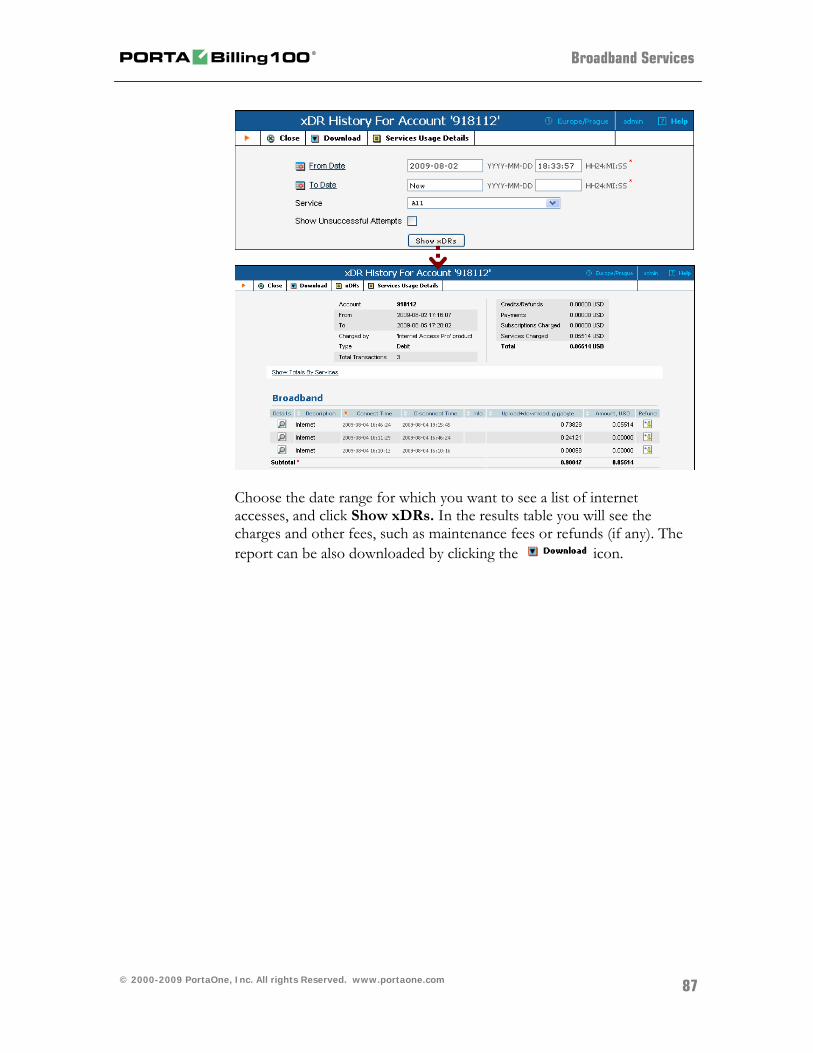
Broadband Services
Choose the date range for which you want to see a list of internet accesses, and click Show xDRs. In the results table you will see the charges and other fees, such as maintenance fees or refunds (if any). The report can be also downloaded by clicking the icon.
© 2000-2009 PortaOne, Inc. All rights Reserved. www.portaone.com
87
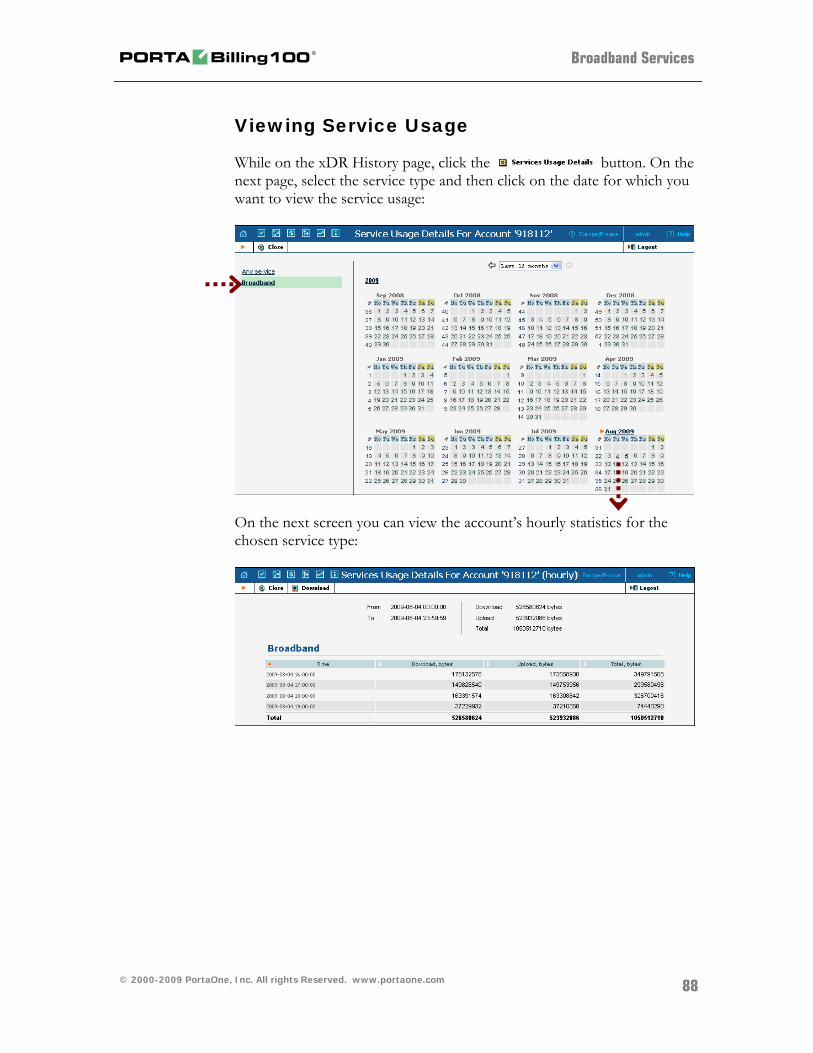
Broadband Services
© 2000-2009 PortaOne, Inc. All rights Reserved. www.portaone.com
88
Viewing Service Usage
While on the xDR History page, click the button. On the next page, select the service type and then click on the date for which you want to view the service usage:
On the next screen you can view the account’s hourly statistics for the chosen service type: