Embed Size (px)
Citation preview

Contents What Can I do with FaxMind Server 2
System Requirements 3
Fax Recipients 4
Before Install 5
Install FaxMind Server 6
FaxMind Server Setup
Step 1 - Specify an Administrator 7
Step 2 - Corporate Information for Cover Page 8
Step 3 - Choose a Database Engine 9
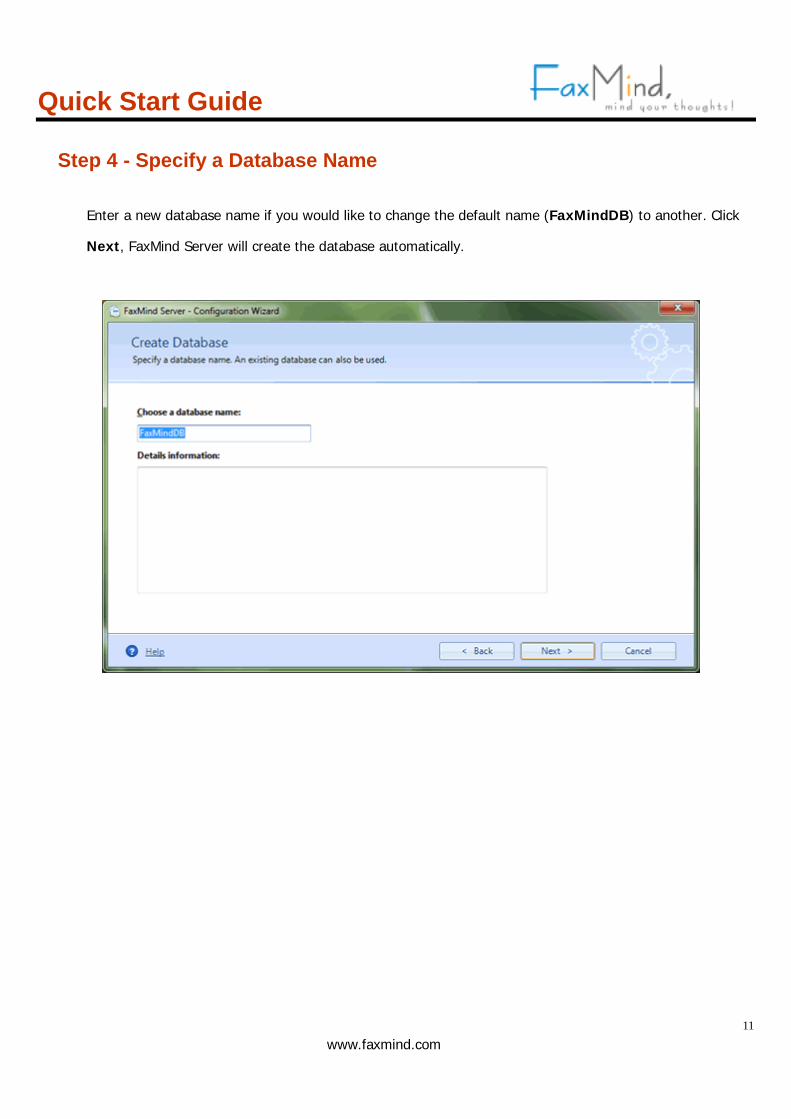
Step 4 - Specify a Database Name 11
Step 5 - System Default Configuration Profile Setup 12
Step 5.1 - Setup FaxMind for Google Apps 13
Step 6 - Mailbox for outbound faxes 14
Step 7 - SMTP Server Information 15
Step 8 - Google Docs Setup 16
Step 9 - Fax Devices Setup 17
Step 10 - Configuration Complete 18
FaxMind Desktop Client Setup
Install FaxMind Desktop Client for Windows 19
Connect Desktop Clients to FaxMind Server 20
How To Send Fax
1 - Sending a fax via an Email Client 21
1.1 - Send a fax from Microsoft Outlook 22
1.2 - Sending a coverpage only fax with Microsoft Outlook 23
1.3 - Use an email address as the fax number to send fax to 24
2 - Sending a fax from FaxMind Printer Driver (Desktop Client) 26
3 - Sending Faxes from a Web Browser 28
FaxMind Macros
Email Macros 30
Fax Macros 33

Quick Start Guide
2
What Can I do with FaxMind Server
· Email to Fax
Attachments can be MS Word, Excel, PowerPoint, Adobe PDF, Text, RTF, HTML, bmp, gif, jpg, png and
multiple-page tiff images. No Third-party softwares required. For full list, see: Supported File Formats
· Fax to Email
Incoming fax will be forwarded to specific user's mail box in PDF format.
· Web to Fax
The Web Interface enables you to send & receive fax from Internet Explorer, Firefox, Safari, Chrome, or any
other web browser on PC, Macintosh or a mobile device.
· Fax to Fax
Incoming fax could be forwarded to another fax number (regular fax machine).
· Fax to Print
Automatically print incoming fax to multiple printers.
· Print to Fax (PC to Fax)
Printer driver (FaxMind Printer) for Windows supports printing to fax from any application.
· Auto-Backup to Google Drive
Automatically backup your fax to your Google Drive account If you have one.
· Fax to SMS
Automatic inbound fax notifications and fax transmission reports via SMS are available.
· Voice to Email
Simple IVR, Virtual PBX and Voice message capability if you are using Dialogic® Diva API Fax Boards.
· Monitor up to 10 mail box
Each department can has their own monitoring mailbox, STMP account, Routing Rules and Fax Lines.
· Anti-junk/spam fax
Black list based upon Caller ID and CSID may prevent you from junk/spam faxes.
· Support all mail servers
Easy integration with Microsoft Exchange, MDaemon, Domino/Notes, Postfix, or other mail servers.

Quick Start Guide
3
System Requirements
The following minimum requirements do not take into account running multiple applications simultaneously. To
guarantee stable operation, the computer should exceed these recommendations.
· Microsoft Windows XP or above, both 32-bit and 64-bit editions.
· 1.2GHz or higher processor (Dual core recommended)
· 1 GB of memory (2 GB recommended).
· Disk space: 50MB for application and at least 1GB for working space.
· Video display capable of 16-bit color and 1024 x 768 resolution.
· Ethernet Network Card, TCP/IP network protocol installed.
· Internet or Intranet communication capabilities.
· Microsoft .NET Framework 2.0.
· Access to a standard SMTP/POP3 Email server, like Google Gmail, your ISP's mail server,
Microsoft Exchange Server, Lotus, ect.
· One or more Fax Class 1, 1.0, 2, 2.0, or 2.1 modems/boards;
Supported Dialogic® Diva Boards: Diva BRI-2FX (PCI), Diva BRI-CTI (PCI), Diva BRI-2 V2
(PCI/PCIe), Diva UM-BRI-2 V2 (PCI/PCIe), Diva 4BRI V2 (PCI/PCIe), Diva UM-4BRI V2
(PCI/PCIe), Diva PRI-CTI (PCI/PCIe), Diva PRI-8 (PCI), Diva V-PRI (PCI/PCIe), Diva UM-PRI
(PCI/PCIe), Diva PRI V3 (PCI/PCIe), Diva Analog 2/4/8 (PCI/PCIe), Diva UM-Analog 2/4/8
(PCI/PCIe), Diva V-1PRI (PCIe) and Diva V-2/4PRI (PCI/PCIe), Diva V-1/2/4/8PRI (PCIe) and
Diva V-2/4PRI (PCI)
· Optional: Microsoft SQL Server 2000 or above (Including free edition of SQL Server) and MySQL
Server 5.x, i.e: Microsoft SQL Server 2008 Express, or MySQL Server 5.x
· Optional: GSM Modem or SMS gateway to send inbound fax notifications and fax transmission
reports via SMS.
Quick Start Guide
4
Fax Recipients
Once you create a fax, a fax number of the person who is receiving the fax must be specified. FaxMind allow you
to send a fax to multiple recipients, each recipient is split by the ; (semicolon) character. In general, you do not
have to enter the recipient fax number one by one, since most of Email Clients (Including FaxMind Desktop
Client) has the ability to choose Contacts while Composing a new email. However, you can also enter fax
number manually. Here is the list of the formats of fax number that FaxMind supports:
1. Local Phone Number: 934-1234, 934 1234 or 9341234.
This is the format for making local calls, i.e. within the same area.
2. Long Distance Number: (865)934-1234, 865-934-1234, 865-9341234 or 865 934 1234 (separated by
space).
This is the format for making long distance calls within the same country.
3. International Phone Number: +1(865)346-3654, +1-865-8463654, +1 865 8463654 and +1 865 846
3654.
In international usage, telephone numbers should always be quoted with the country code preceded by a
"+";
4. Extension Phone Number: 934-1234,,,,802 or +44-20-654-5678x802
The comma causes a 2 seconds pause in dialing, you can add several commas if you want a longer soft
pause. I.e. for the PBX (SPC exchanges) response.
The x character is used to split the fax number and extension number, and will cause a 6 seconds pause in
dialing.
The above 4 formats follow the rules of the Microsoft Canonical address format for phone numbers which
are easily understood around the world.
5. Email address
The main difference with other Email to Fax software is, that you can simply add/choose a Email address
as a Recipient Fax number in your email client (Microsoft Outlook, Windows Live Mail) and never need to
remember the recipient's fax number. In this way, it is necessary for you to add the recipient into the
Public Contact in FaxMind Server first. See Sending a fax via an Email Client for details.

Quick Start Guide
5
Before Install
During the installation process, you will be asked to specify a number of
settings for the FaxMind Server. You can save time and end the installation
with a fully configured server by knowning the following settings and
information before you begin:
· The directory in which you wish to store logs and saved voices & faxes. The default is D:\FaxMindData.
· The email address that FaxMind will monitor for outbound faxes, including the server address and authentication information.
· The outgoing mail server or IP address, logon and password.
· The administrator email address (system user) used to manager FaxMind Server.
· Your company information, including name, fax & phone number, address, etc., these can be displayed in cover page.
· If your fax line is behind a PBX or some other switched phone system, an access code may be specified for dialing an outside line, e.g. 9 or 0. See Fax Device Properties in users manual.
· A Configuration Profile can be used to set and configure the monitoring mailbox, STMP account, Routing Rules, assigned users/departments and Fax Lines. FaxMind allows you add up to 10 configuration profiles.
· Microsoft SQL Server instance name or MySQL Server address and its logon account if you choose to use one of these database engines, be sure the account has the right to create database & tables.
· Your Google Apps administrator account if you would like to integrate FaxMind to Google Apps, FaxMind can imports your user list directly.
· The Identification String (TSID) that you wish to assign to your fax devices, this is usually the same as your company name.
· Dialogic® Diva Boards If you wish to use a Diva Board, Dialogic® Diva® System Release for Windows is highly recommended to be installed on your server before installing FaxMind Server. Supported boards: Diva BRI-2FX (PCI), Diva BRI-CTI (PCI), Diva BRI-2 V2 (PCI/PCIe), Diva UM-BRI-2 V2 (PCI/PCIe), Diva 4BRI V2 (PCI/PCIe), Diva UM-4BRI V2 (PCI/PCIe), Diva PRI-CTI (PCI/PCIe), Diva PRI-8 (PCI), Diva V-PRI (PCI/PCIe), Diva UM-PRI (PCI/PCIe), Diva PRI V3 (PCI/PCIe), Diva Analog 2/4/8 (PCI/PCIe), Diva UM-Analog 2/4/8 (PCI/PCIe), Diva V-1PRI (PCIe) and Diva V-2/4PRI (PCI/PCIe), Diva V-1/2/4/8PRI (PCIe) and Diva V-2/4PRI (PCI)
Quick Start Guide
www.faxmind.com
6
Install FaxMind Server
· Download the FaxMind installer file from:
http://www.faxmind.com/download.php
· Double-click the FaxMind installer to begin the installation.
· Select a Language for Installation, click OK.
· Click Next on the Welcome screen.
· Click I accept the terms of the License Agreement, then click Next.
· Select a destination directory for the installer to copy files to, then click Next.
· If your computer does not have Microsoft .NET framework 2.05 installed, the installation will
automatically download and install it. Be sure you have Internet connection if you need to
download .NET framework 2.05 on MS's website.
· The installer will copy the files to the destination directory, and complete the installation.
· Click Finish button to close the installer, and launch the FaxMind Configuration Wizard.
· Install FaxMind directly on the server rather than through RDP or any other remote desktop software to ensure the installation is properly done.
· A system restart may be required if you choose to install Microsoft .NET framework. · You have to complete the Configuration Wizard to run FaxMind Server. · You can start/stop FaxMind Service by using the corresponding tool under Start
Menu -> FaxMind Server

Quick Start Guide
www.faxmind.com
7
Step 1 - Specify an Administrator
In order to manage FaxMind Server, we need to set up an Administrator user account for FaxMind Manager.
On the FaxMind Configuration Wizard Welcome screen, click Next button. Enter your Login Email and
Password for the administrator user, and then click the browse button to choose a directory in which you
wish to store logs and saved voices & faxes. Click Next to continue.
· The email address is the login account of Administrator user for FaxMind
Manager, but NOT be monitored for outbound faxes.
· Administrator has the rights to send & receive faxes.

Quick Start Guide
www.faxmind.com
8
Step 2 - Corporate Information for Cover Page
Enter your Corporate Information which will be displayed in cover page. Click Next to continue.

Quick Start Guide
www.faxmind.com
9
Step 3 - Choose a Database Engine
FaxMind Server is integrated with a built-in database engine for small-scale users (less 25 users) to maintain
data, you can also use a Microsoft SQL(including MS SQL Server Express Edition) or MySQL Server to protect
from power failures, unexpected system changes, and restarts.
Select the database engine you would like to use, click Next to set up the database connection.
· Make sure the user has the permissions to create Database & Tables if you
choose MS SQL or MySQL Server.
· Local/LAN database server is recommended. FaxMind Server may stop response
due to large data processing in a slow network connection environment.

Quick Start Guide
www.faxmind.com
10
· Build-in Database Engine
The database file will be stored in the Storage Location folder. By default, it is
D:\FaxMindData\FaxMindDB.db3.
· MS SQL Server
Click Next to enter the SQL Instance name, User name and Password (Windows
authentication supported) for SQL Server, click Test... button to test the account. If the test is OK,
click Next to continue.
· MySQL Server
Click Next to enter to enter the host name or ip address of your MySQL Server, and specify the
user name and password, click Test... button to test the account. If the test is OK, click Next to
continue.
Quick Start Guide
www.faxmind.com
11
Step 4 - Specify a Database Name
Enter a new database name if you would like to change the default name (FaxMindDB) to another. Click
Next, FaxMind Server will create the database automatically.

Quick Start Guide
www.faxmind.com
12
Step 5 - System Default Configuration Profile Setup
If you use Google Apps as your office email server, simply choose Use an existing Google Apps Account
to automatically setup the configurations; or else, you have to configure the mail servers and email accounts
manually.
Let's assume that you have a third party mail server, like Microsoft Exchange Server, Lotus Notes, etc..
Select Manually configuration server settings option, click Next to continue.

Quick Start Guide
www.faxmind.com
13
Step 5.1 - Setup FaxMind for Google Apps
1. Google Apps administrator
Enter the administrator account and password of your Google Apps, click Next button to continue.
2. Choose an account for outbound faxes
All of the members under your Google Apps account will be listed in the combo box, select an Account (Email
box) you would like FaxMind to monitor for outbound faxes, enter the password. Click Next button to
continue.
3. Import users into FaxMind
Check to select the users you would like to import to FaxMind Server. Click Next button to continue.

Quick Start Guide
www.faxmind.com
14
Step 6 - Mailbox for outbound faxes
FaxMind Server supports both POP3 and IMAP protocols. Enter the email address that FaxMind will collect
email messages for outbound faxes, and specify the POP3/IMAP server's host name or IP address, Port,
account login information. Click Next to continue.
· A new mailbox is recommended;
· Use IMAP protocol rather than POP3 protocol if both of these protocols are
supported by your email provider.

Quick Start Guide
www.faxmind.com
15
Step 7 - SMTP Server Information
Enter the STMP server's host name or IP address, Port (port 25, TSL 587, SSL 465), user name and
password. You can also sepcify a testing email to test the account. Click Next to continue.
· It's highly recommended that you click the Test this account... button below
to make sure your SMTP account is configured correctly.
· To customize the e-mail message: Open FaxMind Manager, select Settings tab,
click E-mail... button in the Advanced group.
· FaxMind Server supports Direct Email if you do not have an SMTP server.

Quick Start Guide
www.faxmind.com
16
Step 8 - Google Docs Setup
Check Upload Inbound Fax or/and Upload Outbound Fax check boxes, and enter your Google Drive
login information if you would like FaxMind to automatically upload all of your inbound and outbound faxes to
your Google Drive in order to share them with others. Click Next to continue.

Quick Start Guide
www.faxmind.com
17
Step 9 - Fax Devices Setup
FaxMind will auto-detect fax modems and boards which installed on your computer, and lists them below.
Check to select which devices you would like to use, click Advanced settings... for more settings. Click
Next to continue.
· You can manually add fax modem by: Open FaxMind Manager, click Settings
tab, choose Fax Devices section, click New Device. .button.
· Evaluation edition can support TWO fax devices only.

Quick Start Guide
www.faxmind.com
18
Step 10 - Configuration Complete
You have finished configuring FaxMind Server on your computer. It's highly recommended that you set up
the Routing Rules so the users able to receive incoming fax & voice message.
Click Finish button to apply your settings, and display the Login Dialog of FaxMind Manager.
Quick Start Guide
www.faxmind.com
19
Step 1 - Install FaxMind Desktop Client for Windows
· Download the FaxMind installer file from:
http://www.faxmind.com/download.html
· Double-click the FaxMind Desktop Client installer to begin the installation.
· Click Next on the Welcome screen.
· Click I accept the terms of the License Agreement, then click Next.
· Verify the destination directory for the installer to copy files to.
· Click Next to begin copying the files, and install the FaxMind printer driver which allows you
to send faxes by to the printer.
· When Launch FaxMind Desktop Client is checked, FaxMind Desktop Client will be
launched after the installation. Select Finish button to complete the installation.
Install FaxMind Desktop Client for Windows
· FaxMind Desktop Client is an OPTIONAL tool for Windows to send faxes.
· Before you begin, be sure to install the FaxMind Desktop Client directly on your workstation rather than through RDP or other remote desktop software to ensure that the FaxMind printer drivers install properly.

Quick Start Guide
www.faxmind.com
20
Step 2 - Connect Desktop Clients to FaxMind Server
1. Double-click the FaxMind DeskTop Client icon on Desktop;
2. Click Scanning icon to scan available FaxMind Server on your LAN.
This may take a few minutes and the client software may stop responding.
3. Select a Service Provider URL (FaxMind Server) you would like to connect to.
You can also manually enter the Domain Name and IP Address of your FaxMind server.
4. In E-mail address field, enter your user's email address. i.e. [email protected]
5. Enter the your password.
6. Click Login.
· NAT or port forwarding in your Office Router may be set up, in order to
enable outside desktop clients to access to an internal FaxMind Server.
Usually, the port is 8088.
· Double-click the FaxMind Desktop Client icon in notification area (system
tray) to Compose a new Fax; Right-click for pop up menu.

Quick Start Guide
www.faxmind.com
21
How To Send Fax
1 - Sending a fax via an Email Client
Most of time, it is more suitable and effective for sending a fax via your familiar email client application, i.e.
Microsoft Outlook. This is done by composing your email message and sending to an email account that
you know FaxMind Server is monitoring. For example, if FaxMind Server is collecting all the email
messages sent to [email protected] then sending your message to that address will get it
faxed. Some special considerations must be observed in order to use this method of faxing.
When you compose your email message you can specify just a fax number or an email address on the
Subject line like this:
(203) 2250505; [email protected]
You can also specify the recipient's name and the fax number or email address:
Daniel Wollman <(203) 2250505>; Daniel Wollman <[email protected]>; 'Daniel Wollman'
FaxMind supports many special macros for you to customize your fax message, i.e. SUBJECT, COVERPAGE,
HEADER, MEMO, PRIORITY ect., more details see the Email Macros section in the User's Manual.
· Recipients are separated by a semicolon ( " ; " ). Recipient names can not have quotes (" ' "),
but fax numbers or email addresss must be encapsulated within " < "and " > " characters. The
round brackets can be used in Email Address only.
· If you would like to use an email address as a recipient fax number, be sure the
contact has already been added in the Public Contacts list of FaxMind Server.
Quick Start Guide
www.faxmind.com
22
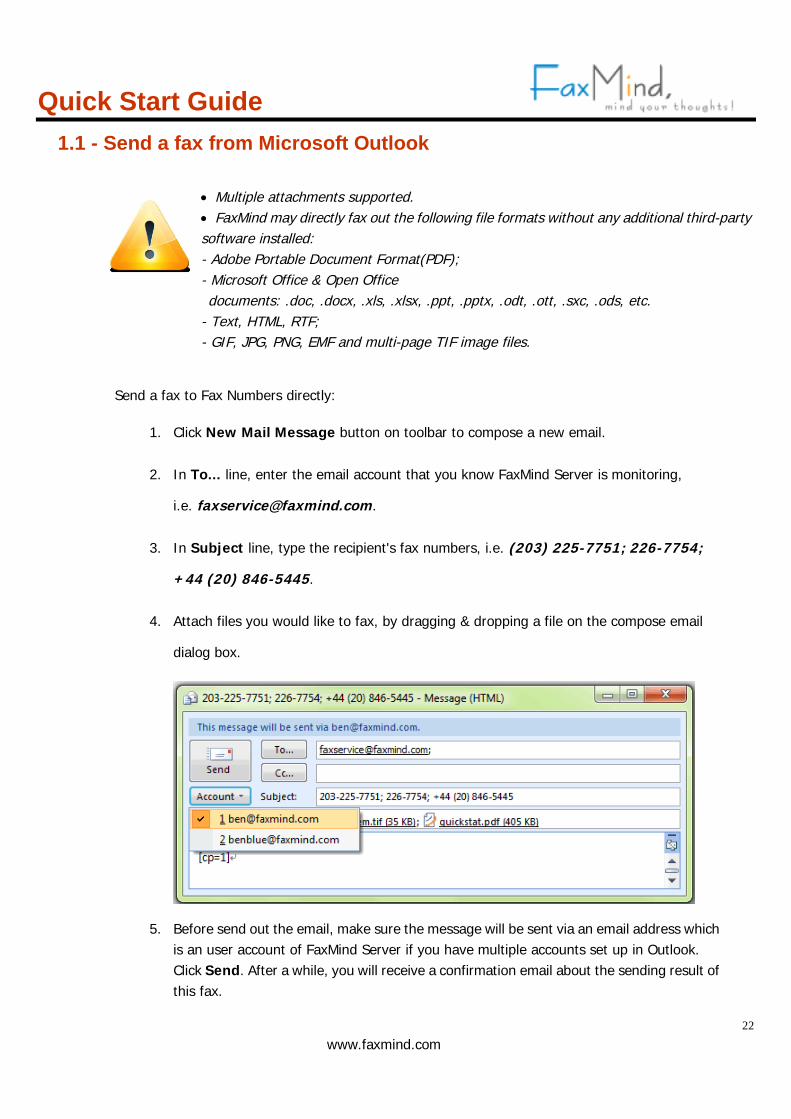
1.1 - Send a fax from Microsoft Outlook
Send a fax to Fax Numbers directly:
1. Click New Mail Message button on toolbar to compose a new email.
2. In To... line, enter the email account that you know FaxMind Server is monitoring,
i.e. [email protected].
3. In Subject line, type the recipient's fax numbers, i.e. (203) 225-7751; 226-7754;
+44 (20) 846-5445.
4. Attach files you would like to fax, by dragging & dropping a file on the compose email
dialog box.
5. Before send out the email, make sure the message will be sent via an email address which is an user account of FaxMind Server if you have multiple accounts set up in Outlook. Click Send. After a while, you will receive a confirmation email about the sending result of this fax.
· Multiple attachments supported. · FaxMind may directly fax out the following file formats without any additional third-party software installed: - Adobe Portable Document Format(PDF); - Microsoft Office & Open Office documents: .doc, .docx, .xls, .xlsx, .ppt, .pptx, .odt, .ott, .sxc, .ods, etc. - Text, HTML, RTF; - GIF, JPG, PNG, EMF and multi-page TIF image files.
Quick Start Guide
www.faxmind.com
23
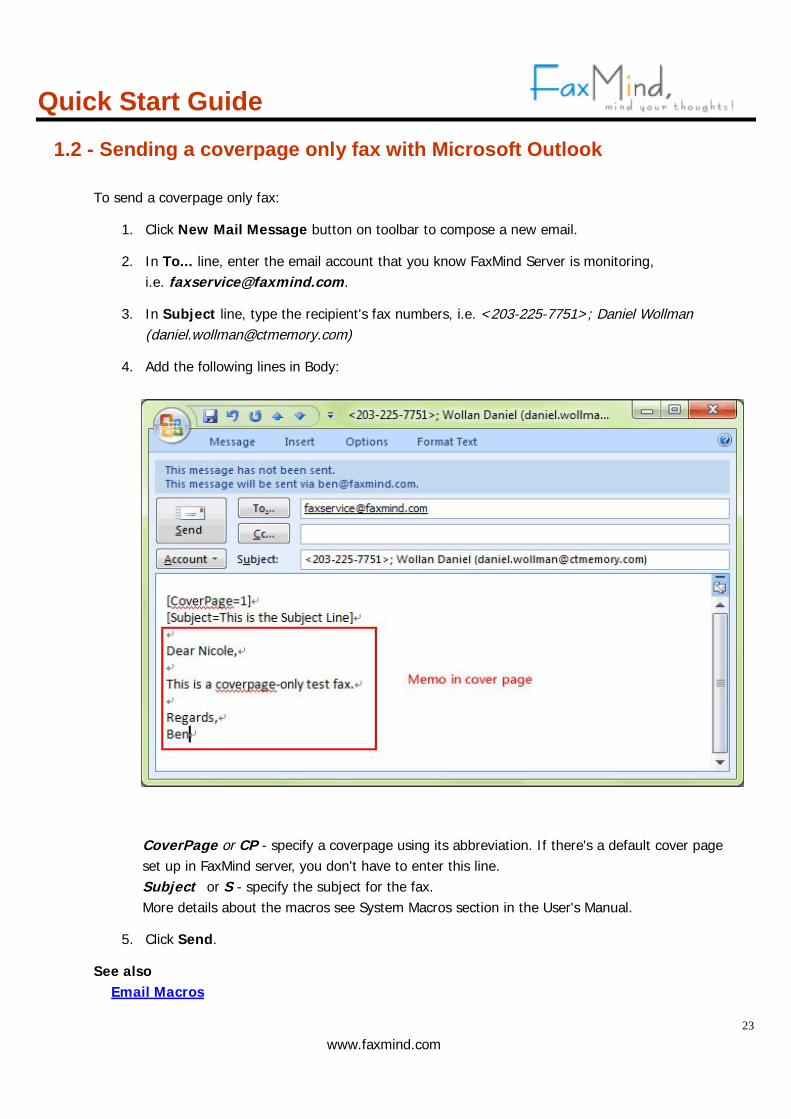
1.2 - Sending a coverpage only fax with Microsoft Outlook
To send a coverpage only fax:
1. Click New Mail Message button on toolbar to compose a new email.
2. In To... line, enter the email account that you know FaxMind Server is monitoring, i.e. [email protected].
3. In Subject line, type the recipient's fax numbers, i.e. <203-225-7751>; Daniel Wollman ([email protected])
4. Add the following lines in Body:
CoverPage or CP - specify a coverpage using its abbreviation. If there's a default cover page set up in FaxMind server, you don't have to enter this line. Subject or S - specify the subject for the fax. More details about the macros see System Macros section in the User's Manual.
5. Click Send.
See also Email Macros
Quick Start Guide
www.faxmind.com
24
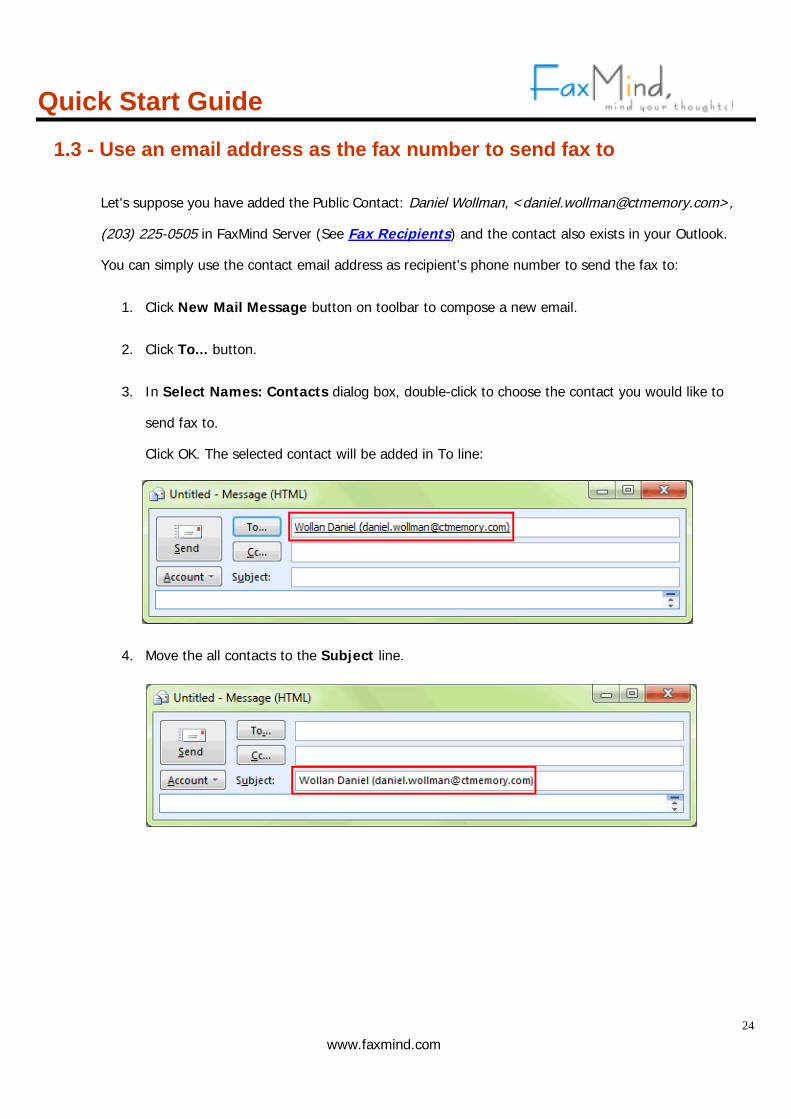
1.3 - Use an email address as the fax number to send fax to
Let's suppose you have added the Public Contact: Daniel Wollman, <[email protected]>,
(203) 225-0505 in FaxMind Server (See Fax Recipients) and the contact also exists in your Outlook.
You can simply use the contact email address as recipient's phone number to send the fax to:
1. Click New Mail Message button on toolbar to compose a new email.
2. Click To... button.
3. In Select Names: Contacts dialog box, double-click to choose the contact you would like to
send fax to.
Click OK. The selected contact will be added in To line:
4. Move the all contacts to the Subject line.

Quick Start Guide
www.faxmind.com
25
5. In To... line, enter the email account that you know FaxMind Server is monitoring,
i.e. [email protected].
6. Attach a file you would like to fax by dragging & dropping a file on the compose email dialog box.
7. Click Send to send out the fax.

Quick Start Guide
www.faxmind.com
26
2 - Sending a fax from FaxMind Printer Driver (Desktop Client)
With the FaxMind Printer Driver, you can fax documents directly from any applications. You can do this by
printing the documents to the FaxMind Printer Driver instead of to your usual printer.
From within your application:
1. Click Print on the File menu, or the appropriate command for printing;
2. On the Print dialog box, change the printer to FaxMind Printer;
3. If you would like to change the Resolution of fax:
Click the Properties button, click Graphic or Advanced tab, choose 204 x 196 dots per
inch in Resolution combo box, click OK, click OK.
4. Click OK.
The FaxMind Desktop Client will appear automatically.
5. If you are not logged in to FaxMind Server, you will be asked to enter your User's Email
address and Password, click OK to login to the FaxMind Server.
6. In the Recipients field, type the phone number of the fax machine you would like to send the fax to.
7. In the Header field, you can customize the header of the outgoing fax.

Quick Start Guide
www.faxmind.com
27
8. To send a scheduled fax, check the Scheduling box and specify what time the fax will be sent out.
If necessary, modify other fields in the window.
9. Click Send Now! button.

Quick Start Guide
www.faxmind.com
28
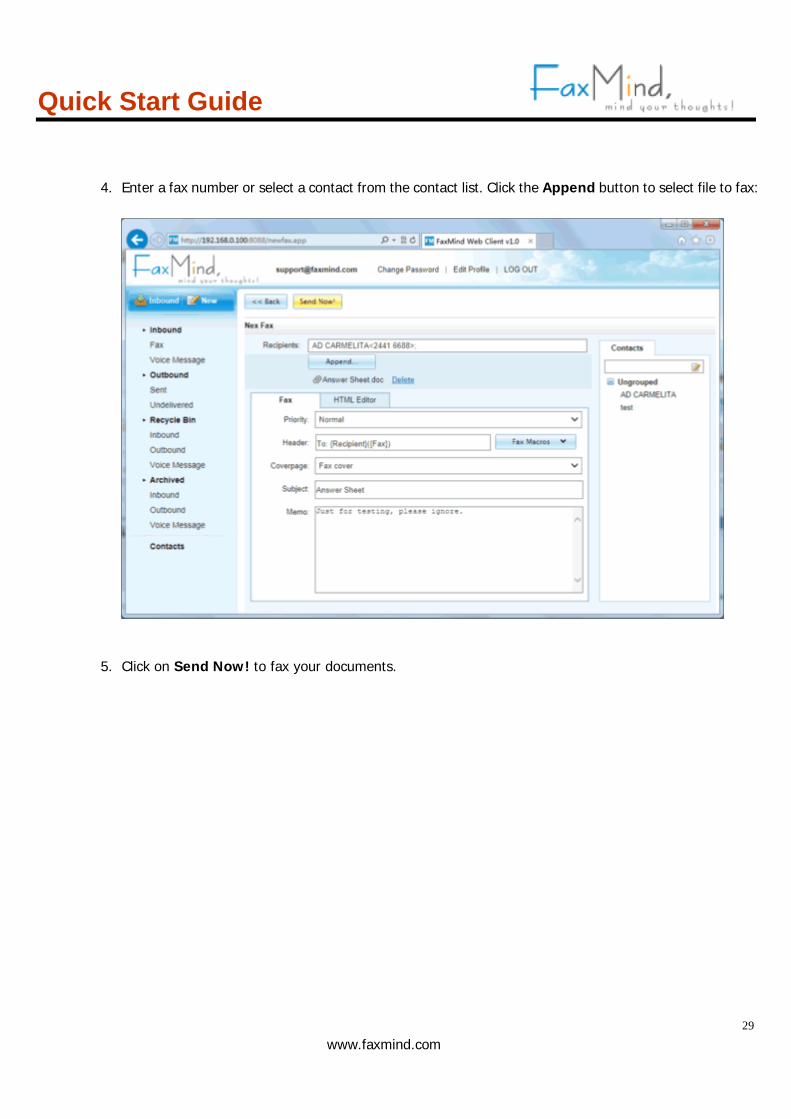
3 - Sending Faxes from a Web Browser
To send a fax from your web browser (Microsoft Internet Explorer, Mozilla Firefox, Apple Safari, Google
Chrome):
1. Open Web browser and navigate the FaxMind server's address
2. Enter your user name and password (if you specified before), click Login button.
3. Click New button to open the New Fax window.
Quick Start Guide
www.faxmind.com
29
4. Enter a fax number or select a contact from the contact list. Click the Append button to select file to fax:
5. Click on Send Now! to fax your documents.

Quick Start Guide
www.faxmind.com
30
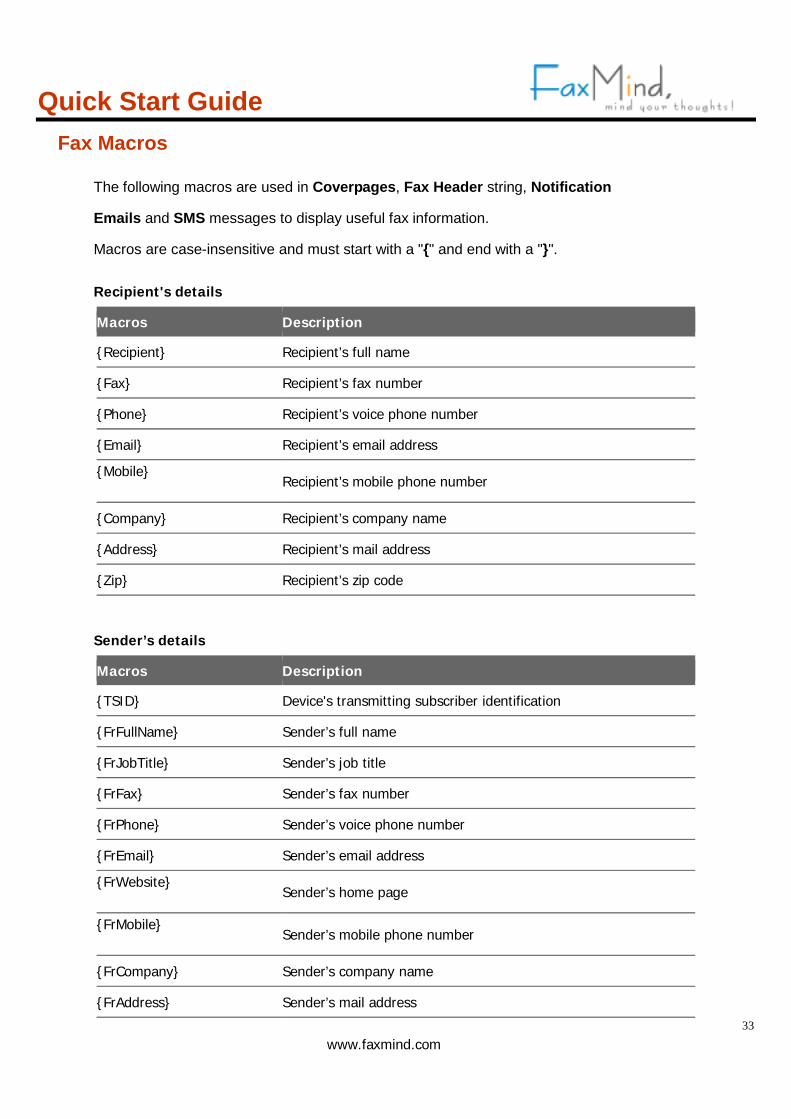
FaxMind Macros
Email Macros
When FaxMind processes an email message in preparation for faxing, it examines the mail Subject line to
determine where to whom (usually called Recipients) the fax should be sent. Even more, it is possible to place
the following special macros within the body of an email message to achieve specific results:
· Macros must appear at the top of the message body and one macro per line.
· Macros are case-insensitive.
· Macros must start with a "[", "(" or "}" (macro keys MUST be next to these starting characters) and
end with "]", ")" or "}".
· Macro keys and values are splitted by "=" (equal) or ":" (colon).
· Usage for the macro should be:
[Macro = Value ]
or
[Macro =
Value - Line 1
Value - Line 2
Value - Line 3
...
]
If you use a mobile device (iPhone, iPad, Android mobile) to send a fax, the following line can be
more easily inputted:
(Macro : Value )
For example:

Quick Start Guide
www.faxmind.com
31
Fax's details
Macros Abbreviated Description
CoverPage CP / P Specify the cover page that will be used for this fax. Value must specify a valid Abbreviation of the cover page in FaxMind Server.
Subject S Specify the subject of the fax. This text is inserted in the {Subject} field of the coverpage.
Memo / Comment M Specify the memo of the fax. This text is inserted in the {Memo} field of the coverpage. When no memo is present, email body text below the macro lines will be treated as memo.
Header / Banner H Set the fax header string (banner text) of the fax. This text is added to the top of each fax page sent.
Priority PY
Set a priority value for the fax. 2 is the highest priority and 0 is the lowest. Fax messages will always be faxed in the order of their priority setting. When no priority setting is present, they will be treated as Normal with a setting of 1.
TSID / CSID Set the TSID for fax device. When no TSID setting is present, FaxMind will use the Fax device's default Local ID.
Quick Start Guide
www.faxmind.com
32
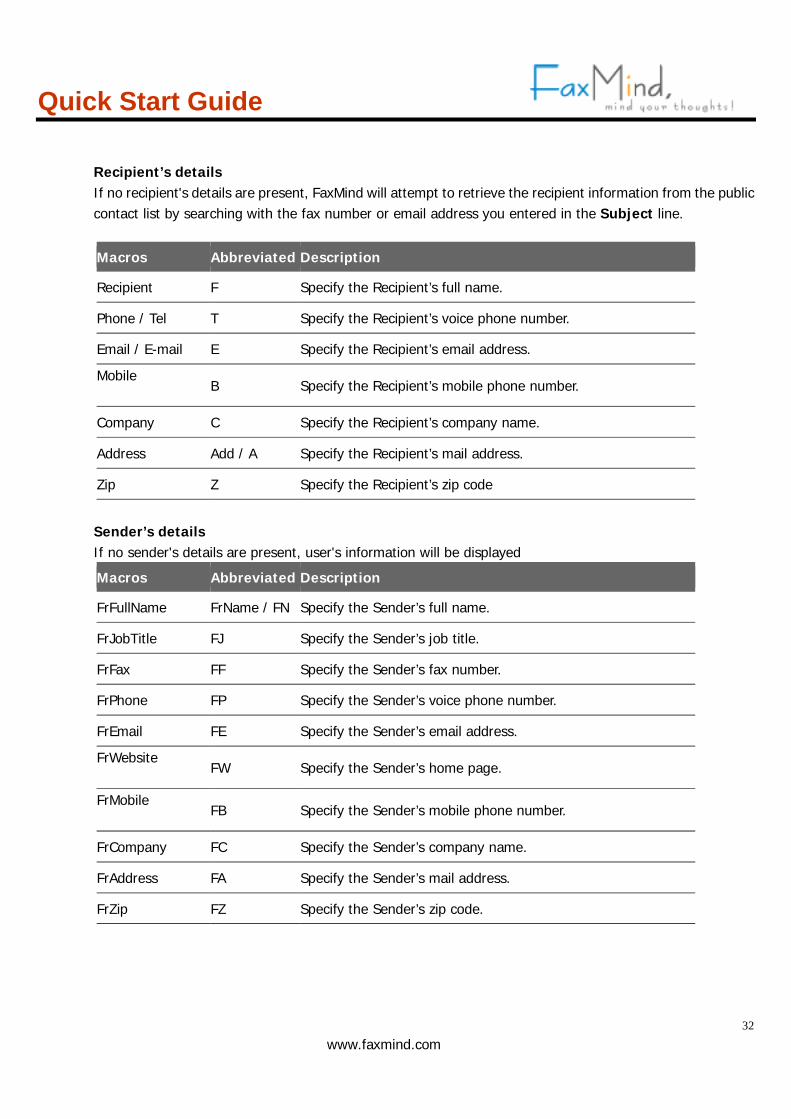
Recipient’s details If no recipient's details are present, FaxMind will attempt to retrieve the recipient information from the public contact list by searching with the fax number or email address you entered in the Subject line.
Macros Abbreviated Description
Recipient F Specify the Recipient’s full name.
Phone / Tel T Specify the Recipient’s voice phone number.
Email / E-mail E Specify the Recipient’s email address.
Mobile
B Specify the Recipient’s mobile phone number.
Company C Specify the Recipient’s company name.
Address Add / A Specify the Recipient’s mail address.
Zip Z Specify the Recipient’s zip code
Sender’s details If no sender's details are present, user's information will be displayed
Macros Abbreviated Description
FrFullName FrName / FN Specify the Sender’s full name.
FrJobTitle FJ Specify the Sender’s job title.
FrFax FF Specify the Sender’s fax number.
FrPhone FP Specify the Sender’s voice phone number.
FrEmail FE Specify the Sender’s email address.
FrWebsite
FW Specify the Sender’s home page.
FrMobile
FB Specify the Sender’s mobile phone number.
FrCompany FC Specify the Sender’s company name.
FrAddress FA Specify the Sender’s mail address.
FrZip FZ Specify the Sender’s zip code.
Quick Start Guide
www.faxmind.com
33
Fax Macros
The following macros are used in Coverpages, Fax Header string, Notification
Emails and SMS messages to display useful fax information.
Macros are case-insensitive and must start with a "{" and end with a "}".
Recipient's details
Macros Description
{Recipient} Recipient’s full name
{Fax} Recipient’s fax number
{Phone} Recipient’s voice phone number
{Email} Recipient’s email address
{Mobile}
Recipient’s mobile phone number
{Company} Recipient’s company name
{Address} Recipient’s mail address
{Zip} Recipient’s zip code
Sender’s details
Macros Description
{TSID} Device's transmitting subscriber identification
{FrFullName} Sender’s full name
{FrJobTitle} Sender’s job title
{FrFax} Sender’s fax number
{FrPhone} Sender’s voice phone number
{FrEmail} Sender’s email address
{FrWebsite}
Sender’s home page
{FrMobile}
Sender’s mobile phone number
{FrCompany} Sender’s company name
{FrAddress} Sender’s mail address
Quick Start Guide
www.faxmind.com
34
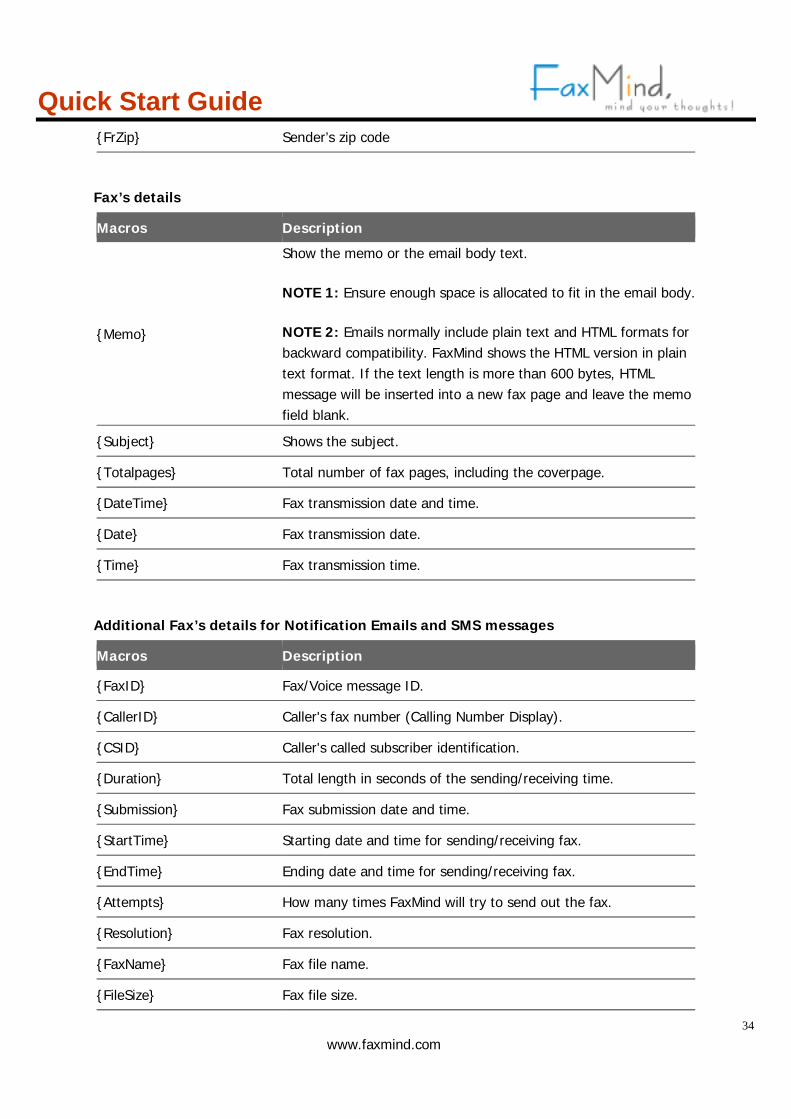
{FrZip} Sender’s zip code
Fax’s details
Macros Description
{Memo}
Show the memo or the email body text.
NOTE 1: Ensure enough space is allocated to fit in the email body.
NOTE 2: Emails normally include plain text and HTML formats for backward compatibility. FaxMind shows the HTML version in plain text format. If the text length is more than 600 bytes, HTML message will be inserted into a new fax page and leave the memo field blank.
{Subject} Shows the subject.
{Totalpages} Total number of fax pages, including the coverpage.
{DateTime} Fax transmission date and time.
{Date} Fax transmission date.
{Time} Fax transmission time.
Additional Fax’s details for Notification Emails and SMS messages
Macros Description
{FaxID} Fax/Voice message ID.
{CallerID} Caller's fax number (Calling Number Display).
{CSID} Caller's called subscriber identification.
{Duration} Total length in seconds of the sending/receiving time.
{Submission} Fax submission date and time.
{StartTime} Starting date and time for sending/receiving fax.
{EndTime} Ending date and time for sending/receiving fax.
{Attempts} How many times FaxMind will try to send out the fax.
{Resolution} Fax resolution.
{FaxName} Fax file name.
{FileSize} Fax file size.

Quick Start Guide
www.faxmind.com
35
{PhoneType} Local, Long-distance, International or Direct-dial calls.
{Status} Brief description of fax result.
{LastError} Last error message.