Embed Size (px)
Citation preview

6-1
Chapter 6 ACD Operation
ACD Operation
FEATURE DESCRIPTION The DCS Gateway System provides ACD (Automatic Call Distribution) feature. This feature distributes calls to agents equally, with calls waiting for the longest time being connected to agents first. Additionally each call has a priority order with the highest priority call being connected to the agent first. If a customer calls in when no agent is available, the customer will hear an announcement and then be held or be transferred to other group or a station.
Major Features and Characteristics.
Call distribution and Grouping Features
Routing Features
Agents Features
Supervisor Features
Recording Features
Supervisor Statistics Report Features
Major Features and CharacteristicsMajor Features and CharacteristicsMajor Features and CharacteristicsMajor Features and Characteristics Prompt Response ACD is the required feature for users, who configure and operate a call center such as customer consultation or telemarketing, to respond to congestion calls efficiently and promptly. Efficient Call Distribution Calls are distributed to agents equally with a customer who has waited for the longest time or has the highest priority being connected to the first free agent. Announcement Service When a customer calls in and there is no agent available, the customer will hear an announcement message and then music or be transferred to another group or a station.
Call distribution and Grouping FeaturesCall distribution and Grouping FeaturesCall distribution and Grouping FeaturesCall distribution and Grouping Features A customer call will be connected to the agent promptly. At this time, if all agents are busy or absent, the customer will listen to Announcement following ring-back tone.
The order of distribution of calls to the ACD group is based on FIFO (First In First Out), and they will be distributed in accordance with the priority order.
In other words, a call which has the higher priority number will be connected to the agent first. And if the priority order is the same, it will be connected to the agent according to the order in which the calls came in. Incoming ACD calls are divided in three categories according to the priority order as below.
Priority ACD Call (Give the priority order number 0,1 and 2) Overflow ACD Call (Calls to be transferred from other group, the priority order number 3) General ACD Call (includes station calls, the lowest priority order)
Incoming ACD Call distribution in mode of FIFO shall be connected to the agent on the basis of the available

6-2
Chapter 6 ACD Operation
agents. If no agent is available, incoming calls are saved in a Waiting Queue. At this time, an announcement or music (as defined in the Routing Table and according to those steps) will be heard by the calls.
6-3
Agents FeaturesAgents FeaturesAgents FeaturesAgents Features The system can only manage agent records on the statistics report only for registered agents, as Agents are performing Log In and Log Out to inform the System status of each Agent. In other words, every Agent shall perform Log In on arriving at the office and Log Out on leaving the office to get accurate data from the Agent Record Management through the Statistics Report. You can set the system to automatically change into Night Mode at the predefined time, even if Agents do not perform Log In. The path for incoming calls shall be as designated in the Log In/Out Table. In this case, working time statistics data by agent does not have any special meaning.
Types of status of the ACD Agents are as below.
Available (Available Status for answering the customer call)
Unavailable (Reject Status to the customer call)
Work (Holding Status handling work for customer)
Non ACD (when using local phone or external phone call and calls received directly to the station No)
ACD In (In case of having a customer's call)
The Agent can change the status of the telephone to Available, Unavailable or Work. In the other two statuses, Non ACD & ACD In, the Agent can just monitor them on the statistics PC.
When no agent are available to answer the calls in the ACD Group, incoming ACD calls are placed in waiting status the call waiting button LEDs on the telephones of the other agents will be on.
Off : No Waiting Calls
Blinking : Some Waiting Calls (The number of calls is option)
Flash Slowly : Few Waiting Calls (The number of calls is option)
Flash Rapidly : Plenty of Waiting Calls
On : A large quantity of Waiting Calls
Because it is possible to have a maximum 1,998 of Agent IDs (1~1998) in this system, it is possible to use them as data for individual performance analysis of each Agent. Agent I.D. can be fixed in one digit, two digits, three digits or four digits, by setting the number of digits at MAP.
Available features for Agents are as below.
Agent State Change (Work, Available, Unavailable)
Agent I.D. Input (Option of one digit, two digits, three digits and four digits)
Customer Call Transaction
Message Transmission to Supervisor
Emergent Message Transmission to Supervisor
ACD Message Receipt from Supervisor (The maximum number of messages to be transferred from the supervisor to agents are 16.)
In cases where external recording devices are connected, it is possible to record call conversations.
6-4
Chapter 6 ACD Operation
Supervisor FeaturesSupervisor FeaturesSupervisor FeaturesSupervisor Features Each ACD Group allows one supervisor telephone. Available features for supervisors are:
Supervisor Status Change (Work, Available, Unavailable)
Customer Call Transaction Available
Executive Override
Monitor
ACD Message Transmission to Agents
Message Receipt from Agent (The maximum number of messages to be received from agents is 16).
Emergency Receipt from Agents
Each statistics PC can manage five ACD Groups. When using the statistics PC, the statistics group number, from 0 to 4, and statistics output port should be assigned separately on the MAP.
Announcement FeaturesAnnouncement FeaturesAnnouncement FeaturesAnnouncement Features When all agents are busy, not available for ACD Call Transactions, incoming ACD calls are connected to the Announcement Device and announcements are heard. At this time, it defines which Announcement Source is to be connected to incoming ACD calls which is determined by the Routing Table that is set on the MAP in advance. And also duration of M.O.H (Music On Hold) for ACD calls is defined in the Routing Table that is set in the MAP in advance.
Announcement Features are as follows.
1. Each ACD Group has an announcement group. Individual announcement groups can have 12 types of announcement sources and each announcement source is called 1st, 2nd, … 12th announcement source. Where sources from 7th to 12th are not used for ACD Service, they are used for Nighttime or Holiday Announcements.
2. It uses AVA2 (Automatic Voice Announcement) Board for the Announcement Device. 8 recording ports (or 15 ports) are on one AVA2 Board. In case of using 4 ports for each Announcement Source, you can use two types (or four types) of Announcement.
3. Plural ACD groups can share one Announcement Group. If ACD groups that announce the same Announcement hold one Announcement group in common, it is convenient.
4. The maximum Announcement time is 16 sec. (or 31 sec.), but it is repeatable according to the Routing Table. If an Announcement is longer than 16 sec. (or 31 sec.), it records the announcement in two parts then the Routing Table is set to repeat them inserting MOH between them.
While the incoming caller is listening to the Announcement and an agent becomes available, the call will be connected to the agent. The call will be distributed according to the order in which it came in regardless of the degree of the announcement.
6-5
Supervisor Statistics RepSupervisor Statistics RepSupervisor Statistics RepSupervisor Statistics Report Featuresort Featuresort Featuresort Features The Statistics Report performs on the Statistics PC and the separate Call Viewer Package is required. Commands using in the Statistics PC are in Menu Driven Mode.
The Statistics PC provides below 13 types of the Statistics Report.
Current Agent State Report
Current Trunk State Report
ACD system Summary Report
Trunk Usage Report
Trunk Usage Detailed Report
ACD Position Performance Report
ACD Agent Performance Report
ACD Group Answered Call Profile by hours
Trunk Answered Call Profile by hours
Overflowed Call Profile by hours
Abandoned Call Profile by hours
Daily Agent Performance Report
Daily Position Performance Report You shall register the following items on the Statistics PC before using it.
ACD Agent Group Name
Agent I.D
Agent Name
ACD TRK Group Name
The Maximum numbers of Trunk by Group
For more information, refer to ‘Call View’ section.
6-6
Chapter 6 ACD Operation
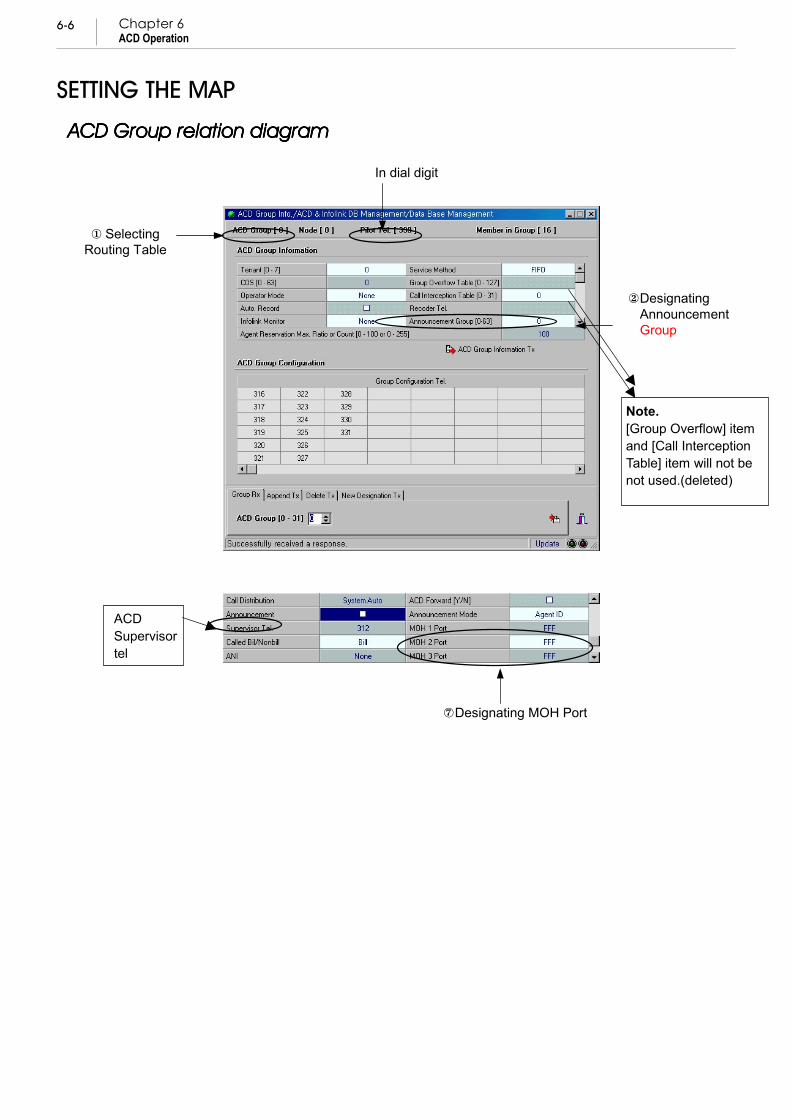
SETTING THE MAP
ACD Group relation diagramACD Group relation diagramACD Group relation diagramACD Group relation diagram
In dial digit
� Selecting Routing Table
� Designating Announcement Group
� Designating MOH Port
ACD Supervisor tel
Note. [Group Overflow] item and [Call Interception Table] item will not be not used.(deleted)
6-7
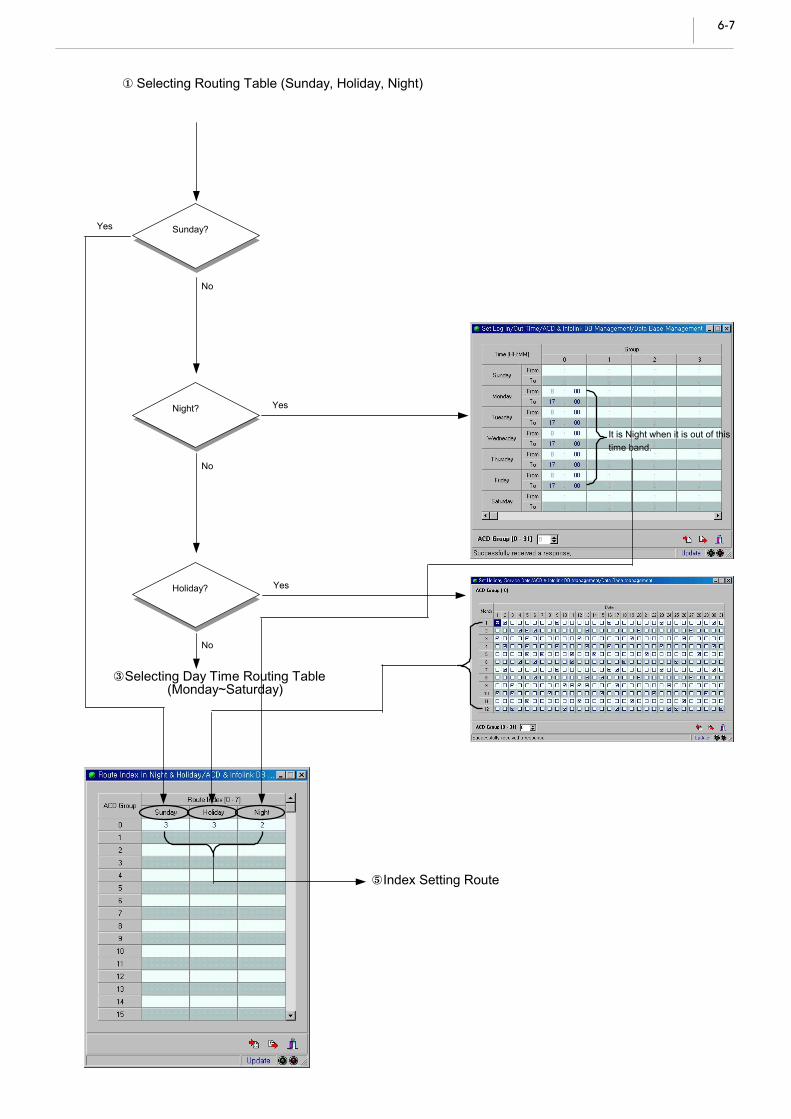
Sunday? Yes
Night?
Holiday?
No
It is Night when it is out of this time band.
Yes
No
Yes
No
� Selecting Routing Table (Sunday, Holiday, Night)
� Selecting Day Time Routing Table (Monday~Saturday)
� Index Setting Route
6-8
Chapter 6 ACD Operation
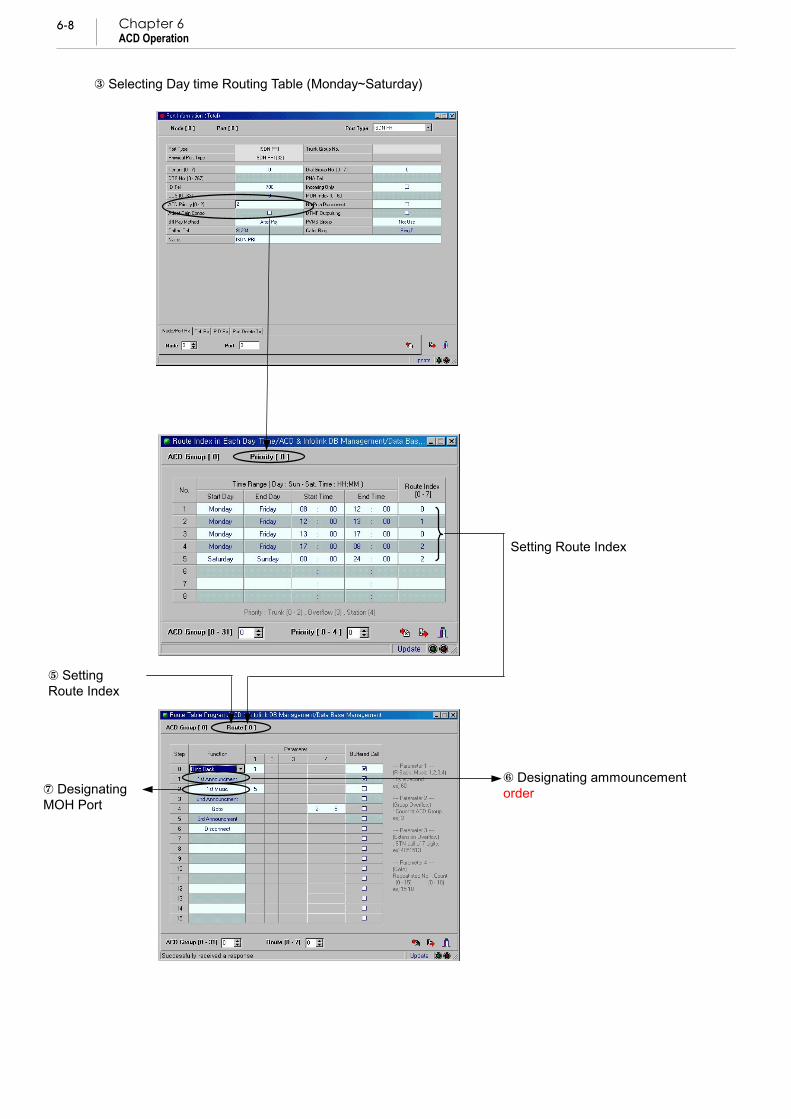
� Selecting Day time Routing Table (Monday~Saturday)
� Setting Route Index
� Designating ammouncement order � Designating
MOH Port
Setting Route Index
6-9
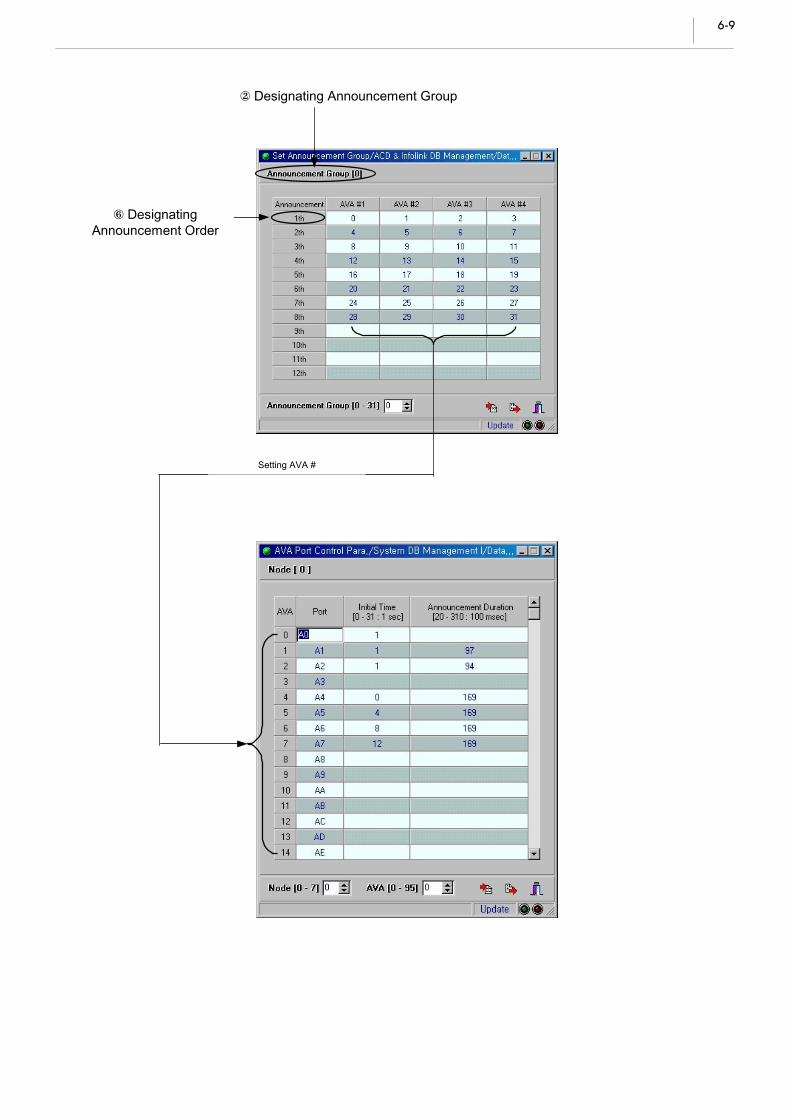
� Designating Announcement Group
Setting AVA #
� Designating Announcement Order
6-10
Chapter 6 ACD Operation
How to decide routing table
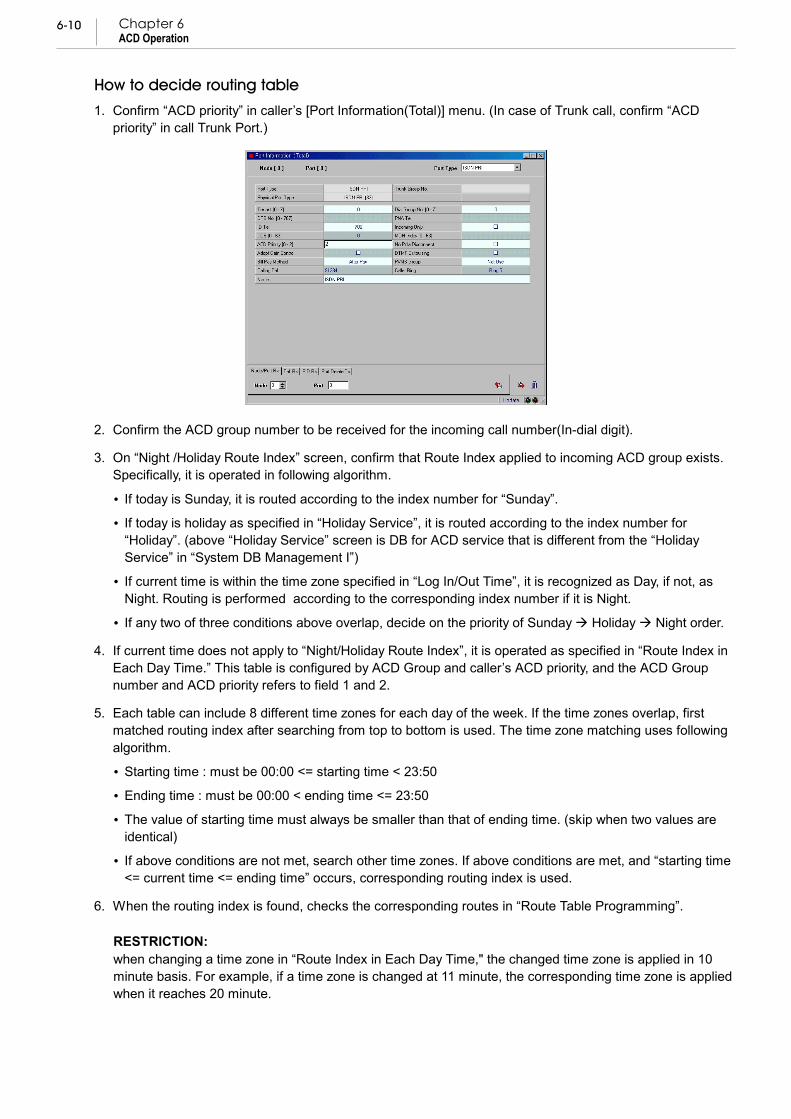
1. Confirm “ACD priority” in caller’s [Port Information(Total)] menu. (In case of Trunk call, confirm “ACD priority” in call Trunk Port.)
2. Confirm the ACD group number to be received for the incoming call number(In-dial digit).
3. On “Night /Holiday Route Index” screen, confirm that Route Index applied to incoming ACD group exists. Specifically, it is operated in following algorithm.
If today is Sunday, it is routed according to the index number for “Sunday”.
If today is holiday as specified in “Holiday Service”, it is routed according to the index number for “Holiday”. (above “Holiday Service” screen is DB for ACD service that is different from the “Holiday Service” in “System DB Management I”)
If current time is within the time zone specified in “Log In/Out Time”, it is recognized as Day, if not, as Night. Routing is performed according to the corresponding index number if it is Night.
If any two of three conditions above overlap, decide on the priority of Sunday Holiday Night order.
4. If current time does not apply to “Night/Holiday Route Index”, it is operated as specified in “Route Index in Each Day Time.” This table is configured by ACD Group and caller’s ACD priority, and the ACD Group number and ACD priority refers to field 1 and 2.
5. Each table can include 8 different time zones for each day of the week. If the time zones overlap, first matched routing index after searching from top to bottom is used. The time zone matching uses following algorithm.
Starting time : must be 00:00 <= starting time < 23:50
Ending time : must be 00:00 < ending time <= 23:50
The value of starting time must always be smaller than that of ending time. (skip when two values are identical)
If above conditions are not met, search other time zones. If above conditions are met, and “starting time <= current time <= ending time” occurs, corresponding routing index is used.
6. When the routing index is found, checks the corresponding routes in “Route Table Programming”. RESTRICTION: when changing a time zone in “Route Index in Each Day Time," the changed time zone is applied in 10 minute basis. For example, if a time zone is changed at 11 minute, the corresponding time zone is applied when it reaches 20 minute.
6-11
How to program routing table
1. Routing table consists of Ring back, Announcement, Music, Go to, Disconnect and Overflow.
Ring back and Music requires playback time input. But Announcement does not require additionally input because recording time is playback time.
Overflow consists of “Group Overflow” overflowing into ACD group and “Ext. Overflow” overflowing into arbitrary station.
2. “Ansback” signal is transmitted to initiate a call connection to opposite station and billing. This signal is transmitted when the first Announcement is made, or Music is heard.
3. In general, Ringback is programmed for one or several seconds prior to the first Annoucement. This is to prevent from mute sound possibly occuring in the process of Announcement playback.
4. Group as in Group overflow means only ACD group. And once it is overflowed, ignore next occurrence of group overflow during next Group routing, and jump to the next step.
5. The type of Extension overflow’s extension is identical to that of forwarding tel. of Forward function.
6. Even if disconnect is void at the end of Routing table, it is processed as disconnect implicitly.
7. In general, if there is an Agent available for service at any point of routing, this call gets out of routing queue, and is received to the corresponding ACD agent. If you want it to be received to ACD agent after corresponding Announcement or Music is finished, set “Buffered Call” field.
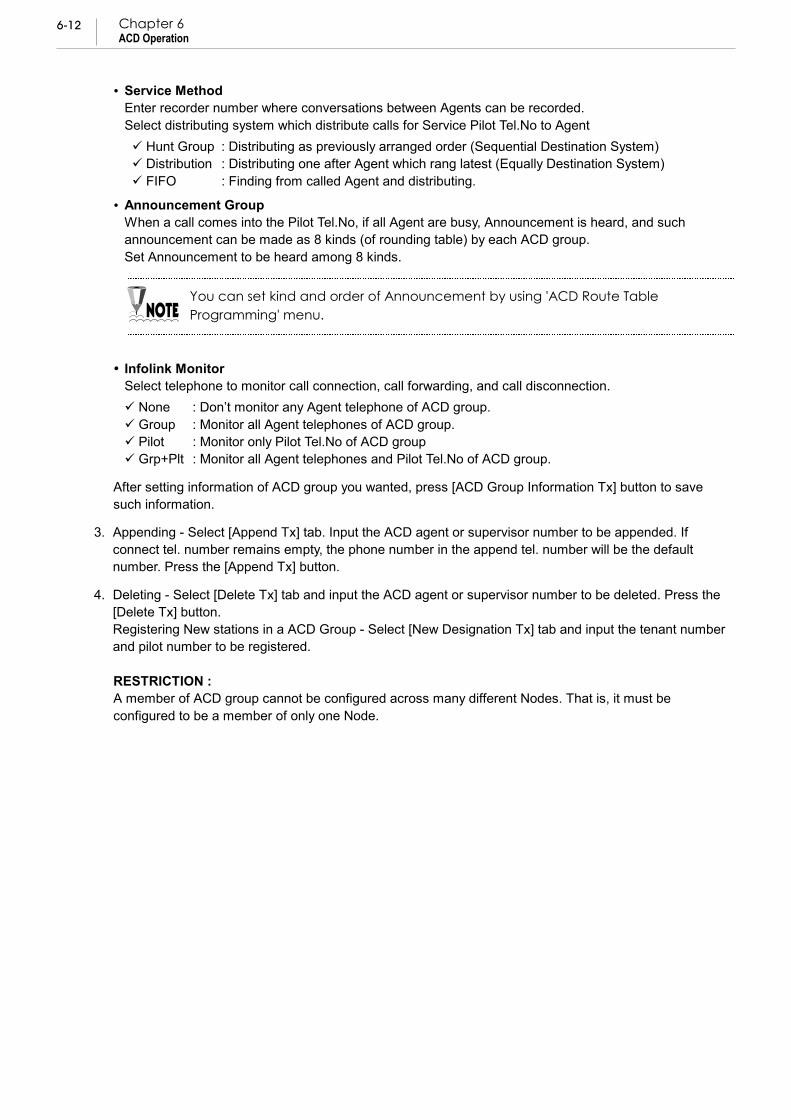
Setting/Browsing ACD Group Information
This function enables you to set or view general information of ACD group.
1. Selecting Menu
DDaattaabbaassee MMaannaaggeemmeenntt ⇒⇒⇒⇒ ACD & Infolink DB Management ⇒⇒⇒⇒ ACD Group Information & Configuration
2. Browsing : Select Group Rx tab and input the ACD Group number. Press the Group [Rx] button. Set the following information of each group and press the ACD Group Information [Tx] button to send the values to the system.
Tenant Input the Tenant number, which ACD group belongs to.
Pilot Tel. Input the Pilot Tel No of ACD group which users (customers) use, when they make phone call.
Note. [Group Overflow] item and [Call Interception Table] item will not be not used.(deleted)
6-12
Chapter 6 ACD Operation
Service Method Enter recorder number where conversations between Agents can be recorded. Select distributing system which distribute calls for Service Pilot Tel.No to Agent
Hunt Group : Distributing as previously arranged order (Sequential Destination System) Distribution : Distributing one after Agent which rang latest (Equally Destination System) FIFO : Finding from called Agent and distributing.
Announcement Group When a call comes into the Pilot Tel.No, if all Agent are busy, Announcement is heard, and such announcement can be made as 8 kinds (of rounding table) by each ACD group. Set Announcement to be heard among 8 kinds.
You can set kind and order of Announcement by using 'ACD Route Table Programming' menu.
Infolink Monitor Select telephone to monitor call connection, call forwarding, and call disconnection.
None : Don’t monitor any Agent telephone of ACD group. Group : Monitor all Agent telephones of ACD group. Pilot : Monitor only Pilot Tel.No of ACD group Grp+Plt : Monitor all Agent telephones and Pilot Tel.No of ACD group.
After setting information of ACD group you wanted, press [ACD Group Information Tx] button to save such information.
3. Appending - Select [Append Tx] tab. Input the ACD agent or supervisor number to be appended. If connect tel. number remains empty, the phone number in the append tel. number will be the default number. Press the [Append Tx] button.
4. Deleting - Select [Delete Tx] tab and input the ACD agent or supervisor number to be deleted. Press the [Delete Tx] button. Registering New stations in a ACD Group - Select [New Designation Tx] tab and input the tenant number and pilot number to be registered. RESTRICTION : A member of ACD group cannot be configured across many different Nodes. That is, it must be configured to be a member of only one Node.
6-13
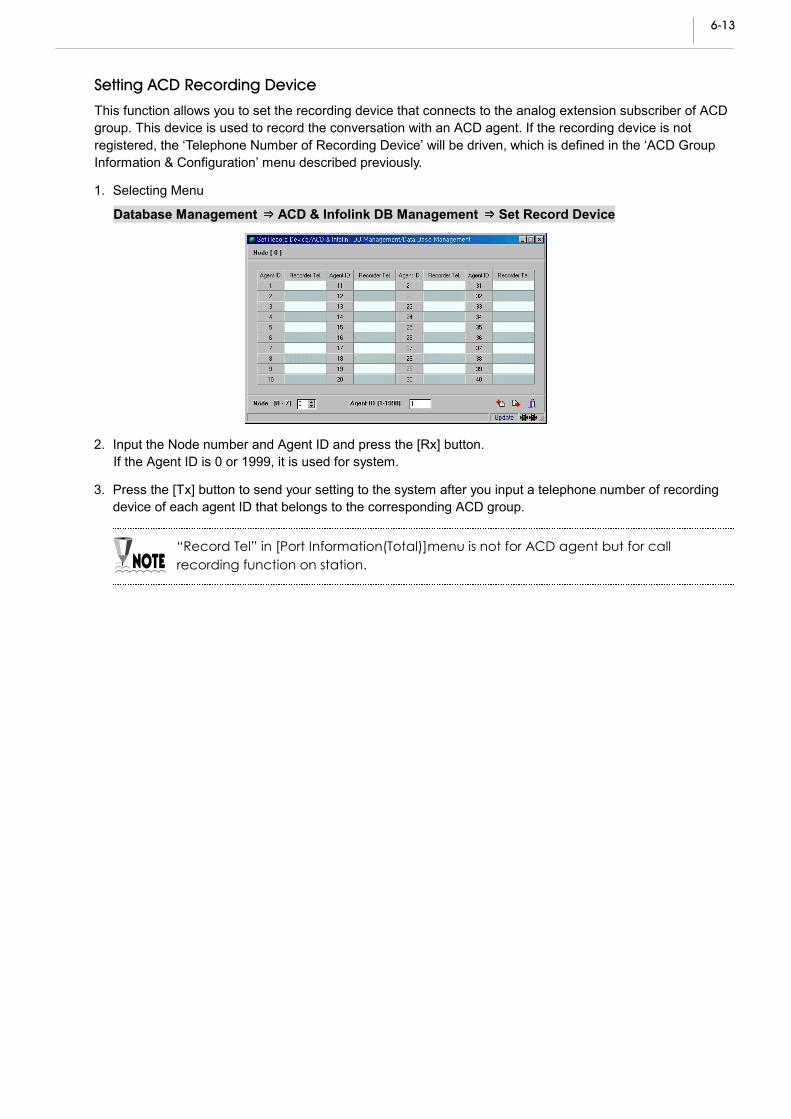
Setting ACD Recording Device
This function allows you to set the recording device that connects to the analog extension subscriber of ACD group. This device is used to record the conversation with an ACD agent. If the recording device is not registered, the ‘Telephone Number of Recording Device’ will be driven, which is defined in the ‘ACD Group Information & Configuration’ menu described previously.
1. Selecting Menu
DDaattaabbaassee MMaannaaggeemmeenntt ⇒⇒⇒⇒ ACD & Infolink DB Management ⇒⇒⇒⇒ Set Record Device
2. Input the Node number and Agent ID and press the [Rx] button. If the Agent ID is 0 or 1999, it is used for system.
3. Press the [Tx] button to send your setting to the system after you input a telephone number of recording device of each agent ID that belongs to the corresponding ACD group.
“Record Tel” in [Port Information(Total)]menu is not for ACD agent but for call recording function on station.
6-14
Chapter 6 ACD Operation
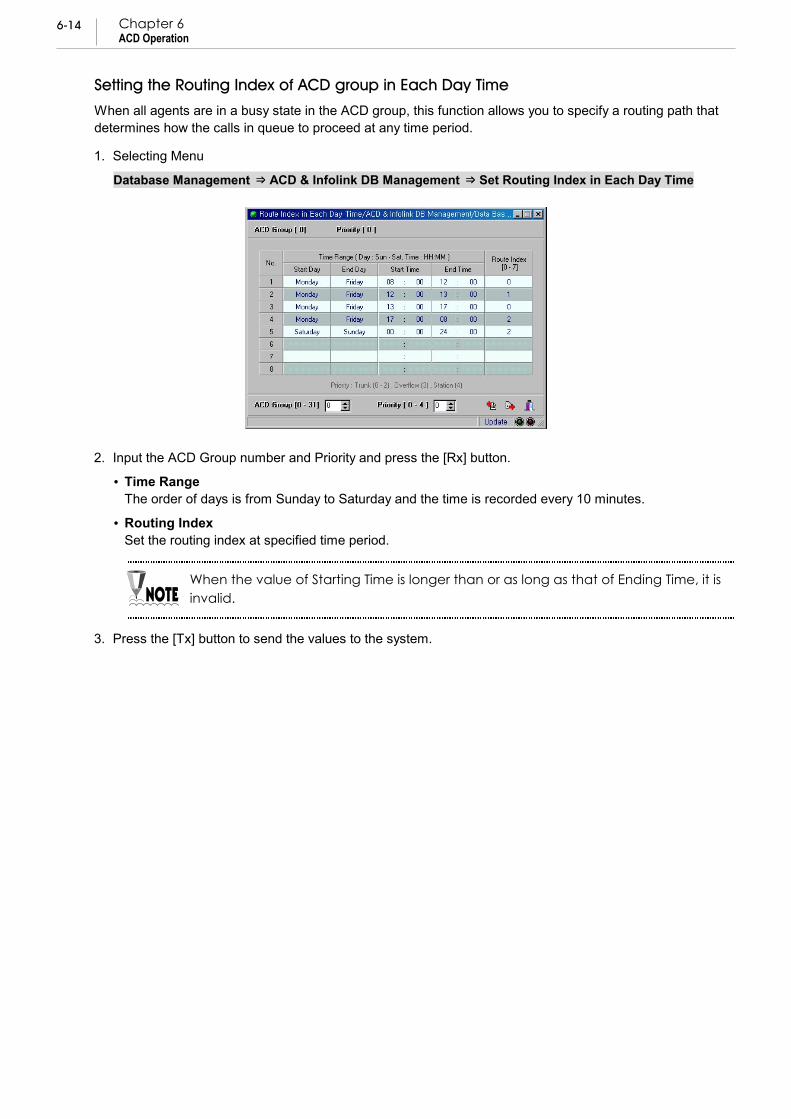
Setting the Routing Index of ACD group in Each Day Time
When all agents are in a busy state in the ACD group, this function allows you to specify a routing path that determines how the calls in queue to proceed at any time period.
1. Selecting Menu
DDaattaabbaassee MMaannaaggeemmeenntt ⇒⇒⇒⇒ ACD & Infolink DB Management ⇒⇒⇒⇒ Set Routing Index in Each Day Time
2. Input the ACD Group number and Priority and press the [Rx] button.
Time Range The order of days is from Sunday to Saturday and the time is recorded every 10 minutes.
Routing Index Set the routing index at specified time period.
When the value of Starting Time is longer than or as long as that of Ending Time, it is invalid.
3. Press the [Tx] button to send the values to the system.
6-15
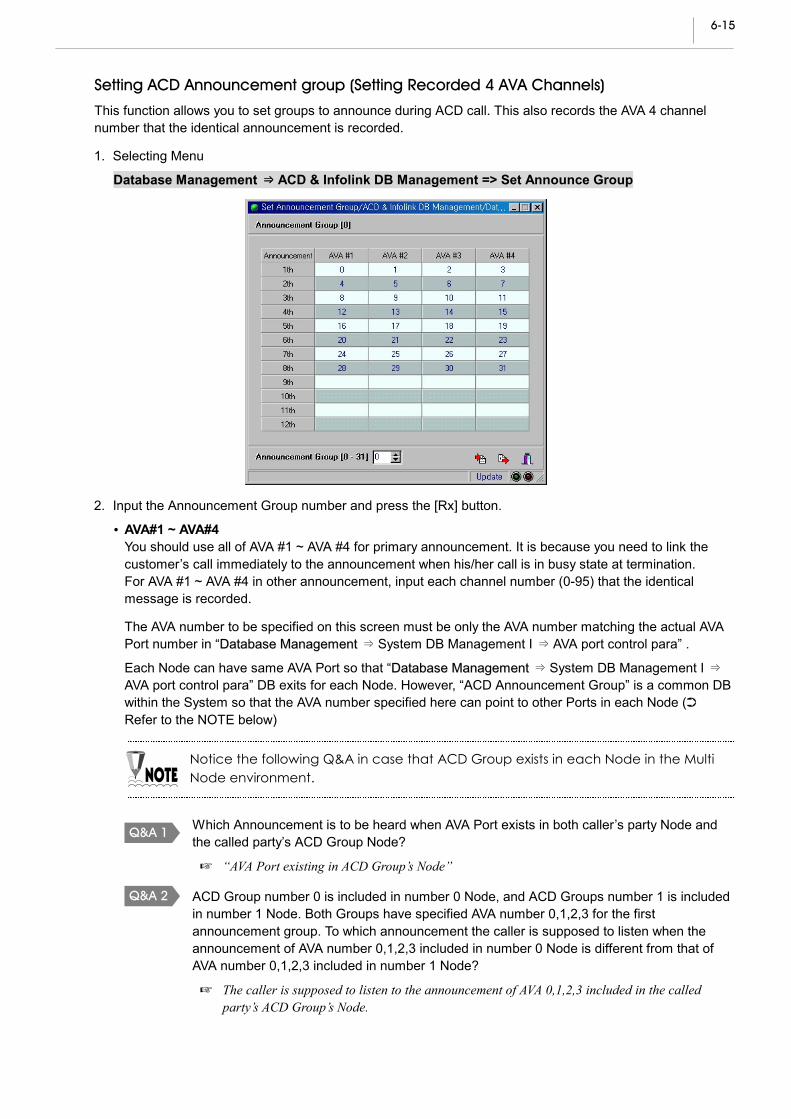
Setting ACD Announcement group (Setting Recorded 4 AVA Channels)
This function allows you to set groups to announce during ACD call. This also records the AVA 4 channel number that the identical announcement is recorded.
1. Selecting Menu
DDaattaabbaassee MMaannaaggeemmeenntt ⇒⇒⇒⇒ ACD & Infolink DB Management => Set Announce Group
2. Input the Announcement Group number and press the [Rx] button.
AVA#1 ~ AVA#4 You should use all of AVA #1 ~ AVA #4 for primary announcement. It is because you need to link the customer’s call immediately to the announcement when his/her call is in busy state at termination. For AVA #1 ~ AVA #4 in other announcement, input each channel number (0-95) that the identical message is recorded.
The AVA number to be specified on this screen must be only the AVA number matching the actual AVA Port number in “DDaattaabbaassee MMaannaaggeemmeenntt ⇒ System DB Management I ⇒ AVA port control para” .
Each Node can have same AVA Port so that “DDaattaabbaassee MMaannaaggeemmeenntt ⇒ System DB Management I ⇒ AVA port control para” DB exits for each Node. However, “ACD Announcement Group” is a common DB within the System so that the AVA number specified here can point to other Ports in each Node (➲ Refer to the NOTE below)
Notice the following Q&A in case that ACD Group exists in each Node in the Multi Node environment.
Which Announcement is to be heard when AVA Port exists in both caller’s party Node and the called party’s ACD Group Node?
� “AVA Port existing in ACD Group’s Node”
ACD Group number 0 is included in number 0 Node, and ACD Groups number 1 is included in number 1 Node. Both Groups have specified AVA number 0,1,2,3 for the first announcement group. To which announcement the caller is supposed to listen when the announcement of AVA number 0,1,2,3 included in number 0 Node is different from that of AVA number 0,1,2,3 included in number 1 Node?
� The caller is supposed to listen to the announcement of AVA 0,1,2,3 included in the called party’s ACD Group’s Node.
Q&A 1
Q&A 2
6-16
Chapter 6 ACD Operation
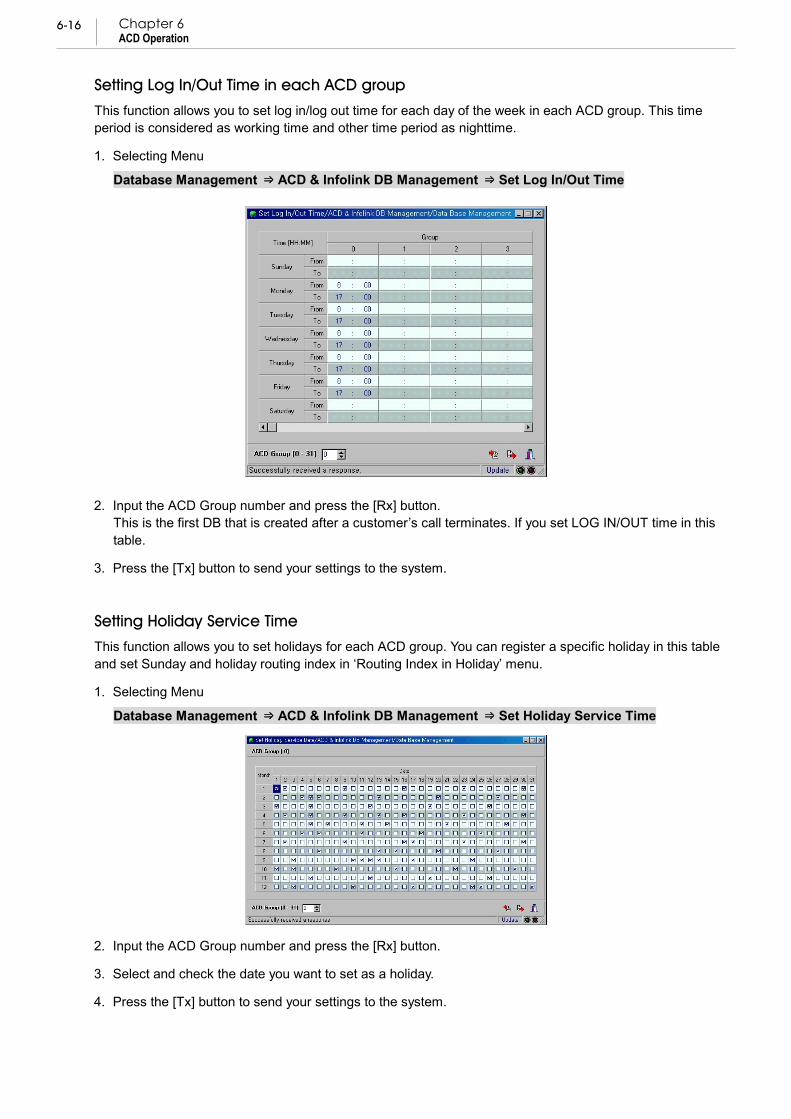
Setting Log In/Out Time in each ACD group
This function allows you to set log in/log out time for each day of the week in each ACD group. This time period is considered as working time and other time period as nighttime.
1. Selecting Menu
DDaattaabbaassee MMaannaaggeemmeenntt ⇒⇒⇒⇒ ACD & Infolink DB Management ⇒⇒⇒⇒ Set Log In/Out Time
2. Input the ACD Group number and press the [Rx] button. This is the first DB that is created after a customer’s call terminates. If you set LOG IN/OUT time in this table.
3. Press the [Tx] button to send your settings to the system. Setting Holiday Service Time
This function allows you to set holidays for each ACD group. You can register a specific holiday in this table and set Sunday and holiday routing index in ‘Routing Index in Holiday’ menu.
1. Selecting Menu
DDaattaabbaassee MMaannaaggeemmeenntt ⇒⇒⇒⇒ ACD & Infolink DB Management ⇒⇒⇒⇒ Set Holiday Service Time
2. Input the ACD Group number and press the [Rx] button.
3. Select and check the date you want to set as a holiday.
4. Press the [Tx] button to send your settings to the system.
6-17
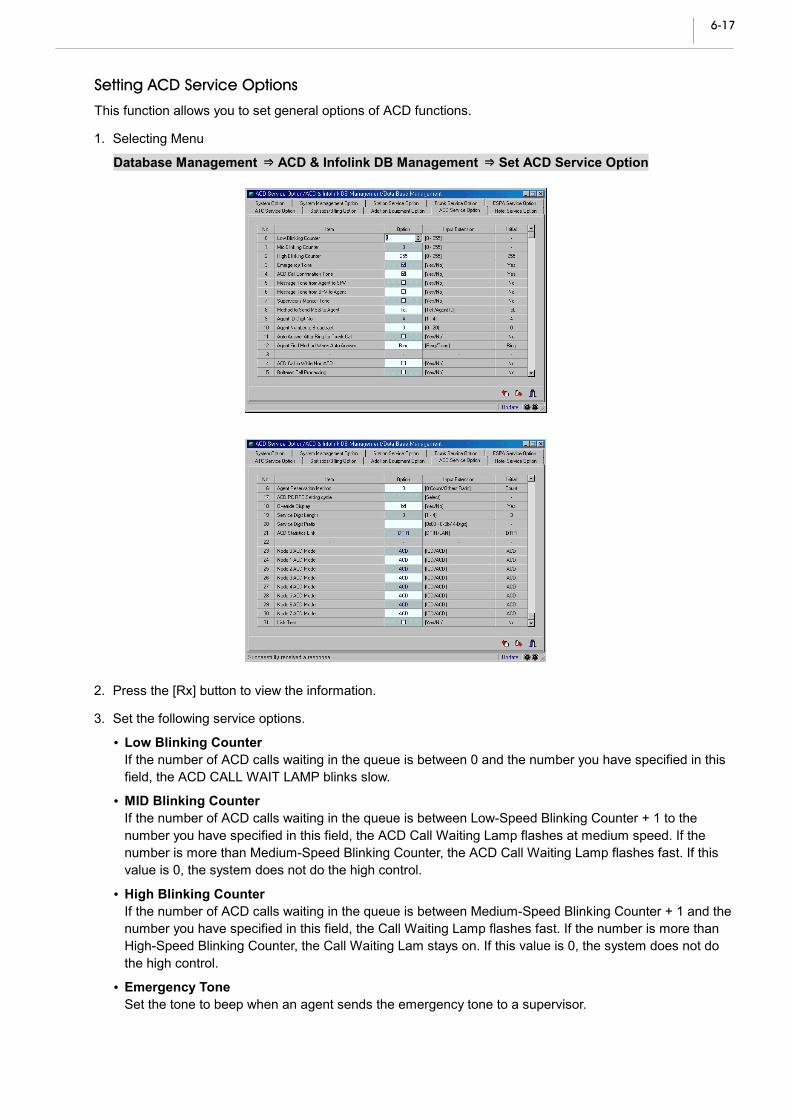
Setting ACD Service Options
This function allows you to set general options of ACD functions.
1. Selecting Menu
DDaattaabbaassee MMaannaaggeemmeenntt ⇒⇒⇒⇒ ACD & Infolink DB Management ⇒⇒⇒⇒ Set ACD Service Option
2. Press the [Rx] button to view the information.
3. Set the following service options.
Low Blinking Counter If the number of ACD calls waiting in the queue is between 0 and the number you have specified in this field, the ACD CALL WAIT LAMP blinks slow.
MID Blinking Counter If the number of ACD calls waiting in the queue is between Low-Speed Blinking Counter + 1 to the number you have specified in this field, the ACD Call Waiting Lamp flashes at medium speed. If the number is more than Medium-Speed Blinking Counter, the ACD Call Waiting Lamp flashes fast. If this value is 0, the system does not do the high control.
High Blinking Counter If the number of ACD calls waiting in the queue is between Medium-Speed Blinking Counter + 1 and the number you have specified in this field, the Call Waiting Lamp flashes fast. If the number is more than High-Speed Blinking Counter, the Call Waiting Lam stays on. If this value is 0, the system does not do the high control.
Emergency Tone Set the tone to beep when an agent sends the emergency tone to a supervisor.
6-18
Chapter 6 ACD Operation
ACD Call Confirmation Tone Set the tone to beep when ACD termination call occurs during an agent is non-ACD state.
Message Tone from Agent to SPV Set the tone to beep when an agent sends a message to a supervisor.
Message Tone from SPV to Agent Set the tone to beep when a supervisor sends message to an agent.
Supervisor’s Monitor Tone Set the tone to beep when any agent is monitored.
Method to Send MSG to Agent Select whether to use telephone number or Agent ID for a supervisor to send message to an agent.
Agent ID Digit No. When an agent logs in, input the number of ID digits.
Agent Number to Broadcast Input the number of agents that the supervisor can call at the same time.
Auto Answer after Ring for Trunk Call If you set automatic answering option for trunk incoming call and if you want the system to answer automatically after ringing for predetermined time (set this option at ‘System DB Management => System Timer’ menu), select and check this item.
Agent find Method When Auto Answer Select whether to use ring or tone (headset Mode) to notify agent during auto answering.
ACD Call in While Non-ACD Set whether to terminate ACD call in NON-ACD (which is not ACD representative number) queue as well as to distribute calls when an ACD call is incoming during call processing.
Buffered Call Processing When all ACD agents are busy, the call receives queuing service by routing table. At this time, any particular routing can distribute a call only after all are finished even if there is an idling attendant. Select and check if you want so. This function is often used to announce about the new product or public announcement of the company.
Attendant Reservation Method Select whether to use number or ratio when you set the agents available for reservation from all agents.
ACD PC RTC Setting Method The system does link test with ACD statistics PC regularly. Set this cycle.
Override Display Set whether to display ‘OVERRIDE’ on the LCD of agents when a supervisor monitors an agent.
Service Digit Length When an agent wants to collect statistics from services for various customer demands, he/she makes the types of services into codes. Input the length of prefix of the codes.
Service Digit Prefix The customer service performed by an agent summarizes into statistics through an external device. Input prefix value to send the data to external device.
ACD Statistics Link Select the ACD statistics port (DTIR or LAN).
Node 0- 7 ACD Mode Link Test
4. Press the [Tx] button to send your settings to the system.
6-19
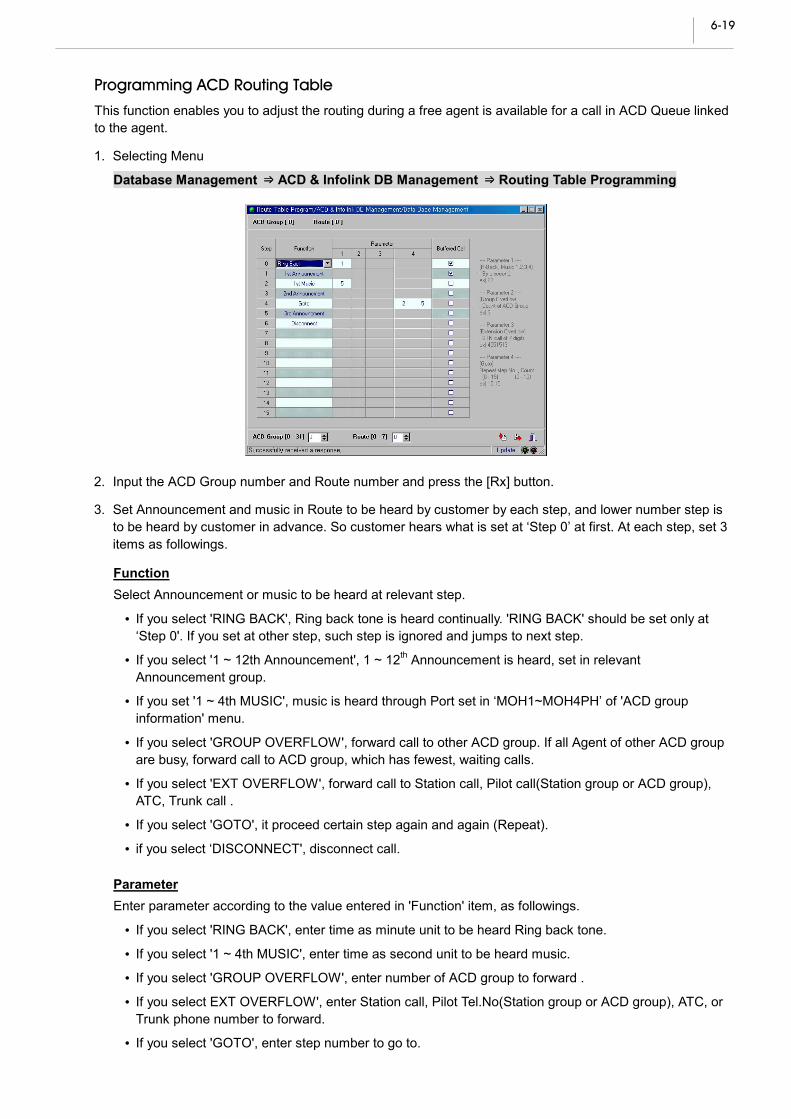
Programming ACD Routing Table
This function enables you to adjust the routing during a free agent is available for a call in ACD Queue linked to the agent.
1. Selecting Menu
DDaattaabbaassee MMaannaaggeemmeenntt ⇒⇒⇒⇒ ACD & Infolink DB Management ⇒⇒⇒⇒ Routing Table Programming
2. Input the ACD Group number and Route number and press the [Rx] button.
3. Set Announcement and music in Route to be heard by customer by each step, and lower number step is to be heard by customer in advance. So customer hears what is set at ‘Step 0’ at first. At each step, set 3 items as followings.
Function Select Announcement or music to be heard at relevant step.
If you select 'RING BACK', Ring back tone is heard continually. 'RING BACK' should be set only at ‘Step 0'. If you set at other step, such step is ignored and jumps to next step.
If you select '1 ~ 12th Announcement', 1 ~ 12th Announcement is heard, set in relevant Announcement group.
If you set '1 ~ 4th MUSIC', music is heard through Port set in ‘MOH1~MOH4PH’ of 'ACD group information' menu.
If you select 'GROUP OVERFLOW', forward call to other ACD group. If all Agent of other ACD group are busy, forward call to ACD group, which has fewest, waiting calls.
If you select 'EXT OVERFLOW', forward call to Station call, Pilot call(Station group or ACD group), ATC, Trunk call .
If you select 'GOTO', it proceed certain step again and again (Repeat).
if you select ‘DISCONNECT', disconnect call.
Parameter Enter parameter according to the value entered in 'Function' item, as followings.
If you select 'RING BACK', enter time as minute unit to be heard Ring back tone.
If you select '1 ~ 4th MUSIC', enter time as second unit to be heard music.
If you select 'GROUP OVERFLOW', enter number of ACD group to forward .
If you select EXT OVERFLOW', enter Station call, Pilot Tel.No(Station group or ACD group), ATC, or Trunk phone number to forward.
If you select 'GOTO', enter step number to go to.
6-20
Chapter 6 ACD Operation
Buffered Call Set whether to buffer calls that Announcement or music set in relevant step should be heard until the time set in ‘Parameter’ item.
At 'GROUP OVERFLOW' step if you set ACD group as parameter which itself belongs to, it will go to the next step.
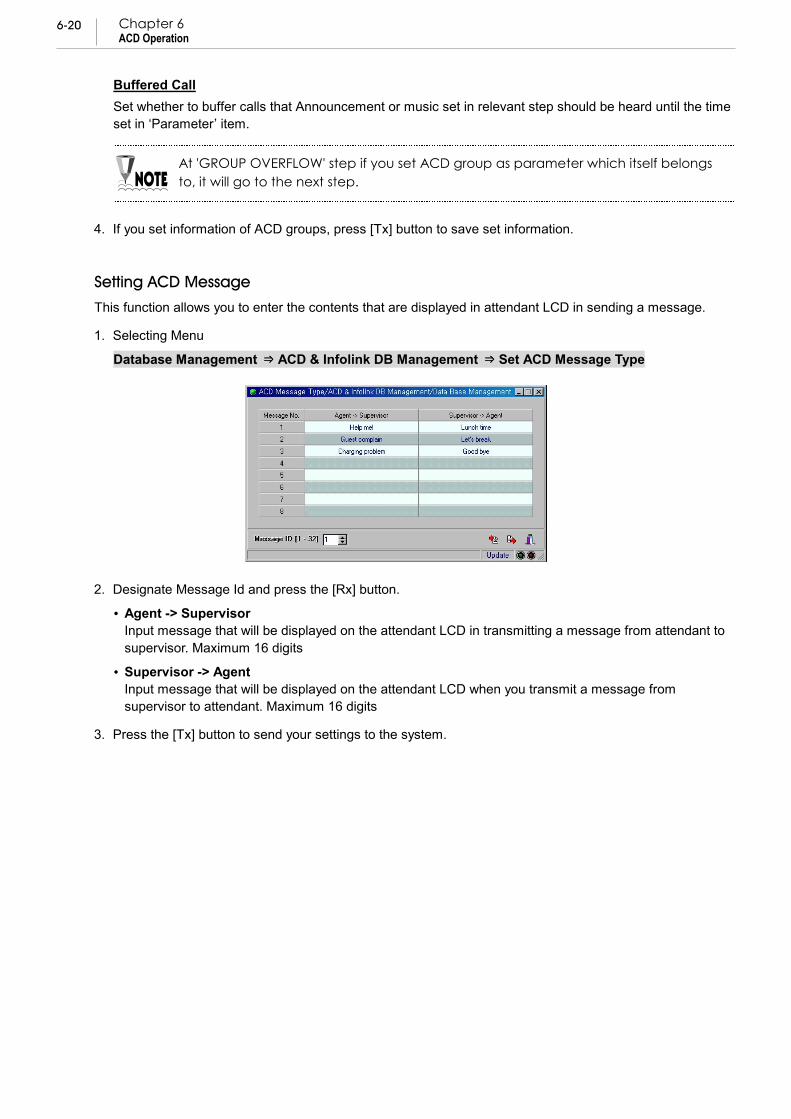
4. If you set information of ACD groups, press [Tx] button to save set information. Setting ACD Message
This function allows you to enter the contents that are displayed in attendant LCD in sending a message.
1. Selecting Menu
DDaattaabbaassee MMaannaaggeemmeenntt ⇒⇒⇒⇒ ACD & Infolink DB Management ⇒⇒⇒⇒ Set ACD Message Type
2. Designate Message Id and press the [Rx] button.
Agent -> Supervisor Input message that will be displayed on the attendant LCD in transmitting a message from attendant to supervisor. Maximum 16 digits
Supervisor -> Agent Input message that will be displayed on the attendant LCD when you transmit a message from supervisor to attendant. Maximum 16 digits
3. Press the [Tx] button to send your settings to the system.
6-21
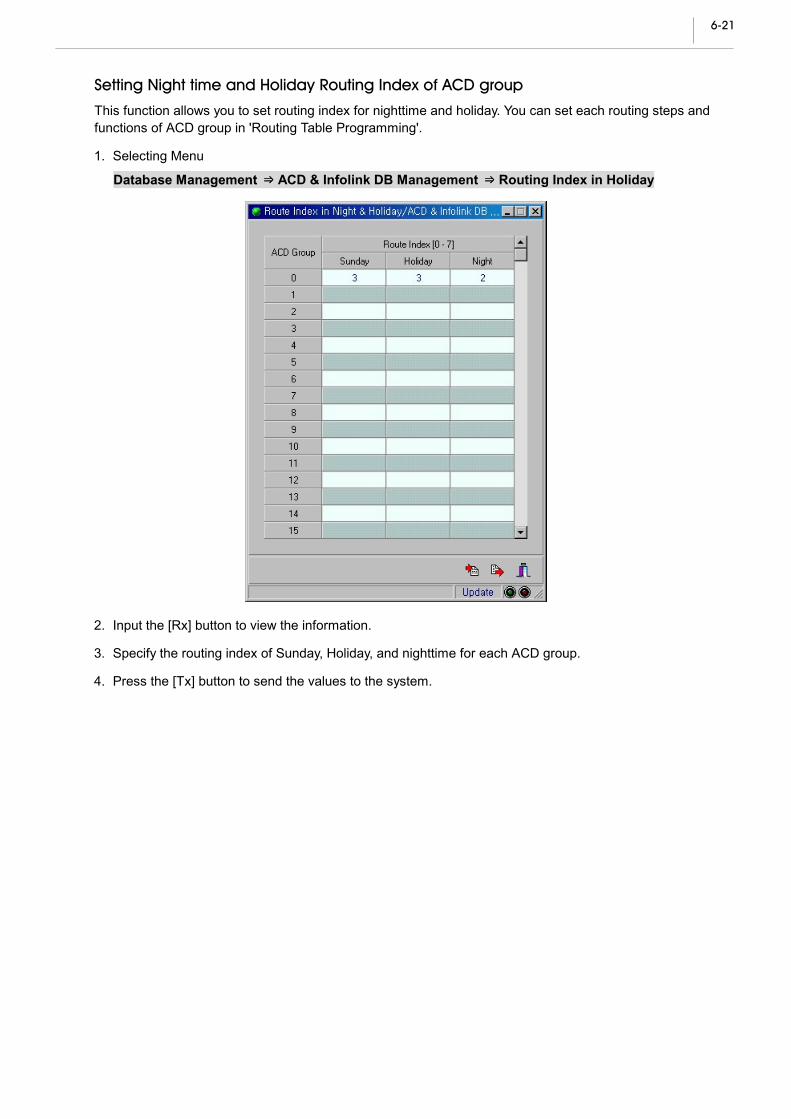
Setting Night time and Holiday Routing Index of ACD group
This function allows you to set routing index for nighttime and holiday. You can set each routing steps and functions of ACD group in 'Routing Table Programming'.
1. Selecting Menu
DDaattaabbaassee MMaannaaggeemmeenntt ⇒⇒⇒⇒ ACD & Inffolink DB Management ⇒⇒⇒⇒ Routing Index in Holiday
2. Input the [Rx] button to view the information.
3. Specify the routing index of Sunday, Holiday, and nighttime for each ACD group.
4. Press the [Tx] button to send the values to the system.
6-22
Chapter 6 ACD Operation
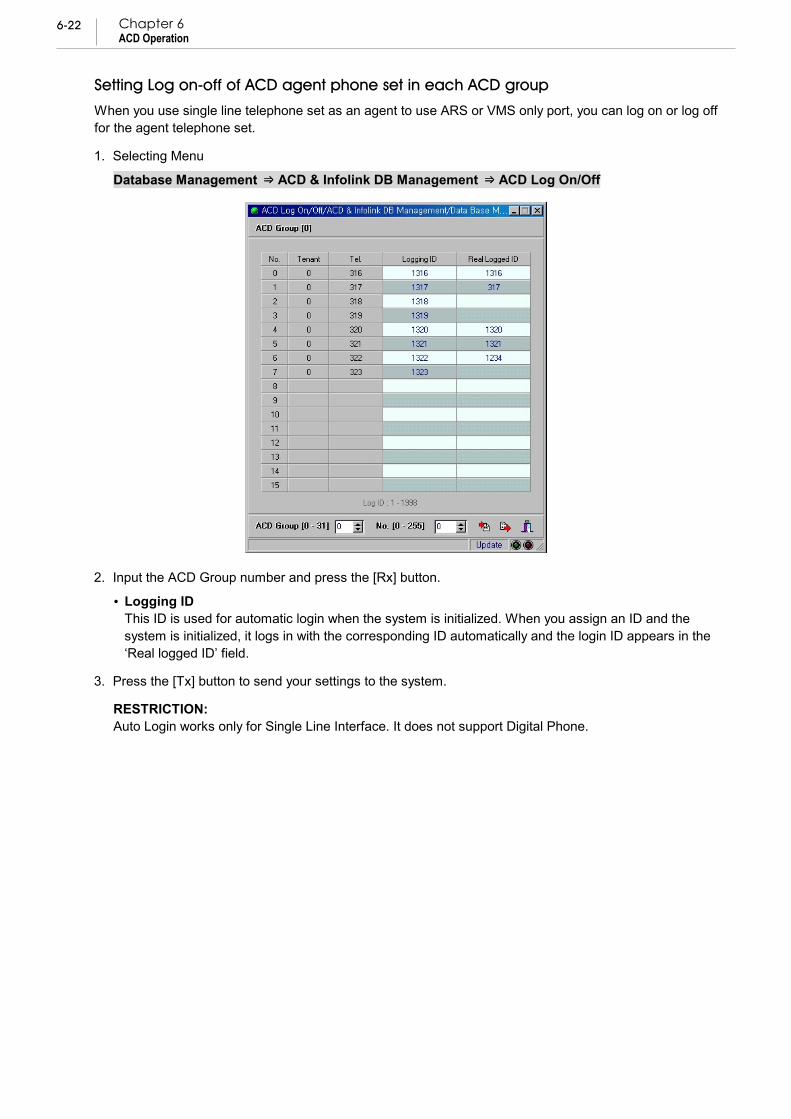
Setting Log on-off of ACD agent phone set in each ACD group
When you use single line telephone set as an agent to use ARS or VMS only port, you can log on or log off for the agent telephone set.
1. Selecting Menu
DDaattaabbaassee MMaannaaggeemmeenntt ⇒⇒⇒⇒ ACD & Infolink DB Management ⇒⇒⇒⇒ ACD Log On/Off
2. Input the ACD Group number and press the [Rx] button.
Logging ID This ID is used for automatic login when the system is initialized. When you assign an ID and the system is initialized, it logs in with the corresponding ID automatically and the login ID appears in the ‘Real logged ID’ field.
3. Press the [Tx] button to send your settings to the system.
RESTRICTION: Auto Login works only for Single Line Interface. It does not support Digital Phone.
6-23
Specifying Statistics port for each ACD trunk
The ACD statistics PC and the system exchanges message data for each trunk group. This function allows you to specify the statistics port to be used at this time. You can specify only ports that the ‘ACD Statistics Port’ of ‘Port Information’ menu is selected and checked and the supplemental service is registered as ACD AGT/ACD SUP.
1. Selecting Menu
DDaattaabbaassee MMaannaaggeemmeenntt ⇒⇒⇒⇒ ACD & Infolink DB Management ⇒⇒⇒⇒ Statistics Port of ACD Trunk
2. Input the trunk group number and press the [Rx] button. You can use duplex statistics port for each trunk group. Assign node and port to be used as ACD trunk statistics port. Then, all call processing event that occurs in the corresponding trunk group are sent through assigned node and port. At this time, the assigned node and port should have ‘ACD Statistics Port’ of ‘Port Information’ selected and checked.
3. Press the [Tx] button to send the values to the system. Specifying Statistics port for each ACD agent
The ACD statistics PC and the system exchange data for each ACD Agent. This function allows you to specify statistics port to be used at this time. You can only specify port that has ‘ACD Statistics Port’ of ‘Port Information’ menu selected and checked and its supplemental service is registered as ACD AGT/ACD SUP.
1. Selecting Menu
DDaattaabbaassee MMaannaaggeemmeenntt ⇒⇒⇒⇒ ACD & Infolink DB Management ⇒⇒⇒⇒ Statistics Port of ACD Agent
2. Press the [Rx] button to view the information. You can use duplex statistics port for each ACD agent group. Assign node and port to be used as ACD agent statistics port. Then, all call processing event that occurs in the corresponding ACD Agent group are sent through assigned node and port. At this time, the assigned node and port should have ‘ACD Statistics Port’ of [Port Information(Total)]menu selected and checked.
3. Press the [Tx] button to send the values to the system.
6-24
Chapter 6 ACD Operation
Correcting Port Information (Total)
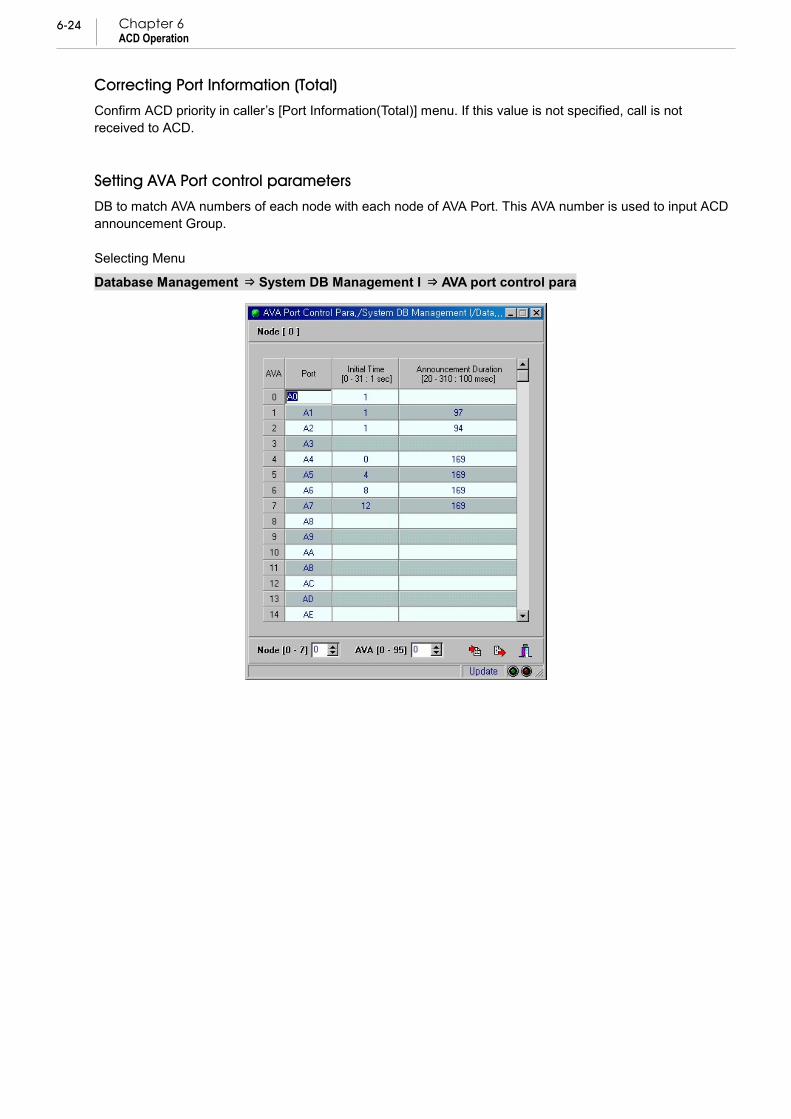
Confirm ACD priority in caller’s [Port Information(Total)] menu. If this value is not specified, call is not received to ACD. Setting AVA Port control parameters
DB to match AVA numbers of each node with each node of AVA Port. This AVA number is used to input ACD announcement Group. Selecting Menu
DDaattaabbaassee MMaannaaggeemmeenntt ⇒⇒⇒⇒ System DB Management I ⇒⇒⇒⇒ AVA port control para
6-25
OPERATING PROCEDURES How to record an announcement
1. Recording is available only in ACD agent and supervisor. AVA Port must be installed in DCS Gateway.
2. Recording is only available by means of Handset or Headset.
3. You can record an announcement on one Port at a time. Or you can record the same announcement on four consecutive Ports at the same time
4. After recording you can play back. In MAP you can adjust the playback time by 100ms unit. ( Refer to “Record AVA” part at the end of this section ) How to make an announcement group
1. AVA Port ceaselessly plays back recorded announcements with no end. As all the Ports that want to listen to a sound played back in one Port listen to it, listening moment cannot be synch with playback time. This drawback is called as “asynchronism.”
2. One announcement Group consists of four consecutive AVA Ports.
3. Each AVA Port records the same announcement. Therefore, You can sort out the problem of AVA Port’s “asynchronism” in certain degree by playing back simultaneously with some time intervals(like singing a round)
4. The maximum recording time of one AVA Port is 32 seconds. Therefore, the problem of “asynchronism” with the maximum of 8 seconds(32 seconds divided by 4) can occur even if 4 AVA Ports is consisted as one Group(optional).
5. In order not to let a caller recognize this problem, repeat the former routing till synchronous point is reached, and play back Announcement at that point in case of Announcement being in Routing Table.
6. (Example) In case of 1 second for Routing Table, and 24 seconds for Announcement, the maximum 6 seconds (24 seconds divided by 4) of sync can be missed after Ringback 1 second is finished. So for the 6-second, repeat Ringback and play back Announcement at sync point after 5 seconds.
7. (Example) Therefore, the caller will hear Ringback Tone for 5 to 10 seconds – “several seconds on Central Office Ringback Tone provided by Central Office” + “several seconds on DCS Gateway Ringback” + “average 3 seconds (0 to 6 seconds) to sync Announcement playback time”.
Configuration Tasks for Using ACD Features
1. Agent/Supervisor Phone Connection Connect digital phones used for agent/supervisor to DL14 board of the DCS Gateway System.
2. MOH Connection Connecting external Announcement Devices such as MOH via a trunk port or a port of the G4W E&M board provide background music.
Connection of MOH equipment must be via a Line Isolation Unit with a telecommunications compliance label.
6-26
Chapter 6 ACD Operation
Recording Device (VMS) Connection
Set MAP by referring to ‘VMS Feature’ Description part, if you wish to use the recording device. Program Button Function Registration of the Agent/Supervisor telephone
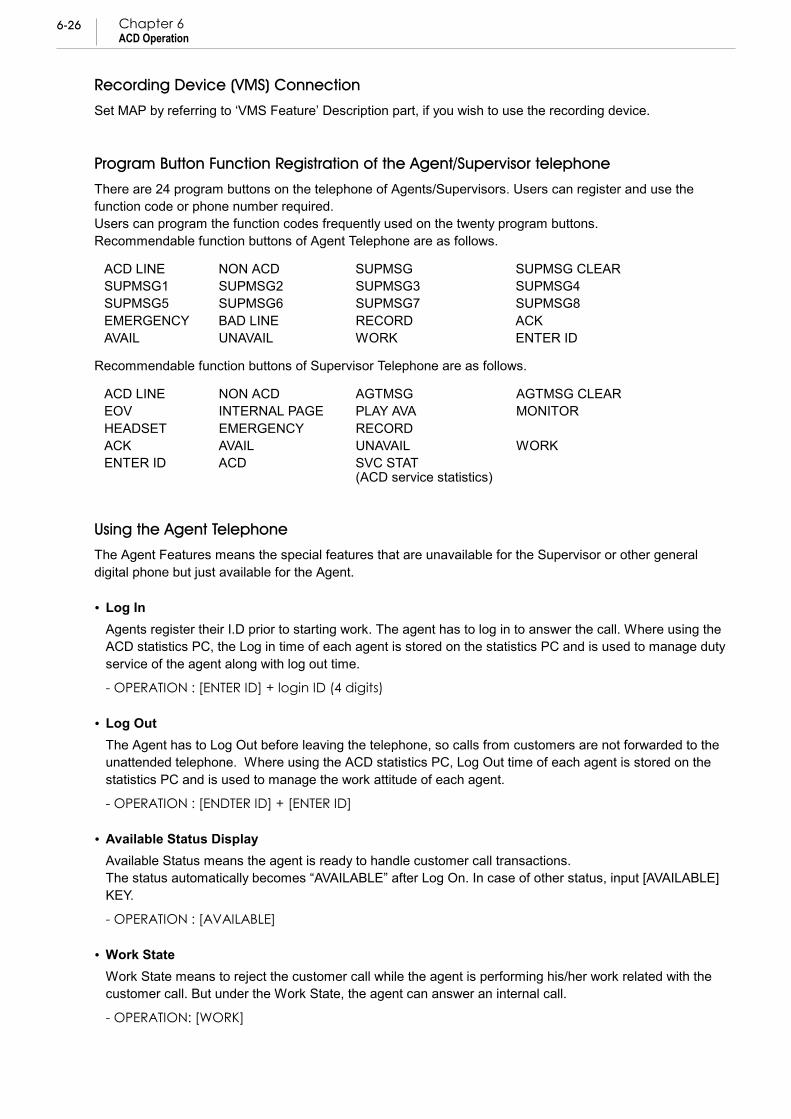
There are 24 program buttons on the telephone of Agents/Supervisors. Users can register and use the function code or phone number required. Users can program the function codes frequently used on the twenty program buttons. Recommendable function buttons of Agent Telephone are as follows.
ACD LINE NON ACD SUPMSG SUPMSG CLEAR SUPMSG1 SUPMSG2 SUPMSG3 SUPMSG4 SUPMSG5 SUPMSG6 SUPMSG7 SUPMSG8 EMERGENCY BAD LINE RECORD ACK AVAIL UNAVAIL WORK ENTER ID
Recommendable function buttons of Supervisor Telephone are as follows.
ACD LINE NON ACD AGTMSG AGTMSG CLEAR EOV INTERNAL PAGE PLAY AVA MONITOR HEADSET EMERGENCY RECORD ACK AVAIL UNAVAIL WORK ENTER ID ACD SVC STAT
(ACD service statistics)
Using the Agent Telephone
The Agent Features means the special features that are unavailable for the Supervisor or other general digital phone but just available for the Agent. Log In Agents register their I.D prior to starting work. The agent has to log in to answer the call. Where using the ACD statistics PC, the Log in time of each agent is stored on the statistics PC and is used to manage duty service of the agent along with log out time.
- OPERATION : [ENTER ID] + login ID (4 digits) Log Out The Agent has to Log Out before leaving the telephone, so calls from customers are not forwarded to the unattended telephone. Where using the ACD statistics PC, Log Out time of each agent is stored on the statistics PC and is used to manage the work attitude of each agent.
- OPERATION : [ENDTER ID] + [ENTER ID] Available Status Display Available Status means the agent is ready to handle customer call transactions. The status automatically becomes “AVAILABLE” after Log On. In case of other status, input [AVAILABLE] KEY.
- OPERATION : [AVAILABLE] Work State Work State means to reject the customer call while the agent is performing his/her work related with the customer call. But under the Work State, the agent can answer an internal call.
- OPERATION: [WORK]
6-27
Unavailable State If the agent is intending to take a break, he/she will display current status as Unavailable State. Then it is impossible to receive the customer call but internal calls are receivable.
- OPERATION : [UNAVAILABLE]
Where the current state is AVAIL or WORK, it is possible to change into the Unavailable State.
Message Transmission During communication with a customer an agent can transfer a predefined message to the Supervisor via the SUPMSG keys. The messages are predefined on the MAP. The customer is unaware of the transmission of the message.
Message Receipt The supervisor can also transfer messages to the agent.
Emergency Message Transmission When an emergent or important customer call is in, the agent can notify the supervisor by pressing EMEG button. Then BEEP RING sounds and the message is displayed on the supervisor phone for appropriate attention.
Conversation on the Phone Recording The agent can record the telephone conversations of customers or internal line subscribers. At this time, the other side of the conversation does not recognize that his voice is being recorded.
Hook Off means to pick up the hand set, and Hook on is to put down the hand set. And you can also hook on/off by using speaker button.
Using the Supervisor Telephone Features
On the supervisor phone, basically all features of the agent phone are available along with 7 additional features. Message Transmission This feature is to send the message to be defined in advance to the agent from the supervisor. Various messages are defined on the MAP in advance, and for a special message, user can change the MAP set.
Message Simulcast Transmission The supervisor phone can transfer the same message to a maximum of 20 agents at the same time via the AGTMSG key. This feature is called Message Simulcast Transmission.
Speech Monitoring The Supervisor can monitor the conversation between the agent and the customer, if required. At this time the LCD of the agent’s phone displays ‘MONITOR’ so the agent is aware that the call is being monitored. At this time, the supervisor can not participate in the conversation but just monitor it. If the supervisor wishes to participate in the conversation, he/she presses the CONF button as described below.
Interrupt during the Conversation Monitoring The supervisor can interrupt the conversation between the agent and the customer whilst monitoring by operating the CONF button.
6-28
Chapter 6 ACD Operation
PAGING The supervisor can page the agent if required. The Paging device shall be connected to a spare trunk port that is programmed to provide this paging feature.
Perform the wire broadcast after using hold-up feature during trunk call. Connection of paging equipment must be via a Line Isolation Unit with a telecommunications compliance label.
Forced Interrupt (EOV) This feature allows the supervisor to interrupt forcibly the conversation between the agent and the customer by establishing a three-way conversation. Set in COS [44]
You can not use EOV if any of the person on EOV or his/her counterpart is on Privacy Port, in the use of Privacy function, or in the use of any equivalent functions (conference, call recording, Soft Bridge function, and etc).
Play AVA This feature plays the AVA message where the customer call is placed on hold during the transaction. Set in COS [145]
Record AVA This feature records the AVA message to be played when customer calls are placed on hold. Set in COS [144] One Port recording: AVA function key or function code + AVA number Four Ports simultaneous recording: AVA function key or function code + ‘*’ + AVA number As soon as two-digit AVA # is entered, recording starts with 1 second delay. Recording is only available by means of Handset / Headset, and no additional Mic. jack and/or Line In jack are provided. Recording is finished by means of Hang On, Speaker key, and ANS/RLS key. At the same time, the recording time is automatically registered by 100ms unit in “DDaattaabbaassee MMaannaaggeemmeenntt ⇒ System DB Management I ⇒ AVA port control para”. Usually, some noise from taking off Handset can be recorded. On this screen, you can adjust recording time to take care of noise. You can specify simultaneously recorded four Ports when specifying your ACD announcement group. But simply doing so does not provide sequential play-back effect. You need to adjust the initialization value to play back sequentially in “DDaattaabbaassee MMaannaaggeemmeenntt ⇒ System DB Management I ⇒ AVA port control para” menu.
6-29
CallView
FEATURE DESCRIPTION CallView is designed to process various event messages in relation to the handling of calls which may be generated by the DCS Gateway system during the operation of the customer service center by organizing the ACD group. CallView shows whether operators and trunks are busy and print the statistical report related to the ACD. CallView is designed to increase the effectiveness of the system so that the manager of the Customer service can run the system more efficiently.
INSTALLING THE CALLVIEINSTALLING THE CALLVIEINSTALLING THE CALLVIEINSTALLING THE CALLVIEWWWW STEP 1. ACD Group configuration
1. Set [ACD Agent] for "Special Service" in [Port Information(Total)] menu of a user to use as Agent. 2. Set ACD Group information.
- Service Type, COS and Tenant are the required fields, and they have to be set. 3. ACD Group configuration
- Register the user set as Agent in the ACD Group. 4. Set DB necessary to process ACD.
- Register ACD LOG ON/OFF Time. - Set Route DB for each time zone. - Register Route Programming. - Register necessary DB.
STEP 2. Specifying ACD Statistics Port and installing DTIR
1. Select a Port to use as ACD Statistics Port among DLI Ports. And set it as "ACD Agent". 2. In Port, set "ACD Statistics" as available. 3. Set "Statistics Port of ACD Agent" in ACD related DB to fit into ACD Group. 4. Set "Statistics of ACD Trunk" in ACD related DB to fit into Trunk Group. 5. Connect DLI Port line specified as Statistics Port to DTIR.
DTIR doesn’t require additional power because power is supplied from DLI. - Confirm that DTIR’s power LED and other LEDs are turned on.
If they don’t work well, check if DLI Port and DTIR have any problem. 6. Connect DTIR to Call View PC.
Use Serial Cable. If possible, use the cable that comes with DTIR.
6-30
Chapter 6 ACD Operation
STEP 3. Call View Local Program Installation and Plink Test
1. Run setup at "Local" directory from Call View Program CD to install it.
- Set directory. By Default, "Callview" is specified. In case of installing Call View Remote Program in the same PC, change directory. e.g.) Local : "Callview_LC", Remote : "Callview_RM"
- If correctly Installed, the message saying "Finished" appears. 2. Double-click the icon in the Call View Local Program installed in the desktop to run the Program. 3. "Plink" Program is loaded into Memory.
On Windows Status bar at the bottom of the screen, you can find that "Plink" Program is loaded. 4. Click "Plink" in the status bar to show Menu screen. 5. Select the field ‘Configuration’ in the Plink Menu to set the COM Port. 6. From the Plink Menu, select Trace. 7. Call ACD Pilot number to reach Agent.
Confirm that Message is traced. If message is traced properly, it indicates that Statistics Port is operating normally. If message is not traced, check the COM Port and Cable.
- On the Local Program’s main screen, the color of "Plink" Item turns into green. Plink Item turns into red if there’s no Message while it turns into green if there’s any message.
SETP 4. Call View Remote Program Installation and Configuration Setup
1. From Call View Program CD, run setup "Remote" directory to install.
- "Callview" is selected for the directory by default. If Local Program is installed in the same PC, select different directory.
2. Double-click the Call View Remote Program ICON at the desktop to run the program. 3. In the Configuration Menu, select ACD Group.
- Three fields of Super ACD Group, ACD Group and ACD Agent appear. Super ACD Group can be ignored.
- Set the ACD Group. This setting must be identical to PABX’s ACD Group. Define the Group and Name. In case of multiple ACD Group, register Group individually.
#. If message saying that you cannot change ACD Group # prompts, delete Shell and then register again Deteting Shell is same with "Excel”.
- Register Agent. Reister ID in serial. This nothing to do with the Agent LOG ID in PABX.
- Register Agent Name. #. Note: Gray-colored data is automatically set up with the data received from Local Program
- Save when finished. 4. From Configuration Menu, select Team.
Agent has been classified into Team, regardless of ACD Group. - Set Team Name and Team Number, and then define Team Number for the Agent. - Save when finished.
6-31
5. From Configuration Menu, select Trunk Group. - Define Trunk Group and its Name. - Set DTS in Trunk Group appropriately for the Trunk.
Current DTS is represented as "o", other DTS selected are represented as "*". - Save when finished.
Only if Trunk Group is registered, Data appears normally without the DTS registration.
STEP 5. State Inquiry and Report Printing
1. State Inquiry
- This enables users to view ACD or Trunk State. 2. Report Printing
- Report is available for Printer and File. In case it is done in File, the extension is "RPT". You can open it using Microsoft Excel.
3. If multiple number of users are going to use Remote Call View, register the users and their passwords in
the User Management field in Option prior to use
- Set the available Item for user registration. # For other fields, refer to the manual that comes with product. # Call View Local Password : cvwlcl
Call View Remote Password : cvwrmt