Embed Size (px)
Citation preview
http://www.instructables.com/id/5-Minute-Recipes/
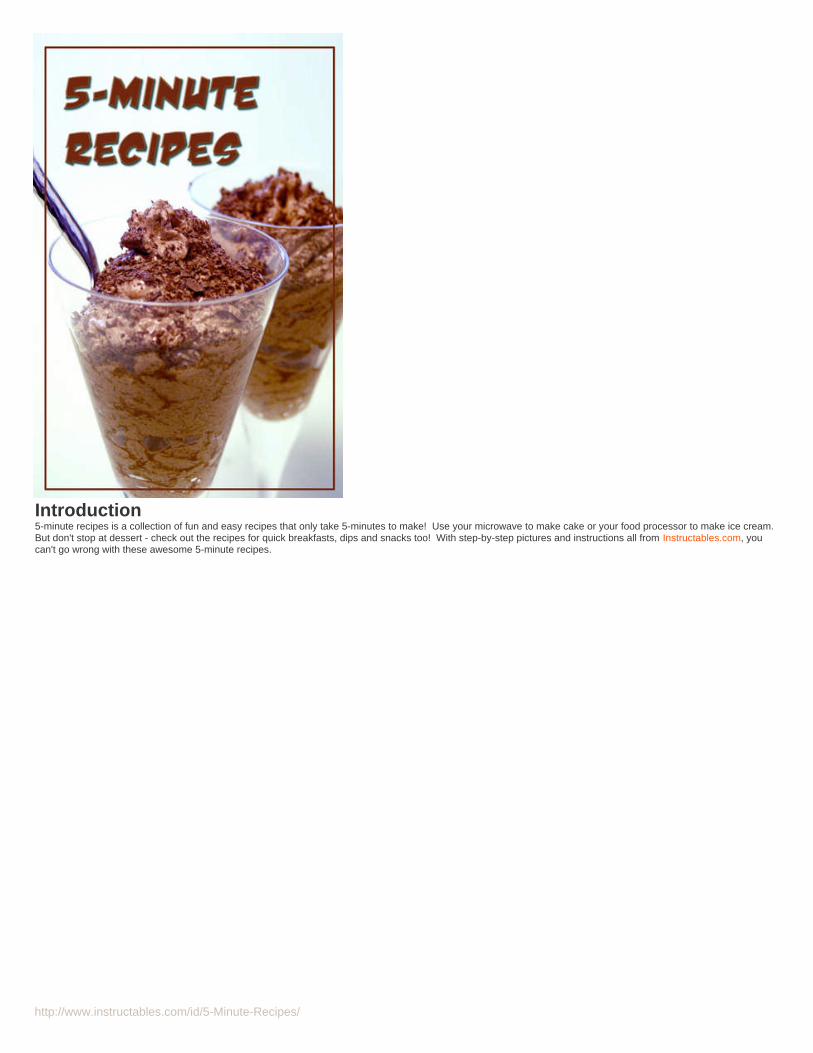
Introduction5-minute recipes is a collection of fun and easy recipes that only take 5-minutes to make! Use your microwave to make cake or your food processor to make ice cream. But don't stop at dessert - check out the recipes for quick breakfasts, dips and snacks too! With step-by-step pictures and instructions all from Instructables.com, youcan't go wrong with these awesome 5-minute recipes.

http://www.instructables.com/id/5-Minute-Recipes/
Table of Contents
Introduction . . . . . . . . . . . . . . . . . . . . . . . . . . . . . . . . . . . . . . . . . . . . . . . . . . . . . . . . . . . . . . . . . . . . . . . . . . . . . . . . . . . . . . . . . . . . . . . . . . . . . . . . . . . . . . . . . . 1
Author and Copyright Notices . . . . . . . . . . . . . . . . . . . . . . . . . . . . . . . . . . . . . . . . . . . . . . . . . . . . . . . . . . . . . . . . . . . . . . . . . . . . . . . . . . . . . . . . . . . . . . . . . . 8
Disclaimer . . . . . . . . . . . . . . . . . . . . . . . . . . . . . . . . . . . . . . . . . . . . . . . . . . . . . . . . . . . . . . . . . . . . . . . . . . . . . . . . . . . . . . . . . . . . . . . . . . . . . . . . . . . . . . . . . 10
5-minute Chocolate Cake . . . . . . . . . . . . . . . . . . . . . . . . . . . . . . . . . . . . . . . . . . . . . . . . . . . . . . . . . . . . . . . . . . . . . . . . . . . . . . . . . . . . . . . . . . . . . . . . . . . . . . . . 11
Intro: 5-minute Chocolate Cake . . . . . . . . . . . . . . . . . . . . . . . . . . . . . . . . . . . . . . . . . . . . . . . . . . . . . . . . . . . . . . . . . . . . . . . . . . . . . . . . . . . . . . . . . . . . . . . . 11
Step 1: Supplies . . . . . . . . . . . . . . . . . . . . . . . . . . . . . . . . . . . . . . . . . . . . . . . . . . . . . . . . . . . . . . . . . . . . . . . . . . . . . . . . . . . . . . . . . . . . . . . . . . . . . . . . . . . 11
Step 2: Mix your ingredients . . . . . . . . . . . . . . . . . . . . . . . . . . . . . . . . . . . . . . . . . . . . . . . . . . . . . . . . . . . . . . . . . . . . . . . . . . . . . . . . . . . . . . . . . . . . . . . . . . 12
Step 3: Nuke It! . . . . . . . . . . . . . . . . . . . . . . . . . . . . . . . . . . . . . . . . . . . . . . . . . . . . . . . . . . . . . . . . . . . . . . . . . . . . . . . . . . . . . . . . . . . . . . . . . . . . . . . . . . . . 12
Step 4: Eat it! . . . . . . . . . . . . . . . . . . . . . . . . . . . . . . . . . . . . . . . . . . . . . . . . . . . . . . . . . . . . . . . . . . . . . . . . . . . . . . . . . . . . . . . . . . . . . . . . . . . . . . . . . . . . . 13
Related Instructables . . . . . . . . . . . . . . . . . . . . . . . . . . . . . . . . . . . . . . . . . . . . . . . . . . . . . . . . . . . . . . . . . . . . . . . . . . . . . . . . . . . . . . . . . . . . . . . . . . . . . . . . 14
5 Minute Bread Pudding for One . . . . . . . . . . . . . . . . . . . . . . . . . . . . . . . . . . . . . . . . . . . . . . . . . . . . . . . . . . . . . . . . . . . . . . . . . . . . . . . . . . . . . . . . . . . . . . . . . . 15
Intro: 5 Minute Bread Pudding for One . . . . . . . . . . . . . . . . . . . . . . . . . . . . . . . . . . . . . . . . . . . . . . . . . . . . . . . . . . . . . . . . . . . . . . . . . . . . . . . . . . . . . . . . . . . 15
Step 1: Tools / Ingredients . . . . . . . . . . . . . . . . . . . . . . . . . . . . . . . . . . . . . . . . . . . . . . . . . . . . . . . . . . . . . . . . . . . . . . . . . . . . . . . . . . . . . . . . . . . . . . . . . . . . 15
Step 2: Tear it up! . . . . . . . . . . . . . . . . . . . . . . . . . . . . . . . . . . . . . . . . . . . . . . . . . . . . . . . . . . . . . . . . . . . . . . . . . . . . . . . . . . . . . . . . . . . . . . . . . . . . . . . . . . 16
Step 3: Mix & Pour . . . . . . . . . . . . . . . . . . . . . . . . . . . . . . . . . . . . . . . . . . . . . . . . . . . . . . . . . . . . . . . . . . . . . . . . . . . . . . . . . . . . . . . . . . . . . . . . . . . . . . . . . 16
Step 4: Microwave, set and serve . . . . . . . . . . . . . . . . . . . . . . . . . . . . . . . . . . . . . . . . . . . . . . . . . . . . . . . . . . . . . . . . . . . . . . . . . . . . . . . . . . . . . . . . . . . . . . 17
Related Instructables . . . . . . . . . . . . . . . . . . . . . . . . . . . . . . . . . . . . . . . . . . . . . . . . . . . . . . . . . . . . . . . . . . . . . . . . . . . . . . . . . . . . . . . . . . . . . . . . . . . . . . . . 17
Tiny Turtles . . . . . . . . . . . . . . . . . . . . . . . . . . . . . . . . . . . . . . . . . . . . . . . . . . . . . . . . . . . . . . . . . . . . . . . . . . . . . . . . . . . . . . . . . . . . . . . . . . . . . . . . . . . . . . . . . . 18
Intro: Tiny Turtles . . . . . . . . . . . . . . . . . . . . . . . . . . . . . . . . . . . . . . . . . . . . . . . . . . . . . . . . . . . . . . . . . . . . . . . . . . . . . . . . . . . . . . . . . . . . . . . . . . . . . . . . . . 18
Step 1: Ingredients . . . . . . . . . . . . . . . . . . . . . . . . . . . . . . . . . . . . . . . . . . . . . . . . . . . . . . . . . . . . . . . . . . . . . . . . . . . . . . . . . . . . . . . . . . . . . . . . . . . . . . . . . 18
Step 2: Preheat oven . . . . . . . . . . . . . . . . . . . . . . . . . . . . . . . . . . . . . . . . . . . . . . . . . . . . . . . . . . . . . . . . . . . . . . . . . . . . . . . . . . . . . . . . . . . . . . . . . . . . . . . . 19
Step 3: Unwrap . . . . . . . . . . . . . . . . . . . . . . . . . . . . . . . . . . . . . . . . . . . . . . . . . . . . . . . . . . . . . . . . . . . . . . . . . . . . . . . . . . . . . . . . . . . . . . . . . . . . . . . . . . . . 19
Step 4: Place pecans . . . . . . . . . . . . . . . . . . . . . . . . . . . . . . . . . . . . . . . . . . . . . . . . . . . . . . . . . . . . . . . . . . . . . . . . . . . . . . . . . . . . . . . . . . . . . . . . . . . . . . . 19
Step 5: Put in oven . . . . . . . . . . . . . . . . . . . . . . . . . . . . . . . . . . . . . . . . . . . . . . . . . . . . . . . . . . . . . . . . . . . . . . . . . . . . . . . . . . . . . . . . . . . . . . . . . . . . . . . . . 20
Step 6: Let them cool . . . . . . . . . . . . . . . . . . . . . . . . . . . . . . . . . . . . . . . . . . . . . . . . . . . . . . . . . . . . . . . . . . . . . . . . . . . . . . . . . . . . . . . . . . . . . . . . . . . . . . . 20
Related Instructables . . . . . . . . . . . . . . . . . . . . . . . . . . . . . . . . . . . . . . . . . . . . . . . . . . . . . . . . . . . . . . . . . . . . . . . . . . . . . . . . . . . . . . . . . . . . . . . . . . . . . . . . 21
4-minute Chocolate Mousse . . . . . . . . . . . . . . . . . . . . . . . . . . . . . . . . . . . . . . . . . . . . . . . . . . . . . . . . . . . . . . . . . . . . . . . . . . . . . . . . . . . . . . . . . . . . . . . . . . . . . . 22
Intro: 4-minute Chocolate Mousse . . . . . . . . . . . . . . . . . . . . . . . . . . . . . . . . . . . . . . . . . . . . . . . . . . . . . . . . . . . . . . . . . . . . . . . . . . . . . . . . . . . . . . . . . . . . . . 22
WARNING: THE FOLLOWING RECIPE IS EXTREMELY ADDICTIVE . . . . . . . . . . . . . . . . . . . . . . . . . . . . . . . . . . . . . . . . . . . . . . . . . . . . . . . . . . . . . . . . . . . . 22
YOU'LL ALWAYS BE FOUR MINUTES or so FROM ABSOLUTE DECADENCE!! . . . . . . . . . . . . . . . . . . . . . . . . . . . . . . . . . . . . . . . . . . . . . . . . . . . . . . . . . . . 22
Step 1: Ingredients . . . . . . . . . . . . . . . . . . . . . . . . . . . . . . . . . . . . . . . . . . . . . . . . . . . . . . . . . . . . . . . . . . . . . . . . . . . . . . . . . . . . . . . . . . . . . . . . . . . . . . . . . 22
. . . . . . . . . . . . . . . . . . . . . . . . . . . . . . . . . . . . . . . . . . . . . . . . . . . . . . . . . . . . . . . . . . . . . . . . . . . . . . . . . . . . . . . . . . . . . . . . . . . . . . . . . . . . . . . . . . . . . . . . . 22
. . . . . . . . . . . . . . . . . . . . . . . . . . . . . . . . . . . . . . . . . . . . . . . . . . . . . . . . . . . . . . . . . . . . . . . . . . . . . . . . . . . . . . . . . . . . . . . . . . . . . . . . . . . . . . . . . . . . . . . . . 22
. . . . . . . . . . . . . . . . . . . . . . . . . . . . . . . . . . . . . . . . . . . . . . . . . . . . . . . . . . . . . . . . . . . . . . . . . . . . . . . . . . . . . . . . . . . . . . . . . . . . . . . . . . . . . . . . . . . . . . . . . 23
UPDATE . . . . . . . . . . . . . . . . . . . . . . . . . . . . . . . . . . . . . . . . . . . . . . . . . . . . . . . . . . . . . . . . . . . . . . . . . . . . . . . . . . . . . . . . . . . . . . . . . . . . . . . . . . . . . . . . . . 23
Step 2: Cream + Chocolate . . . . . . . . . . . . . . . . . . . . . . . . . . . . . . . . . . . . . . . . . . . . . . . . . . . . . . . . . . . . . . . . . . . . . . . . . . . . . . . . . . . . . . . . . . . . . . . . . . . 24
Step 3: Egg white + Sugar . . . . . . . . . . . . . . . . . . . . . . . . . . . . . . . . . . . . . . . . . . . . . . . . . . . . . . . . . . . . . . . . . . . . . . . . . . . . . . . . . . . . . . . . . . . . . . . . . . . . 25
Step 4: Fold together and Devour . . . . . . . . . . . . . . . . . . . . . . . . . . . . . . . . . . . . . . . . . . . . . . . . . . . . . . . . . . . . . . . . . . . . . . . . . . . . . . . . . . . . . . . . . . . . . . 27
Related Instructables . . . . . . . . . . . . . . . . . . . . . . . . . . . . . . . . . . . . . . . . . . . . . . . . . . . . . . . . . . . . . . . . . . . . . . . . . . . . . . . . . . . . . . . . . . . . . . . . . . . . . . . . 28
5-minute Chocolate Balls . . . . . . . . . . . . . . . . . . . . . . . . . . . . . . . . . . . . . . . . . . . . . . . . . . . . . . . . . . . . . . . . . . . . . . . . . . . . . . . . . . . . . . . . . . . . . . . . . . . . . . . . 29
Intro: 5-minute Chocolate Balls . . . . . . . . . . . . . . . . . . . . . . . . . . . . . . . . . . . . . . . . . . . . . . . . . . . . . . . . . . . . . . . . . . . . . . . . . . . . . . . . . . . . . . . . . . . . . . . . 29

http://www.instructables.com/id/5-Minute-Recipes/
Step 1: Ingredients . . . . . . . . . . . . . . . . . . . . . . . . . . . . . . . . . . . . . . . . . . . . . . . . . . . . . . . . . . . . . . . . . . . . . . . . . . . . . . . . . . . . . . . . . . . . . . . . . . . . . . . . . 29
Step 2: Mix it up! . . . . . . . . . . . . . . . . . . . . . . . . . . . . . . . . . . . . . . . . . . . . . . . . . . . . . . . . . . . . . . . . . . . . . . . . . . . . . . . . . . . . . . . . . . . . . . . . . . . . . . . . . . . 30
Step 3: Form balls . . . . . . . . . . . . . . . . . . . . . . . . . . . . . . . . . . . . . . . . . . . . . . . . . . . . . . . . . . . . . . . . . . . . . . . . . . . . . . . . . . . . . . . . . . . . . . . . . . . . . . . . . . 31
Step 4: Try to Share! . . . . . . . . . . . . . . . . . . . . . . . . . . . . . . . . . . . . . . . . . . . . . . . . . . . . . . . . . . . . . . . . . . . . . . . . . . . . . . . . . . . . . . . . . . . . . . . . . . . . . . . . 31
Related Instructables . . . . . . . . . . . . . . . . . . . . . . . . . . . . . . . . . . . . . . . . . . . . . . . . . . . . . . . . . . . . . . . . . . . . . . . . . . . . . . . . . . . . . . . . . . . . . . . . . . . . . . . . 32
5-minute Ice Cream . . . . . . . . . . . . . . . . . . . . . . . . . . . . . . . . . . . . . . . . . . . . . . . . . . . . . . . . . . . . . . . . . . . . . . . . . . . . . . . . . . . . . . . . . . . . . . . . . . . . . . . . . . . . 33
Intro: 5-minute Ice Cream . . . . . . . . . . . . . . . . . . . . . . . . . . . . . . . . . . . . . . . . . . . . . . . . . . . . . . . . . . . . . . . . . . . . . . . . . . . . . . . . . . . . . . . . . . . . . . . . . . . . 33
Step 1: Ingredients . . . . . . . . . . . . . . . . . . . . . . . . . . . . . . . . . . . . . . . . . . . . . . . . . . . . . . . . . . . . . . . . . . . . . . . . . . . . . . . . . . . . . . . . . . . . . . . . . . . . . . . . . 33
Step 2: Make Ice Cream!!!! . . . . . . . . . . . . . . . . . . . . . . . . . . . . . . . . . . . . . . . . . . . . . . . . . . . . . . . . . . . . . . . . . . . . . . . . . . . . . . . . . . . . . . . . . . . . . . . . . . . 34
Step 3: Eat! . . . . . . . . . . . . . . . . . . . . . . . . . . . . . . . . . . . . . . . . . . . . . . . . . . . . . . . . . . . . . . . . . . . . . . . . . . . . . . . . . . . . . . . . . . . . . . . . . . . . . . . . . . . . . . . 35
Related Instructables . . . . . . . . . . . . . . . . . . . . . . . . . . . . . . . . . . . . . . . . . . . . . . . . . . . . . . . . . . . . . . . . . . . . . . . . . . . . . . . . . . . . . . . . . . . . . . . . . . . . . . . . 35
5-Minute Pie . . . . . . . . . . . . . . . . . . . . . . . . . . . . . . . . . . . . . . . . . . . . . . . . . . . . . . . . . . . . . . . . . . . . . . . . . . . . . . . . . . . . . . . . . . . . . . . . . . . . . . . . . . . . . . . . . 36
Intro: 5-Minute Pie . . . . . . . . . . . . . . . . . . . . . . . . . . . . . . . . . . . . . . . . . . . . . . . . . . . . . . . . . . . . . . . . . . . . . . . . . . . . . . . . . . . . . . . . . . . . . . . . . . . . . . . . . . 36
Step 1: Ingredients . . . . . . . . . . . . . . . . . . . . . . . . . . . . . . . . . . . . . . . . . . . . . . . . . . . . . . . . . . . . . . . . . . . . . . . . . . . . . . . . . . . . . . . . . . . . . . . . . . . . . . . . . 36
Step 2: Form Pies . . . . . . . . . . . . . . . . . . . . . . . . . . . . . . . . . . . . . . . . . . . . . . . . . . . . . . . . . . . . . . . . . . . . . . . . . . . . . . . . . . . . . . . . . . . . . . . . . . . . . . . . . . 37
Step 3: Fry Pies . . . . . . . . . . . . . . . . . . . . . . . . . . . . . . . . . . . . . . . . . . . . . . . . . . . . . . . . . . . . . . . . . . . . . . . . . . . . . . . . . . . . . . . . . . . . . . . . . . . . . . . . . . . 38
Related Instructables . . . . . . . . . . . . . . . . . . . . . . . . . . . . . . . . . . . . . . . . . . . . . . . . . . . . . . . . . . . . . . . . . . . . . . . . . . . . . . . . . . . . . . . . . . . . . . . . . . . . . . . . 38
1-ingredient Ice Cream . . . . . . . . . . . . . . . . . . . . . . . . . . . . . . . . . . . . . . . . . . . . . . . . . . . . . . . . . . . . . . . . . . . . . . . . . . . . . . . . . . . . . . . . . . . . . . . . . . . . . . . . . 39
Intro: 1-ingredient Ice Cream . . . . . . . . . . . . . . . . . . . . . . . . . . . . . . . . . . . . . . . . . . . . . . . . . . . . . . . . . . . . . . . . . . . . . . . . . . . . . . . . . . . . . . . . . . . . . . . . . . 39
Step 1: Ingredients . . . . . . . . . . . . . . . . . . . . . . . . . . . . . . . . . . . . . . . . . . . . . . . . . . . . . . . . . . . . . . . . . . . . . . . . . . . . . . . . . . . . . . . . . . . . . . . . . . . . . . . . . 39
Step 2: Blend to Perfection . . . . . . . . . . . . . . . . . . . . . . . . . . . . . . . . . . . . . . . . . . . . . . . . . . . . . . . . . . . . . . . . . . . . . . . . . . . . . . . . . . . . . . . . . . . . . . . . . . . 41
Step 3: Enjoy! . . . . . . . . . . . . . . . . . . . . . . . . . . . . . . . . . . . . . . . . . . . . . . . . . . . . . . . . . . . . . . . . . . . . . . . . . . . . . . . . . . . . . . . . . . . . . . . . . . . . . . . . . . . . . 41
Related Instructables . . . . . . . . . . . . . . . . . . . . . . . . . . . . . . . . . . . . . . . . . . . . . . . . . . . . . . . . . . . . . . . . . . . . . . . . . . . . . . . . . . . . . . . . . . . . . . . . . . . . . . . . 42
Nectarine smoothie . . . . . . . . . . . . . . . . . . . . . . . . . . . . . . . . . . . . . . . . . . . . . . . . . . . . . . . . . . . . . . . . . . . . . . . . . . . . . . . . . . . . . . . . . . . . . . . . . . . . . . . . . . . . 43
Intro: Nectarine smoothie . . . . . . . . . . . . . . . . . . . . . . . . . . . . . . . . . . . . . . . . . . . . . . . . . . . . . . . . . . . . . . . . . . . . . . . . . . . . . . . . . . . . . . . . . . . . . . . . . . . . 43
Step 1: . . . . . . . . . . . . . . . . . . . . . . . . . . . . . . . . . . . . . . . . . . . . . . . . . . . . . . . . . . . . . . . . . . . . . . . . . . . . . . . . . . . . . . . . . . . . . . . . . . . . . . . . . . . . . . . . . . 44
Step 2: . . . . . . . . . . . . . . . . . . . . . . . . . . . . . . . . . . . . . . . . . . . . . . . . . . . . . . . . . . . . . . . . . . . . . . . . . . . . . . . . . . . . . . . . . . . . . . . . . . . . . . . . . . . . . . . . . . 44
Step 3: . . . . . . . . . . . . . . . . . . . . . . . . . . . . . . . . . . . . . . . . . . . . . . . . . . . . . . . . . . . . . . . . . . . . . . . . . . . . . . . . . . . . . . . . . . . . . . . . . . . . . . . . . . . . . . . . . . 45
Step 4: . . . . . . . . . . . . . . . . . . . . . . . . . . . . . . . . . . . . . . . . . . . . . . . . . . . . . . . . . . . . . . . . . . . . . . . . . . . . . . . . . . . . . . . . . . . . . . . . . . . . . . . . . . . . . . . . . . 46
Related Instructables . . . . . . . . . . . . . . . . . . . . . . . . . . . . . . . . . . . . . . . . . . . . . . . . . . . . . . . . . . . . . . . . . . . . . . . . . . . . . . . . . . . . . . . . . . . . . . . . . . . . . . . . 46
5-Minute Breakfast Rice . . . . . . . . . . . . . . . . . . . . . . . . . . . . . . . . . . . . . . . . . . . . . . . . . . . . . . . . . . . . . . . . . . . . . . . . . . . . . . . . . . . . . . . . . . . . . . . . . . . . . . . . . 47
Intro: 5-Minute Breakfast Rice . . . . . . . . . . . . . . . . . . . . . . . . . . . . . . . . . . . . . . . . . . . . . . . . . . . . . . . . . . . . . . . . . . . . . . . . . . . . . . . . . . . . . . . . . . . . . . . . . 47
Step 1: Ingredients . . . . . . . . . . . . . . . . . . . . . . . . . . . . . . . . . . . . . . . . . . . . . . . . . . . . . . . . . . . . . . . . . . . . . . . . . . . . . . . . . . . . . . . . . . . . . . . . . . . . . . . . . 47
Step 2: Heat the Rice . . . . . . . . . . . . . . . . . . . . . . . . . . . . . . . . . . . . . . . . . . . . . . . . . . . . . . . . . . . . . . . . . . . . . . . . . . . . . . . . . . . . . . . . . . . . . . . . . . . . . . . 48
Step 3: Add Sweetener . . . . . . . . . . . . . . . . . . . . . . . . . . . . . . . . . . . . . . . . . . . . . . . . . . . . . . . . . . . . . . . . . . . . . . . . . . . . . . . . . . . . . . . . . . . . . . . . . . . . . . 48
Step 4: Serve and Eat . . . . . . . . . . . . . . . . . . . . . . . . . . . . . . . . . . . . . . . . . . . . . . . . . . . . . . . . . . . . . . . . . . . . . . . . . . . . . . . . . . . . . . . . . . . . . . . . . . . . . . . 48
Related Instructables . . . . . . . . . . . . . . . . . . . . . . . . . . . . . . . . . . . . . . . . . . . . . . . . . . . . . . . . . . . . . . . . . . . . . . . . . . . . . . . . . . . . . . . . . . . . . . . . . . . . . . . . 49
5 Minute Perfect Deli-style Egg Bagel Sandwich in Microwave - Yummy . . . . . . . . . . . . . . . . . . . . . . . . . . . . . . . . . . . . . . . . . . . . . . . . . . . . . . . . . . . . . . . . . . . . . 50
Intro: 5 Minute Perfect Deli-style Egg Bagel Sandwich in Microwave - Yummy . . . . . . . . . . . . . . . . . . . . . . . . . . . . . . . . . . . . . . . . . . . . . . . . . . . . . . . . . . . . . 50
Step 1: Ingredients . . . . . . . . . . . . . . . . . . . . . . . . . . . . . . . . . . . . . . . . . . . . . . . . . . . . . . . . . . . . . . . . . . . . . . . . . . . . . . . . . . . . . . . . . . . . . . . . . . . . . . . . . 50
Step 2: The Secret Butter Step . . . . . . . . . . . . . . . . . . . . . . . . . . . . . . . . . . . . . . . . . . . . . . . . . . . . . . . . . . . . . . . . . . . . . . . . . . . . . . . . . . . . . . . . . . . . . . . . 51

http://www.instructables.com/id/5-Minute-Recipes/
Step 3: Add Eggs and Ingredients . . . . . . . . . . . . . . . . . . . . . . . . . . . . . . . . . . . . . . . . . . . . . . . . . . . . . . . . . . . . . . . . . . . . . . . . . . . . . . . . . . . . . . . . . . . . . . 52
Step 4: Microwave . . . . . . . . . . . . . . . . . . . . . . . . . . . . . . . . . . . . . . . . . . . . . . . . . . . . . . . . . . . . . . . . . . . . . . . . . . . . . . . . . . . . . . . . . . . . . . . . . . . . . . . . . . 52
Step 5: Final Assembly - Enjoy! . . . . . . . . . . . . . . . . . . . . . . . . . . . . . . . . . . . . . . . . . . . . . . . . . . . . . . . . . . . . . . . . . . . . . . . . . . . . . . . . . . . . . . . . . . . . . . . . 53
Related Instructables . . . . . . . . . . . . . . . . . . . . . . . . . . . . . . . . . . . . . . . . . . . . . . . . . . . . . . . . . . . . . . . . . . . . . . . . . . . . . . . . . . . . . . . . . . . . . . . . . . . . . . . . 54
Two Minute Microwave Egg . . . . . . . . . . . . . . . . . . . . . . . . . . . . . . . . . . . . . . . . . . . . . . . . . . . . . . . . . . . . . . . . . . . . . . . . . . . . . . . . . . . . . . . . . . . . . . . . . . . . . . 55
Intro: Two Minute Microwave Egg . . . . . . . . . . . . . . . . . . . . . . . . . . . . . . . . . . . . . . . . . . . . . . . . . . . . . . . . . . . . . . . . . . . . . . . . . . . . . . . . . . . . . . . . . . . . . . 55
Step 1: Butter Cup . . . . . . . . . . . . . . . . . . . . . . . . . . . . . . . . . . . . . . . . . . . . . . . . . . . . . . . . . . . . . . . . . . . . . . . . . . . . . . . . . . . . . . . . . . . . . . . . . . . . . . . . . . 55
Step 2: Crack It . . . . . . . . . . . . . . . . . . . . . . . . . . . . . . . . . . . . . . . . . . . . . . . . . . . . . . . . . . . . . . . . . . . . . . . . . . . . . . . . . . . . . . . . . . . . . . . . . . . . . . . . . . . . 56
Step 3: H2egg . . . . . . . . . . . . . . . . . . . . . . . . . . . . . . . . . . . . . . . . . . . . . . . . . . . . . . . . . . . . . . . . . . . . . . . . . . . . . . . . . . . . . . . . . . . . . . . . . . . . . . . . . . . . . 57
Step 4: Stir It . . . . . . . . . . . . . . . . . . . . . . . . . . . . . . . . . . . . . . . . . . . . . . . . . . . . . . . . . . . . . . . . . . . . . . . . . . . . . . . . . . . . . . . . . . . . . . . . . . . . . . . . . . . . . . 58
Step 5: Nuke It . . . . . . . . . . . . . . . . . . . . . . . . . . . . . . . . . . . . . . . . . . . . . . . . . . . . . . . . . . . . . . . . . . . . . . . . . . . . . . . . . . . . . . . . . . . . . . . . . . . . . . . . . . . . 59
Step 6: Bang-Bang You're Egg . . . . . . . . . . . . . . . . . . . . . . . . . . . . . . . . . . . . . . . . . . . . . . . . . . . . . . . . . . . . . . . . . . . . . . . . . . . . . . . . . . . . . . . . . . . . . . . . 60
Step 7: Shake N Wait . . . . . . . . . . . . . . . . . . . . . . . . . . . . . . . . . . . . . . . . . . . . . . . . . . . . . . . . . . . . . . . . . . . . . . . . . . . . . . . . . . . . . . . . . . . . . . . . . . . . . . . 61
Step 8: Scarf or Savor . . . . . . . . . . . . . . . . . . . . . . . . . . . . . . . . . . . . . . . . . . . . . . . . . . . . . . . . . . . . . . . . . . . . . . . . . . . . . . . . . . . . . . . . . . . . . . . . . . . . . . . 62
Related Instructables . . . . . . . . . . . . . . . . . . . . . . . . . . . . . . . . . . . . . . . . . . . . . . . . . . . . . . . . . . . . . . . . . . . . . . . . . . . . . . . . . . . . . . . . . . . . . . . . . . . . . . . . 62
Bruschetta Recipe . . . . . . . . . . . . . . . . . . . . . . . . . . . . . . . . . . . . . . . . . . . . . . . . . . . . . . . . . . . . . . . . . . . . . . . . . . . . . . . . . . . . . . . . . . . . . . . . . . . . . . . . . . . . . 63
Intro: Bruschetta Recipe . . . . . . . . . . . . . . . . . . . . . . . . . . . . . . . . . . . . . . . . . . . . . . . . . . . . . . . . . . . . . . . . . . . . . . . . . . . . . . . . . . . . . . . . . . . . . . . . . . . . . 63
Step 1: Ingredients . . . . . . . . . . . . . . . . . . . . . . . . . . . . . . . . . . . . . . . . . . . . . . . . . . . . . . . . . . . . . . . . . . . . . . . . . . . . . . . . . . . . . . . . . . . . . . . . . . . . . . . . . 63
Step 2: Dice the tomatoes . . . . . . . . . . . . . . . . . . . . . . . . . . . . . . . . . . . . . . . . . . . . . . . . . . . . . . . . . . . . . . . . . . . . . . . . . . . . . . . . . . . . . . . . . . . . . . . . . . . . 64
Step 3: Chop the onion . . . . . . . . . . . . . . . . . . . . . . . . . . . . . . . . . . . . . . . . . . . . . . . . . . . . . . . . . . . . . . . . . . . . . . . . . . . . . . . . . . . . . . . . . . . . . . . . . . . . . . 64
Step 4: Chop the garlic . . . . . . . . . . . . . . . . . . . . . . . . . . . . . . . . . . . . . . . . . . . . . . . . . . . . . . . . . . . . . . . . . . . . . . . . . . . . . . . . . . . . . . . . . . . . . . . . . . . . . . 65
Step 5: Add in fresh basil . . . . . . . . . . . . . . . . . . . . . . . . . . . . . . . . . . . . . . . . . . . . . . . . . . . . . . . . . . . . . . . . . . . . . . . . . . . . . . . . . . . . . . . . . . . . . . . . . . . . . 65
Step 6: Olive oil, salt and pepper . . . . . . . . . . . . . . . . . . . . . . . . . . . . . . . . . . . . . . . . . . . . . . . . . . . . . . . . . . . . . . . . . . . . . . . . . . . . . . . . . . . . . . . . . . . . . . . 65
Step 7: Toast the bread . . . . . . . . . . . . . . . . . . . . . . . . . . . . . . . . . . . . . . . . . . . . . . . . . . . . . . . . . . . . . . . . . . . . . . . . . . . . . . . . . . . . . . . . . . . . . . . . . . . . . . 66
Step 8: Serve . . . . . . . . . . . . . . . . . . . . . . . . . . . . . . . . . . . . . . . . . . . . . . . . . . . . . . . . . . . . . . . . . . . . . . . . . . . . . . . . . . . . . . . . . . . . . . . . . . . . . . . . . . . . . 66
Related Instructables . . . . . . . . . . . . . . . . . . . . . . . . . . . . . . . . . . . . . . . . . . . . . . . . . . . . . . . . . . . . . . . . . . . . . . . . . . . . . . . . . . . . . . . . . . . . . . . . . . . . . . . . 67
Avocado with agave and lime . . . . . . . . . . . . . . . . . . . . . . . . . . . . . . . . . . . . . . . . . . . . . . . . . . . . . . . . . . . . . . . . . . . . . . . . . . . . . . . . . . . . . . . . . . . . . . . . . . . . . 68
Intro: Avocado with agave and lime . . . . . . . . . . . . . . . . . . . . . . . . . . . . . . . . . . . . . . . . . . . . . . . . . . . . . . . . . . . . . . . . . . . . . . . . . . . . . . . . . . . . . . . . . . . . . 68
Step 1: Acquire ingredients . . . . . . . . . . . . . . . . . . . . . . . . . . . . . . . . . . . . . . . . . . . . . . . . . . . . . . . . . . . . . . . . . . . . . . . . . . . . . . . . . . . . . . . . . . . . . . . . . . . 68
Step 2: Peel and chop avocado . . . . . . . . . . . . . . . . . . . . . . . . . . . . . . . . . . . . . . . . . . . . . . . . . . . . . . . . . . . . . . . . . . . . . . . . . . . . . . . . . . . . . . . . . . . . . . . . 69
Step 3: Add agave and lime . . . . . . . . . . . . . . . . . . . . . . . . . . . . . . . . . . . . . . . . . . . . . . . . . . . . . . . . . . . . . . . . . . . . . . . . . . . . . . . . . . . . . . . . . . . . . . . . . . . 69
Step 4: Wait, then eat . . . . . . . . . . . . . . . . . . . . . . . . . . . . . . . . . . . . . . . . . . . . . . . . . . . . . . . . . . . . . . . . . . . . . . . . . . . . . . . . . . . . . . . . . . . . . . . . . . . . . . . 69
Step 5: Variation . . . . . . . . . . . . . . . . . . . . . . . . . . . . . . . . . . . . . . . . . . . . . . . . . . . . . . . . . . . . . . . . . . . . . . . . . . . . . . . . . . . . . . . . . . . . . . . . . . . . . . . . . . . 70
Related Instructables . . . . . . . . . . . . . . . . . . . . . . . . . . . . . . . . . . . . . . . . . . . . . . . . . . . . . . . . . . . . . . . . . . . . . . . . . . . . . . . . . . . . . . . . . . . . . . . . . . . . . . . . 70
Fresh Guacamole . . . . . . . . . . . . . . . . . . . . . . . . . . . . . . . . . . . . . . . . . . . . . . . . . . . . . . . . . . . . . . . . . . . . . . . . . . . . . . . . . . . . . . . . . . . . . . . . . . . . . . . . . . . . . 71
Intro: Fresh Guacamole . . . . . . . . . . . . . . . . . . . . . . . . . . . . . . . . . . . . . . . . . . . . . . . . . . . . . . . . . . . . . . . . . . . . . . . . . . . . . . . . . . . . . . . . . . . . . . . . . . . . . . 71
Step 1: Ingredients & tools . . . . . . . . . . . . . . . . . . . . . . . . . . . . . . . . . . . . . . . . . . . . . . . . . . . . . . . . . . . . . . . . . . . . . . . . . . . . . . . . . . . . . . . . . . . . . . . . . . . . 71
Step 2: Split . . . . . . . . . . . . . . . . . . . . . . . . . . . . . . . . . . . . . . . . . . . . . . . . . . . . . . . . . . . . . . . . . . . . . . . . . . . . . . . . . . . . . . . . . . . . . . . . . . . . . . . . . . . . . . 71
Step 3: Chop . . . . . . . . . . . . . . . . . . . . . . . . . . . . . . . . . . . . . . . . . . . . . . . . . . . . . . . . . . . . . . . . . . . . . . . . . . . . . . . . . . . . . . . . . . . . . . . . . . . . . . . . . . . . . . 72
Step 4: Add the good stuff! . . . . . . . . . . . . . . . . . . . . . . . . . . . . . . . . . . . . . . . . . . . . . . . . . . . . . . . . . . . . . . . . . . . . . . . . . . . . . . . . . . . . . . . . . . . . . . . . . . . 72
Step 5: Lime . . . . . . . . . . . . . . . . . . . . . . . . . . . . . . . . . . . . . . . . . . . . . . . . . . . . . . . . . . . . . . . . . . . . . . . . . . . . . . . . . . . . . . . . . . . . . . . . . . . . . . . . . . . . . . 72
Step 6: Salt & pepper . . . . . . . . . . . . . . . . . . . . . . . . . . . . . . . . . . . . . . . . . . . . . . . . . . . . . . . . . . . . . . . . . . . . . . . . . . . . . . . . . . . . . . . . . . . . . . . . . . . . . . . 73

http://www.instructables.com/id/5-Minute-Recipes/
Step 7: Mix . . . . . . . . . . . . . . . . . . . . . . . . . . . . . . . . . . . . . . . . . . . . . . . . . . . . . . . . . . . . . . . . . . . . . . . . . . . . . . . . . . . . . . . . . . . . . . . . . . . . . . . . . . . . . . . 73
Step 8: Modify . . . . . . . . . . . . . . . . . . . . . . . . . . . . . . . . . . . . . . . . . . . . . . . . . . . . . . . . . . . . . . . . . . . . . . . . . . . . . . . . . . . . . . . . . . . . . . . . . . . . . . . . . . . . . 73
Step 9: Eat . . . . . . . . . . . . . . . . . . . . . . . . . . . . . . . . . . . . . . . . . . . . . . . . . . . . . . . . . . . . . . . . . . . . . . . . . . . . . . . . . . . . . . . . . . . . . . . . . . . . . . . . . . . . . . . 74
Step 10: Refrigerate . . . . . . . . . . . . . . . . . . . . . . . . . . . . . . . . . . . . . . . . . . . . . . . . . . . . . . . . . . . . . . . . . . . . . . . . . . . . . . . . . . . . . . . . . . . . . . . . . . . . . . . . 74
Step 11: Scraps . . . . . . . . . . . . . . . . . . . . . . . . . . . . . . . . . . . . . . . . . . . . . . . . . . . . . . . . . . . . . . . . . . . . . . . . . . . . . . . . . . . . . . . . . . . . . . . . . . . . . . . . . . . 74
Related Instructables . . . . . . . . . . . . . . . . . . . . . . . . . . . . . . . . . . . . . . . . . . . . . . . . . . . . . . . . . . . . . . . . . . . . . . . . . . . . . . . . . . . . . . . . . . . . . . . . . . . . . . . . 75
Salsa fresca . . . . . . . . . . . . . . . . . . . . . . . . . . . . . . . . . . . . . . . . . . . . . . . . . . . . . . . . . . . . . . . . . . . . . . . . . . . . . . . . . . . . . . . . . . . . . . . . . . . . . . . . . . . . . . . . . 76
Intro: Salsa fresca . . . . . . . . . . . . . . . . . . . . . . . . . . . . . . . . . . . . . . . . . . . . . . . . . . . . . . . . . . . . . . . . . . . . . . . . . . . . . . . . . . . . . . . . . . . . . . . . . . . . . . . . . . 76
Step 1: Ingredients . . . . . . . . . . . . . . . . . . . . . . . . . . . . . . . . . . . . . . . . . . . . . . . . . . . . . . . . . . . . . . . . . . . . . . . . . . . . . . . . . . . . . . . . . . . . . . . . . . . . . . . . . 76
Step 2: Chop tomatoes . . . . . . . . . . . . . . . . . . . . . . . . . . . . . . . . . . . . . . . . . . . . . . . . . . . . . . . . . . . . . . . . . . . . . . . . . . . . . . . . . . . . . . . . . . . . . . . . . . . . . . 77
Step 3: Add corn . . . . . . . . . . . . . . . . . . . . . . . . . . . . . . . . . . . . . . . . . . . . . . . . . . . . . . . . . . . . . . . . . . . . . . . . . . . . . . . . . . . . . . . . . . . . . . . . . . . . . . . . . . . 78
Step 4: Chop the onion . . . . . . . . . . . . . . . . . . . . . . . . . . . . . . . . . . . . . . . . . . . . . . . . . . . . . . . . . . . . . . . . . . . . . . . . . . . . . . . . . . . . . . . . . . . . . . . . . . . . . . 78
Step 5: Shred the cilantro . . . . . . . . . . . . . . . . . . . . . . . . . . . . . . . . . . . . . . . . . . . . . . . . . . . . . . . . . . . . . . . . . . . . . . . . . . . . . . . . . . . . . . . . . . . . . . . . . . . . 79
Step 6: Peel and mince the garlic . . . . . . . . . . . . . . . . . . . . . . . . . . . . . . . . . . . . . . . . . . . . . . . . . . . . . . . . . . . . . . . . . . . . . . . . . . . . . . . . . . . . . . . . . . . . . . 79
Step 7: Mix well and enjoy! . . . . . . . . . . . . . . . . . . . . . . . . . . . . . . . . . . . . . . . . . . . . . . . . . . . . . . . . . . . . . . . . . . . . . . . . . . . . . . . . . . . . . . . . . . . . . . . . . . . 80
Related Instructables . . . . . . . . . . . . . . . . . . . . . . . . . . . . . . . . . . . . . . . . . . . . . . . . . . . . . . . . . . . . . . . . . . . . . . . . . . . . . . . . . . . . . . . . . . . . . . . . . . . . . . . . 81
Mast-o-Khiar (Iranian cucumber and mint yougurt) . . . . . . . . . . . . . . . . . . . . . . . . . . . . . . . . . . . . . . . . . . . . . . . . . . . . . . . . . . . . . . . . . . . . . . . . . . . . . . . . . . . . . 82
Intro: Mast-o-Khiar (Iranian cucumber and mint yougurt) . . . . . . . . . . . . . . . . . . . . . . . . . . . . . . . . . . . . . . . . . . . . . . . . . . . . . . . . . . . . . . . . . . . . . . . . . . . . . 82
Step 1: Gather Ingredients . . . . . . . . . . . . . . . . . . . . . . . . . . . . . . . . . . . . . . . . . . . . . . . . . . . . . . . . . . . . . . . . . . . . . . . . . . . . . . . . . . . . . . . . . . . . . . . . . . . . 82
Step 2: Mix mint and yogurt . . . . . . . . . . . . . . . . . . . . . . . . . . . . . . . . . . . . . . . . . . . . . . . . . . . . . . . . . . . . . . . . . . . . . . . . . . . . . . . . . . . . . . . . . . . . . . . . . . . 83
Step 3: Add cucumber . . . . . . . . . . . . . . . . . . . . . . . . . . . . . . . . . . . . . . . . . . . . . . . . . . . . . . . . . . . . . . . . . . . . . . . . . . . . . . . . . . . . . . . . . . . . . . . . . . . . . . . 83
Step 4: Garnish with fresh mint . . . . . . . . . . . . . . . . . . . . . . . . . . . . . . . . . . . . . . . . . . . . . . . . . . . . . . . . . . . . . . . . . . . . . . . . . . . . . . . . . . . . . . . . . . . . . . . . 83
Step 5: Serve . . . . . . . . . . . . . . . . . . . . . . . . . . . . . . . . . . . . . . . . . . . . . . . . . . . . . . . . . . . . . . . . . . . . . . . . . . . . . . . . . . . . . . . . . . . . . . . . . . . . . . . . . . . . . 84
Related Instructables . . . . . . . . . . . . . . . . . . . . . . . . . . . . . . . . . . . . . . . . . . . . . . . . . . . . . . . . . . . . . . . . . . . . . . . . . . . . . . . . . . . . . . . . . . . . . . . . . . . . . . . . 84
Hummus: Quick, Easy, and Delicious! . . . . . . . . . . . . . . . . . . . . . . . . . . . . . . . . . . . . . . . . . . . . . . . . . . . . . . . . . . . . . . . . . . . . . . . . . . . . . . . . . . . . . . . . . . . . . . 85
Intro: Hummus: Quick, Easy, and Delicious! . . . . . . . . . . . . . . . . . . . . . . . . . . . . . . . . . . . . . . . . . . . . . . . . . . . . . . . . . . . . . . . . . . . . . . . . . . . . . . . . . . . . . . . 85
Step 1: The ingredients . . . . . . . . . . . . . . . . . . . . . . . . . . . . . . . . . . . . . . . . . . . . . . . . . . . . . . . . . . . . . . . . . . . . . . . . . . . . . . . . . . . . . . . . . . . . . . . . . . . . . . 85
Step 2: The garlic . . . . . . . . . . . . . . . . . . . . . . . . . . . . . . . . . . . . . . . . . . . . . . . . . . . . . . . . . . . . . . . . . . . . . . . . . . . . . . . . . . . . . . . . . . . . . . . . . . . . . . . . . . 86
Step 3: The chickpeas, the tahini, the yogurt . . . . . . . . . . . . . . . . . . . . . . . . . . . . . . . . . . . . . . . . . . . . . . . . . . . . . . . . . . . . . . . . . . . . . . . . . . . . . . . . . . . . . . 86
Step 4: The lemon . . . . . . . . . . . . . . . . . . . . . . . . . . . . . . . . . . . . . . . . . . . . . . . . . . . . . . . . . . . . . . . . . . . . . . . . . . . . . . . . . . . . . . . . . . . . . . . . . . . . . . . . . . 86
Step 5: Blend it . . . . . . . . . . . . . . . . . . . . . . . . . . . . . . . . . . . . . . . . . . . . . . . . . . . . . . . . . . . . . . . . . . . . . . . . . . . . . . . . . . . . . . . . . . . . . . . . . . . . . . . . . . . . 87
Step 6: The extra flavors . . . . . . . . . . . . . . . . . . . . . . . . . . . . . . . . . . . . . . . . . . . . . . . . . . . . . . . . . . . . . . . . . . . . . . . . . . . . . . . . . . . . . . . . . . . . . . . . . . . . . 87
Step 7: Serve and eat it . . . . . . . . . . . . . . . . . . . . . . . . . . . . . . . . . . . . . . . . . . . . . . . . . . . . . . . . . . . . . . . . . . . . . . . . . . . . . . . . . . . . . . . . . . . . . . . . . . . . . . 87
Related Instructables . . . . . . . . . . . . . . . . . . . . . . . . . . . . . . . . . . . . . . . . . . . . . . . . . . . . . . . . . . . . . . . . . . . . . . . . . . . . . . . . . . . . . . . . . . . . . . . . . . . . . . . . 88
Easy Fruit Dip . . . . . . . . . . . . . . . . . . . . . . . . . . . . . . . . . . . . . . . . . . . . . . . . . . . . . . . . . . . . . . . . . . . . . . . . . . . . . . . . . . . . . . . . . . . . . . . . . . . . . . . . . . . . . . . . 89
Intro: Easy Fruit Dip . . . . . . . . . . . . . . . . . . . . . . . . . . . . . . . . . . . . . . . . . . . . . . . . . . . . . . . . . . . . . . . . . . . . . . . . . . . . . . . . . . . . . . . . . . . . . . . . . . . . . . . . 89
Step 1: Mix ingredients . . . . . . . . . . . . . . . . . . . . . . . . . . . . . . . . . . . . . . . . . . . . . . . . . . . . . . . . . . . . . . . . . . . . . . . . . . . . . . . . . . . . . . . . . . . . . . . . . . . . . . 89
Step 2: Serve . . . . . . . . . . . . . . . . . . . . . . . . . . . . . . . . . . . . . . . . . . . . . . . . . . . . . . . . . . . . . . . . . . . . . . . . . . . . . . . . . . . . . . . . . . . . . . . . . . . . . . . . . . . . . 90
Related Instructables . . . . . . . . . . . . . . . . . . . . . . . . . . . . . . . . . . . . . . . . . . . . . . . . . . . . . . . . . . . . . . . . . . . . . . . . . . . . . . . . . . . . . . . . . . . . . . . . . . . . . . . . 90
Shrimp Dip . . . . . . . . . . . . . . . . . . . . . . . . . . . . . . . . . . . . . . . . . . . . . . . . . . . . . . . . . . . . . . . . . . . . . . . . . . . . . . . . . . . . . . . . . . . . . . . . . . . . . . . . . . . . . . . . . . 91
Intro: Shrimp Dip . . . . . . . . . . . . . . . . . . . . . . . . . . . . . . . . . . . . . . . . . . . . . . . . . . . . . . . . . . . . . . . . . . . . . . . . . . . . . . . . . . . . . . . . . . . . . . . . . . . . . . . . . . . 91
Step 1: Tools and Ingredients . . . . . . . . . . . . . . . . . . . . . . . . . . . . . . . . . . . . . . . . . . . . . . . . . . . . . . . . . . . . . . . . . . . . . . . . . . . . . . . . . . . . . . . . . . . . . . . . . 91

http://www.instructables.com/id/5-Minute-Recipes/
Step 2: Combine dip ingredients . . . . . . . . . . . . . . . . . . . . . . . . . . . . . . . . . . . . . . . . . . . . . . . . . . . . . . . . . . . . . . . . . . . . . . . . . . . . . . . . . . . . . . . . . . . . . . . 94
Step 3: Prepare base . . . . . . . . . . . . . . . . . . . . . . . . . . . . . . . . . . . . . . . . . . . . . . . . . . . . . . . . . . . . . . . . . . . . . . . . . . . . . . . . . . . . . . . . . . . . . . . . . . . . . . . 95
Step 4: Add dip . . . . . . . . . . . . . . . . . . . . . . . . . . . . . . . . . . . . . . . . . . . . . . . . . . . . . . . . . . . . . . . . . . . . . . . . . . . . . . . . . . . . . . . . . . . . . . . . . . . . . . . . . . . . 96
Step 5: Garnish . . . . . . . . . . . . . . . . . . . . . . . . . . . . . . . . . . . . . . . . . . . . . . . . . . . . . . . . . . . . . . . . . . . . . . . . . . . . . . . . . . . . . . . . . . . . . . . . . . . . . . . . . . . . 97
Step 6: Serve . . . . . . . . . . . . . . . . . . . . . . . . . . . . . . . . . . . . . . . . . . . . . . . . . . . . . . . . . . . . . . . . . . . . . . . . . . . . . . . . . . . . . . . . . . . . . . . . . . . . . . . . . . . . . 97
Related Instructables . . . . . . . . . . . . . . . . . . . . . . . . . . . . . . . . . . . . . . . . . . . . . . . . . . . . . . . . . . . . . . . . . . . . . . . . . . . . . . . . . . . . . . . . . . . . . . . . . . . . . . . . 98
Creamy Dill Dip . . . . . . . . . . . . . . . . . . . . . . . . . . . . . . . . . . . . . . . . . . . . . . . . . . . . . . . . . . . . . . . . . . . . . . . . . . . . . . . . . . . . . . . . . . . . . . . . . . . . . . . . . . . . . . . 99
Intro: Creamy Dill Dip . . . . . . . . . . . . . . . . . . . . . . . . . . . . . . . . . . . . . . . . . . . . . . . . . . . . . . . . . . . . . . . . . . . . . . . . . . . . . . . . . . . . . . . . . . . . . . . . . . . . . . . 99
Step 1: Mix base . . . . . . . . . . . . . . . . . . . . . . . . . . . . . . . . . . . . . . . . . . . . . . . . . . . . . . . . . . . . . . . . . . . . . . . . . . . . . . . . . . . . . . . . . . . . . . . . . . . . . . . . . . . 99
Step 2: Add seasonings . . . . . . . . . . . . . . . . . . . . . . . . . . . . . . . . . . . . . . . . . . . . . . . . . . . . . . . . . . . . . . . . . . . . . . . . . . . . . . . . . . . . . . . . . . . . . . . . . . . . . . 100
Step 3: Serve . . . . . . . . . . . . . . . . . . . . . . . . . . . . . . . . . . . . . . . . . . . . . . . . . . . . . . . . . . . . . . . . . . . . . . . . . . . . . . . . . . . . . . . . . . . . . . . . . . . . . . . . . . . . . 100
Related Instructables . . . . . . . . . . . . . . . . . . . . . . . . . . . . . . . . . . . . . . . . . . . . . . . . . . . . . . . . . . . . . . . . . . . . . . . . . . . . . . . . . . . . . . . . . . . . . . . . . . . . . . . . 100
How to Make Delicious, Healthy Homemade Potato Chips With a Microwave! . . . . . . . . . . . . . . . . . . . . . . . . . . . . . . . . . . . . . . . . . . . . . . . . . . . . . . . . . . . . . . . . . 101
Intro: How to Make Delicious, Healthy Homemade Potato Chips With a Microwave! . . . . . . . . . . . . . . . . . . . . . . . . . . . . . . . . . . . . . . . . . . . . . . . . . . . . . . . . . 101
Step 1: What You Need . . . . . . . . . . . . . . . . . . . . . . . . . . . . . . . . . . . . . . . . . . . . . . . . . . . . . . . . . . . . . . . . . . . . . . . . . . . . . . . . . . . . . . . . . . . . . . . . . . . . . . 101
Step 2: Cut The Potato . . . . . . . . . . . . . . . . . . . . . . . . . . . . . . . . . . . . . . . . . . . . . . . . . . . . . . . . . . . . . . . . . . . . . . . . . . . . . . . . . . . . . . . . . . . . . . . . . . . . . . 101
Step 3: Lay Potato Slices on Plate . . . . . . . . . . . . . . . . . . . . . . . . . . . . . . . . . . . . . . . . . . . . . . . . . . . . . . . . . . . . . . . . . . . . . . . . . . . . . . . . . . . . . . . . . . . . . . 102
Step 4: Add Flavoring . . . . . . . . . . . . . . . . . . . . . . . . . . . . . . . . . . . . . . . . . . . . . . . . . . . . . . . . . . . . . . . . . . . . . . . . . . . . . . . . . . . . . . . . . . . . . . . . . . . . . . . 102
Step 5: Nuke it. . . . . . . . . . . . . . . . . . . . . . . . . . . . . . . . . . . . . . . . . . . . . . . . . . . . . . . . . . . . . . . . . . . . . . . . . . . . . . . . . . . . . . . . . . . . . . . . . . . . . . . . . . . . . 103
Step 6: Watch the Chips . . . . . . . . . . . . . . . . . . . . . . . . . . . . . . . . . . . . . . . . . . . . . . . . . . . . . . . . . . . . . . . . . . . . . . . . . . . . . . . . . . . . . . . . . . . . . . . . . . . . . 103
Step 7: Enjoy! . . . . . . . . . . . . . . . . . . . . . . . . . . . . . . . . . . . . . . . . . . . . . . . . . . . . . . . . . . . . . . . . . . . . . . . . . . . . . . . . . . . . . . . . . . . . . . . . . . . . . . . . . . . . . 103
Related Instructables . . . . . . . . . . . . . . . . . . . . . . . . . . . . . . . . . . . . . . . . . . . . . . . . . . . . . . . . . . . . . . . . . . . . . . . . . . . . . . . . . . . . . . . . . . . . . . . . . . . . . . . . 103
The Best Mexican Chip Dip in the whole entire world! :) (well my world) . . . . . . . . . . . . . . . . . . . . . . . . . . . . . . . . . . . . . . . . . . . . . . . . . . . . . . . . . . . . . . . . . . . . . 104
Intro: The Best Mexican Chip Dip in the whole entire world! :) (well my world) . . . . . . . . . . . . . . . . . . . . . . . . . . . . . . . . . . . . . . . . . . . . . . . . . . . . . . . . . . . . . . 104
Step 1: Gather your Ingredients and supplies. . . . . . . . . . . . . . . . . . . . . . . . . . . . . . . . . . . . . . . . . . . . . . . . . . . . . . . . . . . . . . . . . . . . . . . . . . . . . . . . . . . . . . 104
Step 2: Dump out your contents. . . . . . . . . . . . . . . . . . . . . . . . . . . . . . . . . . . . . . . . . . . . . . . . . . . . . . . . . . . . . . . . . . . . . . . . . . . . . . . . . . . . . . . . . . . . . . . . 105
Step 3: Add the cheese . . . . . . . . . . . . . . . . . . . . . . . . . . . . . . . . . . . . . . . . . . . . . . . . . . . . . . . . . . . . . . . . . . . . . . . . . . . . . . . . . . . . . . . . . . . . . . . . . . . . . . 105
Step 4: Let technology take its course. . . . . . . . . . . . . . . . . . . . . . . . . . . . . . . . . . . . . . . . . . . . . . . . . . . . . . . . . . . . . . . . . . . . . . . . . . . . . . . . . . . . . . . . . . . . 106
Step 5: MIX IT! . . . . . . . . . . . . . . . . . . . . . . . . . . . . . . . . . . . . . . . . . . . . . . . . . . . . . . . . . . . . . . . . . . . . . . . . . . . . . . . . . . . . . . . . . . . . . . . . . . . . . . . . . . . . 106
Step 6: ENJOY! . . . . . . . . . . . . . . . . . . . . . . . . . . . . . . . . . . . . . . . . . . . . . . . . . . . . . . . . . . . . . . . . . . . . . . . . . . . . . . . . . . . . . . . . . . . . . . . . . . . . . . . . . . . . 106
Related Instructables . . . . . . . . . . . . . . . . . . . . . . . . . . . . . . . . . . . . . . . . . . . . . . . . . . . . . . . . . . . . . . . . . . . . . . . . . . . . . . . . . . . . . . . . . . . . . . . . . . . . . . . . 107
Bernie's Best Bean and Salsa Dip . . . . . . . . . . . . . . . . . . . . . . . . . . . . . . . . . . . . . . . . . . . . . . . . . . . . . . . . . . . . . . . . . . . . . . . . . . . . . . . . . . . . . . . . . . . . . . . . . 108
Intro: Bernie's Best Bean and Salsa Dip . . . . . . . . . . . . . . . . . . . . . . . . . . . . . . . . . . . . . . . . . . . . . . . . . . . . . . . . . . . . . . . . . . . . . . . . . . . . . . . . . . . . . . . . . . 108
Step 1: Ingredients . . . . . . . . . . . . . . . . . . . . . . . . . . . . . . . . . . . . . . . . . . . . . . . . . . . . . . . . . . . . . . . . . . . . . . . . . . . . . . . . . . . . . . . . . . . . . . . . . . . . . . . . . 109
Step 2: Avocado . . . . . . . . . . . . . . . . . . . . . . . . . . . . . . . . . . . . . . . . . . . . . . . . . . . . . . . . . . . . . . . . . . . . . . . . . . . . . . . . . . . . . . . . . . . . . . . . . . . . . . . . . . . 111
Step 3: Beans and Salsa . . . . . . . . . . . . . . . . . . . . . . . . . . . . . . . . . . . . . . . . . . . . . . . . . . . . . . . . . . . . . . . . . . . . . . . . . . . . . . . . . . . . . . . . . . . . . . . . . . . . . 112
Step 4: Cheese sauce and flavor . . . . . . . . . . . . . . . . . . . . . . . . . . . . . . . . . . . . . . . . . . . . . . . . . . . . . . . . . . . . . . . . . . . . . . . . . . . . . . . . . . . . . . . . . . . . . . . 115
Step 5: Serve! . . . . . . . . . . . . . . . . . . . . . . . . . . . . . . . . . . . . . . . . . . . . . . . . . . . . . . . . . . . . . . . . . . . . . . . . . . . . . . . . . . . . . . . . . . . . . . . . . . . . . . . . . . . . . 116
Related Instructables . . . . . . . . . . . . . . . . . . . . . . . . . . . . . . . . . . . . . . . . . . . . . . . . . . . . . . . . . . . . . . . . . . . . . . . . . . . . . . . . . . . . . . . . . . . . . . . . . . . . . . . . 118
Chili and Cream Cheese Chip Dip . . . . . . . . . . . . . . . . . . . . . . . . . . . . . . . . . . . . . . . . . . . . . . . . . . . . . . . . . . . . . . . . . . . . . . . . . . . . . . . . . . . . . . . . . . . . . . . . . 119
Intro: Chili and Cream Cheese Chip Dip . . . . . . . . . . . . . . . . . . . . . . . . . . . . . . . . . . . . . . . . . . . . . . . . . . . . . . . . . . . . . . . . . . . . . . . . . . . . . . . . . . . . . . . . . . 119
http://www.instructables.com/id/5-Minute-Recipes/
Step 1: Ingredients . . . . . . . . . . . . . . . . . . . . . . . . . . . . . . . . . . . . . . . . . . . . . . . . . . . . . . . . . . . . . . . . . . . . . . . . . . . . . . . . . . . . . . . . . . . . . . . . . . . . . . . . . 119
Step 2: Mixing the Ingredients . . . . . . . . . . . . . . . . . . . . . . . . . . . . . . . . . . . . . . . . . . . . . . . . . . . . . . . . . . . . . . . . . . . . . . . . . . . . . . . . . . . . . . . . . . . . . . . . . 120
Step 3: Serve . . . . . . . . . . . . . . . . . . . . . . . . . . . . . . . . . . . . . . . . . . . . . . . . . . . . . . . . . . . . . . . . . . . . . . . . . . . . . . . . . . . . . . . . . . . . . . . . . . . . . . . . . . . . . 120
Related Instructables . . . . . . . . . . . . . . . . . . . . . . . . . . . . . . . . . . . . . . . . . . . . . . . . . . . . . . . . . . . . . . . . . . . . . . . . . . . . . . . . . . . . . . . . . . . . . . . . . . . . . . . . 120
[Collegiate Meals] Ultimate Bachelor Dinner . . . . . . . . . . . . . . . . . . . . . . . . . . . . . . . . . . . . . . . . . . . . . . . . . . . . . . . . . . . . . . . . . . . . . . . . . . . . . . . . . . . . . . . . . . 121
Intro: [Collegiate Meals] Ultimate Bachelor Dinner . . . . . . . . . . . . . . . . . . . . . . . . . . . . . . . . . . . . . . . . . . . . . . . . . . . . . . . . . . . . . . . . . . . . . . . . . . . . . . . . . . 121
Step 1: Gather Materials . . . . . . . . . . . . . . . . . . . . . . . . . . . . . . . . . . . . . . . . . . . . . . . . . . . . . . . . . . . . . . . . . . . . . . . . . . . . . . . . . . . . . . . . . . . . . . . . . . . . . 121
Step 2: Mix and Heat . . . . . . . . . . . . . . . . . . . . . . . . . . . . . . . . . . . . . . . . . . . . . . . . . . . . . . . . . . . . . . . . . . . . . . . . . . . . . . . . . . . . . . . . . . . . . . . . . . . . . . . . 122
Related Instructables . . . . . . . . . . . . . . . . . . . . . . . . . . . . . . . . . . . . . . . . . . . . . . . . . . . . . . . . . . . . . . . . . . . . . . . . . . . . . . . . . . . . . . . . . . . . . . . . . . . . . . . . 123
Microwave Corn . . . . . . . . . . . . . . . . . . . . . . . . . . . . . . . . . . . . . . . . . . . . . . . . . . . . . . . . . . . . . . . . . . . . . . . . . . . . . . . . . . . . . . . . . . . . . . . . . . . . . . . . . . . . . . 124
Intro: Microwave Corn . . . . . . . . . . . . . . . . . . . . . . . . . . . . . . . . . . . . . . . . . . . . . . . . . . . . . . . . . . . . . . . . . . . . . . . . . . . . . . . . . . . . . . . . . . . . . . . . . . . . . . . 124
Step 1: Materials . . . . . . . . . . . . . . . . . . . . . . . . . . . . . . . . . . . . . . . . . . . . . . . . . . . . . . . . . . . . . . . . . . . . . . . . . . . . . . . . . . . . . . . . . . . . . . . . . . . . . . . . . . . 124
Step 2: Microwave corn . . . . . . . . . . . . . . . . . . . . . . . . . . . . . . . . . . . . . . . . . . . . . . . . . . . . . . . . . . . . . . . . . . . . . . . . . . . . . . . . . . . . . . . . . . . . . . . . . . . . . . 124
Step 3: Wrap it up . . . . . . . . . . . . . . . . . . . . . . . . . . . . . . . . . . . . . . . . . . . . . . . . . . . . . . . . . . . . . . . . . . . . . . . . . . . . . . . . . . . . . . . . . . . . . . . . . . . . . . . . . . 126
Step 4: EAT . . . . . . . . . . . . . . . . . . . . . . . . . . . . . . . . . . . . . . . . . . . . . . . . . . . . . . . . . . . . . . . . . . . . . . . . . . . . . . . . . . . . . . . . . . . . . . . . . . . . . . . . . . . . . . 127
Related Instructables . . . . . . . . . . . . . . . . . . . . . . . . . . . . . . . . . . . . . . . . . . . . . . . . . . . . . . . . . . . . . . . . . . . . . . . . . . . . . . . . . . . . . . . . . . . . . . . . . . . . . . . . 127
Microwave Popcorn: Home made, cheap and easy . . . . . . . . . . . . . . . . . . . . . . . . . . . . . . . . . . . . . . . . . . . . . . . . . . . . . . . . . . . . . . . . . . . . . . . . . . . . . . . . . . . . 128
Intro: Microwave Popcorn: Home made, cheap and easy . . . . . . . . . . . . . . . . . . . . . . . . . . . . . . . . . . . . . . . . . . . . . . . . . . . . . . . . . . . . . . . . . . . . . . . . . . . . . 128
Step 1: First... . . . . . . . . . . . . . . . . . . . . . . . . . . . . . . . . . . . . . . . . . . . . . . . . . . . . . . . . . . . . . . . . . . . . . . . . . . . . . . . . . . . . . . . . . . . . . . . . . . . . . . . . . . . . . 129
Step 2: Things are really popping now! . . . . . . . . . . . . . . . . . . . . . . . . . . . . . . . . . . . . . . . . . . . . . . . . . . . . . . . . . . . . . . . . . . . . . . . . . . . . . . . . . . . . . . . . . . 129
Step 3: Relax and savor . . . . . . . . . . . . . . . . . . . . . . . . . . . . . . . . . . . . . . . . . . . . . . . . . . . . . . . . . . . . . . . . . . . . . . . . . . . . . . . . . . . . . . . . . . . . . . . . . . . . . 130
Related Instructables . . . . . . . . . . . . . . . . . . . . . . . . . . . . . . . . . . . . . . . . . . . . . . . . . . . . . . . . . . . . . . . . . . . . . . . . . . . . . . . . . . . . . . . . . . . . . . . . . . . . . . . . 130

http://www.instructables.com/id/5-Minute-Recipes/
Author and Copyright NoticesInstructable: 5-minute Chocolate CakeAuthor: scoochmarooLicense: Public Domain (pd)
Instructable: 5 Minute Bread Pudding for OneAuthor: KoukalnatorLicense: Attribution-NonCommercial-ShareAlike (by-nc-sa)
Instructable: Tiny TurtlesAuthor: moonkittieLicense: Attribution-NonCommercial-ShareAlike (by-nc-sa)
Instructable: 4-minute Chocolate MousseAuthor: scoochmarooLicense: Attribution-NonCommercial-ShareAlike (by-nc-sa)
Instructable: 5-minute Chocolate BallsAuthor: scoochmarooLicense: Attribution-NonCommercial-ShareAlike (by-nc-sa)
Instructable: 5-minute Ice CreamAuthor: scoochmarooLicense: Attribution-NonCommercial-ShareAlike (by-nc-sa)
Instructable: 5-Minute PieAuthor: scoochmarooLicense: Attribution-NonCommercial-ShareAlike (by-nc-sa)
Instructable: 1-ingredient Ice CreamAuthor: scoochmarooLicense: Attribution-NonCommercial-ShareAlike (by-nc-sa)
Instructable: Nectarine smoothieAuthor: ewilhelmLicense: Attribution-NonCommercial-ShareAlike (by-nc-sa)
Instructable: 5-Minute Breakfast RiceAuthor: frenzyLicense: Attribution-NonCommercial-ShareAlike (by-nc-sa)
Instructable: 5 Minute Perfect Deli-style Egg Bagel Sandwich in Microwave - YummyAuthor: hondaman900License: Attribution-NonCommercial-ShareAlike (by-nc-sa)
Instructable: Two Minute Microwave EggAuthor: iectyx3cLicense: Attribution-NonCommercial-ShareAlike (by-nc-sa)
Instructable: Bruschetta RecipeAuthor: noahwLicense: Attribution-NonCommercial-ShareAlike (by-nc-sa)
Instructable: Avocado with agave and limeAuthor: canidaLicense: Attribution-NonCommercial-ShareAlike (by-nc-sa)
Instructable: Fresh GuacamoleAuthor: ilyssa.shapiroLicense: Attribution-NonCommercial-ShareAlike (by-nc-sa)
Instructable: Salsa frescaAuthor: zieakLicense: Attribution-NonCommercial-ShareAlike (by-nc-sa)
Instructable: Mast-o-Khiar (Iranian cucumber and mint yougurt)Author: LinuxH4x0rLicense: Attribution-NonCommercial-ShareAlike (by-nc-sa)
Instructable: Hummus: Quick, Easy, and Delicious!Author: megtalleyLicense: Attribution-NonCommercial-ShareAlike (by-nc-sa)
Instructable: Easy Fruit DipAuthor: canidaLicense: Attribution-NonCommercial-ShareAlike (by-nc-sa)
Instructable: Shrimp DipAuthor: canidaLicense: Attribution-NonCommercial-ShareAlike (by-nc-sa)
Instructable: Creamy Dill DipAuthor: canidaLicense: Attribution-NonCommercial-ShareAlike (by-nc-sa)
Instructable: How to Make Delicious, Healthy Homemade Potato Chips With a Microwave!

http://www.instructables.com/id/5-Minute-Recipes/
Author: thatkidwithayoyoLicense: Attribution-NonCommercial-ShareAlike (by-nc-sa)
Instructable: The Best Mexican Chip Dip in the whole entire world! :) (well my world)Author: Comp101License: Attribution-NonCommercial-ShareAlike (by-nc-sa)
Instructable: Bernie's Best Bean and Salsa DipAuthor: Junk MailLicense: Attribution-NonCommercial-ShareAlike (by-nc-sa)
Instructable: Chili and Cream Cheese Chip DipAuthor: Comp101License: Attribution-NonCommercial-ShareAlike (by-nc-sa)
Instructable: [Collegiate Meals] Ultimate Bachelor DinnerAuthor: DiscopantsLicense: Attribution-NonCommercial-ShareAlike (by-nc-sa)
Instructable: Microwave CornAuthor: scoochmarooLicense: Attribution-NonCommercial-ShareAlike (by-nc-sa)
Instructable: Microwave Popcorn: Home made, cheap and easyAuthor: HoopajooLicense: Attribution-NonCommercial-ShareAlike (by-nc-sa)

http://www.instructables.com/id/5-Minute-Recipes/
DisclaimerAll do-it-yourself activities involve risk, and your safety is your own responsibility, including proper use of equipment and safety gear, and determining whether you haveadequate skill and experience. Some of the resources used for these projects are dangerous unless used properly and with adequate precautions, including safety gear.Some illustrative photos do not depict safety precautions or equipment, in order to show the project steps more clearly. The projects are not intended for use by children.
Many projects on Instructables are user-submitted, and appearance of a project in this format does not indicate it has been checked for safety or functionality. Use of theinstructions and suggestions is at your own risk. Instructables, Inc. disclaims all responsibility for any resulting damage, injury, or expense. It is your responsibility to makesure that your activities comply with all applicable laws.
http://www.instructables.com/id/5-Minute-Recipes/
5-minute Chocolate Cakeby scoochmaroo on October 19, 2008
Author:scoochmaroo My fan pageEditor of the Food and Living channels. If you like what you see, subscribe to me!
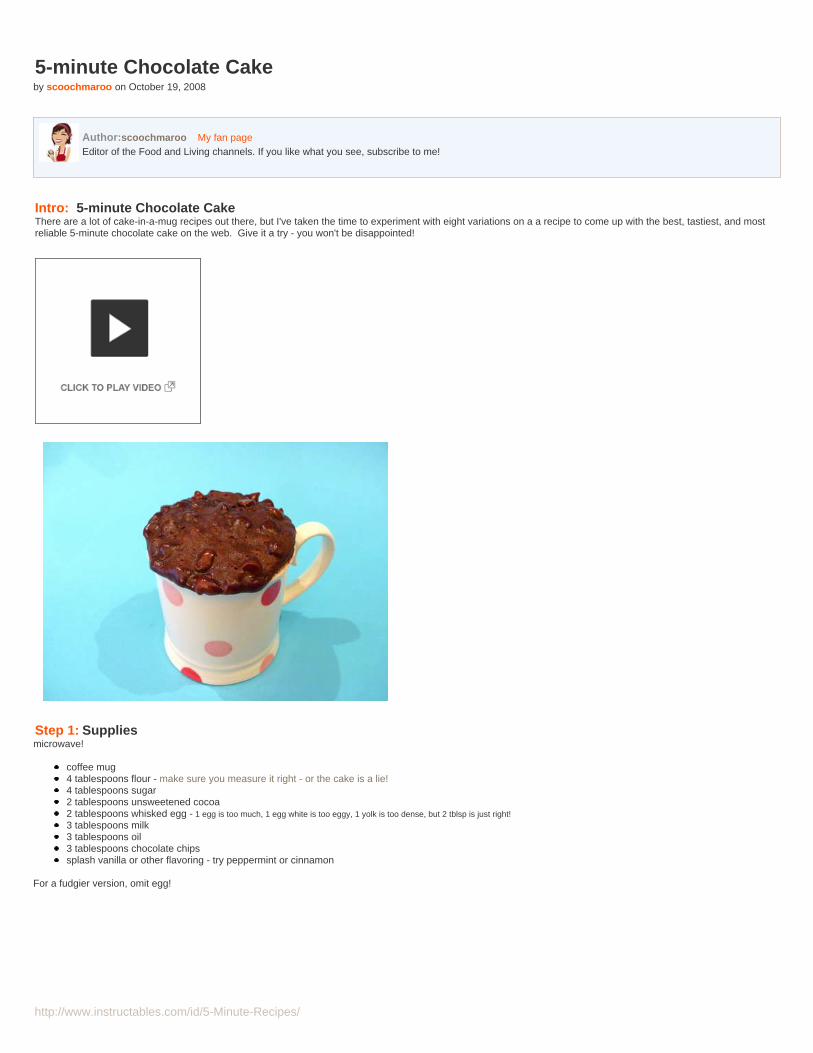
Intro: 5-minute Chocolate CakeThere are a lot of cake-in-a-mug recipes out there, but I've taken the time to experiment with eight variations on a a recipe to come up with the best, tastiest, and mostreliable 5-minute chocolate cake on the web. Give it a try - you won't be disappointed!
Step 1: Suppliesmicrowave!
coffee mug4 tablespoons flour - make sure you measure it right - or the cake is a lie!4 tablespoons sugar2 tablespoons unsweetened cocoa2 tablespoons whisked egg - 1 egg is too much, 1 egg white is too eggy, 1 yolk is too dense, but 2 tblsp is just right!3 tablespoons milk3 tablespoons oil3 tablespoons chocolate chipssplash vanilla or other flavoring - try peppermint or cinnamon
For a fudgier version, omit egg!
http://www.instructables.com/id/5-Minute-Recipes/
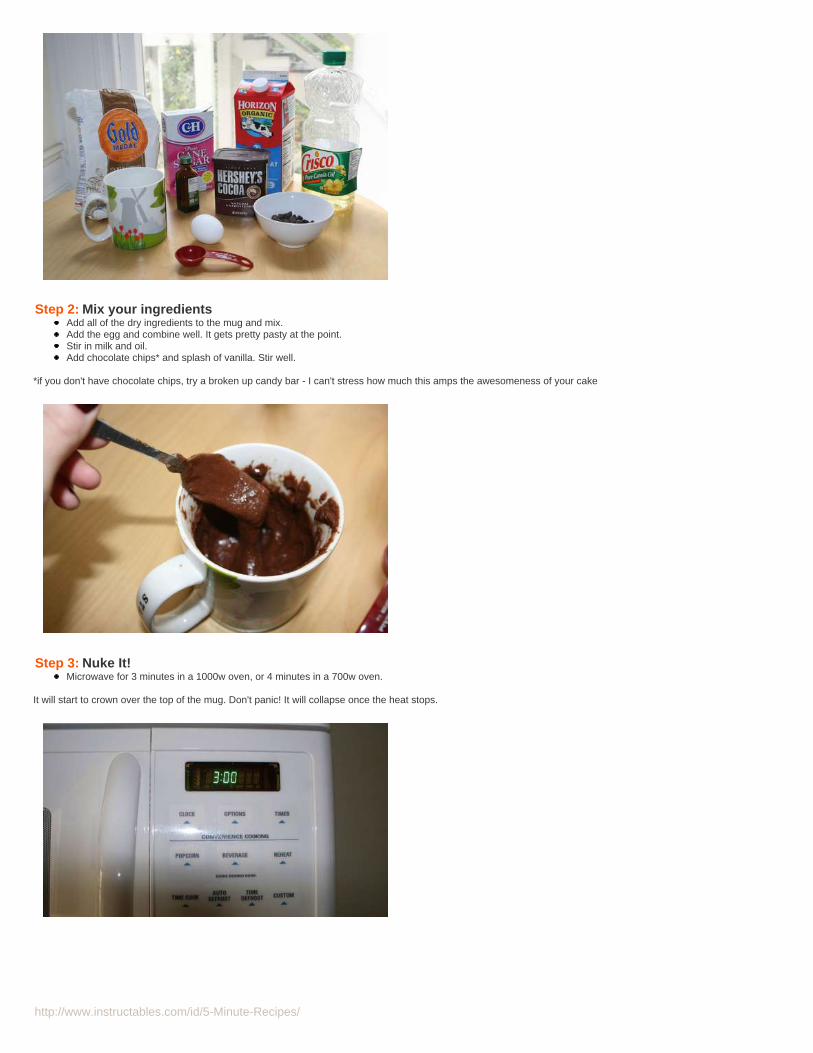
Step 2: Mix your ingredientsAdd all of the dry ingredients to the mug and mix.Add the egg and combine well. It gets pretty pasty at the point.Stir in milk and oil.Add chocolate chips* and splash of vanilla. Stir well.
*if you don't have chocolate chips, try a broken up candy bar - I can't stress how much this amps the awesomeness of your cake
Step 3: Nuke It!Microwave for 3 minutes in a 1000w oven, or 4 minutes in a 700w oven.
It will start to crown over the top of the mug. Don't panic! It will collapse once the heat stops.

http://www.instructables.com/id/5-Minute-Recipes/
Image Notes1. it's crowning!
Step 4: Eat it!Cuidado! Muy caliente!
This cake is still good half an hour out of the oven. In fact, I think it gets better the longer it sits, but I can't speak to how it does after that, since there's never any left!
Enjoy!
Image Notes1. Fance it up with powdered sugar and it's own bowl! Ooo la la!

http://www.instructables.com/id/5-Minute-Recipes/
Related Instructables
5 MinuteChocolate MugCake byWill_Tingle
Mug Brownie bySpastic
Single serveinstantchocolatepudding bykinawera
Quick and EasyFruity Dessert!by mossimo3
HostessCupcake cakebyshangrilarcadia
Quick andChewy CuppaCakes byDebH57
Devilishpumpkin devil'sfood muffins bytrsinger
NEW ANDIMPROVEDCHOCOLATECAKE!!! byheyzuphowsitgoin

http://www.instructables.com/id/5-Minute-Recipes/
5 Minute Bread Pudding for Oneby Koukalnator on June 16, 2010
Intro: 5 Minute Bread Pudding for OneWhen you don't know what to do with those pesky end heels of your bread loaf - turn them into fluffy, custardy gold with this super quick and simple dessert!
Step 1: Tools / IngredientsThese ingredients are more suggestions, you can easily make substitutions to almost everything but the bread and eggs.
You'll need: - a microwaveable coffee cup or bowl- bread (stale ok!)- 1 egg- 1-3 tablespoons sugar- 2 tablespoons of yogurt or milk- 1-2 tablespoons of butter / margarine
Optional ingredients:- 2 tablespoons applesauce - 1 tsp vanilla - dash of cinnamin
http://www.instructables.com/id/5-Minute-Recipes/
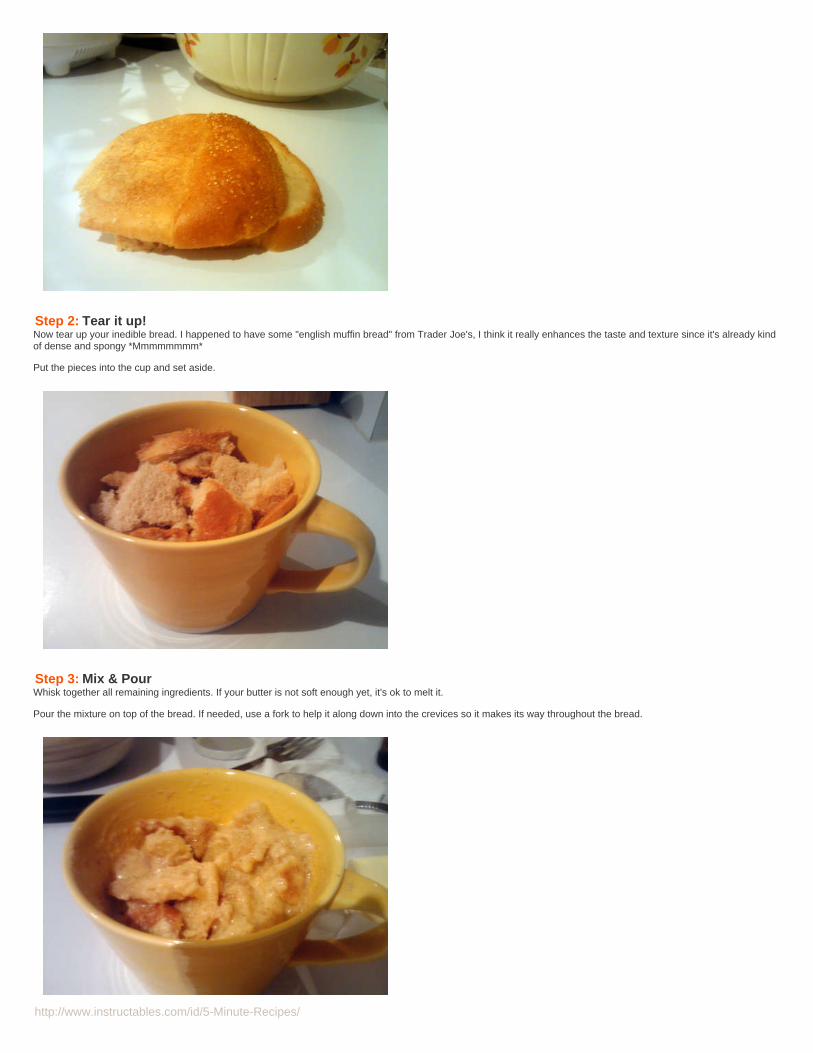
Step 2: Tear it up!Now tear up your inedible bread. I happened to have some "english muffin bread" from Trader Joe's, I think it really enhances the taste and texture since it's already kindof dense and spongy *Mmmmmmmm*
Put the pieces into the cup and set aside.
Step 3: Mix & PourWhisk together all remaining ingredients. If your butter is not soft enough yet, it's ok to melt it.
Pour the mixture on top of the bread. If needed, use a fork to help it along down into the crevices so it makes its way throughout the bread.
http://www.instructables.com/id/5-Minute-Recipes/
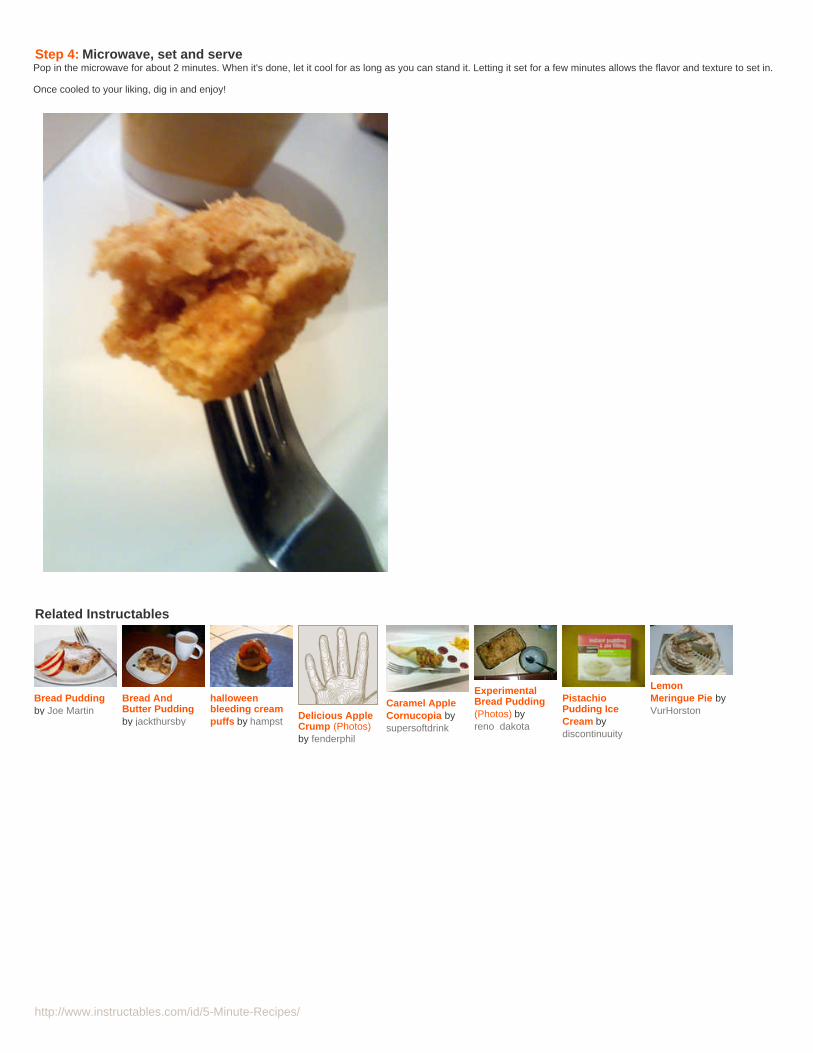
Step 4: Microwave, set and servePop in the microwave for about 2 minutes. When it's done, let it cool for as long as you can stand it. Letting it set for a few minutes allows the flavor and texture to set in.
Once cooled to your liking, dig in and enjoy!
Related Instructables
Bread Puddingby Joe Martin
Bread AndButter Puddingby jackthursby
halloweenbleeding creampuffs by hampst
Delicious AppleCrump (Photos)by fenderphil
Caramel AppleCornucopia bysupersoftdrink
ExperimentalBread Pudding(Photos) byreno_dakota
PistachioPudding IceCream bydiscontinuuity
LemonMeringue Pie byVurHorston

http://www.instructables.com/id/5-Minute-Recipes/
Tiny Turtlesby moonkittie on January 18, 2010
Intro: Tiny TurtlesMy mother gave me this recipe one day, and not only have I loved them, but everyone I know who's had one of these have loved them! So, what better way to sharethem with everyone than to make an Instructable on how to make them? They're sure to be a hit, and I call them Tiny Turtles. If you make some, make a lot. They'll goquickly and are highly addictive, not to mention they're extremely easy to make!
Step 1: IngredientsSmall pretzels
Pecan halves
Rolos (preferably the ones from the bag that you can find in the candy section)
You will also need a sheet pan, an oven, and some wax paper.

http://www.instructables.com/id/5-Minute-Recipes/
Step 2: Preheat ovenPreheat your oven to 200F degrees.
Place wax paper on a sheet pan and spread out the pretzels over the wax paper.
Step 3: UnwrapUnwrap the Rolos and place on top of the pretzels
Step 4: Place pecansNow, this step you can do one of two ways. You can either place a Pecan half on top of the Rolo, or wait until they come out of the oven. We prefer to place the Pecan ontop of the Rolo before we place it in the oven.

http://www.instructables.com/id/5-Minute-Recipes/
Step 5: Put in ovenPlace the sheet pan in the oven and set the timer for 2 minutes.
Once 2 minutes is up, pull out the sheet pan. If you placed the Pecans on top of the Rolos before you placed them in the oven, simply and gently, press down on top ofthem slightly. If you didn’t put the Pecans on yet, now would be the time to do so, pressing down lightly.
Step 6: Let them coolNow, all you have to do is let them cool. The fastest and easiest way I’ve found to do this is to place the sheet pan in the fridge. They’re amazing warm, but gooey. It’syour choice. Enjoy!

http://www.instructables.com/id/5-Minute-Recipes/
Related Instructables
ChocolateCaramel Turtlesby linuxmom
Turtle PondDesign (video)by The PondDigger
How to eat asnack. bycrimson sausage
Styrofoam turtleDock bychrysemyspicta
Dog Treats by133jl
Sweet Treat,HomemadeHoney Sticks.by Spl1nt3rC3ll
Homemade DogTreats to BeatBad Breath bydesolatedecember
ATurtle HuntingWe Will Go! byldchev

http://www.instructables.com/id/5-Minute-Recipes/
4-minute Chocolate Mousseby scoochmaroo on July 13, 2009
Author:scoochmaroo My fan pageEditor of the Food and Living channels. If you like what you see, subscribe to me!
Intro: 4-minute Chocolate MousseThis incredibly decadent, luxurious chocolate mousse recipe comes to us from Gordon Ramsay (to whom I lovingly refer as Angry Chef). You have to try this! It's worthevery single minute of effort.
WARNING: THE FOLLOWING RECIPE IS EXTREMELY ADDICTIVE
"But Scooch," you say, "Restaurant-quality chocolate mousse in four minutes?! Sound too good to be true?" Yeah, I thought so too.
So I decided to take this recipe to task - could it possibly be done in four minutes without the use of a microwave? I had to find out.
Then, of course, I realized I'd have to stop and take pictures and make notes along the way; I really wouldn't be the best judge of the passage of time here. So I enlistedmy trusty assistant (who was also able to help me translate the Britishisms) to help out so that we could get a better idea of the time.
It went VERY fast. I'm sure that after a couple stabs at this recipe, four minutes would be no problem at all.
Also, have I mentioned yet how DEADLY DELICIOUS this is? I could eat about two spoonfuls before I was down for the count.
This is going to be a new staple in our household. Keep the ingredients on hand!
YOU'LL ALWAYS BE FOUR MINUTES or so FROM ABSOLUTE DECADENCE!!
Step 1: IngredientsHere's the recipe in its original British, and then followed with an American translation.
Brits, etc. use:
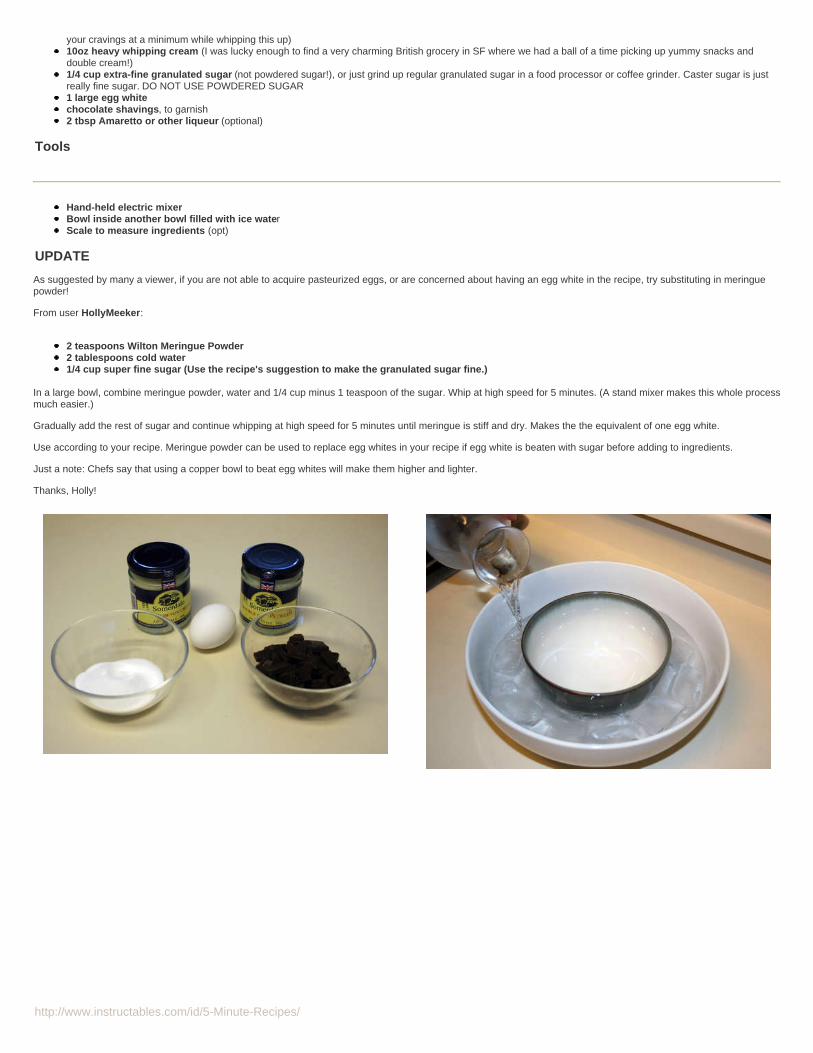
100g dark chocolate (70% cocoa solids) broken up into pieces -300ml double cream50g caster sugar1 large egg whitechocolate shavings, to garnish2 tbsp Amaretto or other liqueur (optional)
Yanks, etc. use:
4oz bar of high-quality dark chocolate (I used Ghiradelli). You'll use 7 of the 8 squares, and the 8th square you can shave for garnish (or munch on to keep
http://www.instructables.com/id/5-Minute-Recipes/
your cravings at a minimum while whipping this up)10oz heavy whipping cream (I was lucky enough to find a very charming British grocery in SF where we had a ball of a time picking up yummy snacks anddouble cream!)1/4 cup extra-fine granulated sugar (not powdered sugar!), or just grind up regular granulated sugar in a food processor or coffee grinder. Caster sugar is justreally fine sugar. DO NOT USE POWDERED SUGAR1 large egg whitechocolate shavings, to garnish2 tbsp Amaretto or other liqueur (optional)
Tools
Hand-held electric mixerBowl inside another bowl filled with ice waterScale to measure ingredients (opt)
UPDATE
As suggested by many a viewer, if you are not able to acquire pasteurized eggs, or are concerned about having an egg white in the recipe, try substituting in meringuepowder!
From user HollyMeeker:
2 teaspoons Wilton Meringue Powder2 tablespoons cold water1/4 cup super fine sugar (Use the recipe's suggestion to make the granulated sugar fine.)
In a large bowl, combine meringue powder, water and 1/4 cup minus 1 teaspoon of the sugar. Whip at high speed for 5 minutes. (A stand mixer makes this whole processmuch easier.)
Gradually add the rest of sugar and continue whipping at high speed for 5 minutes until meringue is stiff and dry. Makes the the equivalent of one egg white.
Use according to your recipe. Meringue powder can be used to replace egg whites in your recipe if egg white is beaten with sugar before adding to ingredients.
Just a note: Chefs say that using a copper bowl to beat egg whites will make them higher and lighter.
Thanks, Holly!
http://www.instructables.com/id/5-Minute-Recipes/
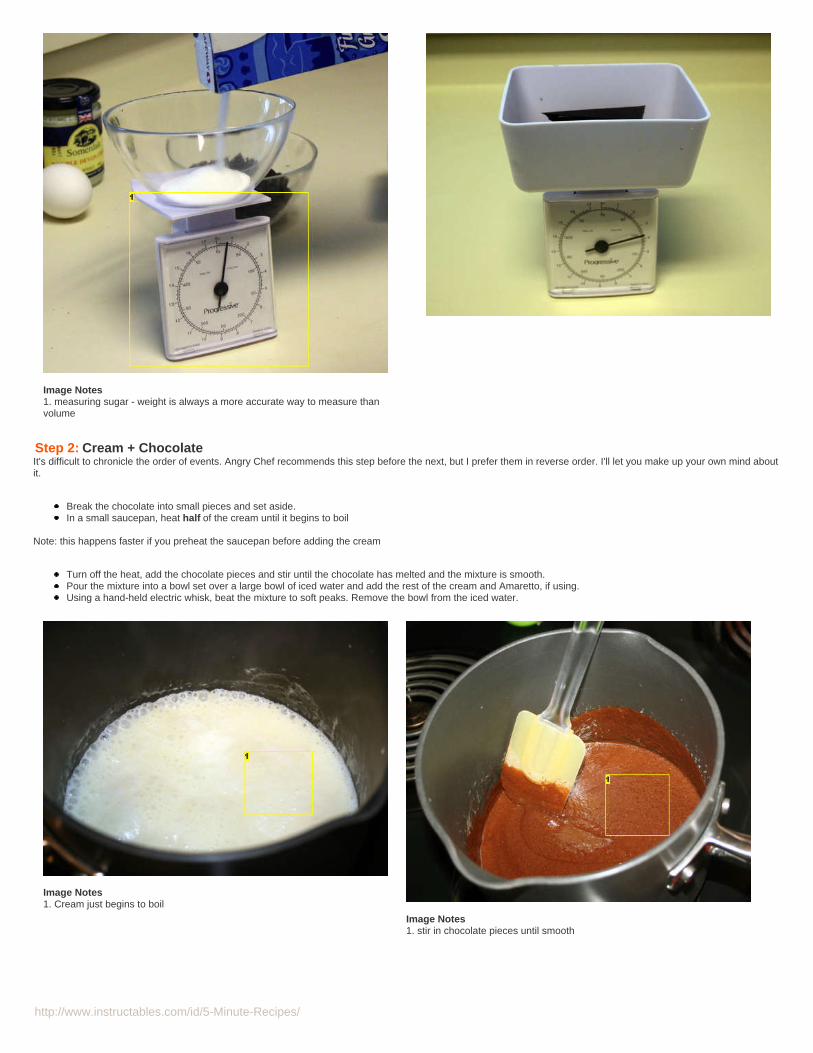
Image Notes1. measuring sugar - weight is always a more accurate way to measure thanvolume
Step 2: Cream + ChocolateIt's difficult to chronicle the order of events. Angry Chef recommends this step before the next, but I prefer them in reverse order. I'll let you make up your own mind aboutit.
Break the chocolate into small pieces and set aside.In a small saucepan, heat half of the cream until it begins to boil
Note: this happens faster if you preheat the saucepan before adding the cream
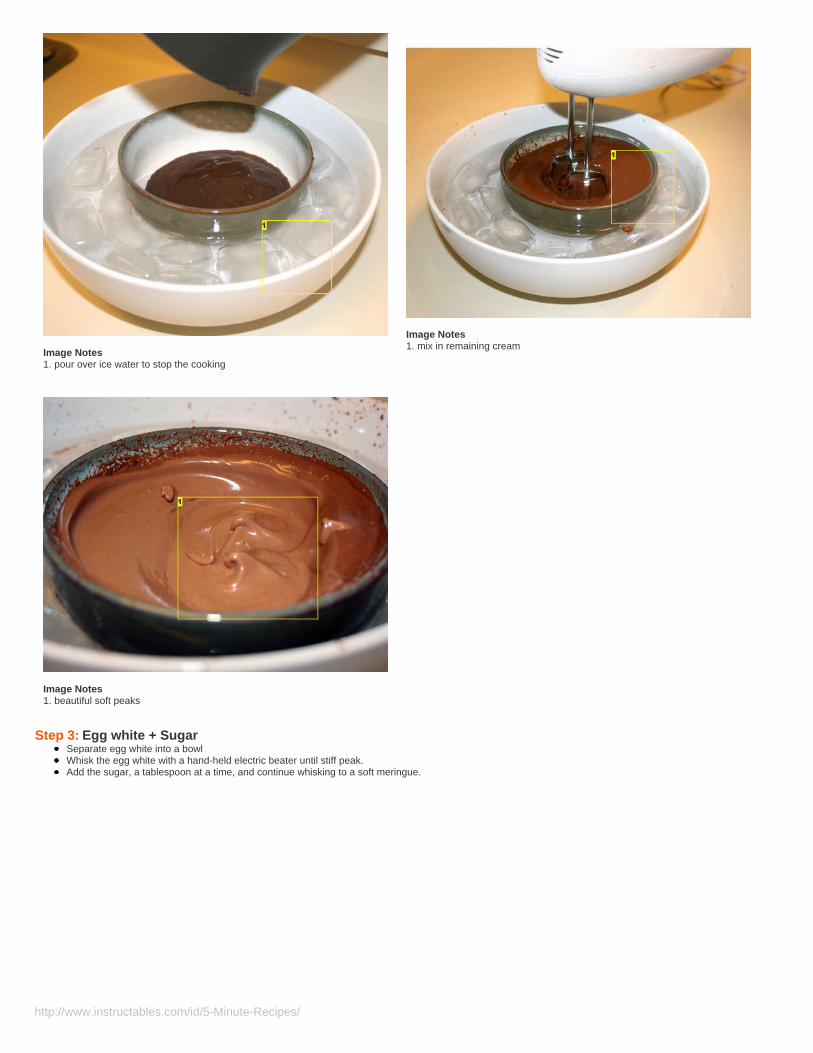
Turn off the heat, add the chocolate pieces and stir until the chocolate has melted and the mixture is smooth.Pour the mixture into a bowl set over a large bowl of iced water and add the rest of the cream and Amaretto, if using.Using a hand-held electric whisk, beat the mixture to soft peaks. Remove the bowl from the iced water.
Image Notes1. Cream just begins to boil
Image Notes1. stir in chocolate pieces until smooth
http://www.instructables.com/id/5-Minute-Recipes/
Image Notes1. pour over ice water to stop the cooking
Image Notes1. mix in remaining cream
Image Notes1. beautiful soft peaks
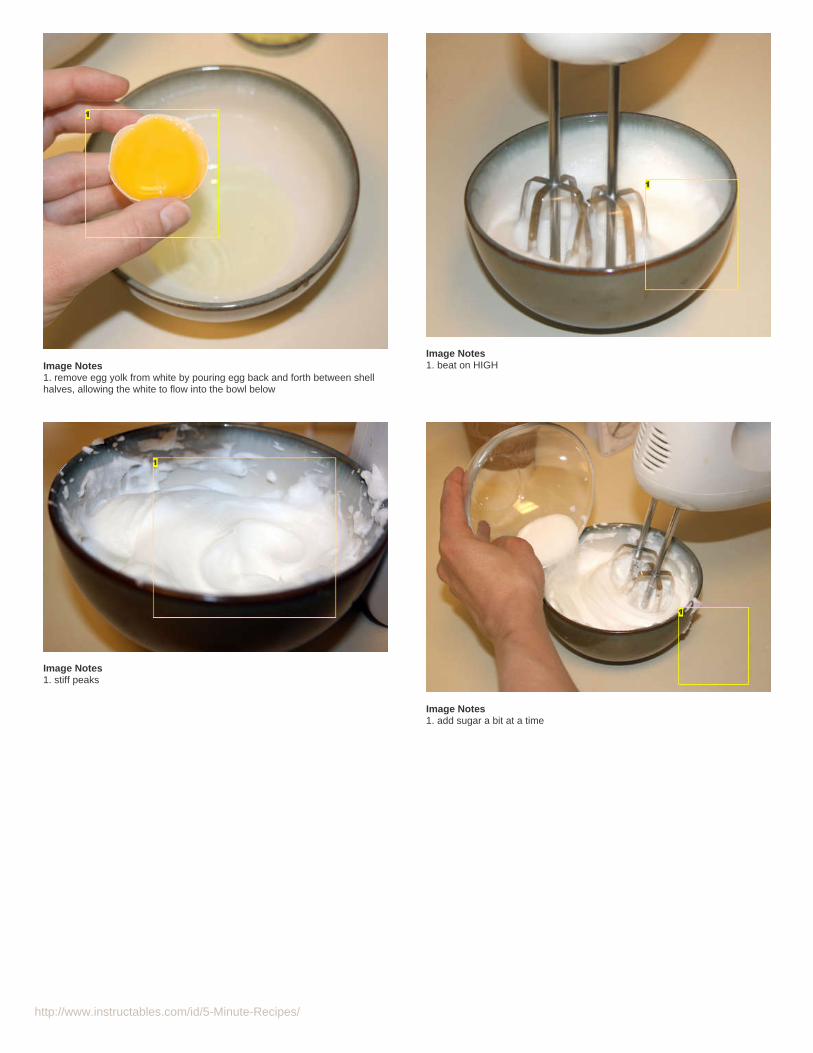
Step 3: Egg white + SugarSeparate egg white into a bowlWhisk the egg white with a hand-held electric beater until stiff peak.Add the sugar, a tablespoon at a time, and continue whisking to a soft meringue.
http://www.instructables.com/id/5-Minute-Recipes/
Image Notes1. remove egg yolk from white by pouring egg back and forth between shellhalves, allowing the white to flow into the bowl below
Image Notes1. beat on HIGH
Image Notes1. stiff peaks
Image Notes1. add sugar a bit at a time
http://www.instructables.com/id/5-Minute-Recipes/
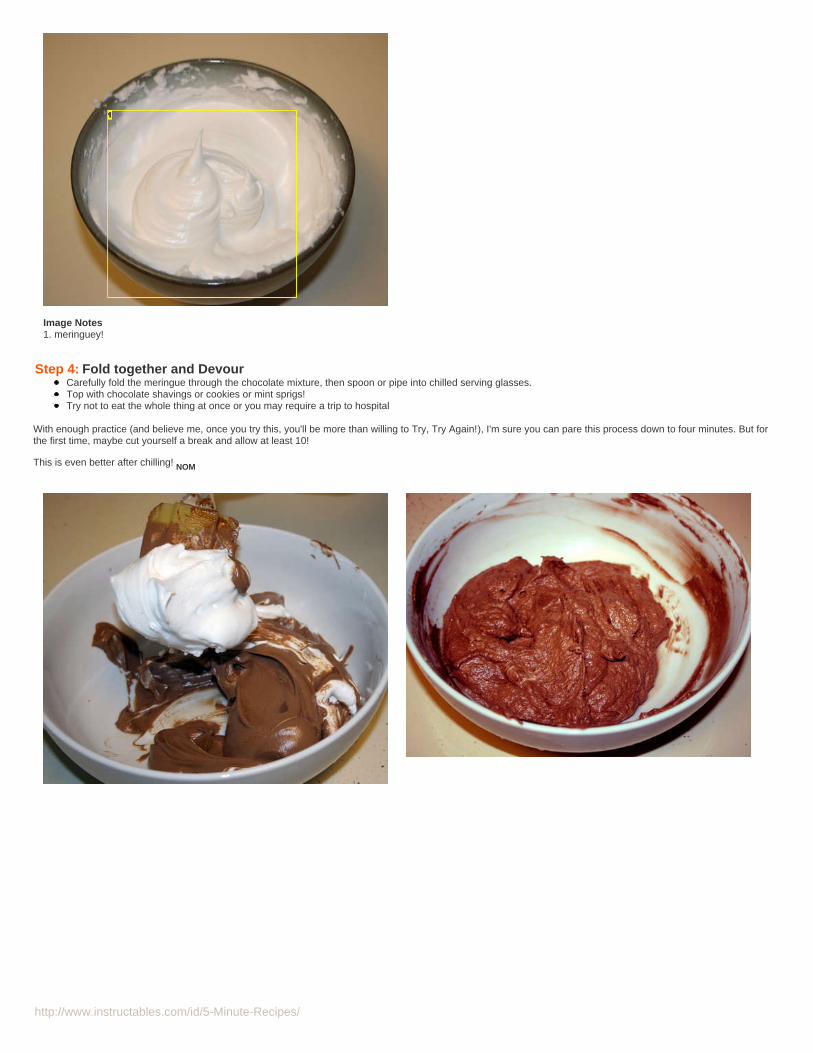
Image Notes1. meringuey!
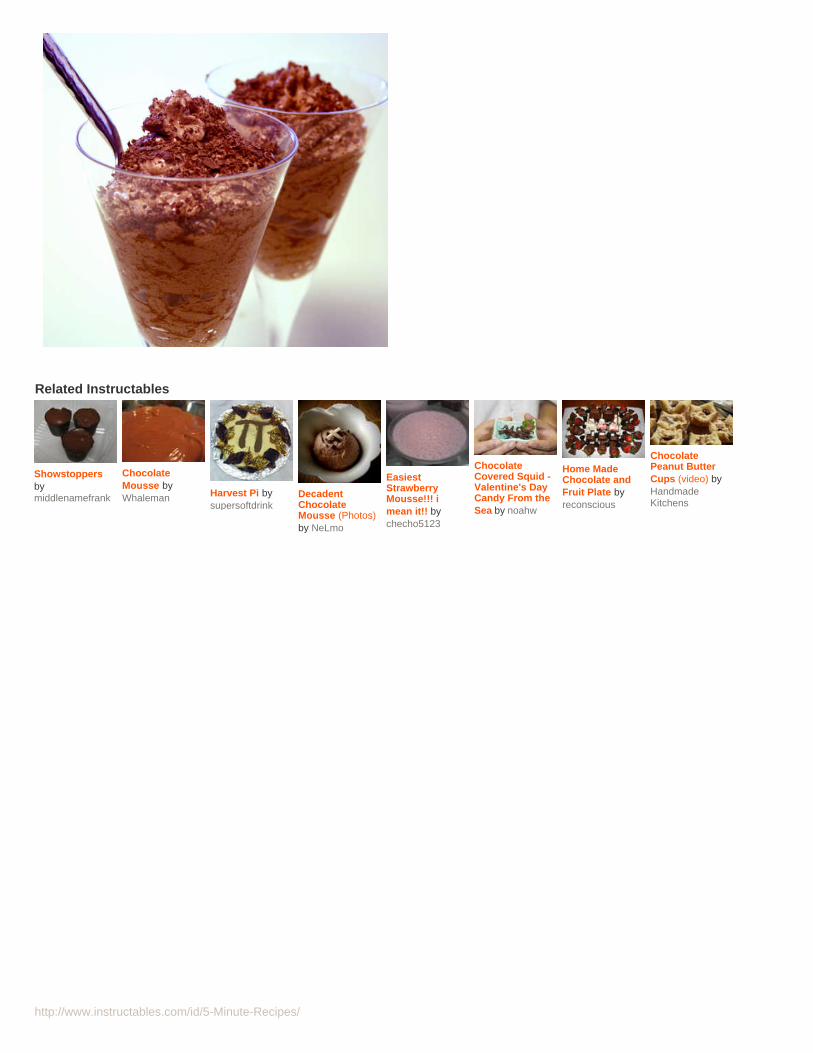
Step 4: Fold together and DevourCarefully fold the meringue through the chocolate mixture, then spoon or pipe into chilled serving glasses.Top with chocolate shavings or cookies or mint sprigs!Try not to eat the whole thing at once or you may require a trip to hospital
With enough practice (and believe me, once you try this, you'll be more than willing to Try, Try Again!), I'm sure you can pare this process down to four minutes. But forthe first time, maybe cut yourself a break and allow at least 10!
This is even better after chilling! NOM
http://www.instructables.com/id/5-Minute-Recipes/
Related Instructables
Showstoppersbymiddlenamefrank
ChocolateMousse byWhaleman Harvest Pi by
supersoftdrinkDecadentChocolateMousse (Photos)by NeLmo
EasiestStrawberryMousse!!! imean it!! bychecho5123
ChocolateCovered Squid -Valentine's DayCandy From theSea by noahw
Home MadeChocolate andFruit Plate byreconscious
ChocolatePeanut ButterCups (video) byHandmadeKitchens
http://www.instructables.com/id/5-Minute-Recipes/
5-minute Chocolate Ballsby scoochmaroo on May 20, 2009
Author:scoochmaroo My fan pageEditor of the Food and Living channels. If you like what you see, subscribe to me!
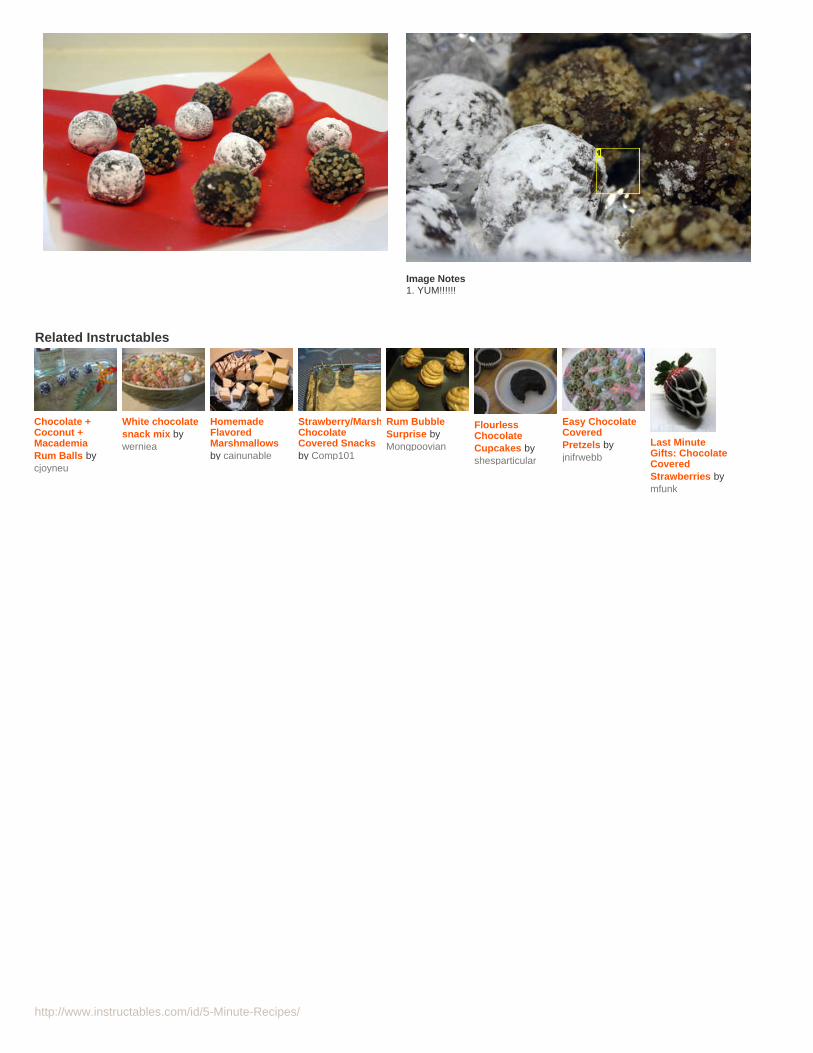
Intro: 5-minute Chocolate BallsQuick and delicious Rum Balls recipe (with or without rum!). These tasty treats whip up in no time, and are completely addictive. Whether you need a chocolate fix or aquick gift, these are sure to please.
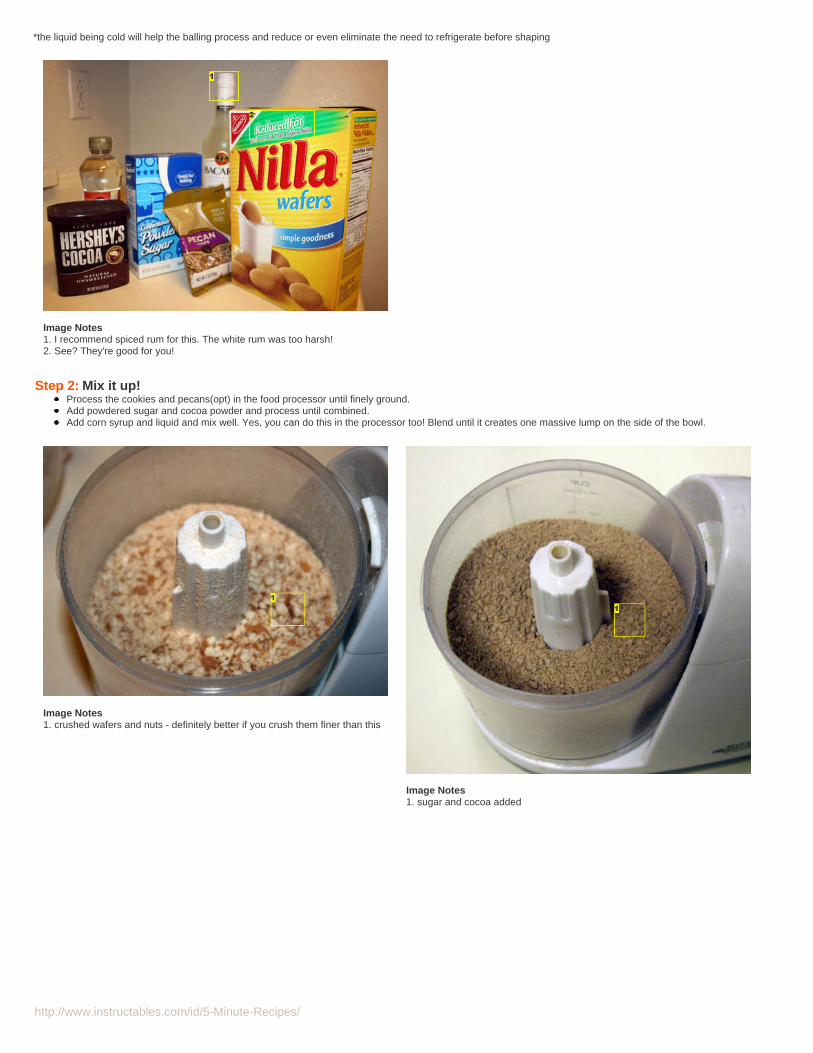
Step 1: IngredientsA food processor will help you cut through this recipe in a cool five minutes or less!
1 1/4 cups (120 grams) vanilla wafer cookies, shortbread, or graham crackers (about 35 Nilla brand wafers)1/2 cup (55 grams) powdered (confectioners) sugar2 tablespoons (12 grams) cocoa powder (Dutch processed or regular unsweetened cocoa powder)2 tablespoons light corn syrup1/4 cup (60 ml) COLD* liquid: juice; rum; water + rum extract (or your favorite); or whatever else you can imagine -- I did one batch with OJ and one with rum1 1/2 cups (140 grams) pecans (hazelnuts, walnuts, or almonds can be used - and toasting them beforehand makes them awesome! but will probably result inlonger than 5 minutes)1/2 cup (55 grams) topping - crushed nuts, powdered sugar, cocoa powder, flaked coconut, go crazy
Makes about 2 dozen decent-sized chocolate balls.
http://www.instructables.com/id/5-Minute-Recipes/
*the liquid being cold will help the balling process and reduce or even eliminate the need to refrigerate before shaping
Image Notes1. I recommend spiced rum for this. The white rum was too harsh!2. See? They're good for you!
Step 2: Mix it up!Process the cookies and pecans(opt) in the food processor until finely ground.Add powdered sugar and cocoa powder and process until combined.Add corn syrup and liquid and mix well. Yes, you can do this in the processor too! Blend until it creates one massive lump on the side of the bowl.
Image Notes1. crushed wafers and nuts - definitely better if you crush them finer than this
Image Notes1. sugar and cocoa added

http://www.instructables.com/id/5-Minute-Recipes/
Image Notes1. liquids added and processed until it forms one mass
Step 3: Form ballsGrease your hands (trust me on this one) and shape mixture into 1 inch (2.54 cm) balls.Roll the finished balls in the toppings of your choice. (I used powdered sugar and crushed nuts)
If the balls are too sticky for you to work with, you can stick 'em in the freezer for a couple minutes or in the fridge for a few hours. I'm guessing that would work. . . I'venever had the patience to find out!
Step 4: Try to Share!If you don't eat them all yourself in one sitting, try to remember to bring them in to share with your colleagues/peers the next day. These are perfect little gifts to give too.A sandwich baggie with a colorful ribbon even makes it look like you put a lot of thought into it!
http://www.instructables.com/id/5-Minute-Recipes/
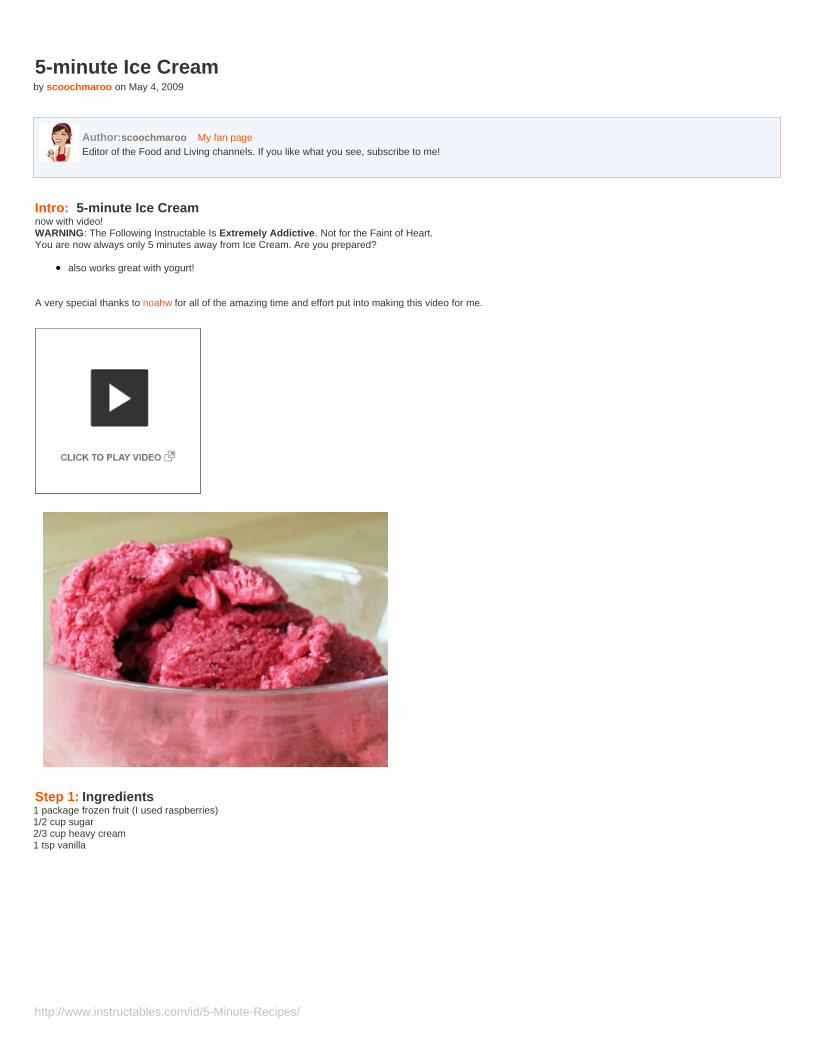
Image Notes1. YUM!!!!!!
Related Instructables
Chocolate +Coconut +MacademiaRum Balls bycjoyneu
White chocolatesnack mix bywerniea
HomemadeFlavoredMarshmallowsby cainunable
Strawberry/MarshmallowChocolateCovered Snacksby Comp101
Rum BubbleSurprise byMongpoovian
FlourlessChocolateCupcakes byshesparticular
Easy ChocolateCoveredPretzels byjnifrwebb
Last MinuteGifts: ChocolateCoveredStrawberries bymfunk
http://www.instructables.com/id/5-Minute-Recipes/
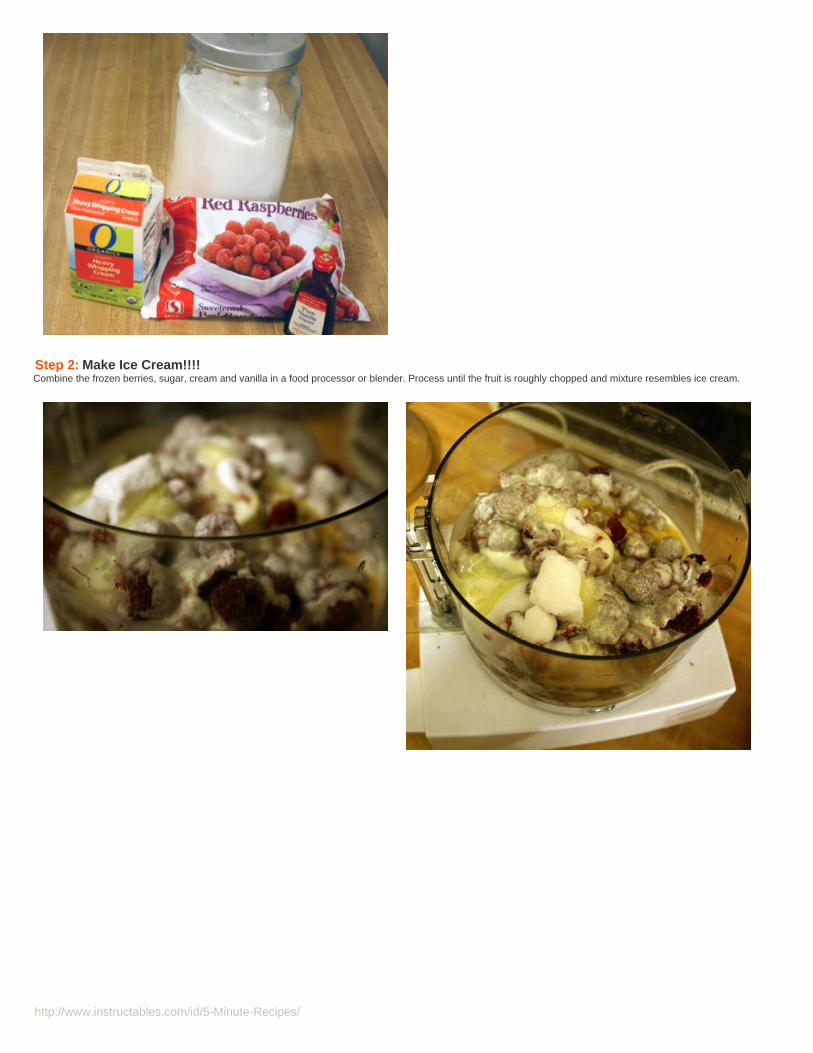
5-minute Ice Creamby scoochmaroo on May 4, 2009
Author:scoochmaroo My fan pageEditor of the Food and Living channels. If you like what you see, subscribe to me!
Intro: 5-minute Ice Creamnow with video!WARNING: The Following Instructable Is Extremely Addictive. Not for the Faint of Heart.You are now always only 5 minutes away from Ice Cream. Are you prepared?
also works great with yogurt!
A very special thanks to noahw for all of the amazing time and effort put into making this video for me.
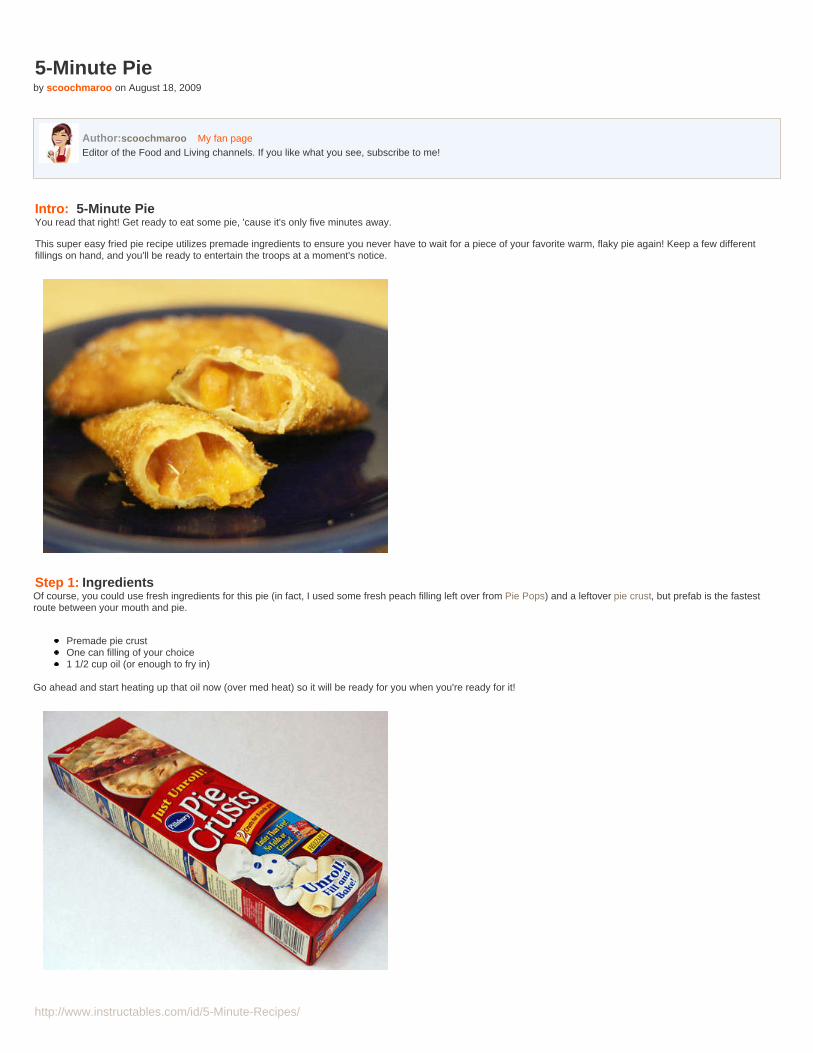
Step 1: Ingredients1 package frozen fruit (I used raspberries)1/2 cup sugar2/3 cup heavy cream1 tsp vanilla
http://www.instructables.com/id/5-Minute-Recipes/
Step 2: Make Ice Cream!!!!Combine the frozen berries, sugar, cream and vanilla in a food processor or blender. Process until the fruit is roughly chopped and mixture resembles ice cream.

http://www.instructables.com/id/5-Minute-Recipes/
Step 3: Eat!Your ice cream is ready to enjoy!Eat now if you can't wait, or freeze for firmer texture.
Should there be any leftovers (ha!), they can be frozen for up to a week.
I can't wait to try this with chocolate syrup incorporated!
Related Instructables
Yummy Bailey'sIrish Cream IceCream bystarsclds
Homemade icecream by syribia
Two IngredientIce Cream - No'Ice CreamMachine'Required bymommyknows1
PistachioPudding IceCream bydiscontinuuity
ChocolateTortilla IceCreamEnchilada bysansoy
FREE miniicecream in arestaurant bymaxstevenson
Mug Brownie bySpastic
Giant Ice CreamCookieSandwich bynoahw
http://www.instructables.com/id/5-Minute-Recipes/
5-Minute Pieby scoochmaroo on August 18, 2009
Author:scoochmaroo My fan pageEditor of the Food and Living channels. If you like what you see, subscribe to me!
Intro: 5-Minute PieYou read that right! Get ready to eat some pie, 'cause it's only five minutes away.
This super easy fried pie recipe utilizes premade ingredients to ensure you never have to wait for a piece of your favorite warm, flaky pie again! Keep a few differentfillings on hand, and you'll be ready to entertain the troops at a moment's notice.
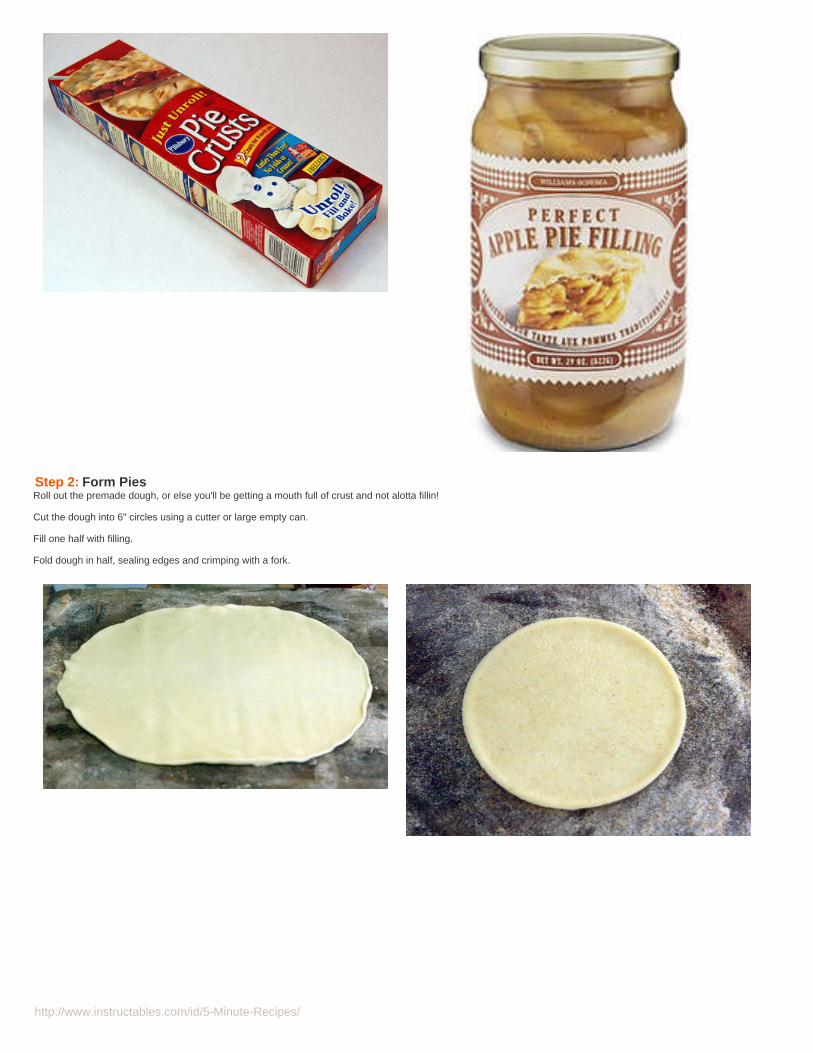
Step 1: IngredientsOf course, you could use fresh ingredients for this pie (in fact, I used some fresh peach filling left over from Pie Pops) and a leftover pie crust, but prefab is the fastestroute between your mouth and pie.
Premade pie crustOne can filling of your choice1 1/2 cup oil (or enough to fry in)
Go ahead and start heating up that oil now (over med heat) so it will be ready for you when you're ready for it!
http://www.instructables.com/id/5-Minute-Recipes/
Step 2: Form PiesRoll out the premade dough, or else you'll be getting a mouth full of crust and not alotta fillin!
Cut the dough into 6" circles using a cutter or large empty can.
Fill one half with filling.
Fold dough in half, sealing edges and crimping with a fork.

http://www.instructables.com/id/5-Minute-Recipes/
Step 3: Fry PiesCarefully lower the pies into the oil with forks or slotted spoon.
Fry for about 3 minutes total. If you're frying in a shallow pan, you'll need to flip the pies half way through. If you're deep frying (yeah baby!), then just let them float aboutuntil they're golden brown and delicious.
Drain hot pies on a rack over paper towels (or just paper towels if you don't have a rack) and sprinkle with sugar. Powdered sugar is yummy too, and cinnamon sugar ismy favorite!
These are good right away, and also store nicely wrapped in paper towels in the fridge. The instructables crew all thought they were just as good the second day!
Enjoy!
Related Instructables
Bacon and EggPie byjackthursby
Great-GreatAunt Bertha'sPecan PieRecipe bydiscontinuuity
MexicanDessert:Bunuelos byjamezcua08
The best applepie ever! byalexsparrow
Quick and EasyPie Chart Pi DayFruit Pizza Pieby AshleyShea
Rutabaga Pi bydomestic_engineer
Fried Pi Pies bystarshipminivan
Pretzel Pie byhedgiehog

http://www.instructables.com/id/5-Minute-Recipes/
1-ingredient Ice Creamby scoochmaroo on August 27, 2009
Author:scoochmaroo My fan pageEditor of the Food and Living channels. If you like what you see, subscribe to me!
Intro: 1-ingredient Ice CreamThis ice cream recipe is almost too good to be believed - so rich, creamy and luscious, you'd never know it's fat-free, dairy-free, and with no added sugar orpreservatives, is even good for you!
It only takes one ingredient to make this dreamy dessert - can you guess what it is?? (without looking at the next step)
You may argue that without dairy, this has no place being called "ice cream." But I challenge you to try this recipe, and tell me it doesn't taste EXACTLY like ice cream!Prepare to be amazed.
Thanks to everyone who pointed out the link to thekitchn's great post on this time-honored recipe!
Step 1: IngredientsDid you guess our secret ingredient?
BANANAS!
I find bananas that have turned brown work best for this. You may already peel and freeze your bananas for smoothies or breads or dipping in chocolate. Now you canuse them to make this luscious ice cream in no time at all!
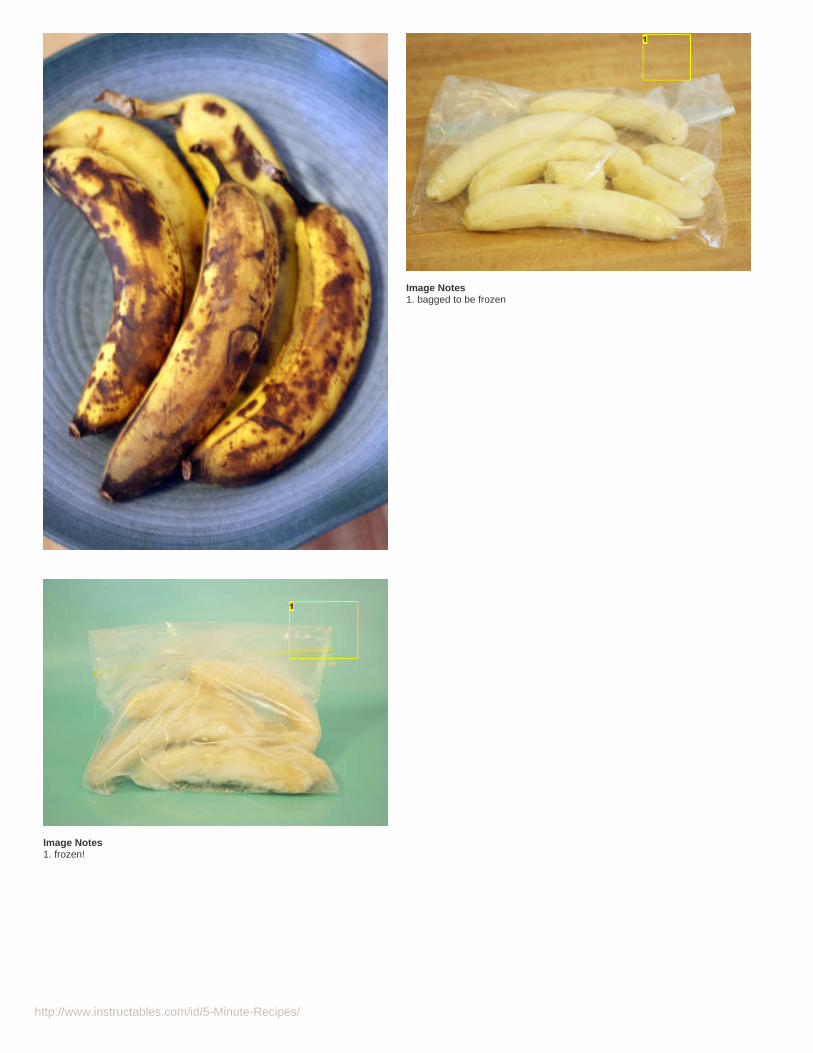
http://www.instructables.com/id/5-Minute-Recipes/
Image Notes1. bagged to be frozen
Image Notes1. frozen!

http://www.instructables.com/id/5-Minute-Recipes/
Step 2: Blend to PerfectionAt first, the bananas resist the blending.
Don't panic.
Chop them up a few at a time, adding more bit by bit. They'll reach that nice chunky stage that you can use in smoothies. But you're not done yet! Keep that blenderrunning for another 3-4 minutes, and watch in amazement as what you once saw as frozen bananas turn into a rich, creamy, silky blend.
AMAZED!!!
Step 3: Enjoy!For the first go-round, try this recipe as-is.
Thereafter, feel free to consider this a blank canvas for all of your ice cream dreams.
Try adding honey, chocolate syrup, maple syrup, peanut butter, flavored extracts, or additional frozen fruits! Go to town, and make sure you share your favorite remixes inthe comments!

http://www.instructables.com/id/5-Minute-Recipes/
Related Instructables
FrozenChocolateBananas byTheGeek1984
Super SimpleSmoothie bylittlechef37
WonderfulBanana Split IceCream Pie bysinisterduo
Raw VeganMango Pie bysusanrm
Run out of IceCream? Make aFrozenDelight!!! byFrenchCrawler
Classic bananasplit. byvoemaster
Yummy Bailey'sIrish Cream IceCream bystarsclds
Homemade"SuperPremium" (OldFashioned) IceCream byegbertfitzwilly

http://www.instructables.com/id/5-Minute-Recipes/
Nectarine smoothieby ewilhelm on August 5, 2005
Author:ewilhelm author's websiteEric J. Wilhelm is the founder and CEO of Instructables. He has a Ph.D. from MIT in Mechanical Engineering. Eric believes in making technology accessiblethrough understanding, and strives to inspire others to learn as much as they can and share it with those around them. Read about Instructables' history:http://www.instructables.com/id/How_to_Start_a_Business_1/ and meet the others on the Instructables team [http://www.instructables.com/about/ .
In addition to his doctorate, Eric earned his SB, and SM degrees in mechanical engineering from MIT, where he developed methods to print electronics andmicro-electromechanical systems using nanoparticles. He co-founded Squid Labs http://www.squid-labs.com, an innovation and design partnership, and anumber of Squid Labs spin-off companies including Potenco http://www.potenco.com, producing a human-powered generator for cell phones and laptops;Makani http://www.makanipower.com, an energy company seeking to harness high-altitude wind; and OptiOpia http://www.optiopia.com, developing low-costportable vision-testing and lens-fabricating devices.
Eric has been recognized as one of the top innovators under 35 years old by Technology Review:http://www.instructables.com/community/Eric_wins_TR35_Innovation_Award/, and was awarded the National Inventors Hall of Fame Collegiate InventorsAward for the development of a printing technique used to create patterns in films of nanoparticles or polymers with resolutions reaching into the 10's ofnanometers.
Contact him at his Instructables profile by clicking the "Private Message Me" button, or by guessing his email address @instructables.com (it's easy).
You can also follow his work here by clicking the "subscribe" button, or on Twitter http://twitter.com/ericwilhelm or Facebookhttp://www.facebook.com/ewilhelm
Intro: Nectarine smoothieNectarine smoothie
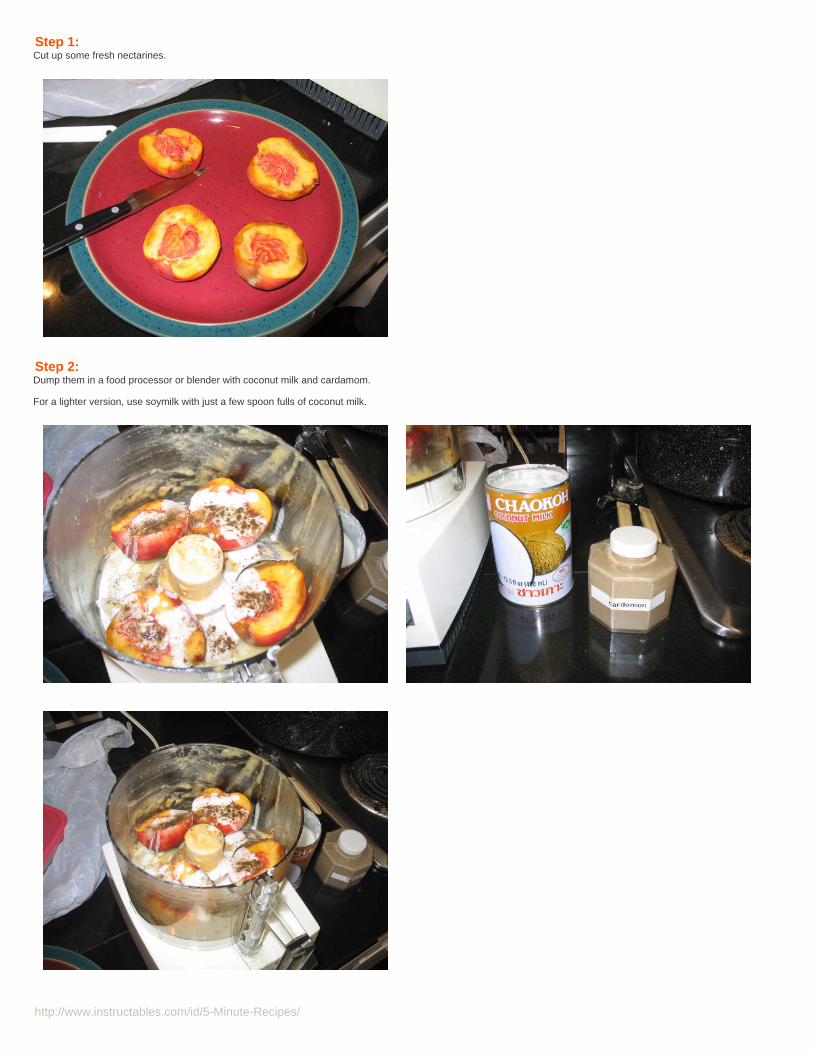
http://www.instructables.com/id/5-Minute-Recipes/
Step 1: Cut up some fresh nectarines.
Step 2: Dump them in a food processor or blender with coconut milk and cardamom.
For a lighter version, use soymilk with just a few spoon fulls of coconut milk.
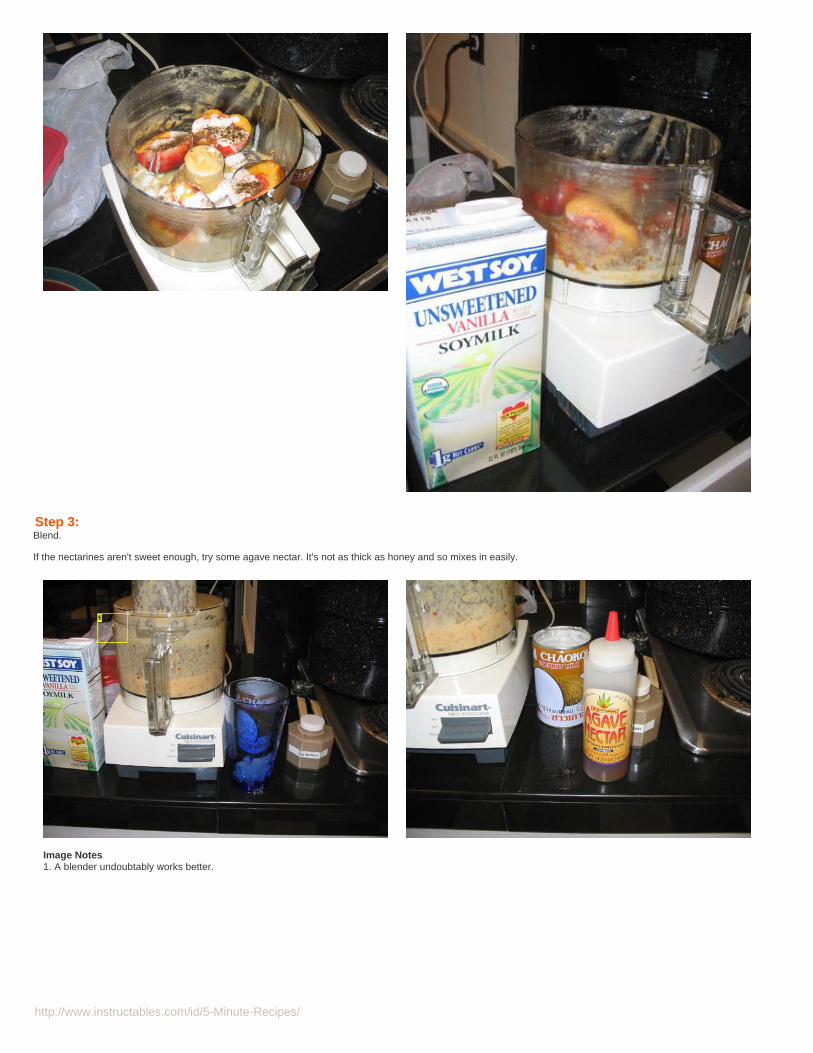
http://www.instructables.com/id/5-Minute-Recipes/
Step 3: Blend.
If the nectarines aren't sweet enough, try some agave nectar. It's not as thick as honey and so mixes in easily.
Image Notes1. A blender undoubtably works better.

http://www.instructables.com/id/5-Minute-Recipes/
Step 4: Pour into a glass full of ice and serve.
Related Instructables
Super SimpleSmoothie bylittlechef37
How to ThriveWithout Dairy byRobyntheslug
How to Make anAwesome ChocBerry Smoothieby BodenM
Frozen BananaSmoothie byTimAnderson
MangoSmoothie byTuxgirl
How to MakeHomemade SoyMilk by jen7714
Husk aCoconut; MakeCoconut Milk byTimAnderson
Shredded SweetPotatoPancakes withCoconut Milk(Photos) byewilhelm
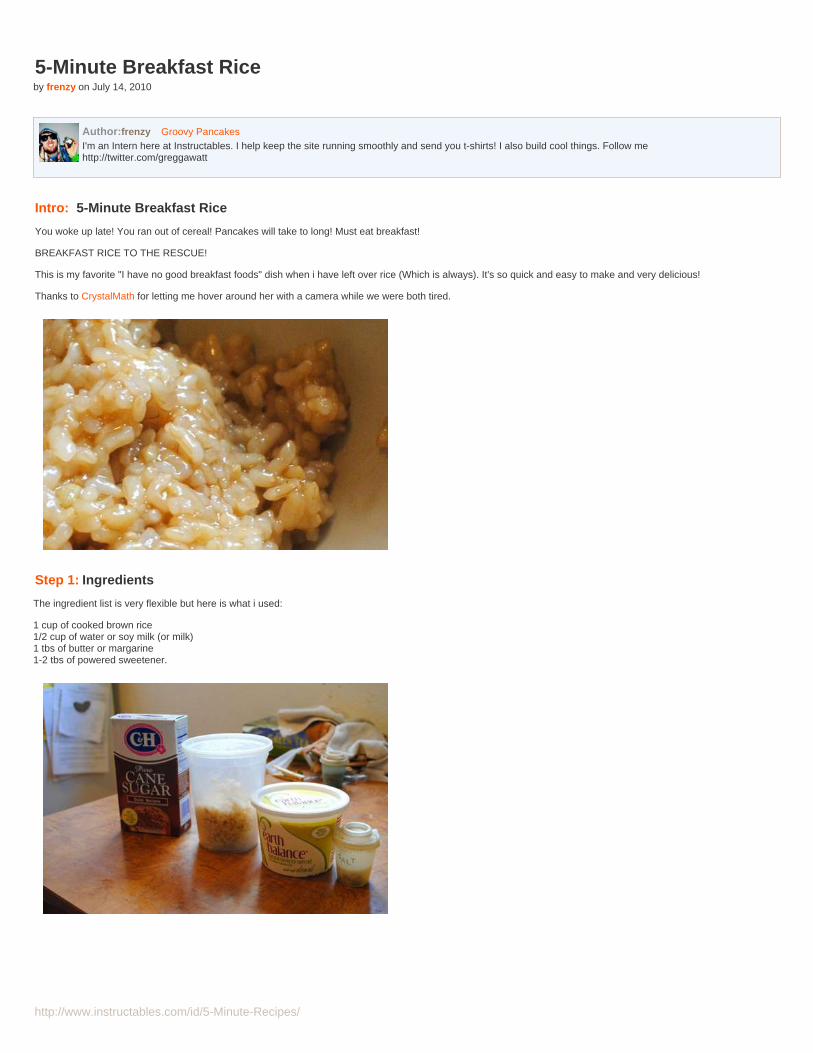
http://www.instructables.com/id/5-Minute-Recipes/
5-Minute Breakfast Riceby frenzy on July 14, 2010
Author:frenzy Groovy PancakesI'm an Intern here at Instructables. I help keep the site running smoothly and send you t-shirts! I also build cool things. Follow mehttp://twitter.com/greggawatt
Intro: 5-Minute Breakfast Rice
You woke up late! You ran out of cereal! Pancakes will take to long! Must eat breakfast!
BREAKFAST RICE TO THE RESCUE!
This is my favorite "I have no good breakfast foods" dish when i have left over rice (Which is always). It's so quick and easy to make and very delicious!
Thanks to CrystalMath for letting me hover around her with a camera while we were both tired.
Step 1: Ingredients
The ingredient list is very flexible but here is what i used:
1 cup of cooked brown rice1/2 cup of water or soy milk (or milk)1 tbs of butter or margarine1-2 tbs of powered sweetener.
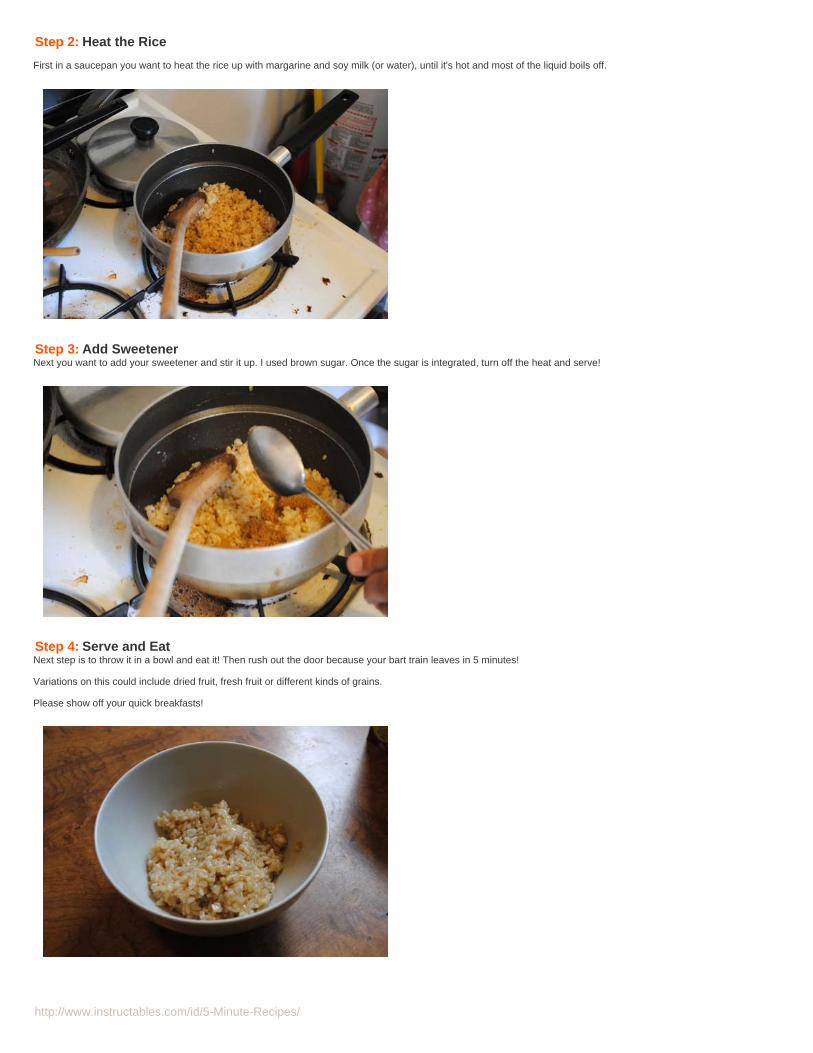
http://www.instructables.com/id/5-Minute-Recipes/
Step 2: Heat the Rice
First in a saucepan you want to heat the rice up with margarine and soy milk (or water), until it's hot and most of the liquid boils off.
Step 3: Add SweetenerNext you want to add your sweetener and stir it up. I used brown sugar. Once the sugar is integrated, turn off the heat and serve!
Step 4: Serve and EatNext step is to throw it in a bowl and eat it! Then rush out the door because your bart train leaves in 5 minutes!
Variations on this could include dried fruit, fresh fruit or different kinds of grains.
Please show off your quick breakfasts!

http://www.instructables.com/id/5-Minute-Recipes/
Related Instructables
How to makekheer (ricepudding) byjessyratfink
Breakfast madehealthy andquick (video) bystsalway
How to MakeSeafood FriedRice by jen7714
The Perfectlycooked 1 1/2" x6" PancakeCake by Harvey_
Perfect BasmatiRice byrupamagic
Flourless, Fat-free Rice Cakeby italiancooking Brown Puffed
Rice Treats (akaRice KrispiesTreats) by susie
EASYVEGETABLEFRIED RICE. byKMOM14

http://www.instructables.com/id/5-Minute-Recipes/
5 Minute Perfect Deli-style Egg Bagel Sandwich in Microwave - Yummyby hondaman900 on April 12, 2009
Intro: 5 Minute Perfect Deli-style Egg Bagel Sandwich in Microwave - YummyI love egg sandwiches, especially on bagels or croissants from the deli or coffee shop. They're the perfect amount of protein and carbs to jump start your day,especially with a really good cup of coffee.
You may be surprised to know that you can make one of these sandwiches really quickly at home with you microwave - no previous experience or culinary skillsrequired! No pans, spatulas, or big clean-up chores afterwards. And when rushing out the door to work, these are as quick as a bowl of instant oatmeal.
You probably have the ingredients in your kitchen already. If not, they're cheap and easy to include in your next trip to the store.
So let's get started....
Disclaimer: This sandwich is not associated with nor endorsed by Disney Corp. Any likeness to any Disney logos in any photographs in this Instructable is absolutely andpurely coincidental. You'll see what I mean....
Image Notes1. A good assistant is helpful, but not essential.2. You're favorite beverage
Image Notes1. The final product - delicious!
Step 1: IngredientsYou will need the following ingredients:
- 1-2 Fresh Eggs- Fresh Bagel- Some Cheese (best grated, but not essential)- Knob of Butter- Slice of Cooked Ham- Milk (optional)- Salt, Pepper, other seasoning to taste
You will need the following Tools:
- A microwave-safe cup- Fork

http://www.instructables.com/id/5-Minute-Recipes/
- Paper towel- Small plate
Image Notes1. Cup2. Butter3. Cheese (grated shown)4. Eggs (from our hens, hence the different sizes)5. Fork6. Sliced Cooked Ham7. Fresh Bagel
Step 2: The Secret Butter StepThis step makes all the difference to a successful outcome.
Put a small knob of butter in the cup (about the size of your thumb) and microwave it for 20 seconds. This will melt the butter without scorching it. Swirl the meltedbutter around the bottom of the cup to coat the inside of the cup. Apart from the flavor butter gives your eggs, this step reduces the microwaved eggs' tendency to stickto your cup and make things difficult.
Be careful to not spill/splash any hot butter as it could burn you.
Image Notes1. Small knob of butter
Image Notes1. Swirl melted butter around inside of cup
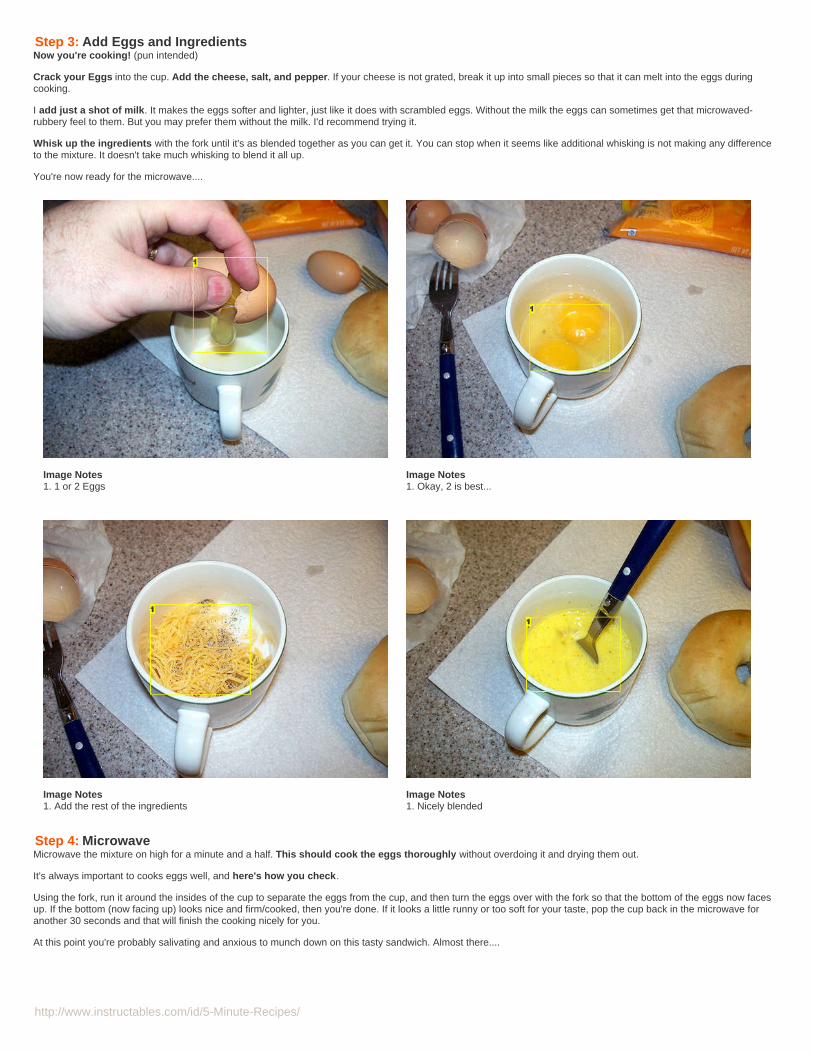
http://www.instructables.com/id/5-Minute-Recipes/
Step 3: Add Eggs and IngredientsNow you're cooking! (pun intended)
Crack your Eggs into the cup. Add the cheese, salt, and pepper. If your cheese is not grated, break it up into small pieces so that it can melt into the eggs duringcooking.
I add just a shot of milk. It makes the eggs softer and lighter, just like it does with scrambled eggs. Without the milk the eggs can sometimes get that microwaved-rubbery feel to them. But you may prefer them without the milk. I'd recommend trying it.
Whisk up the ingredients with the fork until it's as blended together as you can get it. You can stop when it seems like additional whisking is not making any differenceto the mixture. It doesn't take much whisking to blend it all up.
You're now ready for the microwave....
Image Notes1. 1 or 2 Eggs
Image Notes1. Okay, 2 is best...
Image Notes1. Add the rest of the ingredients
Image Notes1. Nicely blended
Step 4: MicrowaveMicrowave the mixture on high for a minute and a half. This should cook the eggs thoroughly without overdoing it and drying them out.
It's always important to cooks eggs well, and here's how you check.
Using the fork, run it around the insides of the cup to separate the eggs from the cup, and then turn the eggs over with the fork so that the bottom of the eggs now facesup. If the bottom (now facing up) looks nice and firm/cooked, then you're done. If it looks a little runny or too soft for your taste, pop the cup back in the microwave foranother 30 seconds and that will finish the cooking nicely for you.
At this point you're probably salivating and anxious to munch down on this tasty sandwich. Almost there....

http://www.instructables.com/id/5-Minute-Recipes/
Image Notes1. As it comes out of the microwave
Image Notes1. Underside of the eggs (turned over)
Step 5: Final Assembly - Enjoy!Remove the cooked egg from the cup, and place it on your bagel or sliced ham, replace the other half of the bagel, and you're done. Grab your coffee, sit down in yourfavorite breakfast spot (for me it's the driver's seat on my long commute) and enjoy this tasty treat.
Here are some options to consider:
- Ham can be torn up into pieces and cooked into the eggs along with the other ingredients. It gives a different taste, but adds time to the prep work.- The cheese can be added as a slice in the sandwich. A 10 to 20-second blast of the microwave will melt the cheese nicely over the egg/ham. A small change fora remarkably different taste/texture.- Try a croissant, Hawaiian bun, or other bread. You can also toast the bagel - I like this option, but it adds to the prep time.- Lettuce, celery or sliced apples also add excellent taste variations.
Also, these sandwiches can be prepared the night before and kept in the fridge overnight (be sure to wrap it so that it doesn't dry out). A quick microwave blast to heatto taste, either at home or in the office, still renders a delicious breakfast.
Hope you enjoyed this Instructable and, more importantly, your sandwich. Please be sure to rate this :)
Image Notes1. The final product - delicious!

http://www.instructables.com/id/5-Minute-Recipes/
Related Instructables
SimpleMicrowave eggsandwich byEggHead101
SandwichColonial byTheOneGreatX
Bagel Sandwichby kcls
Breakfastexperiments:Rocky Mountaintoast by TheIdeanator
The MidnightMunchieSandwich! bycad97
A Summer of[CollegiateMeals] by joshf
Egg Muffin byPetervG
Chicken CordonBleu byscoochmaroo

http://www.instructables.com/id/5-Minute-Recipes/
Two Minute Microwave Eggby iectyx3c on October 26, 2008
Intro: Two Minute Microwave EggCook a perfect microwave egg in 2 minutes without special gear - unless you consider a paper coffee cup and a fork special, that is. Never fails, always moist anddelicious. Why compromise?
Years of experimentation from college dorm living, to bachelor pad, to road-warrior have perfected this egg-tech.
Spray or butter a paper coffee cup, slap in an egg and some water, microwave 1 minute at 30 percent power, inspect and nuke it again.
Serve with your choice of condiments, salt, pepper, spices, hot sauce, jam, ketchup.
Step 1: Butter CupA cardboard coffee cup is your best bet.
Do not use a ceramic mug or cup.
And avoid using a wax paper cold cup or a styrofoam coffee cup.
Lightly coat the cup with cooking spray, or wipe the inside of the cup with olive oil, salad oil, butter or margarine on a paper towel.
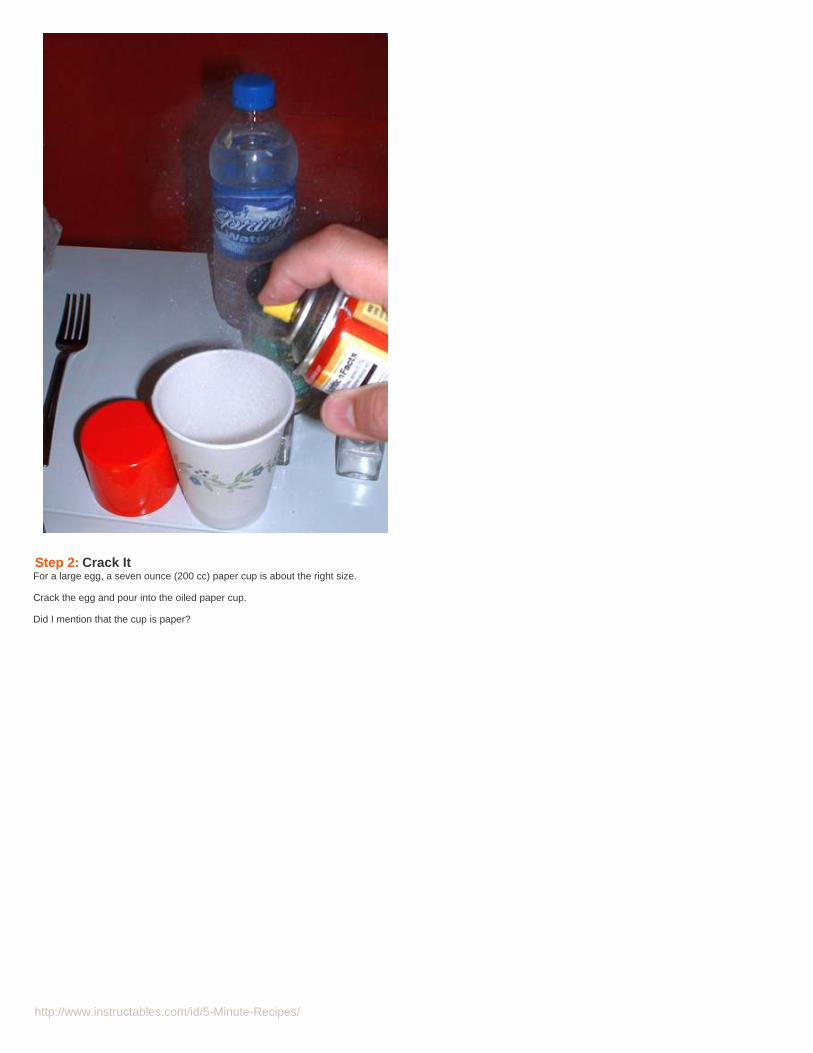
http://www.instructables.com/id/5-Minute-Recipes/
Step 2: Crack ItFor a large egg, a seven ounce (200 cc) paper cup is about the right size.
Crack the egg and pour into the oiled paper cup.
Did I mention that the cup is paper?

http://www.instructables.com/id/5-Minute-Recipes/
Step 3: H2eggYah, I know yer mom always added a little milk.
But wait until you try your egg with a splash of water.
A trick I learned from a pro chef.
Milk makes eggs a bit rubbery.
Water makes them fluffy.
Start with about a teaspoon (5 cc).
You do not need bottled water -- the bottle is just to make the photo more clear.

http://www.instructables.com/id/5-Minute-Recipes/
Step 4: Stir ItGently stir the egg and water together with a fork, spoon, or chopsticks.
Your goal is to break the yolk, and stir it and the water into the white.
But you want to feel a little springy body in the mixture.
Do not whip into a foam.
At this point you can add optional ingredients like a little grated cheese, chopped peppers, onions.
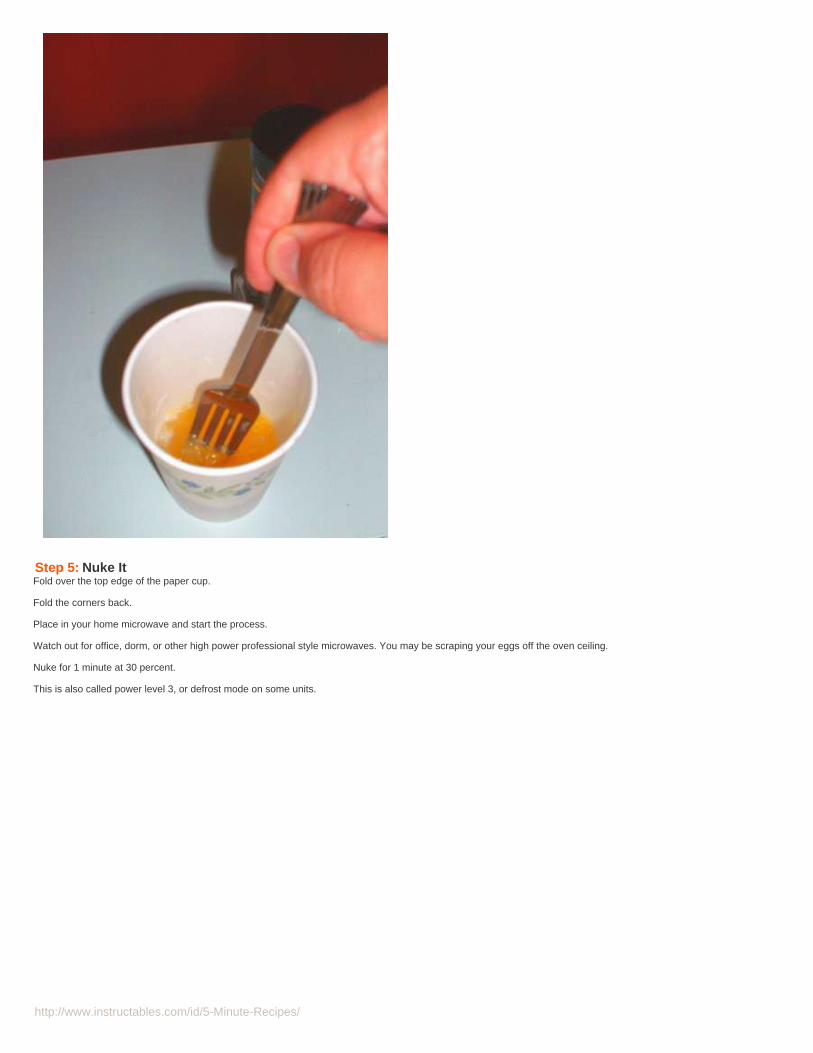
http://www.instructables.com/id/5-Minute-Recipes/
Step 5: Nuke ItFold over the top edge of the paper cup.
Fold the corners back.
Place in your home microwave and start the process.
Watch out for office, dorm, or other high power professional style microwaves. You may be scraping your eggs off the oven ceiling.
Nuke for 1 minute at 30 percent.
This is also called power level 3, or defrost mode on some units.
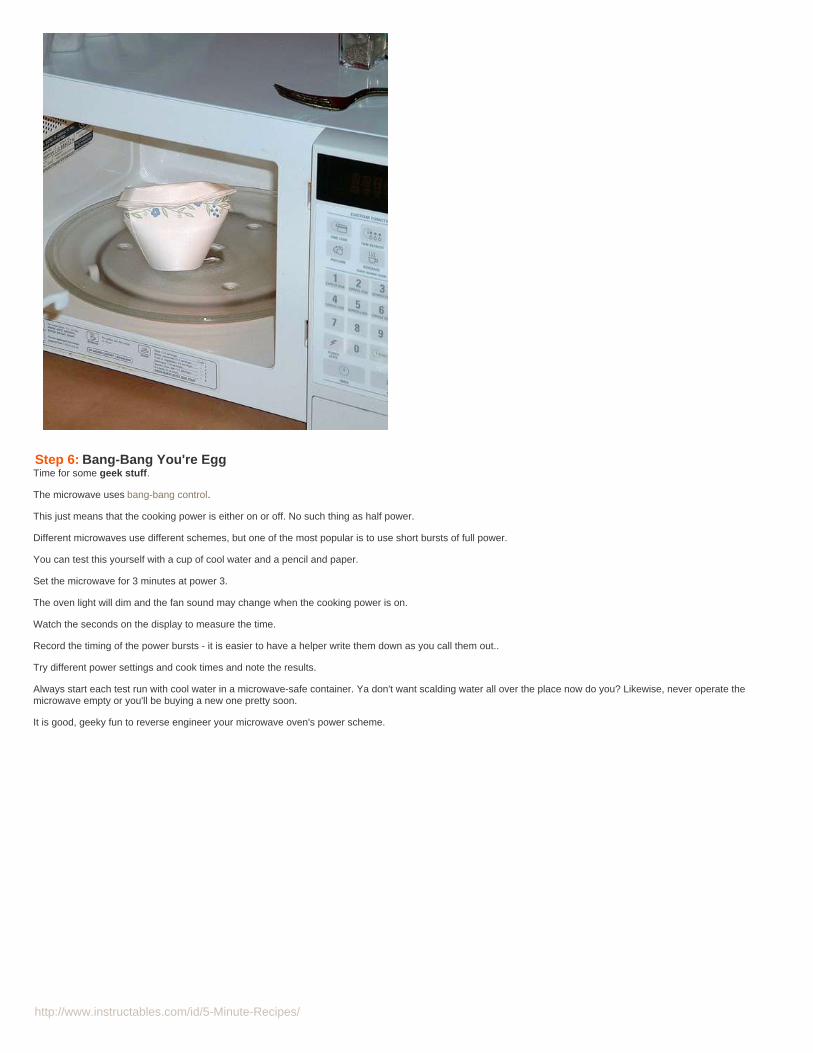
http://www.instructables.com/id/5-Minute-Recipes/
Step 6: Bang-Bang You're EggTime for some geek stuff.
The microwave uses bang-bang control.
This just means that the cooking power is either on or off. No such thing as half power.
Different microwaves use different schemes, but one of the most popular is to use short bursts of full power.
You can test this yourself with a cup of cool water and a pencil and paper.
Set the microwave for 3 minutes at power 3.
The oven light will dim and the fan sound may change when the cooking power is on.
Watch the seconds on the display to measure the time.
Record the timing of the power bursts - it is easier to have a helper write them down as you call them out..
Try different power settings and cook times and note the results.
Always start each test run with cool water in a microwave-safe container. Ya don't want scalding water all over the place now do you? Likewise, never operate themicrowave empty or you'll be buying a new one pretty soon.
It is good, geeky fun to reverse engineer your microwave oven's power scheme.

http://www.instructables.com/id/5-Minute-Recipes/
Step 7: Shake N WaitSo back to cooking the egg -- after the first heating wait ten seconds or so.
Open the door.
Do not open the cup.
Pinch the folded edge shut and swirl the cup to distribute the heat.
It should feel like half liquid with some cooked eggs floating in the center.
Repeat the 1 minute at power 3 cooking process.
Wait a few seconds after -- the egg is still cooking even after the power is off.
Now open the cup, and peer anxiously over the edge.
If it is still too liquid for your taste, close the cup, swirl it and heat it for 15 to 20 seconds on high.
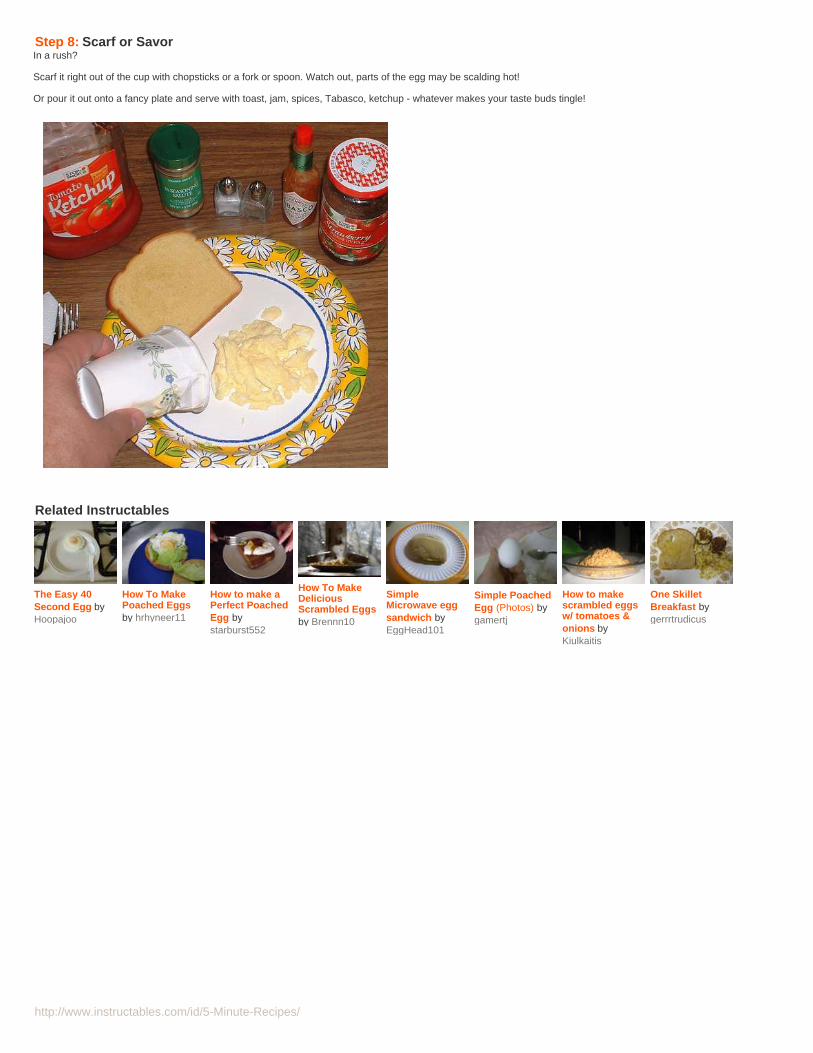
http://www.instructables.com/id/5-Minute-Recipes/
Step 8: Scarf or SavorIn a rush?
Scarf it right out of the cup with chopsticks or a fork or spoon. Watch out, parts of the egg may be scalding hot!
Or pour it out onto a fancy plate and serve with toast, jam, spices, Tabasco, ketchup - whatever makes your taste buds tingle!
Related Instructables
The Easy 40Second Egg byHoopajoo
How To MakePoached Eggsby hrhyneer11
How to make aPerfect PoachedEgg bystarburst552
How To MakeDeliciousScrambled Eggsby Brennn10
SimpleMicrowave eggsandwich byEggHead101
Simple PoachedEgg (Photos) bygamertj
How to makescrambled eggsw/ tomatoes &onions byKiulkaitis
One SkilletBreakfast bygerrrtrudicus

http://www.instructables.com/id/5-Minute-Recipes/
Bruschetta Recipeby noahw on November 12, 2009
Intro: Bruschetta RecipeBruschetta is a fresh, simple and delicious Italian appetizer that can be prepared in minutes and enjoyed any time of the year.
In its simplest Italian form, bruschetta requires that bread be toasted over real coals, then rubbed down with slices of raw garlic, drizzled with olive oil and finished with alittle bit of sea salt and fresh pepper.
Variations evolved to further incorporate things like chopped tomatoes, beans and fresh herbs. This Instructable recreates the standard Italian tomato bruschetta thatyou'd often be served in an Italian restaurant at the start of a meal, quickly and easily in your own kitchen.
If you've got 15 minutes and are looking for a delicious appetizer to start off your favorite Italian meal, then this bruschetta recipe Instructable is the answer for you.
Step 1: IngredientsBruschetta is made up of very simple flavors, and is therefore best if you make it with highest quality and freshest ingredients you can find.
2 lbs. fresh tomatoes (roma, heirloom, beefsteak...whatever is in season is best)1/2 fresh onion4 cloves fresh garlic1 bunch fresh basil4 tablespoons extra virgin olive oilsea salt and fresh ground pepperItalian bread or baguette
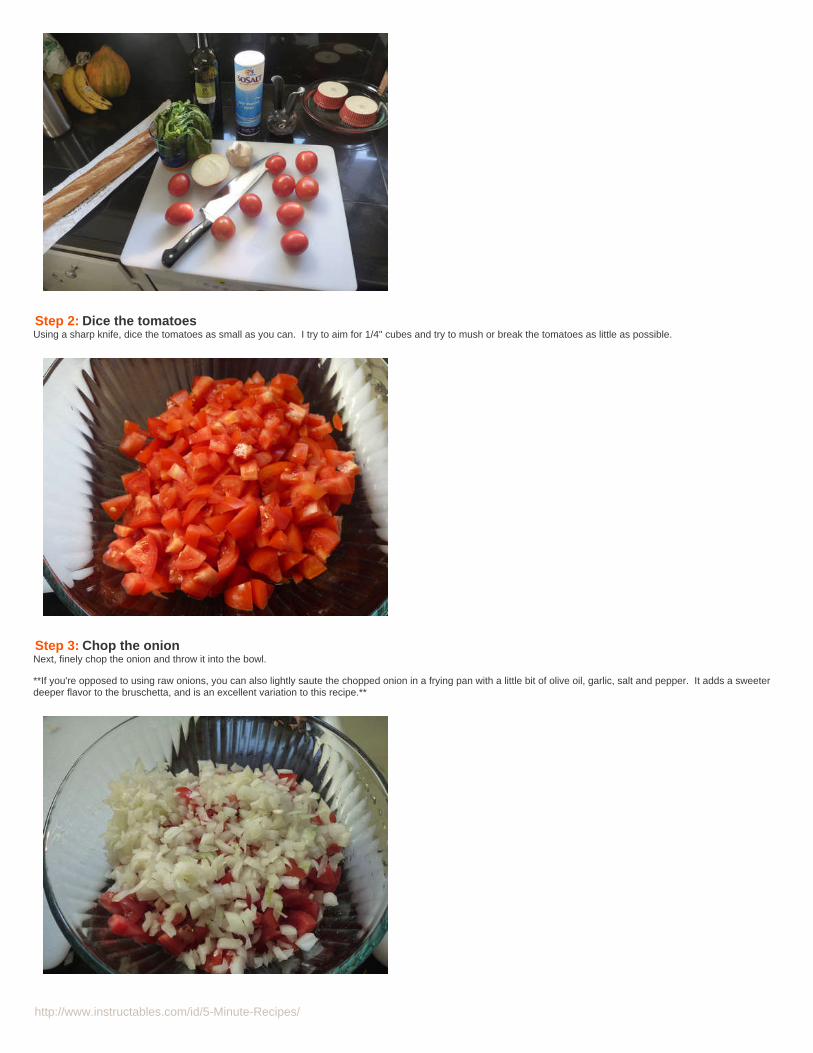
http://www.instructables.com/id/5-Minute-Recipes/
Step 2: Dice the tomatoesUsing a sharp knife, dice the tomatoes as small as you can. I try to aim for 1/4" cubes and try to mush or break the tomatoes as little as possible.
Step 3: Chop the onionNext, finely chop the onion and throw it into the bowl.
**If you're opposed to using raw onions, you can also lightly saute the chopped onion in a frying pan with a little bit of olive oil, garlic, salt and pepper. It adds a sweeterdeeper flavor to the bruschetta, and is an excellent variation to this recipe.**
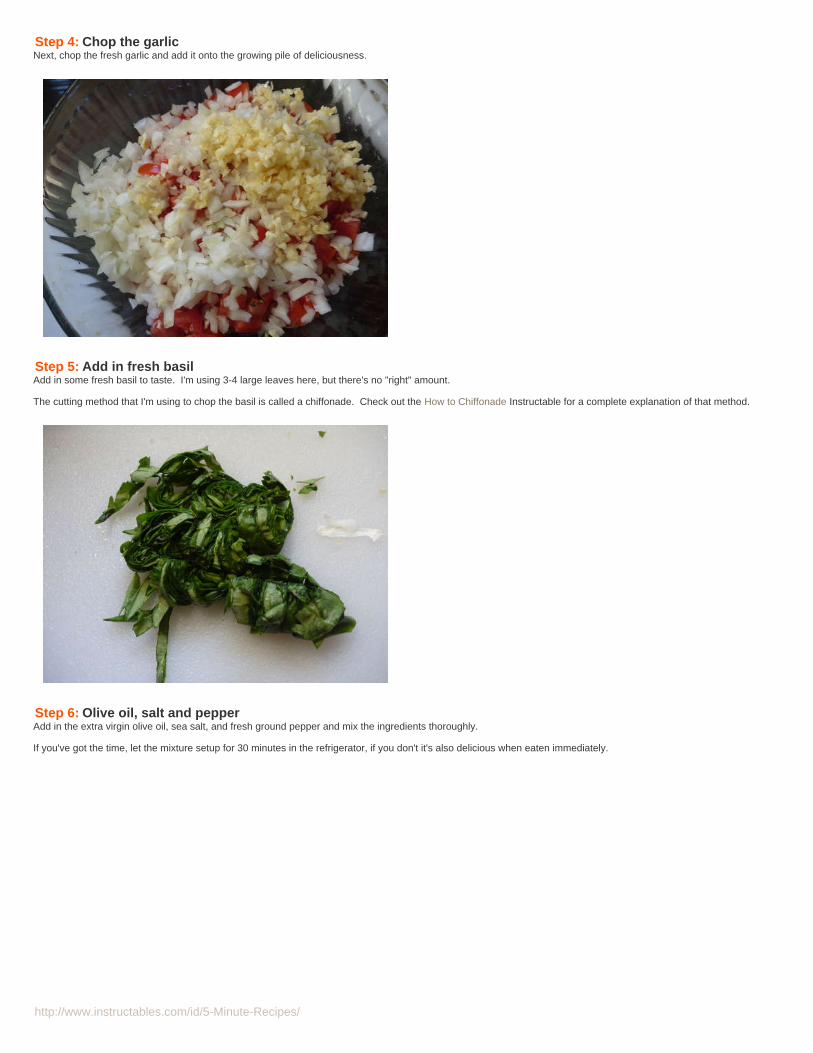
http://www.instructables.com/id/5-Minute-Recipes/
Step 4: Chop the garlicNext, chop the fresh garlic and add it onto the growing pile of deliciousness.
Step 5: Add in fresh basilAdd in some fresh basil to taste. I'm using 3-4 large leaves here, but there's no "right" amount.
The cutting method that I'm using to chop the basil is called a chiffonade. Check out the How to Chiffonade Instructable for a complete explanation of that method.
Step 6: Olive oil, salt and pepperAdd in the extra virgin olive oil, sea salt, and fresh ground pepper and mix the ingredients thoroughly.
If you've got the time, let the mixture setup for 30 minutes in the refrigerator, if you don't it's also delicious when eaten immediately.
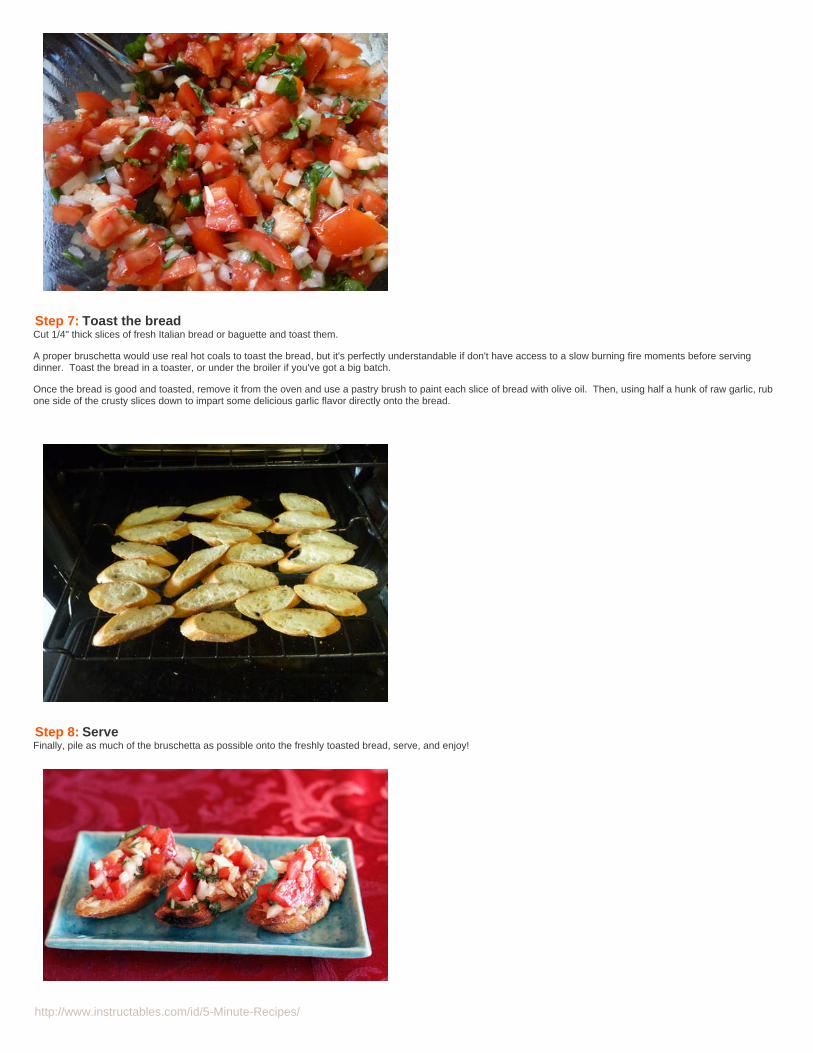
http://www.instructables.com/id/5-Minute-Recipes/
Step 7: Toast the breadCut 1/4" thick slices of fresh Italian bread or baguette and toast them.
A proper bruschetta would use real hot coals to toast the bread, but it's perfectly understandable if don't have access to a slow burning fire moments before servingdinner. Toast the bread in a toaster, or under the broiler if you've got a big batch.
Once the bread is good and toasted, remove it from the oven and use a pastry brush to paint each slice of bread with olive oil. Then, using half a hunk of raw garlic, rubone side of the crusty slices down to impart some delicious garlic flavor directly onto the bread.
Step 8: ServeFinally, pile as much of the bruschetta as possible onto the freshly toasted bread, serve, and enjoy!

http://www.instructables.com/id/5-Minute-Recipes/
Related Instructables
Easy Bruschettaby iwitmateo
Tomato Jewels(video) byHandmadeKitchens
Market to Tableby Ceryniti
How to make anice ItalianDinner byscienceboy63
Asian-StyleTomato Soupwith RiceNoodles byjen7714
RoastedEggplant withGarlic by canida
An in depthguide tohomemadeItalian(American)tomato sauce(for pastas,spaghetti,lasagna, etc.) bykarossii
HalloweenMeatball FruitBats by skyisblu
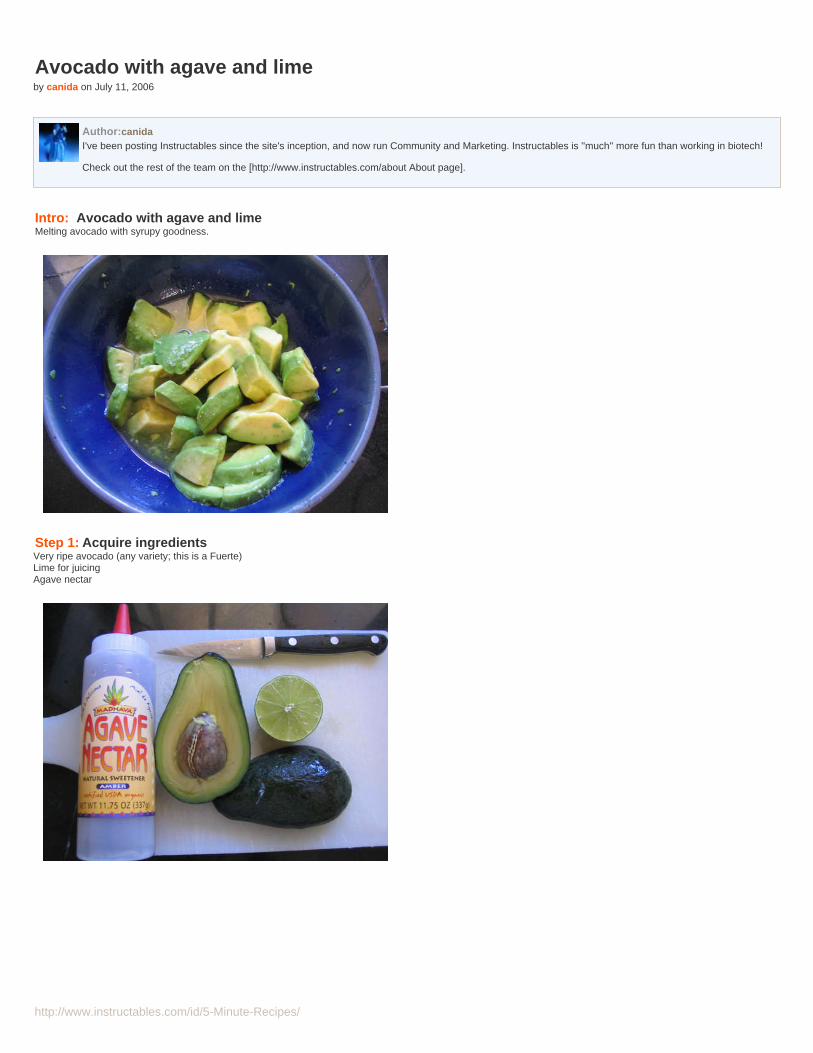
http://www.instructables.com/id/5-Minute-Recipes/
Avocado with agave and limeby canida on July 11, 2006
Author:canidaI've been posting Instructables since the site's inception, and now run Community and Marketing. Instructables is ''much'' more fun than working in biotech!
Check out the rest of the team on the [http://www.instructables.com/about About page].
Intro: Avocado with agave and limeMelting avocado with syrupy goodness.
Step 1: Acquire ingredientsVery ripe avocado (any variety; this is a Fuerte)Lime for juicingAgave nectar
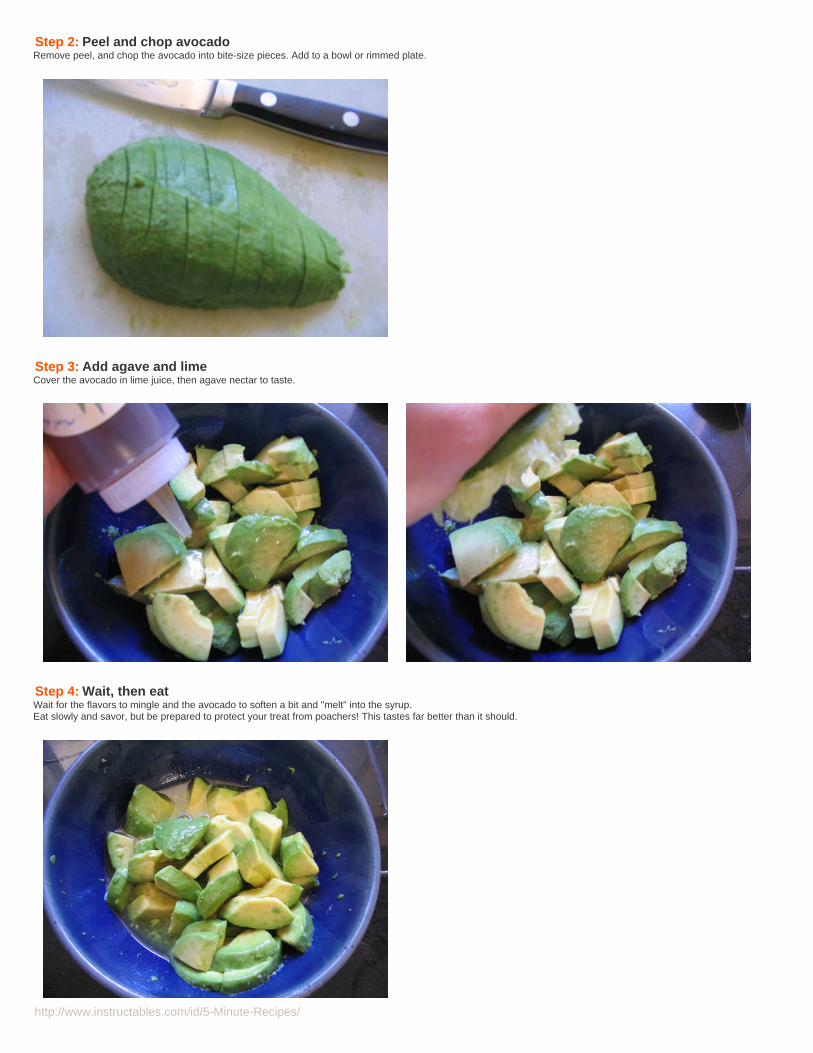
http://www.instructables.com/id/5-Minute-Recipes/
Step 2: Peel and chop avocadoRemove peel, and chop the avocado into bite-size pieces. Add to a bowl or rimmed plate.
Step 3: Add agave and limeCover the avocado in lime juice, then agave nectar to taste.
Step 4: Wait, then eatWait for the flavors to mingle and the avocado to soften a bit and "melt" into the syrup.Eat slowly and savor, but be prepared to protect your treat from poachers! This tastes far better than it should.

http://www.instructables.com/id/5-Minute-Recipes/
Step 5: VariationIf you've got good peaches or nectarines, chop them into bite-sized pieces and to the mix. They will melt in and complement the avocado nicely.
Related Instructables
Avocados withfruit syrup bycanida
Spinach Saladwith Fruit, Nuts,and SesameLime Vinaigretteby canida
Avocado -Preparing MadeSimple bywalkerbarb
Paleo Avocado& Tomato Saladby angelabchua
Fruit Salad withcherrytomatoes! bymikeasaurus
Guacamole - BeDip Ready! byzurichko
Quick and EasyGuacamole byfroglover
FreshFruit Margarita'sby lorr
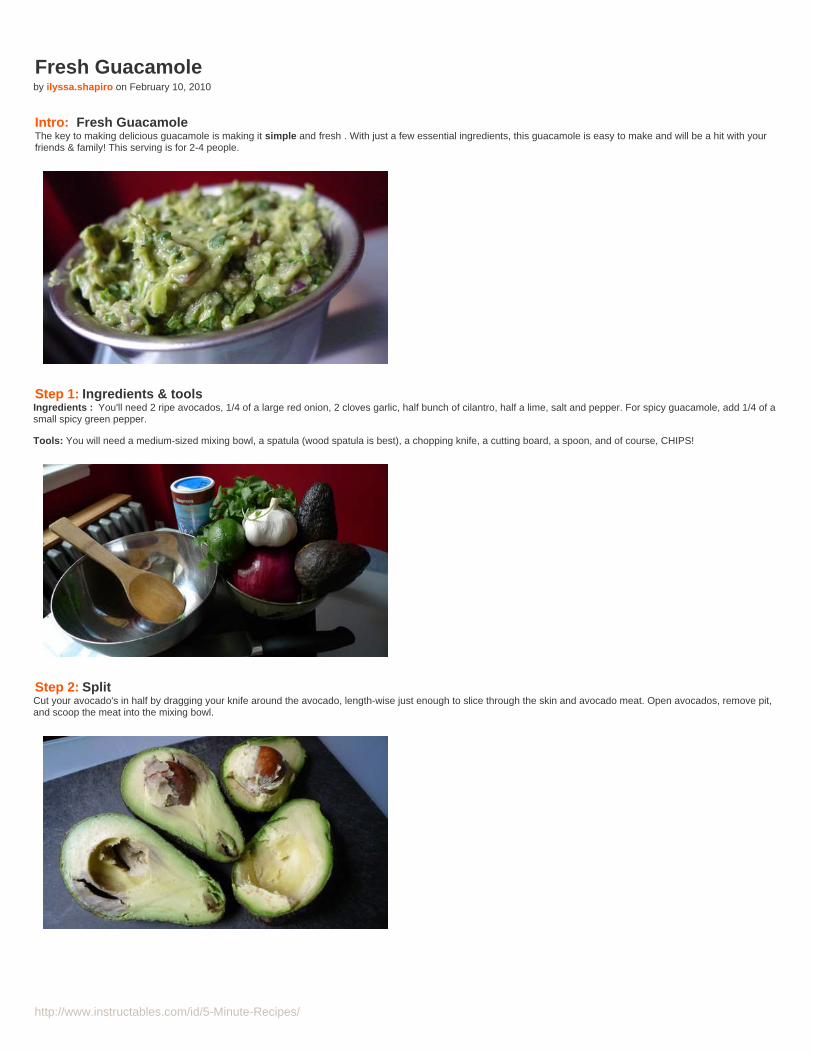
http://www.instructables.com/id/5-Minute-Recipes/
Fresh Guacamoleby ilyssa.shapiro on February 10, 2010
Intro: Fresh GuacamoleThe key to making delicious guacamole is making it simple and fresh . With just a few essential ingredients, this guacamole is easy to make and will be a hit with yourfriends & family! This serving is for 2-4 people.
Step 1: Ingredients & toolsIngredients : You'll need 2 ripe avocados, 1/4 of a large red onion, 2 cloves garlic, half bunch of cilantro, half a lime, salt and pepper. For spicy guacamole, add 1/4 of asmall spicy green pepper.
Tools: You will need a medium-sized mixing bowl, a spatula (wood spatula is best), a chopping knife, a cutting board, a spoon, and of course, CHIPS!
Step 2: SplitCut your avocado's in half by dragging your knife around the avocado, length-wise just enough to slice through the skin and avocado meat. Open avocados, remove pit,and scoop the meat into the mixing bowl.

http://www.instructables.com/id/5-Minute-Recipes/
Step 3: ChopChop 1/4 of a large red onion (about a handful) and mince 2 cloves of garlic. Add both into mixing bowl. If you are adding 1/4 of a small spicy green pepper, now is thetime to chop it up and add.
Note: This can also be done quicker in a mini food processor! Just throw in red onion, garlic, and spicy pepper (if using) and chop away with the press of a button. Chopuntil smooth and no large chunks are visible.
Step 4: Add the good stuff!One of the best parts of guacamole is the fresh taste of cilantro; I use half a bunch, but you can use less.
The easiest way to chop cilantro is to roll it up into as tight of a ball as you can and chop away. This technique allows for a quicker chopping time, as multiple cuts aremade to each stem with each chop!Add to mixture.
Step 5: LimeUse a reamer or your hands to squeeze the juice of half a lime into the mixture.

http://www.instructables.com/id/5-Minute-Recipes/
Step 6: Salt & pepperThrow in some salt & freshly ground pepper to taste. Just a few tosses of both will do; you can always go back in the end and modify it in the end!
Step 7: MixUse your wooden spatula to mash the avocado and gradually begin to fold in the onion, garlic, lime, salt and pepper. Mash only slightly for chunkier guacamole.
Step 8: ModifyMaking the perfect guacamole isn't an exact science.
Some more lime, salt and pepper may need to added in the end to get just the right taste. Use your most important tool, the chip, to get a taste for what you might need toadd just a little more of!
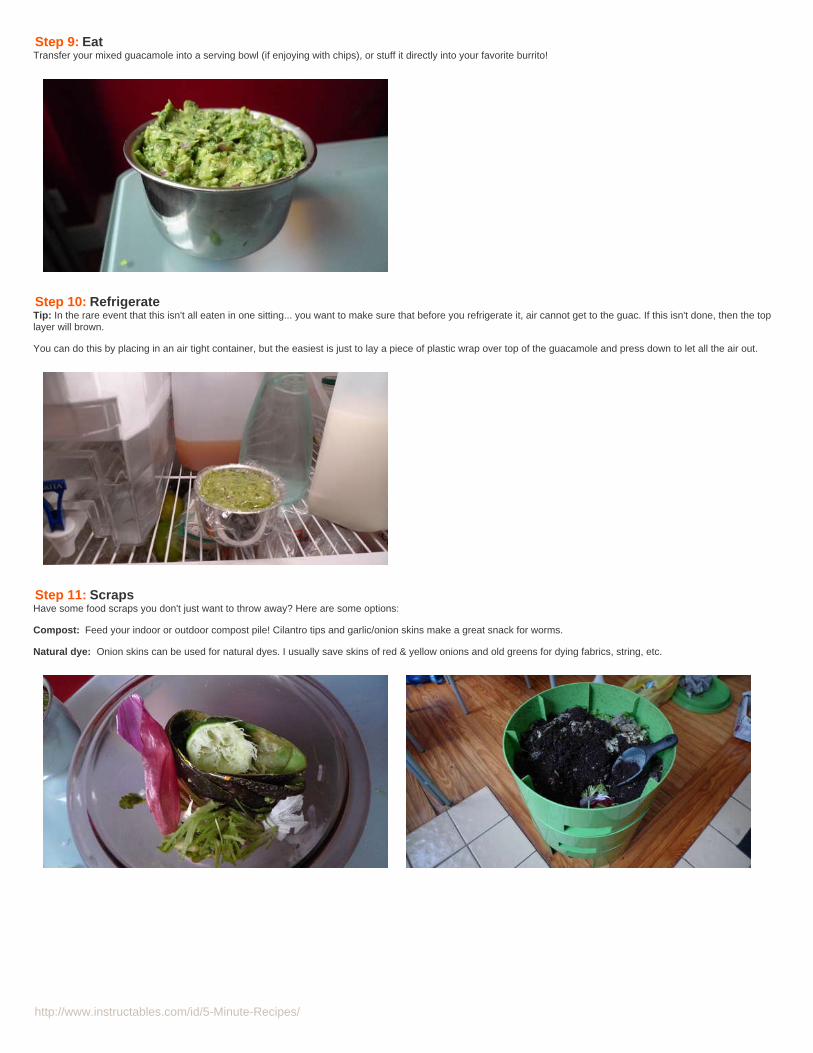
http://www.instructables.com/id/5-Minute-Recipes/
Step 9: EatTransfer your mixed guacamole into a serving bowl (if enjoying with chips), or stuff it directly into your favorite burrito!
Step 10: RefrigerateTip: In the rare event that this isn't all eaten in one sitting... you want to make sure that before you refrigerate it, air cannot get to the guac. If this isn't done, then the toplayer will brown.
You can do this by placing in an air tight container, but the easiest is just to lay a piece of plastic wrap over top of the guacamole and press down to let all the air out.
Step 11: ScrapsHave some food scraps you don't just want to throw away? Here are some options:
Compost: Feed your indoor or outdoor compost pile! Cilantro tips and garlic/onion skins make a great snack for worms.
Natural dye: Onion skins can be used for natural dyes. I usually save skins of red & yellow onions and old greens for dying fabrics, string, etc.

http://www.instructables.com/id/5-Minute-Recipes/
Related Instructables
Quick and EasyGuacamole byfroglover
World's BestGuacamole bybhardy007
Guacamole byeasement Guacamole - Be
Dip Ready! byzurichko
How to makeBuffalo ChickenEnchiladas withGuacamole byPaige10
Paleo Avocado& Tomato Saladby angelabchua
Avocado -Preparing MadeSimple bywalkerbarb
How To MakeGuacamole byForkable
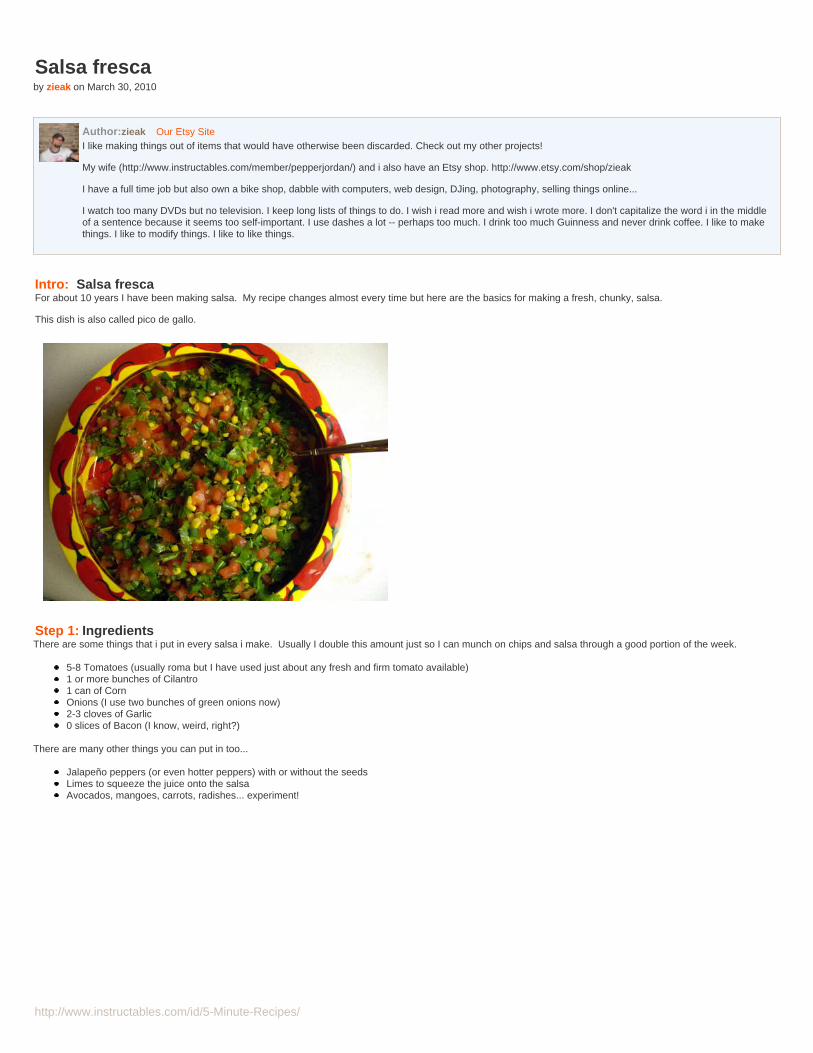
http://www.instructables.com/id/5-Minute-Recipes/
Salsa frescaby zieak on March 30, 2010
Author:zieak Our Etsy SiteI like making things out of items that would have otherwise been discarded. Check out my other projects!
My wife (http://www.instructables.com/member/pepperjordan/) and i also have an Etsy shop. http://www.etsy.com/shop/zieak
I have a full time job but also own a bike shop, dabble with computers, web design, DJing, photography, selling things online...
I watch too many DVDs but no television. I keep long lists of things to do. I wish i read more and wish i wrote more. I don't capitalize the word i in the middleof a sentence because it seems too self-important. I use dashes a lot -- perhaps too much. I drink too much Guinness and never drink coffee. I like to makethings. I like to modify things. I like to like things.
Intro: Salsa frescaFor about 10 years I have been making salsa. My recipe changes almost every time but here are the basics for making a fresh, chunky, salsa.
This dish is also called pico de gallo.
Step 1: IngredientsThere are some things that i put in every salsa i make. Usually I double this amount just so I can munch on chips and salsa through a good portion of the week.
5-8 Tomatoes (usually roma but I have used just about any fresh and firm tomato available)1 or more bunches of Cilantro1 can of CornOnions (I use two bunches of green onions now)2-3 cloves of Garlic0 slices of Bacon (I know, weird, right?)
There are many other things you can put in too...
Jalapeño peppers (or even hotter peppers) with or without the seedsLimes to squeeze the juice onto the salsaAvocados, mangoes, carrots, radishes... experiment!
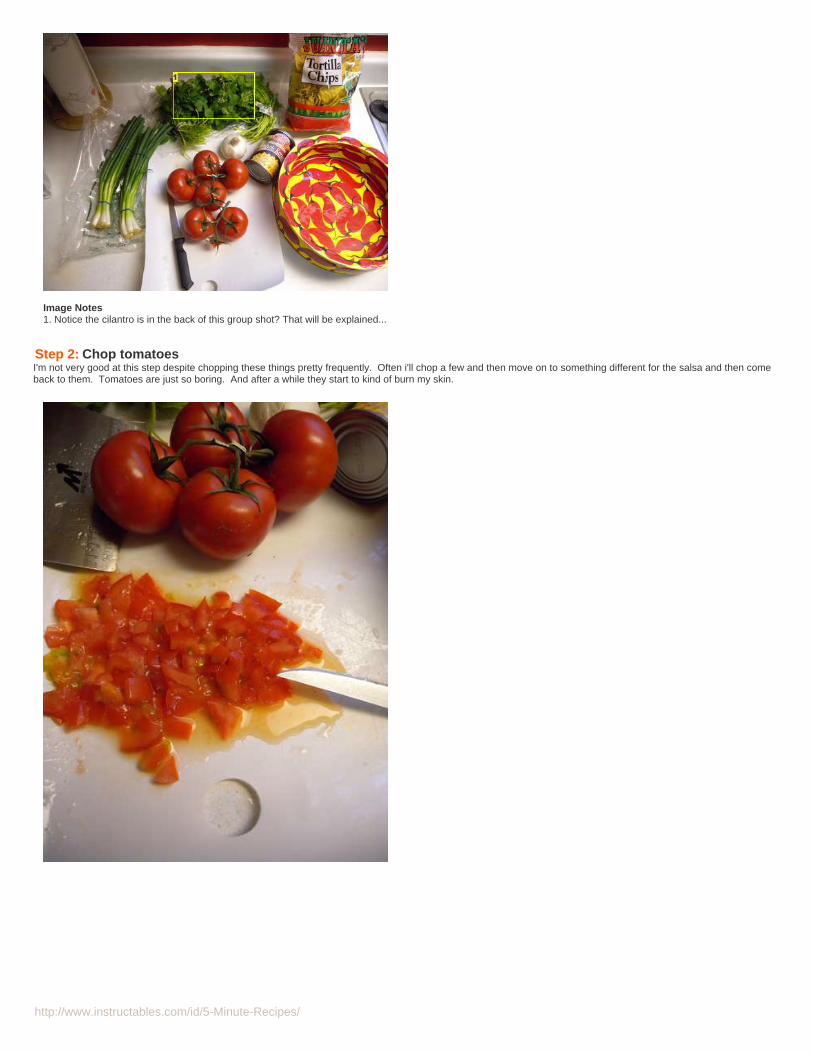
http://www.instructables.com/id/5-Minute-Recipes/
Image Notes1. Notice the cilantro is in the back of this group shot? That will be explained...
Step 2: Chop tomatoesI'm not very good at this step despite chopping these things pretty frequently. Often i'll chop a few and then move on to something different for the salsa and then comeback to them. Tomatoes are just so boring. And after a while they start to kind of burn my skin.
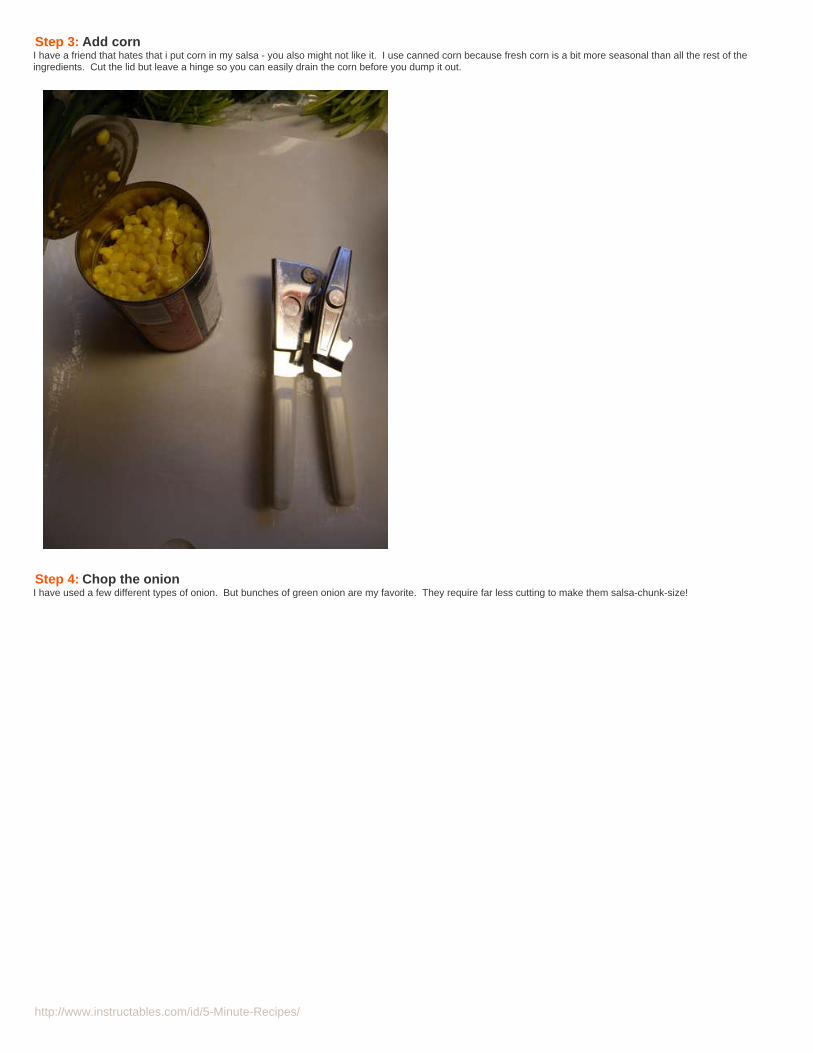
http://www.instructables.com/id/5-Minute-Recipes/
Step 3: Add cornI have a friend that hates that i put corn in my salsa - you also might not like it. I use canned corn because fresh corn is a bit more seasonal than all the rest of theingredients. Cut the lid but leave a hinge so you can easily drain the corn before you dump it out.
Step 4: Chop the onionI have used a few different types of onion. But bunches of green onion are my favorite. They require far less cutting to make them salsa-chunk-size!

http://www.instructables.com/id/5-Minute-Recipes/
Step 5: Shred the cilantroUnfortunately I do not have a photo of this step. As you're well aware, cilantro is very sneaky. If cilantro was your friend and you had your camera out, cilantro is the kindof friend that always turns away or hold up their hand whenever a camera is around. This is well documented. Ask anyone that has tried to photograph cilantro.
Maybe it is the whole "Chinese parsley" or "coriander" naming confusion.
One thing that is for sure - this stuff is good for you!
Step 6: Peel and mince the garlicI tend to go overboard on the garlic. Sorry. I have been known to put an entire head in. But just a few cloves are probably best if you're going to be sharing this batch.
Many health benefits have been identified for garlic. Social benefits seem t be fairly limited though.
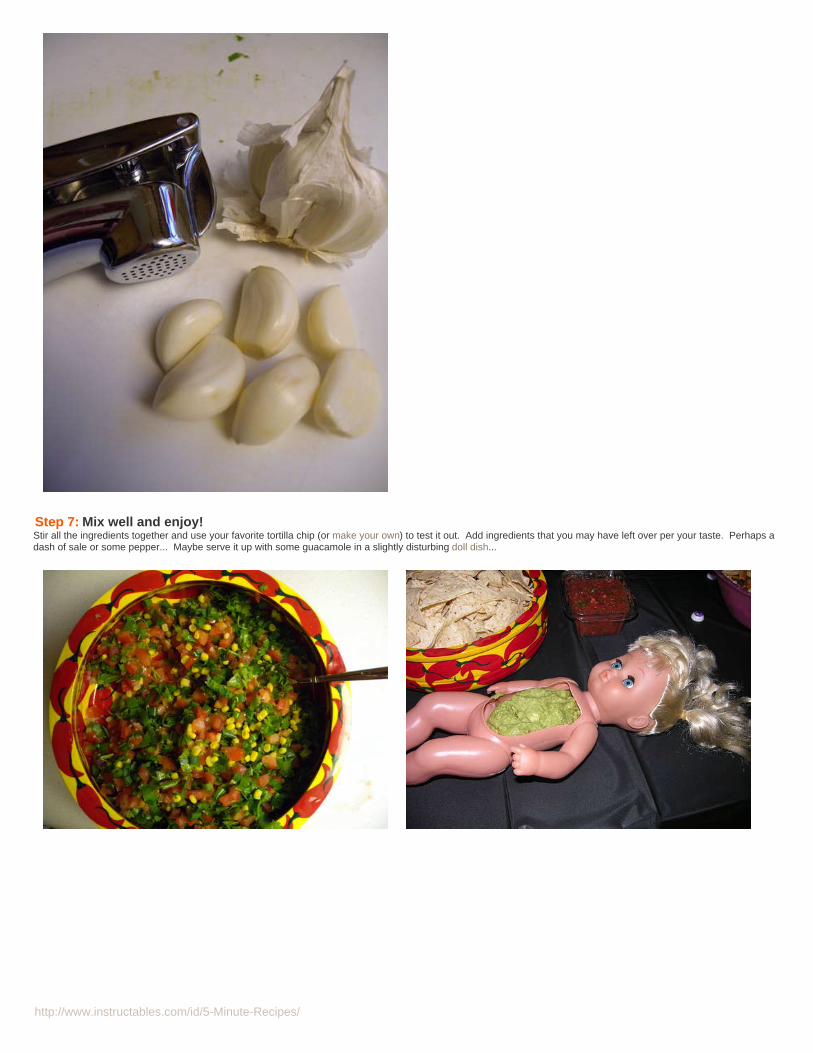
http://www.instructables.com/id/5-Minute-Recipes/
Step 7: Mix well and enjoy!Stir all the ingredients together and use your favorite tortilla chip (or make your own) to test it out. Add ingredients that you may have left over per your taste. Perhaps adash of sale or some pepper... Maybe serve it up with some guacamole in a slightly disturbing doll dish...

http://www.instructables.com/id/5-Minute-Recipes/
Related Instructables
How to Make asemi-authenticPico de Gallo toServe with asemi-authenticSalsa Verde byraccoon
Pico De Gallo(Peeko-Day-Guy-o) byzurichko
Quig's Salsa byGitarGr8
How to Make,Serve and Storea semi-authentic SalsaVerde byraccoon
RoastedVeggies & SalsaRecipes! byjessyratfink
Mom's FreshGarden Salsa byCheeseduck
How to makesalsa verde byChoko-Ale
Salsa Negra(Salsa Baja) bydougbutscher

http://www.instructables.com/id/5-Minute-Recipes/
Mast-o-Khiar (Iranian cucumber and mint yougurt)by LinuxH4x0r on July 5, 2008
Intro: Mast-o-Khiar (Iranian cucumber and mint yougurt)Mast o Khiar is a simple traditional Iranian side dish that goes good with almost everything. With mint, cucumbers and yogurt it makes the perfect summer snack thattakes only takes a few minutes to make.
Step 1: Gather IngredientsYou will need:
2 cups yogurt (not sweet. Just a little sour is perfect. Mine is home made)1/2 a large cucumber1 Tablespoon dry mint4-5 sprigs fresh mint1/3 Teaspoon saltRaisins (optional)
You will also need:
KnifeDish to serve inServing spoonMeasuring spoons

http://www.instructables.com/id/5-Minute-Recipes/
Step 2: Mix mint and yogurtOk, this is easy.
-Pour approximately two cups of yogurt into your bowl.-Add 1 Tablespoon of dried mint.-Add about 1/3 of a teaspoon of salt.-Mix everything
Step 3: Add cucumber- Peel and dice half a cucumber.-Mix into yougurt
Step 4: Garnish with fresh mintTake the fresh mint and put it on top.
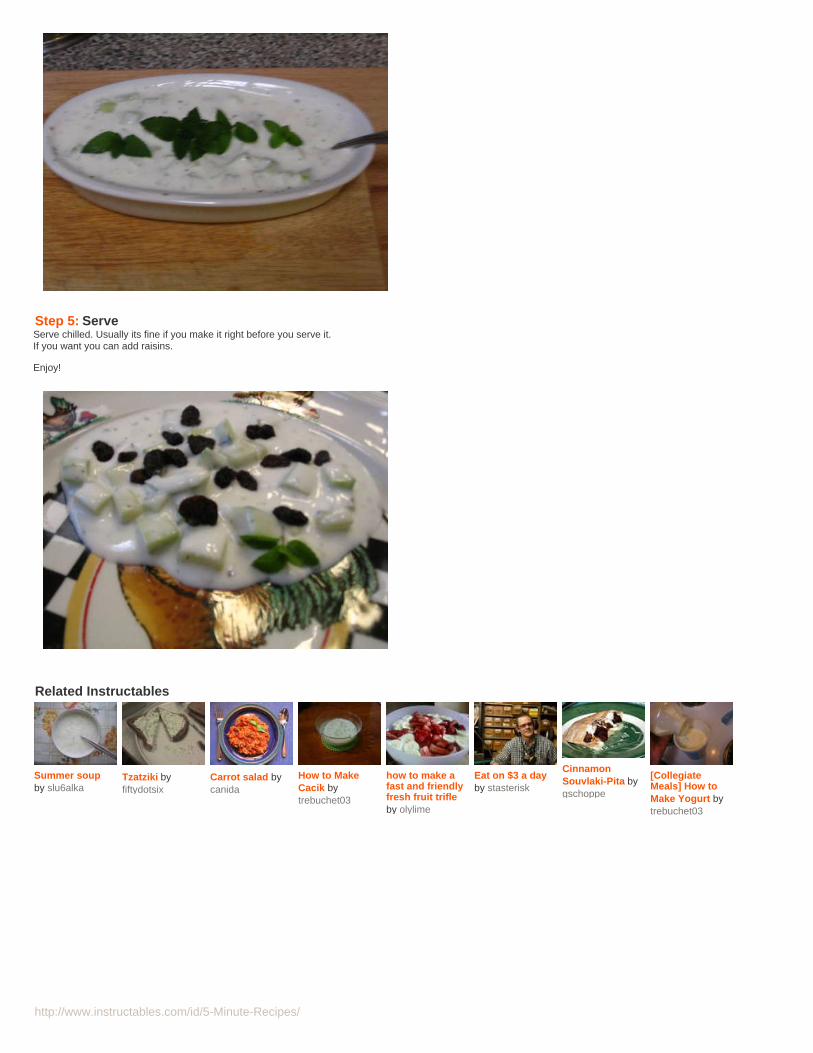
http://www.instructables.com/id/5-Minute-Recipes/
Step 5: ServeServe chilled. Usually its fine if you make it right before you serve it.If you want you can add raisins.
Enjoy!
Related Instructables
Summer soupby slu6alka
Tzatziki byfiftydotsix
Carrot salad bycanida
How to MakeCacik bytrebuchet03
how to make afast and friendlyfresh fruit trifleby olylime
Eat on $3 a dayby stasterisk
CinnamonSouvlaki-Pita bygschoppe
[CollegiateMeals] How toMake Yogurt bytrebuchet03

http://www.instructables.com/id/5-Minute-Recipes/
Hummus: Quick, Easy, and Delicious!by megtalley on February 4, 2010
Intro: Hummus: Quick, Easy, and Delicious!Here's how to make hummus, the ultimate delicious and healthy Mediterranean snack.
Step 1: The ingredientsFirst you need a food processor.While you're at the grocery store pick up the following things:
15 oz. can of garbanzo beans, otherwise known as chickpeas6 oz. cup of plain Greek yogurtjar of Tahini, often located in the Mediterranean food section, or near salad dressing1 good sized clove of garlic, or 2 small ones1 lemonsaltolive oil
Optional ingredients:cumin, chili pepper, chipotle pepper, and/or any other delicious spicesolivescapersavocadoroasted red peppersblack beanssun-dried tomatoespine nuts
Image Notes1. The essentials2. You can leave out this guy if you want a vegan snack
Image Notes1. These are some optional ingredients you may want to add to make your dipmore flavorful, mmm

http://www.instructables.com/id/5-Minute-Recipes/
Step 2: The garlic• Cut garlic clove/s into quarters, toss into the food processor to chop 'em up.
Step 3: The chickpeas, the tahini, the yogurt• Open a can of chickpeas, drain, and toss into the food processor• Measure about a 1/4 cup of Tahini and pour into the mix• Spoon about half of the container of Greek yogurt into the mix[Note- yogurt can be left out for a vegan-friendly dip!]
Image Notes1. It's about a 1/4 cup. More will make it smoother.
Step 4: The lemon • Squeeze half a lemon, 1/8 to 1/4 cup of juice, and add it to the food processor.
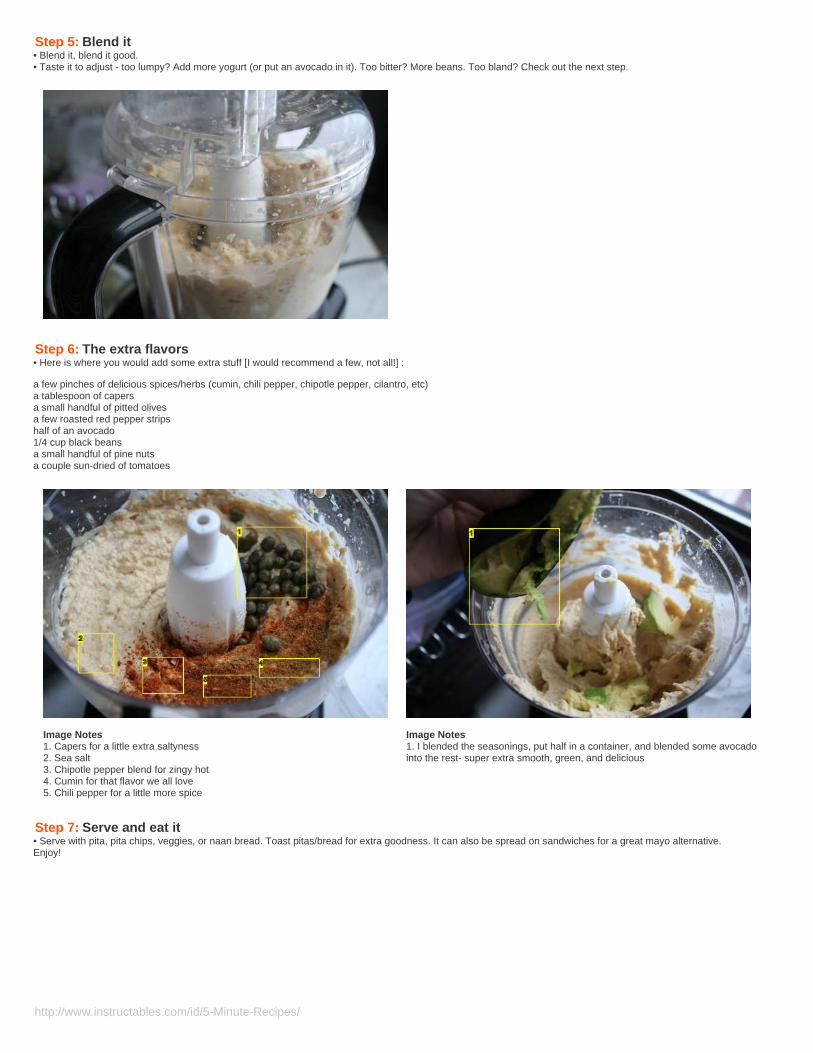
http://www.instructables.com/id/5-Minute-Recipes/
Step 5: Blend it• Blend it, blend it good.• Taste it to adjust - too lumpy? Add more yogurt (or put an avocado in it). Too bitter? More beans. Too bland? Check out the next step.
Step 6: The extra flavors• Here is where you would add some extra stuff [I would recommend a few, not all!] :
a few pinches of delicious spices/herbs (cumin, chili pepper, chipotle pepper, cilantro, etc)a tablespoon of capersa small handful of pitted olivesa few roasted red pepper stripshalf of an avocado1/4 cup black beansa small handful of pine nutsa couple sun-dried of tomatoes
Image Notes1. Capers for a little extra saltyness2. Sea salt3. Chipotle pepper blend for zingy hot4. Cumin for that flavor we all love5. Chili pepper for a little more spice
Image Notes1. I blended the seasonings, put half in a container, and blended some avocadointo the rest- super extra smooth, green, and delicious
Step 7: Serve and eat it• Serve with pita, pita chips, veggies, or naan bread. Toast pitas/bread for extra goodness. It can also be spread on sandwiches for a great mayo alternative.Enjoy!

http://www.instructables.com/id/5-Minute-Recipes/
Related Instructables
Hummus byIcetigris
Paleo FriendlyHummus byangelabchua
Easy Crispy,Crunchy, Tasty,Healthy Snack -Baked ChickPeas byhomesteadcat
Moroccan Stew(Vegan) bySpamDam Frankenstein
Hummus Platter(Photos) byrachela99
How to useherbs andspices incooking! byjessyratfink
Easy DeliciousEdamame(GreenSoybean) Snackby homesteadcat
Market to Tableby Ceryniti
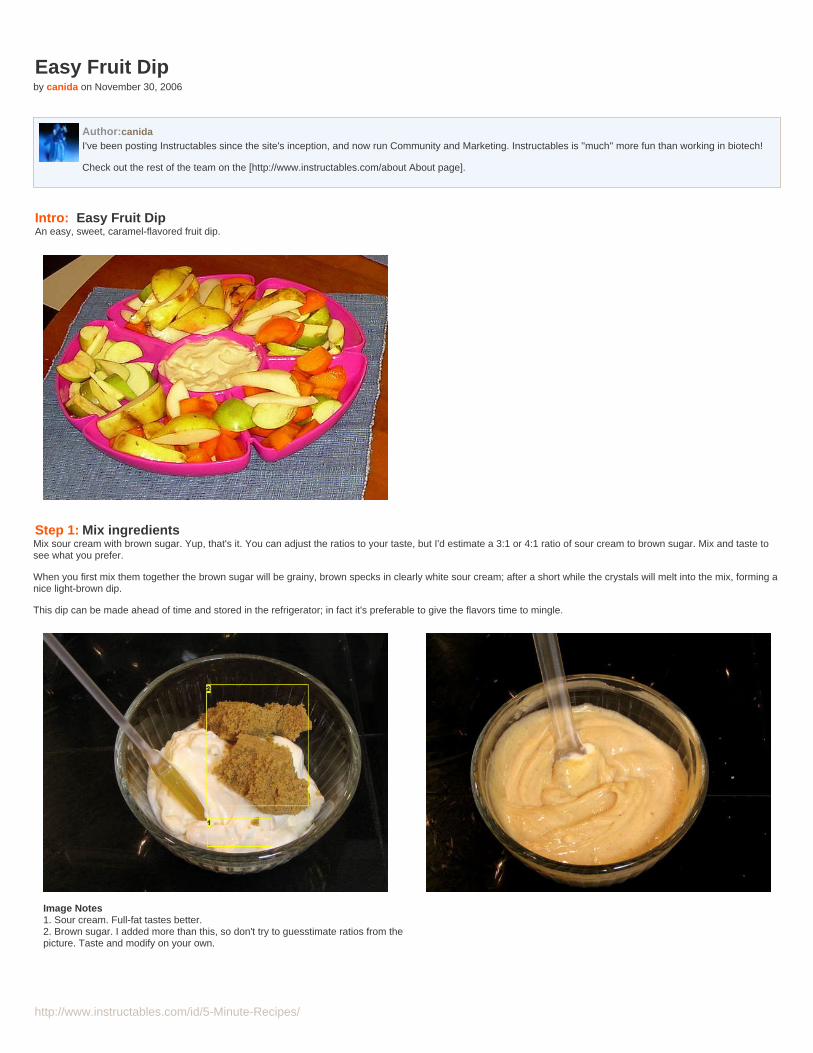
http://www.instructables.com/id/5-Minute-Recipes/
Easy Fruit Dipby canida on November 30, 2006
Author:canidaI've been posting Instructables since the site's inception, and now run Community and Marketing. Instructables is ''much'' more fun than working in biotech!
Check out the rest of the team on the [http://www.instructables.com/about About page].
Intro: Easy Fruit DipAn easy, sweet, caramel-flavored fruit dip.
Step 1: Mix ingredientsMix sour cream with brown sugar. Yup, that's it. You can adjust the ratios to your taste, but I'd estimate a 3:1 or 4:1 ratio of sour cream to brown sugar. Mix and taste tosee what you prefer.
When you first mix them together the brown sugar will be grainy, brown specks in clearly white sour cream; after a short while the crystals will melt into the mix, forming anice light-brown dip.
This dip can be made ahead of time and stored in the refrigerator; in fact it's preferable to give the flavors time to mingle.
Image Notes1. Sour cream. Full-fat tastes better.2. Brown sugar. I added more than this, so don't try to guesstimate ratios from thepicture. Taste and modify on your own.

http://www.instructables.com/id/5-Minute-Recipes/
Step 2: ServeRemove from refrigerator, stir, and serve with the fruit of your choice. It goes well with apples, pears, persimmons, peaches, strawberries, pineapple, bananas, and mostany other fruit I've tried it with.
One of these divided dishes works well, though I'd recommend against this ungodly color of pink. Even if it's on sale, DON'T buy the pink one.
Store unused portion in the refrigerator; it should keep just under a week.
Related Instructables
Creamy Dill Dipby canida
3 STEPS TOREAL SOURCREAMWITHOUTMILKING THECOW! bySylviasvideosfyi
Market to Tableby Ceryniti
Super Nachosbyclonetrooper13 Shrimp Dip by
canida
Deep FriedParty Snacks bydepotdevoid Killer Crab Dip
by Rednecker52
Killer DnD BeanDip byAtomicBeaker
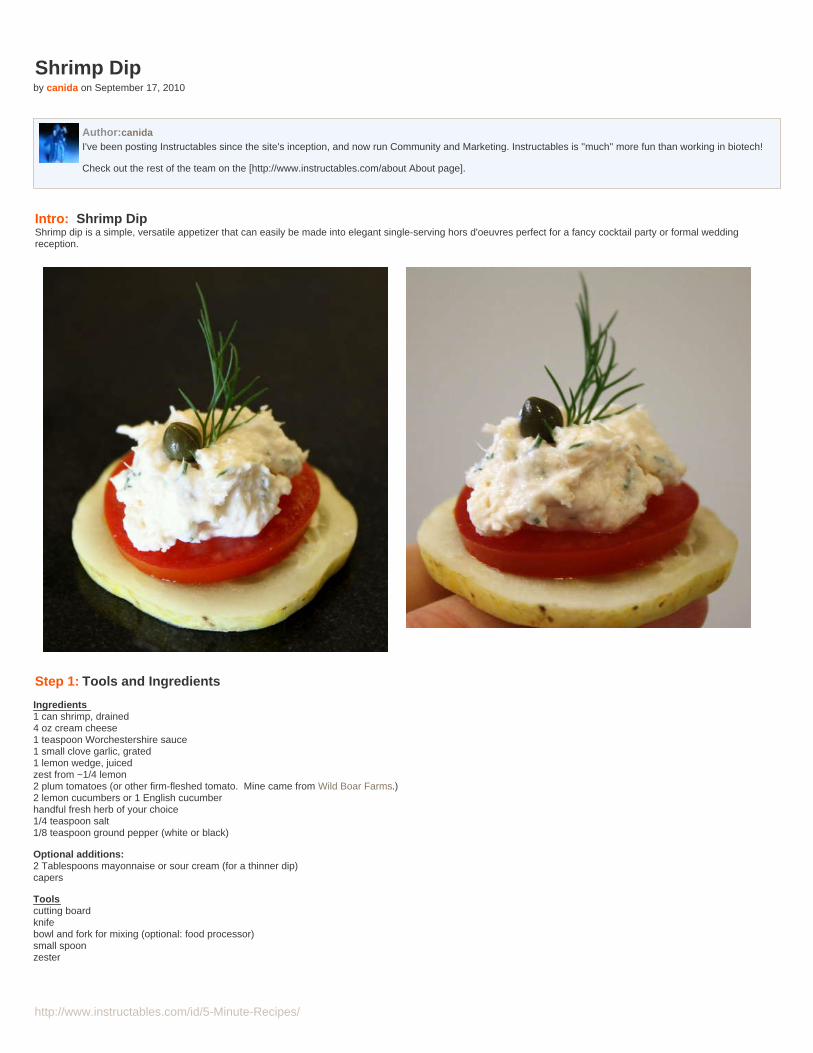
http://www.instructables.com/id/5-Minute-Recipes/
Shrimp Dipby canida on September 17, 2010
Author:canidaI've been posting Instructables since the site's inception, and now run Community and Marketing. Instructables is ''much'' more fun than working in biotech!
Check out the rest of the team on the [http://www.instructables.com/about About page].
Intro: Shrimp DipShrimp dip is a simple, versatile appetizer that can easily be made into elegant single-serving hors d'oeuvres perfect for a fancy cocktail party or formal weddingreception.
Step 1: Tools and Ingredients
Ingredients1 can shrimp, drained4 oz cream cheese1 teaspoon Worchestershire sauce1 small clove garlic, grated1 lemon wedge, juicedzest from ~1/4 lemon2 plum tomatoes (or other firm-fleshed tomato. Mine came from Wild Boar Farms.)2 lemon cucumbers or 1 English cucumberhandful fresh herb of your choice1/4 teaspoon salt1/8 teaspoon ground pepper (white or black)
Optional additions:2 Tablespoons mayonnaise or sour cream (for a thinner dip)capers
Toolscutting boardknifebowl and fork for mixing (optional: food processor)small spoonzester

http://www.instructables.com/id/5-Minute-Recipes/
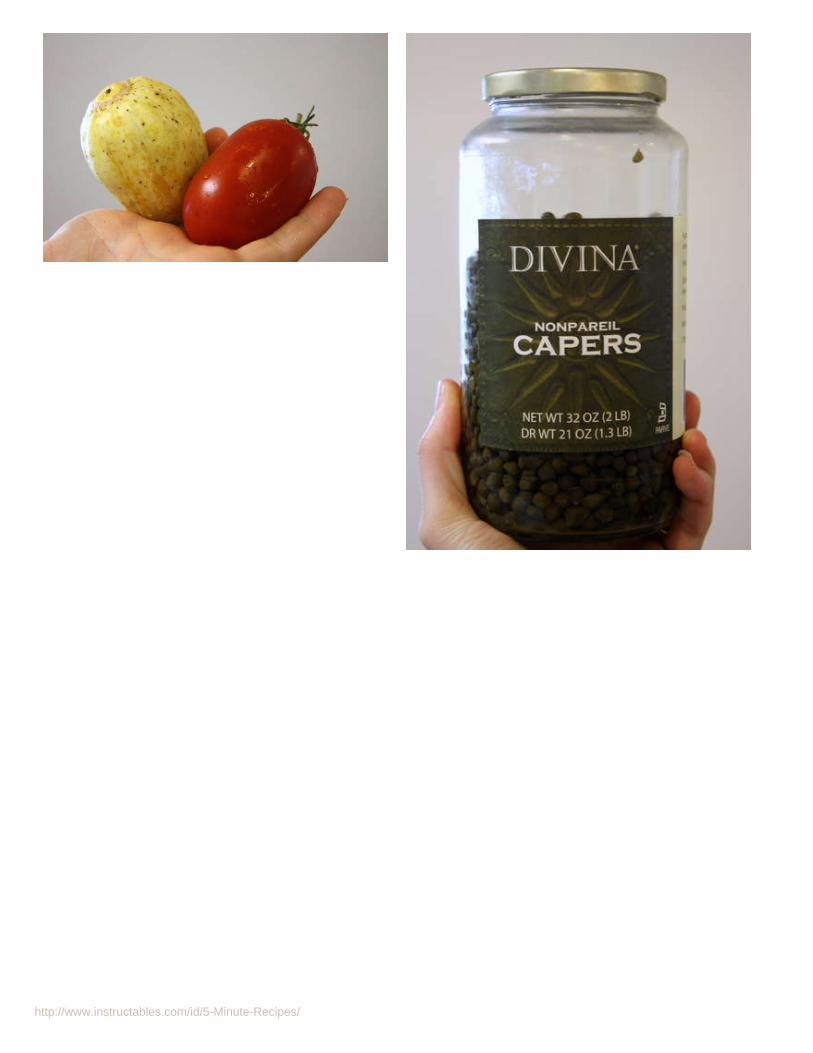
http://www.instructables.com/id/5-Minute-Recipes/
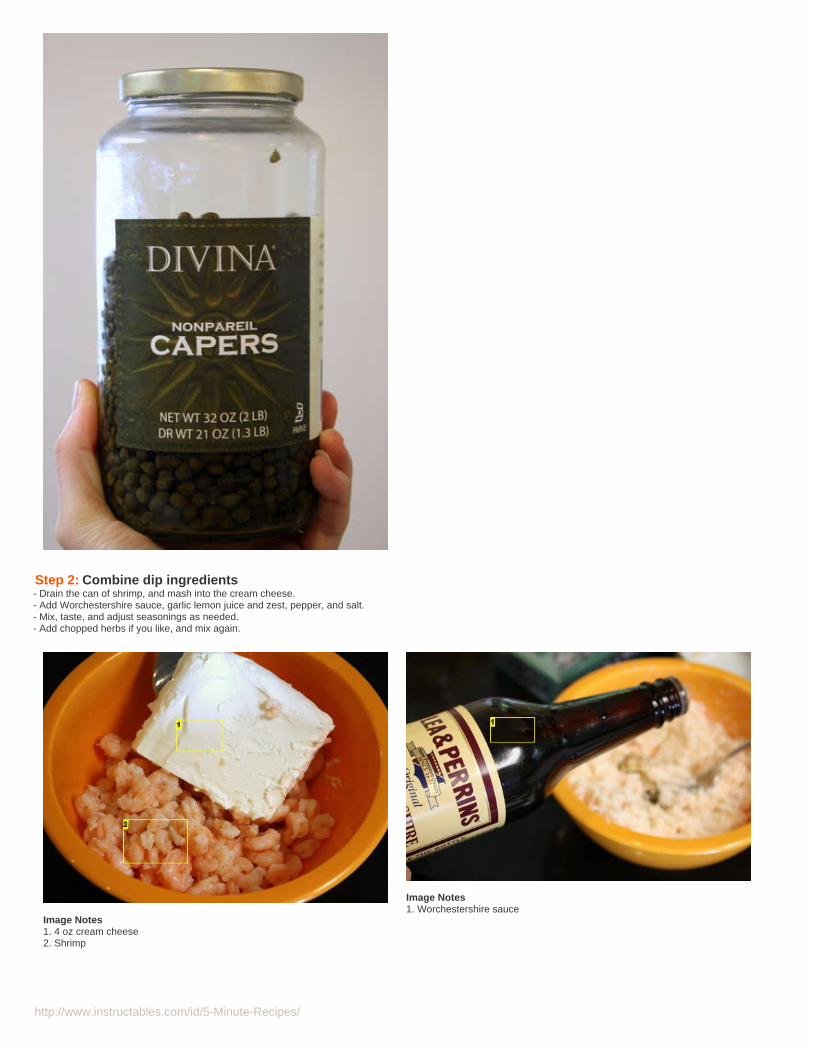
http://www.instructables.com/id/5-Minute-Recipes/
Step 2: Combine dip ingredients- Drain the can of shrimp, and mash into the cream cheese.- Add Worchestershire sauce, garlic lemon juice and zest, pepper, and salt. - Mix, taste, and adjust seasonings as needed.- Add chopped herbs if you like, and mix again.
Image Notes1. 4 oz cream cheese2. Shrimp
Image Notes1. Worchestershire sauce
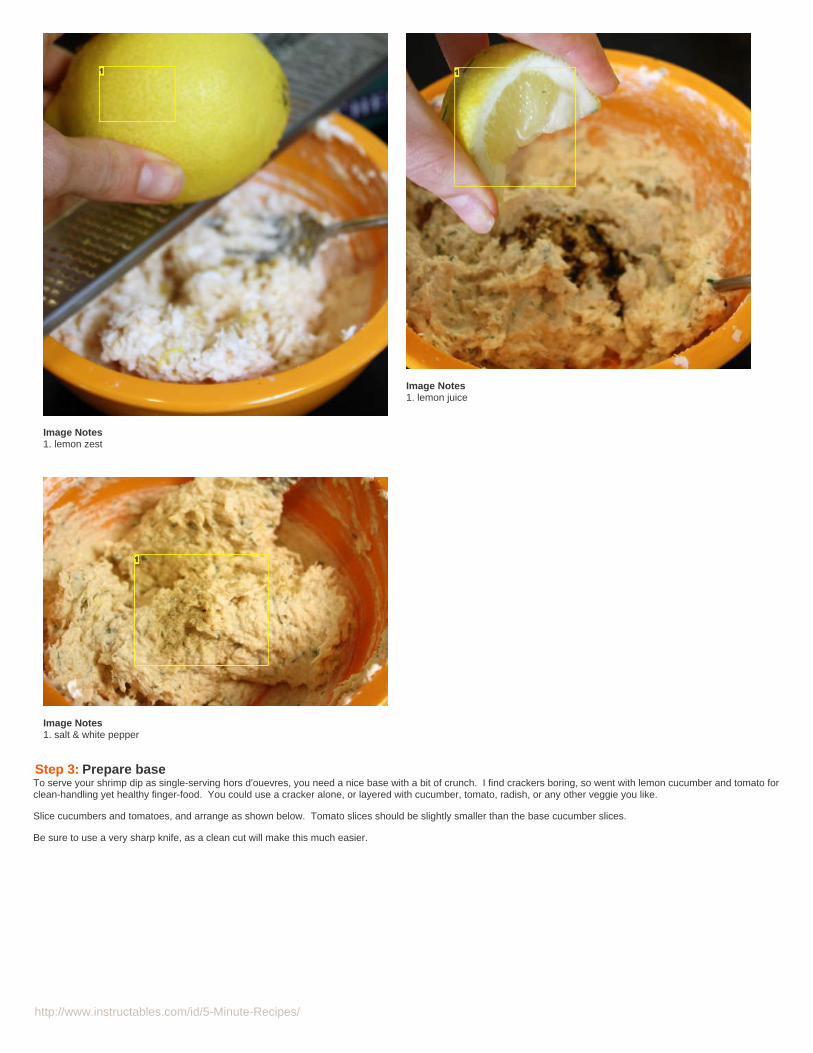
http://www.instructables.com/id/5-Minute-Recipes/
Image Notes1. lemon zest
Image Notes1. lemon juice
Image Notes1. salt & white pepper
Step 3: Prepare baseTo serve your shrimp dip as single-serving hors d'ouevres, you need a nice base with a bit of crunch. I find crackers boring, so went with lemon cucumber and tomato forclean-handling yet healthy finger-food. You could use a cracker alone, or layered with cucumber, tomato, radish, or any other veggie you like.
Slice cucumbers and tomatoes, and arrange as shown below. Tomato slices should be slightly smaller than the base cucumber slices.
Be sure to use a very sharp knife, as a clean cut will make this much easier.
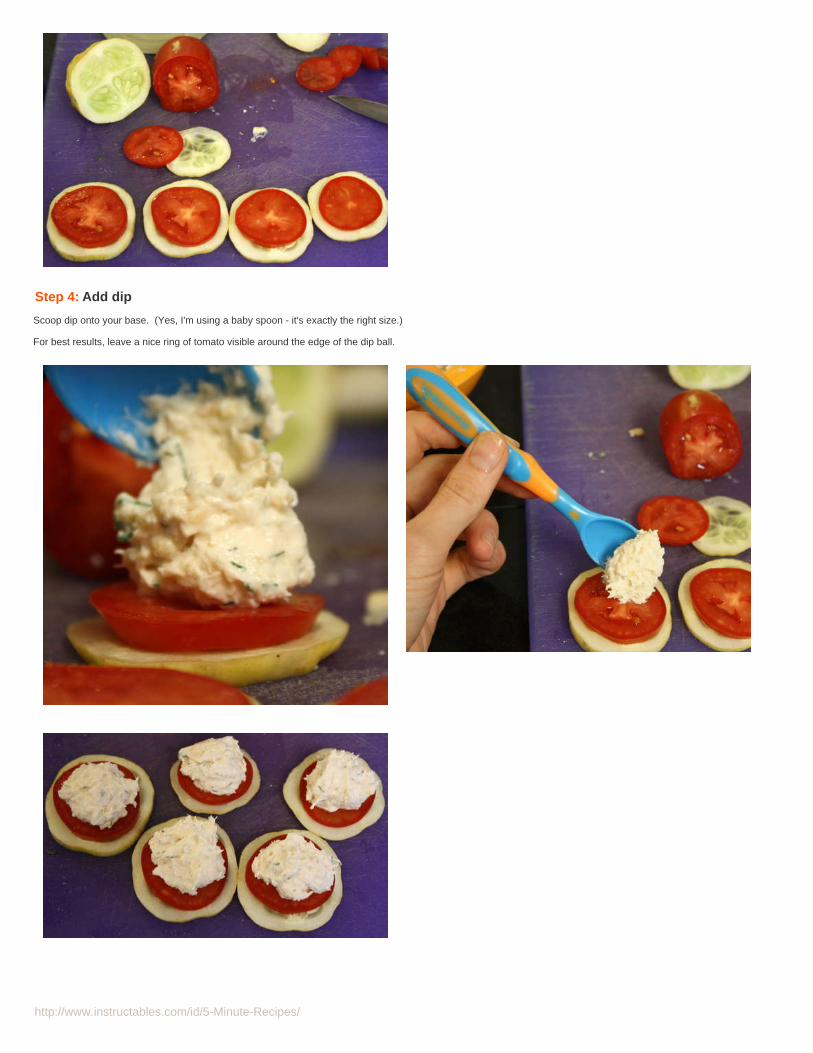
http://www.instructables.com/id/5-Minute-Recipes/
Step 4: Add dip
Scoop dip onto your base. (Yes, I'm using a baby spoon - it's exactly the right size.)
For best results, leave a nice ring of tomato visible around the edge of the dip ball.
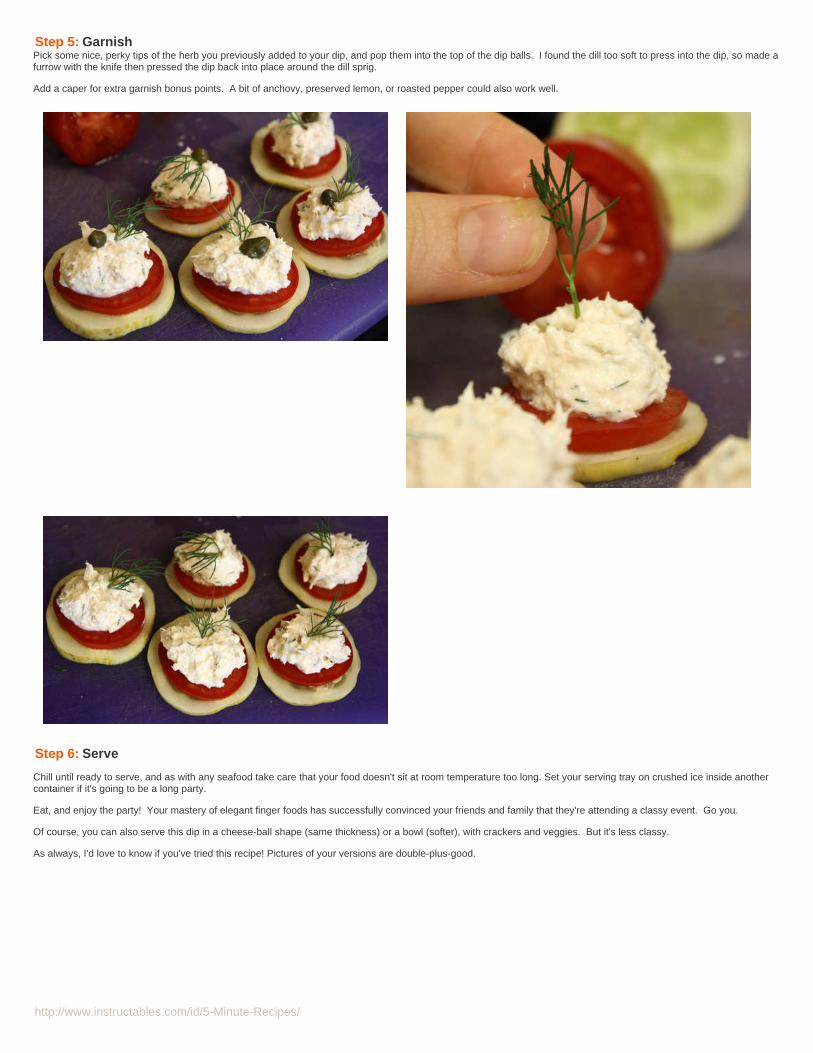
http://www.instructables.com/id/5-Minute-Recipes/
Step 5: GarnishPick some nice, perky tips of the herb you previously added to your dip, and pop them into the top of the dip balls. I found the dill too soft to press into the dip, so made afurrow with the knife then pressed the dip back into place around the dill sprig.
Add a caper for extra garnish bonus points. A bit of anchovy, preserved lemon, or roasted pepper could also work well.
Step 6: Serve
Chill until ready to serve, and as with any seafood take care that your food doesn't sit at room temperature too long. Set your serving tray on crushed ice inside anothercontainer if it's going to be a long party.
Eat, and enjoy the party! Your mastery of elegant finger foods has successfully convinced your friends and family that they're attending a classy event. Go you.
Of course, you can also serve this dip in a cheese-ball shape (same thickness) or a bowl (softer), with crackers and veggies. But it's less classy.
As always, I'd love to know if you've tried this recipe! Pictures of your versions are double-plus-good.

http://www.instructables.com/id/5-Minute-Recipes/
Related Instructables
Quick CrabCakes byRealSimple.com
Killer Crab Dipby Rednecker52
Penguins inParty Hats byModMischief
How to MakeSeafood FriedRice by jen7714 Calamari di
pasta (pastasquid) bylemonie
Crab CakesRecipe by noahw
GorgeousPotatoMushroom Tartsby jen7714
Eyeballcocktails bymakendo
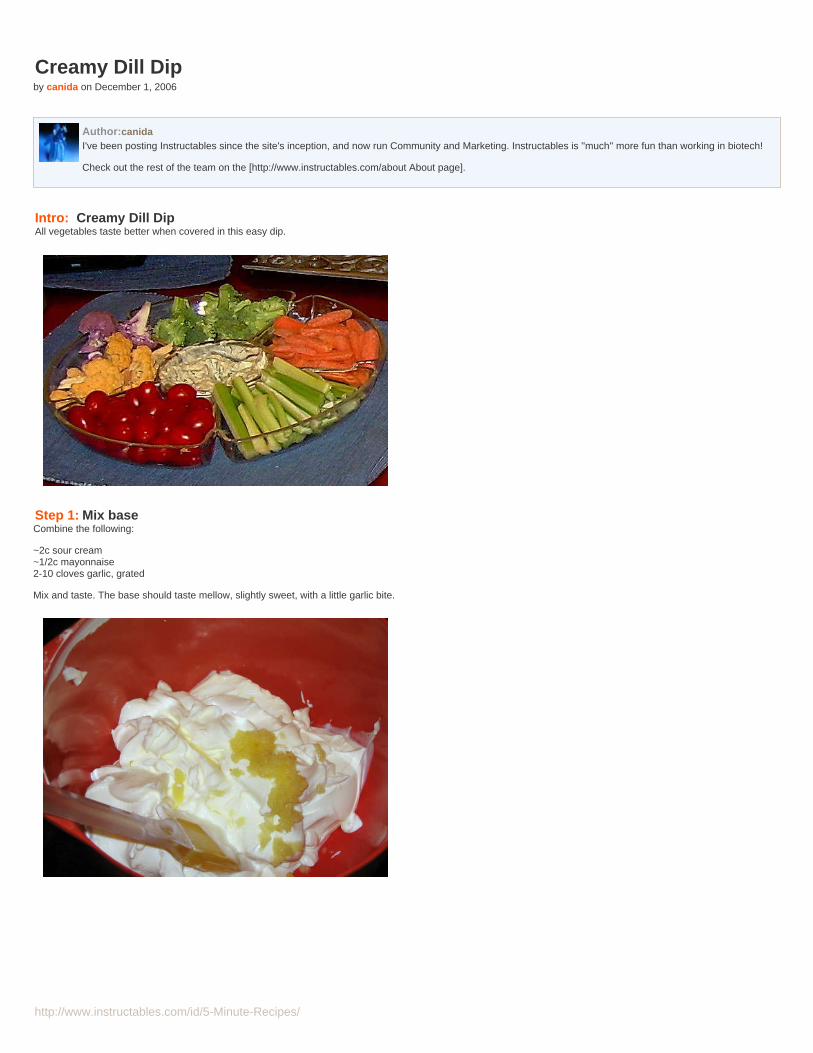
http://www.instructables.com/id/5-Minute-Recipes/
Creamy Dill Dipby canida on December 1, 2006
Author:canidaI've been posting Instructables since the site's inception, and now run Community and Marketing. Instructables is ''much'' more fun than working in biotech!
Check out the rest of the team on the [http://www.instructables.com/about About page].
Intro: Creamy Dill DipAll vegetables taste better when covered in this easy dip.
Step 1: Mix baseCombine the following:
~2c sour cream~1/2c mayonnaise2-10 cloves garlic, grated
Mix and taste. The base should taste mellow, slightly sweet, with a little garlic bite.

http://www.instructables.com/id/5-Minute-Recipes/
Step 2: Add seasoningsCombine the following:
1/2 onion, finely choppedbunch dill, finely chopped1/2 lemon, juiceddash of Worchestershire or soy saucesalt & fresh ground pepper to taste
Stir and taste. Adjust seasonings as necessary. The flavors wll mellow and mingle if allowed to sit, so making this dip ahead and storing it in the refrigerator is preferable.
Image Notes1. Minced onion.2. Dill.
Step 3: ServeServe with a selection of chopped fresh vegetables such as carrots, celery, peppers, broccoli, cauliflower, cucumbers, grape tomatoes, green beans, or jicama.
Unused dip should store in the refrigerator for just under a week.
Related Instructables
Tomato Jewels(video) byHandmadeKitchens
Spinach-CheeseSwirls (video) byHandmadeKitchens
Holiday Brie enCroute (video)by HandmadeKitchens
Chicken RanchLasanga(Photos) bySWV1787 Vegetarian
Matzo Ball Soupby shesparticular
CandiedWalnut-BriePockets (video)by HandmadeKitchens
Bison andVegetableKabobs (video)byHighPlainsBison
Fried ZucchiniFlowers bynmolvin
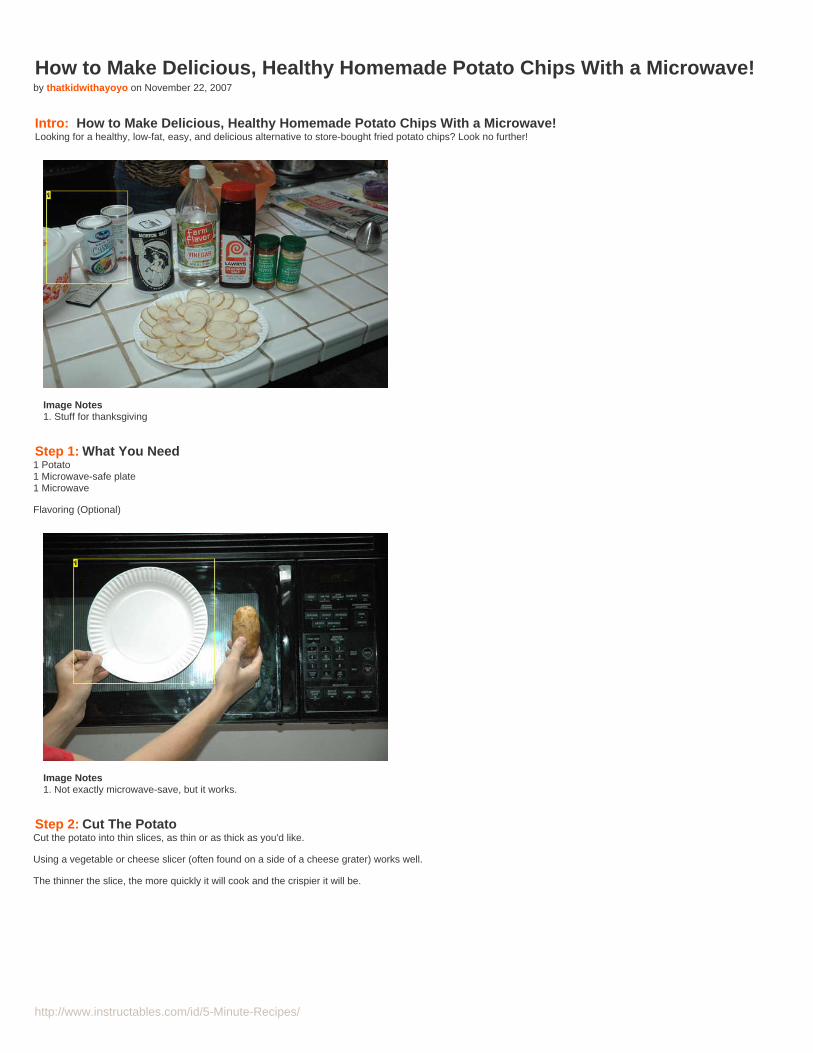
http://www.instructables.com/id/5-Minute-Recipes/
How to Make Delicious, Healthy Homemade Potato Chips With a Microwave!by thatkidwithayoyo on November 22, 2007
Intro: How to Make Delicious, Healthy Homemade Potato Chips With a Microwave!Looking for a healthy, low-fat, easy, and delicious alternative to store-bought fried potato chips? Look no further!
Image Notes1. Stuff for thanksgiving
Step 1: What You Need1 Potato1 Microwave-safe plate1 Microwave
Flavoring (Optional)
Image Notes1. Not exactly microwave-save, but it works.
Step 2: Cut The PotatoCut the potato into thin slices, as thin or as thick as you'd like.
Using a vegetable or cheese slicer (often found on a side of a cheese grater) works well.
The thinner the slice, the more quickly it will cook and the crispier it will be.

http://www.instructables.com/id/5-Minute-Recipes/
Image Notes1. Other stuff I cut for thanksgiving dinner.
Step 3: Lay Potato Slices on PlateArrange the potato slices on the plate with the thinner slices on the outside and the thicker slices on the inside. This will provide for more even cooking.
Image Notes1. Thin chips
Step 4: Add FlavoringAdd any desired flavoring. I have tried salt, salt and vinegar, cayenne pepper, seasoned salt, and garlic powder.
Image Notes1. Stuff for thanksgiving
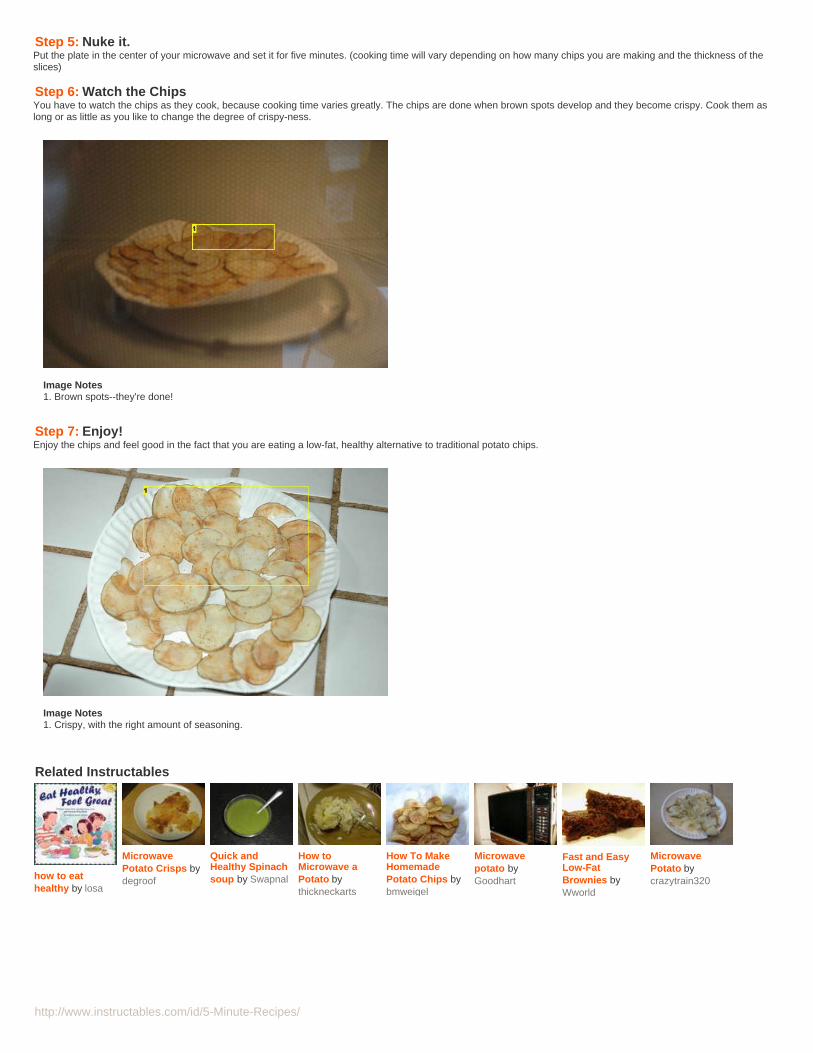
http://www.instructables.com/id/5-Minute-Recipes/
Step 5: Nuke it.Put the plate in the center of your microwave and set it for five minutes. (cooking time will vary depending on how many chips you are making and the thickness of theslices)
Step 6: Watch the ChipsYou have to watch the chips as they cook, because cooking time varies greatly. The chips are done when brown spots develop and they become crispy. Cook them aslong or as little as you like to change the degree of crispy-ness.
Image Notes1. Brown spots--they're done!
Step 7: Enjoy!Enjoy the chips and feel good in the fact that you are eating a low-fat, healthy alternative to traditional potato chips.
Image Notes1. Crispy, with the right amount of seasoning.
Related Instructables
how to eathealthy by losa
MicrowavePotato Crisps bydegroof
Quick andHealthy Spinachsoup by Swapnal
How toMicrowave aPotato bythickneckarts
How To MakeHomemadePotato Chips bybmweigel
Microwavepotato byGoodhart
Fast and EasyLow-FatBrownies byWworld
MicrowavePotato bycrazytrain320

http://www.instructables.com/id/5-Minute-Recipes/
The Best Mexican Chip Dip in the whole entire world! :) (well my world)by Comp101 on December 14, 2009
Author:Comp101 AF Comp 101This profile is comprised of the instructions written by my Composition 101 students. The assignment was intent to get them thinking about how to explainand teach how to complete a given process to a group. If you would like to see the larger project that this is attached to, you can visit the class website whereall their assignments are posted.
Please consider this when you comment on their instructables. This is a group of growing writers, many of whom are just now becoming aware of a largeraudience than their immediate peers. If you have feed back to leave, please make sure that it is constructive and not merely critical. The more you can helpthese students become aware of the ways in which they can become better communicators, the better writers they will become.
Thank you for looking at our projects, and have a wonderful day.
Cheers,Price
Intro: The Best Mexican Chip Dip in the whole entire world! :) (well my world) OK! So, are your chip dips boring and dull? Well then you need to try my family recipe chip dip! IT may not attract so much attention by its color, but it is delectable! :)Try it out, its simple and easy to make, and leaves your taste buds satisfied! :)
Supplies and Ingredients needed:1) Bottle of PACE Picante Sauce, or close variations, I prefer PACE. You can adjust the type of sauce you like and how hot you like it. 2) 2 Cheese Singles. More cheese if you wish for your dip to be more cheesy, or less for spicy. 3) A Bag of Tortilla Chips4) A Microwavable Bowl5) A Spoon 6) A Microwave! :)
* Note none of the above ingredients depend on a specific brand or generic to make the dip taste better. The Dip is extremely adjustable, there is nothing you can do,within reason, to make the dip taste bad. Experiment! :)
*I Do Not recommend this recipe for any one who does not like spicy or moderately hot stuff! :)
Image Notes1. Don't Worry bout the color! ITS JUST CHEESE! :) hehe don't let your scardiness, affect your chance of tasting the world's best dip! :)
Step 1: Gather your Ingredients and supplies. Once you have all of your ingredients together. As always, wash your hands, pull your hair back (if you have any), and lets get ready to rumble! :)

http://www.instructables.com/id/5-Minute-Recipes/
Step 2: Dump out your contents. Dump out the desired amount of salsa into a microwavable bowl! :)
Step 3: Add the cheeseOpen the wrapped singles, and plop them on top of the salsa.

http://www.instructables.com/id/5-Minute-Recipes/
Step 4: Let technology take its course.Place the bowl into the microwave for a minimum of two minutes on high.
Step 5: MIX IT!Once the salsa is ready, take it out of the microwave, (careful its hot!) , and mix it with a spoon! :)
Step 6: ENJOY!Once you have mixed the salsa sufficiently, Take your tortilla chips, and dip it in the dip! :) Simple, Fast, Easy, and delicious! :)
*Don't be afraid of the color of the salsa it's just cheese and salsa! Taste it and you won't regret it! Try many different variations or adjustments to the dip, like adding ground beef, and as always, enjoy!
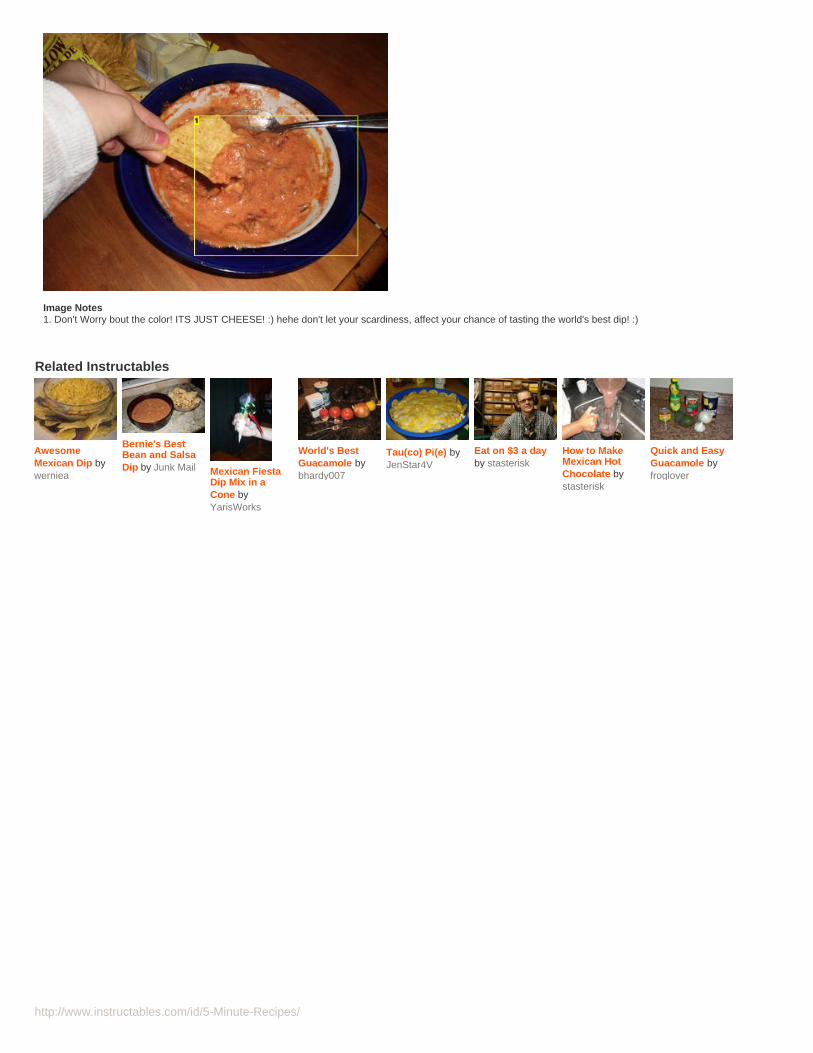
http://www.instructables.com/id/5-Minute-Recipes/
Image Notes1. Don't Worry bout the color! ITS JUST CHEESE! :) hehe don't let your scardiness, affect your chance of tasting the world's best dip! :)
Related Instructables
AwesomeMexican Dip bywerniea
Bernie's BestBean and SalsaDip by Junk Mail Mexican Fiesta
Dip Mix in aCone byYarisWorks
World's BestGuacamole bybhardy007
Tau(co) Pi(e) byJenStar4V
Eat on $3 a dayby stasterisk
How to MakeMexican HotChocolate bystasterisk
Quick and EasyGuacamole byfroglover
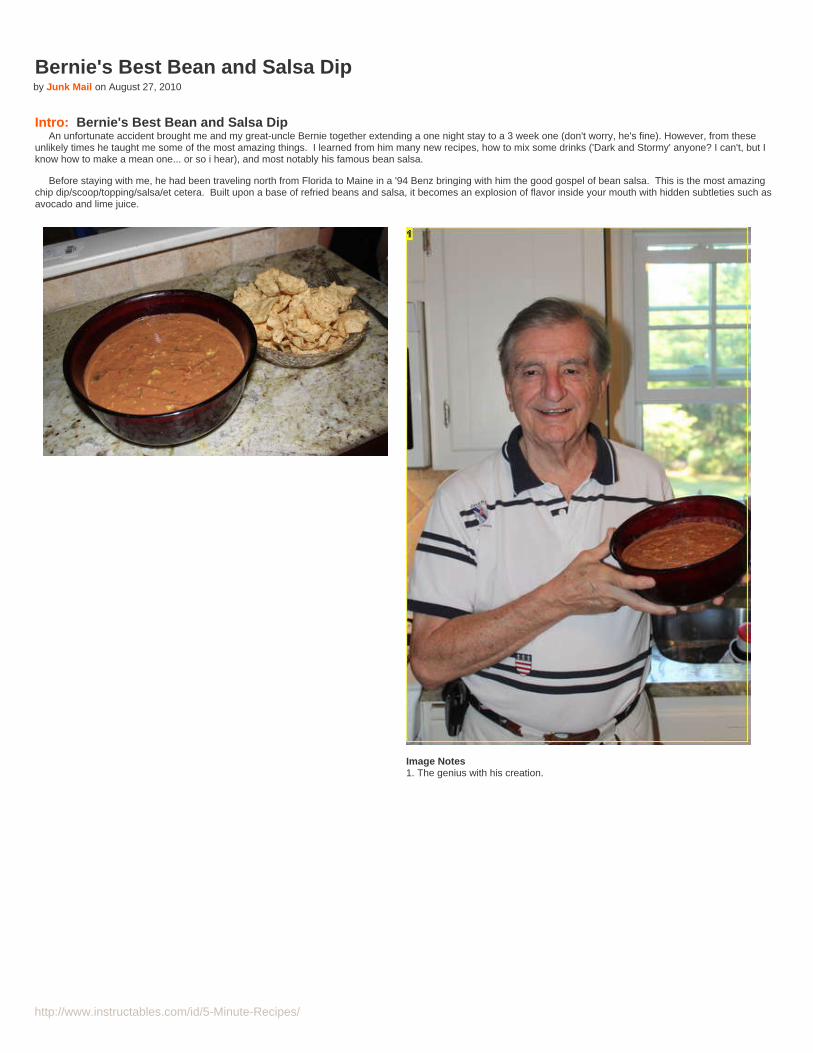
http://www.instructables.com/id/5-Minute-Recipes/
Bernie's Best Bean and Salsa Dipby Junk Mail on August 27, 2010
Intro: Bernie's Best Bean and Salsa Dip An unfortunate accident brought me and my great-uncle Bernie together extending a one night stay to a 3 week one (don't worry, he's fine). However, from theseunlikely times he taught me some of the most amazing things. I learned from him many new recipes, how to mix some drinks ('Dark and Stormy' anyone? I can't, but Iknow how to make a mean one... or so i hear), and most notably his famous bean salsa.
Before staying with me, he had been traveling north from Florida to Maine in a '94 Benz bringing with him the good gospel of bean salsa. This is the most amazingchip dip/scoop/topping/salsa/et cetera. Built upon a base of refried beans and salsa, it becomes an explosion of flavor inside your mouth with hidden subtleties such asavocado and lime juice.
Image Notes1. The genius with his creation.

http://www.instructables.com/id/5-Minute-Recipes/
Step 1: IngredientsThe dip is an easy combination of just a few simple ingredients:
1 mature Avocado. If you do not have an avocado you can always just use guacamole.
1 large can Refried Beans. About 32 oz. Old El Paso is the best because it's denser and less liquid.
1 jar Salsa. About 12 oz. Medium or Hot. We used medium for this Instructable, but I would recommend hot because it gets diluted to about 1/4 its original strength.
1/3 jar Salsa con Queso, or any other mexican cheese dip. About 4 ounces. More if you like the flavor.
Tabasco or other hot sauce to flavor and to add spice if you wish.
Lime Juice
Bag of your favorite Corn Chips
Optional: Shredded Cheese
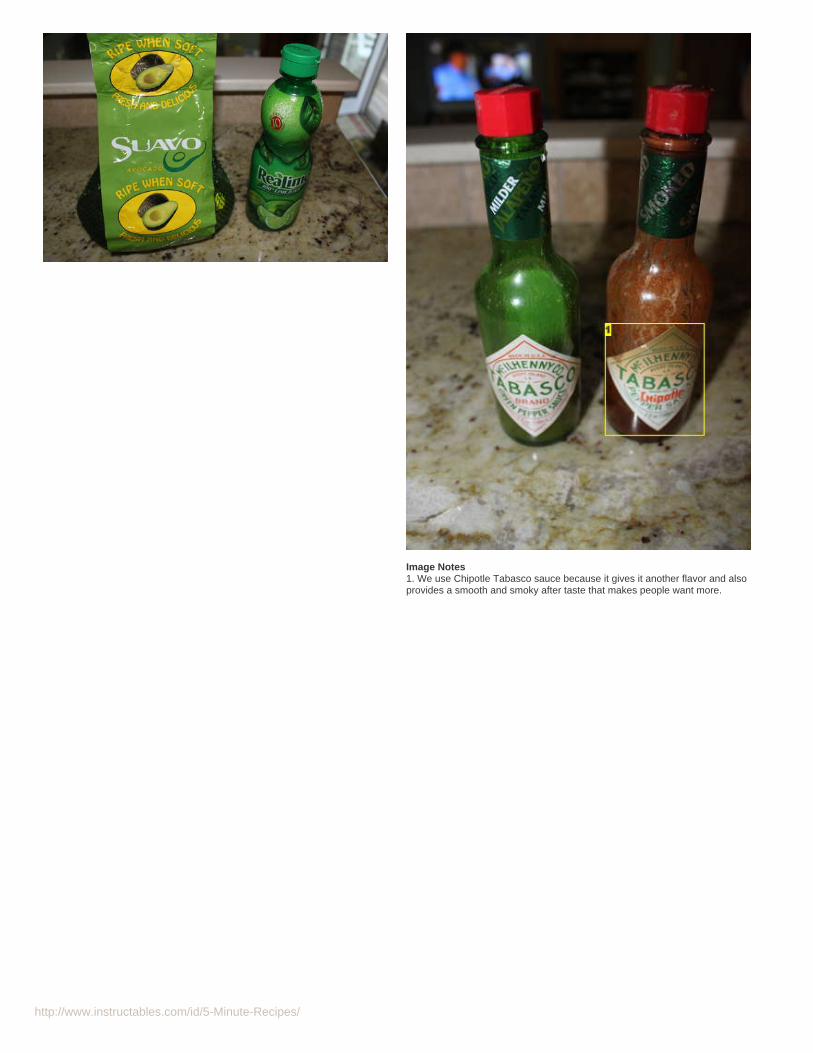
http://www.instructables.com/id/5-Minute-Recipes/
Image Notes1. We use Chipotle Tabasco sauce because it gives it another flavor and alsoprovides a smooth and smoky after taste that makes people want more.

http://www.instructables.com/id/5-Minute-Recipes/
Step 2: AvocadoThe first thing to do is split the avocado and spoon out the good stuff into a large bowl. We prepared ours right in our serving bowl. Preserve the pit if you want to grow atree, but thats another instructable. Next, smash the avocado into a paste so that it will mix in with the rest. You want constant avocado flavor throughout, not largeavocado chunks.
Image Notes1. Our pit was cracked, so no trees this time.
Image Notes1. The avocado we used was rather firm. This makes it more difficult to mash intoa smooth paste, but with the right tool it is possible...
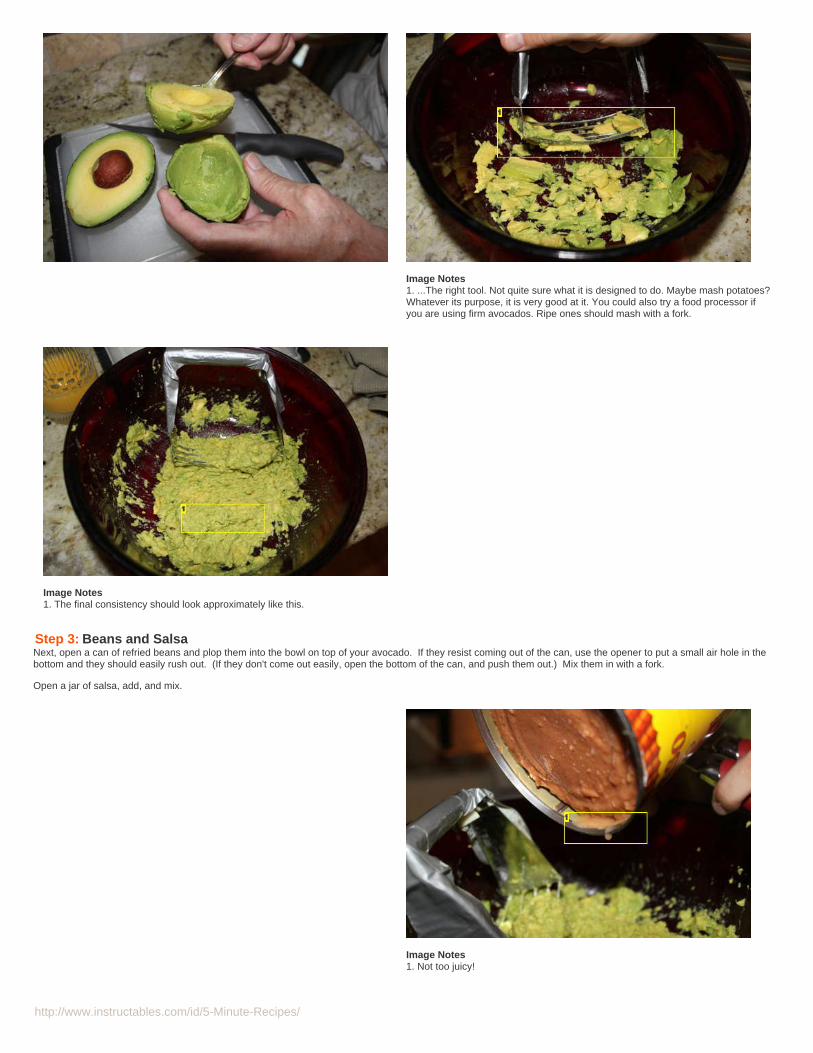
http://www.instructables.com/id/5-Minute-Recipes/
Image Notes1. ...The right tool. Not quite sure what it is designed to do. Maybe mash potatoes?Whatever its purpose, it is very good at it. You could also try a food processor ifyou are using firm avocados. Ripe ones should mash with a fork.
Image Notes1. The final consistency should look approximately like this.
Step 3: Beans and SalsaNext, open a can of refried beans and plop them into the bowl on top of your avocado. If they resist coming out of the can, use the opener to put a small air hole in thebottom and they should easily rush out. (If they don't come out easily, open the bottom of the can, and push them out.) Mix them in with a fork.
Open a jar of salsa, add, and mix.
Image Notes1. Not too juicy!

http://www.instructables.com/id/5-Minute-Recipes/

http://www.instructables.com/id/5-Minute-Recipes/
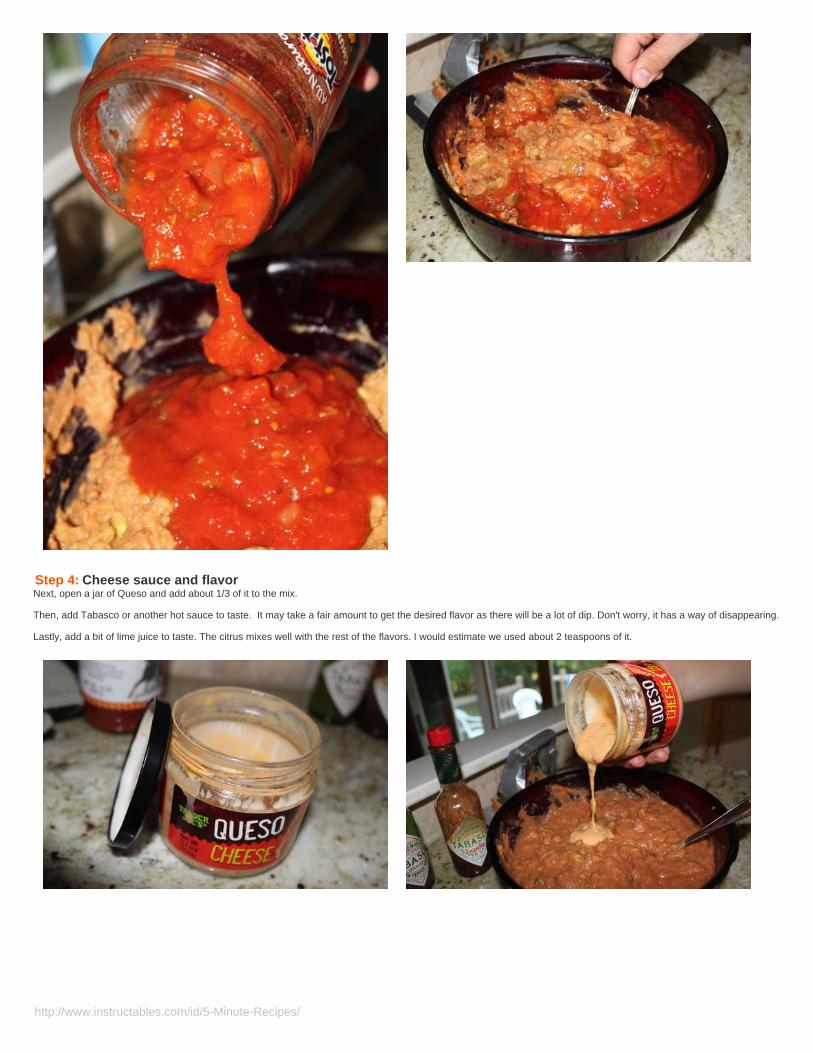
http://www.instructables.com/id/5-Minute-Recipes/
Step 4: Cheese sauce and flavorNext, open a jar of Queso and add about 1/3 of it to the mix.
Then, add Tabasco or another hot sauce to taste. It may take a fair amount to get the desired flavor as there will be a lot of dip. Don't worry, it has a way of disappearing.
Lastly, add a bit of lime juice to taste. The citrus mixes well with the rest of the flavors. I would estimate we used about 2 teaspoons of it.

http://www.instructables.com/id/5-Minute-Recipes/
Step 5: Serve!Get out your favorite chips. Make a Dark and Stormy. Grab some friends, and enjoy.
If you have any extra, it stores in the fridge for a while. I've never tested how long "a while" is because I don't have that level of self restraint, but it will be fine for at least5 days.
One possible alternate recipe is using refried pinto beans instead of the traditional ones (I don't know what bean that uses). This way came out a bit more orange with aslightly different flavor. Could just be the brand, but there was definitely a difference. Also on this try we used a hot salsa and added a large amount of Chipotle Tabascoto give it a nice burn.
If you have further ideas or questions, please feel free to comment below.
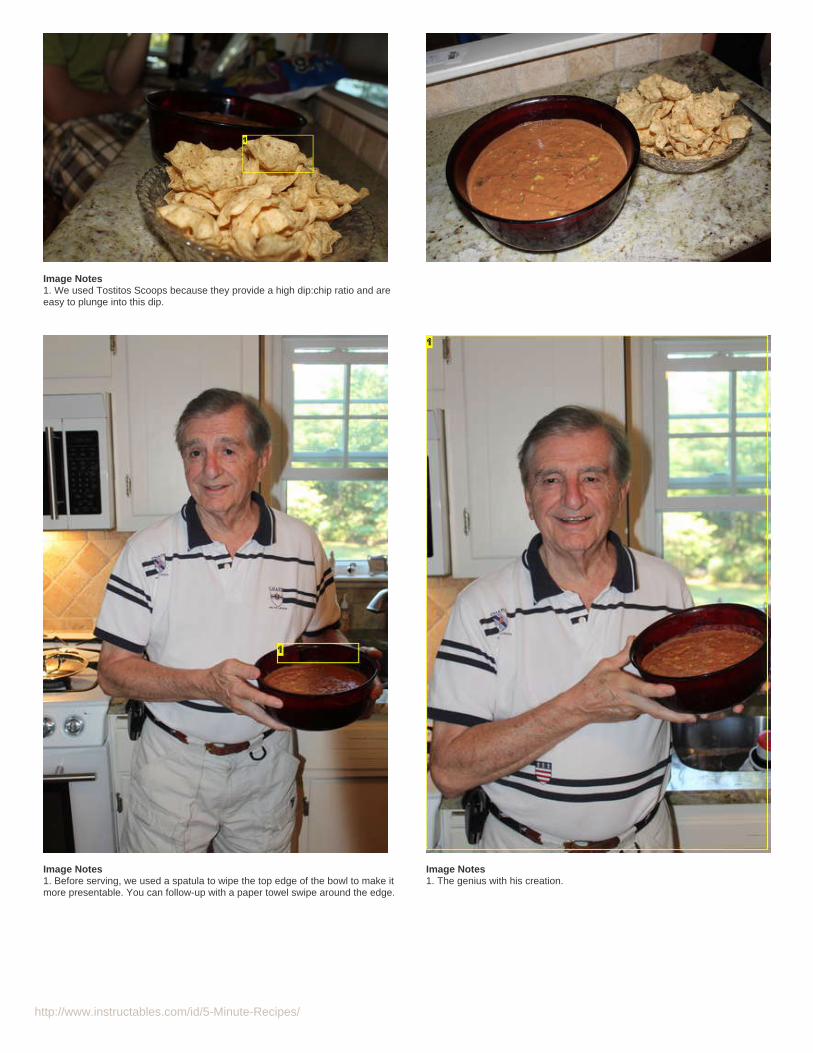
http://www.instructables.com/id/5-Minute-Recipes/
Image Notes1. We used Tostitos Scoops because they provide a high dip:chip ratio and areeasy to plunge into this dip.
Image Notes1. Before serving, we used a spatula to wipe the top edge of the bowl to make itmore presentable. You can follow-up with a paper towel swipe around the edge.
Image Notes1. The genius with his creation.

http://www.instructables.com/id/5-Minute-Recipes/
Related Instructables
AwesomeMexican Dip bywerniea
Super Nachosbyclonetrooper13
Killer DnD BeanDip byAtomicBeaker
Tau(co) Pi(e) byJenStar4V
World's BestGuacamole bybhardy007
The BestMexican ChipDip in the wholeentire world! :)(well my world)by Comp101
Hummus:Quick, Easy,and Delicious!by megtalley
How to MakeLazy MansNachos byfantomzed

http://www.instructables.com/id/5-Minute-Recipes/
Chili and Cream Cheese Chip Dipby Comp101 on December 14, 2009
Author:Comp101 AF Comp 101This profile is comprised of the instructions written by my Composition 101 students. The assignment was intent to get them thinking about how to explainand teach how to complete a given process to a group. If you would like to see the larger project that this is attached to, you can visit the class website whereall their assignments are posted.
Please consider this when you comment on their instructables. This is a group of growing writers, many of whom are just now becoming aware of a largeraudience than their immediate peers. If you have feed back to leave, please make sure that it is constructive and not merely critical. The more you can helpthese students become aware of the ways in which they can become better communicators, the better writers they will become.
Thank you for looking at our projects, and have a wonderful day.
Cheers,Price
Intro: Chili and Cream Cheese Chip DipHello. My cousin once introduced this chip dip to me at a family get together. It's super simple to make and really delicious. It only takes a few minutes to make, and sofar everyone that has tried it has enjoyed this snack. The Chili and Cream Cheese Chip Dip only takes about five minutes to make and is great for parties and gatherings.
Step 1: Ingredients1 can of chili - I prefer to use thick chili1 package of cream cheese
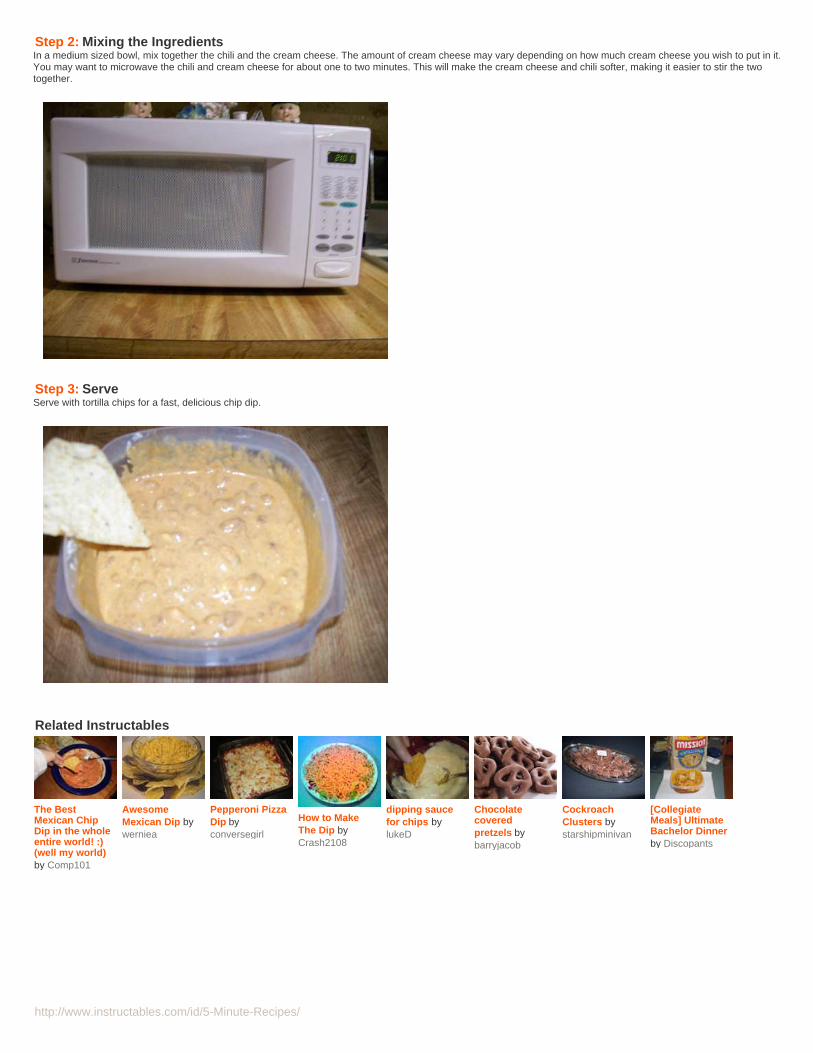
http://www.instructables.com/id/5-Minute-Recipes/
Step 2: Mixing the IngredientsIn a medium sized bowl, mix together the chili and the cream cheese. The amount of cream cheese may vary depending on how much cream cheese you wish to put in it.You may want to microwave the chili and cream cheese for about one to two minutes. This will make the cream cheese and chili softer, making it easier to stir the twotogether.
Step 3: ServeServe with tortilla chips for a fast, delicious chip dip.
Related Instructables
The BestMexican ChipDip in the wholeentire world! :)(well my world)by Comp101
AwesomeMexican Dip bywerniea
Pepperoni PizzaDip byconversegirl
How to MakeThe Dip byCrash2108
dipping saucefor chips bylukeD
Chocolatecoveredpretzels bybarryjacob
CockroachClusters bystarshipminivan
[CollegiateMeals] UltimateBachelor Dinnerby Discopants
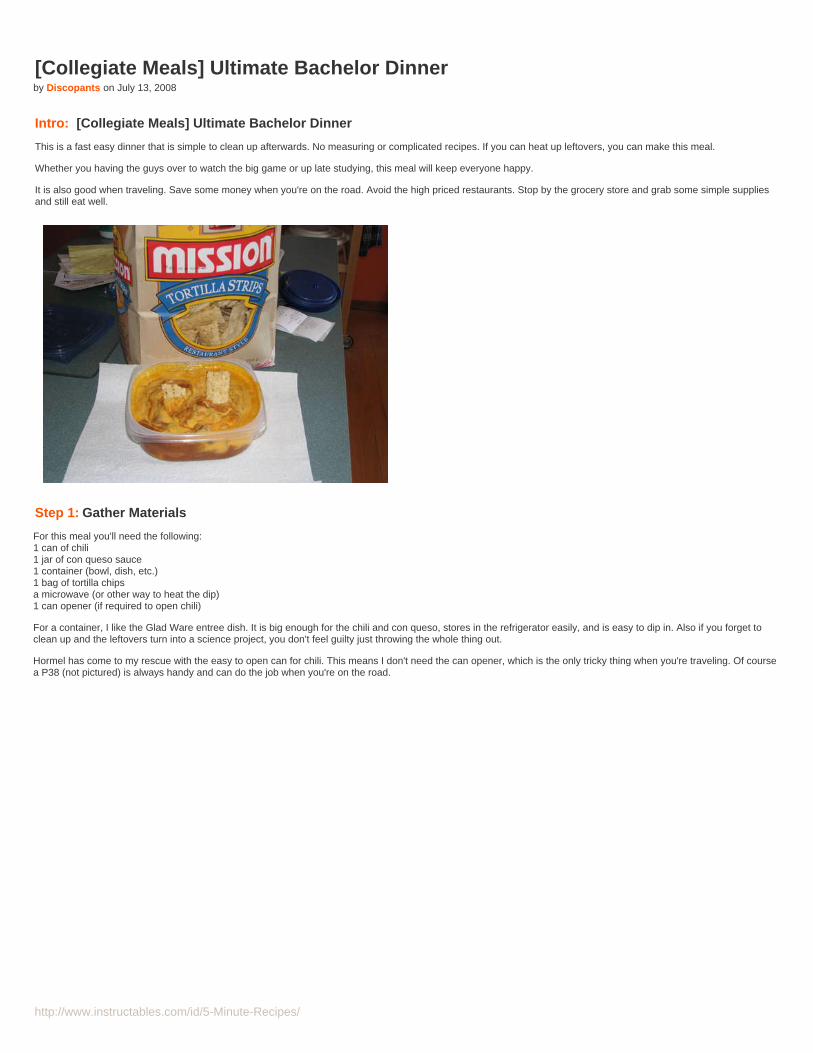
http://www.instructables.com/id/5-Minute-Recipes/
[Collegiate Meals] Ultimate Bachelor Dinnerby Discopants on July 13, 2008
Intro: [Collegiate Meals] Ultimate Bachelor Dinner
This is a fast easy dinner that is simple to clean up afterwards. No measuring or complicated recipes. If you can heat up leftovers, you can make this meal.
Whether you having the guys over to watch the big game or up late studying, this meal will keep everyone happy.
It is also good when traveling. Save some money when you're on the road. Avoid the high priced restaurants. Stop by the grocery store and grab some simple suppliesand still eat well.
Step 1: Gather Materials
For this meal you'll need the following:1 can of chili1 jar of con queso sauce1 container (bowl, dish, etc.)1 bag of tortilla chipsa microwave (or other way to heat the dip)1 can opener (if required to open chili)
For a container, I like the Glad Ware entree dish. It is big enough for the chili and con queso, stores in the refrigerator easily, and is easy to dip in. Also if you forget toclean up and the leftovers turn into a science project, you don't feel guilty just throwing the whole thing out.
Hormel has come to my rescue with the easy to open can for chili. This means I don't need the can opener, which is the only tricky thing when you're traveling. Of coursea P38 (not pictured) is always handy and can do the job when you're on the road.
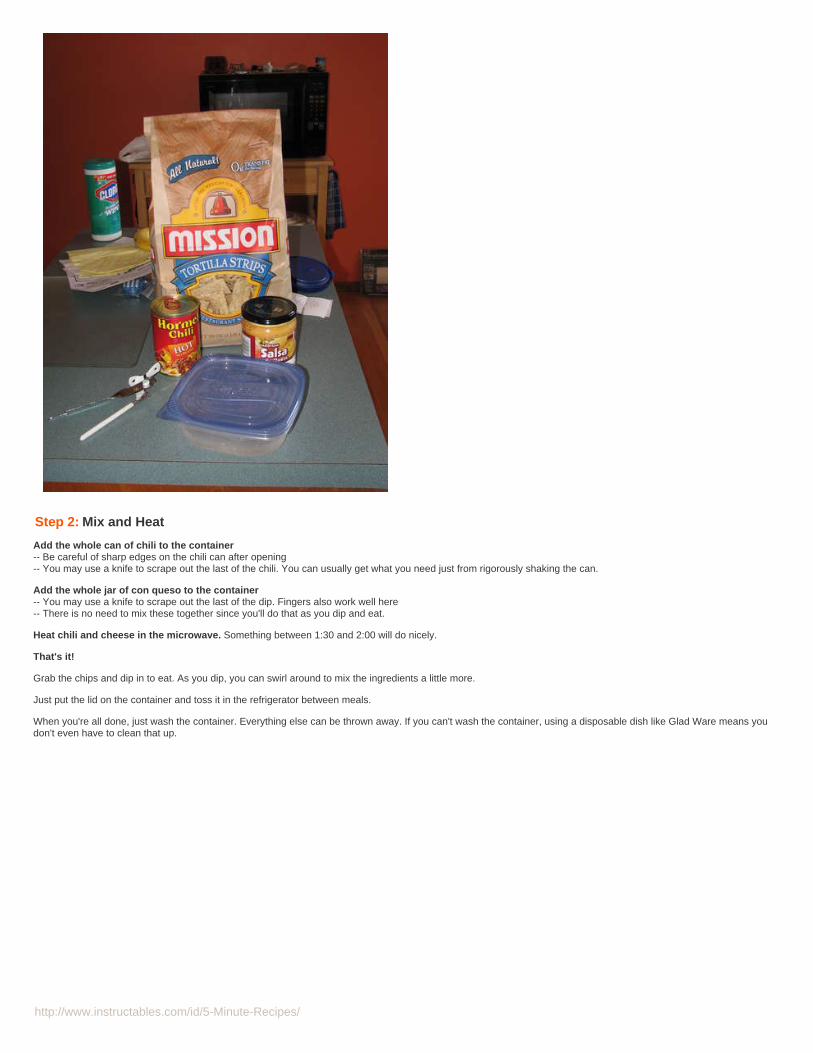
http://www.instructables.com/id/5-Minute-Recipes/
Step 2: Mix and Heat
Add the whole can of chili to the container-- Be careful of sharp edges on the chili can after opening-- You may use a knife to scrape out the last of the chili. You can usually get what you need just from rigorously shaking the can.
Add the whole jar of con queso to the container-- You may use a knife to scrape out the last of the dip. Fingers also work well here-- There is no need to mix these together since you'll do that as you dip and eat.
Heat chili and cheese in the microwave. Something between 1:30 and 2:00 will do nicely.
That's it!
Grab the chips and dip in to eat. As you dip, you can swirl around to mix the ingredients a little more.
Just put the lid on the container and toss it in the refrigerator between meals.
When you're all done, just wash the container. Everything else can be thrown away. If you can't wash the container, using a disposable dish like Glad Ware means youdon't even have to clean that up.
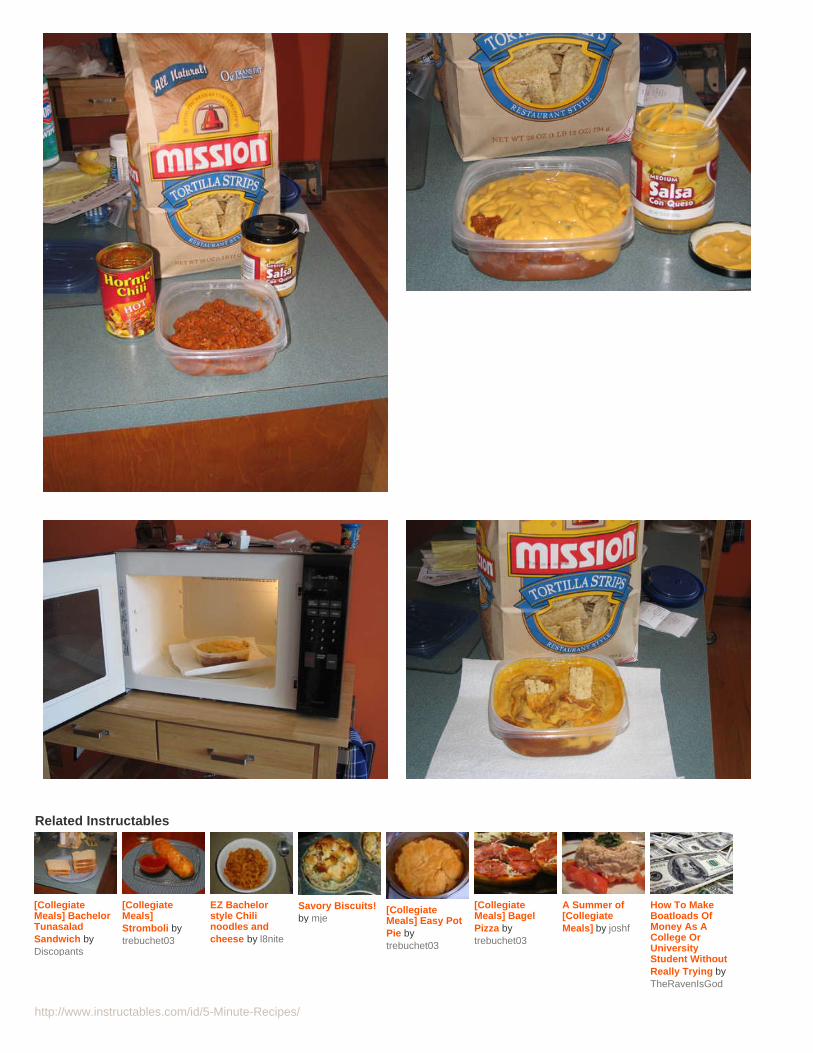
http://www.instructables.com/id/5-Minute-Recipes/
Related Instructables
[CollegiateMeals] BachelorTunasaladSandwich byDiscopants
[CollegiateMeals]Stromboli bytrebuchet03
EZ Bachelorstyle Chilinoodles andcheese by l8nite
Savory Biscuits!by mje
[CollegiateMeals] Easy PotPie bytrebuchet03
[CollegiateMeals] BagelPizza bytrebuchet03
A Summer of[CollegiateMeals] by joshf
How To MakeBoatloads OfMoney As ACollege OrUniversityStudent WithoutReally Trying byTheRavenIsGod

http://www.instructables.com/id/5-Minute-Recipes/

http://www.instructables.com/id/5-Minute-Recipes/
Microwave Cornby scoochmaroo on November 3, 2008
Author:scoochmaroo My fan pageEditor of the Food and Living channels. If you like what you see, subscribe to me!
Intro: Microwave CornThere's no shorter path between you and delicious, piping hot corn on the cob, than via the microwave! This microwave corn on the cob recipe will show you the tips andtricks you need for perfect corn every time. Once you try it, you'll never go back to boiling again!
Step 1: MaterialsCorn on the cob - unshucked
Towel
Paper towel or plate
Microwave
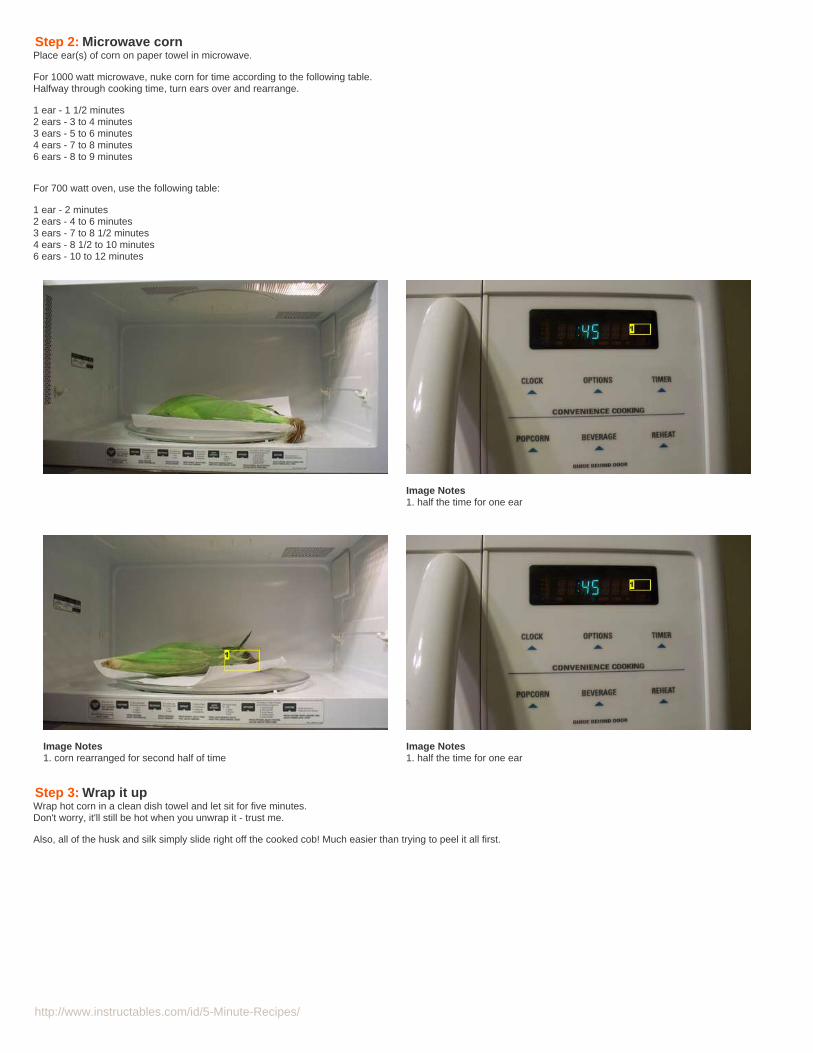
http://www.instructables.com/id/5-Minute-Recipes/
Step 2: Microwave cornPlace ear(s) of corn on paper towel in microwave.
For 1000 watt microwave, nuke corn for time according to the following table.Halfway through cooking time, turn ears over and rearrange.
1 ear - 1 1/2 minutes2 ears - 3 to 4 minutes3 ears - 5 to 6 minutes4 ears - 7 to 8 minutes6 ears - 8 to 9 minutes
For 700 watt oven, use the following table:
1 ear - 2 minutes2 ears - 4 to 6 minutes3 ears - 7 to 8 1/2 minutes4 ears - 8 1/2 to 10 minutes6 ears - 10 to 12 minutes
Image Notes1. half the time for one ear
Image Notes1. corn rearranged for second half of time
Image Notes1. half the time for one ear
Step 3: Wrap it upWrap hot corn in a clean dish towel and let sit for five minutes.Don't worry, it'll still be hot when you unwrap it - trust me.
Also, all of the husk and silk simply slide right off the cooked cob! Much easier than trying to peel it all first.
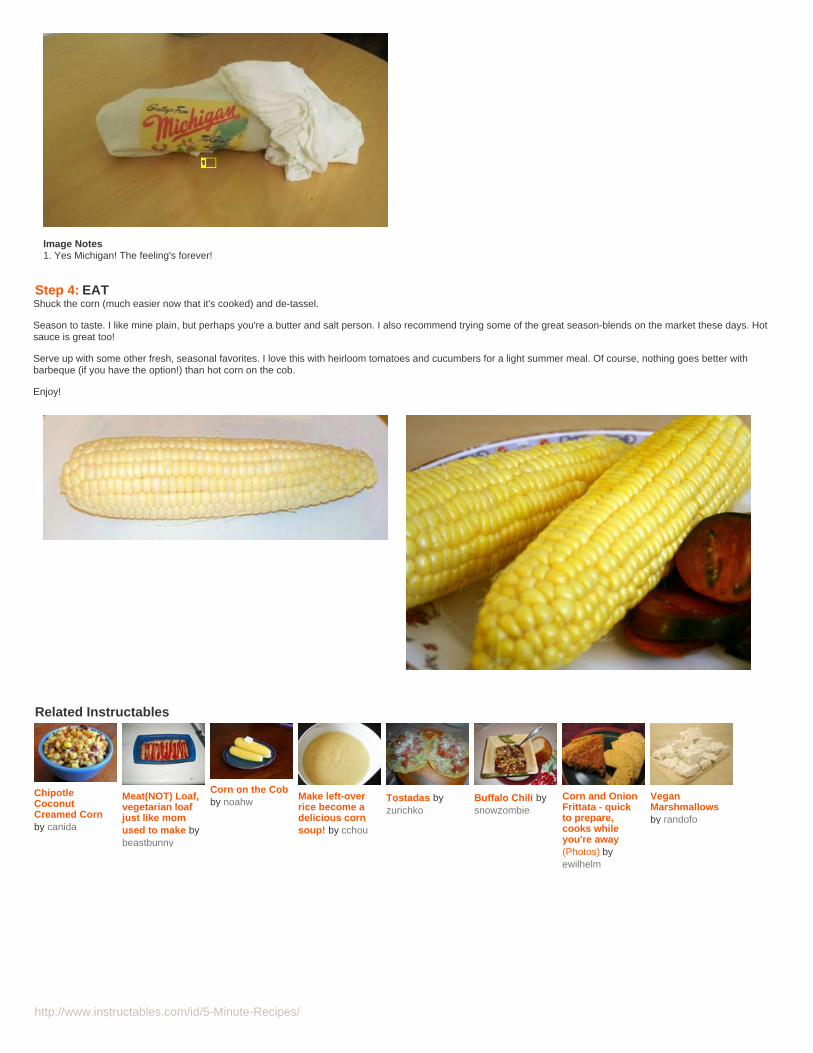
http://www.instructables.com/id/5-Minute-Recipes/
Image Notes1. Yes Michigan! The feeling's forever!
Step 4: EATShuck the corn (much easier now that it's cooked) and de-tassel.
Season to taste. I like mine plain, but perhaps you're a butter and salt person. I also recommend trying some of the great season-blends on the market these days. Hotsauce is great too!
Serve up with some other fresh, seasonal favorites. I love this with heirloom tomatoes and cucumbers for a light summer meal. Of course, nothing goes better withbarbeque (if you have the option!) than hot corn on the cob.
Enjoy!
Related Instructables
ChipotleCoconutCreamed Cornby canida
Meat(NOT) Loaf,vegetarian loafjust like momused to make bybeastbunny
Corn on the Cobby noahw
Make left-overrice become adelicious cornsoup! by cchou
Tostadas byzurichko
Buffalo Chili bysnowzombie
Corn and OnionFrittata - quickto prepare,cooks whileyou're away(Photos) byewilhelm
VeganMarshmallowsby randofo
http://www.instructables.com/id/5-Minute-Recipes/
Microwave Popcorn: Home made, cheap and easyby Hoopajoo on October 28, 2006
Author:Hoopajoo author's websiteUSAF - Spec. Communications, Telemetry & Data Networking, Microwave Networks, Aeronautics
Currently working for Amalgamated Research LLC. as a Lab Research Tech and Chemical Engineer
Intro: Microwave Popcorn: Home made, cheap and easyGo to the supermarket and look at the boxes of microwave popping corn. $1.99 to $3.00 a box and the odds are you won't find one seasoned to your individual taste.You just have to settle for what they offer.
HAH!
Not anymore, my friends. I am here to liberate your palates form the work-a-day microwave popcorn. Today, you will learn that which they don't want you to know. Youwill learn how simple and cheap it is to make your own popping corn. Lets get started.
First you will need the following ingredients:
1/4 cup of popping corn (generally $0.99 for a pound bag. This is enough to make at least 50 bags of microwave corn)1 Teaspoon extra virgin olive oilTo taste - popcorn salt (it has finer granules than table salt with the same taste)
And the following tools:
A staplerA teaspoonA measuring cupA brown paper bagandA microwave
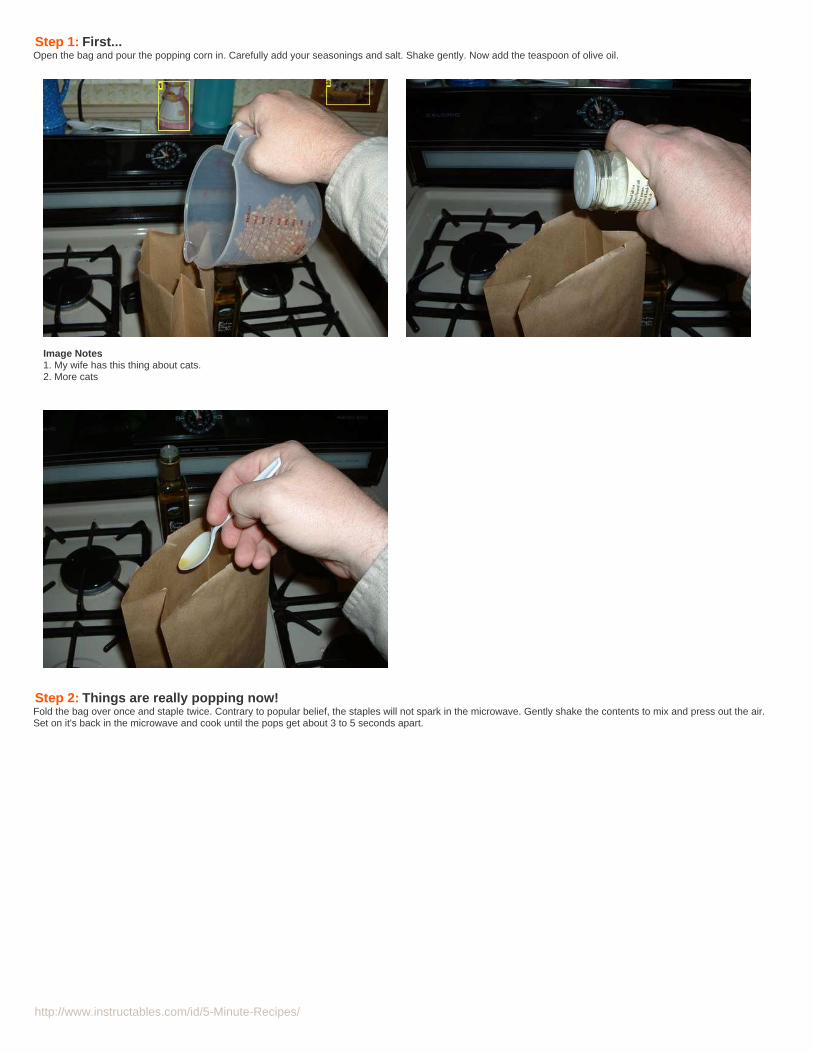
http://www.instructables.com/id/5-Minute-Recipes/
Step 1: First...Open the bag and pour the popping corn in. Carefully add your seasonings and salt. Shake gently. Now add the teaspoon of olive oil.
Image Notes1. My wife has this thing about cats.2. More cats
Step 2: Things are really popping now!Fold the bag over once and staple twice. Contrary to popular belief, the staples will not spark in the microwave. Gently shake the contents to mix and press out the air.Set on it's back in the microwave and cook until the pops get about 3 to 5 seconds apart.

http://www.instructables.com/id/5-Minute-Recipes/
Step 3: Relax and savorOpen the bag with great care as steam will be escaping and you can get scalded. Pour into a bowl, serve and enjoy the taste and the knowledge that this heaping bag ofmicrowave popcorn cost less than $0.10!
Image Notes1. YUMMMM!
Related Instructables
How to HackMicrowavePopcorn byjblanke
Ultra-cheap (buttasty)microwavepopcorn by not-bob
Easy StovetopPopcorn byscoochmaroo
How to MakeKettle Corn byGRitter
JelloFlavoredPopcorn BallOrnaments byAdran
My DelectablyDeliciousCaramelPopcorn byComp101
BrownbagPopcorn byfoxquarry
Mug Brownie bySpastic

http://www.instructables.com/id/5-Minute-Recipes/