Embed Size (px)
Citation preview

page 1

page 2
Contents1. In t roduct ion . . . . . . . . . . . . . . . . . . . . . . . . . . . . . . . . . . . . . . . . . . . . . . . . . . . . . . . . . . . . . . . . . . . . . . . . . . . . . . . . . . . . . . 3
2 . Suppl iedAccessor ies . . . . . . . . . . . . . . . . . . . . . . . . . . . . . . . . . . . . . . . . . . . . . . . . . . . . . . . . . . . . . . . . . . . . . . . 3
3 . Connect ions. . . . . . . . . . . . . . . . . . . . . . . . . . . . . . . . . . . . . . . . . . . . . . . . . . . . . . . . . . . . . . . . . . . . . . . . . . . . . . . . . . . . . . . . 4
4 . Menus/Conf igurat ion. . . . . . . . . . . . . . . . . . . . . . . . . . . . . . . . . . . . . . . . . . . . . . . . . . . . . . . . . . . . . . . . . . . . . . 4
5 . V ideo-On-DemandSetup. . . . . . . . . . . . . . . . . . . . . . . . . . . . . . . . . . . . . . . . . . . . . . . . . . . . . . . . . . . . . . . 5
6 . Manual Set UpMenu. . . . . . . . . . . . . . . . . . . . . . . . . . . . . . . . . . . . . . . . . . . . . . . . . . . . . . . . . . . . . . . . . . . . . . 5
7. Channel Opt ions. . . . . . . . . . . . . . . . . . . . . . . . . . . . . . . . . . . . . . . . . . . . . . . . . . . . . . . . . . . . . . . . . . . . . . . . . . . . . . 6
8 . Swi tch-OnOpt ionsMenu. . . . . . . . . . . . . . . . . . . . . . . . . . . . . . . . . . . . . . . . . . . . . . . . . . . . . . . . . . . 10
9 . On-ScreenDisp layOpt ions. . . . . . . . . . . . . . . . . . . . . . . . . . . . . . . . . . . . . . . . . . . . . . . . . . . . . . . . .11
10. Cont ro l Opt ions. . . . . . . . . . . . . . . . . . . . . . . . . . . . . . . . . . . . . . . . . . . . . . . . . . . . . . . . . . . . . . . . . . . . . . . . . . . . . . 13
11. Capt ioningSetup. . . . . . . . . . . . . . . . . . . . . . . . . . . . . . . . . . . . . . . . . . . . . . . . . . . . . . . . . . . . . . . . . . . . . . . . . . . . 14
12. V-ChipSetup. . . . . . . . . . . . . . . . . . . . . . . . . . . . . . . . . . . . . . . . . . . . . . . . . . . . . . . . . . . . . . . . . . . . . . . . . . . . . . . . . . . . 15
13. Serv iceMenu. . . . . . . . . . . . . . . . . . . . . . . . . . . . . . . . . . . . . . . . . . . . . . . . . . . . . . . . . . . . . . . . . . . . . . . . . . . . . . . . . . . . 18
14. User Menu. . . . . . . . . . . . . . . . . . . . . . . . . . . . . . . . . . . . . . . . . . . . . . . . . . . . . . . . . . . . . . . . . . . . . . . . . . . . . . . . . . . . . . . . . 19
15. Operat ion . . . . . . . . . . . . . . . . . . . . . . . . . . . . . . . . . . . . . . . . . . . . . . . . . . . . . . . . . . . . . . . . . . . . . . . . . . . . . . . . . . . . . . . . . 20
16. FAQ 21
17. P roduct Spec i f icat ion . . . . . . . . . . . . . . . . . . . . . . . . . . . . . . . . . . . . . . . . . . . . . . . . . . . . . . . . . . . . . . . . . . . . . 22
18. FCCStatement&L icenseAcknowledgement. . . . . . . . . . . . . . . . . . . . . . . 22
19. EnseoL imi tedWar ranty/Sof twareMaintenanceAgreement. . . . . . . . . . . . . . . . . . . . . . . . . . . . . . . . . . . . . . . . . . . . 23
20. Disc la imer &Par t Number. . . . . . . . . . . . . . . . . . . . . . . . . . . . . . . . . . . . . . . . . . . . . . . . . . . . . . . . . . . 24

page 3
Introduction TheHD2000RFisaprofessionaltri-bandtunerproviding8VSB,QAMandNTSCtunerdesignedforuseinhospitalityapplications.TheHD2000RFisconfiguredwithhardwarecomponentsthatenablefutureexpansiontosupportIPTVandIPVODsystemrequiringEthernetconnections.Thesecomponentsaredisabledinsoftwaretofocustheapplica-tionuseoftheHD2000RFtocoaxsystemsonly.
Thisdocumentoutlinestheinstallation,setupandoperationoftheHD2000RFinastandardhospitalityoperationwithacompatibleLGElectronicsdisplayusingeitherMPIorSerialcontrol.
Supplied Accessoriestup
Note on Compatible Displays:TheHD2000RFisdesignedforconnectionandintegratedcontrolwithLGElectronicscommercialdisplaysutilizingeitherahospitalityMPI(RJ12)connectororserial(DB-9)connector.
HD2000 RFSet Top Box
HDMICable
DataCable
12V DCPower Supply

page 4
F-Connector
L/R StereoAudio In
DisplayControl
Ethernet USB x 2
CompositeVideo In
S/PDIFAudio Out
HDMI Out PPVControl
VLANSwitch
12V DCpower
DB-9• RS232• IR
• 5V DC out
L/R StereoAudio Out
ConnectionsTheHD2000RFisdesignedtofunctionwithHDMI-HDCPenableddisplayswhichmaydifferininputtypesandcon-nectionconfiguration.SomeDVI-HDCPproductswillfunctionifanHDMItoDVIadapterisusedandL/Raudioisconnectedwithaseparateaudiocable(notsupplied).
InstallationInstalling Cables:1. RemoveACpowerfromLGTVandHD2000RF.
2. InstalltheHD2000RF,connectingthesignalsourcetotheHD2000RFandtheHDMIcabletotheLGTV.
3. ConnecttheTVcontrolcable(220-0281-003)totheLGTV.DonotconnecttheTVcontrolcabletotheHD2000RFyet.
Select TV Type on the HD2000 RF:4. ApplypowertotheTVandturnitonusingtheLGremote.
5. SelectTVHDMI-1inputwithLGTVremote(notincluded).
6. ApplyACpower(plug-inpower,notthePWRbutton)totheHD2000RFandwait1minutefortheHD2000RFtoproperlyboot.

page 5
7. UsingtheEnseoremote(notincluded),press0-MENU-7-8-9.
• DuringStep7,aimtheremoteattheHD2000RF,nottheTV.
• Ifthesequencewassuccessful,theHD2000RFwillturnonanddisplaythesetupchannel.
8. PressSETUPontheEnseoremoteandnavigatetoServiceOptions/TVInterfaceType.Selecttheappropriatetype.TVwilldisplay“PleaseWaitRestarting...”andreboot.
Completing the Setup:
9. WhiletheHD2000RFisrebooting,connecttheTVcontrolcabletotheHD2000RF(itshouldalreadybecon-nectedtotheTV).
• WhentheTVhascompleteditsrebootandgainedcontroloftheTV,itwillpowerdowntheTV.
• Fromthispoint,onecanuseeithertheEnseoortheLGremotetoissuecommands.
RF IN VIDEOIN
AUDIO OUT DIGITALAUDIO
OUT
AUDIO
IN
HDMIOUT
CONTROL NETWORK POWER
DISPLAY PPV
USB

page 6
LG Escape Sequence**If you incorrectly selected a panel type or use another manufacturer’s TV, use the fol-lowing method to reset the HD2000 RF to Generic Mode:1. MakesurenoTVcontrolcableisconnectedtotheHD2000RF.
2. Makeallotherconnections(HDMI,network,RF,etc.),butDONOTAPPLYACtotheHD2000RFyet.
3. TurnontheTVusingthemanufacturer’sremote.
4. ApplyACtotheHD2000RF.
5. WhiletheHD2000RFbootsup,depressandholdtheUPbuttonoftheEnseoremote.
• TheHD2000RFwilldetecttheUPbuttonIR,switchtoGenericMode,thenpowerup.
• Afterabout1minuteyouwillseethestartupchanneldisplayedontheTV.
6. UsingtheEnseoremote,entertheServiceMenuandselecttheappropriatetypeforyourTV(None,Auto,PT2orPT4).TheHD2000RFwillreboot.
7. WhiletheHD2000RFreboots,connectthecontrolcable,ifapplicable.
Menus/ConfigurationSupported Remote ControlsTheHD2000RFisdesignedtofunctionwitheithertheEnseoremotecontrolthatshippedwiththedevice,aremotecontrolprovidedbythemanufacturer,oraLodgingremotecontrolprovidedbytheVideo-On-Demandprovider.TheEnseoremotecontrolcanbeusedforsettinguptheHD2000RF.
This remote control includes direct button access for the follow key functions: BUTTON: FUNCTION:
Setup Access the setup menus for the HD2000RF, including channelmapping of digital channelstoanalogchannelnumbers

page 7
Video-On-Demand SetupTheEnseoHD200RFisdesignedtoautomaticallyconfigureitselfwithmanyVideo-On-Demandsystems,includingLodgeNet™(Terminalrequired).Tooperatewiththesesystems,connecttheHD2000RFtotheLGTVusingthecorrectdatacableforthemodelused,andconnecttheVODsystemtothePPVControlportusingadatacableprovidedbytheVODsystemintegrator.
ToaccessusermenusandtoadjustsettingsfortheHD2000RF,thePPVControldatacablemustbedisconnectedfromtheVODsystem.
Manual Set Up MenuTheHD2000RFisshippedwithanEnseoremotecontrolthatincludesasetupbuttonforaccesstothesetupmenus.
Navigating Menus:MostmenusandsubmenusarenavigatedusingtheUP/DOWN/RIGHT/LEFTarrowsontheremotecontrol.Toenteramenu,presstheRIGHTbutton.
Toenteraniteminasubmenu,theENTERbuttoncanbepressedortheLEFTarrowbuttoncanbepressedtoexitaentryfieldandstorethesetting.
Somesub-menusrequirespecificcharactersandonscreeninstructionswillbeprovidedinsuchcases.
Image 1 - Setup Menu
page 8
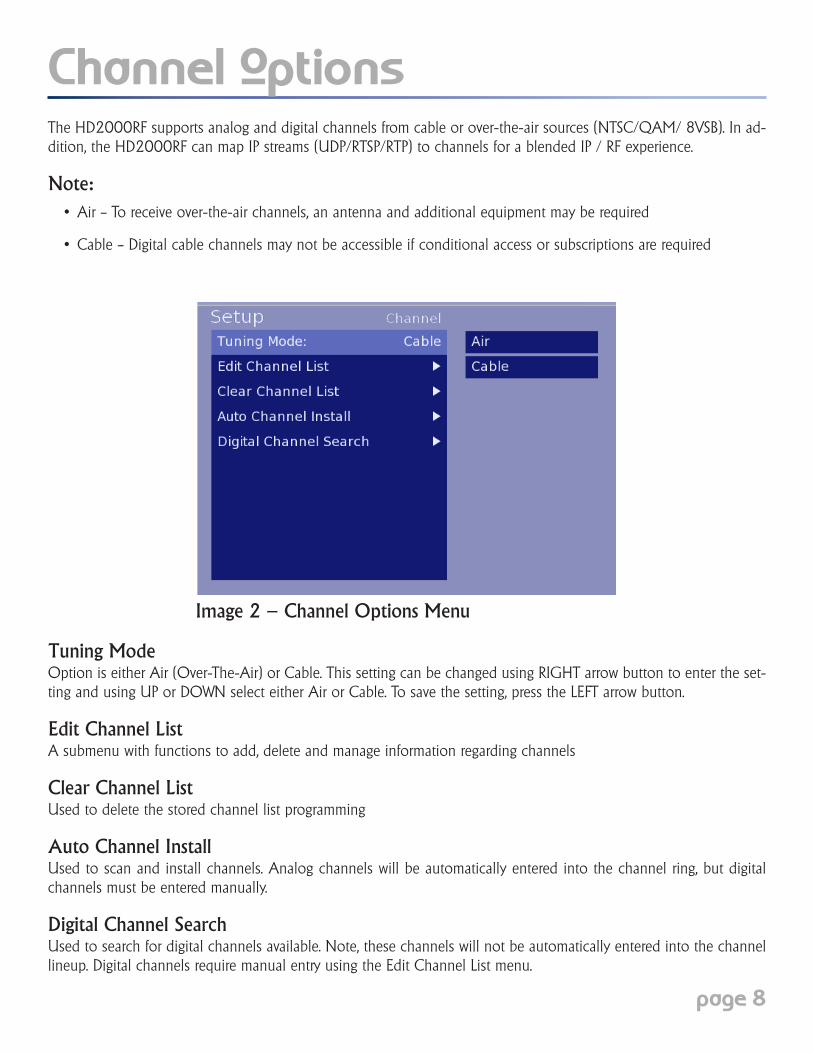
Channel OptionsTheHD2000RFsupportsanaloganddigitalchannelsfromcableorover-the-airsources(NTSC/QAM/8VSB).Inad-dition,theHD2000RFcanmapIPstreams(UDP/RTSP/RTP)tochannelsforablendedIP/RFexperience.
Note: • Air–Toreceiveover-the-airchannels,anantennaandadditionalequipmentmayberequired
• Cable–Digitalcablechannelsmaynotbeaccessibleifconditionalaccessorsubscriptionsarerequired
Tuning ModeOptioniseitherAir(Over-The-Air)orCable.ThissettingcanbechangedusingRIGHTarrowbuttontoentertheset-tingandusingUPorDOWNselecteitherAirorCable.Tosavethesetting,presstheLEFTarrowbutton.
Edit Channel ListAsubmenuwithfunctionstoadd,deleteandmanageinformationregardingchannels
Clear Channel ListUsedtodeletethestoredchannellistprogramming
Auto Channel Install Usedtoscanandinstallchannels.Analogchannelswillbeautomaticallyenteredintothechannelring,butdigitalchannelsmustbeenteredmanually.
Digital Channel Search Usedtosearchfordigitalchannelsavailable.Note,thesechannelswillnotbeautomaticallyenteredintothechannellineup.DigitalchannelsrequiremanualentryusingtheEditChannelListmenu.
Image 2 – Channel Options Menu

page 9
Edit Channel List SubmenuThissubmenuallowsformanualadd,deleteandmanagementfunctionsofchannels.
ChannelUsingremote,enterthenumberofthechanneltomanage,ortosetuptheStartupChannel,selectStartupChannel
TheStartupChannelisafeaturetohaveaspecificchanneltunedasthedefaultwhenevertheTVturnson.TheStartupChannelmayalsobeanAVInputinthecasewhereanexternalmediadeviceisusedforthePPVsystem.
AStartupChanneldoesnotneedtobeachannelthatisinthechannelring.
Include in List ThisfunctionallowsachanneltoberemovedfromtheChannelRing(availablechannels)withoutlosingstoreddata.SelectYestoinclude/Notoexclude
Type• Selectionoptionsinclude:
1. Analog–AnalogNTSCChannelsfrom1-125
2. Digital–DigitalChannels–SelectDigitaltoremapthedigitalQAMor8VSBchanneltoananalogchannelnumber
3. A/V Input –ProvideaccesstoTVA/VInputsthroughremappingtheinputtoachannelringnumber.*
*Note:A/VInputremappingmaynotfunctionwithallPPVproviders.FordetailsonusingA/VInputswhilein LodgingMode,consultthesectiononA/VInputmapping.
Image 3 – Edit Channel Submenu

page 10
4. UDP/RTP–TheseIPstream“Channels”requireanIPaddressandportinformationinordertotunetotheI/Pstreamchan-nelyoudesiretoview.
Note:Dependingontheselectiontype,themenuoptionswillchangefortheChannelListmenu
Analog Type Selection:TheoptionsforananalogchannelincludeacustomizedLabelforthechannel,additionofathumbnaillogoforthechannelandse-lectionofaudio/videooptionsforthechannel.
Digital Type Selection:1. Browse Digital Channels-Availableforscanningthrough
digitalchannelsaftertheyhavebeenscannedusingtheDigitalChannelSearchfunctionfromtheChannelOptionsMenu.
Note: To browse the digital channels, a standard SonyTV remote, with CH+/CH- buttons is required. Theremotes provided with the FWD and KLH model dis-plays do not include CH+ / CH- buttons and cannotbrowse the scanned digital channels. Also note thatthe encrypted channels will display a blank screen untilactuallyplacedinthechannelring.
2. Selection Method-Digitalstreamsmaycontaininformationthatallowforthecreationofvirtualchannels.Forexample,stationWXYZmaytransmitonchannel14.1,butincludeinfor-mationthatdescribesthechannelas8.1.Thisisdoneinsituationswherenamebrandinghasoccurredandthestationstillwantstobeidentifiedwithitsoldallocation.
In the example above, 14.1 is the direct channel and 8.1 is the virtual channel. The Enseo unit is able to captureandinterpretthesevirtualchannels.Whensettingupyourchannelring,youmaychoosebetweenthe virtualchannelIDortheactualchannelinformation.
3. Digital Channel-ThissectionprovidesfortheentryoftheChannelPrimarydigitsandSub(Program)digitsfortheknowndigitalchannel
4. Label-EntryusingUP/DOWNarrowbuttonstoenteratextlabelforthechannel
Note:PPVsystemsmaynotusethelabelsettingintheHD2000RFandinsteaduseownlabelmethod.ConfirmwithyourPPVprovideriflabelinformationwillbeused.
Image 6 – Digital Channel Options
Image 5 – Analog Channel Settings

page 11
5. Logo-SelectablemenuofgraphicallogosforaddingavisualthumbnailformanypopularTVchannels
(Note:PPVsystemsmaynotusethelogosettingintheHD2000RFandinsteaduseownlogomethod.ConfirmwithyourPPVprovideriflabelinformationwillbeused)
6. Usage-SelectionofAudioandVideo(default),AudioOnlyformusicchannels/inputsorVideoOnlyforvideoonlyusage.
7. Allow Online Remapping-NotallPPVsystemsallowOnlineremapping.PleaseconsultEnseoat972-234-2513toensureyoursystemissupported.
ThissettingisusedforLodgingModetoallowremappingofaDigitalChannelorAVInputtoexistinacontrolledhospitalitysystem.SelectYEStohavethesettingsforthechannelspecifiedmaintainthemappedinformation.
Analogtunecommandsaretheonlytunecommandsthatcanbere-mapped.IfyourPPVproviderdoesnotuseana-logtunecommandstheywillneedtoimplementthembeforethisfunctionwillwork.
BeforethisfunctionisusedthePPVprovidermustbeconsultedduetodifferencesincommandstructuresbetweenPPVproviders,thenecessitytoincludethere-mappedchannelinthering,andotherproprietaryconcerns.
Image 7 – Logo Options
Image 8 – Online Remapping Selection

page 12
Lodging System Requirements for Channel Re-mapping:1. TheLodgingSystemMUSTNOTexplicitly‘delete’thechannel
2. TheLodgingSystemMUSTNOTadd‘installationdata’forthechannel
3. TheLodgingSystemMUSTusean‘AnalogChannelTune’commandtoaccessthere-mappedchannel
Switch-On Options MenuThismenuprovidesoptionsforsettingupdefaultsettingsforwhenthedisplayfirstturnson.Thesesettingsarepar-ticularlyusefulinalodgingenvironmenttobesurethedisplaystartsontheStartupChannelandtopre-definevolume,screenformatandothersettings.
1. Channel-Allowsfortheconfigurationofadefaultchannel:
• None–AllowsPPVsystemtodefinestartupchannel
• StartupChannel–UsestheinformationconfiguredforStartupChannelonEditChannelSubmenu.ThismayincludeanA/VInput.Note:Pro:Idiomencryptedchannelsarenotsupportedasstartupchannelsatthistime.
• Restore–ReturnstheTVtothelastchanneltunedpriortoturningoffbyuser
2. Volume-Setthenumericvaluefrom0to99thatyouwouldliketobeusedasthedefaultvolumelevelforthedisplay.
3. Picture Format-Selectbetweendifferentformatsforthescreenandcontentpresented.Optionsinclude:
• Native-Thissettingwillshowtheaspectratioofthesourcematerial.4:3NSTCimageswillbeshown
Image 9 – Switch-On Options Menu

page 13
withsidebars.
• Widescreen-Thissettingwillfillthescreenwiththeimagebystretchingtheimage(ifnecessary)tocreatea16:9image.
4. Power-SelectthebehaviorfortheHD2000RFwhenACpowerislostandrestored.Settingsinclude:
• Standby–Returntoastandbymodeifpowerislostoronfirstplugin
• ForceOn–TurnonTVandTunerifpowerislostoronfirstplugin.ForceOnmodemaycauseTVtoturnoninlodgingenvironmentfollowingpoweroutage.
• Restore–RestorestheTVtoitspreviouspowerstateafteralossandrecoveryofpower.
5. ON>OFF Hold Off Timer-ThissettingallowsforaselectableperiodoftimewheretheHD2000RFwillignoreadditionalIRbuttonpressesduringapoweroffprocess.Thisfeatureisusedwhenguestsmayhavesitua-tionswhereextraIRpressesarecausingundesirableinteraction.
6. OFF>ONHold Off Timer -ThissettingallowsforaselectableperiodoftimewheretheHD2000RFwillignoreadditionalIRbuttonpressesduringapoweronprocess
On-Screen Display OptionsTheOn-ScreenDisplayOptionssettingsprovideforcustomizationandsetupofOSDoptions.
1. Show Volume Indicator-ThismenuitemisaYes/Noselectionforwhetheravisualrepresentationonthevolumeadjustmentshouldbeshownonthescreenwhentheuserusesthevolumeupordownontheremote.
Image 10 – On-Screen Display Options Menu

page 14
2. Use 3-Digit Entry-ThismenuitemisaYes/Noselectionforsupportof3-digitnumbersforchannelsover99anddigitalchannelsthatmayuseasub-digit
3. Show Channel Guide-ThismenuitemisaYes/Noselectionforwhetherachannelguideisactivefortheusertoseetheavailablechannelsonthedisplay.ChannelGuidecontentisgeneratedbytheanalogchannelnumbersandtextlabelsforeachchannel.
4. Channel Banner Contents-Thismenuitemallowstheselectionofthecontentavailableonthedisplayban-ner.Usethe0buttonwhenselectingordeselectinganoptiononthissub-menu.Selectionsinclude:
• Shownumber:Thechannelnumber
• ShowLabel:Thetextlabelforachannel
• ShowLogo:Theselectgraphicifany
5. Welcome Message Options-Thismenuitemprovidesforawaytohaveawelcomemessageshownonthedisplay.
• ShowMessage(Yes/No)
• Line1:Firstlineoftext
• Line2:Secondlineoftext
Note:Ifshowmessageisyesandthereisnothinginlineoneortwo, thewelcomemessagewilldisplay“AcquiringChannel”. UsetheUpandDownbuttonstoselectcharacters.UsetheRightandLeftbuttonstomovethecursor.
Control OptionsThissetupsectionprovidessystemlevelsettingsforthetunercard.
1. ESP(EnergySavingsProtection)-ThismenuitemallowforasettingofadefaulttimeofftoprotectagainstaTVbeingleftonwhenaguestleavesaroomwithoutturningofftheTV.ThemodecanbesetOnorOff,andthehoursofinactivityuntilitturnsitselfoffcanbe1to9hours.
2. Source Menu Item-ThismenuitemisaYes/Noselectionandallowscontroloverwhetherauser,throughtheusermenu,hasaccesstoinputselection.
3. Picture Format Menu Item-ThismenuitemisaYes/Noselectionandallowscon-
Image 11 – Welcome Message Submenu
Image 12 – Control Options Menu

page 15
troloverwhetherauser,throughtheusermenu,hasaccesstochangetheImageFormat(widescreenornative).
4. Minimum Volume-Settheavailableminimumvolumefrom0to99
5. Maximum Volume-Setstheavailablemaximumvolumefrom0to99
6. Setup Key Sequence-Providesamethodforchangingthekeybuttonsequenceusedtoaccesssetupfea-tures.Ifthesearechanged,makesuretowritedownthekeys.Failing to record these would require re-clon-ing an entire system to restore the set up key sequence.
• Akeypresssequenceofuptoeightbuttonscanbedefined.Thesekeysaremorethannumerickeysandaddstothesecurityforasystem.
7. Orbit Options-ThissubmenuprovidesoptionsavailableonspecificPlasmamonitorsandmaynotappearwhenconnectedtotheLGdisplay.
8. PPV Terminal Options-Thissubmenuprovidesoptionsforspecifichospitalityconfigurationrequirements,including:
• TerminalControlsVolumeDefaultisYESforthelodgingterminaldevicetocontrolthevolume.Insomespecificinstallations,thismayneedtobesettoNOfortheHD2000RFtocontrolthevolumeadjustmentindependentofthelodgingsystem.
• TerminalControlsSleepDefaultisYESforthelodgingterminaldevicetocontrolthecommandsettingsfortheSleepMode.Insomespecificinstallations,thismayneedtobesettoNOfortheHD2000RFtodirectlymanagetheSleepModeindependentofthelodgingsystem.
• TerminalControlsCCDefaultisYESforthelodgingterminaldevicetocontrolthesettingsforClosedCaptioning.Insomespecificinstallations,thismayneedtobesettoNOfortheHD2000RFtocontroldirectlymanagetheClosedCaptioningfunctionsindependentofthelodgingsystem.
Image 13 – Setup Key Sequence Submenu

page 16
9. Auxiliary Control Options-ThissubmenuprovidessettingforBaudRateofcommunicationsovertheserviceport.Baudrateoftheserialcommunicationsportcanbeadjustedwithfixedvaluesfrom1200to115200.
Captioning SetupThissubmenuisusedtocontrolthedefaultvaluesfortheClosedCaptioningfunctiononthetuner.
1. Restore User Setting-ThissettingallowsfortheselectionofallowingusersettingsforCCtobestoredbetweenpowercycles,ortoalwaysuseadefaultsettingonpoweron.SelectNOtooverridetheprevioususerCCsettingonpoweron(usingthedefaultsettings),orselectYEStoallowtheprevioususersettingtobeusedonthenextpoweron.
2. Captioning-ThissettingallowsthreeoptionsforClosedCaptioningatthedefaultpoweronstatus.
• ON–ClosedCaptioningwillbesettoONatpoweron
• ONWHENMUTED–ThissettingwillhavetheHD2000RFdisplayClosedCaptioningcontentwhentheuserMutesvolume.
• OFF–ThissettinghastheClosedCaptioningsettoOFFasthedefault
3. Digital Captioning Mode-ThissettingallowstheselectionoftheCCmodetobeusedfortheDigitalChan-nels
4. Analog Captioning Mode-ThissettingallowstheselectionoftheCCmodetobeusedfortheAnalogChannels
Image 16 – Captioning Options Menu

page 17
V-Chip SetupThissubmenusetsupdefaultoptionsfortheV-Chipsettings.
1. Restore User Settings-ThissettingallowsfortheselectionofallowingusersettingsforV-Chiptobestoredbetweenpowercycles,ortoalwaysuseadefaultsettingonpoweron.SelectNOtooverridetheprevioususerV-Chipsettingonpoweron,orselectYEStoallowtheprevioususersettingtobeusedonthenextpoweron.
2. V-Chip Menu Item-ThissettingcontrolswhethertheuserhasaccesstotheV-Chipselectionandsettings.SelectingYESwillallowtheV-Chipmenuitemtoappearontheusermenu.SelectingNOwillcausetheV-Chipsettingstonobeuseraccessibleandtheywillnotappearontheusermenu.
3. Reset Access Code-Thisisanopensettingtoallowfortheresetofthecode.Insetupmode,thiscodecanbeoverwrittenwithoutknowingthepreviouscode.Thisisusefulincasetheprevioususerforgotthecode.Thecodewillberesettothedefaultcodeof0000
4. Default Limits-Thissectionallowforvariousdefaultvaluestobesetforthetuner.
1. Enable V-Chip-ThissettingisaYES/NOselection.BysettingYES,thedefaultV-ChipsettingswillbeactivewhentheHD2000RFstartsup.SelectingNOdisablestheV-Chipsettings.
Image 17 – V-Chip Options Menu
Image 18 – V-Chip Default Limit Submenu

page 18
2. Select TV Ratings-Thismatrixallowsforallowingorrestrictingvarioussettings,includingtheTVindustryParentalGuideratings,andnewspecificratings:
TV-Y=AllChildrenFV=FantasyViolence(cartoons)
TV-Y7=DirectedtoOlderChildren V=Violence
TV-G=GeneralAudience S=SexualSituations
TV-PG=ParentalGuidanceSuggested L=Language
TV-14=ParentsStronglyCautioned D=SuggestiveDialog
TV-MA=MutualAudienceOnly
Usethearrowkeystohighlightaboxinthematrixandthenusethe0buttonontheremoteisusedtotogglebetweenselections.Whenfinished,movetotheOKboxandpress0tosavesettingsandexit.
Image 19 – V-Chip TV Ratings

page 19
3. SelectMovieRatings-ThismenuallowsfortheauthorizationorexclusionofcontentbasedontheMovieRatingsystem.
GChildrenandFamily
PGParentalGuidanceSuggested
PG-13ParentalGuidance–SpecialGuidancetochildrenunder13
RRestricted.Nooneunder17withoutanadult
NC-17Nochildrenunder17
XAdultcontent/Adultsonly
NotRatedSome films are not rated and other content is beyondNC-17andwithdrawnbeforerating..
Usethearrowkeystohighlightaboxinthematrixandthenusethe0buttonontheremoteisusedtotogglebetweenselections.Whenfinished,movetotheOKboxandpress0tosavesettingsandexit.
Image 20 – V-Chip Movie Ratings

page 20
4. Change Access Code-TheV-ChipAccessCodecanbesetthroughthesetupprocessusingthisfunction.
Image 21 – V-Chip Reset Function

page 21
Service MenuTheHDtunerisanadvancedmediadevicewiththeabilityofcommunicatingthroughanRFnetworktomaintainup-datedfirmwareandcontrol.ThefeaturesoutlinedbelowareadvancedfunctionsdesignedforanintegratedRFsystem.
Thismenuareaisusedtosetupparametersforservicingthetunerorperformingservicefunctions.
1. Update Channel-Thisfeatureisusedforsettingachanneltoperformfirmwareupdates.Usingthenumerickeysontheremote,enterthechannelthathasbeenidentifiedbyyoursystemadministratorforfirmwareup-dates.Requiresare-updater,consultyoursalesrepresentative.
2. Allow Update Searching-ThisYES/NOselectioneitherallowsorprohibitsthedisplayfromsearchingforanupdatechannelforfirmwareupdates.HavingthisselectedasYESwillallowupdateswhentheUpdateChan-nelneedstobechangedforsomereason,andeliminatestheneedforsettinguptheupdatechannelatinstalla-tion.
3. Start Firmware Update-Tomanuallyinitiateafirmwareupdate,presstheRightarrowbuttonontheremotefromthismenuline.Byselectingthisitem,thetunerwillimmediatelybeginthefirmwareupdateprocessandrebootwhencomplete.
Note:Duringafirmwareupdate,theDisplayMUSTNOTbeunpluggedorturnedoff.Doingsowhilefirmwareisbeingdownloadedandupgradedonthedevicecoulddamagetheunitandmakeitunusable.Ifthefirmwareupdatewasinitiatedbymistake,itwilltimeoutafter3to5minutes.
• StartFirmwareUpdatebyUSB-TheHD2000RFcanbeupdatedusingaUSBstickandfirmwareprovidedbyEnseoforthepurposeofupdatingthedevice.PleasecontactEnseotechnicalsupportfordetailsrelatedtotheupdateoftheHD2000RF.
Image 22 – Service Options Menu
page 22
4. Start Settings Update-TomanuallyinitiateaCloneSettingupdate,presstheRightarrowbuttonontheremotefromthismenuline.Byselectingthisitem,thetunerwillimmediatelybegintheprocessofdownloadingandstoringsettingsstoredontheEnseoGalileoSystemServer.
5. Restore Factory Settings-Thisfunctionallowsthetunertoberesettothefactorysettings.Changes,channellineupprogrammingandothersetupcustomizationswillbelostandthetunerwillreturntofactorysettings.
6. Show Status-Thismenuitemwillactivateastatuswindowshowingimportantinformationaboutthedisplay,tuner,firmwareversionsandotherdiagnosticdata.
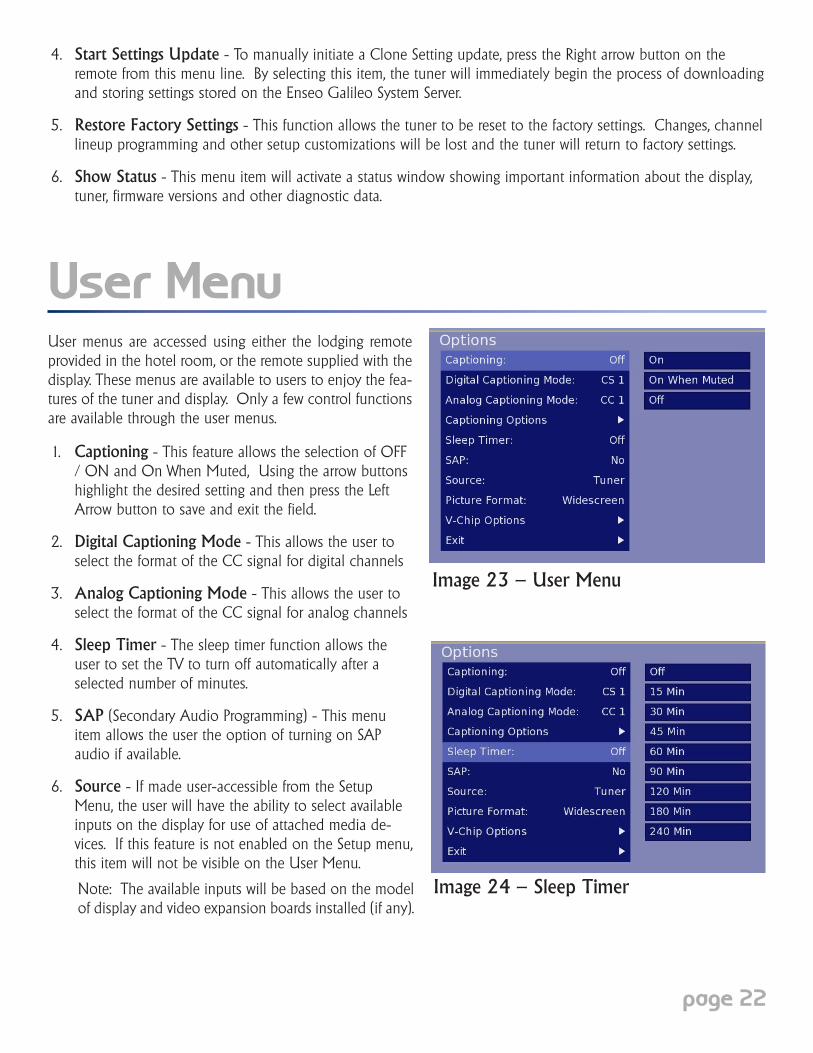
User MenuUsermenusareaccessedusingeither the lodgingremoteprovidedinthehotelroom,ortheremotesuppliedwiththedisplay.Thesemenusareavailabletouserstoenjoythefea-turesofthetuneranddisplay.Onlyafewcontrolfunctionsareavailablethroughtheusermenus.
1. Captioning-ThisfeatureallowstheselectionofOFF/ONandOnWhenMuted,UsingthearrowbuttonshighlightthedesiredsettingandthenpresstheLeftArrowbuttontosaveandexitthefield.
2. Digital Captioning Mode-ThisallowstheusertoselecttheformatoftheCCsignalfordigitalchannels
3. Analog Captioning Mode-ThisallowstheusertoselecttheformatoftheCCsignalforanalogchannels
4. Sleep Timer-ThesleeptimerfunctionallowstheusertosettheTVtoturnoffautomaticallyafteraselectednumberofminutes.
5. SAP(SecondaryAudioProgramming)-ThismenuitemallowstheusertheoptionofturningonSAPaudioifavailable.
6. Source-Ifmadeuser-accessiblefromtheSetupMenu,theuserwillhavetheabilitytoselectavailableinputsonthedisplayforuseofattachedmediade-vices.IfthisfeatureisnotenabledontheSetupmenu,thisitemwillnotbevisibleontheUserMenu.
Note:Theavailableinputswillbebasedonthemodelofdisplayandvideoexpansionboardsinstalled(ifany).
Image25–PictureFormat
Image 23 – User Menu
Image 24 – Sleep Timer

page 23
4. Start Settings Update-TomanuallyinitiateaCloneSettingupdate,presstheRightarrowbuttonontheremotefromthismenuline.Byselectingthisitem,thetunerwillimmediatelybegintheprocessofdownloadingandstoringsettingsstoredontheEnseoGalileoSystemServer.
5. Restore Factory Settings-Thisfunctionallowsthetunertoberesettothefactorysettings.Changes,channellineupprogrammingandothersetupcustomizationswillbelostandthetunerwillreturntofactorysettings.
6. Show Status-Thismenuitemwillactivateastatuswindowshowingimportantinformationaboutthedisplay,tuner,firmwareversionsandotherdiagnosticdata.
User MenuUsermenusareaccessedusingeither the lodgingremoteprovidedinthehotelroom,ortheremotesuppliedwiththedisplay.Thesemenusareavailabletouserstoenjoythefea-turesofthetuneranddisplay.Onlyafewcontrolfunctionsareavailablethroughtheusermenus.
1. Captioning-ThisfeatureallowstheselectionofOFF/ONandOnWhenMuted,UsingthearrowbuttonshighlightthedesiredsettingandthenpresstheLeftArrowbuttontosaveandexitthefield.
2. Digital Captioning Mode-ThisallowstheusertoselecttheformatoftheCCsignalfordigitalchannels
3. Analog Captioning Mode-ThisallowstheusertoselecttheformatoftheCCsignalforanalogchannels
4. Sleep Timer-ThesleeptimerfunctionallowstheusertosettheTVtoturnoffautomaticallyafteraselectednumberofminutes.
5. SAP(SecondaryAudioProgramming)-ThismenuitemallowstheusertheoptionofturningonSAPaudioifavailable.
6. Source-Ifmadeuser-accessiblefromtheSetupMenu,theuserwillhavetheabilitytoselectavailableinputsonthedisplayforuseofattachedmediade-vices.IfthisfeatureisnotenabledontheSetupmenu,thisitemwillnotbevisibleontheUserMenu.
Note:Theavailableinputswillbebasedonthemodelofdisplayandvideoexpansionboardsinstalled(ifany).
Image25–PictureFormat
7. Picture Format-Ifmadeuser-accessiblefromtheSetupMenu,theuserwillhavetheabilitytoadjusttheaspectratioofcontentpresentedonthedisplay.IfthisfeatureisnotenabledontheSetupmenu,thisitemwillnotbevis-ibleontheUserMenu.
Note:OnPlasmamonitors,useraccesstoPictureFormatwillbelimitedtopreventthepotentialforimageretention.
8. V-Chip Options-Ifmadeuser-accessiblefromtheSetupMenu,theuserwillhavetheabilitytosetandcontrolV-Chipsettingstorestrictcontentfrombeingshownonthetuner.IfthisfeatureisnotenabledontheSetupmenu,thisitemwillnotbevisibleontheUserMenu.
Operation TheHDtunerisanadvancedHDTVandNTSCTVtunerwithfeaturesthatsupportlodgingsystemsandstand-aloneoperation.
Lodging Mode:ThetunerwillautomaticallyfunctioninalodgingmodewhenattachedtoacompatiblePPVsystem.Thetunerwillcommunicatewithlodgingsystem,identifythesystemandthenecessarycommunicationprotocolsandimmediatelysendcommandstothedisplaynecessarytofunctionwiththeattachedPPVsystem.
Stand Alone Mode: Tocontrolthetunerinstand-alonemode,thetunermustnotbeconnectedtoPPVsystem.IfthedisplayisconnectedtoaPPVsystem,firstdisconnecttheRJ12communicationcablebetweenthetunerandthePPVcontrolbox.(RJ12isconnectedtoCONTROL-PPV).
InStandAlonemode,thetunerwillrespondtotheEnseoremoteandothercompatiblePPVsystemremotes.ToaccesstheUserMenuinstandalonemode,presstheMENUbuttonontheremote.
Image 25 - Picture Format
page 24
FAQQ: Which hospitality systems is the HD2000RF Compatible With?
A: TheHD2000RFisdesignedtobecompatiblewithmostmajorPPVHospitalitySystems, including:
• LodgeNet(TestedandCertifiedCompatible)
• OnCommand(TestedandCertifiedCompatible)
• SeaChange(TestedandCompatible)
• Guest-Tek
• NXTV
• KoolConnect
• nStreams
• More…
Mostlodgingsystemoperateonasimilarstandardofprotocolcommandsforoperation.IfaPPVproviderisnotlistedabove,itmaybepossiblefortheHD2000RFtoworkwiththisprovider.

page 25
Product Specification
HD2000 RF
DETAILS COMMENTS6.26"x11.5"x1.1"12.5WattsTypical ACPowerAdapter(12vDC)QAM/8VSBNTSCPro:IdiomOne
Ethernet RF45 DisabledinfirmwareCompositeVideo 1xRCA(Yellow)AudioInput 1x3.5mmMinijackUSB 2xUSBTypeA USB2.0
1XDB-9 Specialpin-out/SerialControlWithHDCPS/PDIF VariableAudioOutRCAL/R VariableAudioOutRiskAssessmentbasedonIEC60950 UsesULapprovedACadapterFCC(ClassB)RoHS
OSD Co-ordinateFont,Color&PositionRJ12Connector SmartPort™,MTI,MPI,SerialprotocolRJ12Connector SmartPort™/MTIprotocol
ITEMSDimensionsTotalPowerConsumption
Tuner DigitalAnalog
DecryptionRFInput
Inputs
SerialPortHDMIDigitalAudioAnalogAudio
Outputs
ControlPorts
DisplayPPV
English
StandardProductSafetyEMCEnvironmental
FCC Statement & License Acknowledgement
This device complies with Part 15 of the FCC Rules. Operation is subject to the following two conditions: (1) this device may not cause harmful interference, and (2) this device must accept any interference re-ceived, including interference that may cause undesired operation.
page 26
Enseo Limited Warranty/Software Maintenance Agreement
General Warranty Terms:EnseoprovidesalimitedwarrantyforrepairorreplacementservicefortheHD2000RF.Thelimitedwarrantyforthisproductis12monthsfromthedateofpurchase.SoftwareMaintenanceisprovidedduringthewarrantyperiod.Afterthewarrantyexpires,performanceandcertificationsupportisavailablefromEnseoatadirectexpensetocustomer.Warrantyextensionbeyond12monthsisavailableatadditionalcost.
Terms and Conditions for Warranty/Return Policy:Enseo,Inc.(ENSEO)warrantstotheoriginalconsumerpurchaser(“purchaser”)ofthisproductthattheEnseoprod-uctpurchasedshallbefreefromdefectsinmaterialsandworkmanshipforaperiodof12monthsofnormalusefromthedateofpurchase.Thiswarrantydoesnotcoveranyincompatibilitiesduetothepurchaser’scomputer,hardware,softwareoranyotherconfigurationinwhichtheproductinterfaces.Ifadefectcoveredbythislimitedwarrantyoccurs,Enseo,atitsoption,willrepairorreplacethedefectiveEnseoproductfreeofcharge.EnseoreservestherighttoreplaceanydefectiveEnseoproductwithproductofequivalentorsuperiorperformance.Such replacementproductmaybe remanufacturedproductormanufacturedusing remanufacturedcomponentsatEnseo’soption.Repairedorreplacedproductwillbecoveredbythesamewarranty.
This12-monthwarrantydoesnotapplytodefectscausedbyabuse,misuse,negligence,accident,tampering,modifica-tionorothercausesnotrelatedtodefectivematerialsorworkmanship.Enseoreservestherighttoimposeareason-ablechargefortherepairofproductsreturnedwithdefectsresultingfromanyoftheabovecausesandforreturnswheretheproductisfoundtobeingoodworkingcondition.Memoryorothercomponentsnotoriginallyshippedwiththeproductarenotcoveredbythiswarranty.
ToreceivewarrantyservicecallEnseoTechnicalSupportdepartmentat1-800-270-8747intheUnitedStates.Beforereturninganyproductforservice,youmustspeaktooneofourservicerepresentatives.TheservicerepresentativewillissueaRMAnumberandadditionalinstructionsforreturningyourdefectiveproduct.NoEnseoproductwillbeacceptedforrepairwithoutanRMAnumber.ThepurchasershallpaythecostofreturningthedefectiveproducttoEnseo’sservicecenter.
Nootherwarrantiesareexpressedorimplied,includingbutnotlimitedto,anyimpliedwarrantiesofmerchantabilityorfitnessforaparticularpurpose.InnoeventshallEnseo,Inc.beliableforconsequentialorincidentaldamagesresultingfromtheuseorinstallationofanyEnseoproduct,orthebreachofanyexpressorimpliedwarranties.Enseo’sliabilitytopurchaserwithrespecttoanyclaimorlossarisingoutofthistransactionorallegedtohaveresultedfromanactoromissionofEnseoshallbelimitedtopurchaser’scostoftheEnseoproduct.
page 27
DisclaimerEnseo,Inc.©2009AllRightsReserved
Thisproductandtheproductdescribedinthisdocumentationaresubjecttochangewithoutnotice.
ThisproductisprovidedbyEnseo”asis’”andanyexpressedorimpliedwarranties,including,butnotlimitedto,theimpliedwarrantiesofmerchantabilityandfitnessforaparticularpurposearedisclaimed.InnoeventshallEnseobeliableforanydirect,indirect,incidental,special,exemplary,orconsequentialdamages(including,butnotlimitedto,procurementofsubstitutegoodsorservices;lossofuse,data,orprofits;orbusinessinterruption)howevercausedandonanytheoryofliability,whetherincontract,strictliability,ortort(includingnegligenceorotherwise)arisinginanywayoutoftheuseofthisproductortheproductdescribedherein,evenifadvisedofthepossibilityofsuchdamage.
930-6027-401v1.0