Embed Size (px)
Citation preview
© 2012 Avaya, Inc. All rights reserved, Page 1
Module Duration:
Module 6: System Manager & Business Continuity
3 Hours
© 2012 Avaya, Inc. All rights reserved. Page 2
After completing this module, you will be able to: Understand how to backup SMGR data. Know how to restore from backup. Configure SMGR to exploit high availability features of SP.
Module Objectives
Module Duration: 3 Hours
© 2012 Avaya, Inc. All rights reserved, Page 3
Lesson Duration:
Module 06: SMGR & Business Continuity
Lesson 01: Backing Up SMGR Data
30 Minutes
© 2012 Avaya, Inc. All rights reserved. Page 4
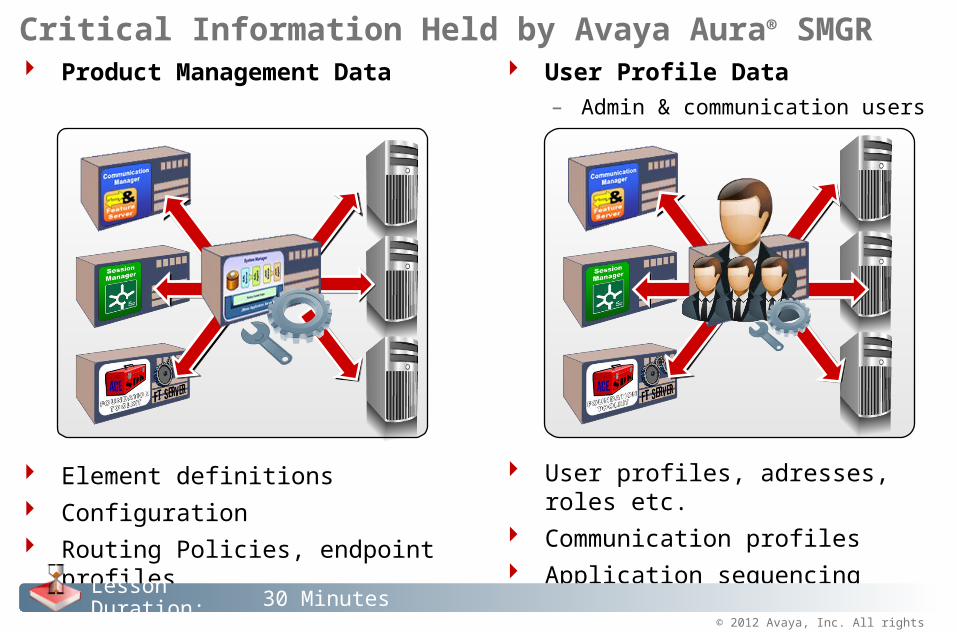
Product Management Data
Element definitions Configuration Routing Policies, endpoint profiles
Critical Information Held by Avaya Aura® SMGR User Profile Data
– Admin & communication users
User profiles, adresses, roles etc. Communication profiles Application sequencing
Lesson Duration: 30 Minutes
© 2012 Avaya, Inc. All rights reserved. Page 5
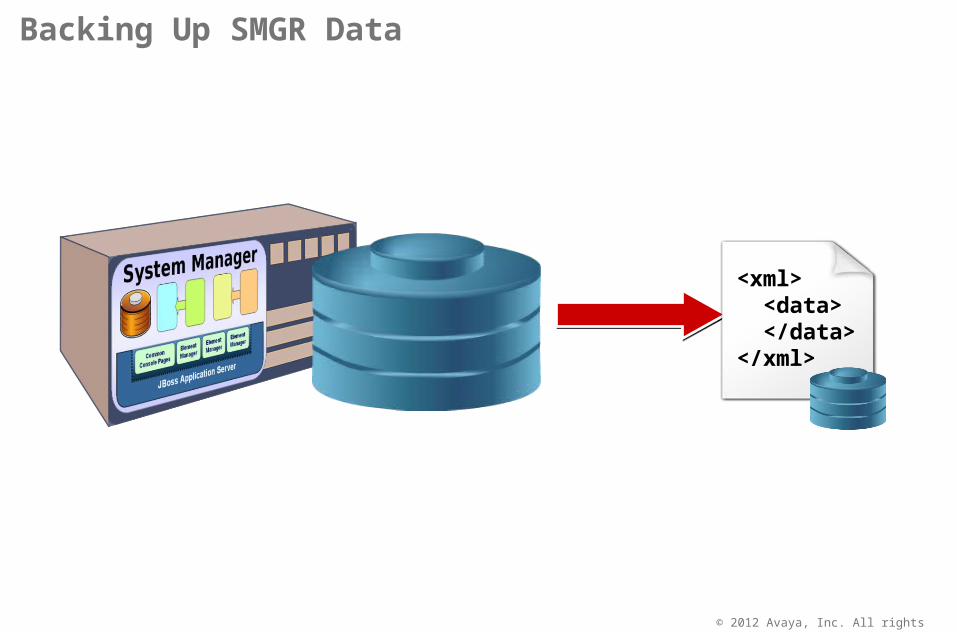
Backing Up SMGR Data
<xml><data></data>
</xml>
<xml><data></data>
</xml>
© 2012 Avaya, Inc. All rights reserved. Page 6
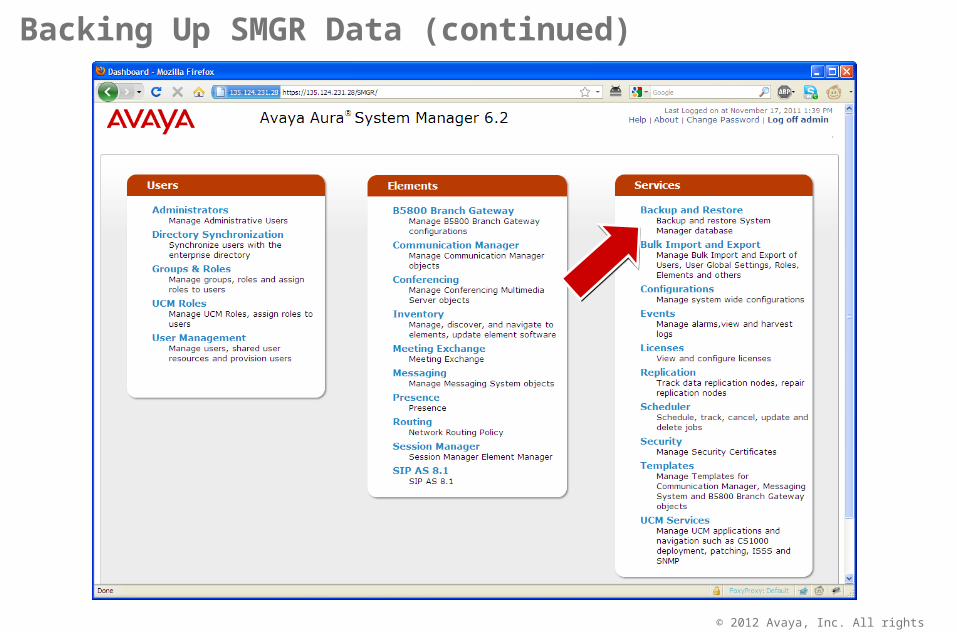
Backing Up SMGR Data (continued)
© 2012 Avaya, Inc. All rights reserved. Page 7
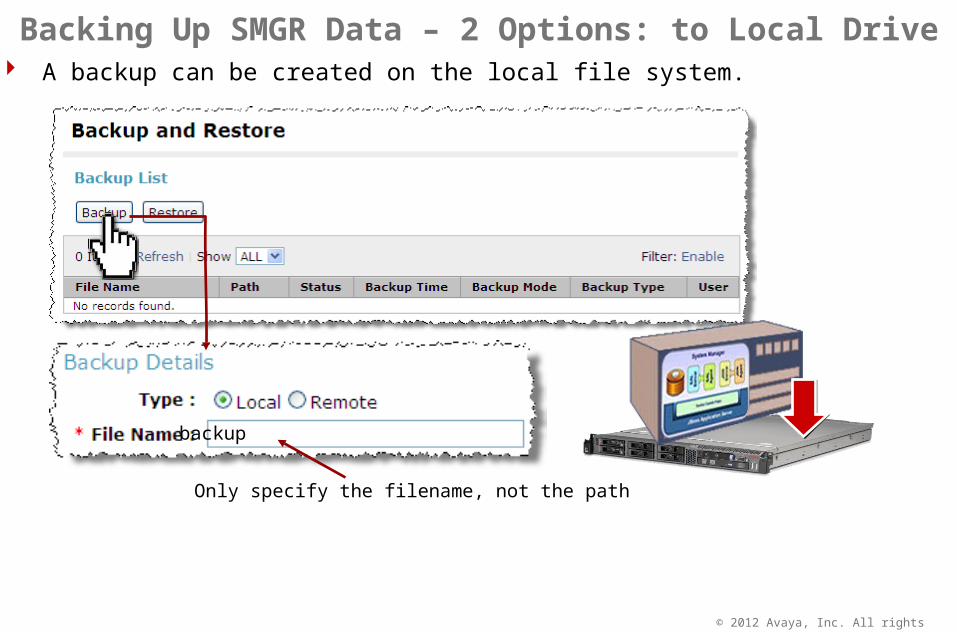
A backup can be created on the local file system.
Backing Up SMGR Data – 2 Options: to Local Drive
backup
Only specify the filename, not the path
© 2012 Avaya, Inc. All rights reserved. Page 8
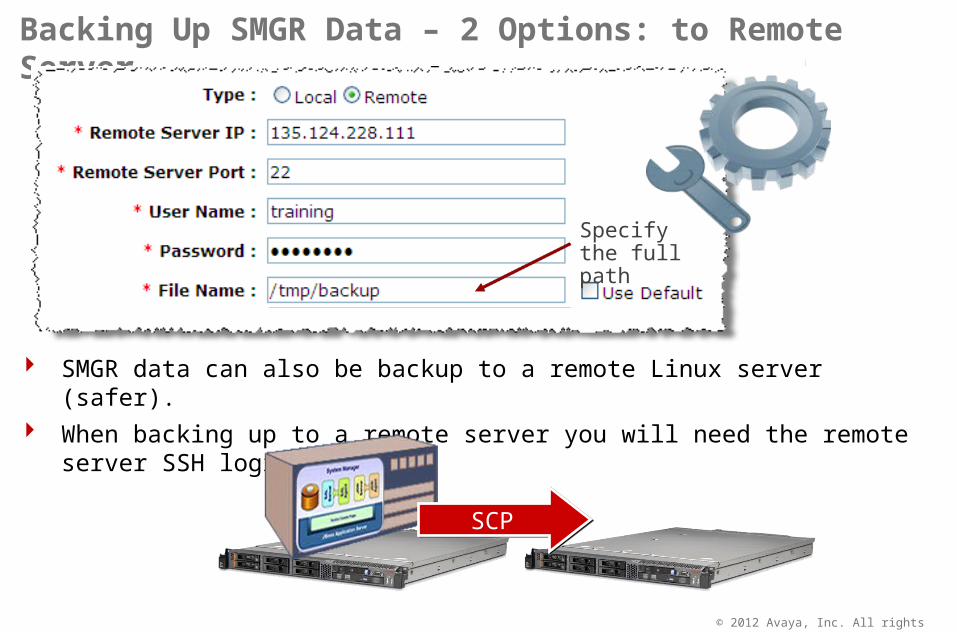
SMGR data can also be backup to a remote Linux server (safer). When backing up to a remote server you will need the remote server SSH login
details.
Backing Up SMGR Data – 2 Options: to Remote Server
Specify the full path
SCP
© 2012 Avaya, Inc. All rights reserved. Page 9
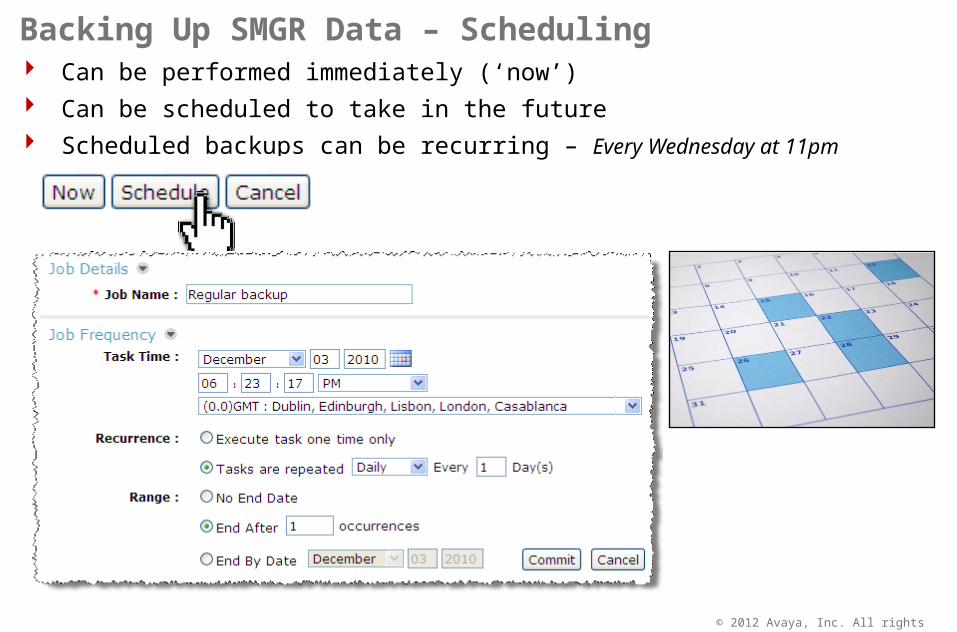
Can be performed immediately (‘now’) Can be scheduled to take in the future Scheduled backups can be recurring – Every Wednesday at 11pm
Backing Up SMGR Data – Scheduling
© 2012 Avaya, Inc. All rights reserved. Page 10
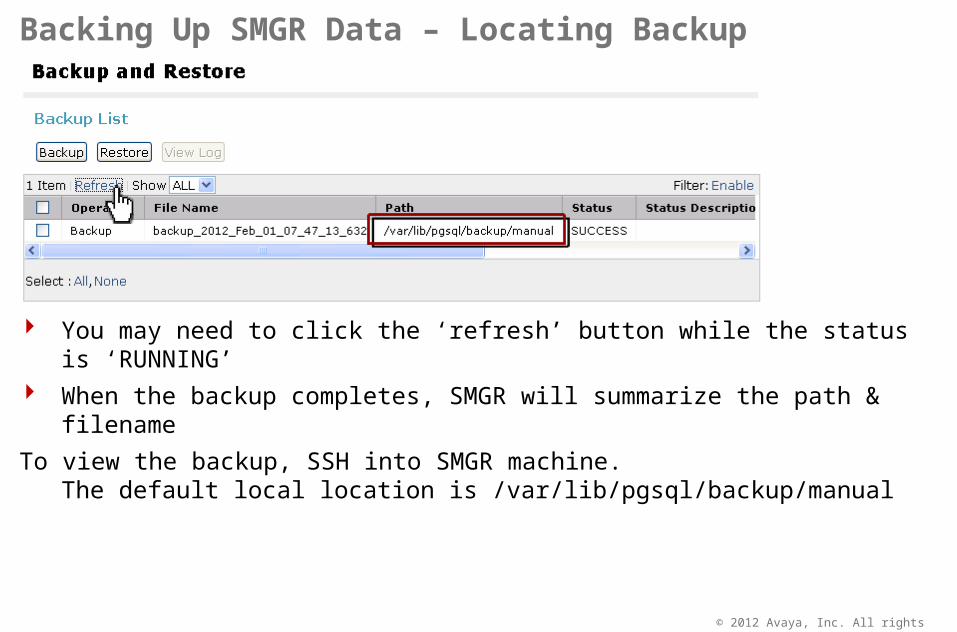
Backing Up SMGR Data – Locating Backup
You may need to click the ‘refresh’ button while the status is ‘RUNNING’ When the backup completes, SMGR will summarize the path & filename
To view the backup, SSH into SMGR machine. The default local location is /var/lib/pgsql/backup/manual
© 2012 Avaya, Inc. All rights reserved. Page 11
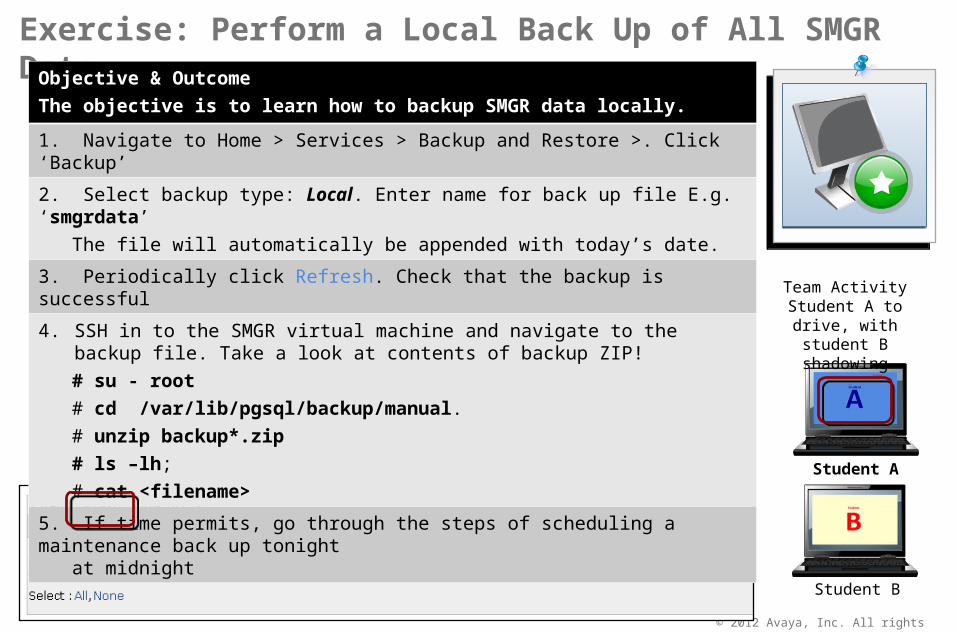
Exercise: Perform a Local Back Up of All SMGR DataObjective & Outcome
The objective is to learn how to backup SMGR data locally.
1. Navigate to Home > Services > Backup and Restore >. Click ‘Backup’
2. Select backup type: Local. Enter name for back up file E.g. ‘smgrdata’
The file will automatically be appended with today’s date.
3. Periodically click Refresh. Check that the backup is successful
4. SSH in to the SMGR virtual machine and navigate to the backup file. Take a look at contents of backup ZIP!
# su - root
# cd /var/lib/pgsql/backup/manual.
# unzip backup*.zip
# ls –lh;
# cat <filename>
5. If time permits, go through the steps of scheduling a maintenance back up tonight at midnight
Team ActivityStudent A to drive,
with student B shadowing
Student A
Student B
© 2012 Avaya, Inc. All rights reserved. Page 12
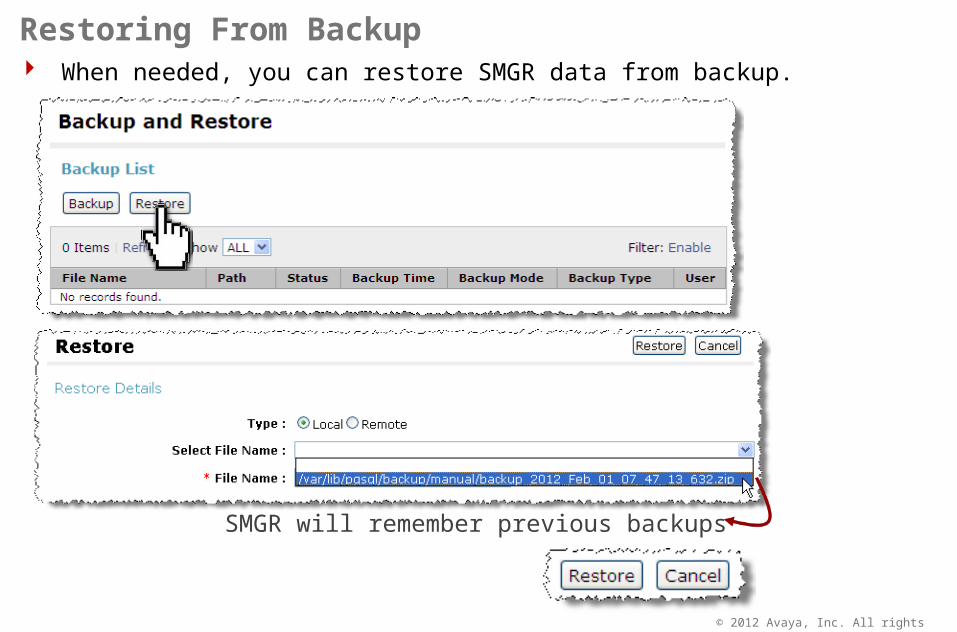
When needed, you can restore SMGR data from backup.
Restoring From Backup
SMGR will remember previous backups

© 2012 Avaya, Inc. All rights reserved. Page 13
Restoring From Backup (continued)
Be warned that this is a dangerous operation! It will wipe existing configuration in favor of the
settings found in the backup. Can take a long time to complete
– Up to 45 minutes (depending on data)
© 2012 Avaya, Inc. All rights reserved. Page 14
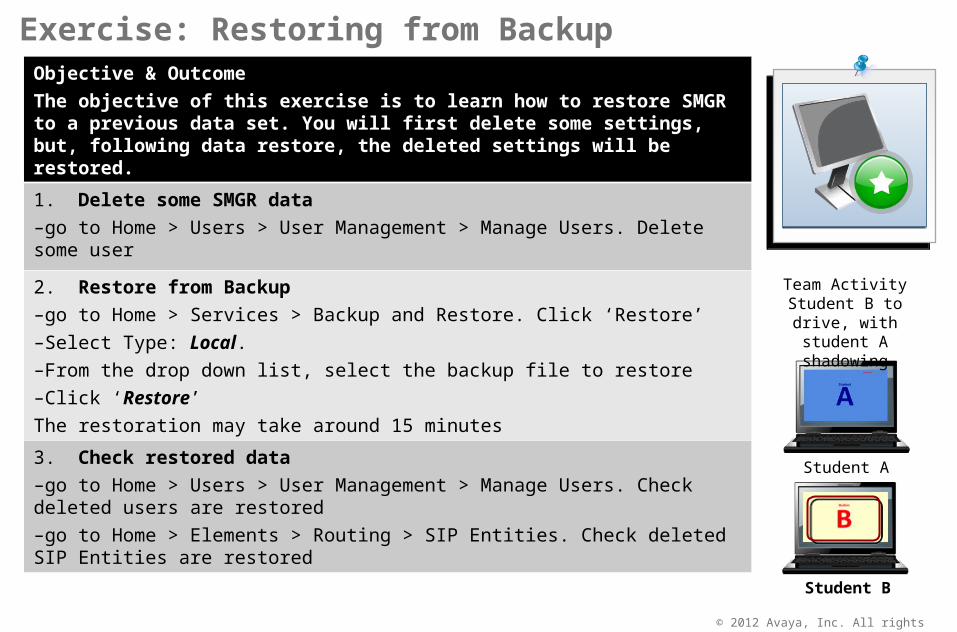
Exercise: Restoring from BackupObjective & Outcome
The objective of this exercise is to learn how to restore SMGR to a previous data set. You will first delete some settings, but, following data restore, the deleted settings will be restored.
1. Delete some SMGR data
–go to Home > Users > User Management > Manage Users. Delete some user
2. Restore from Backup
–go to Home > Services > Backup and Restore. Click ‘Restore’
–Select Type: Local.
–From the drop down list, select the backup file to restore
–Click ‘Restore’
The restoration may take around 15 minutes
3. Check restored data
–go to Home > Users > User Management > Manage Users. Check deleted users are restored
–go to Home > Elements > Routing > SIP Entities. Check deleted SIP Entities are restored
Team ActivityStudent B to drive,
with student A shadowing
Student A
Student B
© 2012 Avaya, Inc. All rights reserved, Page 16
Lesson Duration:
Module 06: SMGR & Business Continuity
Lesson 02: High Availability
1 hour
© 2012 Avaya, Inc. All rights reserved. Page 17
After completing this lesson, you will be able to: Understand the High Availability model used by SMGR. Be able to configure SMGR for failover.
Lesson Objectives
Lesson Duration: 1 Hours
© 2012 Avaya, Inc. All rights reserved. Page 18
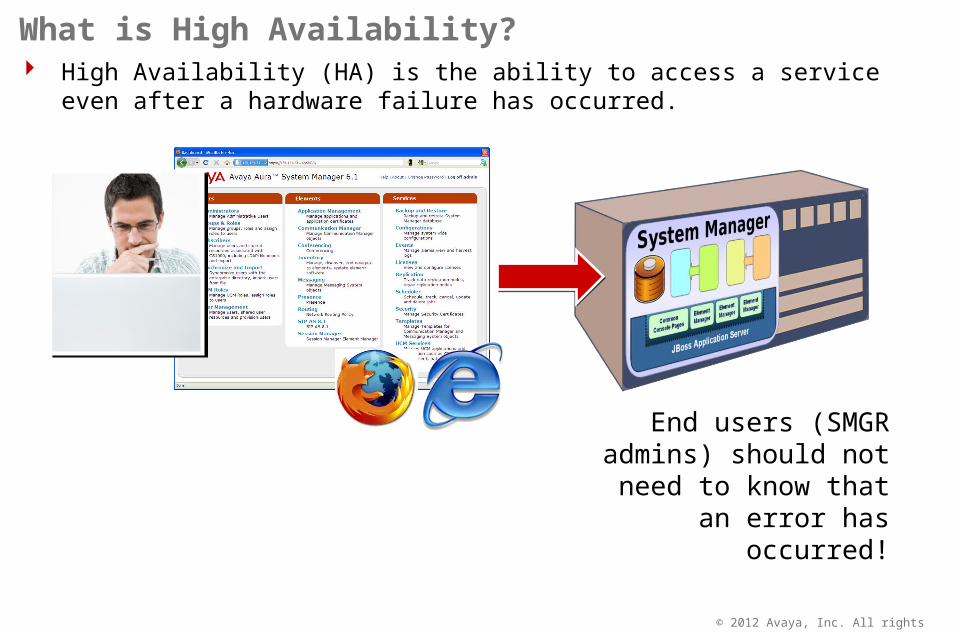
High Availability (HA) is the ability to access a service even after a hardware failure has occurred.
What is High Availability?
End users (SMGR admins) should not need to know
that an error has occurred!
© 2012 Avaya, Inc. All rights reserved. Page 19
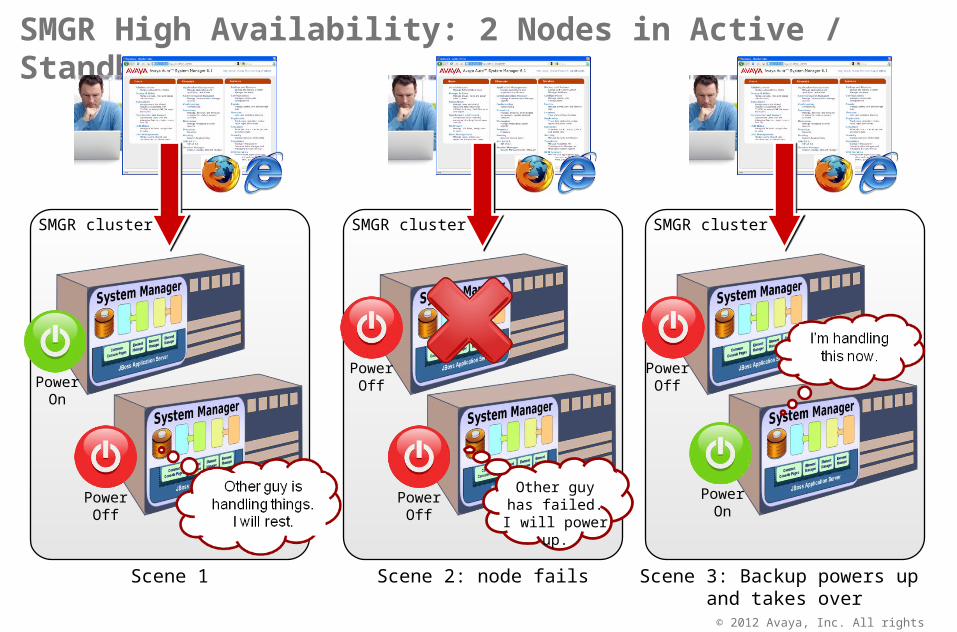
SMGR High Availability: 2 Nodes in Active / Standby
SMGR cluster
PowerOn
PowerOff
SMGR cluster
PowerOff
SMGR cluster
PowerOff
Scene 1
PowerOff
Other guy has failed. I will power up.
PowerOn
Scene 2: node fails Scene 3: Backup powers up and takes over
© 2012 Avaya, Inc. All rights reserved. Page 20
XEN Hypervisor - DOM-0XEN Hypervisor - DOM-0XEN Hypervisor - DOM-0XEN Hypervisor - DOM-0
Utils
CentOS
CDom
CentOS
Services
Proc HDD RAM NIC
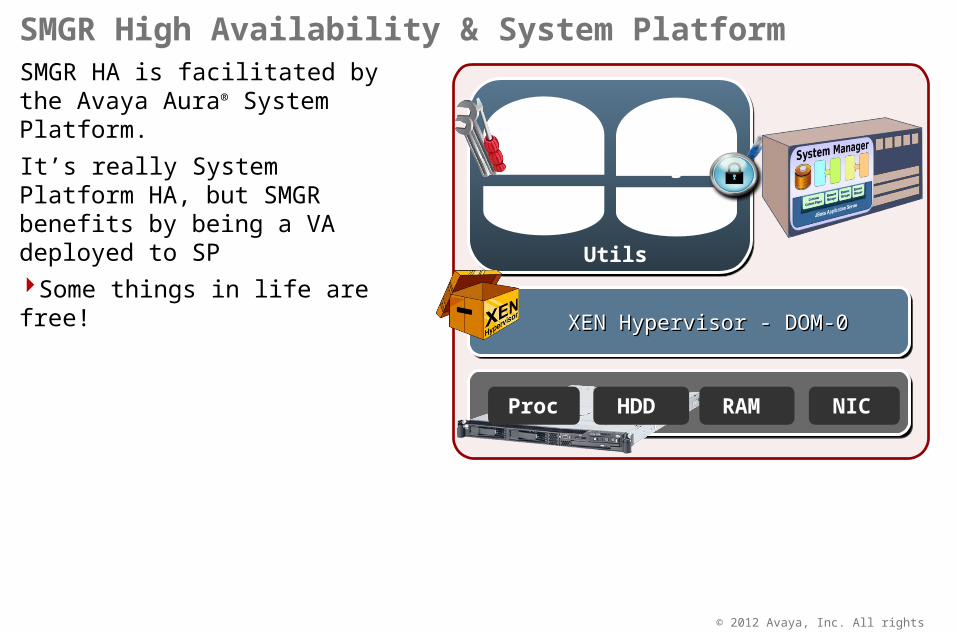
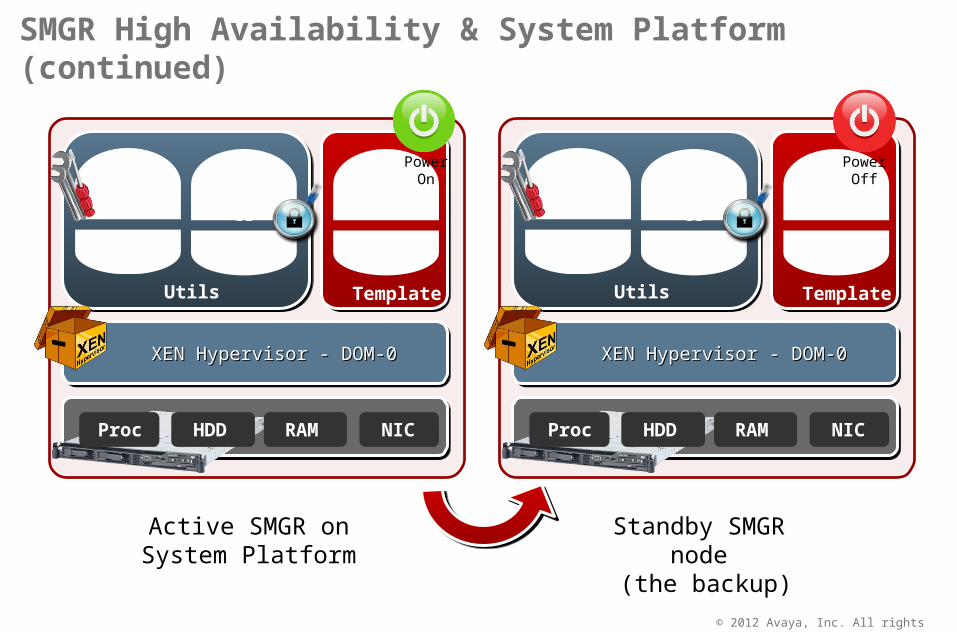
SMGR HA is facilitated by the Avaya Aura® System Platform.
It’s really System Platform HA, but SMGR benefits by being a VA deployed to SPSome things in life are free!
SMGR High Availability & System Platform
© 2012 Avaya, Inc. All rights reserved. Page 21
XEN Hypervisor - DOM-0XEN Hypervisor - DOM-0XEN Hypervisor - DOM-0XEN Hypervisor - DOM-0
Utils
CentOS
CDom
Template
CentOS
Services
Proc HDD RAM NIC
RHEL
SMGR
SMGR High Availability & System Platform (continued)
Active SMGR onSystem Platform
Standby SMGR node (the backup)
XEN Hypervisor - DOM-0XEN Hypervisor - DOM-0XEN Hypervisor - DOM-0XEN Hypervisor - DOM-0
Utils
CentOS
CDom
Template
CentOS
Services
Proc HDD RAM NIC
RHEL
SMGR
PowerOn
PowerOff
© 2012 Avaya, Inc. All rights reserved. Page 22
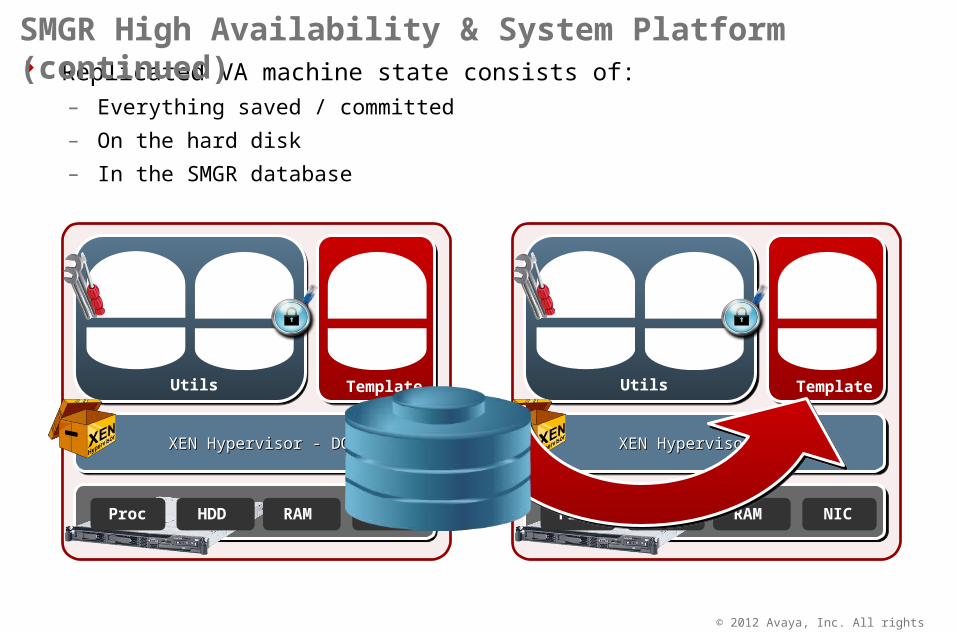
Replicated VA machine state consists of:– Everything saved / committed
– On the hard disk
– In the SMGR database
SMGR High Availability & System Platform (continued)
XEN Hypervisor - DOM-0XEN Hypervisor - DOM-0XEN Hypervisor - DOM-0XEN Hypervisor - DOM-0
Utils
CentOS
CDom
Template
CentOS
Services
Proc HDD RAM NIC
RHEL
SMGR
XEN Hypervisor - DOM-0XEN Hypervisor - DOM-0XEN Hypervisor - DOM-0XEN Hypervisor - DOM-0
Utils
CentOS
CDom
Template
CentOS
Services
Proc HDD RAM NIC
RHEL
SMGR
© 2012 Avaya, Inc. All rights reserved. Page 23
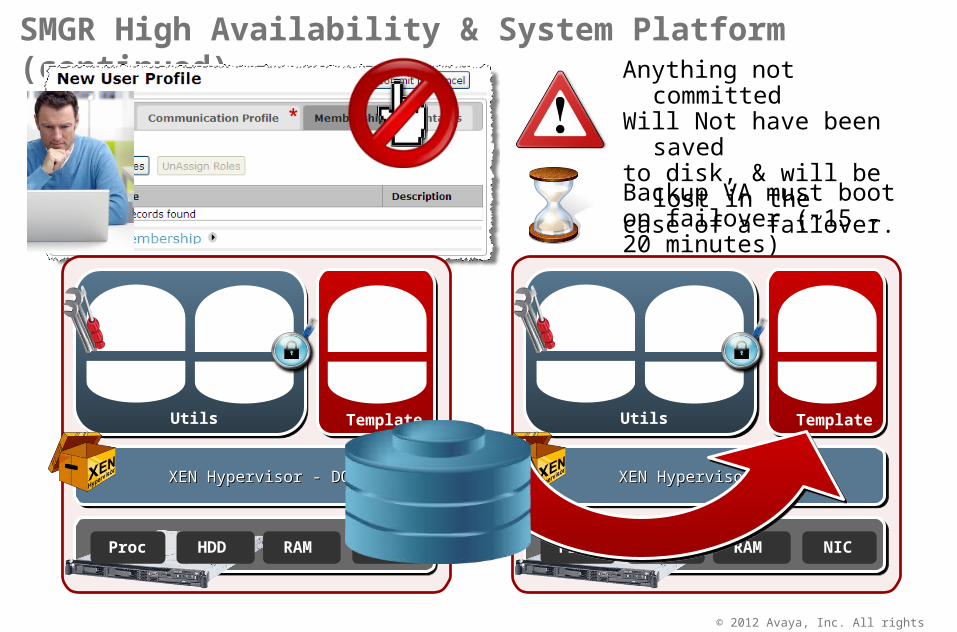
SMGR High Availability & System Platform (continued)Anything not committed Will Not have been saved to disk, & will be lost in the case of a failover.
Backup VA must boot on failover (~15 - 20 minutes)
XEN Hypervisor - DOM-0XEN Hypervisor - DOM-0XEN Hypervisor - DOM-0XEN Hypervisor - DOM-0
Utils
CentOS
CDom
Template
CentOS
Services
Proc HDD RAM NIC
RHEL
SMGR
XEN Hypervisor - DOM-0XEN Hypervisor - DOM-0XEN Hypervisor - DOM-0XEN Hypervisor - DOM-0
Utils
CentOS
CDom
Template
CentOS
Services
Proc HDD RAM NIC
RHEL
SMGR
© 2012 Avaya, Inc. All rights reserved. Page 24
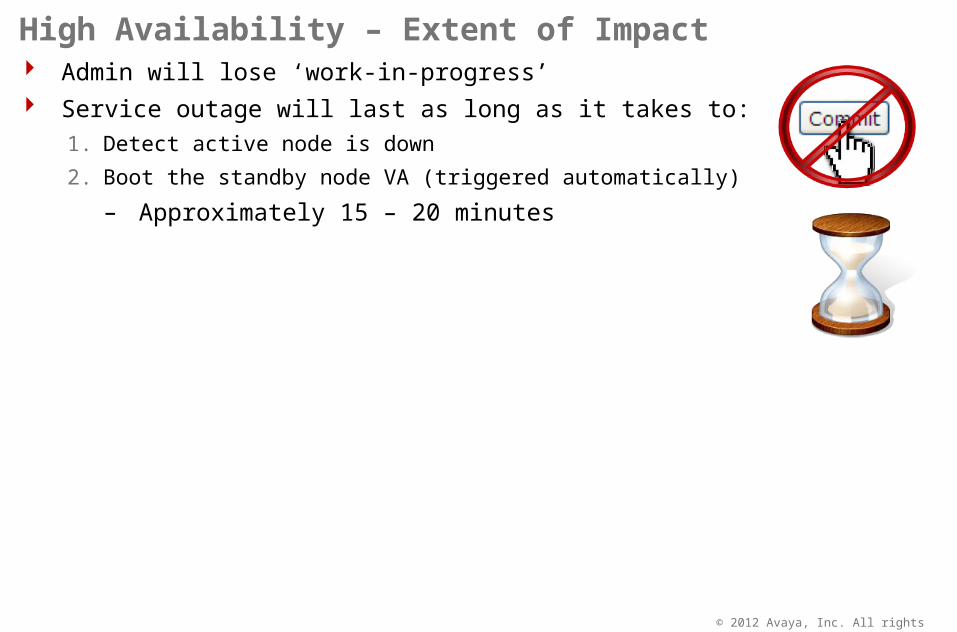
Admin will lose ‘work-in-progress’ Service outage will last as long as it takes to:
1. Detect active node is down
2. Boot the standby node VA (triggered automatically)
– Approximately 15 – 20 minutes
High Availability – Extent of Impact
© 2012 Avaya, Inc. All rights reserved. Page 25
XEN Hypervisor - DOM-0XEN Hypervisor - DOM-0XEN Hypervisor - DOM-0XEN Hypervisor - DOM-0
Utils
CentOS
CDom
Template
CentOS
Services
Proc HDD RAM NIC
RHEL
SMGR
XEN Hypervisor - DOM-0XEN Hypervisor - DOM-0XEN Hypervisor - DOM-0XEN Hypervisor - DOM-0
Utils
CentOS
CDom
CentOS
Services
Proc HDD RAM NIC
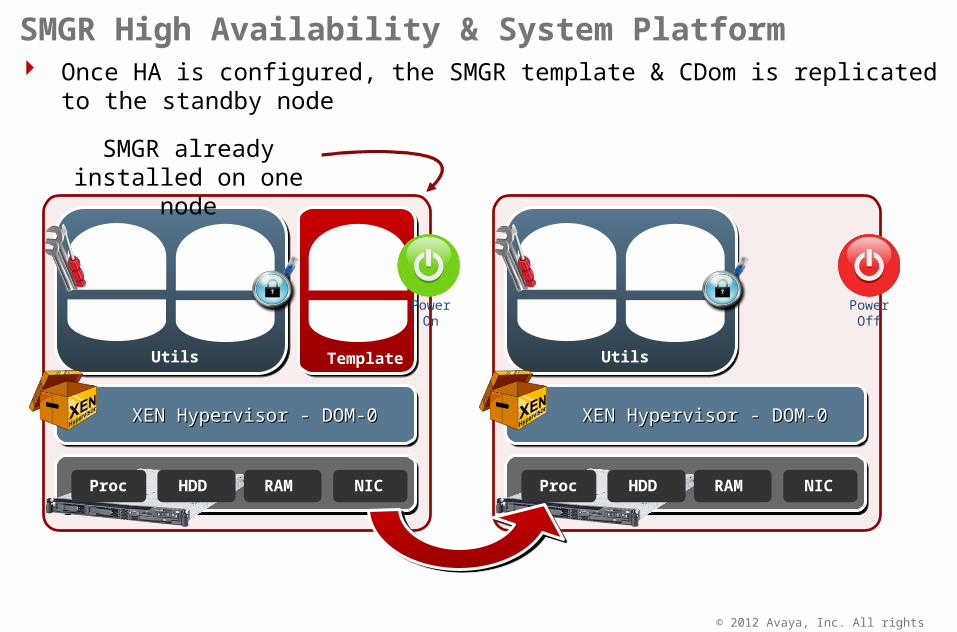
Once HA is configured, the SMGR template & CDom is replicated to the standby node
SMGR High Availability & System Platform
SMGR already installed on one node
PowerOn
PowerOff
© 2012 Avaya, Inc. All rights reserved. Page 26
XEN Hypervisor - DOM-0XEN Hypervisor - DOM-0XEN Hypervisor - DOM-0XEN Hypervisor - DOM-0
Utils
CentOS
CDom
Template
CentOS
Services
Proc HDD RAM NIC
RHEL
SMGR
XEN Hypervisor - DOM-0XEN Hypervisor - DOM-0XEN Hypervisor - DOM-0XEN Hypervisor - DOM-0
Utils
CentOS
CDom
Template
CentOS
Services
Proc HDD RAM NIC
RHEL
SMGR
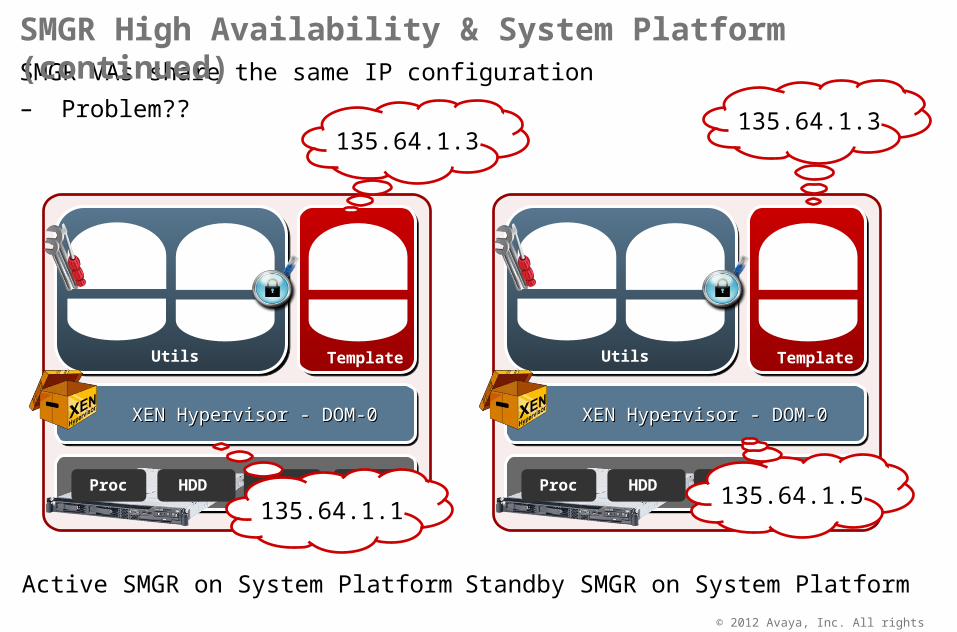
SMGR VAs share the same IP configuration
– Problem??
SMGR High Availability & System Platform (continued)
Active SMGR on System Platform Standby SMGR on System Platform
135.64.1.3
135.64.1.1
135.64.1.3
135.64.1.5
© 2012 Avaya, Inc. All rights reserved. Page 27
XEN Hypervisor - DOM-0XEN Hypervisor - DOM-0XEN Hypervisor - DOM-0XEN Hypervisor - DOM-0
Utils
CentOS
CDom
Template
CentOS
Services
Proc HDD RAM NIC
RHEL
SMGR
XEN Hypervisor - DOM-0XEN Hypervisor - DOM-0XEN Hypervisor - DOM-0XEN Hypervisor - DOM-0
Utils
CentOS
CDom
Template
CentOS
Services
Proc HDD RAM NIC
RHEL
SMGR
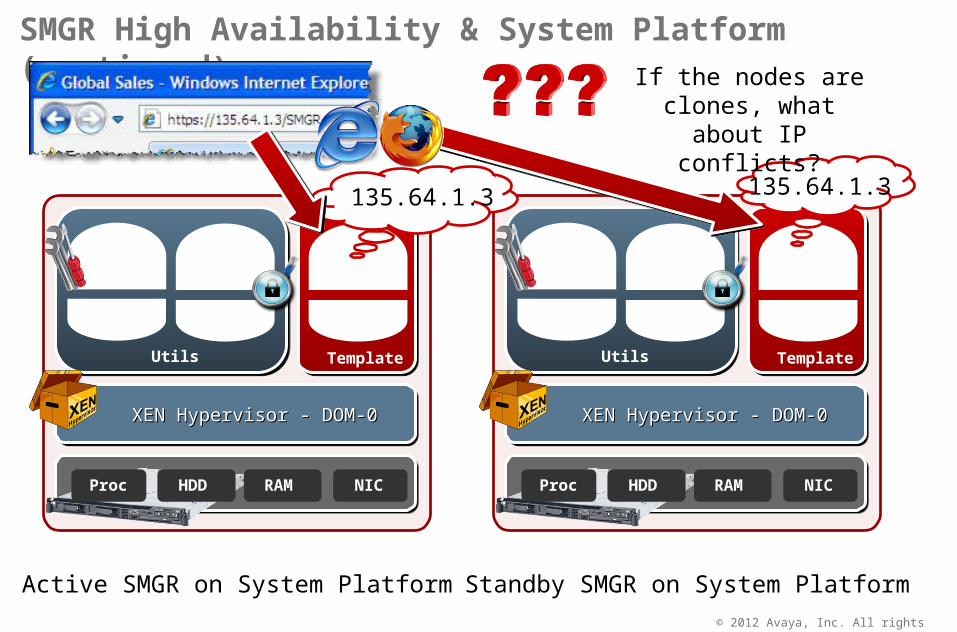
SMGR High Availability & System Platform (continued)
135.64.1.3 135.64.1.3
If the nodes are clones, what about IP conflicts?
Active SMGR on System Platform Standby SMGR on System Platform
© 2012 Avaya, Inc. All rights reserved. Page 28
XEN Hypervisor - DOM-0XEN Hypervisor - DOM-0XEN Hypervisor - DOM-0XEN Hypervisor - DOM-0
Utils
CentOS
CDom
Template
CentOS
Services
Proc HDD RAM NIC
RHEL
SMGR
XEN Hypervisor - DOM-0XEN Hypervisor - DOM-0XEN Hypervisor - DOM-0XEN Hypervisor - DOM-0
Utils
CentOS
CDom
Template
CentOS
Services
Proc HDD RAM NIC
RHEL
SMGR
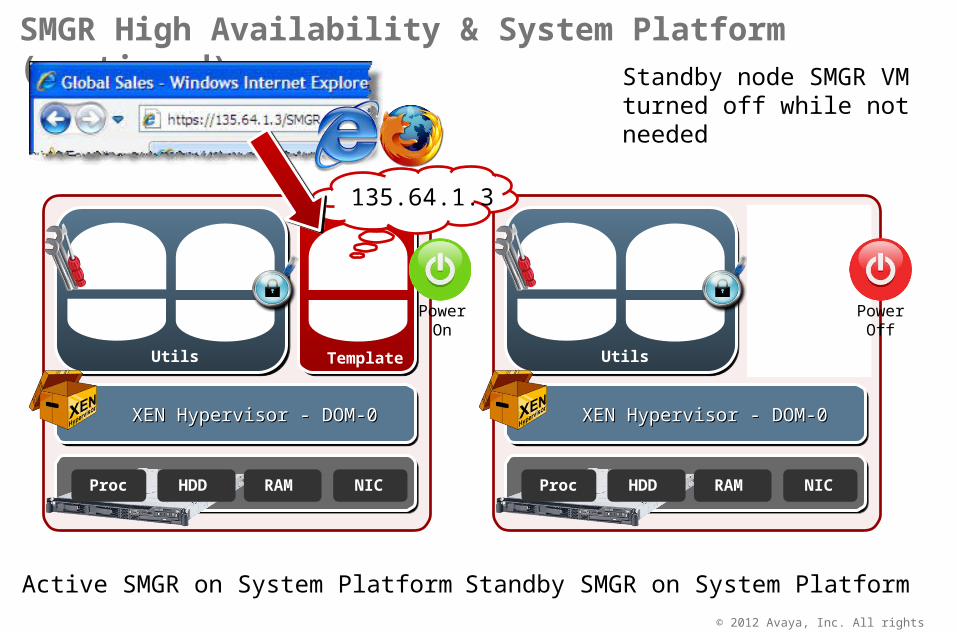
SMGR High Availability & System Platform (continued)
PowerOn
PowerOff
135.64.1.3
Active SMGR on System Platform Standby SMGR on System Platform
Standby node SMGR VM turned off while not needed
© 2012 Avaya, Inc. All rights reserved. Page 29
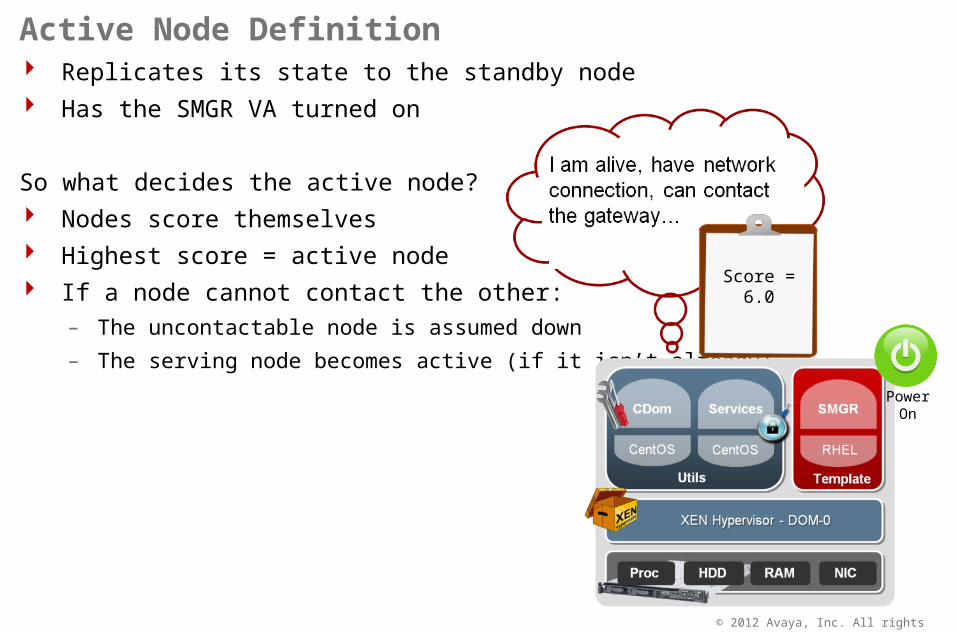
Replicates its state to the standby node Has the SMGR VA turned on
So what decides the active node? Nodes score themselves Highest score = active node If a node cannot contact the other:
– The uncontactable node is assumed down
– The serving node becomes active (if it isn’t already)
Active Node Definition
Score = 6.0
PowerOn
© 2012 Avaya, Inc. All rights reserved. Page 30
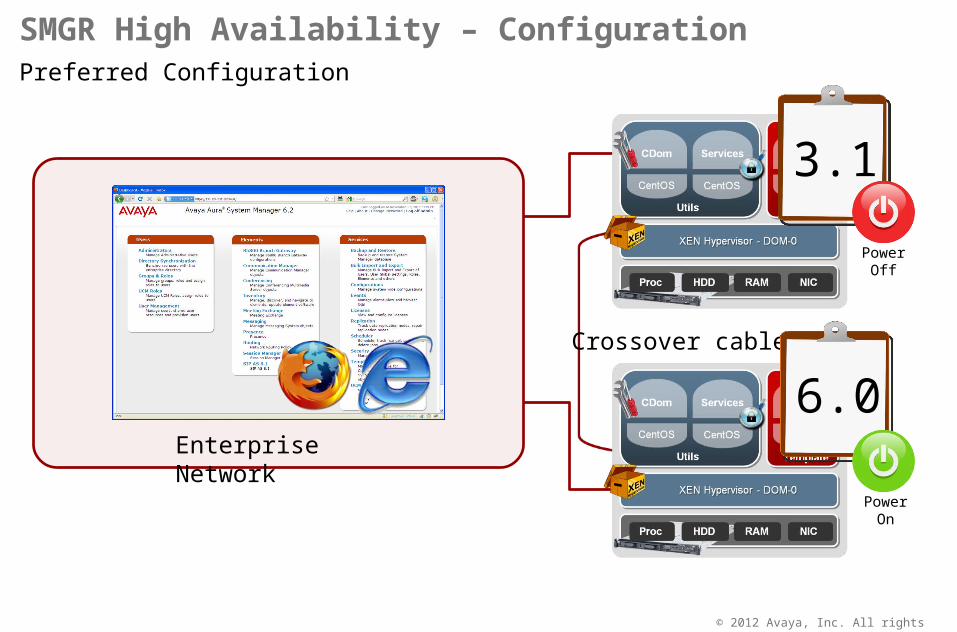
Preferred Configuration
SMGR High Availability – Configuration
Crossover cable
Enterprise Network
6.0
3.1
PowerOn
PowerOff
© 2012 Avaya, Inc. All rights reserved. Page 31
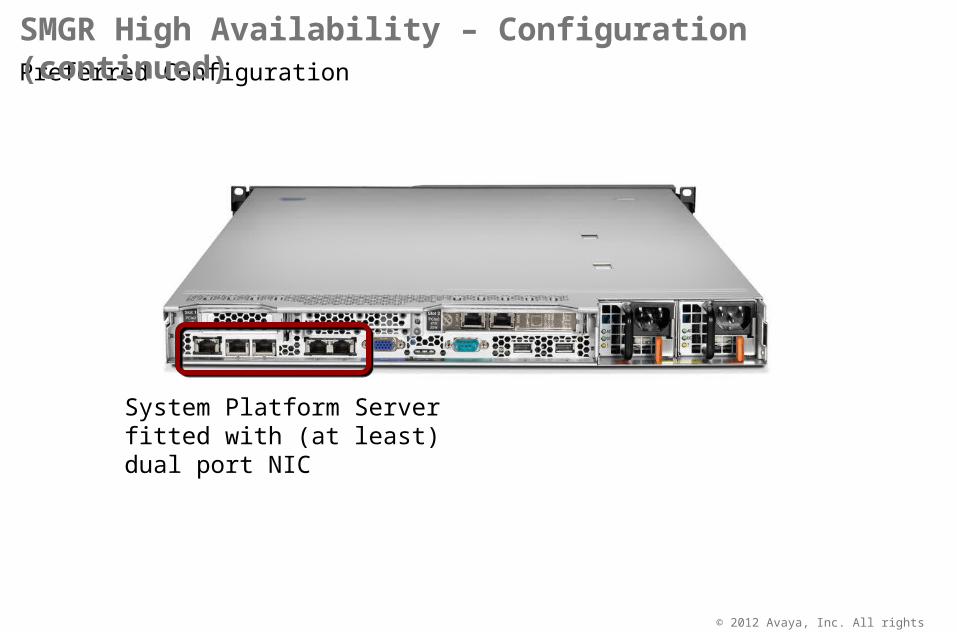
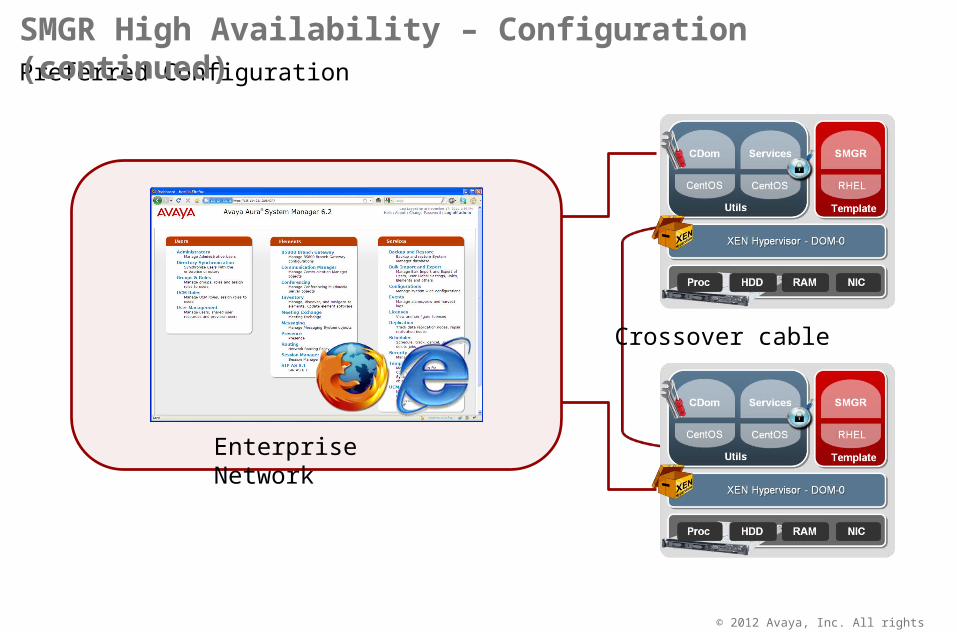
Preferred Configuration
SMGR High Availability – Configuration (continued)
System Platform Server fitted with (at least) dual port NIC
© 2012 Avaya, Inc. All rights reserved. Page 32
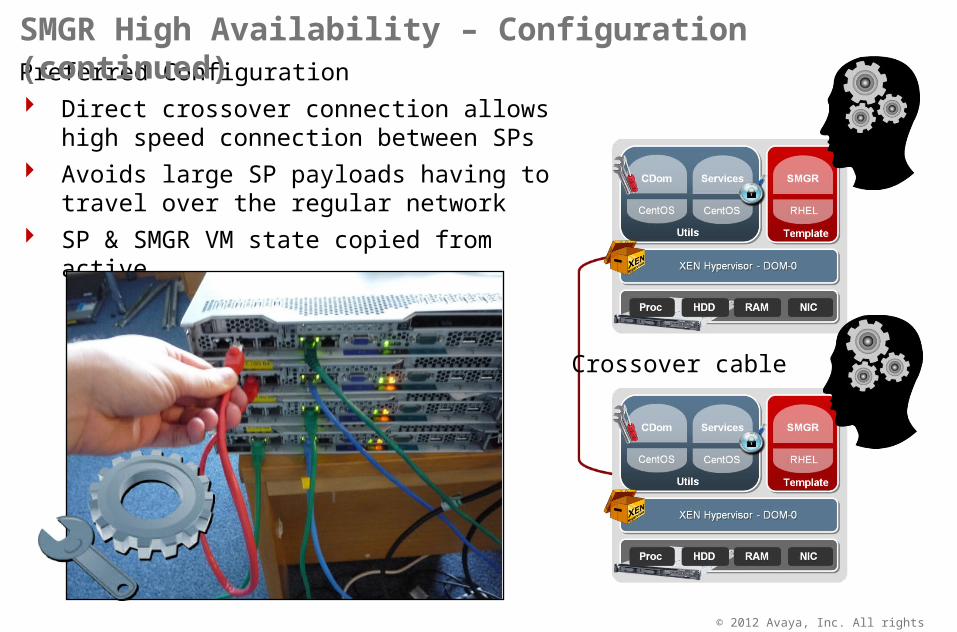
Crossover cable
Preferred Configuration Direct crossover connection allows high speed
connection between SPs Avoids large SP payloads having to travel over
the regular network SP & SMGR VM state copied from active
SMGR High Availability – Configuration (continued)
© 2012 Avaya, Inc. All rights reserved. Page 33
Preferred Configuration
SMGR High Availability – Configuration (continued)
Crossover cable
Enterprise Network
© 2012 Avaya, Inc. All rights reserved. Page 34
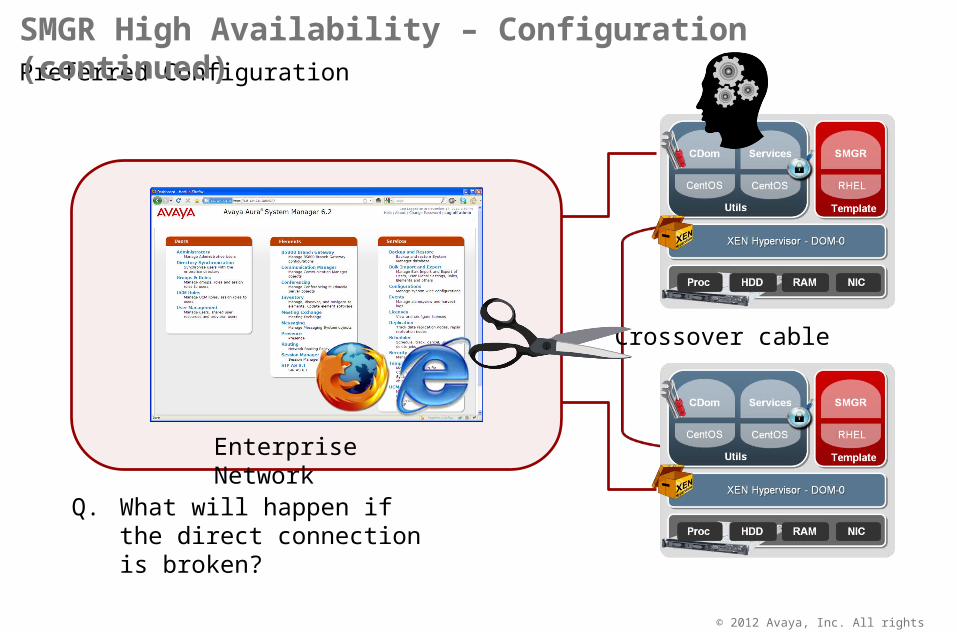
Preferred Configuration
SMGR High Availability – Configuration (continued)
Crossover cable
Q. What will happen if the direct connection is broken?
Enterprise Network
© 2012 Avaya, Inc. All rights reserved. Page 35
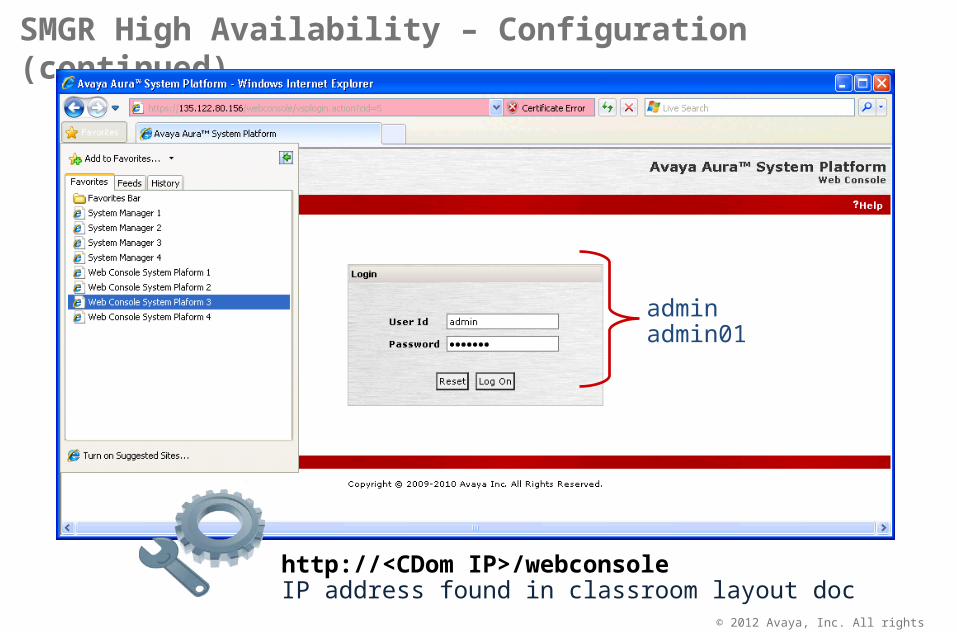
SMGR High Availability – Configuration (continued)
adminadmin01
http://<CDom IP>/webconsoleIP address found in classroom layout doc
© 2012 Avaya, Inc. All rights reserved. Page 36
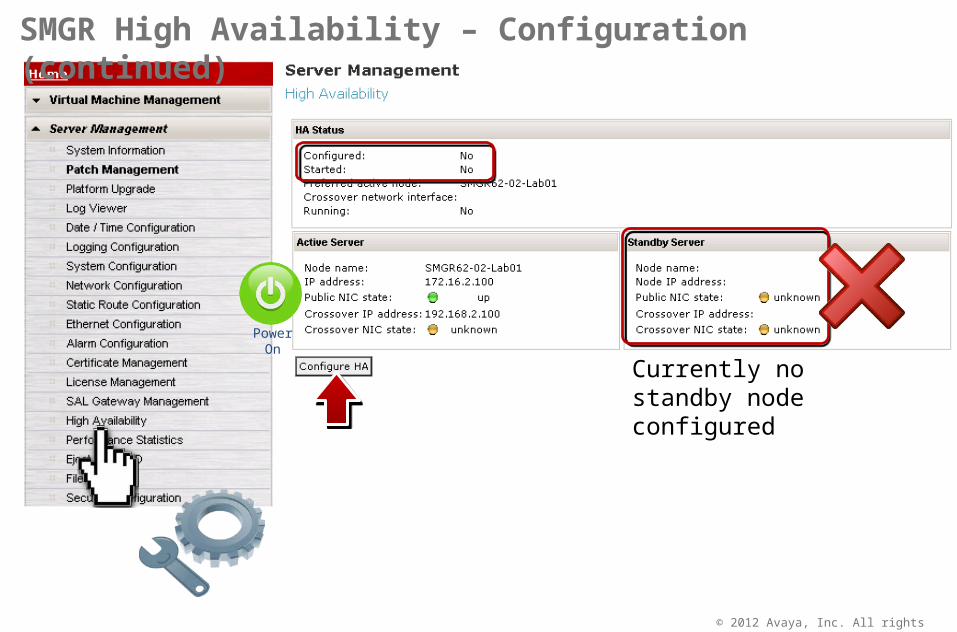
SMGR High Availability – Configuration (continued)
Currently no standby node configured
PowerOn
© 2012 Avaya, Inc. All rights reserved. Page 37
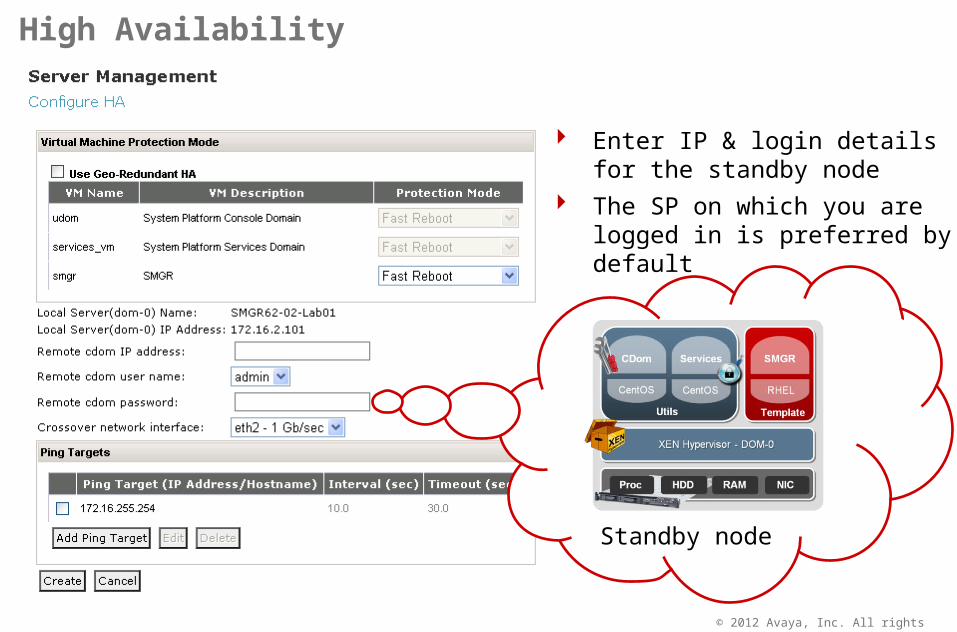
Enter IP & login details for the standby node
The SP on which you are logged in is preferred by default
High Availability
Standby node
© 2012 Avaya, Inc. All rights reserved. Page 38
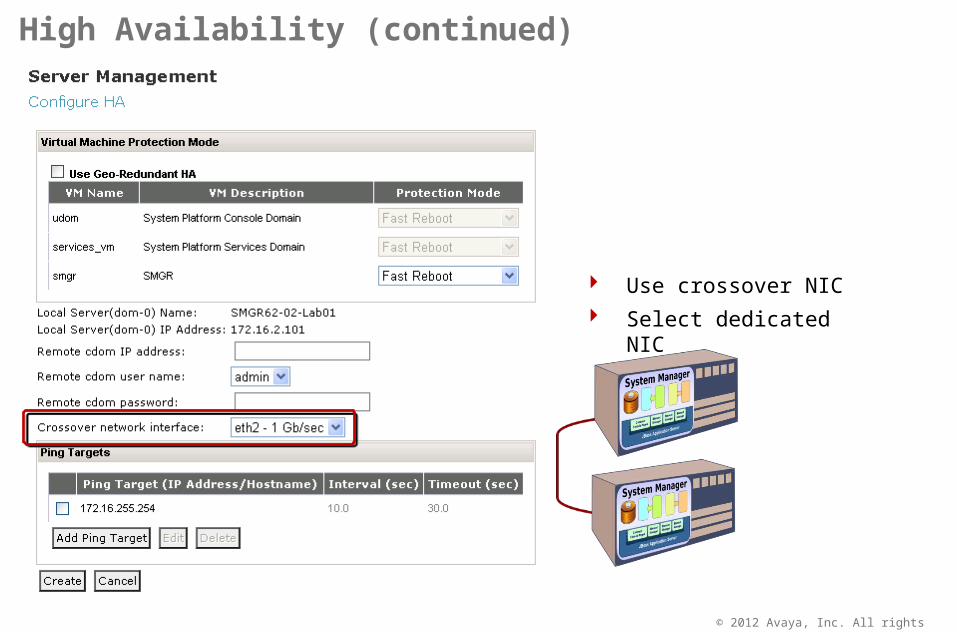
Use crossover NIC
Select dedicated NIC
High Availability (continued)
© 2012 Avaya, Inc. All rights reserved. Page 39
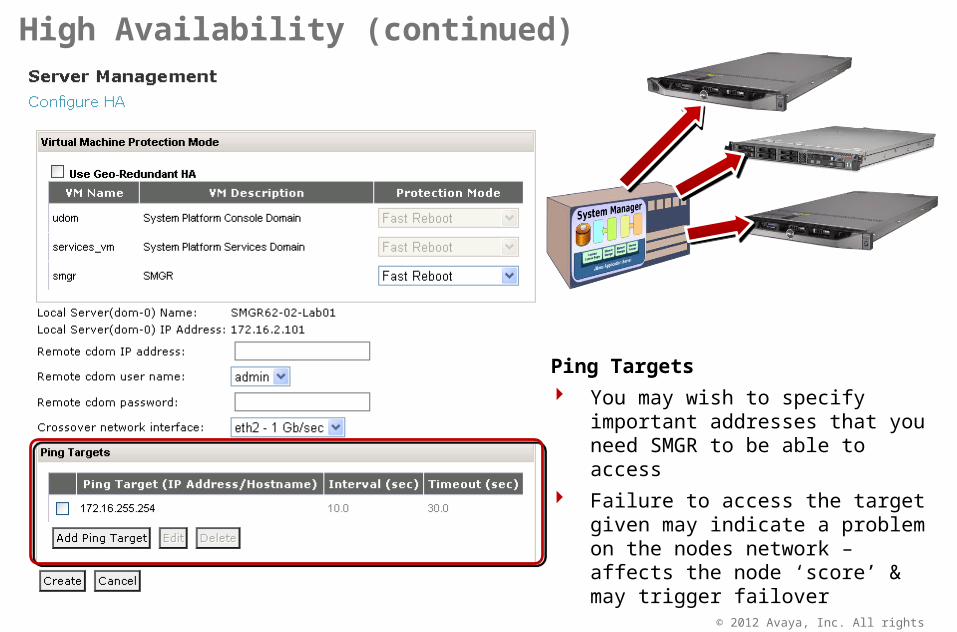
Ping Targets
You may wish to specify important addresses that you need SMGR to be able to access
Failure to access the target given may indicate a problem on the nodes network – affects the node ‘score’ & may trigger failover
High Availability (continued)
© 2012 Avaya, Inc. All rights reserved. Page 40
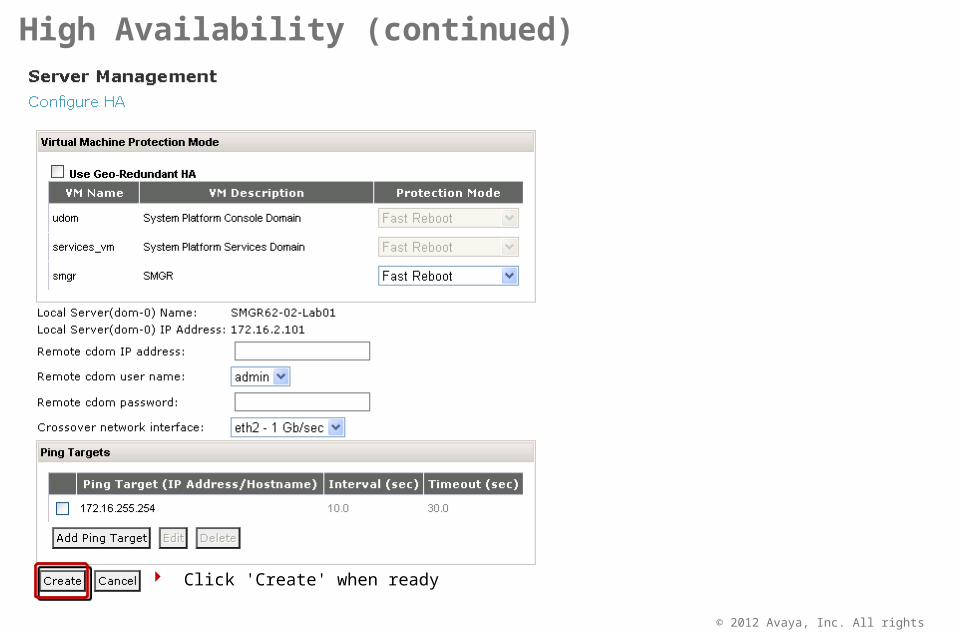
High Availability (continued)
Click 'Create' when ready
© 2012 Avaya, Inc. All rights reserved. Page 41
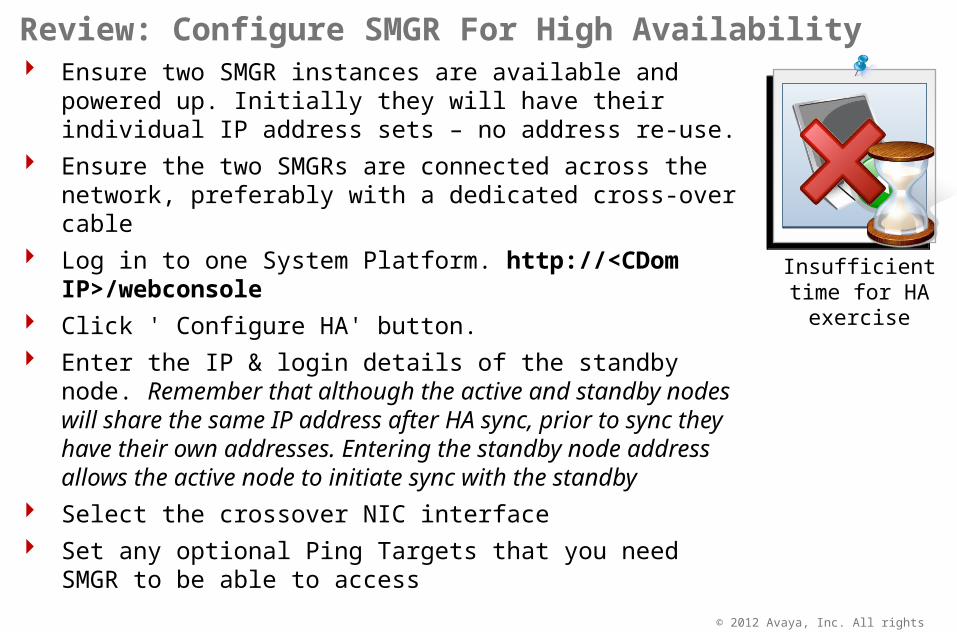
Ensure two SMGR instances are available and powered up. Initially they will have their individual IP address sets – no address re-use.
Ensure the two SMGRs are connected across the network, preferably with a dedicated cross-over cable
Log in to one System Platform. http://<CDom IP>/webconsole Click ' Configure HA' button. Enter the IP & login details of the standby node. Remember that
although the active and standby nodes will share the same IP address after HA sync, prior to sync they have their own addresses. Entering the standby node address allows the active node to initiate sync with the standby
Select the crossover NIC interface Set any optional Ping Targets that you need SMGR to be able
to access
Review: Configure SMGR For High Availability
Insufficient time for HA exercise
© 2012 Avaya, Inc. All rights reserved. Page 42
Click ‘Create’ Initial state replication and synchronisation can take well over
an hour, depending on the quantity of data To test HA, login to SMGR web console. Remove network
connection on active server. Watch standby node VM power up. Continue navigating around SMGR. You should not need to login again, even though a different server is now serving the http request. Remember that it can take up to 15 minutes to transition.
Review: Configure SMGR For High Availability (continued)
Insufficient time for HA exercise

© 2012 Avaya, Inc. All rights reserved. Page 43
Q & A?
© 2012 Avaya, Inc. All rights reserved. Page 44
After completing this course, you should: Understand:
– SMGR user related features & functions
– SMGR product related features & functions
Be able to:– Use SMGR to manage users & their permissions
– Use SMGR to administer Avaya Aura® products
– Implement business continuity
– Backing up / restoring from backup
– Configure High Availability
Course Summary
© 2012 Avaya, Inc. All rights reserved, Page 45
Module 06: SMGR & Business Continuity
Lesson 03: Additional Information

© 2012 Avaya, Inc. All rights reserved. Page 46
Additional Glossary TermsTerm Definition
SMGR Avaya Aura® System Manager
LDAP Lightweight Directory Access Protocol
SAL Secure Access Link
ASM Avaya Aura® Session Manager
POM Proactive Outreach Manager
SP Avaya Aura® System Platform
HA High Availability
CLI Command Line Interface
UPM User Profile Manager
RBAC Role Based Access Control
UFA Unlikely Faux Acronym
© 2012 Avaya, Inc. All rights reserved. Page 47
Internet Explorer 7,8,9 and Google Chrome To bypass a range of IP addresses or a specific domain name,
specify the addresses in the proxy exception list:
1. In Internet Explorer, on the Tools menu, click Internet Options.
2. On the Connections tab, click LAN Settings.
3. Click Advanced, and type 127.0.0.*; in the Exceptions area
Google Chrome uses Internet Explorer's settings for proxy, please change the settings as per the Internet explorer.
Appendix A – Adding Proxy Exceptions
© 2012 Avaya, Inc. All rights reserved. Page 48
Mozilla Firefox To bypass a range of IP addresses or a specific domain name,
specify the addresses in the proxy exception list:– In Mozilla Firefox, on the Tools menu, click Options.
– On the Advanced tab, click Network.
– Click Settings, and type 127.0.0.1/27, in the No Proxy for area
Appendix A – Adding Proxy Exceptions (continued)
© 2012 Avaya, Inc. All rights reserved. Page 49
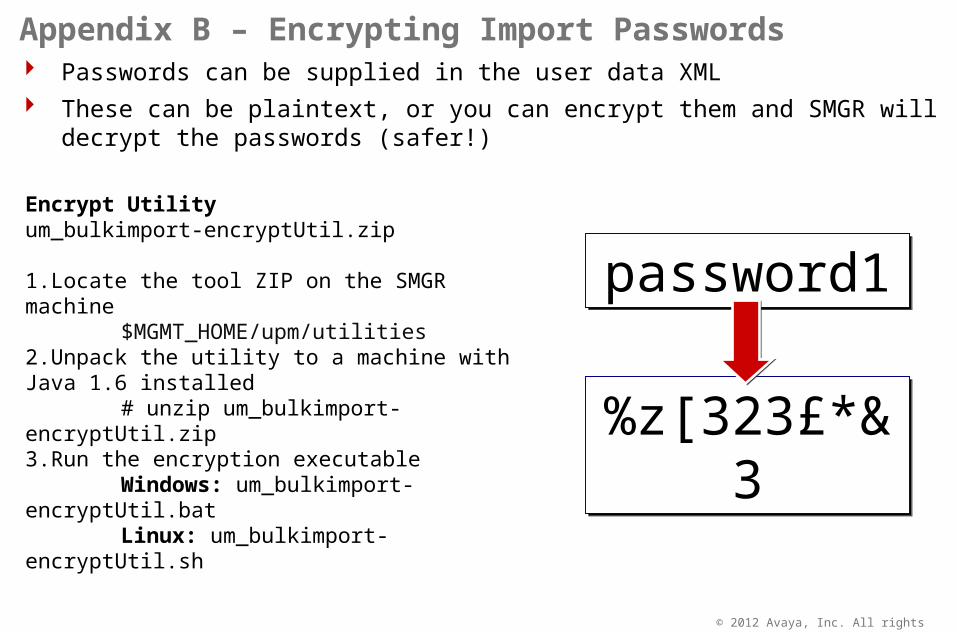
Passwords can be supplied in the user data XML These can be plaintext, or you can encrypt them and SMGR will decrypt the
passwords (safer!)
Appendix B – Encrypting Import Passwords
Encrypt Utility um_bulkimport-encryptUtil.zip
1.Locate the tool ZIP on the SMGR machine $MGMT_HOME/upm/utilities
2.Unpack the utility to a machine with Java 1.6 installed
# unzip um_bulkimport-encryptUtil.zip3.Run the encryption executable
Windows: um_bulkimport-encryptUtil.batLinux: um_bulkimport-encryptUtil.sh
password1password1
%z[323£*&3%z[323£*&3
© 2012 Avaya, Inc. All rights reserved. Page 50
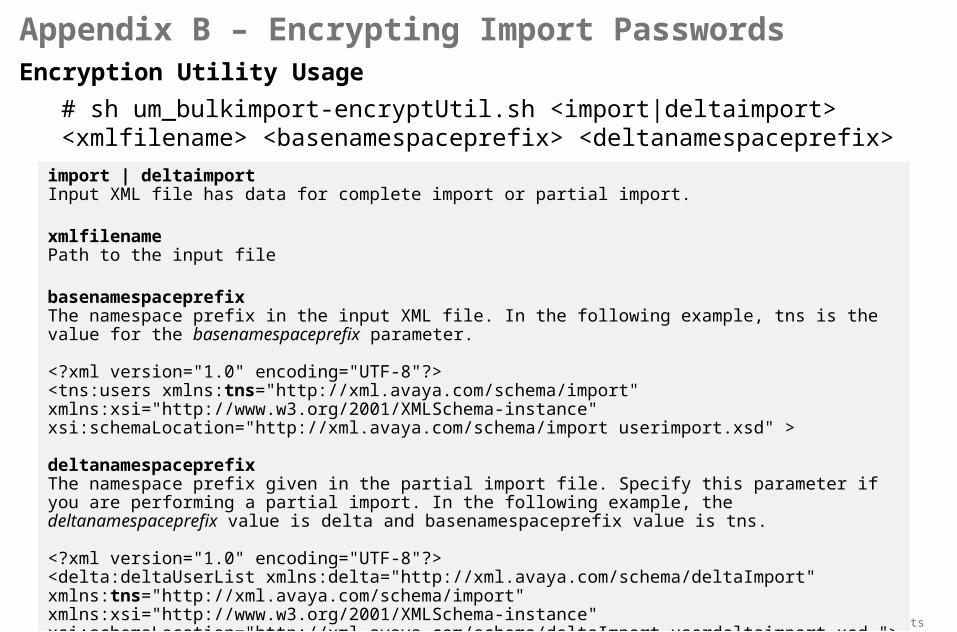
Encryption Utility Usage
# sh um_bulkimport-encryptUtil.sh <import|deltaimport> <xmlfilename> <basenamespaceprefix> <deltanamespaceprefix>
Appendix B – Encrypting Import Passwords
import | deltaimport Input XML file has data for complete import or partial import.
xmlfilename Path to the input file
basenamespaceprefix The namespace prefix in the input XML file. In the following example, tns is the value for the basenamespaceprefix parameter.
<?xml version="1.0" encoding="UTF-8"?><tns:users xmlns:tns="http://xml.avaya.com/schema/import" xmlns:xsi="http://www.w3.org/2001/XMLSchema-instance" xsi:schemaLocation="http://xml.avaya.com/schema/import userimport.xsd" > deltanamespaceprefix The namespace prefix given in the partial import file. Specify this parameter if you are performing a partial import. In the following example, the deltanamespaceprefix value is delta and basenamespaceprefix value is tns.
<?xml version="1.0" encoding="UTF-8"?><delta:deltaUserList xmlns:delta="http://xml.avaya.com/schema/deltaImport" xmlns:tns="http://xml.avaya.com/schema/import" xmlns:xsi="http://www.w3.org/2001/XMLSchema-instance" xsi:schemaLocation="http://xml.avaya.com/schema/deltaImport userdeltaimport.xsd ">

© 2012 Avaya, Inc. All rights reserved. Page 51
Encryption Utility Usage
# sh um_bulkimport-encryptUtil.sh <import|deltaimport> <xmlfilename> <basenamespaceprefix> <deltanamespaceprefix>
Appendix B – Encrypting Import PasswordsData
Examples:
# sh um_bulkimport-encryptUtil.sh import newUsers.xml tns
Encrypt the passwords in an XML document describing a bunch of complete, new users
# sh um_bulkimport-encryptUtil.sh deltaimport usersUpdate.xml tns
Encrypt the passwords in an XML document describing a number of updates to users
Examples:
# sh um_bulkimport-encryptUtil.sh import newUsers.xml tns
Encrypt the passwords in an XML document describing a bunch of complete, new users
# sh um_bulkimport-encryptUtil.sh deltaimport usersUpdate.xml tns
Encrypt the passwords in an XML document describing a number of updates to users
<xml><data></data>
</xml>
<xml><data></data>
</xml>
<xml><data></data>
</xml>
<xml><data></data>
</xml>
© 2012 Avaya, Inc. All rights reserved. Page 52
Instructions for VILT Instructors:
• If you will not be teaching the follow-on ASM class, 5u00096v, then in vSphere change the snapshots to Day 1 for the next instructor. Change the following:
– ASMxa
– ASMxb
– BSMx
– CMx
– Desktop 1
– Desktop 2
– SMGRx
Then, ensure that all devices are turned ON. (Often, changing the snapshot leaves the device powered OFF.)