Embed Size (px)
Citation preview

© 1992-2014 by Pearson Education, Inc. All Rights Reserved.
© 1992-2014 by Pearson Education, Inc. All Rights Reserved.
© 1992-2014 by Pearson Education, Inc. All Rights Reserved.
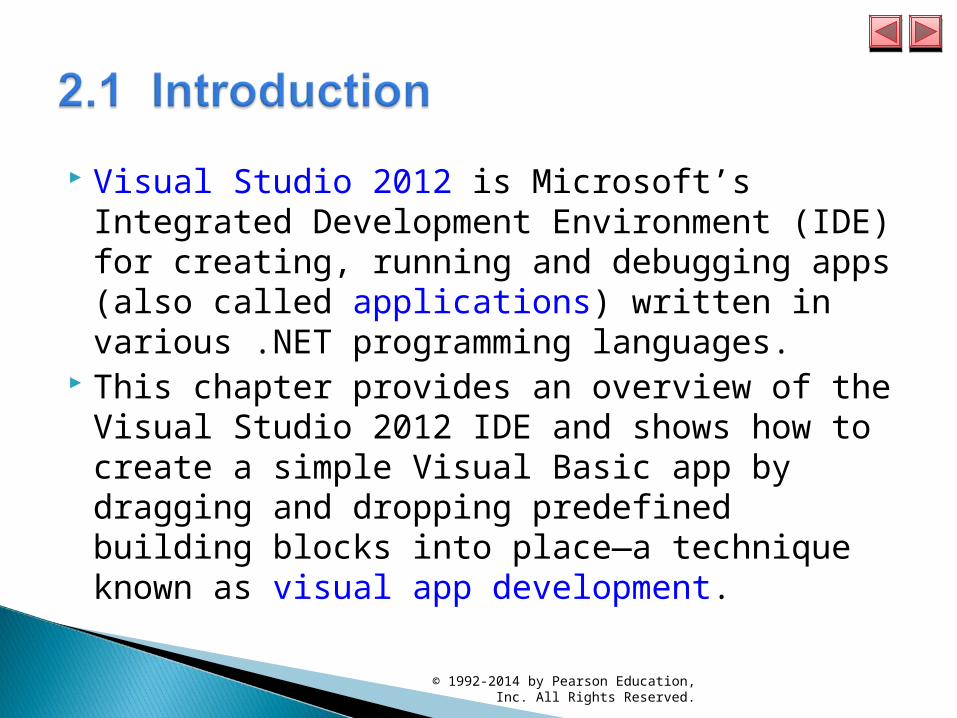
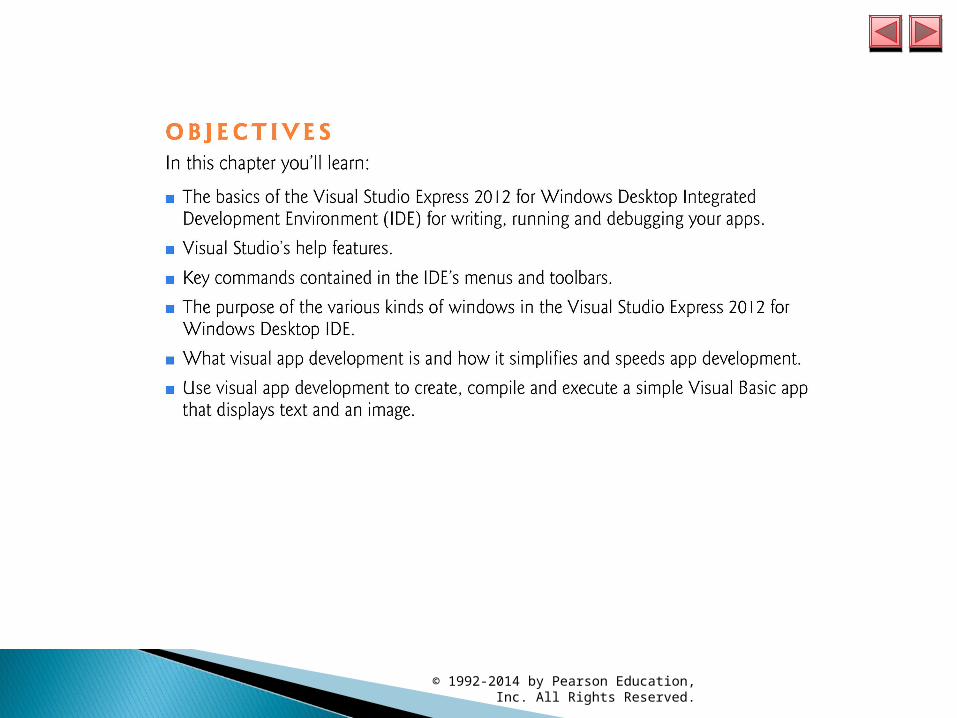
Visual Studio 2012 is Microsoft’s Integrated Development Environment (IDE) for creating, running and debugging apps (also called applications) written in various .NET programming languages.
This chapter provides an overview of the Visual Studio 2012 IDE and shows how to create a simple Visual Basic app by dragging and dropping predefined building blocks into place—a technique known as visual app development.
© 1992-2014 by Pearson Education, Inc. All Rights Reserved.
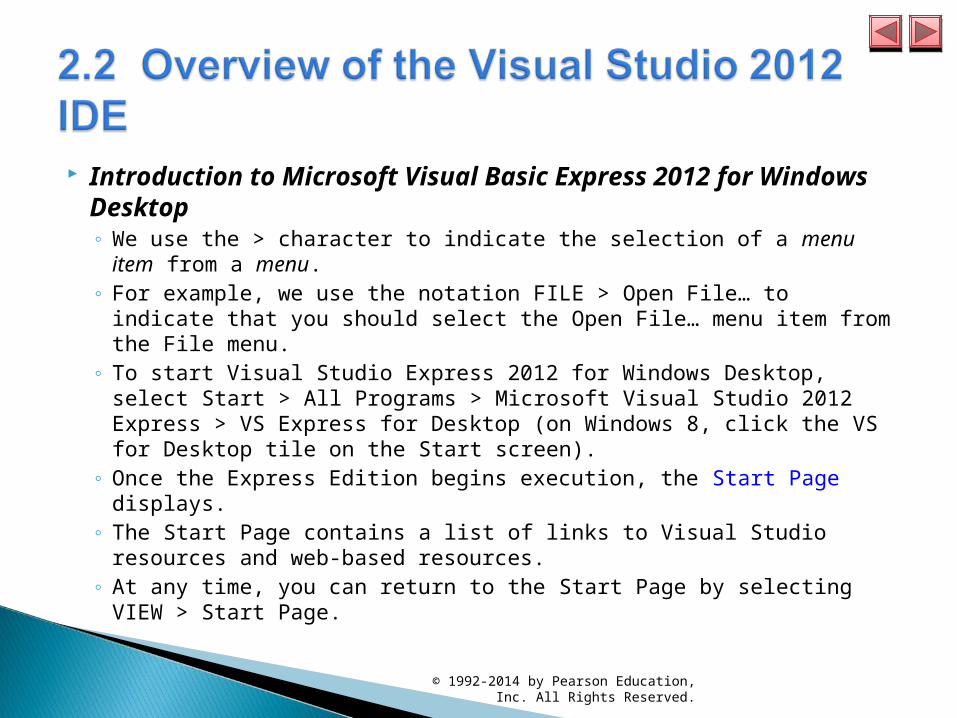
Introduction to Microsoft Visual Basic Express 2012 for Windows Desktop◦ We use the > character to indicate the selection of a menu item from a menu.◦ For example, we use the notation FILE > Open File… to indicate that you
should select the Open File… menu item from the File menu.◦ To start Visual Studio Express 2012 for Windows Desktop, select Start >
All Programs > Microsoft Visual Studio 2012 Express > VS Express for Desktop (on Windows 8, click the VS for Desktop tile on the Start screen).
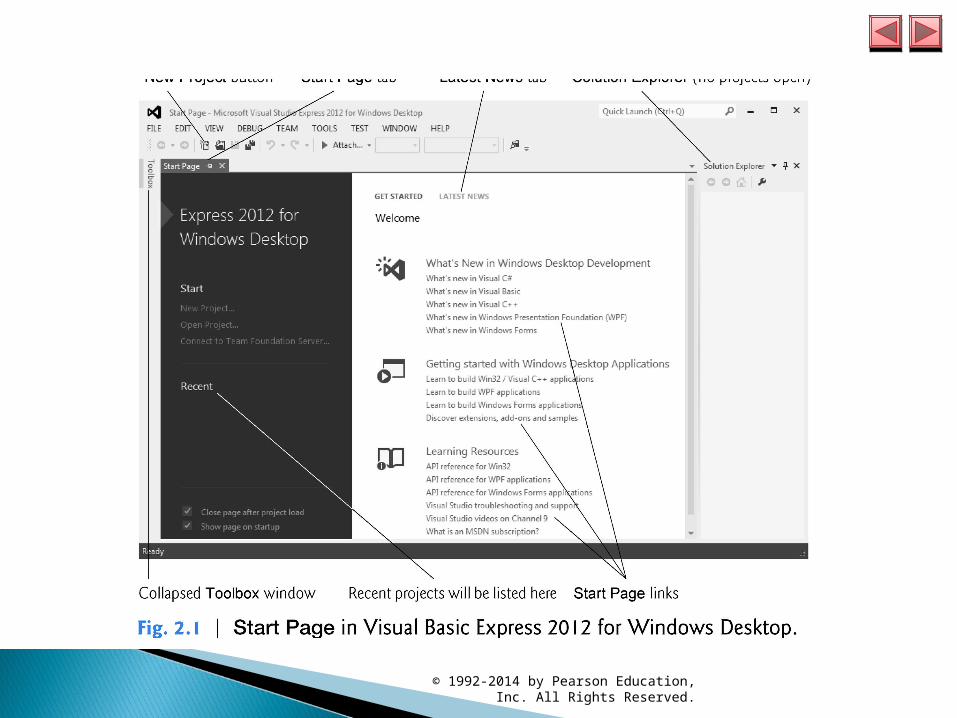
◦ Once the Express Edition begins execution, the Start Page displays. ◦ The Start Page contains a list of links to Visual Studio resources and web-
based resources.◦ At any time, you can return to the Start Page by selecting VIEW > Start
Page.
© 1992-2014 by Pearson Education, Inc. All Rights Reserved.
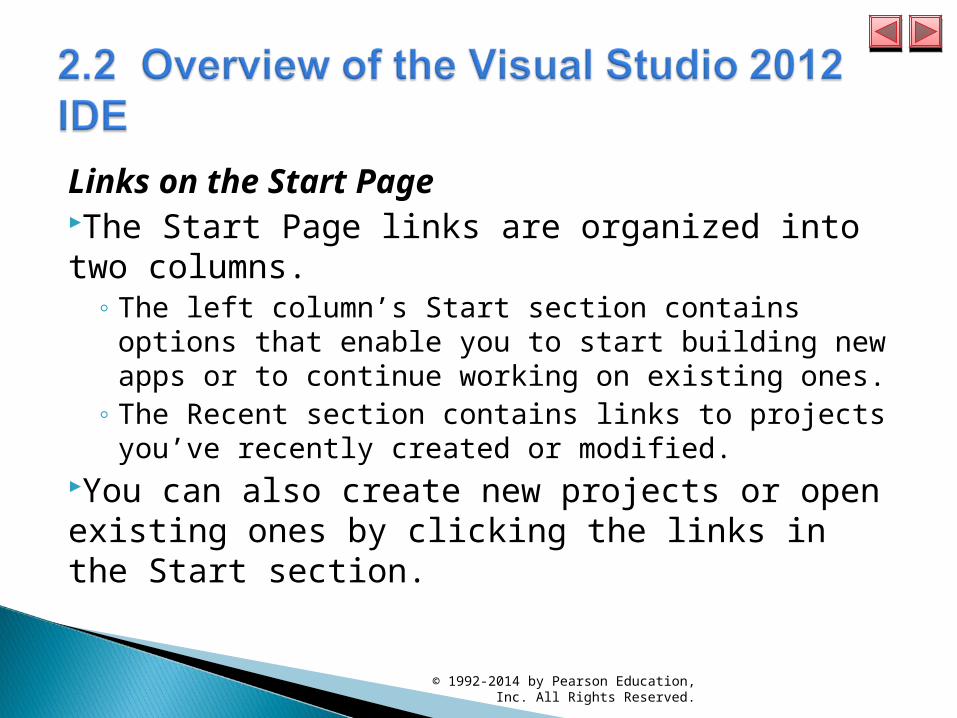
Links on the Start PageThe Start Page links are organized into two columns.
◦ The left column’s Start section contains options that enable you to start building new apps or to continue working on existing ones.
◦ The Recent section contains links to projects you’ve recently created or modified.
You can also create new projects or open existing ones by clicking the links in the Start section.
© 1992-2014 by Pearson Education, Inc. All Rights Reserved.
© 1992-2014 by Pearson Education, Inc. All Rights Reserved.
Creating a New Project◦ To begin app development in Visual Basic, you must create a
new project or open an existing one.◦ You select FILE > New Project… to create a new project or
FILE > Open Project… to open an existing one.◦ From the Start Page’s Start section, you can also click the
links New Project… or Open Project….◦ A project is a group of related files, such as the Visual Basic
code and any images that might make up an app.◦ Visual Studio organizes apps into projects and solutions, which
contain one or more projects.
© 1992-2014 by Pearson Education, Inc. All Rights Reserved.
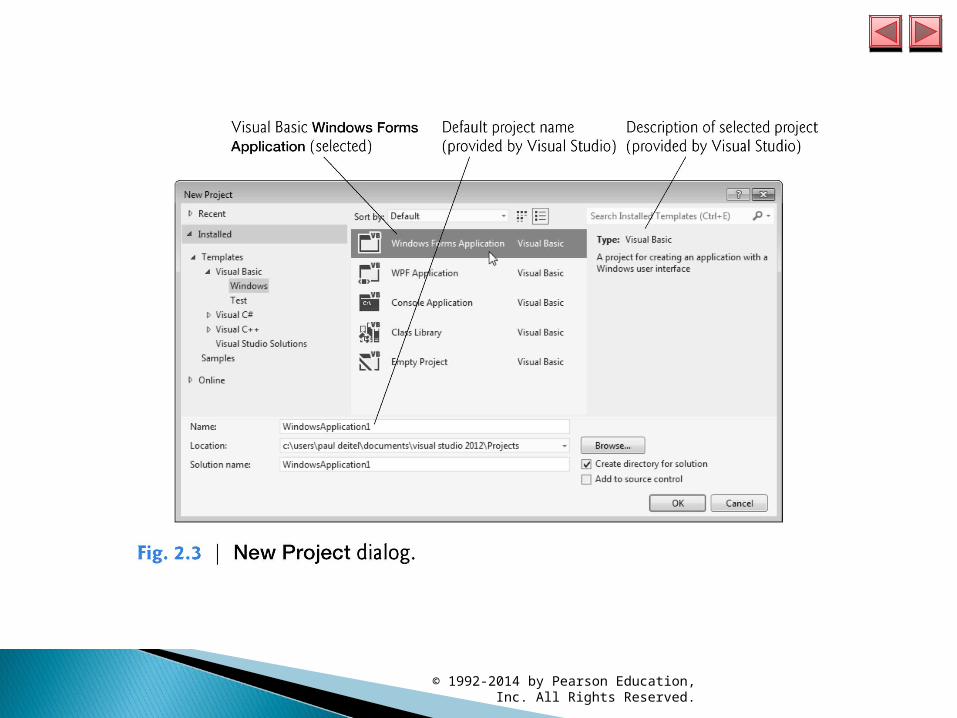
New Project Dialog and Project TemplatesWhen you select FILE > New Project… or click the New Project… link on the Start Page, the New Project dialog displays.Dialogs are windows that facilitate user–computer communication. Visual Studio provides several templates—the project types users can create in Visual Basic and other languages.The templates include Windows Forms apps, WPF apps and others—full versions of Visual Studio provide many additional templates.
© 1992-2014 by Pearson Education, Inc. All Rights Reserved.
In this chapter, we build a Windows Forms Application. A Windows Forms app executes within a Windows
operating system (such as Windows 7 or Windows 8) and typically has a graphical user interface (GUI)—users interact with this visual part of the app.
Windows apps include Microsoft software products like Microsoft Word, Internet Explorer and Visual Studio; software products created by other vendors; and customized software that you and other app developers create.
© 1992-2014 by Pearson Education, Inc. All Rights Reserved.
By default, Visual Studio assigns the name WindowsApplication1 to a new Windows Forms Application project and solution.
Select Windows Forms Application, then click OK to display the IDE in Design view, which contains the features that enable you to create an app’s GUI.
© 1992-2014 by Pearson Education, Inc. All Rights Reserved.
© 1992-2014 by Pearson Education, Inc. All Rights Reserved.
© 1992-2014 by Pearson Education, Inc. All Rights Reserved.
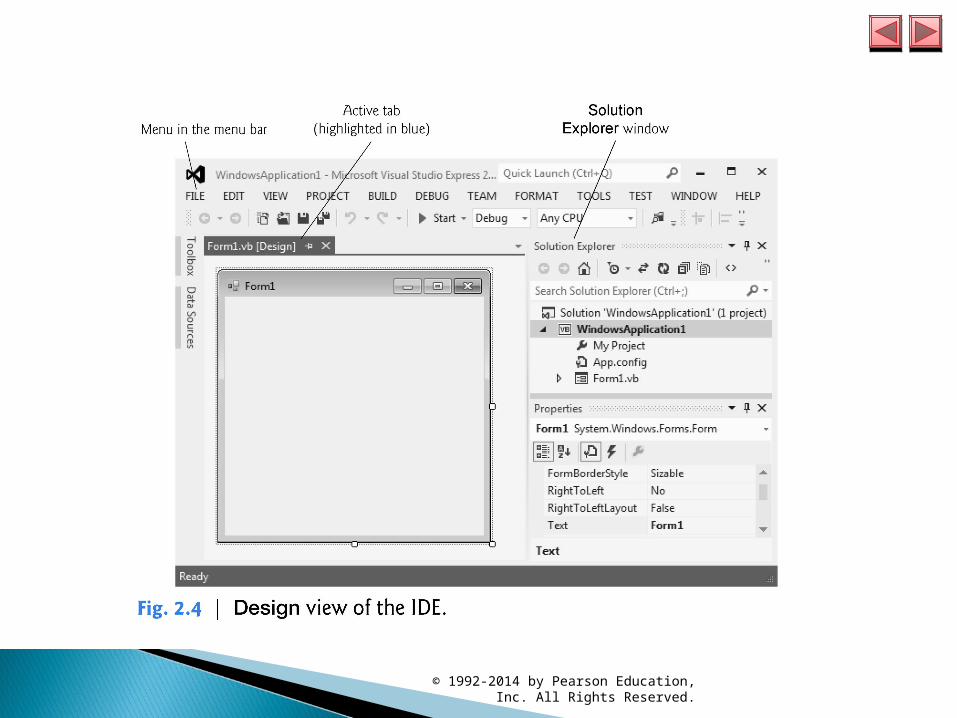
Forms and ControlsThe rectangle in the Design area titled Form1 (called a Form) represents the main window of the Windows Forms app that you’re creating.Visual Basic apps can have multiple Forms (windows)—but we’ll use use only one Form.You’ll learn how to customize the Form by adding GUI controls—in this example, you’ll add a Label and a PictureBox (as you’ll see in Fig. 2.20).A Label typically contains descriptive text (for example, "Welcome to Visual Basic!"), and a Picture-Box displays an image.
© 1992-2014 by Pearson Education, Inc. All Rights Reserved.
© 1992-2014 by Pearson Education, Inc. All Rights Reserved.
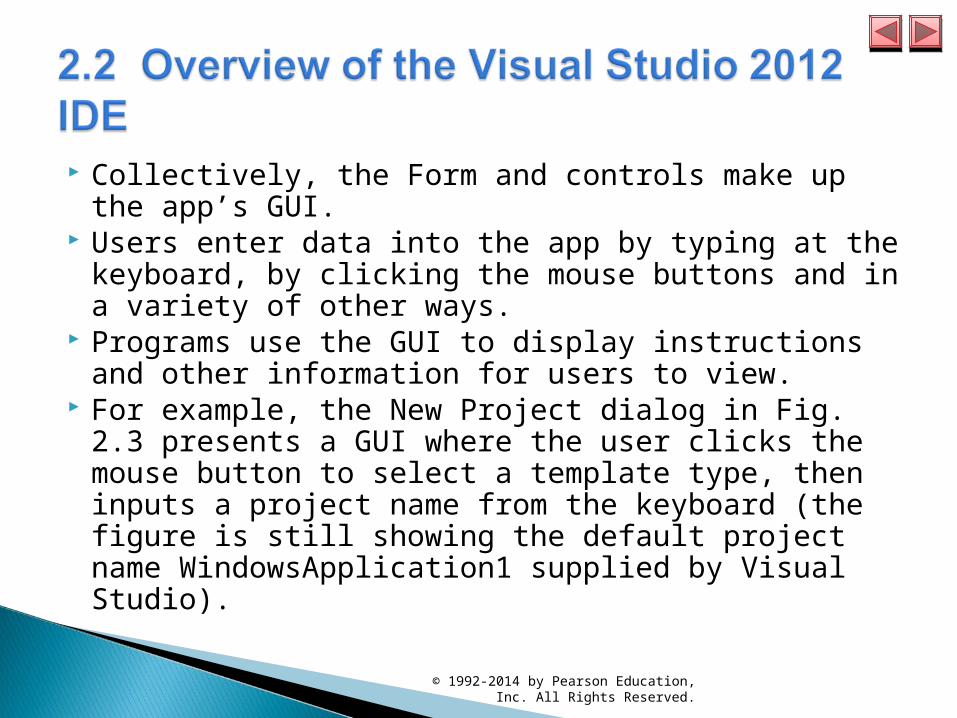
Collectively, the Form and controls make up the app’s GUI.
Users enter data into the app by typing at the keyboard, by clicking the mouse buttons and in a variety of other ways.
Programs use the GUI to display instructions and other information for users to view.
For example, the New Project dialog in Fig. 2.3 presents a GUI where the user clicks the mouse button to select a template type, then inputs a project name from the keyboard (the figure is still showing the default project name WindowsApplication1 supplied by Visual Studio).
© 1992-2014 by Pearson Education, Inc. All Rights Reserved.
Each open document’s name is listed on a tab. To view a document when multiple documents are
open, click its tab. The active tab (the tab of the currently displayed
document) is highlighted in blue (for example, Form1.vb [Design] in Fig. 2.4).
© 1992-2014 by Pearson Education, Inc. All Rights Reserved.
© 1992-2014 by Pearson Education, Inc. All Rights Reserved.
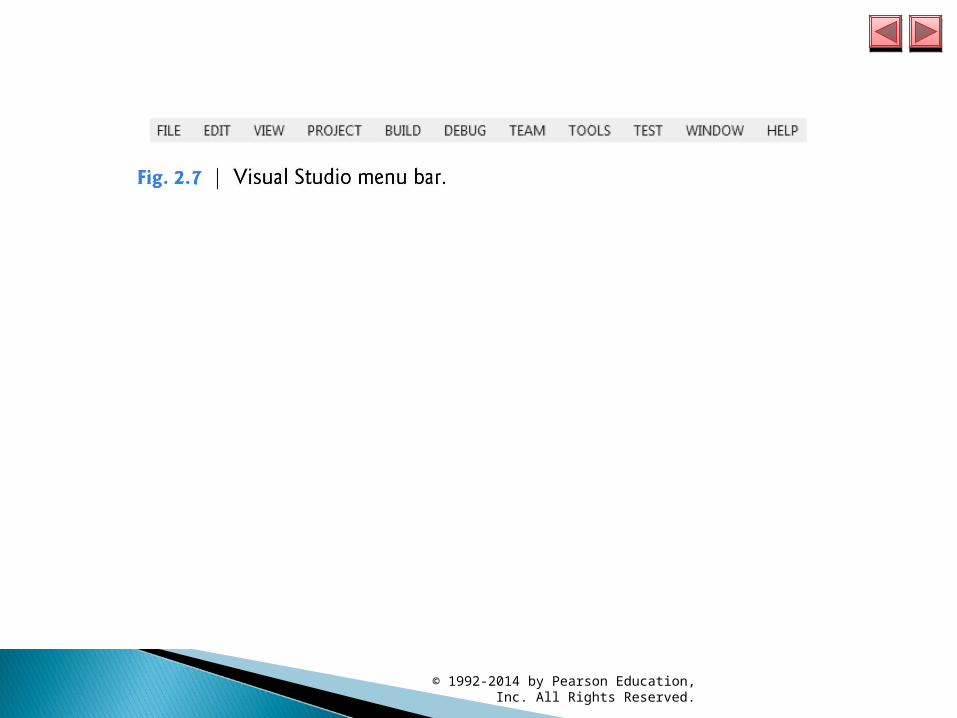
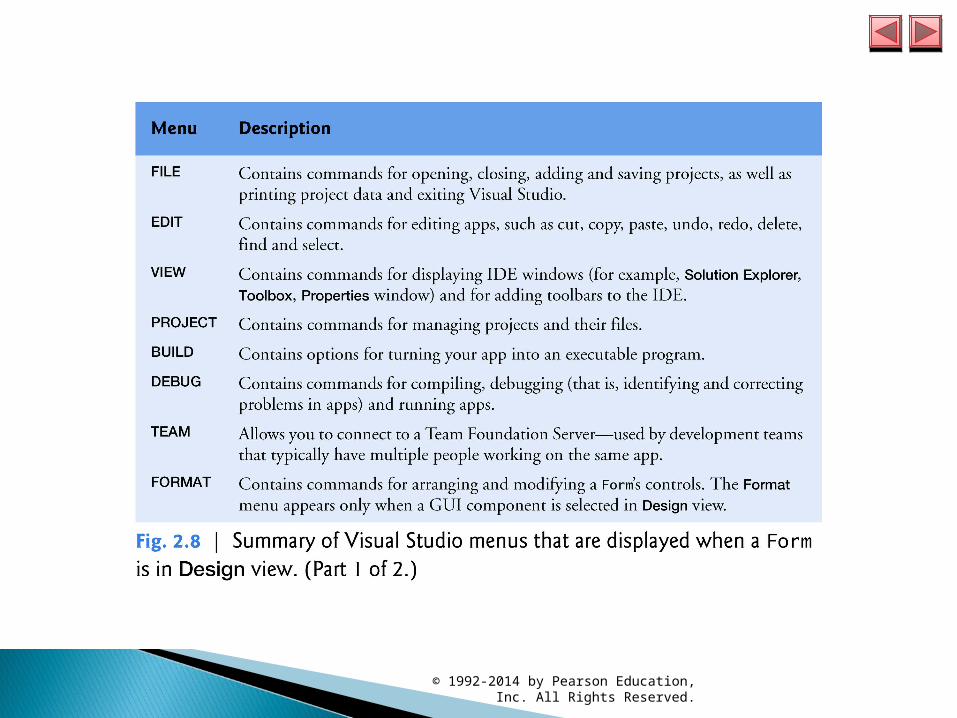
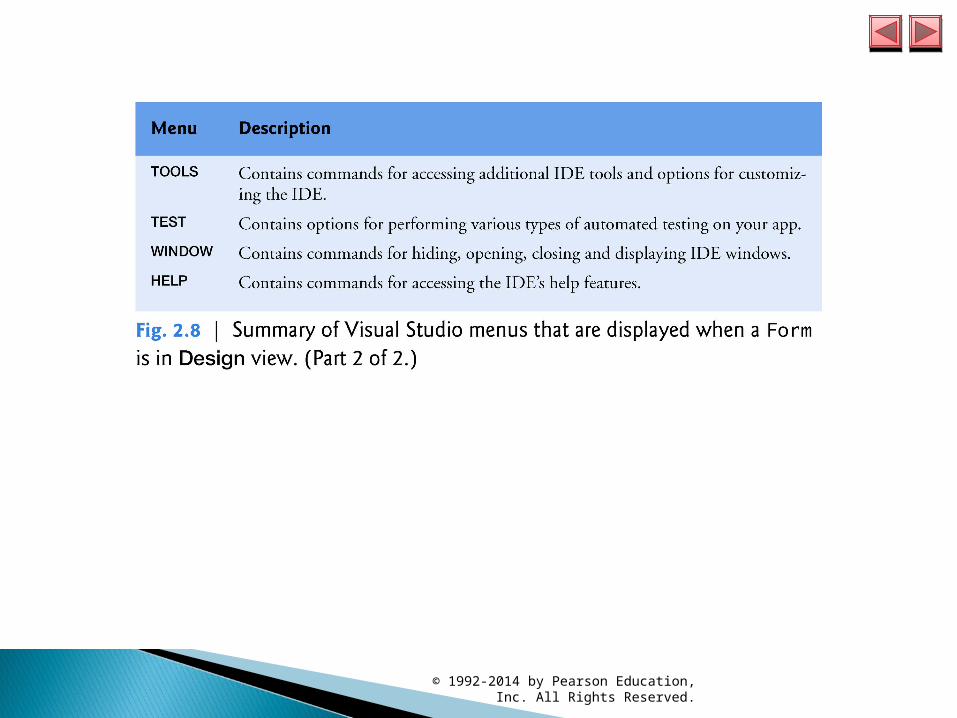
Commands for managing the IDE and for developing, maintaining and executing apps are contained in menus, which are located on the menu bar of the IDE
The set of menus displayed depends on what you’re currently doing in the IDE.
© 1992-2014 by Pearson Education, Inc. All Rights Reserved.
© 1992-2014 by Pearson Education, Inc. All Rights Reserved.
© 1992-2014 by Pearson Education, Inc. All Rights Reserved.
© 1992-2014 by Pearson Education, Inc. All Rights Reserved.
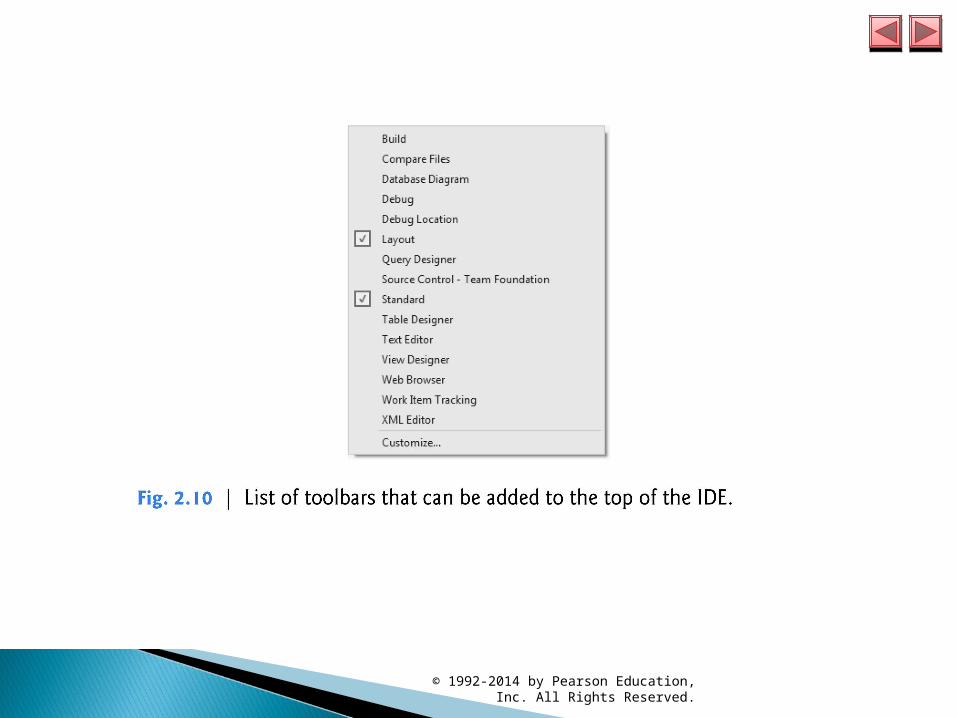
You can customize which toolbars are displayed by selecting VIEW > Toolbars then selecting a toolbar from the list in Fig. 2.10.
Each toolbar you select is displayed with the other toolbars at the top of the Visual Studio window.
You move a toolbar by dragging its handle at the left side of the toolbar.
To execute a command via the toolbar, click its icon.
© 1992-2014 by Pearson Education, Inc. All Rights Reserved.
© 1992-2014 by Pearson Education, Inc. All Rights Reserved.
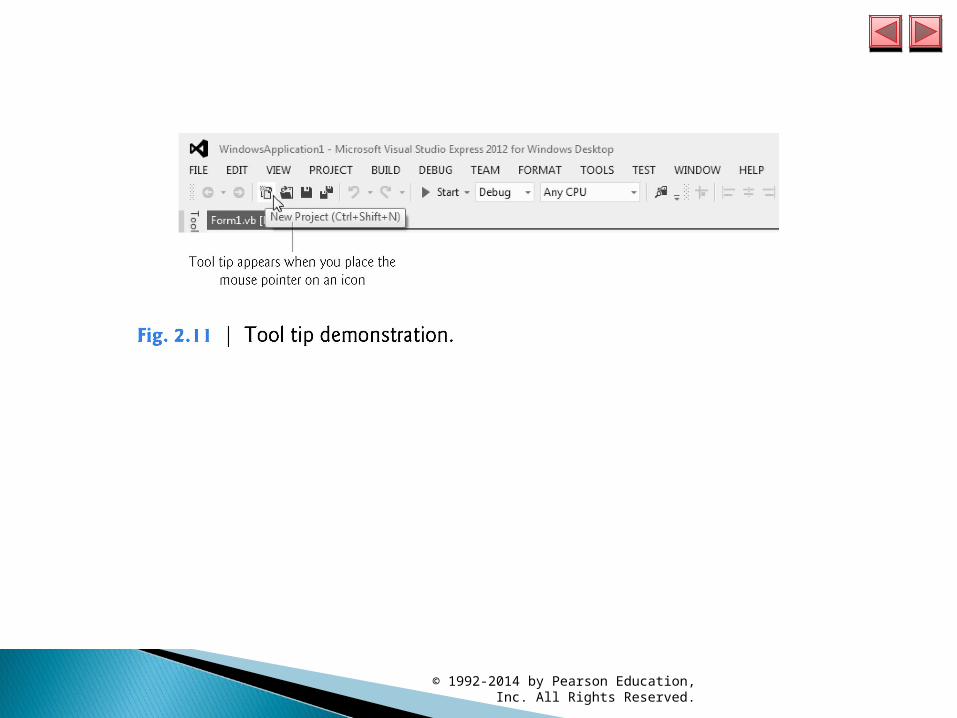
It can be difficult to remember what each toolbar icon represents.
Hovering the mouse pointer over an icon highlights it and, after a brief pause, displays a description of the icon called a tool tip .
Tool tips help you become familiar with the IDE’s features and serve as useful reminders for each toolbar icon’s functionality.
© 1992-2014 by Pearson Education, Inc. All Rights Reserved.
© 1992-2014 by Pearson Education, Inc. All Rights Reserved.

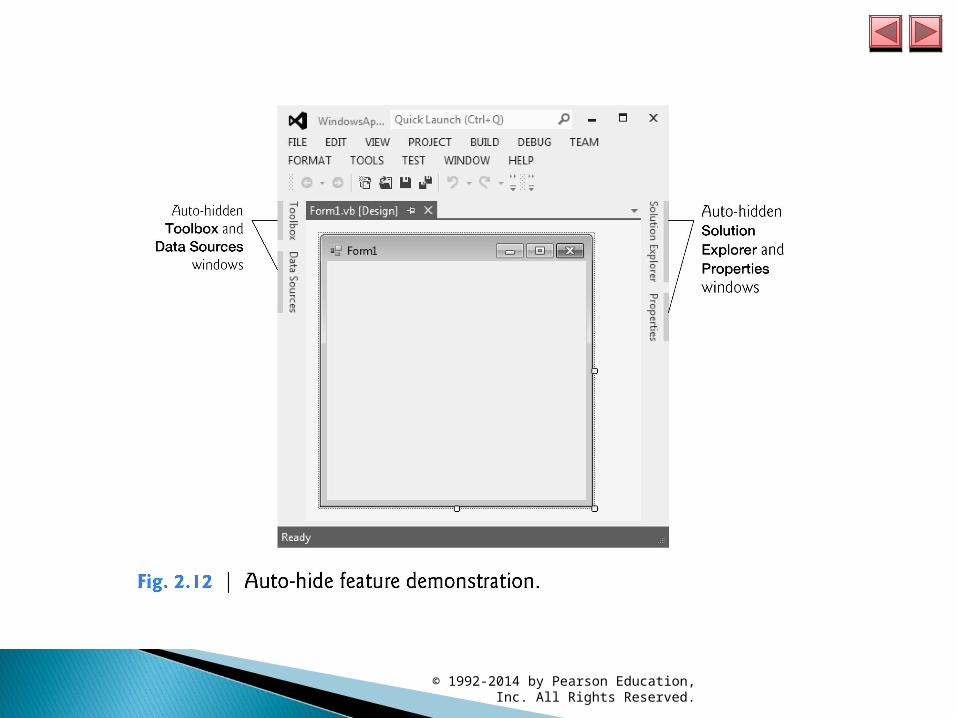
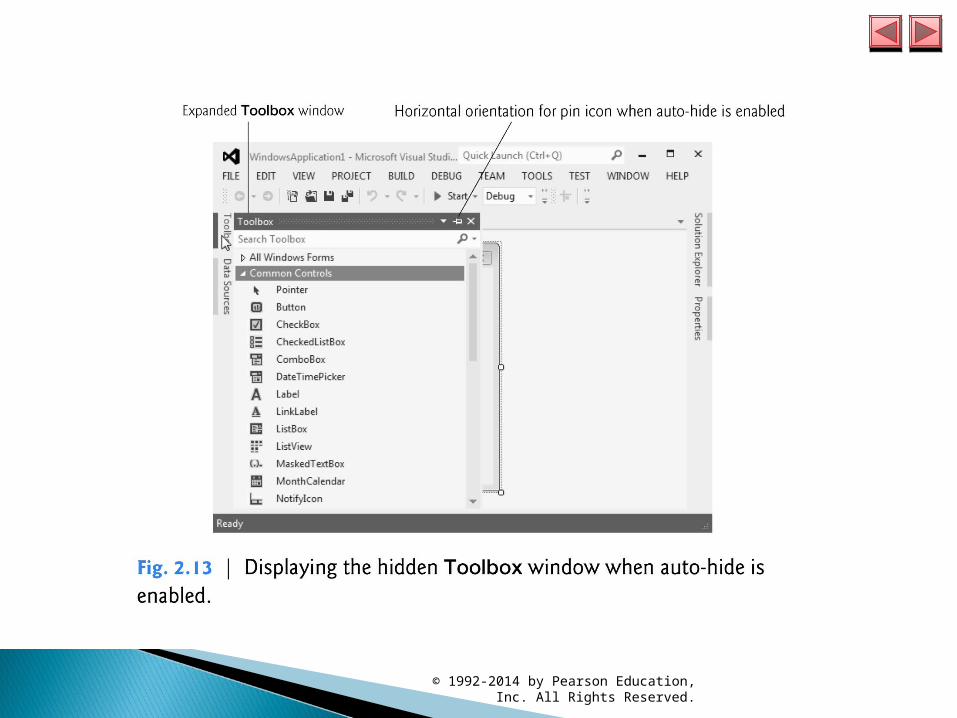
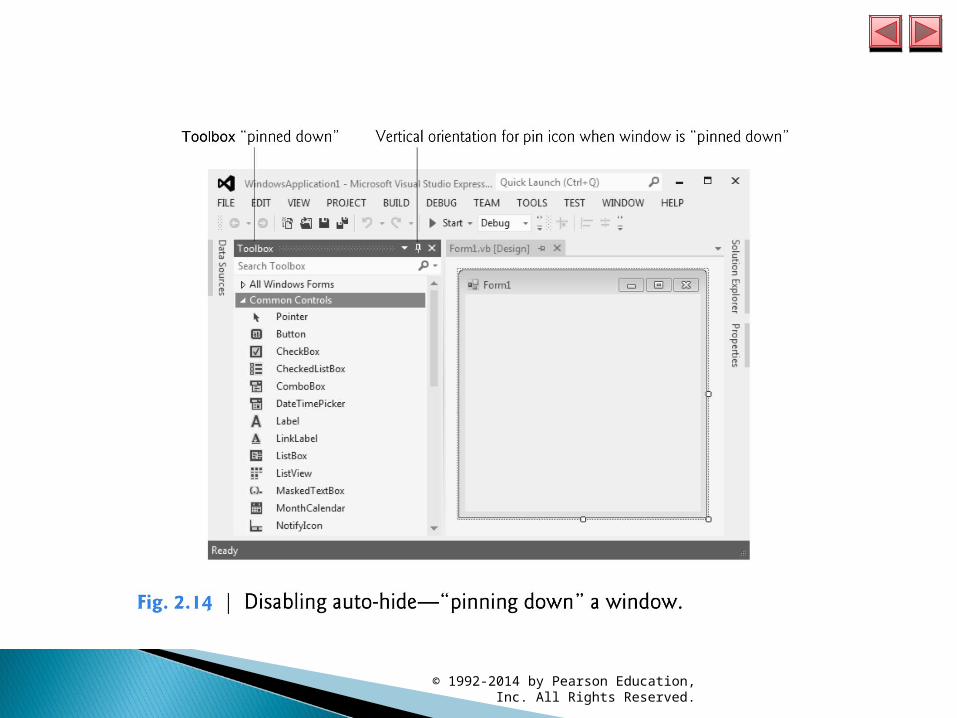
Auto-HideVisual Studio provides a space-saving feature called auto-hide.When auto-hide is enabled for a window, a tab containing the window’s name appears along either the left, right or bottom edge of the IDE window (Fig. 2.12).Clicking the name of an auto-hidden window displays that window (Fig. 2.13).Clicking the name again hides the window.To “pin down” a window (that is, to disable auto-hide and keep the window open), click the pin icon.When auto-hide is enabled, the pin icon is horizontal—when a window is “pinned down,” the pin icon is vertical.
© 1992-2014 by Pearson Education, Inc. All Rights Reserved.
© 1992-2014 by Pearson Education, Inc. All Rights Reserved.
The next few sections cover three of Visual Studio’s main windows—the Solution Explorer, the Properties window and the Toolbox.
These windows display project information and include tools that help you build your apps.
© 1992-2014 by Pearson Education, Inc. All Rights Reserved.
© 1992-2014 by Pearson Education, Inc. All Rights Reserved.
© 1992-2014 by Pearson Education, Inc. All Rights Reserved.
The Solution Explorer window (Fig. 2.15) provides access to all of a solution’s files.
If it’s not shown in the IDE, select VIEW > Solution Explorer.
When you open a new or existing solution, the Solution Explorer displays the solution’s contents.
© 1992-2014 by Pearson Education, Inc. All Rights Reserved.

© 1992-2014 by Pearson Education, Inc. All Rights Reserved.

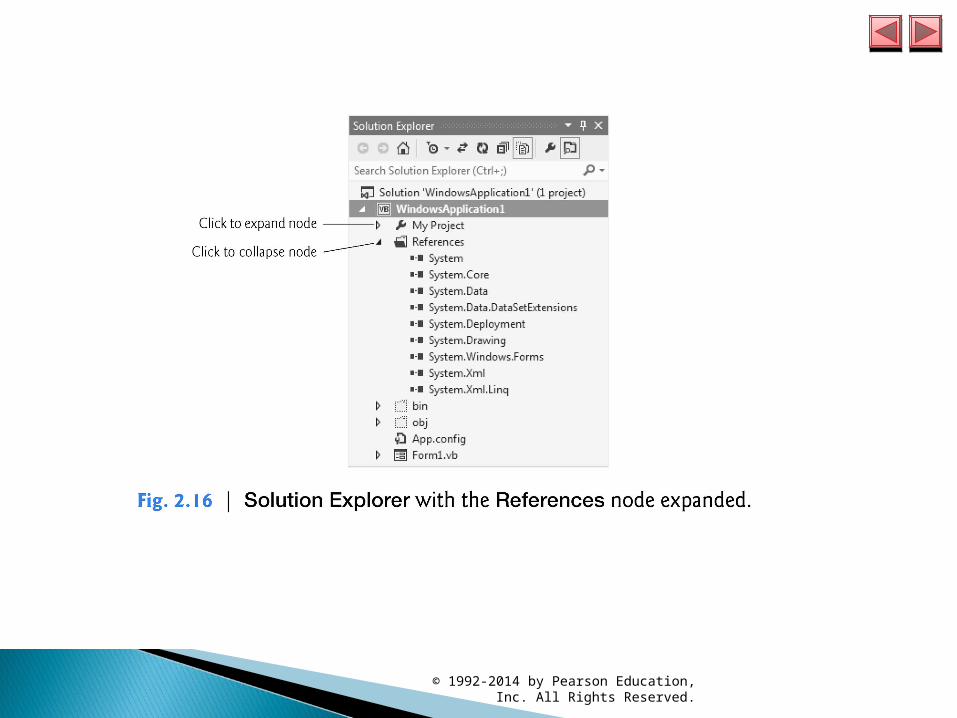
By default, the IDE displays only files that you may need to edit—other files that the IDE generates are hidden.
The Solution Explorer window includes a toolbar that contains several icons.
Clicking the Show All Files icon (Fig. 2.15) displays all the solution’s files, including those generated by the IDE (Fig. 2.16).
Clicking the arrows to the left of a file or folder expands or collapses the project tree’s nodes.
© 1992-2014 by Pearson Education, Inc. All Rights Reserved.
© 1992-2014 by Pearson Education, Inc. All Rights Reserved.
To display the Toolbox window, select VIEW > Toolbox. The Toolbox contains the controls used to customize Forms (Fig. 2.17).
With visual app development, you can “drag and drop” controls onto the Form and the IDE will write the code that creates the controls for you.
You’ll use the Toolbox when you create your first app later in the chapter.
© 1992-2014 by Pearson Education, Inc. All Rights Reserved.
© 1992-2014 by Pearson Education, Inc. All Rights Reserved.
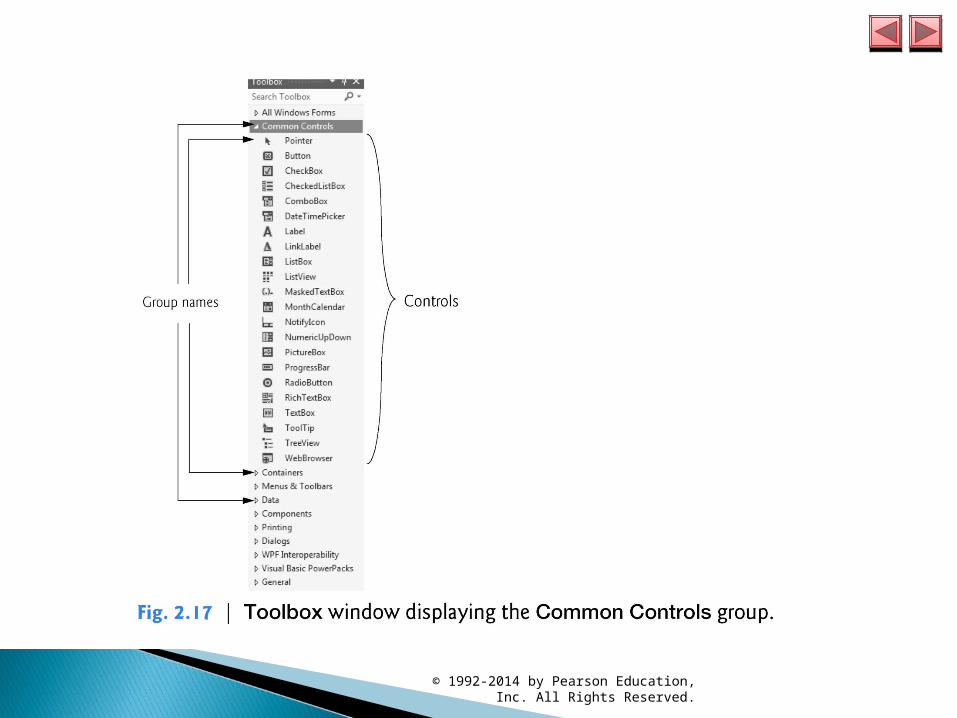
The Toolbox groups the prebuilt controls into categories—All Windows Forms, Common Controls, Containers, Menus & Toolbars, Data, Components, Printing, Dialogs, WPF Interoperability, Visual Basic PowerPacks and General are listed in Fig. 2.17.
Again, note the use of arrows, which can expand or collapse a group of controls.
© 1992-2014 by Pearson Education, Inc. All Rights Reserved.
To display the Properties window, select VIEW > Properties Window.
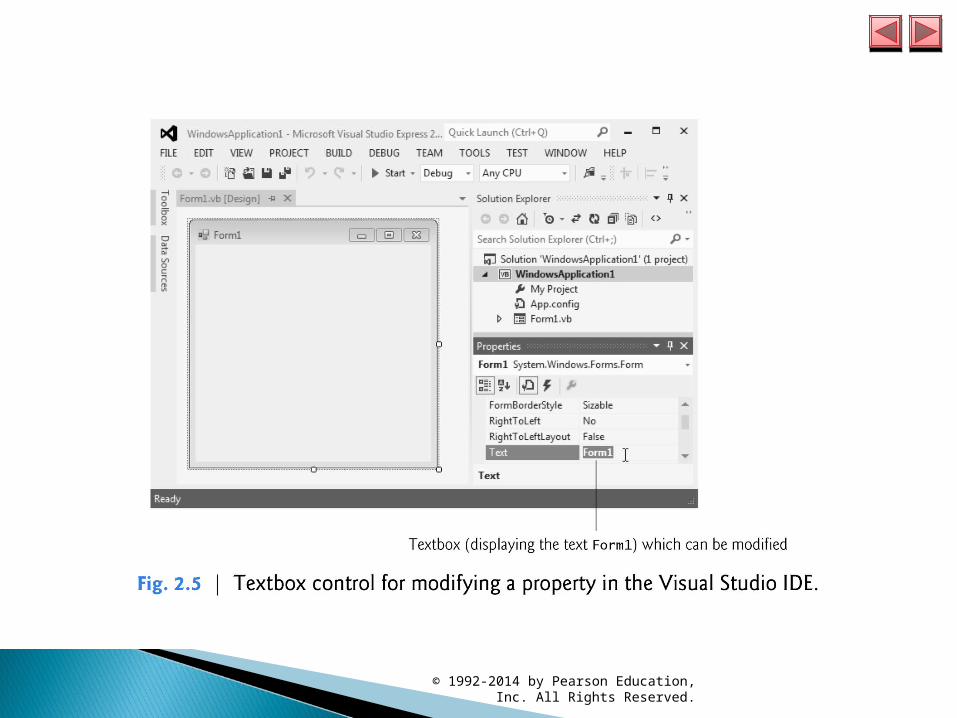
The Properties window displays the properties for the currently selected Form (Fig. 2.18), control or file in Design view.
Properties specify information about the Form or control, such as its size, color and position.
Each Form or control has its own set of properties—a property’s description is displayed at the bottom of the Properties window whenever that property is selected.
© 1992-2014 by Pearson Education, Inc. All Rights Reserved.
© 1992-2014 by Pearson Education, Inc. All Rights Reserved.
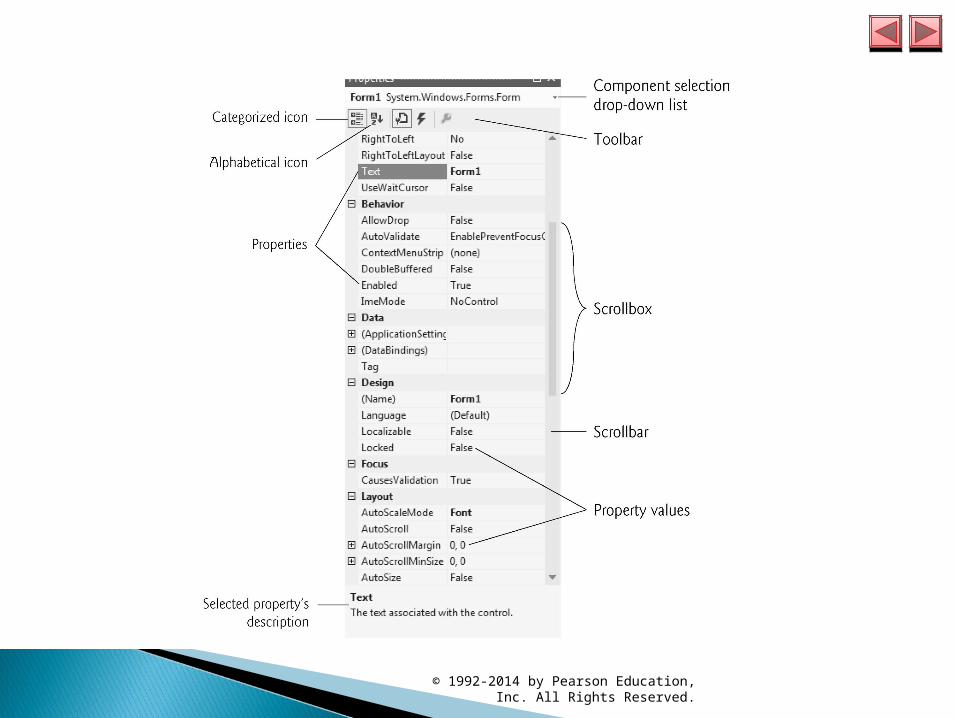
Fig. 2.18 shows Form1’s Properties window. The left column lists the Form’s properties—the right
column displays the current value of each property. You can sort the properties either alphabetically (by
clicking the Alphabetical icon) or categorically (by clicking the Categorized icon).
Depending on the size of the Properties window, some of the properties may be hidden from view on the screen.
© 1992-2014 by Pearson Education, Inc. All Rights Reserved.

To be continued…
© 1992-2014 by Pearson Education, Inc. All Rights Reserved.
![[PPT]Dive Into® Visual Basic 2010 Expressmars.umhb.edu/~ikg/docs/cshtp5_02.ppt · Web viewAll Rights Reserved. © 1992-2014 by Pearson Education, Inc. All Rights Reserved. © 1992-2014](https://img.pdfslide.us/doc/110x75/5aacb13e7f8b9a59658d562d/pptdive-into-visual-basic-2010-ikgdocscshtp502pptweb-viewall-rights-reserved.jpg)