Embed Size (px)
Citation preview
Hannah Collier Portfol io
2 3
INSTRUCTOR Bianca Rodriguez
DATE COURSE Comm 130 Section 16
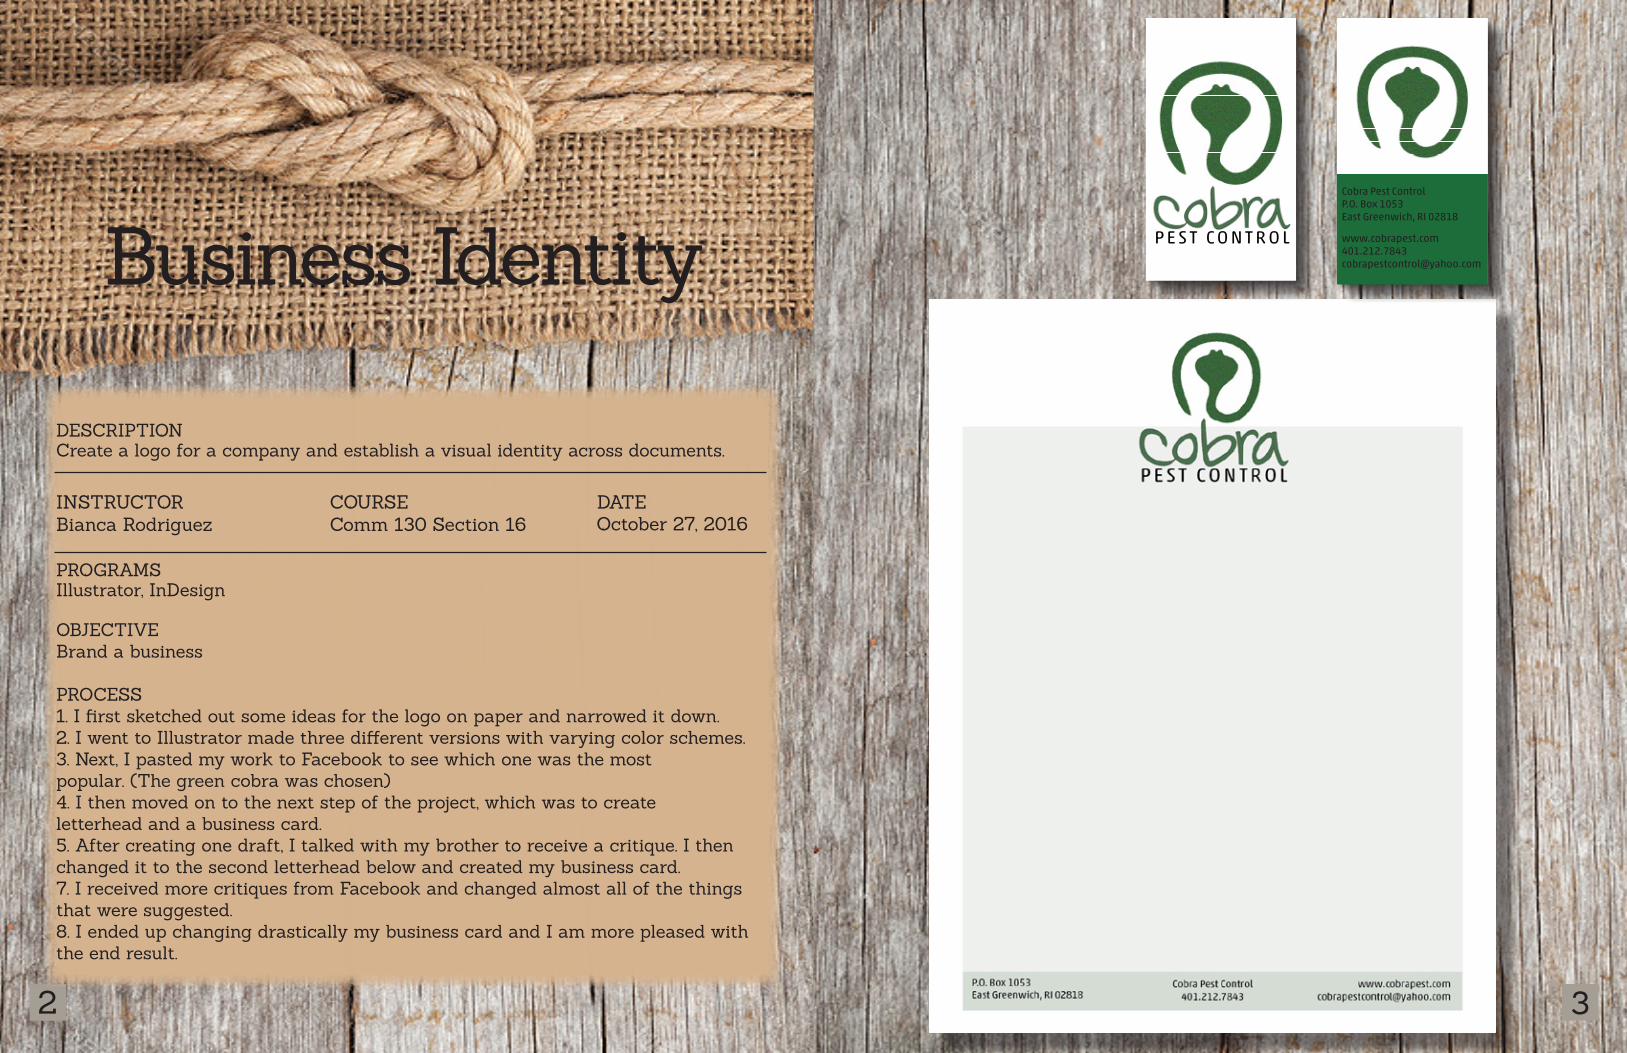
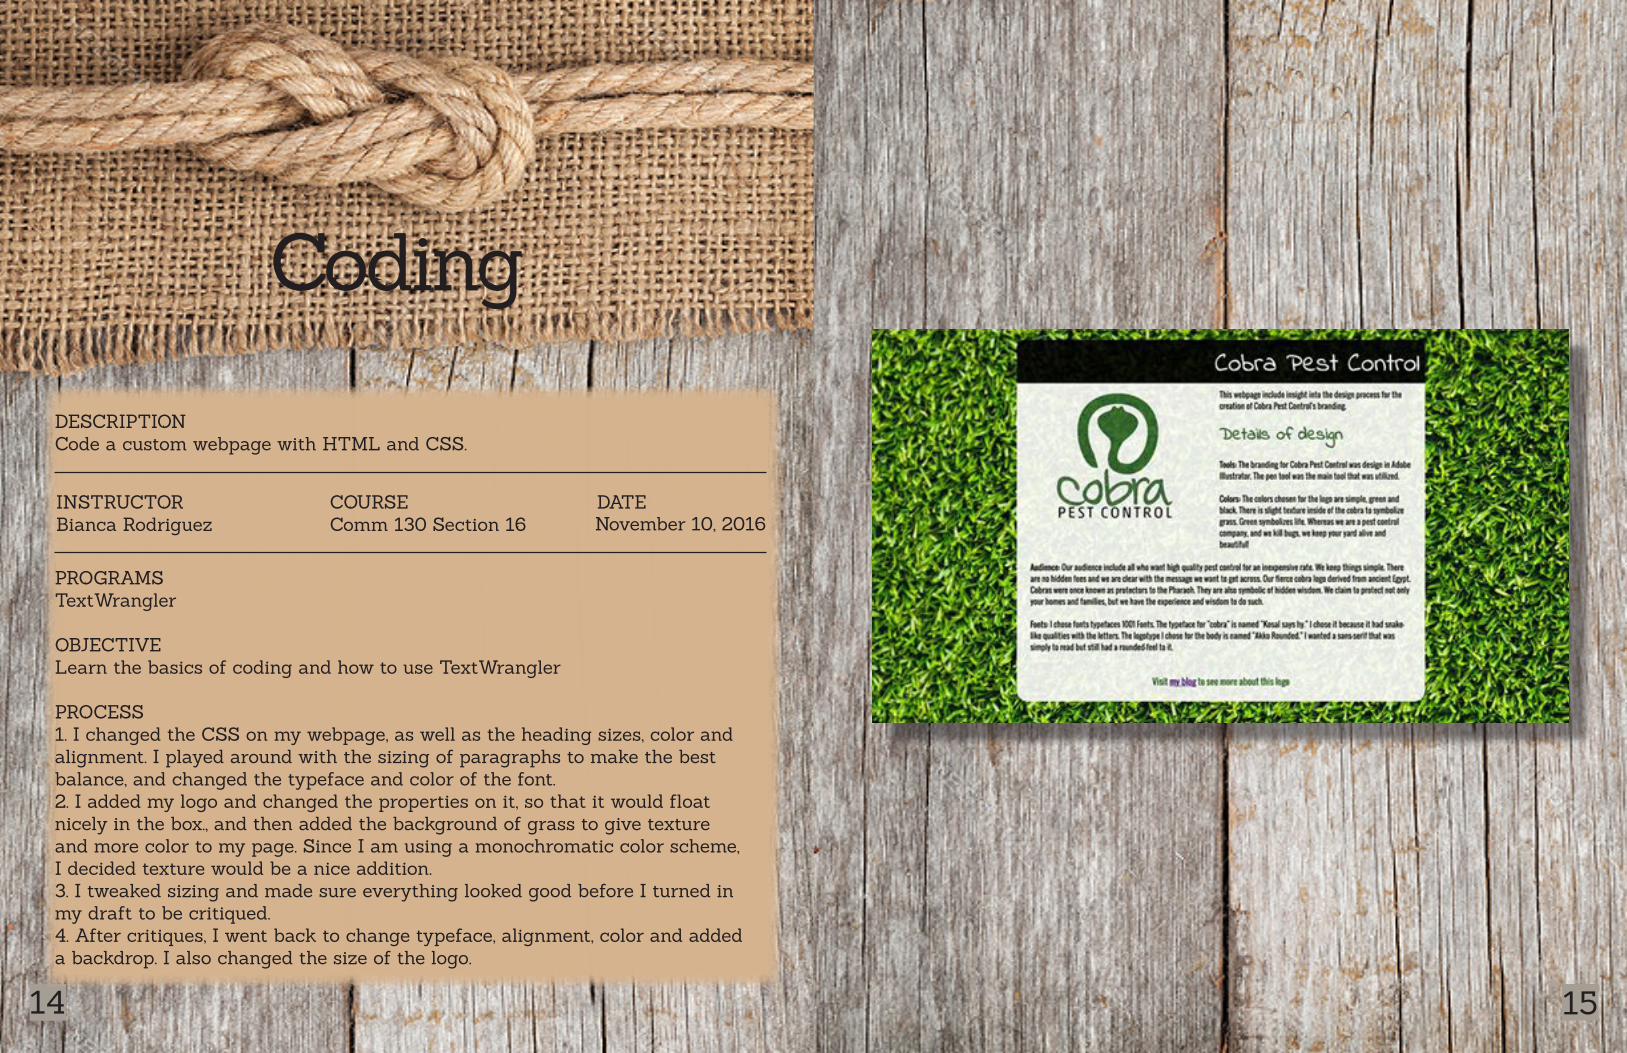
Business Identity P E S T C O N T R O L
Cobra Pest ControlP.O. Box 1053East Greenwich, RI 02818
DESCRIPTIONCreate a logo for a company and establish a visual identity across documents.
PROGRAMSIllustrator, InDesign
OBJECTIVEBrand a business
PROCESS1. I first sketched out some ideas for the logo on paper and narrowed it down.2. I went to Illustrator made three different versions with varying color schemes.3. Next, I pasted my work to Facebook to see which one was the most popular. (The green cobra was chosen)4. I then moved on to the next step of the project, which was to create letterhead and a business card.5. After creating one draft, I talked with my brother to receive a critique. I then changed it to the second letterhead below and created my business card.7. I received more critiques from Facebook and changed almost all of the things that were suggested.8. I ended up changing drastically my business card and I am more pleased with the end result.
October 27, 2016
4 5
INSTRUCTOR Bianca Rodriguez
DATE COURSE Comm 130 Section 16
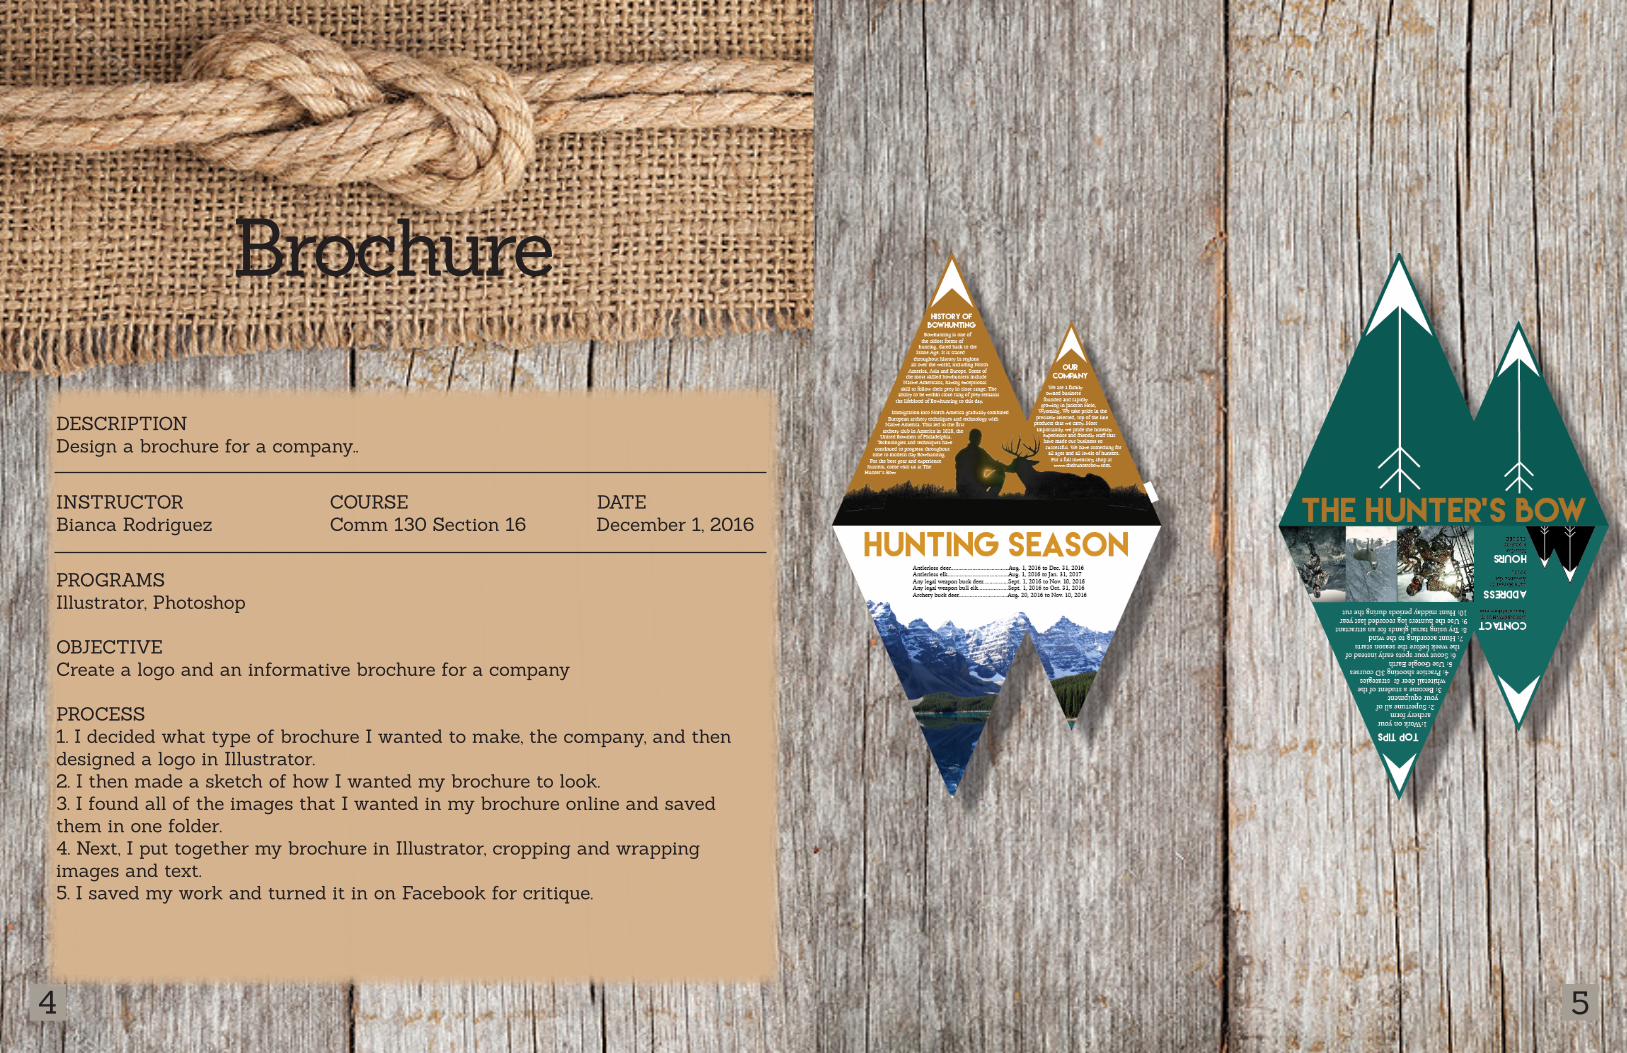
Brochure
DESCRIPTIONDesign a brochure for a company..
PROGRAMSIllustrator, Photoshop
OBJECTIVECreate a logo and an informative brochure for a company
PROCESS1. I decided what type of brochure I wanted to make, the company, and then designed a logo in Illustrator.2. I then made a sketch of how I wanted my brochure to look.3. I found all of the images that I wanted in my brochure online and saved them in one folder.4. Next, I put together my brochure in Illustrator, cropping and wrapping images and text.5. I saved my work and turned it in on Facebook for critique.
December 1, 2016
6 7
INSTRUCTOR Bianca Rodriguez
DATE COURSE Comm 130 Section 16
SPONTANEOUSfeaturing Hannah Collier
Adventure & Travelhow to spend less& go more
Organize & Createrecycle & repurposecommon items
Gluten & Dairy Freerecipes you can’tget enough of
Volume 5 Issue 3March 2017
25
13
41
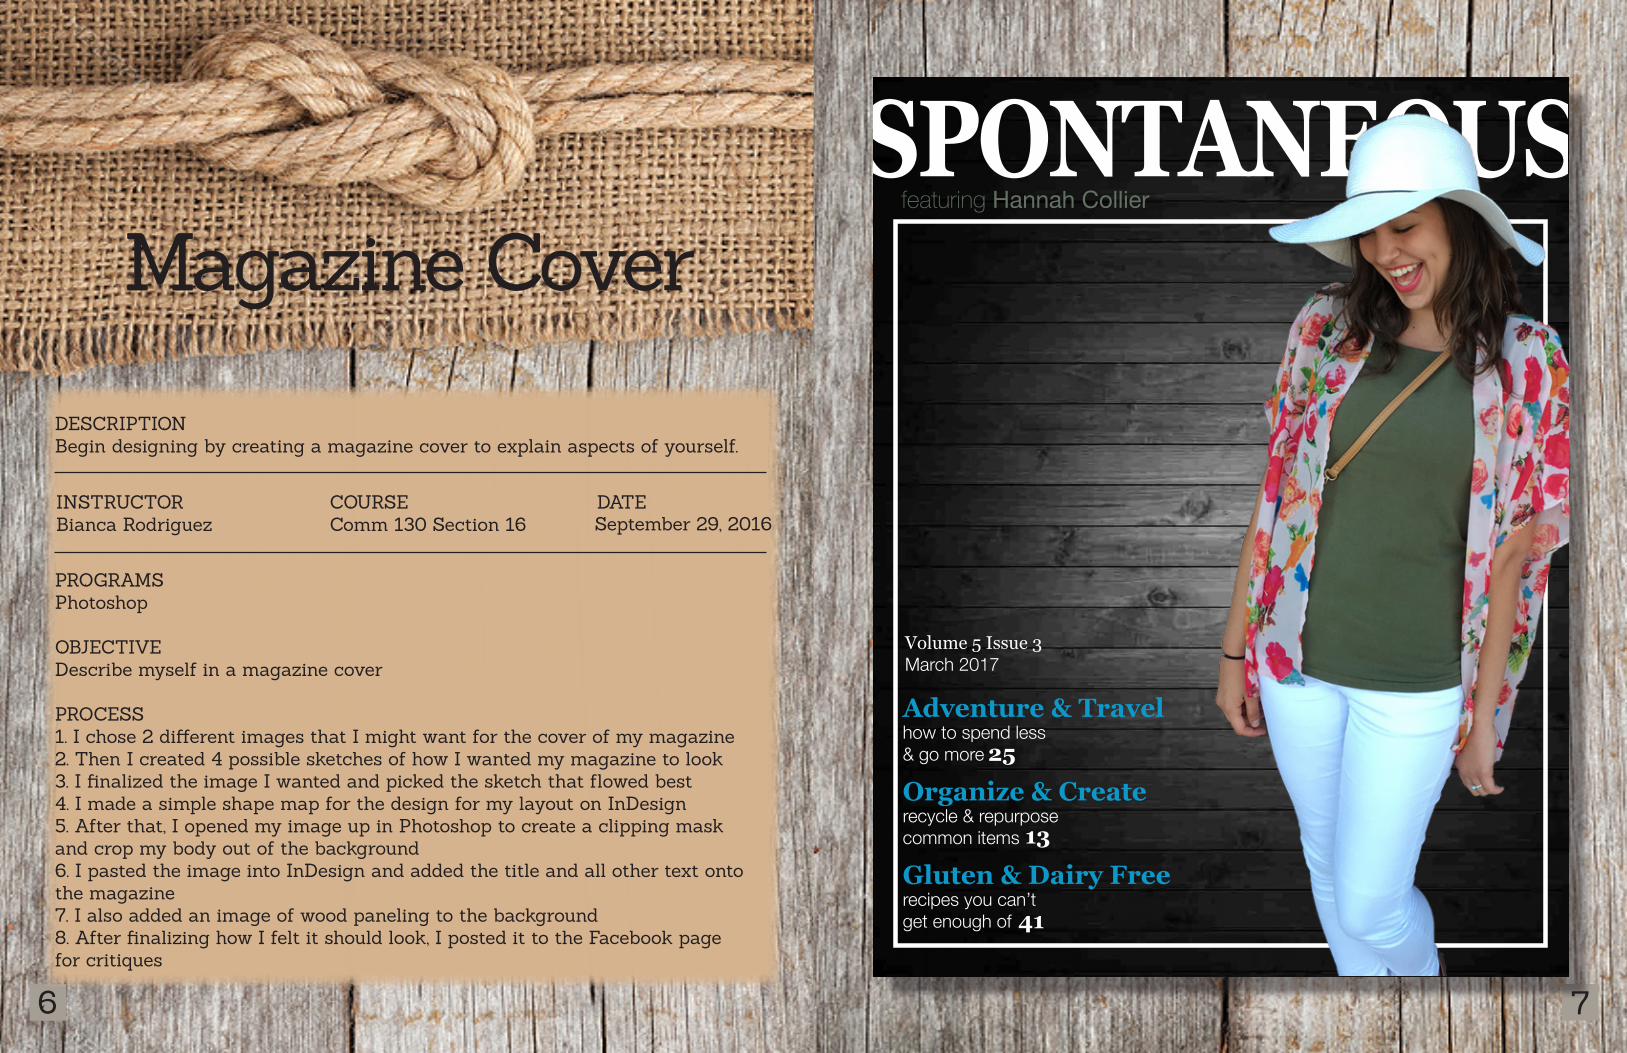
Magazine Cover
DESCRIPTIONBegin designing by creating a magazine cover to explain aspects of yourself.
PROGRAMS Photoshop
OBJECTIVEDescribe myself in a magazine cover
PROCESS1. I chose 2 different images that I might want for the cover of my magazine2. Then I created 4 possible sketches of how I wanted my magazine to look3. I finalized the image I wanted and picked the sketch that flowed best4. I made a simple shape map for the design for my layout on InDesign5. After that, I opened my image up in Photoshop to create a clipping mask and crop my body out of the background6. I pasted the image into InDesign and added the title and all other text onto the magazine7. I also added an image of wood paneling to the background8. After finalizing how I felt it should look, I posted it to the Facebook page for critiques
September 29, 2016
8 9
INSTRUCTOR Bianca Rodriguez
DATE COURSE Comm 130 Section 16
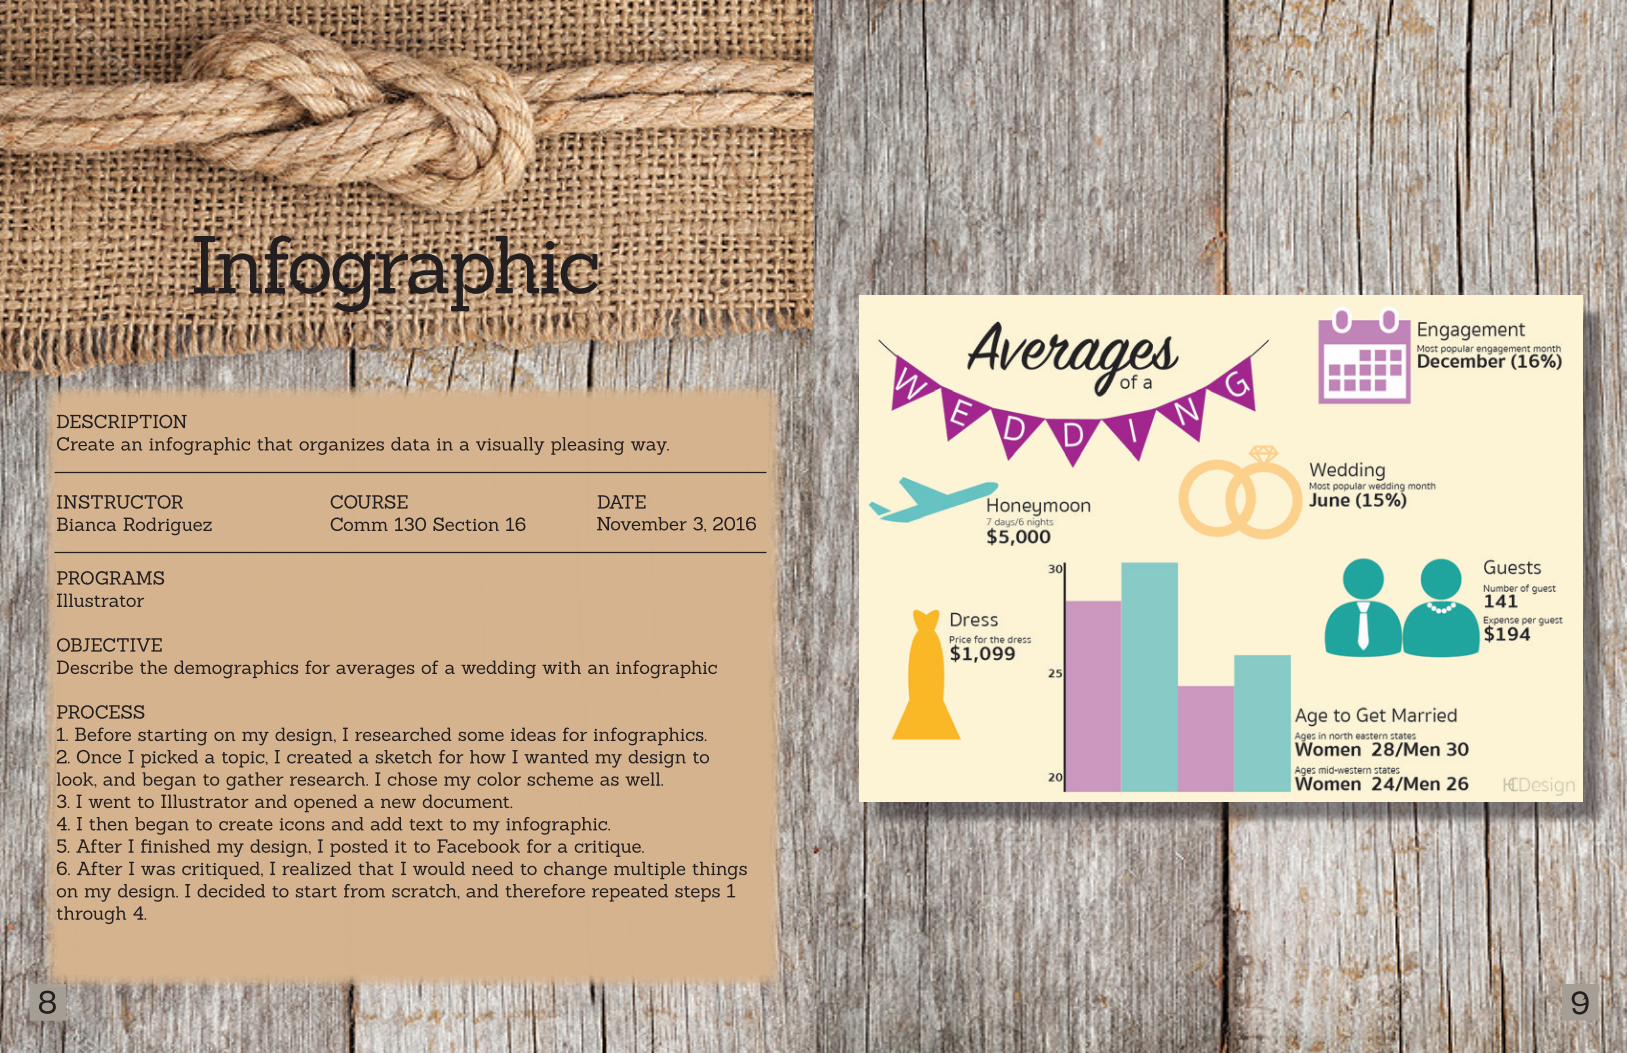
Infographic
DESCRIPTIONCreate an infographic that organizes data in a visually pleasing way.
PROGRAMS Illustrator
OBJECTIVEDescribe the demographics for averages of a wedding with an infographic
PROCESS1. Before starting on my design, I researched some ideas for infographics.2. Once I picked a topic, I created a sketch for how I wanted my design to look, and began to gather research. I chose my color scheme as well.3. I went to Illustrator and opened a new document.4. I then began to create icons and add text to my infographic.5. After I finished my design, I posted it to Facebook for a critique.6. After I was critiqued, I realized that I would need to change multiple things on my design. I decided to start from scratch, and therefore repeated steps 1 through 4.
November 3, 2016
10 11
INSTRUCTOR Bianca Rodriguez
DATE COURSE Comm 130 Section 16
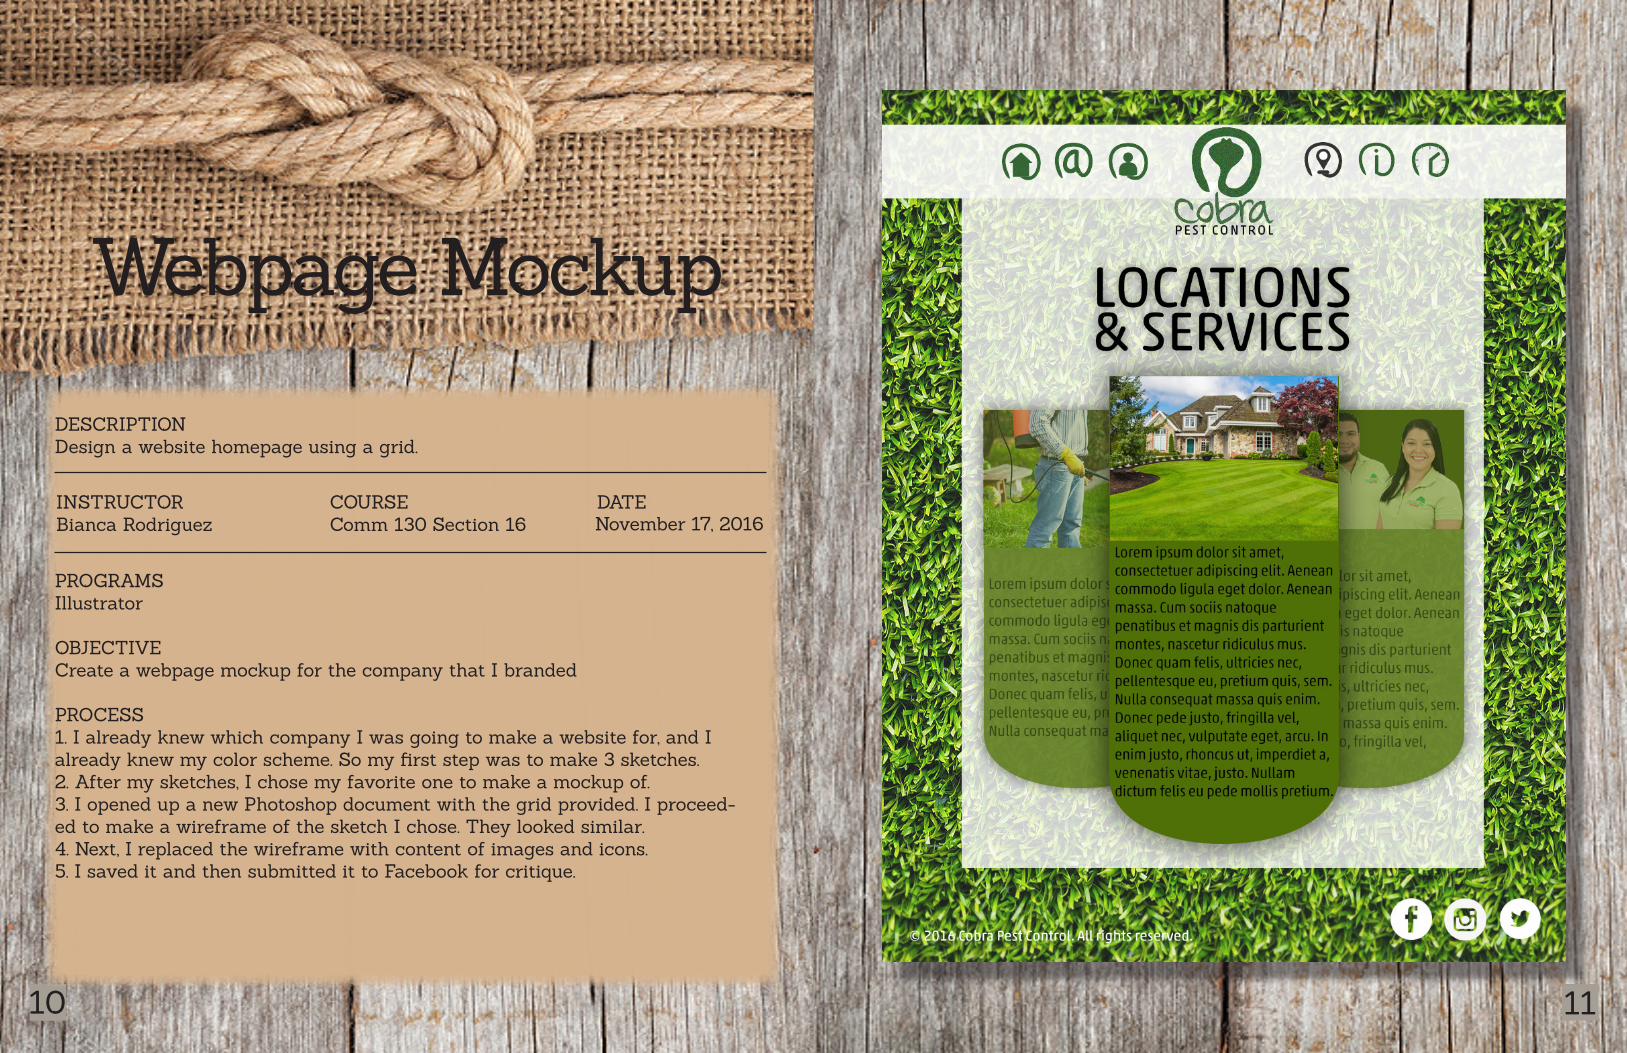
Webpage Mockup
November 17, 2016
DESCRIPTIONDesign a website homepage using a grid.
PROGRAMS Illustrator
OBJECTIVECreate a webpage mockup for the company that I branded
PROCESS1. I already knew which company I was going to make a website for, and I already knew my color scheme. So my first step was to make 3 sketches.2. After my sketches, I chose my favorite one to make a mockup of.3. I opened up a new Photoshop document with the grid provided. I proceed-ed to make a wireframe of the sketch I chose. They looked similar.4. Next, I replaced the wireframe with content of images and icons.5. I saved it and then submitted it to Facebook for critique.
12 13
INSTRUCTOR Bianca Rodriguez
DATE COURSE Comm 130 Section 16
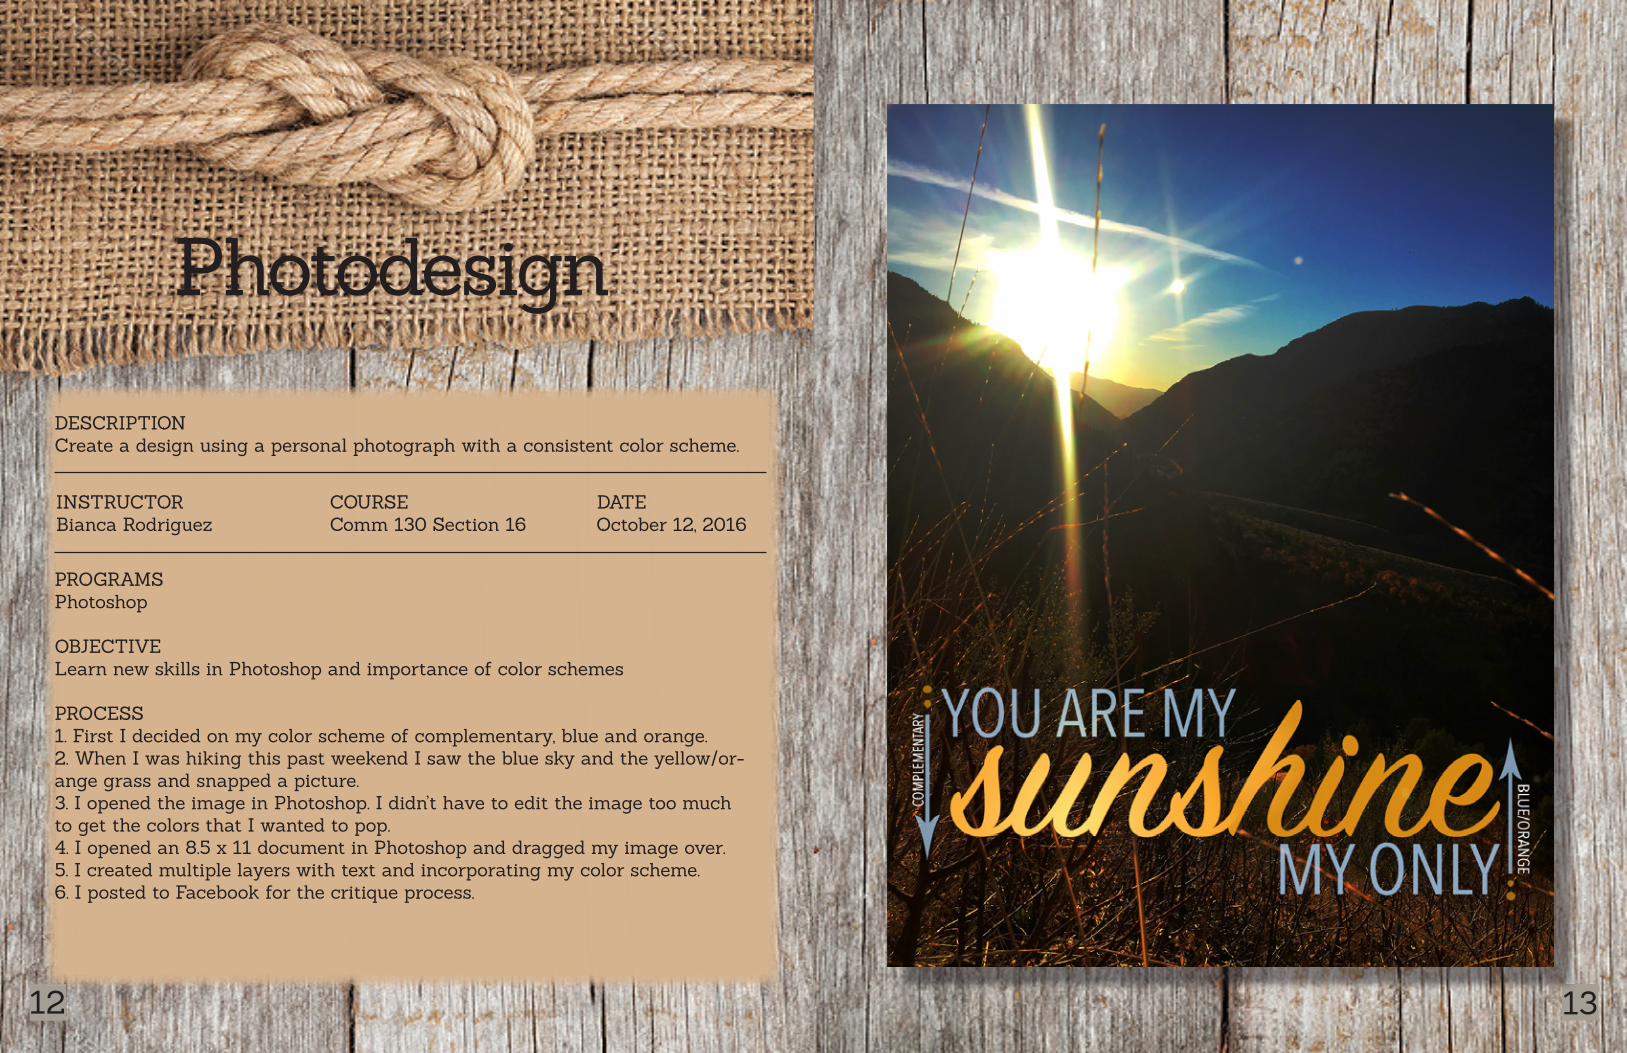
Photodesign
DESCRIPTIONCreate a design using a personal photograph with a consistent color scheme.
PROGRAMS Photoshop
OBJECTIVELearn new skills in Photoshop and importance of color schemes
PROCESS 1. First I decided on my color scheme of complementary, blue and orange.2. When I was hiking this past weekend I saw the blue sky and the yellow/or-ange grass and snapped a picture.3. I opened the image in Photoshop. I didn’t have to edit the image too much to get the colors that I wanted to pop.4. I opened an 8.5 x 11 document in Photoshop and dragged my image over.5. I created multiple layers with text and incorporating my color scheme.6. I posted to Facebook for the critique process.
October 12, 2016
14 15
INSTRUCTOR Bianca Rodriguez
DATE COURSE Comm 130 Section 16
Coding
DESCRIPTIONCode a custom webpage with HTML and CSS.
PROGRAMSTextWrangler
OBJECTIVELearn the basics of coding and how to use TextWrangler
PROCESS1. I changed the CSS on my webpage, as well as the heading sizes, color and alignment. I played around with the sizing of paragraphs to make the best balance, and changed the typeface and color of the font.2. I added my logo and changed the properties on it, so that it would float nicely in the box., and then added the background of grass to give texture and more color to my page. Since I am using a monochromatic color scheme, I decided texture would be a nice addition.3. I tweaked sizing and made sure everything looked good before I turned in my draft to be critiqued.4. After critiques, I went back to change typeface, alignment, color and added a backdrop. I also changed the size of the logo.
November 10, 2016
16 17
INSTRUCTOR Bianca Rodriguez
DATE COURSE Comm 130 Section 16
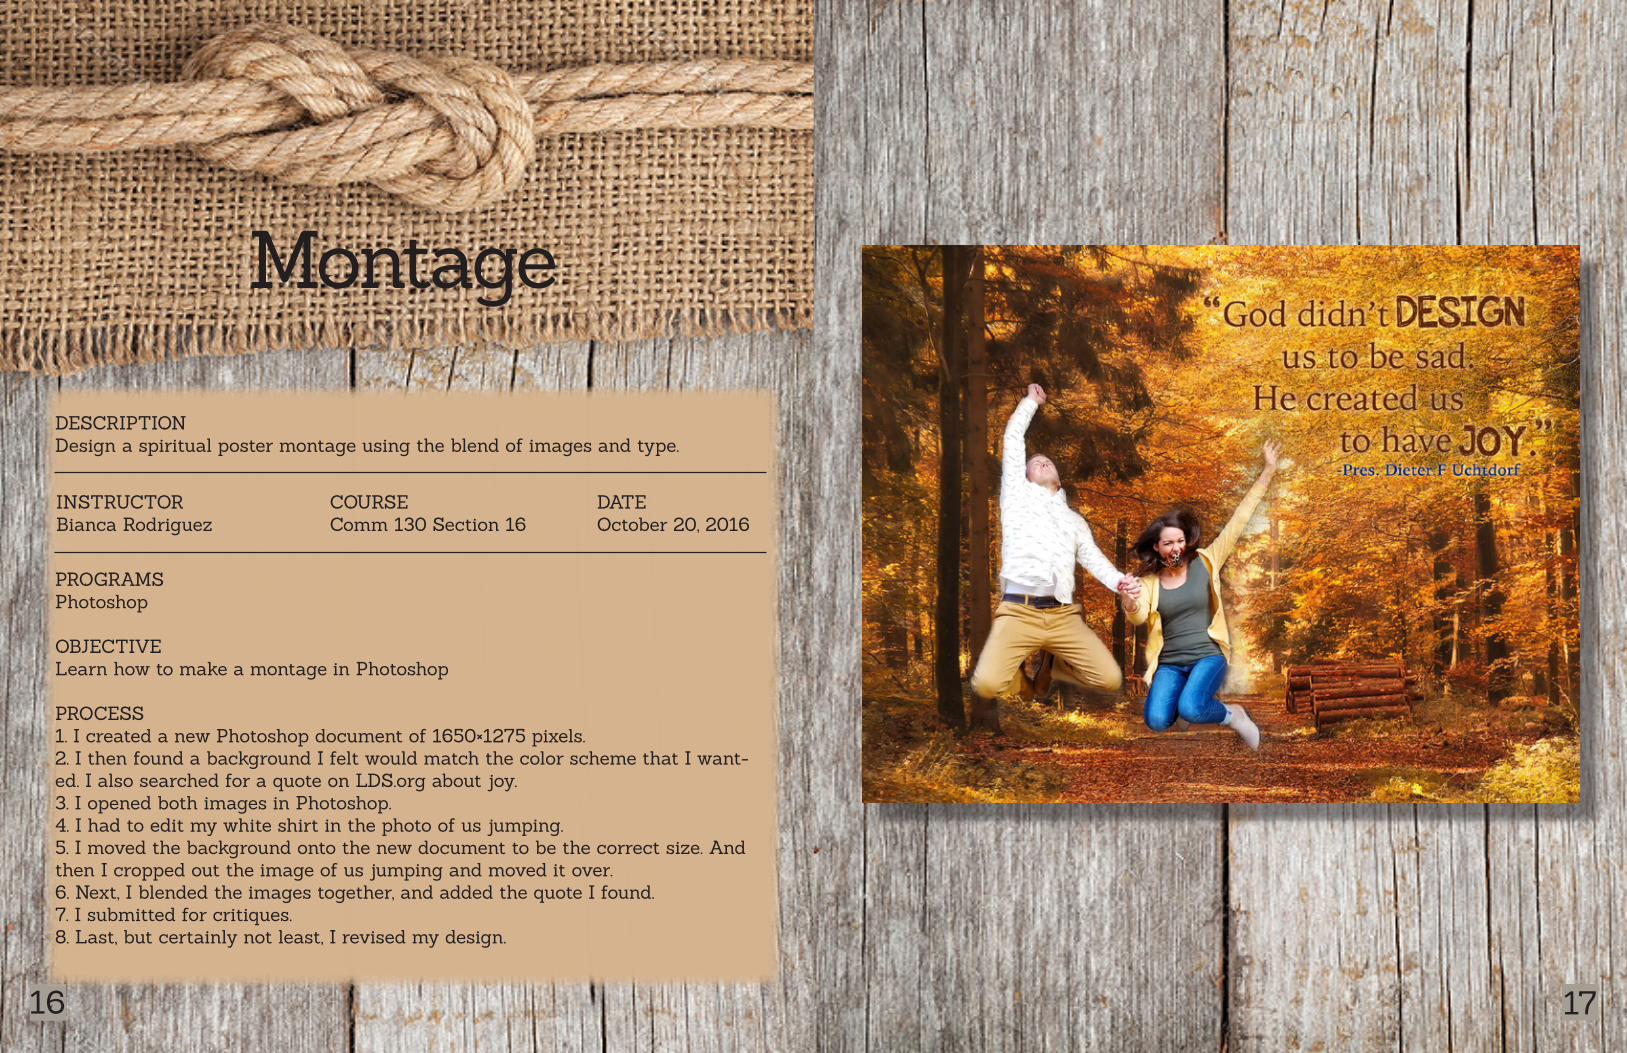
Montage
DESCRIPTIONDesign a spiritual poster montage using the blend of images and type.
PROGRAMSPhotoshop
OBJECTIVELearn how to make a montage in Photoshop
PROCESS1. I created a new Photoshop document of 1650×1275 pixels.2. I then found a background I felt would match the color scheme that I want-ed. I also searched for a quote on LDS.org about joy.3. I opened both images in Photoshop.4. I had to edit my white shirt in the photo of us jumping.5. I moved the background onto the new document to be the correct size. And then I cropped out the image of us jumping and moved it over.6. Next, I blended the images together, and added the quote I found.7. I submitted for critiques.8. Last, but certainly not least, I revised my design.
October 20, 2016
18 19
INSTRUCTOR Bianca Rodriguez
DATE COURSE Comm 130 Section 16
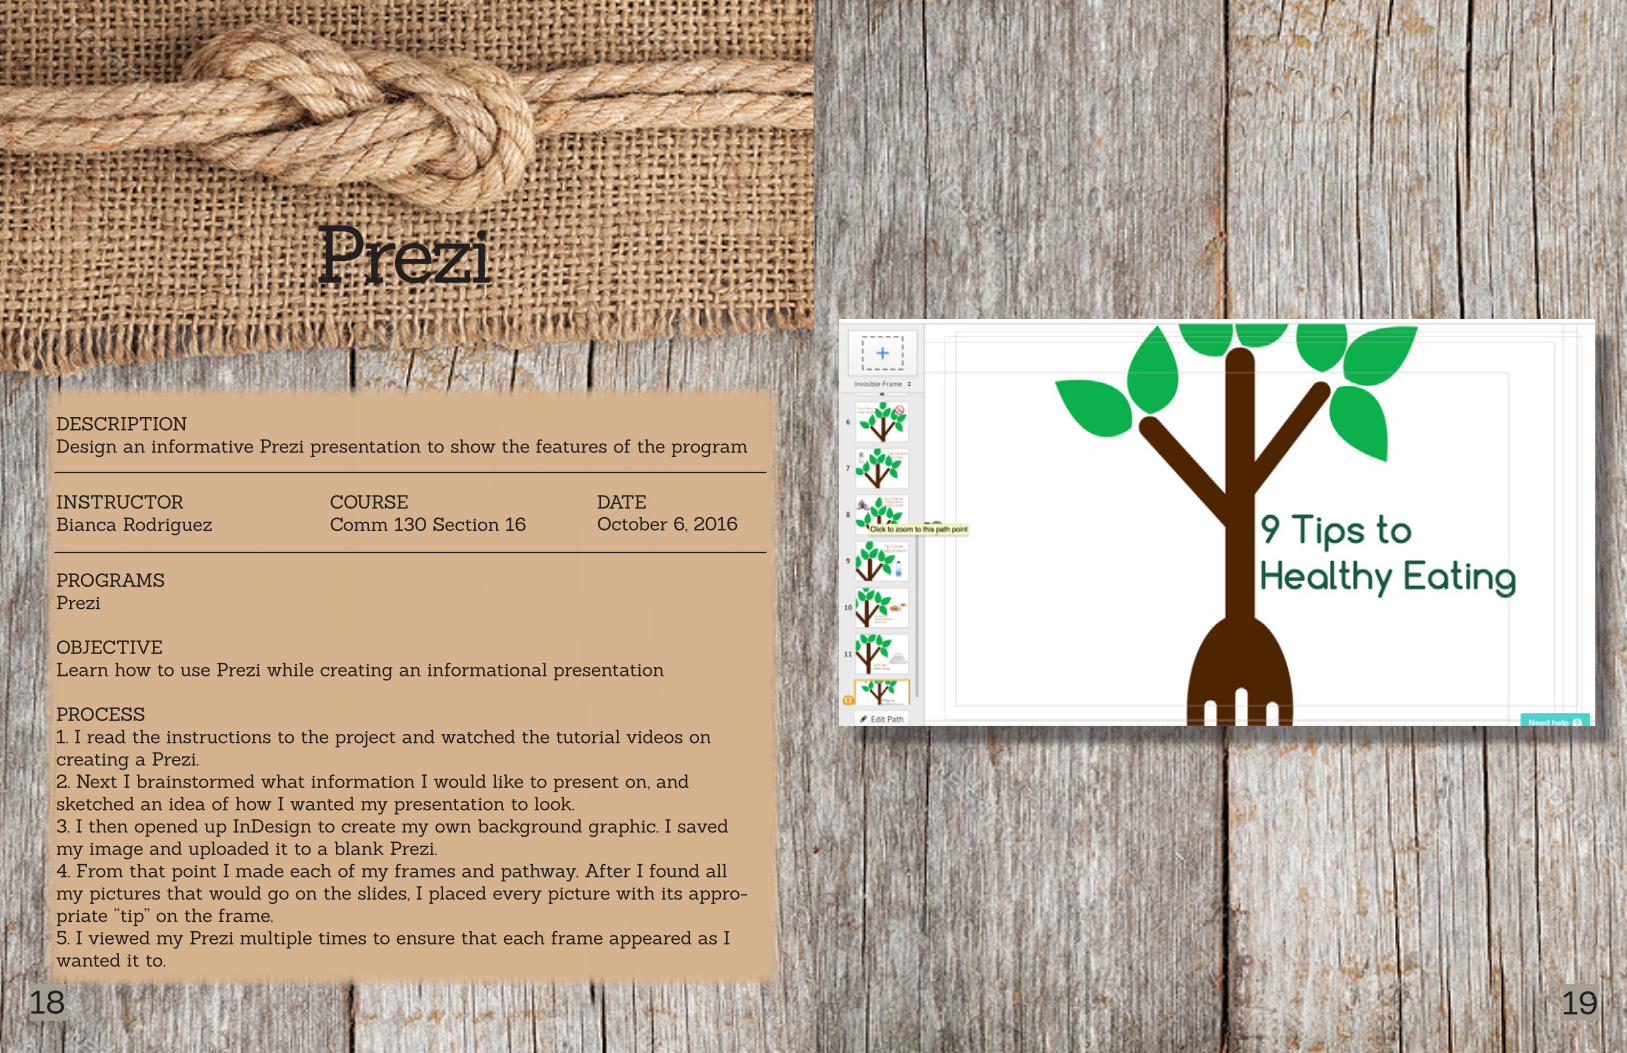
Prezi
October 6, 2016
DESCRIPTIONDesign an informative Prezi presentation to show the features of the program
PROGRAMSPrezi
OBJECTIVELearn how to use Prezi while creating an informational presentation
PROCESS1. I read the instructions to the project and watched the tutorial videos on creating a Prezi.2. Next I brainstormed what information I would like to present on, and sketched an idea of how I wanted my presentation to look.3. I then opened up InDesign to create my own background graphic. I saved my image and uploaded it to a blank Prezi.4. From that point I made each of my frames and pathway. After I found all my pictures that would go on the slides, I placed every picture with its appro-priate “tip” on the frame.5. I viewed my Prezi multiple times to ensure that each frame appeared as I wanted it to.


![Hannah l im portfolio[11_x17in]](https://img.pdfslide.us/doc/110x75/58ac40941a28ab99028b48c9/hannah-l-im-portfolio11x17in.jpg)