Embed Size (px)
Citation preview

INDEX
What is Photoshop………………………………………….page.3
Photoshop tools……………………………………….…….page.4
Move and ruler tool…………………………………......page.5
Layer freehand pen magnetic lasso tool…….page.6
History brush, healing brush, gradient tool.page.7
Quick selection, magic wand, type tool………page.8
Spot healing, crop, zoom tools……………….….….page.9
Hand tool…………………………………………………….….page.10
Eraser tool, background eraser tool………….….page.12
Hand tool…………………………………………………….….page.11
Clone stamp tool………………………………………….page.13
Old to new picture………………………………………….page.14
Old to new picture ………………………………………….page.15
Old to new picture ……………………………………….page.16
How to remove acne ………………………………………….page.17
Gradient text………………………………………………….page.18
Conclusion…………..………………………………………….page.19
Resources…………………………………………………………page.20
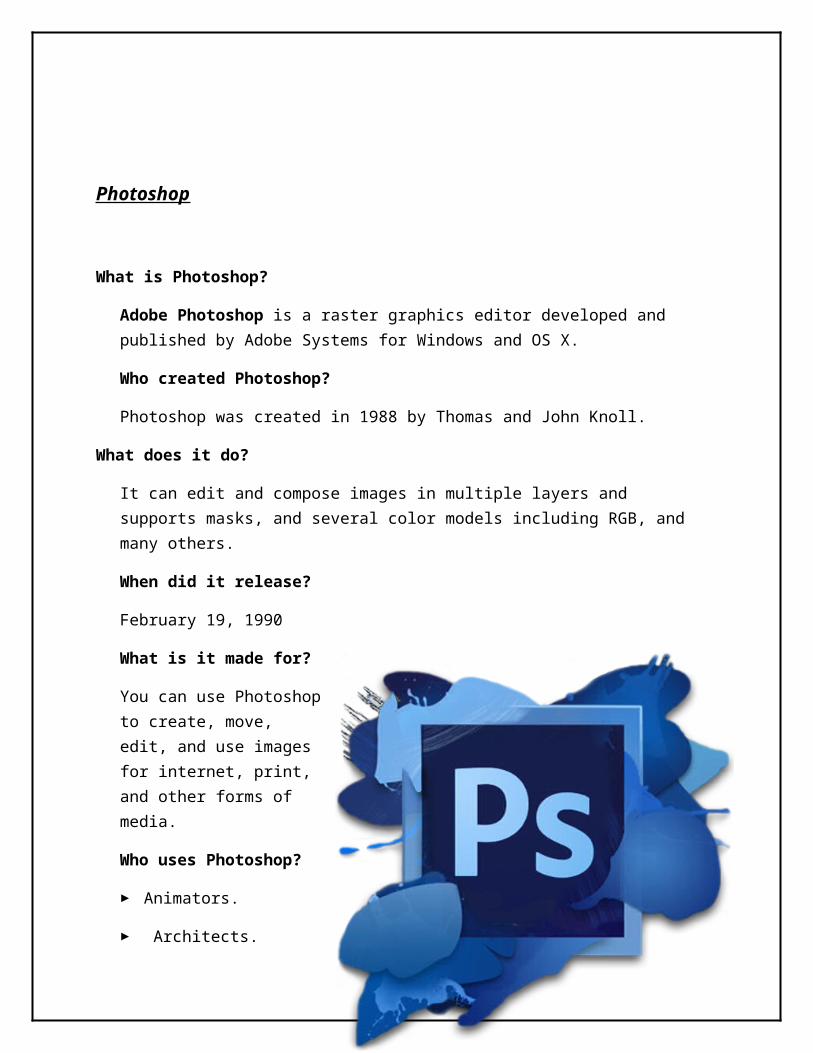
Photoshop
What is Photoshop?
Adobe Photoshop is a raster graphics editor developed and published by Adobe Systems for Windows and OS X.
Who created Photoshop?
Photoshop was created in 1988 by Thomas and John Knoll.
What does it do?
It can edit and compose images in multiple layers and supports masks, and several color models including RGB, and many others.
When did it release?
February 19, 1990
What is it made for?
You can use Photoshop to create, move, edit, and use images for internet, print, and other forms of media.
Who uses Photoshop?
Animators.
Architects.
Astronomers.
Commercial printers.
Fashion designers.
Graphic designers.
And much more…
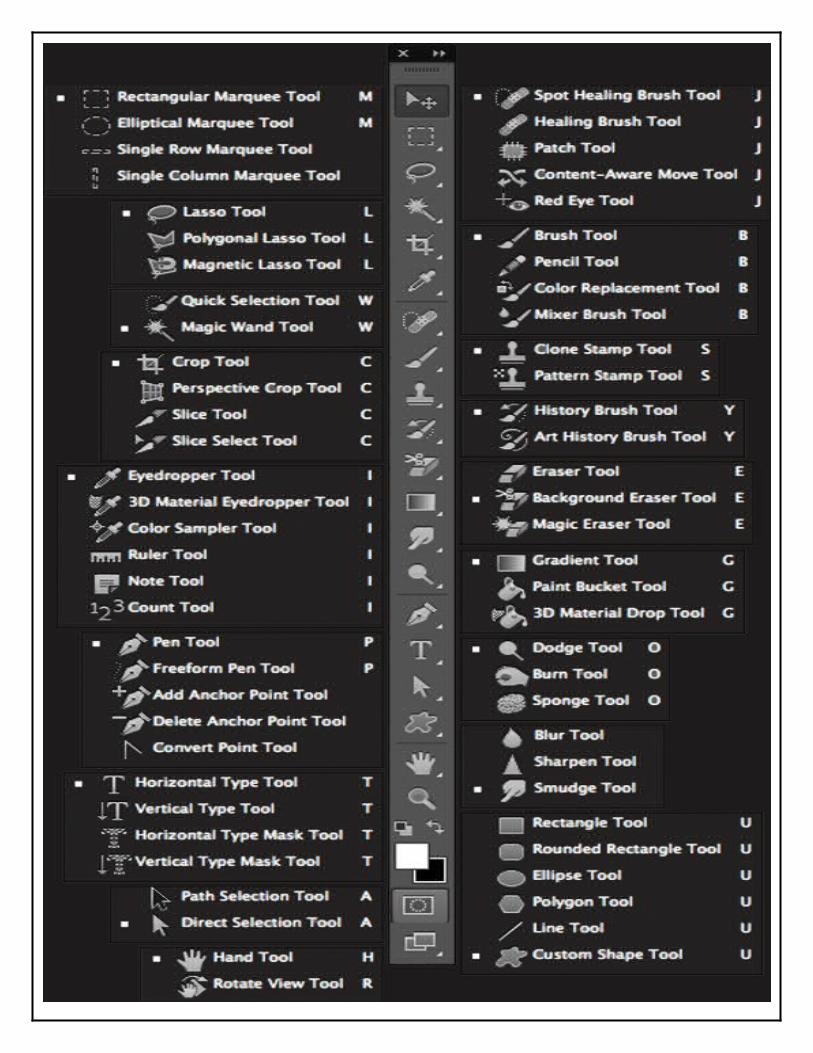
Photoshop Tools
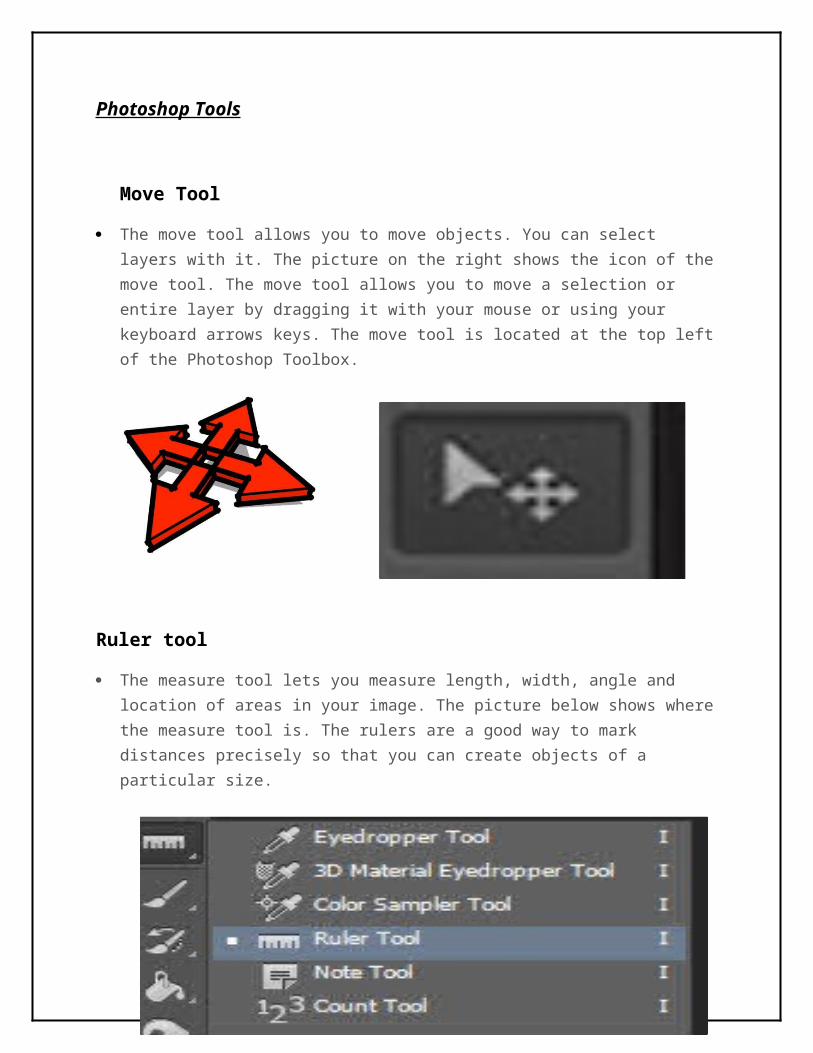
Move Tool
The move tool allows you to move objects. You can select layers with it. The picture on the right shows the icon of the move tool. The move tool allows you to move a selection or entire layer by dragging it with your mouse or using your keyboard arrows keys. The move tool is located at the top left of the Photoshop Toolbox.
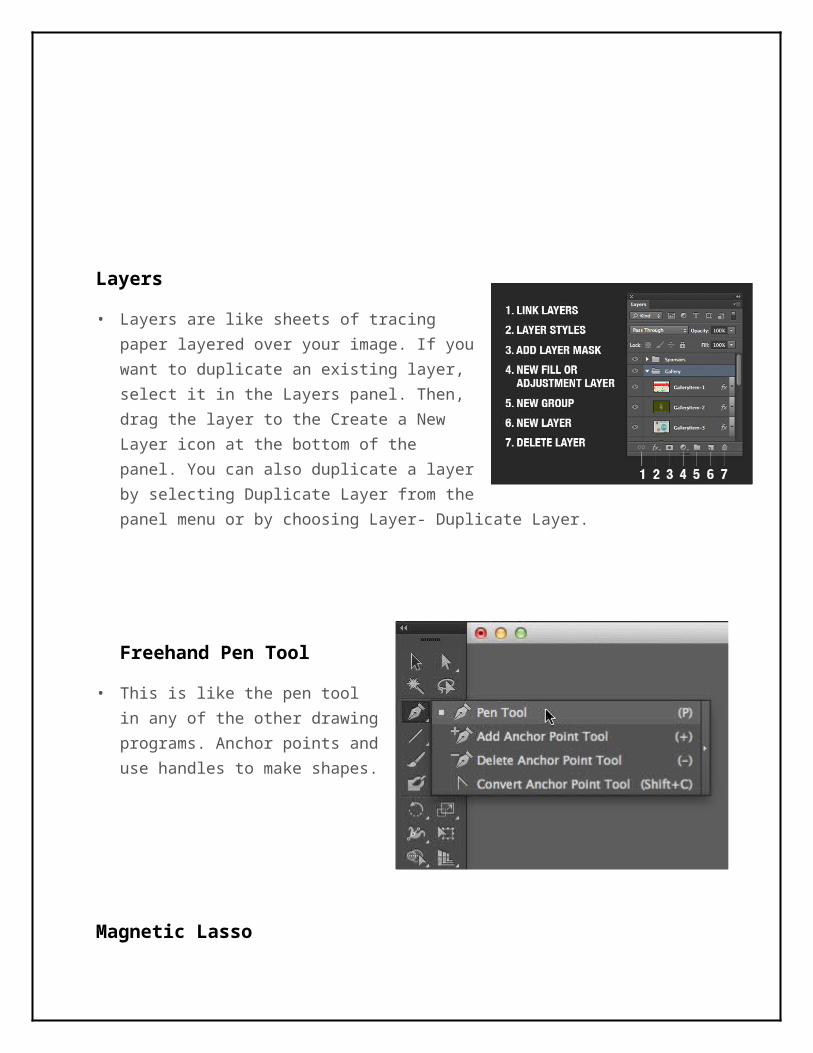
Ruler tool
The measure tool lets you measure length, width, angle and location of areas in your image. The picture below shows where the measure tool is. The rulers are a good way to mark distances precisely so that you can create objects of a particular size.
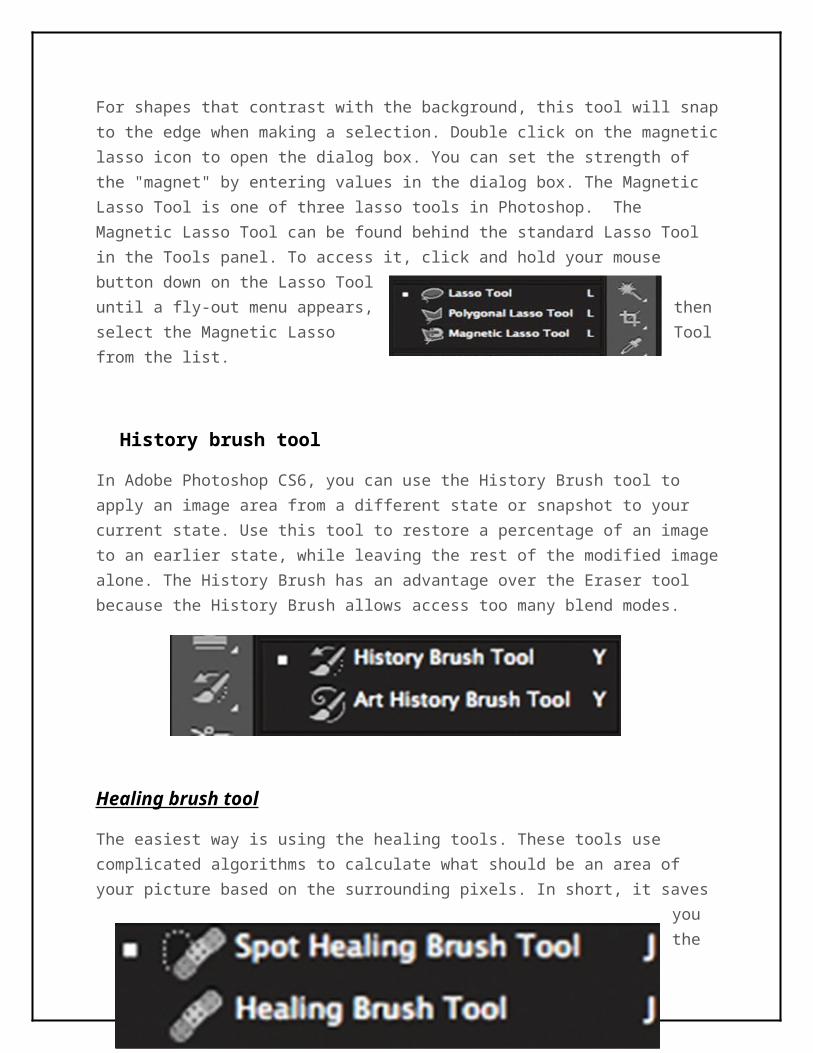
Layers
• Layers are like sheets of tracing paper layered over your image. If you want to duplicate an existing layer, select it in the Layers panel. Then, drag the layer to the Create a New Layer icon at the bottom of the panel. You can also duplicate a layer by selecting Duplicate Layer from the panel menu or by choosing Layer- Duplicate Layer.
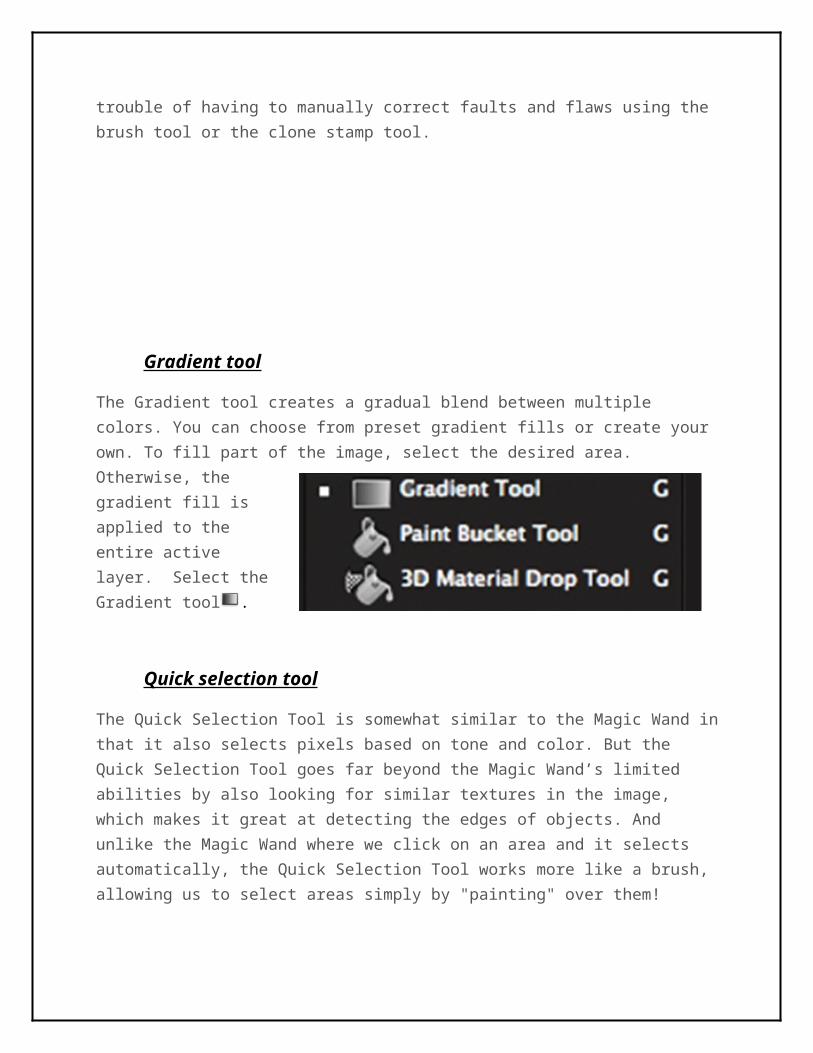
Freehand Pen Tool
• This is like the pen tool in any of the other drawing programs. Anchor points and use handles to make shapes.
Magnetic Lasso
For shapes that contrast with the background, this tool will snap to the edge when making a selection. Double click on the magnetic lasso icon to open the dialog box. You can set the strength of the "magnet" by entering values in the dialog box. The Magnetic Lasso Tool is one of three lasso tools in Photoshop. The Magnetic Lasso Tool can be found behind the standard Lasso Tool in the Tools panel. To access it, click and hold your mouse button down on the Lasso Tool until a fly-out menu appears, then select the Magnetic Lasso Tool from the list.
History brush tool
In Adobe Photoshop CS6, you can use the History Brush tool to apply an image area from a different state or snapshot to your current state. Use this tool to restore a percentage of an image to an earlier state, while leaving the rest of the modified image alone. The History Brush has an advantage over the Eraser tool because the History Brush allows access too many blend modes.
Healing brush tool
The easiest way is using the healing tools. These tools use complicated algorithms to calculate what should be an area of your picture based on the surrounding pixels. In short, it saves you the trouble of having to manually correct faults and flaws using the brush tool or the clone stamp tool.
Gradient tool
The Gradient tool creates a gradual blend between multiple colors. You can choose from preset gradient fills or create your own. To fill part of the image, select the desired area. Otherwise, the gradient fill is applied to the entire active layer. Select the Gradient tool .
Quick selection tool
The Quick Selection Tool is somewhat similar to the Magic Wand in that it also selects pixels based on tone and color. But the Quick Selection Tool goes far beyond the Magic Wand’s limited abilities by also looking for similar textures in the image, which makes it great at detecting the edges of objects. And unlike the Magic Wand where we click on an area and it selects automatically, the Quick Selection Tool works more like a brush, allowing us to select areas simply by "painting" over them!
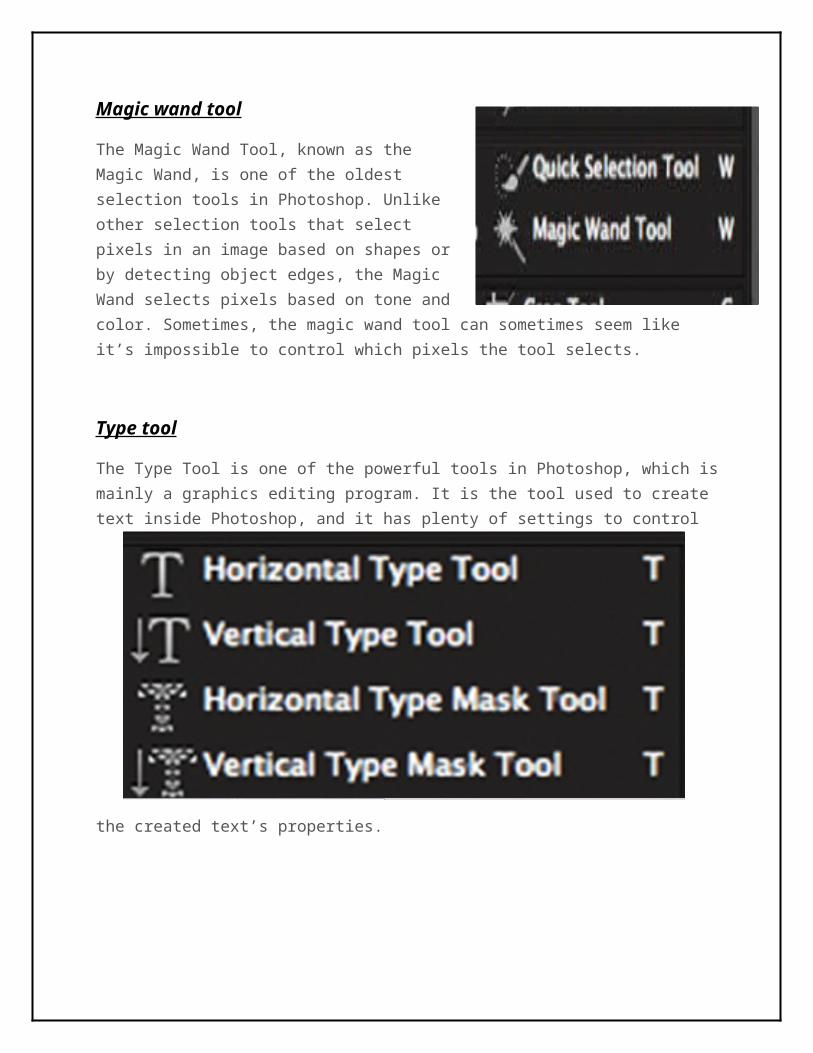
Magic wand tool
The Magic Wand Tool, known as the Magic Wand, is one of the oldest selection tools in Photoshop. Unlike other selection tools that select pixels in an image based on shapes or by detecting object edges, the Magic Wand selects pixels based on tone and color. Sometimes, the magic wand tool can sometimes seem like it’s impossible to control which pixels the tool selects.
Type tool
The Type Tool is one of the powerful tools in Photoshop, which is mainly a graphics editing program. It is the tool used to create text inside Photoshop, and it has plenty of settings to control the created text’s properties.
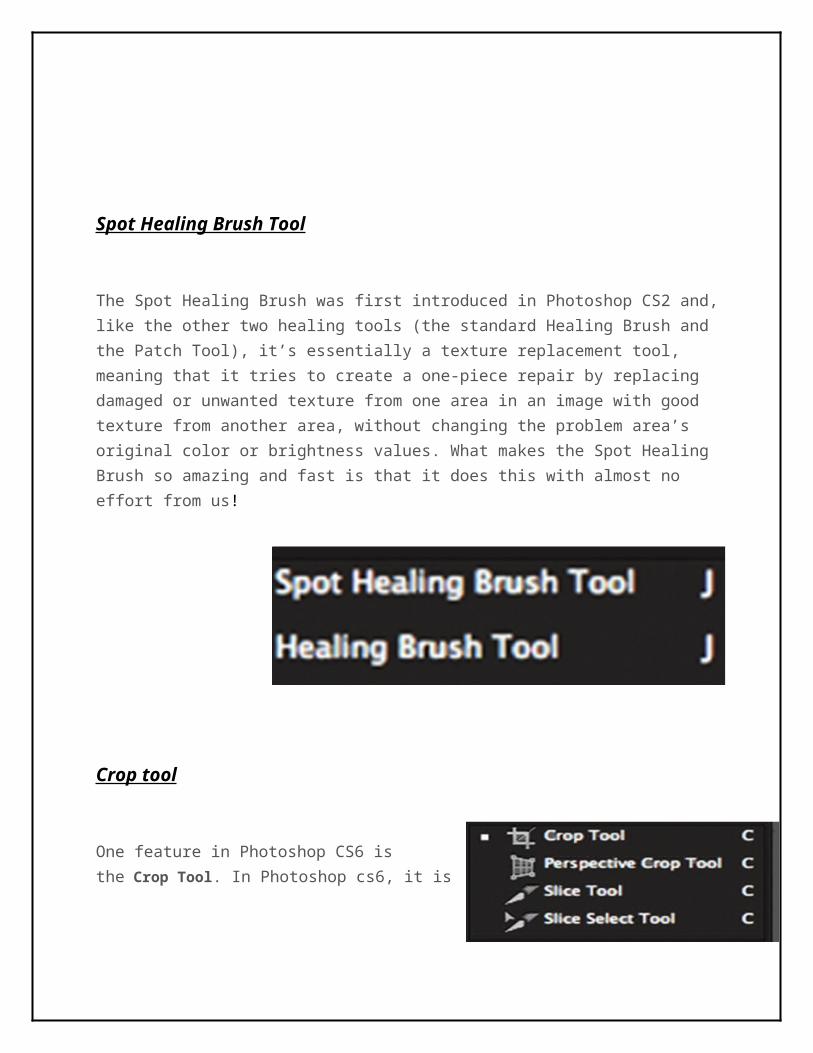
Spot Healing Brush Tool
The Spot Healing Brush was first introduced in Photoshop CS2 and, like the other two healing tools (the standard Healing Brush and the Patch Tool), it’s essentially a texture replacement tool, meaning that it tries to create a one-piece repair by replacing damaged or unwanted texture from one area in an image with good texture from another area, without changing the problem area’s original color or brightness values. What makes the Spot Healing Brush so amazing and fast is that it does this with almost no effort from us!
Crop tool
One feature in Photoshop CS6 is the Crop
Tool. In Photoshop cs6, it is now easier to make cropping and unbending images easier and more it’s more flexible.
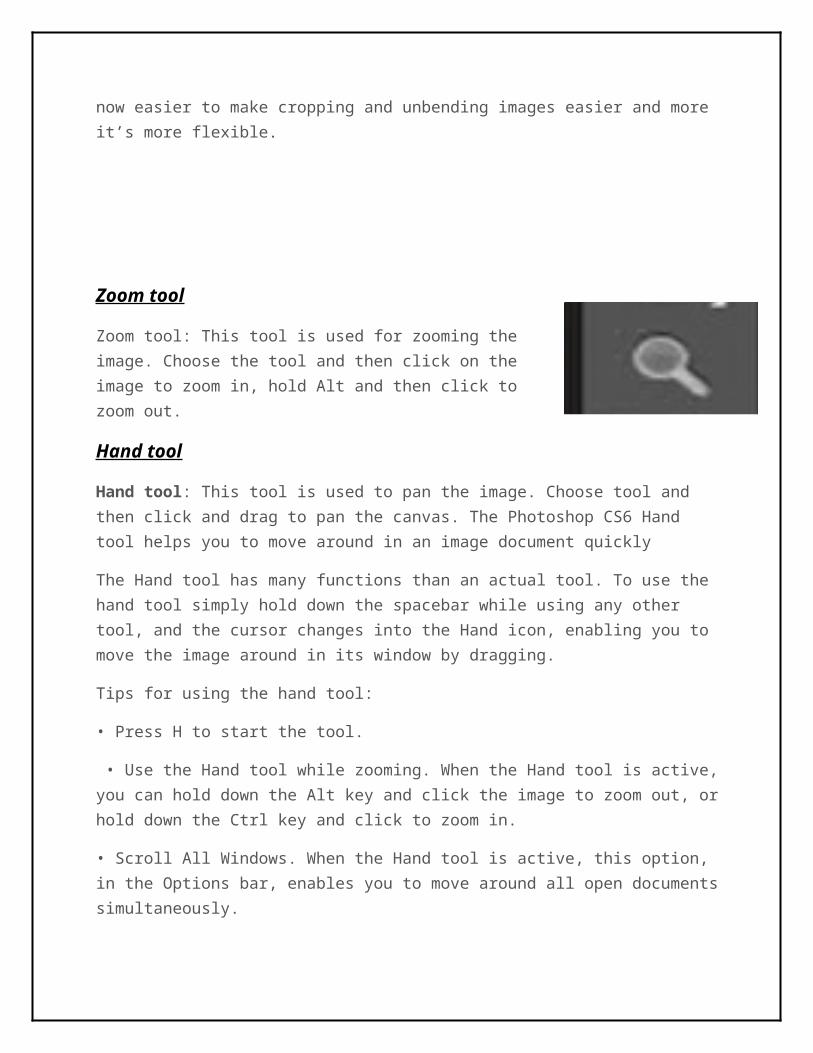
Zoom tool
Zoom tool: This tool is used for zooming the image. Choose the tool and then click on the image to zoom in, hold Alt and then click to zoom out.
Hand tool
Hand tool: This tool is used to pan the image. Choose tool and then click and drag to pan the canvas. The Photoshop CS6 Hand tool helps you to move around in an image document quickly
The Hand tool has many functions than an actual tool. To use the hand tool simply hold down the spacebar while using any other tool, and the cursor changes into the Hand icon, enabling you to move the image around in its window by dragging.
Tips for using the hand tool:
• Press H to start the tool.
• Use the Hand tool while zooming. When the Hand tool is active, you can hold down the Alt key and click the image to zoom out, or hold down the Ctrl key and click to zoom in.
• Scroll All Windows. When the Hand tool is active, this option, in the Options bar, enables you to move around all open documents simultaneously.
• Double-click the Hand tool. Resizes the document image to a Fit on Screen magnification.
• Press the Page Up or Page Down buttons to change the view. These buttons move the view up or down by a window.
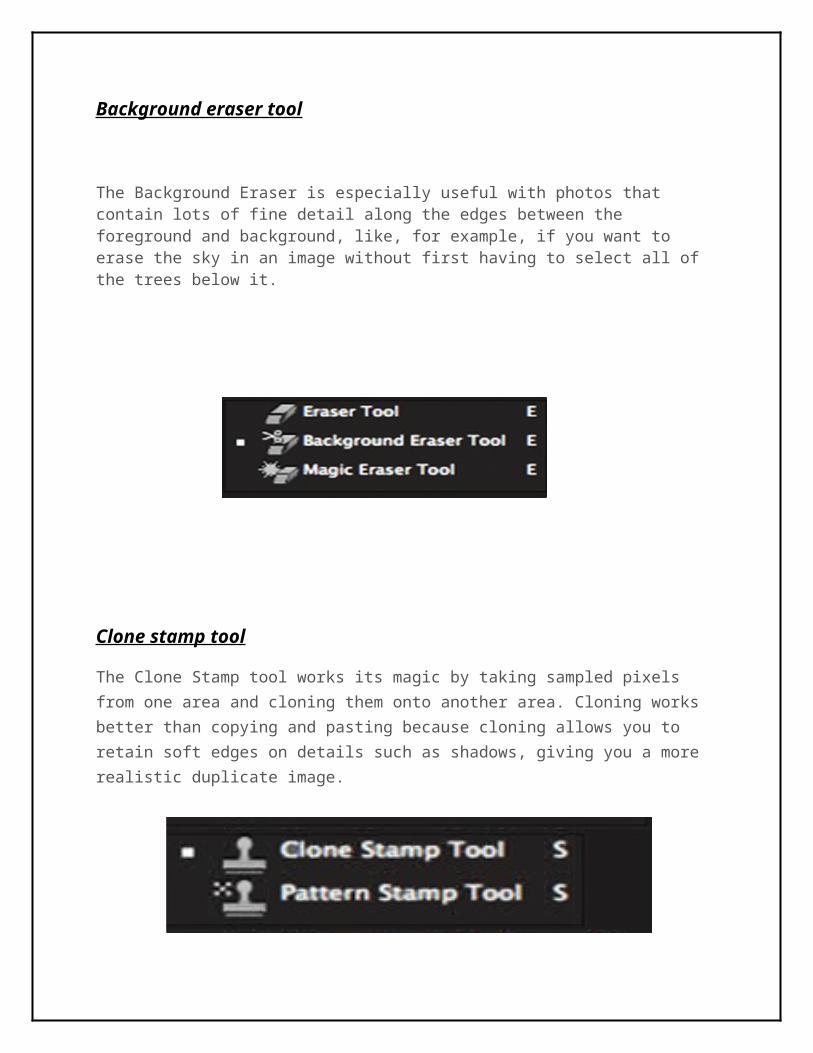
Eraser tool
The eraser is basically a brush which erases pixels as you drag it across the image. Pixels are erased to transparency or the background color if the layer is locked.
Background eraser tool
The Background Eraser is especially useful with photos that contain lots of fine detail along the edges between the foreground and background, like, for example, if you want to erase the sky in an image without first having to select all of the trees below it.
Clone stamp tool
The Clone Stamp tool works its magic by taking sampled pixels from one area and cloning them onto another area. Cloning works better than copying
and pasting because cloning allows you to retain soft edges on details such as shadows, giving you a more realistic duplicate image.
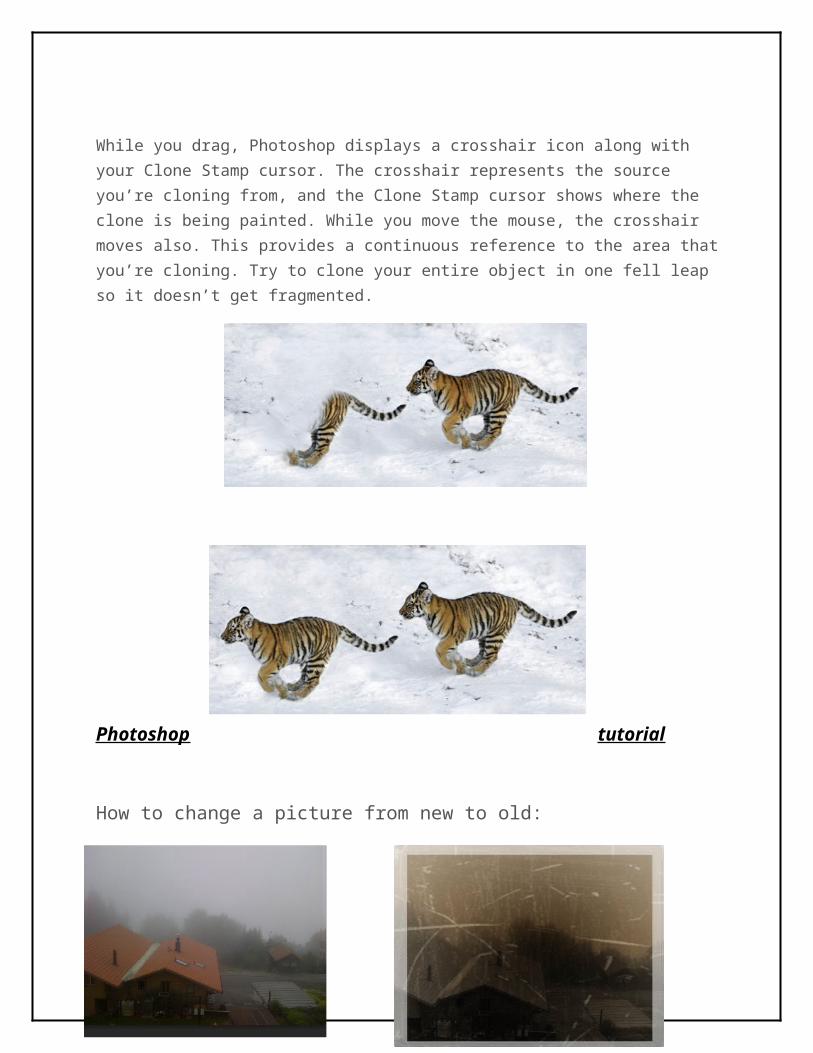
While you drag, Photoshop displays a crosshair icon along with your Clone Stamp cursor. The crosshair represents the source you’re cloning from, and the Clone Stamp cursor shows where the clone is being painted. While you move the mouse, the crosshair moves also. This provides a continuous reference to the area that you’re cloning. Try to clone your entire object in one fell leap so it doesn’t get fragmented.
Photoshop tutorial
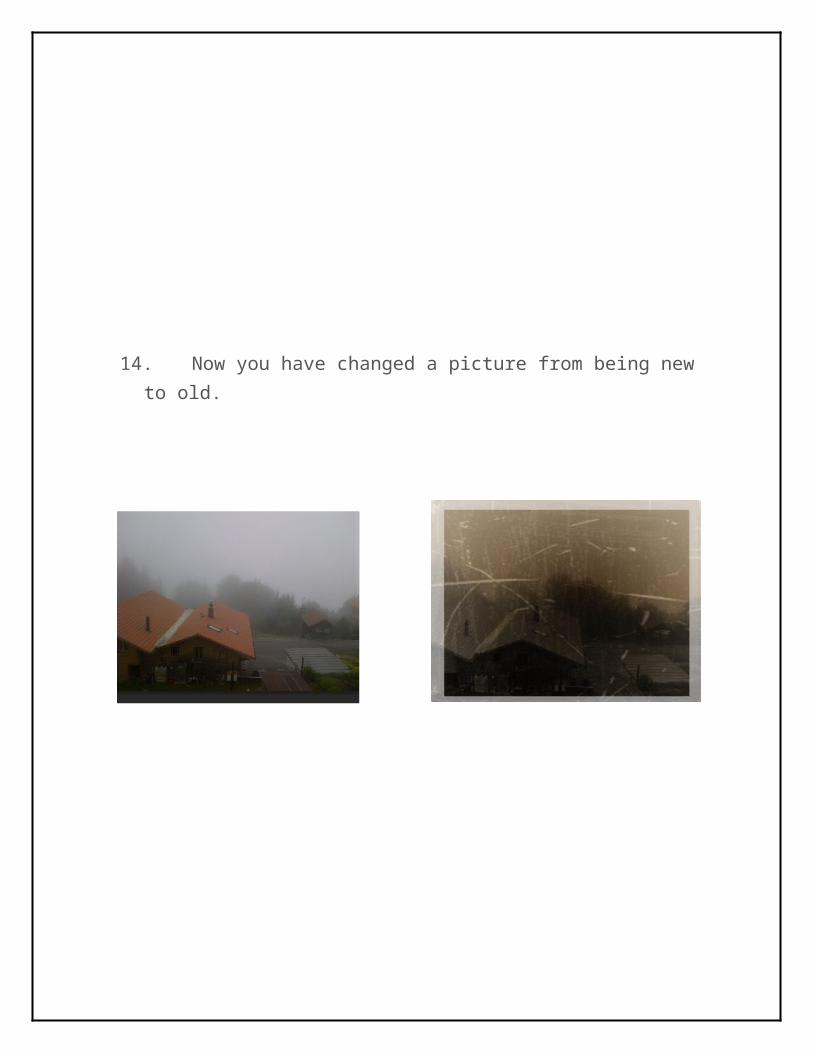
How to change a picture from new to old:
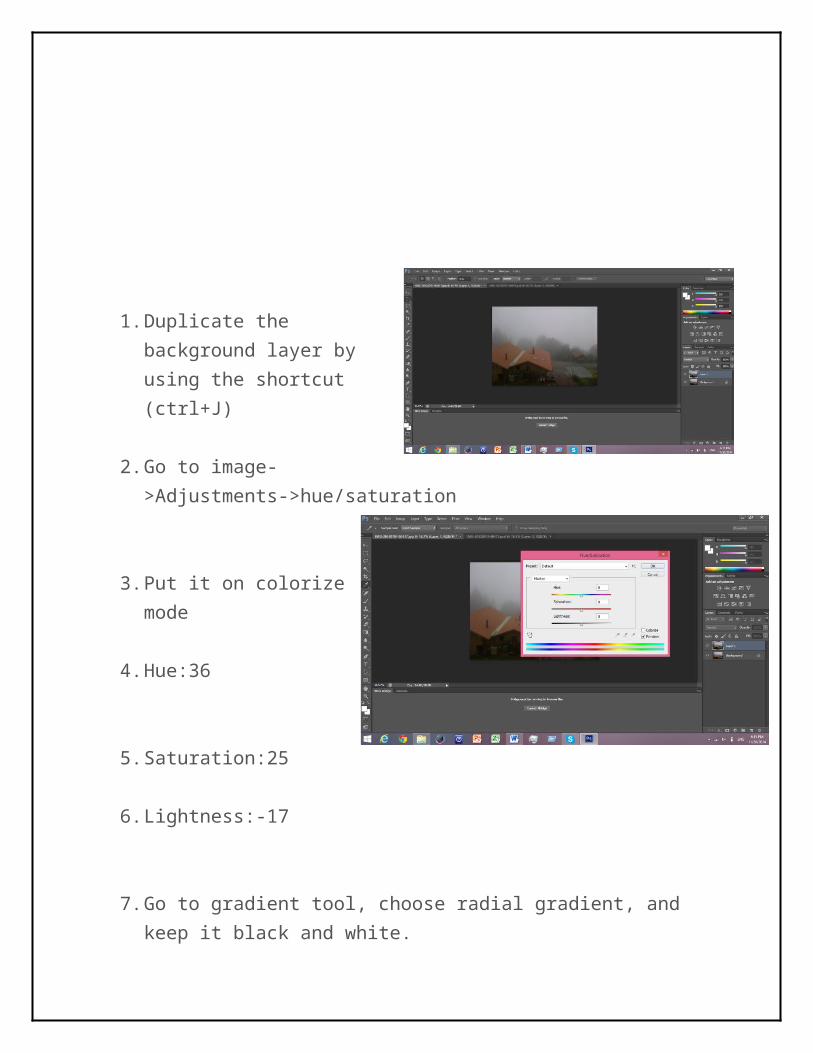
1. Duplicate the background layer by using the shortcut (ctrl+J)
2. Go to image->Adjustments->hue/saturation
3. Put it on colorize mode
4. Hue:36
5. Saturation:25
6. Lightness:-17
7. Go to gradient tool, choose radial gradient, and keep it black and white.
8. Put it on soft light
9. Download a scratch picture like this one.
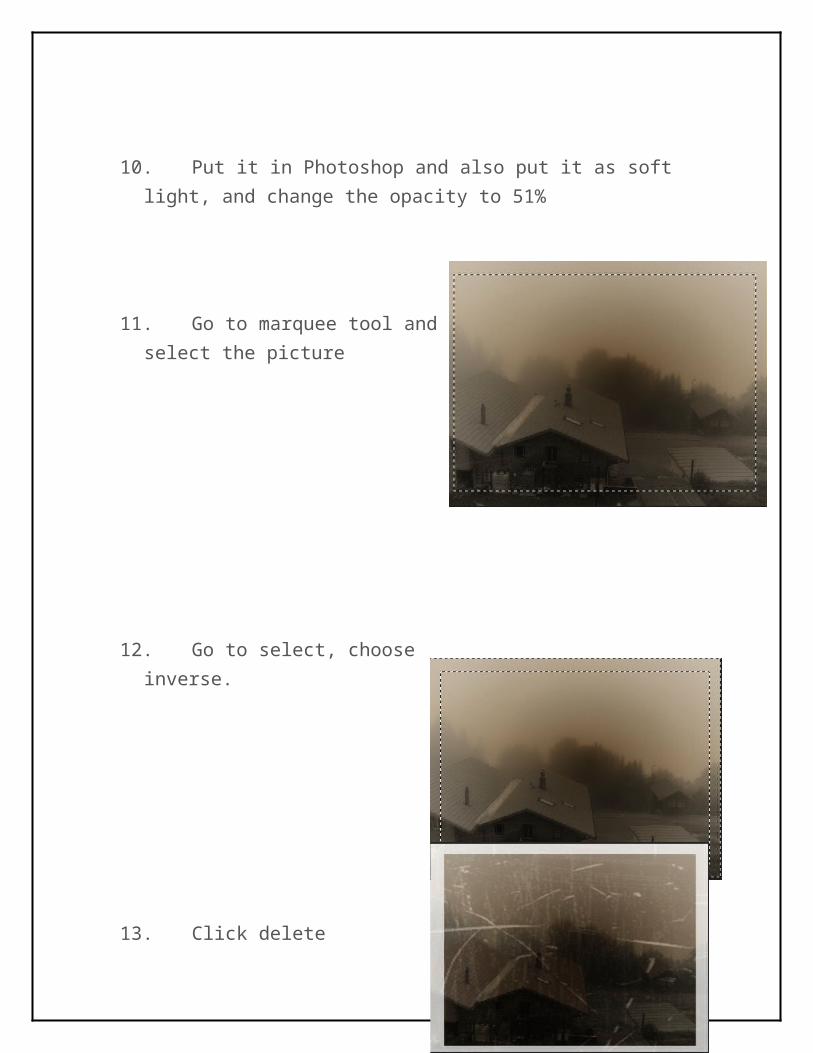
10. Put it in Photoshop and also put it as soft light, and change the opacity to 51%
11. Go to marquee tool and select the picture
12. Go to select, choose inverse.
13. Click delete
14. Now you have changed a picture from being new to old.
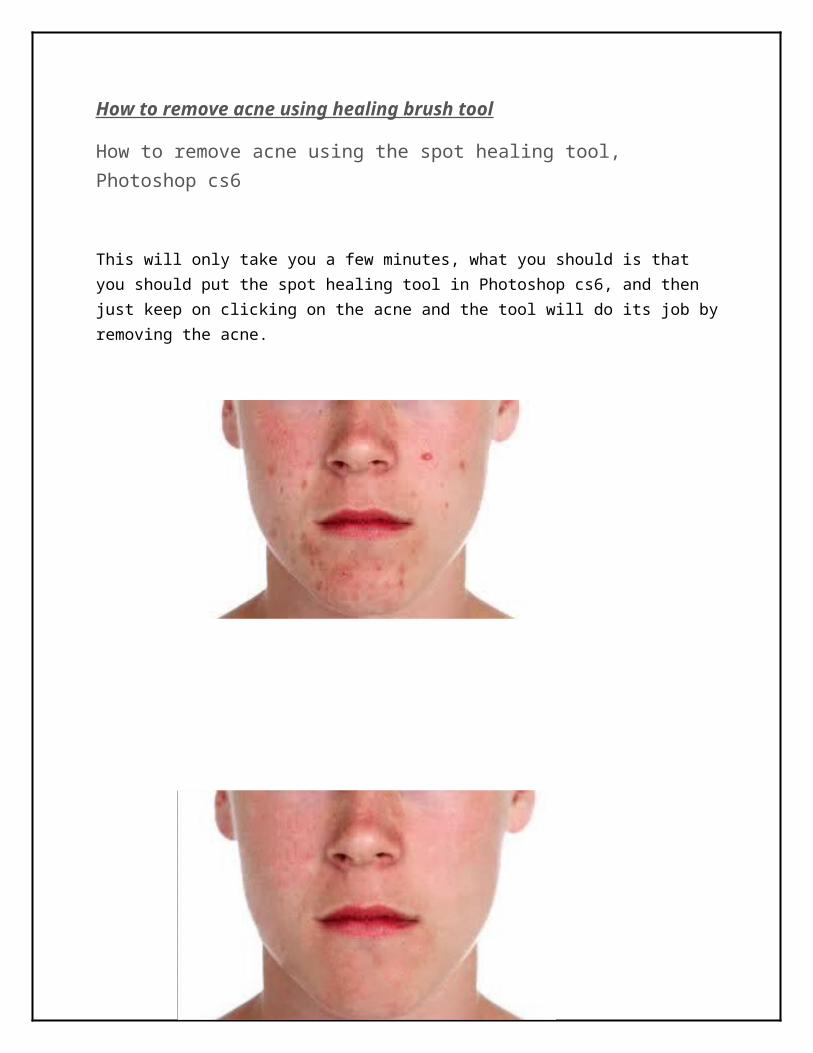
How to remove acne using healing brush tool
How to remove acne using the spot healing tool, Photoshop cs6
This will only take you a few minutes, what you should is that you should put the spot healing tool in Photoshop cs6, and then just keep on clicking on the acne and the tool will do its job by removing the acne.

How to make a gradient text?
First open Photoshop cs6, download any background or use a paint bucket to make a background. I will use dark metal template. Use the text tool to type anything, I will write text. Make a new layer, put gradient tool, don’t forget to put the style linear or if you want to change
it, it’s your choice. Make a new layer, and double-click the gradient editor and choose the color you want. When you finish, click on the image to put the gradient on the text (I changed the font and color).
You can download ground crack to make it even better:
I changed the brightness of the text and the ground crack brightness. I also changed the blend mode of the ground crack by making it linear light to make it look better.
In conclusion, I had an incredible time making the most of Photoshop cs6 particularly when I make logos. I’m hoping to continue using Photoshop every time because, I love photography and I like to make logos.
I additionally I’ve learned many things and one of them is face swap. Photoshop is not difficult to operate. And It helps you in various things. I learnt how to make logos and how to remove acne using the spot healing tool. I likewise learnt how to use the gradient tool.
The gradient tool helped me make amazing text, and I also downloaded some fonts that helped me make a good looking text with background. These are the names of the fonts I downloaded:
1. Vermin Vibes 2. 28 days later 3. Origami 4. Aircruser. 5. DIPLOMA 6. EDGE 7. Flemish Script BT 8. GINGA
http://www.instructables.com/id/How-To-Make-An-Old-Fashioned-Photo-Effect-Photosh/
http://www.mediacollege.com/adobe/photoshop/tool/paint-bucket.html
http://www.dummies.com/how-to/content/how-to-use-the-hand-tool-in-photoshop-cs6.html
http://www.photoshoplab.com/photoshop-tool-basics.html
http://helpx.adobe.com/photoshop/using/tools.html
http://www.digitaltutors.com/tutorial/1712-Understanding-the-Pen-Tool-in-Photoshop
http://jura.wi.mit.edu/bio/graphics/photoshop/tools.php
http://www.photoshopessentials.com/basics/selections/lasso-tool/
http://www.dummies.com/how-to/content/how-to-use-the-clone-stamp-tool-in-photoshop-cs6.html
www.phlearn.com