Embed Size (px)
Citation preview
HPE Data ProtectorSoftware Version: 9.07
Granular Recovery Extension User Guide for Microsoft SharePoint Server, Exchange and VMware
Document Release Date: June 2016Software Release Date: June 2016
Legal Notices
WarrantyThe only warranties for Hewlett Packard Enterprise Development LP products and services are set forth in the express warranty statements accompanying such products and services. Nothing herein should be construed as constituting an additional warranty. HPE shall not be liable for technical or editorial errors or omissions contained herein.
The information contained herein is subject to change without notice.
Restricted Rights LegendConfidential computer software. Valid license from HPE required for possession, use or copying. Consistent with FAR 12.211 and 12.212, Commercial Computer Software, Computer Software Documentation, and Technical Data for Commercial Items are licensed to the U.S. Government under vendor's standard commercial license.
Copyright Notice© Copyright 2016 Hewlett Packard Enterprise Development LP
Trademark NoticesAdobe™ is a trademark of Adobe Systems Incorporated.
Microsoft® and Windows® are U.S. registered trademarks of Microsoft Corporation.
UNIX® is a registered trademark of The Open Group.
This product includes an interface of the 'zlib' general purpose compression library, which is Copyright © 1995-2002 Jean-loup Gailly and Mark Adler.
Documentation UpdatesThe title page of this document contains the following identifying information:
l Software Version number, which indicates the software version. l Document Release Date, which changes each time the document is updated. l Software Release Date, which indicates the release date of this version of the software.
To check for recent updates or to verify that you are using the most recent edition of a document, go to: https://softwaresupport.hp.com
This site requires that you register for an HPE Passport and sign in. To register for an HPE Passport ID, go to: https://hpp12.passport.hp.com/hppcf/createuser.do
Or click the Register link at the top of the HPE Software Support page.
You will also receive updated or new editions if you subscribe to the appropriate product support service. Contact your HPE sales representative for details.
SupportVisit the HPE Software Support Online web site at: https://softwaresupport.hp.com
This web site provides contact information and details about the products, services, and support that HPE Software offers.
HPE Software online support provides customer self-solve capabilities. It provides a fast and efficient way to access interactive technical support tools needed to manage your business. As a valued support customer, you can benefit by using the support web site to:
Granular Recovery Extension User Guide for Microsoft SharePoint Server, Exchange and VMware
HPE Data Protector (9.07) Page 2 of 176
l Search for knowledge documents of interest l Submit and track support cases and enhancement requests l Download software patches l Manage support contracts l Look up HPE support contacts l Review information about available services l Enter into discussions with other software customers l Research and register for software training
Most of the support areas require that you register as an HPE Passport user and sign in. Many also require a support contract. To register for an HPE Passport ID, go to:
https://hpp12.passport.hp.com/hppcf/createuser.do
To find more information about access levels, go to:
https://softwaresupport.hp.com/web/softwaresupport/access-levels
HPE Software Solutions Now accesses the HPESW Solution and Integration Portal Web site. This site enables you to explore HPE Product Solutions to meet your business needs, includes a full list of Integrations between HPE Products, as well as a listing of ITIL Processes. The URL for this Web site is http://h20230.www2.hp.com/sc/solutions/index.jsp
Granular Recovery Extension User Guide for Microsoft SharePoint Server, Exchange and VMware
HPE Data Protector (9.07) Page 3 of 176
Contents
Part 1: Microsoft SharePoint Server and the Granular Recovery Extension 11Chapter 1: Introduction 12
Backup 12Recovery 12
Chapter 2: Installation 14
Chapter 3: Configuration 16Verifying the configuration of the Recovery Web Application 16Configuring HPE Data Protector user rights 16Configuring HPE Data Protectorbackup specifications 17Verifying the configuration of Internet Information Services application pools 18
Chapter 4: Backup 20Considerations 20
Chapter 5: Recovery 21Launching the HPE Data Protector Granular Recovery Extension GUI 21Importing content databases from backup 24
Prerequisites 24Considerations 24Procedure 24
Importing content databases from the filesystem 26Prerequisites 26Considerations 27Procedure 27
Executing Perform content recovery tasks 29Prerequisites 29Procedure 30
Recovering site items 30Prerequisites 30Supported items 31Considerations 32Procedure 33
Removing content databases from the cache 37Procedure 37
Monitoring granular recovery import jobs 38Procedure 38
Changing HPE Data Protector Granular Recovery Extension settings 39Procedure 39
Chapter 6: Command line reference 41Examples 41
Restoring a content database from Data Protector backup 41
Granular Recovery Extension User Guide for Microsoft SharePoint Server, Exchange and VMware
HPE Data Protector (9.07) Page 4 of 176
Monitoring jobs progress 42Verifying target location disk space size 42Listing content databases 43Removing restore jobs 43Recovering a site item to the original site 43Recovering a site item to another location 43Removing content databases from the cache 44Removing content databases from disk 44Setting content database automatic removal 44Exporting items from a content database 44Listing exported items 44Importing items from a content database 45Displaying Microsoft SharePoint farm information 45Displaying content database information 45Displaying a list of sites 45Browsing sites 45Displaying Granular Recovery Extension version 45
Chapter 7: Troubleshooting 46Troubleshooting Known Issues and Workarounds 46
Installation reports a warning "No full read permissions" 46Remote installation fails 47An import job fails - Insufficient user rights 47An import job fails - Insufficient disk space 48Recovery session fails 50Granular Recovery Cache Management link is not accessible from My Sites - Manage Farm Features 50Granular Recovery Cache Management link is not accessible from My Sites - Read permission 51HPE Data Protector Granular Recovery Extension is not available on a newly created Web Application 52Import from backup or from filesystem fails 53Changing default recovery settings fails 53Recovery fails with "Unknown error has occurred, contact administrator." error message 53Slow response of the command line interface 54Slow response of the graphical user interface 55The Data Protector service is not running 56The restoring - Mount Request Pending status 56Subfolders are not recovered to original location 56Granular Recovery Extension component installation fails 56Granular Recovery Extension removal fails 57Installation ends unexpectedly on a farm with multiple servers on Central Administration 57
Part 2 - Microsoft Exchange and the Granular Recovery Extension 59
Granular Recovery Extension User Guide for Microsoft SharePoint Server, Exchange and VMware
HPE Data Protector (9.07) Page 5 of 176
Chapter 8: Introduction 60Granular Recovery Extension Documentation set 60Backup 61Restore and recovery 61
Chapter 9: Installation 63
Chapter 10: Configuration 64Meeting Data Protector configuration requirements for the Granular Recovery Extension 64
Configuring the Granular Recovery Web service port 64Configuring user account for the Granular Recovery Extension 64
Data Protector user rights 64Other necessary privileges 65Privileges for executing Exchange Management cmdlet operations 66
Chapter 11: Backup 67
Chapter 12: Restore and recovery 68Limitations 68
Data Protector Granular Recovery Extension limitations 68Microsoft Exchange Server limitations 68
Considerations 68Data Protector Granular Recovery Extension considerations 68Data Protector considerations 69Microsoft Exchange Server considerations 70
Restore and recovery flow 70Opening the HP Data Protector Granular Recovery Extension GUI 71Remote powershell configuration 73Importing mailbox databases 73Mounting databases 79Starting recovery 80Dismounting databases 83Removing databases 84Changing settings 85
Changing the retention period 86
Chapter 13: Command line reference 88Synopsis 89Description 90Options 90Examples 93
Changing Granular Recovery Extension settings 93Restoring a mailbox database from Data Protector backup 94Listing mailbox database information 94Changing the retention period 95Mounting a mailbox database 95Searching a mailbox 95Recovering items to the original location 96Recovering items to another location 96Removing sessions 97
Granular Recovery Extension User Guide for Microsoft SharePoint Server, Exchange and VMware
HPE Data Protector (9.07) Page 6 of 176
Removing recovery databases 97
Chapter 14: Troubleshooting 98Before you begin 98Debugging 98
Enabling debugging option 98Known issues and workarounds 98
Search Criteria Results page remains empty after at least one search keyword is entered 98Manual removal of temporary mailboxes created by the extension 99Search for mailbox items fails and reports an error 99Mailboxes are missing from the list in the Import from Backup wizard 100Mounting a restored database fails 100Interprocess communication error being reported by the GUI 101An Exchange GRE recovery or restore operation fails due to insufficient permission 101The message Adding snap-in to console... is displayed for a long time 102The About HP Data Protector Granular Recovery Extension for Microsoft Exchange Server does not display the product build number 102Recovery items are not getting deleted automatically from the exchange management shell 103
Part 3 - VMware and the Granular Recovery Extension 104Chapter 15: Introduction 105
GRE features 105Recovery flow 105
Web Plug-in 106Advanced GRE Web Plug-in 106
Chapter 16: Installation 108
Chapter 17: Configuration 109Meeting Data Protector configuration requirements for Granular Recovery Extension 109
Configuring a GRE for VMware vSphere user group and users 109Adding a GRE for VMware vSphere user group 109Adding users to the GRE for VMware vSphere group 110Adding an Inet user account to the Data Protector Admin group 111
Configuring GRE Administrators using HPE Data Protector 112Configuring systems for VMware vSphere 113
Configuring Windows/Linux Firewall exceptions 113Configuring encrypted control communication 114
Chapter 18: Backup 115Backup to Smart Cache devices 115Backups from 3PAR arrays 116Backups to StoreOnce Catalyst device 116
Chapter 19: Recovery 117Considerations 117Limitations 118
Granular Recovery Extension User Guide for Microsoft SharePoint Server, Exchange and VMware
HPE Data Protector (9.07) Page 7 of 176
Recovery 118Restoration and preservation of Ownerships, ACLs, File attributes, and Alternate data streams 1193PAR storage systems 120Smart Cache devices 120StoreOnce Catalyst devices 120
Recovery using GRE Web Plug-in 120Operator tasks 121
Accessing the Data Protector Web plug-in from VMware vSphere Web Client 121Requesting restore or presentation 122Monitoring requests 124Recovering files from virtual machines 125About Granular Recovery Extension 127
Administrator tasks 127Accessing the Data Protector plug-in from VMware vSphere Web Client 127Configuring mount proxy systems 128Handling requests 130
Approve request 130Triggering restore sessions 131Rejecting requests 132
Monitoring requests 133Recovering files from virtual machines 134Removing virtual machine disks 136About Granular Recovery Extension 137
Recovery using Advanced GRE Web Plug-in 137Accessing the Advanced GRE Web Plug-in from VMware vSphere Web Client 138Viewing the list of requests 138Creating a new request 140Recovering files 141Configuring GRE settings 143
Retention time and debugging 144Configuring the mount proxy 144
Changing the Cell Manager 145Identifying the Advanced GRE Web Plug-in version 145
Chapter 20: Troubleshooting 147Before you begin 147Debugging 147
Enabling debugging option 147Known issues and workarounds 148
Mounting virtual machine disks 148Inability to browse a virtual machine disk 149Issues after removing the extension 149VMware VirtualCenter Management Webservices service is not running 150RSA certificates with keys that are less than 1024 bits long are blocked 150Remote installation of VMware Granular Recovery Extension Web Plug-In ends unexpectedly 151
Granular Recovery Extension User Guide for Microsoft SharePoint Server, Exchange and VMware
HPE Data Protector (9.07) Page 8 of 176

VMware Granular Recovery Extension Web Plug-In installation fails 152Mounting of LVM logical volumes fail when browsing VMware GRE on Linux 152VMware Granular Recovery Extension tab is missing 153VMware Granular Recovery Extension tab is missing with vCenter Server plug-in disabled 153HPE Data Protector cannot add any Granular Recovery Extension component 154Local installation workaround 154
Monitor displays request removed by administrator 155Overwritten files issues 155Missing VIX API libraries 156Insufficient permission in the Host Operating System 156Authentication failure or insufficient permission in the Guest Operating System 157Viewing partitions on selected disk 157Presentation failed 157Cached recovery fails 158Restore session stops after some time 158The VMware GRE session is unresponsive 159VMware GRE file recovery could not access network share 159Resizing the browser window causes an error and reloads the page 159Browsing for Recovery throws an error message 160While performing a Recovery operation a session time-out occurs 160Time difference exists between the backup sessions on the Data Protector GUI and vSphere web client 160Unable to expand a folder for browsing 161Expanding a partition for browsing throws an error 161vSphere web interface becomes greyed out 161Error message appears while browsing for LVM disks 161Error message appears when registering the Advanced GRE Web Plug-in 162The message "VIX API is not installed" re-appears although VIX API is installed 162Shared folders/directories created on Media Agent host system are not removed 163While browsing a Smart Cache in the Advanced GRE Web Plug-in you may see mount errors on agent time-out. 164VEPA backup to a Smart Cache fails on a Windows 2008 system. 164Browse and recovery problems with folders containing special characters 164Unable to browse the disk 165Unable to view existing requests in Recover Files page of GRE Web Plug-in 165VMware vSphere Web Client hangs 166Error message appears while browsing for LVM disks on SLES 12 mount proxy host 166The VMware GRE session of large volumes from Smart Cache devices may fail 167Recovery fails on Virtual Machine 167VMware Granular Recovery Extension intermittently fails to recover files and folders 167The Granular Recovery Extension operation to StoreOnce Catalyst fails, when Data Protector process dpfs is not initialized 168Backup session performed with "No Logs" option is not eligible for GRE or Live Migrate and Power On from StoreOnce Catalyst 168Data consistency issues during cached GRE operations 168
Granular Recovery Extension User Guide for Microsoft SharePoint Server, Exchange and VMware
HPE Data Protector (9.07) Page 9 of 176
Documentation set 170Documentation map 170
Abbreviations 171Integrations 173
Send Documentation Feedback 175
Granular Recovery Extension User Guide for Microsoft SharePoint Server, Exchange and VMware
HPE Data Protector (9.07) Page 10 of 176
HPE Data Protector (9.07)
Page 11 of 176
Part 1: Microsoft SharePoint Server and the Granular Recovery ExtensionThis part of the guide describes Data Protector Granular Recovery Extension for Microsoft Office SharePoint Server 2007, Microsoft SharePoint Server 2010, and Microsoft SharePoint Server 2013 (Microsoft SharePoint Server).
This part includes the following chapters:
Introduction
Installation
Configuration
Backup
Recovery
Command Line Interface
Troubleshooting
Chapter 1: IntroductionA part of the information provided in this document is also available in a custom Help collection that the HPE Data Protector Granular Recovery Extension for Microsoft SharePoint Server adds to the basic Microsoft SharePoint Server Help. The collection contains Granular Recovery Extension-related topics. You can access them by clicking the Help icon in a Granular Recovery Extension context of the Central Administration site.
Backup
Back up Microsoft SharePoint Server data using one of the following backup solutions:
l HPE Data Protector Microsoft SharePoint Server 2007/2010/2013 integration l HPE Data Protector Microsoft SharePoint Server VSS based solution l HPE Data Protector Microsoft SQL Server integration l HPE Data Protector Microsoft Volume Shadow Copy Service integration
Recovery
The benefits of the HPE Data Protector Granular Recovery Extension are the following:
l recovery granularityThe smallest object that you can restore with the backup solution is a Microsoft SQL Server database (content database), which may contain data of multiple websites. In contrast, the smallest object that you can recover with HPE Data Protector Granular Recovery Extension is an individual website item, for example: a Calendar item, a Calendar, a Tasks item, a Team Discussion item, a document, a shared document, a folder, a list, a library, an announcement, a form, a reporting template, an object's metadata, and a document workflow.
l integration into Microsoft SharePoint Server Central AdministrationGranular Recovery Extension is fully integrated into the Microsoft SharePoint Server Central Administration. This empowers Site Collection Administrators to perform recovery of single items independently or with minimal interference of backup administrators.
l recovery of multiple sitesAccidental deletion of a site is no longer an issue, even if you cannot use the recycle bin to recover your site. Granular Recovery Extension can recover an entire site with multiple subsites.
l ease of searchThe Granular Recovery Extension advanced and quick search helps you find the item you need to recover. This search system checks object's metadata, enabling you to filter your search by document type, author, date and so on. Objects are displayed in object tree browser.
Granular Recovery Extension User Guide for Microsoft SharePoint Server, Exchange and VMwareChapter 1: Introduction
HPE Data Protector (9.07) Page 12 of 176
l recovery to different locationsThe Granular Recovery Extension enables recovery to different destinations, for example you can recover your objects to different sites, different farms, and to filesystem.
Granular Recovery Extension User Guide for Microsoft SharePoint Server, Exchange and VMwareChapter 1: Introduction
HPE Data Protector (9.07) Page 13 of 176
Chapter 2: InstallationInstall the MS SharePoint Granular Recovery Extension on the Microsoft SharePoint Server Central Administration system, to recover individual Microsoft SharePoint Server objects.
The "Microsoft SharePoint Server Clients - Data Protector Granular Recovery Extension for Microsoft SharePoint Server" section in the HPE Data Protector Installation Guide provides prerequisites and other details necessary for installing the Data Protector Granular Recovery Extension for Microsoft SharePoint Server.
HPE Data Protector (9.07) Page 14 of 176
Page 15 of 176HPE Data Protector (9.07)
Granular Recovery Extension User Guide for Microsoft SharePoint Server, Exchange and VMwareChapter 2: Installation
Chapter 3: ConfigurationThis section describes the configuration steps that you need to follow. Not following this steps may lead to failure in recovering your objects.
Verifying the configuration of the Recovery Web Application
Procedure
1. Open the Central Administration webpage and click the Application Management tab. 2. Under Application Security, click Authentication providers and click Default. 3. Ensure that the settings for the Recovery Web Application are the same as the default settings of
the Central Administration Application.
Configuring HPE Data Protector user rights
Procedure
1. Launch the Data Protector GUI (Data Protector Manager). 2. In the Context list, select Users. 3. Ensure the user account under which the Windows SharePoint Services Timer service is running
is assigned the Data Protector Start restore and See private objects user rights.
HPE Data Protector (9.07) Page 16 of 176
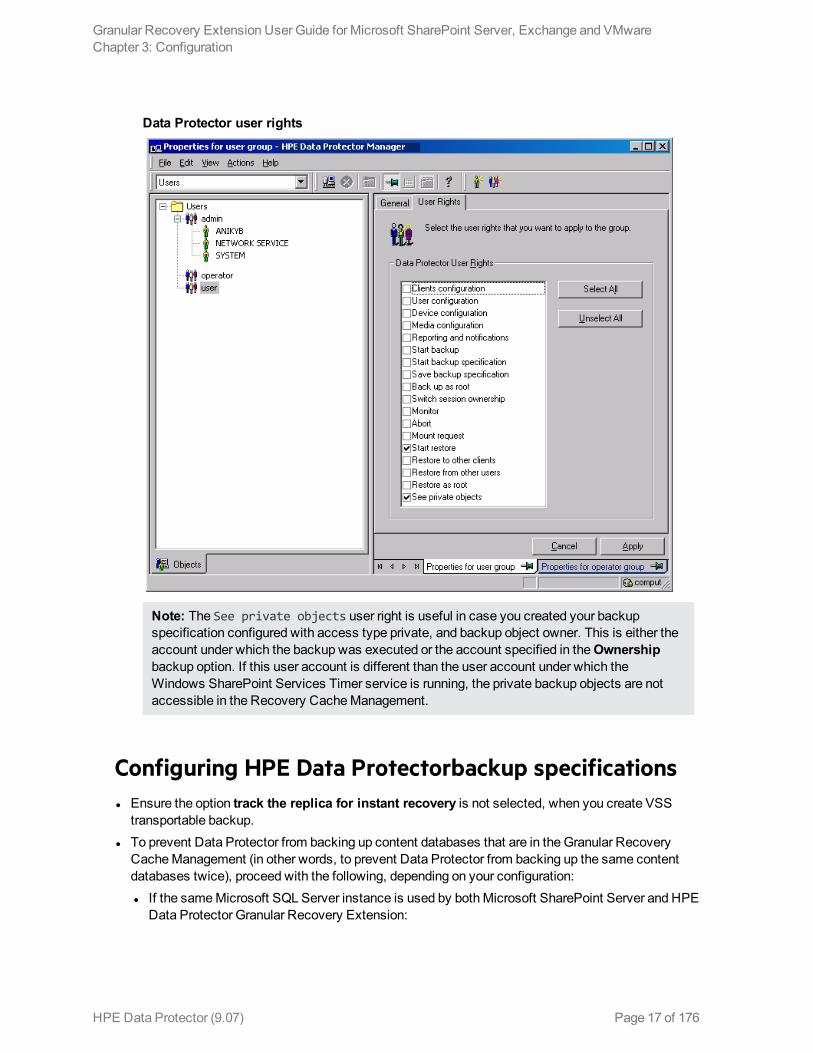
Data Protector user rights
Note: The See private objects user right is useful in case you created your backup specification configured with access type private, and backup object owner. This is either the account under which the backup was executed or the account specified in the Ownership backup option. If this user account is different than the user account under which the Windows SharePoint Services Timer service is running, the private backup objects are not accessible in the Recovery Cache Management.
Configuring HPE Data Protectorbackup specifications l Ensure the option track the replica for instant recovery is not selected, when you create VSS
transportable backup. l To prevent Data Protector from backing up content databases that are in the Granular Recovery
Cache Management (in other words, to prevent Data Protector from backing up the same content databases twice), proceed with the following, depending on your configuration: l If the same Microsoft SQL Server instance is used by both Microsoft SharePoint Server and HPE
Data Protector Granular Recovery Extension:
Granular Recovery Extension User Guide for Microsoft SharePoint Server, Exchange and VMwareChapter 3: Configuration
HPE Data Protector (9.07) Page 17 of 176
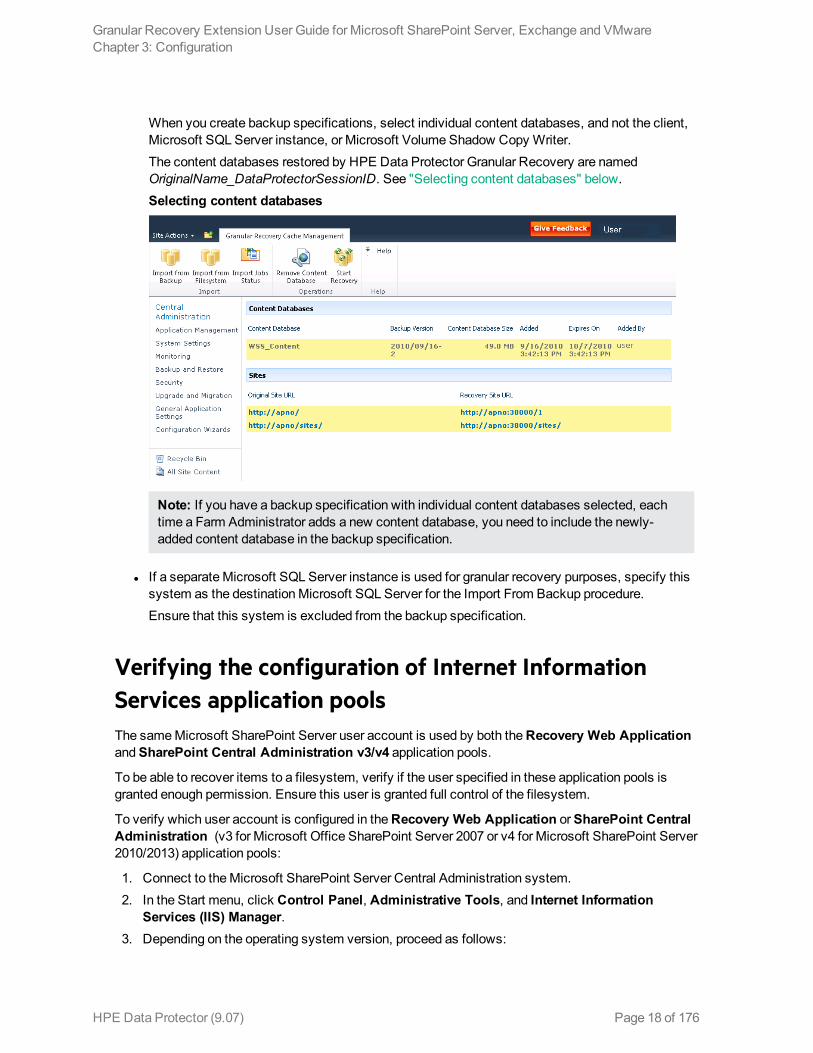
When you create backup specifications, select individual content databases, and not the client, Microsoft SQL Server instance, or Microsoft Volume Shadow Copy Writer. The content databases restored by HPE Data Protector Granular Recovery are named OriginalName_DataProtectorSessionID. See "Selecting content databases" below.Selecting content databases
Note: If you have a backup specification with individual content databases selected, each time a Farm Administrator adds a new content database, you need to include the newly-added content database in the backup specification.
l If a separate Microsoft SQL Server instance is used for granular recovery purposes, specify this system as the destination Microsoft SQL Server for the Import From Backup procedure.Ensure that this system is excluded from the backup specification.
Verifying the configuration of Internet Information Services application poolsThe same Microsoft SharePoint Server user account is used by both the Recovery Web Application and SharePoint Central Administration v3/v4 application pools.
To be able to recover items to a filesystem, verify if the user specified in these application pools is granted enough permission. Ensure this user is granted full control of the filesystem.
To verify which user account is configured in the Recovery Web Application or SharePoint Central Administration (v3 for Microsoft Office SharePoint Server 2007 or v4 for Microsoft SharePoint Server 2010/2013) application pools:
1. Connect to the Microsoft SharePoint Server Central Administration system. 2. In the Start menu, click Control Panel, Administrative Tools, and Internet Information
Services (IIS) Manager. 3. Depending on the operating system version, proceed as follows:
Granular Recovery Extension User Guide for Microsoft SharePoint Server, Exchange and VMwareChapter 3: Configuration
HPE Data Protector (9.07) Page 18 of 176
Windows Server 2008 or Windows Server 2012: a. Open the Application Pools page. b. Right-click an application pool and click Advanced Settings. c. Under Process Model, verify the Identity of the Microsoft SharePoint Server user account.Windows Server 2003: a. Expand Application Pools. b. Right-click an application pool and click Properties. c. Click the Identity tab, select the Configurable option, and verify the selected Microsoft
SharePoint Server user account.
Granular Recovery Extension User Guide for Microsoft SharePoint Server, Exchange and VMwareChapter 3: Configuration
HPE Data Protector (9.07) Page 19 of 176
Chapter 4: BackupBack up Microsoft SharePoint Server data as described in your backup solution documentation.
For more information on the HPE Data Protector backup solutions, see:
l HPE Data Protector Integration Guide l HPE Data Protector Zero Downtime Backup Integration Guide
Note: Granular Recovery Extension for Microsoft SharePoint Server uses the same procedure for recovery of different objects. The recovery procedure does not depend on the backup type.
Considerations l It is recommended to restore content databases bigger than 10 GB from VSS transportable backup. l If you have configured VSS transportable backup using ZDB to disk+tape, Granular Recovery
Extension for Microsoft SharePoint Server selects the content database version from disk for restore. This backup type does not require additional disk space and is adequate for bigger content databases, taking less time to complete the restore session.
HPE Data Protector (9.07) Page 20 of 176
Chapter 5: RecoveryEach site has its data stored in a Microsoft SQL Server database (content database). Therefore, to recover site items, follow this basic procedure:
1. Import a. Restore
Restore the content database from backup to a temporary location on a Microsoft SQL Server system.
b. MountPresent the restored content database (recovery content database) to the Microsoft SharePoint Server. This creates a temporary site (recovery site).
2. RecoverTransfer site items from the recovery site to the original site, or to another location of your choice.
3. DismountDismount the recovery content database from the Microsoft SharePoint Server. Optionally, delete the database from the disk.
Launching the HPE Data Protector Granular Recovery Extension GUI
Procedure
1. Log on to the Microsoft SharePoint Server Central Administration system under a Microsoft SharePoint Server Farm Administrator user account.
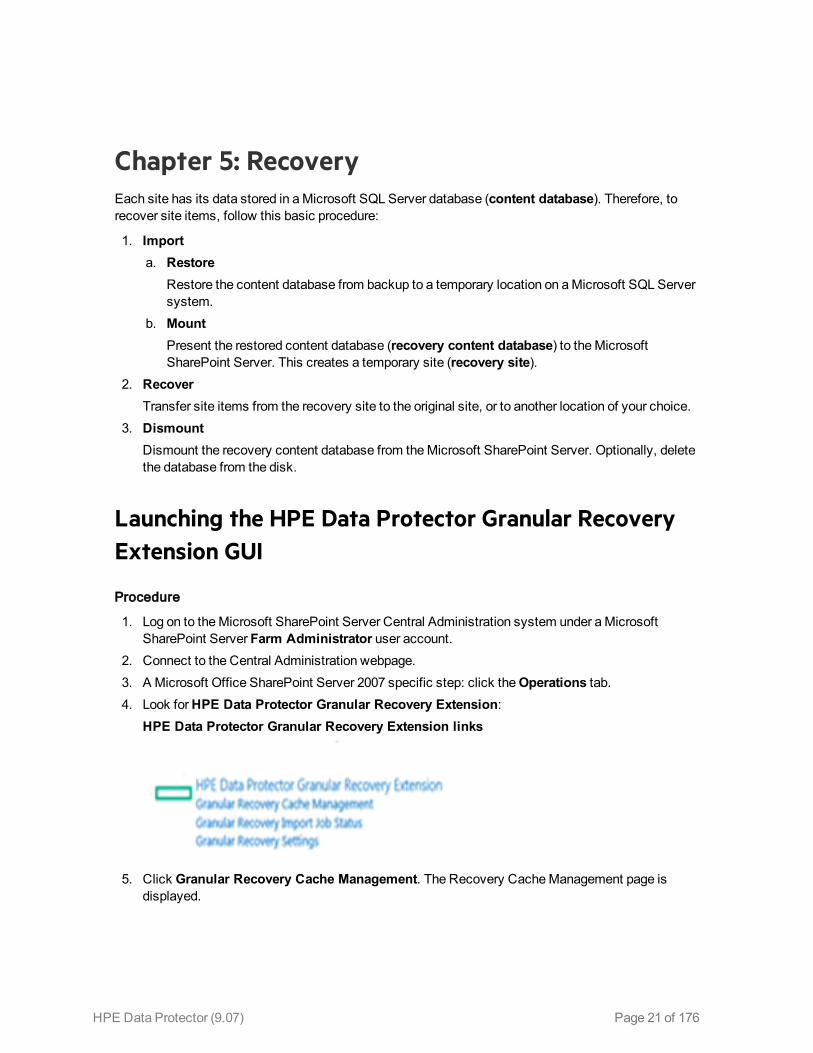
2. Connect to the Central Administration webpage. 3. A Microsoft Office SharePoint Server 2007 specific step: click the Operations tab. 4. Look for HPE Data Protector Granular Recovery Extension:
HPE Data Protector Granular Recovery Extension links
5. Click Granular Recovery Cache Management. The Recovery Cache Management page is
displayed.
HPE Data Protector (9.07) Page 21 of 176
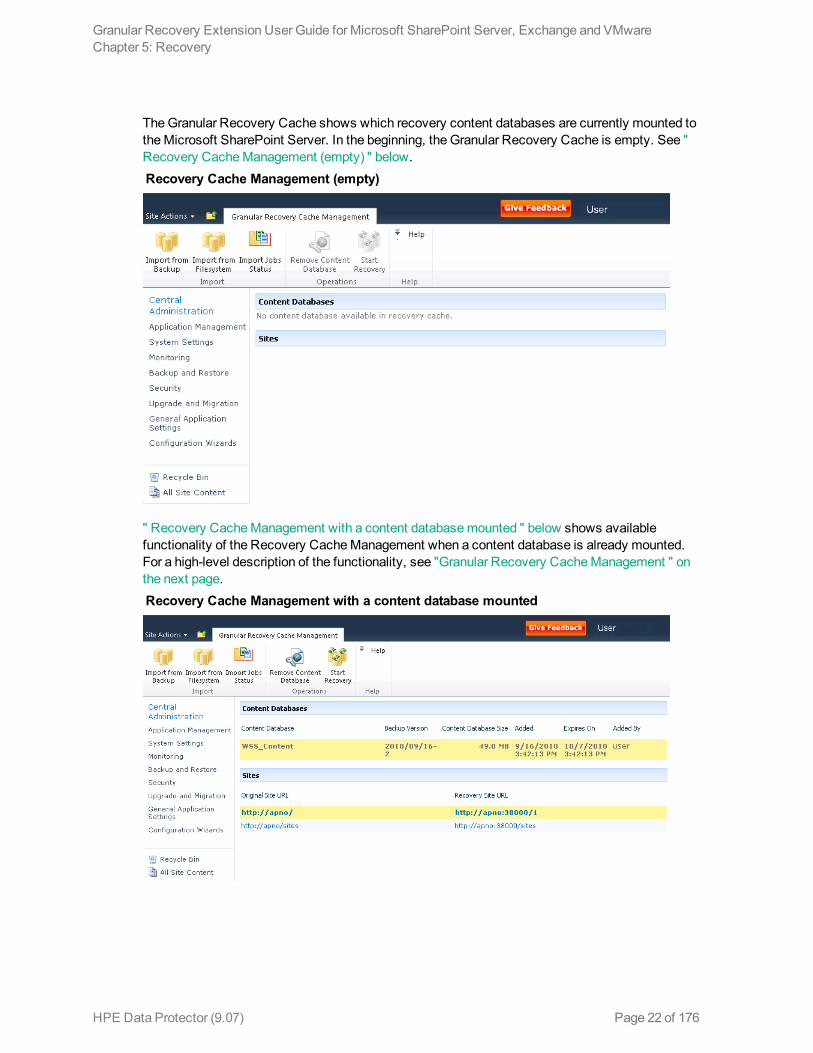
The Granular Recovery Cache shows which recovery content databases are currently mounted to the Microsoft SharePoint Server. In the beginning, the Granular Recovery Cache is empty. See " Recovery Cache Management (empty) " below. Recovery Cache Management (empty)
" Recovery Cache Management with a content database mounted " below shows available functionality of the Recovery Cache Management when a content database is already mounted. For a high-level description of the functionality, see "Granular Recovery Cache Management " on the next page. Recovery Cache Management with a content database mounted
Granular Recovery Extension User Guide for Microsoft SharePoint Server, Exchange and VMwareChapter 5: Recovery
HPE Data Protector (9.07) Page 22 of 176

l Import From BackupAfter you have backed up your content database with an HPE Data Protector backup solution, use Import From Backup to restore the database to a temporary location and to mount the database to the Microsoft SharePoint Server.For details, see "Importing content databases from backup" on the next page.
l Import From FilesystemIf you have restored the content database to the filesystem, use Import From Filesystem to mount the content database to the Microsoft SharePoint Server.For details, see "Importing content databases from the filesystem" on page 26.
l Import Job StatusThis enables you to monitor import jobs (importing a content database from backup or from filesystem) status.For details, see "Monitoring granular recovery import jobs" on page 38.
l Remove from Recovery CacheThis dismounts a recovery content database from the Microsoft SharePoint Server (removes the content database from the Granular Recovery Cache) and removes the database files from the disk.For details, see "Removing content databases from the cache" on page 37.
l Start RecoveryUse this to browse and recover objects that are stored in a recovery content database.Note that this is also available for Site Collection Administrators from the original site: Microsoft SharePoint Server 2007/2010: Site Actions > Site Settings > Granular RecoveryMicrosoft SharePoint Server 2013: Settings icon > Site Settings > Granular RecoveryFor details, see "Executing Perform content recovery tasks" on page 29 and "Recovering site items" on page 30.
l Original Site URLThe link to the original site.
l Recovery Site URLThe link to the recovery site.
Granular Recovery Cache Management
Granular Recovery Extension User Guide for Microsoft SharePoint Server, Exchange and VMwareChapter 5: Recovery
HPE Data Protector (9.07) Page 23 of 176

Importing content databases from backup
PrerequisitesOn the destination Microsoft SQL Server system, you need enough disk space for the content database that you want to import.
Considerations l If a site already exists in the Recovery Cache Management, and you perform an Import From
Filesystem session for the same site, the URL changes as follows: l http://computer.company.com:38000/OriginalNameSequenceNumber
l http://computer.company.com:25884/SequenceNumber
(root site)
l If the original site does not exist in the Recovery Cache Management, the site URL does not change.
l If a root site does not exist, the Recovery Cache Management uses an empty string during the restore session, and the URL of the root site changes to:
http://computer.company.com:25884/SequenceNumber
l If the site URL exceeds 260 characters, the import of two backup versions is not possible. l If the destination path exceeds 260 characters, recovery is not possible. Please select a different
location.
Procedure 1. In the Recovery Cache Management page, click Import From Backup. The Site Collection
Selection page is displayed. Select the content database of the site you want to recover and click Continue.
Granular Recovery Extension User Guide for Microsoft SharePoint Server, Exchange and VMwareChapter 5: Recovery
HPE Data Protector (9.07) Page 24 of 176
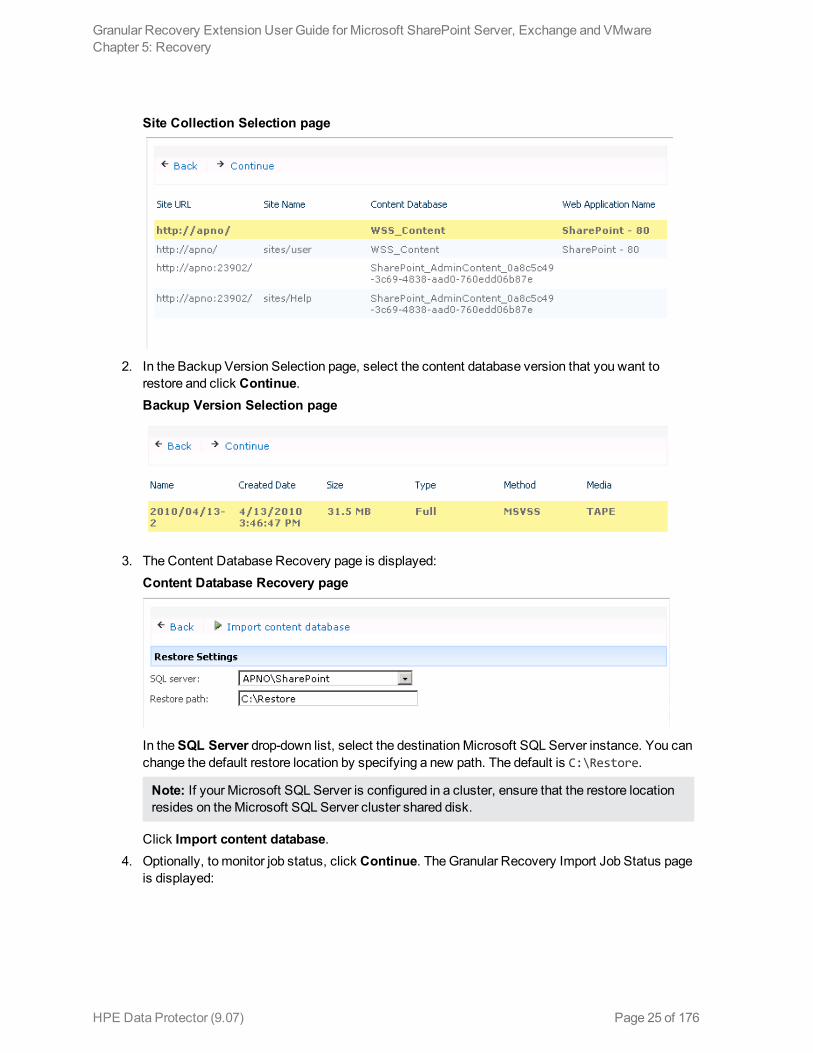
Site Collection Selection page
2. In the Backup Version Selection page, select the content database version that you want to
restore and click Continue.Backup Version Selection page
3. The Content Database Recovery page is displayed:Content Database Recovery page
In the SQL Server drop-down list, select the destination Microsoft SQL Server instance. You can change the default restore location by specifying a new path. The default is C:\Restore.
Note: If your Microsoft SQL Server is configured in a cluster, ensure that the restore location resides on the Microsoft SQL Server cluster shared disk.
Click Import content database. 4. Optionally, to monitor job status, click Continue. The Granular Recovery Import Job Status page
is displayed:
Granular Recovery Extension User Guide for Microsoft SharePoint Server, Exchange and VMwareChapter 5: Recovery
HPE Data Protector (9.07) Page 25 of 176
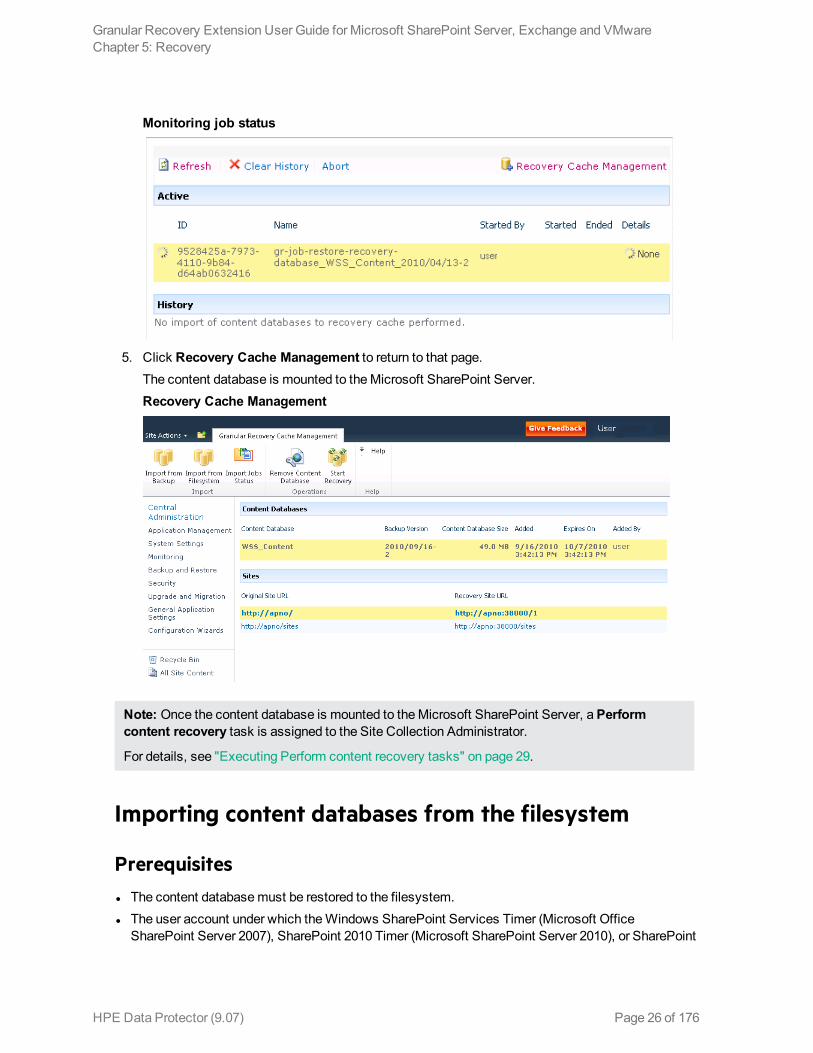
Monitoring job status
5. Click Recovery Cache Management to return to that page.
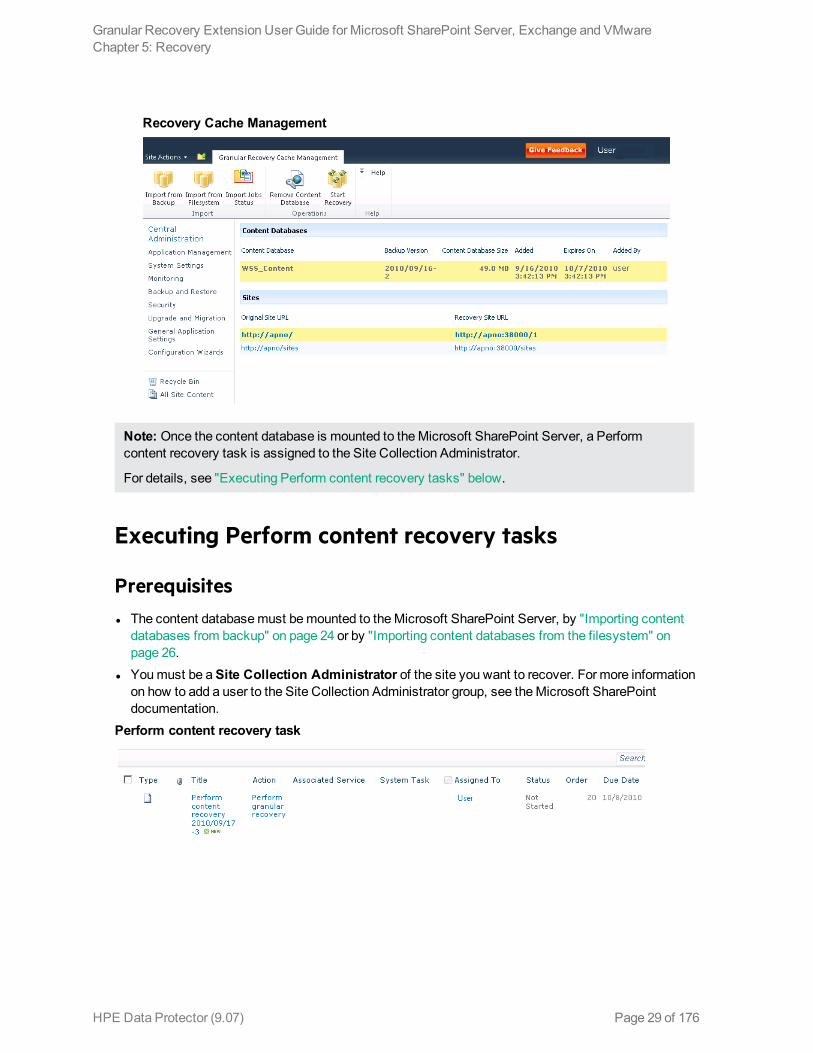
The content database is mounted to the Microsoft SharePoint Server.Recovery Cache Management
Note: Once the content database is mounted to the Microsoft SharePoint Server, a Perform content recovery task is assigned to the Site Collection Administrator.
For details, see "Executing Perform content recovery tasks" on page 29.
Importing content databases from the filesystem
Prerequisites l The content database must be restored to the filesystem. l The user account under which the Windows SharePoint Services Timer (Microsoft Office
SharePoint Server 2007), SharePoint 2010 Timer (Microsoft SharePoint Server 2010), or SharePoint
Granular Recovery Extension User Guide for Microsoft SharePoint Server, Exchange and VMwareChapter 5: Recovery
HPE Data Protector (9.07) Page 26 of 176
Timer Service (Microsoft SharePoint Server 2013) service is running must be granted full control permission for the content database.
Considerations l The Microsoft SQL Server Database Primary Data Files and all transaction log files cannot be
imported from a network share. l If a site already exists in the Recovery Cache Management, and you perform an Import From
Filesystem session for the same site, the URL changes as follows: l http://computer.company.com:38000/OriginalNameSequenceNumber
l http://computer.company.com:25884/SequenceNumber
(root site)
l If the original site does not exist in the Recovery Cache Management, the site URL does not change.
l If a root site does not exist, the Recovery Cache Management uses an empty string during the restore session, the URL of the root site changes to:
http://computer.company.com:25884/SequenceNumber
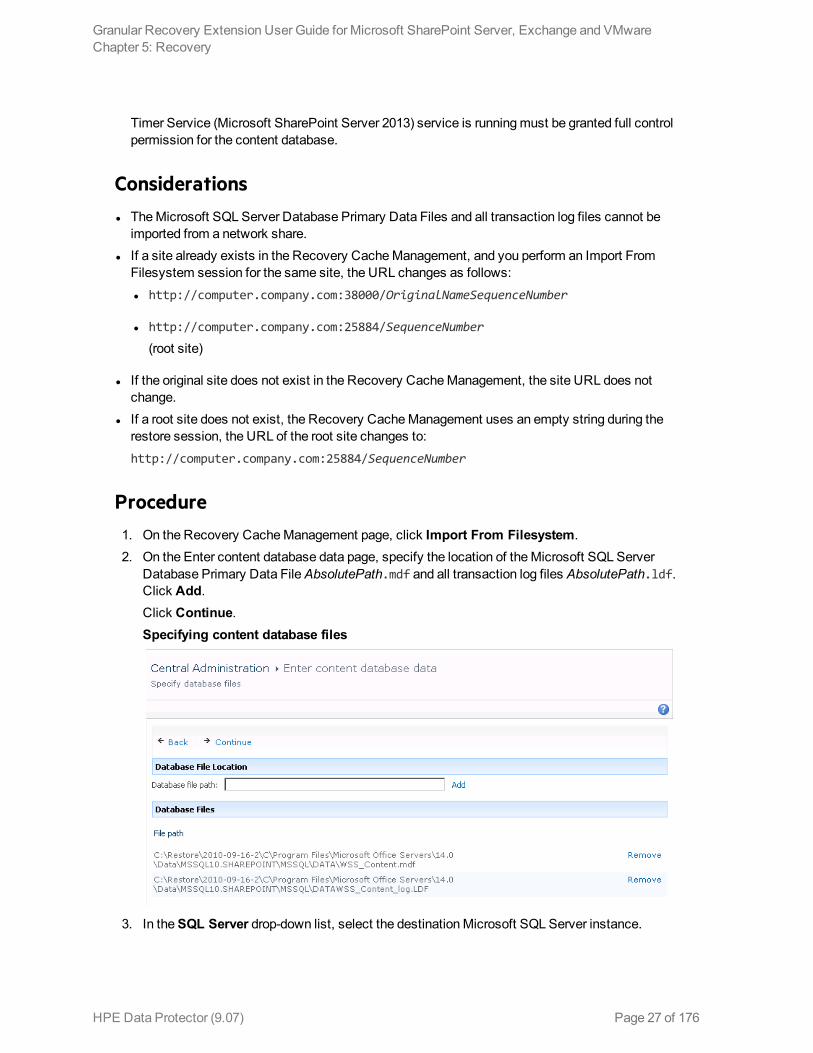
Procedure 1. On the Recovery Cache Management page, click Import From Filesystem. 2. On the Enter content database data page, specify the location of the Microsoft SQL Server
Database Primary Data File AbsolutePath.mdf and all transaction log files AbsolutePath.ldf. Click Add.Click Continue.Specifying content database files
3. In the SQL Server drop-down list, select the destination Microsoft SQL Server instance.
Granular Recovery Extension User Guide for Microsoft SharePoint Server, Exchange and VMwareChapter 5: Recovery
HPE Data Protector (9.07) Page 27 of 176
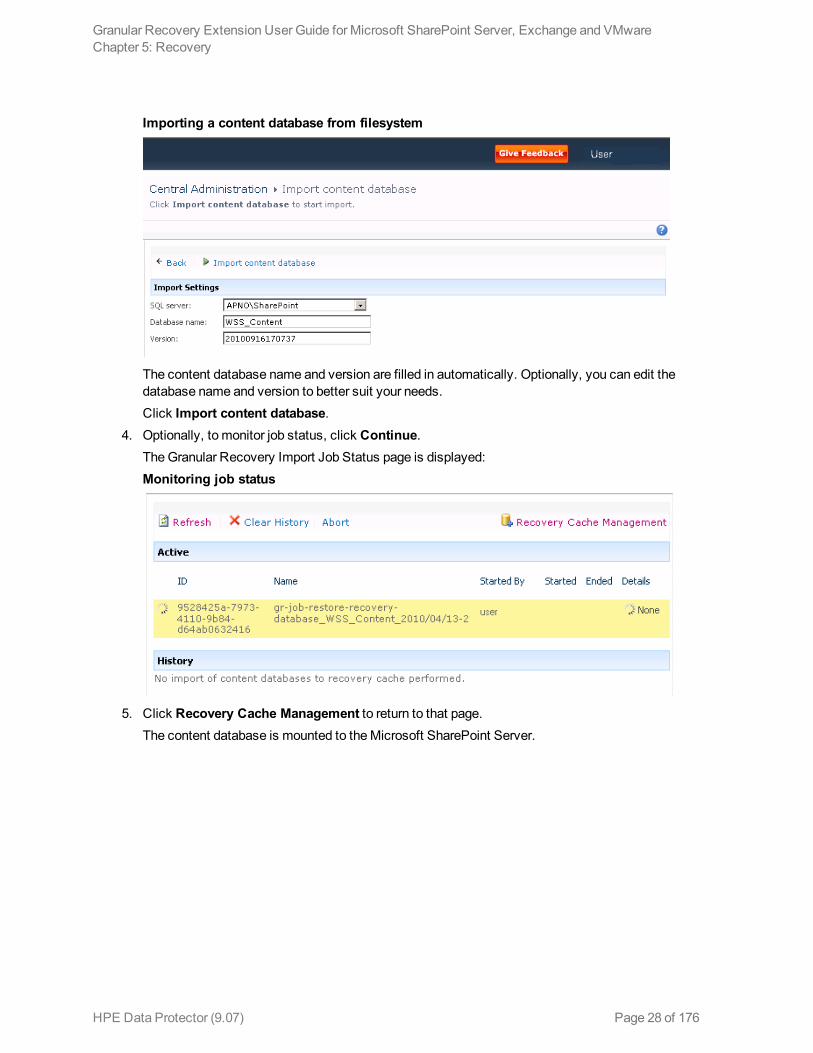
Importing a content database from filesystem
The content database name and version are filled in automatically. Optionally, you can edit the database name and version to better suit your needs.Click Import content database.
4. Optionally, to monitor job status, click Continue.The Granular Recovery Import Job Status page is displayed:Monitoring job status
5. Click Recovery Cache Management to return to that page.
The content database is mounted to the Microsoft SharePoint Server.
Granular Recovery Extension User Guide for Microsoft SharePoint Server, Exchange and VMwareChapter 5: Recovery
HPE Data Protector (9.07) Page 28 of 176
Recovery Cache Management
Note: Once the content database is mounted to the Microsoft SharePoint Server, a Perform content recovery task is assigned to the Site Collection Administrator.
For details, see "Executing Perform content recovery tasks" below.
Executing Perform content recovery tasks
Prerequisites l The content database must be mounted to the Microsoft SharePoint Server, by "Importing content
databases from backup" on page 24 or by "Importing content databases from the filesystem" on page 26.
l You must be a Site Collection Administrator of the site you want to recover. For more information on how to add a user to the Site Collection Administrator group, see the Microsoft SharePoint documentation.
Perform content recovery task
Granular Recovery Extension User Guide for Microsoft SharePoint Server, Exchange and VMwareChapter 5: Recovery
HPE Data Protector (9.07) Page 29 of 176
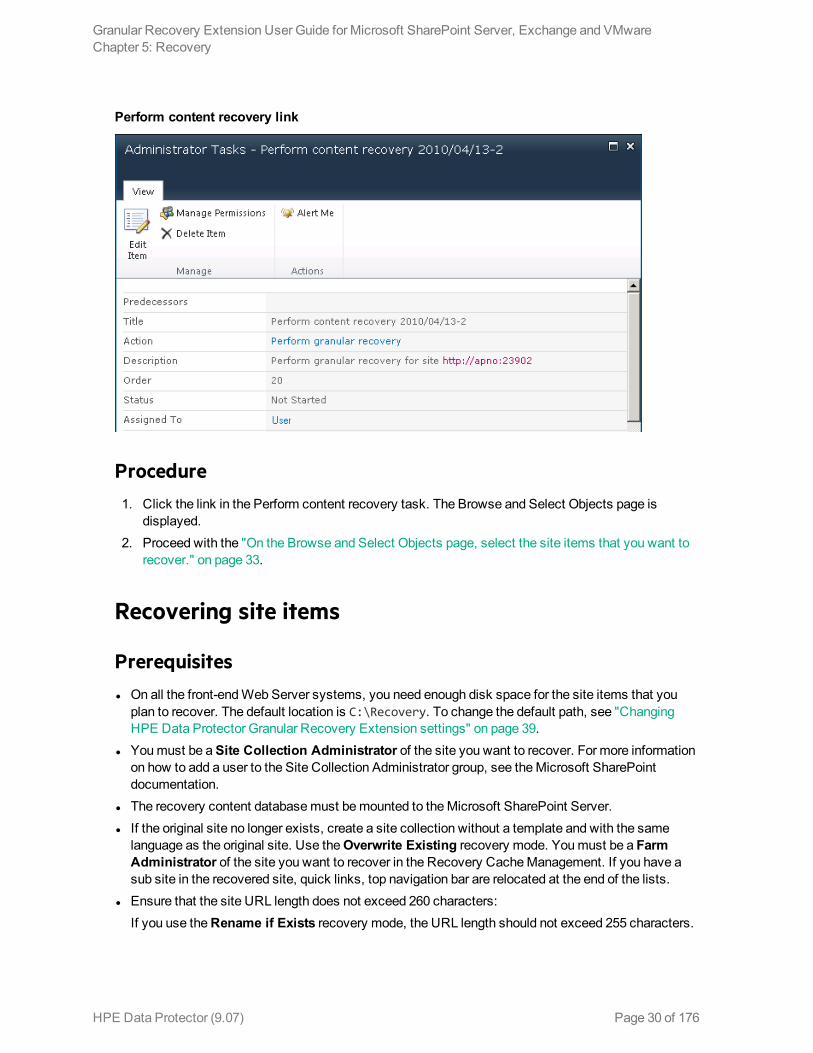
Perform content recovery link
Procedure 1. Click the link in the Perform content recovery task. The Browse and Select Objects page is
displayed. 2. Proceed with the "On the Browse and Select Objects page, select the site items that you want to
recover." on page 33.
Recovering site items
Prerequisites l On all the front-end Web Server systems, you need enough disk space for the site items that you
plan to recover. The default location is C:\Recovery. To change the default path, see "Changing HPE Data Protector Granular Recovery Extension settings" on page 39.
l You must be a Site Collection Administrator of the site you want to recover. For more information on how to add a user to the Site Collection Administrator group, see the Microsoft SharePoint documentation.
l The recovery content database must be mounted to the Microsoft SharePoint Server. l If the original site no longer exists, create a site collection without a template and with the same
language as the original site. Use the Overwrite Existing recovery mode. You must be a Farm Administrator of the site you want to recover in the Recovery Cache Management. If you have a sub site in the recovered site, quick links, top navigation bar are relocated at the end of the lists.
l Ensure that the site URL length does not exceed 260 characters:If you use the Rename if Exists recovery mode, the URL length should not exceed 255 characters.
Granular Recovery Extension User Guide for Microsoft SharePoint Server, Exchange and VMwareChapter 5: Recovery
HPE Data Protector (9.07) Page 30 of 176

Supported itemsYou can recover the following Microsoft SharePoint Server items with the HPE Data Protector Granular Recovery Extension:
l Libraries: l Document library
l Wiki page library
l Report library
l Asset library
l Picture library
l Translation Management Library
l Communication: l Announcements
l Contacts
l Discussion board
l Tracking: l Links
l Calendar
l Tasks
l Project tasks
l Issue tracking
l Survey
l Custom List l User Information List l Pages and Sites:
l Page
l Site
l Publishing pages
l Sites with a blog template: Posts, Comments, Categories
Granular Recovery Extension User Guide for Microsoft SharePoint Server, Exchange and VMwareChapter 5: Recovery
HPE Data Protector (9.07) Page 31 of 176
l Sites with a meeting template: Meetings, Agenda, Attendees, Decision, Meeting Objective, Text Box, Things To Bring, Home Page Library
Note: Granular recovery of SharePoint lists that are customized with a custom ID value (greater than 10000) is supported. However, the success of granular recovery depends on the extent of list customization.
Considerations l If the data to be recovered already exists at the destination, depending on the recovery mode, note
the following: l Rename if Exists : Files and folders items are recovered with different names, OriginalName_
DPGRE_Timestamp. For example, suppose that on November 17, 2012 at 10:59:35 you start a recovery of the file wizard.txt. The file is recovered with the name wizard_DPGRE_20121117-105935.txt.Other items (for example, form templates, documents and tasks items) are not recovered, and not renamed to the original location.List items cannot be renamed as part of the recovery.
l Leave Existing : Items are not recovered, the existing items remain the same in the target location.
l Overwrite Existing : Items are recovered with the original names, replacing the existing. For example, the existing Microsoft SharePoint Server items (Document Library) are overwritten with those from the backup data. Only lists and sites are not overwritten.
l If the data to be recovered does not exist at the destination, it is recovered with the original name. l If the List items (Announcement, Contact, Link, Calendar, or Task) are recovered to other location,
or to other farm twice, depending on the recovery mode: l Overwrite Existing : the List items are duplicated with the same names and different IDs. Delete
the items with the same names.
l Rename if Exists : the List items are renamed even though these kinds of items do not support renaming.
l If discussion items, with attachments and replies, or surveys with responses are recovered with the Overwrite Existing recovery mode, the items are overwritten but the attachments, replies, or responses are not recovered. To avoid data loss, delete the attachments, replies, or responses before starting your recovery session.
l Multiple recovery sessions can be performed in parallel, except if the same items are selected for recovery.
l Multiple farm administrators and site collection administrators can browse objects in parallel. l To recover a document workflow status ensure you create a template and association at the
destination site. Workflow status can be recovered only in case of recovery to the original location and if original item exists.
Granular Recovery Extension User Guide for Microsoft SharePoint Server, Exchange and VMwareChapter 5: Recovery
HPE Data Protector (9.07) Page 32 of 176
l Workflow history cannot be recovered.
l Unique user permissions of an item are not recovered. The recovered item inherits permissions of the destination container type where it is recovered to.
l To recover a site collection or subsite, you need to manually create the destination site collection or subsite. Destination must be of the same template as that of site collection or subsite being recovered and the Overwrite Existing recovery mode must be used.
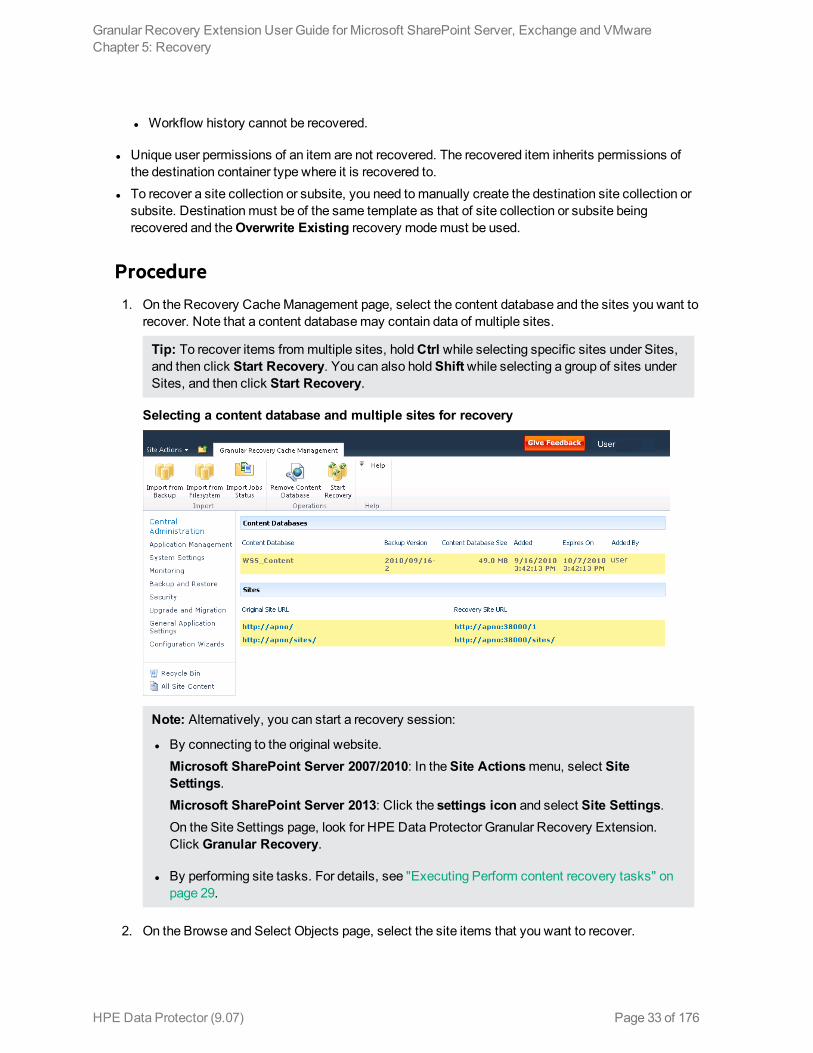
Procedure 1. On the Recovery Cache Management page, select the content database and the sites you want to
recover. Note that a content database may contain data of multiple sites.
Tip: To recover items from multiple sites, hold Ctrl while selecting specific sites under Sites, and then click Start Recovery. You can also hold Shift while selecting a group of sites under Sites, and then click Start Recovery.
Selecting a content database and multiple sites for recovery
Note: Alternatively, you can start a recovery session:
l By connecting to the original website.Microsoft SharePoint Server 2007/2010: In the Site Actions menu, select Site Settings.Microsoft SharePoint Server 2013: Click the settings icon and select Site Settings.On the Site Settings page, look for HPE Data Protector Granular Recovery Extension. Click Granular Recovery.
l By performing site tasks. For details, see "Executing Perform content recovery tasks" on page 29.
2. On the Browse and Select Objects page, select the site items that you want to recover.
Granular Recovery Extension User Guide for Microsoft SharePoint Server, Exchange and VMwareChapter 5: Recovery
HPE Data Protector (9.07) Page 33 of 176
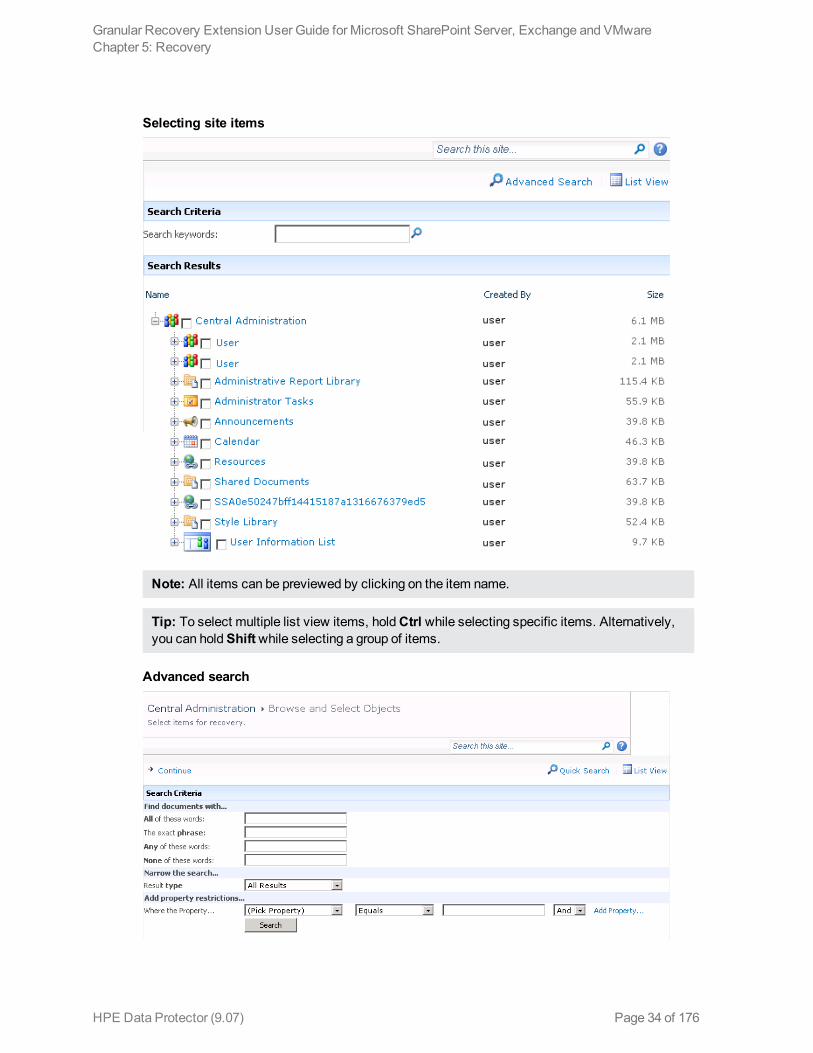
Selecting site items
Note: All items can be previewed by clicking on the item name.
Tip: To select multiple list view items, hold Ctrl while selecting specific items. Alternatively, you can hold Shift while selecting a group of items.
Advanced search
Granular Recovery Extension User Guide for Microsoft SharePoint Server, Exchange and VMwareChapter 5: Recovery
HPE Data Protector (9.07) Page 34 of 176
Tip: You can filter the items using the Advanced search. For example, in Result type, select Microsoft Office Word documents. In Add properties restriction, select a property and click Search.
For details about the advanced and quick search, see the Microsoft SharePoint Server Help. To select multiple list view items, hold Ctrl while selecting specific items. Alternatively, you can hold Shift while selecting a group of items.
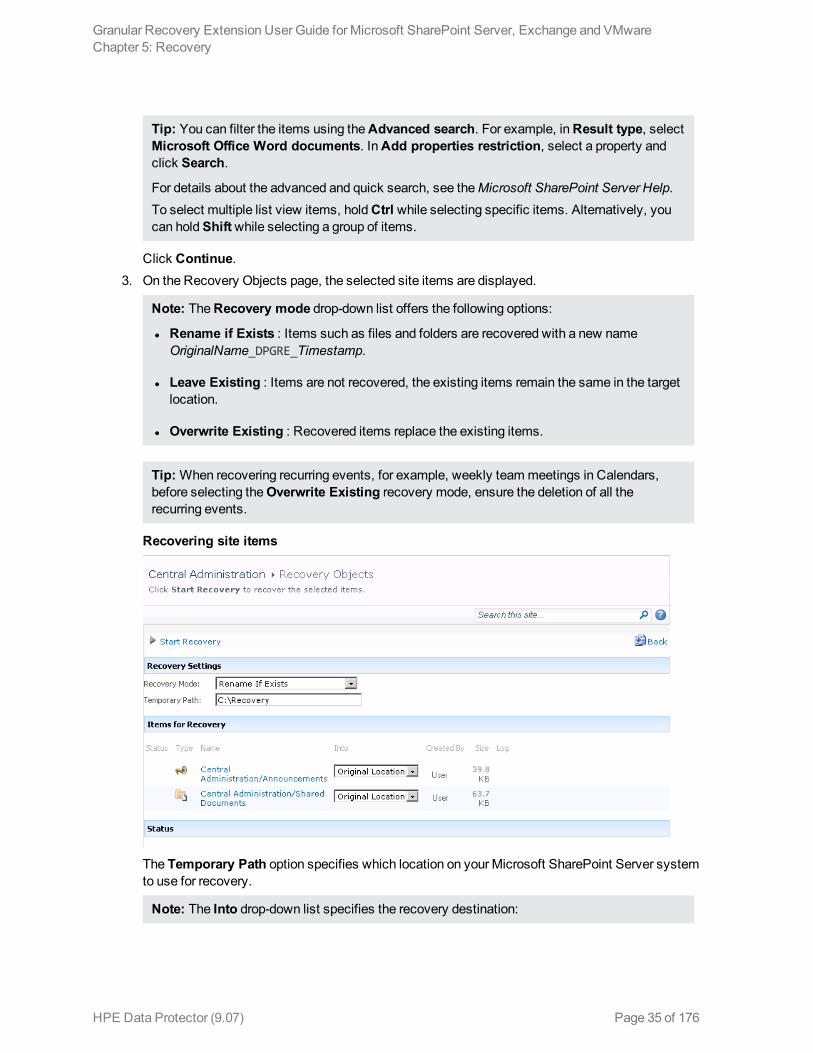
Click Continue. 3. On the Recovery Objects page, the selected site items are displayed.
Note: The Recovery mode drop-down list offers the following options:
l Rename if Exists : Items such as files and folders are recovered with a new name OriginalName_DPGRE_Timestamp.
l Leave Existing : Items are not recovered, the existing items remain the same in the target location.
l Overwrite Existing : Recovered items replace the existing items.
Tip: When recovering recurring events, for example, weekly team meetings in Calendars, before selecting the Overwrite Existing recovery mode, ensure the deletion of all the recurring events.
Recovering site items
The Temporary Path option specifies which location on your Microsoft SharePoint Server system to use for recovery.
Note: The Into drop-down list specifies the recovery destination:
Granular Recovery Extension User Guide for Microsoft SharePoint Server, Exchange and VMwareChapter 5: Recovery
HPE Data Protector (9.07) Page 35 of 176
l Original Location : The item is recovered to the original location in the original site. The option is not available for the recovery of sites or subsites with the Rename If Exists.
l Other Location : The item is recovered to a different site or a different location in the original site. Use this location, if the original site no longer exists.
l Other Farm : The item is recovered to a different destination farm.
l Filesystem : The item is recovered to a directory in your filesystem. This option is available only for files and folders.
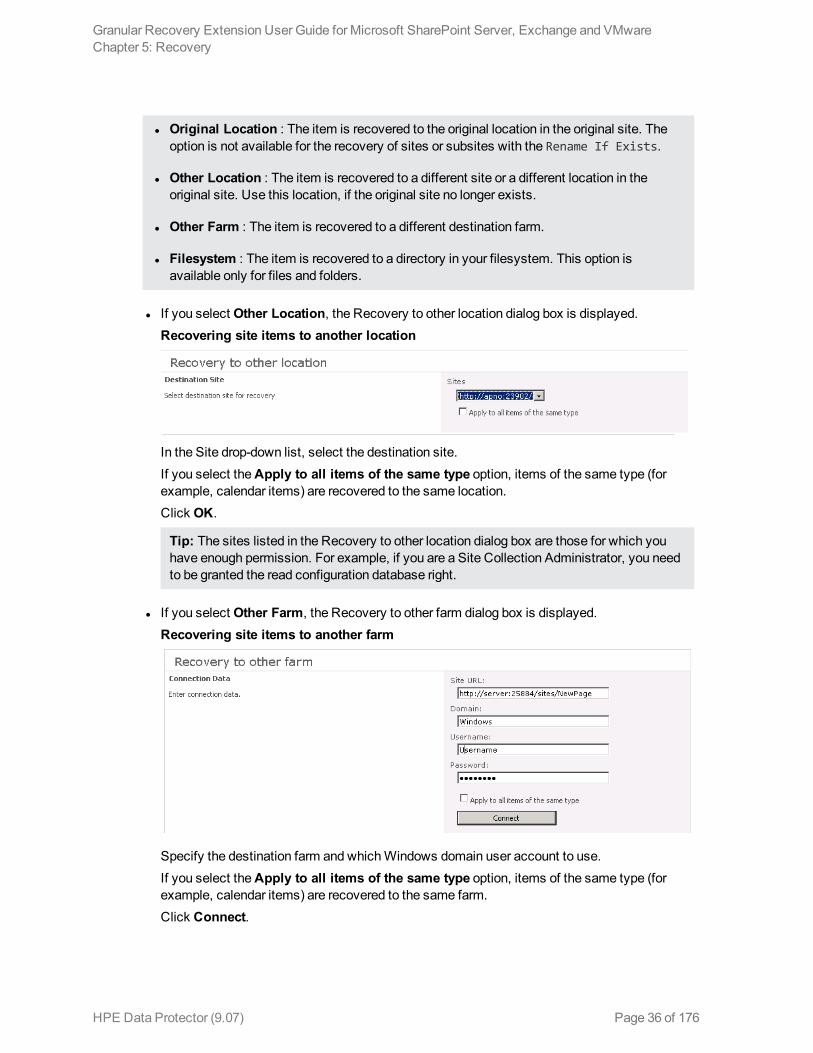
l If you select Other Location, the Recovery to other location dialog box is displayed.Recovering site items to another location
In the Site drop-down list, select the destination site.If you select the Apply to all items of the same type option, items of the same type (for example, calendar items) are recovered to the same location.Click OK.
Tip: The sites listed in the Recovery to other location dialog box are those for which you have enough permission. For example, if you are a Site Collection Administrator, you need to be granted the read configuration database right.
l If you select Other Farm, the Recovery to other farm dialog box is displayed.Recovering site items to another farm
Specify the destination farm and which Windows domain user account to use.If you select the Apply to all items of the same type option, items of the same type (for example, calendar items) are recovered to the same farm. Click Connect.
Granular Recovery Extension User Guide for Microsoft SharePoint Server, Exchange and VMwareChapter 5: Recovery
HPE Data Protector (9.07) Page 36 of 176
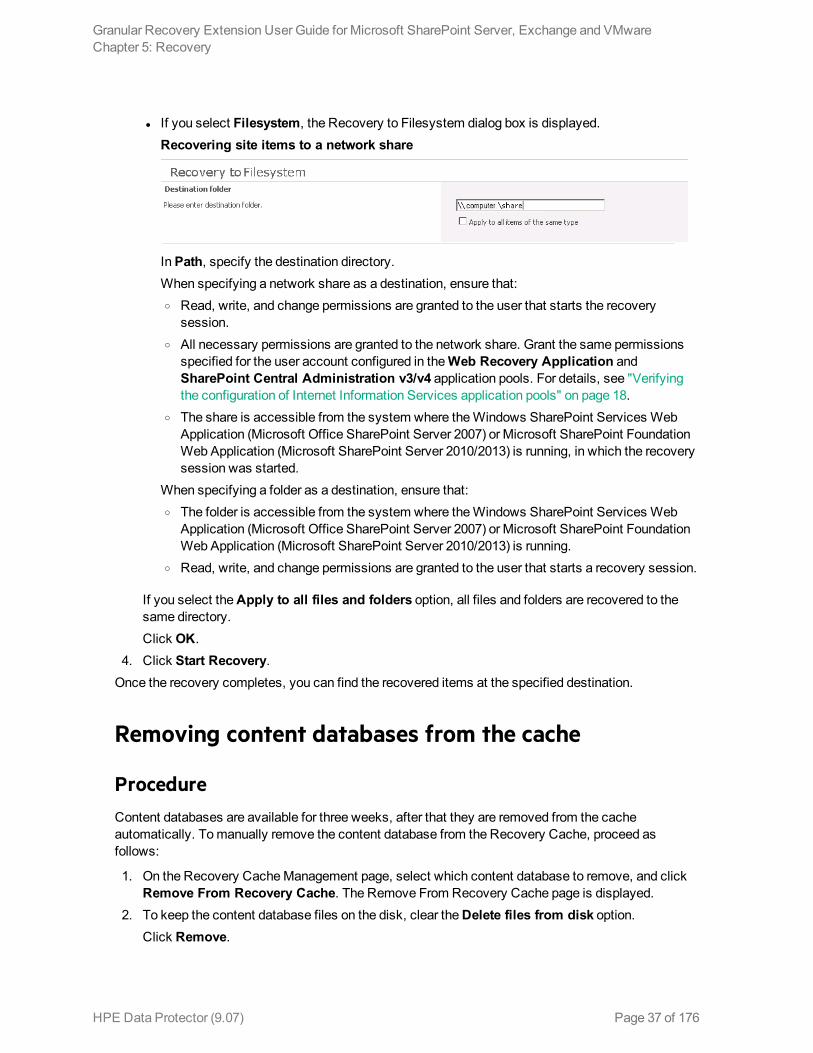
l If you select Filesystem, the Recovery to Filesystem dialog box is displayed.Recovering site items to a network share
In Path, specify the destination directory.When specifying a network share as a destination, ensure that: o Read, write, and change permissions are granted to the user that starts the recovery
session. o All necessary permissions are granted to the network share. Grant the same permissions
specified for the user account configured in the Web Recovery Application and SharePoint Central Administration v3/v4 application pools. For details, see "Verifying the configuration of Internet Information Services application pools" on page 18.
o The share is accessible from the system where the Windows SharePoint Services Web Application (Microsoft Office SharePoint Server 2007) or Microsoft SharePoint Foundation Web Application (Microsoft SharePoint Server 2010/2013) is running, in which the recovery session was started.
When specifying a folder as a destination, ensure that: o The folder is accessible from the system where the Windows SharePoint Services Web
Application (Microsoft Office SharePoint Server 2007) or Microsoft SharePoint Foundation Web Application (Microsoft SharePoint Server 2010/2013) is running.
o Read, write, and change permissions are granted to the user that starts a recovery session.
If you select the Apply to all files and folders option, all files and folders are recovered to the same directory.Click OK.
4. Click Start Recovery.Once the recovery completes, you can find the recovered items at the specified destination.
Removing content databases from the cache
ProcedureContent databases are available for three weeks, after that they are removed from the cache automatically. To manually remove the content database from the Recovery Cache, proceed as follows:
1. On the Recovery Cache Management page, select which content database to remove, and click Remove From Recovery Cache. The Remove From Recovery Cache page is displayed.
2. To keep the content database files on the disk, clear the Delete files from disk option.Click Remove.
Granular Recovery Extension User Guide for Microsoft SharePoint Server, Exchange and VMwareChapter 5: Recovery
HPE Data Protector (9.07) Page 37 of 176
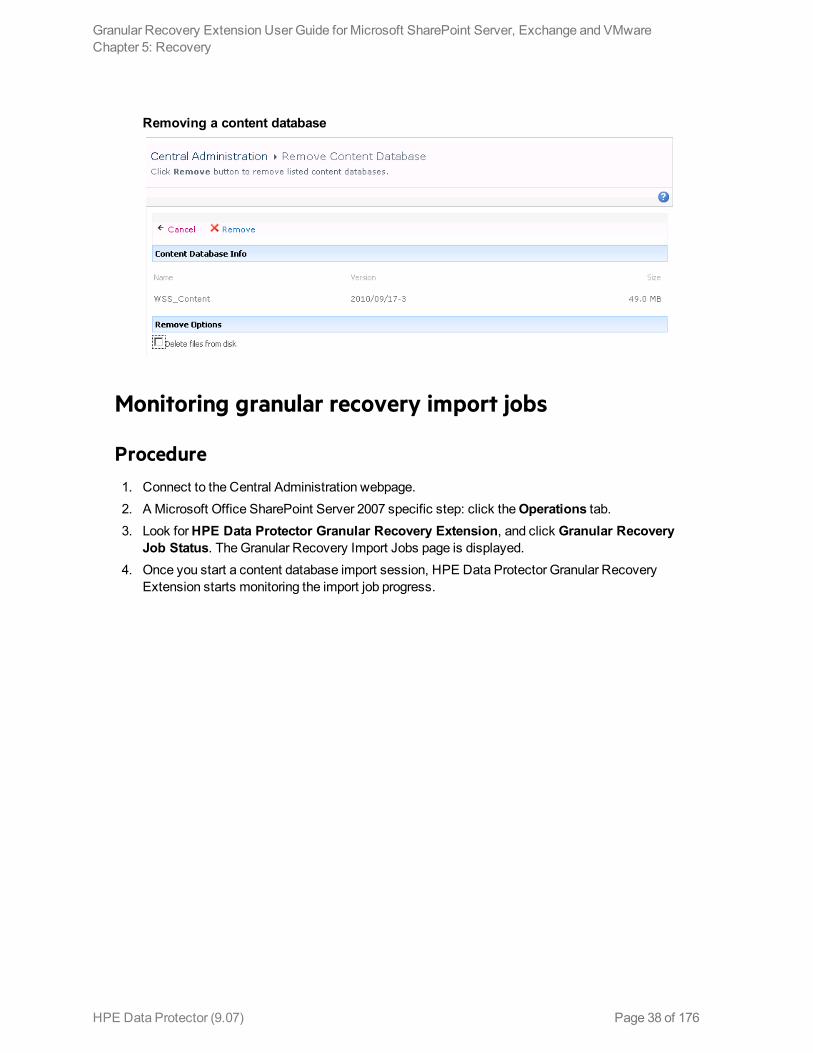
Removing a content database
Monitoring granular recovery import jobs
Procedure 1. Connect to the Central Administration webpage. 2. A Microsoft Office SharePoint Server 2007 specific step: click the Operations tab. 3. Look for HPE Data Protector Granular Recovery Extension, and click Granular Recovery
Job Status. The Granular Recovery Import Jobs page is displayed. 4. Once you start a content database import session, HPE Data Protector Granular Recovery
Extension starts monitoring the import job progress.
Granular Recovery Extension User Guide for Microsoft SharePoint Server, Exchange and VMwareChapter 5: Recovery
HPE Data Protector (9.07) Page 38 of 176
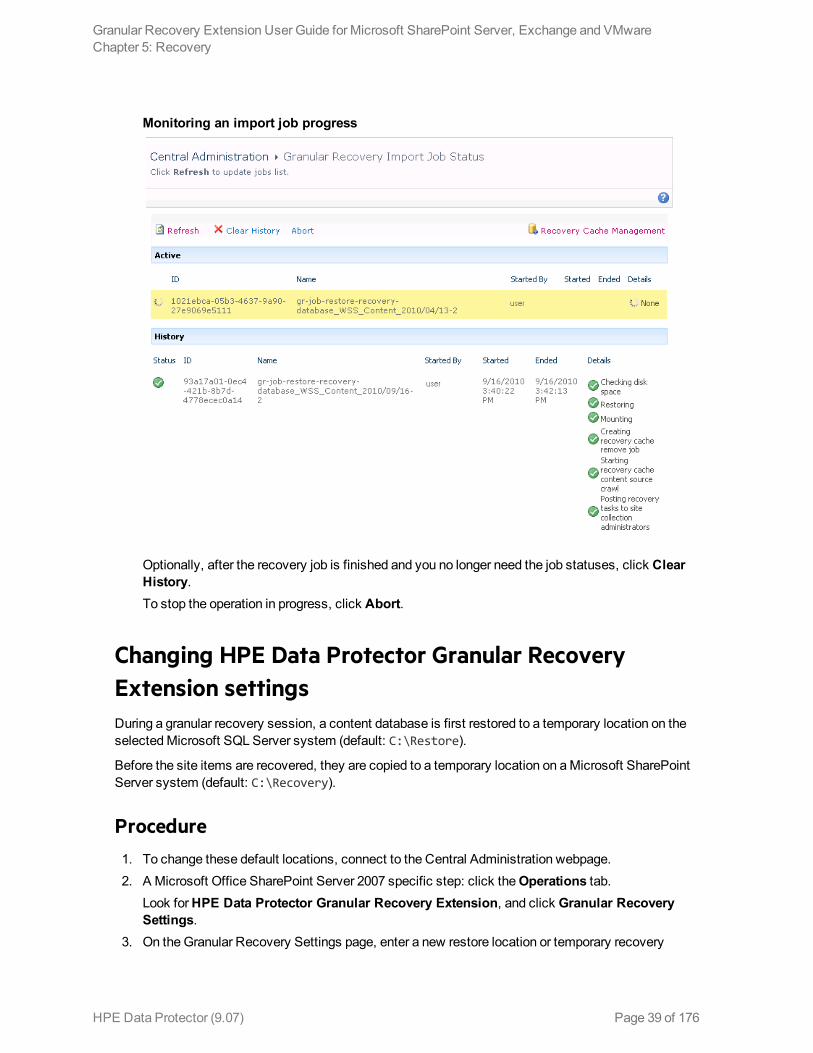
Monitoring an import job progress
Optionally, after the recovery job is finished and you no longer need the job statuses, click Clear History.To stop the operation in progress, click Abort.
Changing HPE Data Protector Granular Recovery Extension settingsDuring a granular recovery session, a content database is first restored to a temporary location on the selected Microsoft SQL Server system (default: C:\Restore).
Before the site items are recovered, they are copied to a temporary location on a Microsoft SharePoint Server system (default: C:\Recovery).
Procedure 1. To change these default locations, connect to the Central Administration webpage. 2. A Microsoft Office SharePoint Server 2007 specific step: click the Operations tab.
Look for HPE Data Protector Granular Recovery Extension, and click Granular Recovery Settings.
3. On the Granular Recovery Settings page, enter a new restore location or temporary recovery
Granular Recovery Extension User Guide for Microsoft SharePoint Server, Exchange and VMwareChapter 5: Recovery
HPE Data Protector (9.07) Page 39 of 176
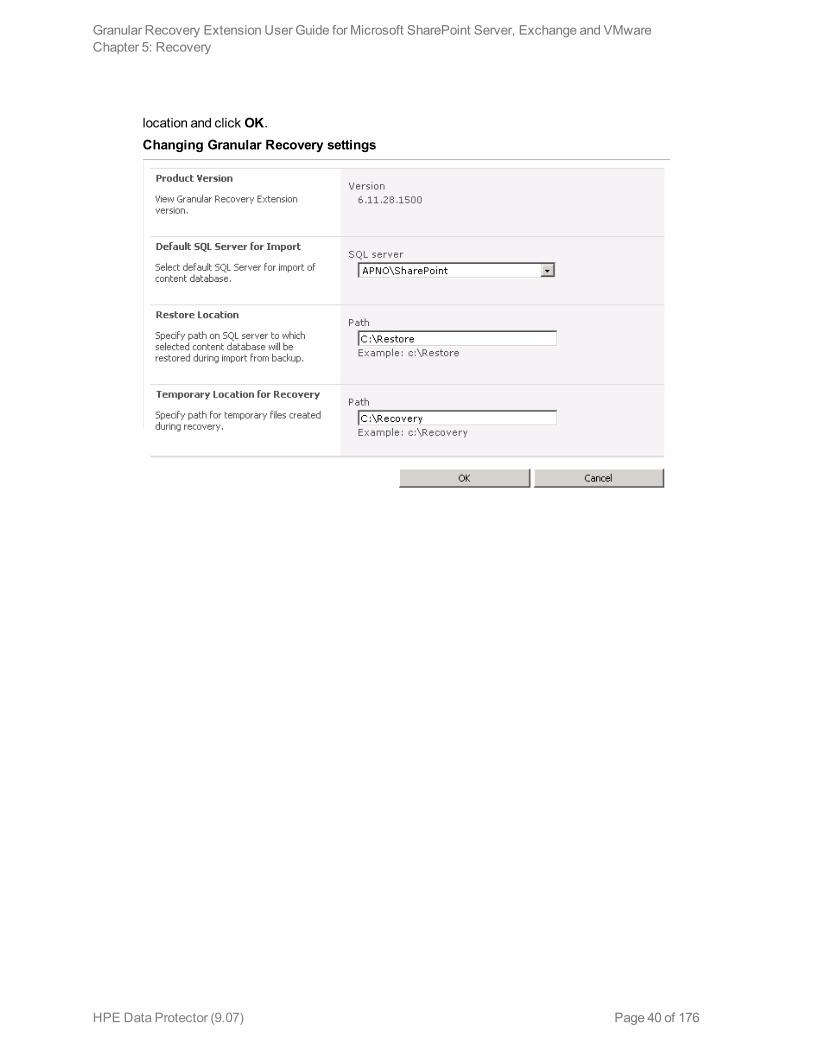
location and click OK.Changing Granular Recovery settings
Granular Recovery Extension User Guide for Microsoft SharePoint Server, Exchange and VMwareChapter 5: Recovery
HPE Data Protector (9.07) Page 40 of 176
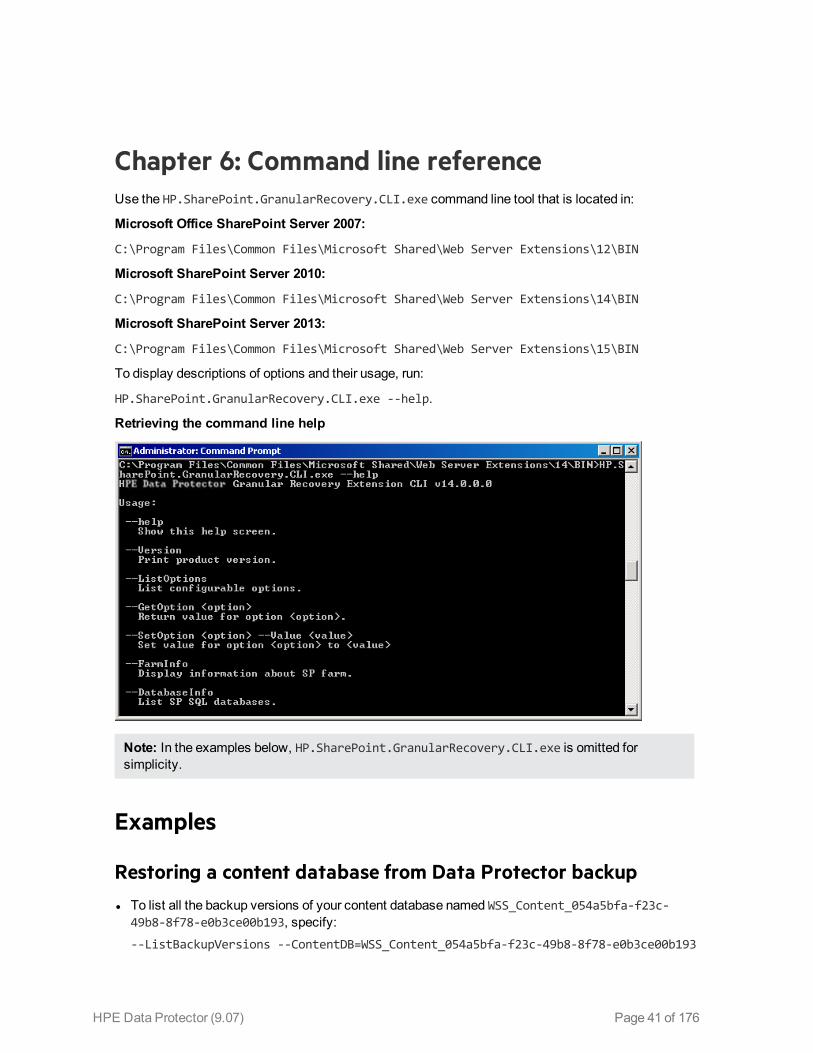
Chapter 6: Command line referenceUse the HP.SharePoint.GranularRecovery.CLI.exe command line tool that is located in:
Microsoft Office SharePoint Server 2007:
C:\Program Files\Common Files\Microsoft Shared\Web Server Extensions\12\BIN
Microsoft SharePoint Server 2010:
C:\Program Files\Common Files\Microsoft Shared\Web Server Extensions\14\BIN
Microsoft SharePoint Server 2013:
C:\Program Files\Common Files\Microsoft Shared\Web Server Extensions\15\BIN
To display descriptions of options and their usage, run:
HP.SharePoint.GranularRecovery.CLI.exe --help.
Retrieving the command line help
Note: In the examples below, HP.SharePoint.GranularRecovery.CLI.exe is omitted for simplicity.
Examples
Restoring a content database from Data Protector backup l To list all the backup versions of your content database named WSS_Content_054a5bfa-f23c-
49b8-8f78-e0b3ce00b193, specify:--ListBackupVersions --ContentDB=WSS_Content_054a5bfa-f23c-49b8-8f78-e0b3ce00b193
HPE Data Protector (9.07) Page 41 of 176
Monitoring jobs progress l To list all the jobs that have been started of your content database, specify:
--ListJobs
l To start a restore job by importing the content database from the backup version “2010/04/20-4” to the default restore location C:\Restore, specify:--StartImportJob
--ContentDB WSS_Content_054a5bfa-f23c-49b8-8f78-e0b3ce00b193
--BackupID "2010/04/20-4" ––Server computer
––Instance OFFICESERVERS --TargetLocation C:\Restore
Note: To successfully import the content database when your Microsoft SQL Server is installed with the default instance, replace OFFICESERVERS with one of the following:
l the instance name
l DEFAULT
l MSSQLSERVER
You can also leave the instance name empty to ensure that Data Protector uses its correct name.
l Suppose you want to start a restore job by importing the content database from a filesystem to the Microsoft SharePoint Server to the default restore location C:\Restore.If the Microsoft SQL Server Database Primary Data File is WSS_Content_054a5bfa-f23c-49b8-8f78-e0b3ce00b193.mdf and the SQL Server Transaction log file is WSS_Content054a5bfa-f23c-49b8-8f78-e0b3ce00b193_log.LDF, specify:--StartImportJob
--ContentDB WSS_Content_054a5bfa-f23c-49b8-8f78-e0b3ce00b193
--BackupID "2010/04/20-4" ––Server computer
––Instance OFFICESERVERS
––Files="C:\Restore\WSS_Content_054a5bfa-f23c-49b8-8f78-e0b3ce
00b193.mdf";"C:\Restore\WSS_Content054a5bfa-f23c-49b8-8f78-e0b
3ce00b193_log.LDF"
--TargetLocation C:\Restore
Verifying target location disk space size l To check the available disk space on the default restore location C:\Restore, specify:
--QueryServerInfo --Server computer --Instance OFFICESERVERS --TargetLocation C:\Restore
This also lists the location of all content database files in the tree structure.
Granular Recovery Extension User Guide for Microsoft SharePoint Server, Exchange and VMwareChapter 6: Command line reference
HPE Data Protector (9.07) Page 42 of 176
Listing content databases l To list all content databases in the Recovery Cache including the backup versions, specify:
--ListCache --All
l To list detailed information of the content databases, specify:
--ListCache --Verbose
Removing restore jobs l To delete all the restore job statuses, specify:
--DeleteAllJobs Confirm
l To delete a specific restore job, specify:
--DeleteJob=JobID
Recovering a site item to the original site l Suppose you want to recover the site item /Shared Documents/Document.txt that was backed up
from the site http://computer.company.com:25884/sites/AnikyB. Suppose the recovery site is http://computer.company.com:38000/sites/AnikyB. To recover the item to the original location, specify:
--Recover
--Source http://computer.company.com:38000/sites/AnikyB
--Destination http://computer.company.com:25884/sites/AnikyB
--TempLocation="C:\Recovery"
--Items "/Shared Documents/Document.txt"
The recovery session finishes and the following message is displayed:
recovery ended, object status: object: [/Shared Documents/Document.txt] destination: [/Shared Documents/Document_MOSSGR_24032010-024302.txt] status: Finished status details: [recovered to [http://computer.company.com: 25884/sites/AnikyB//Shared Documents]]
Recovering a site item to another location l To recover the site item "/Shared Documents/Document.txt" to My Documents, specify:
--Recover
--Source http://computer.company.com:38000/sites/AnikyB
--Destination http://computer.company.com:25884/sites/AnikyB
Granular Recovery Extension User Guide for Microsoft SharePoint Server, Exchange and VMwareChapter 6: Command line reference
HPE Data Protector (9.07) Page 43 of 176
--TempLocation="C:\Recovery"
--Items "/Shared Documents/Document.txt:/My Documents"
Removing content databases from the cache l To remove a database from the cache, specify:
--RemoveFromCache --ContentDB DatabaseName--BackupIDBackupID
l To remove all the content databases from the cache, specify:
--RemoveFromCache ––All
Removing content databases from disk l To delete a content database from the disk after you have removed it from the cache, specify:
--RemoveFromCache --ContentDB DatabaseName -–DeleteFiles
Setting content database automatic removalContent databases remain available for 21 days (default retention period), afterwards they are removed from the cache.
l To display the time (number of days) a content database remains available before it is removed from the cache, specify:
--GetOption RecoveryDatabaseAutoCleanupDays
l To set how long a content database remains available before it is automatically removed from the cache, specify:
--SetOption RecoveryDatabaseAutoCleanupDays --Value number_of_days
Exporting items from a content database l To export an item from a content database, specify:
--Export --Source source --Location path
--Item item
l To export items from a content database, specify:
--Export --Source source --Location path
--Items item1 item2 item3
Note: Workflows cannot be exported.
Listing exported items l To list the exported items, specify:
--ListExport --Location
Granular Recovery Extension User Guide for Microsoft SharePoint Server, Exchange and VMwareChapter 6: Command line reference
HPE Data Protector (9.07) Page 44 of 176
Importing items from a content database l To import an item from a content database, specify:
--Import --Destination destination --Location path
--Item item
l To import items from a content database, specify:
--Import --Destination destination --Location path
--Items item1item2item3
Note: Workflows cannot be imported.
Displaying Microsoft SharePoint farm information l To display detailed information of the farm, such as name, display name, address, type name, role,
version, status and all services running in this farm, specify:
--FarmInfo
Displaying content database information l To display content database information such as: Office Servers, Shared Services, SharePoint
configuration, Share Services Search, Recovery Web Application, Shared Services Content, SharePoint Admin Content, content database name, specify:
--DatabaseInfo
Displaying a list of sites l To display the Web Application name, the site’s URL, content database name and the all the sites in
this content database, specify:
--ListSites
Browsing sites l To browse a My Site structure and items such as: Forms, Lists, Template Gallery, Master Page
Gallery, Personal Documents, Shared Documents, Shared Pictures, Site Template Gallery, User Information List, and Web Part Gallery, specify:
--BrowseSite --Site http://ivanka/personal/anikyb
Displaying Granular Recovery Extension version l To display the Granular Recovery Extension version, specify:
--Version
Granular Recovery Extension User Guide for Microsoft SharePoint Server, Exchange and VMwareChapter 6: Command line reference
HPE Data Protector (9.07) Page 45 of 176
Chapter 7: TroubleshootingThis chapter lists general checks and verifications, plus problems you might encounter when using the Data Protector Granular Recovery Extension for Microsoft SharePoint.
l For Microsoft SharePoint troubleshooting information, see the troubleshooting sections of the Microsoft SharePoint Server parts of the HPE Data Protector Integration Guide.
l For general Data Protector troubleshooting information, see the HPE Data Protector Troubleshooting Guide.
The folder with debugs entries and logs is located in the folder:
Microsoft Office SharePoint Server 2007:
C:\Program Files\Common Files\Microsoft Shared\Web Server Extensions\12\LOGS\GranularRecovery
Microsoft SharePoint Server 2010:
C:\Program Files\Common Files\Microsoft Shared\Web Server Extensions\14\LOGS\GranularRecovery
Microsoft SharePoint Server 2013:
C:\Program Files\Common Files\Microsoft Shared\Web Server Extensions\15\LOGS\GranularRecovery
This folder contains the files debugs.txt, debugs_cliproxy.txt, note.txt, and note_cliproxy.txt. The folder location may vary depending on where you install the Microsoft SharePoint Server.
During installation, a setup debug log is created in the Data_Protector_program_data\tmp\shp_gre_setup.txt file.
Troubleshooting Known Issues and Workarounds
Installation reports a warning "No full read permissions"
Problem
When installing the MS SharePoint Granular Recovery Extension component, Data Protector reports the following warning:
Windows SharePoint Services Search service has no full read permissions for all content databases.
Action
You can safely ignore the warning. However, to prevent it from appearing again, proceed as follows:
HPE Data Protector (9.07) Page 46 of 176
1. Open SQL Server Management Studio. 2. Under Security, expand Logins, right-click the user account under which the Windows
SharePoint Services Search service is running, and click Properties. 3. In the Properties dialog box, click User Mapping. Select all content databases and assign the
following two database roles to the user: l db_owner
l WSS_Content_Application_Pools
4. Click OK to apply the changes.
Remote installation fails
Problem
When installing the MS SharePoint Granular Recovery Extension component remotely, the session fails with an error similar to the following:
[Critical] ClientName Post-installation script for the MS SharePoint Granular Recovery Extension failed with the output: CreateProcessWithLogonW failed, trying LogonUser/CreateProcessAsUser, GetLastError(): 1326 LogonUser failed, GetLastError(): 1326
Action
Make sure that the user account under which Data Protector tries to connect to the Microsoft SharePoint Server system (for example, the Farm Administrator) has been assigned the Allow log on locally policy:
1. On the Microsoft SharePoint Server system, open Administrative Tools and then Local Security Policy.
2. Under Security Settings, expand Local Policies and then click User Rights Assignment. 3. Right-click the Allow log on locally policy, click Properties, and add the user. 4. Click OK to apply the changes.
An import job fails - Insufficient user rights
Problem
After performing an Import From Backup, the Granular Recovery Import Job Status page reports a failed status in the Restoring phase.
Granular Recovery Extension User Guide for Microsoft SharePoint Server, Exchange and VMwareChapter 7: Troubleshooting
HPE Data Protector (9.07) Page 47 of 176
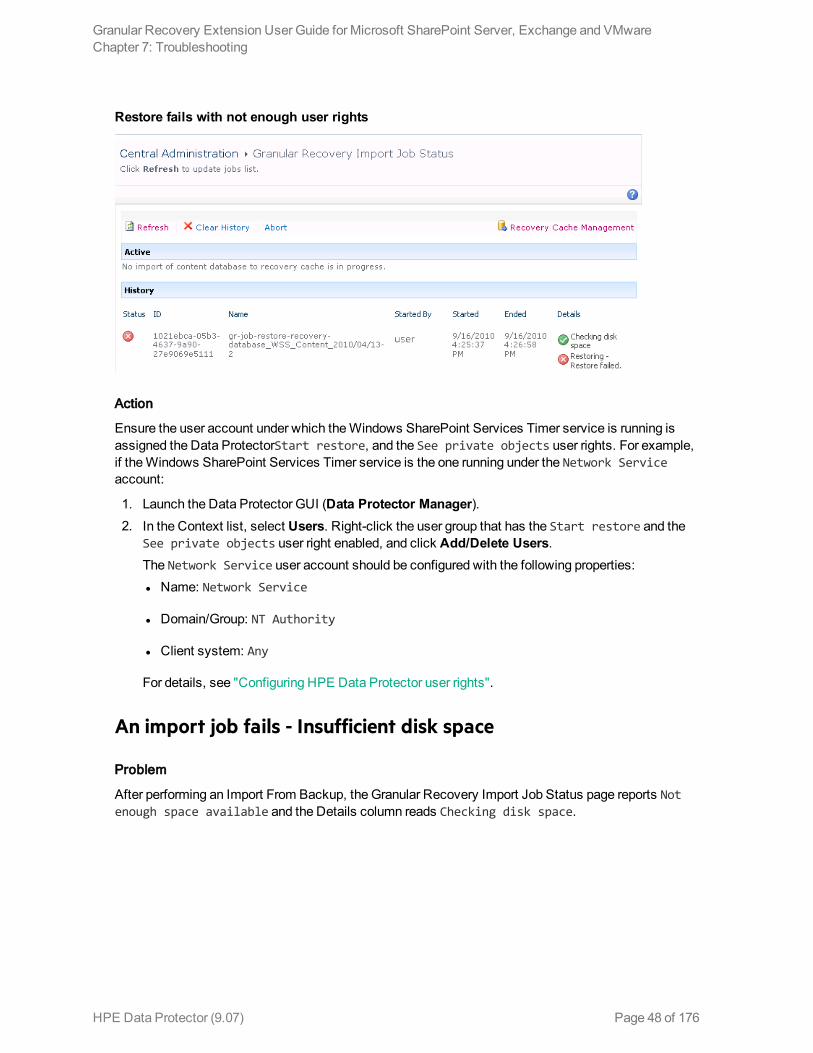
Restore fails with not enough user rights
Action
Ensure the user account under which the Windows SharePoint Services Timer service is running is assigned the Data ProtectorStart restore, and the See private objects user rights. For example, if the Windows SharePoint Services Timer service is the one running under the Network Service account:
1. Launch the Data Protector GUI (Data Protector Manager). 2. In the Context list, select Users. Right-click the user group that has the Start restore and the
See private objects user right enabled, and click Add/Delete Users.The Network Service user account should be configured with the following properties: l Name: Network Service
l Domain/Group: NT Authority
l Client system: Any
For details, see "Configuring HPE Data Protector user rights".
An import job fails - Insufficient disk space
Problem
After performing an Import From Backup, the Granular Recovery Import Job Status page reports Not enough space available and the Details column reads Checking disk space.
Granular Recovery Extension User Guide for Microsoft SharePoint Server, Exchange and VMwareChapter 7: Troubleshooting
HPE Data Protector (9.07) Page 48 of 176
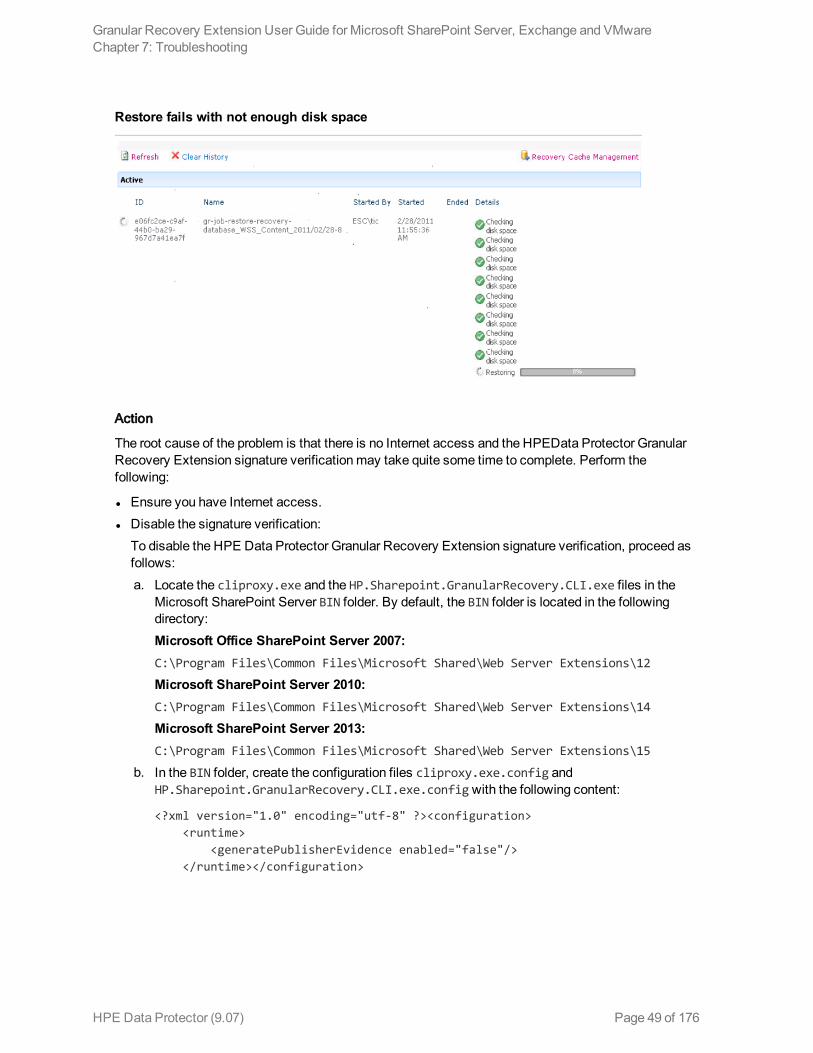
Restore fails with not enough disk space
Action
The root cause of the problem is that there is no Internet access and the HPEData Protector Granular Recovery Extension signature verification may take quite some time to complete. Perform the following:
l Ensure you have Internet access. l Disable the signature verification:
To disable the HPE Data Protector Granular Recovery Extension signature verification, proceed as follows: a. Locate the cliproxy.exe and the HP.Sharepoint.GranularRecovery.CLI.exe files in the
Microsoft SharePoint Server BIN folder. By default, the BIN folder is located in the following directory:Microsoft Office SharePoint Server 2007:C:\Program Files\Common Files\Microsoft Shared\Web Server Extensions\12
Microsoft SharePoint Server 2010:C:\Program Files\Common Files\Microsoft Shared\Web Server Extensions\14
Microsoft SharePoint Server 2013:C:\Program Files\Common Files\Microsoft Shared\Web Server Extensions\15
b. In the BIN folder, create the configuration files cliproxy.exe.config and HP.Sharepoint.GranularRecovery.CLI.exe.config with the following content:
<?xml version="1.0" encoding="utf-8" ?><configuration> <runtime> <generatePublisherEvidence enabled="false"/> </runtime></configuration>
Granular Recovery Extension User Guide for Microsoft SharePoint Server, Exchange and VMwareChapter 7: Troubleshooting
HPE Data Protector (9.07) Page 49 of 176
Recovery session fails
Problem
If you start a recovery session by connecting to the original website, the following message is displayed:
No recovery available for this site http://computer:25884/sites/User! Please contact Granular Recovery Administrator for further info!
Action
The root cause of the problem is that the content database is not in the cache. Perform an import job.
Granular Recovery Cache Management link is not accessible from My Sites - Manage Farm Features
Problem
After you create a new site collection or a new web application and then back up your new site collection, you cannot access the Granular Recovery Cache Management link from My Sites (Site Actions > Site Settings > Granular Recovery for Microsoft SharePoint Server 2007/2010 or settings icon > Site Settings > Granular Recovery for Microsoft SharePoint Server 2013). The following message is displayed:
GR resource files are missing in site's "App_GlobalResources" folder.
Action
1. Open Central Administration as follows:Microsoft Office SharePoint Server 2007:Click the Operations Tab and under Global Configuration, select Manage Farm Features.Microsoft SharePoint Server 2010/2013:Under System Settings, select Manage Farm Features.
2. By the HPE Data Protector Granular Recovery Extension, click Deactivate. The Warning page is displayed, click the Deactivate this feature link. Return to Manage Farm Features. By the HPE Data Protector Granular Recovery Extension, click Activate.
Granular Recovery Extension User Guide for Microsoft SharePoint Server, Exchange and VMwareChapter 7: Troubleshooting
HPE Data Protector (9.07) Page 50 of 176

Manage Farm Features deactivating HPE Data Protector Granular Recovery Extension
Granular Recovery Cache Management link is not accessible from My Sites - Read permission
Problem
After you create a new site collection or a new web application and then back up your new site collection, you cannot access the Granular Recovery Cache Management link from My Sites (Site Actions > Site Settings > Granular Recovery for Microsoft SharePoint Server 2007/2010 or settings icon > Site Settings > Granular Recovery for Microsoft SharePoint Server 2013). The message "Access denied." is displayed. The following debug entry is displayed:
[6 - Fatal] FATAL debugs - Recovery.aspx: OnPreInit: - Exception: Thread was being aborted.
Action
Application pool users of every web application in the farm must be granted the Read permissions on the Recovery Web Application. To grant the Read permission to application pool user accounts:
1. Connect to the Microsoft SharePoint Server Central Administration system as follows:Microsoft Office SharePoint Server 2007:Click Application Management, under Application Security, and click Policy for Web Application.Microsoft SharePoint Server 2010/2013:Under Application Management, select Manage web applications, select Recovery Web Application, and click User Policy, the Policy for Web Application is displayed.
2. If a user does not exist in the Policy for Web Application, click Add Users. In the Add Users page,
Granular Recovery Extension User Guide for Microsoft SharePoint Server, Exchange and VMwareChapter 7: Troubleshooting
HPE Data Protector (9.07) Page 51 of 176
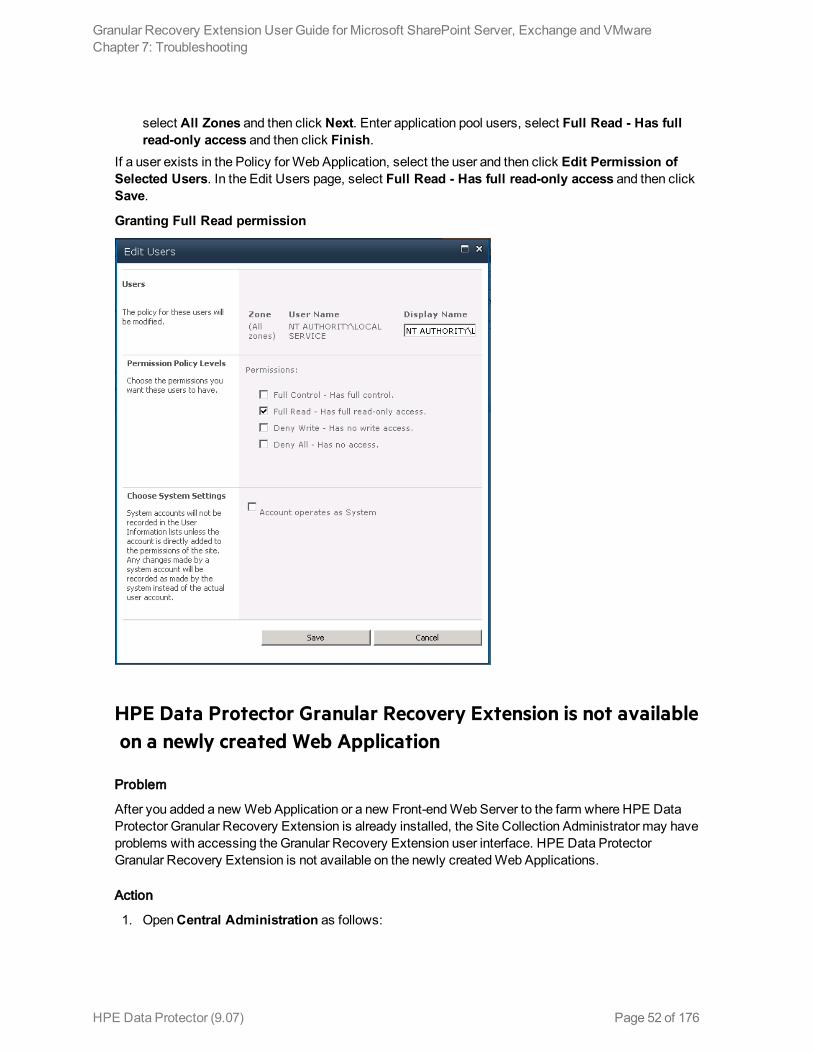
select All Zones and then click Next. Enter application pool users, select Full Read - Has full read-only access and then click Finish.
If a user exists in the Policy for Web Application, select the user and then click Edit Permission of Selected Users. In the Edit Users page, select Full Read - Has full read-only access and then click Save.
Granting Full Read permission
HPE Data Protector Granular Recovery Extension is not available on a newly created Web Application
Problem
After you added a new Web Application or a new Front-end Web Server to the farm where HPE Data Protector Granular Recovery Extension is already installed, the Site Collection Administrator may have problems with accessing the Granular Recovery Extension user interface. HPE Data Protector Granular Recovery Extension is not available on the newly created Web Applications.
Action
1. Open Central Administration as follows:
Granular Recovery Extension User Guide for Microsoft SharePoint Server, Exchange and VMwareChapter 7: Troubleshooting
HPE Data Protector (9.07) Page 52 of 176
Microsoft Office SharePoint Server 2007:Click the Operations Tab and under Global Configuration, select Manage Farm Features.Microsoft SharePoint Server 2010/2013:Under System Settings, select Manage Farm Features.
2. By the HPE Data Protector Granular Recovery Extension, click Deactivate. The Warning page is displayed, click the Deactivate this feature link. Return to Manage Farm Features. By the HPE Data Protector Granular Recovery Extension, click Activate.
Import from backup or from filesystem fails
Problem
Import from backup or from filesystem ends with an error Checking disk space — Unknown error occurred. This problem may occur if Microsoft SQL prerequisites are not met on one or more systems in the farm.
Action
Make sure that all prerequisites are installed. In case you had to install the missing packages, restart SharePoint Timer service and IIS on the updated clients.
Changing default recovery settings fails
Problem
When starting the recovery process, you cannot change the default recovery settings, for example, the recovery location. As the default recovery settings are configured in the pop-up windows, the problem can be caused by the enabled pop-up blocker in your browser.
Action
Disable any pop-up blocker software in your browser.
Recovery fails with "Unknown error has occurred, contact administrator." error message
Problem
Recovery fails with "Unknown error has occurred, contact administrator." error message and in the debug.log there is a debug line logged "System.ServiceModel.FaultException: There was an exception running the extensions specified in the config file. ---> Maximum request length exceeded."
It happens as the size of the item being recovered exceeds the maximum allowed content length of a request body.
Granular Recovery Extension User Guide for Microsoft SharePoint Server, Exchange and VMwareChapter 7: Troubleshooting
HPE Data Protector (9.07) Page 53 of 176
Action
Navigate to %ProgramFiles%\Common Files\Microsoft Shared\web server extensions\15\TEMPLATE\LAYOUTS\web.config file and increase the maximum allowed content length on every remote farm's Web Front End (WFE) by adding the following code:
<location path="GranularRecovery/RemoteFarm.asmx">
<system.web>
<!-- maxRequestLength is in kilobytes (KB) -->
<httpRuntime maxRequestLength="102400"/>
</system.web>
<system.webServer>
<security>
<requestFiltering>
<!-- maxAllowedContentLength is in bytes (B) -->
<requestLimits maxAllowedContentLength="104857600"/>
</requestFiltering>
</security>
</system.webServer>
</location>
Note: The code added is an example for setting the limit to 100 MB. If you need to recover files greater than 100 MB, you need to set values in the code accordingly.
Slow response of the command line interface
Problem
You can notice slow response of the HPE Data Protector Granular Recovery Extension command line interface. For example when you run the HP.Sharepoint.GranularRecovery.CLI.exe --help command, the command takes from 10 seconds to several minutes to display the usage. The root cause of the problem is the HPE Data Protector Granular Recovery Extension signature verification which may take quite some time to complete.
Action
To disable the HPE Data Protector Granular Recovery Extension signature verification, proceed as follows:
1. Locate the cliproxy.exe and the HP.Sharepoint.GranularRecovery.CLI.exe files in the Microsoft SharePoint Server BIN folder. By default, the path of the BIN folder is:Microsoft Office SharePoint Server 2007:C:\Program Files\Common Files\Microsoft Shared\Web Server Extensions\12\BIN
Granular Recovery Extension User Guide for Microsoft SharePoint Server, Exchange and VMwareChapter 7: Troubleshooting
HPE Data Protector (9.07) Page 54 of 176
Microsoft SharePoint Server 2010:C:\Program Files\Common Files\Microsoft Shared\Web Server Extensions\14\BIN
Microsoft SharePoint Server 2013:C:\Program Files\Common Files\Microsoft Shared\Web Server Extensions\15\BIN
2. In the BIN folder, create the configuration files cliproxy.exe.config and HP.Sharepoint.GranularRecovery.CLI.exe.config with the following content:
<?xml version="1.0" encoding="utf-8" ?><configuration><runtime><generatePublisherEvidence enabled="false"/></runtime></configuration>
Slow response of the graphical user interface
Problem
You can notice slow response of the HPE Data Protector Granular Recovery Extension GUI. For example when importing a content database from backup or from filesystem. The import job might fail, due to a time-out. The root cause of the problem is the HPE Data Protector Granular Recovery Extension signature verification which may take too long to complete.
Action
To disable the HPE Data Protector Granular Recovery Extension signature verification, proceed as follows.
1. Locate the cliproxy.exe and the HP.Sharepoint.GranularRecovery.CLI.exe files in the Microsoft SharePoint Server BIN folder. By default, the path of the BIN folder is:Microsoft Office SharePoint Server 2007:C:\Program Files\Common Files\Microsoft Shared\Web Server Extensions\12\BIN
Microsoft SharePoint Server 2010:C:\Program Files\Common Files\Microsoft Shared\Web Server Extensions\14\BIN
Microsoft SharePoint Server 2013:C:\Program Files\Common Files\Microsoft Shared\Web Server Extensions\15\BIN
2. In the BIN folder, create the configuration files cliproxy.exe.config and HP.Sharepoint.GranularRecovery.CLI.exe.config with the following content:
<?xml version="1.0" encoding="utf-8" ?><configuration> <runtime> <generatePublisherEvidence enabled="false"/> </runtime></configuration>
Granular Recovery Extension User Guide for Microsoft SharePoint Server, Exchange and VMwareChapter 7: Troubleshooting
HPE Data Protector (9.07) Page 55 of 176
The Data Protector service is not running
Problem
When performing an import from filesystem session, the following message is displayed: Required Data Protector service is not running!
Action
1. Open Control Panel, double-click Administrative tools, and double-click Services.Find the Data Protector services, right-click the disabled service, and click Start to enable it.
2. In the Backup Version Selection page, click Back to finish your session.
The restoring - Mount Request Pending status
Problem
When performing an import from backup session, the status Restoring - Mount Request Pending is displayed on the Granular Recovery Import Job Status page.
Action
1. Launch the Data Protector GUI (Data Protector Manager). 2. In the Monitor context, check for any mount requests. Confirm the mount requests and restart the
backup session. 3. Once the backup session is finished, perform an import from backup session again.
Subfolders are not recovered to original location
Problem
When recovering a folder with subfolders the parent folder is recovered but its subfolders are not.
Action
After you delete a folder, Microsoft SharePoint Server places this folder in the Site Collection Recycle bin. To recover your folder and its subfolders to original location using Granular Recovery Extension:
1. In the Site Collection Recycle bin, select the folder and click Delete Selection. 2. Perform a recovery session of your folder again.
Granular Recovery Extension component installation fails
Problem
Installing HPE Data Protector with the HPE Data Protector Granular Recovery Extension component enabled fails.
Granular Recovery Extension User Guide for Microsoft SharePoint Server, Exchange and VMwareChapter 7: Troubleshooting
HPE Data Protector (9.07) Page 56 of 176
Action
To manually install the HPE Data Protector Granular Recovery Extension without using standard HPE Data Protector installation procedure:
1. Log on to the Microsoft SharePoint Server Central Administration system under a Microsoft SharePoint Server Farm Administrator user account.
2. In the Start menu, right-click Command Prompt and select Run as Administrator. 3. Change the current directory to the Data_Protector_home\bin directory where the files from the
self-extracting archive were extracted during the product installation process. 4. Run grm_install.bat to install the HPE Data Protector Granular Recovery Extension solution.
Granular Recovery Extension removal fails
Problem
After HPE Data Protector deinstallation, the HPE Data Protector Granular Recovery Extension is not removed from the system.
Action
To manually remove the HPE Data Protector Granular Recovery Extension without using standard HPE Data Protector removal procedure:
1. Microsoft Office SharePoint Server 2007:Start Microsoft PowerShell v2.0 or higher using the SharePoint system account.Microsoft SharePoint Server 2010/2013:Start SharePoint 2010/2013 Management Shell using the SharePoint system account.
2. From the Data_Protector_home\bin directory, run:grm_check.ps1
Installation ends unexpectedly on a farm with multiple servers on Central Administration
Problem
On a farm with multiple servers on Central Administration, the installation of the HPE Data Protector Granular Recovery Extension ends unexpectedly.
Action
Ensure that the following service is enabled on Central Administration:
Microsoft Office SharePoint Server 2007:
Windows SharePoint Services Web Application
Microsoft SharePoint Server 2010/2013:
Microsoft SharePoint Foundation Web Application
Granular Recovery Extension User Guide for Microsoft SharePoint Server, Exchange and VMwareChapter 7: Troubleshooting
HPE Data Protector (9.07) Page 57 of 176
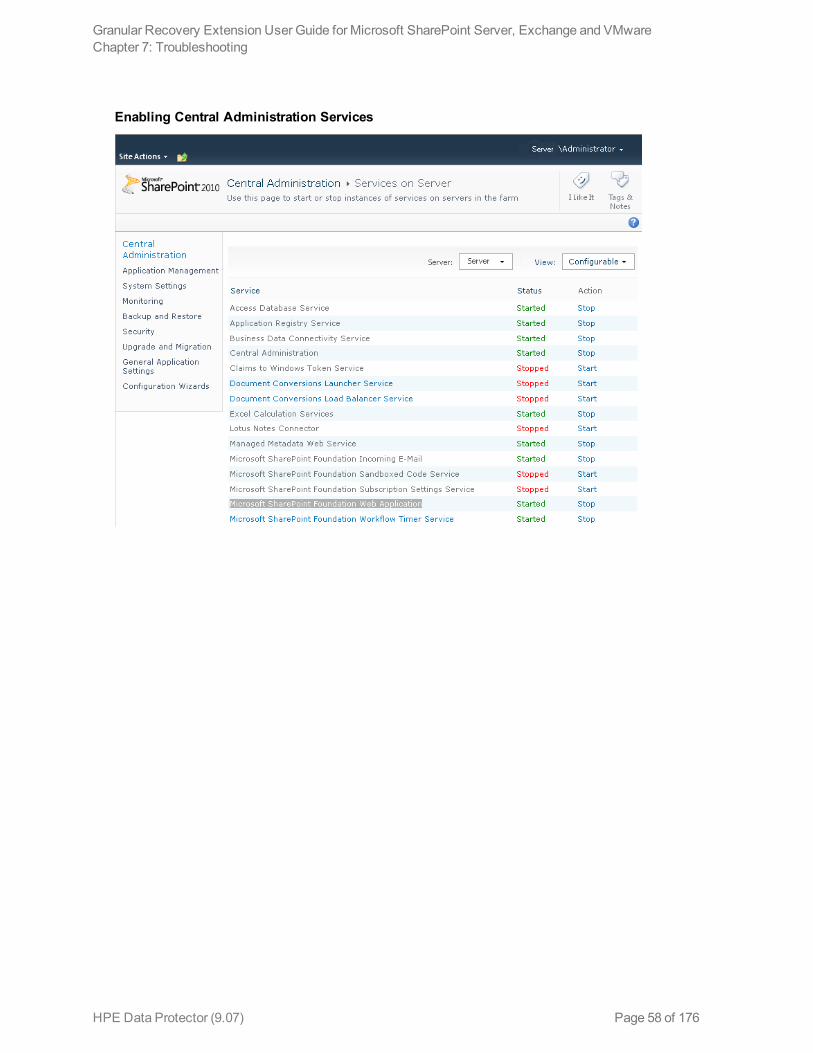
Enabling Central Administration Services
Granular Recovery Extension User Guide for Microsoft SharePoint Server, Exchange and VMwareChapter 7: Troubleshooting
HPE Data Protector (9.07) Page 58 of 176
HPE Data Protector (9.07)
Page 59 of 176
Part 2 - Microsoft Exchange and the Granular Recovery ExtensionThis part of the guide describes the Data Protector Granular Recovery Extension for Microsoft Exchange Server 2010 and Microsoft Exchange Server 2013 (hereafter both referred to as Microsoft Exchange Server unless differences are pointed out).
This part includes the following chapters:
Introduction
Installation
Configuration
Backup
Recovery
Command Line Interface
Troubleshooting
Chapter 8: IntroductionThe Granular Recovery Extension for Microsoft Exchange Server (the extension) does not provide you with any backup solution. Use the Data Protector Microsoft Exchange Server 2010 integration to back up Microsoft Exchange Server 2010 mailbox and public folder databases or Microsoft Exchange Server 2013 mailbox databases (databases). Use the extension to restore Microsoft Exchange Server mailbox database files and to recover Microsoft Exchange Server single items or complete mailboxes.
Thus, the extension enables you to recover individual mailbox items, such as e-mail folders, calendar, contacts, or notes, with no need to recover the whole Microsoft Exchange Server mailbox or the entire mailbox database.
Granular Recovery Extension Documentation set l Electronic PDF format
The HP Data Protector Granular Recovery Extension User Guide for Microsoft Exchange Server provides information specific to this extension: l For detailed information about Data Protector specifics, see the Data Protector Documentation
set.
l For detailed information about Microsoft Exchange Server specifics, refer to the official Microsoft Exchange Server documentation.
l HelpTo complete the information presented in this guide available in the electronic PDF format, the Granular Recovery Extension for Microsoft Exchange Server provides the context-sensitive (F1) Help integrated in the Microsoft Management Console (MMC). The Help explains the pages and options available in the Granular Recovery Extension Graphical User Interface (GUI). You can access the Help by pressing F1, or by clicking the question mark (? Help) in the action pane.
HPE Data Protector (9.07) Page 60 of 176
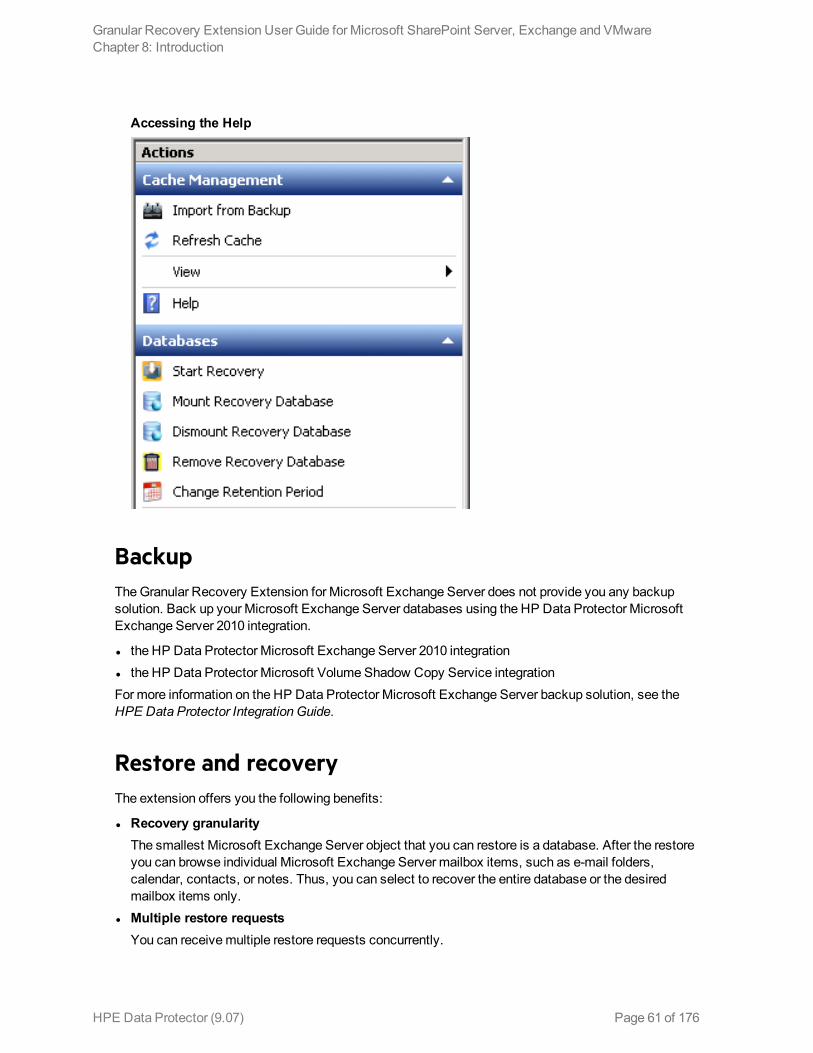
Accessing the Help
BackupThe Granular Recovery Extension for Microsoft Exchange Server does not provide you any backup solution. Back up your Microsoft Exchange Server databases using the HP Data Protector Microsoft Exchange Server 2010 integration.
l the HP Data Protector Microsoft Exchange Server 2010 integration l the HP Data Protector Microsoft Volume Shadow Copy Service integrationFor more information on the HP Data Protector Microsoft Exchange Server backup solution, see the HPE Data Protector Integration Guide.
Restore and recoveryThe extension offers you the following benefits:
l Recovery granularityThe smallest Microsoft Exchange Server object that you can restore is a database. After the restore you can browse individual Microsoft Exchange Server mailbox items, such as e-mail folders, calendar, contacts, or notes. Thus, you can select to recover the entire database or the desired mailbox items only.
l Multiple restore requestsYou can receive multiple restore requests concurrently.
Granular Recovery Extension User Guide for Microsoft SharePoint Server, Exchange and VMwareChapter 8: Introduction
HPE Data Protector (9.07) Page 61 of 176
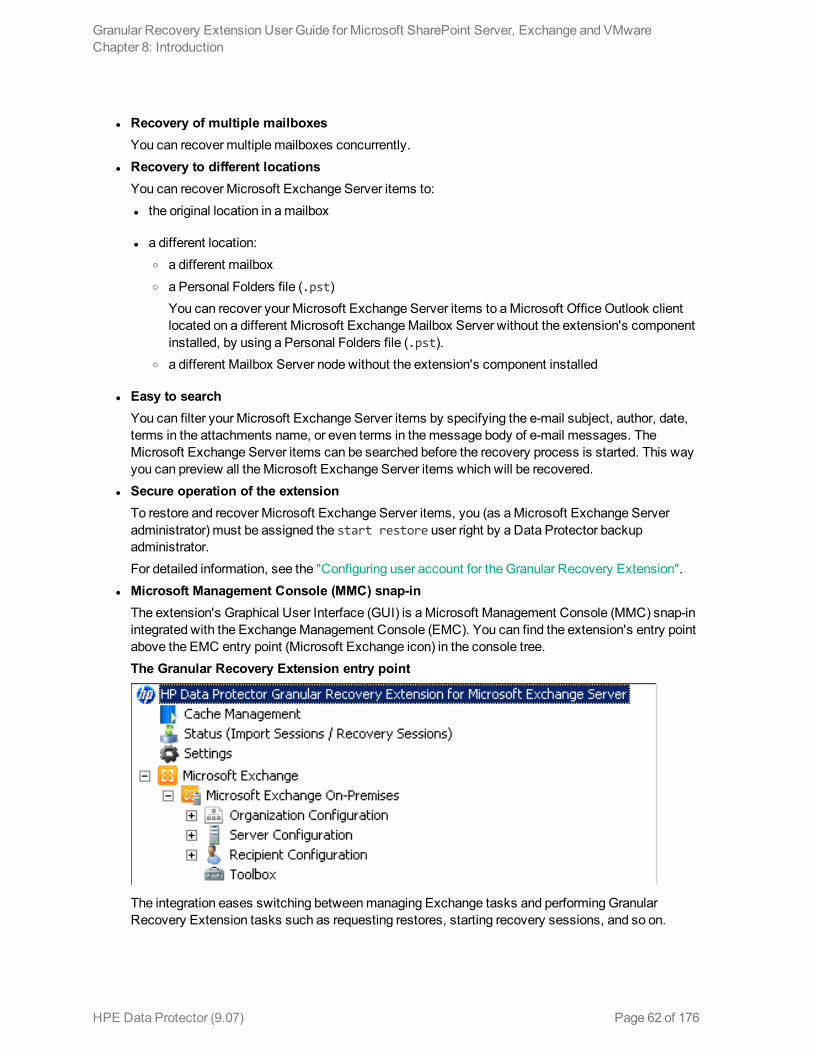
l Recovery of multiple mailboxesYou can recover multiple mailboxes concurrently.
l Recovery to different locationsYou can recover Microsoft Exchange Server items to: l the original location in a mailbox
l a different location: o a different mailbox o a Personal Folders file (.pst)
You can recover your Microsoft Exchange Server items to a Microsoft Office Outlook client located on a different Microsoft Exchange Mailbox Server without the extension's component installed, by using a Personal Folders file (.pst).
o a different Mailbox Server node without the extension's component installed
l Easy to searchYou can filter your Microsoft Exchange Server items by specifying the e-mail subject, author, date, terms in the attachments name, or even terms in the message body of e-mail messages. The Microsoft Exchange Server items can be searched before the recovery process is started. This way you can preview all the Microsoft Exchange Server items which will be recovered.
l Secure operation of the extensionTo restore and recover Microsoft Exchange Server items, you (as a Microsoft Exchange Server administrator) must be assigned the start restore user right by a Data Protector backup administrator.For detailed information, see the "Configuring user account for the Granular Recovery Extension".
l Microsoft Management Console (MMC) snap-in The extension's Graphical User Interface (GUI) is a Microsoft Management Console (MMC) snap-in integrated with the Exchange Management Console (EMC). You can find the extension's entry point above the EMC entry point (Microsoft Exchange icon) in the console tree.The Granular Recovery Extension entry point
The integration eases switching between managing Exchange tasks and performing Granular Recovery Extension tasks such as requesting restores, starting recovery sessions, and so on.
Granular Recovery Extension User Guide for Microsoft SharePoint Server, Exchange and VMwareChapter 8: Introduction
HPE Data Protector (9.07) Page 62 of 176
Chapter 9: InstallationThe Data Protector Granular Recovery Extension for Microsoft Exchange Server is used to recover individual Microsoft Exchange Server mailbox items. Depending on the configuration of your Microsoft Exchange Server environment, you may need to install the corresponding Data Protector component on single or multiple Microsoft Exchange Server systems.
The "Microsoft Exchange Server clients -Data Protector Granular Recovery Extension for Microsoft Exchange server" section of the HPE Data Protector Installation Guide provides the details necessary for installing the Data Protector Granular Recovery Extension for Microsoft Exchange Server.
HPE Data Protector (9.07) Page 63 of 176
Chapter 10: ConfigurationThis chapter describes the configuration steps that you need to follow.
Meeting Data Protector configuration requirements for the Granular Recovery Extension
Configuring the Granular Recovery Web service portThe Granular Recovery Web service establishes communication using the TCP/IP 60000 port number. If other service is using this port number, configure the Granular Recovery Web service to use an alternative port number:
1. Without starting the extension, search for the following Windows Registry key: HKEY_LOCAL_MACHINE\SOFTWARE\Hewlett-Packard\OpenView\OmniBackII\Plugins\exchgre.
2. Edit the key Client port and enter the new port number. 3. Update the IIS configuration to have the new port value for the Granular Recovery Web service by
running the command:
IIsWeb /create Web Service web site pathwebsite name/b new port number
Where: Web Service web site path is the root path for the Granular Recovery Web service web site. The default path C:\inetpub\wwwroot. website name is the web site hosted by the Granular Recovery Web service. new port number is the new port number on which Granular Recovery Web service establishes communication.For example:
IIsWeb /create c:\inetpub\wwwroot "HP MS Exchange GRE" /b 8000
Configuring user account for the Granular Recovery ExtensionConfigure your Granular Recovery Extension (GRE) user account with the following user rights and privileges:
Data Protector user rights
Make sure you have the following Data Protector user rights assigned:
1. Open the Data Protector GUI (Data Protector Manager). 2. Create a new user group to be used by the extension, for example, GRE_Microsoft_Exchange_
Server.For details on adding user groups, see the HPE Data Protector Help index: “adding, user groups”.
HPE Data Protector (9.07) Page 64 of 176
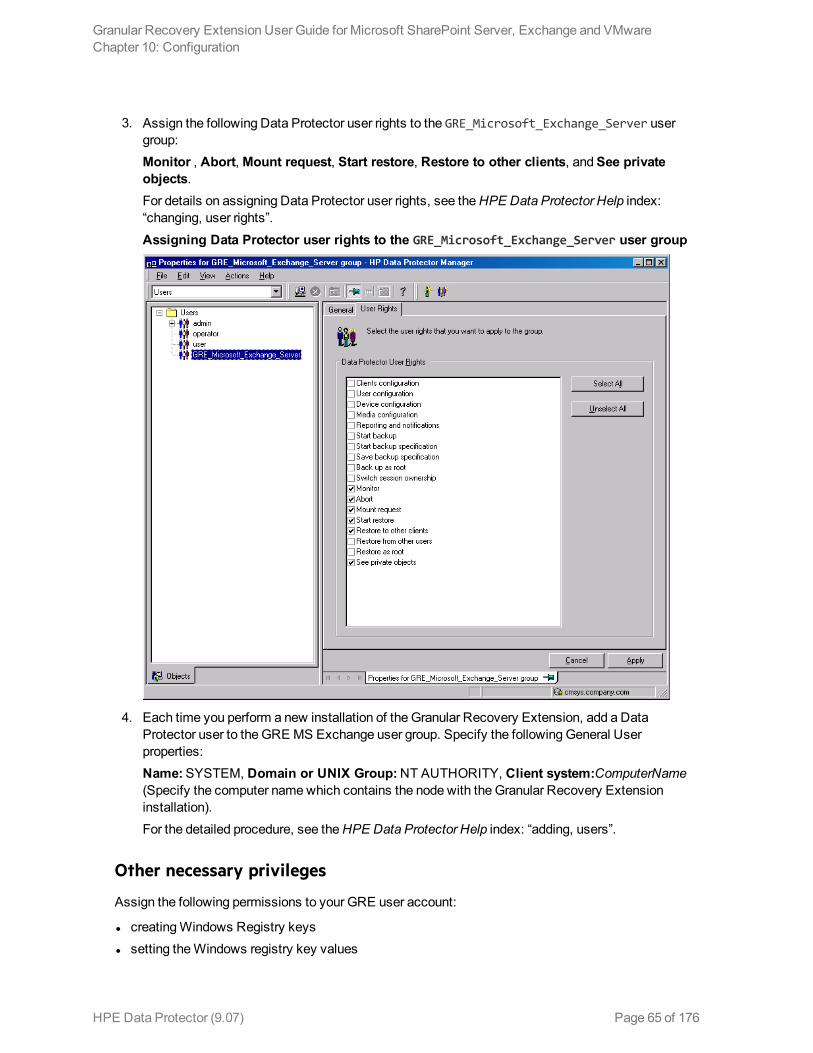
3. Assign the following Data Protector user rights to the GRE_Microsoft_Exchange_Server user group:Monitor , Abort, Mount request, Start restore, Restore to other clients, and See private objects.For details on assigning Data Protector user rights, see the HPE Data Protector Help index: “changing, user rights”.
Assigning Data Protector user rights to the GRE_Microsoft_Exchange_Server user group
4. Each time you perform a new installation of the Granular Recovery Extension, add a Data Protector user to the GRE MS Exchange user group. Specify the following General User properties:Name: SYSTEM, Domain or UNIX Group: NT AUTHORITY, Client system:ComputerName (Specify the computer name which contains the node with the Granular Recovery Extension installation).For the detailed procedure, see the HPE Data Protector Help index: “adding, users”.
Other necessary privileges
Assign the following permissions to your GRE user account:
l creating Windows Registry keys l setting the Windows registry key values
Granular Recovery Extension User Guide for Microsoft SharePoint Server, Exchange and VMwareChapter 10: Configuration
HPE Data Protector (9.07) Page 65 of 176

Privileges for executing Exchange Management cmdlet operations
To create a remote runspace for executing the Exchange Management cmdlet operations remotely, configure user credentials with specific Exchange Management roles. These operations are executed as part of Microsoft Exchange Server backup and restore operations and are necessary for successful operation of the extension.
Configure your GRE user account with the following Exchange privileges:
l a member of the specific Exchange Management built-in role groups with certain built-in management roles assigned: l the Organization Management role group
l the Discovery Management role group
l the Mailbox Import Export management roleAs a member of the Organization Management role group, you are not assigned this management role by default. Assign the role to your GRE user account to be able to recover Exchange mailbox items to the original location in the original mailbox or to a Personal Folders file (.pst).
Note: Recovery to a .pst file requires you to create a network shared folder with read/write permissions granted to the Exchange Trusted Subsystem group.
l a member of the administrators group of the Microsoft Exchange Server system on which the extension is installed
The user credentials specified in the Remote Powershell Configuration dialog box are stored locally in the Windows Registry under the HKEY_LOCAL_MACHINE\SOFTWARE\Hewlett-Packard\OpenView\OmniBackII\Plugins\exchgre directory, on the Microsoft Exchange Server system on which the extension is installed.
Only user credentials (a username, password and domain name) of a single user can be stored. Each time you enter new user credentials the existing ones are overwritten. The encrypted password is stored on the Microsoft Exchange Server system on which the extension is installed.
For more information on the Exchange Management cmdlet operations and on how to assign the Exchange Management built-in management roles, see the Microsoft Exchange Server documentation.
Granular Recovery Extension User Guide for Microsoft SharePoint Server, Exchange and VMwareChapter 10: Configuration
HPE Data Protector (9.07) Page 66 of 176
Chapter 11: BackupThe Granular Recovery Extension for Microsoft Exchange Server does not provide you any backup solution. Back up your Microsoft Exchange Server databases using the HP Data Protector Microsoft Exchange Server 2010 integration.
For more information on the HP Data Protector Microsoft Exchange Server backup solution, see the HPE Data Protector Integration Guide.
The following backup types are supported: Full, Incremental, Copy, and Differential.
The following disk-based backups are not supported:
l Microsoft Volume Shadow Copy Service (VSS) zero downtime backup (ZDB) to Disk l VSS ZDB to Disk + Tape l VSS ZDB instant recovery transportableFor detailed information on backup types, see the HPE Data Protector Help index: “backup types”.
Note: The recovery procedure does not differ by Data Protector backup type.
HPE Data Protector (9.07) Page 67 of 176

Chapter 12: Restore and recovery
Limitations
Data Protector Granular Recovery Extension limitations l Databases or mailboxes encrypted by third party applications cannot be recovered. l The View button in the action pane is meant for the future use. Thus, you cannot customize columns
displayed in the results pane in the Cache Management and Status pages yet. l The recovery of Public Folder mailboxes, team/site mailboxes, and linked mailboxes are not
supported. l The mount-point folder path that points to a mount volume location without a drive letter is not a
supported restore location path.
Microsoft Exchange Server limitations l Due to Microsoft Exchange Server Restore-Mailbox cmdlet limitation, the items stored in the
Exchange Server special folders cannot be browsed in the Granular Recovery – Recovery Settings Page: l using the Recover to an existing folder option that sets the target of the original mailbox.
l using the Recover into different Mailbox option that sets the target of the different mailbox.
You can recover items where the target is a special folder only when using the option Recovery to original location.
l Due to the Microsoft Exchange Server limitations, the restore of Public Folder mailbox databases is not supported.
l Due to the Microsoft Exchange Server 2013 limitation in identifying the deleted team mailboxes, those mailboxes cannot be filtered out.
l Due to the lack of direct support of single mailbox item recovery by Microsoft Exchange Server 2013, the search query is formed with the supported options "subject", "From", "sent" , and "Received" to narrow down the search of selected mails/items for recovery. Due to this approach, selected or unselected mails / items that match the search query are recovered.
Considerations
Data Protector Granular Recovery Extension considerations l Two or more instances of the Granular Recovery Extension GUI or the GUI and the command-line
interface (CLI) cannot be used at the same time.
HPE Data Protector (9.07) Page 68 of 176
l Any Microsoft Exchange Server operations, such as creating or deleting the Recovery Database, that are performed outside the Granular Recovery Extension (GRE) using management tools such as the Exchange Management Console, while the GRE user interface is open, are not reflected in the GRE user interface.
l Multiple restore requests for the same backup object (mailbox database) from the same backup version are processed once.
l The Export List ... button is displayed in the action pane, if you select the HP Data Protector Granular Recovery Extension node. The button creates a list of all the contents displayed in the console tree: Cache Management, Status (Import Sessions / Recovery Sessions) and Settings Microsoft Exchange. The list can be exported in the following formats: text, Unicode text, comma-separated value (CSV), and Unicode CSV. This functionality is provided by default by the Microsoft Management Console (MMC).
l You can perform multiple recovery requests for the same restored database. l In the GRE wizard, you can specify search criteria to narrow the list of items which you can select
for recovery. After entering some values in the Mailbox Search Criteria page, and selecting one or more items for recovery in a specific mailbox folder, any items in this folder's subfolders will also be recovered if they meet the same search criteria.
l The Search Results page displays only three levels of folders, which does not affect your restore process. If you select an item on the third level, its child items will also be restored.
l Make sure the destination folder is empty before performing restore.
Tip: You can specify a new restore folder in the Restore Settings page of the Import From Backup wizard, and the extension creates a new folder.
l In the Mailbox Selection page of the Import from Backup wizard, the Mailbox user names starting with non-ASCII characters are grouped under --.
l Non-ASCII characters are not supported in paths. When typing the restore path, avoid non-ASCII characters. Otherwise the restore may fail.
l If a recovery database already exists in a target location on a mailbox server, the Granular Recovery Cache keeps all the versions without deleting them.
l You can perform multiple restore requests to the same target location. l Multiple recovery databases can be created on a mailbox server. l The number of recovery databases is limited by the disk space available in the temporary restore
location. l The Granular Recovery Cache keeps only one recovery database (RDB) mounted per Microsoft
Exchange mailbox server, even though the restored database files are still on the disk once the recovery session finishes.On a Microsoft Exchange mailbox server, there is only one recovery database stored.For example, in a DAG environment, each mailbox node can contain one recovery database, but only on one server there can be a mounted recovery database.
Data Protector considerations l The Granular Recovery Extension cannot restore or recover items from backup images created with
the Data Protector Microsoft Volume Shadow Copy Service (VSS) integration.
Granular Recovery Extension User Guide for Microsoft SharePoint Server, Exchange and VMwareChapter 12: Restore and recovery
HPE Data Protector (9.07) Page 69 of 176
l The Granular Recovery Extension does not support Instant Recovery (IR).
Microsoft Exchange Server considerations l The option of recovering data into a PST file is only available for Microsoft Exchange Server 2010
environments using Microsoft Exchange Server 2010 SP1 or a later service pack. l Moved or deleted mailbox databases cannot be searched (the Microsoft Exchange Server known
issue). However, you can recover a moved mailbox once it was moved.Deleted mailboxes are displayed in the Import From Backup wizard, on the Import from Backup — Mailbox Selection only if the retention period is not expired. Once the retention period is reached and the deleted mailbox is no longer available in the Import From Backup wizard, re-importing the mailbox database that contains the needed mailbox is necessary.For details, see "Importing mailbox databases".
l In the Microsoft Exchange Server 2013 environment, a combination of New-MailboxRestoreRequest, Search-Mailbox, and New-SearchMailbox cmdlet operations induces storage space and performance factors which cannot be avoided due to Microsoft Exchange Server limitations.
l Make sure that active databases in a standalone or DAG configuration (the GRE supported Microsoft Exchange Server configuration) have two times of a source mailbox size storage space for creating temporary mailboxes during recovery.
l Make sure that target mailboxes to which recovery items are to be stored have sufficient storage space for storing the recovered items.
Restore and recovery flowTo restore and then recover the Microsoft Exchange Server items, follow the basic steps:
1. Import a. Restore
The Data Protector Granular Recovery Extension uses the Data Protector Microsoft Exchange Server 2010 integration to restore the Microsoft Exchange Server databases.Temporary restore locationFirst the Microsoft Exchange Server database files are saved to a temporary restore location. Restore the database files (.edb), checkpoint files (.chk), reserve transaction log files (.jrs), and transaction log files (.log) to the specified temporary restore location on a Microsoft Exchange Server system.A recovery database (RDB) is created in the temporary location.The restored files are located on the Microsoft Exchange Server system that is chosen as the restore target system. The default location is C:\Restore, but you can specify a different restore location.For details, see "Changing settings".After successful restore of mailbox databases from their backup images, the restored databases are available in the granular recovery cache.
Granular Recovery Extension User Guide for Microsoft SharePoint Server, Exchange and VMwareChapter 12: Restore and recovery
HPE Data Protector (9.07) Page 70 of 176
b. MountMount the restored database in the granular recovery cache to the Microsoft Exchange Server. Before browsing and recovering items you have to mount the restored database files.
2. RecoverBrowse and recover the Microsoft Exchange Server items from the recovery database to the original mailbox database, or to any different location.
3. DismountOnly one recovery database can remain mounted, for this reason when you no longer need to recover items from a recovery database: l Dismount the recovery database from the Microsoft Exchange Server.
Once you dismount the recovery databases, the recovery databases are still in the Granular Recovery — Cache Management but their status are dismounted. At this point, you can still remount them if needed for another recovery session.
4. RemovalThe recovery databases remain in the cache for 30 days (default value) or for as long as it is set in the retention time.After the retention time expires, the database is dismounted and removed from the Granular Recovery Extension cache automatically, but the restored database files still exist in temporary restore location. l Optionally, change the retention period. For detailed procedure, see "Changing the retention
period".
l Optionally, remove the no longer needed recovery database from the cache manually before the retention period. For detailed procedure, see "Removing databases".
l The restored database files still remain in temporary restore location, you can completely remove them, by deleting the files from the temporary restore location manually.
Opening the HP Data Protector Granular Recovery Extension GUI
To open the extension:
1. Log in to the Microsoft Exchange Server system where the Granular Recovery Extension is installed.
2. Click the Start button and then click the HP Data Protector Exchange GRE icon to open the extension's Graphical User Interface (GUI).The HP Data Protector Granular Recovery Extension for Microsoft Exchange Server is started.
Granular Recovery Extension User Guide for Microsoft SharePoint Server, Exchange and VMwareChapter 12: Restore and recovery
HPE Data Protector (9.07) Page 71 of 176
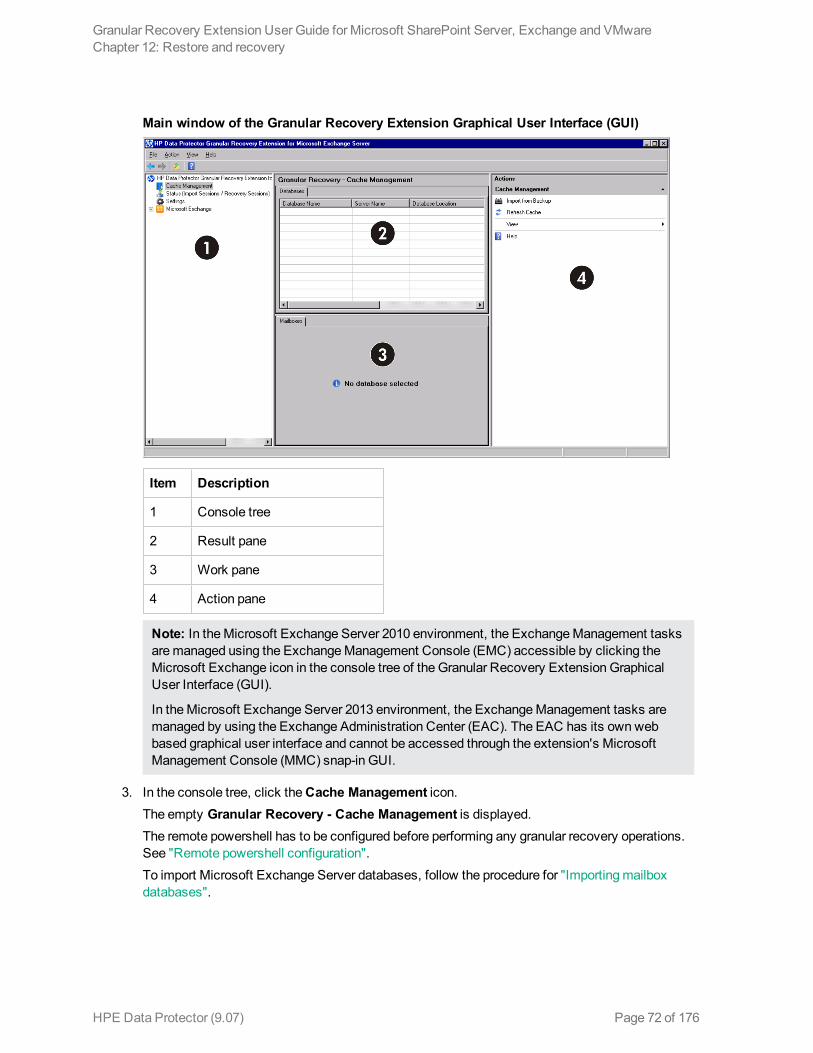
Main window of the Granular Recovery Extension Graphical User Interface (GUI)
Item Description
1 Console tree
2 Result pane
3 Work pane
4 Action pane
Note: In the Microsoft Exchange Server 2010 environment, the Exchange Management tasks are managed using the Exchange Management Console (EMC) accessible by clicking the Microsoft Exchange icon in the console tree of the Granular Recovery Extension Graphical User Interface (GUI).
In the Microsoft Exchange Server 2013 environment, the Exchange Management tasks are managed by using the Exchange Administration Center (EAC). The EAC has its own web based graphical user interface and cannot be accessed through the extension's Microsoft Management Console (MMC) snap-in GUI.
3. In the console tree, click the Cache Management icon.The empty Granular Recovery - Cache Management is displayed.The remote powershell has to be configured before performing any granular recovery operations. See "Remote powershell configuration".To import Microsoft Exchange Server databases, follow the procedure for "Importing mailbox databases".
Granular Recovery Extension User Guide for Microsoft SharePoint Server, Exchange and VMwareChapter 12: Restore and recovery
HPE Data Protector (9.07) Page 72 of 176
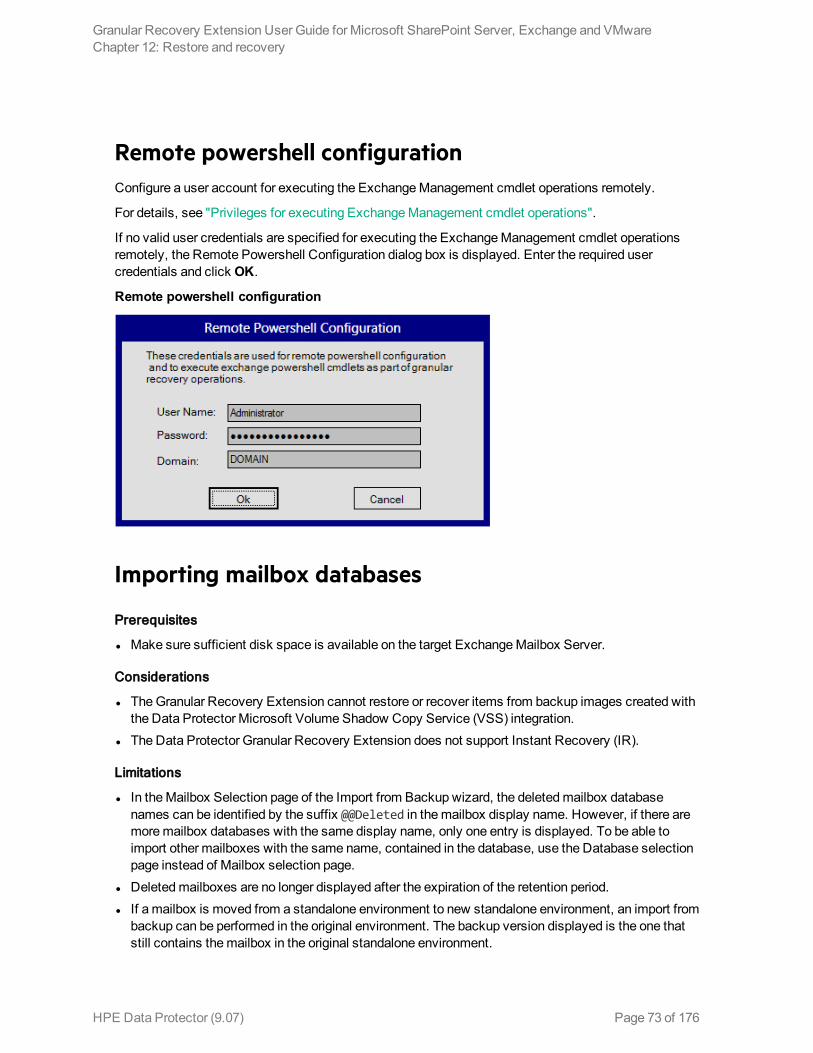
Remote powershell configurationConfigure a user account for executing the Exchange Management cmdlet operations remotely.
For details, see "Privileges for executing Exchange Management cmdlet operations".
If no valid user credentials are specified for executing the Exchange Management cmdlet operations remotely, the Remote Powershell Configuration dialog box is displayed. Enter the required user credentials and click OK.
Remote powershell configuration
Importing mailbox databases
Prerequisites
l Make sure sufficient disk space is available on the target Exchange Mailbox Server.
Considerations
l The Granular Recovery Extension cannot restore or recover items from backup images created with the Data Protector Microsoft Volume Shadow Copy Service (VSS) integration.
l The Data Protector Granular Recovery Extension does not support Instant Recovery (IR).
Limitations
l In the Mailbox Selection page of the Import from Backup wizard, the deleted mailbox database names can be identified by the suffix @@Deleted in the mailbox display name. However, if there are more mailbox databases with the same display name, only one entry is displayed. To be able to import other mailboxes with the same name, contained in the database, use the Database selection page instead of Mailbox selection page.
l Deleted mailboxes are no longer displayed after the expiration of the retention period. l If a mailbox is moved from a standalone environment to new standalone environment, an import from
backup can be performed in the original environment. The backup version displayed is the one that still contains the mailbox in the original standalone environment.
Granular Recovery Extension User Guide for Microsoft SharePoint Server, Exchange and VMwareChapter 12: Restore and recovery
HPE Data Protector (9.07) Page 73 of 176
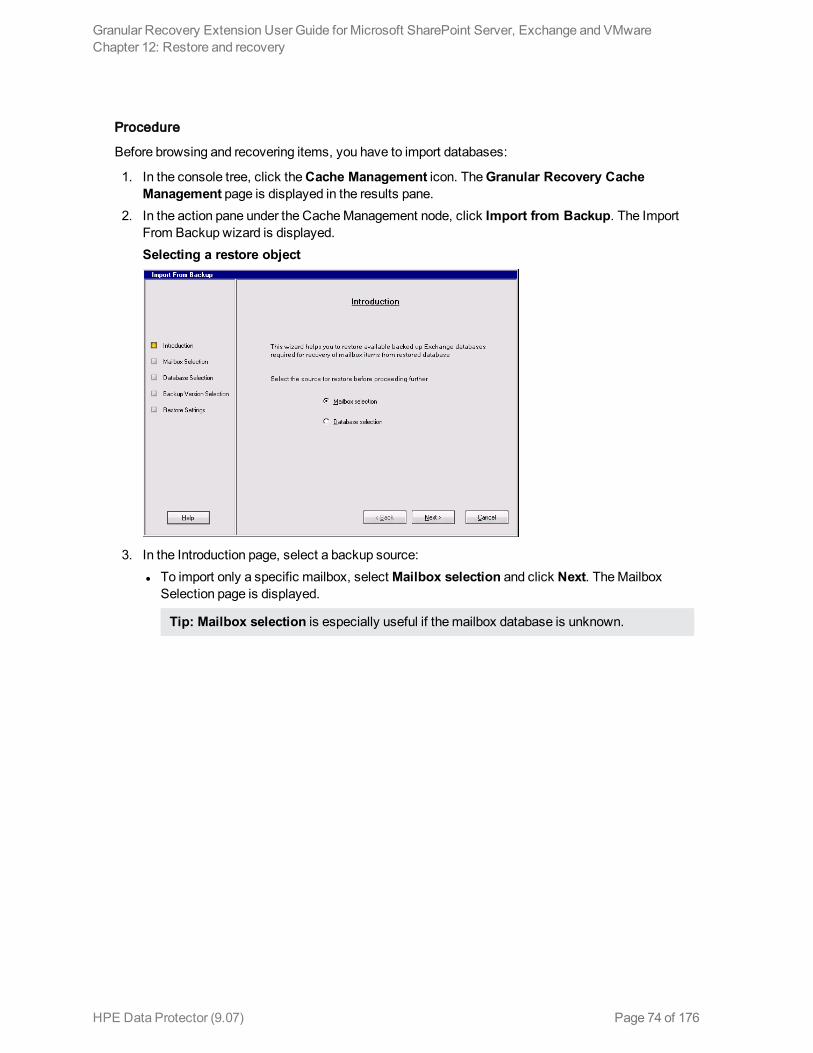
Procedure
Before browsing and recovering items, you have to import databases:
1. In the console tree, click the Cache Management icon. The Granular Recovery Cache Management page is displayed in the results pane.
2. In the action pane under the Cache Management node, click Import from Backup. The Import From Backup wizard is displayed.Selecting a restore object
3. In the Introduction page, select a backup source: l To import only a specific mailbox, select Mailbox selection and click Next. The Mailbox
Selection page is displayed.
Tip: Mailbox selection is especially useful if the mailbox database is unknown.
Granular Recovery Extension User Guide for Microsoft SharePoint Server, Exchange and VMwareChapter 12: Restore and recovery
HPE Data Protector (9.07) Page 74 of 176
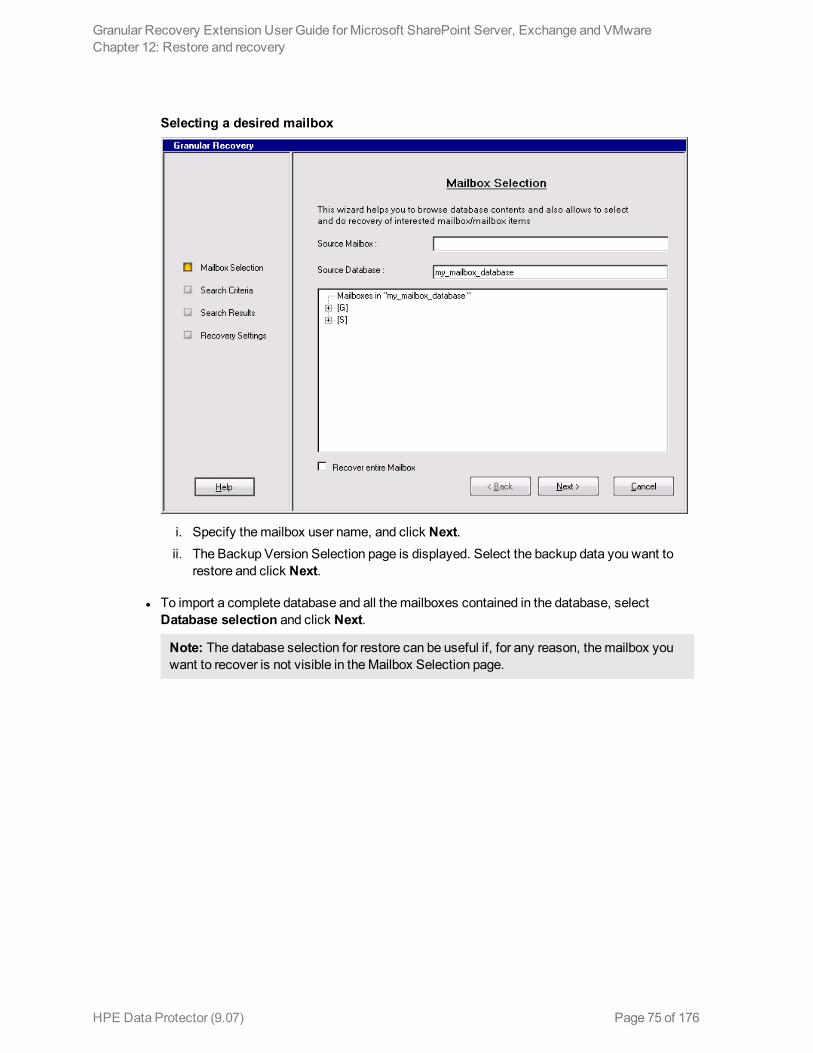
Selecting a desired mailbox
i. Specify the mailbox user name, and click Next. ii. The Backup Version Selection page is displayed. Select the backup data you want to
restore and click Next.
l To import a complete database and all the mailboxes contained in the database, select Database selection and click Next.
Note: The database selection for restore can be useful if, for any reason, the mailbox you want to recover is not visible in the Mailbox Selection page.
Granular Recovery Extension User Guide for Microsoft SharePoint Server, Exchange and VMwareChapter 12: Restore and recovery
HPE Data Protector (9.07) Page 75 of 176
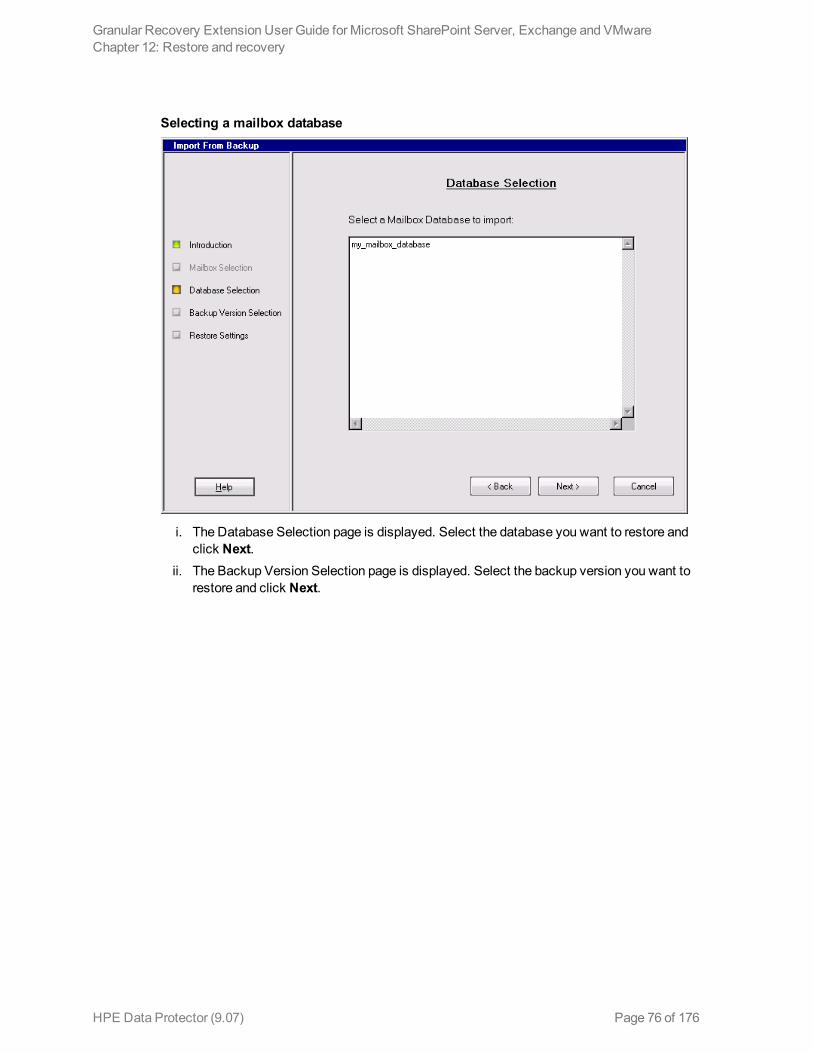
Selecting a mailbox database
i. The Database Selection page is displayed. Select the database you want to restore and click Next.
ii. The Backup Version Selection page is displayed. Select the backup version you want to restore and click Next.
Granular Recovery Extension User Guide for Microsoft SharePoint Server, Exchange and VMwareChapter 12: Restore and recovery
HPE Data Protector (9.07) Page 76 of 176
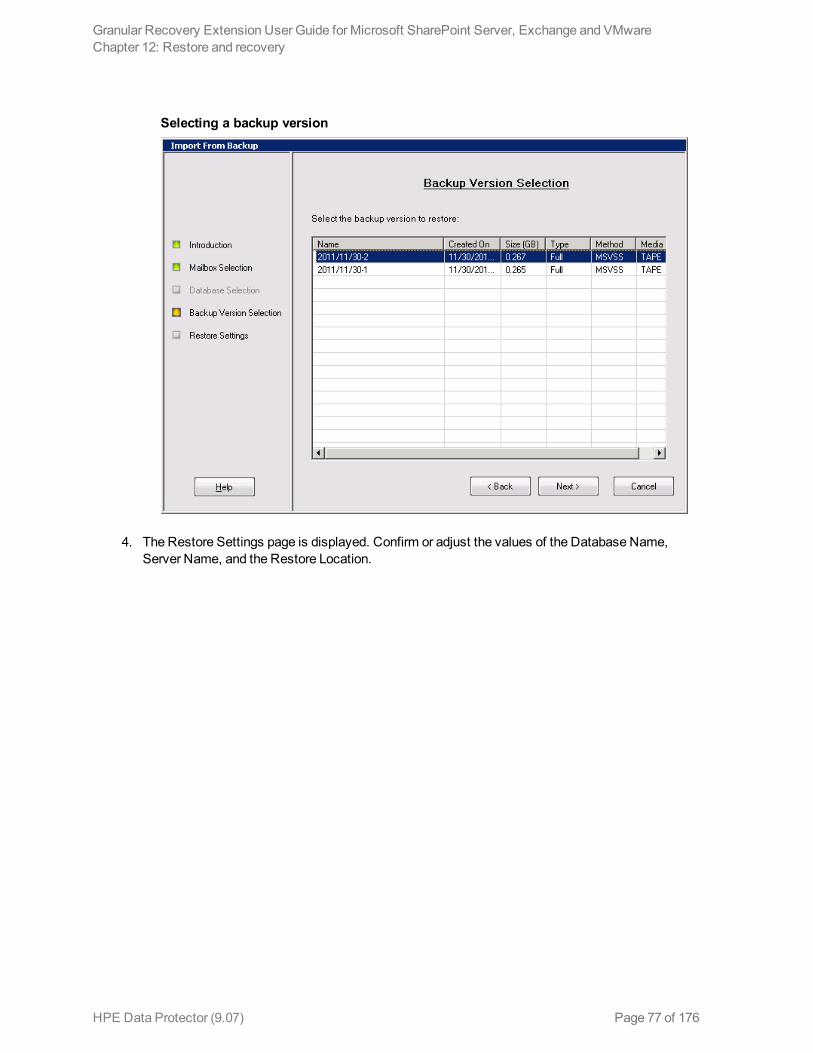
Selecting a backup version
4. The Restore Settings page is displayed. Confirm or adjust the values of the Database Name, Server Name, and the Restore Location.
Granular Recovery Extension User Guide for Microsoft SharePoint Server, Exchange and VMwareChapter 12: Restore and recovery
HPE Data Protector (9.07) Page 77 of 176
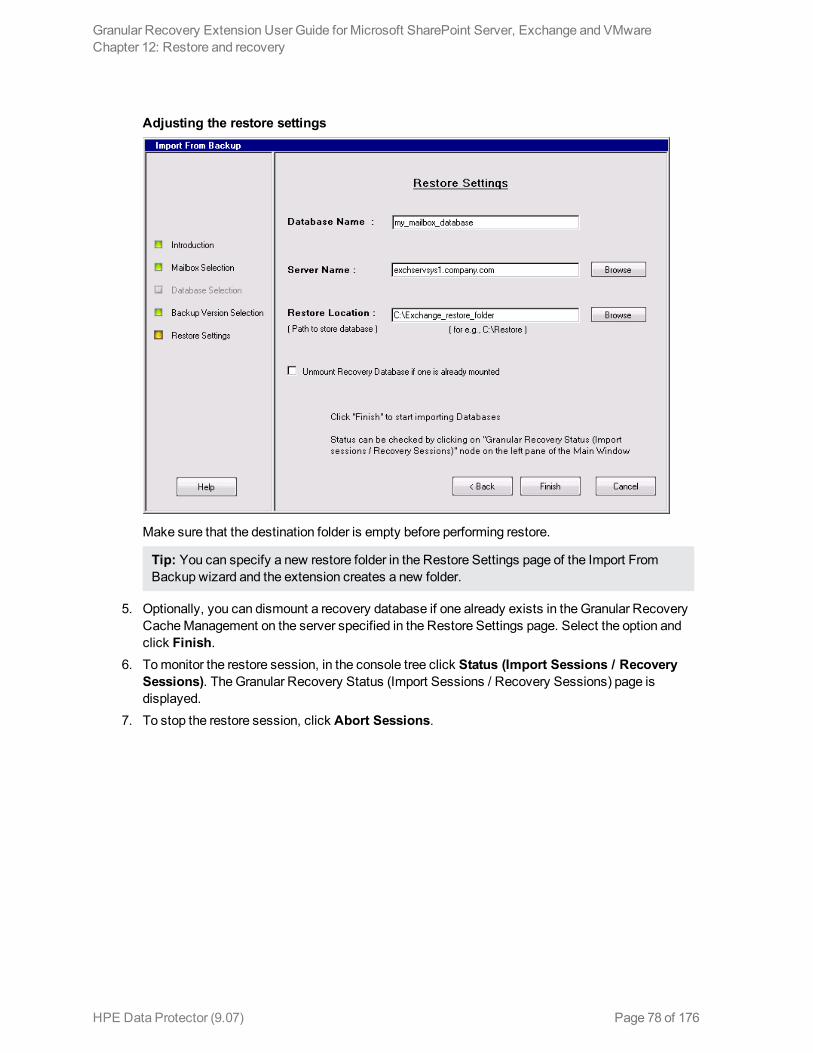
Adjusting the restore settings
Make sure that the destination folder is empty before performing restore.
Tip: You can specify a new restore folder in the Restore Settings page of the Import From Backup wizard and the extension creates a new folder.
5. Optionally, you can dismount a recovery database if one already exists in the Granular Recovery Cache Management on the server specified in the Restore Settings page. Select the option and click Finish.
6. To monitor the restore session, in the console tree click Status (Import Sessions / Recovery Sessions). The Granular Recovery Status (Import Sessions / Recovery Sessions) page is displayed.
7. To stop the restore session, click Abort Sessions.
Granular Recovery Extension User Guide for Microsoft SharePoint Server, Exchange and VMwareChapter 12: Restore and recovery
HPE Data Protector (9.07) Page 78 of 176
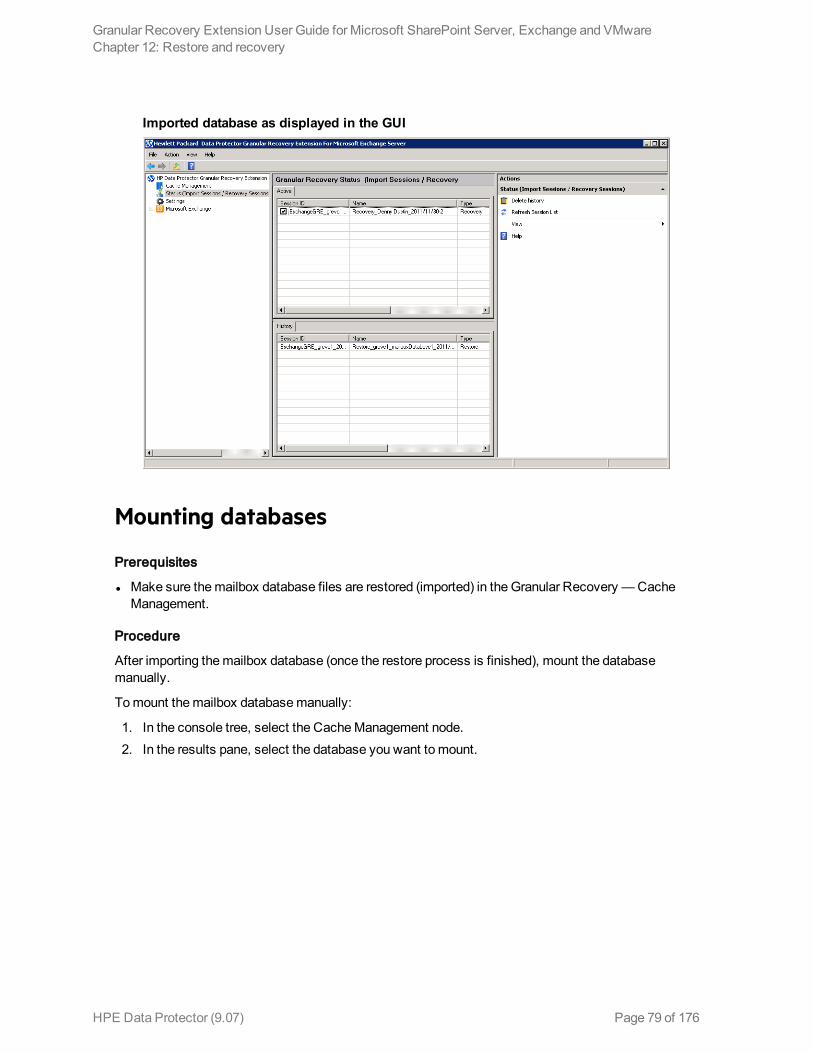
Imported database as displayed in the GUI
Mounting databases
Prerequisites
l Make sure the mailbox database files are restored (imported) in the Granular Recovery — Cache Management.
Procedure
After importing the mailbox database (once the restore process is finished), mount the database manually.
To mount the mailbox database manually:
1. In the console tree, select the Cache Management node. 2. In the results pane, select the database you want to mount.
Granular Recovery Extension User Guide for Microsoft SharePoint Server, Exchange and VMwareChapter 12: Restore and recovery
HPE Data Protector (9.07) Page 79 of 176
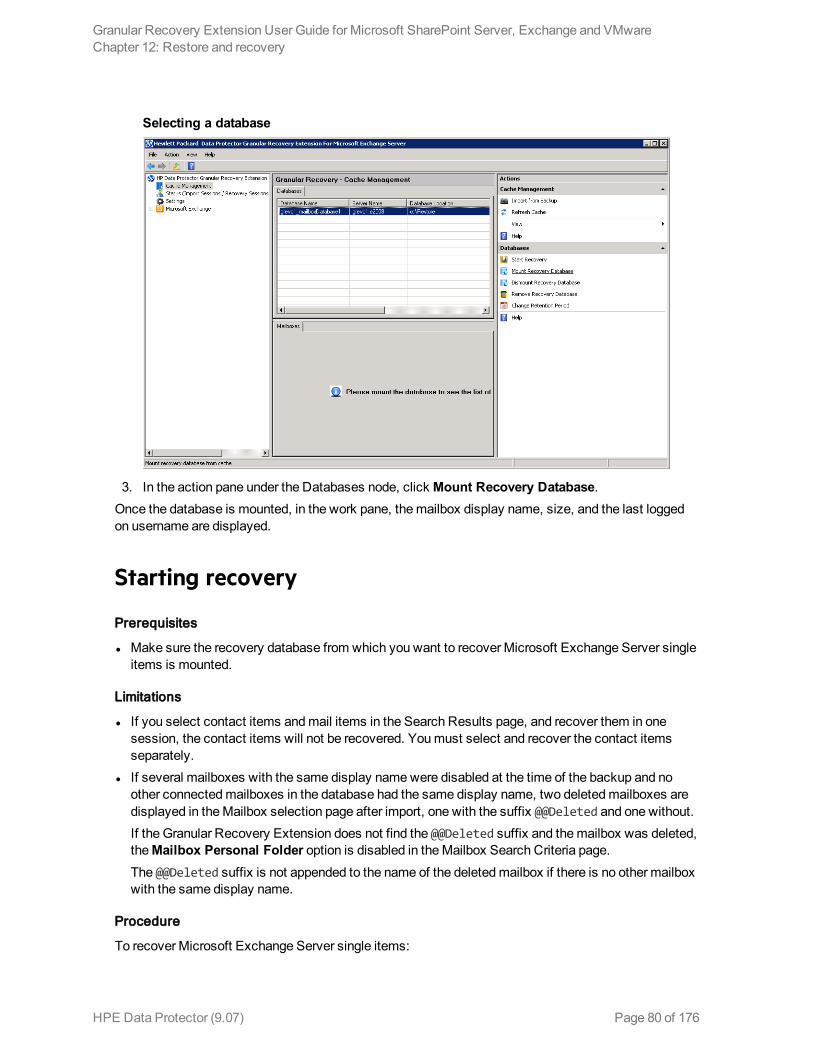
Selecting a database
3. In the action pane under the Databases node, click Mount Recovery Database.Once the database is mounted, in the work pane, the mailbox display name, size, and the last logged on username are displayed.
Starting recovery
Prerequisites
l Make sure the recovery database from which you want to recover Microsoft Exchange Server single items is mounted.
Limitations
l If you select contact items and mail items in the Search Results page, and recover them in one session, the contact items will not be recovered. You must select and recover the contact items separately.
l If several mailboxes with the same display name were disabled at the time of the backup and no other connected mailboxes in the database had the same display name, two deleted mailboxes are displayed in the Mailbox selection page after import, one with the suffix @@Deleted and one without.If the Granular Recovery Extension does not find the @@Deleted suffix and the mailbox was deleted, the Mailbox Personal Folder option is disabled in the Mailbox Search Criteria page.
The @@Deleted suffix is not appended to the name of the deleted mailbox if there is no other mailbox with the same display name.
Procedure
To recover Microsoft Exchange Server single items:
Granular Recovery Extension User Guide for Microsoft SharePoint Server, Exchange and VMwareChapter 12: Restore and recovery
HPE Data Protector (9.07) Page 80 of 176
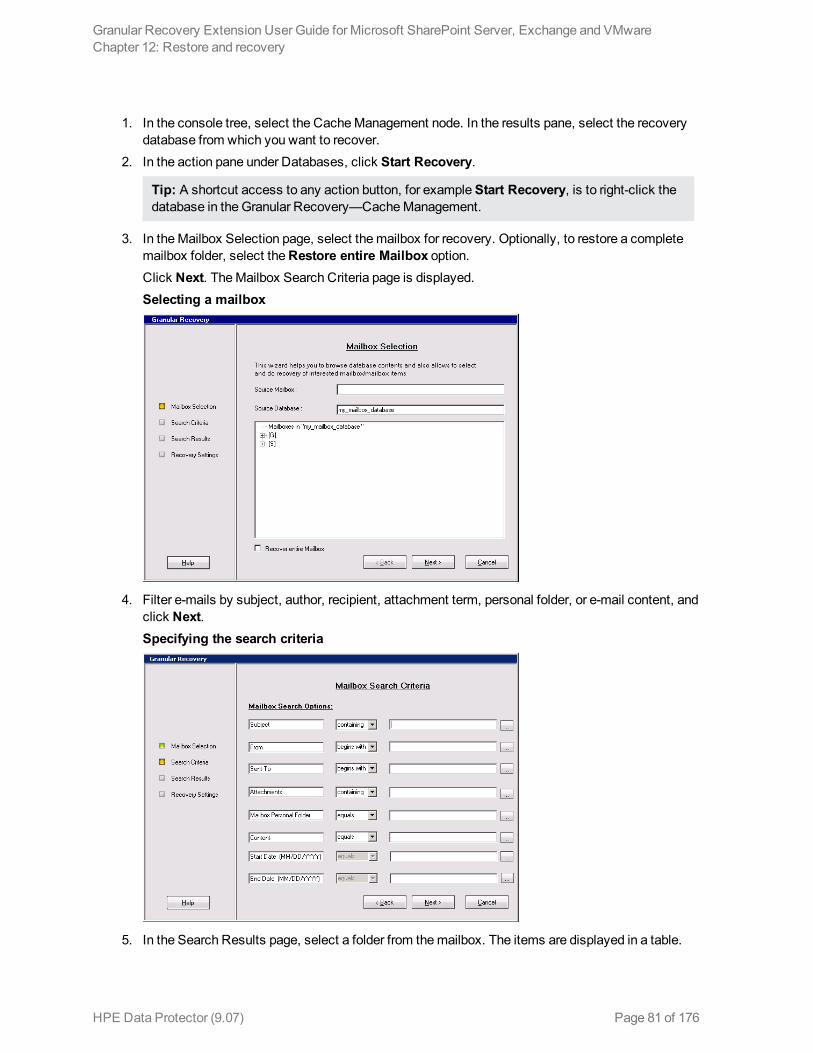
1. In the console tree, select the Cache Management node. In the results pane, select the recovery database from which you want to recover.
2. In the action pane under Databases, click Start Recovery.
Tip: A shortcut access to any action button, for example Start Recovery, is to right-click the database in the Granular Recovery—Cache Management.
3. In the Mailbox Selection page, select the mailbox for recovery. Optionally, to restore a complete mailbox folder, select the Restore entire Mailbox option.Click Next. The Mailbox Search Criteria page is displayed.Selecting a mailbox
4. Filter e-mails by subject, author, recipient, attachment term, personal folder, or e-mail content, and click Next.Specifying the search criteria
5. In the Search Results page, select a folder from the mailbox. The items are displayed in a table.
Granular Recovery Extension User Guide for Microsoft SharePoint Server, Exchange and VMwareChapter 12: Restore and recovery
HPE Data Protector (9.07) Page 81 of 176
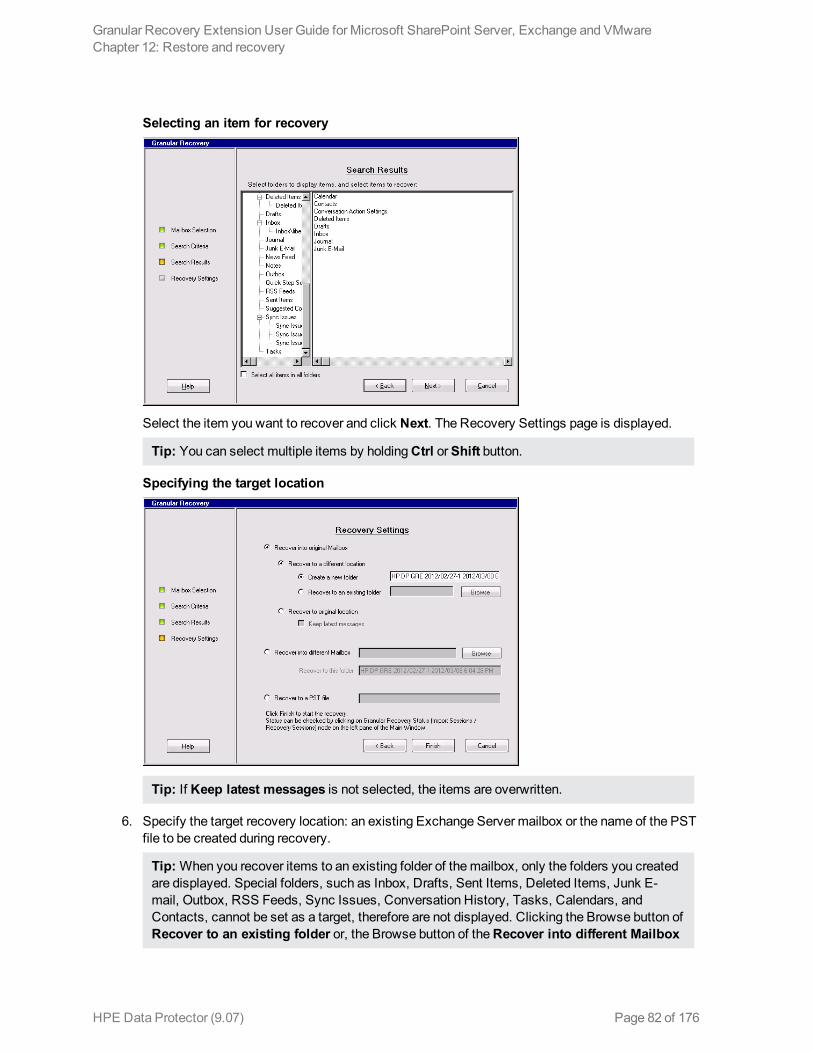
Selecting an item for recovery
Select the item you want to recover and click Next. The Recovery Settings page is displayed.
Tip: You can select multiple items by holding Ctrl or Shift button.
Specifying the target location
Tip: If Keep latest messages is not selected, the items are overwritten.
6. Specify the target recovery location: an existing Exchange Server mailbox or the name of the PST file to be created during recovery.
Tip: When you recover items to an existing folder of the mailbox, only the folders you created are displayed. Special folders, such as Inbox, Drafts, Sent Items, Deleted Items, Junk E-mail, Outbox, RSS Feeds, Sync Issues, Conversation History, Tasks, Calendars, and Contacts, cannot be set as a target, therefore are not displayed. Clicking the Browse button of Recover to an existing folder or, the Browse button of the Recover into different Mailbox
Granular Recovery Extension User Guide for Microsoft SharePoint Server, Exchange and VMwareChapter 12: Restore and recovery
HPE Data Protector (9.07) Page 82 of 176
does not display special folders. Only Recover to original location can recover items to special folders.
The PST file folder must be accessible from the Exchange Server system.To use a remote system or current server, enter the path to the network shared folder in the following (UNC) format:
\\SystemName\FolderShareName\Filename.pst
Note: Make sure the local system user account performing the recovery has read and write permissions set on the network share folder in order to create a PST file. If the folder is located on a remote server system, the Data Protector MS Exchange Granular Recovery Extension component does not need to be installed on the remote system.
Click Finish to start the recovery operation and close the wizard.
Dismounting databases
Prerequisites
l Make sure the recovery database you want to dismount is mounted.
Considerations
l Only one recovery database can stay mounted. For this reason, when you want to recover single items, or complete mailboxes from a different backup version or from a different mailbox database, you have to first dismount the mailbox database already presented to the Microsoft Exchange Server, the one displayed in the Granular Recovery Cache Management.
After the restore process is finished, the selected database is mounted in the Granular Recovery Cache Management. The mounted database is displayed in the results pane.
To dismount no longer needed databases from the Granular Recovery Cache Management:
1. In the console tree, select the Cache Management node. The Granular Recovery Cache Management page is displayed.
2. In the results pane, select the database. In the action pane under the Databases node, click Dismount Recovery Database.
Granular Recovery Extension User Guide for Microsoft SharePoint Server, Exchange and VMwareChapter 12: Restore and recovery
HPE Data Protector (9.07) Page 83 of 176
Clicking Dismount
3. The confirmation dialog box is displayed. Click Yes. The database is dismounted, the mailbox information is no longer displayed in the work pane.
Removing databases
Prerequisites
l Make sure the recovery database you want to remove from the disk is restored.
Considerations
l The restored mailbox database is available in the Granular Recovery — Cache Management for 30 days (default value). After the retention period the database is deleted automatically.
Procedure
To remove no longer needed databases manually from the Granular Recovery — Cache Management and from the temporary restore location on the disk:
1. In the console tree, select the Cache Management node. The Granular Recovery Cache Management page is displayed.
2. In the results pane, select the database. In the action pane under the Databases node, click Remove Recovery Database.
Granular Recovery Extension User Guide for Microsoft SharePoint Server, Exchange and VMwareChapter 12: Restore and recovery
HPE Data Protector (9.07) Page 84 of 176
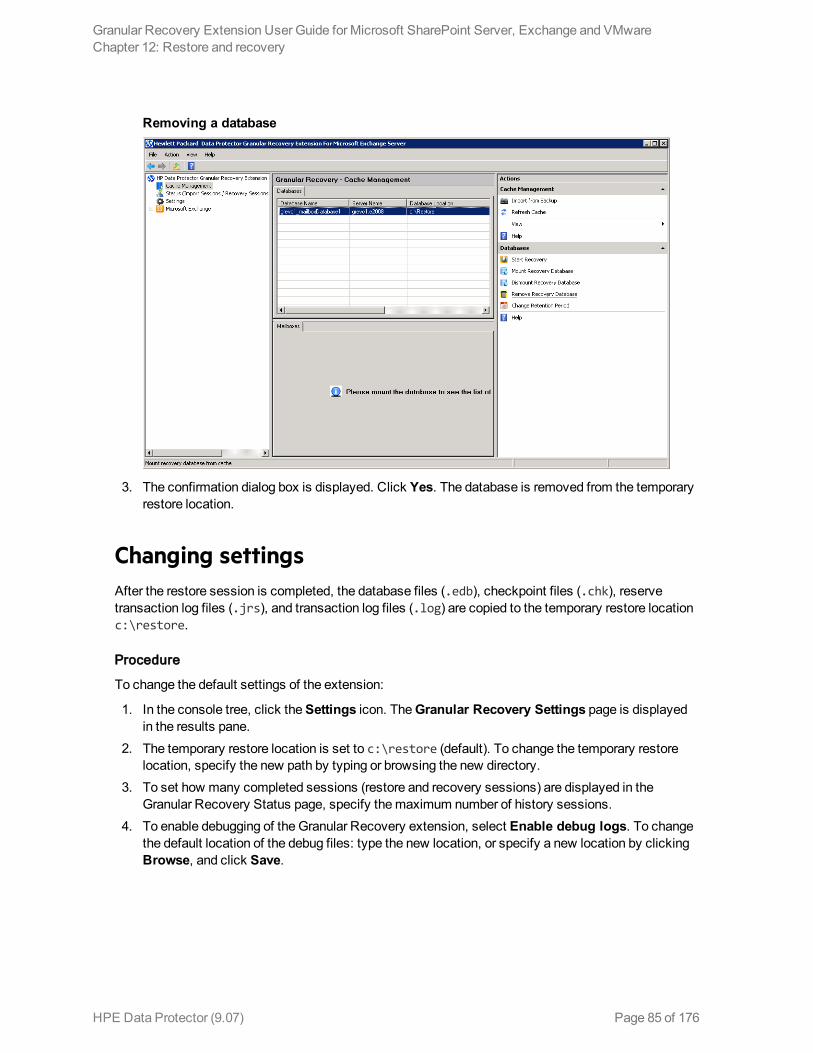
Removing a database
3. The confirmation dialog box is displayed. Click Yes. The database is removed from the temporary restore location.
Changing settingsAfter the restore session is completed, the database files (.edb), checkpoint files (.chk), reserve transaction log files (.jrs), and transaction log files (.log) are copied to the temporary restore location c:\restore.
Procedure
To change the default settings of the extension:
1. In the console tree, click the Settings icon. The Granular Recovery Settings page is displayed in the results pane.
2. The temporary restore location is set to c:\restore (default). To change the temporary restore location, specify the new path by typing or browsing the new directory.
3. To set how many completed sessions (restore and recovery sessions) are displayed in the Granular Recovery Status page, specify the maximum number of history sessions.
4. To enable debugging of the Granular Recovery extension, select Enable debug logs. To change the default location of the debug files: type the new location, or specify a new location by clicking Browse, and click Save.
Granular Recovery Extension User Guide for Microsoft SharePoint Server, Exchange and VMwareChapter 12: Restore and recovery
HPE Data Protector (9.07) Page 85 of 176
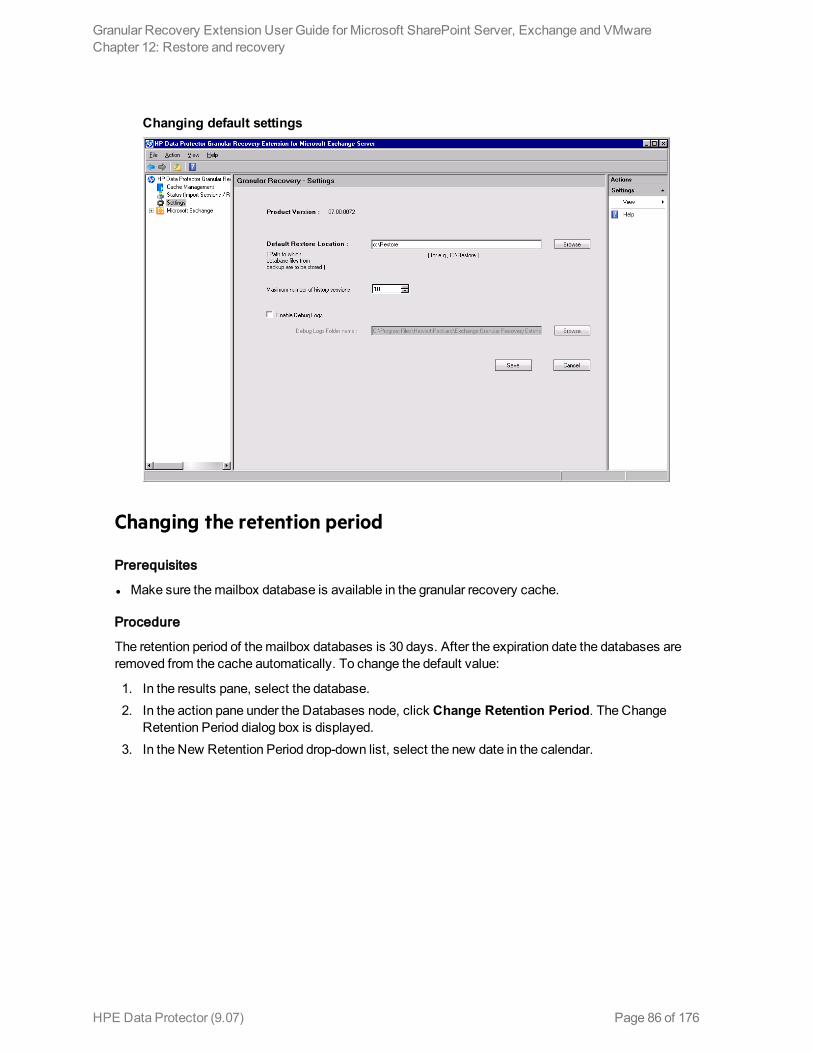
Changing default settings
Changing the retention period
Prerequisites
l Make sure the mailbox database is available in the granular recovery cache.
Procedure
The retention period of the mailbox databases is 30 days. After the expiration date the databases are removed from the cache automatically. To change the default value:
1. In the results pane, select the database. 2. In the action pane under the Databases node, click Change Retention Period. The Change
Retention Period dialog box is displayed. 3. In the New Retention Period drop-down list, select the new date in the calendar.
Granular Recovery Extension User Guide for Microsoft SharePoint Server, Exchange and VMwareChapter 12: Restore and recovery
HPE Data Protector (9.07) Page 86 of 176
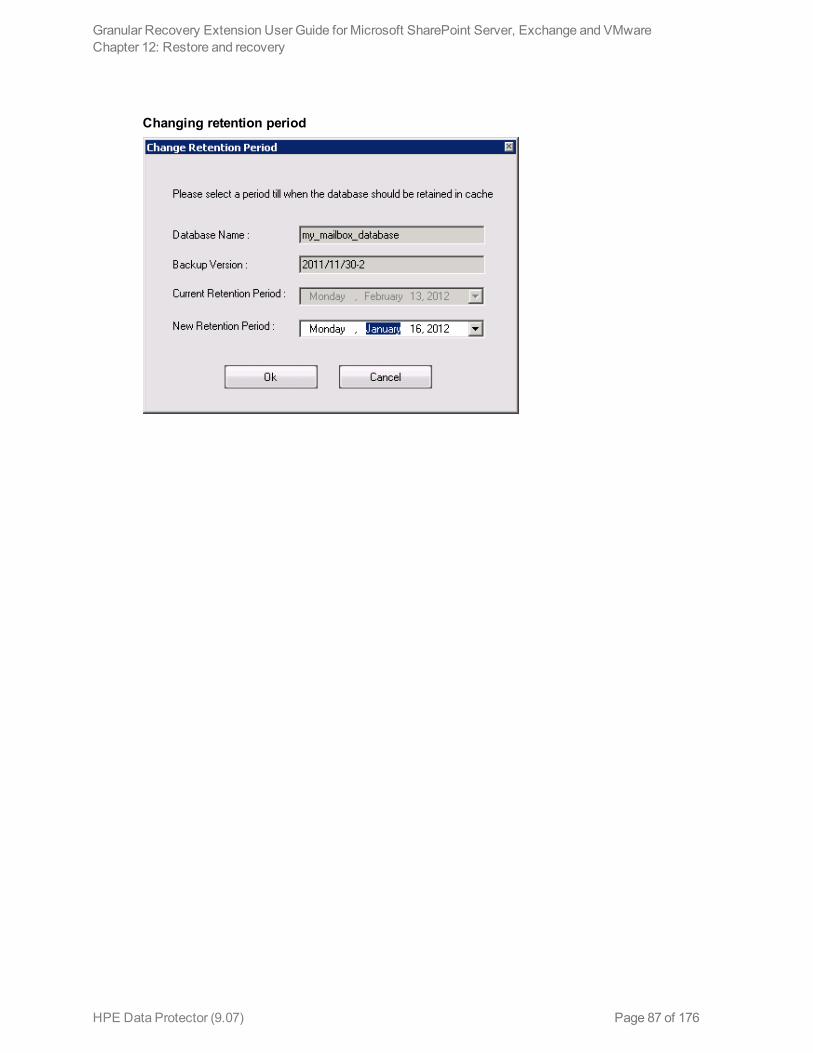
Changing retention period
Granular Recovery Extension User Guide for Microsoft SharePoint Server, Exchange and VMwareChapter 12: Restore and recovery
HPE Data Protector (9.07) Page 87 of 176
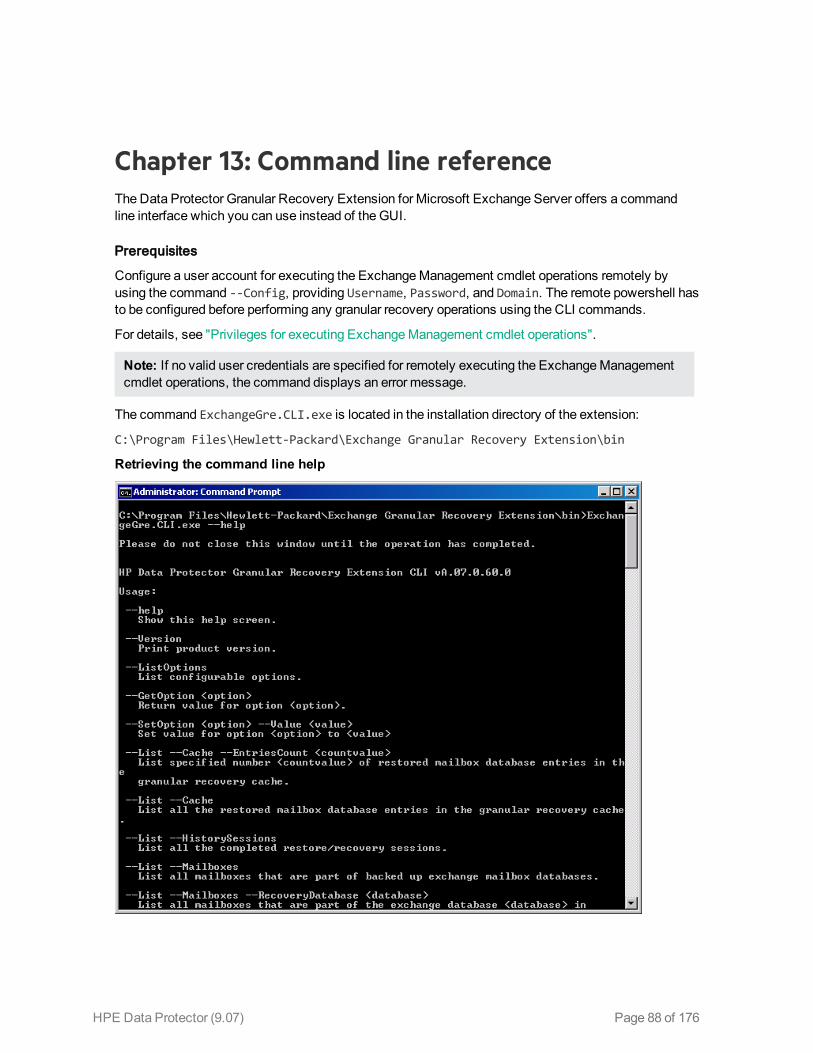
Chapter 13: Command line referenceThe Data Protector Granular Recovery Extension for Microsoft Exchange Server offers a command line interface which you can use instead of the GUI.
Prerequisites
Configure a user account for executing the Exchange Management cmdlet operations remotely by using the command --Config, providing Username, Password, and Domain. The remote powershell has to be configured before performing any granular recovery operations using the CLI commands.
For details, see "Privileges for executing Exchange Management cmdlet operations".
Note: If no valid user credentials are specified for remotely executing the Exchange Management cmdlet operations, the command displays an error message.
The command ExchangeGre.CLI.exe is located in the installation directory of the extension:
C:\Program Files\Hewlett-Packard\Exchange Granular Recovery Extension\bin
Retrieving the command line help
HPE Data Protector (9.07) Page 88 of 176
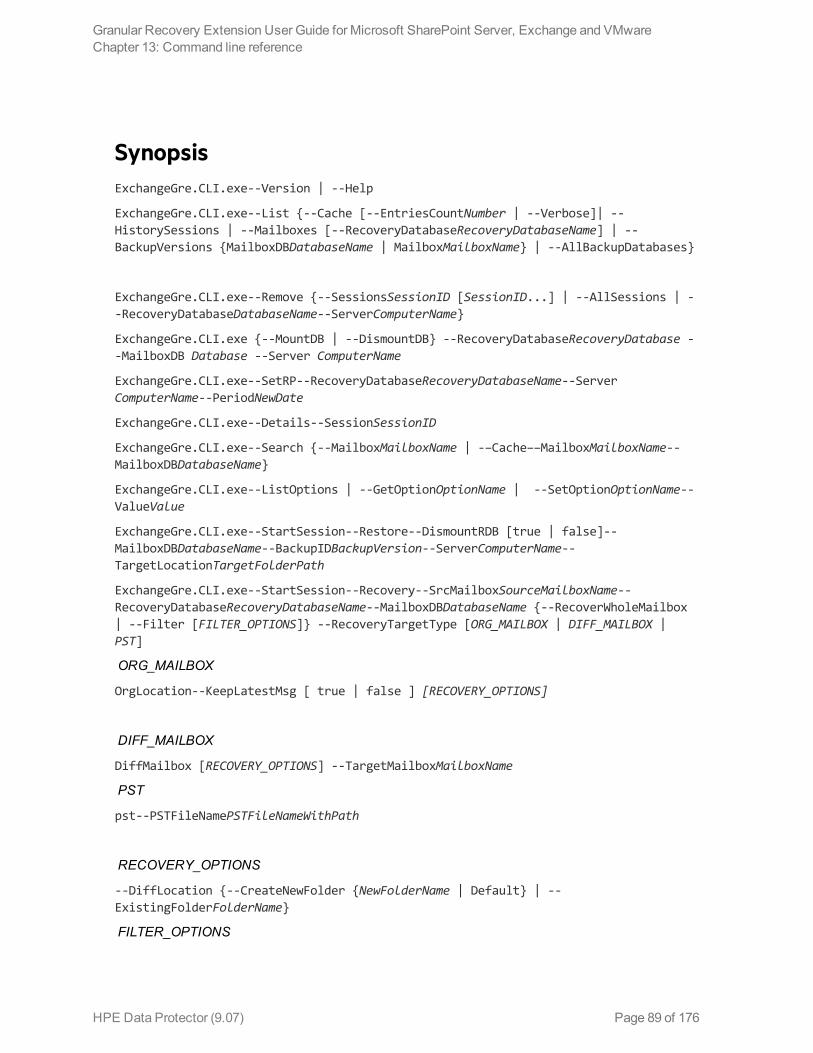
SynopsisExchangeGre.CLI.exe--Version | --Help
ExchangeGre.CLI.exe--List {--Cache [--EntriesCountNumber | --Verbose]| --HistorySessions | --Mailboxes [--RecoveryDatabaseRecoveryDatabaseName] | --BackupVersions {MailboxDBDatabaseName | MailboxMailboxName} | --AllBackupDatabases}
ExchangeGre.CLI.exe--Remove {--SessionsSessionID [SessionID...] | --AllSessions | --RecoveryDatabaseDatabaseName--ServerComputerName}
ExchangeGre.CLI.exe {--MountDB | --DismountDB} --RecoveryDatabaseRecoveryDatabase --MailboxDB Database --Server ComputerName
ExchangeGre.CLI.exe--SetRP--RecoveryDatabaseRecoveryDatabaseName--Server ComputerName--PeriodNewDate
ExchangeGre.CLI.exe--Details--SessionSessionID
ExchangeGre.CLI.exe--Search {--MailboxMailboxName | -–Cache––MailboxMailboxName--MailboxDBDatabaseName}
ExchangeGre.CLI.exe--ListOptions | --GetOptionOptionName | --SetOptionOptionName--ValueValue
ExchangeGre.CLI.exe--StartSession--Restore--DismountRDB [true | false]--MailboxDBDatabaseName--BackupIDBackupVersion--ServerComputerName--TargetLocationTargetFolderPath
ExchangeGre.CLI.exe--StartSession--Recovery--SrcMailboxSourceMailboxName--RecoveryDatabaseRecoveryDatabaseName--MailboxDBDatabaseName {--RecoverWholeMailbox | --Filter [FILTER_OPTIONS]} --RecoveryTargetType [ORG_MAILBOX | DIFF_MAILBOX | PST]
ORG_MAILBOX
OrgLocation--KeepLatestMsg [ true | false ] [RECOVERY_OPTIONS]
DIFF_MAILBOX
DiffMailbox [RECOVERY_OPTIONS] --TargetMailboxMailboxName
PST
pst--PSTFileNamePSTFileNameWithPath
RECOVERY_OPTIONS
--DiffLocation {--CreateNewFolder {NewFolderName | Default} | --ExistingFolderFolderName}
FILTER_OPTIONS
Granular Recovery Extension User Guide for Microsoft SharePoint Server, Exchange and VMwareChapter 13: Command line reference
HPE Data Protector (9.07) Page 89 of 176
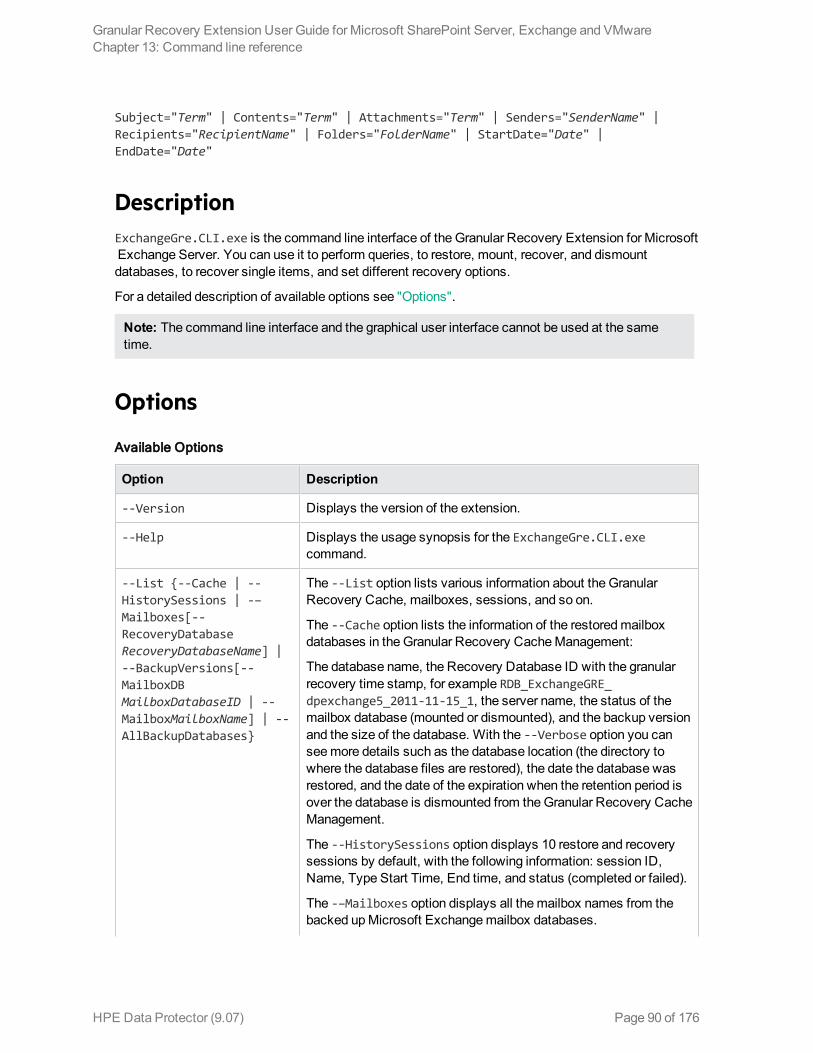
Subject="Term" | Contents="Term" | Attachments="Term" | Senders="SenderName" | Recipients="RecipientName" | Folders="FolderName" | StartDate="Date" | EndDate="Date"
DescriptionExchangeGre.CLI.exe is the command line interface of the Granular Recovery Extension for Microsoft Exchange Server. You can use it to perform queries, to restore, mount, recover, and dismount databases, to recover single items, and set different recovery options.
For a detailed description of available options see "Options".
Note: The command line interface and the graphical user interface cannot be used at the same time.
Options
Available Options
Option Description
--Version Displays the version of the extension.
--Help Displays the usage synopsis for the ExchangeGre.CLI.exe command.
--List {--Cache | --HistorySessions | -–Mailboxes[--RecoveryDatabaseRecoveryDatabaseName] | --BackupVersions[--MailboxDBMailboxDatabaseID | --MailboxMailboxName] | --AllBackupDatabases}
The --List option lists various information about the Granular Recovery Cache, mailboxes, sessions, and so on.
The --Cache option lists the information of the restored mailbox databases in the Granular Recovery Cache Management:
The database name, the Recovery Database ID with the granular recovery time stamp, for example RDB_ExchangeGRE_dpexchange5_2011-11-15_1, the server name, the status of the mailbox database (mounted or dismounted), and the backup version and the size of the database. With the --Verbose option you can see more details such as the database location (the directory to where the database files are restored), the date the database was restored, and the date of the expiration when the retention period is over the database is dismounted from the Granular Recovery Cache Management.
The --HistorySessions option displays 10 restore and recovery sessions by default, with the following information: session ID, Name, Type Start Time, End time, and status (completed or failed).
The -–Mailboxes option displays all the mailbox names from the backed up Microsoft Exchange mailbox databases.
Granular Recovery Extension User Guide for Microsoft SharePoint Server, Exchange and VMwareChapter 13: Command line reference
HPE Data Protector (9.07) Page 90 of 176
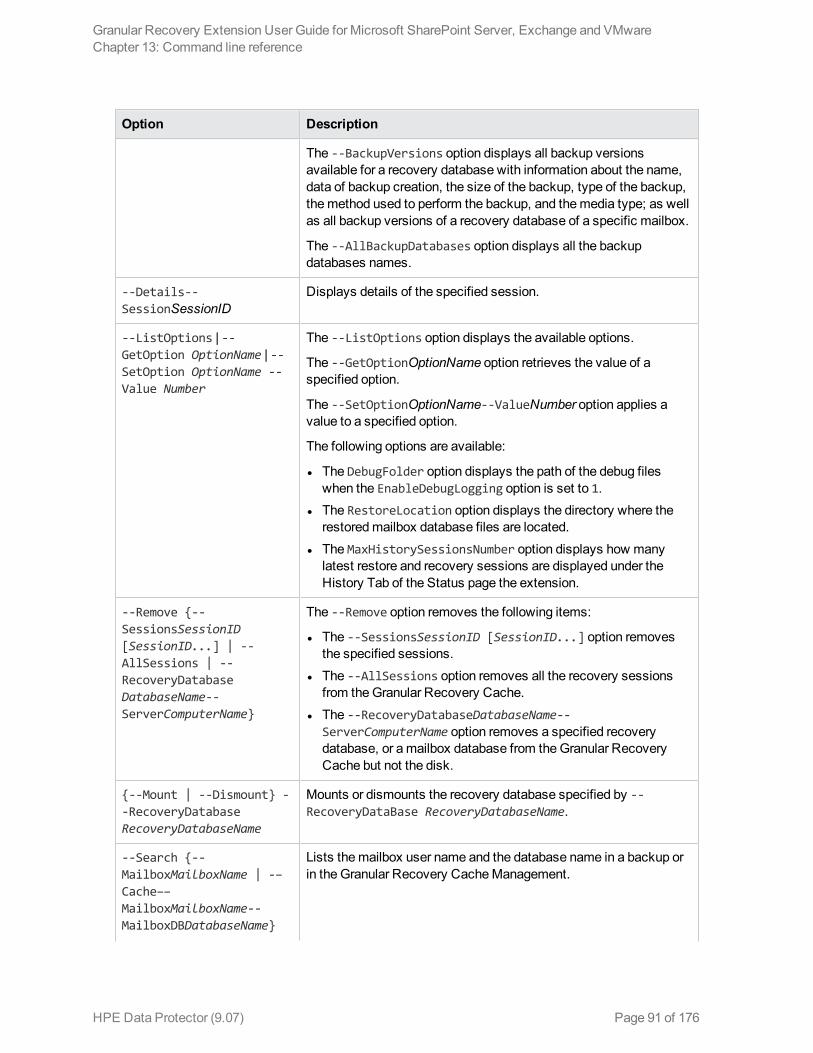
Option Description
The --BackupVersions option displays all backup versions available for a recovery database with information about the name, data of backup creation, the size of the backup, type of the backup, the method used to perform the backup, and the media type; as well as all backup versions of a recovery database of a specific mailbox.
The --AllBackupDatabases option displays all the backup databases names.
--Details--SessionSessionID
Displays details of the specified session.
--ListOptions | --GetOption OptionName | --SetOption OptionName --Value Number
The --ListOptions option displays the available options.
The --GetOptionOptionName option retrieves the value of a specified option.
The --SetOptionOptionName--ValueNumber option applies a value to a specified option.
The following options are available:
l The DebugFolder option displays the path of the debug files when the EnableDebugLogging option is set to 1.
l The RestoreLocation option displays the directory where the restored mailbox database files are located.
l The MaxHistorySessionsNumber option displays how many latest restore and recovery sessions are displayed under the History Tab of the Status page the extension.
--Remove {--SessionsSessionID [SessionID...] | --AllSessions | --RecoveryDatabaseDatabaseName--ServerComputerName}
The --Remove option removes the following items:
l The --SessionsSessionID [SessionID...] option removes the specified sessions.
l The --AllSessions option removes all the recovery sessions from the Granular Recovery Cache.
l The --RecoveryDatabaseDatabaseName--ServerComputerName option removes a specified recovery database, or a mailbox database from the Granular Recovery Cache but not the disk.
{--Mount | --Dismount} --RecoveryDatabase RecoveryDatabaseName
Mounts or dismounts the recovery database specified by --RecoveryDataBase RecoveryDatabaseName.
--Search {--MailboxMailboxName | -–Cache––MailboxMailboxName--MailboxDBDatabaseName}
Lists the mailbox user name and the database name in a backup or in the Granular Recovery Cache Management.
Granular Recovery Extension User Guide for Microsoft SharePoint Server, Exchange and VMwareChapter 13: Command line reference
HPE Data Protector (9.07) Page 91 of 176
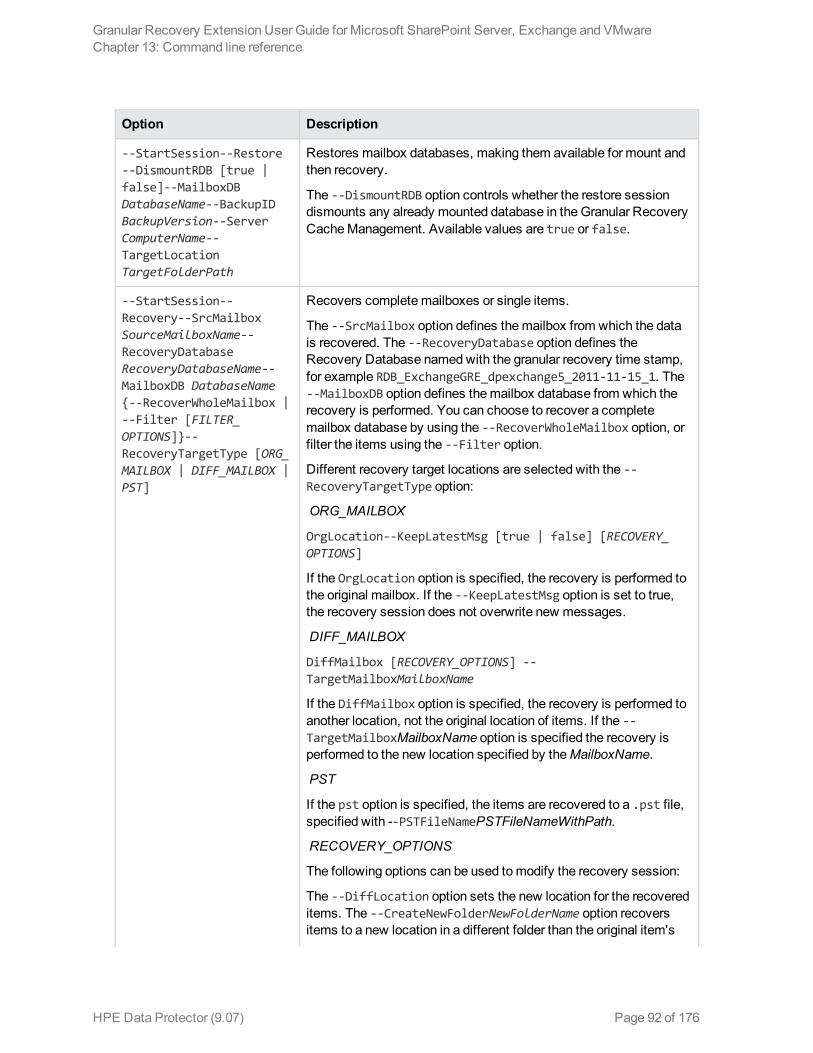
Option Description
--StartSession--Restore --DismountRDB [true | false]--MailboxDB DatabaseName--BackupID BackupVersion--Server ComputerName--TargetLocation TargetFolderPath
Restores mailbox databases, making them available for mount and then recovery.
The --DismountRDB option controls whether the restore session dismounts any already mounted database in the Granular Recovery Cache Management. Available values are true or false.
--StartSession--Recovery--SrcMailbox SourceMailboxName--RecoveryDatabase RecoveryDatabaseName--MailboxDB DatabaseName {--RecoverWholeMailbox | --Filter [FILTER_OPTIONS]}--RecoveryTargetType [ORG_MAILBOX | DIFF_MAILBOX | PST]
Recovers complete mailboxes or single items.
The --SrcMailbox option defines the mailbox from which the data is recovered. The --RecoveryDatabase option defines the Recovery Database named with the granular recovery time stamp, for example RDB_ExchangeGRE_dpexchange5_2011-11-15_1. The --MailboxDB option defines the mailbox database from which the recovery is performed. You can choose to recover a complete mailbox database by using the --RecoverWholeMailbox option, or filter the items using the --Filter option.
Different recovery target locations are selected with the --RecoveryTargetType option:
ORG_MAILBOX
OrgLocation--KeepLatestMsg [true | false] [RECOVERY_OPTIONS]
If the OrgLocation option is specified, the recovery is performed to the original mailbox. If the --KeepLatestMsg option is set to true, the recovery session does not overwrite new messages.
DIFF_MAILBOX
DiffMailbox [RECOVERY_OPTIONS] --TargetMailboxMailboxName
If the DiffMailbox option is specified, the recovery is performed to another location, not the original location of items. If the --TargetMailboxMailboxName option is specified the recovery is performed to the new location specified by the MailboxName.
PST
If the pst option is specified, the items are recovered to a .pst file, specified with --PSTFileNamePSTFileNameWithPath.
RECOVERY_OPTIONS
The following options can be used to modify the recovery session:
The --DiffLocation option sets the new location for the recovered items. The --CreateNewFolderNewFolderName option recovers items to a new location in a different folder than the original item's
Granular Recovery Extension User Guide for Microsoft SharePoint Server, Exchange and VMwareChapter 13: Command line reference
HPE Data Protector (9.07) Page 92 of 176
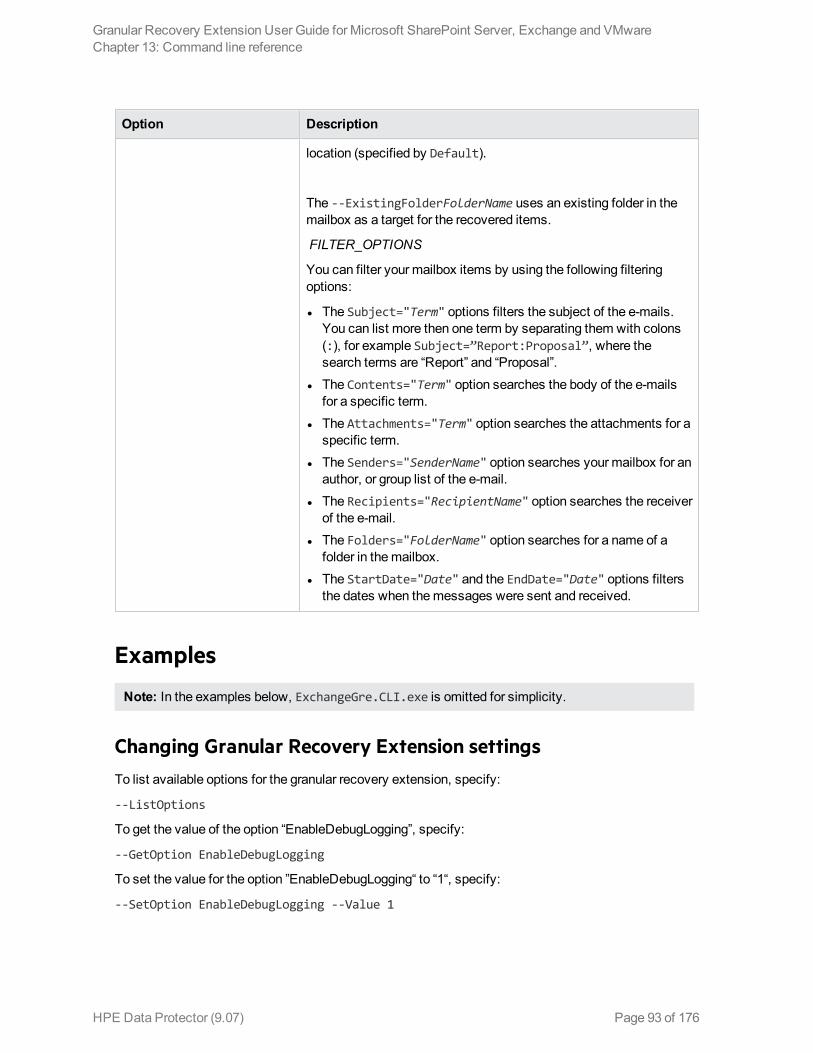
Option Description
location (specified by Default).
The --ExistingFolderFolderName uses an existing folder in the mailbox as a target for the recovered items.
FILTER_OPTIONS
You can filter your mailbox items by using the following filtering options:
l The Subject="Term" options filters the subject of the e-mails. You can list more then one term by separating them with colons (:), for example Subject=”Report:Proposal”, where the search terms are “Report” and “Proposal”.
l The Contents="Term" option searches the body of the e-mails for a specific term.
l The Attachments="Term" option searches the attachments for a specific term.
l The Senders="SenderName" option searches your mailbox for an author, or group list of the e-mail.
l The Recipients="RecipientName" option searches the receiver of the e-mail.
l The Folders="FolderName" option searches for a name of a folder in the mailbox.
l The StartDate="Date" and the EndDate="Date" options filters the dates when the messages were sent and received.
Examples
Note: In the examples below, ExchangeGre.CLI.exe is omitted for simplicity.
Changing Granular Recovery Extension settingsTo list available options for the granular recovery extension, specify:
--ListOptions
To get the value of the option “EnableDebugLogging”, specify:
--GetOption EnableDebugLogging
To set the value for the option ”EnableDebugLogging“ to “1“, specify:
--SetOption EnableDebugLogging --Value 1
Granular Recovery Extension User Guide for Microsoft SharePoint Server, Exchange and VMwareChapter 13: Command line reference
HPE Data Protector (9.07) Page 93 of 176
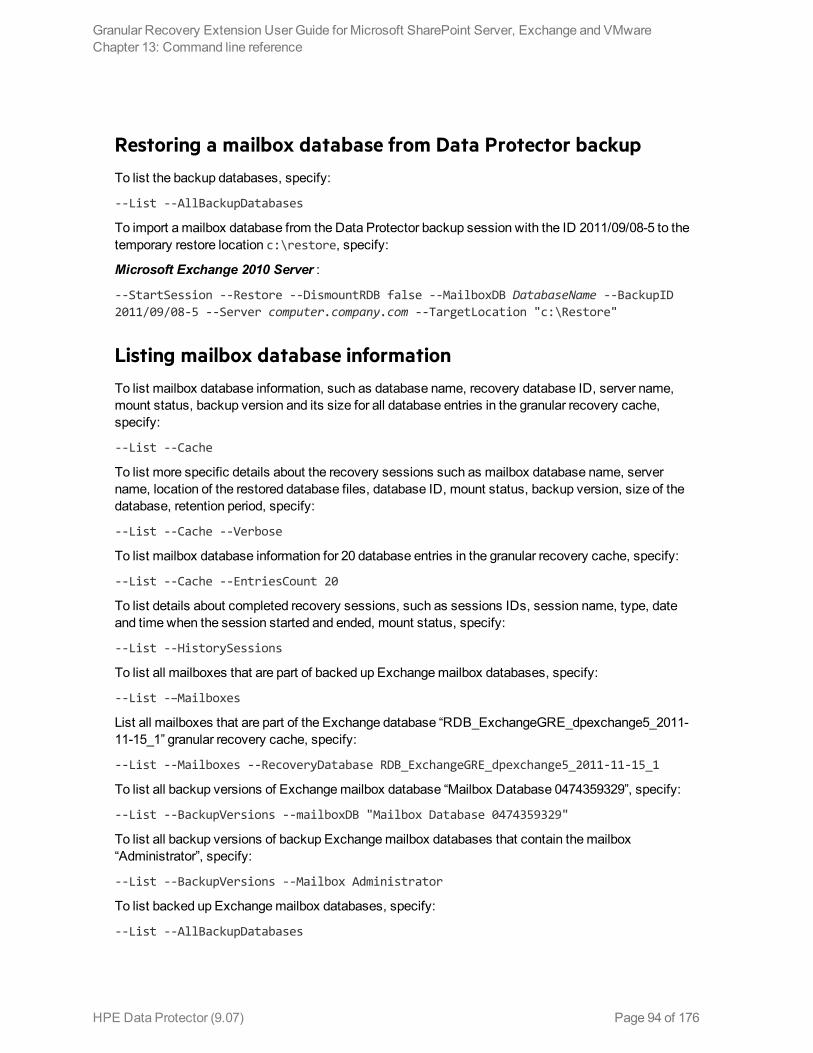
Restoring a mailbox database from Data Protector backupTo list the backup databases, specify:
--List --AllBackupDatabases
To import a mailbox database from the Data Protector backup session with the ID 2011/09/08-5 to the temporary restore location c:\restore, specify:
Microsoft Exchange 2010 Server :
--StartSession --Restore --DismountRDB false --MailboxDB DatabaseName --BackupID 2011/09/08-5 --Server computer.company.com --TargetLocation "c:\Restore"
Listing mailbox database informationTo list mailbox database information, such as database name, recovery database ID, server name, mount status, backup version and its size for all database entries in the granular recovery cache, specify:
--List --Cache
To list more specific details about the recovery sessions such as mailbox database name, server name, location of the restored database files, database ID, mount status, backup version, size of the database, retention period, specify:
--List --Cache --Verbose
To list mailbox database information for 20 database entries in the granular recovery cache, specify:
--List --Cache --EntriesCount 20
To list details about completed recovery sessions, such as sessions IDs, session name, type, date and time when the session started and ended, mount status, specify:
--List --HistorySessions
To list all mailboxes that are part of backed up Exchange mailbox databases, specify:
--List -–Mailboxes
List all mailboxes that are part of the Exchange database “RDB_ExchangeGRE_dpexchange5_2011-11-15_1” granular recovery cache, specify:
--List --Mailboxes --RecoveryDatabase RDB_ExchangeGRE_dpexchange5_2011-11-15_1
To list all backup versions of Exchange mailbox database “Mailbox Database 0474359329”, specify:
--List --BackupVersions --mailboxDB "Mailbox Database 0474359329"
To list all backup versions of backup Exchange mailbox databases that contain the mailbox “Administrator”, specify:
--List --BackupVersions --Mailbox Administrator
To list backed up Exchange mailbox databases, specify:
--List --AllBackupDatabases
Granular Recovery Extension User Guide for Microsoft SharePoint Server, Exchange and VMwareChapter 13: Command line reference
HPE Data Protector (9.07) Page 94 of 176
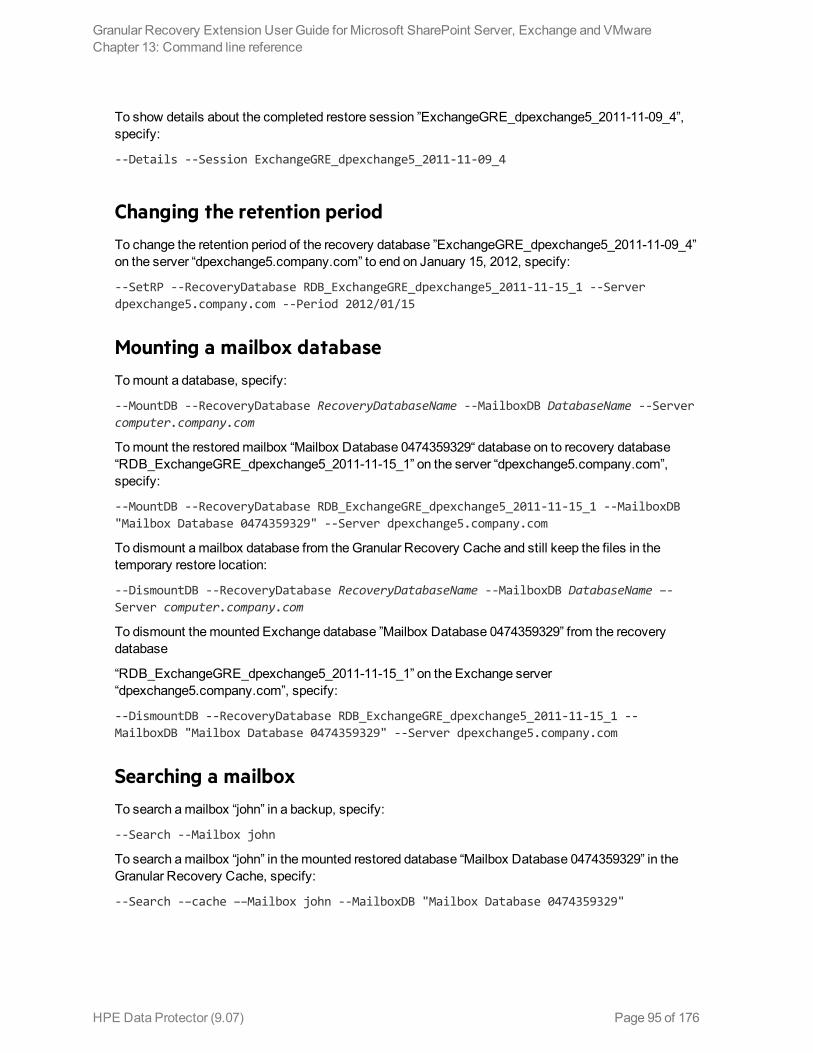
To show details about the completed restore session ”ExchangeGRE_dpexchange5_2011-11-09_4”, specify:
--Details --Session ExchangeGRE_dpexchange5_2011-11-09_4
Changing the retention periodTo change the retention period of the recovery database ”ExchangeGRE_dpexchange5_2011-11-09_4” on the server “dpexchange5.company.com” to end on January 15, 2012, specify:
--SetRP --RecoveryDatabase RDB_ExchangeGRE_dpexchange5_2011-11-15_1 --Server dpexchange5.company.com --Period 2012/01/15
Mounting a mailbox databaseTo mount a database, specify:
--MountDB --RecoveryDatabase RecoveryDatabaseName --MailboxDB DatabaseName --Server computer.company.com
To mount the restored mailbox “Mailbox Database 0474359329“ database on to recovery database “RDB_ExchangeGRE_dpexchange5_2011-11-15_1” on the server “dpexchange5.company.com”, specify:
--MountDB --RecoveryDatabase RDB_ExchangeGRE_dpexchange5_2011-11-15_1 --MailboxDB "Mailbox Database 0474359329" --Server dpexchange5.company.com
To dismount a mailbox database from the Granular Recovery Cache and still keep the files in the temporary restore location:
--DismountDB --RecoveryDatabase RecoveryDatabaseName --MailboxDB DatabaseName –-Server computer.company.com
To dismount the mounted Exchange database ”Mailbox Database 0474359329” from the recovery database
“RDB_ExchangeGRE_dpexchange5_2011-11-15_1” on the Exchange server “dpexchange5.company.com”, specify:
--DismountDB --RecoveryDatabase RDB_ExchangeGRE_dpexchange5_2011-11-15_1 --MailboxDB "Mailbox Database 0474359329" --Server dpexchange5.company.com
Searching a mailboxTo search a mailbox “john” in a backup, specify:
--Search --Mailbox john
To search a mailbox “john” in the mounted restored database “Mailbox Database 0474359329” in the Granular Recovery Cache, specify:
--Search -–cache ––Mailbox john --MailboxDB "Mailbox Database 0474359329"
Granular Recovery Extension User Guide for Microsoft SharePoint Server, Exchange and VMwareChapter 13: Command line reference
HPE Data Protector (9.07) Page 95 of 176
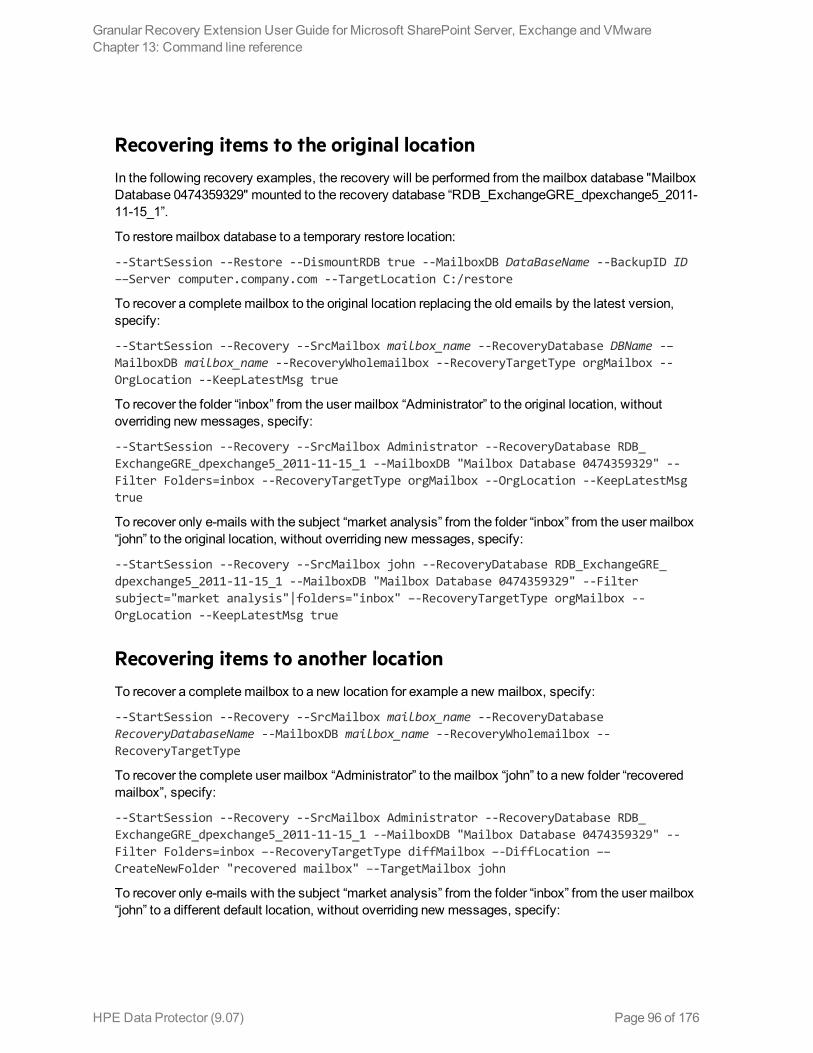
Recovering items to the original locationIn the following recovery examples, the recovery will be performed from the mailbox database "Mailbox Database 0474359329" mounted to the recovery database “RDB_ExchangeGRE_dpexchange5_2011-11-15_1”.
To restore mailbox database to a temporary restore location:
--StartSession --Restore --DismountRDB true --MailboxDB DataBaseName --BackupID ID ––Server computer.company.com --TargetLocation C:/restore
To recover a complete mailbox to the original location replacing the old emails by the latest version, specify:
--StartSession --Recovery --SrcMailbox mailbox_name --RecoveryDatabase DBName -–MailboxDB mailbox_name --RecoveryWholemailbox --RecoveryTargetType orgMailbox --OrgLocation --KeepLatestMsg true
To recover the folder “inbox” from the user mailbox “Administrator” to the original location, without overriding new messages, specify:
--StartSession --Recovery --SrcMailbox Administrator --RecoveryDatabase RDB_ExchangeGRE_dpexchange5_2011-11-15_1 --MailboxDB "Mailbox Database 0474359329" --Filter Folders=inbox --RecoveryTargetType orgMailbox --OrgLocation --KeepLatestMsg true
To recover only e-mails with the subject “market analysis” from the folder “inbox” from the user mailbox “john” to the original location, without overriding new messages, specify:
--StartSession --Recovery --SrcMailbox john --RecoveryDatabase RDB_ExchangeGRE_dpexchange5_2011-11-15_1 --MailboxDB "Mailbox Database 0474359329" --Filter subject="market analysis"|folders="inbox" –-RecoveryTargetType orgMailbox --OrgLocation --KeepLatestMsg true
Recovering items to another locationTo recover a complete mailbox to a new location for example a new mailbox, specify:
--StartSession --Recovery --SrcMailbox mailbox_name --RecoveryDatabase RecoveryDatabaseName --MailboxDB mailbox_name --RecoveryWholemailbox --RecoveryTargetType
To recover the complete user mailbox “Administrator” to the mailbox “john” to a new folder “recovered mailbox”, specify:
--StartSession --Recovery --SrcMailbox Administrator --RecoveryDatabase RDB_ExchangeGRE_dpexchange5_2011-11-15_1 --MailboxDB "Mailbox Database 0474359329" --Filter Folders=inbox –-RecoveryTargetType diffMailbox –-DiffLocation ––CreateNewFolder "recovered mailbox" –-TargetMailbox john
To recover only e-mails with the subject “market analysis” from the folder “inbox” from the user mailbox “john” to a different default location, without overriding new messages, specify:
Granular Recovery Extension User Guide for Microsoft SharePoint Server, Exchange and VMwareChapter 13: Command line reference
HPE Data Protector (9.07) Page 96 of 176
--StartSession --Recovery --SrcMailbox john --RecoveryDatabase RDB_ExchangeGRE_dpexchange5_2011-11-15_1 --MailboxDB "Mailbox Database 0474359329" --Filter subject="market analysis”|folders="inbox" –-RecoveryTargetType orgMailbox --OrgLocation --KeepLatestMsg true –-DiffLocation ––CreateNewFolder default
To recover only e-mails with the subject “market analysis” from the folder “inbox” from the user mailbox “john” to a different (existing) folder “recovered data items”, without overriding new messages, specify:
--StartSession --Recovery --SrcMailbox john --RecoveryDatabase RDB_ExchangeGRE_dpexchange5_2011-11-15_1 --MailboxDB "Mailbox Database 0474359329" --Filter subject="market analysis"|folders="inbox" –-RecoveryTargetType orgMailbox --OrgLocation --KeepLatestMsg true –-DiffLocation –-ExistingFolder "recovered data items"
To recover a complete mailbox to a .pst file, specify:
--StartSession --Recovery --SrcMailbox mailbox_name --RecoveryDatabase RecoveryDatabaseName --RecoveryDatabase MailboxDB mailbox_name --RecoveryWholemailbox --RecoveryTargetType pst
To recover the complete user mailbox “john” to the file “C:\recovered\john.pst”, specify:
--StartSession --Recovery --SrcMailbox john --RecoveryDatabase RDB_ExchangeGRE_dpexchange5_2011-11-15_1 --MailboxDB "Mailbox Database 0474359329" --RecoverWholeMailbox –-RecoveryTargetType pst ––PSTfilename "C:\\recovered\\john.pst"
Removing sessionsTo remove a completed recovery session with the ID 2011/09/08-5 from the Granular Recovery Cache, specify:
--Remove --Session 2011/09/08-5
To remove all the recovery sessions from the Granular Recovery Cache, specify:
--Remove --AllSessions
Removing recovery databasesTo remove the mailbox database “RDB_ExchangeGRE_dpexchange5_2011-11-15_1” from disk on the server ”dpexchange5.company.com”, specify:
--Remove --RecoveryDatabase RDB_ExchangeGRE_dpexchange5_2011-11-15_1 --Server dpexchange5.company.com
Granular Recovery Extension User Guide for Microsoft SharePoint Server, Exchange and VMwareChapter 13: Command line reference
HPE Data Protector (9.07) Page 97 of 176
Chapter 14: TroubleshootingThis chapter lists general checks and verifications, plus problems you might encounter when using the Data Protector Granular Recovery Extension for Microsoft Exchange Server.
l For Microsoft Exchange Server troubleshooting information, see the troubleshooting sections of the Microsoft Exchange Server parts of the HPE Data Protector Integration Guide.
l For general Data Protector troubleshooting information, see the HPE Data Protector Troubleshooting Guide.
Before you begin l To enable debugging, see "Enabling debugging option". l Make sure that the latest official Data Protector patches are installed. See the HPE Data Protector
Help index: “patches” on how to verify this. l For general Data Protector limitations, as well as recognized issues and workarounds, see the HPE
Data Protector Product Announcements, Software Notes, and References. l For an up-to-date list of supported versions, platforms, and other information, see
http://support.openview.hp.com/selfsolve/manuals
Debugging
Enabling debugging option 1. To enable the debugging option, click Settings in the console tree. The Granular Recovery
Settings page is displayed. 2. Select the Enable Debug Logs option. The Debug Logs folder name field is activated. Specify a
new location of the folder, and click Save.For a list of known issues and workarounds, see "Known issues and workarounds".
Known issues and workarounds
Search Criteria Results page remains empty after at least one search keyword is entered
Problem
In the Granular Recovery wizard, in the Mailbox Search Criteria page, after you enter a term to search for and then click Next, no results appear in the Search Results page even if the search criteria are met for some items.
HPE Data Protector (9.07) Page 98 of 176
Action
To display a list of search results, proceed as follows:
1. Dismount the recovery database. For detailed procedure see "Dismounting databases". 2. Using the Cache Management page of the Granular Recovery Extension GUI, identify the folder
where the database has been restore into. From this folder, remove the subfolder that has the string CatalogData in its name.
3. In the Exchange Management Shell, run the following command:
set-mailboxDatabase DatabaseName -indexenabled $false. 4. Mount the recovery database again. For detailed procedure, see "Mounting databases". 5. Start the recovery once again and follow the Granular Recovery wizard. 6. In the Mailbox Search Criteria page, re-enter the search keywords and click Next.
Manual removal of temporary mailboxes created by the extension
Problem
Normally, temporary mailboxes created by the extension during the recovery process, are also deleted automatically after the process completes. However, in exceptional cases (for example, if the extension stops working), the temporary mailboxes created by the extension, are not deleted automatically after the process completes and have to be removed manually.
Action
You can identify such mailboxes by the prefix DP_Recovery or DP_SEARCH.
In the Microsoft Exchange Server 2010 environment, use the Exchange Management Console (EMC) to remove the redundant mailboxes manually.
In the Microsoft Exchange Server 2013 environment, use the Exchange Administration Center (EAC) or the Exchange Management Shell (EMS) to remove the redundant mailboxes manually.
Search for mailbox items fails and reports an error
Problem
In the Microsoft Exchange Server 2010 environment, in the Granular Recovery wizard, in the Mailbox Search Criteria page, after you trigger a search using the specified criteria, the search fails with the following error:
ERROR debugs - Powershell error : Restore-Mailbox : Error was found for DP_Recovery_ExchangeGRE_2011-10-03_38 ([email protected]) because: Error occurred in the step: Opening source mailbox. Failed to open mailbox by GUID with error: The operation failed. error code: -1056749260 + CategoryInfo: InvalidOperation: (0:Int32) [Restore-Mailbox], RecipientTaskException
Granular Recovery Extension User Guide for Microsoft SharePoint Server, Exchange and VMwareChapter 14: Troubleshooting
HPE Data Protector (9.07) Page 99 of 176
+ FullyQualifiedErrorId: DD312EA7,Microsoft.Exchange.Management.RecipientTasks.RestoreMailbox
Action
Install the Update Rollup 2 for Exchange Server 2010 Service Pack 1 (KB2425179) or a subsequent update. You can obtain the Update Rollup 2 from the website http://www.microsoft.com/download/en/details.aspx?id=12938.
Mailboxes are missing from the list in the Import from Backup wizard
Problem
In the Import from Backup wizard, in the Mailbox Selection page, when you browse for user mailboxes after clicking Advanced, some mailboxes are missing from the Mailboxes tree, although they exist in the backup image of the Exchange Server database.
There can be different reasons for such a problem, including time synchronization problems within the Data Protector cell and Exchange Server problems in retrieving the mailbox metadata.
Action
If you know to which mailbox database the desired mailbox belongs, you can start the process anew by selecting the appropriate database. Follow the steps:
1. Check Back to return to the Introduction page of the wizard. 2. Select Database selection, click Next, and follow the wizard to complete the importing process.
Mounting a restored database fails
Problem
In the Microsoft Exchange Server 2013 environment, mounting a restored database might end up with an error.
The problem occurs when the restored database is in the "dirty-shutdown state". The database should be in the "clean-shutdown state" to be mounted successfully.
Action
1. Bring the restored database to the "clean-shutdown state" by executing the Microsoft Exchange Server eseutil.exe recovery command.For more information on the eseutil.exe utility, see the Microsoft Exchange Server documentation.
2. Retry to mount the restored database.
Granular Recovery Extension User Guide for Microsoft SharePoint Server, Exchange and VMwareChapter 14: Troubleshooting
HPE Data Protector (9.07) Page 100 of 176
Interprocess communication error being reported by the GUI
Problem
After attempting to trigger an operation from the Granular Recovery Extension graphical user interface (GUI), the following error message is displayed in a dialog box:
The communication object, System.ServiceModel.Channels.ServiceChannel, cannot be used for communication because it is in the Faulted state.
All subsequent user actions in the GUI fail with the same error.
This error is reported when the Granular Recovery Extension GUI is open for a period of time that is longer than the Internet Information Services (IIS) recycling time period. The IIS unloads the Exchange GRE Web Service among other web services, resulting in a communication failure between the service and the GUI.
Action
Close and then re-launch the Granular Recovery Extension GUI.
An Exchange GRE recovery or restore operation fails due to insufficient permission
Problem
If an Granular Recovery Extension recovery or restore operation fails due to insufficient permissions even when the user who executes the Granular Recovery Extension (either GUI or CLI) has sufficient permissions, the issue may arise due to insufficient permission for the local SYSTEM account.
This account needs appropriate permissions due to the following:
l The Granular Recovery Extension Web Service runs with Local SYSTEM privileges. l The Granular Recovery Extension Web Service allows the Data Protector Inet service, which by
default runs under the Windows local System user account, to execute or launch the Data Protector Exchange Integration agent. The restore session is performed using the same user account.
Action
Grant the local SYSTEM user account appropriate permissions to restore Microsoft Exchange Server databases and create recovery databases:
1. Close the currently running Exchange Granular Recovery Extension client (GUI or CLI). 2. Stop the Granular Recovery Extension Web Service. 3. Provide appropriate permissions for the local SYSTEM account. 4. Start the Granular Recovery Extension and continue the Granular Recovery Extension operations.
When a request comes from the GUI or CLI, the Internet Information Services (IIS) start the Granular Recovery Extension Web Service automatically.
Granular Recovery Extension User Guide for Microsoft SharePoint Server, Exchange and VMwareChapter 14: Troubleshooting
HPE Data Protector (9.07) Page 101 of 176
The message Adding snap-in to console... is displayed for a long time
Problem
When you open the Granular Recovery Extension graphical user interface (GUI), the message MMC cannot initialize the snap-in is displayed, followed by the Adding snap-in to console… which is displayed for a long time.
When you open the GUI and locate the console tree, the Cache Management, Status and Settings nodes are not loaded.
The issue may appear if Internet Information Services (IIS) or if its associated services are not running and the Granular Recovery Extension GUI cannot communicate with the Exchange GREWeb Service.
Action
Make sure that IIS and its associated services are up and running:
1. Open the Internet Information Services (IIS) Manager, locate and select the ExchangeGre node in the console tree under the Default Web Site. The Exchange GRE Web Service home page is displayed.
2. Right-click the ExchangeGre node, click Manage Application, and then click Browse.The snap-in is added to the MMC. When you open the GUI, the Cache Management, Status and Settings nodes are displayed. The message is not displayed anymore.
If during the step 1, the Exchange GRE Web Service home page is not displayed:
1. When the Adding snap-in to console... is displayed, click Cancel to close the message. 2. Open the Server Manager, select the Roles node. Under the Roles Summary locate the
WebServer (IIS) and select it. 3. The Web Server (IIS) is displayed. Under the System Services, verify if all the services are up and
running, including the Application Host Helper Service, IIS Admin Service, and the World Wide Web Publishing Service.
4. Re-open the Granular Recovery Extension GUI.
The About HP Data Protector Granular Recovery Extension for Microsoft Exchange Server does not display the product build number
Problem
You select Help About HP Data Protector Granular Recovery Extension for Microsoft Exchange Server, but the product version is not displayed.
The issue is caused by a Microsoft Management Console (MMC) known issue, due to a string caching mechanism in the MUI cache. The registry is not updated automatically after the upgrade. The MUI cache does not get cleared and the product version is not displayed in the MMC snap-in.
Granular Recovery Extension User Guide for Microsoft SharePoint Server, Exchange and VMwareChapter 14: Troubleshooting
HPE Data Protector (9.07) Page 102 of 176
Action
To manually delete strings in the MUI cache and re-install the snap-in:
1. Click the Start button, click Run, type REGEDIT, and click OK. 2. In the Registry Editor, locate one of the following hierarchy (if they exist ):
HKEY_USERS\S-1-5-21-61196776-1057610366-2591919248-500_Classes\Local Settings\Software\Microsoft\Windows\Shell\MuiCache
HKEY_USERS\S-1-5-21-2765349584-3720068851-1520285658-500_Classes\Local Settings\MuiCache\96\52C64B7E
3. Delete the following registry keys of the Granular Recovery Extension for Microsoft Exchange Server:
@C:\Program Files\Hewlett-Packard\Exchange Granular Recovery Extension\bin\GreSnapInResource.dll,-114
@C:\Program Files\Hewlett-Packard\Exchange Granular Recovery Extension\bin\GreSnapInResource.dll,-115
@C:\Program Files\Hewlett-Packard\Exchange Granular Recovery Extension\bin\GreSnapInResource.dll,-116
@C:\Program Files\Hewlett-Packard\Exchange Granular Recovery Extension\bin\GreSnapInResource.dll,-117
Close the Registry Editor. 4. Run the following command:
%windir%\Microsoft.NET\Framework64\v2.0.50727\InstallUtil.exe "C:\Program Files\Hewlett-Packard\Exchange Granular Recovery Extension\bin\ExchangeGre.MmcGui.dll" /install
5. Click the Help menu and then click the About HP Data Protector Granular Recovery Extension for Microsoft Exchange Server again, the product build number is displayed.
Recovery items are not getting deleted automatically from the exchange management shell
Problem
In the Exchange 2013 SP1 environment, Exchange GRE is sometimes unable to remove the mailbox restore request (initiated using "New-MailboxRestoreRequest" command) by using “Remove-MailboxRestoreRequest” command for a target mailbox even after the mailbox restore request status is updated to "completed". This could be because the Exchange server is unable to remove the request from the complete queue. As the previously executed Mailbox restore request for a mailbox is not cleaned / removed, it is not possible to initiate another recovery operation to the same target mailbox.
Action
1. Please make sure that no Exchange GRE operation is active/running. 2. Clean up the completed "restore requests" for a mailbox manually by executing the following
command in the Exchange Management shell and then retry the operation. Get-MailboxRestoreRequest -Status Completed | Remove-MailboxRestoreRequest
Granular Recovery Extension User Guide for Microsoft SharePoint Server, Exchange and VMwareChapter 14: Troubleshooting
HPE Data Protector (9.07) Page 103 of 176
HPE Data Protector (9.07)
Page 104 of 176
Part 3 - VMware and the Granular Recovery ExtensionThis part of the guide describes Data Protector Granular Recovery Extension (GRE) for VMware vSphere.
This part includes the following chapters:
Introduction
Installation
Configuration
Backup
Recovery
Troubleshooting
Chapter 15: IntroductionThis section provides the following information on the Data Protector Granular Recovery Extension (GRE):
l Features l Recovery FlowThe HPE Data Protector Granular Recovery Extension (GRE) restores data using the Data Protector Virtual Environment integration; this extension is a recovery solution only.
The GRE plug-in is accessible through two user interfaces:
l Web Plug-in l Advanced GRE Web Plug-in
GRE features l Restore and recovery: The Data Protector GRE for VMware vSphere restores VMDK(s) to a
temporary restore location (a mount proxy system) and then recovers individual VMware virtual machine files from the restored VMDK. This feature is available as Staged restore and recovery in Web Plug-in and as Non-Cached restore and recovery in Advanced GRE Web Plug-in.
l Presentation and recovery: The Data Protector GRE for VMware vSphere does not restore the VMDK file to a temporary location (mount proxy) for recovering individual files. Instead, the VMDK is presented to a temporary location (mount proxy) for recovering individual files. You can perform file recovery from a VMDK, without restoring the VMDK file into a temporary location (mount proxy). GRE for VMware vSphere directly mounts the VMDK to the mount proxy host and enables the user to browse the disk and select the file(s) to recover. Hence, with presentation, it is not necessary to restore a disk (or a whole chain) of any particular backup for recovering files. This feature is available as Non-Staged Recovery in the Web Plug-in and as Cached recovery in the Advanced GRE Web Plug-in.
Note: Backups done to Smart Cache and StoreOnce Catalyst devices or backups from array snapshots residing on the HPE 3PAR storage are referred to as cached backups and the other backups are referred to as non-cached backups.
Recovery flow The Data Protector GRE and the plug-ins (Web Plug-in or the Advanced GRE Web Plug-in) enable file recovery from VM Disks. The Data Protector GRE environment must be configured before using the Web plug-ins for file recovery operations. The following illustration depicts the standard GRE environment. For detailed information on meeting the requirements for the GRE environment and installing the Data Protector GRE, see the "VMware Client" section of the HPE Data Protector Installation Guide.
The HPE Data Protector components appear in blue, and the VMware components appear in black.
HPE Data Protector (9.07) Page 105 of 176
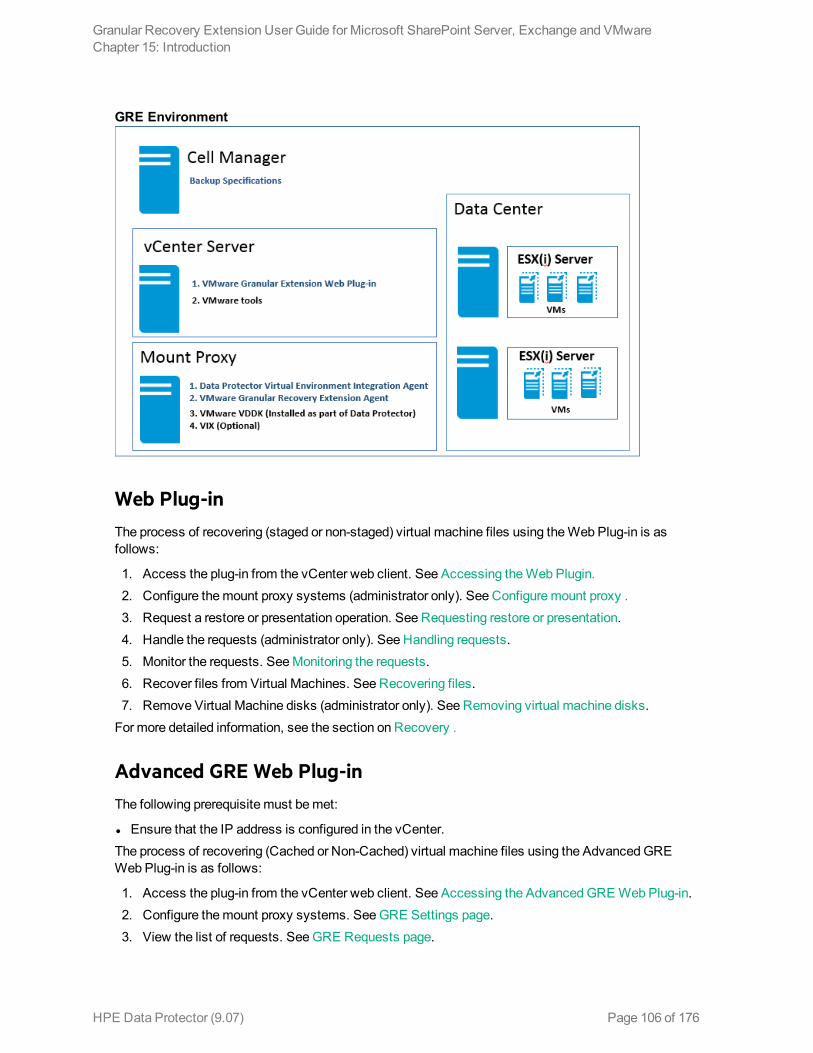
GRE Environment
Web Plug-inThe process of recovering (staged or non-staged) virtual machine files using the Web Plug-in is as follows:
1. Access the plug-in from the vCenter web client. See Accessing the Web Plugin. 2. Configure the mount proxy systems (administrator only). See Configure mount proxy . 3. Request a restore or presentation operation. See Requesting restore or presentation. 4. Handle the requests (administrator only). See Handling requests. 5. Monitor the requests. See Monitoring the requests. 6. Recover files from Virtual Machines. See Recovering files. 7. Remove Virtual Machine disks (administrator only). See Removing virtual machine disks.
For more detailed information, see the section on Recovery .
Advanced GRE Web Plug-inThe following prerequisite must be met:
l Ensure that the IP address is configured in the vCenter.The process of recovering (Cached or Non-Cached) virtual machine files using the Advanced GRE Web Plug-in is as follows:
1. Access the plug-in from the vCenter web client. See Accessing the Advanced GRE Web Plug-in. 2. Configure the mount proxy systems. See GRE Settings page. 3. View the list of requests. See GRE Requests page.
Granular Recovery Extension User Guide for Microsoft SharePoint Server, Exchange and VMwareChapter 15: Introduction
HPE Data Protector (9.07) Page 106 of 176
4. Create a new request for restore or presentation. See New Request page. 5. Monitor the requests. See GRE Requests page. 6. Recover files from Virtual Machines. See Recover files page.
For more detailed information, see the section on Recovery .
Granular Recovery Extension User Guide for Microsoft SharePoint Server, Exchange and VMwareChapter 15: Introduction
HPE Data Protector (9.07) Page 107 of 176
Chapter 16: InstallationThe Data Protector Granular Recovery Extension requires the installation and configuration of the following systems:
l Data Protector cell and the following clients: l VMware vCenter Server system
l Mount proxy system
Note: If encrypted control communication is enabled on mount proxy systems (default), vCenter Server systems must be added as exceptions. For details, see the section Configuring encrypted control communication.
For detailed instructions on meeting the requirements for the GRE environment, installing the Granular Recovery Extension, and the required Data Protector components, see the, "VMware clients" section of the HPE Data Protector Installation Guide.
For detailed instructions on remotely or locally installing any or all of the following, see the HPE Data Protector Installation Guide
l Data Protector Cell Manager - See the "Installing the Data Protector Cell Manager and Installation Server" section.
l Data Protector clients - See the "Installing Data Protector integration clients", "VMware clients" section.
HPE Data Protector (9.07) Page 108 of 176
Chapter 17: ConfigurationThis chapter describes the configuration steps that you need to follow.
Meeting Data Protector configuration requirements for Granular Recovery ExtensionThis section provides information for the following:
l Configuring GRE User Group and Users l Configuring GRE Administrators l Configuring Systems for vSphere l Configuring Encrypted Control Communication
Configuring a GRE for VMware vSphere user group and usersThis section provides the following details:
l Adding a GRE for VMware vSphere User Group l Adding users to the GRE for VMware vSphere User Group l Adding an Inet user account to the admin group
Adding a GRE for VMware vSphere user group
Note: The steps provided in this section are required for using the GRE Web Plug-in. User must be part of the Data Protector administrator group to perform Granular Recovery Extension (GRE) on a specific virtual machine. If not, the Data Protector restricts the user from performing the GRE operations. Also, user must have sufficient permissions or privileges on the corresponding vCenter server to perform the GRE operations. If not, the Data Protector does not restrict the user, instead the user receives an error message from the vCenter server.
Also, user must have sufficient permissions or privileges on the corresponding vCenter server to perform the GRE operations. If not, the Data Protector does not restrict the user, instead the user receives an error message from the vCenter server.
Also, user must have sufficient permissions or privileges on the corresponding vCenter server to perform the GRE operations. If not, the Data Protector does not restrict the user, instead the user receives an error message from the vCenter server.
Prerequisite
You need to have the Data Protector User configuration user right assigned.
HPE Data Protector (9.07) Page 109 of 176
Procedure
To create a Data Protector group for the Granular Recovery Extension VMware using the Data Protector GUI (Data Protector Manager):
1. In the Context List, click Users. 2. In the Scoping Pane, right-click Users. 3. Click Add User Group to open the wizard. 4. Under General, type the Name and Description of the new group. 5. Click Next. 6. Set the start restore user right for the group. 7. Click Finish to exit the wizard.
The new GRE VMware user group is added to Data Protector. To add users, see "Adding users to the GRE for VMware vSphere group" below.
Adding users to the GRE for VMware vSphere group
Note: The steps provided in this section are required for using the GRE Web Plug-in.
Prerequisite
You need to have the User configuration user right to be able to add users.
Procedure
To add users to the GRE VMware group:
1. In the Context List, click Users. 2. In the Scoping Pane, expand Users. 3. Right-click the user group to which you want to add a user. 4. Click Add/Delete Users to open the wizard. 5. In the Add/Delete Users dialog, enter the specific user properties.
When entering Name and Group/Domain, make sure you enter information about an existing user on your network.To make sure that GRE VMware Administrators have an access to the administrative entry point of the extension, specify the following information:Type : Windows
Name : usernameGroup/Domain : GRE VMware user group, VCENTERClient : VCenterSystemNameThe GRE VMware Administrators must be added to the vSphere permission tab. Set the user's role to Administrator.
Granular Recovery Extension User Guide for Microsoft SharePoint Server, Exchange and VMwareChapter 17: Configuration
HPE Data Protector (9.07) Page 110 of 176
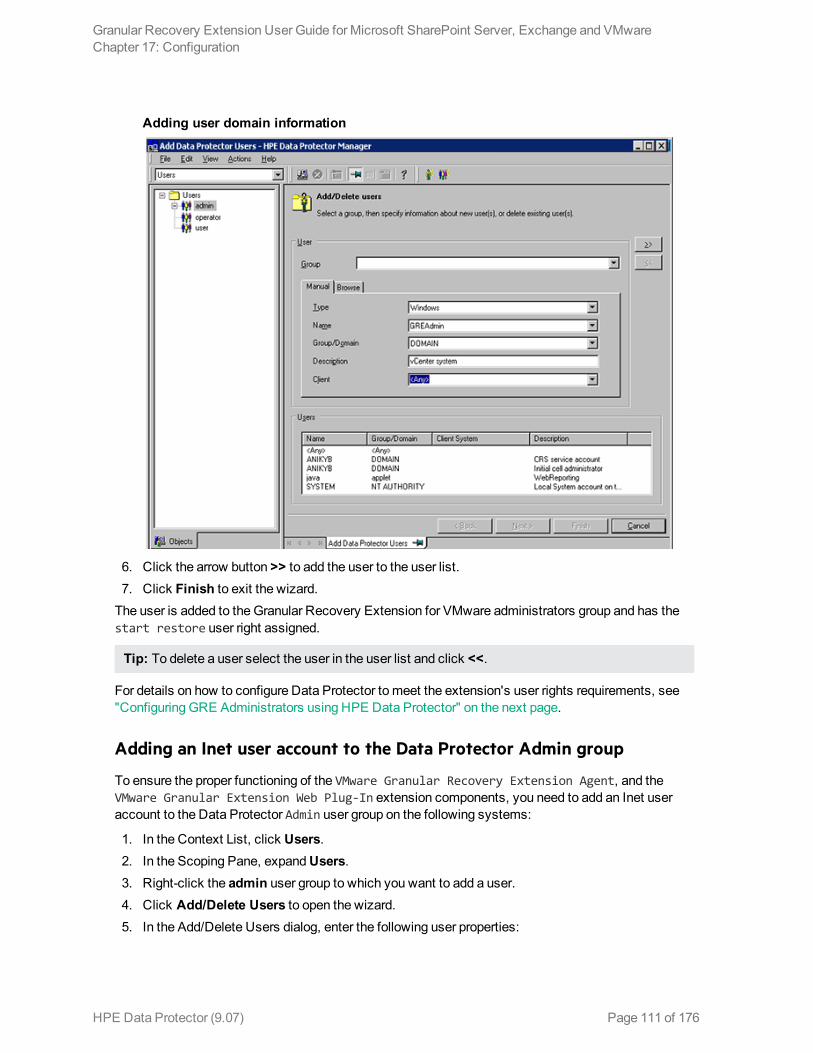
Adding user domain information
6. Click the arrow button >> to add the user to the user list. 7. Click Finish to exit the wizard.
The user is added to the Granular Recovery Extension for VMware administrators group and has the start restore user right assigned.
Tip: To delete a user select the user in the user list and click <<.
For details on how to configure Data Protector to meet the extension's user rights requirements, see "Configuring GRE Administrators using HPE Data Protector" on the next page.
Adding an Inet user account to the Data Protector Admin group
To ensure the proper functioning of the VMware Granular Recovery Extension Agent, and the VMware Granular Extension Web Plug-In extension components, you need to add an Inet user account to the Data Protector Admin user group on the following systems:
1. In the Context List, click Users. 2. In the Scoping Pane, expand Users. 3. Right-click the admin user group to which you want to add a user. 4. Click Add/Delete Users to open the wizard. 5. In the Add/Delete Users dialog, enter the following user properties:
Granular Recovery Extension User Guide for Microsoft SharePoint Server, Exchange and VMwareChapter 17: Configuration
HPE Data Protector (9.07) Page 111 of 176

Mount proxy system:Type : Windows or LinuxName : SYSTEM or rootGroup/Domain : NT AUTHORITY or root
Note: Make sure that you specify an existing user account on your network.
Client : MountProxySystemNameIf you are using the GRE Web Plug-in, then set the vCenter Server system properties.vCenter Server system:Type : Windows Name : the account under which the VMware vCenter Server runs (by default - SYSTEM). Group/Domain : the account group/domain under which the VMware vCenter Server runs (by default - NT AUTHORITY).
Client : VCenterSystemName. 6. Click the arrow button >> to add the user to the user list. 7. Click Finish to exit the wizard.
The user accounts are added to the Data Protector admin user group with the user rights assigned to the group.
Note: The Data Protector Inet uses SYSTEM, NT AUTHORITY which is used in the Data Protector Local system account (in Windows operating system).
Configuring GRE Administrators using HPE Data Protector
Procedure
To enable the Granular Recovery Extension administrators a free access to the extension and their tasks, proceed as follows using the HPE Data Protector GUI (Data Protector Manager):
1. In the Context list, select Users. 2. Right-click the GRE VMware user group. 3. Click Properties and then click the User Rights tab. 4. Make sure the Data Protector user account is assigned the Data Protector Start restore user
right.
Granular Recovery Extension User Guide for Microsoft SharePoint Server, Exchange and VMwareChapter 17: Configuration
HPE Data Protector (9.07) Page 112 of 176
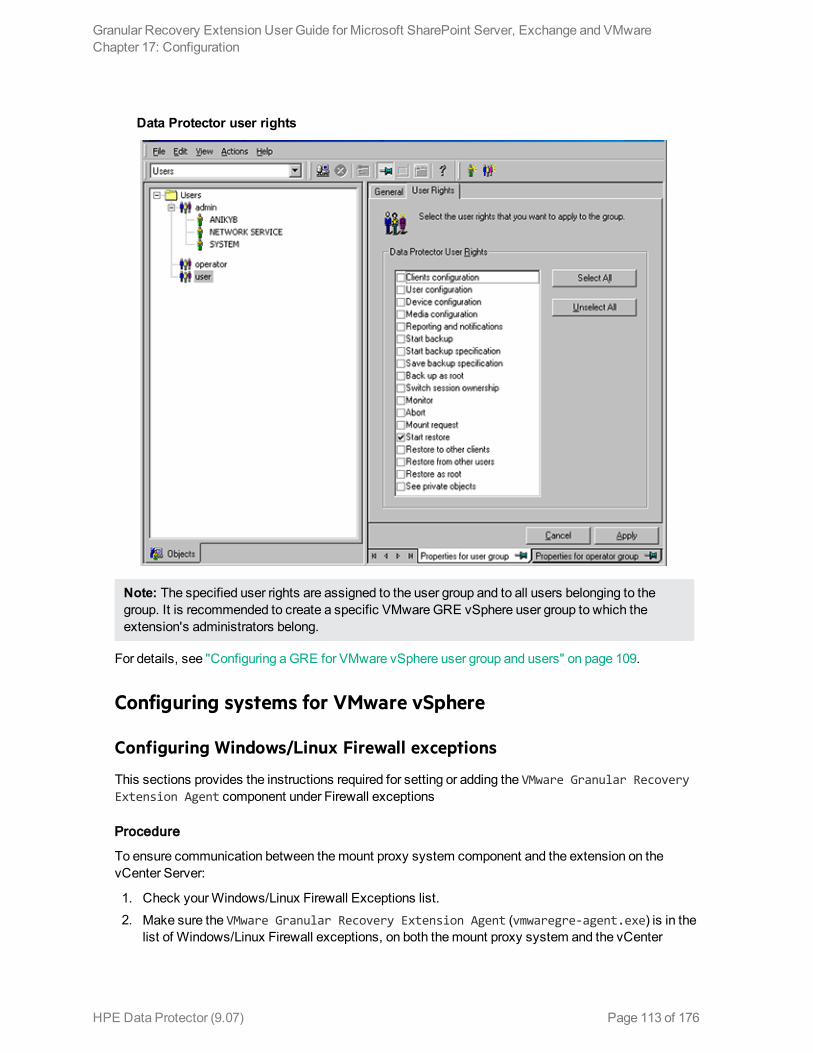
Data Protector user rights
Note: The specified user rights are assigned to the user group and to all users belonging to the group. It is recommended to create a specific VMware GRE vSphere user group to which the extension's administrators belong.
For details, see "Configuring a GRE for VMware vSphere user group and users" on page 109.
Configuring systems for VMware vSphere
Configuring Windows/Linux Firewall exceptions
This sections provides the instructions required for setting or adding the VMware Granular Recovery Extension Agent component under Firewall exceptions
Procedure
To ensure communication between the mount proxy system component and the extension on the vCenter Server:
1. Check your Windows/Linux Firewall Exceptions list. 2. Make sure the VMware Granular Recovery Extension Agent (vmwaregre-agent.exe) is in the
list of Windows/Linux Firewall exceptions, on both the mount proxy system and the vCenter
Granular Recovery Extension User Guide for Microsoft SharePoint Server, Exchange and VMwareChapter 17: Configuration
HPE Data Protector (9.07) Page 113 of 176
Server systems.
Note: Only inbound firewall rules are automatically created during the installation of the Granular Recovery Extension for VMware vSphere. You need to manually create any outbound firewall rule. This is required for communication between the extension's components and the vCenter Server. For the required port ranges, see the HPE Data Protector Installation Guide: “firewall support”.
The port ranges for the Advanced GRE Web-plugin are between 15000 and 15999.
Configuring encrypted control communication
Procedure
Complete the following steps to enable VMware GRE integration to work in an encrypted Data Protector environment.
1. Identify all the Data Protector clients that have the VMware GRE agent installed (that is, identify all the mount proxy systems).
2. On each client with the VMware GRE agent installed, implement the following: a. Create a new file called config in the following path:
Windows systems: Data_Protector_program_data\Config\Server\ and set encoding to UCS-2 Little Endian. UNIX systems: /etc/opt/omni/server and create an ordinary (ascii) file.
b. For each vCenter Server system add an entry one after another in the config file. For example: <vcenter1.company.com>={ encryption={ exception=1; }; }; <vcenter2.company.com>={ encryption={ exception=1; }; };
Here <vcenter.company.com> is the host where the plug-in is installed, and uses the VMware GRE agent.
c. Copy the created file (config) to all the VMware GRE agent hosts. d. If the VMware GRE agent and vCenter Server are installed on the same system, then modify
the omnirc file on the GRE agent client and set: OB2SEC_READ_LOCAL_EXCEPTIONS=1
Granular Recovery Extension User Guide for Microsoft SharePoint Server, Exchange and VMwareChapter 17: Configuration
HPE Data Protector (9.07) Page 114 of 176
Chapter 18: BackupThe HPE Data Protector Granular Recovery Extension (GRE) for VMware vSphere relies on the Data Protector Virtual Environment integration component for VMware vSphere to back up VMDK(s). Back up your VMware vSphere data using the backup solution. For details, see the HPE Data Protector Integration Guide, the chapter about the Virtual Environment integration.
The extension supports full, incremental and differential backups. Incremental / differential backups are supported for cached recovery operations from StoreOnce Catalyst device. For details on backup types, see the HPE Data Protector Help : “backup types”. A backup of virtual machines with user snapshots and quiescence is also supported.
Note : The Granular Recovery Extension for VMware vSphere uses the same procedure for recovery of all VMware vSphere data. The procedure does not depend on the backup type. It is recommended to set up a dedicated mount proxy system. The extension will need to allocate extendable disk space (disk space that can be made larger) for the temporary restore location of virtual machine disks.
To utilize the non-staged recovery feature in the Web Plug-in or the Cached recovery feature in the Advanced GRE Web Plug-in of the GRE for VMware vSphere, you must use a Smart Cache or StoreOnce Catalyst device for VMware vSphere VMDK backups, using the Data Protector Virtual Environment Integration component.
Backup to Smart Cache devicesThe Smart Cache device is a disk-based device, which is configurable on Windows and Linux. The administrator can back up VM(s) out of a vCenter configuration to a Smart Cache device using the Data Protector GUI.
For more background information on Smart Cache devices, see the HPE Data Protector Concepts Guide.
Note: The Smart Cache device is available as a target only for VMware Virtual Environment Integration backups. Additionally, only one directory as a datastore per Smart Cache device is supported.
The non-cached and the cached recovery operation is performed when the Smart Cache device presents the disks to the mount proxy host. The Smart Cache device saves the VM disks in native format and when a presentation operation is requested, these disks are made available to the GRE agent. By managing disks in the native format, and by enabling easy presentation, restores are avoided, thereby saving time and space.
For more information on configuring a Smart Cache device, see the Configuring a backup to disk device page in HPE Data Protector Help.
Note: Backups done to disk devices or backups from array snapshots residing on the HPE 3PAR storage are referred to as cached backups and the other backups are referred to as non-cached backups.
HPE Data Protector (9.07) Page 115 of 176
Backups from 3PAR arrays
Note: This feature is available for the Advanced GRE Web Plug-in only.
Cached recovery of data from virtual machines is possible from array snapshots residing on the HPE 3PAR storage. This can be done by performing the zero downtime backup of virtual machines using ZDB to disk, ZDB to tape, and ZDB to disk+tape options. The virtual machines that are protected using the Snapshot backup method can be used to perform a recovery operation.
The 3PAR storage system enables snapshot replication of the disk volumes used by virtual machines. This unique method utilizes the cached recovery feature of the Advanced GRE Web Plug-in available in the GRE for VMware vSphere. The backups done using this method use existing zero downtime backup functionality. The Data Protector Virtual Environment ZDB integration for VMware supports environments where ESX and/or ESXi Server systems are set up with the 3PAR storage system and are managed through a vCenter Server (vCenter environments).
For more information on disk replication, see the HPE Data Protector Concepts Guide. For more information on the ZDB backups of virtual machines on the 3PAR replica, see the HPE Data Protector Integration Guide.
Backups to StoreOnce Catalyst device
Note: This feature is available for the Advanced GRE Web Plug-in only.
The StoreOnce Catalyst device is a Backup to Disk (B2D) device. To utilize the cached recovery feature in GRE for VMware vSphere without staging the restore, you must use a StoreOnce Catalyst device for backups. The administrator can back up VM(s) out of a vCenter configuration to a StoreOnce Catalyst device using the Data Protector GUI.
For more information on configuring a StoreOnce Catalyst device, see the Configuring a backup to disk device - StoreOnce page in HPE Data Protector Help.For more background information on StoreOnce Catalyst devices, see the HPE Data Protector Concepts Guide.
Full, incremental and differential backups are supported for cached recovery operations. For details on backup types, see the HPE Data Protector Help : “backup types”. When you perform GRE, all the backups that were performed prior to 9.07 are listed as Non-Cached.
Note: Non-CBT backups are also displayed as Non-Cached.
Granular Recovery Extension User Guide for Microsoft SharePoint Server, Exchange and VMwareChapter 18: Backup
HPE Data Protector (9.07) Page 116 of 176
Chapter 19: Recovery
Considerations l The Granular Recovery Extension for VMware vSphere does not support a cross-platform recovery.
A recovery of Windows virtual machine files from a Windows virtual machine to a Linux virtual machine and the other way around is not supported. However, you can perform a restore of Windows virtual machine disks to different mount proxy system platforms. A restore of Linux virtual machine disks to Windows mount proxy systems is not supported.
l Consider a VMware vSphere Web Client with two or more vCenters and each vCenter being a member of different Data Protector cell configuration. If each Data Protector cell contains the same user in user lists but with a different set of permissions, the user acquires privileges from the Data Protector cell on which the VMware GRE agent for selected vCenter starts to run first.
l You cannot recover a virtual machine from an incremental and differential backup, if the virtual machine name in the vSphere Center has been changed after full backup.
l If two operators connect remotely using the VMware vSphere Client with the same user account and browse one partition of a virtual machine disk simultaneously, once the first partition is mounted the second partition is dismounted. Parallel mounting of partitions is not supported.
l The extension displays the whole restore chain. When browsing through files, the objects displayed contain the whole restore chain: a full backup of the object and any number of related incremental backups.
l You may experience slow performance when browsing folders with many files and subfolders. l To preserve ownership and permission bits UID/GUID on a target virtual machine and a mount proxy
system, both must be mapped. A network share server should be properly configured to support it. l The non-partitioned disks on the Guest virtual machine are not supported. l You can perform GRE operations only on LVM volumes, which have partition Type ID set to 8E.
Also, kpartx is required for disks with LVM partitions. l If the ESX server is not accessible from the mount proxy, then you need to modify the host file and
add the ESX hostname and IP address or resolve the hostname of ESX server.
Note: You need to partition the disk before adding a volume group. The partitions reported in fdisk –l can only be considered.
Note: Windows Internet Explorer 8 version is not supported for the Granular Recovery Extension interface. For a list of supported environments, see the latest support matrices at http://support.openview.hp.com/selfsolve/manuals.
HPE 3PAR storage systems
l To perform GRE operations from the 3PAR replica, the mount ESX server and the production ESX server must be present in the same 3PAR zone.
HPE Data Protector (9.07) Page 117 of 176
l Configure the 3PAR array, having a replica and being used for GRE in the cell manager, by executing the following command on the Cell Manager: omnidbzdb --diskarray 3PAR --ompasswd --add <3PAR array CIM server name/ip> --user <CIM server login name> --passwd <CIM server password>
l To perform GRE operations using the Linux mount proxy for Windows Guest Operating System, the backup session must have the Operating System disk backed up and the same must be selected for creating a new request along with the disk(s) to be browsed.
LimitationsData Protector Granular Recovery Extension (GRE) for VMware vSphere has certain limitations.
Recovery
l Cached GRE of Windows Guest VM is not supported from StoreOnce Catalyst device. Windows Guest VM can be recovered in Non-Cached mode using Windows mount proxy.
l To perform GRE of Windows Server 2012 and Windows Server 2012 R2 on Linux mount proxy, use NTFS-3G (an NTFS driver for Linux) version 2011 on SLES. To download the NTFS-3G driver, refer to the following link:https://www.rpmfind.net/linux/rpm2html/search.php?query=ntfs-3g
l You cannot: l Recover empty folders.
l Perform VIX related recovery for files or folders with non-ASCII characters in their names.
l Perform the recovery of files from Windows 2012 Resilient File System (ReFS) file system.
l Recover files with longer path names.
Note: You must ensure that the file path in the mount point and the selected disk does not exceed 260 characters for the disk mounted on a mount proxy.
l List the skipped and failed files in recovery details, if the target machine does not have sufficient disk space.
l Preserve POSIX ACLs during recovery, on a Linux target virtual machine or on a Linux mount proxy system.
l When the GRE mount proxy host is rebooted, the mount points created for the requests (which are browsed at least once) of LVM disks become invalid. Hence these requests must be re-created to perform GRE operations.
l For both Advanced GRE Web Plug-in and GRE Web Plug-in, GRE from Dynamic disk is not supported.
l 3PAR ZDB backups from Data Protector 9.03 and earlier versions for VMs residing on data stores created using multiple 3PAR LUNs does not support granular recovery.
Granular Recovery Extension User Guide for Microsoft SharePoint Server, Exchange and VMwareChapter 19: Recovery
HPE Data Protector (9.07) Page 118 of 176
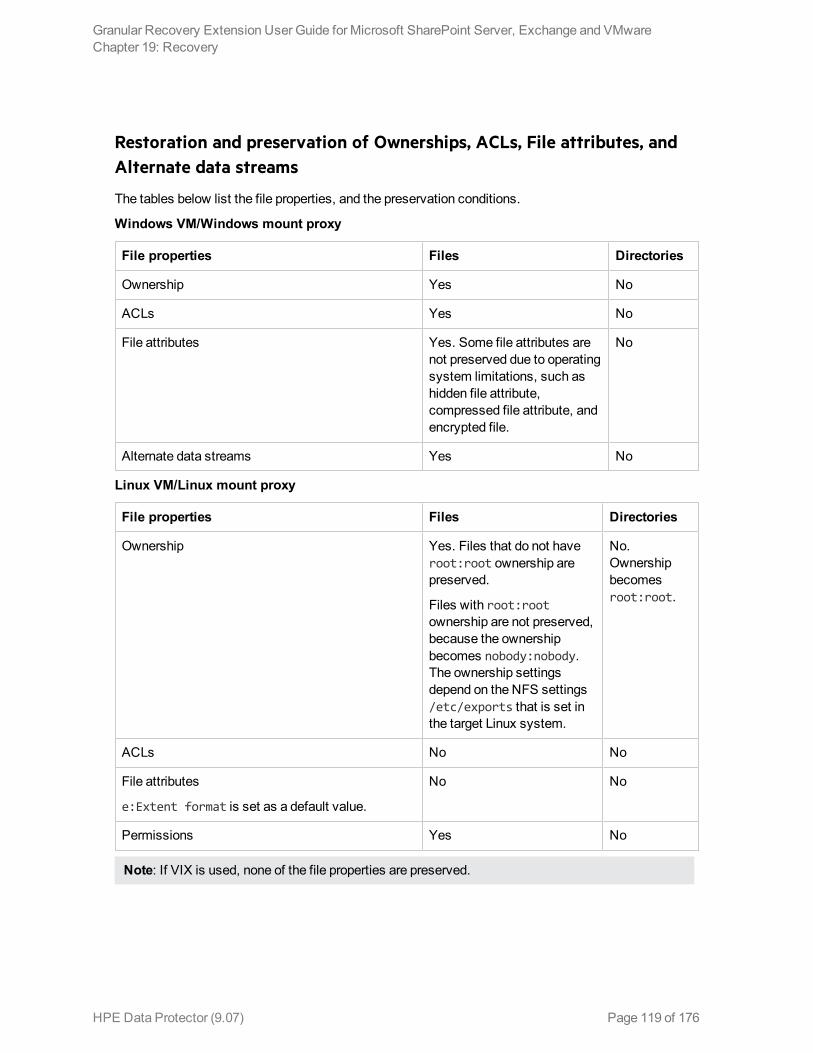
Restoration and preservation of Ownerships, ACLs, File attributes, and Alternate data streams
The tables below list the file properties, and the preservation conditions.
Windows VM/Windows mount proxy
File properties Files Directories
Ownership Yes No
ACLs Yes No
File attributes Yes. Some file attributes are not preserved due to operating system limitations, such as hidden file attribute, compressed file attribute, and encrypted file.
No
Alternate data streams Yes No
Linux VM/Linux mount proxy
File properties Files Directories
Ownership Yes. Files that do not have root:root ownership are preserved.
Files with root:root ownership are not preserved, because the ownership becomes nobody:nobody. The ownership settings depend on the NFS settings /etc/exports that is set in the target Linux system.
No. Ownership becomes root:root.
ACLs No No
File attributes
e:Extent format is set as a default value.
No No
Permissions Yes No
Note: If VIX is used, none of the file properties are preserved.
Granular Recovery Extension User Guide for Microsoft SharePoint Server, Exchange and VMwareChapter 19: Recovery
HPE Data Protector (9.07) Page 119 of 176
If the Ownership, ACLs, File attributes, and Alternate data streams are not preserved by the GRE operation, the restored objects have the VM operating system credentials (mentioned in the GRE page) as their properties.
3PAR storage systems
l Cached GRE can be done only till the replica is rotated/presented. l If the backup is disk+tape, then the secondary storage is considered for GRE only after the replica is
rotated.
Smart Cache devices
l You can perform only a Non-Cached recovery from incremental / differential backups on Smart Cache devices. Incremental / differential backups are not supported for Cached GRE operations.
l A VMware backup to a Smart Cache device is supported for a Network Share (CIFS or NFS share). To perform a Cached presentation operation from a Smart Cache device residing on the Network Share, the Smart Cache device should be listed as a mount point and not as a share.
l An AES encrypted VMware backup is not supported to a Smart Cache device.
StoreOnce Catalyst devices
l Only Linux mount proxies are supported. If Linux mount proxy is used to recover Windows Guest VM, then Ownership, ACLs, File attributes, and Alternate data streams are not recovered.
l Cached GRE from StoreOnce Catalyst backups is not supported with Windows mount proxy. l If a Windows mount proxy is selected for GRE, the backups are auto converted from Cached to
Non-Cached. These requests are now displayed in grey color. l Full and incremental backups on different devices are not supported for GRE operations. l Non-CBT backups to StoreOnce Catalyst device are displayed as Non-Cached. l If the mount proxy host is rebooted with any active GRE request, the request is inaccessible for up
to 4 hours. l Cached GRE is not supported, if the backup to StoreOnce Catalyst device is performed using
software compression or AES encryption. l If the data backed up with Data Protector 9.04 or earlier versions is transferred to a StoreOnce
Catalyst through single session copy in 9.07 version, then Cached GRE is not supported.
Note: If you want to migrate your Data Protector 9.05 or 9.06 version backups to StoreOnce Catalyst to use the feature of Cached GRE, it is recommended to perform object operations at individual session. If you choose multiple sessions at once, data consistency will not be there.
Recovery using GRE Web Plug-inThe Data Protector GRE and the Web plug-in provides the interface required to perform a recovery operation. Recovery can be performed by the operator and administrator users. This section provides information on the following:
Granular Recovery Extension User Guide for Microsoft SharePoint Server, Exchange and VMwareChapter 19: Recovery
HPE Data Protector (9.07) Page 120 of 176
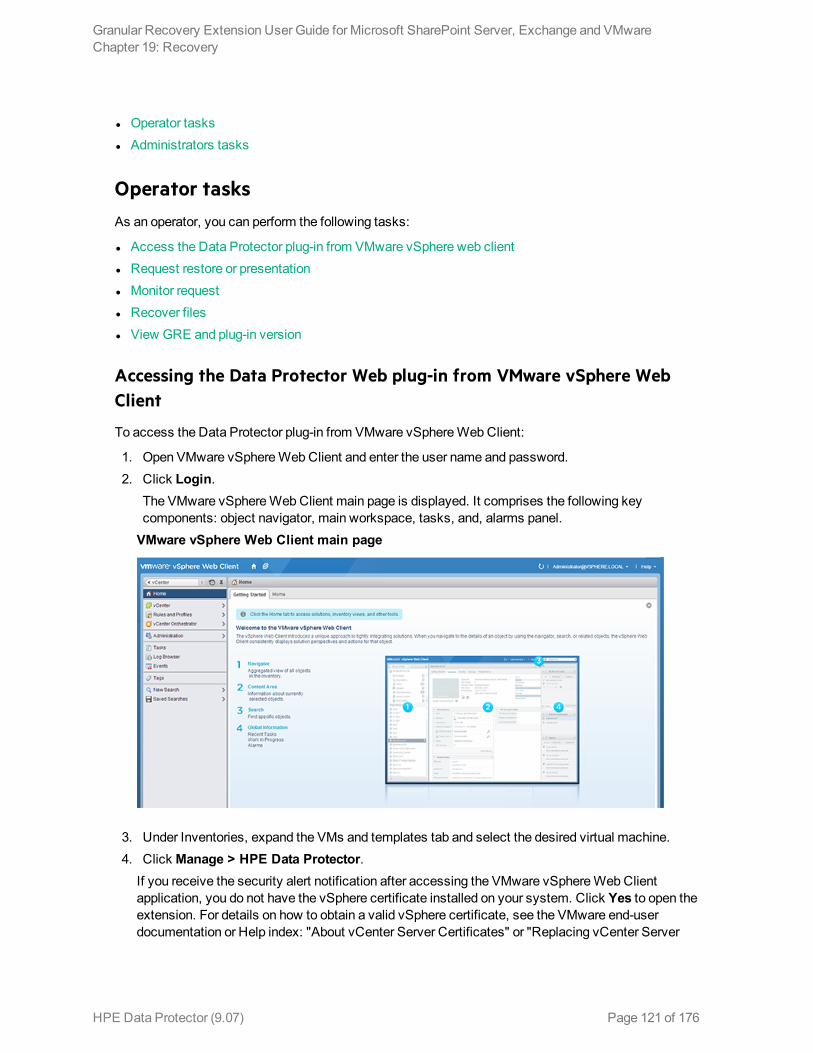
l Operator tasks l Administrators tasks
Operator tasksAs an operator, you can perform the following tasks:
l Access the Data Protector plug-in from VMware vSphere web client l Request restore or presentation l Monitor request l Recover files l View GRE and plug-in version
Accessing the Data Protector Web plug-in from VMware vSphere Web Client
To access the Data Protector plug-in from VMware vSphere Web Client:
1. Open VMware vSphere Web Client and enter the user name and password. 2. Click Login.
The VMware vSphere Web Client main page is displayed. It comprises the following key components: object navigator, main workspace, tasks, and, alarms panel.
VMware vSphere Web Client main page
3. Under Inventories, expand the VMs and templates tab and select the desired virtual machine. 4. Click Manage > HPE Data Protector.
If you receive the security alert notification after accessing the VMware vSphere Web Client application, you do not have the vSphere certificate installed on your system. Click Yes to open the extension. For details on how to obtain a valid vSphere certificate, see the VMware end-user documentation or Help index: "About vCenter Server Certificates" or "Replacing vCenter Server
Granular Recovery Extension User Guide for Microsoft SharePoint Server, Exchange and VMwareChapter 19: Recovery
HPE Data Protector (9.07) Page 121 of 176
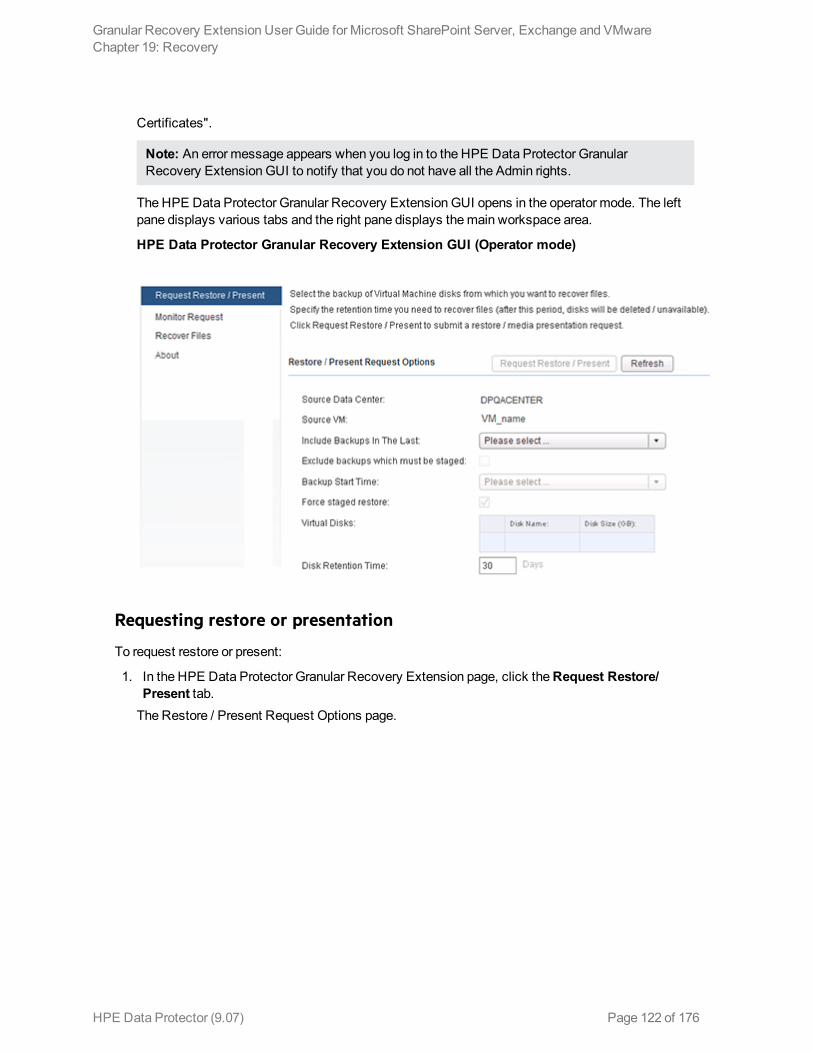
Certificates".
Note: An error message appears when you log in to the HPE Data Protector Granular Recovery Extension GUI to notify that you do not have all the Admin rights.
The HPE Data Protector Granular Recovery Extension GUI opens in the operator mode. The left pane displays various tabs and the right pane displays the main workspace area.
HPE Data Protector Granular Recovery Extension GUI (Operator mode)
Requesting restore or presentation
To request restore or present:
1. In the HPE Data Protector Granular Recovery Extension page, click the Request Restore/ Present tab.
The Restore / Present Request Options page.
Granular Recovery Extension User Guide for Microsoft SharePoint Server, Exchange and VMwareChapter 19: Recovery
HPE Data Protector (9.07) Page 122 of 176
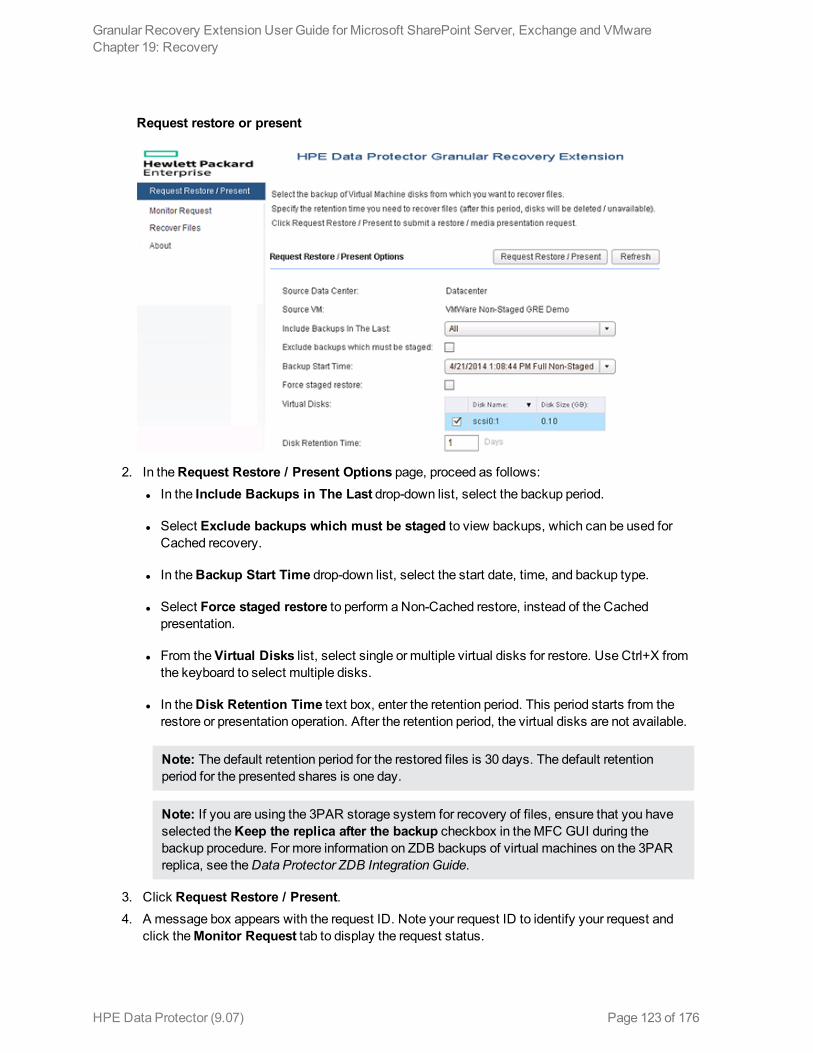
Request restore or present
2. In the Request Restore / Present Options page, proceed as follows: l In the Include Backups in The Last drop-down list, select the backup period.
l Select Exclude backups which must be staged to view backups, which can be used for Cached recovery.
l In the Backup Start Time drop-down list, select the start date, time, and backup type.
l Select Force staged restore to perform a Non-Cached restore, instead of the Cached presentation.
l From the Virtual Disks list, select single or multiple virtual disks for restore. Use Ctrl+X from the keyboard to select multiple disks.
l In the Disk Retention Time text box, enter the retention period. This period starts from the restore or presentation operation. After the retention period, the virtual disks are not available.
Note: The default retention period for the restored files is 30 days. The default retention period for the presented shares is one day.
Note: If you are using the 3PAR storage system for recovery of files, ensure that you have selected the Keep the replica after the backup checkbox in the MFC GUI during the backup procedure. For more information on ZDB backups of virtual machines on the 3PAR replica, see the Data Protector ZDB Integration Guide.
3. Click Request Restore / Present. 4. A message box appears with the request ID. Note your request ID to identify your request and
click the Monitor Request tab to display the request status.
Granular Recovery Extension User Guide for Microsoft SharePoint Server, Exchange and VMwareChapter 19: Recovery
HPE Data Protector (9.07) Page 123 of 176
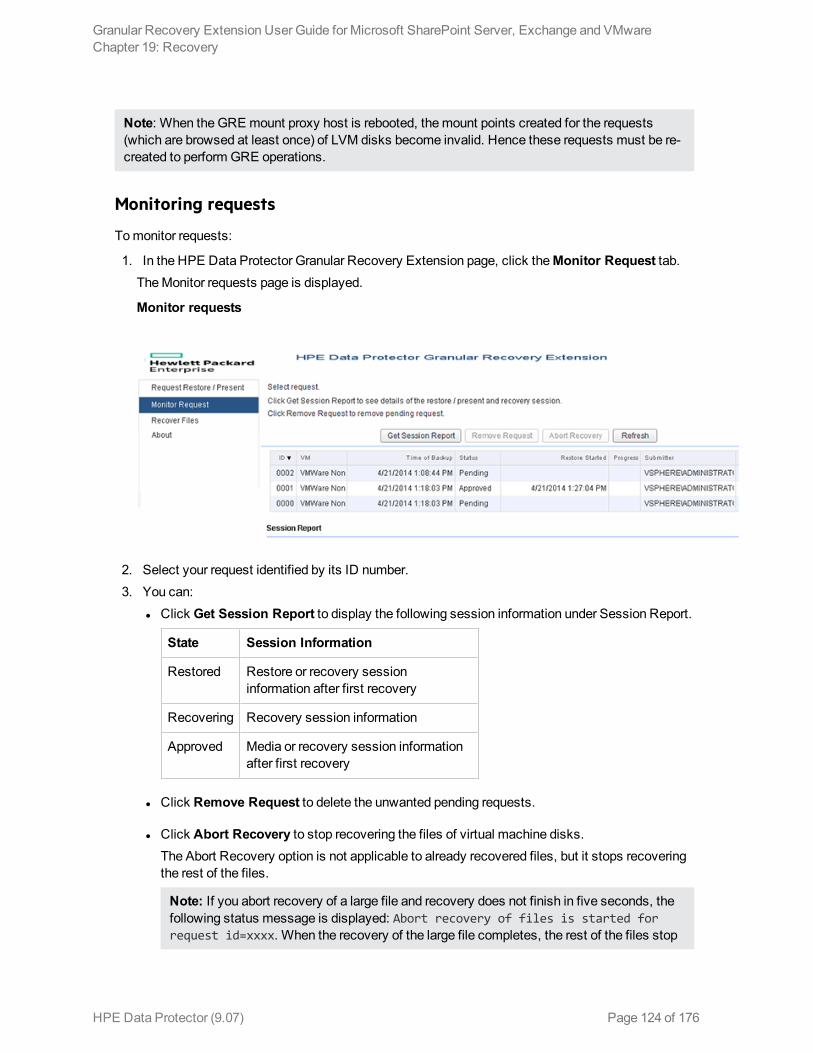
Note: When the GRE mount proxy host is rebooted, the mount points created for the requests (which are browsed at least once) of LVM disks become invalid. Hence these requests must be re-created to perform GRE operations.
Monitoring requests
To monitor requests:
1. In the HPE Data Protector Granular Recovery Extension page, click the Monitor Request tab.The Monitor requests page is displayed.
Monitor requests
2. Select your request identified by its ID number. 3. You can:
l Click Get Session Report to display the following session information under Session Report.
State Session Information
Restored Restore or recovery session information after first recovery
Recovering Recovery session information
Approved Media or recovery session information after first recovery
l Click Remove Request to delete the unwanted pending requests.
l Click Abort Recovery to stop recovering the files of virtual machine disks.The Abort Recovery option is not applicable to already recovered files, but it stops recovering the rest of the files.
Note: If you abort recovery of a large file and recovery does not finish in five seconds, the following status message is displayed: Abort recovery of files is started for request id=xxxx. When the recovery of the large file completes, the rest of the files stop
Granular Recovery Extension User Guide for Microsoft SharePoint Server, Exchange and VMwareChapter 19: Recovery
HPE Data Protector (9.07) Page 124 of 176
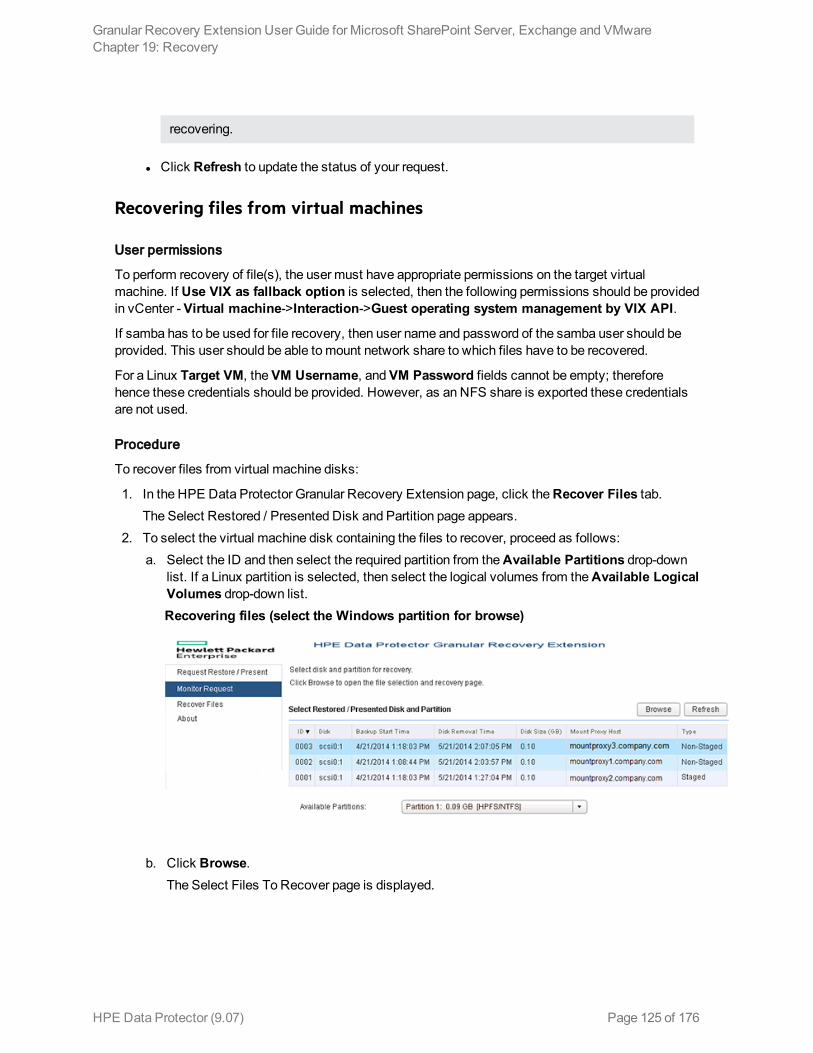
recovering.
l Click Refresh to update the status of your request.
Recovering files from virtual machines
User permissions
To perform recovery of file(s), the user must have appropriate permissions on the target virtual machine. If Use VIX as fallback option is selected, then the following permissions should be provided in vCenter - Virtual machine->Interaction->Guest operating system management by VIX API.
If samba has to be used for file recovery, then user name and password of the samba user should be provided. This user should be able to mount network share to which files have to be recovered.
For a Linux Target VM, the VM Username, and VM Password fields cannot be empty; therefore hence these credentials should be provided. However, as an NFS share is exported these credentials are not used.
Procedure
To recover files from virtual machine disks:
1. In the HPE Data Protector Granular Recovery Extension page, click the Recover Files tab.The Select Restored / Presented Disk and Partition page appears.
2. To select the virtual machine disk containing the files to recover, proceed as follows: a. Select the ID and then select the required partition from the Available Partitions drop-down
list. If a Linux partition is selected, then select the logical volumes from the Available Logical Volumes drop-down list. Recovering files (select the Windows partition for browse)
b. Click Browse.
The Select Files To Recover page is displayed.
Granular Recovery Extension User Guide for Microsoft SharePoint Server, Exchange and VMwareChapter 19: Recovery
HPE Data Protector (9.07) Page 125 of 176
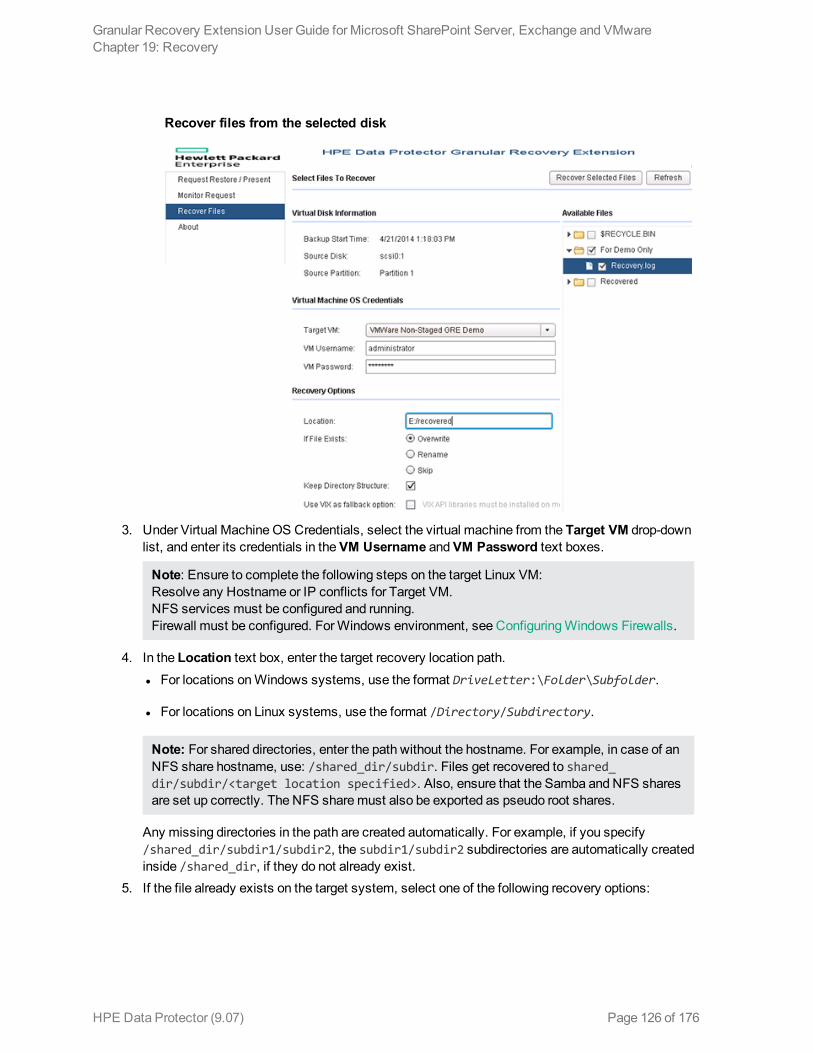
Recover files from the selected disk
3. Under Virtual Machine OS Credentials, select the virtual machine from the Target VM drop-down list, and enter its credentials in the VM Username and VM Password text boxes.
Note: Ensure to complete the following steps on the target Linux VM:Resolve any Hostname or IP conflicts for Target VM. NFS services must be configured and running.Firewall must be configured. For Windows environment, see Configuring Windows Firewalls.
4. In the Location text box, enter the target recovery location path. l For locations on Windows systems, use the format DriveLetter:\Folder\Subfolder.
l For locations on Linux systems, use the format /Directory/Subdirectory.
Note: For shared directories, enter the path without the hostname. For example, in case of an NFS share hostname, use: /shared_dir/subdir. Files get recovered to shared_dir/subdir/<target location specified>. Also, ensure that the Samba and NFS shares are set up correctly. The NFS share must also be exported as pseudo root shares.
Any missing directories in the path are created automatically. For example, if you specify /shared_dir/subdir1/subdir2, the subdir1/subdir2 subdirectories are automatically created inside /shared_dir, if they do not already exist.
5. If the file already exists on the target system, select one of the following recovery options:
Granular Recovery Extension User Guide for Microsoft SharePoint Server, Exchange and VMwareChapter 19: Recovery
HPE Data Protector (9.07) Page 126 of 176
l Overwrite: deletes the original files, and saves the latest files.
l Rename: keeps the original files and saves the recovered files with a unique number (generated by Data Protector).renamed.
l Skip: keeps the original files.
6. Select Keep Directory Structure to maintain the original directory structure of the source virtual machine disk on the target system.
7. Select Use VIX as fallback option when network share is not available. 8. Under Available Files, select the files and folders to be recovered. 9. Click Recover Selected Files.
About Granular Recovery Extension
Procedure
To determine the VMware Granular Recovery Extension agent and Plug-in version:
1. In the HPE Data Protector Granular Recovery Extension for VMware vSphere Web Client, click the About tab.The About Granular Recovery Extension page is displayed.
2. Click User Manual to download a copy of the HPE Data Protector 9.07 Granular Recovery Extension User Guide for VMware vSphere.
Note: You can download the GRE guide if the Data Protector documentation component is installed on the vCenter Server.
Administrator tasksThe administrator can perform the following tasks:
l Access the Data Protector plug-in from VMware vSphere web client l Configure the mount proxy systems l Handle requests l Monitor requests l Recover files from virtual machines l Remove virtual machine disks l View GRE and plug-in version
Accessing the Data Protector plug-in from VMware vSphere Web Client
To access the Data Protector plug-in from VMware vSphere Web Client:
1. Open VMware vSphere Web Client, and connect to the vCenter server. Specify the credentials of the Data Protector user with permission to start restores.
2. Click Login.
Granular Recovery Extension User Guide for Microsoft SharePoint Server, Exchange and VMwareChapter 19: Recovery
HPE Data Protector (9.07) Page 127 of 176
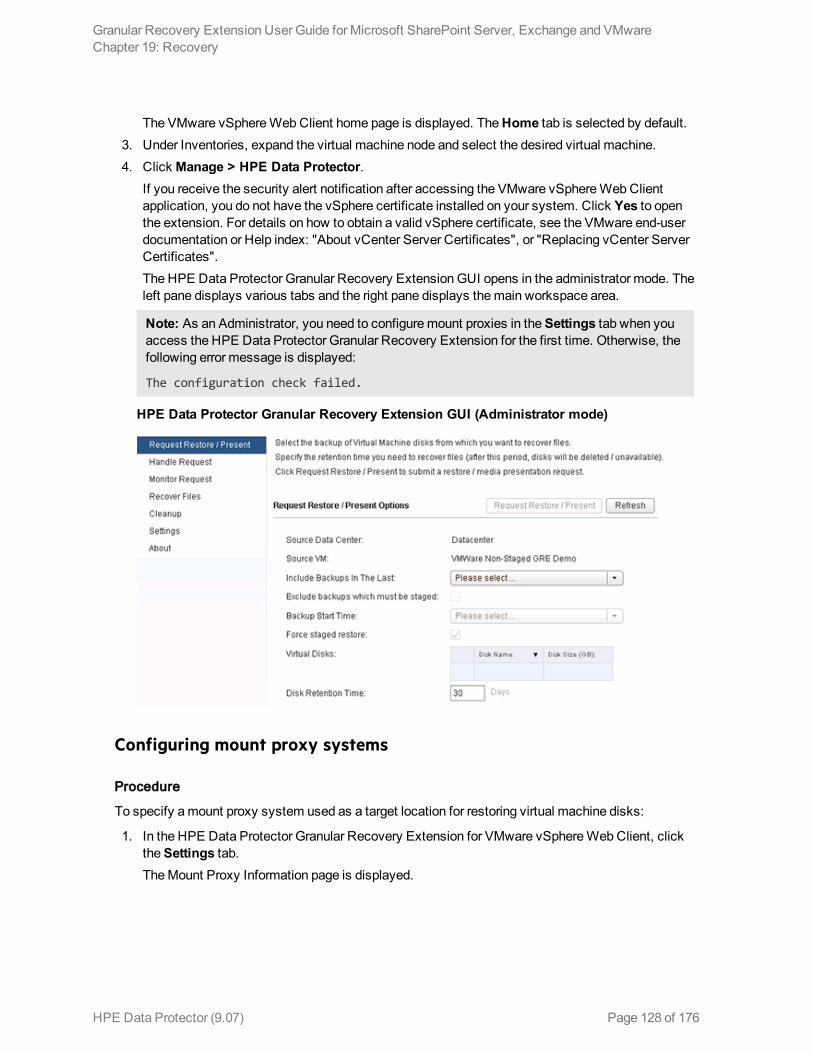
The VMware vSphere Web Client home page is displayed. The Home tab is selected by default. 3. Under Inventories, expand the virtual machine node and select the desired virtual machine. 4. Click Manage > HPE Data Protector.
If you receive the security alert notification after accessing the VMware vSphere Web Client application, you do not have the vSphere certificate installed on your system. Click Yes to open the extension. For details on how to obtain a valid vSphere certificate, see the VMware end-user documentation or Help index: "About vCenter Server Certificates", or "Replacing vCenter Server Certificates".The HPE Data Protector Granular Recovery Extension GUI opens in the administrator mode. The left pane displays various tabs and the right pane displays the main workspace area.
Note: As an Administrator, you need to configure mount proxies in the Settings tab when you access the HPE Data Protector Granular Recovery Extension for the first time. Otherwise, the following error message is displayed:
The configuration check failed.
HPE Data Protector Granular Recovery Extension GUI (Administrator mode)
Configuring mount proxy systems
Procedure
To specify a mount proxy system used as a target location for restoring virtual machine disks:
1. In the HPE Data Protector Granular Recovery Extension for VMware vSphere Web Client, click the Settings tab.The Mount Proxy Information page is displayed.
Granular Recovery Extension User Guide for Microsoft SharePoint Server, Exchange and VMwareChapter 19: Recovery
HPE Data Protector (9.07) Page 128 of 176
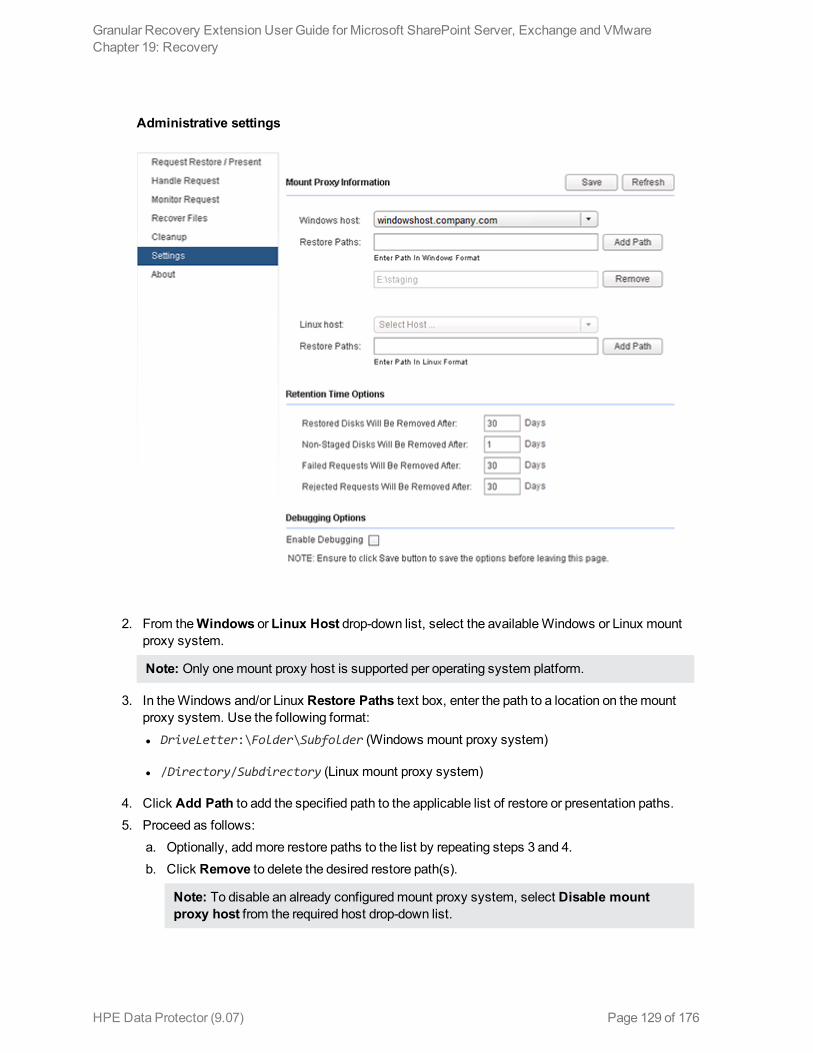
Administrative settings
2. From the Windows or Linux Host drop-down list, select the available Windows or Linux mount proxy system.
Note: Only one mount proxy host is supported per operating system platform.
3. In the Windows and/or Linux Restore Paths text box, enter the path to a location on the mount proxy system. Use the following format: l DriveLetter:\Folder\Subfolder (Windows mount proxy system)
l /Directory/Subdirectory (Linux mount proxy system)
4. Click Add Path to add the specified path to the applicable list of restore or presentation paths. 5. Proceed as follows:
a. Optionally, add more restore paths to the list by repeating steps 3 and 4. b. Click Remove to delete the desired restore path(s).
Note: To disable an already configured mount proxy system, select Disable mount proxy host from the required host drop-down list.
Granular Recovery Extension User Guide for Microsoft SharePoint Server, Exchange and VMwareChapter 19: Recovery
HPE Data Protector (9.07) Page 129 of 176
6. Under Retention Time Options, enter the retention period for the following text boxes: l Restored Disks Will Be Removed After
l Non-Staged Disks will be removed After
l Failed Requests Will Be Removed After
l Rejected Requests Will Be Removed After
Note: The default retention period of the restored data is 30 days. The default retention period for the presented shares of virtual machine disks on the mount proxy system is 1 day.
7. Under Debugging Options, select Enable Debugging to create debug files. 8. Click Save.
Note: Click Refresh to get the previously saved changes.
Handling requests
Procedure
After receiving a request from an operator for a presentation or Cached recovery, you have the following options:
l Approve request l Reject request After receiving a restore request from an operator, you have the following options:
l Trigger session l Reject request
Approve request
Procedure
To approve presentation sessions:
1. In the HPE Data Protector Granular Recovery Extension for VMware vSphere Web Client, click the Handle Request tab.The Restore / Present Requests page is displayed.
Granular Recovery Extension User Guide for Microsoft SharePoint Server, Exchange and VMwareChapter 19: Recovery
HPE Data Protector (9.07) Page 130 of 176
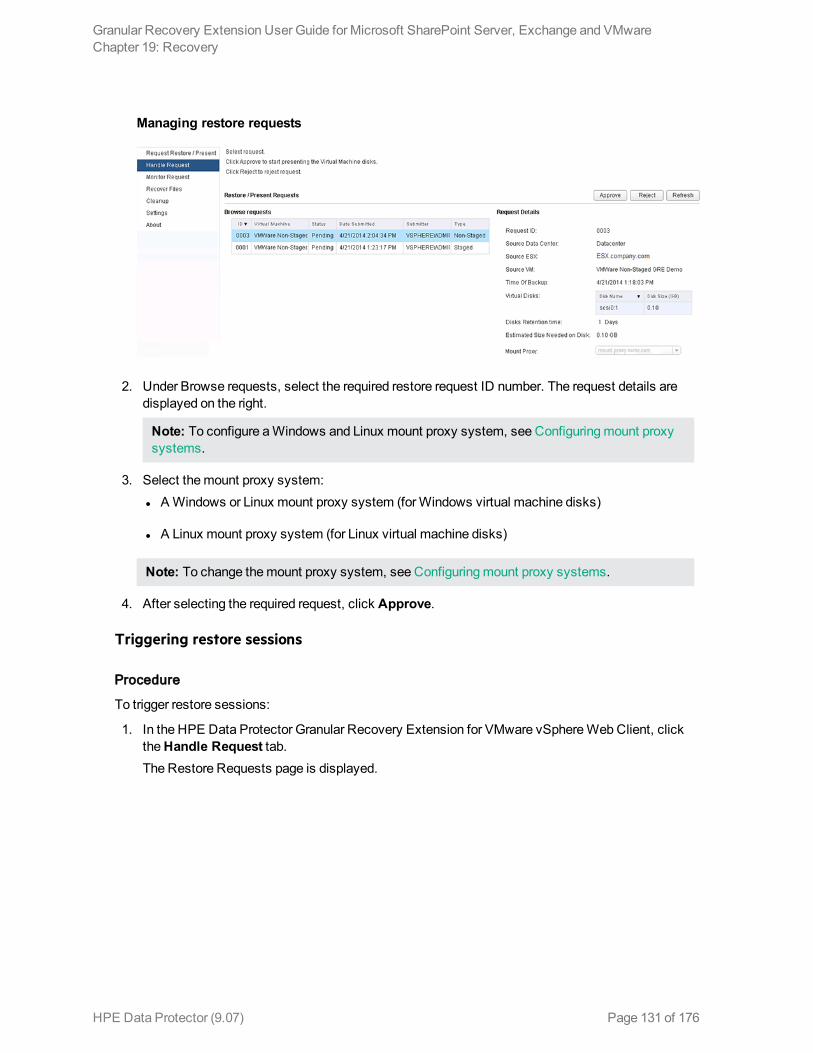
Managing restore requests
2. Under Browse requests, select the required restore request ID number. The request details are displayed on the right.
Note: To configure a Windows and Linux mount proxy system, see Configuring mount proxy systems.
3. Select the mount proxy system: l A Windows or Linux mount proxy system (for Windows virtual machine disks)
l A Linux mount proxy system (for Linux virtual machine disks)
Note: To change the mount proxy system, see Configuring mount proxy systems.
4. After selecting the required request, click Approve.
Triggering restore sessions
Procedure
To trigger restore sessions:
1. In the HPE Data Protector Granular Recovery Extension for VMware vSphere Web Client, click the Handle Request tab.The Restore Requests page is displayed.
Granular Recovery Extension User Guide for Microsoft SharePoint Server, Exchange and VMwareChapter 19: Recovery
HPE Data Protector (9.07) Page 131 of 176
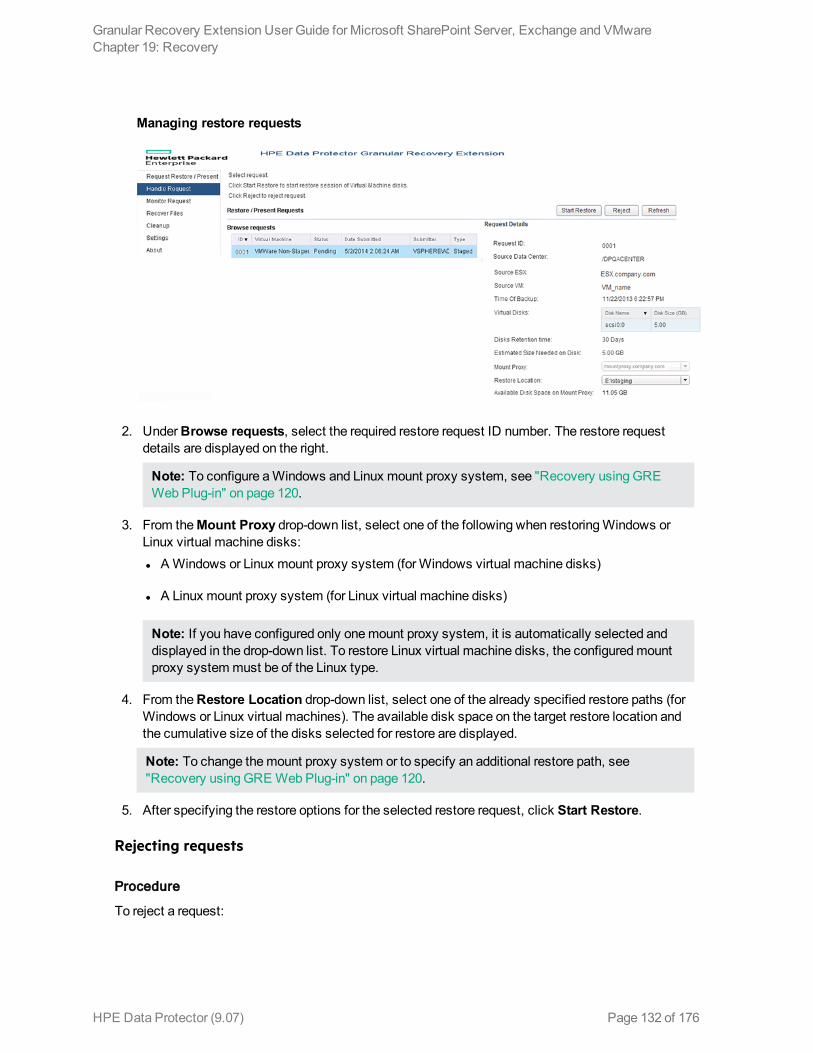
Managing restore requests
2. Under Browse requests, select the required restore request ID number. The restore request details are displayed on the right.
Note: To configure a Windows and Linux mount proxy system, see "Recovery using GRE Web Plug-in" on page 120.
3. From the Mount Proxy drop-down list, select one of the following when restoring Windows or Linux virtual machine disks: l A Windows or Linux mount proxy system (for Windows virtual machine disks)
l A Linux mount proxy system (for Linux virtual machine disks)
Note: If you have configured only one mount proxy system, it is automatically selected and displayed in the drop-down list. To restore Linux virtual machine disks, the configured mount proxy system must be of the Linux type.
4. From the Restore Location drop-down list, select one of the already specified restore paths (for Windows or Linux virtual machines). The available disk space on the target restore location and the cumulative size of the disks selected for restore are displayed.
Note: To change the mount proxy system or to specify an additional restore path, see "Recovery using GRE Web Plug-in" on page 120.
5. After specifying the restore options for the selected restore request, click Start Restore.
Rejecting requests
Procedure
To reject a request:
Granular Recovery Extension User Guide for Microsoft SharePoint Server, Exchange and VMwareChapter 19: Recovery
HPE Data Protector (9.07) Page 132 of 176
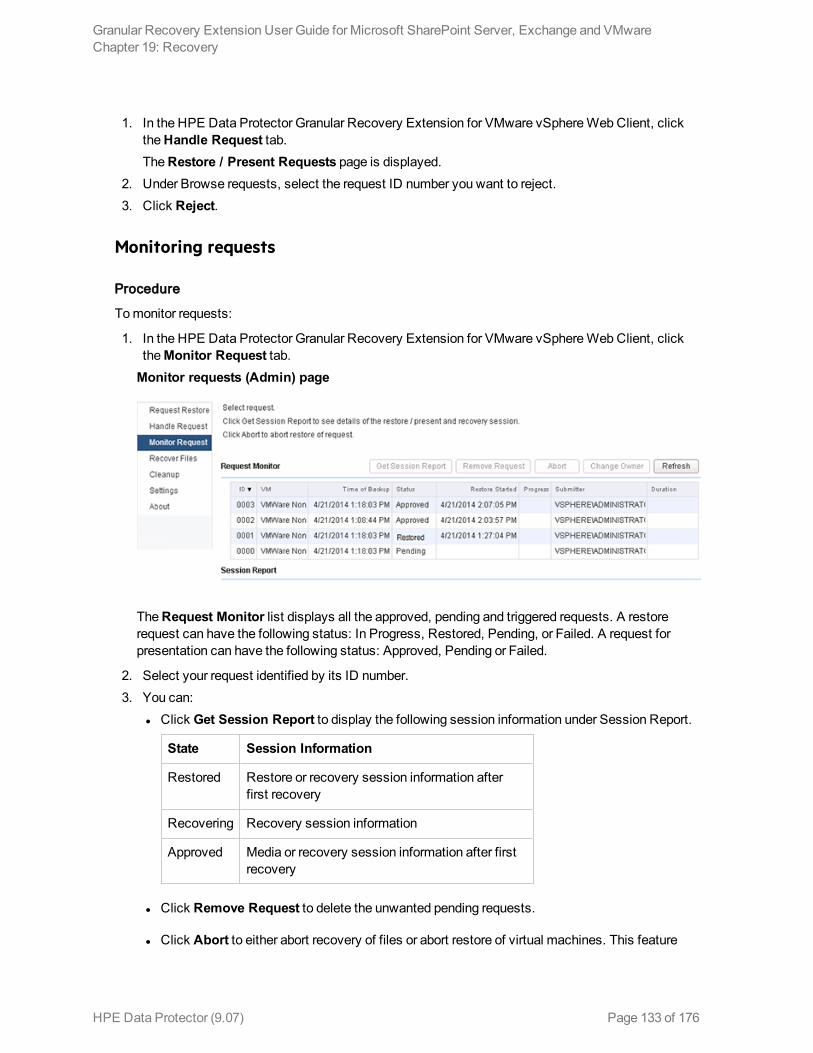
1. In the HPE Data Protector Granular Recovery Extension for VMware vSphere Web Client, click the Handle Request tab.The Restore / Present Requests page is displayed.
2. Under Browse requests, select the request ID number you want to reject. 3. Click Reject.
Monitoring requests
Procedure
To monitor requests:
1. In the HPE Data Protector Granular Recovery Extension for VMware vSphere Web Client, click the Monitor Request tab.
Monitor requests (Admin) page
The Request Monitor list displays all the approved, pending and triggered requests. A restore request can have the following status: In Progress, Restored, Pending, or Failed. A request for presentation can have the following status: Approved, Pending or Failed.
2. Select your request identified by its ID number. 3. You can:
l Click Get Session Report to display the following session information under Session Report.
State Session Information
Restored Restore or recovery session information after first recovery
Recovering Recovery session information
Approved Media or recovery session information after first recovery
l Click Remove Request to delete the unwanted pending requests.
l Click Abort to either abort recovery of files or abort restore of virtual machines. This feature
Granular Recovery Extension User Guide for Microsoft SharePoint Server, Exchange and VMwareChapter 19: Recovery
HPE Data Protector (9.07) Page 133 of 176
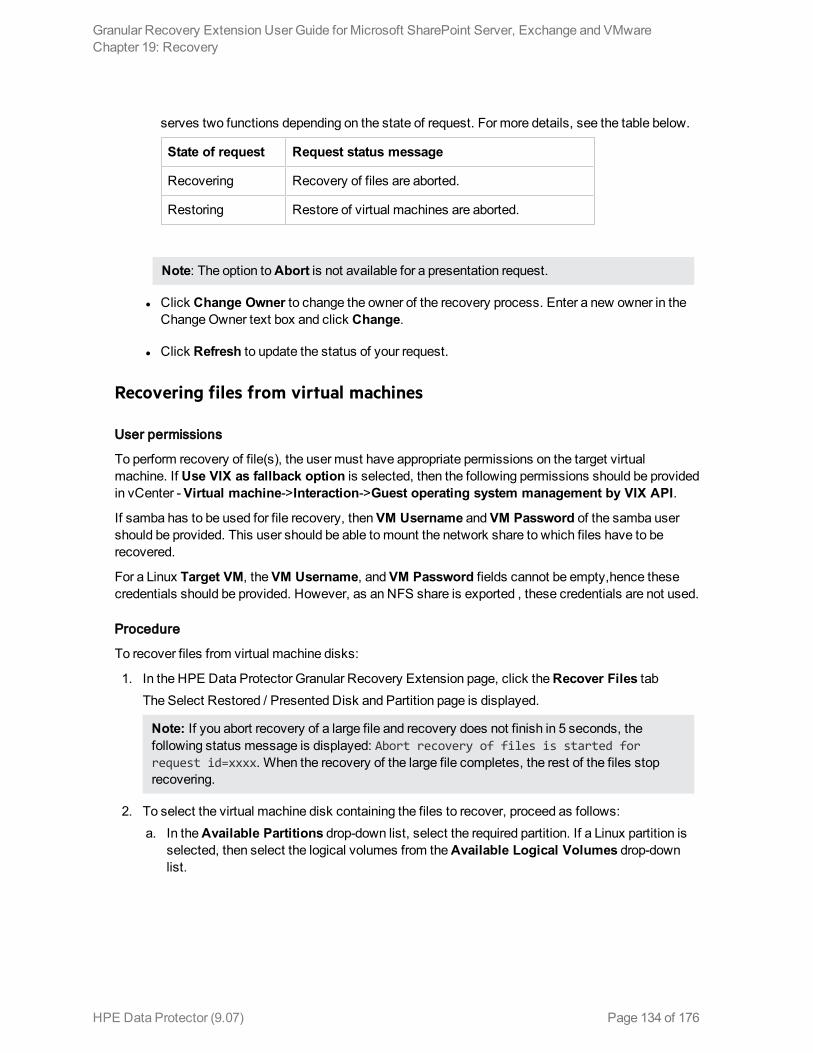
serves two functions depending on the state of request. For more details, see the table below.
State of request Request status message
Recovering Recovery of files are aborted.
Restoring Restore of virtual machines are aborted.
Note: The option to Abort is not available for a presentation request.
l Click Change Owner to change the owner of the recovery process. Enter a new owner in the Change Owner text box and click Change.
l Click Refresh to update the status of your request.
Recovering files from virtual machines
User permissions
To perform recovery of file(s), the user must have appropriate permissions on the target virtual machine. If Use VIX as fallback option is selected, then the following permissions should be provided in vCenter - Virtual machine->Interaction->Guest operating system management by VIX API.
If samba has to be used for file recovery, then VM Username and VM Password of the samba user should be provided. This user should be able to mount the network share to which files have to be recovered.
For a Linux Target VM, the VM Username, and VM Password fields cannot be empty,hence these credentials should be provided. However, as an NFS share is exported , these credentials are not used.
Procedure
To recover files from virtual machine disks:
1. In the HPE Data Protector Granular Recovery Extension page, click the Recover Files tabThe Select Restored / Presented Disk and Partition page is displayed.
Note: If you abort recovery of a large file and recovery does not finish in 5 seconds, the following status message is displayed: Abort recovery of files is started for request id=xxxx. When the recovery of the large file completes, the rest of the files stop recovering.
2. To select the virtual machine disk containing the files to recover, proceed as follows: a. In the Available Partitions drop-down list, select the required partition. If a Linux partition is
selected, then select the logical volumes from the Available Logical Volumes drop-down list.
Granular Recovery Extension User Guide for Microsoft SharePoint Server, Exchange and VMwareChapter 19: Recovery
HPE Data Protector (9.07) Page 134 of 176
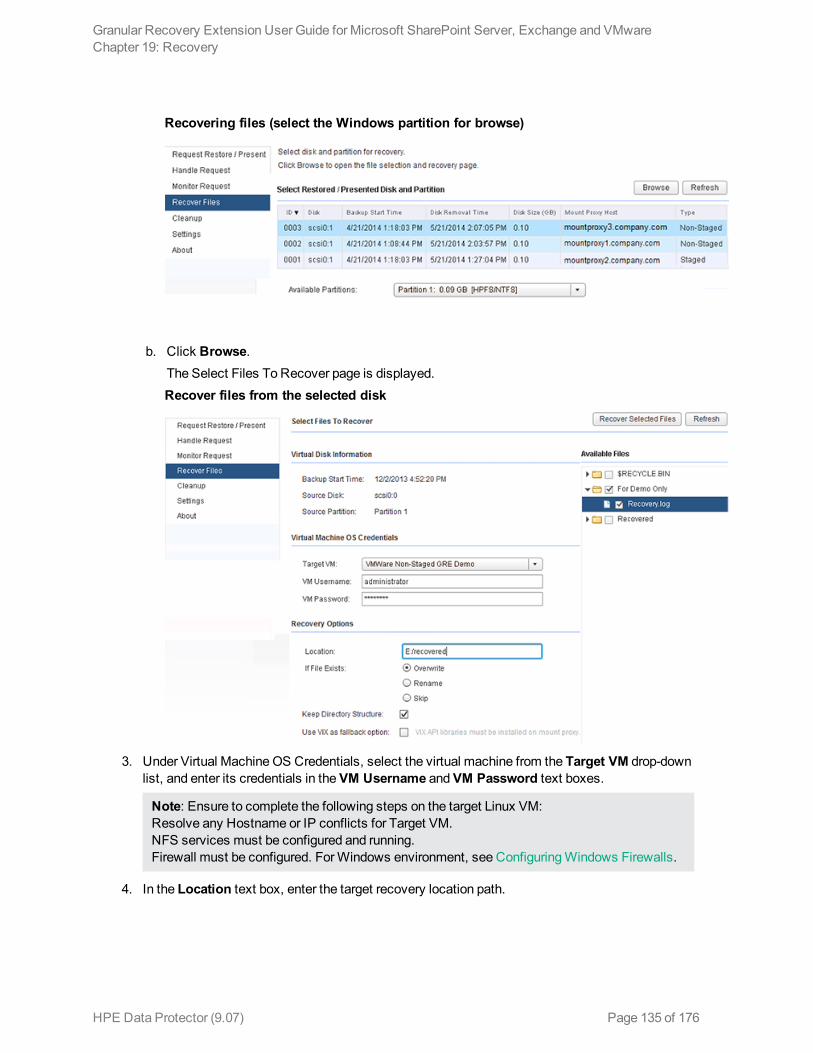
Recovering files (select the Windows partition for browse)
b. Click Browse.
The Select Files To Recover page is displayed.Recover files from the selected disk
3. Under Virtual Machine OS Credentials, select the virtual machine from the Target VM drop-down list, and enter its credentials in the VM Username and VM Password text boxes.
Note: Ensure to complete the following steps on the target Linux VM:Resolve any Hostname or IP conflicts for Target VM. NFS services must be configured and running.Firewall must be configured. For Windows environment, see Configuring Windows Firewalls.
4. In the Location text box, enter the target recovery location path.
Granular Recovery Extension User Guide for Microsoft SharePoint Server, Exchange and VMwareChapter 19: Recovery
HPE Data Protector (9.07) Page 135 of 176
l For locations on Windows systems, use the format DriveLetter:\Folder\Subfolder.
l For locations on Linux systems, use the format /Directory/Subdirectory.
Note: For shared directories, enter the path without the hostname. For example, in case of an NFS share hostname, use: /shared_dir/subdir. Files get recovered to shared_dir/subdir/<target location specified>. Also, ensure that the Samba and NFS shares are set up correctly. The NFS share must also be exported as pseudo root shares.
Any missing directories in the path are created automatically. For example, if you specify /shared_dir/subdir1/subdir2, the subdir1/subdir2 subdirectories are automatically created inside /shared_dir, if they do not already exist.
5. If the file already exists on the target system, select one of the following recovery options: l Overwrite: deletes the original files and saves the latest files.
l Rename: keeps the original files and saves the recovered files with a unique number (generated by Data Protector).renamed.
l Skip: keeps the original files.
6. Select Keep Directory Structure to maintain the original directory structure of the source virtual machine disk on the target system.
7. Select Use VIX as fallback option when network share is not available. 8. Under Available Files, select the files and folders to be recovered. 9. Click Recover Selected Files.
Removing virtual machine disks
Procedure
When the specified retention period expires, the virtual machine disks are deleted automatically. You can remove the virtual machine disks manually, if you want to remove the disks before the retention period.
To delete virtual machine disks manually:
1. In the HPE Data Protector Granular Recovery Extension for VMware vSphere Web Client, click the Cleanup tab.The Cleanup page is displayed.
Granular Recovery Extension User Guide for Microsoft SharePoint Server, Exchange and VMwareChapter 19: Recovery
HPE Data Protector (9.07) Page 136 of 176

Removing disks
2. Under Mount Proxies, select the mount proxy and the restore path from where you want to remove the disks.The table in the Restored / Presented Disks area displays the restored virtual machine disks in the selected path.
3. Under Restored Disks, select the desired disk and click Remove Disk to remove the restored virtual machine disk from the mount proxy system. When you click Remove Disk, it unpresents the share from the Smart Cache device and removes all disks with the same request ID.A confirmation message is displayed in the Command Status area.
About Granular Recovery Extension
Procedure
To determine the VMware Granular Recovery Extension agent and Plug-in version:
1. In the HPE Data Protector Granular Recovery Extension for VMware vSphere Web Client, click the About tab.The About Granular Recovery Extension page is displayed.
2. Click User Manual to download a copy of the HPE Data Protector 9.07 Granular Recovery Extension User Guide for VMware vSphere.
Note: You can download the GRE guide if the Data Protector documentation component is installed on the vCenter Server.
Recovery using Advanced GRE Web Plug-inThe Data Protector GRE with the Advanced GRE Web Plug-in provides the interface required to perform a recovery operation.
The Advanced GRE Web Plug-in enables you to perform the following tasks:
l Access the Advanced GRE Web Plug-in l View the list of requests
Granular Recovery Extension User Guide for Microsoft SharePoint Server, Exchange and VMwareChapter 19: Recovery
HPE Data Protector (9.07) Page 137 of 176
l Configure the GRE settings l Create new request l Recover files l Change the Cell Manager l About Granular Recovery Extension Plug-in
Accessing the Advanced GRE Web Plug-in from VMware vSphere Web ClientTo access the Advanced GRE Web Plug-in from the VMware vSphere Web Client, proceed as follows:
1. Open the VMware vSphere Web Client. You can specify any of the vCenter URLs that are already imported into the Data Protector Cell Manager. Specify the credentials of the Data Protector user and click Login.
The VMware vSphere Web Client home page is displayed and the Home tab is selected by default.
2. Select Hosts and Clusters or VMs and Templates and expand the virtual machine node to select the required virtual machine.
3. Click Manage > HPE Data Protector.
Note: If you receive the security alert notification after accessing the VMware vSphere Web Client application, you do not have the vSphere certificate installed on your system. Click Yes to open the extension.
The Advanced GRE Web Plug-in opens and the Select Cell Manager dialog box appears.
4. Select the Cell Manager from the list and click Select. The GRE Request page with the list of requests appears. If there is only one Cell Manager, then selection is not required. The available Cell Manager is displayed briefly and you are re-directed to the GRE Requests page. If you select a different Cell Manager and click Cancel or Close, then you will be connected to the previously selected Cell Manager.
Viewing the list of requestsThe GRE requests page is the landing page for the Advanced GRE Web Plug-in. In this page you can view the list of requests and perform actions that are described in this section.
Granular Recovery Extension User Guide for Microsoft SharePoint Server, Exchange and VMwareChapter 19: Recovery
HPE Data Protector (9.07) Page 138 of 176
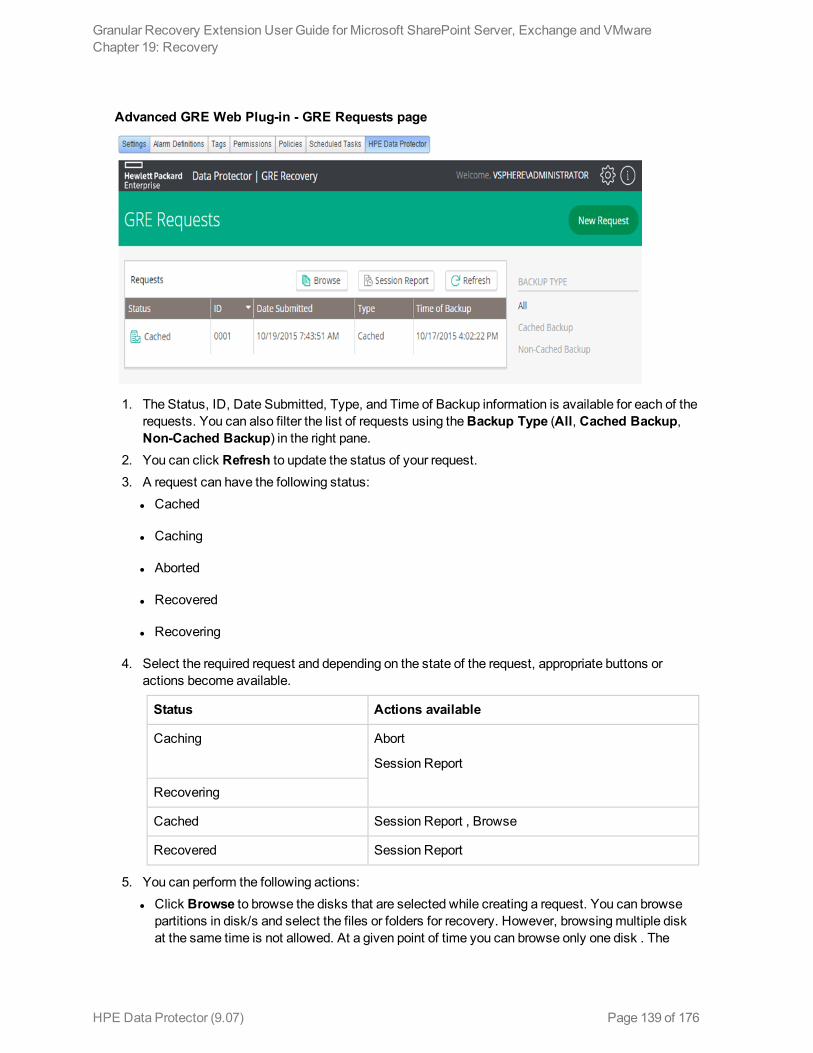
Advanced GRE Web Plug-in - GRE Requests page
1. The Status, ID, Date Submitted, Type, and Time of Backup information is available for each of the requests. You can also filter the list of requests using the Backup Type (All, Cached Backup, Non-Cached Backup) in the right pane.
2. You can click Refresh to update the status of your request. 3. A request can have the following status:
l Cached
l Caching
l Aborted
l Recovered
l Recovering
4. Select the required request and depending on the state of the request, appropriate buttons or actions become available.
Status Actions available
Caching
Abort
Session Report
Recovering
Cached Session Report , Browse
Recovered Session Report
5. You can perform the following actions: l Click Browse to browse the disks that are selected while creating a request. You can browse
partitions in disk/s and select the files or folders for recovery. However, browsing multiple disk at the same time is not allowed. At a given point of time you can browse only one disk . The
Granular Recovery Extension User Guide for Microsoft SharePoint Server, Exchange and VMwareChapter 19: Recovery
HPE Data Protector (9.07) Page 139 of 176
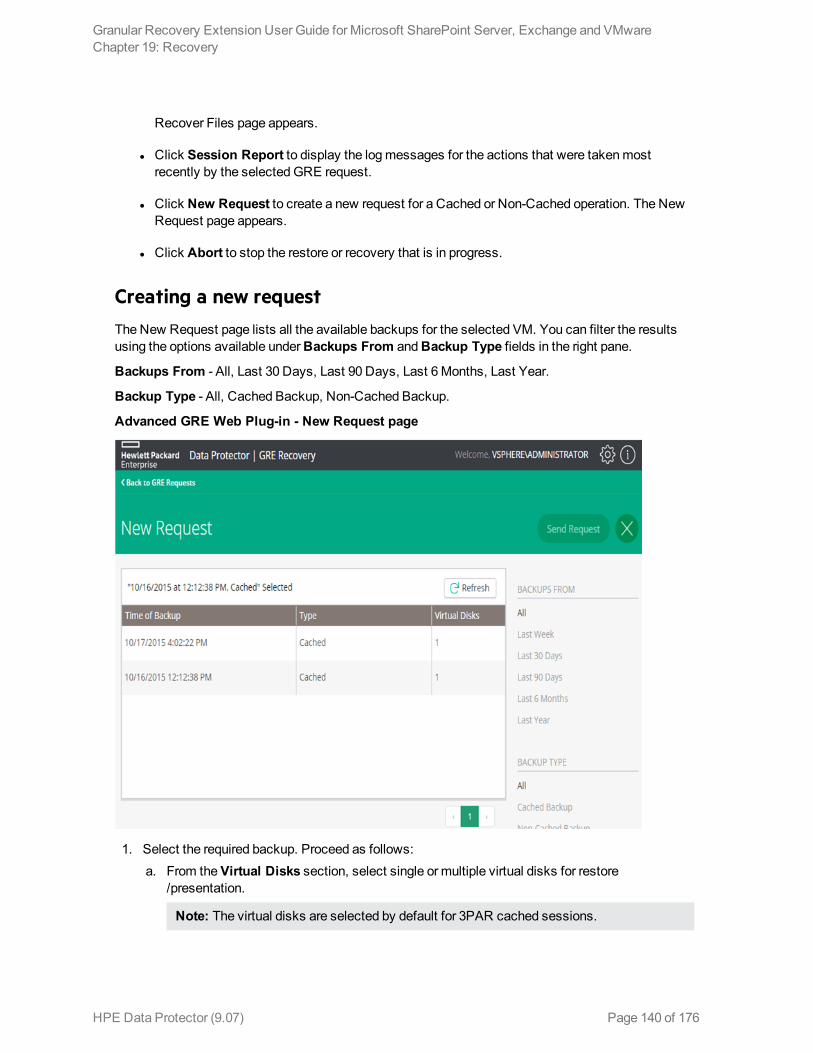
Recover Files page appears.
l Click Session Report to display the log messages for the actions that were taken most recently by the selected GRE request.
l Click New Request to create a new request for a Cached or Non-Cached operation. The New Request page appears.
l Click Abort to stop the restore or recovery that is in progress.
Creating a new requestThe New Request page lists all the available backups for the selected VM. You can filter the results using the options available under Backups From and Backup Type fields in the right pane.
Backups From - All, Last 30 Days, Last 90 Days, Last 6 Months, Last Year.
Backup Type - All, Cached Backup, Non-Cached Backup.
Advanced GRE Web Plug-in - New Request page
1. Select the required backup. Proceed as follows: a. From the Virtual Disks section, select single or multiple virtual disks for restore
/presentation.
Note: The virtual disks are selected by default for 3PAR cached sessions.
Granular Recovery Extension User Guide for Microsoft SharePoint Server, Exchange and VMwareChapter 19: Recovery
HPE Data Protector (9.07) Page 140 of 176
b. In the Disk Retention Time text box, enter the retention period. This period starts from the restore or presentation operation. After the retention period, the virtual disks are not available.
c. From the ESX Host drop-down list, select the required ESX host. By default, the production ESX is selected.
d. From the Select Mount Proxy drop-down list, select the required mount proxy. e. From the Restore Path drop-down list, select the required restore path.
Note: The default retention period of the non-cached backup is 7 days (maximum can be set to 7 days). The default retention period for the cached backup is 1 day (maximum can be set to 7 days).
2. For Cached / Non-Cached Backups, click Send Request. The GRE Request page appears and you can monitor the status of the request. For more information on how to proceed with the request, see the GRE Request section.
3. Click Refresh to update the list of backups.
Note: Configure the mount proxy from the GRE Settings page before proceeding to create a new request for Non-Cached backups. However, it is not necessary to configure mount proxies for Cached backups.
Note: When the GRE mount proxy host is rebooted, the mount points created for the requests (which are browsed at least once) of LVM disks become invalid. Hence these requests must be re-created to perform GRE operations.
Note: Run the following command to force clean up the StoreOnce Catalyst request IDs:vmwaregre-agent.exe -force_cleanup <request_id> -vcenter <hostname>
where
l request_id: StoreOnce Catalyst request ID that needs to be cleaned up l hostname: vCenter host name on which the request is made
Recovering files
User permissions
To perform recovery of file(s), the user must have appropriate permissions on the target virtual machine. If Use VIX as fallback option is selected, then the following permissions should be provided in vCenter - Virtual machine->Interaction->Guest operating system management by VIX API.
If Samba has to be used for file recovery, then user name and password of the Samba user should be provided. This user should be able to mount network share to which files have to be recovered.
For a Linux Target VM, the VM Username, and VM Password fields cannot be empty; therefore, these credentials should be provided. However, as an NFS share is exported , these credentials are not used.
Granular Recovery Extension User Guide for Microsoft SharePoint Server, Exchange and VMwareChapter 19: Recovery
HPE Data Protector (9.07) Page 141 of 176
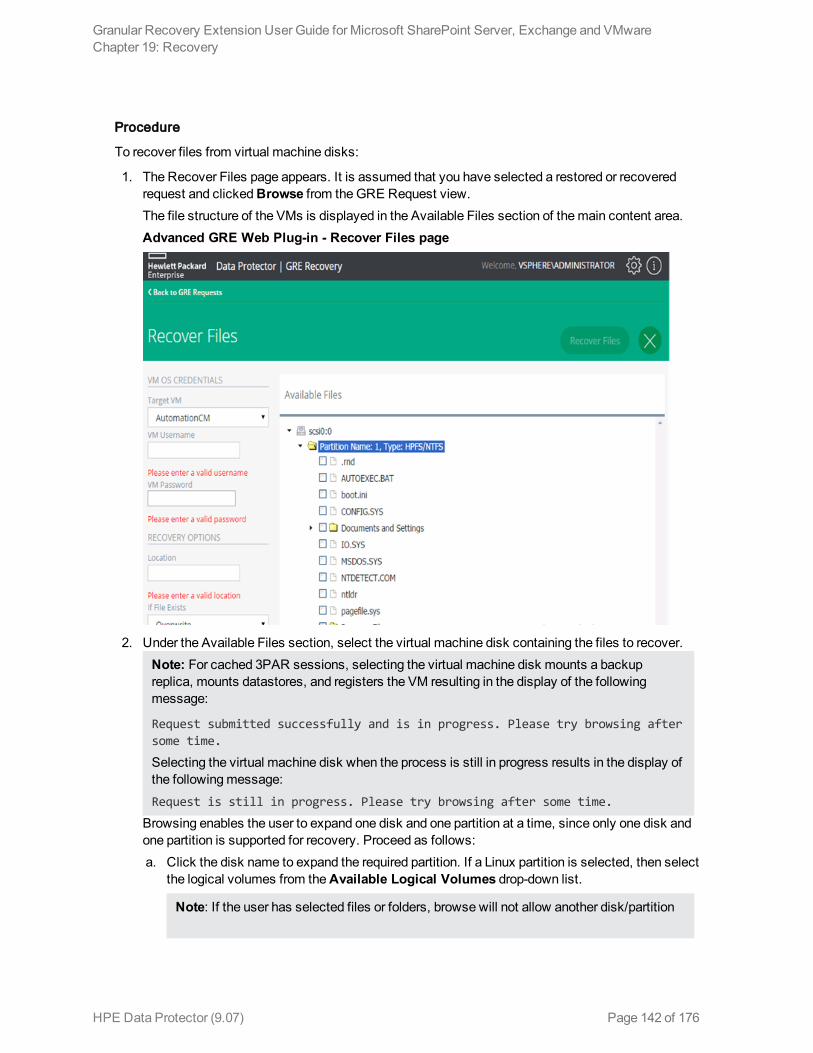
Procedure
To recover files from virtual machine disks:
1. The Recover Files page appears. It is assumed that you have selected a restored or recovered request and clicked Browse from the GRE Request view. The file structure of the VMs is displayed in the Available Files section of the main content area.Advanced GRE Web Plug-in - Recover Files page
2. Under the Available Files section, select the virtual machine disk containing the files to recover. Note: For cached 3PAR sessions, selecting the virtual machine disk mounts a backup replica, mounts datastores, and registers the VM resulting in the display of the following message:
Request submitted successfully and is in progress. Please try browsing after some time.
Selecting the virtual machine disk when the process is still in progress results in the display of the following message:
Request is still in progress. Please try browsing after some time.
Browsing enables the user to expand one disk and one partition at a time, since only one disk and one partition is supported for recovery. Proceed as follows: a. Click the disk name to expand the required partition. If a Linux partition is selected, then select
the logical volumes from the Available Logical Volumes drop-down list.
Note: If the user has selected files or folders, browse will not allow another disk/partition
Granular Recovery Extension User Guide for Microsoft SharePoint Server, Exchange and VMwareChapter 19: Recovery
HPE Data Protector (9.07) Page 142 of 176
to be selected until the files/folders have been deselected.
b. Select the files to recover from the selected disk. 3. Under Virtual Machine OS Credentials, select the virtual machine from the Target VM drop-down
list, and enter its credentials in the VM Username and VM Password text boxes. The Target VM lists all the running VMs under the selected vCenter.
Note: Ensure to complete the following steps on the target Linux VM:Resolve any Hostname or IP conflicts for Target VM. NFS services must be configured and running.Firewall must be configured. For Windows environment, see Configuring Windows Firewalls.
4. Under the Recovery Options section, in the Location text box, enter the target recovery location path. l For locations on Windows systems, use the format DriveLetter:\Folder\Subfolder.
l For locations on Linux systems, use the format /Directory/Subdirectory.
Note: For shared directories, enter the path without the hostname. For example, in the case of an NFS share hostname, use: /shared_dir/subdir. Files get recovered to shared_dir/subdir/<target location specified>. Also, ensure that the Samba and NFS shares are set up correctly. The NFS share must also be exported as pseudo root shares.
Any missing directories in the path are created automatically. For example, if you specify /shared_dir/subdir1/subdir2, the subdir1/subdir2 subdirectories are automatically created inside /shared_dir, if they do not already exist.
5. If the file already exists on the target system, select one of the following recovery options: l Overwrite: deletes the original files, and saves the latest files.
l Rename: keeps the original files, and saves the recovered files with a unique number(generated by Data Protector).renamed
l Skip: keeps the original files.
6. Select Keep Directory Structure to maintain the original directory structure of the source virtual machine disk on the target system.
7. Select Use VIX as fallback option when network share is not available. Recovery using VIX takes a longer time and can be monitored through the session reports generated in the GRE Request page.
8. Under Available Files, select the files and folders to be recovered. 9. Click Recover Files. A confirmation message appears and the GRE Request page is displayed,
where you can monitor the recovery.
Configuring GRE settingsIn this page, you can modify the options for retention time and debugging. In addition you can configure, add, or modify the mount proxy system used as a target location for restoring virtual machine disks.
Granular Recovery Extension User Guide for Microsoft SharePoint Server, Exchange and VMwareChapter 19: Recovery
HPE Data Protector (9.07) Page 143 of 176

Retention time and debugging
To modify the options for retention time and debugging:
1. In the HPE Data Protector Granular Recovery Extension for VMware vSphere Web Client, click the Tools icon.
2. Click GRE Settings. The GRE Settings page is displayed. Advanced GRE Web Plug-in - GRE Settings page
3. Under Retention Time Options, enter the retention period for the following text boxes: l Remove Non-Cached Disks After
l Remove Cached Disks After
Note: The default retention period of the non-cached backup is 7 days (maximum can be set to 7 days). The default retention period for the cached backup is 1 day (maximum can be set to 7 days).
4. Under Debugging Options, select Enable Debugging to create debug files. 5. Click Save. 6. Click Back to GRE Request to return to the list of requests available in the GRE Request page.
Configuring the mount proxy
To configure, add or modify the mount proxy system used as a target location for restoring virtual machine disks:
1. From the Windows or Linux Host drop-down list, select the required Windows or Linux mount proxy system.
Granular Recovery Extension User Guide for Microsoft SharePoint Server, Exchange and VMwareChapter 19: Recovery
HPE Data Protector (9.07) Page 144 of 176
Note: You can configure multiple mount proxies and restore paths.
2. In the Windows and/or Linux Restore Paths text box, enter the path to a location on the mount proxy system. Use the following format: l DriveLetter:\Folder\Subfolder (Windows mount proxy system)
l /Directory/Subdirectory (Linux mount proxy system)
3. Click + to add the specified path to the applicable list of restore or presentation paths. You can add more restore paths, if required.
4. Click - to delete the required restore path(s). You cannot delete a restore path if it is the only one for the mount proxy system.
5. Click Save. 6. Click Back to GRE Requests to return to the list of requests available in the GRE Requests
page.
Changing the Cell ManagerIf you are accessing the Advanced GRE Web Plug-in for the first time, you must select a Cell Manager (if there is only one, it is selected automatically). If more than one Cell Manager exists, then you will not be able to cancel or close the operation. However, the next time you access the plug-in, you can change the Cell Manager.
To change the Cell Manager:
1. In the HPE Data Protector Granular Recovery Extension for VMware vSphere Web Client, click the Tools icon.
2. Click Change Cell Manager. The Select Cell Manager box appears. 3. Select the required Cell Manager from the drop-down list and click Select. 4. If you select a different Cell Manager and click Cancel or Close, the previously selected Cell
Manager is still applicable. However, if there is only one Cell Manager, then selection is not required. The available Cell Manager is displayed briefly and you are re-directed to the GRE Requests page.
The GRE Request page appears with the list of requests available for the selected Cell Manager.
Identifying the Advanced GRE Web Plug-in versionTo determine the VMware Granular Recovery Extension agent and Plug-in version:
1. In the HPE Data Protector Granular Recovery Extension for VMware vSphere Web Client, click the Tools icon.
2. Click About, the Granular Recovery Extension information is displayed.
Granular Recovery Extension User Guide for Microsoft SharePoint Server, Exchange and VMwareChapter 19: Recovery
HPE Data Protector (9.07) Page 145 of 176
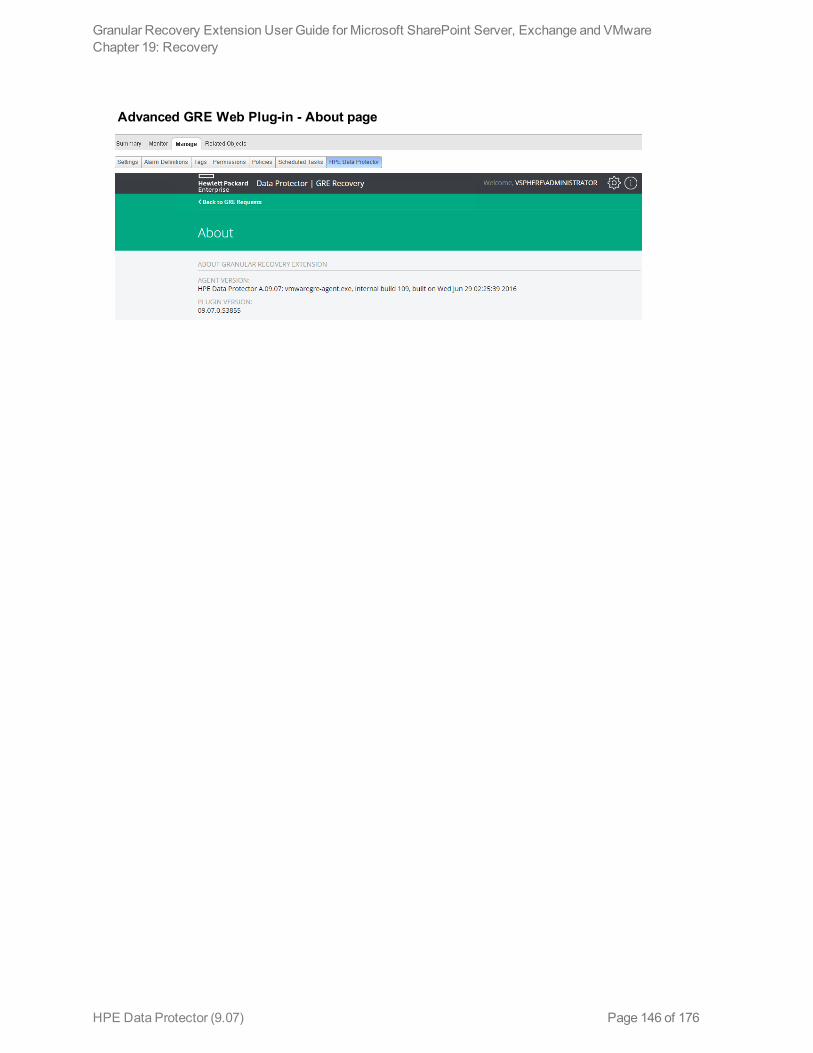
Advanced GRE Web Plug-in - About page
Granular Recovery Extension User Guide for Microsoft SharePoint Server, Exchange and VMwareChapter 19: Recovery
HPE Data Protector (9.07) Page 146 of 176
Chapter 20: TroubleshootingThis chapter lists general checks and verifications, plus problems you might encounter when using the Data Protector Granular Recovery Extension for VMware vSphere.
l For Virtualization Environments troubleshooting information, see the troubleshooting section of the VMware part about the Data Protector Virtual Environment integration, in the HPE Data Protector Integration Guide.
l For general Data Protector troubleshooting information, see the HPE Data Protector Troubleshooting Guide.
Before you begin l To enable debugging, see "Enabling debugging option" below. l Ensure that the latest official Data Protector patches are installed. See the HPE Data Protector Help
index: “patches” on how to verify this. l For general Data Protector limitations, as well as recognized issues and workarounds, see the HPE
Data Protector Product Announcements, Software Notes, and References. l For an up-to-date list of supported versions, platforms, and other information, see
http://support.openview.hp.com/selfsolve/manuals.
Debugging
Enabling debugging option 1. If you encounter an issue when using this extension, the information in the log files can help you
determine the problem. To enable the debugging option, locate the Settings page by clicking the Settings button. The Settings page is displayed.
2. Locate the Debugging option, select Enable Debugging. When you close the vSphere client interface this option is cleared, and the debugging option for this extension disabled.For detailed descriptions of the Data Protector log files, see the HPE Data Protector Troubleshooting Guide, index: “Contents of log files”.
Debugging option enabled
HPE Data Protector (9.07) Page 147 of 176
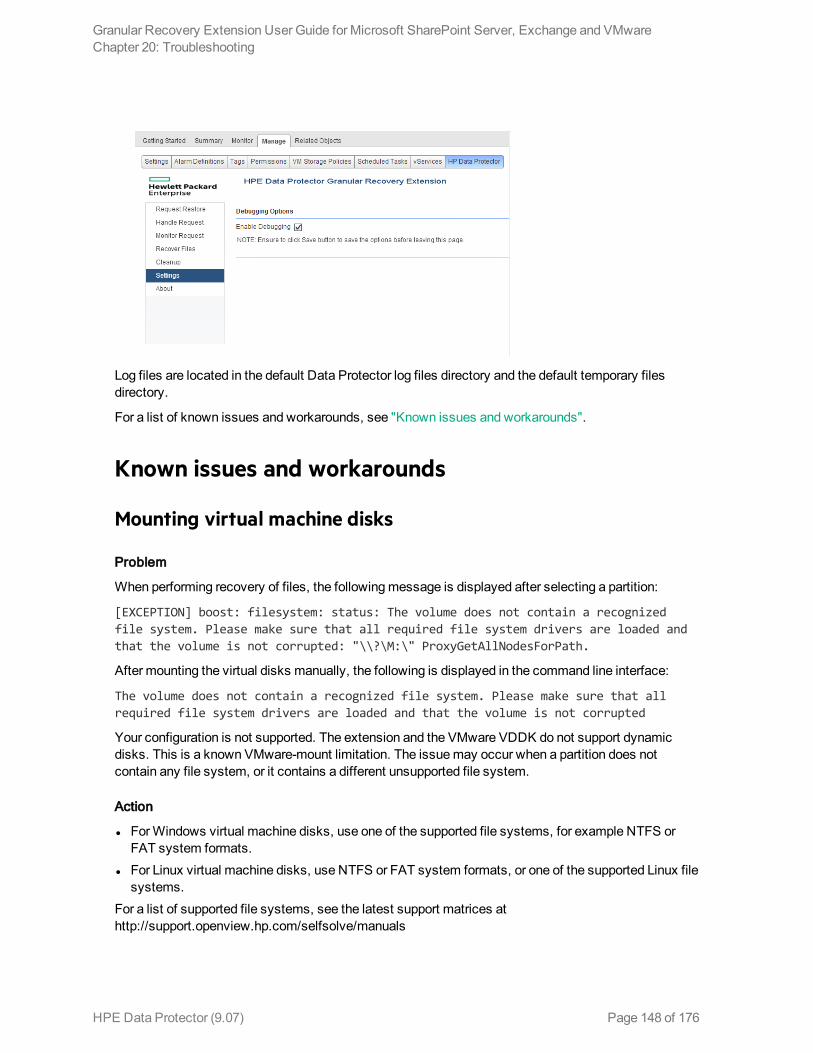
Log files are located in the default Data Protector log files directory and the default temporary files directory.
For a list of known issues and workarounds, see "Known issues and workarounds".
Known issues and workarounds
Mounting virtual machine disks
Problem
When performing recovery of files, the following message is displayed after selecting a partition:
[EXCEPTION] boost: filesystem: status: The volume does not contain a recognized file system. Please make sure that all required file system drivers are loaded and that the volume is not corrupted: "\\?\M:\" ProxyGetAllNodesForPath.
After mounting the virtual disks manually, the following is displayed in the command line interface:
The volume does not contain a recognized file system. Please make sure that all required file system drivers are loaded and that the volume is not corrupted
Your configuration is not supported. The extension and the VMware VDDK do not support dynamic disks. This is a known VMware-mount limitation. The issue may occur when a partition does not contain any file system, or it contains a different unsupported file system.
Action
l For Windows virtual machine disks, use one of the supported file systems, for example NTFS or FAT system formats.
l For Linux virtual machine disks, use NTFS or FAT system formats, or one of the supported Linux file systems.
For a list of supported file systems, see the latest support matrices at http://support.openview.hp.com/selfsolve/manuals
Granular Recovery Extension User Guide for Microsoft SharePoint Server, Exchange and VMwareChapter 20: Troubleshooting
HPE Data Protector (9.07) Page 148 of 176
Inability to browse a virtual machine disk
Problem
When browsing a virtual machine disk, an external error is reported
When you try to browse a virtual machine disk in the vSphere Client, the following error message is displayed in a pop-up window:
External utility reported error
The error details read:
/opt/omni/lib/vddk/vmware-mount -K VirtualDiskRestorePath/Hostname.vmdk:
umount VirtualDiskMountPoint: device is busy. (In some cases useful info about processes that use the device is found by lsof(8) or fuser (1) ) Failed to unmount all partitions on disk 'VirtualDiskRestorePath/Hostname.vmdk': umount command failed
This problem occurs after the vmware-mount utility fails to delete the lock for the mounted disk after dismounting it. The Data Protector VMware Granular Recovery Extension Agent is therefore unable to mount the disk again.
Action
Delete the Hostname.vmdk.lck directory from the VirtualDiskRestorePath folder.
Issues after removing the extension
Problem
You removed the VMware Granular Recovery Extension Agent component and the scripts (post-install and post-reinstall) in the Windows environment. When you remove the component, the removal tries to delete the driver. If the removal command is not successful, the driver stays in the stopped / pending removal on next boot state. Even after repeating the installation procedure the driver stays in a stopped / pending removal on next boot state.
When you try again to install the VMware Granular Recovery Extension Agent component, the HPE Data Protector Manager displays the following message in the installation session log:
[Critical] computer.company.com Post-installation script for the VMware Granular Recovery Extension Agent failed with the output
Data_Protector_home\bin
perl -I "..\lib\perl" vmwgre_ag.pl -install
Cannot start vstor2-mntapi20-shared: The service is starting or stopping. Please try again later.
Delete of vstor2-mntapi20-shared driver failed: [SC] DeleteService FAILED 1072:
The specified service has been marked for deletion.
You must restart target machine to finish installation of VMware GRE Agent.
Granular Recovery Extension User Guide for Microsoft SharePoint Server, Exchange and VMwareChapter 20: Troubleshooting
HPE Data Protector (9.07) Page 149 of 176
Note: These error messages may differ from case to case, but the above error message can be considered as an example.
Action
Restart the system.
Note: If the VMDK driver is already installed on the system outside of Data Protector and running, then this driver is used; it is not removed or reinstalled. The upgrade procedure is successful.
VMware VirtualCenter Management Webservices service is not running
Problem
The debug log file contains the following message:
File not found - C:\Program Files (x86)\VMware\Infrastructure\tomcat\webapps\VMWareGRE\register.xml
There is a problem with VMware VirtualCenter Management Webservices service. Check that the target system has VMware VirtualCenter Management Webservices running.
Action
Check if the C:\Program Files (x86)\VMware\Infrastructure\tomcat\webapps\VMWareGRE folder exists. If it exists, remove it. The VMware VirtualCenter Management Webservices service should create a new folder automatically. Run the script: Data_Protector_home\bin\vmwgre_wp.cmd
If folder does not exist, VMware VirtualCenter Management Webservices is probably not started. Start it, check that the folder is created and run the script: Data_Protector_home\bin\vmwgre_wp.cmd.
RSA certificates with keys that are less than 1024 bits long are blocked
Problem
After installation of the Microsoft Security Advisory update (KB2661254), connection to the vCenter Server VMware GRE plugin may fail.
Action
This happens because the VMware vCenter Server by default uses RSA certificates which are 512 bits and the update in Microsoft Security Advisory kb2661254, blocks the use of RSA certificates which are less than 1024 bits long.
For more details, on the resolution see http://kb.vmware.com/selfservice/microsites/search.do?language=en_US&cmd=displayKC&externalId=2037082
and Microsoft Security Advisory update: kb2661254 = http://support.microsoft.com/kb/2661254
Granular Recovery Extension User Guide for Microsoft SharePoint Server, Exchange and VMwareChapter 20: Troubleshooting
HPE Data Protector (9.07) Page 150 of 176
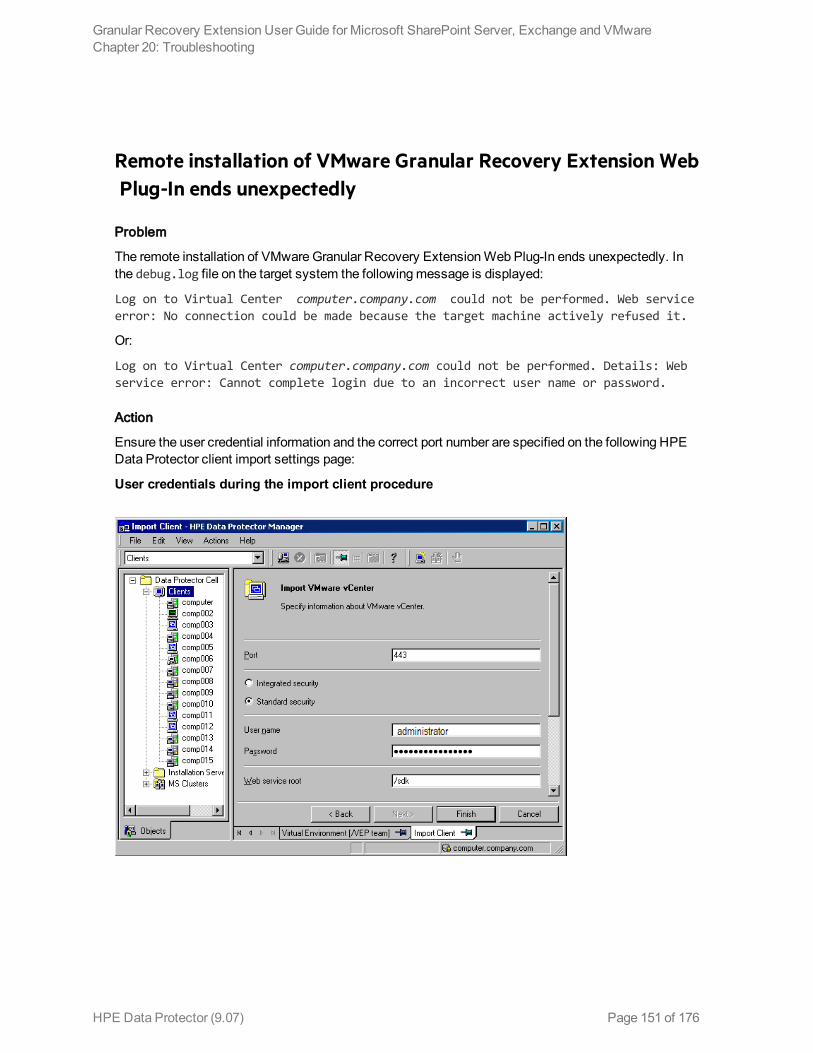
Remote installation of VMware Granular Recovery Extension Web Plug-In ends unexpectedly
Problem
The remote installation of VMware Granular Recovery Extension Web Plug-In ends unexpectedly. In the debug.log file on the target system the following message is displayed:
Log on to Virtual Center computer.company.com could not be performed. Web service error: No connection could be made because the target machine actively refused it.
Or:
Log on to Virtual Center computer.company.com could not be performed. Details: Web service error: Cannot complete login due to an incorrect user name or password.
Action
Ensure the user credential information and the correct port number are specified on the following HPE Data Protector client import settings page:
User credentials during the import client procedure
Granular Recovery Extension User Guide for Microsoft SharePoint Server, Exchange and VMwareChapter 20: Troubleshooting
HPE Data Protector (9.07) Page 151 of 176
VMware Granular Recovery Extension Web Plug-In installation fails
Problem
The post-installation script for the VMware Granular Recovery Extension Web Plug-In fails with the following error message:
C:\Program Files\OmniBack\bin>perl -I "..\lib\perl" vmwgre_wp.pl -install
There was a problem during VMware Granular Recovery Extension Web Plug-In installation. Check if the target system has VMware vCenter Server installed and configured.
Action
1. Navigate to the installation log file under C:\ProgramData\OmniBack\tmp to determine the failure of the post-installation script.
Note: The created installation log file is of the form: OB2DBG_...__VMWGRE_WP_...txt.
The possible causes are: l The Data Protector client is not installed on vCenter host and imported as VMware vCenter to
Data Protector Cell.
l The username and password specified when importing the vCenter host to the Data Protector cell are not valid.
l Due to some leftovers from the previous installation.
l The Auto deploy is not enabled on the vCenter Tomcat web server.
2. Fix the possible causes and push the component again.
Mounting of LVM logical volumes fail when browsing VMware GRE on Linux
Problem
When you try to browse an LVM logical volume, it fails with the following error message:
There are no partitions on selected disk.
Action
You can perform GRE operations only on LVM volumes, which have partition Type ID set to 8E. The following steps describe how to create a new LVM partition/group/volume. Proceed as follows:
1. fdisk /dev/<device_name> 2. Create a new partition by pressing n and configure the settings for this partition. 3. After creating a partition, press t and set the partition type to 8e.
Granular Recovery Extension User Guide for Microsoft SharePoint Server, Exchange and VMwareChapter 20: Troubleshooting
HPE Data Protector (9.07) Page 152 of 176
4. Press w to write the partition table. 5. Create a physical volume on the newly created partition: pvcreate /dev/<partition_name>. 6. Create a volume group on the physical volume: vgcreate <VGNAME> /dev/<partition_name>. 7. Create a logical volume in the volume group: lvcreate -l <Total PE> -n <LVNAME>
/dev/<VGNAME>.
Note: <Total PE> refers to the size of the volume group. You can get that using vgdisplay -v <VGNAME>.
8. Create a file system over the newly created logical volume: mkfs -t ext3 /dev/<VGNAME>/<LVNAME>.
9. Mount the logical volume to any location of your choice.
Note: You can view that there is one LVM partition in the disk if you run the fdisk -l over /dev/<partition_name> command. Hence, the VDDK VIX mount locates the partitions on the selected disk and mounts them.
VMware Granular Recovery Extension tab is missing
Problem
You connected with vSphere Client to vCenter. When you select a virtual machine in the VMs and Templates view, there is no HPE Data Protector tab, the extension is missing. The root cause is the firewall is probably preventing communication.
Action
On the vCenter server, configure the Windows Firewall. Select the Exceptions tab and Add port of the VMware vCenter Server-Web Services HTTPS (default 8443) to the exceptions list, and restart the vSphere Client interface.
VMware Granular Recovery Extension tab is missing with vCenter Server plug-in disabled
Problem
You connected with vSphere Client to vCenter. When you select a virtual machine in the VMs and Templates view, there is no HPE Data Protector tab, and the extension is missing. The root cause is an installation that ended abnormally.
Action
1. On the vCenter server, remove the extension from the system. 2. Remotely install the extension again. For details on the importing procedure, see "Configuring the
Integration" section in the HPE Data Protector Integration Guide. 3. Connect with the vSphere Client interface to a vCenter Server system. The VMware vSphere
Web Client home page is displayed. The Home tab is selected by default. Click the
Granular Recovery Extension User Guide for Microsoft SharePoint Server, Exchange and VMwareChapter 20: Troubleshooting
HPE Data Protector (9.07) Page 153 of 176
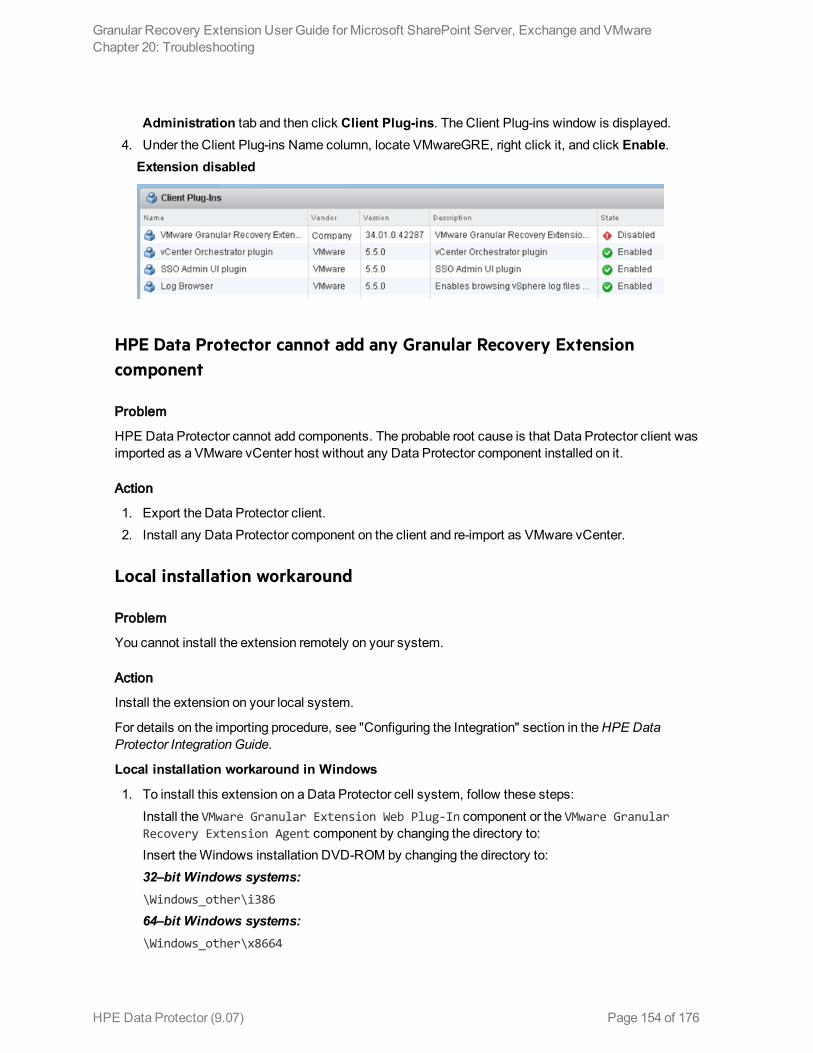
Administration tab and then click Client Plug-ins. The Client Plug-ins window is displayed. 4. Under the Client Plug-ins Name column, locate VMwareGRE, right click it, and click Enable.
Extension disabled
HPE Data Protector cannot add any Granular Recovery Extension component
Problem
HPE Data Protector cannot add components. The probable root cause is that Data Protector client was imported as a VMware vCenter host without any Data Protector component installed on it.
Action
1. Export the Data Protector client. 2. Install any Data Protector component on the client and re-import as VMware vCenter.
Local installation workaround
Problem
You cannot install the extension remotely on your system.
Action
Install the extension on your local system.
For details on the importing procedure, see "Configuring the Integration" section in the HPE Data Protector Integration Guide.
Local installation workaround in Windows
1. To install this extension on a Data Protector cell system, follow these steps:
Install the VMware Granular Extension Web Plug-In component or the VMware Granular Recovery Extension Agent component by changing the directory to:Insert the Windows installation DVD-ROM by changing the directory to:32–bit Windows systems:\Windows_other\i386
64–bit Windows systems:\Windows_other\x8664
Granular Recovery Extension User Guide for Microsoft SharePoint Server, Exchange and VMwareChapter 20: Troubleshooting
HPE Data Protector (9.07) Page 154 of 176
2. Run the VMware Granular Extension Web Plug-In component installation:The \ denotes continuation of the command line.csetup.exe /quiet ADDLOCAL=core,vmwaregre_webplugin \
INSTALLATIONTYPE="Client" \
CELLNAME="CellManagerSystemName" \
CELLCLIENTNAME="VirtualCenterSystemName" \
INSTALLDIR="InstallationPath"\
INETPORT=InetPort OPTDNSCHECK=1 OPT_MSG=1 \
PUSHADDUPG=1
Run the VMware Granular Recovery Extension Agent component installation:csetup.exe /quiet ADDLOCAL=core,vmwaregre_agent \
INSTALLATIONTYPE="Client" \
CELLNAME="CellManagerSystemName" \
CELLCLIENTNAME="TargetSystemName" \
INSTALLDIR="InstallationPath" \
INETPORT=InetPort OPTDNSCHECK=1 OPT_MSG=1 \
PUSHADDUPG=1
Local Installation workaround in LinuxUNIX clients are installed locally using the installation script omnisetup.sh. You can install the client locally from the UNIX installation DVD-ROM and import it to the Cell Manager using automated procedure. For more information on omnisetup.sh, see the HPE Data Protector Command Line Interface Reference.
Monitor displays request removed by administrator
Problem
A message, similar to the following is displayed when monitoring your request:
0030 scsi0:1 2/17/2011 10:35:07 AM Removed by administrator 3.00
Your administrator has removed this disk.
Action
l To recover your files, ensure that you request a new restore for this removed disk.For details on the procedure, see "Requesting restore or presentation".
Overwritten files issues
Problem
A message, similar to the following is displayed when recovering items with the Overwrite option selected:
Granular Recovery Extension User Guide for Microsoft SharePoint Server, Exchange and VMwareChapter 20: Troubleshooting
HPE Data Protector (9.07) Page 155 of 176
The \ denotes continuation of the command line.
[Failed] c:\vix_27-2\incremental-21-2\incremental\ \
Username \CheckVix\vixlibs\arp.ico
Source:\incremental-21-2\incremental\Username\CheckVix\ \
vixlibs\arp.ico
You do not have access rights to this file.
[Failed] c:\overwrite_incr-21-2\incr24-2\incremental-21-2\ \
incremental\Username\CheckVix\vixlibs\vix.h
Source:\incr24-2\incremental-21-2\incremental\Username\ \
CheckVix\vixlibs\vix.h
[5] Access is denied.
The item already exists on the target system. This item cannot be overwritten due to the file security option. If the source location contains NTFS file system and the target virtual machine disk are on the network, the Granular Recovery Extension for VMware recovers all security information associated with the items. This information cannot be overwritten.
Action
If the item already exists in the target location, perform one of the following instead:
l Recover these items to another location. l Select the Skip recovery option. l Select the Rename recovery option. l Change the file permissions on the target location manually before starting recovery.
Missing VIX API libraries
Problem
File recovery fails due to missing VIX API libraries with the following error message:
Could not start recovery.
Cannot find support libraries; Vix appears to have not been installed.
Action
1. Install VMware tools on the target VM. 2. Install VMware VIX API 1.14 on the mount proxy system (Windows/Linux).
Insufficient permission in the Host Operating System
Problem
The following error message is displayed when performing the recovery of files:
Granular Recovery Extension User Guide for Microsoft SharePoint Server, Exchange and VMwareChapter 20: Troubleshooting
HPE Data Protector (9.07) Page 156 of 176
Insufficient permission in host operating system.
Action
The user entered when importing the vCenter to the DP cell must have the following permission assigned on the vCenter:
Virtual machine -> Interaction-> Guest operating system management by VIX API
Authentication failure or insufficient permission in the Guest Operating System
Problem
The following error message is displayed when performing the recovery of files:
Authentication failure or insufficient permissions in guest operating system.
Action
The user entered when specifying the options for the recovery of files in the Web Plug-In GUI must be able to log in to the target VM. The user can perform only the operations to which access rights has been provided on the target machine.
For example, if you want to write to a folder, you need to have permissions to recover files to that folder.
Viewing partitions on selected disk
Problem
The following error message is displayed, for non-staged recovery:
No partitions on selected disk
Action
The selected disk may not have any valid partitions. Verify if the disk has partitions in the original Virtual Machine.
Presentation failed
Problem
Non-staged recovery involves creating a share on a Smart Cache device or host and presenting the same to the mount proxy host. Failure of the presentation task can cause recovery to fail with the following messages:
Unable to present shared disk(displayed during a non-staged presentation operation)
Presentation failed(displayed in the corresponding Data Protector session report)
Granular Recovery Extension User Guide for Microsoft SharePoint Server, Exchange and VMwareChapter 20: Troubleshooting
HPE Data Protector (9.07) Page 157 of 176
Action
l Verify the user / admin credentials provided while configuring the Smart Cache device. This error can occur when there is a credential mismatch.
l Verify details from the session report, using either Data Protector GUI (from the IDB context), or using the GRE plug-in GUI (monitor request).
l Additionally access the share directly, using credentials stored in Data Protector at the time of device creation.
If the problem persists, contact the Data Protector administrator.
Cached recovery fails
Problem
Recovery of VMware files during cached recovery fails with the following error:
Cannot access the file. Access is denied.
This error may occur when there are multiple connections to a server or a shared resource for a single user.
Action
Ensure that in a single Media Agent host, only one operating system user credential must be used to create a Smart Cache device. You may also disconnect all previous connections to the server or the shared resource and reboot the system.
Restore session stops after some time
Problem
When performing a restore, the session stops after a certain period of time and the RSM stops responding. This issue may be caused by firewall closing an inactive connection.
Action
Ensure that the connection remains active so that the firewall does not close it. Set the following omnirc options:OB2IPCKEEPALIVE=1, OB2IPCKEEPALIVETIME=number_of_seconds, OB2IPCKEEPALIVEINTERVAL=number_of_seconds
OB2IPCKEEPALIVETIME specifies how long the connection may remain inactive before the first keep-alive packet is sent and OB2IPCKEEPALIVEINTERVAL specifies the interval for sending successive keep-alive packets if no acknowledgment is received. The options must be set on the Cell Manager system.
Granular Recovery Extension User Guide for Microsoft SharePoint Server, Exchange and VMwareChapter 20: Troubleshooting
HPE Data Protector (9.07) Page 158 of 176
The VMware GRE session is unresponsive
Problem
If the mount proxy host has a Linux environment, and the session is left idle for more than 10 minutes after browsing a disk or recovering from a disk, then the next browse or recovery operation makes the GRE session unresponsive.
Action
Locate the running VMware GRE agent process (vmwaregre-agent.exe) on the mount proxies and end the process manually.
VMware GRE file recovery could not access network share
Problem
File recovery in VMware GRE could not access network share on windows mount proxy.
This issue occurs because of a missing update in the Windows 2008 R2 SP1 environment.
The following error message appears:
Could not start Recovery.
“Cannot access to network share on target VMError info: System error[2250]. The network connection could not be found.”
Action
A supported hotfix is available from Microsoft. Check to see if this fix has been installed . For more details on this fix see, http://support.microsoft.com/kb/2807716
Resizing the browser window causes an error and reloads the page
Problem
Resizing the browser window opened with the Advanced GRE Web Plug-in causes an error and reloads the page.
Action
This is a known issue with VMware. https://communities.vmware.com/message/2434421#2434421.
Granular Recovery Extension User Guide for Microsoft SharePoint Server, Exchange and VMwareChapter 20: Troubleshooting
HPE Data Protector (9.07) Page 159 of 176
Browsing for Recovery throws an error message
Problem
While browsing for recovery in the Advanced Web Plug-in throws an error message Failure of REST call to getPartitionsForDisks:status =500 error . This might happen if you selected an unformatted disk in the Available Files section.
Action
Format the disk. The Advanced GRE Web Plug-in does not support recovery of unformatted disks.
While performing a Recovery operation a session time-out occurs
Problem
While performing a recovery operation the session may time-out with the following error message:
Agent Process on vcenter with IP number has ended because vmwaregre-agent.exe did not send response in the expected time frame of 6 minutes.
This may occur if the firewall is enabled on the target virtual machine but not configured.
Action
You can configure the firewall according to your port requirements or you can disable the firewall.
Time difference exists between the backup sessions on the Data Protector GUI and vSphere web client
Problem
There is a time difference of 1 minute for all the backup sessions between the Data Protector GUI vs vSphere web client.
Action
Rather than comparing Session Time, you need to compare Object Version. A session can have more than one VMs and IDB has object version for each VM. Proceed as follows:
1. Start the Data Protector GUI, and select Internal IDB. 2. Click Sessions. 3. Expand the session that you are verifying on the left (format <date>-<number> IE: 2014-09-22-1) 4. Click on the vCenter. On the right you see Backup Object Version 5. Select Start Time. Here you can observe that the time stamp is the same.
Granular Recovery Extension User Guide for Microsoft SharePoint Server, Exchange and VMwareChapter 20: Troubleshooting
HPE Data Protector (9.07) Page 160 of 176
Unable to expand a folder for browsing
Problem
While trying to browse files for recovery, the folder will not expand to browse the files
Action
This happens if you have been idle on the browse screen for 10 minutes or more because the Mount Proxy Agent shuts down.
Click “Cancel” and then “Browse” to browse and expand folders.
Expanding a partition for browsing throws an error
Problem
While trying to expand the partition, the following error is displayed "Error trying to mount the restored disk(s). Exception occurred while mounting the disk”
Action
There are various causes for this problem. One of them is when you have been idle on the browse screen for 10 minutes or more because the Mount Proxy Agent shuts down.
Click “Cancel” and then “Browse” to browse and expand partitions.
vSphere web interface becomes greyed out
Problem
If you view the Advanced GRE Web Plug-in on a VM and that VM is shut down, then the vSphere web interface can become partially disabled (appearing greyed out). However, the Advanced GRE Web Plug-in does not change its appearance.
Action
You can do as follows:
l Avoid shutting down a guest host while a user is using the plug-in with that host selected. l If the web interface surrounding the Advanced GRE Web Plug-In becomes greyed out, select a
different VM.
Error message appears while browsing for LVM disks
Problem
While browsing for LVM disks, the VMware Advanced GRE Web Plug-in displays the following error message "Something went wrong while searching for logical volumes. Check if you
Granular Recovery Extension User Guide for Microsoft SharePoint Server, Exchange and VMwareChapter 20: Troubleshooting
HPE Data Protector (9.07) Page 161 of 176
backed up and restored all the disks that are a part of the same volume group and try again".
This could happen for the following reasons:
l If the LVM is created with more than 8 disks and all 8 loop devices are available, then browsing of the partition fails with an error message. This is because the additional loop devices are using all the disks that are part of the LVM.
l If the LVM is created with X number of disks and the count of available loop devices is less than the count of LVM disks, then browsing of the partition fails with an error message. This is also because the additional loop devices are using all the disks that are a part of the LVM.
Action
1. It is possible to configure the loop device limit and there are different ways to perform the configuration. For more information, see the following articles on changing the number of loop device support by the loop device module. http://www.tldp.org/HOWTO/CDServer-HOWTO/addloops.html
2. Retry the Browsing operation.
Error message appears when registering the Advanced GRE Web Plug-in
Problem
While importing a vCenter and registering the Advanced GRE Web Plug-in, the following error message appears "Script failed: Cannot get information from remote host".
Action
This error occurs when all the mount proxies have not been upgraded to the latest Data Protector 9.07 patch. Upgrade all of your mount proxies and you will be able to import the vCenter Successfully.
The message "VIX API is not installed" re-appears although VIX API is installed
Problem
On seeing an error message VIX API is not installedduring a recovery operation, while using the VMware GRE Web Client, you proceed to install the VIX API . However, the same message VIX API is not installed appears even after installing the VIX API.
Action
This error message may appear if the GRE agent is running during the installation process of VIX API. After the agent exits, you are prompted with the message VIX installed.
Granular Recovery Extension User Guide for Microsoft SharePoint Server, Exchange and VMwareChapter 20: Troubleshooting
HPE Data Protector (9.07) Page 162 of 176
Shared folders/directories created on Media Agent host system are not removed
Problem
The shared folders/directories created on Media Agent host system as part of cached (Smart Cache device backups) request creation process are not removed if the request is not browsed / recovered once before request gets expired.
Action
Perform the following manual steps to remove the shared folders/directories on the Media Agent host.
In the Windows environment
Privileges: The user should be the Local Administrator of the Media Agent system.
Complete the following steps for removing a share:
1. Select the Share folder. 2. Right-click and select properties. 3. In the Properties tab select the "Sharing" tab and uncheck the check box "share this folder" and
then click Apply button. 4. Close the Properties dialog box.
In the Linux environment:
Privileges: The user should be a root user.
Complete the following steps for removing a share:
1. Make a note of the shared folder name for the non-browsed request by selecting the request and getting the session report. The session report contains the shared folder name.
2. Login to the Media Agent host system and go to file /etc/samba/smb.conf 3. In the smb.conf file check for the entry that matches the shared folder name. 4. The shared folder entries format is as follows:
[dp_share_12435]
comment = dp share
path = /blob_store/blobShare/12435
writeable = yes
valid users = dp_user2
create mask = 0755
5. Remove the matched entry from the smb.conf file. 6. Execute the command "killall -HUP smbd" at the command prompt to reload the configuration
by the Samba deamon.
Granular Recovery Extension User Guide for Microsoft SharePoint Server, Exchange and VMwareChapter 20: Troubleshooting
HPE Data Protector (9.07) Page 163 of 176
While browsing a Smart Cache in the Advanced GRE Web Plug-in you may see mount errors on agent time-out.
Problem
This may happen when you browse the disks but do not initiate a recovery operation. You will not be able to browse the same disk again until all the GRE agent processes are stopped. However, it is not recommended to stop the processes manually, as the agent could be running for a different vCenter and might also be running for the GRE Web Plug-in.
Action
Wait for the GRE agent processes to exit gracefully and try browsing again. This may take around 15 minutes.
VEPA backup to a Smart Cache fails on a Windows 2008 system.
Problem
This could happen if the size of the VM disk is more than 16TB. The backup fails because the Windows operating system is unable to handle this size. The size limitation is documented by Microsoft - https://technet.microsoft.com/en-us/library/cc938937.aspx
Action
VEPA backups to the Smart Cache devices created on Windows 2012 works as expected and this is because Windows 2012 is able to handle large size of files.
Browse and recovery problems with folders containing special characters
Problem
In the Advanced GRE Web Plug-in:
Browsing folders with multi-byte characters in their names not possible. Browsing folders with multi-byte characters does not return the contents.
Action
Although, it is not possible to browse the folders, if selected for recovery, the folder may be recovered successfully.
Problem
In the Advanced GRE Web Plug-in and the GRE Web Plug-in:
Recovery of folders or files with special characters in their names is not supported on Linux
Granular Recovery Extension User Guide for Microsoft SharePoint Server, Exchange and VMwareChapter 20: Troubleshooting
HPE Data Protector (9.07) Page 164 of 176
It is not possible to recover folders or files with the following special characters. You will see “Failed to copy” error in the session report.
• “\” (backslash):
• “`” (grave accent)
• “\” (backslash):
Action
This can be resolved by using the DP GUI to recover the entire VM instead of using GRE for recovering this problem.
Unable to browse the disk
Problem
While browsing the disk, the following error message is displayed
Discovery of the newly presented replica disk(s) on the mount proxy host <mount proxy hostname> is still in progress.
Retry the operation after sometime. This could happen when the mount proxy host system takes more time to scan the newly presented replica disk(s).
Retry the operation after sometime.
Action
This could be because of the following:
1. Multi-path service is not running on the mount proxy system, hence the presented replica is not identified by the mount proxy operating system.
2. The mount proxy operating system is taking more time in identifying the presented replica. 3. The mount proxy operating system is not identifying the presented replica. Although, multi-path
service is running. For all the above mentioned, check to see if there are any problems on the operating system and re-try the operation.
Unable to view existing requests in Recover Files page of GRE Web Plug-in
Problem
After upgrading from Data Protector 8.1x to 9.x, there may be occasions where you are unable to view the existing requests in the Recover Files page of the GRE Web Plug-in. However, you can see the requests in the Monitor Request Page and the restored disks on the related Mount Proxy.
Granular Recovery Extension User Guide for Microsoft SharePoint Server, Exchange and VMwareChapter 20: Troubleshooting
HPE Data Protector (9.07) Page 165 of 176
Action
You can cleanup the existing requests and related restore disks from the associated mount proxy manually, and you can also try to create new requests for recovering the files.
VMware vSphere Web Client hangs
Problem
In the VMware vSphere Web Client, when you click the HPE Data Protector tab and select the Cell Manager, the web GUI hangs.
Action
Ensure that encrypted control communication is configured as described in the Configuring encrypted control communication and restart the VMware vSphere Web Client service on the vCenter Server system.
For example, on a UNIX VMware vCenter Server system, run:
service vsphere-client restart
Error message appears while browsing for LVM disks on SLES 12 mount proxy host
Problem
While browsing for LVM disks on SLES 12 mount proxy host, the agent fails with the following error message:
"Something went wrong while searching for logical volumes. Check that you backed up and restored all disks that are part of same volume group and try again."
This problem in SLES 12 is caused by an issue in the lvscan output.
Action
To get the lvscan command output, set the following line in the /etc/lvm/lvm.conf file:
log {
…
silent = 0
…
}
Granular Recovery Extension User Guide for Microsoft SharePoint Server, Exchange and VMwareChapter 20: Troubleshooting
HPE Data Protector (9.07) Page 166 of 176
The VMware GRE session of large volumes from Smart Cache devices may fail
Problem
Granular recovery of large volumes from the Smart Cache device may fail when the Smart Cache device is hosted on the Windows 2008/2008 R2 server. This failure may be due to memory fragmentation issues in the operating system.
Action
Use Windows 2012 R2 servers for hosting the Smart Cache device, and then perform backup and granular recovery operations.
Recovery fails on Virtual Machine
Problem
Recovery of files or folder on target virtual machine fails with the following error message:
Error while trying to do recovery
Could not start recovery:
Details: Cannot access to network share on target VM
Error info: System Error[2] No such file or directory
This occurs when the target virtual machine is not accessible from the mount proxy system.
Action
Check if the target virtual machine is accessible. Ensure that configured hostname of the target virtual machine is same as DNS of mount proxy systems.
VMware Granular Recovery Extension intermittently fails to recover files and folders
Problem
For a cached recovery from StoreOnce Catalyst device, VMware Granular Recovery Extension intermittently fails to recover files and folders from Windows virtual machine while using Linux mount proxy.
Action
Perform non-cached recovery using Windows mount proxy.
Granular Recovery Extension User Guide for Microsoft SharePoint Server, Exchange and VMwareChapter 20: Troubleshooting
HPE Data Protector (9.07) Page 167 of 176
The Granular Recovery Extension operation to StoreOnce Catalyst fails, when Data Protector process dpfs is not initialized
Problem
The Data Protector dpfs process fails to initialize during VMware GRE operation for backups to StoreOnce catalyst. The failure is due to fuse library not being initialized. The error message "Files are not available at mount path" is found in the OB2DBG__DBGLOG_ClientInterface debug log.
Action
Execute the following modprobe fuse command on the mount proxy host:
<hostname>/: # modprobe fuse
Backup session performed with "No Logs" option is not eligible for GRE or Live Migrate and Power On from StoreOnce Catalyst
Problem
The Data Protector backup session performed with "No Logs" option is not eligible for GRE or Live Migrate and Power On from StoreOnce Catalyst. The following error message is displayed during the backup:
[Major] From: [email protected] <VMname> Time: <Timestamp>
[61:4039] Following error occurred while storing detail catalog
information for device <Catalyst_device>
with loaded medium <Catalyst_medium> to Data Protector Internal Database:
There is no more space available in any of the Detail Catalog directories.
From this point on, all objects on this medium will have logging switched to "No Log".
Action
Create space on the IDB drive on the cell manager and perform a single session copy to another device. Ensure that replication option is not selected when single session copy is being performed to another StoreOnce Catalyst.
Data consistency issues during cached GRE operations
Problem
Data consistency issues during cached GRE operations due to following reasons:
Granular Recovery Extension User Guide for Microsoft SharePoint Server, Exchange and VMwareChapter 20: Troubleshooting
HPE Data Protector (9.07) Page 168 of 176
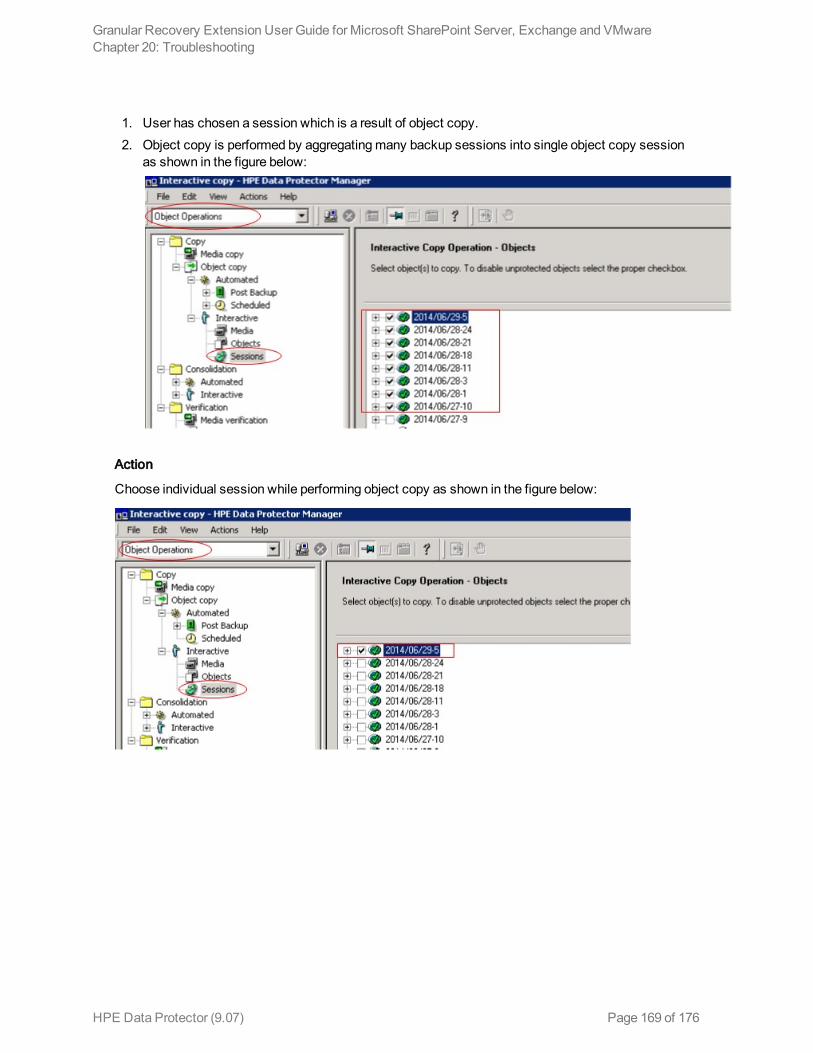
1. User has chosen a session which is a result of object copy. 2. Object copy is performed by aggregating many backup sessions into single object copy session
as shown in the figure below:
Action
Choose individual session while performing object copy as shown in the figure below:
Granular Recovery Extension User Guide for Microsoft SharePoint Server, Exchange and VMwareChapter 20: Troubleshooting
HPE Data Protector (9.07) Page 169 of 176
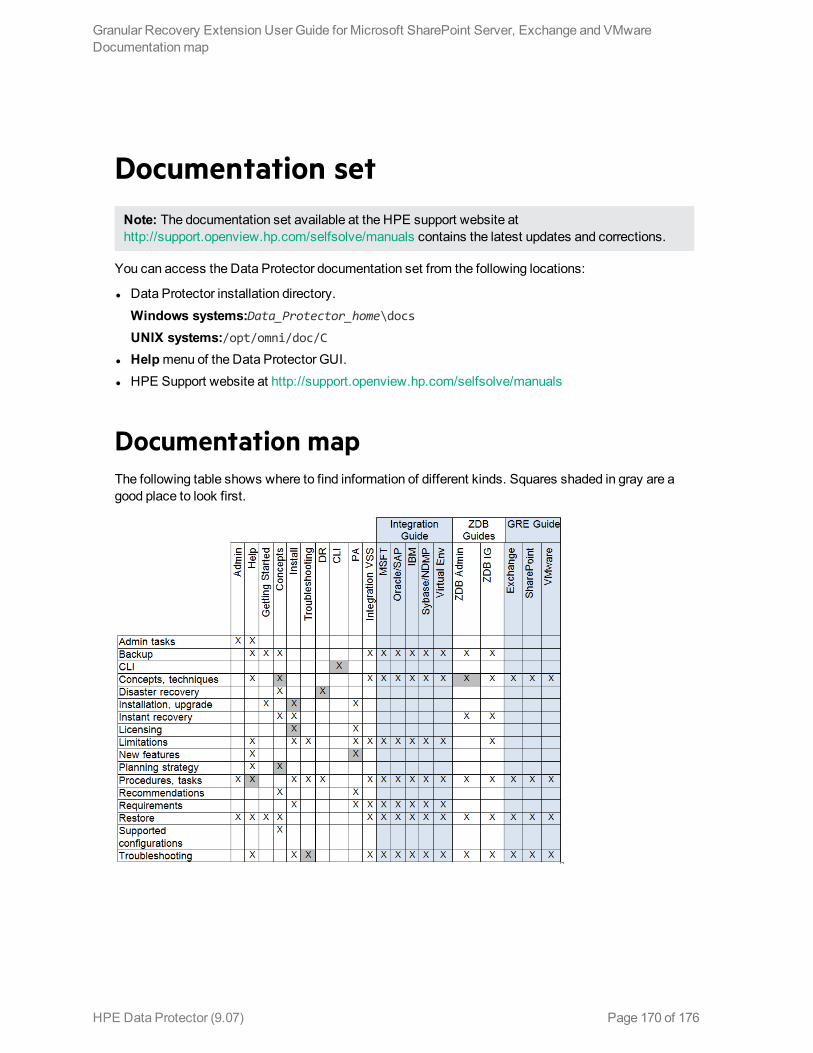
Documentation setNote: The documentation set available at the HPE support website at http://support.openview.hp.com/selfsolve/manuals contains the latest updates and corrections.
You can access the Data Protector documentation set from the following locations:
l Data Protector installation directory.
Windows systems:Data_Protector_home\docsUNIX systems:/opt/omni/doc/C
l Help menu of the Data Protector GUI. l HPE Support website at http://support.openview.hp.com/selfsolve/manuals
Documentation mapThe following table shows where to find information of different kinds. Squares shaded in gray are a good place to look first.
Granular Recovery Extension User Guide for Microsoft SharePoint Server, Exchange and VMwareDocumentation map
HPE Data Protector (9.07) Page 170 of 176
AbbreviationsAbbreviations in the documentation map above are explained below. The documentation item titles are all preceded by the words “HPE Data Protector.”
Abbreviation Documentation item
Admin Administrator's Guide This guide describes administrative tasks in Data Protector.
CLI Command Line Interface Reference
This guide describes the Data Protector command-line interface, command options, and their usage as well as provides some basic command-line examples.
Concepts Concepts Guide This guide describes Data Protector concepts and zero downtime backup (ZDB) concepts and provides background information on how Data Protector works. It is intended to be used with the task-oriented Help.
DR Disaster Recovery Guide This guide describes how to plan, prepare for, test, and perform a disaster recovery.
Getting Started Getting Started Guide This guide contains information to get you started with using Data Protector. It lists installation prerequisites, provides instructions on installing and configuring a basic backup environment and procedures for performing backup and restore. It also lists resources for further information.
GRE Guide Granular Recovery Extension User Guide for Microsoft SharePoint Server, Exchange and VMware
This guide describes how to configure and use the Data Protector Granular Recovery Extension for:
l Microsoft SharePoint Server l Exchange Server l VMware vSphere
Help Help
Install Installation Guide This guide describes how to install the
Granular Recovery Extension User Guide for Microsoft SharePoint Server, Exchange and VMwareDocumentation map
HPE Data Protector (9.07) Page 171 of 176
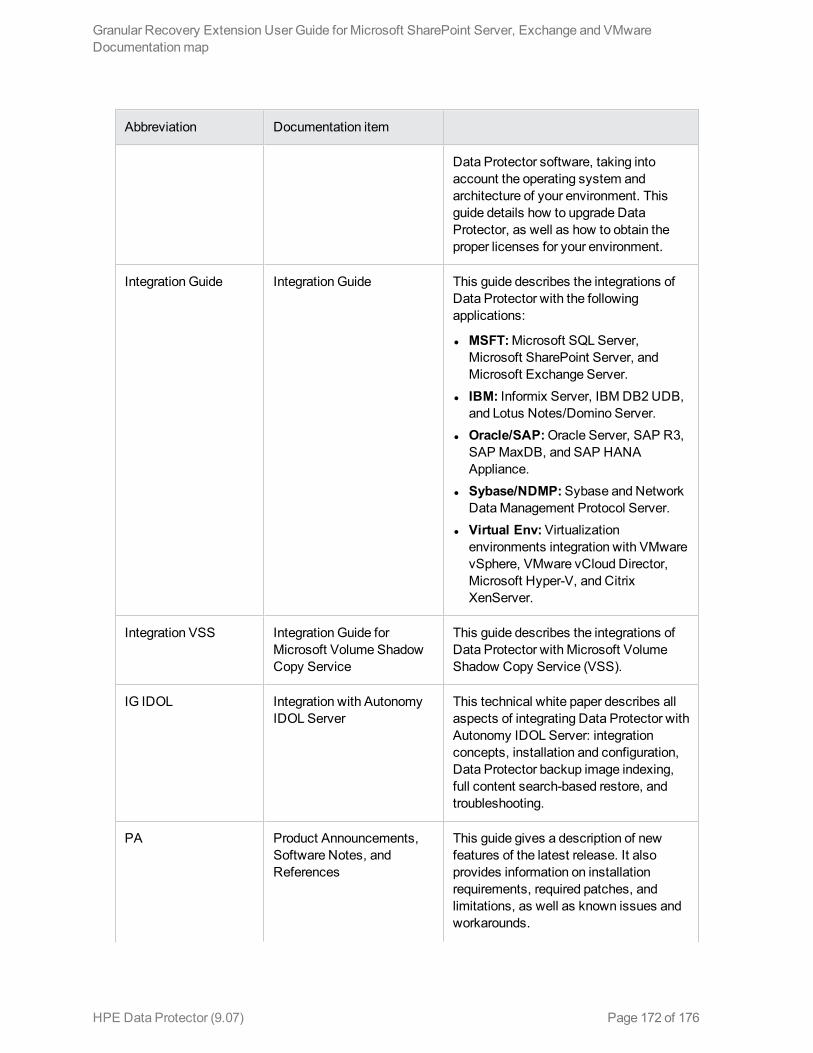
Abbreviation Documentation item
Data Protector software, taking into account the operating system and architecture of your environment. This guide details how to upgrade Data Protector, as well as how to obtain the proper licenses for your environment.
Integration Guide Integration Guide This guide describes the integrations of Data Protector with the following applications:
l MSFT: Microsoft SQL Server, Microsoft SharePoint Server, and Microsoft Exchange Server.
l IBM: Informix Server, IBM DB2 UDB, and Lotus Notes/Domino Server.
l Oracle/SAP: Oracle Server, SAP R3, SAP MaxDB, and SAP HANA Appliance.
l Sybase/NDMP: Sybase and Network Data Management Protocol Server.
l Virtual Env: Virtualization environments integration with VMware vSphere, VMware vCloud Director, Microsoft Hyper-V, and Citrix XenServer.
Integration VSS Integration Guide for Microsoft Volume Shadow Copy Service
This guide describes the integrations of Data Protector with Microsoft Volume Shadow Copy Service (VSS).
IG IDOL Integration with Autonomy IDOL Server
This technical white paper describes all aspects of integrating Data Protector with Autonomy IDOL Server: integration concepts, installation and configuration, Data Protector backup image indexing, full content search-based restore, and troubleshooting.
PA Product Announcements, Software Notes, and References
This guide gives a description of new features of the latest release. It also provides information on installation requirements, required patches, and limitations, as well as known issues and workarounds.
Granular Recovery Extension User Guide for Microsoft SharePoint Server, Exchange and VMwareDocumentation map
HPE Data Protector (9.07) Page 172 of 176
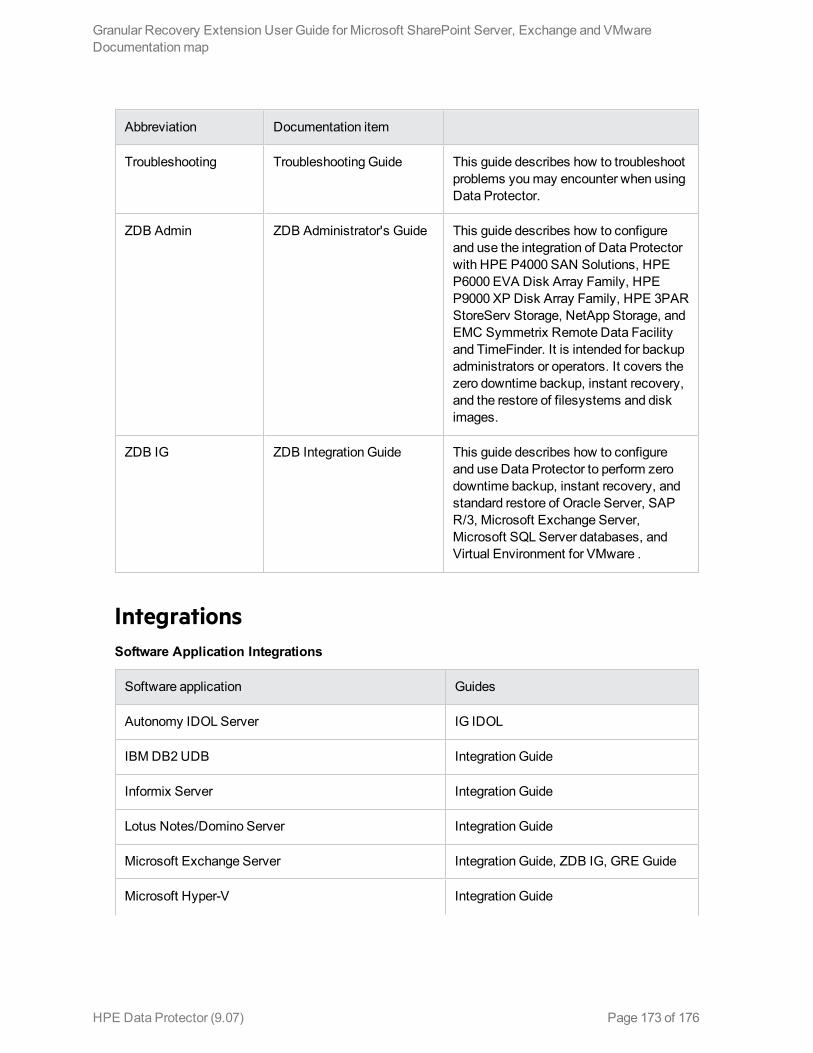
Abbreviation Documentation item
Troubleshooting Troubleshooting Guide This guide describes how to troubleshoot problems you may encounter when using Data Protector.
ZDB Admin ZDB Administrator's Guide This guide describes how to configure and use the integration of Data Protector with HPE P4000 SAN Solutions, HPE P6000 EVA Disk Array Family, HPE P9000 XP Disk Array Family, HPE 3PAR StoreServ Storage, NetApp Storage, and EMC Symmetrix Remote Data Facility and TimeFinder. It is intended for backup administrators or operators. It covers the zero downtime backup, instant recovery, and the restore of filesystems and disk images.
ZDB IG ZDB Integration Guide This guide describes how to configure and use Data Protector to perform zero downtime backup, instant recovery, and standard restore of Oracle Server, SAP R/3, Microsoft Exchange Server, Microsoft SQL Server databases, and Virtual Environment for VMware .
IntegrationsSoftware Application Integrations
Software application Guides
Autonomy IDOL Server IG IDOL
IBM DB2 UDB Integration Guide
Informix Server Integration Guide
Lotus Notes/Domino Server Integration Guide
Microsoft Exchange Server Integration Guide, ZDB IG, GRE Guide
Microsoft Hyper-V Integration Guide
Granular Recovery Extension User Guide for Microsoft SharePoint Server, Exchange and VMwareDocumentation map
HPE Data Protector (9.07) Page 173 of 176
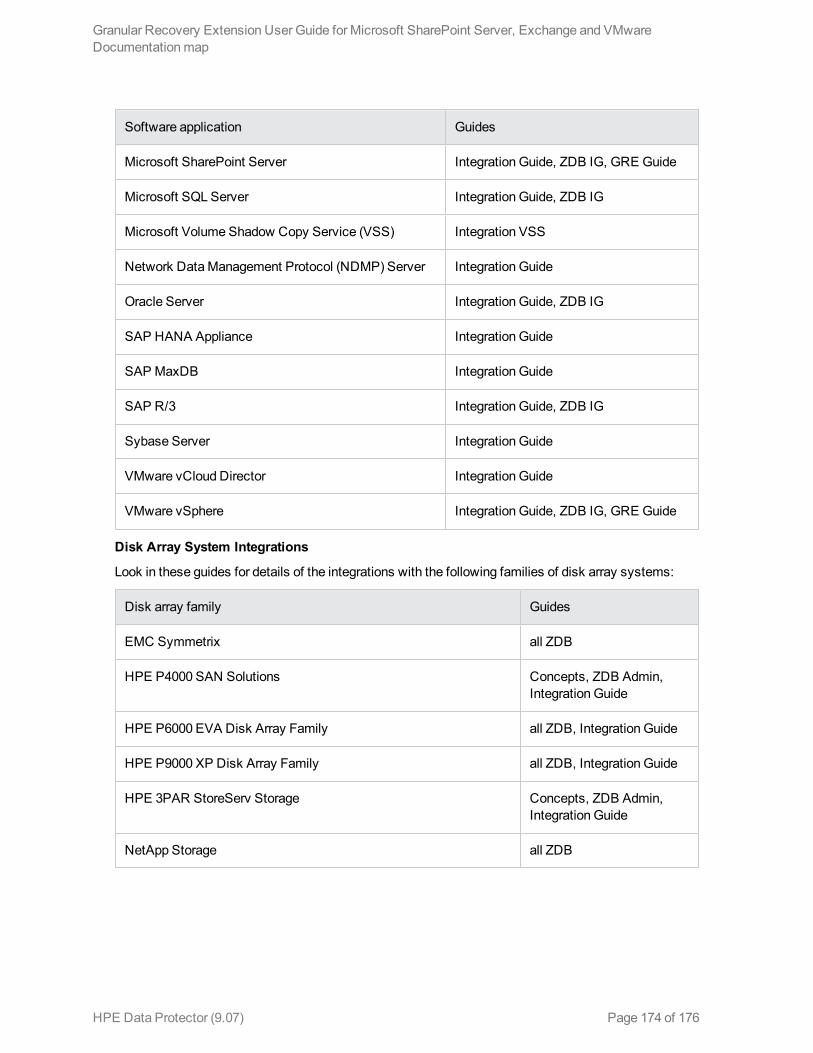
Software application Guides
Microsoft SharePoint Server Integration Guide, ZDB IG, GRE Guide
Microsoft SQL Server Integration Guide, ZDB IG
Microsoft Volume Shadow Copy Service (VSS) Integration VSS
Network Data Management Protocol (NDMP) Server Integration Guide
Oracle Server Integration Guide, ZDB IG
SAP HANA Appliance Integration Guide
SAP MaxDB Integration Guide
SAP R/3 Integration Guide, ZDB IG
Sybase Server Integration Guide
VMware vCloud Director Integration Guide
VMware vSphere Integration Guide, ZDB IG, GRE Guide
Disk Array System Integrations
Look in these guides for details of the integrations with the following families of disk array systems:
Disk array family Guides
EMC Symmetrix all ZDB
HPE P4000 SAN Solutions Concepts, ZDB Admin, Integration Guide
HPE P6000 EVA Disk Array Family all ZDB, Integration Guide
HPE P9000 XP Disk Array Family all ZDB, Integration Guide
HPE 3PAR StoreServ Storage Concepts, ZDB Admin, Integration Guide
NetApp Storage all ZDB
Granular Recovery Extension User Guide for Microsoft SharePoint Server, Exchange and VMwareDocumentation map
HPE Data Protector (9.07) Page 174 of 176
Send Documentation FeedbackIf you have comments about this document, you can contact the documentation team by email. If an email client is configured on this system, click the link above and an email window opens with the following information in the subject line:
Feedback on Granular Recovery Extension User Guide for Microsoft SharePoint Server, Exchange and VMware (Data Protector 9.07)
Just add your feedback to the email and click send.
If no email client is available, copy the information above to a new message in a web mail client, and send your feedback to [email protected].
We appreciate your feedback!
HPE Data Protector (9.07) Page 175 of 176