Embed Size (px)
Citation preview
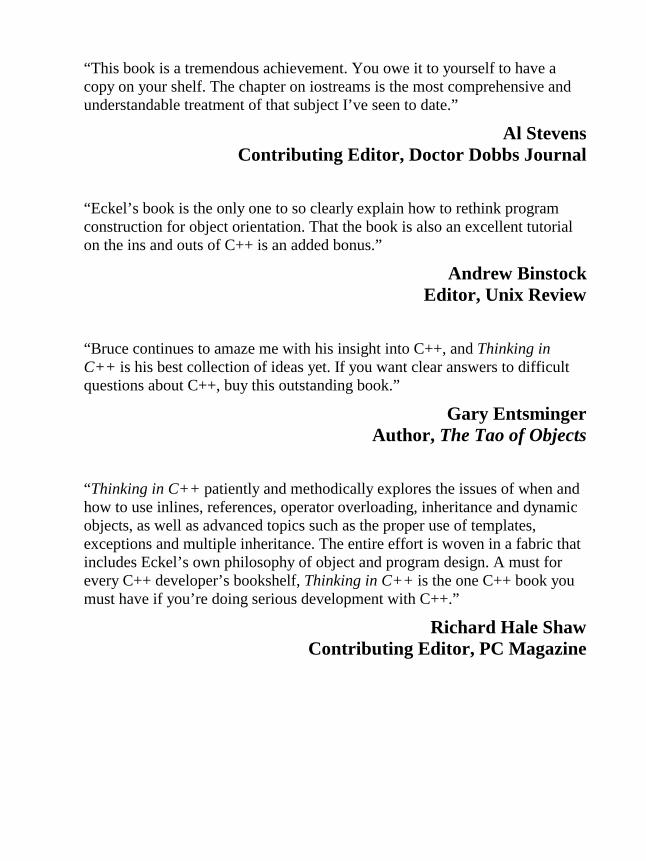
“This book is a tremendous achievement. You owe it to yourself to have a copy on your shelf. The chapter on iostreams is the most comprehensive and understandable treatment of that subject I’ve seen to date.”
Al Stevens Contributing Editor, Doctor Dobbs Journal
“Eckel’s book is the only one to so clearly explain how to rethink program construction for object orientation. That the book is also an excellent tutorial on the ins and outs of C++ is an added bonus.”
Andrew Binstock Editor, Unix Review
“Bruce continues to amaze me with his insight into C++, and Thinking in C++ is his best collection of ideas yet. If you want clear answers to difficult questions about C++, buy this outstanding book.”
Gary Entsminger Author, The Tao of Objects
“Thinking in C++ patiently and methodically explores the issues of when and how to use inlines, references, operator overloading, inheritance and dynamic objects, as well as advanced topics such as the proper use of templates, exceptions and multiple inheritance. The entire effort is woven in a fabric that includes Eckel’s own philosophy of object and program design. A must for every C++ developer’s bookshelf, Thinking in C++ is the one C++ book you must have if you’re doing serious development with C++.”
Richard Hale Shaw Contributing Editor, PC Magazine
Thinking In
C++ 2nd Edition, Volume 2
Bruce Eckel
President, MindView Inc.
© 1999 by Bruce Eckel, MindView, Inc. The information in this book is distributed on an “as is” basis, without warranty. While every precaution has been taken in the preparation of this book, neither the author nor the
publisher shall have any liability to any person or entitle with respect to any liability, loss or damage caused or alleged to be caused directly or indirectly by instructions contained in this book or by the computer software or hardware products described herein.
All rights reserved. No part of this book may be reproduced in any form or by any electronic or mechanical means including information storage and retrieval systems without permission in writing from the publisher or author, except by a reviewer who may quote brief passages in a review. Any of the names used in the examples and text of this book are fictional; any relationship to persons living or dead or to fictional characters in other works is purely coincidental.

dedication To the scholar, the healer, and the muse
What’s inside... Thinking in C++ 2nd edition Volume 2: Standard Libraries & Advanced Topics Revision 1, xx 1999............................................................1
Preface 13 What’s new in the second edition13
What’s in Volume 2 of this book ......14 How to get Volume 2 ........................14
Prerequisites............................... 14 Learning C++............................. 14 Goals .......................................... 16 Chapters ..................................... 17 Exercises .................................... 18
Exercise solutions .............................18 Source code................................ 18 Language standards.................... 20
Language support..............................20 The book’s CD ROM................. 20 Seminars, CD Roms & consulting20 Errors ......................................... 21 Acknowledgements.................... 21
Part 1: The Standard C++ Library 23 Library overview........................ 24
1: Strings 27 What’s in a string ....................... 27
Creating and initializing C++ strings 29 Operating on strings................... 31
Appending, inserting and concatenating strings 32 Replacing string characters ...............34 Concatenation using non-member overloaded operators 37
Searching in strings.................... 38 Finding in reverse..............................43 Finding first/last of a set....................44 Removing characters from strings.....45 Comparing strings .............................49 Using iterators...................................53
Chapter 2: Hiding the Implementation 7
Strings and character traits ................55 A string application.................... 58 Summary.................................... 61 Exercises .................................... 62
2: Iostreams 63 Why iostreams?.......................... 63
True wrapping...................................65 Iostreams to the rescue............... 67
Sneak preview of operator overloading68 Inserters and extractors .....................69 Common usage..................................70 Line-oriented input............................72
File iostreams............................. 74 Open modes ......................................76
Iostream buffering...................... 76 Using get( ) with a streambuf............78
Seeking in iostreams .................. 78 Creating read/write files ....................80
stringstreams .............................. 81 strstreams ................................... 81
User-allocated storage.......................81 Automatic storage allocation.............84
Output stream formatting........... 87 Internal formatting data.....................88 An exhaustive example .....................92
Formatting manipulators............ 95 Manipulators with arguments............96
Creating manipulators................ 99 Effectors..........................................100
Iostream examples ................... 102 Code generation ..............................102 A simple datalogger ........................110 Counting editor ...............................117 Breaking up big files .......................118
Summary.................................. 120 Exercises .................................. 120
3: Templates in depth 121 Nontype template arguments ... 121 Default template arguments ..... 122 The typename keyword............ 122
Typedefing a typename...................124 Using typename instead of class ....124
Function templates ................... 124 A string conversion system .............125 A memory allocation system...........126
Type induction in function templates 129 Taking the address of a generated function template 130
Chapter 2: Hiding the Implementation 8
Local classes in templates ........ 131 Applying a function to an STL sequence 131 Template-templates .................. 134 Member function templates ..... 135
Why virtual member template functions are disallowed 137 Nested template classes...................137
Template specializations .......... 137 Full specialization ...........................137 Partial Specialization.......................137 A practical example ........................137 Design & efficiency ........................141 Preventing template bloat................141
Explicit instantiation ................ 143 Explicit specification of template functions 144
Controlling template instantiation144 The inclusion vs. separation models145 The export keyword ........................145
Template programming idioms 145 The “curiously-recurring template”.145 Traits...............................................145
Summary.................................. 145
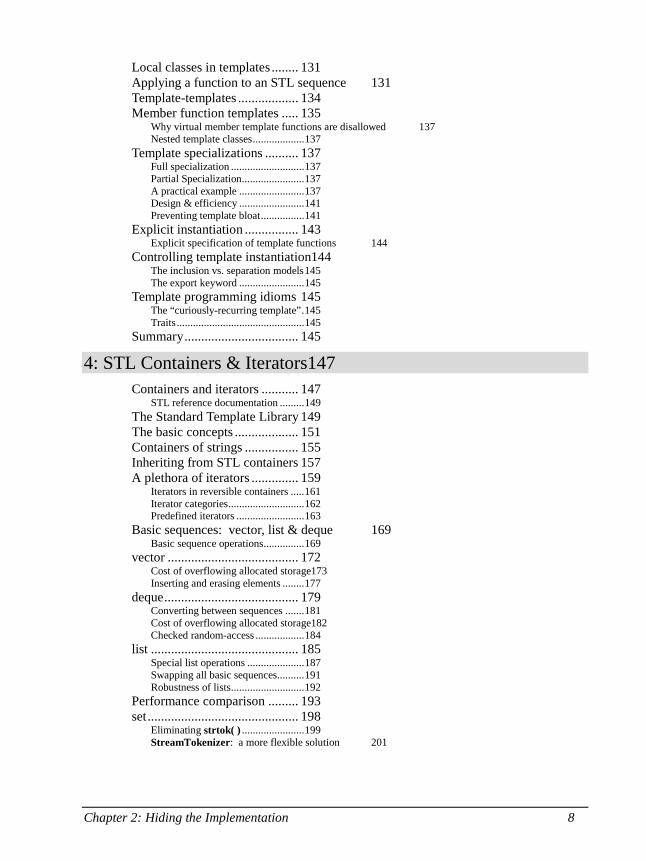
4: STL Containers & Iterators147 Containers and iterators ........... 147
STL reference documentation .........149 The Standard Template Library 149 The basic concepts ................... 151 Containers of strings ................ 155 Inheriting from STL containers 157 A plethora of iterators .............. 159
Iterators in reversible containers .....161 Iterator categories............................162 Predefined iterators .........................163
Basic sequences: vector, list & deque 169 Basic sequence operations...............169
vector ....................................... 172 Cost of overflowing allocated storage173 Inserting and erasing elements ........177
deque........................................ 179 Converting between sequences .......181 Cost of overflowing allocated storage182 Checked random-access ..................184
list ............................................ 185 Special list operations .....................187 Swapping all basic sequences..........191 Robustness of lists...........................192
Performance comparison ......... 193 set............................................. 198
Eliminating strtok( ) .......................199 StreamTokenizer: a more flexible solution 201
Chapter 2: Hiding the Implementation 9
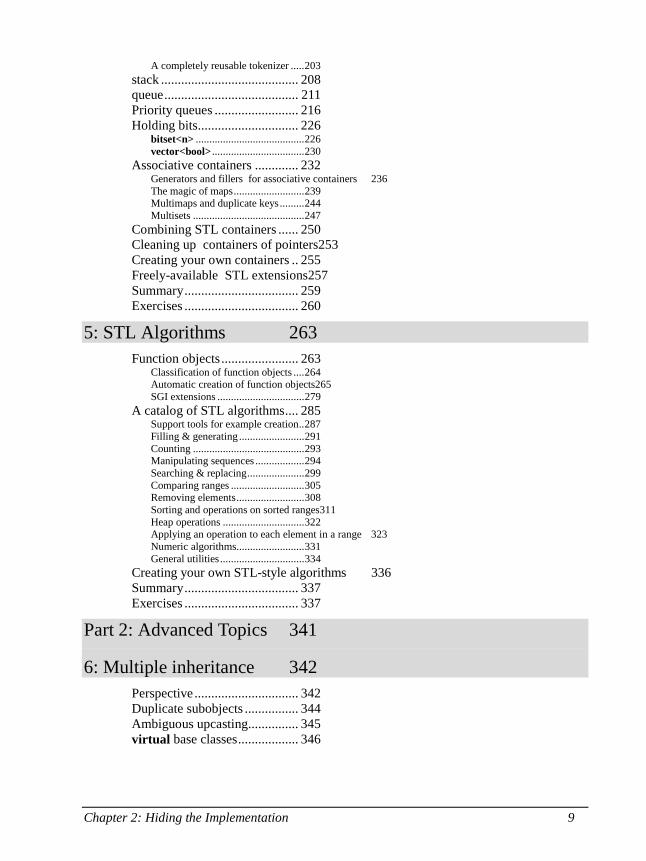
A completely reusable tokenizer .....203 stack ......................................... 208 queue........................................ 211 Priority queues ......................... 216 Holding bits.............................. 226
bitset<n> ........................................226 vector<bool> ..................................230
Associative containers ............. 232 Generators and fillers for associative containers 236 The magic of maps..........................239 Multimaps and duplicate keys .........244 Multisets .........................................247
Combining STL containers ...... 250 Cleaning up containers of pointers253 Creating your own containers .. 255 Freely-available STL extensions257 Summary.................................. 259 Exercises .................................. 260
5: STL Algorithms 263 Function objects....................... 263
Classification of function objects ....264 Automatic creation of function objects265 SGI extensions ................................279
A catalog of STL algorithms.... 285 Support tools for example creation..287 Filling & generating ........................291 Counting .........................................293 Manipulating sequences ..................294 Searching & replacing.....................299 Comparing ranges ...........................305 Removing elements.........................308 Sorting and operations on sorted ranges311 Heap operations ..............................322 Applying an operation to each element in a range 323 Numeric algorithms.........................331 General utilities...............................334
Creating your own STL-style algorithms 336 Summary.................................. 337 Exercises .................................. 337
Part 2: Advanced Topics 341
6: Multiple inheritance 342 Perspective ............................... 342 Duplicate subobjects ................ 344 Ambiguous upcasting............... 345 virtual base classes.................. 346
Chapter 2: Hiding the Implementation 10
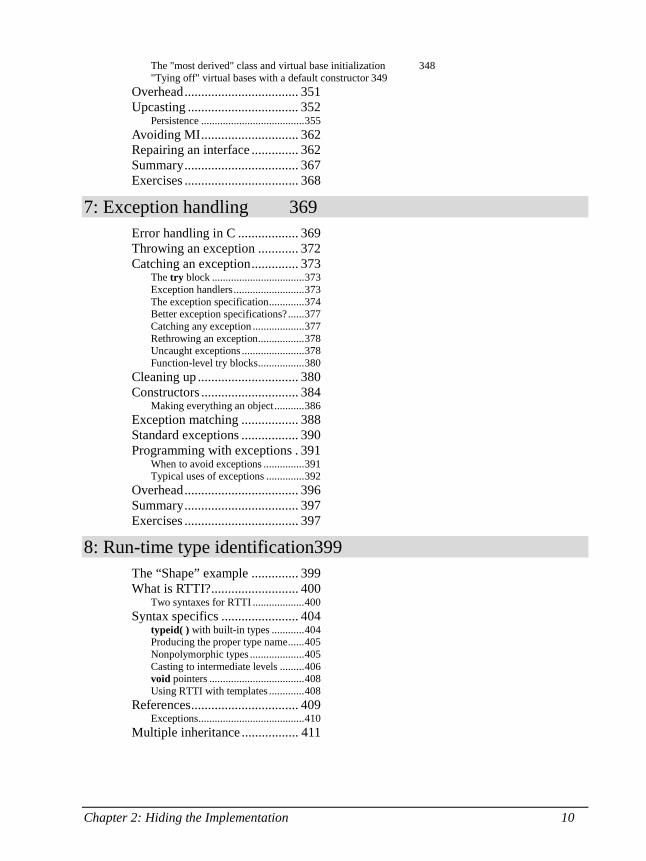
The "most derived" class and virtual base initialization 348 "Tying off" virtual bases with a default constructor 349
Overhead.................................. 351 Upcasting ................................. 352
Persistence ......................................355 Avoiding MI............................. 362 Repairing an interface .............. 362 Summary.................................. 367 Exercises .................................. 368
7: Exception handling 369 Error handling in C .................. 369 Throwing an exception ............ 372 Catching an exception.............. 373
The try block ..................................373 Exception handlers..........................373 The exception specification.............374 Better exception specifications?......377 Catching any exception ...................377 Rethrowing an exception.................378 Uncaught exceptions .......................378 Function-level try blocks.................380
Cleaning up .............................. 380 Constructors ............................. 384
Making everything an object...........386 Exception matching ................. 388 Standard exceptions ................. 390 Programming with exceptions . 391
When to avoid exceptions ...............391 Typical uses of exceptions ..............392
Overhead.................................. 396 Summary.................................. 397 Exercises .................................. 397
8: Run-time type identification399 The “Shape” example .............. 399 What is RTTI?.......................... 400
Two syntaxes for RTTI ...................400 Syntax specifics ....................... 404
typeid( ) with built-in types ............404 Producing the proper type name......405 Nonpolymorphic types ....................405 Casting to intermediate levels .........406 void pointers ...................................408 Using RTTI with templates .............408
References................................ 409 Exceptions.......................................410
Multiple inheritance ................. 411
Chapter 2: Hiding the Implementation 11
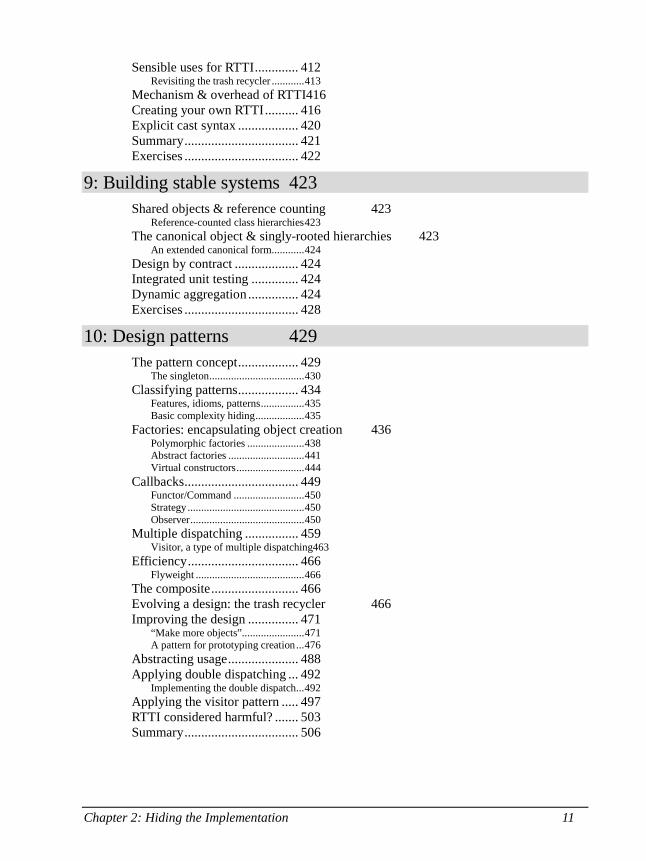
Sensible uses for RTTI............. 412 Revisiting the trash recycler ............413
Mechanism & overhead of RTTI416 Creating your own RTTI.......... 416 Explicit cast syntax .................. 420 Summary.................................. 421 Exercises .................................. 422
9: Building stable systems 423 Shared objects & reference counting 423
Reference-counted class hierarchies423 The canonical object & singly-rooted hierarchies 423
An extended canonical form............424 Design by contract ................... 424 Integrated unit testing .............. 424 Dynamic aggregation ............... 424 Exercises .................................. 428
10: Design patterns 429 The pattern concept.................. 429
The singleton...................................430 Classifying patterns.................. 434
Features, idioms, patterns................435 Basic complexity hiding..................435
Factories: encapsulating object creation 436 Polymorphic factories .....................438 Abstract factories ............................441 Virtual constructors.........................444
Callbacks.................................. 449 Functor/Command ..........................450 Strategy ...........................................450 Observer..........................................450
Multiple dispatching ................ 459 Visitor, a type of multiple dispatching463
Efficiency................................. 466 Flyweight ........................................466
The composite.......................... 466 Evolving a design: the trash recycler 466 Improving the design ............... 471
“Make more objects”.......................471 A pattern for prototyping creation...476
Abstracting usage..................... 488 Applying double dispatching ... 492
Implementing the double dispatch...492 Applying the visitor pattern ..... 497 RTTI considered harmful? ....... 503 Summary.................................. 506
Chapter 2: Hiding the Implementation 12
Exercises .................................. 507
11: Tools & topics 509 The code extractor ................... 509 Debugging................................ 531
assert( )...........................................531 Trace macros...................................531 Trace file .........................................532 Abstract base class for debugging ...533 Tracking new/delete & malloc/free533
CGI programming in C++........ 539 Encoding data for CGI ....................540 The CGI parser................................541 Using POST ....................................548 Handling mailing lists .....................549 A general information-extraction CGI program 560 Parsing the data files .......................566
Summary.................................. 573 Exercises .................................. 573
A: Recommended reading 575 C............................................... 575 General C++............................. 575
My own list of books.......................576 Depth & dark corners............... 576 The STL................................... 576 Design Patterns ........................ 576
B:Compiler specifics 577
Index 580
13
Preface Like any human language, C++ provides a way to express concepts. If successful, this medium of expression will be significantly easier and more flexible than the alternatives as problems grow larger and more complex.
You can’t just look at C++ as a collection of features; some of the features make no sense in isolation. You can only use the sum of the parts if you are thinking about design, not simply coding. And to understand C++ in this way, you must understand the problems with C and with programming in general. This book discusses programming problems, why they are problems, and the approach C++ has taken to solve such problems. Thus, the set of features I explain in each chapter will be based on the way that I see a particular type of problem being solved with the language. In this way I hope to move you, a little at a time, from understanding C to the point where the C++ mindset becomes your native tongue.
Throughout, I’ll be taking the attitude that you want to build a model in your head that allows you to understand the language all the way down to the bare metal; if you encounter a puzzle you’ll be able to feed it to your model and deduce the answer. I will try to convey to you the insights which have rearranged my brain to make me start “thinking in C++.”
What’s new in the second edition
This book is a thorough rewrite of the first edition to reflect all the changes introduced in C++ by the finalization of the ANSI/ISO C++ Standard. The entire text present in the first edition has been examined and rewritten, sometimes removing old examples, often changing existing examples and adding new ones, and adding many new exercises. Significant rearrangement and re-ordering of the material took place to reflect the availability of better tools and my improved understanding of how people learn C++. A new chapter was added which is a rapid introduction to the C concepts and basic C++ features for those who haven’t been exposed. The CD ROM bound into the back of the book contains a seminar which is an even gentler introduction to the C concepts necessary to understand C++ (or Java). It was created by Chuck Allison for my company (MindView, Inc.) and it’s called “Thinking in C: Foundations for Java and C++.” It introduces you to the aspects of C that are necessary for you to move on
Preface 14
to C++ or Java (leaving out the nasty bits that C programmers must deal with on a day-to-day basis but that the C++ and Java languages steer you away from).
So the short answer is: what isn’t brand new has been rewritten, sometimes to the point where you wouldn’t recognize the original examples and material.
What’s in Volume 2 of this book The completion of the C++ Standard also added a number of important new libraries such as string and the Standard Template Library (STL) as well as new complexity in templates. These and other more advanced topics have been relegated to Volume 2 of this book, including issues like multiple inheritance, exception handling, design patterns and topics about building stable systems and debugging them.
How to get Volume 2 Just like the book that you currently hold, Thinking in C++, Volume 2 is freely downloadable in its entirety from my web site at www.BruceEckel.com. The final version of Volume 2 will be completed and printed in late 2000 or early 2001.
The web site also contains the source code for both the books, along with updates and information about CD ROMs, public seminars, and in-house training, consulting, mentoring and walk-throughs.
Prerequisites In the first edition of this book, I decided to assume that someone else had taught you C and that you have at least a reading level of comfort with it. My primary focus was on simplifying what I found difficult – the C++ language. In this edition I have added a chapter that is a very rapid introduction to C, along with the Thinking in C seminar-on-CD, but still assuming that you have some kind of programming experience already. In addition, just as you learn many new words intuitively by seeing them in context in a novel, it’s possible to learn a great deal about C from the context in which it is used in the rest of the book.
Learning C++ I clawed my way into C++ from exactly the same position as I expect many of the readers of this book will: As a programmer with a very no-nonsense, nuts-and-bolts attitude about programming. Worse, my background and experience was in hardware-level embedded programming, where C has often been considered a high-level language and an inefficient overkill for pushing bits around. I discovered later that I wasn’t even a very good C programmer, hiding my ignorance of structures, malloc( ) & free( ), setjmp( ) & longjmp( ),
Preface 15
and other “sophisticated” concepts, scuttling away in shame when the subjects came up in conversation rather than reaching out for new knowledge.
When I began my struggle to understand C++, the only decent book was Stroustrup’s self-professed “expert’s guide,1 ” so I was left to simplify the basic concepts on my own. This resulted in my first C++ book,2 which was essentially a brain dump of my experience. That was designed as a reader’s guide, to bring programmers into C and C++ at the same time. Both editions3 of the book garnered an enthusiastic response.
At about the same time that Using C++ came out, I began teaching the language in live seminars and presentations. Teaching C++ (and later, Java) became my profession; I’ve seen nodding heads, blank faces, and puzzled expressions in audiences all over the world since 1989. As I began giving in-house training with smaller groups of people, I discovered something during the exercises. Even those people who were smiling and nodding were confused about many issues. I found out, by creating and chairing the C++ and Java tracks at the Software Development Conference for many years, that I and other speakers tended to give the typical audience too many topics, too fast. So eventually, through both variety in the audience level and the way that I presented the material, I would end up losing some portion of the audience. Maybe it’s asking too much, but because I am one of those people resistant to traditional lecturing (and for most people, I believe, such resistance results from boredom), I wanted to try to keep everyone up to speed.
For a time, I was creating a number of different presentations in fairly short order. Thus, I ended up learning by experiment and iteration (a technique that also works well in C++ program design). Eventually I developed a course using everything I had learned from my teaching experience. It tackles the learning problem in discrete, easy-to-digest steps and for a hands-on seminar (the ideal learning situation), there are exercises following each of the presentations.
The first edition of this book developed over the course of two years, and the material in this book has been road-tested in many forms in many different seminars. The feedback that I’ve gotten from each seminar has helped me change and refocus the material until I feel it works well as a teaching medium. But it isn’t just a seminar handout – I tried to pack as much information as I could within these pages, and structure it to draw you through, onto the next subject. More than anything, the book is designed to serve the solitary reader, struggling with a new programming language.
1 Bjarne Stroustrup, The C++ Programming Language, Addison-Wesley, 1986 (first edition).
2 Using C++, Osborne/McGraw-Hill 1989.
3 Using C++ and C++ Inside & Out, Osborne/McGraw-Hill 1993.
Preface 16
Goals My goals in this book are to:
1. Present the material a simple step at a time, so the reader can easily digest each concept before moving on.
2. Use examples that are as simple and short as possible. This sometimes prevents me from tackling “real-world” problems, but I’ve found that beginners are usually happier when they can understand every detail of an example rather than being impressed by the scope of the problem it solves. Also, there’s a severe limit to the amount of code that can be absorbed in a classroom situation. For this I sometimes receive criticism for using “toy examples,” but I’m willing to accept that in favor of producing something pedagogically useful.
3. Carefully sequence the presentation of features so that you aren’t seeing something you haven’t been exposed to. Of course, this isn’t always possible; in those situations, a brief introductory description will be given.
4. Give you what I think is important for you to understand about the language, rather than everything I know. I believe there is an “information importance hierarchy,” and there are some facts that 95% of programmers will never need to know, but that would just confuse people and add to their perception of the complexity of the language. To take an example from C, if you memorize the operator precedence table (I never did) you can write clever code. But if you have to think about it, it will confuse the reader/maintainer of that code. So forget about precedence, and use parentheses when things aren’t clear. This same attitude will be taken with some information in the C++ language, which I think is more important for compiler writers than for programmers.
5. Keep each section focused enough so the lecture time – and the time between exercise periods – is small. Not only does this keep the audience’ minds more active and involved during a hands-on seminar, but it gives the reader a greater sense of accomplishment.
6. Provide the reader with a solid foundation so they can understand the issues well enough to move on to more difficult coursework and books (in particular, Volume 2 of this book).
7. I’ve endeavored not to use any particular vendor’s version of C++ because, for learning the language, I don’t feel like the details of a particular

Preface 17
implementation are as important as the language itself. Most vendors’ documentation concerning their own implementation specifics is adequate.
Chapters C++ is a language where new and different features are built on top of an existing syntax. (Because of this it is referred to as a hybrid object-oriented programming language.) As more people have passed through the learning curve, we’ve begun to get a feel for the way programmers move through the stages of the C++ language features. Because it appears to be the natural progression of the procedurally-trained mind, I decided to understand and follow this same path, and accelerate the process by posing and answering the questions that came to me as I learned the language and that came from audiences as I taught it.
This course was designed with one thing in mind: to streamline the process of learning the C++ language. Audience feedback helped me understand which parts were difficult and needed extra illumination. In the areas where I got ambitious and included too many features all at once, I came to know – through the process of presenting the material – that if you include a lot of new features, you have to explain them all, and the student’s confusion is easily compounded. As a result, I’ve taken a great deal of trouble to introduce the features as few at a time as possible; ideally, only one major concept at a time per chapter.
The goal, then, is for each chapter to teach a single concept, or a small group of associated concepts, in such a way that no additional features are relied upon. That way you can digest each piece in the context of your current knowledge before moving on. To accomplish this, I leave some C features in place for longer than I would prefer. The benefit is that you will not be confused by seeing all the C++ features used before they are explained, so your introduction to the language will be gentle and will mirror the way you will assimilate the features if left to your own devices.
Here is a brief description of the chapters contained in this book:
(5) Introduction to iostreams. One of the original C++ libraries – the one that provides the essential I/O facility – is called iostreams. Iostreams is intended to replace C’s stdio.h with an I/O library that is easier to use, more flexible, and extensible – you can adapt it to work with your new classes. This chapter teaches you the ins and outs of how to make the best use of the existing iostream library for standard I/O, file I/O, and in-memory formatting.
(15) Multiple inheritance. This sounds simple at first: A new class is inherited from more than one existing class. However, you can end up with ambiguities and multiple copies of base-class objects. That problem is solved with virtual base classes, but the bigger issue remains: When do you use it? Multiple inheritance is only essential when you need to manipulate an object through more than one common base class. This chapter explains the syntax for multiple inheritance, and shows alternative approaches – in particular, how templates solve one common problem. The use of multiple inheritance to repair a “damaged” class interface is demonstrated as a genuinely valuable use of this feature.
Preface 18
(16) Exception handling. Error handling has always been a problem in programming. Even if you dutifully return error information or set a flag, the function caller may simply ignore it. Exception handling is a primary feature in C++ that solves this problem by allowing you to “throw” an object out of your function when a critical error happens. You throw different types of objects for different errors, and the function caller “catches” these objects in separate error handling routines. If you throw an exception, it cannot be ignored, so you can guarantee that something will happen in response to your error.
(17) Run-time type identification. Run-time type identification (RTTI) lets you find the exact type of an object when you only have a pointer or reference to the base type. Normally, you’ll want to intentionally ignore the exact type of an object and let the virtual function mechanism implement the correct behavior for that type. But occasionally it is very helpful to know the exact type of an object for which you only have a base pointer; often this information allows you to perform a special-case operation more efficiently. This chapter explains what RTTI is for and how to use it.
Exercises I’ve discovered that simple exercises are exceptionally useful during a seminar to complete a student’s understanding, so you’ll find a set at the end of each chapter.
These are fairly simple, so they can be finished in a reasonable amount of time in a classroom situation while the instructor observes, making sure all the students are absorbing the material. Some exercises are a bit more challenging to keep advanced students entertained. They’re all designed to be solved in a short time and are only there to test and polish your knowledge rather than present major challenges (presumably, you’ll find those on your own – or more likely they’ll find you).
Exercise solutions Solutions to exercises can be found in the electronic document The C++ Annotated Solution Guide, Volume 2 by Chuck Allison, available for a small fee from www.BruceEckel.com. [[ Note this is not yet available ]]
Source code The source code for this book is copyrighted freeware, distributed via the web site http://www.BruceEckel.com. The copyright prevents you from republishing the code in print media without permission.
Although the code is available in a zipped file on the above web site, you can also unpack the code yourself by downloading the text version of the book and running the program ExtractCode (from Volume 2 of this book), the source for which is also provided on the Web
Preface 19
site. The program will create a directory for each chapter and unpack the code into those directories. In the starting directory where you unpacked the code you will find the following copyright notice:
//:! :CopyRight.txt
Copyright (c) Bruce Eckel, 1999
Source code file from the book "Thinking in C++"
All rights reserved EXCEPT as allowed by the
following statements: You can freely use this file
for your own work (personal or commercial),
including modifications and distribution in
executable form only. Permission is granted to use
this file in classroom situations, including its
use in presentation materials, as long as the book
"Thinking in C++" is cited as the source.
Except in classroom situations, you cannot copy
and distribute this code; instead, the sole
distribution point is http://www.BruceEckel.com
(and official mirror sites) where it is
freely available. You cannot remove this
copyright and notice. You cannot distribute
modified versions of the source code in this
package. You cannot use this file in printed
media without the express permission of the
author. Bruce Eckel makes no representation about
the suitability of this software for any purpose.
It is provided "as is" without express or implied
warranty of any kind, including any implied
warranty of merchantability, fitness for a
particular purpose or non-infringement. The entire
risk as to the quality and performance of the
software is with you. Bruce Eckel and the
publisher shall not be liable for any damages
suffered by you or any third party as a result of
using or distributing software. In no event will
Bruce Eckel or the publisher be liable for any
lost revenue, profit, or data, or for direct,
indirect, special, consequential, incidental, or
punitive damages, however caused and regardless of
the theory of liability, arising out of the use of
or inability to use software, even if Bruce Eckel
and the publisher have been advised of the
possibility of such damages. Should the software
prove defective, you assume the cost of all

Preface 20
necessary servicing, repair, or correction. If you
think you've found an error, please submit the
correction using the form you will find at
www.BruceEckel.com. (Please use the same
form for non-code errors found in the book.)
///:~
You may use the code in your projects and in the classroom as long as the copyright notice is retained.
Language standards Throughout this book, when referring to conformance to the ANSI/ISO C standard, I will generally just say ‘C.’ Only if it is necessary to distinguish between Standard C and older, pre-Standard versions of C will I make the distinction.
At this writing the ANSI/ISO C++ committee was finished working on the language. Thus, I will use the term Standard C++ to refer to the standardized language. If I simply refer to C++ you should assume I mean “Standard C++.”
Language support Your compiler may not support all the features discussed in this book, especially if you don’t have the newest version of your compiler. Implementing a language like C++ is a Herculean task, and you can expect that the features will appear in pieces rather than all at once. But if you attempt one of the examples in the book and get a lot of errors from the compiler, it’s not necessarily a bug in the code or the compiler – it may simply not be implemented in your particular compiler yet.
The book’s CD ROM Seminars, CD Roms &
consulting My company, MindView, Inc., provides public hands-on training seminars based on the material in this book, and also for advanced topics. Selected material from each chapter represents a lesson, which is followed by a monitored exercise period so each student receives personal attention. We also provide on-site training, consulting, mentoring, and design & code
Preface 21
walkthroughs. Information and sign-up forms for upcoming seminars and other contact information can be found at http://www.BruceEckel.com.
Errors No matter how many tricks a writer uses to detect errors, some always creep in and these often leap off the page for a fresh reader. If you discover anything you believe to be an error, please use the correction form you will find at http://www.BruceEckel.com. Your help is appreciated.
Acknowledgements The ideas and understanding in this book have come from many sources: friends like Chuck Allison, Andrea Provaglio, Dan Saks, Scott Meyers, Charles Petzold, and Michael Wilk; pioneers of the language like Bjarne Stroustrup, Andrew Koenig, and Rob Murray; members of the C++ Standards Committee like Nathan Myers (who was particularly helpful and generous with his insights), Tom Plum, Reg Charney, Tom Penello, Sam Druker, and Uwe Steinmueller; people who have spoken in my C++ track at the Software Development Conference; and very often students in my seminars, who ask the questions I need to hear in order to make the material clearer.
I have been presenting this material on tours produced by Miller Freeman Inc. with my friend Richard Hale Shaw. Richard’s insights and support have been very helpful (and Kim’s, too). Thanks also to KoAnn Vikoren, Eric Faurot, Jennifer Jessup, Nicole Freeman, Barbara Hanscome, Regina Ridley, Alex Dunne, and the rest of the cast and crew at MFI.
The book design, cover design, and cover photo were created by my friend Daniel Will-Harris, noted author and designer, who used to play with rub-on letters in junior high school while he awaited the invention of computers and desktop publishing. However, I produced the camera-ready pages myself, so the typesetting errors are mine. Microsoft® Word for Windows 97 was used to write the book and to create camera-ready pages. The body typeface is [Times for the electronic distribution] and the headlines are in [Times for the electronic distribution].
A special thanks to all my teachers, and all my students (who are my teachers as well).
Personal thanks to my friends Gen Kiyooka and Kraig Brockschmidt. The supporting cast of friends includes, but is not limited to: Zack Urlocker, Andrew Binstock, Neil Rubenking, Steve Sinofsky, JD Hildebrandt, Brian McElhinney, Brinkley Barr, Larry O’Brien, Bill Gates at Midnight Engineering Magazine, Larry Constantine & Lucy Lockwood, Tom Keffer, Greg Perry, Dan Putterman, Christi Westphal, Gene Wang, Dave Mayer, David Intersimone, Claire Sawyers, Claire Jones, The Italians (Andrea Provaglio, Laura Fallai, Marco Cantu, Corrado, Ilsa and Christina Giustozzi), Chris & Laura Strand, The Almquists, Brad Jerbic, Marilyn Cvitanic, The Mabrys, The Haflingers, The Pollocks, Peter Vinci, The Robbins Families, The Moelter Families (& the McMillans), The Wilks, Dave Stoner, Laurie Adams, The Penneys,

Preface 22
The Cranstons, Larry Fogg, Mike & Karen Sequeira, Gary Entsminger & Allison Brody, Chester Andersen, Joe Lordi, Dave & Brenda Bartlett, The Rentschlers, The Sudeks, Lynn & Todd, and their families. And of course, Mom & Dad.
23
Part 1: The Standard C++ Library
Standard C++ not only incorporates all the Standard C libraries, with small additions and changes to support type safety, it also adds libraries of its own. These libraries are far more powerful than those in Standard C; the leverage you get from them is analogous to the leverage you get from changing from C to C++.
This section of the book gives you an in-depth introduction to the most important portions of the Standard C++ library.
The most complete and also the most obscure reference to the full libraries is the Standard itself. Somewhat more readable (and yet still a self-described “expert’s guide”) is Bjarne Stroustrup’s 3rd Edition of The C++ Programming Language (Addison-Wesley, 1997). Another valuable reference is the 3rd edition of C++ Primer, by Lippman & Lajoie. The goal of the chapters in this book that cover the libraries is to provide you with an encyclopedia of descriptions and examples so you’ll have a good starting point for solving any problem that requires the use of the Standard libraries. However, there are some techniques and topics that are used rarely enough that they are not covered here, so if you can’t find it in these chapters you should reach for the other two books; this book is not intended to replace those but rather to complement them. In particular, I hope that after going through the material in the following chapters you’ll have a much easier time understanding those books.
You will notice that this section does not contain exhaustive documentation describing every function and class in the Standard C++ library. I’ve left the full descriptions to others; in particular there a particularly good on-line sources of standard library documentation in HTML format that you can keep resident on your computer and view with a Web browser whenever you need to look something up. This is PJ Plauger’s Dinkumware C/C++ Library reference at http://www.dinkumware.com. You can view this on-line, and purchase it for local
Chapter 14: Templates & Container Classes 24
viewing. It contains complete reference pages for the both the C and C++ libraries (so it’s good to use for all your Standard C/C++ programming questions). I am particularly fond of electronic documentation not only because you can always have it with you, but also because you can do an electronic search for what you’re seeking.
When you’re actively programming, these resources should adequately satisfy your reference needs (and you can use them to look up anything in this chapter that isn’t clear to you). Appendix XX lists additional references.
Library overview [[ Still needs work ]]
The first chapter in this section introduces the Standard C++ string class, which is a powerful tool that simplifies most of the text processing chores you might have to do. The string class may be the most thorough string manipulation tool you’ve ever seen. Chances are, anything you’ve done to character strings with lines of code in C can be done with a member function call in the string class, including append( ), assign( ), insert( ), remove( ), replace( ), resize( ), copy( ), find( ), rfind( ), find_first_of( ), find_last_of( ), find_first_not_of( ), find_last_not_of( ), substr( ), and compare( ). The operators =, +=, and [ ] are also overloaded to perform the intuitive operations. In addition, there’s a “wide” wstring class designed to support international character sets. Both string and wstring (declared in <string>, not to be confused with C’s <string.h>, which is, in strict C++, <cstring>) are created from a common template class called basic_string. Note that the string classes are seamlessly integrated with iostreams, virtually eliminating the need for you to ever use strstream.
The next chapter covers the iostream library.
Language Support. Elements inherent to the language itself, like implementation limits in <climits> and <cfloat>; dynamic memory declarations in <new> like bad_alloc (the exception thrown when you’re out of memory) and set_new_handler; the <typeinfo> header for RTTI and the <exception> header that declares the terminate( ) and unexpected( ) functions.
Diagnostics Library. Components C++ programs can use to detect and report errors. The <exception> header declares the standard exception classes and <cassert> declares the same thing as C’s assert.h.
General Utilities Library. These components are used by other parts of the Standard C++ library, but you can also use them in your own programs. Included are templatized versions of operators !=, >, <=, and >= (to prevent redundant definitions), a pair template class with a tuple-making template function, a set of function objects for support of the STL, and storage allocation functions for use with the STL so you can easily modify the storage allocation mechanism.
Chapter 14: Templates & Container Classes 25
Localization Library. This allows you to localize strings in your program to adapt to usage in different countries, including money, numbers, date, time, and so on.
Containers Library. This includes the Standard Template Library (described in the next section of this appendix) and also the bits and bit_string classes in <bits> and <bitstring>, respectively. Both bits and bit_string are more complete implementations of the bitvector concept introduced in Chapter XX. The bits template creates a fixed-sized array of bits that can be manipulated with all the bitwise operators, as well as member functions like set( ), reset( ), count( ), length( ), test( ), any( ), and none( ). There are also conversion operators to_ushort( ), to_ulong( ), and to_string( ).
The bit_string class is, by contrast, a dynamically sized array of bits, with similar operations to bits, but also with additional operations that make it act somewhat like a string. There’s a fundamental difference in bit weighting: With bits, the right-most bit (bit zero) is the least significant bit, but with bit_string, the right-most bit is the most significant bit. There are no conversions between bits and bit_string. You’ll use bits for a space-efficient set of on-off flags and bit_string for manipulating arrays of binary values (like pixels).
Iterators Library. Includes iterators that are tools for the STL (described in the next section of this appendix), streams, and stream buffers.
Algorithms Library. These are the template functions that perform operations on the STL containers using iterators. The algorithms include: adjacent_find, prev_permutation, binary_search, push_heap, copy, random_shuffle, copy_backward, remove, count, remove_copy, count_if, remove_copy_if, equal, remove_if, equal_range, replace, fill, replace_copy, fill_n, replace_copy_if, find, replace_if, find_if, reverse, for_each, reverse_copy, generate, rotate, generate_n, rotate_copy, includes, search, inplace_merge, set_difference, lexicographical_compare, set_intersection, lower_bound, set_symmetric_difference, make_heap, set_union, max, sort, max_element, sort_heap, merge, stable_partition, min, stable_sort, min_element, swap, mismatch, swap_ranges, next_permutation, transform, nth_element, unique, partial_sort, unique_copy, partial_sort_copy, upper_bound, and partition.
Numerics Library. The goal of this library is to allow the compiler implementer to take advantage of the architecture of the underlying machine when used for numerical operations. This way, creators of higher level numerical libraries can write to the numerics library and produce efficient algorithms without having to customize to every possible machine. The numerics library also includes the complex number class (which appeared in the first version of C++ as an example, and has become an expected part of the library) in float, double, and long double forms.

27
1: Strings 4One of the biggest time-wasters in C is character arrays: keeping track of the difference between static quoted strings and arrays created on the stack and the heap, and the fact that sometimes you’re passing around a char* and sometimes you must copy the whole array.
(This is the general problem of shallow copy vs. deep copy.) Especially because string manipulation is so common, character arrays are a great source of misunderstandings and bugs.
Despite this, creating string classes remained a common exercise for beginning C++ programmers for many years. The Standard C++ library string class solves the problem of character array manipulation once and for all, keeping track of memory even during assignments and copy-constructions. You simply don’t need to think about it.
This chapter examines the Standard C++ string class, beginning with a look at what constitutes a C++ string and how the C++ version differs from a traditional C character array. You’ll learn about operations and manipulations using string objects, and see how C++ strings accommodate variation in character sets and string data conversion.
Handling text is perhaps one of the oldest of all programming applications, so it’s not surprising that the C++ string draws heavily on the ideas and terminology that have long been used for this purpose in C and other languages. As you begin to acquaint yourself with C++ strings this fact should be reassuring, in the respect that no matter what programming idiom you choose, there are really only about three things you can do with a string: create or modify the sequence of characters stored in the string, detect the presence or absence of elements within the string, and translate between various schemes for representing string characters.
You’ll see how each of these jobs is accomplished using C++ string objects.
What’s in a string In C, a string is simply an array of characters that always includes a binary zero (often called the null terminator) as its final array element. There are two significant differences between
4 Much of the material in this chapter was originally created by Nancy Nicolaisen
Chapter 14: Templates & Container Classes 28
C++ strings and their C progenitors. First, C++ string objects associate the array of characters which constitute the string with methods useful for managing and operating on it. A string also contains certain “housekeeping” information about the size and storage location of its data. Specifically, a C++ string object knows its starting location in memory, its content, its length in characters, and the length in characters to which it can grow before the string object must resize its internal data buffer. This gives rise to the second big difference between C char arrays and C++ strings. C++ strings do not include a null terminator, nor do the C++ string handling member functions rely on the existence of a null terminator to perform their jobs. C++ strings greatly reduce the likelihood of making three of the most common and destructive C programming errors: overwriting array bounds, trying to access arrays through uninitialized or incorrectly valued pointers, and leaving pointers “dangling” after an array ceases to occupy the storage that was once allocated to it.
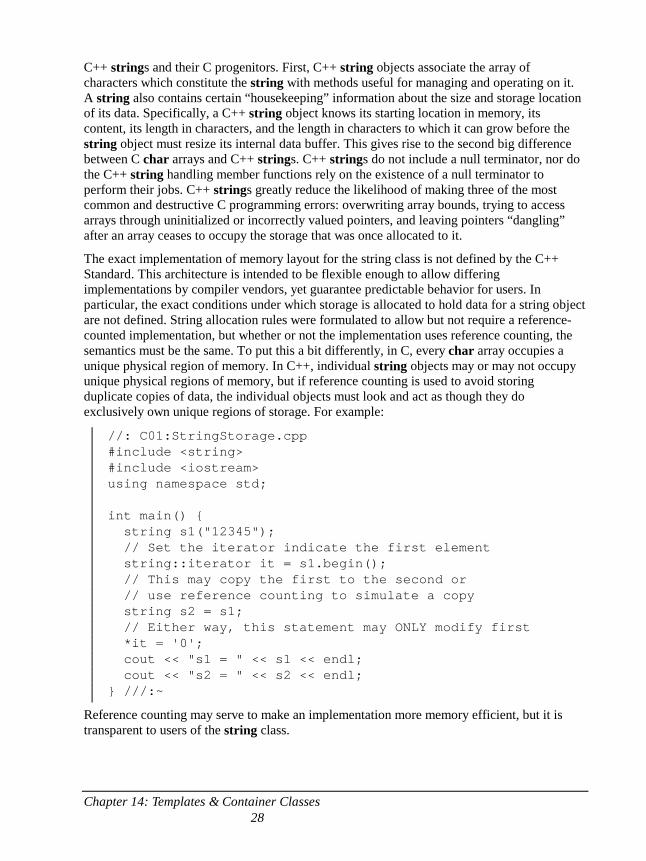
The exact implementation of memory layout for the string class is not defined by the C++ Standard. This architecture is intended to be flexible enough to allow differing implementations by compiler vendors, yet guarantee predictable behavior for users. In particular, the exact conditions under which storage is allocated to hold data for a string object are not defined. String allocation rules were formulated to allow but not require a reference-counted implementation, but whether or not the implementation uses reference counting, the semantics must be the same. To put this a bit differently, in C, every char array occupies a unique physical region of memory. In C++, individual string objects may or may not occupy unique physical regions of memory, but if reference counting is used to avoid storing duplicate copies of data, the individual objects must look and act as though they do exclusively own unique regions of storage. For example:
//: C01:StringStorage.cpp #include <string> #include <iostream> using namespace std; int main() { string s1("12345"); // Set the iterator indicate the first element string::iterator it = s1.begin(); // This may copy the first to the second or // use reference counting to simulate a copy string s2 = s1; // Either way, this statement may ONLY modify first *it = '0'; cout << "s1 = " << s1 << endl; cout << "s2 = " << s2 << endl; } ///:~
Reference counting may serve to make an implementation more memory efficient, but it is transparent to users of the string class.

Chapter 14: Templates & Container Classes 29
Creating and initializing C++ strings Creating and initializing strings is a straightforward proposition, and fairly flexible as well. In the example shown below, the first string, imBlank, is declared but contains no initial value. Unlike a C char array, which would contain a random and meaningless bit pattern until initialization, imBlank does contain meaningful information. This string object has been initialized to hold “no characters,” and can properly report its 0 length and absence of data elements through the use of class member functions.
The next string, heyMom, is initialized by the literal argument "Where are my socks?". This form of initialization uses a quoted character array as a parameter to the string constructor. By contrast, standardReply is simply initialized with an assignment. The last string of the group, useThisOneAgain, is initialized using an existing C++ string object. Put another way, this example illustrates that string objects let you:
• Create an empty string and defer initializing it with character data
• Initialize a string by passing a literal, quoted character array as an argument to the constructor
• Initialize a string using ‘=‘
• Use one string to initialize another
//: C01:SmallString.cpp #include <string> using namespace std; int main() { string imBlank; string heyMom("Where are my socks?"); string standardReply = "Beamed into deep " "space on wide angle dispersion?"; string useThisOneAgain(standardReply); } ///:~
These are the simplest forms of string initialization, but there are other variations which offer more flexibility and control. You can :
• Use a portion of either a C char array or a C++ string
• Combine different sources of initialization data using operator+
• Use the string object’s substr( ) member function to create a substring
//: C01:SmallString2.cpp #include <string> #include <iostream> using namespace std;
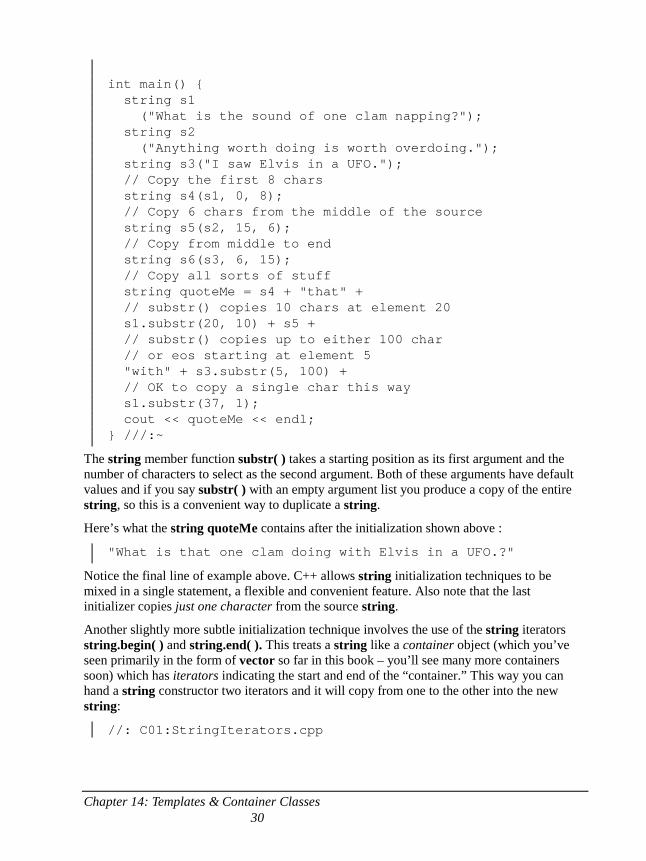
Chapter 14: Templates & Container Classes 30
int main() { string s1 ("What is the sound of one clam napping?"); string s2 ("Anything worth doing is worth overdoing."); string s3("I saw Elvis in a UFO."); // Copy the first 8 chars string s4(s1, 0, 8); // Copy 6 chars from the middle of the source string s5(s2, 15, 6); // Copy from middle to end string s6(s3, 6, 15); // Copy all sorts of stuff string quoteMe = s4 + "that" + // substr() copies 10 chars at element 20 s1.substr(20, 10) + s5 + // substr() copies up to either 100 char // or eos starting at element 5 "with" + s3.substr(5, 100) + // OK to copy a single char this way s1.substr(37, 1); cout << quoteMe << endl; } ///:~
The string member function substr( ) takes a starting position as its first argument and the number of characters to select as the second argument. Both of these arguments have default values and if you say substr( ) with an empty argument list you produce a copy of the entire string, so this is a convenient way to duplicate a string.
Here’s what the string quoteMe contains after the initialization shown above :
"What is that one clam doing with Elvis in a UFO.?"
Notice the final line of example above. C++ allows string initialization techniques to be mixed in a single statement, a flexible and convenient feature. Also note that the last initializer copies just one character from the source string.
Another slightly more subtle initialization technique involves the use of the string iterators string.begin( ) and string.end( ). This treats a string like a container object (which you’ve seen primarily in the form of vector so far in this book – you’ll see many more containers soon) which has iterators indicating the start and end of the “container.” This way you can hand a string constructor two iterators and it will copy from one to the other into the new string:
//: C01:StringIterators.cpp
Chapter 14: Templates & Container Classes 31
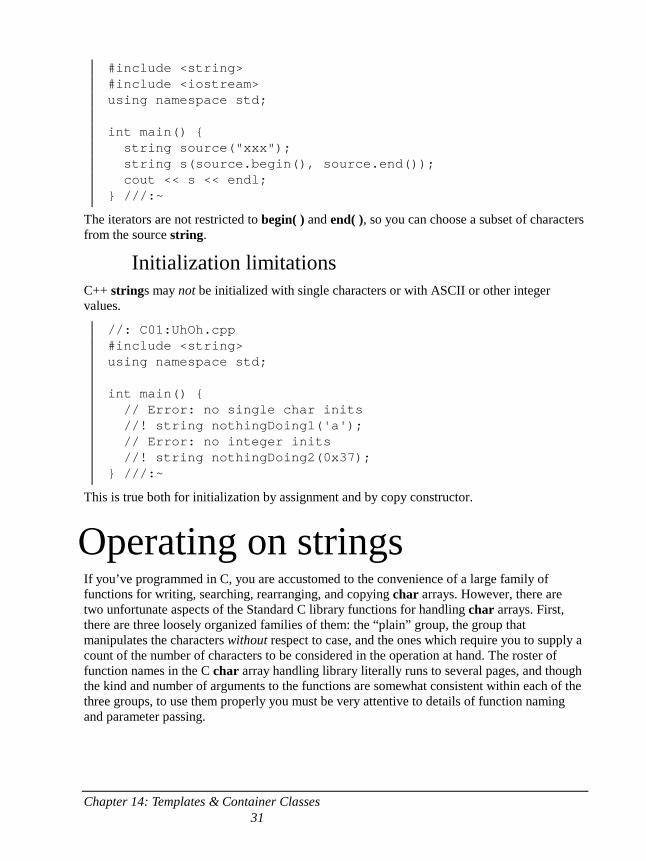
#include <string> #include <iostream> using namespace std; int main() { string source("xxx"); string s(source.begin(), source.end()); cout << s << endl; } ///:~
The iterators are not restricted to begin( ) and end( ), so you can choose a subset of characters from the source string.
Initialization limitations C++ strings may not be initialized with single characters or with ASCII or other integer values.
//: C01:UhOh.cpp #include <string> using namespace std; int main() { // Error: no single char inits //! string nothingDoing1('a'); // Error: no integer inits //! string nothingDoing2(0x37); } ///:~
This is true both for initialization by assignment and by copy constructor.
Operating on strings If you’ve programmed in C, you are accustomed to the convenience of a large family of functions for writing, searching, rearranging, and copying char arrays. However, there are two unfortunate aspects of the Standard C library functions for handling char arrays. First, there are three loosely organized families of them: the “plain” group, the group that manipulates the characters without respect to case, and the ones which require you to supply a count of the number of characters to be considered in the operation at hand. The roster of function names in the C char array handling library literally runs to several pages, and though the kind and number of arguments to the functions are somewhat consistent within each of the three groups, to use them properly you must be very attentive to details of function naming and parameter passing.
Chapter 14: Templates & Container Classes 32
The second inherent trap of the standard C char array tools is that they all rely explicitly on the assumption that the character array includes a null terminator. If by oversight or error the null is omitted or overwritten, there’s very little to keep the C char array handling functions from manipulating the memory beyond the limits of the allocated space, sometimes with disastrous results.
C++ provides a vast improvement in the convenience and safety of string objects. For purposes of actual string handling operations, there are a modest two or three dozen member function names. It’s worth your while to become acquainted with these. Each function is overloaded, so you don’t have to learn a new string member function name simply because of small differences in their parameters.
Appending, inserting and concatenating strings
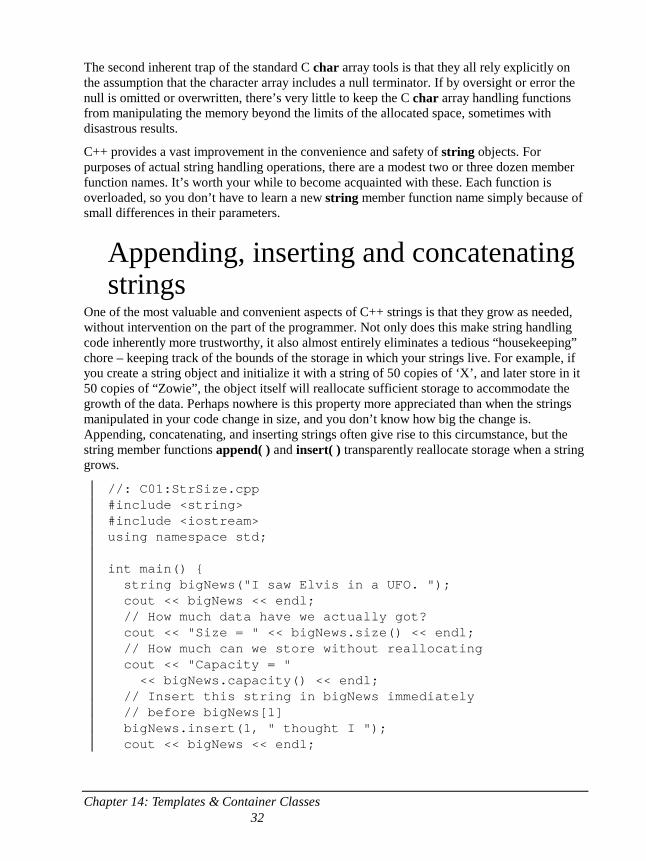
One of the most valuable and convenient aspects of C++ strings is that they grow as needed, without intervention on the part of the programmer. Not only does this make string handling code inherently more trustworthy, it also almost entirely eliminates a tedious “housekeeping” chore – keeping track of the bounds of the storage in which your strings live. For example, if you create a string object and initialize it with a string of 50 copies of ‘X’, and later store in it 50 copies of “Zowie”, the object itself will reallocate sufficient storage to accommodate the growth of the data. Perhaps nowhere is this property more appreciated than when the strings manipulated in your code change in size, and you don’t know how big the change is. Appending, concatenating, and inserting strings often give rise to this circumstance, but the string member functions append( ) and insert( ) transparently reallocate storage when a string grows.
//: C01:StrSize.cpp #include <string> #include <iostream> using namespace std; int main() { string bigNews("I saw Elvis in a UFO. "); cout << bigNews << endl; // How much data have we actually got? cout << "Size = " << bigNews.size() << endl; // How much can we store without reallocating cout << "Capacity = " << bigNews.capacity() << endl; // Insert this string in bigNews immediately // before bigNews[1] bigNews.insert(1, " thought I "); cout << bigNews << endl;
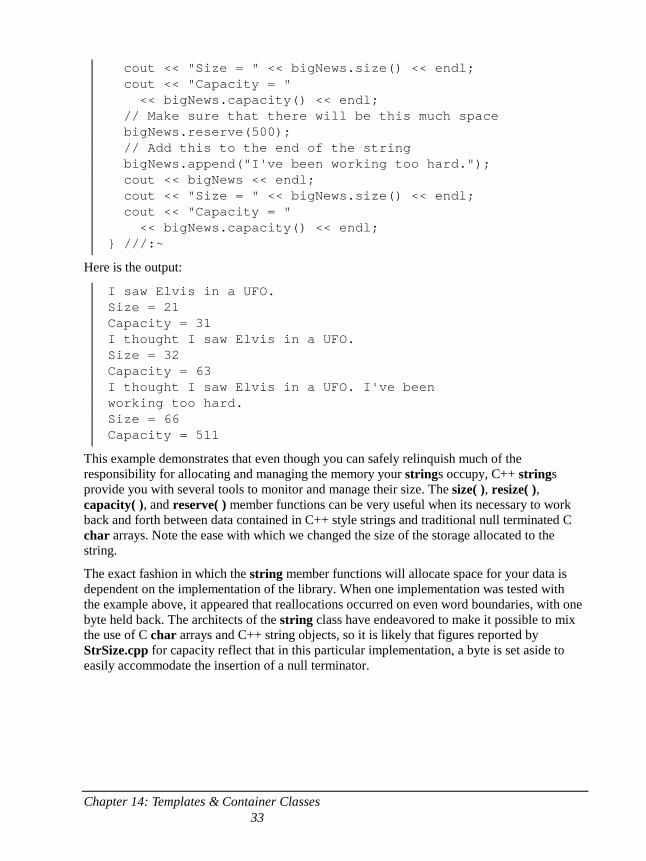
Chapter 14: Templates & Container Classes 33
cout << "Size = " << bigNews.size() << endl; cout << "Capacity = " << bigNews.capacity() << endl; // Make sure that there will be this much space bigNews.reserve(500); // Add this to the end of the string bigNews.append("I've been working too hard."); cout << bigNews << endl; cout << "Size = " << bigNews.size() << endl; cout << "Capacity = " << bigNews.capacity() << endl; } ///:~
Here is the output:
I saw Elvis in a UFO. Size = 21 Capacity = 31 I thought I saw Elvis in a UFO. Size = 32 Capacity = 63 I thought I saw Elvis in a UFO. I've been working too hard. Size = 66 Capacity = 511
This example demonstrates that even though you can safely relinquish much of the responsibility for allocating and managing the memory your strings occupy, C++ strings provide you with several tools to monitor and manage their size. The size( ), resize( ), capacity( ), and reserve( ) member functions can be very useful when its necessary to work back and forth between data contained in C++ style strings and traditional null terminated C char arrays. Note the ease with which we changed the size of the storage allocated to the string.
The exact fashion in which the string member functions will allocate space for your data is dependent on the implementation of the library. When one implementation was tested with the example above, it appeared that reallocations occurred on even word boundaries, with one byte held back. The architects of the string class have endeavored to make it possible to mix the use of C char arrays and C++ string objects, so it is likely that figures reported by StrSize.cpp for capacity reflect that in this particular implementation, a byte is set aside to easily accommodate the insertion of a null terminator.
Chapter 14: Templates & Container Classes 34
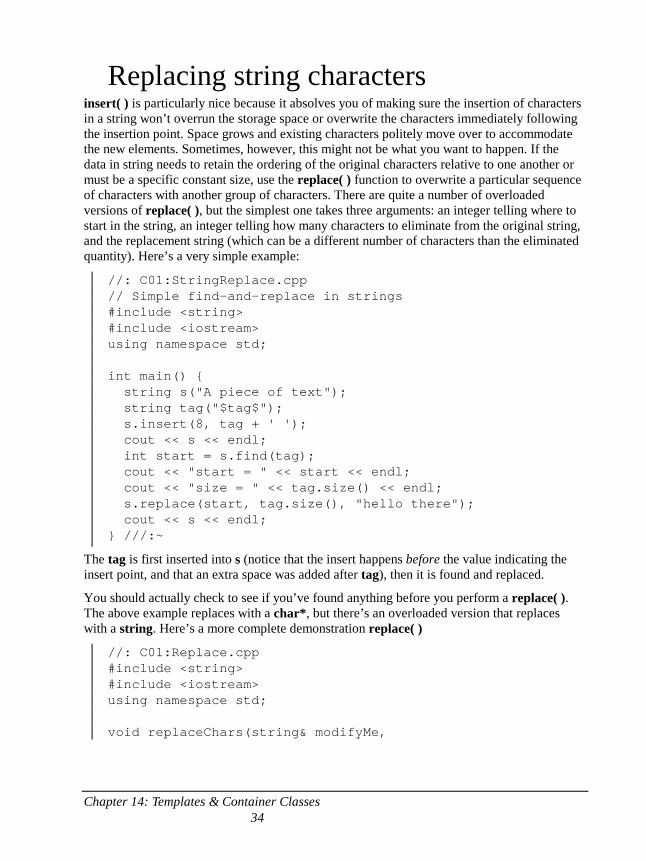
Replacing string characters insert( ) is particularly nice because it absolves you of making sure the insertion of characters in a string won’t overrun the storage space or overwrite the characters immediately following the insertion point. Space grows and existing characters politely move over to accommodate the new elements. Sometimes, however, this might not be what you want to happen. If the data in string needs to retain the ordering of the original characters relative to one another or must be a specific constant size, use the replace( ) function to overwrite a particular sequence of characters with another group of characters. There are quite a number of overloaded versions of replace( ), but the simplest one takes three arguments: an integer telling where to start in the string, an integer telling how many characters to eliminate from the original string, and the replacement string (which can be a different number of characters than the eliminated quantity). Here’s a very simple example:
//: C01:StringReplace.cpp // Simple find-and-replace in strings #include <string> #include <iostream> using namespace std; int main() { string s("A piece of text"); string tag("$tag$"); s.insert(8, tag + ' '); cout << s << endl; int start = s.find(tag); cout << "start = " << start << endl; cout << "size = " << tag.size() << endl; s.replace(start, tag.size(), "hello there"); cout << s << endl; } ///:~
The tag is first inserted into s (notice that the insert happens before the value indicating the insert point, and that an extra space was added after tag), then it is found and replaced.
You should actually check to see if you’ve found anything before you perform a replace( ). The above example replaces with a char*, but there’s an overloaded version that replaces with a string. Here’s a more complete demonstration replace( )
//: C01:Replace.cpp #include <string> #include <iostream> using namespace std; void replaceChars(string& modifyMe,
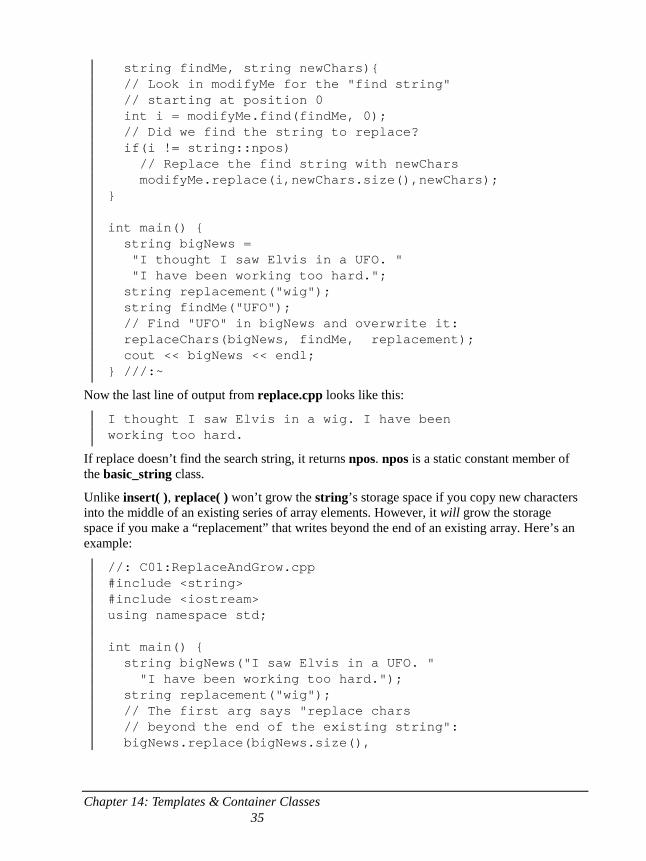
Chapter 14: Templates & Container Classes 35
string findMe, string newChars){ // Look in modifyMe for the "find string" // starting at position 0 int i = modifyMe.find(findMe, 0); // Did we find the string to replace? if(i != string::npos) // Replace the find string with newChars modifyMe.replace(i,newChars.size(),newChars); } int main() { string bigNews = "I thought I saw Elvis in a UFO. " "I have been working too hard."; string replacement("wig"); string findMe("UFO"); // Find "UFO" in bigNews and overwrite it: replaceChars(bigNews, findMe, replacement); cout << bigNews << endl; } ///:~
Now the last line of output from replace.cpp looks like this:
I thought I saw Elvis in a wig. I have been working too hard.
If replace doesn’t find the search string, it returns npos. npos is a static constant member of the basic_string class.
Unlike insert( ), replace( ) won’t grow the string’s storage space if you copy new characters into the middle of an existing series of array elements. However, it will grow the storage space if you make a “replacement” that writes beyond the end of an existing array. Here’s an example:
//: C01:ReplaceAndGrow.cpp #include <string> #include <iostream> using namespace std; int main() { string bigNews("I saw Elvis in a UFO. " "I have been working too hard."); string replacement("wig"); // The first arg says "replace chars // beyond the end of the existing string": bigNews.replace(bigNews.size(),
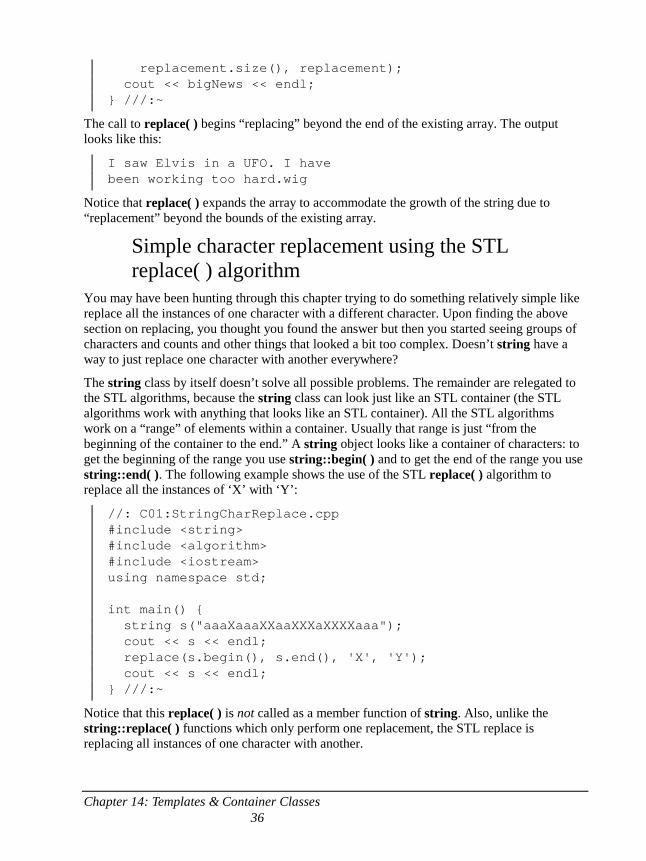
Chapter 14: Templates & Container Classes 36
replacement.size(), replacement); cout << bigNews << endl; } ///:~
The call to replace( ) begins “replacing” beyond the end of the existing array. The output looks like this:
I saw Elvis in a UFO. I have been working too hard.wig
Notice that replace( ) expands the array to accommodate the growth of the string due to “replacement” beyond the bounds of the existing array.
Simple character replacement using the STL replace( ) algorithm
You may have been hunting through this chapter trying to do something relatively simple like replace all the instances of one character with a different character. Upon finding the above section on replacing, you thought you found the answer but then you started seeing groups of characters and counts and other things that looked a bit too complex. Doesn’t string have a way to just replace one character with another everywhere?
The string class by itself doesn’t solve all possible problems. The remainder are relegated to the STL algorithms, because the string class can look just like an STL container (the STL algorithms work with anything that looks like an STL container). All the STL algorithms work on a “range” of elements within a container. Usually that range is just “from the beginning of the container to the end.” A string object looks like a container of characters: to get the beginning of the range you use string::begin( ) and to get the end of the range you use string::end( ). The following example shows the use of the STL replace( ) algorithm to replace all the instances of ‘X’ with ‘Y’:
//: C01:StringCharReplace.cpp #include <string> #include <algorithm> #include <iostream> using namespace std; int main() { string s("aaaXaaaXXaaXXXaXXXXaaa"); cout << s << endl; replace(s.begin(), s.end(), 'X', 'Y'); cout << s << endl; } ///:~
Notice that this replace( ) is not called as a member function of string. Also, unlike the string::replace( ) functions which only perform one replacement, the STL replace is replacing all instances of one character with another.
Chapter 14: Templates & Container Classes 37
The STL replace( ) algorithm only works with single objects (in this case, char objects), and will not perform replacements of quoted char arrays or of string objects.
Since a string looks like an STL container, there are a number of other STL algorithms that can be applied to it, which may solve other problems you have that are not directly addressed by the string member functions. See Chapter XX for more information on the STL algorithms.
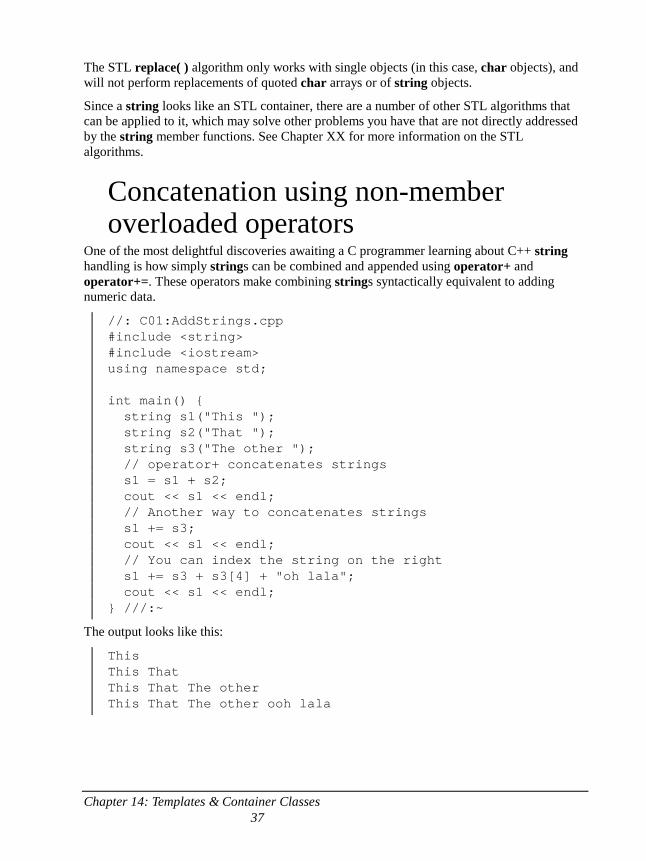
Concatenation using non-member overloaded operators
One of the most delightful discoveries awaiting a C programmer learning about C++ string handling is how simply strings can be combined and appended using operator+ and operator+=. These operators make combining strings syntactically equivalent to adding numeric data.
//: C01:AddStrings.cpp #include <string> #include <iostream> using namespace std; int main() { string s1("This "); string s2("That "); string s3("The other "); // operator+ concatenates strings s1 = s1 + s2; cout << s1 << endl; // Another way to concatenates strings s1 += s3; cout << s1 << endl; // You can index the string on the right s1 += s3 + s3[4] + "oh lala"; cout << s1 << endl; } ///:~
The output looks like this:
This This That This That The other This That The other ooh lala
Chapter 14: Templates & Container Classes 38
operator+ and operator+= are a very flexible and convenient means of combining string data. On the right hand side of the statement, you can use almost any type that evaluates to a group of one or more characters.
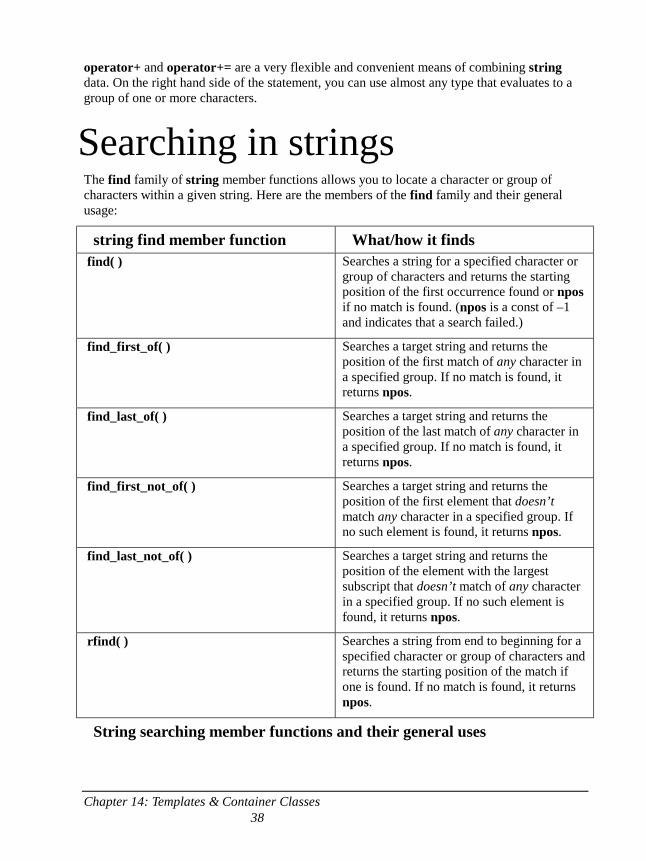
Searching in strings The find family of string member functions allows you to locate a character or group of characters within a given string. Here are the members of the find family and their general usage:
string find member function What/how it finds find( ) Searches a string for a specified character or
group of characters and returns the starting position of the first occurrence found or npos if no match is found. (npos is a const of –1 and indicates that a search failed.)
find_first_of( ) Searches a target string and returns the position of the first match of any character in a specified group. If no match is found, it returns npos.
find_last_of( ) Searches a target string and returns the position of the last match of any character in a specified group. If no match is found, it returns npos.
find_first_not_of( ) Searches a target string and returns the position of the first element that doesn’t match any character in a specified group. If no such element is found, it returns npos.
find_last_not_of( ) Searches a target string and returns the position of the element with the largest subscript that doesn’t match of any character in a specified group. If no such element is found, it returns npos.
rfind( ) Searches a string from end to beginning for a specified character or group of characters and returns the starting position of the match if one is found. If no match is found, it returns npos.
String searching member functions and their general uses
Chapter 14: Templates & Container Classes 39
The simplest use of find( ) searches for one or more characters in a string. This overloaded version of find( ) takes a parameter that specifies the character(s) for which to search, and optionally one that tells it where in the string to begin searching for the occurrence of a substring. (The default position at which to begin searching is 0.) By setting the call to find inside a loop, you can easily move through a string, repeating a search in order to find all of the occurrences of a given character or group of characters within the string.
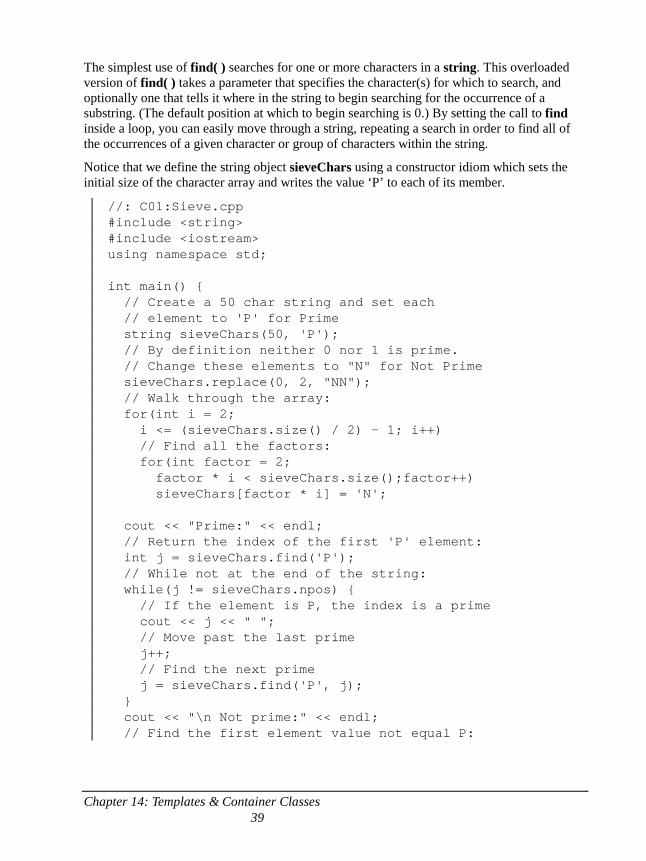
Notice that we define the string object sieveChars using a constructor idiom which sets the initial size of the character array and writes the value ‘P’ to each of its member.
//: C01:Sieve.cpp #include <string> #include <iostream> using namespace std; int main() { // Create a 50 char string and set each // element to 'P' for Prime string sieveChars(50, 'P'); // By definition neither 0 nor 1 is prime. // Change these elements to "N" for Not Prime sieveChars.replace(0, 2, "NN"); // Walk through the array: for(int i = 2; i <= (sieveChars.size() / 2) - 1; i++) // Find all the factors: for(int factor = 2; factor * i < sieveChars.size();factor++) sieveChars[factor * i] = 'N'; cout << "Prime:" << endl; // Return the index of the first 'P' element: int j = sieveChars.find('P'); // While not at the end of the string: while(j != sieveChars.npos) { // If the element is P, the index is a prime cout << j << " "; // Move past the last prime j++; // Find the next prime j = sieveChars.find('P', j); } cout << "\n Not prime:" << endl; // Find the first element value not equal P:
Chapter 14: Templates & Container Classes 40
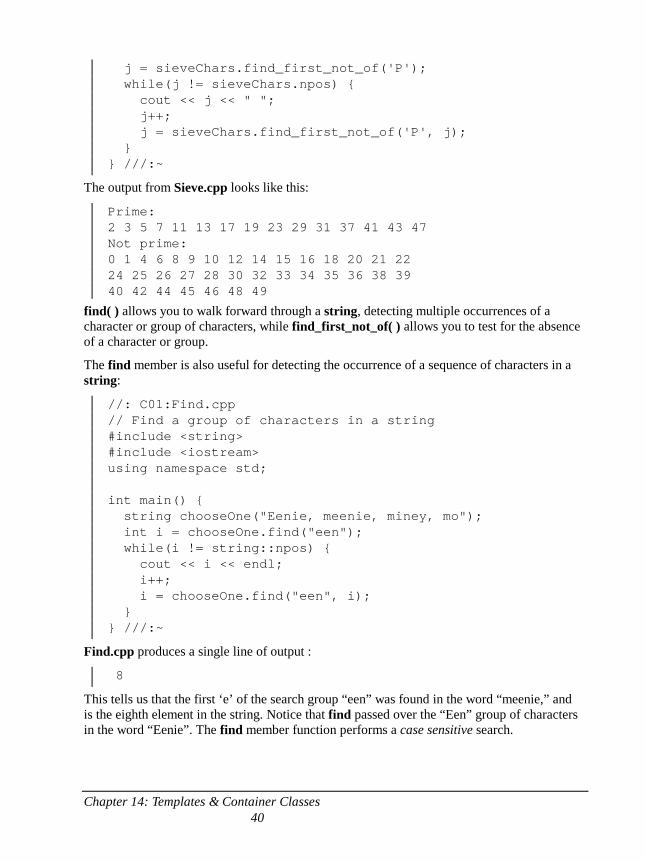
j = sieveChars.find_first_not_of('P'); while(j != sieveChars.npos) { cout << j << " "; j++; j = sieveChars.find_first_not_of('P', j); } } ///:~
The output from Sieve.cpp looks like this:
Prime: 2 3 5 7 11 13 17 19 23 29 31 37 41 43 47 Not prime: 0 1 4 6 8 9 10 12 14 15 16 18 20 21 22 24 25 26 27 28 30 32 33 34 35 36 38 39 40 42 44 45 46 48 49
find( ) allows you to walk forward through a string, detecting multiple occurrences of a character or group of characters, while find_first_not_of( ) allows you to test for the absence of a character or group.
The find member is also useful for detecting the occurrence of a sequence of characters in a string:
//: C01:Find.cpp // Find a group of characters in a string #include <string> #include <iostream> using namespace std; int main() { string chooseOne("Eenie, meenie, miney, mo"); int i = chooseOne.find("een"); while(i != string::npos) { cout << i << endl; i++; i = chooseOne.find("een", i); } } ///:~
Find.cpp produces a single line of output :
8
This tells us that the first ‘e’ of the search group “een” was found in the word “meenie,” and is the eighth element in the string. Notice that find passed over the “Een” group of characters in the word “Eenie”. The find member function performs a case sensitive search.
Chapter 14: Templates & Container Classes 41
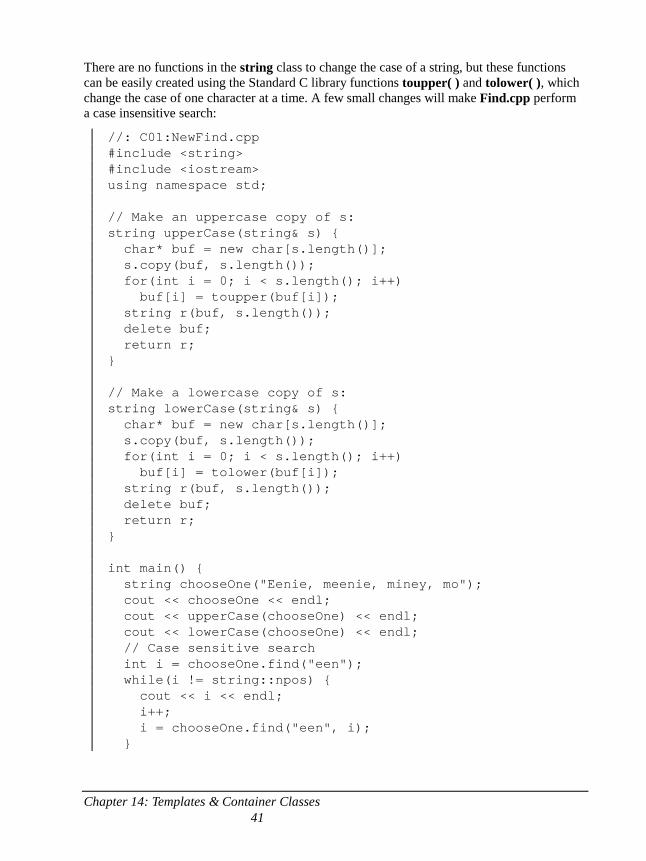
There are no functions in the string class to change the case of a string, but these functions can be easily created using the Standard C library functions toupper( ) and tolower( ), which change the case of one character at a time. A few small changes will make Find.cpp perform a case insensitive search:
//: C01:NewFind.cpp #include <string> #include <iostream> using namespace std; // Make an uppercase copy of s: string upperCase(string& s) { char* buf = new char[s.length()]; s.copy(buf, s.length()); for(int i = 0; i < s.length(); i++) buf[i] = toupper(buf[i]); string r(buf, s.length()); delete buf; return r; } // Make a lowercase copy of s: string lowerCase(string& s) { char* buf = new char[s.length()]; s.copy(buf, s.length()); for(int i = 0; i < s.length(); i++) buf[i] = tolower(buf[i]); string r(buf, s.length()); delete buf; return r; } int main() { string chooseOne("Eenie, meenie, miney, mo"); cout << chooseOne << endl; cout << upperCase(chooseOne) << endl; cout << lowerCase(chooseOne) << endl; // Case sensitive search int i = chooseOne.find("een"); while(i != string::npos) { cout << i << endl; i++; i = chooseOne.find("een", i); }
Chapter 14: Templates & Container Classes 42
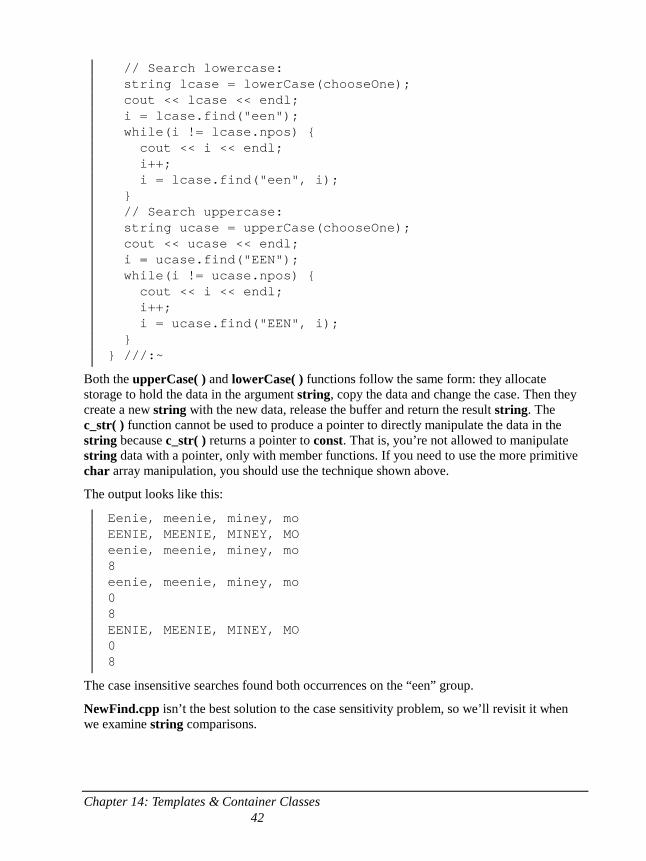
// Search lowercase: string lcase = lowerCase(chooseOne); cout << lcase << endl; i = lcase.find("een"); while(i != lcase.npos) { cout << i << endl; i++; i = lcase.find("een", i); } // Search uppercase: string ucase = upperCase(chooseOne); cout << ucase << endl; i = ucase.find("EEN"); while(i != ucase.npos) { cout << i << endl; i++; i = ucase.find("EEN", i); } } ///:~
Both the upperCase( ) and lowerCase( ) functions follow the same form: they allocate storage to hold the data in the argument string, copy the data and change the case. Then they create a new string with the new data, release the buffer and return the result string. The c_str( ) function cannot be used to produce a pointer to directly manipulate the data in the string because c_str( ) returns a pointer to const. That is, you’re not allowed to manipulate string data with a pointer, only with member functions. If you need to use the more primitive char array manipulation, you should use the technique shown above.
The output looks like this:
Eenie, meenie, miney, mo EENIE, MEENIE, MINEY, MO eenie, meenie, miney, mo 8 eenie, meenie, miney, mo 0 8 EENIE, MEENIE, MINEY, MO 0 8
The case insensitive searches found both occurrences on the “een” group.
NewFind.cpp isn’t the best solution to the case sensitivity problem, so we’ll revisit it when we examine string comparisons.
Chapter 14: Templates & Container Classes 43
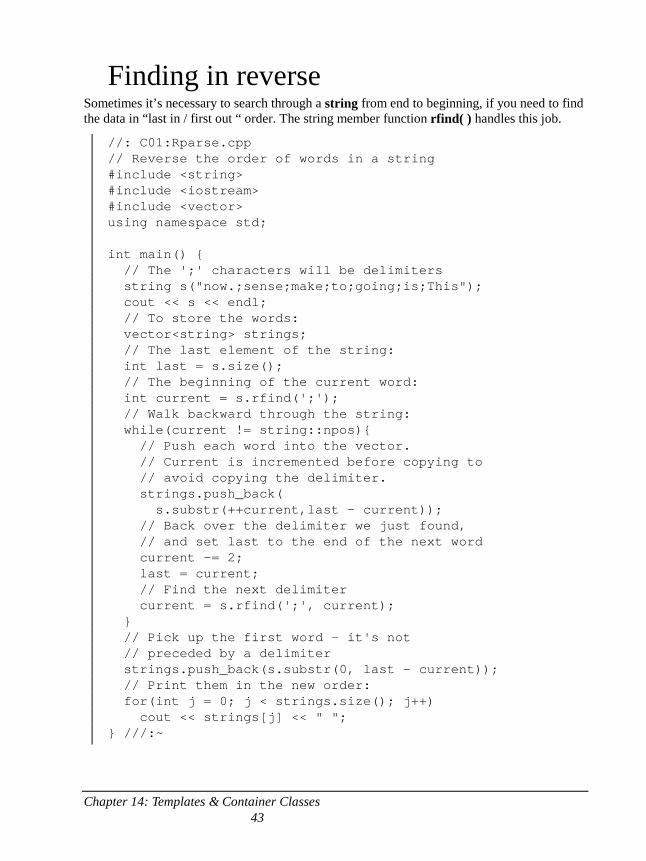
Finding in reverse Sometimes it’s necessary to search through a string from end to beginning, if you need to find the data in “last in / first out “ order. The string member function rfind( ) handles this job.
//: C01:Rparse.cpp // Reverse the order of words in a string #include <string> #include <iostream> #include <vector> using namespace std; int main() { // The ';' characters will be delimiters string s("now.;sense;make;to;going;is;This"); cout << s << endl; // To store the words: vector<string> strings; // The last element of the string: int last = s.size(); // The beginning of the current word: int current = s.rfind(';'); // Walk backward through the string: while(current != string::npos){ // Push each word into the vector. // Current is incremented before copying to // avoid copying the delimiter. strings.push_back( s.substr(++current,last - current)); // Back over the delimiter we just found, // and set last to the end of the next word current -= 2; last = current; // Find the next delimiter current = s.rfind(';', current); } // Pick up the first word - it's not // preceded by a delimiter strings.push_back(s.substr(0, last - current)); // Print them in the new order: for(int j = 0; j < strings.size(); j++) cout << strings[j] << " "; } ///:~
Chapter 14: Templates & Container Classes 44
Here’s how the output from Rparse.cpp looks:
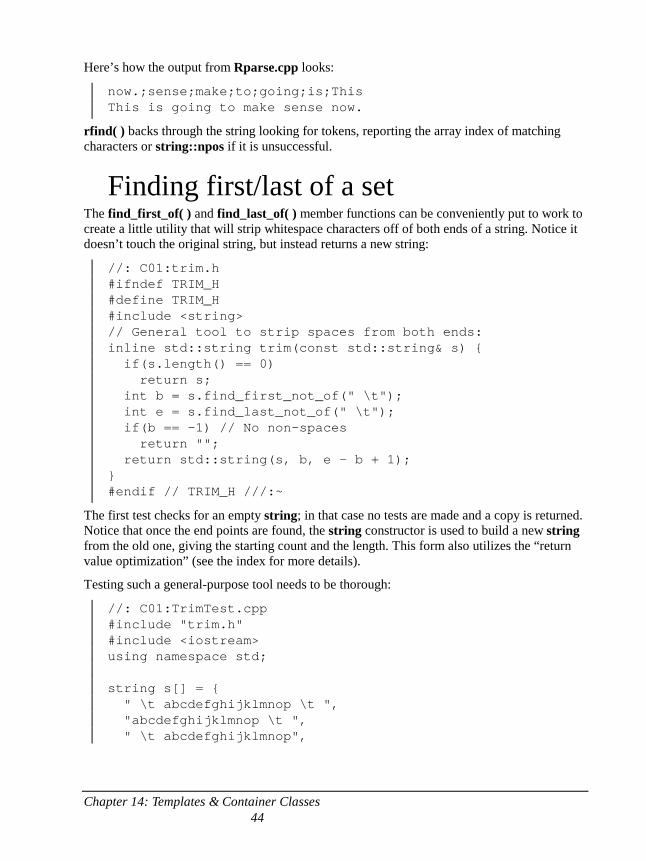
now.;sense;make;to;going;is;This This is going to make sense now.
rfind( ) backs through the string looking for tokens, reporting the array index of matching characters or string::npos if it is unsuccessful.
Finding first/last of a set The find_first_of( ) and find_last_of( ) member functions can be conveniently put to work to create a little utility that will strip whitespace characters off of both ends of a string. Notice it doesn’t touch the original string, but instead returns a new string:
//: C01:trim.h #ifndef TRIM_H #define TRIM_H #include <string> // General tool to strip spaces from both ends: inline std::string trim(const std::string& s) { if(s.length() == 0) return s; int b = s.find_first_not_of(" \t"); int e = s.find_last_not_of(" \t"); if(b == -1) // No non-spaces return ""; return std::string(s, b, e - b + 1); } #endif // TRIM_H ///:~
The first test checks for an empty string; in that case no tests are made and a copy is returned. Notice that once the end points are found, the string constructor is used to build a new string from the old one, giving the starting count and the length. This form also utilizes the “return value optimization” (see the index for more details).
Testing such a general-purpose tool needs to be thorough:
//: C01:TrimTest.cpp #include "trim.h" #include <iostream> using namespace std; string s[] = { " \t abcdefghijklmnop \t ", "abcdefghijklmnop \t ", " \t abcdefghijklmnop",
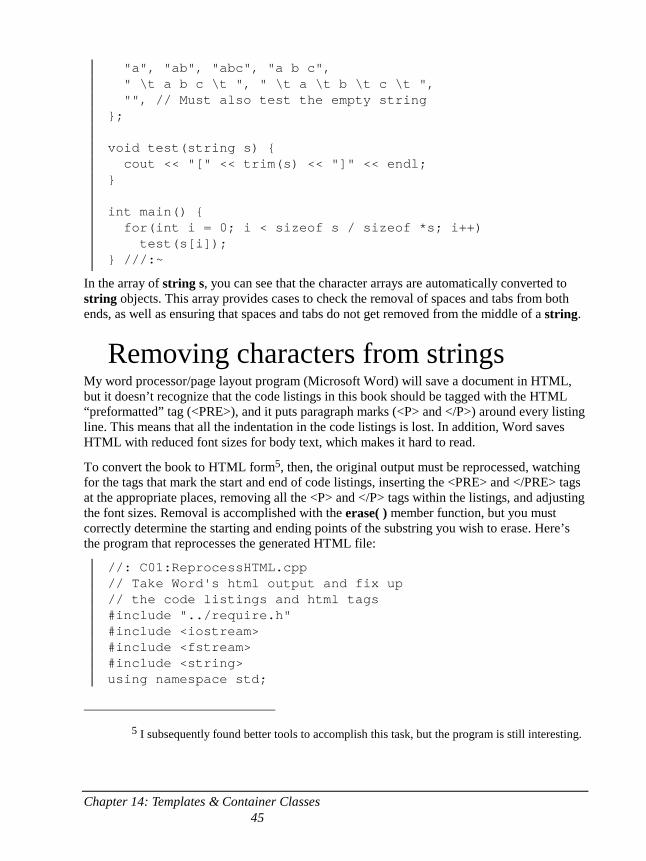
Chapter 14: Templates & Container Classes 45
"a", "ab", "abc", "a b c", " \t a b c \t ", " \t a \t b \t c \t ", "", // Must also test the empty string }; void test(string s) { cout << "[" << trim(s) << "]" << endl; } int main() { for(int i = 0; i < sizeof s / sizeof *s; i++) test(s[i]); } ///:~
In the array of string s, you can see that the character arrays are automatically converted to string objects. This array provides cases to check the removal of spaces and tabs from both ends, as well as ensuring that spaces and tabs do not get removed from the middle of a string.
Removing characters from strings My word processor/page layout program (Microsoft Word) will save a document in HTML, but it doesn’t recognize that the code listings in this book should be tagged with the HTML “preformatted” tag (<PRE>), and it puts paragraph marks (<P> and </P>) around every listing line. This means that all the indentation in the code listings is lost. In addition, Word saves HTML with reduced font sizes for body text, which makes it hard to read.
To convert the book to HTML form5, then, the original output must be reprocessed, watching for the tags that mark the start and end of code listings, inserting the <PRE> and </PRE> tags at the appropriate places, removing all the <P> and </P> tags within the listings, and adjusting the font sizes. Removal is accomplished with the erase( ) member function, but you must correctly determine the starting and ending points of the substring you wish to erase. Here’s the program that reprocesses the generated HTML file:
//: C01:ReprocessHTML.cpp // Take Word's html output and fix up // the code listings and html tags #include "../require.h" #include <iostream> #include <fstream> #include <string> using namespace std;
5 I subsequently found better tools to accomplish this task, but the program is still interesting.
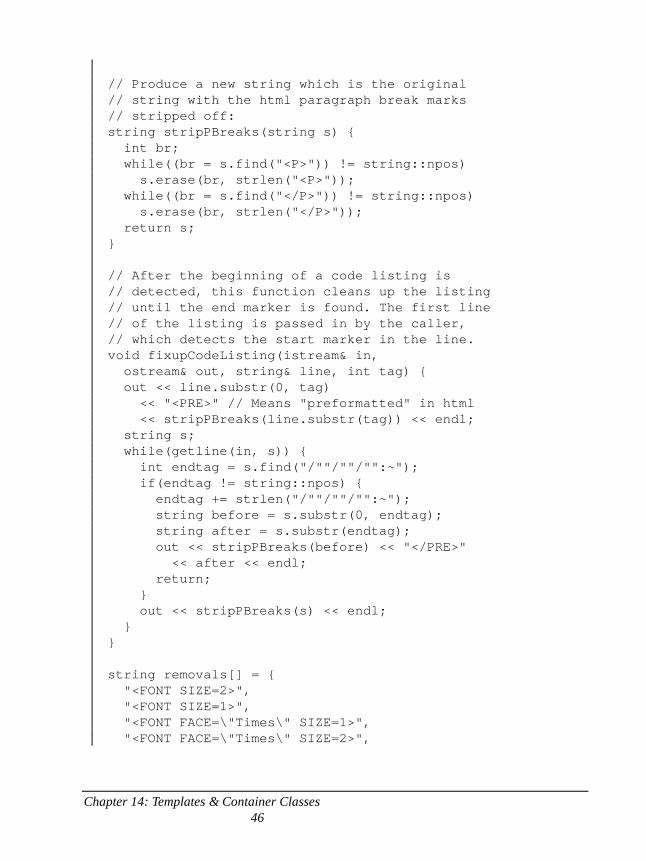
Chapter 14: Templates & Container Classes 46
// Produce a new string which is the original // string with the html paragraph break marks // stripped off: string stripPBreaks(string s) { int br; while((br = s.find("<P>")) != string::npos) s.erase(br, strlen("<P>")); while((br = s.find("</P>")) != string::npos) s.erase(br, strlen("</P>")); return s; } // After the beginning of a code listing is // detected, this function cleans up the listing // until the end marker is found. The first line // of the listing is passed in by the caller, // which detects the start marker in the line. void fixupCodeListing(istream& in, ostream& out, string& line, int tag) { out << line.substr(0, tag) << "<PRE>" // Means "preformatted" in html << stripPBreaks(line.substr(tag)) << endl; string s; while(getline(in, s)) { int endtag = s.find("/""/""/"":~"); if(endtag != string::npos) { endtag += strlen("/""/""/"":~"); string before = s.substr(0, endtag); string after = s.substr(endtag); out << stripPBreaks(before) << "</PRE>" << after << endl; return; } out << stripPBreaks(s) << endl; } } string removals[] = { "<FONT SIZE=2>", "<FONT SIZE=1>", "<FONT FACE=\"Times\" SIZE=1>", "<FONT FACE=\"Times\" SIZE=2>",
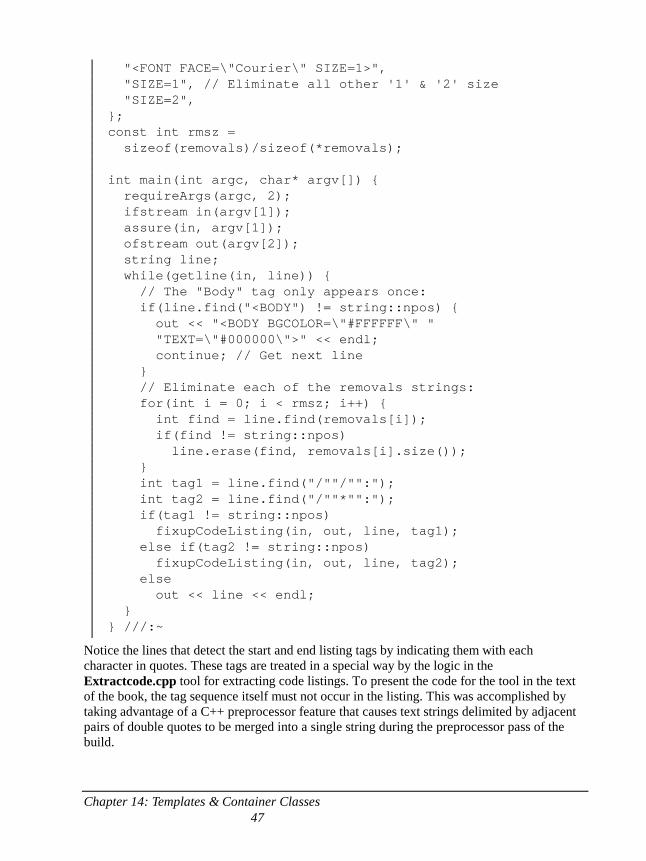
Chapter 14: Templates & Container Classes 47
"<FONT FACE=\"Courier\" SIZE=1>", "SIZE=1", // Eliminate all other '1' & '2' size "SIZE=2", }; const int rmsz = sizeof(removals)/sizeof(*removals); int main(int argc, char* argv[]) { requireArgs(argc, 2); ifstream in(argv[1]); assure(in, argv[1]); ofstream out(argv[2]); string line; while(getline(in, line)) { // The "Body" tag only appears once: if(line.find("<BODY") != string::npos) { out << "<BODY BGCOLOR=\"#FFFFFF\" " "TEXT=\"#000000\">" << endl; continue; // Get next line } // Eliminate each of the removals strings: for(int i = 0; i < rmsz; i++) { int find = line.find(removals[i]); if(find != string::npos) line.erase(find, removals[i].size()); } int tag1 = line.find("/""/"":"); int tag2 = line.find("/""*"":"); if(tag1 != string::npos) fixupCodeListing(in, out, line, tag1); else if(tag2 != string::npos) fixupCodeListing(in, out, line, tag2); else out << line << endl; } } ///:~
Notice the lines that detect the start and end listing tags by indicating them with each character in quotes. These tags are treated in a special way by the logic in the Extractcode.cpp tool for extracting code listings. To present the code for the tool in the text of the book, the tag sequence itself must not occur in the listing. This was accomplished by taking advantage of a C++ preprocessor feature that causes text strings delimited by adjacent pairs of double quotes to be merged into a single string during the preprocessor pass of the build.

Chapter 14: Templates & Container Classes 48
int tag1 = line.find("/""/"":");
The effect of the sequence of char arrays is to produce the starting tag for code listings.
Stripping HTML tags Sometimes it’s useful to take an HTML file and strip its tags so you have something approximating the text that would be displayed in the Web browser, only as an ASCII text file. The string class once again comes in handy. The following has some variation on the theme of the previous example:
//: C01:HTMLStripper.cpp // Filter to remove html tags and markers #include "../require.h" #include <fstream> #include <iostream> #include <string> using namespace std; string replaceAll(string s, string f, string r) { unsigned int found = s.find(f); while(found != string::npos) { s.replace(found, f.length(), r); found = s.find(f); } return s; } string stripHTMLTags(string s) { while(true) { unsigned int left = s.find('<'); unsigned int right = s.find('>'); if(left==string::npos || right==string::npos) break; s = s.erase(left, right - left + 1); } s = replaceAll(s, "<", "<"); s = replaceAll(s, ">", ">"); s = replaceAll(s, "&", "&"); s = replaceAll(s, " ", " "); // Etc... return s; } int main(int argc, char* argv[]) {
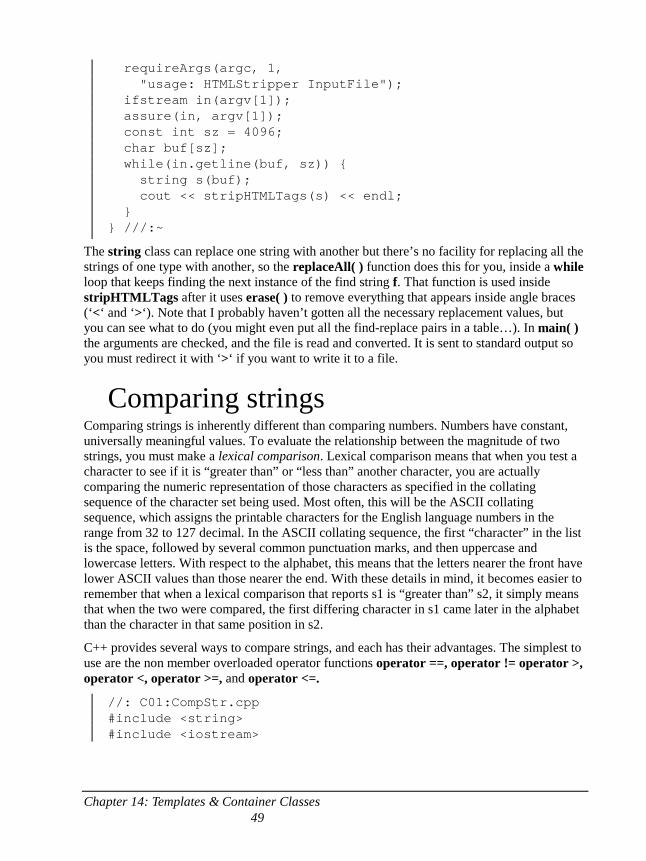
Chapter 14: Templates & Container Classes 49
requireArgs(argc, 1, "usage: HTMLStripper InputFile"); ifstream in(argv[1]); assure(in, argv[1]); const int sz = 4096; char buf[sz]; while(in.getline(buf, sz)) { string s(buf); cout << stripHTMLTags(s) << endl; } } ///:~
The string class can replace one string with another but there’s no facility for replacing all the strings of one type with another, so the replaceAll( ) function does this for you, inside a while loop that keeps finding the next instance of the find string f. That function is used inside stripHTMLTags after it uses erase( ) to remove everything that appears inside angle braces (‘<‘ and ‘>‘). Note that I probably haven’t gotten all the necessary replacement values, but you can see what to do (you might even put all the find-replace pairs in a table…). In main( ) the arguments are checked, and the file is read and converted. It is sent to standard output so you must redirect it with ‘>‘ if you want to write it to a file.
Comparing strings Comparing strings is inherently different than comparing numbers. Numbers have constant, universally meaningful values. To evaluate the relationship between the magnitude of two strings, you must make a lexical comparison. Lexical comparison means that when you test a character to see if it is “greater than” or “less than” another character, you are actually comparing the numeric representation of those characters as specified in the collating sequence of the character set being used. Most often, this will be the ASCII collating sequence, which assigns the printable characters for the English language numbers in the range from 32 to 127 decimal. In the ASCII collating sequence, the first “character” in the list is the space, followed by several common punctuation marks, and then uppercase and lowercase letters. With respect to the alphabet, this means that the letters nearer the front have lower ASCII values than those nearer the end. With these details in mind, it becomes easier to remember that when a lexical comparison that reports s1 is “greater than” s2, it simply means that when the two were compared, the first differing character in s1 came later in the alphabet than the character in that same position in s2.
C++ provides several ways to compare strings, and each has their advantages. The simplest to use are the non member overloaded operator functions operator ==, operator != operator >, operator <, operator >=, and operator <=.
//: C01:CompStr.cpp #include <string> #include <iostream>
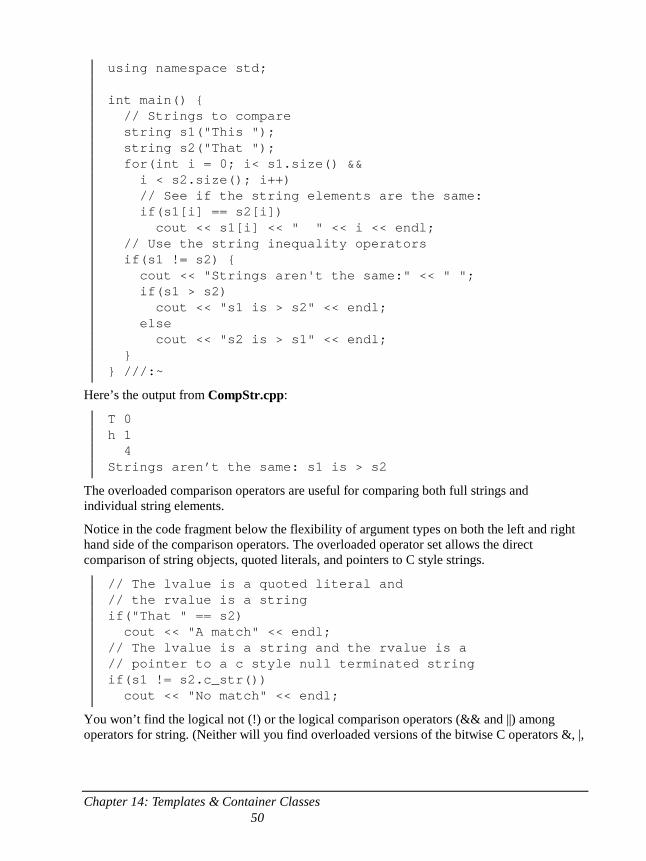
Chapter 14: Templates & Container Classes 50
using namespace std; int main() { // Strings to compare string s1("This "); string s2("That "); for(int i = 0; i< s1.size() && i < s2.size(); i++) // See if the string elements are the same: if(s1[i] == s2[i]) cout << s1[i] << " " << i << endl; // Use the string inequality operators if(s1 != s2) { cout << "Strings aren't the same:" << " "; if(s1 > s2) cout << "s1 is > s2" << endl; else cout << "s2 is > s1" << endl; } } ///:~
Here’s the output from CompStr.cpp:
T 0 h 1 4 Strings aren’t the same: s1 is > s2
The overloaded comparison operators are useful for comparing both full strings and individual string elements.
Notice in the code fragment below the flexibility of argument types on both the left and right hand side of the comparison operators. The overloaded operator set allows the direct comparison of string objects, quoted literals, and pointers to C style strings.
// The lvalue is a quoted literal and // the rvalue is a string if("That " == s2) cout << "A match" << endl; // The lvalue is a string and the rvalue is a // pointer to a c style null terminated string if(s1 != s2.c_str()) cout << "No match" << endl;
You won’t find the logical not (!) or the logical comparison operators (&& and ||) among operators for string. (Neither will you find overloaded versions of the bitwise C operators &, |,
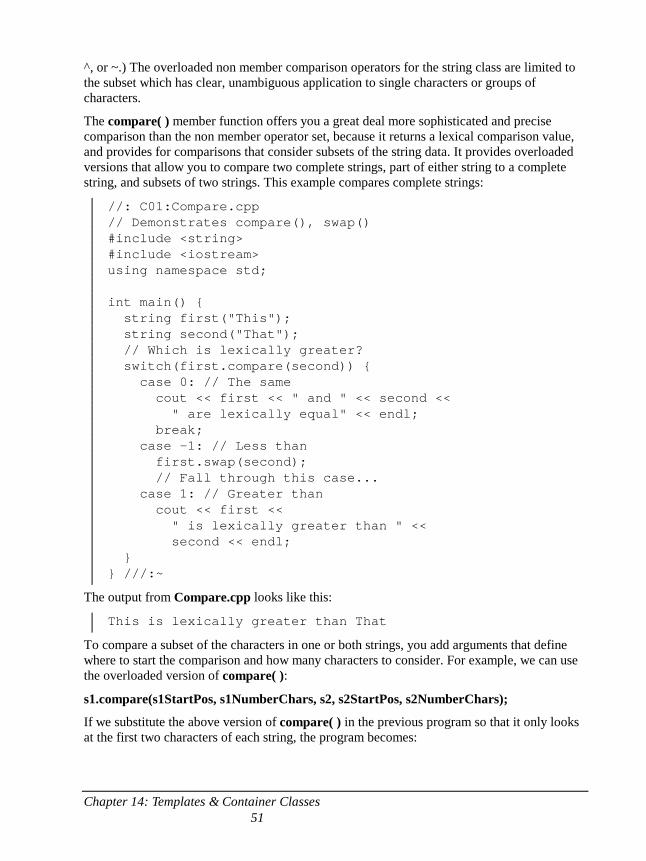
Chapter 14: Templates & Container Classes 51
^, or ~.) The overloaded non member comparison operators for the string class are limited to the subset which has clear, unambiguous application to single characters or groups of characters.
The compare( ) member function offers you a great deal more sophisticated and precise comparison than the non member operator set, because it returns a lexical comparison value, and provides for comparisons that consider subsets of the string data. It provides overloaded versions that allow you to compare two complete strings, part of either string to a complete string, and subsets of two strings. This example compares complete strings:
//: C01:Compare.cpp // Demonstrates compare(), swap() #include <string> #include <iostream> using namespace std; int main() { string first("This"); string second("That"); // Which is lexically greater? switch(first.compare(second)) { case 0: // The same cout << first << " and " << second << " are lexically equal" << endl; break; case -1: // Less than first.swap(second); // Fall through this case... case 1: // Greater than cout << first << " is lexically greater than " << second << endl; } } ///:~
The output from Compare.cpp looks like this:
This is lexically greater than That
To compare a subset of the characters in one or both strings, you add arguments that define where to start the comparison and how many characters to consider. For example, we can use the overloaded version of compare( ):
s1.compare(s1StartPos, s1NumberChars, s2, s2StartPos, s2NumberChars);
If we substitute the above version of compare( ) in the previous program so that it only looks at the first two characters of each string, the program becomes:
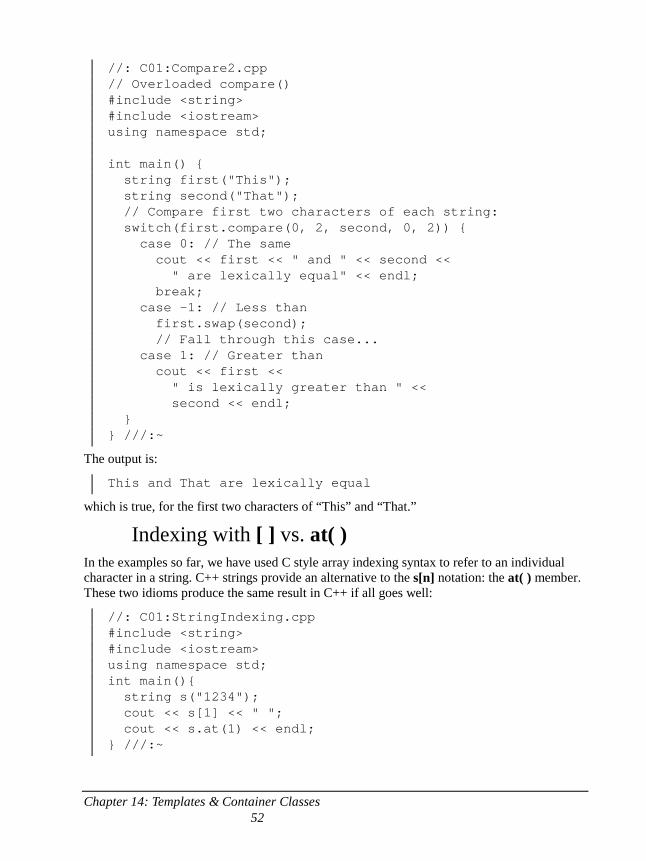
Chapter 14: Templates & Container Classes 52
//: C01:Compare2.cpp // Overloaded compare() #include <string> #include <iostream> using namespace std; int main() { string first("This"); string second("That"); // Compare first two characters of each string: switch(first.compare(0, 2, second, 0, 2)) { case 0: // The same cout << first << " and " << second << " are lexically equal" << endl; break; case -1: // Less than first.swap(second); // Fall through this case... case 1: // Greater than cout << first << " is lexically greater than " << second << endl; } } ///:~
The output is:
This and That are lexically equal
which is true, for the first two characters of “This” and “That.”
Indexing with [ ] vs. at( ) In the examples so far, we have used C style array indexing syntax to refer to an individual character in a string. C++ strings provide an alternative to the s[n] notation: the at( ) member. These two idioms produce the same result in C++ if all goes well:
//: C01:StringIndexing.cpp #include <string> #include <iostream> using namespace std; int main(){ string s("1234"); cout << s[1] << " "; cout << s.at(1) << endl; } ///:~
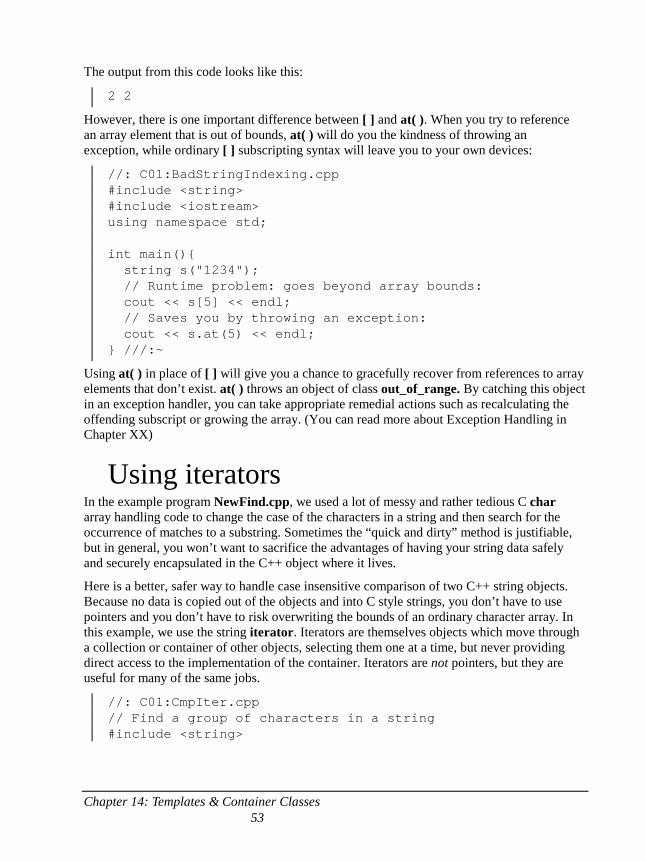
Chapter 14: Templates & Container Classes 53
The output from this code looks like this:
2 2
However, there is one important difference between [ ] and at( ). When you try to reference an array element that is out of bounds, at( ) will do you the kindness of throwing an exception, while ordinary [ ] subscripting syntax will leave you to your own devices:
//: C01:BadStringIndexing.cpp #include <string> #include <iostream> using namespace std; int main(){ string s("1234"); // Runtime problem: goes beyond array bounds: cout << s[5] << endl; // Saves you by throwing an exception: cout << s.at(5) << endl; } ///:~
Using at( ) in place of [ ] will give you a chance to gracefully recover from references to array elements that don’t exist. at( ) throws an object of class out_of_range. By catching this object in an exception handler, you can take appropriate remedial actions such as recalculating the offending subscript or growing the array. (You can read more about Exception Handling in Chapter XX)
Using iterators In the example program NewFind.cpp, we used a lot of messy and rather tedious C char array handling code to change the case of the characters in a string and then search for the occurrence of matches to a substring. Sometimes the “quick and dirty” method is justifiable, but in general, you won’t want to sacrifice the advantages of having your string data safely and securely encapsulated in the C++ object where it lives.
Here is a better, safer way to handle case insensitive comparison of two C++ string objects. Because no data is copied out of the objects and into C style strings, you don’t have to use pointers and you don’t have to risk overwriting the bounds of an ordinary character array. In this example, we use the string iterator. Iterators are themselves objects which move through a collection or container of other objects, selecting them one at a time, but never providing direct access to the implementation of the container. Iterators are not pointers, but they are useful for many of the same jobs.
//: C01:CmpIter.cpp // Find a group of characters in a string #include <string>
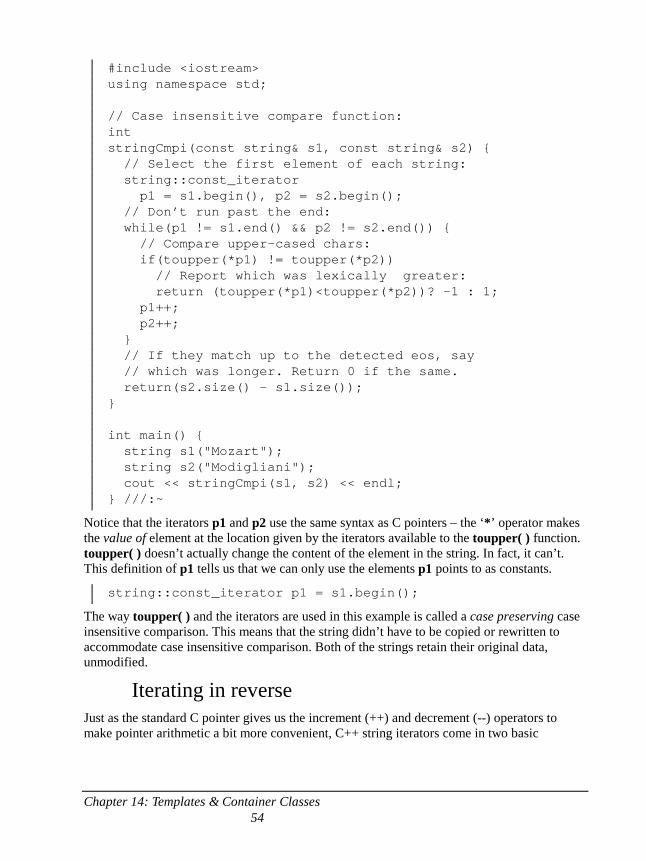
Chapter 14: Templates & Container Classes 54
#include <iostream> using namespace std; // Case insensitive compare function: int stringCmpi(const string& s1, const string& s2) { // Select the first element of each string: string::const_iterator p1 = s1.begin(), p2 = s2.begin(); // Don’t run past the end: while(p1 != s1.end() && p2 != s2.end()) { // Compare upper-cased chars: if(toupper(*p1) != toupper(*p2)) // Report which was lexically greater: return (toupper(*p1)<toupper(*p2))? -1 : 1; p1++; p2++; } // If they match up to the detected eos, say // which was longer. Return 0 if the same. return(s2.size() - s1.size()); } int main() { string s1("Mozart"); string s2("Modigliani"); cout << stringCmpi(s1, s2) << endl; } ///:~
Notice that the iterators p1 and p2 use the same syntax as C pointers – the ‘*’ operator makes the value of element at the location given by the iterators available to the toupper( ) function. toupper( ) doesn’t actually change the content of the element in the string. In fact, it can’t. This definition of p1 tells us that we can only use the elements p1 points to as constants.
string::const_iterator p1 = s1.begin();
The way toupper( ) and the iterators are used in this example is called a case preserving case insensitive comparison. This means that the string didn’t have to be copied or rewritten to accommodate case insensitive comparison. Both of the strings retain their original data, unmodified.
Iterating in reverse Just as the standard C pointer gives us the increment (++) and decrement (--) operators to make pointer arithmetic a bit more convenient, C++ string iterators come in two basic
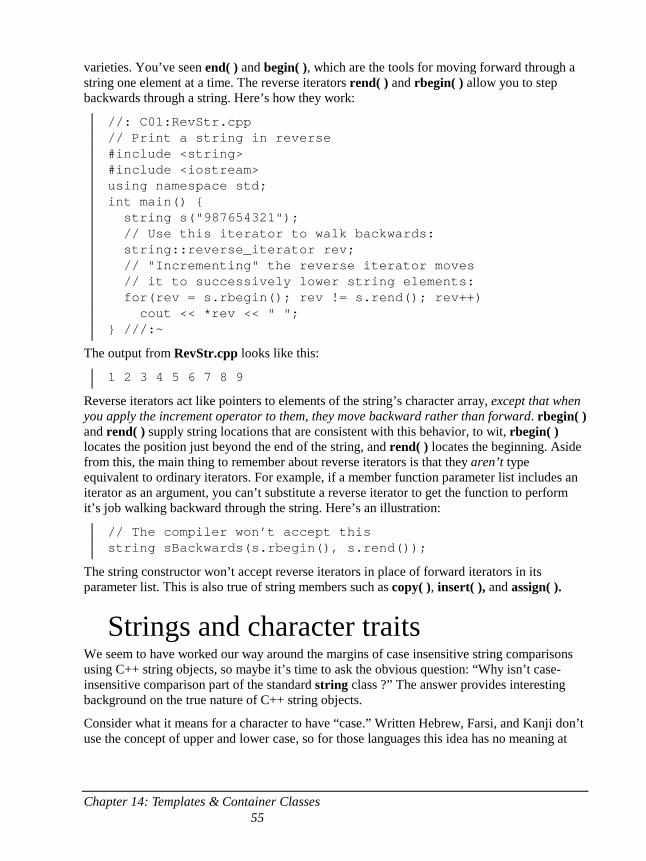
Chapter 14: Templates & Container Classes 55
varieties. You’ve seen end( ) and begin( ), which are the tools for moving forward through a string one element at a time. The reverse iterators rend( ) and rbegin( ) allow you to step backwards through a string. Here’s how they work:
//: C01:RevStr.cpp // Print a string in reverse #include <string> #include <iostream> using namespace std; int main() { string s("987654321"); // Use this iterator to walk backwards: string::reverse_iterator rev; // "Incrementing" the reverse iterator moves // it to successively lower string elements: for(rev = s.rbegin(); rev != s.rend(); rev++) cout << *rev << " "; } ///:~
The output from RevStr.cpp looks like this:
1 2 3 4 5 6 7 8 9
Reverse iterators act like pointers to elements of the string’s character array, except that when you apply the increment operator to them, they move backward rather than forward. rbegin( ) and rend( ) supply string locations that are consistent with this behavior, to wit, rbegin( ) locates the position just beyond the end of the string, and rend( ) locates the beginning. Aside from this, the main thing to remember about reverse iterators is that they aren’t type equivalent to ordinary iterators. For example, if a member function parameter list includes an iterator as an argument, you can’t substitute a reverse iterator to get the function to perform it’s job walking backward through the string. Here’s an illustration:
// The compiler won’t accept this string sBackwards(s.rbegin(), s.rend());
The string constructor won’t accept reverse iterators in place of forward iterators in its parameter list. This is also true of string members such as copy( ), insert( ), and assign( ).
Strings and character traits We seem to have worked our way around the margins of case insensitive string comparisons using C++ string objects, so maybe it’s time to ask the obvious question: “Why isn’t case-insensitive comparison part of the standard string class ?” The answer provides interesting background on the true nature of C++ string objects.
Consider what it means for a character to have “case.” Written Hebrew, Farsi, and Kanji don’t use the concept of upper and lower case, so for those languages this idea has no meaning at
Chapter 14: Templates & Container Classes 56
all. This the first impediment to built-in C++ support for case-insensitive character search and comparison: the idea of case sensitivity is not universal, and therefore not portable.
It would seem that if there were a way of designating that some languages were “all uppercase” or “all lowercase” we could design a generalized solution. However, some languages which employ the concept of “case” also change the meaning of particular characters with diacritical marks: the cedilla in Spanish, the circumflex in French, and the umlaut in German. For this reason, any case-sensitive collating scheme that attempts to be comprehensive will be nightmarishly complex to use.
Although we usually treat the C++ string as a class, this is really not the case. string is a typedef of a more general constituent, the basic_string< > template. Observe how string is declared in the standard C++ header file:
typedef basic_string<char> string;
To really understand the nature of strings, it’s helpful to delve a bit deeper and look at the template on which it is based. Here’s the declaration of the basic_string< > template:
template<class charT, class traits = char_traits<charT>, class allocator = allocator<charT> > class basic_string;
Earlier in this book, templates were examined in a great deal of detail. The main thing to notice about the two declarations above are that the string type is created when the basic_string template is instantiated with char. Inside the basic_string< > template declaration, the line
class traits = char_traits<charT>,
tells us that the behavior of the class made from the basic_string< > template is specified by a class based on the template char_traits< >. Thus, the basic_string< > template provides for cases where you need string oriented classes that manipulate types other than char (wide characters or unicode, for example). To do this, the char_traits< > template controls the content and collating behaviors of a variety of character sets using the character comparison functions eq( ) (equal), ne( ) (not equal), and lt( ) (less than) upon which the basic_string< > string comparison functions rely.
This is why the string class doesn’t include case insensitive member functions: That’s not in its job description. To change the way the string class treats character comparison, you must supply a different char_traits< > template, because that defines the behavior of the individual character comparison member functions.
This information can be used to make a new type of string class that ignores case. First, we’ll define a new case insensitive char_traits< > template that inherits the existing one. Next, we’ll override only the members we need to change in order to make character-by-character comparison case insensitive. (In addition to the three lexical character comparison members mentioned above, we’ll also have to supply new implementation of find( ) and compare( ).)
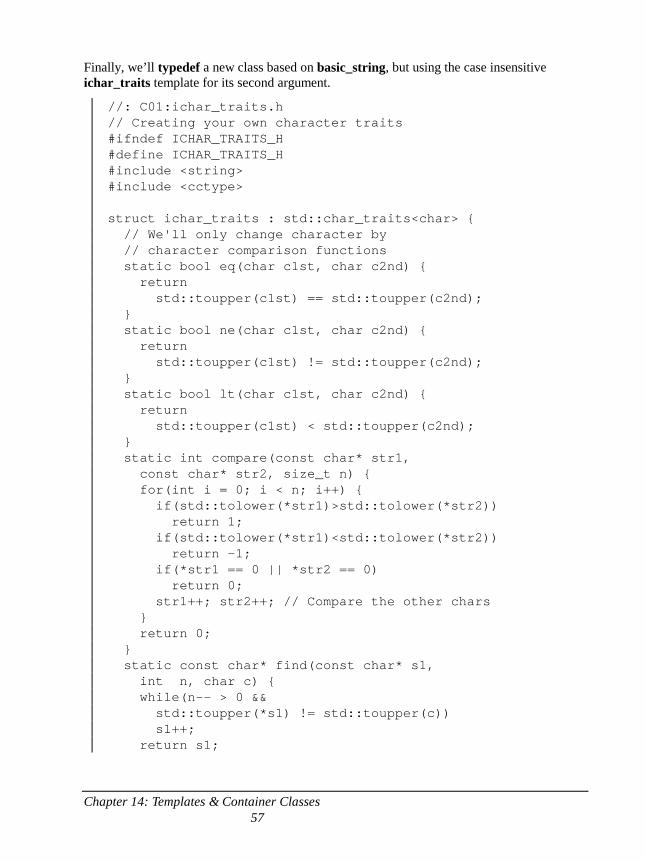
Chapter 14: Templates & Container Classes 57
Finally, we’ll typedef a new class based on basic_string, but using the case insensitive ichar_traits template for its second argument.
//: C01:ichar_traits.h // Creating your own character traits #ifndef ICHAR_TRAITS_H #define ICHAR_TRAITS_H #include <string> #include <cctype> struct ichar_traits : std::char_traits<char> { // We'll only change character by // character comparison functions static bool eq(char c1st, char c2nd) { return std::toupper(c1st) == std::toupper(c2nd); } static bool ne(char c1st, char c2nd) { return std::toupper(c1st) != std::toupper(c2nd); } static bool lt(char c1st, char c2nd) { return std::toupper(c1st) < std::toupper(c2nd); } static int compare(const char* str1, const char* str2, size_t n) { for(int i = 0; i < n; i++) { if(std::tolower(*str1)>std::tolower(*str2)) return 1; if(std::tolower(*str1)<std::tolower(*str2)) return -1; if(*str1 == 0 || *str2 == 0) return 0; str1++; str2++; // Compare the other chars } return 0; } static const char* find(const char* s1, int n, char c) { while(n-- > 0 && std::toupper(*s1) != std::toupper(c)) s1++; return s1;
Chapter 14: Templates & Container Classes 58
} }; #endif // ICHAR_TRAITS_H ///:~
If we typedef an istring class like this:
typedef basic_string<char, ichar_traits, allocator<char> > istring;
Then this istring will act like an ordinary string in every way, except that it will make all comparisons without respect to case. Here’s an example:
//: C01:ICompare.cpp #include "ichar_traits.h" #include <string> #include <iostream> using namespace std; typedef basic_string<char, ichar_traits, allocator<char> > istring; int main() { // The same letters except for case: istring first = "tHis"; istring second = "ThIS"; cout << first.compare(second) << endl; } ///:~
The output from the program is “0”, indicating that the strings compare as equal. This is just a simple example – in order to make istring fully equivalent to string, we’d have to create the other functions necessary to support the new istring type.
A string application My friend Daniel (who designed the cover and page layout for this book) does a lot of work with Web pages. One tool he uses creates a “site map” consisting of a Java applet to display the map and an HTML tag that invoked the applet and provided it with the necessary data to create the map. Daniel wanted to use this data to create an ordinary HTML page (sans applet) that would contain regular links as the site map. The resulting program turns out to be a nice practical application of the string class, so it is presented here.
The input is an HTML file that contains the usual stuff along with an applet tag with a parameter that begins like this:
<param name="source_file" value="
Chapter 14: Templates & Container Classes 59
The rest of the line contains encoded information about the site map, all combined into a single line (it’s rather long, but fortunately string objects don’t care). Each entry may or may not begin with a number of ‘#’ signs; each of these indicates one level of depth. If no ‘#’ sign is present the entry will be considered to be at level one. After the ‘#’ is the text to be displayed on the page, followed by a ‘%’ and the URL to use as the link. Each entry is terminated by a ‘*’. Thus, a single entry in the line might look like this:
###|Useful Art%./Build/useful_art.html*
The ‘|’ at the beginning is an artifact that needs to be removed.
My solution was to create an Item class whose constructor would take input text and create an object that contains the text to be displayed, the URL and the level. The objects essentially parse themselves, and at that point you can read any value you want. In main( ), the input file is opened and read until the line contains the parameter that we’re interested in. Everything but the site map codes are stripped away from this string, and then it is parsed into Item objects:
//: C01:SiteMapConvert.cpp // Using strings to create a custom conversion // program that generates HTML output #include "../require.h" #include <iostream> #include <fstream> #include <string> #include <cstdlib> using namespace std; class Item { string id, url; int depth; string removeBar(string s) { if(s[0] == '|') return s.substr(1); else return s; } public: Item(string in, int& index) : depth(0) { while(in[index] == '#' && index < in.size()){ depth++; index++; } // 0 means no '#' marks were found: if(depth == 0) depth = 1; while(in[index] != '%' && index < in.size())
Chapter 14: Templates & Container Classes 60
id += in[index++]; id = removeBar(id); index++; // Move past '%' while(in[index] != '*' && index < in.size()) url += in[index++]; url = removeBar(url); index++; // To move past '*' } string identifier() { return id; } string path() { return url; } int level() { return depth; } }; int main(int argc, char* argv[]) { requireArgs(argc, 1, "usage: SiteMapConvert inputfilename"); ifstream in(argv[1]); assure(in, argv[1]); ofstream out("plainmap.html"); string line; while(getline(in, line)) { if(line.find("<param name=\"source_file\"") != string::npos) { // Extract data from start of sequence // until the terminating quote mark: line = line.substr(line.find("value=\"") + string("value=\"").size()); line = line.substr(0, line.find_last_of("\"")); int index = 0; while(index < line.size()) { Item item(line, index); string startLevel, endLevel; if(item.level() == 1) { startLevel = "<h1>"; endLevel = "</h1>"; } else for(int i = 0; i < item.level(); i++) for(int j = 0; j < 5; j++) out << " "; string htmlLine = "<a href=\"" + item.path() + "\">" + item.identifier() + "</a><br>";
Chapter 14: Templates & Container Classes 61
out << startLevel << htmlLine << endLevel << endl; } break; // Out of while loop } } } ///:~
Item contains a private member function removeBar( ) that is used internally to strip off the leading bars, if they appear.
The constructor for Item initializes depth to 0 to indicate that no ‘#’ signs were found yet; if none are found then it is assumed the Item should be displayed at level one. Each character in the string is examined using operator[ ] to find the depth, id and url values. The other member functions simply return these values.
After opening the files, main( ) uses string::find( ) to locate the line containing the site map data. At this point, substr( ) is used in order to strip off the information before and after the site map data. The subsequent while loop performs the parsing, but notice that the value index is passed by reference into the Item constructor, and that constructor increments index as it parses each new Item, thus moving forward in the sequence.
If an Item is at level one, then an HTML h1 tag is used, otherwise the elements are indented using HTML non-breaking spaces. Note in the initialization of htmlLine how easy it is to construct a string – you can just combine quoted character arrays and other string objects using operator+.
When the output is written to the destination file, startLevel and endLevel will only produce results if they have been given any value other than their default initialization values.
Summary C++ string objects provide developers with a number of great advantages over their C counterparts. For the most part, the string class makes referring to strings through the use of character pointers unnecessary. This eliminates an entire class of software defects that arise from the use of uninitialized and incorrectly valued pointers. C++ strings dynamically and transparently grow their internal data storage space to accommodate increases in the size of the string data. This means that when the data in a string grows beyond the limits of the memory initially allocated to it, the string object will make the memory management calls that take space from and return space to the heap. Consistent allocation schemes prevent memory leaks and have the potential to be much more efficient than “roll your own” memory management.
The string class member functions provide a fairly comprehensive set of tools for creating, modifying, and searching in strings. string comparisons are always case sensitive, but you can work around this by copying string data to C style null terminated strings and using case
Chapter 14: Templates & Container Classes 62
insensitive string comparison functions, temporarily converting the data held in sting objects to a single case, or by creating a case insensitive string class which overrides the character traits used to create the basic_string object.
Exercises 1. A palindrome is a word or group of words that read the same forward and
backward. For example “madam” or “wow”. Write a program that takes a string argument from the command line and returns TRUE if the string was a palindrome.
2. Sometimes the input from a file stream contains a two character sequence to represent a newline. These two characters (0x0a 0x0d) produce extra blank lines when the stream is printed to standard out. Write a program that finds the character 0x0d (ASCII carriage return) and deletes it from the string.
3. Write a program that reverses the order of the characters in a string.
63
2: Iostreams There’s much more you can do with the general I/O problem than just take standard I/O and turn it into a class.
Wouldn’t it be nice if you could make all the usual “receptacles” – standard I/O, files and even blocks of memory – look the same, so you need to remember only one interface? That’s the idea behind iostreams. They’re much easier, safer, and often more efficient than the assorted functions from the Standard C stdio library.
Iostream is usually the first class library that new C++ programmers learn to use. This chapter explores the use of iostreams, so they can replace the C I/O functions through the rest of the book. In future chapters, you’ll see how to set up your own classes so they’re compatible with iostreams.
Why iostreams? You may wonder what’s wrong with the good old C library. And why not “wrap” the C library in a class and be done with it? Indeed, there are situations when this is the perfect thing to do, when you want to make a C library a bit safer and easier to use. For example, suppose you want to make sure a stdio file is always safely opened and properly closed, without relying on the user to remember to call the close( ) function:
//: C02:FileClass.h // Stdio files wrapped #ifndef FILECLAS_H #define FILECLAS_H #include <cstdio> class FileClass { std::FILE* f; public: FileClass(const char* fname, const char* mode="r"); ~FileClass(); std::FILE* fp(); }; #endif // FILECLAS_H ///:~
Chapter 14: Templates & Container Classes 64
In C when you perform file I/O, you work with a naked pointer to a FILE struct, but this class wraps around the pointer and guarantees it is properly initialized and cleaned up using the constructor and destructor. The second constructor argument is the file mode, which defaults to “r” for “read.”
To fetch the value of the pointer to use in the file I/O functions, you use the fp( ) access function. Here are the member function definitions:
//: C02:FileClass.cpp {O} // Implementation #include "FileClass.h" #include <cstdlib> using namespace std; FileClass::FileClass(const char* fname, const char* mode){ f = fopen(fname, mode); if(f == NULL) { printf("%s: file not found\n", fname); exit(1); } } FileClass::~FileClass() { fclose(f); } FILE* FileClass::fp() { return f; } ///:~
The constructor calls fopen( ),as you would normally do, but it also checks to ensure the result isn’t zero, which indicates a failure upon opening the file. If there’s a failure, the name of the file is printed and exit( ) is called.
The destructor closes the file, and the access function fp( )returns f. Here’s a simple example using class FileClass:
//: C02:FileClassTest.cpp //{L} FileClass // Testing class File #include "FileClass.h" #include "../require.h" using namespace std; int main(int argc, char* argv[]) { requireArgs(argc, 1); FileClass f(argv[1]); // Opens and tests const int bsize = 100; char buf[bsize]; while(fgets(buf, bsize, f.fp()))
Chapter 14: Templates & Container Classes 65
puts(buf); } // File automatically closed by destructor ///:~
You create the FileClass object and use it in normal C file I/O function calls by calling fp( ). When you’re done with it, just forget about it, and the file is closed by the destructor at the end of the scope.
True wrapping Even though the FILE pointer is private, it isn’t particularly safe because fp( ) retrieves it. The only effect seems to be guaranteed initialization and cleanup, so why not make it public, or use a struct instead? Notice that while you can get a copy of f using fp( ), you cannot assign to f – that’s completely under the control of the class. Of course, after capturing the pointer returned by fp( ), the client programmer can still assign to the structure elements, so the safety is in guaranteeing a valid FILE pointer rather than proper contents of the structure.
If you want complete safety, you have to prevent the user from direct access to the FILE pointer. This means some version of all the normal file I/O functions will have to show up as class members, so everything you can do with the C approach is available in the C++ class:
//: C02:Fullwrap.h // Completely hidden file IO #ifndef FULLWRAP_H #define FULLWRAP_H class File { std::FILE* f; std::FILE* F(); // Produces checked pointer to f public: File(); // Create object but don't open file File(const char* path, const char* mode = "r"); ~File(); int open(const char* path, const char* mode = "r"); int reopen(const char* path, const char* mode); int getc(); int ungetc(int c); int putc(int c); int puts(const char* s); char* gets(char* s, int n); int printf(const char* format, ...); size_t read(void* ptr, size_t size,
Chapter 14: Templates & Container Classes 66
size_t n); size_t write(const void* ptr, size_t size, size_t n); int eof(); int close(); int flush(); int seek(long offset, int whence); int getpos(fpos_t* pos); int setpos(const fpos_t* pos); long tell(); void rewind(); void setbuf(char* buf); int setvbuf(char* buf, int type, size_t sz); int error(); void clearErr(); }; #endif // FULLWRAP_H ///:~
This class contains almost all the file I/O functions from cstdio. vfprintf( ) is missing; it is used to implement the printf( ) member function.
File has the same constructor as in the previous example, and it also has a default constructor. The default constructor is important if you want to create an array of File objects or use a File object as a member of another class where the initialization doesn’t happen in the constructor (but sometime after the enclosing object is created).
The default constructor sets the private FILE pointer f to zero. But now, before any reference to f, its value must be checked to ensure it isn’t zero. This is accomplished with the last member function in the class, F( ), which is private because it is intended to be used only by other member functions. (We don’t want to give the user direct access to the FILE structure in this class.)6
This is not a terrible solution by any means. It’s quite functional, and you could imagine making similar classes for standard (console) I/O and for in-core formatting (reading/writing a piece of memory rather than a file or the console).
The big stumbling block is the runtime interpreter used for the variable-argument list functions. This is the code that parses through your format string at runtime and grabs and interprets arguments from the variable argument list. It’s a problem for four reasons.
1. Even if you use only a fraction of the functionality of the interpreter, the whole thing gets loaded. So if you say:
6 The implementation and test files for FULLWRAP are available in the freely distributed source code for this book. See preface for details.
Chapter 14: Templates & Container Classes 67
printf("%c", 'x'); you’ll get the whole package, including the parts that print out floating-point numbers and strings. There’s no option for reducing the amount of space used by the program.
2. Because the interpretation happens at runtime there’s a performance overhead you can’t get rid of. It’s frustrating because all the information is there in the format string at compile time, but it’s not evaluated until runtime. However, if you could parse the arguments in the format string at compile time you could make hard function calls that have the potential to be much faster than a runtime interpreter (although the printf( ) family of functions is usually quite well optimized).
3. A worse problem occurs because the evaluation of the format string doesn’t happen until runtime: there can be no compile-time error checking. You’re probably very familiar with this problem if you’ve tried to find bugs that came from using the wrong number or type of arguments in a printf( ) statement. C++ makes a big deal out of compile-time error checking to find errors early and make your life easier. It seems a shame to throw it away for an I/O library, especially because I/O is used a lot.
4. For C++, the most important problem is that the printf( ) family of functions is not particularly extensible. They’re really designed to handle the four basic data types in C (char, int, float, double and their variations). You might think that every time you add a new class, you could add an overloaded printf( ) and scanf( ) function (and their variants for files and strings) but remember, overloaded functions must have different types in their argument lists and the printf( ) family hides its type information in the format string and in the variable argument list. For a language like C++, whose goal is to be able to easily add new data types, this is an ungainly restriction.
Iostreams to the rescue All these issues make it clear that one of the first standard class libraries for C++ should handle I/O. Because “hello, world” is the first program just about everyone writes in a new language, and because I/O is part of virtually every program, the I/O library in C++ must be particularly easy to use. It also has the much greater challenge that it can never know all the classes it must accommodate, but it must nevertheless be adaptable to use any new class. Thus its constraints required that this first class be a truly inspired design.
This chapter won’t look at the details of the design and how to add iostream functionality to your own classes (you’ll learn that in a later chapter). First, you need to learn to use iostreams.
Chapter 14: Templates & Container Classes 68
In addition to gaining a great deal of leverage and clarity in your dealings with I/O and formatting, you’ll also see how a really powerful C++ library can work.
Sneak preview of operator overloading Before you can use the iostreams library, you must understand one new feature of the language that won’t be covered in detail until a later chapter. To use iostreams, you need to know that in C++ all the operators can take on different meanings. In this chapter, we’re particularly interested in << and >>. The statement “operators can take on different meanings” deserves some extra insight.
In Chapter XX, you learned how function overloading allows you to use the same function name with different argument lists. Now imagine that when the compiler sees an expression consisting of an argument followed by an operator followed by an argument, it simply calls a function. That is, an operator is simply a function call with a different syntax.
Of course, this is C++, which is very particular about data types. So there must be a previously declared function to match that operator and those particular argument types, or the compiler will not accept the expression.
What most people find immediately disturbing about operator overloading is the thought that maybe everything they know about operators in C is suddenly wrong. This is absolutely false. Here are two of the sacred design goals of C++:
1. A program that compiles in C will compile in C++. The only compilation errors and warnings from the C++ compiler will result from the “holes” in the C language, and fixing these will require only local editing. (Indeed, the complaints by the C++ compiler usually lead you directly to undiscovered bugs in the C program.)
2. The C++ compiler will not secretly change the behavior of a C program by recompiling it under C++.
Keeping these goals in mind will help answer a lot of questions; knowing there are no capricious changes to C when moving to C++ helps make the transition easy. In particular, operators for built-in types won’t suddenly start working differently – you cannot change their meaning. Overloaded operators can be created only where new data types are involved. So you can create a new overloaded operator for a new class, but the expression
1 << 4;
won’t suddenly change its meaning, and the illegal code
1.414 << 1;
won’t suddenly start working.
Chapter 14: Templates & Container Classes 69
Inserters and extractors In the iostreams library, two operators have been overloaded to make the use of iostreams easy. The operator << is often referred to as an inserter for iostreams, and the operator >> is often referred to as an extractor.
A stream is an object that formats and holds bytes. You can have an input stream (istream) or an output stream (ostream). There are different types of istreams and ostreams: ifstreams and ofstreams for files, istrstreams , and ostrstreams for char* memory (in-core formatting), and istringstreams & ostringstreams for interfacing with the Standard C++ string class. All these stream objects have the same interface, regardless of whether you’re working with a file, standard I/O, a piece of memory or a string object. The single interface you learn also works for extensions added to support new classes.
If a stream is capable of producing bytes (an istream), you can get information from the stream using an extractor. The extractor produces and formats the type of information that’s expected by the destination object. To see an example of this, you can use the cin object, which is the iostream equivalent of stdin in C, that is, redirectable standard input. This object is pre-defined whenever you include the iostream.h header file. (Thus, the iostream library is automatically linked with most compilers.)
int i; cin >> i; float f; cin >> f; char c; cin >> c; char buf[100]; cin >> buf;
There’s an overloaded operator >> for every data type you can use as the right-hand argument of >> in an iostream statement. (You can also overload your own, which you’ll see in a later chapter.)
To find out what you have in the various variables, you can use the cout object (corresponding to standard output; there’s also a cerr object corresponding to standard error) with the inserter <<:
cout << "i = "; cout << i; cout << "\n"; cout << "f = "; cout << f; cout << "\n";
Chapter 14: Templates & Container Classes 70
cout << "c = "; cout << c; cout << "\n"; cout << "buf = "; cout << buf; cout << "\n";
This is notably tedious, and doesn’t seem like much of an improvement over printf( ), type checking or no. Fortunately, the overloaded inserters and extractors in iostreams are designed to be chained together into a complex expression that is much easier to write:
cout << "i = " << i << endl; cout << "f = " << f << endl; cout << "c = " << c << endl; cout << "buf = " << buf << endl;
You’ll understand how this can happen in a later chapter, but for now it’s sufficient to take the attitude of a class user and just know it works that way.
Manipulators One new element has been added here: a manipulator called endl. A manipulator acts on the stream itself; in this case it inserts a newline and flushes the stream (puts out all pending characters that have been stored in the internal stream buffer but not yet output). You can also just flush the stream:
cout << flush;
There are additional basic manipulators that will change the number base to oct (octal), dec (decimal) or hex (hexadecimal):
cout << hex << "0x" << i << endl;
There’s a manipulator for extraction that “eats” white space:
cin >> ws;
and a manipulator called ends, which is like endl, only for strstreams (covered in a while). These are all the manipulators in <iostream>, but there are more in <iomanip> you’ll see later in the chapter.
Common usage Although cin and the extractor >> provide a nice balance to cout and the inserter <<, in practice using formatted input routines, especially with standard input, has the same problems you run into with scanf( ). If the input produces an unexpected value, the process is skewed, and it’s very difficult to recover. In addition, formatted input defaults to whitespace delimiters. So if you collect the above code fragments into a program

Chapter 14: Templates & Container Classes 71
//: C02:Iosexamp.cpp // Iostream examples #include <iostream> using namespace std; int main() { int i; cin >> i; float f; cin >> f; char c; cin >> c; char buf[100]; cin >> buf; cout << "i = " << i << endl; cout << "f = " << f << endl; cout << "c = " << c << endl; cout << "buf = " << buf << endl; cout << flush; cout << hex << "0x" << i << endl; } ///:~
and give it the following input,
12 1.4 c this is a test
you’ll get the same output as if you give it
12 1.4 c this is a test
and the output is, somewhat unexpectedly,
i = 12 f = 1.4 c = c buf = this 0xc
Chapter 14: Templates & Container Classes 72
Notice that buf got only the first word because the input routine looked for a space to delimit the input, which it saw after “this.” In addition, if the continuous input string is longer than the storage allocated for buf, you’ll overrun the buffer.
It seems cin and the extractor are provided only for completeness, and this is probably a good way to look at it. In practice, you’ll usually want to get your input a line at a time as a sequence of characters and then scan them and perform conversions once they’re safely in a buffer. This way you don’t have to worry about the input routine choking on unexpected data.
Another thing to consider is the whole concept of a command-line interface. This has made sense in the past when the console was little more than a glass typewriter, but the world is rapidly changing to one where the graphical user interface (GUI) dominates. What is the meaning of console I/O in such a world? It makes much more sense to ignore cin altogether other than for very simple examples or tests, and take the following approaches:
1. If your program requires input, read that input from a file – you’ll soon see it’s remarkably easy to use files with iostreams. Iostreams for files still works fine with a GUI.
2. Read the input without attempting to convert it. Once the input is someplace where it can’t foul things up during conversion, then you can safely scan it.
3. Output is different. If you’re using a GUI, cout doesn’t work and you must send it to a file (which is identical to sending it to cout) or use the GUI facilities for data display. Otherwise it often makes sense to send it to cout. In both cases, the output formatting functions of iostreams are highly useful.
Line-oriented input To grab input a line at a time, you have two choices: the member functions get( ) and getline( ). Both functions take three arguments: a pointer to a character buffer in which to store the result, the size of that buffer (so they don’t overrun it), and the terminating character, to know when to stop reading input. The terminating character has a default value of ‘\n’, which is what you’ll usually use. Both functions store a zero in the result buffer when they encounter the terminating character in the input.
So what’s the difference? Subtle, but important: get( ) stops when it sees the delimiter in the input stream, but it doesn’t extract it from the input stream. Thus, if you did another get( ) using the same delimiter it would immediately return with no fetched input. (Presumably, you either use a different delimiter in the next get( ) statement or a different input function.) getline( ), on the other hand, extracts the delimiter from the input stream, but still doesn’t store it in the result buffer.
Generally, when you’re processing a text file that you read a line at a time, you’ll want to use getline( ).
Chapter 14: Templates & Container Classes 73
Overloaded versions of get( ) get( ) also comes in three other overloaded versions: one with no arguments that returns the next character, using an int return value; one that stuffs a character into its char argument, using a reference (You’ll have to jump forward to Chapter XX if you want to understand it right this minute . . . .); and one that stores directly into the underlying buffer structure of another iostream object. That is explored later in the chapter.
Reading raw bytes If you know exactly what you’re dealing with and want to move the bytes directly into a variable, array, or structure in memory, you can use read( ). The first argument is a pointer to the destination memory, and the second is the number of bytes to read. This is especially useful if you’ve previously stored the information to a file, for example, in binary form using the complementary write( ) member function for an output stream. You’ll see examples of all these functions later.
Error handling All the versions of get( ) and getline( ) return the input stream from which the characters came except for get( ) with no arguments, which returns the next character or EOF. If you get the input stream object back, you can ask it if it’s still OK. In fact, you can ask any iostream object if it’s OK using the member functions good( ), eof( ), fail( ), and bad( ). These return state information based on the eofbit (indicates the buffer is at the end of sequence), the failbit (indicates some operation has failed because of formatting issues or some other problem that does not affect the buffer) and the badbit (indicates something has gone wrong with the buffer).
However, as mentioned earlier, the state of an input stream generally gets corrupted in weird ways only when you’re trying to do input to specific types and the type read from the input is inconsistent with what is expected. Then of course you have the problem of what to do with the input stream to correct the problem. If you follow my advice and read input a line at a time or as a big glob of characters (with read( )) and don’t attempt to use the input formatting functions except in simple cases, then all you’re concerned with is whether you’re at the end of the input (EOF). Fortunately, testing for this turns out to be simple and can be done inside of conditionals, such as while(cin) or if(cin). For now you’ll have to accept that when you use an input stream object in this context, the right value is safely, correctly and magically produced to indicate whether the object has reached the end of the input. You can also use the Boolean NOT operator !, as in if(!cin), to indicate the stream is not OK; that is, you’ve probably reached the end of input and should quit trying to read the stream.
There are times when the stream becomes not-OK, but you understand this condition and want to go on using it. For example, if you reach the end of an input file, the eofbit and failbit are set, so a conditional on that stream object will indicate the stream is no longer good.
Chapter 14: Templates & Container Classes 74
However, you may want to continue using the file, by seeking to an earlier position and reading more data. To correct the condition, simply call the clear( ) member function.7
File iostreams Manipulating files with iostreams is much easier and safer than using cstdio in C. All you do to open a file is create an object; the constructor does the work. You don’t have to explicitly close a file (although you can, using the close( ) member function) because the destructor will close it when the object goes out of scope.
To create a file that defaults to input, make an ifstream object. To create one that defaults to output, make an ofstream object.
Here’s an example that shows many of the features discussed so far. Note the inclusion of <fstream> to declare the file I/O classes; this also includes <iostream>.
//: C02:Strfile.cpp // Stream I/O with files // The difference between get() & getline() #include "../require.h" #include <fstream> #include <iostream> using namespace std; int main() { const int sz = 100; // Buffer size; char buf[sz]; { ifstream in("Strfile.cpp"); // Read assure(in, "Strfile.cpp"); // Verify open ofstream out("Strfile.out"); // Write assure(out, "Strfile.out"); int i = 1; // Line counter // A less-convenient approach for line input: while(in.get(buf, sz)) { // Leaves \n in input in.get(); // Throw away next character (\n) cout << buf << endl; // Must add \n // File output just like standard I/O:
7 Newer implementations of iostreams will still support this style of handling errors, but in some cases will also throw exceptions.
Chapter 14: Templates & Container Classes 75
out << i++ << ": " << buf << endl; } } // Destructors close in & out ifstream in("Strfile.out"); assure(in, "Strfile.out"); // More convenient line input: while(in.getline(buf, sz)) { // Removes \n char* cp = buf; while(*cp != ':') cp++; cp += 2; // Past ": " cout << cp << endl; // Must still add \n } } ///:~
The creation of both the ifstream and ofstream are followed by an assure( ) to guarantee the file has been successfully opened. Here again the object, used in a situation where the compiler expects an integral result, produces a value that indicates success or failure. (To do this, an automatic type conversion member function is called. These are discussed in Chapter XX.)
The first while loop demonstrates the use of two forms of the get( ) function. The first gets characters into a buffer and puts a zero terminator in the buffer when either sz – 1 characters have been read or the third argument (defaulted to ‘\n’) is encountered. get( ) leaves the terminator character in the input stream, so this terminator must be thrown away via in.get( ) using the form of get( ) with no argument, which fetches a single byte and returns it as an int. You can also use the ignore( ) member function, which has two defaulted arguments. The first is the number of characters to throw away, and defaults to one. The second is the character at which the ignore( ) function quits (after extracting it) and defaults to EOF.
Next you see two output statements that look very similar: one to cout and one to the file out. Notice the convenience here; you don’t need to worry about what kind of object you’re dealing with because the formatting statements work the same with all ostream objects. The first one echoes the line to standard output, and the second writes the line out to the new file and includes a line number.
To demonstrate getline( ), it’s interesting to open the file we just created and strip off the line numbers. To ensure the file is properly closed before opening it to read, you have two choices. You can surround the first part of the program in braces to force the out object out of scope, thus calling the destructor and closing the file, which is done here. You can also call close( ) for both files; if you want, you can even reuse the in object by calling the open( ) member function (you can also create and destroy the object dynamically on the heap as is in Chapter XX).
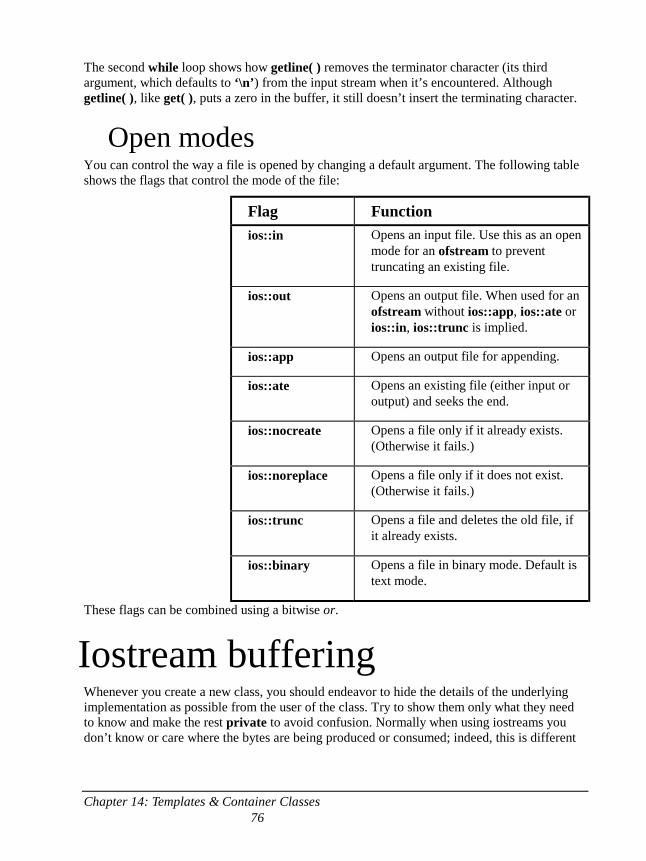
Chapter 14: Templates & Container Classes 76
The second while loop shows how getline( ) removes the terminator character (its third argument, which defaults to ‘\n’) from the input stream when it’s encountered. Although getline( ), like get( ), puts a zero in the buffer, it still doesn’t insert the terminating character.
Open modes You can control the way a file is opened by changing a default argument. The following table shows the flags that control the mode of the file:
Flag Function ios::in Opens an input file. Use this as an open
mode for an ofstream to prevent truncating an existing file.
ios::out Opens an output file. When used for an ofstream without ios::app, ios::ate or ios::in, ios::trunc is implied.
ios::app Opens an output file for appending.
ios::ate Opens an existing file (either input or output) and seeks the end.
ios::nocreate Opens a file only if it already exists. (Otherwise it fails.)
ios::noreplace Opens a file only if it does not exist. (Otherwise it fails.)
ios::trunc Opens a file and deletes the old file, if it already exists.
ios::binary Opens a file in binary mode. Default is text mode.
These flags can be combined using a bitwise or.
Iostream buffering Whenever you create a new class, you should endeavor to hide the details of the underlying implementation as possible from the user of the class. Try to show them only what they need to know and make the rest private to avoid confusion. Normally when using iostreams you don’t know or care where the bytes are being produced or consumed; indeed, this is different
Chapter 14: Templates & Container Classes 77
depending on whether you’re dealing with standard I/O, files, memory, or some newly created class or device.
There comes a time, however, when it becomes important to be able to send messages to the part of the iostream that produces and consumes bytes. To provide this part with a common interface and still hide its underlying implementation, it is abstracted into its own class, called streambuf. Each iostream object contains a pointer to some kind of streambuf. (The kind depends on whether it deals with standard I/O, files, memory, etc.) You can access the streambuf directly; for example, you can move raw bytes into and out of the streambuf, without formatting them through the enclosing iostream. This is accomplished, of course, by calling member functions for the streambuf object.
Currently, the most important thing for you to know is that every iostream object contains a pointer to a streambuf object, and the streambuf has some member functions you can call if you need to.
To allow you to access the streambuf, every iostream object has a member function called rdbuf( ) that returns the pointer to the object’s streambuf. This way you can call any member function for the underlying streambuf. However, one of the most interesting things you can do with the streambuf pointer is to connect it to another iostream object using the << operator. This drains all the bytes from your object into the one on the left-hand side of the <<. This means if you want to move all the bytes from one iostream to another, you don’t have to go through the tedium (and potential coding errors) of reading them one byte or one line at a time. It’s a much more elegant approach.
For example, here’s a very simple program that opens a file and sends the contents out to standard output (similar to the previous example):
//: C02:Stype.cpp // Type a file to standard output #include "../require.h" #include <fstream> #include <iostream> using namespace std; int main(int argc, char* argv[]) { requireArgs(argc, 1); // Must have a command line ifstream in(argv[1]); assure(in, argv[1]); // Ensure file exists cout << in.rdbuf(); // Outputs entire file } ///:~
After making sure there is an argument on the command line, an ifstream is created using this argument. The open will fail if the file doesn’t exist, and this failure is caught by the assert(in).
All the work really happens in the statement
Chapter 14: Templates & Container Classes 78
cout << in.rdbuf();
which causes the entire contents of the file to be sent to cout. This is not only more succinct to code, it is often more efficient than moving the bytes one at a time.
Using get( ) with a streambuf There is a form of get( ) that allows you to write directly into the streambuf of another object. The first argument is the destination streambuf (whose address is mysteriously taken using a reference, discussed in Chapter XX), and the second is the terminating character, which stops the get( ) function. So yet another way to print a file to standard output is
//: C02:Sbufget.cpp // Get directly into a streambuf #include "../require.h" #include <fstream> #include <iostream> using namespace std; int main() { ifstream in("Sbufget.cpp"); assure(in, "Sbufget.cpp"); while(in.get(*cout.rdbuf())) in.ignore(); } ///:~
rdbuf( ) returns a pointer, so it must be dereferenced to satisfy the function’s need to see an object. The get( ) function, remember, doesn’t pull the terminating character from the input stream, so it must be removed using ignore( ) so get( ) doesn’t just bonk up against the newline forever (which it will, otherwise).
You probably won’t need to use a technique like this very often, but it may be useful to know it exists.
Seeking in iostreams Each type of iostream has a concept of where its “next” character will come from (if it’s an istream) or go (if it’s an ostream). In some situations you may want to move this stream position. You can do it using two models: One uses an absolute location in the stream called the streampos; the second works like the Standard C library functions fseek( ) for a file and moves a given number of bytes from the beginning, end, or current position in the file.
The streampos approach requires that you first call a “tell” function: tellp( ) for an ostream or tellg( ) for an istream. (The “p” refers to the “put pointer” and the “g” refers to the “get pointer.”) This function returns a streampos you can later use in the single-argument version
Chapter 14: Templates & Container Classes 79
of seekp( ) for an ostream or seekg( ) for an istream, when you want to return to that position in the stream.
The second approach is a relative seek and uses overloaded versions of seekp( ) and seekg( ). The first argument is the number of bytes to move: it may be positive or negative. The second argument is the seek direction:
ios::beg From beginning of stream
ios::cur Current position in stream
ios::end From end of stream
Here’s an example that shows the movement through a file, but remember, you’re not limited to seeking within files, as you are with C and cstdio. With C++, you can seek in any type of iostream (although the behavior of cin & cout when seeking is undefined):
//: C02:Seeking.cpp // Seeking in iostreams #include "../require.h" #include <iostream> #include <fstream> using namespace std; int main(int argc, char* argv[]) { requireArgs(argc, 1); ifstream in(argv[1]); assure(in, argv[1]); // File must already exist in.seekg(0, ios::end); // End of file streampos sp = in.tellg(); // Size of file cout << "file size = " << sp << endl; in.seekg(-sp/10, ios::end); streampos sp2 = in.tellg(); in.seekg(0, ios::beg); // Start of file cout << in.rdbuf(); // Print whole file in.seekg(sp2); // Move to streampos // Prints the last 1/10th of the file: cout << endl << endl << in.rdbuf() << endl; } ///:~
This program picks a file name off the command line and opens it as an ifstream. assert( ) detects an open failure. Because this is a type of istream, seekg( ) is used to position the “get pointer.” The first call seeks zero bytes off the end of the file, that is, to the end. Because a streampos is a typedef for a long, calling tellg( ) at that point also returns the size of the file, which is printed out. Then a seek is performed moving the get pointer 1/10 the size of the file – notice it’s a negative seek from the end of the file, so it backs up from the end. If you try to seek positively from the end of the file, the get pointer will just stay at the end. The
Chapter 14: Templates & Container Classes 80
streampos at that point is captured into sp2, then a seekg( ) is performed back to the beginning of the file so the whole thing can be printed out using the streambuf pointer produced with rdbuf( ). Finally, the overloaded version of seekg( ) is used with the streampos sp2 to move to the previous position, and the last portion of the file is printed out.
Creating read/write files Now that you know about the streambuf and how to seek, you can understand how to create a stream object that will both read and write a file. The following code first creates an ifstream with flags that say it’s both an input and an output file. The compiler won’t let you write to an ifstream, however, so you need to create an ostream with the underlying stream buffer:
ifstream in("filename", ios::in|ios::out); ostream out(in.rdbuf());
You may wonder what happens when you write to one of these objects. Here’s an example:
//: C02:Iofile.cpp // Reading & writing one file #include "../require.h" #include <iostream> #include <fstream> using namespace std; int main() { ifstream in("Iofile.cpp"); assure(in, "Iofile.cpp"); ofstream out("Iofile.out"); assure(out, "Iofile.out"); out << in.rdbuf(); // Copy file in.close(); out.close(); // Open for reading and writing: ifstream in2("Iofile.out", ios::in | ios::out); assure(in2, "Iofile.out"); ostream out2(in2.rdbuf()); cout << in2.rdbuf(); // Print whole file out2 << "Where does this end up?"; out2.seekp(0, ios::beg); out2 << "And what about this?"; in2.seekg(0, ios::beg); cout << in2.rdbuf(); } ///:~
Chapter 14: Templates & Container Classes 81
The first five lines copy the source code for this program into a file called iofile.out, and then close the files. This gives us a safe text file to play around with. Then the aforementioned technique is used to create two objects that read and write to the same file. In cout << in2.rdbuf( ), you can see the “get” pointer is initialized to the beginning of the file. The “put” pointer, however, is set to the end of the file because “Where does this end up?” appears appended to the file. However, if the put pointer is moved to the beginning with a seekp( ), all the inserted text overwrites the existing text. Both writes are seen when the get pointer is moved back to the beginning with a seekg( ), and the file is printed out. Of course, the file is automatically saved and closed when out2 goes out of scope and its destructor is called.
stringstreams strstreams Before there were stringstreams, there were the more primitive strstreams. Although these are not an official part of Standard C++, they have been around a long time so compilers will no doubt leave in the strstream support in perpetuity, to compile legacy code. You should always use stringstreams, but it’s certainly likely that you’ll come across code that uses strstreams and at that point this section should come in handy. In addition, this section should make it fairly clear why stringstreams have replace strstreams.
A strstream works directly with memory instead of a file or standard output. It allows you to use the same reading and formatting functions to manipulate bytes in memory. On old computers the memory was referred to as core so this type of functionality is often called in-core formatting.
The class names for strstreams echo those for file streams. If you want to create a strstream to extract characters from, you create an istrstream. If you want to put characters into a strstream, you create an ostrstream.
String streams work with memory, so you must deal with the issue of where the memory comes from and where it goes. This isn’t terribly complicated, but you must understand it and pay attention (it turned out is was too easy to lose track of this particular issue, thus the birth of stringstreams).
User-allocated storage The easiest approach to understand is when the user is responsible for allocating the storage. With istrstreams this is the only allowed approach. There are two constructors:
istrstream::istrstream(char* buf); istrstream::istrstream(char* buf, int size);
Chapter 14: Templates & Container Classes 82
The first constructor takes a pointer to a zero-terminated character array; you can extract bytes until the zero. The second constructor additionally requires the size of the array, which doesn’t have to be zero-terminated. You can extract bytes all the way to buf[size], whether or not you encounter a zero along the way.
When you hand an istrstream constructor the address of an array, that array must already be filled with the characters you want to extract and presumably format into some other data type. Here’s a simple example:
//: C02:Istring.cpp // Input strstreams #include <iostream> #include <strstream> using namespace std; int main() { istrstream s("47 1.414 This is a test"); int i; float f; s >> i >> f; // Whitespace-delimited input char buf2[100]; s >> buf2; cout << "i = " << i << ", f = " << f; cout << " buf2 = " << buf2 << endl; cout << s.rdbuf(); // Get the rest... } ///:~
You can see that this is a more flexible and general approach to transforming character strings to typed values than the Standard C Library functions like atof( ), atoi( ), and so on.
The compiler handles the static storage allocation of the string in
istrstream s("47 1.414 This is a test");
You can also hand it a pointer to a zero-terminated string allocated on the stack or the heap.
In s >> i >> f, the first number is extracted into i and the second into f. This isn’t “the first whitespace-delimited set of characters” because it depends on the data type it’s being extracted into. For example, if the string were instead, “1.414 47 This is a test,” then i would get the value one because the input routine would stop at the decimal point. Then f would get 0.414. This could be useful if you want to break a floating-point number into a whole number and a fraction part. Otherwise it would seem to be an error.
As you may already have guessed, buf2 doesn’t get the rest of the string, just the next whitespace-delimited word. In general, it seems the best place to use the extractor in iostreams is when you know the exact sequence of data in the input stream and you’re converting to some type other than a character string. However, if you want to extract the rest of the string all at once and send it to another iostream, you can use rdbuf( ) as shown.
Chapter 14: Templates & Container Classes 83
Output strstreams Output strstreams also allow you to provide your own storage; in this case it’s the place in memory the bytes are formatted into. The appropriate constructor is
ostrstream::ostrstream(char*, int, int = ios::out);
The first argument is the preallocated buffer where the characters will end up, the second is the size of the buffer, and the third is the mode. If the mode is left as the default, characters are formatted into the starting address of the buffer. If the mode is either ios::ate or ios::app (same effect), the character buffer is assumed to already contain a zero-terminated string, and any new characters are added starting at the zero terminator.
The second constructor argument is the size of the array and is used by the object to ensure it doesn’t overwrite the end of the array. If you fill the array up and try to add more bytes, they won’t go in.
An important thing to remember about ostrstreams is that the zero terminator you normally need at the end of a character array is not inserted for you. When you’re ready to zero-terminate the string, use the special manipulator ends.
Once you’ve created an ostrstream you can insert anything you want, and it will magically end up formatted in the memory buffer. Here’s an example:
//: C02:Ostring.cpp // Output strstreams #include <iostream> #include <strstream> using namespace std; int main() { const int sz = 100; cout << "type an int, a float and a string:"; int i; float f; cin >> i >> f; cin >> ws; // Throw away white space char buf[sz]; cin.getline(buf, sz); // Get rest of the line // (cin.rdbuf() would be awkward) ostrstream os(buf, sz, ios::app); os << endl; os << "integer = " << i << endl; os << "float = " << f << endl; os << ends; cout << buf; cout << os.rdbuf(); // Same effect
Chapter 14: Templates & Container Classes 84
cout << os.rdbuf(); // NOT the same effect } ///:~
This is similar to the previous example in fetching the int and float. You might think the logical way to get the rest of the line is to use rdbuf( ); this works, but it’s awkward because all the input including newlines is collected until the user presses control-Z (control-D on Unix) to indicate the end of the input. The approach shown, using getline( ), gets the input until the user presses the carriage return. This input is fetched into buf, which is subsequently used to construct the ostrstream os. If the third argument ios::app weren’t supplied, the constructor would default to writing at the beginning of buf, overwriting the line that was just collected. However, the “append” flag causes it to put the rest of the formatted information at the end of the string.
You can see that, like the other output streams, you can use the ordinary formatting tools for sending bytes to the ostrstream. The only difference is that you’re responsible for inserting the zero at the end with ends. Note that endl inserts a newline in the strstream, but no zero.
Now the information is formatted in buf, and you can send it out directly with cout << buf. However, it’s also possible to send the information out with os.rdbuf( ). When you do this, the get pointer inside the streambuf is moved forward as the characters are output. For this reason, if you say cout << os.rdbuf( ) a second time, nothing happens – the get pointer is already at the end.
Automatic storage allocation Output strstreams (but not istrstreams) give you a second option for memory allocation: they can do it themselves. All you do is create an ostrstream with no constructor arguments:
ostrstream a;
Now a takes care of all its own storage allocation on the heap. You can put as many bytes into a as you want, and if it runs out of storage, it will allocate more, moving the block of memory, if necessary.
This is a very nice solution if you don’t know how much space you’ll need, because it’s completely flexible. And if you simply format data into the strstream and then hand its streambuf off to another iostream, things work perfectly:
a << "hello, world. i = " << i << endl << ends; cout << a.rdbuf();
This is the best of all possible solutions. But what happens if you want the physical address of the memory that a’s characters have been formatted into? It’s readily available – you simply call the str( ) member function:
char* cp = a.str();
There’s a problem now. What if you want to put more characters into a? It would be OK if you knew a had already allocated enough storage for all the characters you want to give it, but
Chapter 14: Templates & Container Classes 85
that’s not true. Generally, a will run out of storage when you give it more characters, and ordinarily it would try to allocate more storage on the heap. This would usually require moving the block of memory. But the stream objects has just handed you the address of its memory block, so it can’t very well move that block, because you’re expecting it to be at a particular location.
The way an ostrstream handles this problem is by “freezing” itself. As long as you don’t use str( ) to ask for the internal char*, you can add as many characters as you want to the ostrstream. It will allocate all the necessary storage from the heap, and when the object goes out of scope, that heap storage is automatically released.
However, if you call str( ), the ostrstream becomes “frozen.” You can’t add any more characters to it. Rather, you aren’t supposed to – implementations are not required to detect the error. Adding characters to a frozen ostrstream results in undefined behavior. In addition, the ostrstream is no longer responsible for cleaning up the storage. You took over that responsibility when you asked for the char* with str( ).
To prevent a memory leak, the storage must be cleaned up somehow. There are two approaches. The more common one is to directly release the memory when you’re done. To understand this, you need a sneak preview of two new keywords in C++: new and delete. As you’ll see in Chapter XX, these do quite a bit, but for now you can think of them as replacements for malloc( ) and free( ) in C. The operator new returns a chunk of memory, and delete frees it. It’s important to know about them here because virtually all memory allocation in C++ is performed with new, and this is also true with ostrstream. If it’s allocated with new, it must be released with delete, so if you have an ostrstream a and you get the char* using str( ), the typical way to clean up the storage is
delete []a.str();
This satisfies most needs, but there’s a second, much less common way to release the storage: You can unfreeze the ostrstream. You do this by calling freeze( ), which is a member function of the ostrstream’s streambuf. freeze( ) has a default argument of one, which freezes the stream, but an argument of zero will unfreeze it:
a.rdbuf()->freeze(0);
Now the storage is deallocated when a goes out of scope and its destructor is called. In addition, you can add more bytes to a. However, this may cause the storage to move, so you better not use any pointer you previously got by calling str( ) – it won’t be reliable after adding more characters.
The following example tests the ability to add more characters after a stream has been unfrozen:
//: C02:Walrus.cpp // Freezing a strstream #include <iostream> #include <strstream> using namespace std;

Chapter 14: Templates & Container Classes 86
int main() { ostrstream s; s << "'The time has come', the walrus said,"; s << ends; cout << s.str() << endl; // String is frozen // s is frozen; destructor won't delete // the streambuf storage on the heap s.seekp(-1, ios::cur); // Back up before NULL s.rdbuf()->freeze(0); // Unfreeze it // Now destructor releases memory, and // you can add more characters (but you // better not use the previous str() value) s << " 'To speak of many things'" << ends; cout << s.rdbuf(); } ///:~
After putting the first string into s, an ends is added so the string can be printed using the char* produced by str( ). At that point, s is frozen. We want to add more characters to s, but for it to have any effect, the put pointer must be backed up one so the next character is placed on top of the zero inserted by ends. (Otherwise the string would be printed only up to the original zero.) This is accomplished with seekp( ). Then s is unfrozen by fetching the underlying streambuf pointer using rdbuf( ) and calling freeze(0). At this point s is like it was before calling str( ): We can add more characters, and cleanup will occur automatically, with the destructor.
It is possible to unfreeze an ostrstream and continue adding characters, but it is not common practice. Normally, if you want to add more characters once you’ve gotten the char* of a ostrstream, you create a new one, pour the old stream into the new one using rdbuf( ) and continue adding new characters to the new ostrstream.
Proving movement If you’re still not convinced you should be responsible for the storage of a ostrstream if you call str( ), here’s an example that demonstrates the storage location is moved, therefore the old pointer returned by str( ) is invalid:
//: C02:Strmove.cpp // ostrstream memory movement #include <iostream> #include <strstream> using namespace std; int main() { ostrstream s; s << "hi";
Chapter 14: Templates & Container Classes 87
char* old = s.str(); // Freezes s s.rdbuf()->freeze(0); // Unfreeze for(int i = 0; i < 100; i++) s << "howdy"; // Should force reallocation cout << "old = " << (void*)old << endl; cout << "new = " << (void*)s.str(); // Freezes delete s.str(); // Release storage } ///:~
After inserting a string to s and capturing the char* with str( ), the string is unfrozen and enough new bytes are inserted to virtually assure the memory is reallocated and most likely moved. After printing out the old and new char* values, the storage is explicitly released with delete because the second call to str( ) froze the string again.
To print out addresses instead of the strings they point to, you must cast the char* to a void*. The operator << for char* prints out the string it is pointing to, while the operator << for void* prints out the hex representation of the pointer.
It’s interesting to note that if you don’t insert a string to s before calling str( ), the result is zero. This means no storage is allocated until the first time you try to insert bytes to the ostrstream.
A better way Again, remember that this section was only left in to support legacy code. You should always use string and stringstream rather than character arrays and strstream. The former is much safer and easier to use and will help ensure your projects get finished faster.
Output stream formatting The whole goal of this effort, and all these different types of iostreams, is to allow you to easily move and translate bytes from one place to another. It certainly wouldn’t be very useful if you couldn’t do all the formatting with the printf( ) family of functions. In this section, you’ll learn all the output formatting functions that are available for iostreams, so you can get your bytes the way you want them.
The formatting functions in iostreams can be somewhat confusing at first because there’s often more than one way to control the formatting: through both member functions and manipulators. To further confuse things, there is a generic member function to set state flags to control formatting, such as left- or right-justification, whether to use uppercase letters for hex notation, whether to always use a decimal point for floating-point values, and so on. On the other hand, there are specific member functions to set and read values for the fill character, the field width, and the precision.
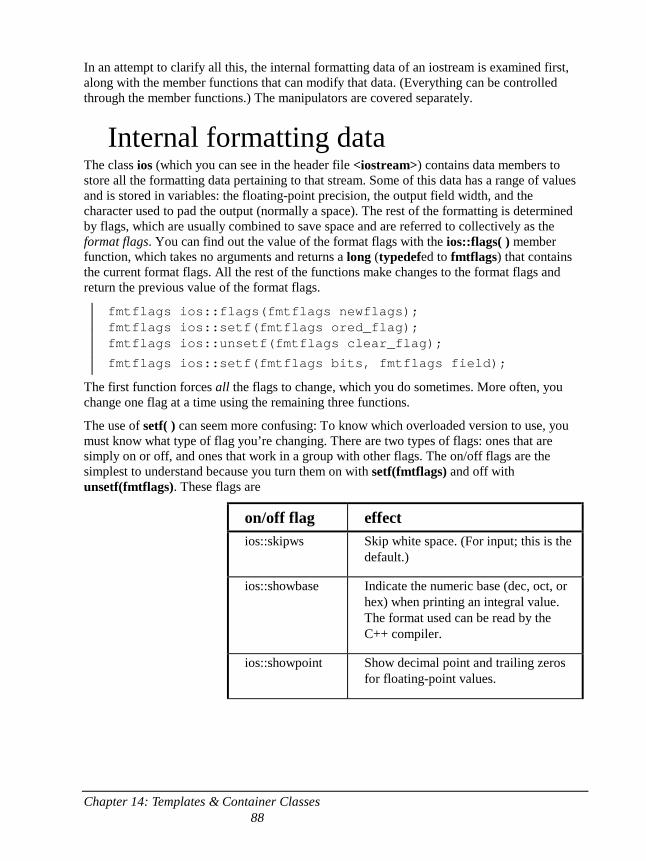
Chapter 14: Templates & Container Classes 88
In an attempt to clarify all this, the internal formatting data of an iostream is examined first, along with the member functions that can modify that data. (Everything can be controlled through the member functions.) The manipulators are covered separately.
Internal formatting data The class ios (which you can see in the header file <iostream>) contains data members to store all the formatting data pertaining to that stream. Some of this data has a range of values and is stored in variables: the floating-point precision, the output field width, and the character used to pad the output (normally a space). The rest of the formatting is determined by flags, which are usually combined to save space and are referred to collectively as the format flags. You can find out the value of the format flags with the ios::flags( ) member function, which takes no arguments and returns a long (typedefed to fmtflags) that contains the current format flags. All the rest of the functions make changes to the format flags and return the previous value of the format flags.
fmtflags ios::flags(fmtflags newflags); fmtflags ios::setf(fmtflags ored_flag); fmtflags ios::unsetf(fmtflags clear_flag);
fmtflags ios::setf(fmtflags bits, fmtflags field);
The first function forces all the flags to change, which you do sometimes. More often, you change one flag at a time using the remaining three functions.
The use of setf( ) can seem more confusing: To know which overloaded version to use, you must know what type of flag you’re changing. There are two types of flags: ones that are simply on or off, and ones that work in a group with other flags. The on/off flags are the simplest to understand because you turn them on with setf(fmtflags) and off with unsetf(fmtflags). These flags are
on/off flag effect ios::skipws Skip white space. (For input; this is the
default.)
ios::showbase Indicate the numeric base (dec, oct, or hex) when printing an integral value. The format used can be read by the C++ compiler.
ios::showpoint Show decimal point and trailing zeros for floating-point values.
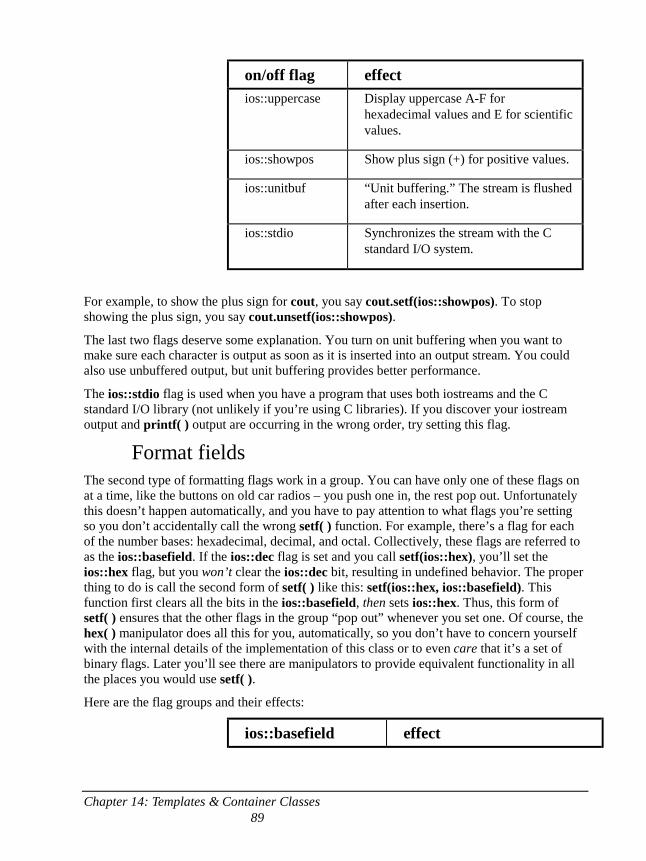
Chapter 14: Templates & Container Classes 89
on/off flag effect ios::uppercase Display uppercase A-F for
hexadecimal values and E for scientific values.
ios::showpos Show plus sign (+) for positive values.
ios::unitbuf “Unit buffering.” The stream is flushed after each insertion.
ios::stdio Synchronizes the stream with the C standard I/O system.
For example, to show the plus sign for cout, you say cout.setf(ios::showpos). To stop showing the plus sign, you say cout.unsetf(ios::showpos).
The last two flags deserve some explanation. You turn on unit buffering when you want to make sure each character is output as soon as it is inserted into an output stream. You could also use unbuffered output, but unit buffering provides better performance.
The ios::stdio flag is used when you have a program that uses both iostreams and the C standard I/O library (not unlikely if you’re using C libraries). If you discover your iostream output and printf( ) output are occurring in the wrong order, try setting this flag.
Format fields The second type of formatting flags work in a group. You can have only one of these flags on at a time, like the buttons on old car radios – you push one in, the rest pop out. Unfortunately this doesn’t happen automatically, and you have to pay attention to what flags you’re setting so you don’t accidentally call the wrong setf( ) function. For example, there’s a flag for each of the number bases: hexadecimal, decimal, and octal. Collectively, these flags are referred to as the ios::basefield. If the ios::dec flag is set and you call setf(ios::hex), you’ll set the ios::hex flag, but you won’t clear the ios::dec bit, resulting in undefined behavior. The proper thing to do is call the second form of setf( ) like this: setf(ios::hex, ios::basefield). This function first clears all the bits in the ios::basefield, then sets ios::hex. Thus, this form of setf( ) ensures that the other flags in the group “pop out” whenever you set one. Of course, the hex( ) manipulator does all this for you, automatically, so you don’t have to concern yourself with the internal details of the implementation of this class or to even care that it’s a set of binary flags. Later you’ll see there are manipulators to provide equivalent functionality in all the places you would use setf( ).
Here are the flag groups and their effects:
ios::basefield effect
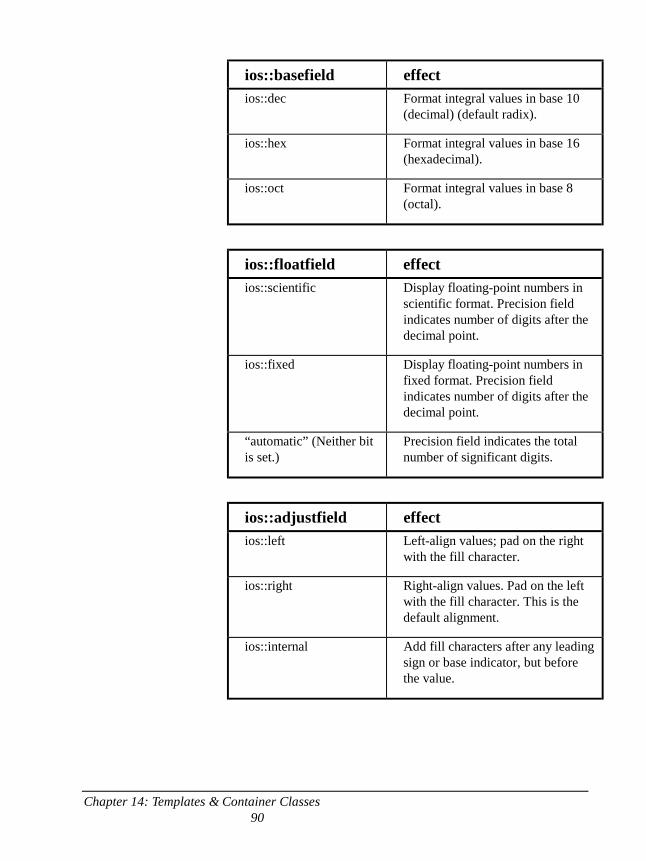
Chapter 14: Templates & Container Classes 90
ios::basefield effect ios::dec Format integral values in base 10
(decimal) (default radix).
ios::hex Format integral values in base 16 (hexadecimal).
ios::oct Format integral values in base 8 (octal).
ios::floatfield effect ios::scientific Display floating-point numbers in
scientific format. Precision field indicates number of digits after the decimal point.
ios::fixed Display floating-point numbers in fixed format. Precision field indicates number of digits after the decimal point.
“automatic” (Neither bit is set.)
Precision field indicates the total number of significant digits.
ios::adjustfield effect ios::left Left-align values; pad on the right
with the fill character.
ios::right Right-align values. Pad on the left with the fill character. This is the default alignment.
ios::internal Add fill characters after any leading sign or base indicator, but before the value.
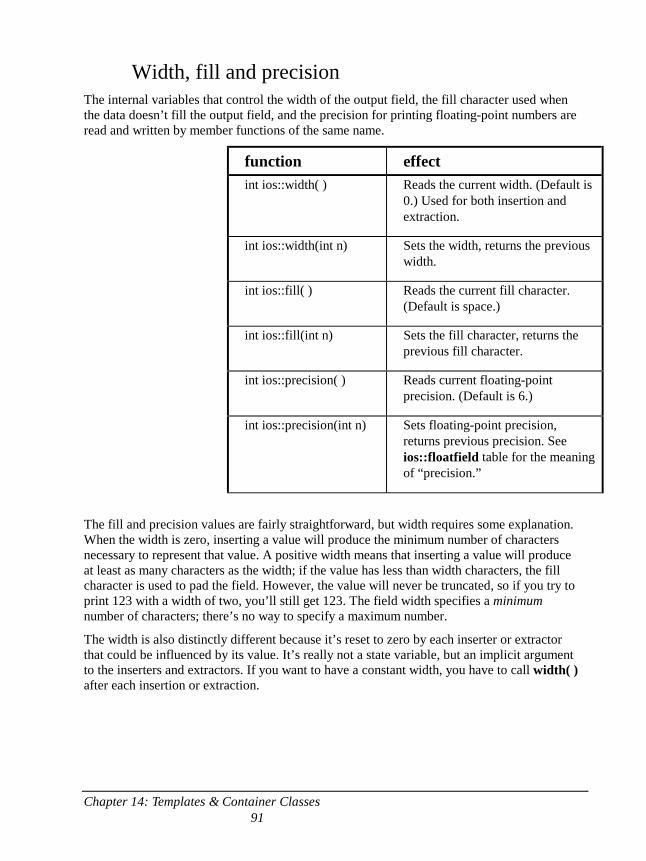
Chapter 14: Templates & Container Classes 91
Width, fill and precision The internal variables that control the width of the output field, the fill character used when the data doesn’t fill the output field, and the precision for printing floating-point numbers are read and written by member functions of the same name.
function effect int ios::width( ) Reads the current width. (Default is
0.) Used for both insertion and extraction.
int ios::width(int n) Sets the width, returns the previous width.
int ios::fill( ) Reads the current fill character. (Default is space.)
int ios::fill(int n) Sets the fill character, returns the previous fill character.
int ios::precision( ) Reads current floating-point precision. (Default is 6.)
int ios::precision(int n) Sets floating-point precision, returns previous precision. See ios::floatfield table for the meaning of “precision.”
The fill and precision values are fairly straightforward, but width requires some explanation. When the width is zero, inserting a value will produce the minimum number of characters necessary to represent that value. A positive width means that inserting a value will produce at least as many characters as the width; if the value has less than width characters, the fill character is used to pad the field. However, the value will never be truncated, so if you try to print 123 with a width of two, you’ll still get 123. The field width specifies a minimum number of characters; there’s no way to specify a maximum number.
The width is also distinctly different because it’s reset to zero by each inserter or extractor that could be influenced by its value. It’s really not a state variable, but an implicit argument to the inserters and extractors. If you want to have a constant width, you have to call width( ) after each insertion or extraction.
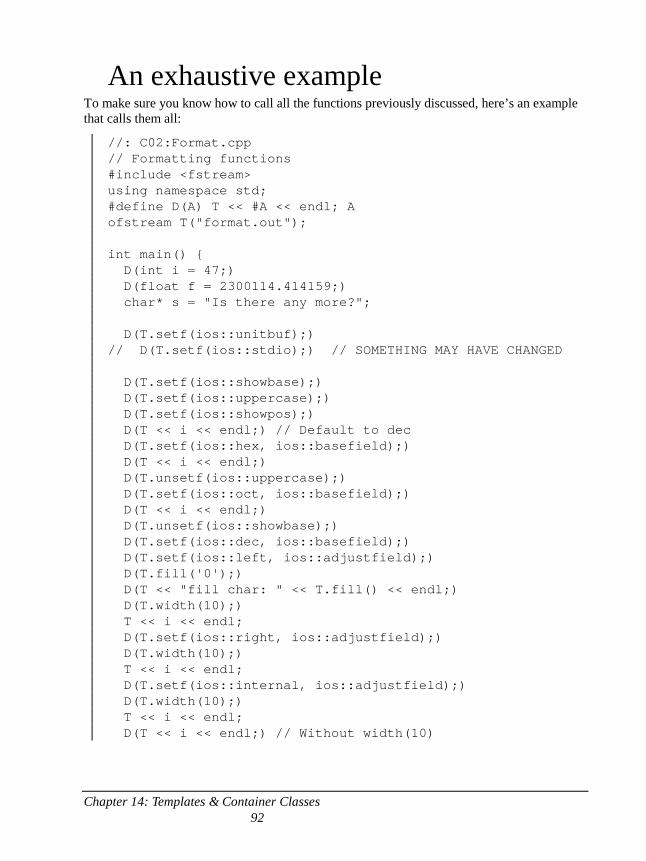
Chapter 14: Templates & Container Classes 92
An exhaustive example To make sure you know how to call all the functions previously discussed, here’s an example that calls them all:
//: C02:Format.cpp // Formatting functions #include <fstream> using namespace std; #define D(A) T << #A << endl; A ofstream T("format.out"); int main() { D(int i = 47;) D(float f = 2300114.414159;) char* s = "Is there any more?"; D(T.setf(ios::unitbuf);) // D(T.setf(ios::stdio);) // SOMETHING MAY HAVE CHANGED D(T.setf(ios::showbase);) D(T.setf(ios::uppercase);) D(T.setf(ios::showpos);) D(T << i << endl;) // Default to dec D(T.setf(ios::hex, ios::basefield);) D(T << i << endl;) D(T.unsetf(ios::uppercase);) D(T.setf(ios::oct, ios::basefield);) D(T << i << endl;) D(T.unsetf(ios::showbase);) D(T.setf(ios::dec, ios::basefield);) D(T.setf(ios::left, ios::adjustfield);) D(T.fill('0');) D(T << "fill char: " << T.fill() << endl;) D(T.width(10);) T << i << endl; D(T.setf(ios::right, ios::adjustfield);) D(T.width(10);) T << i << endl; D(T.setf(ios::internal, ios::adjustfield);) D(T.width(10);) T << i << endl; D(T << i << endl;) // Without width(10)
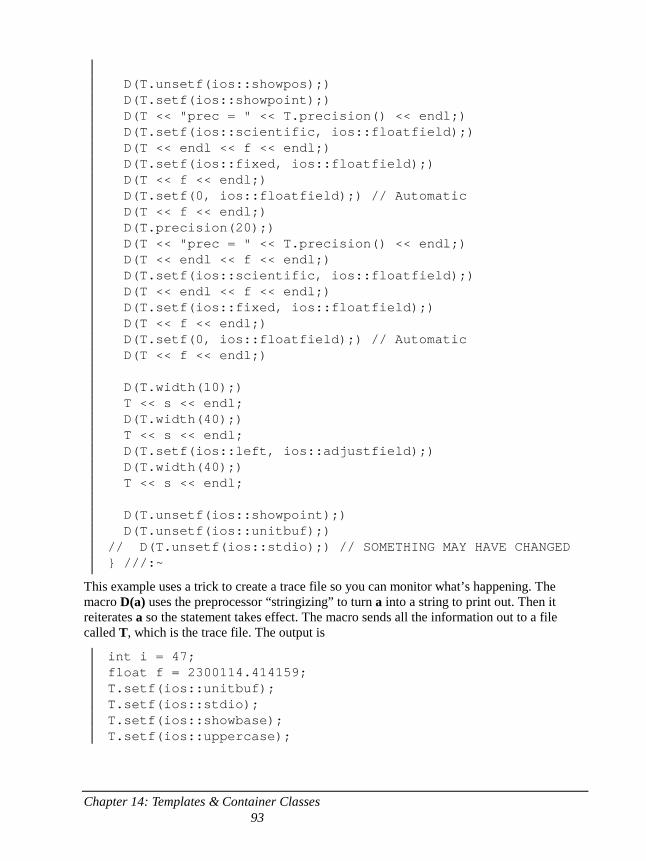
Chapter 14: Templates & Container Classes 93
D(T.unsetf(ios::showpos);) D(T.setf(ios::showpoint);) D(T << "prec = " << T.precision() << endl;) D(T.setf(ios::scientific, ios::floatfield);) D(T << endl << f << endl;) D(T.setf(ios::fixed, ios::floatfield);) D(T << f << endl;) D(T.setf(0, ios::floatfield);) // Automatic D(T << f << endl;) D(T.precision(20);) D(T << "prec = " << T.precision() << endl;) D(T << endl << f << endl;) D(T.setf(ios::scientific, ios::floatfield);) D(T << endl << f << endl;) D(T.setf(ios::fixed, ios::floatfield);) D(T << f << endl;) D(T.setf(0, ios::floatfield);) // Automatic D(T << f << endl;) D(T.width(10);) T << s << endl; D(T.width(40);) T << s << endl; D(T.setf(ios::left, ios::adjustfield);) D(T.width(40);) T << s << endl; D(T.unsetf(ios::showpoint);) D(T.unsetf(ios::unitbuf);) // D(T.unsetf(ios::stdio);) // SOMETHING MAY HAVE CHANGED } ///:~
This example uses a trick to create a trace file so you can monitor what’s happening. The macro D(a) uses the preprocessor “stringizing” to turn a into a string to print out. Then it reiterates a so the statement takes effect. The macro sends all the information out to a file called T, which is the trace file. The output is
int i = 47; float f = 2300114.414159; T.setf(ios::unitbuf); T.setf(ios::stdio); T.setf(ios::showbase); T.setf(ios::uppercase);
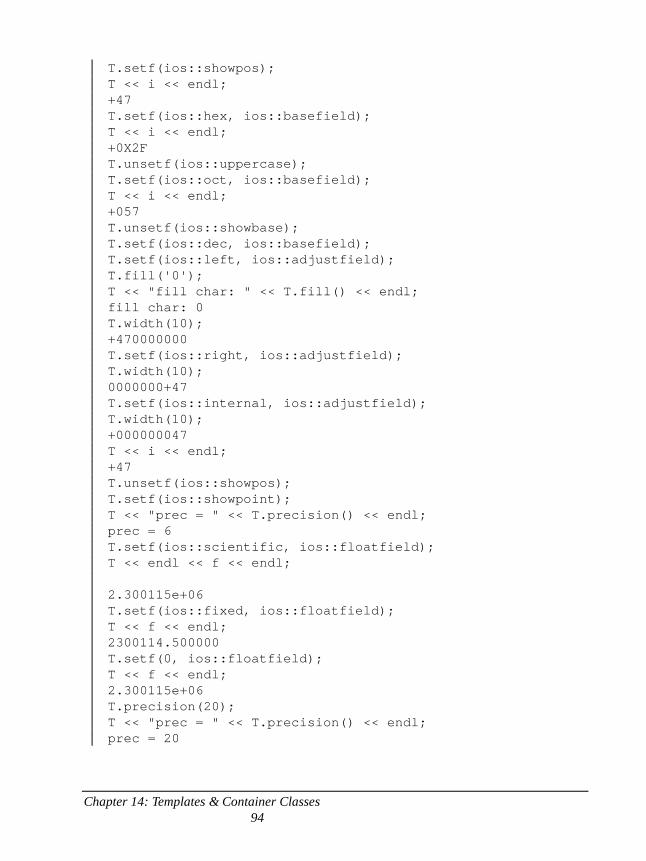
Chapter 14: Templates & Container Classes 94
T.setf(ios::showpos); T << i << endl; +47 T.setf(ios::hex, ios::basefield); T << i << endl; +0X2F T.unsetf(ios::uppercase); T.setf(ios::oct, ios::basefield); T << i << endl; +057 T.unsetf(ios::showbase); T.setf(ios::dec, ios::basefield); T.setf(ios::left, ios::adjustfield); T.fill('0'); T << "fill char: " << T.fill() << endl; fill char: 0 T.width(10); +470000000 T.setf(ios::right, ios::adjustfield); T.width(10); 0000000+47 T.setf(ios::internal, ios::adjustfield); T.width(10); +000000047 T << i << endl; +47 T.unsetf(ios::showpos); T.setf(ios::showpoint); T << "prec = " << T.precision() << endl; prec = 6 T.setf(ios::scientific, ios::floatfield); T << endl << f << endl; 2.300115e+06 T.setf(ios::fixed, ios::floatfield); T << f << endl; 2300114.500000 T.setf(0, ios::floatfield); T << f << endl; 2.300115e+06 T.precision(20); T << "prec = " << T.precision() << endl; prec = 20
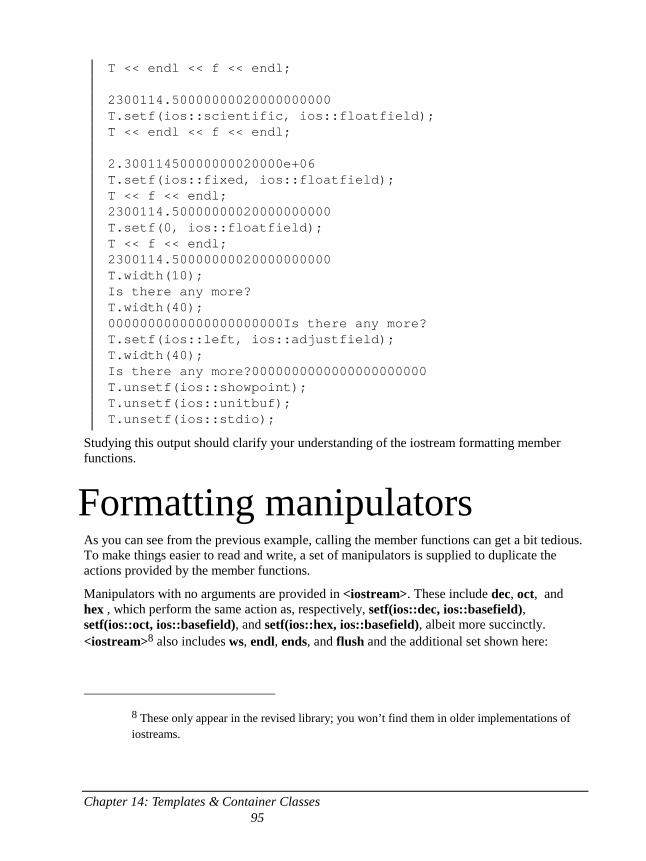
Chapter 14: Templates & Container Classes 95
T << endl << f << endl; 2300114.50000000020000000000 T.setf(ios::scientific, ios::floatfield); T << endl << f << endl; 2.30011450000000020000e+06 T.setf(ios::fixed, ios::floatfield); T << f << endl; 2300114.50000000020000000000 T.setf(0, ios::floatfield); T << f << endl; 2300114.50000000020000000000 T.width(10); Is there any more? T.width(40); 0000000000000000000000Is there any more? T.setf(ios::left, ios::adjustfield); T.width(40); Is there any more?0000000000000000000000 T.unsetf(ios::showpoint); T.unsetf(ios::unitbuf); T.unsetf(ios::stdio);
Studying this output should clarify your understanding of the iostream formatting member functions.
Formatting manipulators As you can see from the previous example, calling the member functions can get a bit tedious. To make things easier to read and write, a set of manipulators is supplied to duplicate the actions provided by the member functions.
Manipulators with no arguments are provided in <iostream>. These include dec, oct, and hex , which perform the same action as, respectively, setf(ios::dec, ios::basefield), setf(ios::oct, ios::basefield), and setf(ios::hex, ios::basefield), albeit more succinctly. <iostream>8 also includes ws, endl, ends, and flush and the additional set shown here:
8 These only appear in the revised library; you won’t find them in older implementations of iostreams.
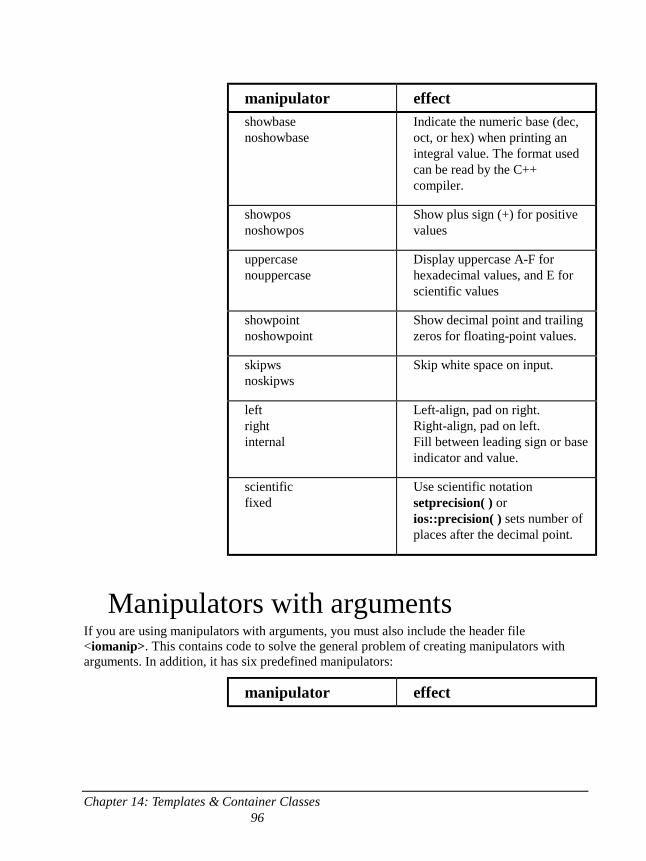
Chapter 14: Templates & Container Classes 96
manipulator effect showbase noshowbase
Indicate the numeric base (dec, oct, or hex) when printing an integral value. The format used can be read by the C++ compiler.
showpos noshowpos
Show plus sign (+) for positive values
uppercase nouppercase
Display uppercase A-F for hexadecimal values, and E for scientific values
showpoint noshowpoint
Show decimal point and trailing zeros for floating-point values.
skipws noskipws
Skip white space on input.
left right internal
Left-align, pad on right. Right-align, pad on left. Fill between leading sign or base indicator and value.
scientific fixed
Use scientific notation setprecision( ) or ios::precision( ) sets number of places after the decimal point.
Manipulators with arguments If you are using manipulators with arguments, you must also include the header file <iomanip>. This contains code to solve the general problem of creating manipulators with arguments. In addition, it has six predefined manipulators:
manipulator effect

Chapter 14: Templates & Container Classes 97
manipulator effect setiosflags (fmtflags n) Sets only the format flags
specified by n. Setting remains in effect until the next change, like ios::setf( ).
resetiosflags(fmtflags n) Clears only the format flags specified by n. Setting remains in effect until the next change, like ios::unsetf( ).
setbase(base n) Changes base to n, where n is 10, 8, or 16. (Anything else results in 0.) If n is zero, output is base 10, but input uses the C conventions: 10 is 10, 010 is 8, and 0xf is 15. You might as well use dec, oct, and hex for output.
setfill(char n) Changes the fill character to n, like ios::fill( ).
setprecision(int n) Changes the precision to n, like ios::precision( ).
setw(int n) Changes the field width to n, like ios::width( ).
If you’re using a lot of inserters, you can see how this can clean things up. As an example, here’s the previous program rewritten to use the manipulators. (The macro has been removed to make it easier to read.)
//: C02:Manips.cpp // Format.cpp using manipulators #include <fstream> #include <iomanip> using namespace std; int main() { ofstream trc("trace.out"); int i = 47; float f = 2300114.414159;
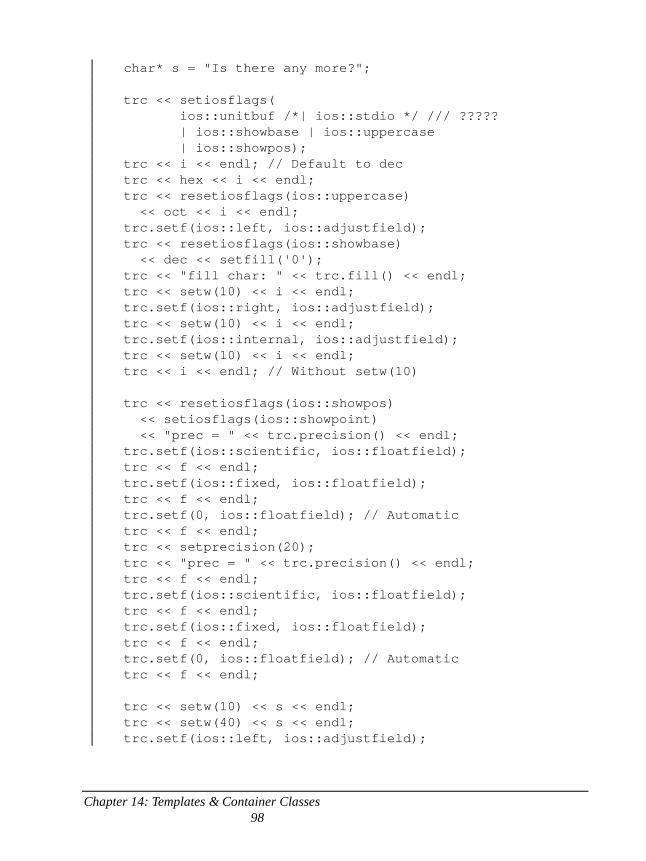
Chapter 14: Templates & Container Classes 98
char* s = "Is there any more?"; trc << setiosflags( ios::unitbuf /*| ios::stdio */ /// ????? | ios::showbase | ios::uppercase | ios::showpos); trc << i << endl; // Default to dec trc << hex << i << endl; trc << resetiosflags(ios::uppercase) << oct << i << endl; trc.setf(ios::left, ios::adjustfield); trc << resetiosflags(ios::showbase) << dec << setfill('0'); trc << "fill char: " << trc.fill() << endl; trc << setw(10) << i << endl; trc.setf(ios::right, ios::adjustfield); trc << setw(10) << i << endl; trc.setf(ios::internal, ios::adjustfield); trc << setw(10) << i << endl; trc << i << endl; // Without setw(10) trc << resetiosflags(ios::showpos) << setiosflags(ios::showpoint) << "prec = " << trc.precision() << endl; trc.setf(ios::scientific, ios::floatfield); trc << f << endl; trc.setf(ios::fixed, ios::floatfield); trc << f << endl; trc.setf(0, ios::floatfield); // Automatic trc << f << endl; trc << setprecision(20); trc << "prec = " << trc.precision() << endl; trc << f << endl; trc.setf(ios::scientific, ios::floatfield); trc << f << endl; trc.setf(ios::fixed, ios::floatfield); trc << f << endl; trc.setf(0, ios::floatfield); // Automatic trc << f << endl; trc << setw(10) << s << endl; trc << setw(40) << s << endl; trc.setf(ios::left, ios::adjustfield);
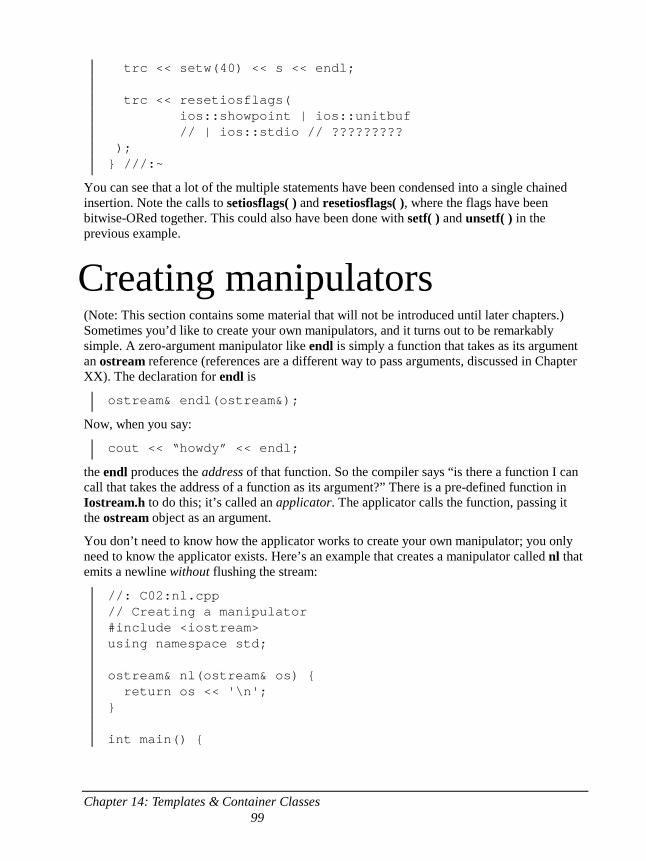
Chapter 14: Templates & Container Classes 99
trc << setw(40) << s << endl; trc << resetiosflags( ios::showpoint | ios::unitbuf // | ios::stdio // ????????? ); } ///:~
You can see that a lot of the multiple statements have been condensed into a single chained insertion. Note the calls to setiosflags( ) and resetiosflags( ), where the flags have been bitwise-ORed together. This could also have been done with setf( ) and unsetf( ) in the previous example.
Creating manipulators (Note: This section contains some material that will not be introduced until later chapters.) Sometimes you’d like to create your own manipulators, and it turns out to be remarkably simple. A zero-argument manipulator like endl is simply a function that takes as its argument an ostream reference (references are a different way to pass arguments, discussed in Chapter XX). The declaration for endl is
ostream& endl(ostream&);
Now, when you say:
cout << “howdy” << endl;
the endl produces the address of that function. So the compiler says “is there a function I can call that takes the address of a function as its argument?” There is a pre-defined function in Iostream.h to do this; it’s called an applicator. The applicator calls the function, passing it the ostream object as an argument.
You don’t need to know how the applicator works to create your own manipulator; you only need to know the applicator exists. Here’s an example that creates a manipulator called nl that emits a newline without flushing the stream:
//: C02:nl.cpp // Creating a manipulator #include <iostream> using namespace std; ostream& nl(ostream& os) { return os << '\n'; } int main() {
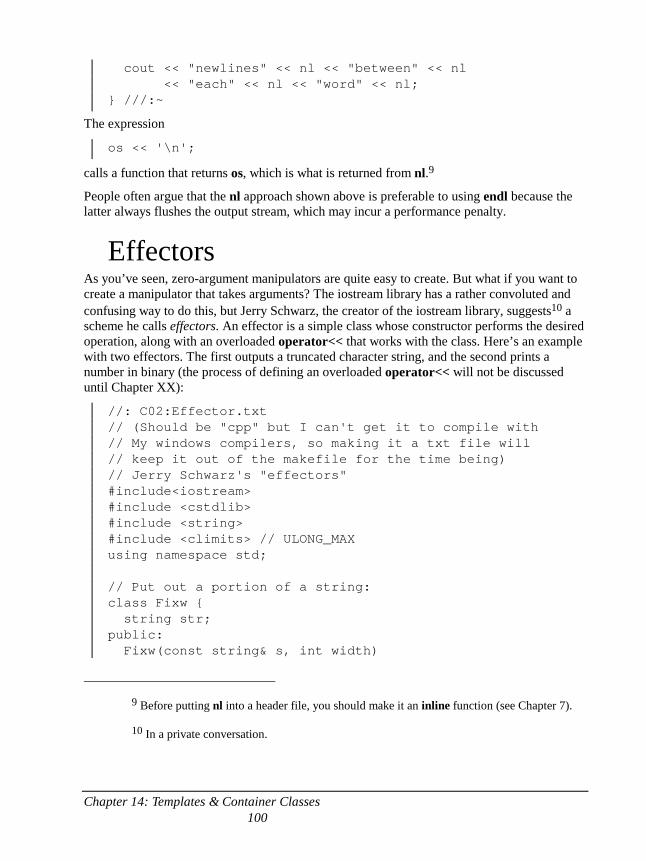
Chapter 14: Templates & Container Classes 100
cout << "newlines" << nl << "between" << nl << "each" << nl << "word" << nl; } ///:~
The expression
os << '\n';
calls a function that returns os, which is what is returned from nl.9
People often argue that the nl approach shown above is preferable to using endl because the latter always flushes the output stream, which may incur a performance penalty.
Effectors As you’ve seen, zero-argument manipulators are quite easy to create. But what if you want to create a manipulator that takes arguments? The iostream library has a rather convoluted and confusing way to do this, but Jerry Schwarz, the creator of the iostream library, suggests10 a scheme he calls effectors. An effector is a simple class whose constructor performs the desired operation, along with an overloaded operator<< that works with the class. Here’s an example with two effectors. The first outputs a truncated character string, and the second prints a number in binary (the process of defining an overloaded operator<< will not be discussed until Chapter XX):
//: C02:Effector.txt // (Should be "cpp" but I can't get it to compile with // My windows compilers, so making it a txt file will // keep it out of the makefile for the time being) // Jerry Schwarz's "effectors" #include<iostream> #include <cstdlib> #include <string> #include <climits> // ULONG_MAX using namespace std; // Put out a portion of a string: class Fixw { string str; public: Fixw(const string& s, int width)
9 Before putting nl into a header file, you should make it an inline function (see Chapter 7).
10 In a private conversation.
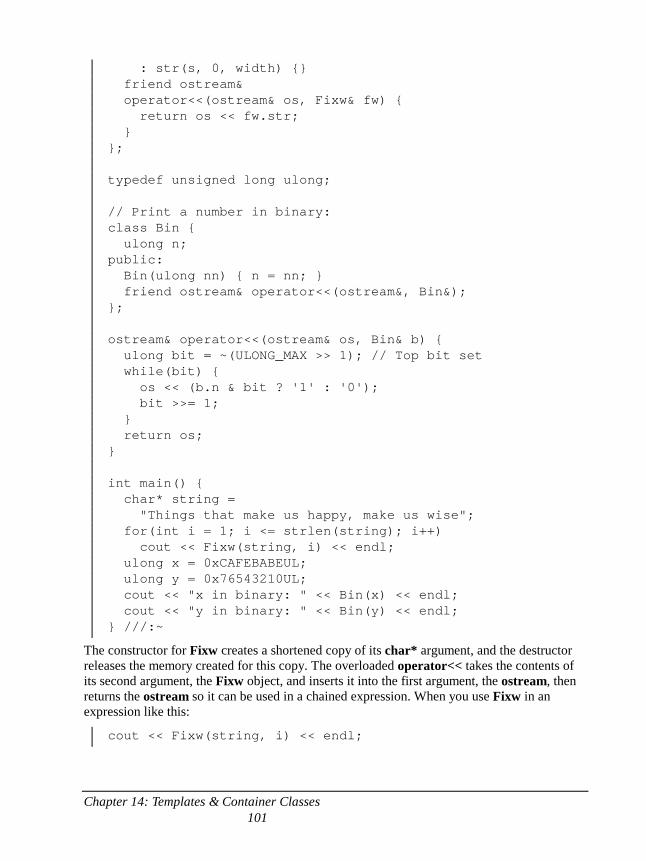
Chapter 14: Templates & Container Classes 101
: str(s, 0, width) {} friend ostream& operator<<(ostream& os, Fixw& fw) { return os << fw.str; } }; typedef unsigned long ulong; // Print a number in binary: class Bin { ulong n; public: Bin(ulong nn) { n = nn; } friend ostream& operator<<(ostream&, Bin&); }; ostream& operator<<(ostream& os, Bin& b) { ulong bit = ~(ULONG_MAX >> 1); // Top bit set while(bit) { os << (b.n & bit ? '1' : '0'); bit >>= 1; } return os; } int main() { char* string = "Things that make us happy, make us wise"; for(int i = 1; i <= strlen(string); i++) cout << Fixw(string, i) << endl; ulong x = 0xCAFEBABEUL; ulong y = 0x76543210UL; cout << "x in binary: " << Bin(x) << endl; cout << "y in binary: " << Bin(y) << endl; } ///:~
The constructor for Fixw creates a shortened copy of its char* argument, and the destructor releases the memory created for this copy. The overloaded operator<< takes the contents of its second argument, the Fixw object, and inserts it into the first argument, the ostream, then returns the ostream so it can be used in a chained expression. When you use Fixw in an expression like this:
cout << Fixw(string, i) << endl;
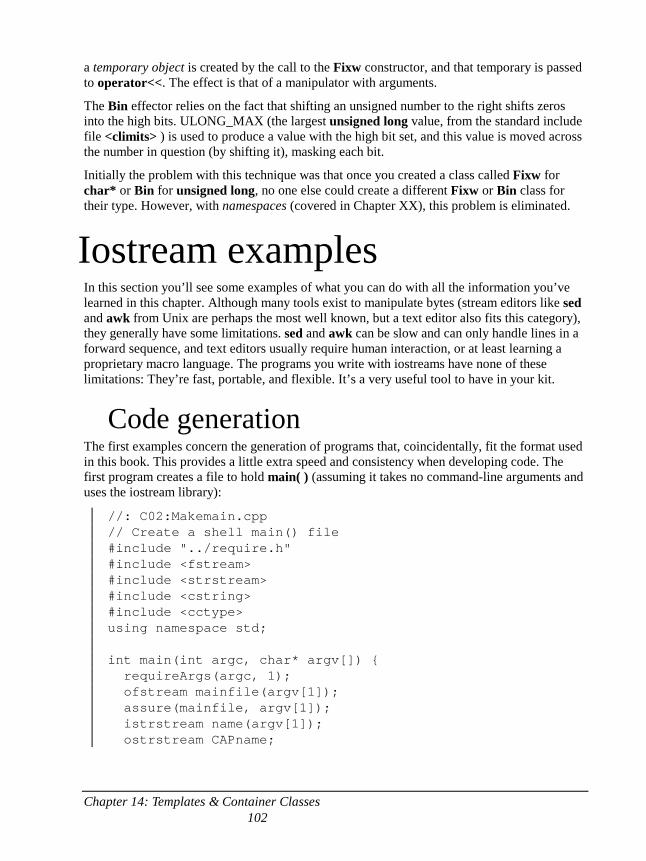
Chapter 14: Templates & Container Classes 102
a temporary object is created by the call to the Fixw constructor, and that temporary is passed to operator<<. The effect is that of a manipulator with arguments.
The Bin effector relies on the fact that shifting an unsigned number to the right shifts zeros into the high bits. ULONG_MAX (the largest unsigned long value, from the standard include file <climits> ) is used to produce a value with the high bit set, and this value is moved across the number in question (by shifting it), masking each bit.
Initially the problem with this technique was that once you created a class called Fixw for char* or Bin for unsigned long, no one else could create a different Fixw or Bin class for their type. However, with namespaces (covered in Chapter XX), this problem is eliminated.
Iostream examples In this section you’ll see some examples of what you can do with all the information you’ve learned in this chapter. Although many tools exist to manipulate bytes (stream editors like sed and awk from Unix are perhaps the most well known, but a text editor also fits this category), they generally have some limitations. sed and awk can be slow and can only handle lines in a forward sequence, and text editors usually require human interaction, or at least learning a proprietary macro language. The programs you write with iostreams have none of these limitations: They’re fast, portable, and flexible. It’s a very useful tool to have in your kit.
Code generation The first examples concern the generation of programs that, coincidentally, fit the format used in this book. This provides a little extra speed and consistency when developing code. The first program creates a file to hold main( ) (assuming it takes no command-line arguments and uses the iostream library):
//: C02:Makemain.cpp // Create a shell main() file #include "../require.h" #include <fstream> #include <strstream> #include <cstring> #include <cctype> using namespace std; int main(int argc, char* argv[]) { requireArgs(argc, 1); ofstream mainfile(argv[1]); assure(mainfile, argv[1]); istrstream name(argv[1]); ostrstream CAPname;
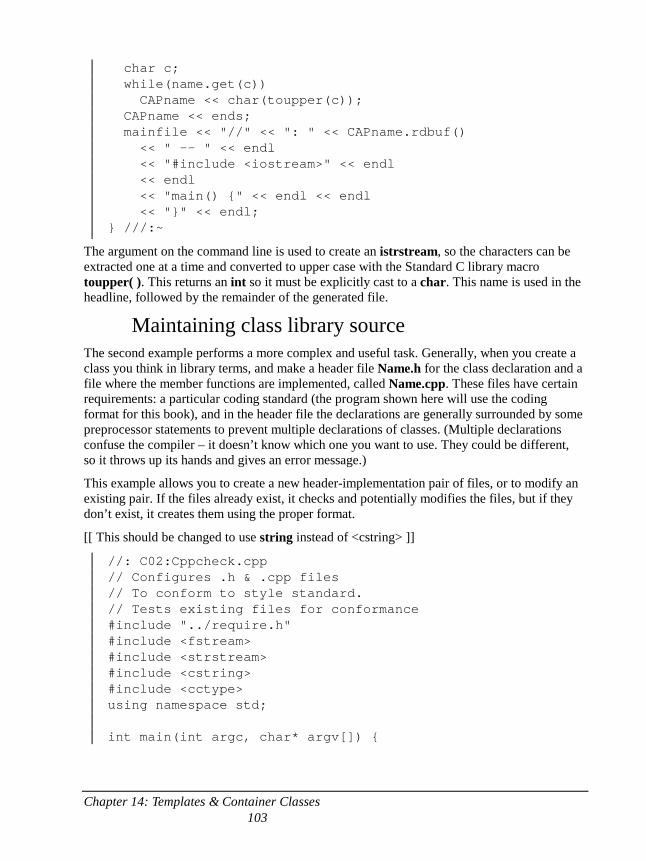
Chapter 14: Templates & Container Classes 103
char c; while(name.get(c)) CAPname << char(toupper(c)); CAPname << ends; mainfile << "//" << ": " << CAPname.rdbuf() << " -- " << endl << "#include <iostream>" << endl << endl << "main() {" << endl << endl << "}" << endl; } ///:~
The argument on the command line is used to create an istrstream, so the characters can be extracted one at a time and converted to upper case with the Standard C library macro toupper( ). This returns an int so it must be explicitly cast to a char. This name is used in the headline, followed by the remainder of the generated file.
Maintaining class library source The second example performs a more complex and useful task. Generally, when you create a class you think in library terms, and make a header file Name.h for the class declaration and a file where the member functions are implemented, called Name.cpp. These files have certain requirements: a particular coding standard (the program shown here will use the coding format for this book), and in the header file the declarations are generally surrounded by some preprocessor statements to prevent multiple declarations of classes. (Multiple declarations confuse the compiler – it doesn’t know which one you want to use. They could be different, so it throws up its hands and gives an error message.)
This example allows you to create a new header-implementation pair of files, or to modify an existing pair. If the files already exist, it checks and potentially modifies the files, but if they don’t exist, it creates them using the proper format.
[[ This should be changed to use string instead of <cstring> ]]
//: C02:Cppcheck.cpp // Configures .h & .cpp files // To conform to style standard. // Tests existing files for conformance #include "../require.h" #include <fstream> #include <strstream> #include <cstring> #include <cctype> using namespace std; int main(int argc, char* argv[]) {
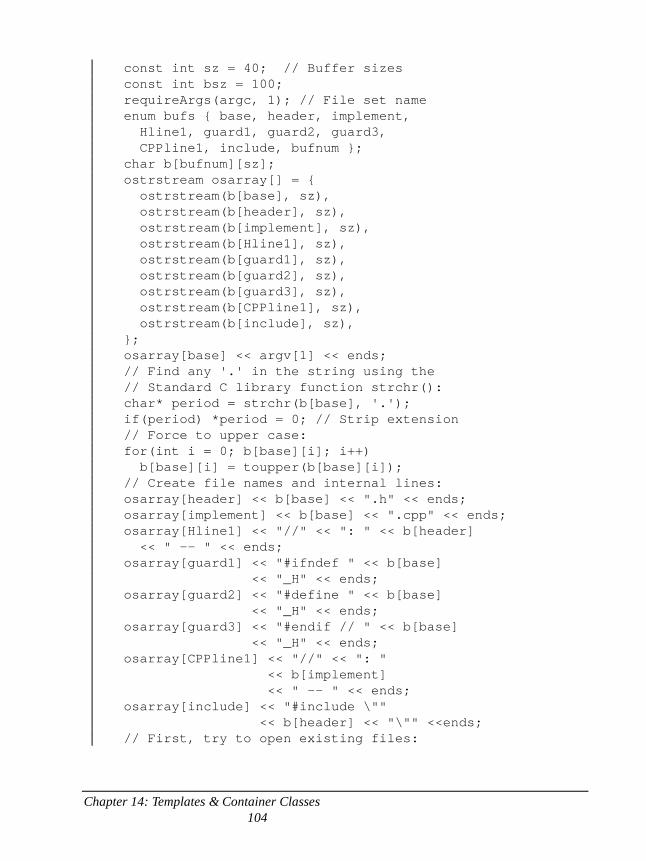
Chapter 14: Templates & Container Classes 104
const int sz = 40; // Buffer sizes const int bsz = 100; requireArgs(argc, 1); // File set name enum bufs { base, header, implement, Hline1, guard1, guard2, guard3, CPPline1, include, bufnum }; char b[bufnum][sz]; ostrstream osarray[] = { ostrstream(b[base], sz), ostrstream(b[header], sz), ostrstream(b[implement], sz), ostrstream(b[Hline1], sz), ostrstream(b[guard1], sz), ostrstream(b[guard2], sz), ostrstream(b[guard3], sz), ostrstream(b[CPPline1], sz), ostrstream(b[include], sz), }; osarray[base] << argv[1] << ends; // Find any '.' in the string using the // Standard C library function strchr(): char* period = strchr(b[base], '.'); if(period) *period = 0; // Strip extension // Force to upper case: for(int i = 0; b[base][i]; i++) b[base][i] = toupper(b[base][i]); // Create file names and internal lines: osarray[header] << b[base] << ".h" << ends; osarray[implement] << b[base] << ".cpp" << ends; osarray[Hline1] << "//" << ": " << b[header] << " -- " << ends; osarray[guard1] << "#ifndef " << b[base] << "_H" << ends; osarray[guard2] << "#define " << b[base] << "_H" << ends; osarray[guard3] << "#endif // " << b[base] << "_H" << ends; osarray[CPPline1] << "//" << ": " << b[implement] << " -- " << ends; osarray[include] << "#include \"" << b[header] << "\"" <<ends; // First, try to open existing files:
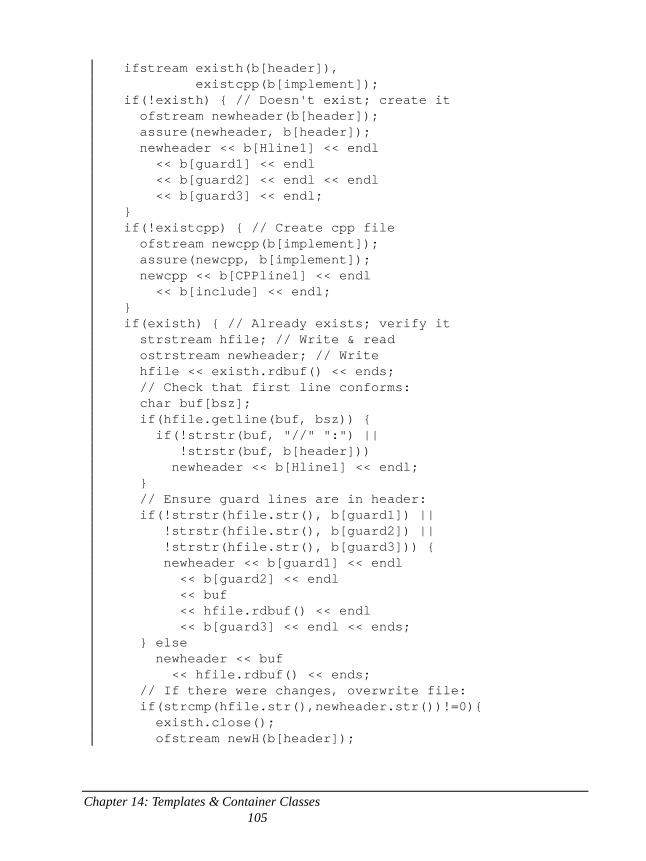
Chapter 14: Templates & Container Classes 105
ifstream existh(b[header]), existcpp(b[implement]); if(!existh) { // Doesn't exist; create it ofstream newheader(b[header]); assure(newheader, b[header]); newheader << b[Hline1] << endl << b[guard1] << endl << b[guard2] << endl << endl << b[guard3] << endl; } if(!existcpp) { // Create cpp file ofstream newcpp(b[implement]); assure(newcpp, b[implement]); newcpp << b[CPPline1] << endl << b[include] << endl; } if(existh) { // Already exists; verify it strstream hfile; // Write & read ostrstream newheader; // Write hfile << existh.rdbuf() << ends; // Check that first line conforms: char buf[bsz]; if(hfile.getline(buf, bsz)) { if(!strstr(buf, "//" ":") || !strstr(buf, b[header])) newheader << b[Hline1] << endl; } // Ensure guard lines are in header: if(!strstr(hfile.str(), b[guard1]) || !strstr(hfile.str(), b[guard2]) || !strstr(hfile.str(), b[guard3])) { newheader << b[guard1] << endl << b[guard2] << endl << buf << hfile.rdbuf() << endl << b[guard3] << endl << ends; } else newheader << buf << hfile.rdbuf() << ends; // If there were changes, overwrite file: if(strcmp(hfile.str(),newheader.str())!=0){ existh.close(); ofstream newH(b[header]);
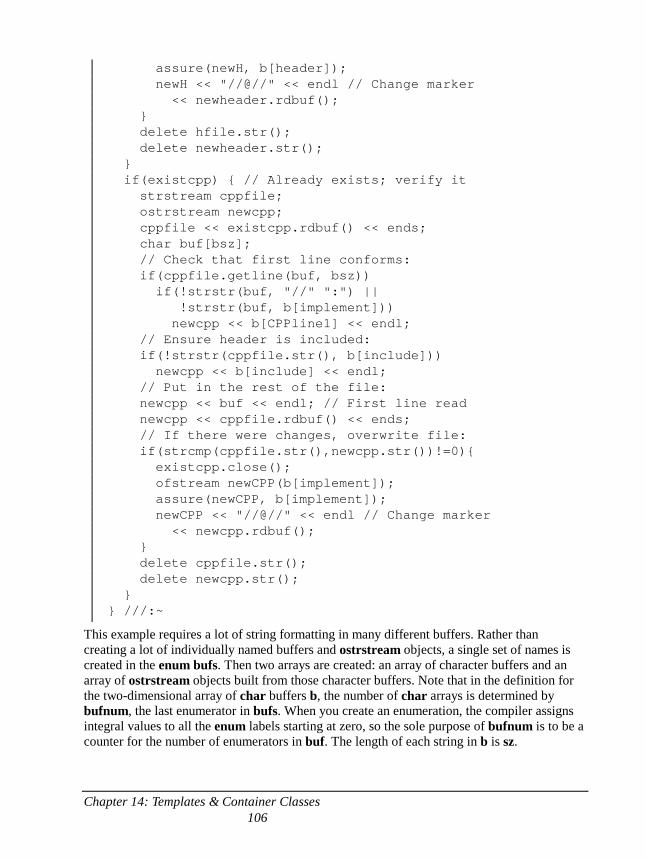
Chapter 14: Templates & Container Classes 106
assure(newH, b[header]); newH << "//@//" << endl // Change marker << newheader.rdbuf(); } delete hfile.str(); delete newheader.str(); } if(existcpp) { // Already exists; verify it strstream cppfile; ostrstream newcpp; cppfile << existcpp.rdbuf() << ends; char buf[bsz]; // Check that first line conforms: if(cppfile.getline(buf, bsz)) if(!strstr(buf, "//" ":") || !strstr(buf, b[implement])) newcpp << b[CPPline1] << endl; // Ensure header is included: if(!strstr(cppfile.str(), b[include])) newcpp << b[include] << endl; // Put in the rest of the file: newcpp << buf << endl; // First line read newcpp << cppfile.rdbuf() << ends; // If there were changes, overwrite file: if(strcmp(cppfile.str(),newcpp.str())!=0){ existcpp.close(); ofstream newCPP(b[implement]); assure(newCPP, b[implement]); newCPP << "//@//" << endl // Change marker << newcpp.rdbuf(); } delete cppfile.str(); delete newcpp.str(); } } ///:~
This example requires a lot of string formatting in many different buffers. Rather than creating a lot of individually named buffers and ostrstream objects, a single set of names is created in the enum bufs. Then two arrays are created: an array of character buffers and an array of ostrstream objects built from those character buffers. Note that in the definition for the two-dimensional array of char buffers b, the number of char arrays is determined by bufnum, the last enumerator in bufs. When you create an enumeration, the compiler assigns integral values to all the enum labels starting at zero, so the sole purpose of bufnum is to be a counter for the number of enumerators in buf. The length of each string in b is sz.
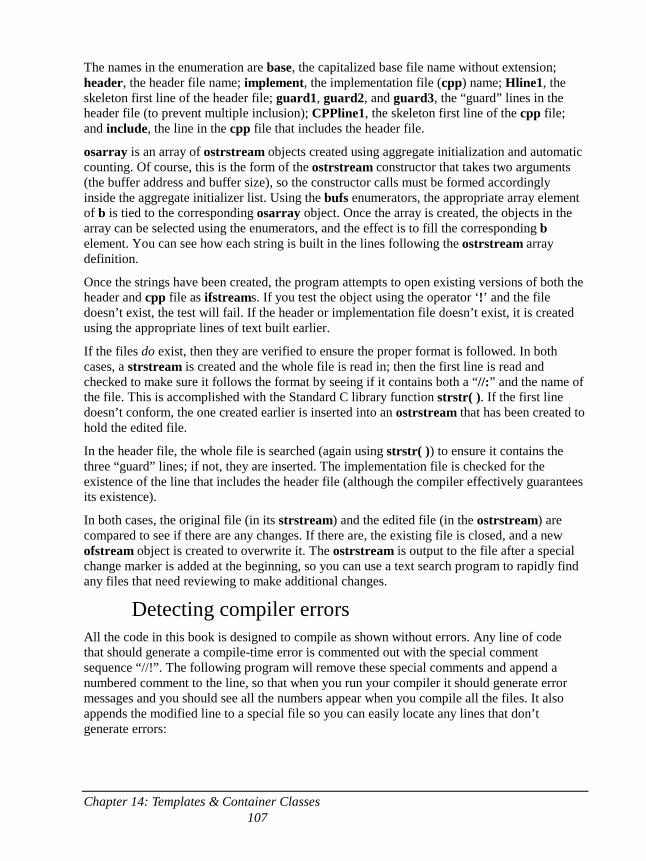
Chapter 14: Templates & Container Classes 107
The names in the enumeration are base, the capitalized base file name without extension; header, the header file name; implement, the implementation file (cpp) name; Hline1, the skeleton first line of the header file; guard1, guard2, and guard3, the “guard” lines in the header file (to prevent multiple inclusion); CPPline1, the skeleton first line of the cpp file; and include, the line in the cpp file that includes the header file.
osarray is an array of ostrstream objects created using aggregate initialization and automatic counting. Of course, this is the form of the ostrstream constructor that takes two arguments (the buffer address and buffer size), so the constructor calls must be formed accordingly inside the aggregate initializer list. Using the bufs enumerators, the appropriate array element of b is tied to the corresponding osarray object. Once the array is created, the objects in the array can be selected using the enumerators, and the effect is to fill the corresponding b element. You can see how each string is built in the lines following the ostrstream array definition.
Once the strings have been created, the program attempts to open existing versions of both the header and cpp file as ifstreams. If you test the object using the operator ‘!’ and the file doesn’t exist, the test will fail. If the header or implementation file doesn’t exist, it is created using the appropriate lines of text built earlier.
If the files do exist, then they are verified to ensure the proper format is followed. In both cases, a strstream is created and the whole file is read in; then the first line is read and checked to make sure it follows the format by seeing if it contains both a “//:” and the name of the file. This is accomplished with the Standard C library function strstr( ). If the first line doesn’t conform, the one created earlier is inserted into an ostrstream that has been created to hold the edited file.
In the header file, the whole file is searched (again using strstr( )) to ensure it contains the three “guard” lines; if not, they are inserted. The implementation file is checked for the existence of the line that includes the header file (although the compiler effectively guarantees its existence).
In both cases, the original file (in its strstream) and the edited file (in the ostrstream) are compared to see if there are any changes. If there are, the existing file is closed, and a new ofstream object is created to overwrite it. The ostrstream is output to the file after a special change marker is added at the beginning, so you can use a text search program to rapidly find any files that need reviewing to make additional changes.
Detecting compiler errors All the code in this book is designed to compile as shown without errors. Any line of code that should generate a compile-time error is commented out with the special comment sequence “//!”. The following program will remove these special comments and append a numbered comment to the line, so that when you run your compiler it should generate error messages and you should see all the numbers appear when you compile all the files. It also appends the modified line to a special file so you can easily locate any lines that don’t generate errors:
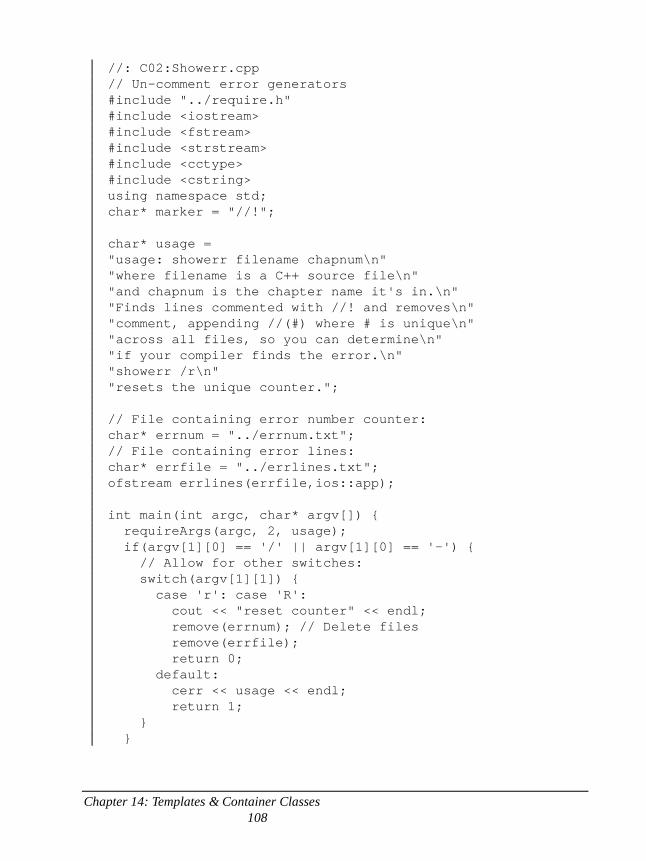
Chapter 14: Templates & Container Classes 108
//: C02:Showerr.cpp // Un-comment error generators #include "../require.h" #include <iostream> #include <fstream> #include <strstream> #include <cctype> #include <cstring> using namespace std; char* marker = "//!"; char* usage = "usage: showerr filename chapnum\n" "where filename is a C++ source file\n" "and chapnum is the chapter name it's in.\n" "Finds lines commented with //! and removes\n" "comment, appending //(#) where # is unique\n" "across all files, so you can determine\n" "if your compiler finds the error.\n" "showerr /r\n" "resets the unique counter."; // File containing error number counter: char* errnum = "../errnum.txt"; // File containing error lines: char* errfile = "../errlines.txt"; ofstream errlines(errfile,ios::app); int main(int argc, char* argv[]) { requireArgs(argc, 2, usage); if(argv[1][0] == '/' || argv[1][0] == '-') { // Allow for other switches: switch(argv[1][1]) { case 'r': case 'R': cout << "reset counter" << endl; remove(errnum); // Delete files remove(errfile); return 0; default: cerr << usage << endl; return 1; } }
Chapter 14: Templates & Container Classes 109
char* chapter = argv[2]; strstream edited; // Edited file int counter = 0; { ifstream infile(argv[1]); assure(infile, argv[1]); ifstream count(errnum); assure(count, errnum); if(count) count >> counter; int linecount = 0; const int sz = 255; char buf[sz]; while(infile.getline(buf, sz)) { linecount++; // Eat white space: int i = 0; while(isspace(buf[i])) i++; // Find marker at start of line: if(strstr(&buf[i], marker) == &buf[i]) { // Erase marker: memset(&buf[i], ' ', strlen(marker)); // Append counter & error info: ostrstream out(buf, sz, ios::ate); out << "//(" << ++counter << ") " << "Chapter " << chapter << " File: " << argv[1] << " Line " << linecount << endl << ends; edited << buf; errlines << buf; // Append error file } else edited << buf << "\n"; // Just copy } } // Closes files ofstream outfile(argv[1]); // Overwrites assure(outfile, argv[1]); outfile << edited.rdbuf(); ofstream count(errnum); // Overwrites assure(count, errnum); count << counter; // Save new counter } ///:~
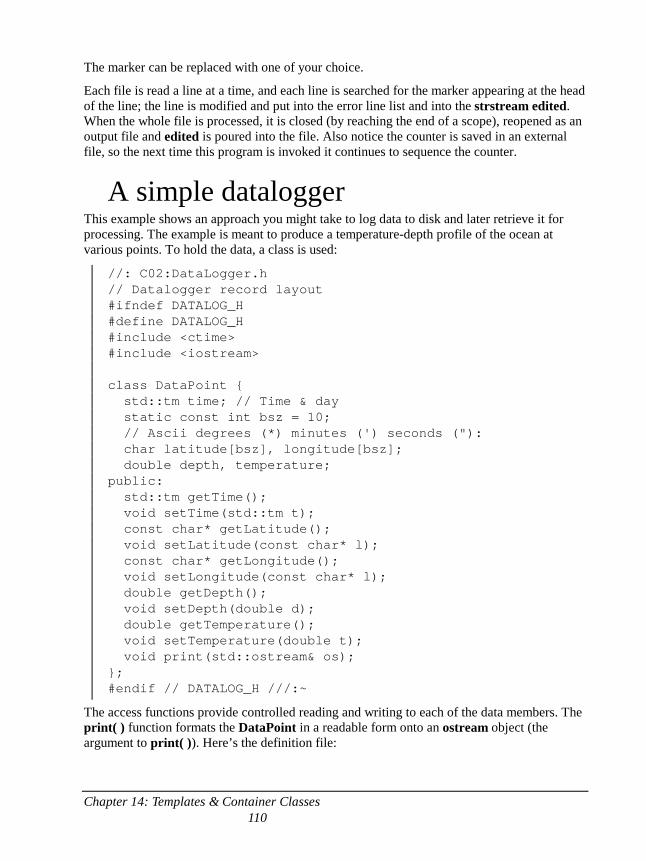
Chapter 14: Templates & Container Classes 110
The marker can be replaced with one of your choice.
Each file is read a line at a time, and each line is searched for the marker appearing at the head of the line; the line is modified and put into the error line list and into the strstream edited. When the whole file is processed, it is closed (by reaching the end of a scope), reopened as an output file and edited is poured into the file. Also notice the counter is saved in an external file, so the next time this program is invoked it continues to sequence the counter.
A simple datalogger This example shows an approach you might take to log data to disk and later retrieve it for processing. The example is meant to produce a temperature-depth profile of the ocean at various points. To hold the data, a class is used:
//: C02:DataLogger.h // Datalogger record layout #ifndef DATALOG_H #define DATALOG_H #include <ctime> #include <iostream> class DataPoint { std::tm time; // Time & day static const int bsz = 10; // Ascii degrees (*) minutes (') seconds ("): char latitude[bsz], longitude[bsz]; double depth, temperature; public: std::tm getTime(); void setTime(std::tm t); const char* getLatitude(); void setLatitude(const char* l); const char* getLongitude(); void setLongitude(const char* l); double getDepth(); void setDepth(double d); double getTemperature(); void setTemperature(double t); void print(std::ostream& os); }; #endif // DATALOG_H ///:~
The access functions provide controlled reading and writing to each of the data members. The print( ) function formats the DataPoint in a readable form onto an ostream object (the argument to print( )). Here’s the definition file:
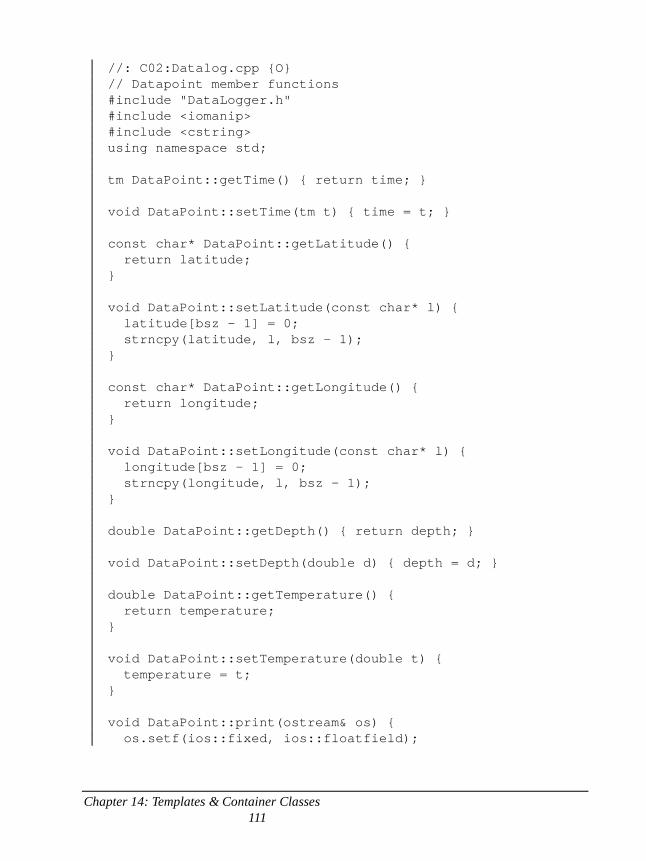
Chapter 14: Templates & Container Classes 111
//: C02:Datalog.cpp {O} // Datapoint member functions #include "DataLogger.h" #include <iomanip> #include <cstring> using namespace std; tm DataPoint::getTime() { return time; } void DataPoint::setTime(tm t) { time = t; } const char* DataPoint::getLatitude() { return latitude; } void DataPoint::setLatitude(const char* l) { latitude[bsz - 1] = 0; strncpy(latitude, l, bsz - 1); } const char* DataPoint::getLongitude() { return longitude; } void DataPoint::setLongitude(const char* l) { longitude[bsz - 1] = 0; strncpy(longitude, l, bsz - 1); } double DataPoint::getDepth() { return depth; } void DataPoint::setDepth(double d) { depth = d; } double DataPoint::getTemperature() { return temperature; } void DataPoint::setTemperature(double t) { temperature = t; } void DataPoint::print(ostream& os) { os.setf(ios::fixed, ios::floatfield);
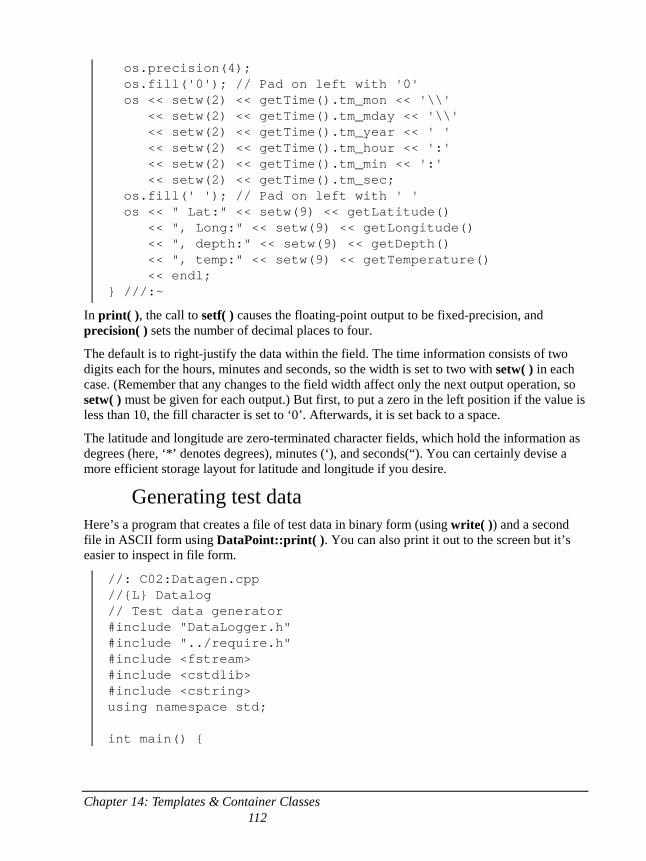
Chapter 14: Templates & Container Classes 112
os.precision(4); os.fill('0'); // Pad on left with '0' os << setw(2) << getTime().tm_mon << '\\' << setw(2) << getTime().tm_mday << '\\' << setw(2) << getTime().tm_year << ' ' << setw(2) << getTime().tm_hour << ':' << setw(2) << getTime().tm_min << ':' << setw(2) << getTime().tm_sec; os.fill(' '); // Pad on left with ' ' os << " Lat:" << setw(9) << getLatitude() << ", Long:" << setw(9) << getLongitude() << ", depth:" << setw(9) << getDepth() << ", temp:" << setw(9) << getTemperature() << endl; } ///:~
In print( ), the call to setf( ) causes the floating-point output to be fixed-precision, and precision( ) sets the number of decimal places to four.
The default is to right-justify the data within the field. The time information consists of two digits each for the hours, minutes and seconds, so the width is set to two with setw( ) in each case. (Remember that any changes to the field width affect only the next output operation, so setw( ) must be given for each output.) But first, to put a zero in the left position if the value is less than 10, the fill character is set to ‘0’. Afterwards, it is set back to a space.
The latitude and longitude are zero-terminated character fields, which hold the information as degrees (here, ‘*’ denotes degrees), minutes (‘), and seconds(“). You can certainly devise a more efficient storage layout for latitude and longitude if you desire.
Generating test data Here’s a program that creates a file of test data in binary form (using write( )) and a second file in ASCII form using DataPoint::print( ). You can also print it out to the screen but it’s easier to inspect in file form.
//: C02:Datagen.cpp //{L} Datalog // Test data generator #include "DataLogger.h" #include "../require.h" #include <fstream> #include <cstdlib> #include <cstring> using namespace std; int main() {
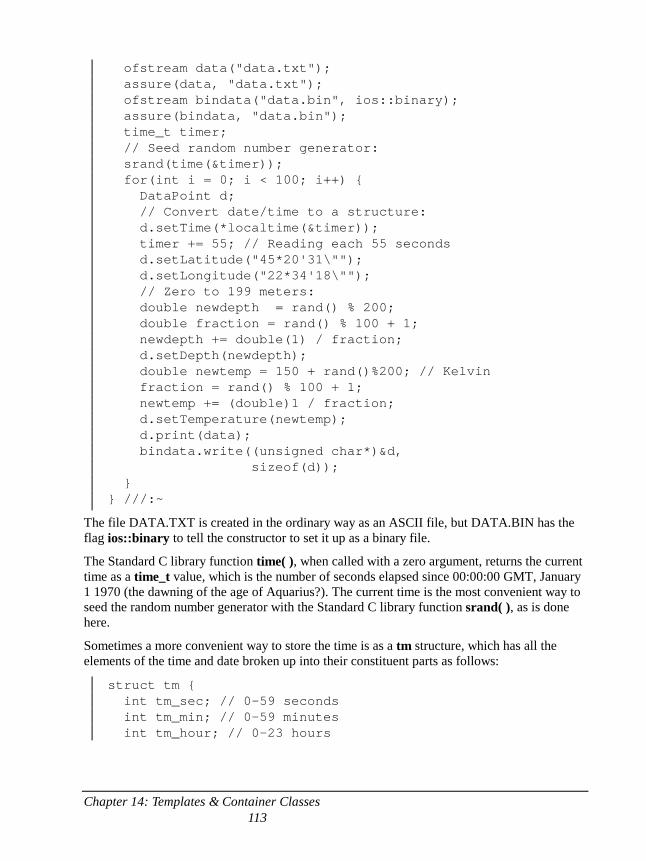
Chapter 14: Templates & Container Classes 113
ofstream data("data.txt"); assure(data, "data.txt"); ofstream bindata("data.bin", ios::binary); assure(bindata, "data.bin"); time_t timer; // Seed random number generator: srand(time(&timer)); for(int i = 0; i < 100; i++) { DataPoint d; // Convert date/time to a structure: d.setTime(*localtime(&timer)); timer += 55; // Reading each 55 seconds d.setLatitude("45*20'31\""); d.setLongitude("22*34'18\""); // Zero to 199 meters: double newdepth = rand() % 200; double fraction = rand() % 100 + 1; newdepth += double(1) / fraction; d.setDepth(newdepth); double newtemp = 150 + rand()%200; // Kelvin fraction = rand() % 100 + 1; newtemp += (double)1 / fraction; d.setTemperature(newtemp); d.print(data); bindata.write((unsigned char*)&d, sizeof(d)); } } ///:~
The file DATA.TXT is created in the ordinary way as an ASCII file, but DATA.BIN has the flag ios::binary to tell the constructor to set it up as a binary file.
The Standard C library function time( ), when called with a zero argument, returns the current time as a time_t value, which is the number of seconds elapsed since 00:00:00 GMT, January 1 1970 (the dawning of the age of Aquarius?). The current time is the most convenient way to seed the random number generator with the Standard C library function srand( ), as is done here.
Sometimes a more convenient way to store the time is as a tm structure, which has all the elements of the time and date broken up into their constituent parts as follows:
struct tm { int tm_sec; // 0-59 seconds int tm_min; // 0-59 minutes int tm_hour; // 0-23 hours
Chapter 14: Templates & Container Classes 114
int tm_mday; // Day of month int tm_mon; // 0-11 months int tm_year; // Calendar year int tm_wday; // Sunday == 0, etc. int tm_yday; // 0-365 day of year int tm_isdst; // Daylight savings? };
To convert from the time in seconds to the local time in the tm format, you use the Standard C library localtime( ) function, which takes the number of seconds and returns a pointer to the resulting tm. This tm, however, is a static structure inside the localtime( ) function, which is rewritten every time localtime( ) is called. To copy the contents into the tm struct inside DataPoint, you might think you must copy each element individually. However, all you must do is a structure assignment, and the compiler will take care of the rest. This means the right-hand side must be a structure, not a pointer, so the result of localtime( ) is dereferenced. The desired result is achieved with
d.setTime(*localtime(&timer));
After this, the timer is incremented by 55 seconds to give an interesting interval between readings.
The latitude and longitude used are fixed values to indicate a set of readings at a single location. Both the depth and the temperature are generated with the Standard C library rand( ) function, which returns a pseudorandom number between zero and the constant RAND_MAX. To put this in a desired range, use the modulus operator % and the upper end of the range. These numbers are integral; to add a fractional part, a second call to rand( ) is made, and the value is inverted after adding one (to prevent divide-by-zero errors).
In effect, the DATA.BIN file is being used as a container for the data in the program, even though the container exists on disk and not in RAM. To send the data out to the disk in binary form, write( ) is used. The first argument is the starting address of the source block – notice it must be cast to an unsigned char* because that’s what the function expects. The second argument is the number of bytes to write, which is the size of the DataPoint object. Because no pointers are contained in DataPoint, there is no problem in writing the object to disk. If the object is more sophisticated, you must implement a scheme for serialization . (Most vendor class libraries have some sort of serialization structure built into them.)
Verifying & viewing the data To check the validity of the data stored in binary format, it is read from the disk and put in text form in DATA2.TXT, so that file can be compared to DATA.TXT for verification. In the following program, you can see how simple this data recovery is. After the test file is created, the records are read at the command of the user.
//: C02:Datascan.cpp //{L} Datalog // Verify and view logged data
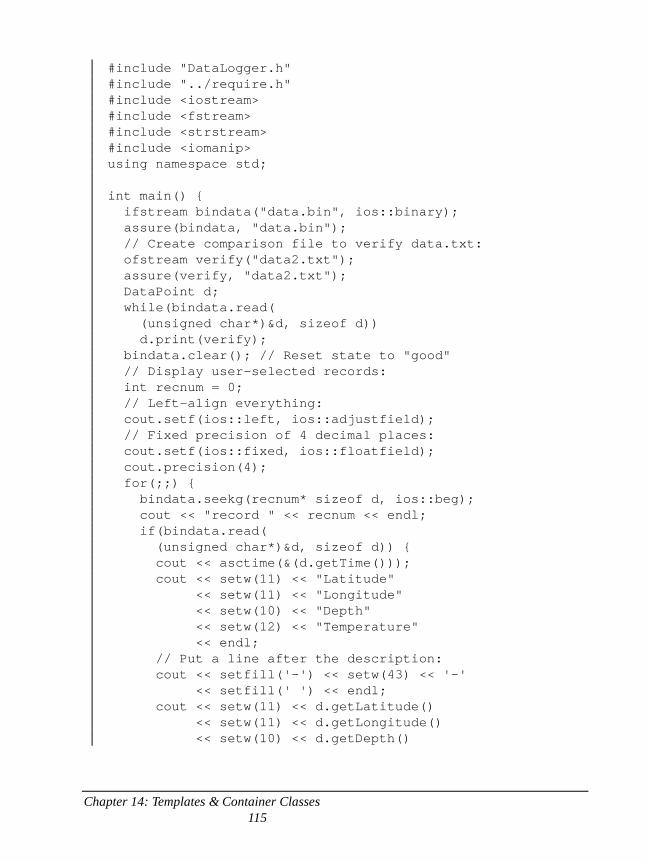
Chapter 14: Templates & Container Classes 115
#include "DataLogger.h" #include "../require.h" #include <iostream> #include <fstream> #include <strstream> #include <iomanip> using namespace std; int main() { ifstream bindata("data.bin", ios::binary); assure(bindata, "data.bin"); // Create comparison file to verify data.txt: ofstream verify("data2.txt"); assure(verify, "data2.txt"); DataPoint d; while(bindata.read( (unsigned char*)&d, sizeof d)) d.print(verify); bindata.clear(); // Reset state to "good" // Display user-selected records: int recnum = 0; // Left-align everything: cout.setf(ios::left, ios::adjustfield); // Fixed precision of 4 decimal places: cout.setf(ios::fixed, ios::floatfield); cout.precision(4); for(;;) { bindata.seekg(recnum* sizeof d, ios::beg); cout << "record " << recnum << endl; if(bindata.read( (unsigned char*)&d, sizeof d)) { cout << asctime(&(d.getTime())); cout << setw(11) << "Latitude" << setw(11) << "Longitude" << setw(10) << "Depth" << setw(12) << "Temperature" << endl; // Put a line after the description: cout << setfill('-') << setw(43) << '-' << setfill(' ') << endl; cout << setw(11) << d.getLatitude() << setw(11) << d.getLongitude() << setw(10) << d.getDepth()
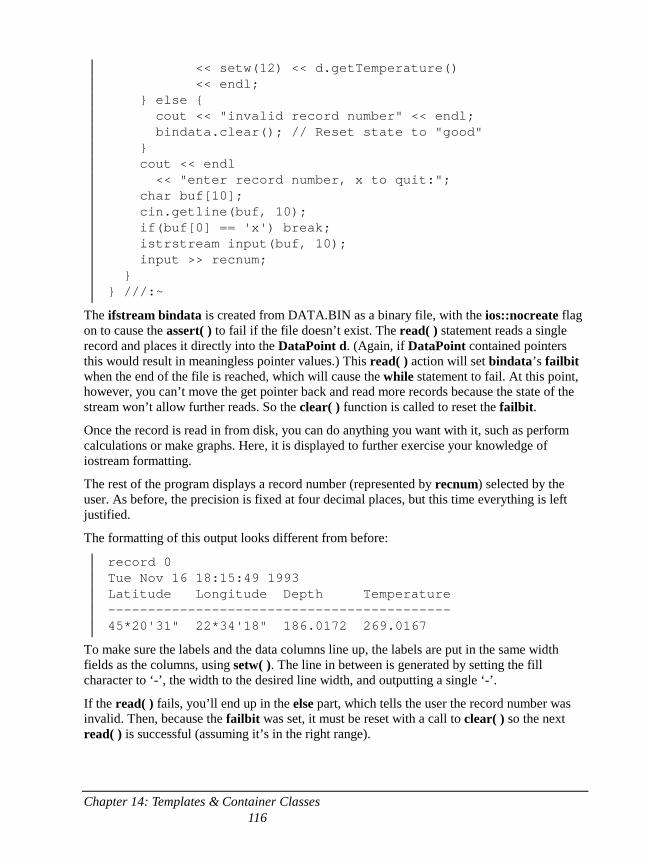
Chapter 14: Templates & Container Classes 116
<< setw(12) << d.getTemperature() << endl; } else { cout << "invalid record number" << endl; bindata.clear(); // Reset state to "good" } cout << endl << "enter record number, x to quit:"; char buf[10]; cin.getline(buf, 10); if(buf[0] == 'x') break; istrstream input(buf, 10); input >> recnum; } } ///:~
The ifstream bindata is created from DATA.BIN as a binary file, with the ios::nocreate flag on to cause the assert( ) to fail if the file doesn’t exist. The read( ) statement reads a single record and places it directly into the DataPoint d. (Again, if DataPoint contained pointers this would result in meaningless pointer values.) This read( ) action will set bindata’s failbit when the end of the file is reached, which will cause the while statement to fail. At this point, however, you can’t move the get pointer back and read more records because the state of the stream won’t allow further reads. So the clear( ) function is called to reset the failbit.
Once the record is read in from disk, you can do anything you want with it, such as perform calculations or make graphs. Here, it is displayed to further exercise your knowledge of iostream formatting.
The rest of the program displays a record number (represented by recnum) selected by the user. As before, the precision is fixed at four decimal places, but this time everything is left justified.
The formatting of this output looks different from before:
record 0 Tue Nov 16 18:15:49 1993 Latitude Longitude Depth Temperature ------------------------------------------- 45*20'31" 22*34'18" 186.0172 269.0167
To make sure the labels and the data columns line up, the labels are put in the same width fields as the columns, using setw( ). The line in between is generated by setting the fill character to ‘-’, the width to the desired line width, and outputting a single ‘-’.
If the read( ) fails, you’ll end up in the else part, which tells the user the record number was invalid. Then, because the failbit was set, it must be reset with a call to clear( ) so the next read( ) is successful (assuming it’s in the right range).
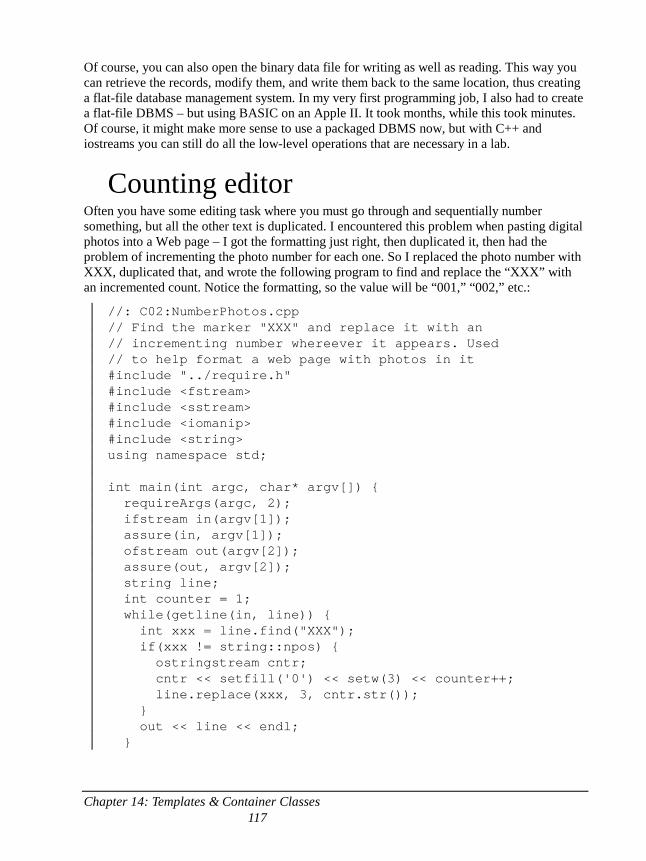
Chapter 14: Templates & Container Classes 117
Of course, you can also open the binary data file for writing as well as reading. This way you can retrieve the records, modify them, and write them back to the same location, thus creating a flat-file database management system. In my very first programming job, I also had to create a flat-file DBMS – but using BASIC on an Apple II. It took months, while this took minutes. Of course, it might make more sense to use a packaged DBMS now, but with C++ and iostreams you can still do all the low-level operations that are necessary in a lab.
Counting editor Often you have some editing task where you must go through and sequentially number something, but all the other text is duplicated. I encountered this problem when pasting digital photos into a Web page – I got the formatting just right, then duplicated it, then had the problem of incrementing the photo number for each one. So I replaced the photo number with XXX, duplicated that, and wrote the following program to find and replace the “XXX” with an incremented count. Notice the formatting, so the value will be “001,” “002,” etc.:
//: C02:NumberPhotos.cpp // Find the marker "XXX" and replace it with an // incrementing number whereever it appears. Used // to help format a web page with photos in it #include "../require.h" #include <fstream> #include <sstream> #include <iomanip> #include <string> using namespace std; int main(int argc, char* argv[]) { requireArgs(argc, 2); ifstream in(argv[1]); assure(in, argv[1]); ofstream out(argv[2]); assure(out, argv[2]); string line; int counter = 1; while(getline(in, line)) { int xxx = line.find("XXX"); if(xxx != string::npos) { ostringstream cntr; cntr << setfill('0') << setw(3) << counter++; line.replace(xxx, 3, cntr.str()); } out << line << endl; }
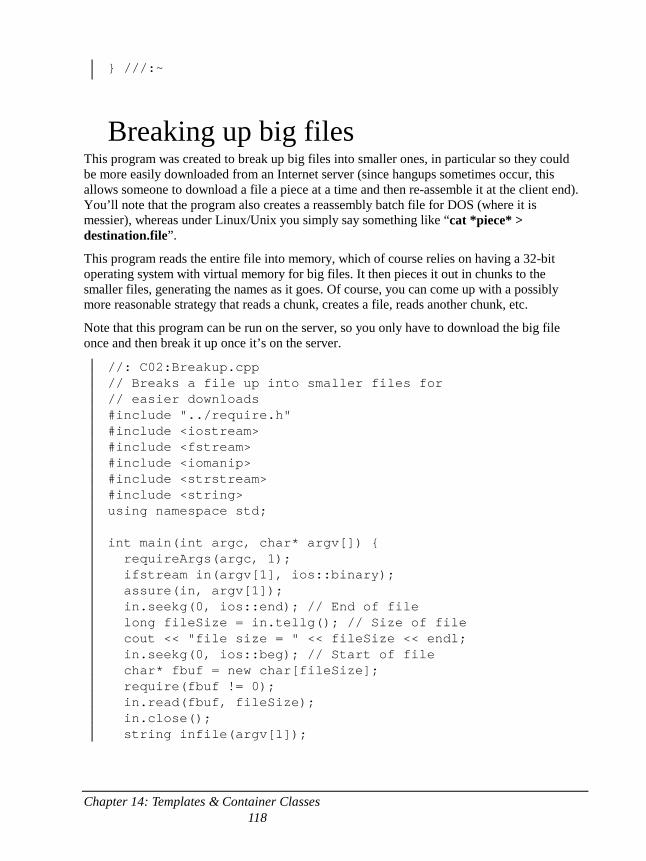
Chapter 14: Templates & Container Classes 118
} ///:~
Breaking up big files This program was created to break up big files into smaller ones, in particular so they could be more easily downloaded from an Internet server (since hangups sometimes occur, this allows someone to download a file a piece at a time and then re-assemble it at the client end). You’ll note that the program also creates a reassembly batch file for DOS (where it is messier), whereas under Linux/Unix you simply say something like “cat *piece* > destination.file”.
This program reads the entire file into memory, which of course relies on having a 32-bit operating system with virtual memory for big files. It then pieces it out in chunks to the smaller files, generating the names as it goes. Of course, you can come up with a possibly more reasonable strategy that reads a chunk, creates a file, reads another chunk, etc.
Note that this program can be run on the server, so you only have to download the big file once and then break it up once it’s on the server.
//: C02:Breakup.cpp // Breaks a file up into smaller files for // easier downloads #include "../require.h" #include <iostream> #include <fstream> #include <iomanip> #include <strstream> #include <string> using namespace std; int main(int argc, char* argv[]) { requireArgs(argc, 1); ifstream in(argv[1], ios::binary); assure(in, argv[1]); in.seekg(0, ios::end); // End of file long fileSize = in.tellg(); // Size of file cout << "file size = " << fileSize << endl; in.seekg(0, ios::beg); // Start of file char* fbuf = new char[fileSize]; require(fbuf != 0); in.read(fbuf, fileSize); in.close(); string infile(argv[1]);
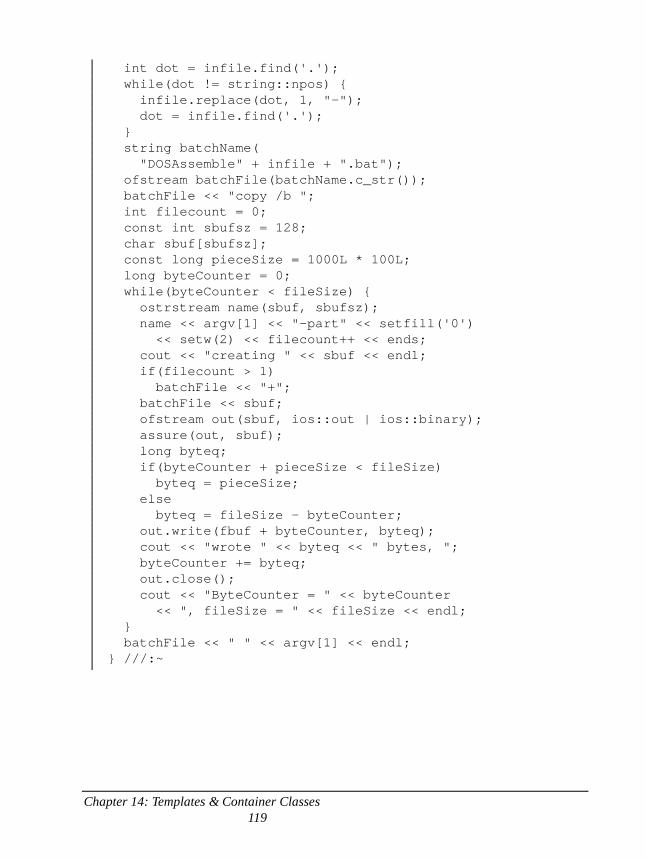
Chapter 14: Templates & Container Classes 119
int dot = infile.find('.'); while(dot != string::npos) { infile.replace(dot, 1, "-"); dot = infile.find('.'); } string batchName( "DOSAssemble" + infile + ".bat"); ofstream batchFile(batchName.c_str()); batchFile << "copy /b "; int filecount = 0; const int sbufsz = 128; char sbuf[sbufsz]; const long pieceSize = 1000L * 100L; long byteCounter = 0; while(byteCounter < fileSize) { ostrstream name(sbuf, sbufsz); name << argv[1] << "-part" << setfill('0') << setw(2) << filecount++ << ends; cout << "creating " << sbuf << endl; if(filecount > 1) batchFile << "+"; batchFile << sbuf; ofstream out(sbuf, ios::out | ios::binary); assure(out, sbuf); long byteq; if(byteCounter + pieceSize < fileSize) byteq = pieceSize; else byteq = fileSize - byteCounter; out.write(fbuf + byteCounter, byteq); cout << "wrote " << byteq << " bytes, "; byteCounter += byteq; out.close(); cout << "ByteCounter = " << byteCounter << ", fileSize = " << fileSize << endl; } batchFile << " " << argv[1] << endl; } ///:~
Chapter 14: Templates & Container Classes 120
Summary This chapter has given you a fairly thorough introduction to the iostream class library. In all likelihood, it is all you need to create programs using iostreams. (In later chapters you’ll see simple examples of adding iostream functionality to your own classes.) However, you should be aware that there are some additional features in iostreams that are not used often, but which you can discover by looking at the iostream header files and by reading your compiler’s documentation on iostreams.
Exercises 1. Open a file by creating an ifstream object called in. Make an ostrstream
object called os, and read the entire contents into the ostrstream using the rdbuf( ) member function. Get the address of os’s char* with the str( ) function, and capitalize every character in the file using the Standard C toupper( ) macro. Write the result out to a new file, and delete the memory allocated by os.
2. Create a program that opens a file (the first argument on the command line) and searches it for any one of a set of words (the remaining arguments on the command line). Read the input a line at a time, and print out the lines (with line numbers) that match.
3. Write a program that adds a copyright notice to the beginning of all source-code files. This is a small modification to exercise 1.
4. Use your favorite text-searching program (grep, for example) to output the names (only) of all the files that contain a particular pattern. Redirect the output into a file. Write a program that uses the contents of that file to generate a batch file that invokes your editor on each of the files found by the search program.
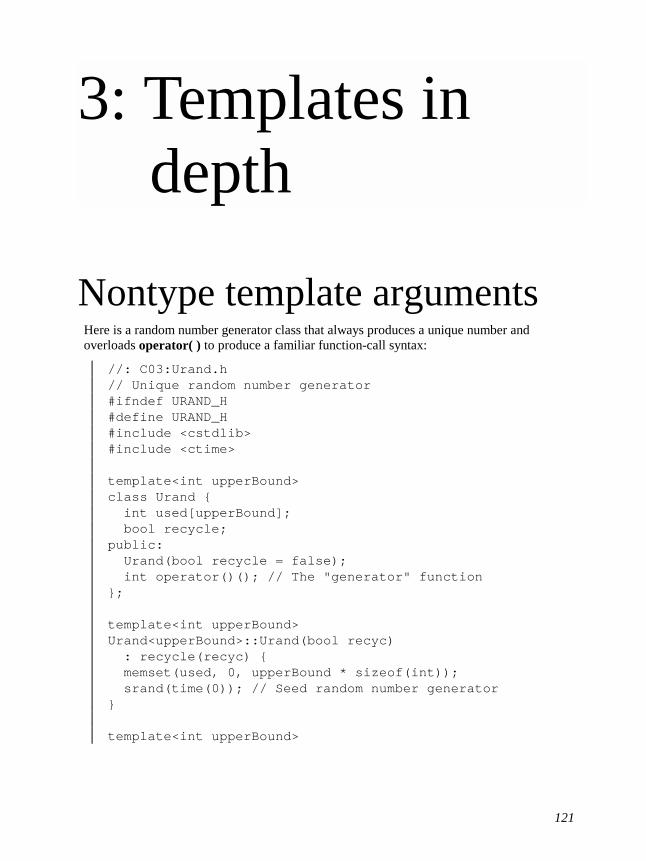
121
3: Templates in depth
Nontype template arguments Here is a random number generator class that always produces a unique number and overloads operator( ) to produce a familiar function-call syntax:
//: C03:Urand.h // Unique random number generator #ifndef URAND_H #define URAND_H #include <cstdlib> #include <ctime> template<int upperBound> class Urand { int used[upperBound]; bool recycle; public: Urand(bool recycle = false); int operator()(); // The "generator" function }; template<int upperBound> Urand<upperBound>::Urand(bool recyc) : recycle(recyc) { memset(used, 0, upperBound * sizeof(int)); srand(time(0)); // Seed random number generator } template<int upperBound>
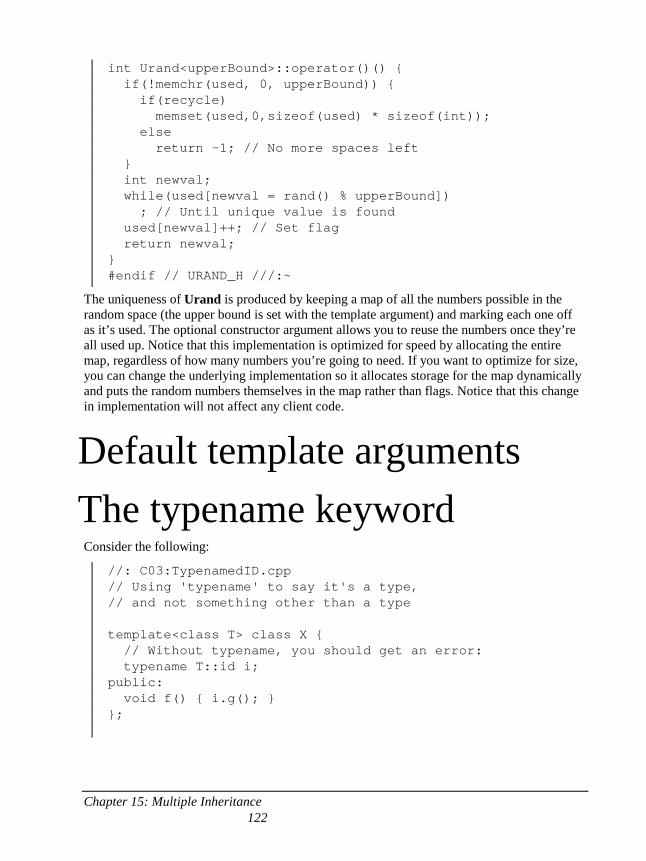
Chapter 15: Multiple Inheritance 122
int Urand<upperBound>::operator()() { if(!memchr(used, 0, upperBound)) { if(recycle) memset(used,0,sizeof(used) * sizeof(int)); else return -1; // No more spaces left } int newval; while(used[newval = rand() % upperBound]) ; // Until unique value is found used[newval]++; // Set flag return newval; } #endif // URAND_H ///:~
The uniqueness of Urand is produced by keeping a map of all the numbers possible in the random space (the upper bound is set with the template argument) and marking each one off as it’s used. The optional constructor argument allows you to reuse the numbers once they’re all used up. Notice that this implementation is optimized for speed by allocating the entire map, regardless of how many numbers you’re going to need. If you want to optimize for size, you can change the underlying implementation so it allocates storage for the map dynamically and puts the random numbers themselves in the map rather than flags. Notice that this change in implementation will not affect any client code.
Default template arguments The typename keyword Consider the following:
//: C03:TypenamedID.cpp // Using 'typename' to say it's a type, // and not something other than a type template<class T> class X { // Without typename, you should get an error: typename T::id i; public: void f() { i.g(); } };

Chapter 15: Multiple Inheritance 123
class Y { public: class id { public: void g() {} }; }; int main() { Y y; X<Y> xy; xy.f(); } ///:~
The template definition assumes that the class T that you hand it must have a nested identifier of some kind called id. But id could be a member object of T, in which case you can perform operations on id directly, but you couldn’t “create an object” of “the type id.” However, that’s exactly what is happening here: the identifier id is being treated as if it were actually a nested type inside T. In the case of class Y, id is in fact a nested type, but (without the typename keyword) the compiler can’t know that when it’s compiling X.
If, when it sees an identifier in a template, the compiler has the option of treating that identifier as a type or as something other than a type, then it will assume that the identifier refers to something other than a type. That is, it will assume that the identifier refers to an object (including variables of primitive types), an enumeration or something similar. However, it will not – cannot – just assume that it is a type. Thus, the compiler gets confused when we pretend it’s a type.
The typename keyword tells the compiler to interpret a particular name as a type. It must be used for a name that:
1. Is a qualified name, one that is nested within another type.
2. Depends on a template argument. That is, a template argument is somehow involved in the name. The template argument causes the ambiguity when the compiler makes the simplest assumption: that the name refers to something other than a type.
Because the default behavior of the compiler is to assume that a name that fits the above two points is not a type, you must use typename even in places where you think that the compiler ought to be able to figure out the right way to interpret the name on its own. In the above example, when the compiler sees T::id, it knows (because of the typename keyword) that id refers to a nested type and thus it can create an object of that type.
The short version of the rule is: if your type is a qualified name that involves a template argument, you must use typename.
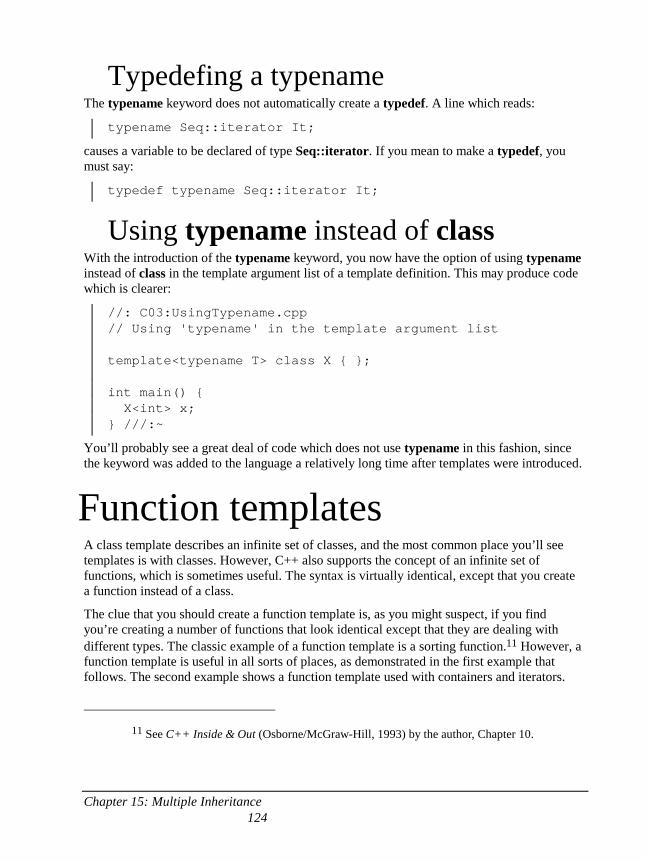
Chapter 15: Multiple Inheritance 124
Typedefing a typename The typename keyword does not automatically create a typedef. A line which reads:
typename Seq::iterator It;
causes a variable to be declared of type Seq::iterator. If you mean to make a typedef, you must say:
typedef typename Seq::iterator It;
Using typename instead of class With the introduction of the typename keyword, you now have the option of using typename instead of class in the template argument list of a template definition. This may produce code which is clearer:
//: C03:UsingTypename.cpp // Using 'typename' in the template argument list template<typename T> class X { }; int main() { X<int> x; } ///:~
You’ll probably see a great deal of code which does not use typename in this fashion, since the keyword was added to the language a relatively long time after templates were introduced.
Function templates A class template describes an infinite set of classes, and the most common place you’ll see templates is with classes. However, C++ also supports the concept of an infinite set of functions, which is sometimes useful. The syntax is virtually identical, except that you create a function instead of a class.
The clue that you should create a function template is, as you might suspect, if you find you’re creating a number of functions that look identical except that they are dealing with different types. The classic example of a function template is a sorting function.11 However, a function template is useful in all sorts of places, as demonstrated in the first example that follows. The second example shows a function template used with containers and iterators.
11 See C++ Inside & Out (Osborne/McGraw-Hill, 1993) by the author, Chapter 10.
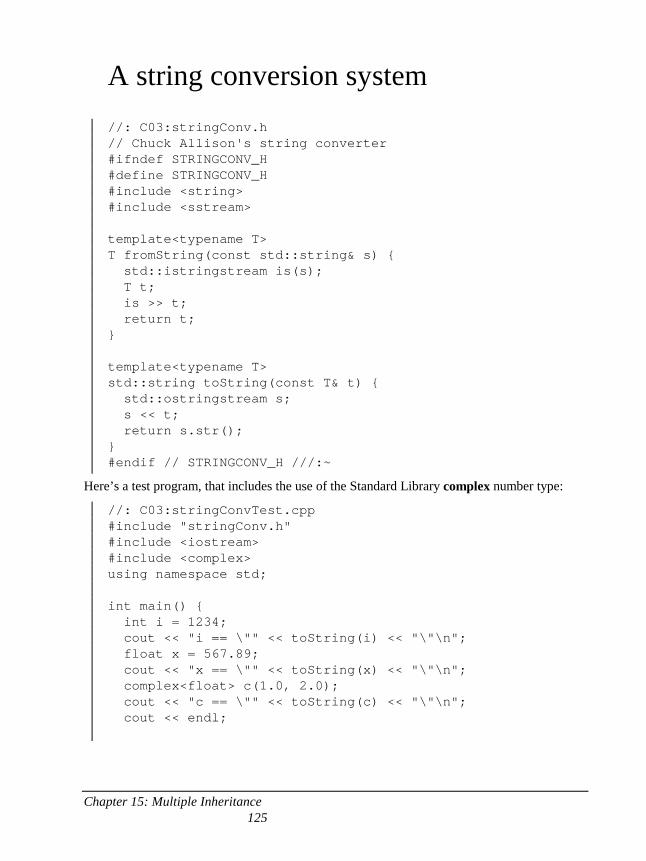
Chapter 15: Multiple Inheritance 125
A string conversion system
//: C03:stringConv.h // Chuck Allison's string converter #ifndef STRINGCONV_H #define STRINGCONV_H #include <string> #include <sstream> template<typename T> T fromString(const std::string& s) { std::istringstream is(s); T t; is >> t; return t; } template<typename T> std::string toString(const T& t) { std::ostringstream s; s << t; return s.str(); } #endif // STRINGCONV_H ///:~
Here’s a test program, that includes the use of the Standard Library complex number type:
//: C03:stringConvTest.cpp #include "stringConv.h" #include <iostream> #include <complex> using namespace std; int main() { int i = 1234; cout << "i == \"" << toString(i) << "\"\n"; float x = 567.89; cout << "x == \"" << toString(x) << "\"\n"; complex<float> c(1.0, 2.0); cout << "c == \"" << toString(c) << "\"\n"; cout << endl;
Chapter 15: Multiple Inheritance 126
i = fromString<int>(string("1234")); cout << "i == " << i << endl; x = fromString<float>(string("567.89")); cout << "x == " << x << endl; c = fromString< complex<float> >(string("(1.0,2.0)")); cout << "c == " << c << endl; } ///:~
The output is what you’d expect:
i == "1234" x == "567.89" c == "(1,2)" i == 1234 x == 567.89 c == (1,2)
A memory allocation system There are a few things you can do to make the raw memory allocation routines malloc( ), calloc( ) and realloc( ) safer. The following function template produces one function getmem( ) that either allocates a new piece of memory or resizes an existing piece (like realloc( )). In addition, it zeroes only the new memory, and it checks to see that the memory is successfully allocated. Also, you only tell it the number of elements of the type you want, not the number of bytes, so the possibility of a programmer error is reduced. Here’s the header file:
//: C03:Getmem.h // Function template for memory #ifndef GETMEM_H #define GETMEM_H #include "../require.h" #include <cstdlib> #include <cstring> template<class T> void getmem(T*& oldmem, int elems) { typedef int cntr; // Type of element counter const int csz = sizeof(cntr); // And size const int tsz = sizeof(T); if(elems == 0) { free(&(((cntr*)oldmem)[-1]));
Chapter 15: Multiple Inheritance 127
return; } T* p = oldmem; cntr oldcount = 0; if(p) { // Previously allocated memory // Old style: // ((cntr*)p)--; // Back up by one cntr // New style: cntr* tmp = reinterpret_cast<cntr*>(p); p = reinterpret_cast<T*>(--tmp); oldcount = *(cntr*)p; // Previous # elems } T* m = (T*)realloc(p, elems * tsz + csz); require(m != 0); *((cntr*)m) = elems; // Keep track of count const cntr increment = elems - oldcount; if(increment > 0) { // Starting address of data: long startadr = (long)&(m[oldcount]); startadr += csz; // Zero the additional new memory: memset((void*)startadr, 0, increment * tsz); } // Return the address beyond the count: oldmem = (T*)&(((cntr*)m)[1]); } template<class T> inline void freemem(T * m) { getmem(m, 0); } #endif // GETMEM_H ///:~
To be able to zero only the new memory, a counter indicating the number of elements allocated is attached to the beginning of each block of memory. The typedef cntr is the type of this counter; it allows you to change from int to long if you need to handle larger chunks (other issues come up when using long, however – these are seen in compiler warnings).
A pointer reference is used for the argument oldmem because the outside variable (a pointer) must be changed to point to the new block of memory. oldmem must point to zero (to allocate new memory) or to an existing block of memory that was created with getmem( ). This function assumes you’re using it properly, but for debugging you could add an additional tag next to the counter containing an identifier, and check that identifier in getmem( ) to help discover incorrect calls.
Chapter 15: Multiple Inheritance 128
If the number of elements requested is zero, the storage is freed. There’s an additional function template freemem( ) that aliases this behavior.
You’ll notice that getmem( ) is very low-level – there are lots of casts and byte manipulations. For example, the oldmem pointer doesn’t point to the true beginning of the memory block, but just past the beginning to allow for the counter. So to free( ) the memory block, getmem( ) must back up the pointer by the amount of space occupied by cntr. Because oldmem is a T*, it must first be cast to a cntr*, then indexed backwards one place. Finally the address of that location is produced for free( ) in the expression:
free(&(((cntr*)oldmem)[-1]));
Similarly, if this is previously allocated memory, getmem( ) must back up by one cntr size to get the true starting address of the memory, and then extract the previous number of elements. The true starting address is required inside realloc( ). If the storage size is being increased, then the difference between the new number of elements and the old number is used to calculate the starting address and the amount of memory to zero in memset( ). Finally, the address beyond the count is produced to assign to oldmem in the statement:
oldmem = (T*)&(((cntr*)m)[1]);
Again, because oldmem is a reference to a pointer, this has the effect of changing the outside argument passed to getmem( ).
Here’s a program to test getmem( ). It allocates storage and fills it up with values, then increases that amount of storage:
//: C03:Getmem.cpp // Test memory function template #include "Getmem.h" #include <iostream> using namespace std; int main() { int* p = 0; getmem(p, 10); for(int i = 0; i < 10; i++) { cout << p[i] << ' '; p[i] = i; } cout << '\n'; getmem(p, 20); for(int j = 0; j < 20; j++) { cout << p[j] << ' '; p[j] = j; } cout << '\n';
Chapter 15: Multiple Inheritance 129
getmem(p, 25); for(int k = 0; k < 25; k++) cout << p[k] << ' '; freemem(p); cout << '\n'; float* f = 0; getmem(f, 3); for(int u = 0; u < 3; u++) { cout << f[u] << ' '; f[u] = u + 3.14159; } cout << '\n'; getmem(f, 6); for(int v = 0; v < 6; v++) cout << f[v] << ' '; freemem(f); } ///:~
After each getmem( ), the values in memory are printed out to show that the new ones have been zeroed.
Notice that a different version of getmem( ) is instantiated for the int and float pointers. You might think that because all the manipulations are so low-level you could get away with a single non-template function and pass a void*& as oldmem. This doesn’t work because then the compiler must do a conversion from your type to a void*. To take the reference, it makes a temporary. This produces an error because then you’re modifying the temporary pointer, not the pointer you want to change. So the function template is necessary to produce the exact type for the argument.
Type induction in function templates
As a simple but very useful example, consider the following:
//: :arraySize.h // Uses template type induction to // discover the size of an array #ifndef ARRAYSIZE_H #define ARRAYSIZE_H template<typename T, int size>
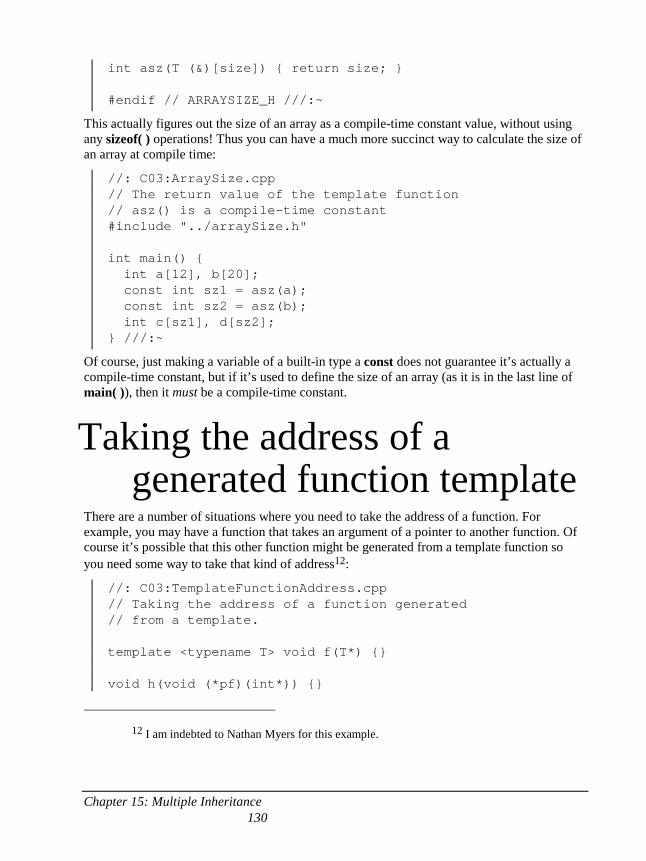
Chapter 15: Multiple Inheritance 130
int asz(T (&)[size]) { return size; } #endif // ARRAYSIZE_H ///:~
This actually figures out the size of an array as a compile-time constant value, without using any sizeof( ) operations! Thus you can have a much more succinct way to calculate the size of an array at compile time:
//: C03:ArraySize.cpp // The return value of the template function // asz() is a compile-time constant #include "../arraySize.h" int main() { int a[12], b[20]; const int sz1 = asz(a); const int sz2 = asz(b); int c[sz1], d[sz2]; } ///:~
Of course, just making a variable of a built-in type a const does not guarantee it’s actually a compile-time constant, but if it’s used to define the size of an array (as it is in the last line of main( )), then it must be a compile-time constant.
Taking the address of a generated function template
There are a number of situations where you need to take the address of a function. For example, you may have a function that takes an argument of a pointer to another function. Of course it’s possible that this other function might be generated from a template function so you need some way to take that kind of address12:
//: C03:TemplateFunctionAddress.cpp // Taking the address of a function generated // from a template. template <typename T> void f(T*) {} void h(void (*pf)(int*)) {}
12 I am indebted to Nathan Myers for this example.
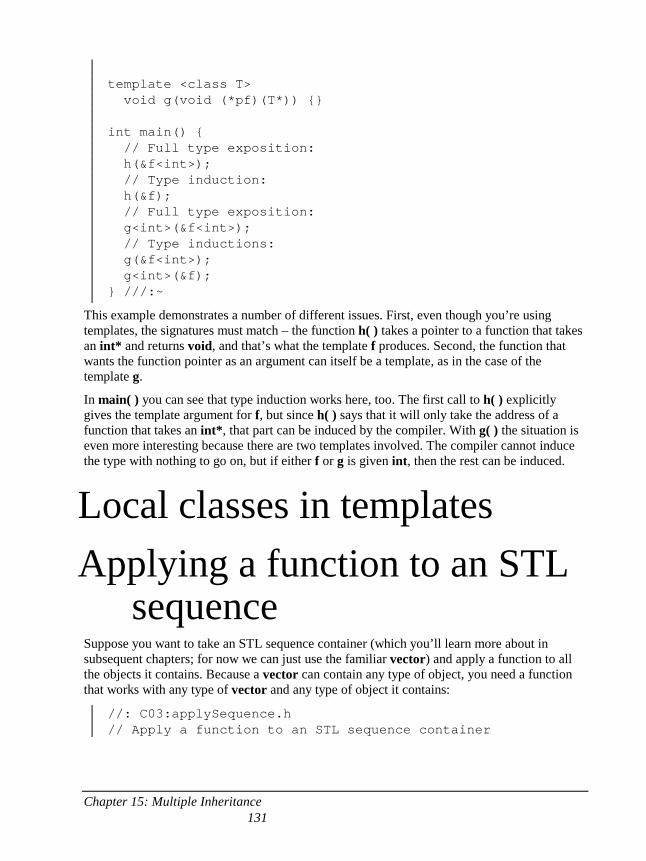
Chapter 15: Multiple Inheritance 131
template <class T> void g(void (*pf)(T*)) {} int main() { // Full type exposition: h(&f<int>); // Type induction: h(&f); // Full type exposition: g<int>(&f<int>); // Type inductions: g(&f<int>); g<int>(&f); } ///:~
This example demonstrates a number of different issues. First, even though you’re using templates, the signatures must match – the function h( ) takes a pointer to a function that takes an int* and returns void, and that’s what the template f produces. Second, the function that wants the function pointer as an argument can itself be a template, as in the case of the template g.
In main( ) you can see that type induction works here, too. The first call to h( ) explicitly gives the template argument for f, but since h( ) says that it will only take the address of a function that takes an int*, that part can be induced by the compiler. With g( ) the situation is even more interesting because there are two templates involved. The compiler cannot induce the type with nothing to go on, but if either f or g is given int, then the rest can be induced.
Local classes in templates Applying a function to an STL
sequence Suppose you want to take an STL sequence container (which you’ll learn more about in subsequent chapters; for now we can just use the familiar vector) and apply a function to all the objects it contains. Because a vector can contain any type of object, you need a function that works with any type of vector and any type of object it contains:
//: C03:applySequence.h // Apply a function to an STL sequence container
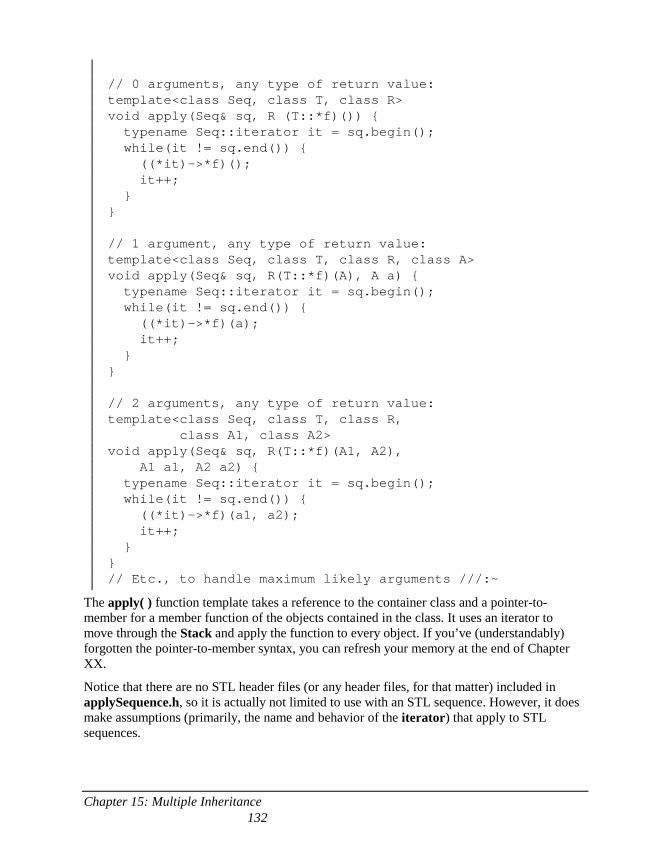
Chapter 15: Multiple Inheritance 132
// 0 arguments, any type of return value: template<class Seq, class T, class R> void apply(Seq& sq, R (T::*f)()) { typename Seq::iterator it = sq.begin(); while(it != sq.end()) { ((*it)->*f)(); it++; } } // 1 argument, any type of return value: template<class Seq, class T, class R, class A> void apply(Seq& sq, R(T::*f)(A), A a) { typename Seq::iterator it = sq.begin(); while(it != sq.end()) { ((*it)->*f)(a); it++; } } // 2 arguments, any type of return value: template<class Seq, class T, class R, class A1, class A2> void apply(Seq& sq, R(T::*f)(A1, A2), A1 a1, A2 a2) { typename Seq::iterator it = sq.begin(); while(it != sq.end()) { ((*it)->*f)(a1, a2); it++; } } // Etc., to handle maximum likely arguments ///:~
The apply( ) function template takes a reference to the container class and a pointer-to-member for a member function of the objects contained in the class. It uses an iterator to move through the Stack and apply the function to every object. If you’ve (understandably) forgotten the pointer-to-member syntax, you can refresh your memory at the end of Chapter XX.
Notice that there are no STL header files (or any header files, for that matter) included in applySequence.h, so it is actually not limited to use with an STL sequence. However, it does make assumptions (primarily, the name and behavior of the iterator) that apply to STL sequences.
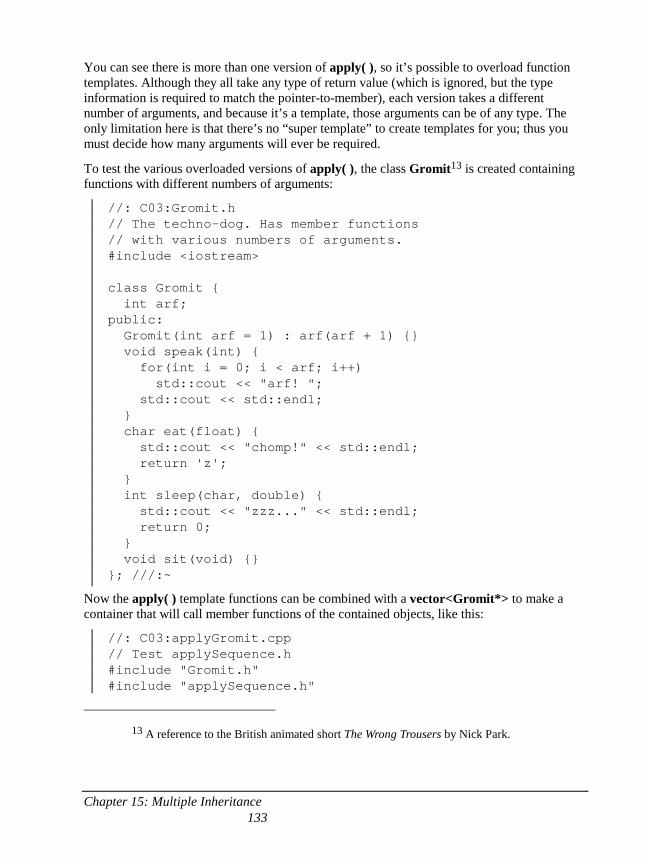
Chapter 15: Multiple Inheritance 133
You can see there is more than one version of apply( ), so it’s possible to overload function templates. Although they all take any type of return value (which is ignored, but the type information is required to match the pointer-to-member), each version takes a different number of arguments, and because it’s a template, those arguments can be of any type. The only limitation here is that there’s no “super template” to create templates for you; thus you must decide how many arguments will ever be required.
To test the various overloaded versions of apply( ), the class Gromit13 is created containing functions with different numbers of arguments:
//: C03:Gromit.h // The techno-dog. Has member functions // with various numbers of arguments. #include <iostream> class Gromit { int arf; public: Gromit(int arf = 1) : arf(arf + 1) {} void speak(int) { for(int i = 0; i < arf; i++) std::cout << "arf! "; std::cout << std::endl; } char eat(float) { std::cout << "chomp!" << std::endl; return 'z'; } int sleep(char, double) { std::cout << "zzz..." << std::endl; return 0; } void sit(void) {} }; ///:~
Now the apply( ) template functions can be combined with a vector<Gromit*> to make a container that will call member functions of the contained objects, like this:
//: C03:applyGromit.cpp // Test applySequence.h #include "Gromit.h" #include "applySequence.h"
13 A reference to the British animated short The Wrong Trousers by Nick Park.
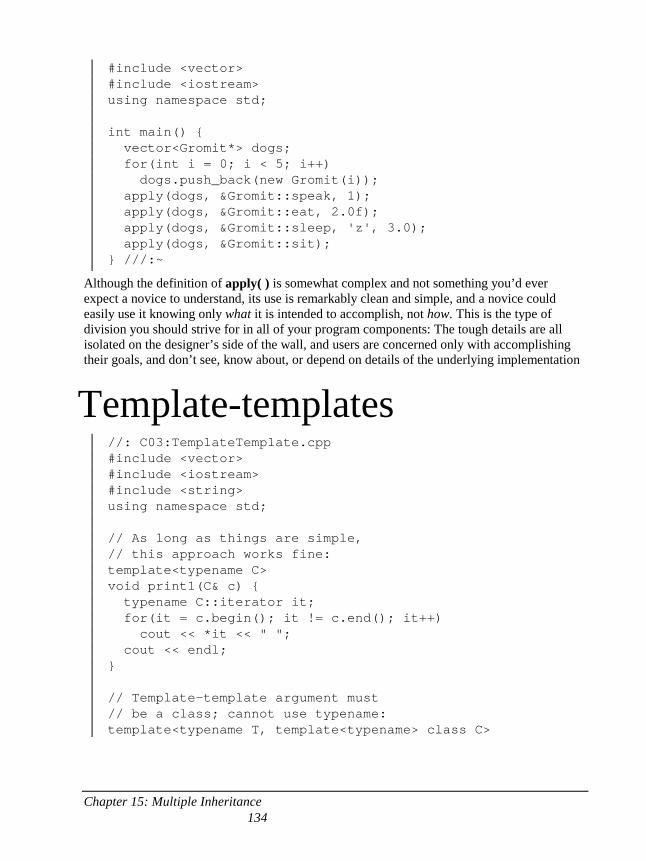
Chapter 15: Multiple Inheritance 134
#include <vector> #include <iostream> using namespace std; int main() { vector<Gromit*> dogs; for(int i = 0; i < 5; i++) dogs.push_back(new Gromit(i)); apply(dogs, &Gromit::speak, 1); apply(dogs, &Gromit::eat, 2.0f); apply(dogs, &Gromit::sleep, 'z', 3.0); apply(dogs, &Gromit::sit); } ///:~
Although the definition of apply( ) is somewhat complex and not something you’d ever expect a novice to understand, its use is remarkably clean and simple, and a novice could easily use it knowing only what it is intended to accomplish, not how. This is the type of division you should strive for in all of your program components: The tough details are all isolated on the designer’s side of the wall, and users are concerned only with accomplishing their goals, and don’t see, know about, or depend on details of the underlying implementation
Template-templates //: C03:TemplateTemplate.cpp #include <vector> #include <iostream> #include <string> using namespace std; // As long as things are simple, // this approach works fine: template<typename C> void print1(C& c) { typename C::iterator it; for(it = c.begin(); it != c.end(); it++) cout << *it << " "; cout << endl; } // Template-template argument must // be a class; cannot use typename: template<typename T, template<typename> class C>
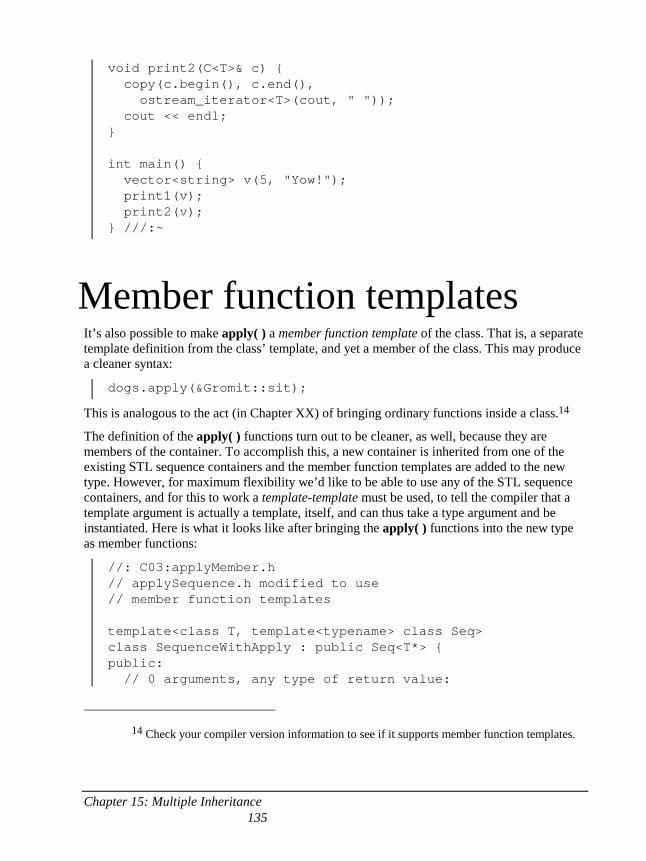
Chapter 15: Multiple Inheritance 135
void print2(C<T>& c) { copy(c.begin(), c.end(), ostream_iterator<T>(cout, " ")); cout << endl; } int main() { vector<string> v(5, "Yow!"); print1(v); print2(v); } ///:~
Member function templates It’s also possible to make apply( ) a member function template of the class. That is, a separate template definition from the class’ template, and yet a member of the class. This may produce a cleaner syntax:
dogs.apply(&Gromit::sit);
This is analogous to the act (in Chapter XX) of bringing ordinary functions inside a class.14
The definition of the apply( ) functions turn out to be cleaner, as well, because they are members of the container. To accomplish this, a new container is inherited from one of the existing STL sequence containers and the member function templates are added to the new type. However, for maximum flexibility we’d like to be able to use any of the STL sequence containers, and for this to work a template-template must be used, to tell the compiler that a template argument is actually a template, itself, and can thus take a type argument and be instantiated. Here is what it looks like after bringing the apply( ) functions into the new type as member functions:
//: C03:applyMember.h // applySequence.h modified to use // member function templates template<class T, template<typename> class Seq> class SequenceWithApply : public Seq<T*> { public: // 0 arguments, any type of return value:
14 Check your compiler version information to see if it supports member function templates.
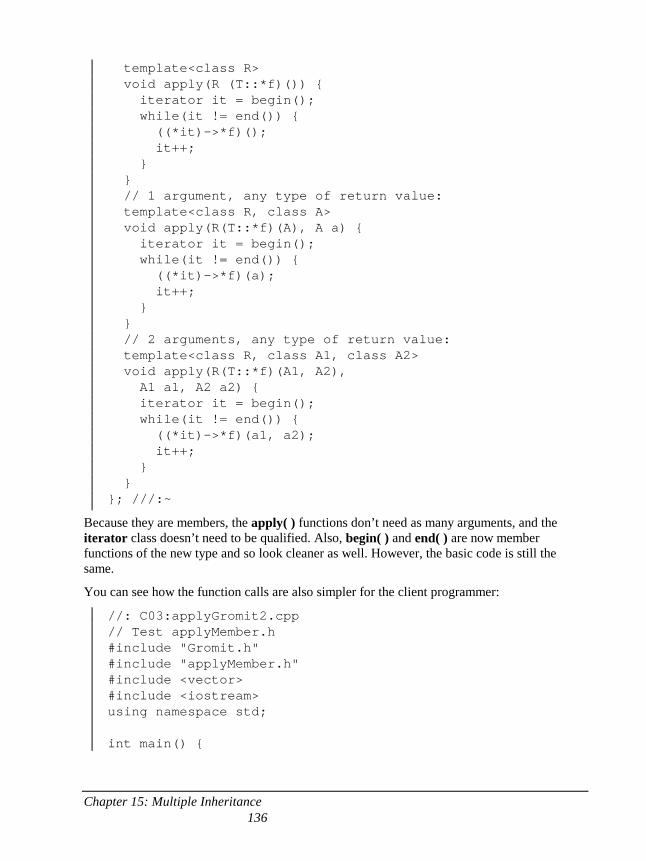
Chapter 15: Multiple Inheritance 136
template<class R> void apply(R (T::*f)()) { iterator it = begin(); while(it != end()) { ((*it)->*f)(); it++; } } // 1 argument, any type of return value: template<class R, class A> void apply(R(T::*f)(A), A a) { iterator it = begin(); while(it != end()) { ((*it)->*f)(a); it++; } } // 2 arguments, any type of return value: template<class R, class A1, class A2> void apply(R(T::*f)(A1, A2), A1 a1, A2 a2) { iterator it = begin(); while(it != end()) { ((*it)->*f)(a1, a2); it++; } } }; ///:~
Because they are members, the apply( ) functions don’t need as many arguments, and the iterator class doesn’t need to be qualified. Also, begin( ) and end( ) are now member functions of the new type and so look cleaner as well. However, the basic code is still the same.
You can see how the function calls are also simpler for the client programmer:
//: C03:applyGromit2.cpp // Test applyMember.h #include "Gromit.h" #include "applyMember.h" #include <vector> #include <iostream> using namespace std; int main() {
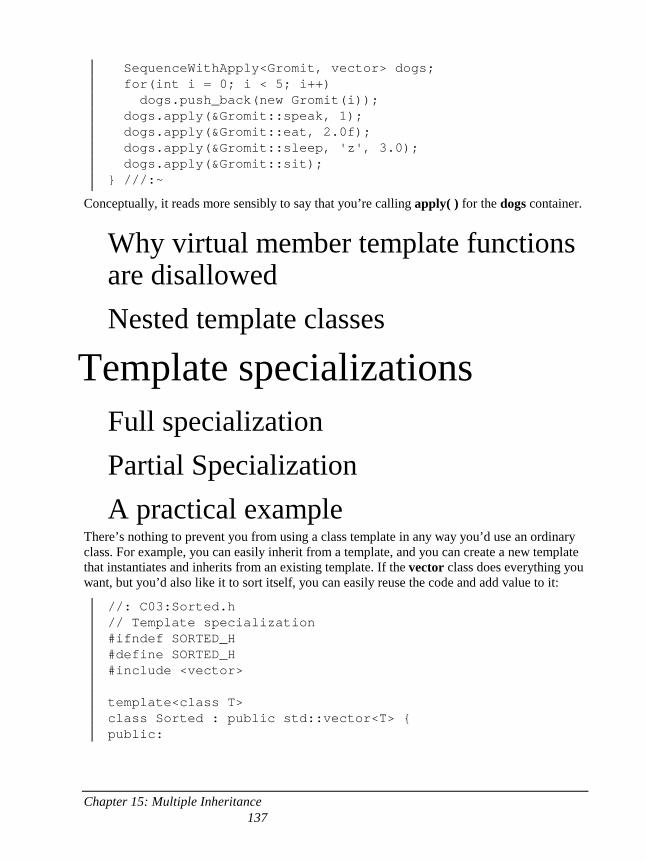
Chapter 15: Multiple Inheritance 137
SequenceWithApply<Gromit, vector> dogs; for(int i = 0; i < 5; i++) dogs.push_back(new Gromit(i)); dogs.apply(&Gromit::speak, 1); dogs.apply(&Gromit::eat, 2.0f); dogs.apply(&Gromit::sleep, 'z', 3.0); dogs.apply(&Gromit::sit); } ///:~
Conceptually, it reads more sensibly to say that you’re calling apply( ) for the dogs container.
Why virtual member template functions are disallowed Nested template classes
Template specializations Full specialization Partial Specialization A practical example
There’s nothing to prevent you from using a class template in any way you’d use an ordinary class. For example, you can easily inherit from a template, and you can create a new template that instantiates and inherits from an existing template. If the vector class does everything you want, but you’d also like it to sort itself, you can easily reuse the code and add value to it:
//: C03:Sorted.h // Template specialization #ifndef SORTED_H #define SORTED_H #include <vector> template<class T> class Sorted : public std::vector<T> { public:
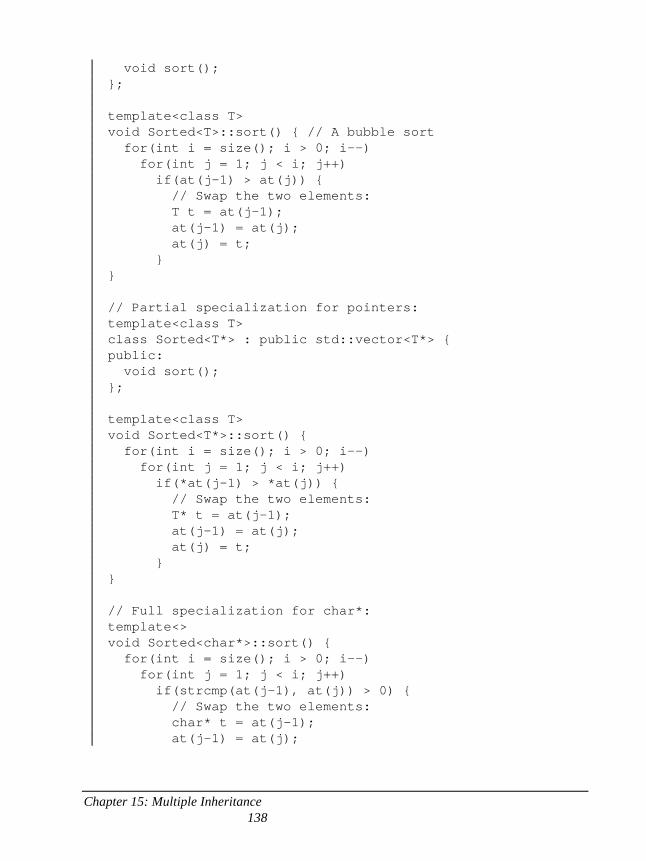
Chapter 15: Multiple Inheritance 138
void sort(); }; template<class T> void Sorted<T>::sort() { // A bubble sort for(int i = size(); i > 0; i--) for(int j = 1; j < i; j++) if(at(j-1) > at(j)) { // Swap the two elements: T t = at(j-1); at(j-1) = at(j); at(j) = t; } } // Partial specialization for pointers: template<class T> class Sorted<T*> : public std::vector<T*> { public: void sort(); }; template<class T> void Sorted<T*>::sort() { for(int i = size(); i > 0; i--) for(int j = 1; j < i; j++) if(*at(j-1) > *at(j)) { // Swap the two elements: T* t = at(j-1); at(j-1) = at(j); at(j) = t; } } // Full specialization for char*: template<> void Sorted<char*>::sort() { for(int i = size(); i > 0; i--) for(int j = 1; j < i; j++) if(strcmp(at(j-1), at(j)) > 0) { // Swap the two elements: char* t = at(j-1); at(j-1) = at(j);
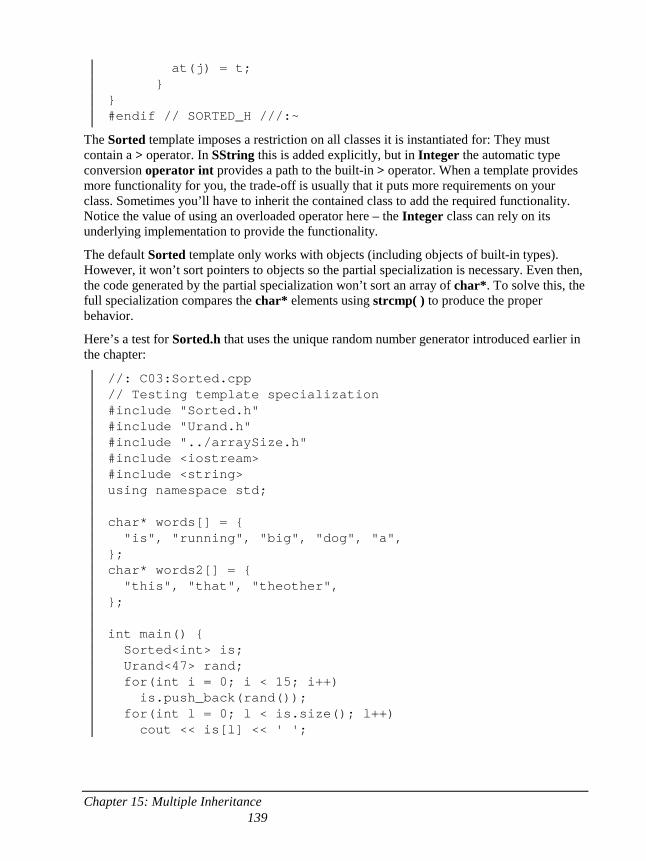
Chapter 15: Multiple Inheritance 139
at(j) = t; } } #endif // SORTED_H ///:~
The Sorted template imposes a restriction on all classes it is instantiated for: They must contain a > operator. In SString this is added explicitly, but in Integer the automatic type conversion operator int provides a path to the built-in > operator. When a template provides more functionality for you, the trade-off is usually that it puts more requirements on your class. Sometimes you’ll have to inherit the contained class to add the required functionality. Notice the value of using an overloaded operator here – the Integer class can rely on its underlying implementation to provide the functionality.
The default Sorted template only works with objects (including objects of built-in types). However, it won’t sort pointers to objects so the partial specialization is necessary. Even then, the code generated by the partial specialization won’t sort an array of char*. To solve this, the full specialization compares the char* elements using strcmp( ) to produce the proper behavior.
Here’s a test for Sorted.h that uses the unique random number generator introduced earlier in the chapter:
//: C03:Sorted.cpp // Testing template specialization #include "Sorted.h" #include "Urand.h" #include "../arraySize.h" #include <iostream> #include <string> using namespace std; char* words[] = { "is", "running", "big", "dog", "a", }; char* words2[] = { "this", "that", "theother", }; int main() { Sorted<int> is; Urand<47> rand; for(int i = 0; i < 15; i++) is.push_back(rand()); for(int l = 0; l < is.size(); l++) cout << is[l] << ' ';
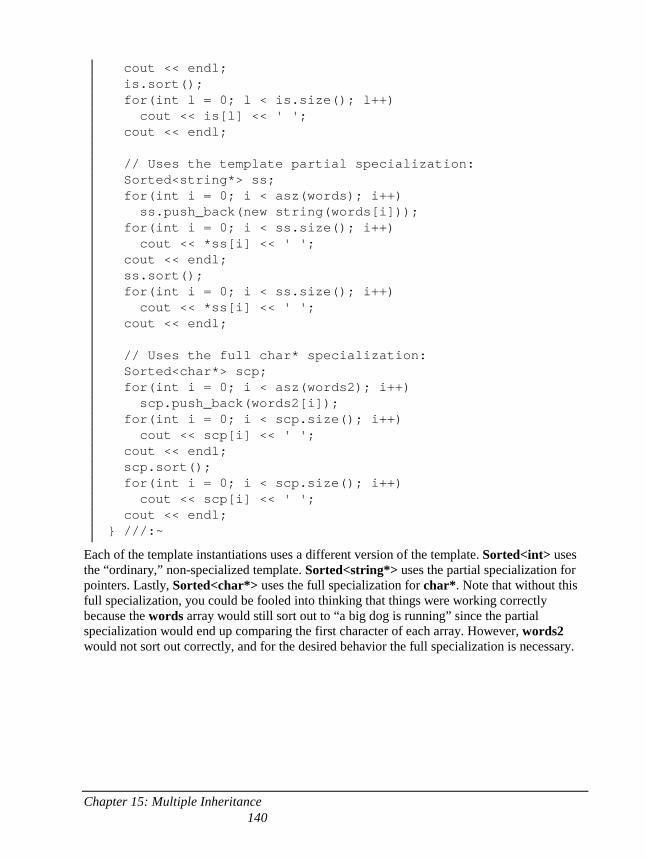
Chapter 15: Multiple Inheritance 140
cout << endl; is.sort(); for(int l = 0; l < is.size(); l++) cout << is[l] << ' '; cout << endl; // Uses the template partial specialization: Sorted<string*> ss; for(int i = 0; i < asz(words); i++) ss.push_back(new string(words[i])); for(int i = 0; i < ss.size(); i++) cout << *ss[i] << ' '; cout << endl; ss.sort(); for(int i = 0; i < ss.size(); i++) cout << *ss[i] << ' '; cout << endl; // Uses the full char* specialization: Sorted<char*> scp; for(int i = 0; i < asz(words2); i++) scp.push_back(words2[i]); for(int i = 0; i < scp.size(); i++) cout << scp[i] << ' '; cout << endl; scp.sort(); for(int i = 0; i < scp.size(); i++) cout << scp[i] << ' '; cout << endl; } ///:~
Each of the template instantiations uses a different version of the template. Sorted<int> uses the “ordinary,” non-specialized template. Sorted<string*> uses the partial specialization for pointers. Lastly, Sorted<char*> uses the full specialization for char*. Note that without this full specialization, you could be fooled into thinking that things were working correctly because the words array would still sort out to “a big dog is running” since the partial specialization would end up comparing the first character of each array. However, words2 would not sort out correctly, and for the desired behavior the full specialization is necessary.
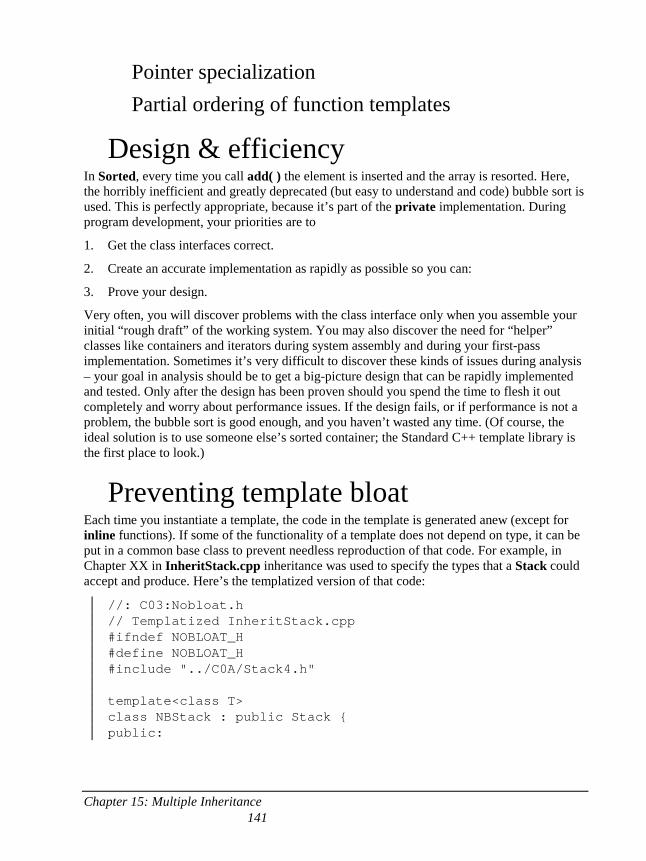
Chapter 15: Multiple Inheritance 141
Pointer specialization Partial ordering of function templates
Design & efficiency In Sorted, every time you call add( ) the element is inserted and the array is resorted. Here, the horribly inefficient and greatly deprecated (but easy to understand and code) bubble sort is used. This is perfectly appropriate, because it’s part of the private implementation. During program development, your priorities are to
1. Get the class interfaces correct.
2. Create an accurate implementation as rapidly as possible so you can:
3. Prove your design.
Very often, you will discover problems with the class interface only when you assemble your initial “rough draft” of the working system. You may also discover the need for “helper” classes like containers and iterators during system assembly and during your first-pass implementation. Sometimes it’s very difficult to discover these kinds of issues during analysis – your goal in analysis should be to get a big-picture design that can be rapidly implemented and tested. Only after the design has been proven should you spend the time to flesh it out completely and worry about performance issues. If the design fails, or if performance is not a problem, the bubble sort is good enough, and you haven’t wasted any time. (Of course, the ideal solution is to use someone else’s sorted container; the Standard C++ template library is the first place to look.)
Preventing template bloat Each time you instantiate a template, the code in the template is generated anew (except for inline functions). If some of the functionality of a template does not depend on type, it can be put in a common base class to prevent needless reproduction of that code. For example, in Chapter XX in InheritStack.cpp inheritance was used to specify the types that a Stack could accept and produce. Here’s the templatized version of that code:
//: C03:Nobloat.h // Templatized InheritStack.cpp #ifndef NOBLOAT_H #define NOBLOAT_H #include "../C0A/Stack4.h" template<class T> class NBStack : public Stack { public:
Chapter 15: Multiple Inheritance 142
void push(T* str) { Stack::push(str); } T* peek() const { return (T*)Stack::peek(); } T* pop() { return (T*)Stack::pop(); } ~NBStack(); }; // Defaults to heap objects & ownership: template<class T> NBStack<T>::~NBStack() { T* top = pop(); while(top) { delete top; top = pop(); } } #endif // NOBLOAT_H ///:~
As before, the inline functions generate no code and are thus “free.” The functionality is provided by creating the base-class code only once. However, the ownership problem has been solved here by adding a destructor (which is type-dependent, and thus must be created by the template). Here, it defaults to ownership. Notice that when the base-class destructor is called, the stack will be empty so no duplicate releases will occur.
//: C03:NobloatTest.cpp #include "Nobloat.h" #include "../require.h" #include <fstream> #include <iostream> #include <string> using namespace std; int main(int argc, char* argv[]) { requireArgs(argc, 1); // File name is argument ifstream in(argv[1]); assure(in, argv[1]); NBStack<string> textlines; string line; // Read file and store lines in the stack:
Chapter 15: Multiple Inheritance 143
while(getline(in, line)) textlines.push(new string(line)); // Pop the lines from the stack and print them: string* s; while((s = (string*)textlines.pop()) != 0) { cout << *s << endl; delete s; } } ///:~
Explicit instantiation At times it is useful to explicitly instantiate a template; that is, to tell the compiler to lay down the code for a specific version of that template even though you’re not creating an object at that point. To do this, you reuse the template keyword as follows:
template class Bobbin<thread>; template void sort<char>(char*[]);
Here’s a version of the Sorted.cpp example that explicitly instantiates a template before using it:
//: C03:ExplicitInstantiation.cpp #include "Urand.h" #include "Sorted.h" #include <iostream> using namespace std; // Explicit instantiation: template class Sorted<int>; int main() { Sorted<int> is; Urand<47> rand1; for(int k = 0; k < 15; k++) is.push_back(rand1()); is.sort(); for(int l = 0; l < is.size(); l++) cout << is[l] << endl; } ///:~
In this example, the explicit instantiation doesn’t really accomplish anything; the program would work the same without it. Explicit instantiation is only for special cases where extra control is needed.
Chapter 15: Multiple Inheritance 144
Explicit specification of template functions
Controlling template instantiation
Normally templates are not instantiated until they are needed. For function templates this just means the point at which you call the function, but for class templates it’s more granular than that: each individual member function of the template is not instantiated until the first point of use. This means that only the member functions you actually use will be instantiated, which is quite important since it allows greater freedom in what the template can be used with. For example:
//: C03:DelayedInstantiation.cpp // Member functions of class templates are not // instantiated until they're needed. class X { public: void f() {} }; class Y { public: void g() {} }; template <typename T> class Z { T t; public: void a() { t.f(); } void b() { t.g(); } }; int main() { Z<X> zx; zx.a(); // Doesn't create Z<X>::b() Z<Y> zy; zy.b(); // Doesn't create Z<Y>::a()
Chapter 15: Multiple Inheritance 145
} ///:~
Here, even though the template purports to use both f( ) and g( ) member functions of T, the fact that the program compiles shows you that it only generates Z<X>::a( ) when it is explicitly called for zx (if Z<X>::b( ) were also generated at the same time, a compile-time error message would be generated). Similarly, the call to zy.b( ) doesn’t generate Z<Y>::a( ). As a result, the Z template can be used with X and Y, whereas if all the member functions were generated when the class was first created it would significantly limit the use of many templates.
The inclusion vs. separation models The export keyword
Template programming idioms The “curiously-recurring template” Traits
Summary One of the greatest weaknesses of C++ templates will be shown to you when you try to write code that uses templates, especially STL code (introduced in the next two chapters), and start getting compile-time error messages. When you’re not used to it, the quantity of inscrutable text that will be spewed at you by the compiler will be quite overwhelming. After a while you’ll adapt (although it always feels a bit barbaric), and if it’s any consolation, C++ compilers have actually gotten a lot better about this – previously they would only give the line where you tried to instantiate the template, and most of them now go to the line in the template definition that caused the problem.
The issue is that a template implies an interface. That is, even though the template keyword says “I’ll take any type,” the code in a template definition actually requires that certain operators and member functions be supported – that’s the interface. So in reality, a template definition is saying “I’ll take any type that supports this interface.” Things would be much nicer if the compiler could simply say “hey, this type that you’re trying to instantiate the template with doesn’t support that interface – can’t do it.” The Java language has a feature called interface that would be a perfect match for this (Java, however, has no parameterized type mechanism), but it will be many years, if ever, before you will see such a thing in C++
Chapter 15: Multiple Inheritance 146
(at this writing the C++ Standard has only just been accepted and it will be a while before all the compilers even achieve compliance). Compilers can only get so good at reporting template instantiation errors, so you’ll have to grit your teeth, go to the first line reported as an error and figure it out.
147
4: STL Containers & Iterators
Container classes are the solution to a specific kind of code reuse problem. They are building blocks used to create object-oriented programs – they make the internals of a program much easier to construct.
A container class describes an object that holds other objects. Container classes are so important that they were considered fundamental to early object-oriented languages. In Smalltalk, for example, programmers think of the language as the program translator together with the class library, and a critical part of that library is the container classes. So it became natural that C++ compiler vendors also include a container class library. You’ll note that the vector was so useful that it was introduced in its simplest form very early in this book.
Like many other early C++ libraries, early container class libraries followed Smalltalk’s object-based hierarchy, which worked well for Smalltalk, but turned out to be awkward and difficult to use in C++. Another approach was required.
This chapter attempts to slowly work you into the concepts of the C++ Standard Template Library (STL), which is a powerful library of containers (as well as algorithms, but these are covered in the following chapter). In the past, I have taught that there is a relatively small subset of elements and ideas that you need to understand in order to get much of the usefulness from the STL. Although this can be true it turns out that understanding the STL more deeply is important to gain the full power of the library. This chapter and the next probe into the STL containers and algorithms.
Containers and iterators If you don’t know how many objects you’re going to need to solve a particular problem, or how long they will last, you also don’t know how to store those objects. How can you know how much space to create? You can’t, since that information isn’t known until run time.
The solution to most problems in object-oriented design seems flippant: you create another type of object. For the storage problem, the new type of object holds other objects, or pointers
Chapter 15: Multiple Inheritance 148
to objects. Of course, you can do the same thing with an array, but there’s more. This new type of object, which is typically referred to in C++ as a container (also called a collection in some languages), will expand itself whenever necessary to accommodate everything you place inside it. So you don’t need to know how many objects you’re going to hold in a collection. You just create a collection object and let it take care of the details.
Fortunately, a good OOP language comes with a set of containers as part of the package. In C++, it’s the Standard Template Library (STL). In some libraries, a generic container is considered good enough for all needs, and in others (C++ in particular) the library has different types of containers for different needs: a vector for consistent access to all elements, and a linked list for consistent insertion at all elements, for example, so you can choose the particular type that fits your needs. These may include sets, queues, hash tables, trees, stacks, etc.
All containers have some way to put things in and get things out. The way that you place something into a container is fairly obvious. There’s a function called “push” or “add” or a similar name. Fetching things out of a container is not always as apparent; if it’s an array-like entity such as a vector, you might be able to use an indexing operator or function. But in many situations this doesn’t make sense. Also, a single-selection function is restrictive. What if you want to manipulate or compare a group of elements in the container?
The solution is an iterator, which is an object whose job is to select the elements within a container and present them to the user of the iterator. As a class, it also provides a level of abstraction. This abstraction can be used to separate the details of the container from the code that’s accessing that container. The container, via the iterator, is abstracted to be simply a sequence. The iterator allows you to traverse that sequence without worrying about the underlying structure – that is, whether it’s a vector, a linked list, a stack or something else. This gives you the flexibility to easily change the underlying data structure without disturbing the code in your program.
From the design standpoint, all you really want is a sequence that can be manipulated to solve your problem. If a single type of sequence satisfied all of your needs, there’d be no reason to have different kinds. There are two reasons that you need a choice of containers. First, containers provide different types of interfaces and external behavior. A stack has a different interface and behavior than that of a queue, which is different than that of a set or a list. One of these might provide a more flexible solution to your problem than the other. Second, different containers have different efficiencies for certain operations. The best example is a vector and a list. Both are simple sequences that can have identical interfaces and external behaviors. But certain operations can have radically different costs. Randomly accessing elements in a vector is a constant-time operation; it takes the same amount of time regardless of the element you select. However, in a linked list it is expensive to move through the list to randomly select an element, and it takes longer to find an element if it is further down the list. On the other hand, if you want to insert an element in the middle of a sequence, it’s much cheaper in a list than in a vector. These and other operations have different efficiencies depending upon the underlying structure of the sequence. In the design phase, you might start with a list and, when tuning for performance, change to a vector. Because of the abstraction via iterators, you can change from one to the other with minimal impact on your code.

Chapter 15: Multiple Inheritance 149
In the end, remember that a container is only a storage cabinet to put objects in. If that cabinet solves all of your needs, it doesn’t really matter how it is implemented (a basic concept with most types of objects). If you’re working in a programming environment that has built-in overhead due to other factors, then the cost difference between a vector and a linked list might not matter. You might need only one type of sequence. You can even imagine the “perfect” container abstraction, which can automatically change its underlying implementation according to the way it is used.
STL reference documentation You will notice that this chapter does not contain exhaustive documentation describing each of the member functions in each STL container. Although I describe the member functions that I use, I’ve left the full descriptions to others: there are at least two very good on-line sources of STL documentation in HTML format that you can keep resident on your computer and view with a Web browser whenever you need to look something up. The first is the Dinkumware library (which covers the entire Standard C and C++ library) mentioned at the beginning of this book section (page XXX). The second is the freely-downloadable SGI STL and documentation, freely downloadable at http://www.sgi.com/Technology/STL/. These should provide complete references when you’re writing code. In addition, the STL books listed in Appendix XX will provide you with other resources.
The Standard Template Library The C++ STL15 is a powerful library intended to satisfy the vast bulk of your needs for containers and algorithms, but in a completely portable fashion. This means that not only are your programs easier to port to other platforms, but that your knowledge itself does not depend on the libraries provided by a particular compiler vendor (and the STL is likely to be more tested and scrutinized than a particular vendor’s library). Thus, it will benefit you greatly to look first to the STL for containers and algorithms, before looking at vendor-specific solutions.
A fundamental principle of software design is that all problems can be simplified by introducing an extra level of indirection. This simplicity is achieved in the STL using iterators to perform operations on a data structure while knowing as little as possible about that structure, thus producing data structure independence. With the STL, this means that any operation that can be performed on an array of objects can also be performed on an STL container of objects and vice versa. The STL containers work just as easily with built-in types as they do with user-defined types. If you learn the library, it will work on everything.
15 Contributed to the C++ Standard by Alexander Stepanov and Meng Lee at Hewlett-Packard.
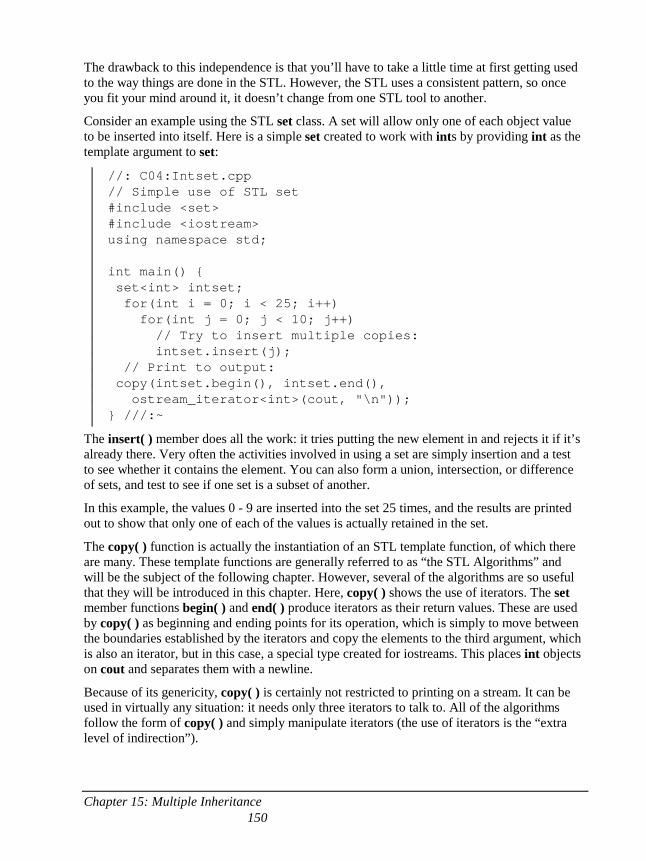
Chapter 15: Multiple Inheritance 150
The drawback to this independence is that you’ll have to take a little time at first getting used to the way things are done in the STL. However, the STL uses a consistent pattern, so once you fit your mind around it, it doesn’t change from one STL tool to another.
Consider an example using the STL set class. A set will allow only one of each object value to be inserted into itself. Here is a simple set created to work with ints by providing int as the template argument to set:
//: C04:Intset.cpp // Simple use of STL set #include <set> #include <iostream> using namespace std; int main() { set<int> intset; for(int i = 0; i < 25; i++) for(int j = 0; j < 10; j++) // Try to insert multiple copies: intset.insert(j); // Print to output: copy(intset.begin(), intset.end(), ostream_iterator<int>(cout, "\n")); } ///:~
The insert( ) member does all the work: it tries putting the new element in and rejects it if it’s already there. Very often the activities involved in using a set are simply insertion and a test to see whether it contains the element. You can also form a union, intersection, or difference of sets, and test to see if one set is a subset of another.
In this example, the values 0 - 9 are inserted into the set 25 times, and the results are printed out to show that only one of each of the values is actually retained in the set.
The copy( ) function is actually the instantiation of an STL template function, of which there are many. These template functions are generally referred to as “the STL Algorithms” and will be the subject of the following chapter. However, several of the algorithms are so useful that they will be introduced in this chapter. Here, copy( ) shows the use of iterators. The set member functions begin( ) and end( ) produce iterators as their return values. These are used by copy( ) as beginning and ending points for its operation, which is simply to move between the boundaries established by the iterators and copy the elements to the third argument, which is also an iterator, but in this case, a special type created for iostreams. This places int objects on cout and separates them with a newline.
Because of its genericity, copy( ) is certainly not restricted to printing on a stream. It can be used in virtually any situation: it needs only three iterators to talk to. All of the algorithms follow the form of copy( ) and simply manipulate iterators (the use of iterators is the “extra level of indirection”).
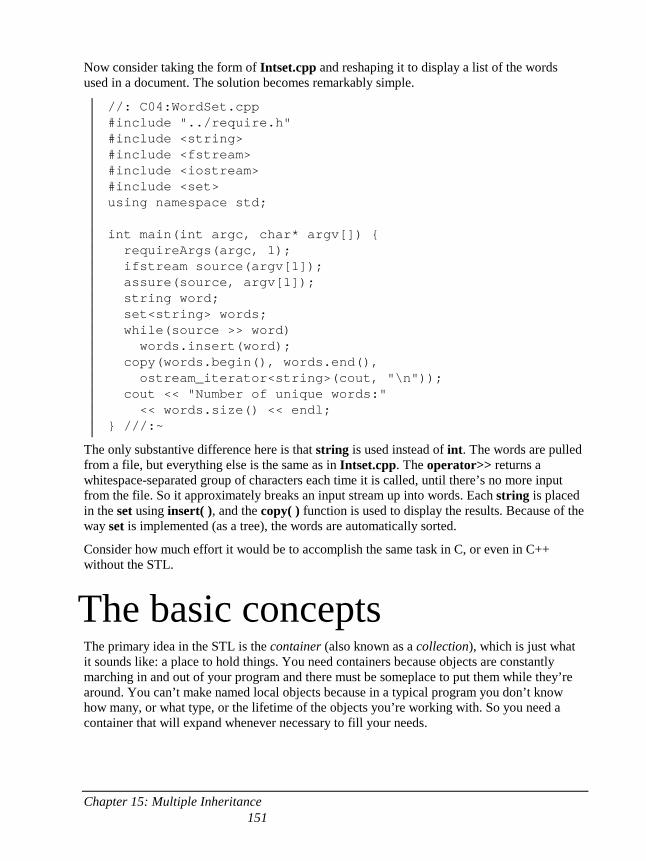
Chapter 15: Multiple Inheritance 151
Now consider taking the form of Intset.cpp and reshaping it to display a list of the words used in a document. The solution becomes remarkably simple.
//: C04:WordSet.cpp #include "../require.h" #include <string> #include <fstream> #include <iostream> #include <set> using namespace std; int main(int argc, char* argv[]) { requireArgs(argc, 1); ifstream source(argv[1]); assure(source, argv[1]); string word; set<string> words; while(source >> word) words.insert(word); copy(words.begin(), words.end(), ostream_iterator<string>(cout, "\n")); cout << "Number of unique words:" << words.size() << endl; } ///:~
The only substantive difference here is that string is used instead of int. The words are pulled from a file, but everything else is the same as in Intset.cpp. The operator>> returns a whitespace-separated group of characters each time it is called, until there’s no more input from the file. So it approximately breaks an input stream up into words. Each string is placed in the set using insert( ), and the copy( ) function is used to display the results. Because of the way set is implemented (as a tree), the words are automatically sorted.
Consider how much effort it would be to accomplish the same task in C, or even in C++ without the STL.
The basic concepts The primary idea in the STL is the container (also known as a collection), which is just what it sounds like: a place to hold things. You need containers because objects are constantly marching in and out of your program and there must be someplace to put them while they’re around. You can’t make named local objects because in a typical program you don’t know how many, or what type, or the lifetime of the objects you’re working with. So you need a container that will expand whenever necessary to fill your needs.
Chapter 15: Multiple Inheritance 152
All the containers in the STL hold objects and expand themselves. In addition, they hold your objects in a particular way. The difference between one container and another is the way the objects are held and how the sequence is created. Let’s start by looking at the simplest containers.
A vector is a linear sequence that allows rapid random access to its elements. However, it’s expensive to insert an element in the middle of the sequence, and is also expensive when it allocates additional storage. A deque is also a linear sequence, and it allows random access that’s nearly as fast as vector, but it’s significantly faster when it needs to allocate new storage, and you can easily add new elements at either end (vector only allows the addition of elements at its tail). A list the third type of basic linear sequence, but it’s expensive to move around randomly and cheap to insert an element in the middle. Thus list, deque and vector are very similar in their basic functionality (they all hold linear sequences), but different in the cost of their activities. So for your first shot at a program, you could choose any one, and only experiment with the others if you’re tuning for efficiency.
Many of the problems you set out to solve will only require a simple linear sequence like a vector, deque or list. All three have a member function push_back( ) which you use to insert a new element at the back of the sequence (deque and list also have push_front( )).
But now how do you retrieve those elements? With a vector or deque, it is possible to use the indexing operator[ ], but that doesn’t work with list. Since it would be nicest to learn a single interface, we’ll often use the one defined for all STL containers: the iterator.
An iterator is a class that abstracts the process of moving through a sequence. It allows you to select each element of a sequence without knowing the underlying structure of that sequence. This is a powerful feature, partly because it allows us to learn a single interface that works with all containers, and partly because it allows containers to be used interchangeably.
One more observation and you’re ready for another example. Even though the STL containers hold objects by value (that is, they hold the whole object inside themselves) that’s probably not the way you’ll generally use them if you’re doing object-oriented programming. That’s because in OOP, most of the time you’ll create objects on the heap with new and then upcast the address to the base-class type, later manipulating it as a pointer to the base class. The beauty of this is that you don’t worry about the specific type of object you’re dealing with, which greatly reduces the complexity of your code and increases the maintainability of your program. This process of upcasting is what you try to do in OOP with polymorphism, so you’ll usually be using containers of pointers.
Consider the classic “shape” example where shapes have a set of common operations, and you have different types of shapes. Here’s what it looks like using the STL vector to hold pointers to various types of Shape created on the heap:
//: C04:Stlshape.cpp // Simple shapes w/ STL #include <vector> #include <iostream> using namespace std;
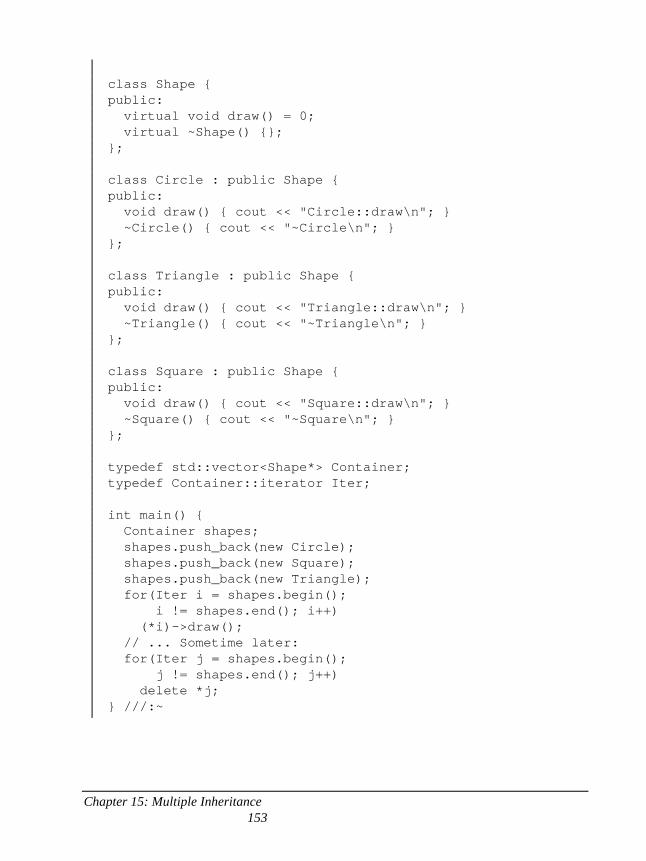
Chapter 15: Multiple Inheritance 153
class Shape { public: virtual void draw() = 0; virtual ~Shape() {}; }; class Circle : public Shape { public: void draw() { cout << "Circle::draw\n"; } ~Circle() { cout << "~Circle\n"; } }; class Triangle : public Shape { public: void draw() { cout << "Triangle::draw\n"; } ~Triangle() { cout << "~Triangle\n"; } }; class Square : public Shape { public: void draw() { cout << "Square::draw\n"; } ~Square() { cout << "~Square\n"; } }; typedef std::vector<Shape*> Container; typedef Container::iterator Iter; int main() { Container shapes; shapes.push_back(new Circle); shapes.push_back(new Square); shapes.push_back(new Triangle); for(Iter i = shapes.begin(); i != shapes.end(); i++) (*i)->draw(); // ... Sometime later: for(Iter j = shapes.begin(); j != shapes.end(); j++) delete *j; } ///:~
Chapter 15: Multiple Inheritance 154
The creation of Shape, Circle, Square and Triangle should be fairly familiar. Shape is a pure abstract base class (because of the pure specifier =0) that defines the interface for all types of shapes. The derived classes redefine the virtual function draw( ) to perform the appropriate operation. Now we’d like to create a bunch of different types of Shape object, but where to put them? In an STL container, of course. For convenience, this typedef:
typedef std::vector<Shape*> Container;
creates an alias for a vector of Shape*, and this typedef:
typedef Container::iterator Iter;
uses that alias to create another one, for vector<Shape*>::iterator. Notice that the container type name must be used to produce the appropriate iterator, which is defined as a nested class. Although there are different types of iterators (forward, bidirectional, reverse, etc., which will be explained later) they all have the same basic interface: you can increment them with ++, you can dereference them to produce the object they’re currently selecting, and you can test them to see if they’re at the end of the sequence. That’s what you’ll want to do 90% of the time. And that’s what is done in the above example: after creating a container, it’s filled with different types of Shape*. Notice that the upcast happens as the Circle, Square or Rectangle pointer is added to the shapes container, which doesn’t know about those specific types but instead holds only Shape*. So as soon as the pointer is added to the container it loses its specific identity and becomes an anonymous Shape*. This is exactly what we want: toss them all in and let polymorphism sort it out.
The first for loop creates an iterator and sets it to the beginning of the sequence by calling the begin( ) member function for the container. All containers have begin( ) and end( ) member functions that produce an iterator selecting, respectively, the beginning of the sequence and one past the end of the sequence. To test to see if you’re done, you make sure you’re != to the iterator produced by end( ). Not < or <=. The only test that works is !=. So it’s very common to write a loop like:
for(Iter i = shapes.begin(); i != shapes.end(); i++)
This says: “take me through every element in the sequence.”
What do you do with the iterator to produce the element it’s selecting? You dereference it using (what else) the ‘*’ (which is actually an overloaded operator). What you get back is whatever the container is holding. This container holds Shape*, so that’s what *i produces. If you want to send a message to the Shape, you must select that message with ->, so you write the line:
(*i)->draw();
This calls the draw( ) function for the Shape* the iterator is currently selecting. The parentheses are ugly but necessary to produce the proper order of evaluation. As an alternative, operator-> is defined so that you can say:
i->draw();
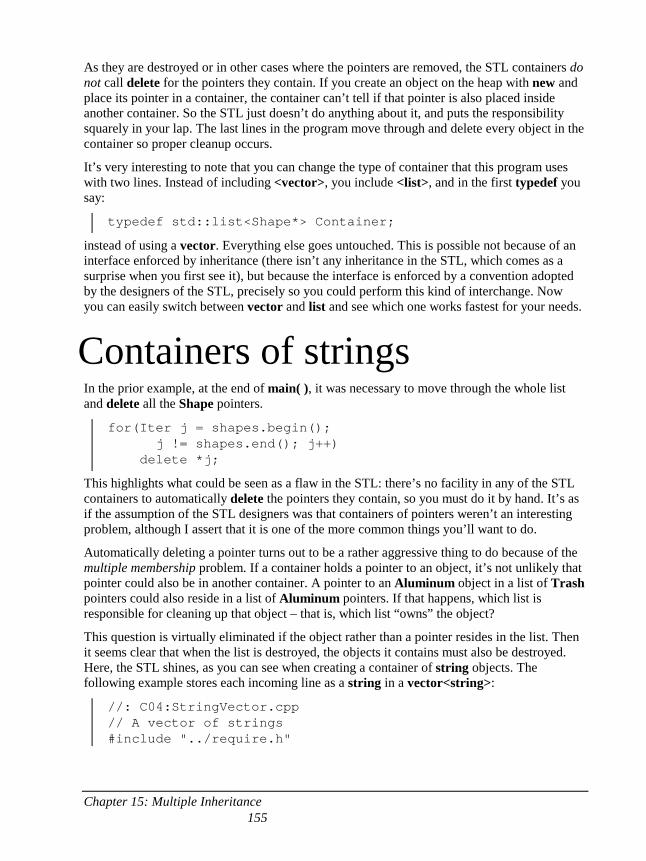
Chapter 15: Multiple Inheritance 155
As they are destroyed or in other cases where the pointers are removed, the STL containers do not call delete for the pointers they contain. If you create an object on the heap with new and place its pointer in a container, the container can’t tell if that pointer is also placed inside another container. So the STL just doesn’t do anything about it, and puts the responsibility squarely in your lap. The last lines in the program move through and delete every object in the container so proper cleanup occurs.
It’s very interesting to note that you can change the type of container that this program uses with two lines. Instead of including <vector>, you include <list>, and in the first typedef you say:
typedef std::list<Shape*> Container;
instead of using a vector. Everything else goes untouched. This is possible not because of an interface enforced by inheritance (there isn’t any inheritance in the STL, which comes as a surprise when you first see it), but because the interface is enforced by a convention adopted by the designers of the STL, precisely so you could perform this kind of interchange. Now you can easily switch between vector and list and see which one works fastest for your needs.
Containers of strings In the prior example, at the end of main( ), it was necessary to move through the whole list and delete all the Shape pointers.
for(Iter j = shapes.begin(); j != shapes.end(); j++) delete *j;
This highlights what could be seen as a flaw in the STL: there’s no facility in any of the STL containers to automatically delete the pointers they contain, so you must do it by hand. It’s as if the assumption of the STL designers was that containers of pointers weren’t an interesting problem, although I assert that it is one of the more common things you’ll want to do.
Automatically deleting a pointer turns out to be a rather aggressive thing to do because of the multiple membership problem. If a container holds a pointer to an object, it’s not unlikely that pointer could also be in another container. A pointer to an Aluminum object in a list of Trash pointers could also reside in a list of Aluminum pointers. If that happens, which list is responsible for cleaning up that object – that is, which list “owns” the object?
This question is virtually eliminated if the object rather than a pointer resides in the list. Then it seems clear that when the list is destroyed, the objects it contains must also be destroyed. Here, the STL shines, as you can see when creating a container of string objects. The following example stores each incoming line as a string in a vector<string>:
//: C04:StringVector.cpp // A vector of strings #include "../require.h"
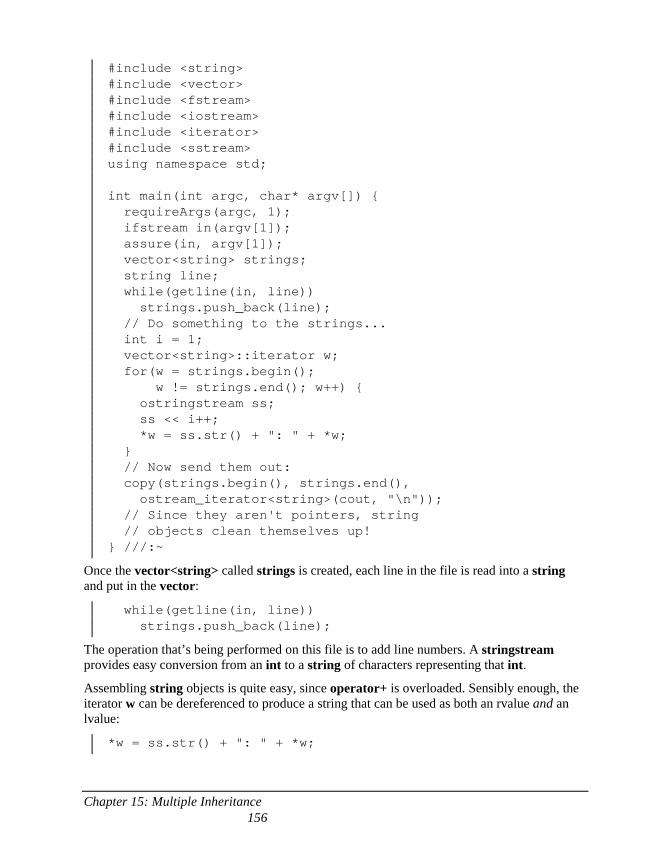
Chapter 15: Multiple Inheritance 156
#include <string> #include <vector> #include <fstream> #include <iostream> #include <iterator> #include <sstream> using namespace std; int main(int argc, char* argv[]) { requireArgs(argc, 1); ifstream in(argv[1]); assure(in, argv[1]); vector<string> strings; string line; while(getline(in, line)) strings.push_back(line); // Do something to the strings... int i = 1; vector<string>::iterator w; for(w = strings.begin(); w != strings.end(); w++) { ostringstream ss; ss << i++; *w = ss.str() + ": " + *w; } // Now send them out: copy(strings.begin(), strings.end(), ostream_iterator<string>(cout, "\n")); // Since they aren't pointers, string // objects clean themselves up! } ///:~
Once the vector<string> called strings is created, each line in the file is read into a string and put in the vector:
while(getline(in, line)) strings.push_back(line);
The operation that’s being performed on this file is to add line numbers. A stringstream provides easy conversion from an int to a string of characters representing that int.
Assembling string objects is quite easy, since operator+ is overloaded. Sensibly enough, the iterator w can be dereferenced to produce a string that can be used as both an rvalue and an lvalue:
*w = ss.str() + ": " + *w;
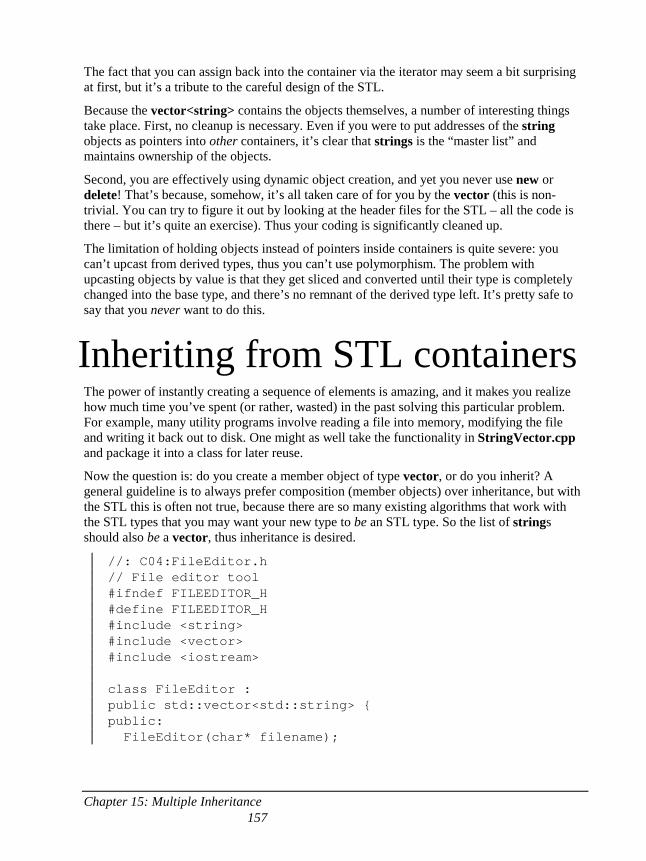
Chapter 15: Multiple Inheritance 157
The fact that you can assign back into the container via the iterator may seem a bit surprising at first, but it’s a tribute to the careful design of the STL.
Because the vector<string> contains the objects themselves, a number of interesting things take place. First, no cleanup is necessary. Even if you were to put addresses of the string objects as pointers into other containers, it’s clear that strings is the “master list” and maintains ownership of the objects.
Second, you are effectively using dynamic object creation, and yet you never use new or delete! That’s because, somehow, it’s all taken care of for you by the vector (this is non-trivial. You can try to figure it out by looking at the header files for the STL – all the code is there – but it’s quite an exercise). Thus your coding is significantly cleaned up.
The limitation of holding objects instead of pointers inside containers is quite severe: you can’t upcast from derived types, thus you can’t use polymorphism. The problem with upcasting objects by value is that they get sliced and converted until their type is completely changed into the base type, and there’s no remnant of the derived type left. It’s pretty safe to say that you never want to do this.
Inheriting from STL containers The power of instantly creating a sequence of elements is amazing, and it makes you realize how much time you’ve spent (or rather, wasted) in the past solving this particular problem. For example, many utility programs involve reading a file into memory, modifying the file and writing it back out to disk. One might as well take the functionality in StringVector.cpp and package it into a class for later reuse.
Now the question is: do you create a member object of type vector, or do you inherit? A general guideline is to always prefer composition (member objects) over inheritance, but with the STL this is often not true, because there are so many existing algorithms that work with the STL types that you may want your new type to be an STL type. So the list of strings should also be a vector, thus inheritance is desired.
//: C04:FileEditor.h // File editor tool #ifndef FILEEDITOR_H #define FILEEDITOR_H #include <string> #include <vector> #include <iostream> class FileEditor : public std::vector<std::string> { public: FileEditor(char* filename);
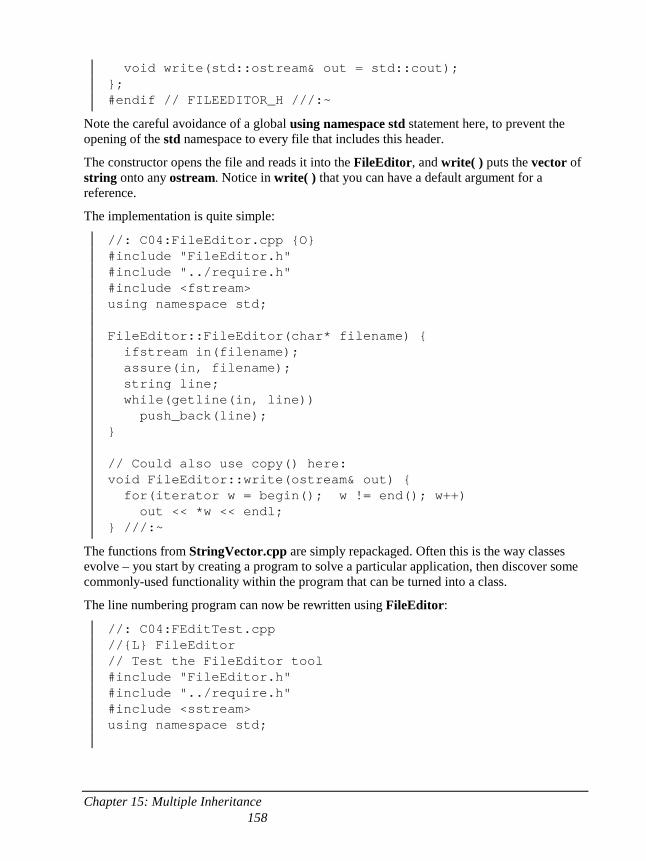
Chapter 15: Multiple Inheritance 158
void write(std::ostream& out = std::cout); }; #endif // FILEEDITOR_H ///:~
Note the careful avoidance of a global using namespace std statement here, to prevent the opening of the std namespace to every file that includes this header.
The constructor opens the file and reads it into the FileEditor, and write( ) puts the vector of string onto any ostream. Notice in write( ) that you can have a default argument for a reference.
The implementation is quite simple:
//: C04:FileEditor.cpp {O} #include "FileEditor.h" #include "../require.h" #include <fstream> using namespace std; FileEditor::FileEditor(char* filename) { ifstream in(filename); assure(in, filename); string line; while(getline(in, line)) push_back(line); } // Could also use copy() here: void FileEditor::write(ostream& out) { for(iterator w = begin(); w != end(); w++) out << *w << endl; } ///:~
The functions from StringVector.cpp are simply repackaged. Often this is the way classes evolve – you start by creating a program to solve a particular application, then discover some commonly-used functionality within the program that can be turned into a class.
The line numbering program can now be rewritten using FileEditor:
//: C04:FEditTest.cpp //{L} FileEditor // Test the FileEditor tool #include "FileEditor.h" #include "../require.h" #include <sstream> using namespace std;
Chapter 15: Multiple Inheritance 159
int main(int argc, char* argv[]) { requireArgs(argc, 1); FileEditor file(argv[1]); // Do something to the lines... int i = 1; FileEditor::iterator w = file.begin(); while(w != file.end()) { ostringstream ss; ss << i++; *w = ss.str() + ": " + *w; w++; } // Now send them to cout: file.write(); } ///:~
Now the operation of reading the file is in the constructor:
FileEditor file(argv[1]);
and writing happens in the single line (which defaults to sending the output to cout):
file.write();
The bulk of the program is involved with actually modifying the file in memory.
A plethora of iterators As mentioned earlier, the iterator is the abstraction that allows a piece of code to be generic, and to work with different types of containers without knowing the underlying structure of those containers. Every container produces iterators. You must always be able to say:
ContainerType::iterator ContainerType::const_iterator
to produce the types of the iterators produced by that container. Every container has a begin( ) method that produces an iterator indicating the beginning of the elements in the container, and an end( ) method that produces an iterator which is the as the past-the-end value of the container. If the container is const ̧begin( ) and end( ) produce const iterators.
Every iterator can be moved forward to the next element using the operator++ (an iterator may be able to do more than this, as you shall see, but it must at least support forward movement with operator++).
The basic iterator is only guaranteed to be able to perform == and != comparisons. Thus, to move an iterator it forward without running it off the end you say something like:
while(it != pastEnd) {
Chapter 15: Multiple Inheritance 160
// Do something it++; }
Where pastEnd is the past-the-end value produced by the container’s end( ) member function.
An iterator can be used to produce the element that it is currently selecting within a container by dereferencing the iterator. This can take two forms. If it is an iterator and f( ) is a member function of the objects held in the container that the iterator is pointing within, then you can say either:
(*it).f();
or
it->f();
Knowing this, you can create a template that works with any container. Here, the apply( ) function template calls a member function for every object in the container, using a pointer to member that is passed as an argument:
//: C04:Apply.cpp // Using basic iterators #include <iostream> #include <vector> #include <iterator> using namespace std; template<class Cont, class PtrMemFun> void apply(Cont& c, PtrMemFun f) { typename Cont::iterator it = c.begin(); while(it != c.end()) { (it->*f)(); // Compact form ((*it).*f)(); // Alternate form it++; } } class Z { int i; public: Z(int ii) : i(ii) {} void g() { i++; } friend ostream& operator<<(ostream& os, const Z& z) { return os << z.i;
Chapter 15: Multiple Inheritance 161
} }; int main() { ostream_iterator<Z> out(cout, " "); vector<Z> vz; for(int i = 0; i < 10; i++) vz.push_back(Z(i)); copy(vz.begin(), vz.end(), out); cout << endl; apply(vz, &Z::g); copy(vz.begin(), vz.end(), out); } ///:~
Because operator-> is defined for STL iterators, it can be used for pointer-to-member dereferencing (in the following chapter you’ll learn a more elegant way to handle the problem of applying a member function or ordinary function to every object in a container).
Much of the time, this is all you need to know about iterators – that they are produced by begin( ) and end( ), and that you can use them to move through a container and select elements. Many of the problems that you solve, and the STL algorithms (covered in the next chapter) will allow you to just flail away with the basics of iterators. However, things can at times become more subtle, and in those cases you need to know more about iterators. The rest of this section gives you the details.
Iterators in reversible containers All containers must produce the basic iterator. A container may also be reversible, which means that it can produce iterators that move backwards from the end, as well as the iterators that move forward from the beginning.
A reversible container has the methods rbegin( ) (to produce a reverse_iterator selecting the end) and rend( ) (to produce a reverse_iterator indicating “one past the beginning”). If the container is const then rbegin( ) and rend( ) will produce const_reverse_iterators.
All the basic sequence containers vector, deque and list are reversible containers. The following example uses vector, but will work with deque and list as well:
//: C04:Reversible.cpp // Using reversible containers #include "../require.h" #include <vector> #include <iostream> #include <fstream> #include <string> using namespace std;
Chapter 15: Multiple Inheritance 162
int main() { ifstream in("Reversible.cpp"); assure(in, "Reversible.cpp"); string line; vector<string> lines; while(getline(in, line)) lines.push_back(line); vector<string>::reverse_iterator r; for(r = lines.rbegin(); r != lines.rend(); r++) cout << *r << endl; } ///:~
You move backward through the container using the same syntax as moving forward through a container with an ordinary iterator.
The associative containers set, multiset, map and multimap are also reversible. Using iterators with associative containers is a bit different, however, and will be delayed until those containers are more fully introduced.
Iterator categories The iterators are classified into different “categories” which describe what they are capable of doing. The order in which they are generally described moves from the categories with the most restricted behavior to those with the most powerful behavior.
Input: read-only, one pass The only predefined implementations of input iterators are istream_iterator and istreambuf_iterator, to read from an istream. As you can imagine, an input iterator can only be dereferenced once for each element that’s selected, just as you can only read a particular portion of an input stream once. They can only move forward. There is a special constructor to define the past-the-end value. In summary, you can dereference it for reading (once only for each value), and move it forward.
Output: write-only, one pass This is the complement of an input iterator, but for writing rather than reading. The only predefined implementations of output iterators are ostream_iterator and ostreambuf_iterator, to write to an ostream, and the less-commonly-used raw_storage_iterator. Again, these can only be dereferenced once for each written value, and they can only move forward. There is no concept of a terminal past-the-end value for an output iterator. Summarizing, you can dereference it for writing (once only for each value) and move it forward.
Chapter 15: Multiple Inheritance 163
Forward: multiple read/write The forward iterator contains all the functionality of both the input iterator and the output iterator, plus you can dereference an iterator location multiple times, so you can read and write to a value multiple times. As the name implies, you can only move forward. There are no predefined iterators that are only forward iterators.
Bidirectional: operator-- The bidirectional iterator has all the functionality of the forward iterator, and in addition it can be moved backwards one location at a time using operator--.
Random-access: like a pointer Finally, the random-access iterator has all the functionality of the bidirectional iterator plus all the functionality of a pointer (a pointer is a random-access iterator). Basically, anything you can do with a pointer you can do with a random-access iterator, including indexing with operator[ ], adding integral values to a pointer to move it forward or backward by a number of locations, and comparing one iterator to another with <, >=, etc.
Is this really important? Why do you care about this categorization? When you’re just using containers in a straightforward way (for example, just hand-coding all the operations you want to perform on the objects in the container) it usually doesn’t impact you too much. Things either work or they don’t. The iterator categories become important when:
1. You use some of the fancier built-in iterator types that will be demonstrated shortly. Or you graduate to creating your own iterators (this will also be demonstrated, later in this chapter).
2. You use the STL algorithms (the subject of the next chapter). Each of the algorithms have requirements that they place on the iterators that they work with. Knowledge of the iterator categories is even more important when you create your own reusable algorithm templates, because the iterator category that your algorithm requires determines how flexible the algorithm will be. If you only require the most primitive iterator category (input or output) then your algorithm will work with everything (copy( ) is an example of this).
Predefined iterators The STL has a predefined set of iterator classes that can be quite handy. For example, you’ve already seen reverse_iterator (produced by calling rbegin( ) and rend( ) for all the basic containers).
The insertion iterators are necessary because some of the STL algorithms – copy( ) for example – use the assignment operator= in order to place objects in the destination container.
Chapter 15: Multiple Inheritance 164
This is a problem when you’re using the algorithm to fill the container rather than to overwrite items that are already in the destination container. That is, when the space isn’t already there. What the insert iterators do is change the implementation of the operator= so that instead of doing an assignment, it calls a “push” or “insert” function for that container, thus causing it to allocate new space. The constructors for both back_insert_iterator and front_insert_iterator take a basic sequence container object (vector, deque or list) as their argument and produce an iterator that calls push_back( ) or push_front( ), respectively, to perform assignment. The shorthand functions back_inserter( ) and front_inserter( ) produce the same objects with a little less typing. Since all the basic sequence containers support push_back( ), you will probably find yourself using back_inserter( ) with some regularity.
The insert_iterator allows you to insert elements in the middle of the sequence, again replacing the meaning of operator=, but this time with insert( ) instead of one of the “push” functions. The insert( ) member function requires an iterator indicating the place to insert before, so the insert_iterator requires this iterator in addition to the container object. The shorthand function inserter( ) produces the same object.
The following example shows the use of the different types of inserters:
//: C04:Inserters.cpp // Different types of iterator inserters #include <iostream> #include <vector> #include <deque> #include <list> #include <iterator> using namespace std; int a[] = { 1, 3, 5, 7, 11, 13, 17, 19, 23 }; template<class Cont> void frontInsertion(Cont& ci) { copy(a, a + sizeof(a)/sizeof(int), front_inserter(ci)); copy(ci.begin(), ci.end(), ostream_iterator<int>(cout, " ")); cout << endl; } template<class Cont> void backInsertion(Cont& ci) { copy(a, a + sizeof(a)/sizeof(int), back_inserter(ci)); copy(ci.begin(), ci.end(), ostream_iterator<int>(cout, " "));
Chapter 15: Multiple Inheritance 165
cout << endl; } template<class Cont> void midInsertion(Cont& ci) { typename Cont::iterator it = ci.begin(); it++; it++; it++; copy(a, a + sizeof(a)/(sizeof(int) * 2), inserter(ci, it)); copy(ci.begin(), ci.end(), ostream_iterator<int>(cout, " ")); cout << endl; } int main() { deque<int> di; list<int> li; vector<int> vi; // Can't use a front_inserter() with vector frontInsertion(di); frontInsertion(li); di.clear(); li.clear(); backInsertion(vi); backInsertion(di); backInsertion(li); midInsertion(vi); midInsertion(di); midInsertion(li); } ///:~
Since vector does not support push_front( ), it cannot produce a front_insertion_iterator. However, you can see that vector does support the other two types of insertion (even though, as you shall see later, insert( ) is not a very efficient operation for vector).
IO stream iterators You’ve already seen some use of the ostream_iterator (an output iterator) in conjunction with copy( ) to place the contents of a container on an output stream. There is a corresponding istream_iterator (an input iterator) which allows you to “iterate” a set of objects of a specified type from an input stream. An important difference between ostream_iterator and istream_iterator comes from the fact that an output stream doesn’t have any concept of an “end,” since you can always just keep writing more elements. However, an input stream eventually terminates (for example, when you reach the end of a file) so there needs to be a
Chapter 15: Multiple Inheritance 166
way to represent that. An istream_iterator has two constructors, one that takes an istream and produces the iterator you actually read from, and the other which is the default constructor and produces an object which is the past-the-end sentinel. In the following program this object is named end:
//: C04:StreamIt.cpp // Iterators for istreams and ostreams #include "../require.h" #include <iostream> #include <fstream> #include <vector> #include <string> using namespace std; int main() { ifstream in("StreamIt.cpp"); assure(in, "StreamIt.cpp"); istream_iterator<string> init(in), end; ostream_iterator<string> out(cout, "\n"); vector<string> vs; copy(init, end, back_inserter(vs)); copy(vs.begin(), vs.end(), out); *out++ = vs[0]; *out++ = "That's all, folks!"; } ///:~
When in runs out of input (in this case when the end of the file is reached) then init becomes equivalent to end and the copy( ) terminates.
Because out is an ostream_iterator<string>, you can simply assign any string object to the dereferenced iterator using operator= and that string will be placed on the output stream, as seen in the two assignments to out. Because out is defined with a newline as its second argument, these assignments also cause a newline to be inserted along with each assignment.
While it is possible to create an istream_iterator<char> and ostream_iterator<char>, these actually parse the input and thus will for example automatically eat whitespace (spaces, tabs and newlines), which is not desirable if you want to manipulate an exact representation of an istream. Instead, you can use the special iterators istreambuf_iterator and ostreambuf_iterator, which are designed strictly to move characters16. Although these are
16 These were actually created to abstract the “locale” facets away from iostreams, so that locale facets could operate on any sequence of characters, not only iostreams. Locales allow iostreams to easily handle culturally-different formatting (such as representation of money), and are beyond the scope of this book.
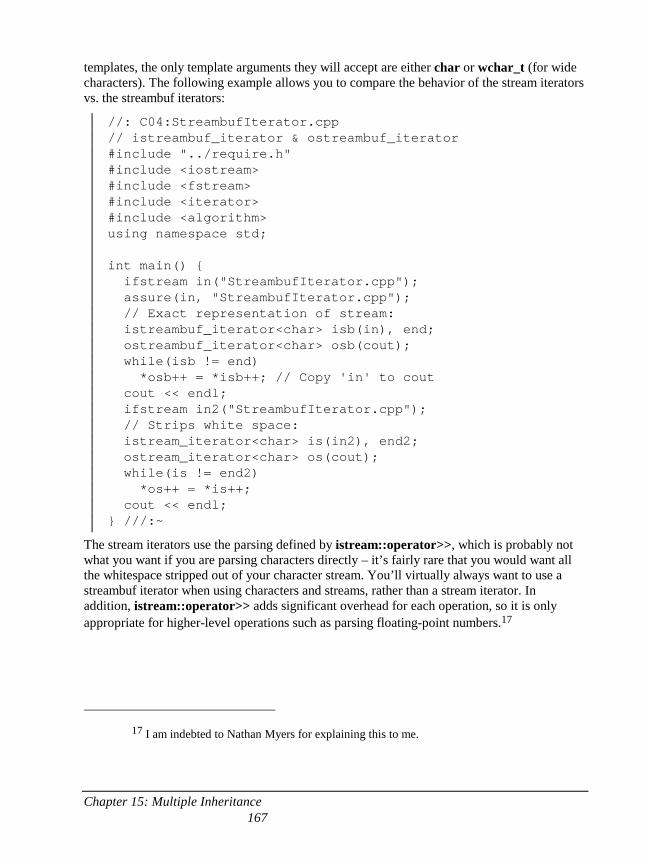
Chapter 15: Multiple Inheritance 167
templates, the only template arguments they will accept are either char or wchar_t (for wide characters). The following example allows you to compare the behavior of the stream iterators vs. the streambuf iterators:
//: C04:StreambufIterator.cpp // istreambuf_iterator & ostreambuf_iterator #include "../require.h" #include <iostream> #include <fstream> #include <iterator> #include <algorithm> using namespace std; int main() { ifstream in("StreambufIterator.cpp"); assure(in, "StreambufIterator.cpp"); // Exact representation of stream: istreambuf_iterator<char> isb(in), end; ostreambuf_iterator<char> osb(cout); while(isb != end) *osb++ = *isb++; // Copy 'in' to cout cout << endl; ifstream in2("StreambufIterator.cpp"); // Strips white space: istream_iterator<char> is(in2), end2; ostream_iterator<char> os(cout); while(is != end2) *os++ = *is++; cout << endl; } ///:~
The stream iterators use the parsing defined by istream::operator>>, which is probably not what you want if you are parsing characters directly – it’s fairly rare that you would want all the whitespace stripped out of your character stream. You’ll virtually always want to use a streambuf iterator when using characters and streams, rather than a stream iterator. In addition, istream::operator>> adds significant overhead for each operation, so it is only appropriate for higher-level operations such as parsing floating-point numbers.17
17 I am indebted to Nathan Myers for explaining this to me.
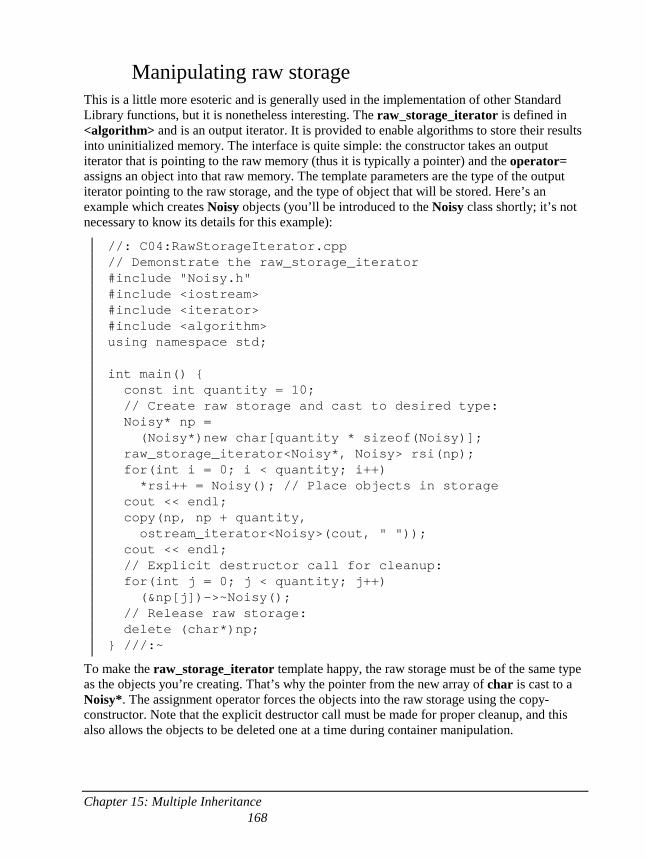
Chapter 15: Multiple Inheritance 168
Manipulating raw storage This is a little more esoteric and is generally used in the implementation of other Standard Library functions, but it is nonetheless interesting. The raw_storage_iterator is defined in <algorithm> and is an output iterator. It is provided to enable algorithms to store their results into uninitialized memory. The interface is quite simple: the constructor takes an output iterator that is pointing to the raw memory (thus it is typically a pointer) and the operator= assigns an object into that raw memory. The template parameters are the type of the output iterator pointing to the raw storage, and the type of object that will be stored. Here’s an example which creates Noisy objects (you’ll be introduced to the Noisy class shortly; it’s not necessary to know its details for this example):
//: C04:RawStorageIterator.cpp // Demonstrate the raw_storage_iterator #include "Noisy.h" #include <iostream> #include <iterator> #include <algorithm> using namespace std; int main() { const int quantity = 10; // Create raw storage and cast to desired type: Noisy* np = (Noisy*)new char[quantity * sizeof(Noisy)]; raw_storage_iterator<Noisy*, Noisy> rsi(np); for(int i = 0; i < quantity; i++) *rsi++ = Noisy(); // Place objects in storage cout << endl; copy(np, np + quantity, ostream_iterator<Noisy>(cout, " ")); cout << endl; // Explicit destructor call for cleanup: for(int j = 0; j < quantity; j++) (&np[j])->~Noisy(); // Release raw storage: delete (char*)np; } ///:~
To make the raw_storage_iterator template happy, the raw storage must be of the same type as the objects you’re creating. That’s why the pointer from the new array of char is cast to a Noisy*. The assignment operator forces the objects into the raw storage using the copy-constructor. Note that the explicit destructor call must be made for proper cleanup, and this also allows the objects to be deleted one at a time during container manipulation.

Chapter 15: Multiple Inheritance 169
Basic sequences: vector, list & deque
If you take a step back from the STL containers you’ll see that there are really only two types of container: sequences (including vector, list, deque, stack, queue, and priority_queue) and associations (including set, multiset, map and multimap). The sequences keep the objects in whatever sequence that you establish (either by pushing the objects on the end or inserting them in the middle).
Since all the sequence containers have the same basic goal (to maintain your order) they seem relatively interchangeable. However, they differ in the efficiency of their operations, so if you are going to manipulate a sequence in a particular fashion you can choose the appropriate container for those types of manipulations. The “basic” sequence containers are vector, list and deque – these actually have fleshed-out implementations, while stack, queue and priority_queue are built on top of the basic sequences, and represent more specialized uses rather than differences in underlying structure (stack, for example, can be implemented using a deque, vector or list).
So far in this book I have been using vector as a catch-all container. This was acceptable because I’ve only used the simplest and safest operations, primarily push_back( ) and operator[ ]. However, when you start making more sophisticated uses of containers it becomes important to know more about their underlying implementations and behavior, so you can make the right choices (and, as you’ll see, stay out of trouble).
Basic sequence operations Using a template, the following example shows the operations that all the basic sequences (vector, deque or list) support. As you shall learn in the sections on the specific sequence containers, not all of these operations make sense for each basic sequence, but they are supported.
//: C04:BasicSequenceOperations.cpp // The operations available for all the // basic sequence Containers. #include <iostream> #include <vector> #include <deque> #include <list> using namespace std; template<typename Container> void print(Container& c, char* s = "") {
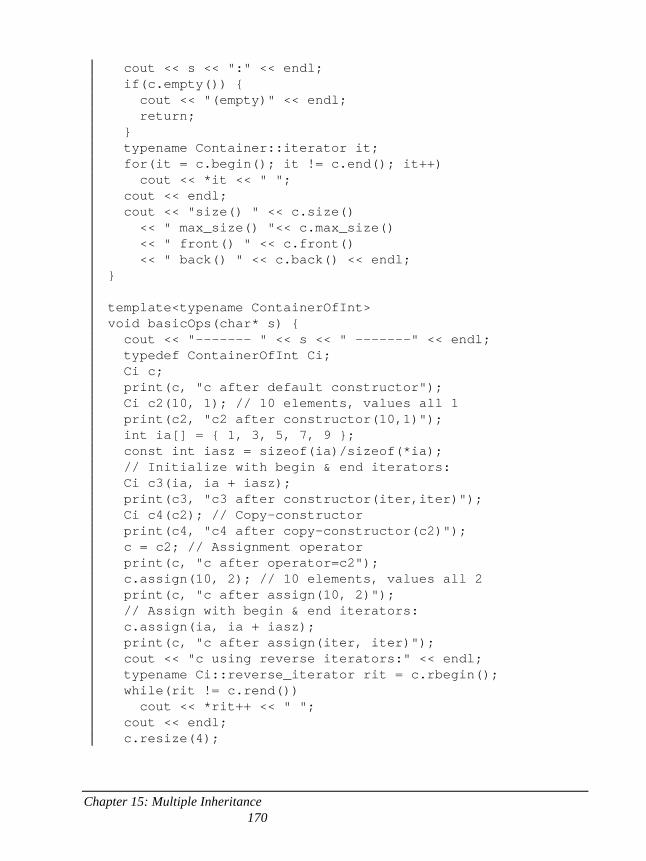
Chapter 15: Multiple Inheritance 170
cout << s << ":" << endl; if(c.empty()) { cout << "(empty)" << endl; return; } typename Container::iterator it; for(it = c.begin(); it != c.end(); it++) cout << *it << " "; cout << endl; cout << "size() " << c.size() << " max_size() "<< c.max_size() << " front() " << c.front() << " back() " << c.back() << endl; } template<typename ContainerOfInt> void basicOps(char* s) { cout << "------- " << s << " -------" << endl; typedef ContainerOfInt Ci; Ci c; print(c, "c after default constructor"); Ci c2(10, 1); // 10 elements, values all 1 print(c2, "c2 after constructor(10,1)"); int ia[] = { 1, 3, 5, 7, 9 }; const int iasz = sizeof(ia)/sizeof(*ia); // Initialize with begin & end iterators: Ci c3(ia, ia + iasz); print(c3, "c3 after constructor(iter,iter)"); Ci c4(c2); // Copy-constructor print(c4, "c4 after copy-constructor(c2)"); c = c2; // Assignment operator print(c, "c after operator=c2"); c.assign(10, 2); // 10 elements, values all 2 print(c, "c after assign(10, 2)"); // Assign with begin & end iterators: c.assign(ia, ia + iasz); print(c, "c after assign(iter, iter)"); cout << "c using reverse iterators:" << endl; typename Ci::reverse_iterator rit = c.rbegin(); while(rit != c.rend()) cout << *rit++ << " "; cout << endl; c.resize(4);
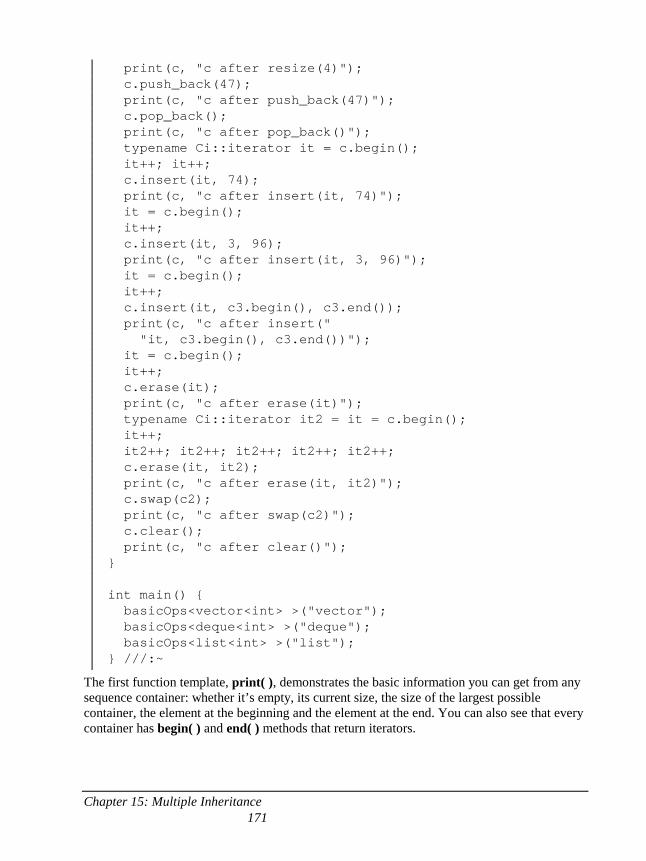
Chapter 15: Multiple Inheritance 171
print(c, "c after resize(4)"); c.push_back(47); print(c, "c after push_back(47)"); c.pop_back(); print(c, "c after pop_back()"); typename Ci::iterator it = c.begin(); it++; it++; c.insert(it, 74); print(c, "c after insert(it, 74)"); it = c.begin(); it++; c.insert(it, 3, 96); print(c, "c after insert(it, 3, 96)"); it = c.begin(); it++; c.insert(it, c3.begin(), c3.end()); print(c, "c after insert(" "it, c3.begin(), c3.end())"); it = c.begin(); it++; c.erase(it); print(c, "c after erase(it)"); typename Ci::iterator it2 = it = c.begin(); it++; it2++; it2++; it2++; it2++; it2++; c.erase(it, it2); print(c, "c after erase(it, it2)"); c.swap(c2); print(c, "c after swap(c2)"); c.clear(); print(c, "c after clear()"); } int main() { basicOps<vector<int> >("vector"); basicOps<deque<int> >("deque"); basicOps<list<int> >("list"); } ///:~
The first function template, print( ), demonstrates the basic information you can get from any sequence container: whether it’s empty, its current size, the size of the largest possible container, the element at the beginning and the element at the end. You can also see that every container has begin( ) and end( ) methods that return iterators.
Chapter 15: Multiple Inheritance 172
The basicOps( ) function tests everything else (and in turn calls print( )), including a variety of constructors: default, copy-constructor, quantity and initial value, and beginning and ending iterators. There’s an assignment operator= and two kinds of assign( ) member functions, one which takes a quantity and initial value and the other which take a beginning and ending iterator.
All the basic sequence containers are reversible containers, as shown by the use of the rbegin( ) and rend( ) member functions. A sequence container can be resized, and the entire contents of the container can be removed with clear( ).
Using an iterator to indicate where you want to start inserting into any sequence container, you can insert( ) a single element, a number of elements that all have the same value, and a group of elements from another container using the beginning and ending iterators of that group.
To erase( ) a single element from the middle, use an iterator; to erase( ) a range of elements, use a pair of iterators. Notice that since a list only supports bidirectional iterators, all the iterator motion must be performed with increments and decrements (if the containers were limited to vector and deque, which produce random-access iterators, then operator+ and operator- could have been used to move the iterators in big jumps).
Although both list and deque support push_front( ) and pop_front( ), vector does not, so the only member functions that work with all three are push_back( ) and pop_back( ).
The naming of the member function swap( ) is a little confusing, since there’s also a non-member swap( ) algorithm that switches two elements of a container. The member swap( ), however, swaps everything in one container for another (if the containers hold the same type), effectively swapping the containers themselves. There’s also a non-member version of this function.
The following sections on the sequence containers discuss the particulars of each type of container.
vector The vector is intentionally made to look like a souped-up array, since it has array-style indexing but also can expand dynamically. vector is so fundamentally useful that it was introduced in a very primitive way early in this book, and used quite regularly in previous examples. This section will give a more in-depth look at vector.
To achieve maximally-fast indexing and iteration, the vector maintains its storage as a single contiguous array of objects. This is a critical point to observe in understanding the behavior of vector. It means that indexing and iteration are lighting-fast, being basically the same as indexing and iterating over an array of objects. But it also means that inserting an object anywhere but at the end (that is, appending) is not really an acceptable operation for a vector. It also means that when a vector runs out of pre-allocated storage, in order to maintain its
Chapter 15: Multiple Inheritance 173
contiguous array it must allocate a whole new (larger) chunk of storage elsewhere and copy the objects to the new storage. This has a number of unpleasant side effects.
Cost of overflowing allocated storage A vector starts by grabbing a block of storage, as if it’s taking a guess at how many objects you plan to put in it. As long as you don’t try to put in more objects than can be held in the initial block of storage, everything is very rapid and efficient (note that if you do know how many objects to expect, you can pre-allocate storage using reserve( )). But eventually you will put in one too many objects and, unbeknownst to you, the vector responds by:
1. Allocating a new, bigger piece of storage
2. Copying all the objects from the old storage to the new (using the copy-constructor)
3. Destroying all the old objects (the destructor is called for each one)
4. Releasing the old memory
For complex objects, this copy-construction and destruction can end up being very expensive if you overfill your vector a lot. To see what happens when you’re filling a vector, here is a class that prints out information about its creations, destructions, assignments and copy-constructions:
//: C04:Noisy.h // A class to track various object activities #ifndef NOISY_H #define NOISY_H #include <iostream> class Noisy { static long create, assign, copycons, destroy; long id; public: Noisy() : id(create++) { std::cout << "d[" << id << "]"; } Noisy(const Noisy& rv) : id(rv.id) { std::cout << "c[" << id << "]"; copycons++; } Noisy& operator=(const Noisy& rv) { std::cout << "(" << id << ")=[" << rv.id << "]"; id = rv.id; assign++;
Chapter 15: Multiple Inheritance 174
return *this; } friend bool operator<(const Noisy& lv, const Noisy& rv) { return lv.id < rv.id; } friend bool operator==(const Noisy& lv, const Noisy& rv) { return lv.id == rv.id; } ~Noisy() { std::cout << "~[" << id << "]"; destroy++; } friend std::ostream& operator<<(std::ostream& os, const Noisy& n) { return os << n.id; } friend class NoisyReport; }; struct NoisyGen { Noisy operator()() { return Noisy(); } }; // A singleton. Will automatically report the // statistics as the program terminates: class NoisyReport { static NoisyReport nr; NoisyReport() {} // Private constructor public: ~NoisyReport() { std::cout << "\n-------------------\n" << "Noisy creations: " << Noisy::create << "\nCopy-Constructions: " << Noisy::copycons << "\nAssignments: " << Noisy::assign << "\nDestructions: " << Noisy::destroy << std::endl; } }; // Because of these this file can only be used
Chapter 15: Multiple Inheritance 175
// in simple test situations. Move them to a // .cpp file for more complex programs: long Noisy::create = 0, Noisy::assign = 0, Noisy::copycons = 0, Noisy::destroy = 0; NoisyReport NoisyReport::nr; #endif // NOISY_H ///:~
Each Noisy object has its own identifier, and there are static variables to keep track of all the creations, assignments (using operator=), copy-constructions and destructions. The id is initialized using the create counter inside the default constructor; the copy-constructor and assignment operator take their id values from the rvalue. Of course, with operator= the lvalue is already an initialized object so the old value of id is printed before it is overwritten with the id from the rvalue.
In order to support certain operations like sorting and searching (which are used implicitly by some of the containers), Noisy must have an operator< and operator==. These simply compare the id values. The operator<< for ostream follows the standard form and simply prints the id.
NoisyGen produces a function object (since it has an operator( )) that is used to automatically generate Noisy objects during testing.
NoisyReport is a type of class called a singleton, which is a “design pattern” (these are covered more fully in Chapter XX). Here, the goal is to make sure there is one and only one NoisyReport object, because it is responsible for printing out the results at program termination. It has a private constructor so no one else can make a NoisyReport object, and a single static instance of NoisyReport called nr. The only executable statements are in the destructor, which is called as the program exits and the static destructors are called; this destructor prints out the statistics captured by the static variables in Noisy.
The one snag to this header file is the inclusion of the definitions for the statics at the end. If you include this header in more than one place in your project, you’ll get multiple-definition errors at link time. Of course, you can put the static definitions in a separate cpp file and link it in, but that is less convenient, and since Noisy is just intended for quick-and-dirty experiments the header file should be reasonable for most situations.
Using Noisy.h, the following program will show the behaviors that occur when a vector overflows its currently allocated storage:
//: C04:VectorOverflow.cpp // Shows the copy-construction and destruction // That occurs when a vector must reallocate // (It maintains a linear array of elements) #include "Noisy.h" #include "../require.h" #include <vector> #include <iostream>
Chapter 15: Multiple Inheritance 176
#include <string> #include <cstdlib> using namespace std; int main(int argc, char* argv[]) { requireArgs(argc, 1); int size = 1000; if(argc >= 2) size = atoi(argv[1]); vector<Noisy> vn; Noisy n; for(int i = 0; i < size; i++) vn.push_back(n); cout << "\n cleaning up \n"; } ///:~
You can either use the default value of 1000, or use your own value by putting it on the command-line.
When you run this program, you’ll see a single default constructor call (for n), then a lot of copy-constructor calls, then some destructor calls, then some more copy-constructor calls, and so on. When the vector runs out of space in the linear array of bytes it has allocated, it must (to maintain all the objects in a linear array, which is an essential part of its job) get a bigger piece of storage and move everything over, copying first and then destroying the old objects. You can imagine that if you store a lot of large and complex objects, this process could rapidly become prohibitive.
There are two solutions to this problem. The nicest one requires that you know beforehand how many objects you’re going to make. In that case you can use reserve( ) to tell the vector how much storage to pre-allocate, thus eliminating all the copies and destructions and making everything very fast (especially random access to the objects with operator[ ]). Note that the use of reserve( ) is different from using the vector constructor with an integral first argument; the latter initializes each element using the default copy-constructor.
However, in the more general case you won’t know how many objects you’ll need. If vector reallocations are slowing things down, you can change sequence containers. You could use a list, but as you’ll see, the deque allows speedy insertions at either end of the sequence, and never needs to copy or destroy objects as it expands its storage. The deque also allows random access with operator[ ], but it’s not quite as fast as vector’s operator[ ]. So in the case where you’re creating all your objects in one part of the program and randomly accessing them in another, you may find yourself filling a deque, then creating a vector from the deque and using the vector for rapid indexing. Of course, you don’t want to program this way habitually, just be aware of these issues (avoid premature optimization).
There is a darker side to vector’s reallocation of memory, however. Because vector keeps its objects in a nice, neat array (allowing, for one thing, maximally-fast random access), the iterators used by vector are generally just pointers. This is a good thing – of all the sequence containers, these pointers allow the fastest selection and manipulation. However, consider
Chapter 15: Multiple Inheritance 177
what happens when you’re holding onto an iterator (i.e. a pointer) and then you add the one additional object that causes the vector to reallocate storage and move it elsewhere. Your pointer is now pointing off into nowhere:
//: C04:VectorCoreDump.cpp // How to break a program using a vector #include <vector> #include <iostream> using namespace std; int main() { vector<int> vi(10, 0); ostream_iterator<int> out(cout, " "); copy(vi.begin(), vi.end(), out); vector<int>::iterator i = vi.begin(); cout << "\n i: " << long(i) << endl; *i = 47; copy(vi.begin(), vi.end(), out); // Force it to move memory (could also just add // enough objects): vi.resize(vi.capacity() + 1); // Now i points to wrong memory: cout << "\n i: " << long(i) << endl; cout << "vi.begin(): " << long(vi.begin()); *i = 48; // Access violation } ///:~
If your program is breaking mysteriously, look for places where you hold onto an iterator while adding more objects to a vector. You’ll need to get a new iterator after adding elements, or use operator[ ] instead for element selections. If you combine the above observation with the awareness of the potential expense of adding new objects to a vector, you may conclude that the safest way to use one is to fill it up all at once (ideally, knowing first how many objects you’ll need) and then just use it (without adding more objects) elsewhere in the program. This is the way vector has been used in the book up to this point.
You may observe that using vector as the “basic” container in the earlier chapters of this book may not be the best choice in all cases. This is a fundamental issue in containers, and in data structures in general: the “best” choice varies according to the way the container is used. The reason vector has been the “best” choice up until now is that it looks a lot like an array, and was thus familiar and easy for you to adopt. But from now on it’s also worth thinking about other issues when choosing containers.
Inserting and erasing elements The vector is most efficient if:
Chapter 15: Multiple Inheritance 178
1. You reserve( ) the correct amount of storage at the beginning so the vector never has to reallocate.
2. You only add and remove elements from the back end.
It is possible to insert and erase elements from the middle of a vector using an iterator, but the following program demonstrates what a bad idea it is:
//: C04:VectorInsertAndErase.cpp // Erasing an element from a vector #include "Noisy.h" #include <iostream> #include <vector> #include <algorithm> using namespace std; int main() { vector<Noisy> v; v.reserve(11); cout << "11 spaces have been reserved" << endl; generate_n(back_inserter(v), 10, NoisyGen()); ostream_iterator<Noisy> out(cout, " "); cout << endl; copy(v.begin(), v.end(), out); cout << "Inserting an element:" << endl; vector<Noisy>::iterator it = v.begin() + v.size() / 2; // Middle v.insert(it, Noisy()); cout << endl; copy(v.begin(), v.end(), out); cout << "\nErasing an element:" << endl; // Cannot use the previous value of it: it = v.begin() + v.size() / 2; v.erase(it); cout << endl; copy(v.begin(), v.end(), out); cout << endl; } ///:~
When you run the program you’ll see that the call to reserve( ) really does only allocate storage – no constructors are called. The generate_n( ) call is pretty busy: each call to NoisyGen::operator( ) results in a construction, a copy-construction (into the vector) and a destruction of the temporary. But when an object is inserted into the vector in the middle, it must shove everything down to maintain the linear array and – since there is enough space – it does this with the assignment operator (if the argument of reserve( ) is 10 instead of eleven
Chapter 15: Multiple Inheritance 179
then it would have to reallocate storage). When an object is erased from the vector, the assignment operator is once again used to move everything up to cover the place that is being erased (notice that this requires that the assignment operator properly cleans up the lvalue). Lastly, the object on the end of the array is deleted.
You can imagine how enormous the overhead can become if objects are inserted and removed from the middle of a vector if the number of elements is large and the objects are complicated. It’s obviously a practice to avoid.
deque The deque (double-ended-queue, pronounced “deck”) is the basic sequence container optimized for adding and removing elements from either end. It also allows for reasonably fast random access – it has an operator[ ] like vector. However, it does not have vector’s constraint of keeping everything in a single sequential block of memory. Instead, deque uses multiple blocks of sequential storage (keeping track of all the blocks and their order in a mapping structure). For this reason the overhead for a deque to add or remove elements at either end is very low. In addition, it never needs to copy and destroy contained objects during a new storage allocation (like vector does) so it is far more efficient than vector if you are adding an unknown quantity of objects. This means that vector is the best choice only if you have a pretty good idea of how many objects you need. In addition, many of the programs shown earlier in this book that use vector and push_back( ) might be more efficient with a deque. The interface to deque is only slightly different from a vector (deque has a push_front( ) and pop_front( ) while vector does not, for example) so converting code from using vector to using deque is almost trivial. Consider StringVector.cpp, which can be changed to use deque by replacing the word “vector” with “deque” everywhere. The following program adds parallel deque operations to the vector operations in StringVector.cpp, and performs timing comparisons:
//: C04:StringDeque.cpp // Converted from StringVector.cpp #include "../require.h" #include <string> #include <deque> #include <vector> #include <fstream> #include <iostream> #include <iterator> #include <sstream> #include <ctime> using namespace std; int main(int argc, char* argv[]) { requireArgs(argc, 1);
Chapter 15: Multiple Inheritance 180
ifstream in(argv[1]); assure(in, argv[1]); vector<string> vstrings; deque<string> dstrings; string line; // Time reading into vector: clock_t ticks = clock(); while(getline(in, line)) vstrings.push_back(line); ticks = clock() - ticks; cout << "Read into vector: " << ticks << endl; // Repeat for deque: ifstream in2(argv[1]); assure(in2, argv[1]); ticks = clock(); while(getline(in2, line)) dstrings.push_back(line); ticks = clock() - ticks; cout << "Read into deque: " << ticks << endl; // Now compare indexing: ticks = clock(); for(int i = 0; i < vstrings.size(); i++) { ostringstream ss; ss << i; vstrings[i] = ss.str() + ": " + vstrings[i]; } ticks = clock() - ticks; cout << "Indexing vector: " << ticks << endl; ticks = clock(); for(int j = 0; j < dstrings.size(); j++) { ostringstream ss; ss << j; dstrings[j] = ss.str() + ": " + dstrings[j]; } ticks = clock() - ticks; cout << "Indexing deqeue: " << ticks << endl; // Compare iteration ofstream tmp1("tmp1.tmp"), tmp2("tmp2.tmp"); ticks = clock(); copy(vstrings.begin(), vstrings.end(), ostream_iterator<string>(tmp1, "\n")); ticks = clock() - ticks; cout << "Iterating vector: " << ticks << endl;
Chapter 15: Multiple Inheritance 181
ticks = clock(); copy(dstrings.begin(), dstrings.end(), ostream_iterator<string>(tmp2, "\n")); ticks = clock() - ticks; cout << "Iterating deqeue: " << ticks << endl; } ///:~
Knowing now what you do about the inefficiency of adding things to vector because of storage reallocation, you may expect dramatic differences between the two. However, on a 1.7 Megabyte text file one compiler’s program produced the following (measured in platform/compiler specific clock ticks, not seconds):
Read into vector: 8350 Read into deque: 7690 Indexing vector: 2360 Indexing deqeue: 2480 Iterating vector: 2470 Iterating deqeue: 2410
A different compiler and platform roughly agreed with this. It’s not so dramatic, is it? This points out some important issues:
1. We (programmers) are typically very bad at guessing where inefficiencies occur in our programs.
2. Efficiency comes from a combination of effects – here, reading the lines in and converting them to strings may dominate over the cost of the vector vs. deque.
3. The string class is probably fairly well-designed in terms of efficiency.
Of course, this doesn’t mean you shouldn’t use a deque rather than a vector when you know that an uncertain number of objects will be pushed onto the end of the container. On the contrary, you should – when you’re tuning for performance. But you should also be aware that performance issues are usually not where you think they are, and the only way to know for sure where your bottlenecks are is by testing. Later in this chapter there will be a more “pure” comparison of performance between vector, deque and list.
Converting between sequences Sometimes you need the behavior or efficiency of one kind of container for one part of your program, and a different container’s behavior or efficiency in another part of the program. For example, you may need the efficiency of a deque when adding objects to the container but the efficiency of a vector when indexing them. Each of the basic sequence containers (vector, deque and list) has a two-iterator constructor (indicating the beginning and ending of the sequence to read from when creating a new object) and an assign( ) member function to read into an existing container, so you can easily move objects from one sequence container to another.
Chapter 15: Multiple Inheritance 182
The following example reads objects into a deque and then converts to a vector:
//: C04:DequeConversion.cpp // Reading into a Deque, converting to a vector #include "Noisy.h" #include <deque> #include <vector> #include <iostream> #include <algorithm> #include <cstdlib> using namespace std; int main(int argc, char* argv[]) { int size = 25; if(argc >= 2) size = atoi(argv[1]); deque<Noisy> d; generate_n(back_inserter(d), size, NoisyGen()); cout << "\n Converting to a vector(1)" << endl; vector<Noisy> v1(d.begin(), d.end()); cout << "\n Converting to a vector(2)" << endl; vector<Noisy> v2; v2.reserve(d.size()); v2.assign(d.begin(), d.end()); cout << "\n Cleanup" << endl; } ///:~
You can try various sizes, but you should see that it makes no difference – the objects are simply copy-constructed into the new vectors. What’s interesting is that v1 does not cause multiple allocations while building the vector, no matter how many elements you use. You might initially think that you must follow the process used for v2 and preallocate the storage to prevent messy reallocations, but the constructor used for v1 determines the memory need ahead of time so this is unnecessary.
Cost of overflowing allocated storage It’s illuminating to see what happens with a deque when it overflows a block of storage, in contrast with VectorOverflow.cpp:
//: C04:DequeOverflow.cpp // A deque is much more efficient than a vector // when pushing back a lot of elements, since it // doesn't require copying and destroying. #include "Noisy.h" #include <deque> #include <cstdlib>
Chapter 15: Multiple Inheritance 183
using namespace std; int main(int argc, char* argv[]) { int size = 1000; if(argc >= 2) size = atoi(argv[1]); deque<Noisy> dn; Noisy n; for(int i = 0; i < size; i++) dn.push_back(n); cout << "\n cleaning up \n"; } ///:~
Here you will never see any destructors before the words “cleaning up” appear. Since the deque allocates all its storage in blocks instead of a contiguous array like vector, it never needs to move existing storage (thus no additional copy-constructions and destructions occur). It simply allocates a new block. For the same reason, the deque can just as efficiently add elements to the beginning of the sequence, since if it runs out of storage it (again) just allocates a new block for the beginning. Insertions in the middle of a deque, however, could be even messier than for vector (but not as costly).
Because a deque never moves its storage, a held iterator never becomes invalid when you add new things to either end of a deque, as it was demonstrated to do with vector (in VectorCoreDump.cpp). However, it’s still possible (albeit harder) to do bad things:
//: C04:DequeCoreDump.cpp // How to break a program using a deque #include <queue> #include <iostream> using namespace std; int main() { deque<int> di(100, 0); // No problem iterating from beginning to end, // even though it spans multiple blocks: copy(di.begin(), di.end(), ostream_iterator<int>(cout, " ")); deque<int>::iterator i = // In the middle: di.begin() + di.size() / 2;; // Walk the iterator forward as you perform // a lot of insertions in the middle: for(int j = 0; j < 1000; j++) { cout << j << endl; di.insert(i++, 1); // Eventually breaks } } ///:~
Chapter 15: Multiple Inheritance 184
Of course, there are two things here that you wouldn’t normally do with a deque: first, elements are inserted in the middle, which deque allows but isn’t designed for. Second, calling insert( ) repeatedly with the same iterator would not ordinarily cause an access violation, but the iterator is walked forward after each insertion. I’m guessing it eventually walks off the end of a block, but I’m not sure what actually causes the problem.
If you stick to what deque is best at – insertions and removals from either end, reasonably rapid traversals and fairly fast random-access using operator[ ] – you’ll be in good shape.
Checked random-access Both vector and deque provide two ways to perform random access of their elements: the operator[ ], which you’ve seen already, and at( ), which checks the boundaries of the container that’s being indexed and throws an exception if you go out of bounds. It does cost more to use at( ):
//: C04:IndexingVsAt.cpp // Comparing "at()" to operator[] #include "../require.h" #include <vector> #include <deque> #include <iostream> #include <ctime> using namespace std; int main(int argc, char* argv[]) { requireMinArgs(argc, 1); long count = 1000; int sz = 1000; if(argc >= 2) count = atoi(argv[1]); if(argc >= 3) sz = atoi(argv[2]); vector<int> vi(sz); clock_t ticks = clock(); for(int i1 = 0; i1 < count; i1++) for(int j = 0; j < sz; j++) vi[j]; cout << "vector[]" << clock() - ticks << endl; ticks = clock(); for(int i2 = 0; i2 < count; i2++) for(int j = 0; j < sz; j++) vi.at(j); cout << "vector::at()" << clock()-ticks <<endl; deque<int> di(sz); ticks = clock();
Chapter 15: Multiple Inheritance 185
for(int i3 = 0; i3 < count; i3++) for(int j = 0; j < sz; j++) di[j]; cout << "deque[]" << clock() - ticks << endl; ticks = clock(); for(int i4 = 0; i4 < count; i4++) for(int j = 0; j < sz; j++) di.at(j); cout << "deque::at()" << clock()-ticks <<endl; // Demonstrate at() when you go out of bounds: di.at(vi.size() + 1); } ///:~
As you’ll learn in the exception-handling chapter, different systems may handle the uncaught exception in different ways, but you’ll know one way or another that something went wrong with the program when using at( ), whereas it’s possible to go blundering ahead using operator[ ].
list A list is implemented as a doubly-linked list and is thus designed for rapid insertion and removal of elements in the middle of the sequence (whereas for vector and deque this is a much more costly operation). A list is so slow when randomly accessing elements that it does not have an operator[ ]. It’s best used when you’re traversing a sequence, in order, from beginning to end (or end to beginning) rather than choosing elements randomly from the middle. Even then the traversal is significantly slower than either a vector or a deque, but if you aren’t doing a lot of traversals that won’t be your bottleneck.
Another thing to be aware of with a list is the memory overhead of each link, which requires a forward and backward pointer on top of the storage for the actual object. Thus a list is a better choice when you have larger objects that you’ll be inserting and removing from the middle of the list. It’s better not to use a list if you think you might be traversing it a lot, looking for objects, since the amount of time it takes to get from the beginning of the list – which is the only place you can start unless you’ve already got an iterator to somewhere you know is closer to your destination – to the object of interest is proportional to the number of objects between the beginning and that object.
The objects in a list never move after they are created; “moving” a list element means changing the links, but never copying or assigning the actual objects. This means that a held iterator never moves when you add new things to a list as it was demonstrated to do in vector. Here’s an example using the Noisy class:
//: C04:ListStability.cpp // Things don't move around in lists #include "Noisy.h"
Chapter 15: Multiple Inheritance 186
#include <list> #include <iostream> #include <algorithm> using namespace std; int main() { list<Noisy> l; ostream_iterator<Noisy> out(cout, " "); generate_n(back_inserter(l), 25, NoisyGen()); cout << "\n Printing the list:" << endl; copy(l.begin(), l.end(), out); cout << "\n Reversing the list:" << endl; l.reverse(); copy(l.begin(), l.end(), out); cout << "\n Sorting the list:" << endl; l.sort(); copy(l.begin(), l.end(), out); cout << "\n Swapping two elements:" << endl; list<Noisy>::iterator it1, it2; it1 = it2 = l.begin(); it2++; swap(*it1, *it2); cout << endl; copy(l.begin(), l.end(), out); cout << "\n Using generic reverse(): " << endl; reverse(l.begin(), l.end()); cout << endl; copy(l.begin(), l.end(), out); cout << "\n Cleanup" << endl; } ///:~
Operations as seemingly radical as reversing and sorting the list require no copying of objects, because instead of moving the objects, the links are simply changed. However, notice that sort( ) and reverse( ) are member functions of list, so they have special knowledge of the internals of list and can perform the pointer movement instead of copying. On the other hand, the swap( ) function is a generic algorithm, and doesn’t know about list in particular and so it uses the copying approach for swapping two elements. There are also generic algorithms for sort( ) and reverse( ), but if you try to use these you’ll discover that the generic reverse( ) performs lots of copying and destruction (so you should never use it with a list) and the generic sort( ) simply doesn’t work because it requires random-access iterators that list doesn’t provide (a definite benefit, since this would certainly be an expensive way to sort compared to list’s own sort( )). The generic sort( ) and reverse( ) should only be used with arrays, vectors and deques.
Chapter 15: Multiple Inheritance 187
If you have large and complex objects you may want to choose a list first, especially if construction, destruction, copy-construction and assignment are expensive and if you are doing things like sorting the objects or otherwise reordering them a lot.
Special list operations The list has some special operations that are built-in to make the best use of the structure of the list. You’ve already seen reverse( ) and sort( ), and here are some of the others in use:
//: C04:ListSpecialFunctions.cpp #include "Noisy.h" #include <list> #include <iostream> #include <algorithm> using namespace std; ostream_iterator<Noisy> out(cout, " "); void print(list<Noisy>& ln, char* comment = "") { cout << "\n" << comment << ":\n"; copy(ln.begin(), ln.end(), out); cout << endl; } int main() { typedef list<Noisy> LN; LN l1, l2, l3, l4; generate_n(back_inserter(l1), 6, NoisyGen()); generate_n(back_inserter(l2), 6, NoisyGen()); generate_n(back_inserter(l3), 6, NoisyGen()); generate_n(back_inserter(l4), 6, NoisyGen()); print(l1, "l1"); print(l2, "l2"); print(l3, "l3"); print(l4, "l4"); LN::iterator it1 = l1.begin(); it1++; it1++; it1++; l1.splice(it1, l2); print(l1, "l1 after splice(it1, l2)"); print(l2, "l2 after splice(it1, l2)"); LN::iterator it2 = l3.begin(); it2++; it2++; it2++; l1.splice(it1, l3, it2); print(l1, "l1 after splice(it1, l3, it2)"); LN::iterator it3 = l4.begin(), it4 = l4.end(); it3++; it4--;
Chapter 15: Multiple Inheritance 188
l1.splice(it1, l4, it3, it4); print(l1, "l1 after splice(it1,l4,it3,it4)"); Noisy n; LN l5(3, n); generate_n(back_inserter(l5), 4, NoisyGen()); l5.push_back(n); print(l5, "l5 before remove()"); l5.remove(l5.front()); print(l5, "l5 after remove()"); l1.sort(); l5.sort(); l5.merge(l1); print(l5, "l5 after l5.merge(l1)"); cout << "\n Cleanup" << endl; } ///:~
The print( ) function is used to display results. After filling four lists with Noisy objects, one list is spliced into another in three different ways. In the first, the entire list l2 is spliced into l1 at the iterator it1. Notice that after the splice, l2 is empty – splicing means removing the elements from the source list. The second splice inserts elements from l3 starting at it2 into l1 starting at it1. The third splice starts at it1 and uses elements from l4 starting at it3 and ending at it4 (the seemingly-redundant mention of the source list is because the elements must be erased from the source list as part of the transfer to the destination list).
The output from the code that demonstrates remove( ) shows that the list does not have to be sorted in order for all the elements of a particular value to be removed.
Finally, if you merge( ) one list with another, the merge only works sensibly if the lists have been sorted. What you end up with in that case is a sorted list containing all the elements from both lists (the source list is erased – that is, the elements are moved to the destination list).
There’s also a unique( ) member function that removes all duplicates, but only if the list has been sorted first:
//: C04:UniqueList.cpp // Testing list's unique() function #include <list> #include <iostream> using namespace std; int a[] = { 1, 3, 1, 4, 1, 5, 1, 6, 1 }; const int asz = sizeof a / sizeof *a; int main() { // For output: ostream_iterator<int> out(cout, " "); list<int> li(a, a + asz);

Chapter 15: Multiple Inheritance 189
li.unique(); // Oops! No duplicates removed: copy(li.begin(), li.end(), out); cout << endl; // Must sort it first: li.sort(); copy(li.begin(), li.end(), out); cout << endl; // Now unique() will have an effect: li.unique(); copy(li.begin(), li.end(), out); cout << endl; } ///:~
The list constructor used here takes the starting and past-the-end iterator from another container, and it copies all the elements from that container into itself (a similar constructor is available for all the containers). Here, the “container” is just an array, and the “iterators” are pointers into that array, but because of the design of the STL it works with arrays just as easily as any other container.
If you run this program, you’ll see that unique( ) will only remove adjacent duplicate elements, and thus sorting is necessary before calling unique( ).
There are four additional list member functions that are not demonstrated here: a remove_if( ) that takes a predicate which is used to decide whether an object should be removed, a unique( ) that takes a binary predicate to perform uniqueness comparisons, a merge( ) that takes an additional argument which performs comparisons, and a sort( ) that takes a comparator (to provide a comparison or override the existing one).
list vs. set Looking at the previous example you may note that if you want a sorted list with no duplicates, a set can give you that, right? It’s interesting to compare the performance of the two containers:
//: C04:ListVsSet.cpp // Comparing list and set performance #include <iostream> #include <list> #include <set> #include <algorithm> #include <ctime> #include <cstdlib> using namespace std; class Obj {
Chapter 15: Multiple Inheritance 190
int a[20]; // To take up extra space int val; public: Obj() : val(rand() % 500) {} friend bool operator<(const Obj& a, const Obj& b) { return a.val < b.val; } friend bool operator==(const Obj& a, const Obj& b) { return a.val == b.val; } friend ostream& operator<<(ostream& os, const Obj& a) { return os << a.val; } }; template<class Container> void print(Container& c) { typename Container::iterator it; for(it = c.begin(); it != c.end(); it++) cout << *it << " "; cout << endl; } struct ObjGen { Obj operator()() { return Obj(); } }; int main() { const int sz = 5000; srand(time(0)); list<Obj> lo; clock_t ticks = clock(); generate_n(back_inserter(lo), sz, ObjGen()); lo.sort(); lo.unique(); cout << "list:" << clock() - ticks << endl; set<Obj> so; ticks = clock(); generate_n(inserter(so, so.begin()), sz, ObjGen());
Chapter 15: Multiple Inheritance 191
cout << "set:" << clock() - ticks << endl; print(lo); print(so); } ///:~
When you run the program, you should discover that set is much faster than list. This is reassuring – after all, it is set’s primary job description!
Swapping all basic sequences It turns out that all basic sequences have a member function swap( ) that’s designed to switch one sequence with another (however, this swap( ) is only defined for sequences of the same type). The member swap( ) makes use of its knowledge of the internal structure of the particular container in order to be efficient:
//: C04:Swapping.cpp // All basic sequence containers can be swapped #include "Noisy.h" #include <list> #include <vector> #include <deque> #include <iostream> #include <algorithm> using namespace std; ostream_iterator<Noisy> out(cout, " "); template<class Cont> void print(Cont& c, char* comment = "") { cout << "\n" << comment << ": "; copy(c.begin(), c.end(), out); cout << endl; } template<class Cont> void testSwap(char* cname) { Cont c1, c2; generate_n(back_inserter(c1), 10, NoisyGen()); generate_n(back_inserter(c2), 5, NoisyGen()); cout << "\n" << cname << ":" << endl; print(c1, "c1"); print(c2, "c2"); cout << "\n Swapping the " << cname << ":" << endl; c1.swap(c2); print(c1, "c1"); print(c2, "c2");
Chapter 15: Multiple Inheritance 192
} int main() { testSwap<vector<Noisy> >("vector"); testSwap<deque<Noisy> >("deque"); testSwap<list<Noisy> >("list"); } ///:~
When you run this, you’ll discover that each type of sequence container is able to swap one sequence for another without any copying or assignments, even if the sequences are of different sizes. In effect, you’re completely swapping the memory of one object for another.
The STL algorithms also contain a swap( ), and when this function is applied to two containers of the same type, it will use the member swap( ) to achieve fast performance. Consequently, if you apply the sort( ) algorithm to a container of containers, you will find that the performance is very fast – it turns out that fast sorting of a container of containers was a design goal of the STL.
Robustness of lists To break a list, you have to work pretty hard:
//: C04:ListRobustness.cpp // lists are harder to break #include <list> #include <iostream> using namespace std; int main() { list<int> li(100, 0); list<int>::iterator i = li.begin(); for(int j = 0; j < li.size() / 2; j++) i++; // Walk the iterator forward as you perform // a lot of insertions in the middle: for(int k = 0; k < 1000; k++) li.insert(i++, 1); // No problem li.erase(i); i++; *i = 2; // Oops! It's invalid } ///:~
When the link that the iterator i was pointing to was erased, it was unlinked from the list and thus became invalid. Trying to move forward to the “next link” from an invalid link is poorly-
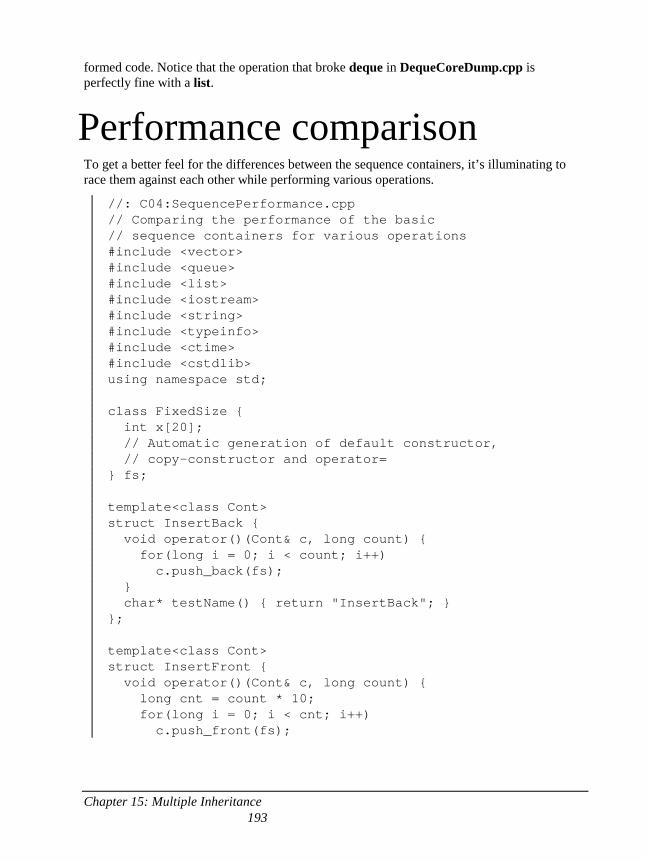
Chapter 15: Multiple Inheritance 193
formed code. Notice that the operation that broke deque in DequeCoreDump.cpp is perfectly fine with a list.
Performance comparison To get a better feel for the differences between the sequence containers, it’s illuminating to race them against each other while performing various operations.
//: C04:SequencePerformance.cpp // Comparing the performance of the basic // sequence containers for various operations #include <vector> #include <queue> #include <list> #include <iostream> #include <string> #include <typeinfo> #include <ctime> #include <cstdlib> using namespace std; class FixedSize { int x[20]; // Automatic generation of default constructor, // copy-constructor and operator= } fs; template<class Cont> struct InsertBack { void operator()(Cont& c, long count) { for(long i = 0; i < count; i++) c.push_back(fs); } char* testName() { return "InsertBack"; } }; template<class Cont> struct InsertFront { void operator()(Cont& c, long count) { long cnt = count * 10; for(long i = 0; i < cnt; i++) c.push_front(fs);
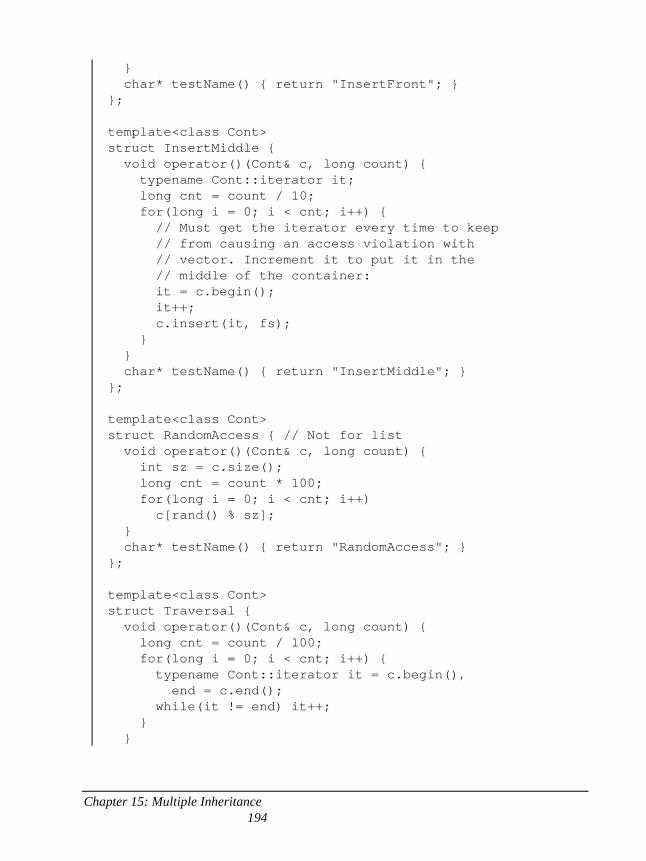
Chapter 15: Multiple Inheritance 194
} char* testName() { return "InsertFront"; } }; template<class Cont> struct InsertMiddle { void operator()(Cont& c, long count) { typename Cont::iterator it; long cnt = count / 10; for(long i = 0; i < cnt; i++) { // Must get the iterator every time to keep // from causing an access violation with // vector. Increment it to put it in the // middle of the container: it = c.begin(); it++; c.insert(it, fs); } } char* testName() { return "InsertMiddle"; } }; template<class Cont> struct RandomAccess { // Not for list void operator()(Cont& c, long count) { int sz = c.size(); long cnt = count * 100; for(long i = 0; i < cnt; i++) c[rand() % sz]; } char* testName() { return "RandomAccess"; } }; template<class Cont> struct Traversal { void operator()(Cont& c, long count) { long cnt = count / 100; for(long i = 0; i < cnt; i++) { typename Cont::iterator it = c.begin(), end = c.end(); while(it != end) it++; } }
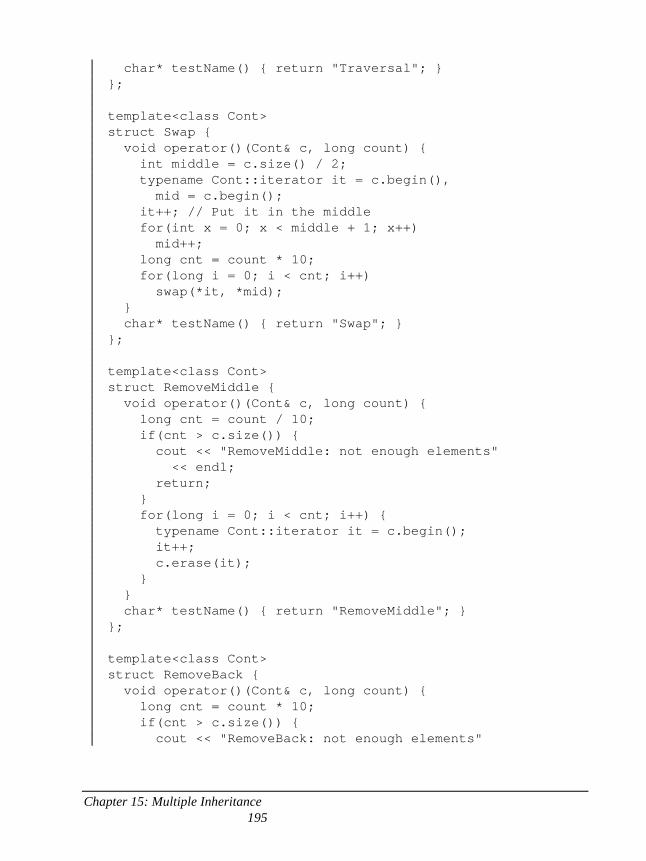
Chapter 15: Multiple Inheritance 195
char* testName() { return "Traversal"; } }; template<class Cont> struct Swap { void operator()(Cont& c, long count) { int middle = c.size() / 2; typename Cont::iterator it = c.begin(), mid = c.begin(); it++; // Put it in the middle for(int x = 0; x < middle + 1; x++) mid++; long cnt = count * 10; for(long i = 0; i < cnt; i++) swap(*it, *mid); } char* testName() { return "Swap"; } }; template<class Cont> struct RemoveMiddle { void operator()(Cont& c, long count) { long cnt = count / 10; if(cnt > c.size()) { cout << "RemoveMiddle: not enough elements" << endl; return; } for(long i = 0; i < cnt; i++) { typename Cont::iterator it = c.begin(); it++; c.erase(it); } } char* testName() { return "RemoveMiddle"; } }; template<class Cont> struct RemoveBack { void operator()(Cont& c, long count) { long cnt = count * 10; if(cnt > c.size()) { cout << "RemoveBack: not enough elements"
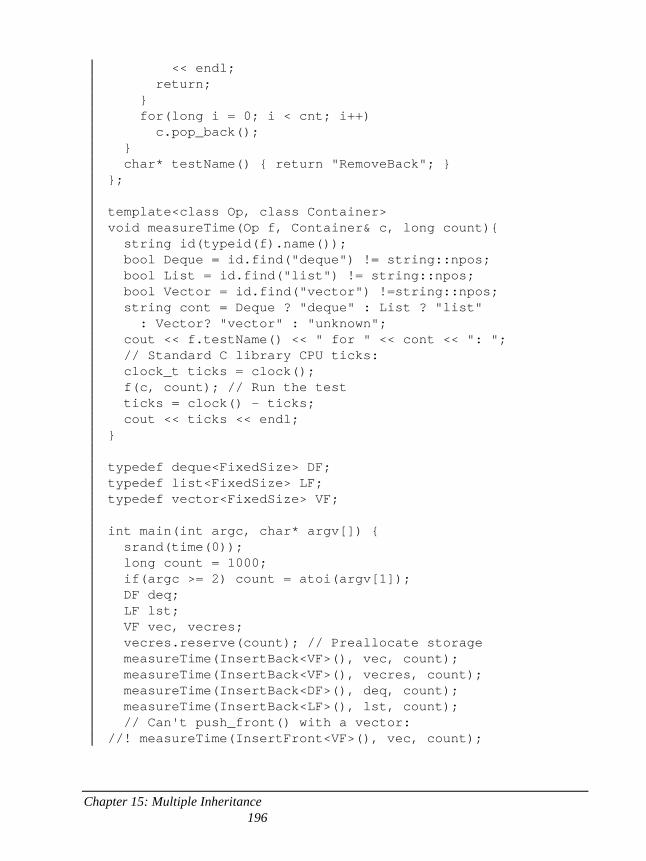
Chapter 15: Multiple Inheritance 196
<< endl; return; } for(long i = 0; i < cnt; i++) c.pop_back(); } char* testName() { return "RemoveBack"; } }; template<class Op, class Container> void measureTime(Op f, Container& c, long count){ string id(typeid(f).name()); bool Deque = id.find("deque") != string::npos; bool List = id.find("list") != string::npos; bool Vector = id.find("vector") !=string::npos; string cont = Deque ? "deque" : List ? "list" : Vector? "vector" : "unknown"; cout << f.testName() << " for " << cont << ": "; // Standard C library CPU ticks: clock_t ticks = clock(); f(c, count); // Run the test ticks = clock() - ticks; cout << ticks << endl; } typedef deque<FixedSize> DF; typedef list<FixedSize> LF; typedef vector<FixedSize> VF; int main(int argc, char* argv[]) { srand(time(0)); long count = 1000; if(argc >= 2) count = atoi(argv[1]); DF deq; LF lst; VF vec, vecres; vecres.reserve(count); // Preallocate storage measureTime(InsertBack<VF>(), vec, count); measureTime(InsertBack<VF>(), vecres, count); measureTime(InsertBack<DF>(), deq, count); measureTime(InsertBack<LF>(), lst, count); // Can't push_front() with a vector: //! measureTime(InsertFront<VF>(), vec, count);
Chapter 15: Multiple Inheritance 197
measureTime(InsertFront<DF>(), deq, count); measureTime(InsertFront<LF>(), lst, count); measureTime(InsertMiddle<VF>(), vec, count); measureTime(InsertMiddle<DF>(), deq, count); measureTime(InsertMiddle<LF>(), lst, count); measureTime(RandomAccess<VF>(), vec, count); measureTime(RandomAccess<DF>(), deq, count); // Can't operator[] with a list: //! measureTime(RandomAccess<LF>(), lst, count); measureTime(Traversal<VF>(), vec, count); measureTime(Traversal<DF>(), deq, count); measureTime(Traversal<LF>(), lst, count); measureTime(Swap<VF>(), vec, count); measureTime(Swap<DF>(), deq, count); measureTime(Swap<LF>(), lst, count); measureTime(RemoveMiddle<VF>(), vec, count); measureTime(RemoveMiddle<DF>(), deq, count); measureTime(RemoveMiddle<LF>(), lst, count); vec.resize(vec.size() * 10); // Make it bigger measureTime(RemoveBack<VF>(), vec, count); measureTime(RemoveBack<DF>(), deq, count); measureTime(RemoveBack<LF>(), lst, count); } ///:~
This example makes heavy use of templates to eliminate redundancy, save space, guarantee identical code and improve clarity. Each test is represented by a class that is templatized on the container it will operate on. The test itself is inside the operator( ) which, in each case, takes a reference to the container and a repeat count – this count is not always used exactly as it is, but sometimes increased or decreased to prevent the test from being too short or too long. The repeat count is just a factor, and all tests are compared using the same value.
Each test class also has a member function that returns its name, so that it can easily be printed. You might think that this should be accomplished using run-time type identification, but since the actual name of the class involves a template expansion, this turns out to be the more direct approach.
The measureTime( ) function template takes as its first template argument the operation that it’s going to test – which is itself a class template selected from the group defined previously in the listing. The template argument Op will not only contain the name of the class, but also (decorated into it) the type of the container it’s working with. The RTTI typeid( ) operation allows the name of the class to be extracted as a char*, which can then be used to create a string called id. This string can be searched using string::find( ) to look for deque, list or vector. The bool variable that corresponds to the matching string becomes true, and this is used to properly initialize the string cont so the container name can be accurately printed, along with the test name.
Chapter 15: Multiple Inheritance 198
Once the type of test and the container being tested has been printed out, the actual test is quite simple. The Standard C library function clock( ) is used to capture the starting and ending CPU ticks (this is typically more fine-grained than trying to measure seconds). Since f is an object of type Op, which is a class that has an operator( ), the line:
f(c, count);
is actually calling the operator( ) for the object f.
In main( ), you can see that each different type of test is run on each type of container, except for the containers that don’t support the particular operation being tested (these are commented out).
When you run the program, you’ll get comparative performance numbers for your particular compiler and your particular operating system and platform. Although this is only intended to give you a feel for the various performance features relative to the other sequences, it is not a bad way to get a quick-and-dirty idea of the behavior of your library, and also to compare one library with another.
set The set produces a container that will accept only one of each thing you place in it; it also sorts the elements (sorting isn’t intrinsic to the conceptual definition of a set, but the STL set stores its elements in a balanced binary tree to provide rapid lookups, thus producing sorted results when you traverse it). The first two examples in this chapter used sets.
Consider the problem of creating an index for a book. You might like to start with all the words in the book, but you only want one instance of each word and you want them sorted. Of course, a set is perfect for this, and solves the problem effortlessly. However, there’s also the problem of punctuation and any other non-alpha characters, which must be stripped off to generate proper words. One solution to this problem is to use the Standard C library function strtok( ), which produces tokens (in our case, words) given a set of delimiters to strip out:
//: C04:WordList.cpp // Display a list of words used in a document #include "../require.h" #include <string> #include <cstring> #include <set> #include <iostream> #include <fstream> using namespace std; const char* delimiters = " \t;()\"<>:{}[]+-=&*#.,/\\~";
Chapter 15: Multiple Inheritance 199
int main(int argc, char* argv[]) { requireArgs(argc, 1); ifstream in(argv[1]); assure(in, argv[1]); set<string> wordlist; string line; while(getline(in, line)) { // Capture individual words: char* s = // Cast probably won’t crash: strtok((char*)line.c_str(), delimiters); while(s) { // Automatic type conversion: wordlist.insert(s); s = strtok(0, delimiters); } } // Output results: copy(wordlist.begin(), wordlist.end(), ostream_iterator<string>(cout, "\n")); } ///:~
strtok( ) takes the starting address of a character buffer (the first argument) and looks for delimiters (the second argument). It replaces the delimiter with a zero, and returns the address of the beginning of the token. If you call it subsequent times with a first argument of zero it will continue extracting tokens from the rest of the string until it finds the end. In this case, the delimiters are those that delimit the keywords and identifiers of C++, so it extracts these keywords and identifiers. Each word is turned into a string and placed into the wordlist vector, which eventually contains the whole file, broken up into words.
You don’t have to use a set just to get a sorted sequence. You can use the sort( ) function (along with a multitude of other functions in the STL) on different STL containers. However, it’s likely that set will be faster.
Eliminating strtok( ) Some programmers consider strtok( ) to be the poorest design in the Standard C library because it uses a static buffer to hold its data between function calls. This means:
1. You can’t use strtok( ) in two places at the same time 2. You can’t use strtok( ) in a multithreaded program 3. You can’t use strtok( ) in a library that might be used in a multithreaded
program 4. strtok( ) modifies the input sequence, which can produce unexpected side
effects
Chapter 15: Multiple Inheritance 200
5. strtok( ) depends on reading in “lines”, which means you need a buffer big enough for the longest line. This produces both wastefully-sized buffers, and lines longer than the “longest” line. This can also introduce security holes. (Notice that the buffer size problem was eliminated in WordList.cpp by using string input, but this required a cast so that strtok( ) could modify the data in the string – a dangerous approach for general-purpose programming).
For all these reasons it seems like a good idea to find an alternative for strtok( ). The following example will use an istreambuf_iterator (introduced earlier) to move the characters from one place (which happens to be an istream) to another (which happens to be a string), depending on whether the Standard C library function isalpha( ) is true:
//: C04:WordList2.cpp // Eliminating strtok() from Wordlist.cpp #include "../require.h" #include <string> #include <cstring> #include <set> #include <iostream> #include <fstream> #include <iterator> using namespace std; int main(int argc, char* argv[]) { requireArgs(argc, 1); ifstream in(argv[1]); assure(in, argv[1]); istreambuf_iterator<char> p(in), end; set<string> wordlist; while (p != end) { string word; insert_iterator<string> ii(word, word.begin()); // Find the first alpha character: while(!isalpha(*p) && p != end) p++; // Copy until the first non-alpha character: while (isalpha(*p) && p != end) *ii++ = *p++; if (word.size() != 0) wordlist.insert(word); } // Output results: copy(wordlist.begin(), wordlist.end(),
Chapter 15: Multiple Inheritance 201
ostream_iterator<string>(cout, "\n")); } ///:~
This example was suggested by Nathan Myers, who invented the istreambuf_iterator and its relatives. This iterator extracts information character-by-character from a stream. Although the istreambuf_iterator template argument might suggest to you that you could extract, for example, ints instead of char, that’s not the case. The argument must be of some character type – a regular char or a wide character.
After the file is open, an istreambuf_iterator called p is attached to the istream so characters can be extracted from it. The set<string> called wordlist will be used to hold the resulting words.
The while loop reads words until the end of the input stream is found. This is detected using the default constructor for istreambuf_iterator which produces the past-the-end iterator object end. Thus, if you want to test to make sure you’re not at the end of the stream, you simply say p != end.
The second type of iterator that’s used here is the insert_iterator, which creates an iterator that knows how to insert objects into a container. Here, the “container” is the string called word which, for the purposes of insert_iterator, behaves like a container. The constructor for insert_iterator requires the container and an iterator indicating where it should start inserting the characters. You could also use a back_insert_iterator, which requires that the container have a push_back( ) (string does).
After the while loop sets everything up, it begins by looking for the first alpha character, incrementing start until that character is found. Then it copies characters from one iterator to the other, stopping when a non-alpha character is found. Each word, assuming it is non-empty, is added to wordlist.
StreamTokenizer: a more flexible solution
The above program parses its input into strings of words containing only alpha characters, but that’s still a special case compared to the generality of strtok( ). What we’d like now is an actual replacement for strtok( ) so we’re never tempted to use it. WordList2.cpp can be modified to create a class called StreamTokenizer that delivers a new token as a string whenever you call next( ), according to the delimiters you give it upon construction (very similar to strtok( )):
//: C04:StreamTokenizer.h // C++ Replacement for Standard C strtok() #ifndef STREAMTOKENIZER_H #define STREAMTOKENIZER_H #include <string> #include <iostream>
Chapter 15: Multiple Inheritance 202
#include <iterator> class StreamTokenizer { typedef std::istreambuf_iterator<char> It; It p, end; std::string delimiters; bool isDelimiter(char c) { return delimiters.find(c) != std::string::npos; } public: StreamTokenizer(std::istream& is, std::string delim = " \t\n;()\"<>:{}[]+-=&*#" ".,/\\~!0123456789") : p(is), end(It()), delimiters(delim) {} std::string next(); // Get next token }; #endif STREAMTOKENIZER_H ///:~
The default delimiters for the StreamTokenizer constructor extract words with only alpha characters, as before, but now you can choose different delimiters to parse different tokens. The implementation of next( ) looks similar to Wordlist2.cpp:
//: C04:StreamTokenizer.cpp {O} #include "StreamTokenizer.h" using namespace std; string StreamTokenizer::next() { string result; if(p != end) { insert_iterator<string> ii(result, result.begin()); while(isDelimiter(*p) && p != end) p++; while (!isDelimiter(*p) && p != end) *ii++ = *p++; } return result; } ///:~
The first non-delimiter is found, then characters are copied until a delimiter is found, and the resulting string is returned. Here’s a test:
//: C04:TokenizeTest.cpp //{L} StreamTokenizer
Chapter 15: Multiple Inheritance 203
// Test StreamTokenizer #include "StreamTokenizer.h" #include "../require.h" #include <iostream> #include <fstream> #include <set> using namespace std; int main(int argc, char* argv[]) { requireArgs(argc, 1); ifstream in(argv[1]); assure(in, argv[1]); StreamTokenizer words(in); set<string> wordlist; string word; while((word = words.next()).size() != 0) wordlist.insert(word); // Output results: copy(wordlist.begin(), wordlist.end(), ostream_iterator<string>(cout, "\n")); } ///:~
Now the tool is more reusable than before, but it’s still inflexible, because it can only work with an istream. This isn’t as bad as it first seems, since a string can be turned into an istream via an istringstream. But in the next section we’ll come up with the most general, reusable tokenizing tool, and this should give you a feeling of what “reusable” really means, and the effort necessary to create truly reusable code.
A completely reusable tokenizer Since the STL containers and algorithms all revolve around iterators, the most flexible solution will itself be an iterator. You could think of the TokenIterator as an iterator that wraps itself around any other iterator that can produce characters. Because it is designed as an input iterator (the most primitive type of iterator) it can be used with any STL algorithm. Not only is it a useful tool in itself, the TokenIterator is also a good example of how you can design your own iterators.18
The TokenIterator is doubly flexible: first, you can choose the type of iterator that will produce the char input. Second, instead of just saying what characters represent the delimiters, TokenIterator will use a predicate which is a function object whose operator( ) takes a char and decides if it should be in the token or not. Although the two examples given
18 This is another example coached by Nathan Myers.
Chapter 15: Multiple Inheritance 204
here have a static concept of what characters belong in a token, you could easily design your own function object to change its state as the characters are read, producing a more sophisticated parser.
The following header file contains the two basic predicates Isalpha and Delimiters, along with the template for TokenIterator:
//: C04:TokenIterator.h #ifndef TOKENITERATOR_H #define TOKENITERATOR_H #include <string> #include <iterator> #include <algorithm> #include <cctype> struct Isalpha { bool operator()(char c) { using namespace std; //[[For a compiler bug]] return isalpha(c); } }; class Delimiters { std::string exclude; public: Delimiters() {} Delimiters(const std::string& excl) : exclude(excl) {} bool operator()(char c) { return exclude.find(c) == std::string::npos; } }; template <class InputIter, class Pred = Isalpha> class TokenIterator: public std::iterator< std::input_iterator_tag,std::string,ptrdiff_t>{ InputIter first; InputIter last; std::string word; Pred predicate; public: TokenIterator(InputIter begin, InputIter end, Pred pred = Pred()) : first(begin), last(end), predicate(pred) {
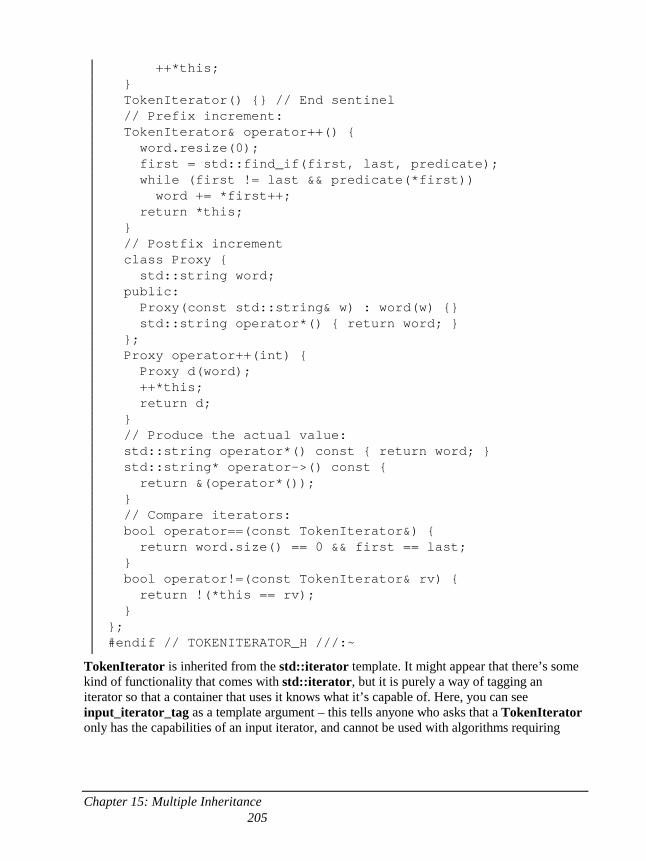
Chapter 15: Multiple Inheritance 205
++*this; } TokenIterator() {} // End sentinel // Prefix increment: TokenIterator& operator++() { word.resize(0); first = std::find_if(first, last, predicate); while (first != last && predicate(*first)) word += *first++; return *this; } // Postfix increment class Proxy { std::string word; public: Proxy(const std::string& w) : word(w) {} std::string operator*() { return word; } }; Proxy operator++(int) { Proxy d(word); ++*this; return d; } // Produce the actual value: std::string operator*() const { return word; } std::string* operator->() const { return &(operator*()); } // Compare iterators: bool operator==(const TokenIterator&) { return word.size() == 0 && first == last; } bool operator!=(const TokenIterator& rv) { return !(*this == rv); } }; #endif // TOKENITERATOR_H ///:~
TokenIterator is inherited from the std::iterator template. It might appear that there’s some kind of functionality that comes with std::iterator, but it is purely a way of tagging an iterator so that a container that uses it knows what it’s capable of. Here, you can see input_iterator_tag as a template argument – this tells anyone who asks that a TokenIterator only has the capabilities of an input iterator, and cannot be used with algorithms requiring
Chapter 15: Multiple Inheritance 206
more sophisticated iterators. Apart from the tagging, std::iterator doesn’t do anything else, which means you must design all the other functionality in yourself.
TokenIterator may look a little strange at first, because the first constructor requires both a “begin” and “end” iterator as arguments, along with the predicate. Remember that this is a “wrapper” iterator that has no idea of how to tell whether it’s at the end of its input source, so the ending iterator is necessary in the first constructor. The reason for the second (default) constructor is that the STL algorithms (and any algorithms you write) need a TokenIterator sentinel to be the past-the-end value. Since all the information necessary to see if the TokenIterator has reached the end of its input is collected in the first constructor, this second constructor creates a TokenIterator that is merely used as a placeholder in algorithms.
The core of the behavior happens in operator++. This erases the current value of word using string::resize( ), then finds the first character that satisfies the predicate (thus discovering the beginning of the new token) using find_if( ) (from the STL algorithms, discussed in the following chapter). The resulting iterator is assigned to first, thus moving first forward to the beginning of the token. Then, as long as the end of the input is not reached and the predicate is satisfied, characters are copied into the word from the input. Finally, the TokenIterator object is returned, and must be dereferenced to access the new token.
The postfix increment requires a proxy object to hold the value before the increment, so it can be returned (see the operator overloading chapter for more details of this). Producing the actual value is a straightforward operator*. The only other functions that must be defined for an output iterator are the operator== and operator!= to indicate whether the TokenIterator has reached the end of its input. You can see that the argument for operator== is ignored – it only cares about whether it has reached its internal last iterator. Notice that operator!= is defined in terms of operator==.
A good test of TokenIterator includes a number of different sources of input characters including a streambuf_iterator, a char*, and a deque<char>::iterator. Finally, the original Wordlist.cpp problem is solved:
//: C04:TokenIteratorTest.cpp #include "TokenIterator.h" #include "../require.h" #include <fstream> #include <iostream> #include <vector> #include <deque> #include <set> using namespace std; int main() { ifstream in("TokenIteratorTest.cpp"); assure(in, "TokenIteratorTest.cpp"); ostream_iterator<string> out(cout, "\n"); typedef istreambuf_iterator<char> IsbIt;
Chapter 15: Multiple Inheritance 207
IsbIt begin(in), isbEnd; Delimiters delimiters(" \t\n~;()\"<>:{}[]+-=&*#.,/\\"); TokenIterator<IsbIt, Delimiters> wordIter(begin, isbEnd, delimiters), end; vector<string> wordlist; copy(wordIter, end, back_inserter(wordlist)); // Output results: copy(wordlist.begin(), wordlist.end(), out); *out++ = "-----------------------------------"; // Use a char array as the source: char* cp = "typedef std::istreambuf_iterator<char> It"; TokenIterator<char*, Delimiters> charIter(cp, cp + strlen(cp), delimiters), end2; vector<string> wordlist2; copy(charIter, end2, back_inserter(wordlist2)); copy(wordlist2.begin(), wordlist2.end(), out); *out++ = "-----------------------------------"; // Use a deque<char> as the source: ifstream in2("TokenIteratorTest.cpp"); deque<char> dc; copy(IsbIt(in2), IsbIt(), back_inserter(dc)); TokenIterator<deque<char>::iterator,Delimiters> dcIter(dc.begin(), dc.end(), delimiters), end3; vector<string> wordlist3; copy(dcIter, end3, back_inserter(wordlist3)); copy(wordlist3.begin(), wordlist3.end(), out); *out++ = "-----------------------------------"; // Reproduce the Wordlist.cpp example: ifstream in3("TokenIteratorTest.cpp"); TokenIterator<IsbIt, Delimiters> wordIter2(IsbIt(in3), isbEnd, delimiters); set<string> wordlist4; while(wordIter2 != end) wordlist4.insert(*wordIter2++); copy(wordlist4.begin(), wordlist4.end(), out); } ///:~
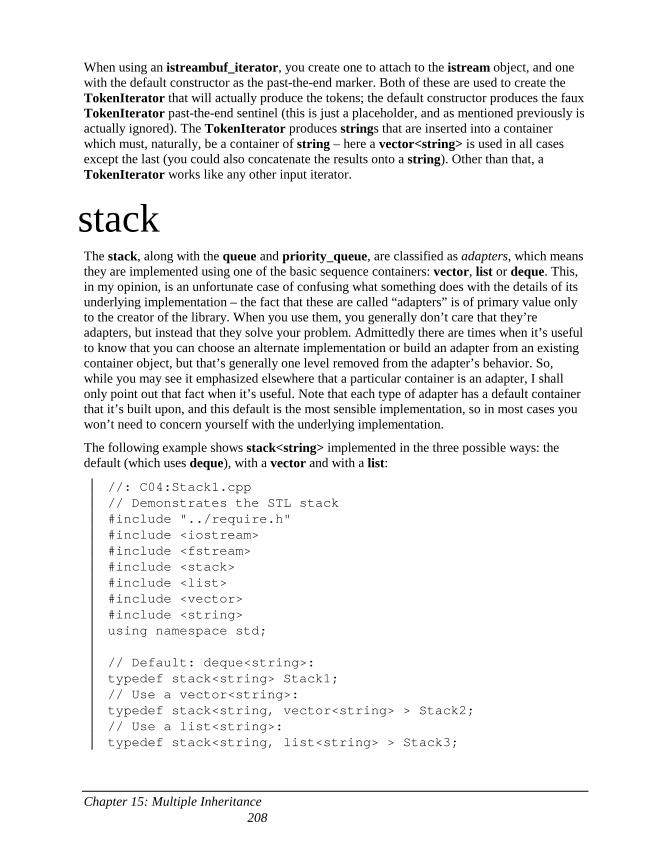
Chapter 15: Multiple Inheritance 208
When using an istreambuf_iterator, you create one to attach to the istream object, and one with the default constructor as the past-the-end marker. Both of these are used to create the TokenIterator that will actually produce the tokens; the default constructor produces the faux TokenIterator past-the-end sentinel (this is just a placeholder, and as mentioned previously is actually ignored). The TokenIterator produces strings that are inserted into a container which must, naturally, be a container of string – here a vector<string> is used in all cases except the last (you could also concatenate the results onto a string). Other than that, a TokenIterator works like any other input iterator.
stack The stack, along with the queue and priority_queue, are classified as adapters, which means they are implemented using one of the basic sequence containers: vector, list or deque. This, in my opinion, is an unfortunate case of confusing what something does with the details of its underlying implementation – the fact that these are called “adapters” is of primary value only to the creator of the library. When you use them, you generally don’t care that they’re adapters, but instead that they solve your problem. Admittedly there are times when it’s useful to know that you can choose an alternate implementation or build an adapter from an existing container object, but that’s generally one level removed from the adapter’s behavior. So, while you may see it emphasized elsewhere that a particular container is an adapter, I shall only point out that fact when it’s useful. Note that each type of adapter has a default container that it’s built upon, and this default is the most sensible implementation, so in most cases you won’t need to concern yourself with the underlying implementation.
The following example shows stack<string> implemented in the three possible ways: the default (which uses deque), with a vector and with a list:
//: C04:Stack1.cpp // Demonstrates the STL stack #include "../require.h" #include <iostream> #include <fstream> #include <stack> #include <list> #include <vector> #include <string> using namespace std; // Default: deque<string>: typedef stack<string> Stack1; // Use a vector<string>: typedef stack<string, vector<string> > Stack2; // Use a list<string>: typedef stack<string, list<string> > Stack3;
Chapter 15: Multiple Inheritance 209
int main(int argc, char* argv[]) { requireArgs(argc, 1); // File name is argument ifstream in(argv[1]); assure(in, argv[1]); Stack1 textlines; // Try the different versions // Read file and store lines in the stack: string line; while(getline(in, line)) textlines.push(line + "\n"); // Print lines from the stack and pop them: while(!textlines.empty()) { cout << textlines.top(); textlines.pop(); } } ///:~
The top( ) and pop( ) operations will probably seem non-intuitive if you’ve used other stack classes. When you call pop( ) it returns void rather than the top element that you might have expected. If you want the top element, you get a reference to it with top( ). It turns out this is more efficient, since a traditional pop( ) would have to return a value rather than a reference, and thus invoke the copy-constructor. When you’re using a stack (or a priority_queue, described later) you can efficiently refer to top( ) as many times as you want, then discard the top element explicitly using pop( ) (perhaps if some other term than the familiar “pop” had been used, this would have been a bit clearer).
The stack template has a very simple interface, essentially the member functions you see above. It doesn’t have sophisticated forms of initialization or access, but if you need that you can use the underlying container that the stack is implemented upon. For example, suppose you have a function that expects a stack interface but in the rest of your program you need the objects stored in a list. The following program stores each line of a file along with the leading number of spaces in that line (you might imagine it as a starting point for performing some kinds of source-code reformatting):
//: C04:Stack2.cpp // Converting a list to a stack #include "../require.h" #include <iostream> #include <fstream> #include <stack> #include <list> #include <string> using namespace std; // Expects a stack:
Chapter 15: Multiple Inheritance 210
template<class Stk> void stackOut(Stk& s, ostream& os = cout) { while(!s.empty()) { os << s.top() << "\n"; s.pop(); } } class Line { string line; // Without leading spaces int lspaces; // Number of leading spaces public: Line(string s) : line(s) { lspaces = line.find_first_not_of(' '); if(lspaces == string::npos) lspaces = 0; line = line.substr(lspaces); } friend ostream& operator<<(ostream& os, const Line& l) { for(int i = 0; i < l.lspaces; i++) os << ' '; return os << l.line; } // Other functions here... }; int main(int argc, char* argv[]) { requireArgs(argc, 1); // File name is argument ifstream in(argv[1]); assure(in, argv[1]); list<Line> lines; // Read file and store lines in the list: string s; while(getline(in, s)) lines.push_front(s); // Turn the list into a stack for printing: stack<Line, list<Line> > stk(lines); stackOut(stk); } ///:~
The function that requires the stack interface just sends each top( ) object to an ostream and then removes it by calling pop( ). The Line class determines the number of leading spaces, then stores the contents of the line without the leading spaces. The ostream operator<< re-
Chapter 15: Multiple Inheritance 211
inserts the leading spaces so the line prints properly, but you can easily change the number of spaces by changing the value of lspaces (the member functions to do this are not shown here).
In main( ), the input file is read into a list<Line>, then a stack is wrapped around this list so it can be sent to stackOut( ).
You cannot iterate through a stack; this emphasizes that you only want to perform stack operations when you create a stack. You can get equivalent “stack” functionality using a vector and its back( ), push_back( ) and pop_back( ) methods, and then you have all the additional functionality of the vector. Stack1.cpp can be rewritten to show this:
//: C04:Stack3.cpp // Using a vector as a stack; modified Stack1.cpp #include "../require.h" #include <iostream> #include <fstream> #include <vector> #include <string> using namespace std; int main(int argc, char* argv[]) { requireArgs(argc, 1); ifstream in(argv[1]); assure(in, argv[1]); vector<string> textlines; string line; while(getline(in, line)) textlines.push_back(line + "\n"); while(!textlines.empty()) { cout << textlines.back(); textlines.pop_back(); } } ///:~
You’ll see this produces the same output as Stack1.cpp, but you can now perform vector operations as well. Of course, list has the additional ability to push things at the front, but it’s generally less efficient than using push_back( ) with vector. (In addition, deque is usually more efficient than list for pushing things at the front).
queue The queue is a restricted form of a deque – you can only enter elements at one end, and pull them off the other end. Functionally, you could use a deque anywhere you need a queue, and you would then also have the additional functionality of the deque. The only reason you need
Chapter 15: Multiple Inheritance 212
to use a queue rather than a deque, then, is if you want to emphasize that you will only be performing queue-like behavior.
The queue is an adapter class like stack, in that it is built on top of another sequence container. As you might guess, the ideal implementation for a queue is a deque, and that is the default template argument for the queue; you’ll rarely need a different implementation.
Queues are often used when modeling systems where some elements of the system are waiting to be served by other elements in the system. A classic example of this is the “bank-teller problem,” where you have customers arriving at random intervals, getting into a line, and then being served by a set of tellers. Since the customers arrive randomly and each take a random amount of time to be served, there’s no way to deterministically know how long the line will be at any time. However, it’s possible to simulate the situation and see what happens.
A problem in performing this simulation is the fact that, in effect, each customer and teller should be run by a separate process. What we’d like is a multithreaded environment, then each customer or teller would have their own thread. However, Standard C++ has no model for multithreading so there is no standard solution to this problem. On the other hand, with a little adjustment to the code it’s possible to simulate enough multithreading to provide a satisfactory solution to our problem.
Multithreading means you have multiple threads of control running at once, in the same address space (this differs from multitasking, where you have different processes each running in their own address space). The trick is that you have fewer CPUs than you do threads (and very often only one CPU) so to give the illusion that each thread has its own CPU there is a time-slicing mechanism that says “OK, current thread – you’ve had enough time. I’m going to stop you and go give time to some other thread.” This automatic stopping and starting of threads is called pre-emptive and it means you don’t need to manage the threading process at all.
An alternative approach is for each thread to voluntarily yield the CPU to the scheduler, which then goes and finds another thread that needs running. This is easier to synthesize, but it still requires a method of “swapping” out one thread and swapping in another (this usually involves saving the stack frame and using the standard C library functions setjmp( ) and longjmp( ); see my article in the (XX) issue of Computer Language magazine for an example). So instead, we’ll build the time-slicing into the classes in the system. In this case, it will be the tellers that represent the “threads,” (the customers will be passive) so each teller will have an infinite-looping run( ) method that will execute for a certain number of “time units,” and then simply return. By using the ordinary return mechanism, we eliminate the need for any swapping. The resulting program, although small, provides a remarkably reasonable simulation:
//: C04:BankTeller.cpp // Using a queue and simulated multithreading // To model a bank teller system #include <iostream> #include <queue>
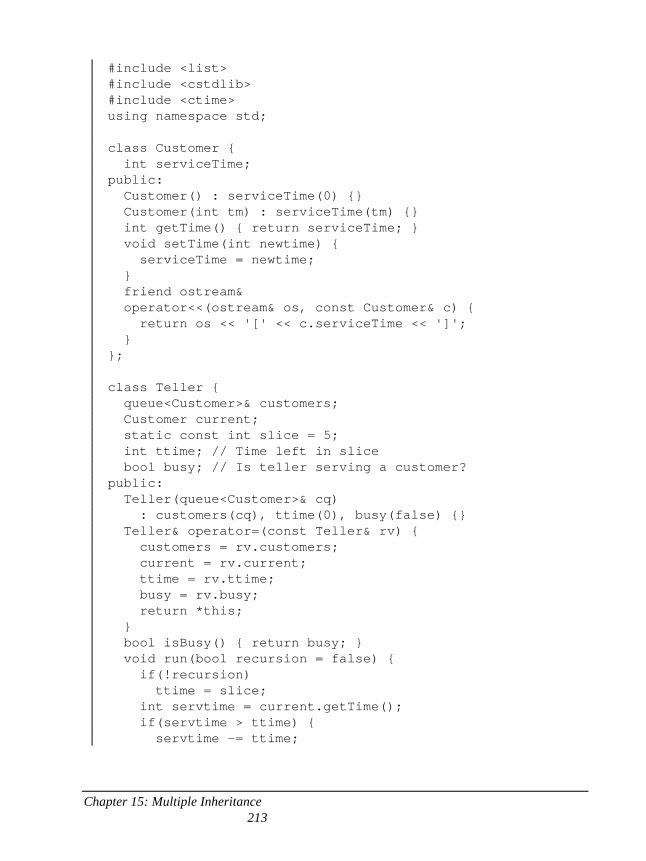
Chapter 15: Multiple Inheritance 213
#include <list> #include <cstdlib> #include <ctime> using namespace std; class Customer { int serviceTime; public: Customer() : serviceTime(0) {} Customer(int tm) : serviceTime(tm) {} int getTime() { return serviceTime; } void setTime(int newtime) { serviceTime = newtime; } friend ostream& operator<<(ostream& os, const Customer& c) { return os << '[' << c.serviceTime << ']'; } }; class Teller { queue<Customer>& customers; Customer current; static const int slice = 5; int ttime; // Time left in slice bool busy; // Is teller serving a customer? public: Teller(queue<Customer>& cq) : customers(cq), ttime(0), busy(false) {} Teller& operator=(const Teller& rv) { customers = rv.customers; current = rv.current; ttime = rv.ttime; busy = rv.busy; return *this; } bool isBusy() { return busy; } void run(bool recursion = false) { if(!recursion) ttime = slice; int servtime = current.getTime(); if(servtime > ttime) { servtime -= ttime;
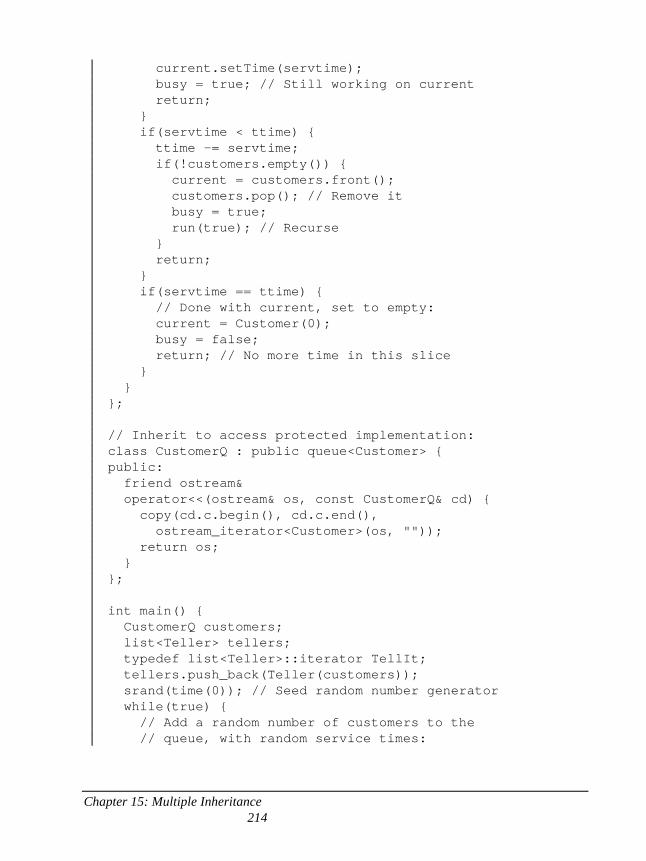
Chapter 15: Multiple Inheritance 214
current.setTime(servtime); busy = true; // Still working on current return; } if(servtime < ttime) { ttime -= servtime; if(!customers.empty()) { current = customers.front(); customers.pop(); // Remove it busy = true; run(true); // Recurse } return; } if(servtime == ttime) { // Done with current, set to empty: current = Customer(0); busy = false; return; // No more time in this slice } } }; // Inherit to access protected implementation: class CustomerQ : public queue<Customer> { public: friend ostream& operator<<(ostream& os, const CustomerQ& cd) { copy(cd.c.begin(), cd.c.end(), ostream_iterator<Customer>(os, "")); return os; } }; int main() { CustomerQ customers; list<Teller> tellers; typedef list<Teller>::iterator TellIt; tellers.push_back(Teller(customers)); srand(time(0)); // Seed random number generator while(true) { // Add a random number of customers to the // queue, with random service times:
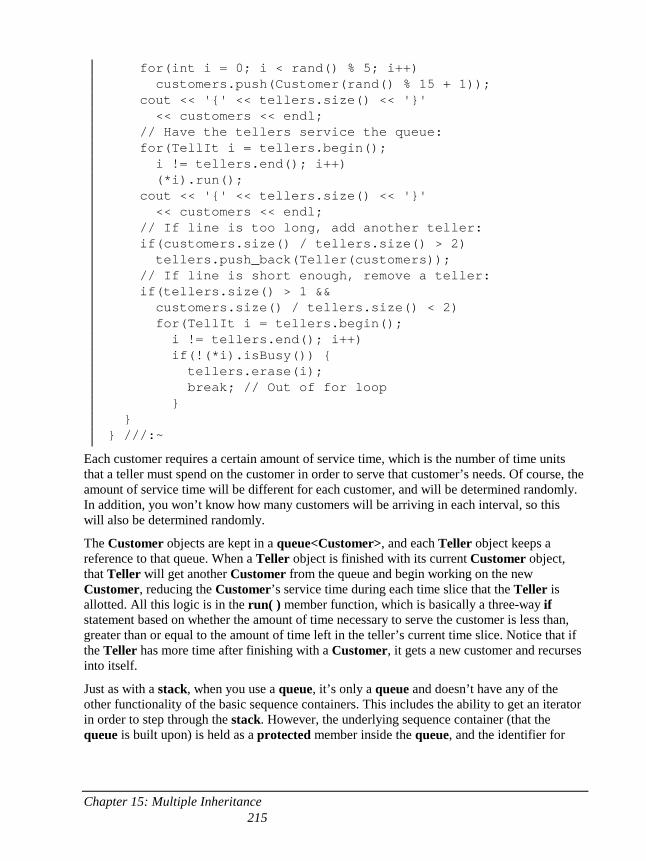
Chapter 15: Multiple Inheritance 215
for(int i = 0; i < rand() % 5; i++) customers.push(Customer(rand() % 15 + 1)); cout << '{' << tellers.size() << '}' << customers << endl; // Have the tellers service the queue: for(TellIt i = tellers.begin(); i != tellers.end(); i++) (*i).run(); cout << '{' << tellers.size() << '}' << customers << endl; // If line is too long, add another teller: if(customers.size() / tellers.size() > 2) tellers.push_back(Teller(customers)); // If line is short enough, remove a teller: if(tellers.size() > 1 && customers.size() / tellers.size() < 2) for(TellIt i = tellers.begin(); i != tellers.end(); i++) if(!(*i).isBusy()) { tellers.erase(i); break; // Out of for loop } } } ///:~
Each customer requires a certain amount of service time, which is the number of time units that a teller must spend on the customer in order to serve that customer’s needs. Of course, the amount of service time will be different for each customer, and will be determined randomly. In addition, you won’t know how many customers will be arriving in each interval, so this will also be determined randomly.
The Customer objects are kept in a queue<Customer>, and each Teller object keeps a reference to that queue. When a Teller object is finished with its current Customer object, that Teller will get another Customer from the queue and begin working on the new Customer, reducing the Customer’s service time during each time slice that the Teller is allotted. All this logic is in the run( ) member function, which is basically a three-way if statement based on whether the amount of time necessary to serve the customer is less than, greater than or equal to the amount of time left in the teller’s current time slice. Notice that if the Teller has more time after finishing with a Customer, it gets a new customer and recurses into itself.
Just as with a stack, when you use a queue, it’s only a queue and doesn’t have any of the other functionality of the basic sequence containers. This includes the ability to get an iterator in order to step through the stack. However, the underlying sequence container (that the queue is built upon) is held as a protected member inside the queue, and the identifier for
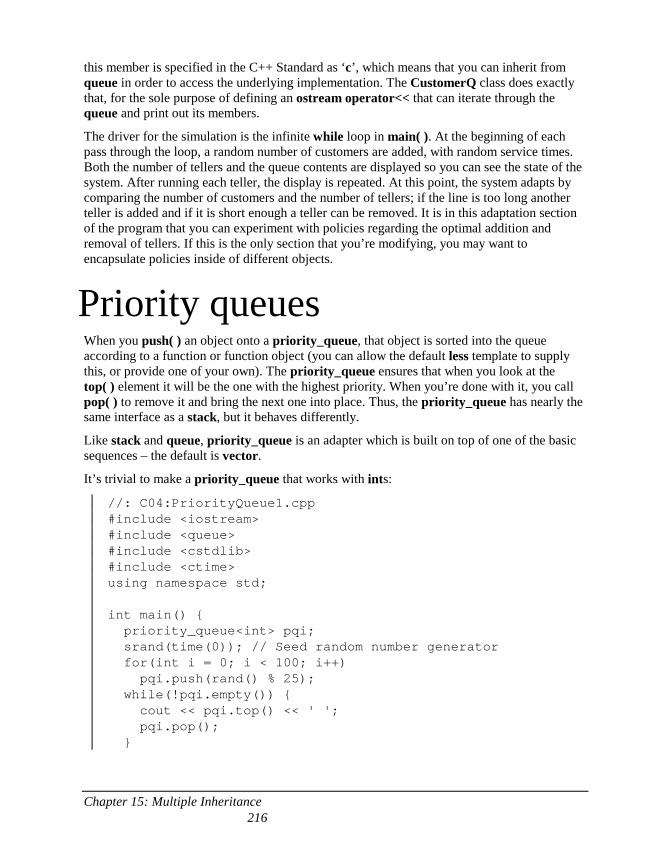
Chapter 15: Multiple Inheritance 216
this member is specified in the C++ Standard as ‘c’, which means that you can inherit from queue in order to access the underlying implementation. The CustomerQ class does exactly that, for the sole purpose of defining an ostream operator<< that can iterate through the queue and print out its members.
The driver for the simulation is the infinite while loop in main( ). At the beginning of each pass through the loop, a random number of customers are added, with random service times. Both the number of tellers and the queue contents are displayed so you can see the state of the system. After running each teller, the display is repeated. At this point, the system adapts by comparing the number of customers and the number of tellers; if the line is too long another teller is added and if it is short enough a teller can be removed. It is in this adaptation section of the program that you can experiment with policies regarding the optimal addition and removal of tellers. If this is the only section that you’re modifying, you may want to encapsulate policies inside of different objects.
Priority queues When you push( ) an object onto a priority_queue, that object is sorted into the queue according to a function or function object (you can allow the default less template to supply this, or provide one of your own). The priority_queue ensures that when you look at the top( ) element it will be the one with the highest priority. When you’re done with it, you call pop( ) to remove it and bring the next one into place. Thus, the priority_queue has nearly the same interface as a stack, but it behaves differently.
Like stack and queue, priority_queue is an adapter which is built on top of one of the basic sequences – the default is vector.
It’s trivial to make a priority_queue that works with ints:
//: C04:PriorityQueue1.cpp #include <iostream> #include <queue> #include <cstdlib> #include <ctime> using namespace std; int main() { priority_queue<int> pqi; srand(time(0)); // Seed random number generator for(int i = 0; i < 100; i++) pqi.push(rand() % 25); while(!pqi.empty()) { cout << pqi.top() << ' '; pqi.pop(); }
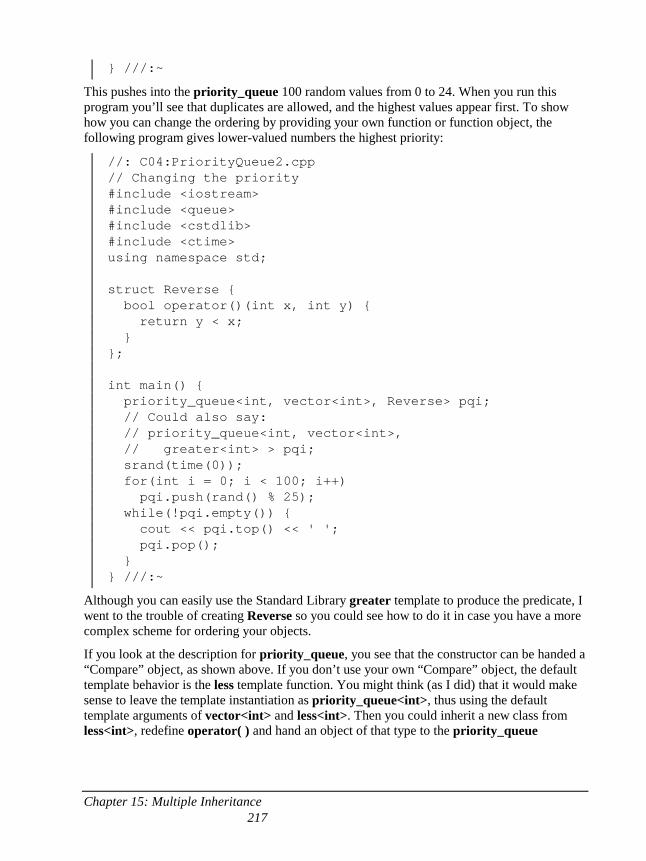
Chapter 15: Multiple Inheritance 217
} ///:~
This pushes into the priority_queue 100 random values from 0 to 24. When you run this program you’ll see that duplicates are allowed, and the highest values appear first. To show how you can change the ordering by providing your own function or function object, the following program gives lower-valued numbers the highest priority:
//: C04:PriorityQueue2.cpp // Changing the priority #include <iostream> #include <queue> #include <cstdlib> #include <ctime> using namespace std; struct Reverse { bool operator()(int x, int y) { return y < x; } }; int main() { priority_queue<int, vector<int>, Reverse> pqi; // Could also say: // priority_queue<int, vector<int>, // greater<int> > pqi; srand(time(0)); for(int i = 0; i < 100; i++) pqi.push(rand() % 25); while(!pqi.empty()) { cout << pqi.top() << ' '; pqi.pop(); } } ///:~
Although you can easily use the Standard Library greater template to produce the predicate, I went to the trouble of creating Reverse so you could see how to do it in case you have a more complex scheme for ordering your objects.
If you look at the description for priority_queue, you see that the constructor can be handed a “Compare” object, as shown above. If you don’t use your own “Compare” object, the default template behavior is the less template function. You might think (as I did) that it would make sense to leave the template instantiation as priority_queue<int>, thus using the default template arguments of vector<int> and less<int>. Then you could inherit a new class from less<int>, redefine operator( ) and hand an object of that type to the priority_queue
Chapter 15: Multiple Inheritance 218
constructor. I tried this, and got it to compile, but the resulting program produced the same old less<int> behavior. The answer lies in the less< > template:
template <class T> struct less : binary_function<T, T, bool> { // Other stuff... bool operator()(const T& x, const T& y) const { return x < y; } };
The operator( ) is not virtual, so even though the constructor takes your subclass of less<int> by reference (thus it doesn’t slice it down to a plain less<int>), when operator( ) is called, it is the base-class version that is used. While it is generally reasonable to expect ordinary classes to behave polymorphically, you cannot make this assumption when using the STL.
Of course, a priority_queue of int is trivial. A more interesting problem is a to-do list, where each object contains a string and a primary and secondary priority value:
//: C04:PriorityQueue3.cpp // A more complex use of priority_queue #include <iostream> #include <queue> #include <string> using namespace std; class ToDoItem { char primary; int secondary; string item; public: ToDoItem(string td, char pri ='A', int sec =1) : item(td), primary(pri), secondary(sec) {} friend bool operator<( const ToDoItem& x, const ToDoItem& y) { if(x.primary > y.primary) return true; if(x.primary == y.primary) if(x.secondary > y.secondary) return true; return false; } friend ostream& operator<<(ostream& os, const ToDoItem& td) {
Chapter 15: Multiple Inheritance 219
return os << td.primary << td.secondary << ": " << td.item; } }; int main() { priority_queue<ToDoItem> toDoList; toDoList.push(ToDoItem("Empty trash", 'C', 4)); toDoList.push(ToDoItem("Feed dog", 'A', 2)); toDoList.push(ToDoItem("Feed bird", 'B', 7)); toDoList.push(ToDoItem("Mow lawn", 'C', 3)); toDoList.push(ToDoItem("Water lawn", 'A', 1)); toDoList.push(ToDoItem("Feed cat", 'B', 1)); while(!toDoList.empty()) { cout << toDoList.top() << endl; toDoList.pop(); } } ///:~
ToDoItem’s operator< must be a non-member function for it to work with less< >. Other than that, everything happens automatically. The output is:
A1: Water lawn A2: Feed dog B1: Feed cat B7: Feed bird C3: Mow lawn C4: Empty trash
Note that you cannot iterate through a priority_queue. However, it is possible to emulate the behavior of a priority_queue using a vector, thus allowing you access to that vector. You can do this by looking at the implementation of priority_queue, which uses make_heap( ), push_heap( ) and pop_heap( ) (they are the soul of the priority_queue; in fact you could say that the heap is the priority queue and priority_queue is just a wrapper around it). This turns out to be reasonably straightforward, but you might think that a shortcut is possible. Since the container used by priority_queue is protected (and has the identifier, according to the Standard C++ specification, named c) you can inherit a new class which provides access to the underlying implementation:
//: C04:PriorityQueue4.cpp // Manipulating the underlying implementation #include <iostream> #include <queue> #include <cstdlib> #include <ctime>
Chapter 15: Multiple Inheritance 220
using namespace std; class PQI : public priority_queue<int> { public: vector<int>& impl() { return c; } }; int main() { PQI pqi; srand(time(0)); for(int i = 0; i < 100; i++) pqi.push(rand() % 25); copy(pqi.impl().begin(), pqi.impl().end(), ostream_iterator<int>(cout, " ")); cout << endl; while(!pqi.empty()) { cout << pqi.top() << ' '; pqi.pop(); } } ///:~
However, if you run this program you’ll discover that the vector doesn’t contain the items in the descending order that you get when you call pop( ), the order that you want from the priority queue. It would seem that if you want to create a vector that is a priority queue, you have to do it by hand, like this:
//: C04:PriorityQueue5.cpp // Building your own priority queue #include <iostream> #include <queue> #include <cstdlib> #include <ctime> using namespace std; template<class T, class Compare> class PQV : public vector<T> { Compare comp; public: PQV(Compare cmp = Compare()) : comp(cmp) { make_heap(begin(), end(), comp); } const T& top() { return front(); } void push(const T& x) { push_back(x);
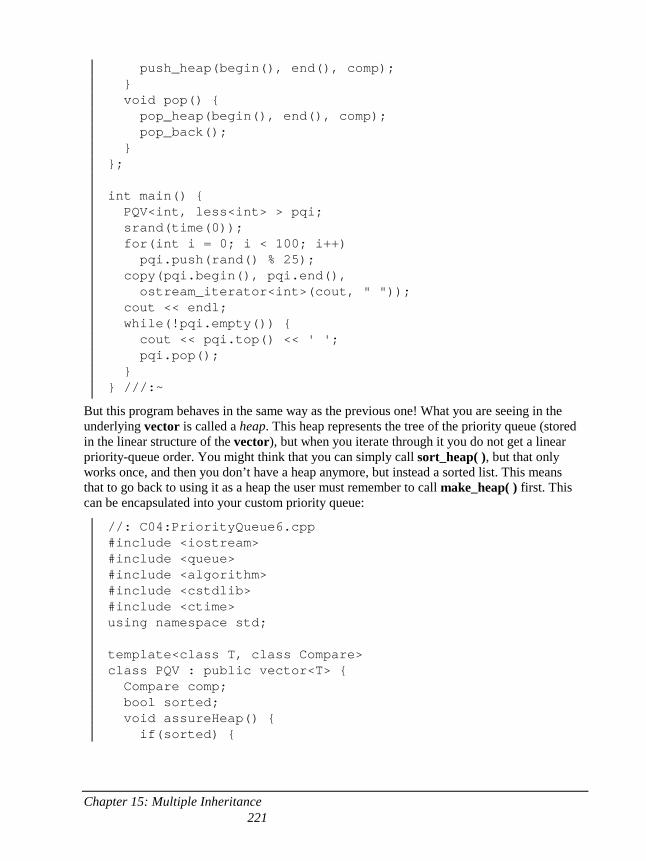
Chapter 15: Multiple Inheritance 221
push_heap(begin(), end(), comp); } void pop() { pop_heap(begin(), end(), comp); pop_back(); } }; int main() { PQV<int, less<int> > pqi; srand(time(0)); for(int i = 0; i < 100; i++) pqi.push(rand() % 25); copy(pqi.begin(), pqi.end(), ostream_iterator<int>(cout, " ")); cout << endl; while(!pqi.empty()) { cout << pqi.top() << ' '; pqi.pop(); } } ///:~
But this program behaves in the same way as the previous one! What you are seeing in the underlying vector is called a heap. This heap represents the tree of the priority queue (stored in the linear structure of the vector), but when you iterate through it you do not get a linear priority-queue order. You might think that you can simply call sort_heap( ), but that only works once, and then you don’t have a heap anymore, but instead a sorted list. This means that to go back to using it as a heap the user must remember to call make_heap( ) first. This can be encapsulated into your custom priority queue:
//: C04:PriorityQueue6.cpp #include <iostream> #include <queue> #include <algorithm> #include <cstdlib> #include <ctime> using namespace std; template<class T, class Compare> class PQV : public vector<T> { Compare comp; bool sorted; void assureHeap() { if(sorted) {
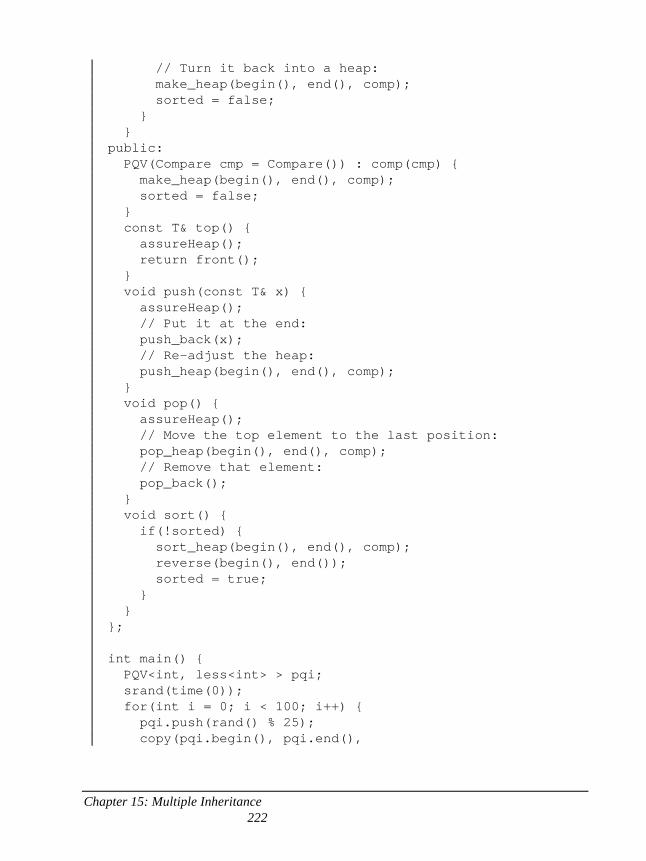
Chapter 15: Multiple Inheritance 222
// Turn it back into a heap: make_heap(begin(), end(), comp); sorted = false; } } public: PQV(Compare cmp = Compare()) : comp(cmp) { make_heap(begin(), end(), comp); sorted = false; } const T& top() { assureHeap(); return front(); } void push(const T& x) { assureHeap(); // Put it at the end: push_back(x); // Re-adjust the heap: push_heap(begin(), end(), comp); } void pop() { assureHeap(); // Move the top element to the last position: pop_heap(begin(), end(), comp); // Remove that element: pop_back(); } void sort() { if(!sorted) { sort_heap(begin(), end(), comp); reverse(begin(), end()); sorted = true; } } }; int main() { PQV<int, less<int> > pqi; srand(time(0)); for(int i = 0; i < 100; i++) { pqi.push(rand() % 25); copy(pqi.begin(), pqi.end(),
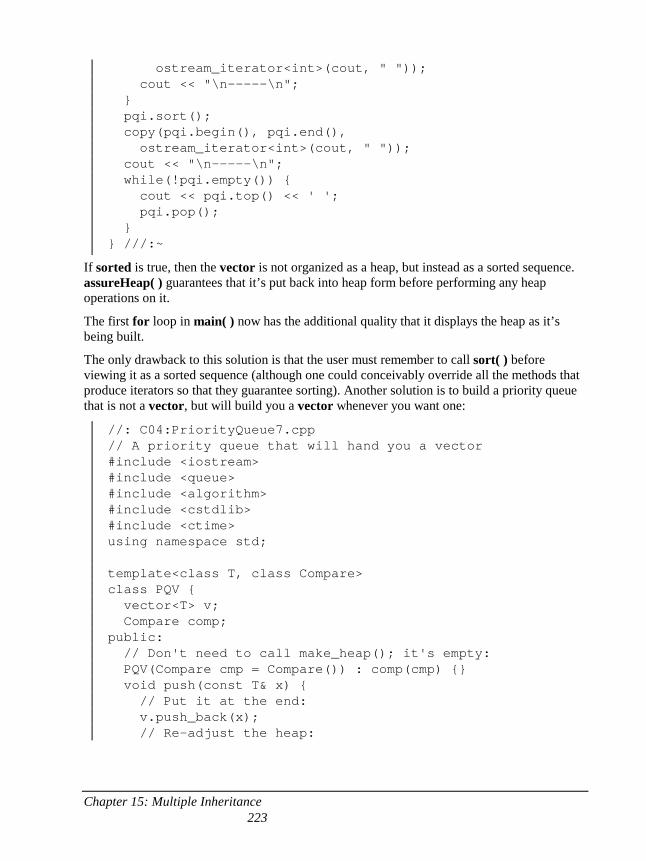
Chapter 15: Multiple Inheritance 223
ostream_iterator<int>(cout, " ")); cout << "\n-----\n"; } pqi.sort(); copy(pqi.begin(), pqi.end(), ostream_iterator<int>(cout, " ")); cout << "\n-----\n"; while(!pqi.empty()) { cout << pqi.top() << ' '; pqi.pop(); } } ///:~
If sorted is true, then the vector is not organized as a heap, but instead as a sorted sequence. assureHeap( ) guarantees that it’s put back into heap form before performing any heap operations on it.
The first for loop in main( ) now has the additional quality that it displays the heap as it’s being built.
The only drawback to this solution is that the user must remember to call sort( ) before viewing it as a sorted sequence (although one could conceivably override all the methods that produce iterators so that they guarantee sorting). Another solution is to build a priority queue that is not a vector, but will build you a vector whenever you want one:
//: C04:PriorityQueue7.cpp // A priority queue that will hand you a vector #include <iostream> #include <queue> #include <algorithm> #include <cstdlib> #include <ctime> using namespace std; template<class T, class Compare> class PQV { vector<T> v; Compare comp; public: // Don't need to call make_heap(); it's empty: PQV(Compare cmp = Compare()) : comp(cmp) {} void push(const T& x) { // Put it at the end: v.push_back(x); // Re-adjust the heap:
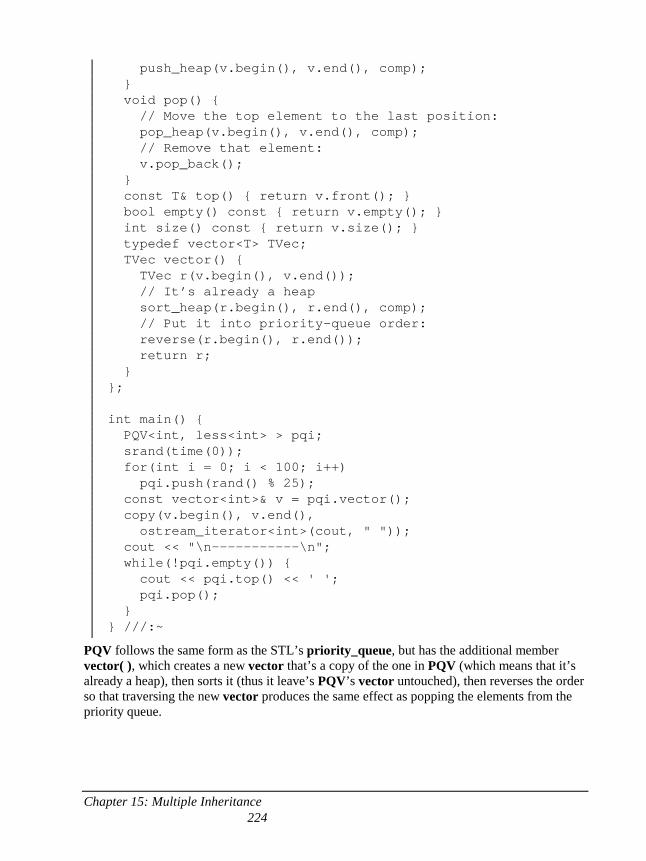
Chapter 15: Multiple Inheritance 224
push_heap(v.begin(), v.end(), comp); } void pop() { // Move the top element to the last position: pop_heap(v.begin(), v.end(), comp); // Remove that element: v.pop_back(); } const T& top() { return v.front(); } bool empty() const { return v.empty(); } int size() const { return v.size(); } typedef vector<T> TVec; TVec vector() { TVec r(v.begin(), v.end()); // It’s already a heap sort_heap(r.begin(), r.end(), comp); // Put it into priority-queue order: reverse(r.begin(), r.end()); return r; } }; int main() { PQV<int, less<int> > pqi; srand(time(0)); for(int i = 0; i < 100; i++) pqi.push(rand() % 25); const vector<int>& v = pqi.vector(); copy(v.begin(), v.end(), ostream_iterator<int>(cout, " ")); cout << "\n-----------\n"; while(!pqi.empty()) { cout << pqi.top() << ' '; pqi.pop(); } } ///:~
PQV follows the same form as the STL’s priority_queue, but has the additional member vector( ), which creates a new vector that’s a copy of the one in PQV (which means that it’s already a heap), then sorts it (thus it leave’s PQV’s vector untouched), then reverses the order so that traversing the new vector produces the same effect as popping the elements from the priority queue.

Chapter 15: Multiple Inheritance 225
You may observe that the approach of inheriting from priority_queue used in PriorityQueue4.cpp could be used with the above technique to produce more succinct code:
//: C04:PriorityQueue8.cpp // A more compact version of PriorityQueue7.cpp #include <iostream> #include <queue> #include <algorithm> #include <cstdlib> #include <ctime> using namespace std; template<class T> class PQV : public priority_queue<T> { public: typedef vector<T> TVec; TVec vector() { TVec r(c.begin(), c.end()); // c is already a heap sort_heap(r.begin(), r.end(), comp); // Put it into priority-queue order: reverse(r.begin(), r.end()); return r; } }; int main() { PQV<int> pqi; srand(time(0)); for(int i = 0; i < 100; i++) pqi.push(rand() % 25); const vector<int>& v = pqi.vector(); copy(v.begin(), v.end(), ostream_iterator<int>(cout, " ")); cout << "\n-----------\n"; while(!pqi.empty()) { cout << pqi.top() << ' '; pqi.pop(); } } ///:~
The brevity of this solution makes it the simplest and most desirable, plus it’s guaranteed that the user will not have a vector in the unsorted state. The only potential problem is that the
Chapter 15: Multiple Inheritance 226
vector( ) member function returns the vector<T> by value, which might cause some overhead issues with complex values of the parameter type T.
Holding bits Most of my computer education was in hardware-level design and programming, and I spent my first few years doing embedded systems development. Because C was a language that purported to be “close to the hardware,” I have always found it dismaying that there was no native binary representation for numbers. Decimal, of course, and hexadecimal (tolerable only because it’s easier to group the bits in your mind), but octal? Ugh. Whenever you read specs for chips you’re trying to program, they don’t describe the chip registers in octal, or even hexadecimal – they use binary. And yet C won’t let you say 0b0101101, which is the obvious solution for a language close to the hardware.
Although there’s still no native binary representation in C++, things have improved with the addition of two classes: bitset and vector<bool>, both of which are designed to manipulate a group of on-off values. The primary differences between these types are:
1. The bitset holds a fixed number of bits. You establish the quantity of bits in the bitset template argument. The vector<bool> can, like a regular vector, expand dynamically to hold any number of bool values.
2. The bitset is explicitly designed for performance when manipulating bits, and not as a “regular” container. As such, it has no iterators and it’s most storage-efficient when it contains an integral number of long values. The vector<bool>, on the other hand, is a specialization of a vector, and so has all the operations of a normal vector – the specialization is just designed to be space-efficient for bool.
There is no trivial conversion between a bitset and a vector<bool>, which implies that the two are for very different purposes.
bitset<n> The template for bitset accepts an integral template argument which is the number of bits to represent. Thus, bitset<10> is a different type than bitset<20>, and you cannot perform comparisons, assignments, etc. between the two.
A bitset provides virtually any bit operation that you could ask for, in a very efficient form. However, each bitset is made up of an integral number of longs (typically 32 bits), so even though it uses no more space than it needs, it always uses at least the size of a long. This means you’ll use space most efficiently if you increase the size of your bitsets in chunks of the number of bits in a long. In addition, the only conversion from a bitset to a numerical value is to an unsigned long, which means that 32 bits (if your long is the typical size) is the most flexible form of a bitset.
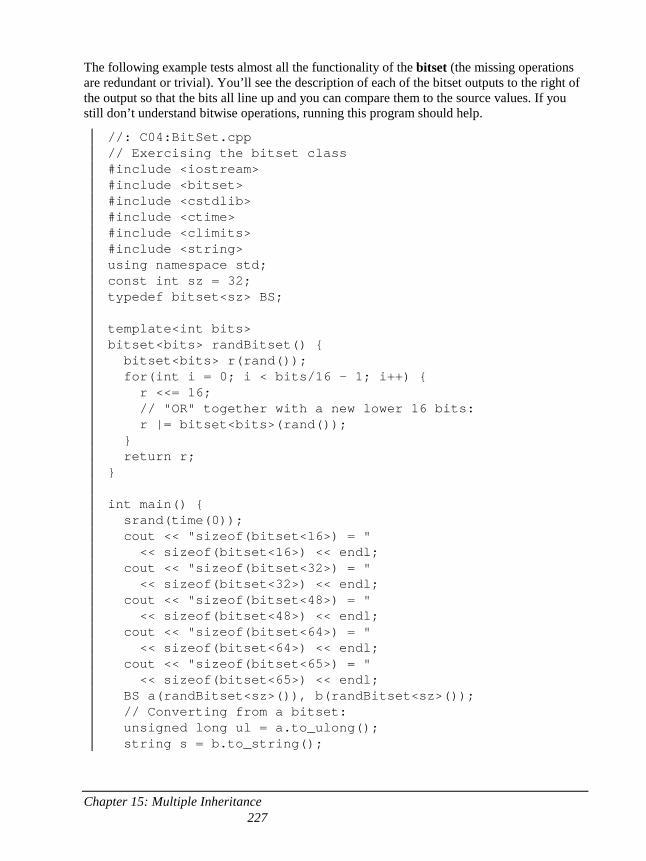
Chapter 15: Multiple Inheritance 227
The following example tests almost all the functionality of the bitset (the missing operations are redundant or trivial). You’ll see the description of each of the bitset outputs to the right of the output so that the bits all line up and you can compare them to the source values. If you still don’t understand bitwise operations, running this program should help.
//: C04:BitSet.cpp // Exercising the bitset class #include <iostream> #include <bitset> #include <cstdlib> #include <ctime> #include <climits> #include <string> using namespace std; const int sz = 32; typedef bitset<sz> BS; template<int bits> bitset<bits> randBitset() { bitset<bits> r(rand()); for(int i = 0; i < bits/16 - 1; i++) { r <<= 16; // "OR" together with a new lower 16 bits: r |= bitset<bits>(rand()); } return r; } int main() { srand(time(0)); cout << "sizeof(bitset<16>) = " << sizeof(bitset<16>) << endl; cout << "sizeof(bitset<32>) = " << sizeof(bitset<32>) << endl; cout << "sizeof(bitset<48>) = " << sizeof(bitset<48>) << endl; cout << "sizeof(bitset<64>) = " << sizeof(bitset<64>) << endl; cout << "sizeof(bitset<65>) = " << sizeof(bitset<65>) << endl; BS a(randBitset<sz>()), b(randBitset<sz>()); // Converting from a bitset: unsigned long ul = a.to_ulong(); string s = b.to_string();

Chapter 15: Multiple Inheritance 228
// Converting a string to a bitset: char* cbits = "111011010110111"; cout << "char* cbits = " << cbits <<endl; cout << BS(cbits) << " [BS(cbits)]" << endl; cout << BS(cbits, 2) << " [BS(cbits, 2)]" << endl; cout << BS(cbits, 2, 11) << " [BS(cbits, 2, 11)]" << endl; cout << a << " [a]" << endl; cout << b << " [b]"<< endl; // Bitwise AND: cout << (a & b) << " [a & b]" << endl; cout << (BS(a) &= b) << " [a &= b]" << endl; // Bitwise OR: cout << (a | b) << " [a | b]" << endl; cout << (BS(a) |= b) << " [a |= b]" << endl; // Exclusive OR: cout << (a ^ b) << " [a ^ b]" << endl; cout << (BS(a) ^= b) << " [a ^= b]" << endl; cout << a << " [a]" << endl; // For reference // Logical left shift (fill with zeros): cout << (BS(a) <<= sz/2) << " [a <<= (sz/2)]" << endl; cout << (a << sz/2) << endl; cout << a << " [a]" << endl; // For reference // Logical right shift (fill with zeros): cout << (BS(a) >>= sz/2) << " [a >>= (sz/2)]" << endl; cout << (a >> sz/2) << endl; cout << a << " [a]" << endl; // For reference cout << BS(a).set() << " [a.set()]" << endl; for(int i = 0; i < sz; i++) if(!a.test(i)) { cout << BS(a).set(i) << " [a.set(" << i <<")]" << endl; break; // Just do one example of this } cout << BS(a).reset() << " [a.reset()]"<< endl; for(int j = 0; j < sz; j++) if(a.test(j)) { cout << BS(a).reset(j) << " [a.reset(" << j <<")]" << endl; break; // Just do one example of this
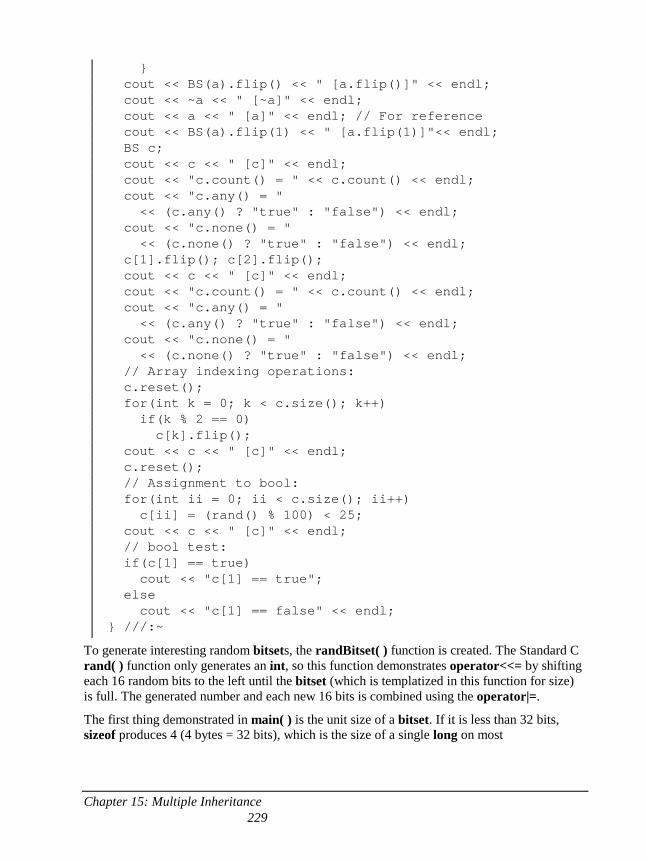
Chapter 15: Multiple Inheritance 229
} cout << BS(a).flip() << " [a.flip()]" << endl; cout << ~a << " [~a]" << endl; cout << a << " [a]" << endl; // For reference cout << BS(a).flip(1) << " [a.flip(1)]"<< endl; BS c; cout << c << " [c]" << endl; cout << "c.count() = " << c.count() << endl; cout << "c.any() = " << (c.any() ? "true" : "false") << endl; cout << "c.none() = " << (c.none() ? "true" : "false") << endl; c[1].flip(); c[2].flip(); cout << c << " [c]" << endl; cout << "c.count() = " << c.count() << endl; cout << "c.any() = " << (c.any() ? "true" : "false") << endl; cout << "c.none() = " << (c.none() ? "true" : "false") << endl; // Array indexing operations: c.reset(); for(int k = 0; k < c.size(); k++) if(k % 2 == 0) c[k].flip(); cout << c << " [c]" << endl; c.reset(); // Assignment to bool: for(int ii = 0; ii < c.size(); ii++) c[ii] = (rand() % 100) < 25; cout << c << " [c]" << endl; // bool test: if(c[1] == true) cout << "c[1] == true"; else cout << "c[1] == false" << endl; } ///:~
To generate interesting random bitsets, the randBitset( ) function is created. The Standard C rand( ) function only generates an int, so this function demonstrates operator<<= by shifting each 16 random bits to the left until the bitset (which is templatized in this function for size) is full. The generated number and each new 16 bits is combined using the operator|=.
The first thing demonstrated in main( ) is the unit size of a bitset. If it is less than 32 bits, sizeof produces 4 (4 bytes = 32 bits), which is the size of a single long on most
Chapter 15: Multiple Inheritance 230
implementations. If it’s between 32 and 64, it requires two longs, greater than 64 requires 3 longs, etc. Thus you make the best use of space if you use a bit quantity that fits in an integral number of longs. However, notice there’s no extra overhead for the object – it’s as if you were hand-coding to use a long.
Another clue that bitset is optimized for longs is that there is a to_ulong( ) member function that produces the value of the bitset as an unsigned long. There are no other numerical conversions from bitset, but there is a to_string( ) conversion that produces a string containing ones and zeros, and this can be as long as the actual bitset. However, using bitset<32> may make your life simpler because of to_ulong( ).
There’s still no primitive format for binary values, but the next best thing is supported by bitset: a string of ones and zeros with the least-significant bit (lsb) on the right. The three constructors demonstrated show taking the entire string (the char array is automatically converted to a string), the string starting at character 2, and the string from character 2 through 11. You can write to an ostream from a bitset using operator<< and it comes out as ones and zeros. You can also read from an istream using operator>> (not shown here).
You’ll notice that bitset only has three non-member operators: and (&), or (|) and exclusive-or (^). Each of these create a new bitset as their return value. All of the member operators opt for the more efficient &=, |=, etc. form where a temporary is not created. However, these forms actually change their lvalue (which is a in most of the tests in the above example). To prevent this, I created a temporary to be used as the lvalue by invoking the copy-constructor on a; this is why you see the form BS(a). The result of each test is printed out, and occasionally a is reprinted so you can easily look at it for reference.
The rest of the example should be self-explanatory when you run it; if not you can find the details in your compiler’s documentation or the other documentation mentioned earlier in this chapter.
vector<bool> vector<bool> is a specialization of the vector template. A normal bool variable requires at least one byte, but since a bool only has two states the ideal implementation of vector<bool> is such that each bool value only requires one bit. This means the iterator must be specially-defined, and cannot be a bool*.
The bit-manipulation functions for vector<bool> are much more limited than those of bitset. The only member function that was added to those already in vector is flip( ), to invert all the bits; there is no set( ) or reset( ) as in bitset. When you use operator[ ], you get back an object of type vector<bool>::reference, which also has a flip( ) to invert that individual bit.
//: C04:VectorOfBool.cpp // Demonstrate the vector<bool> specialization #include <iostream> #include <sstream> #include <vector>
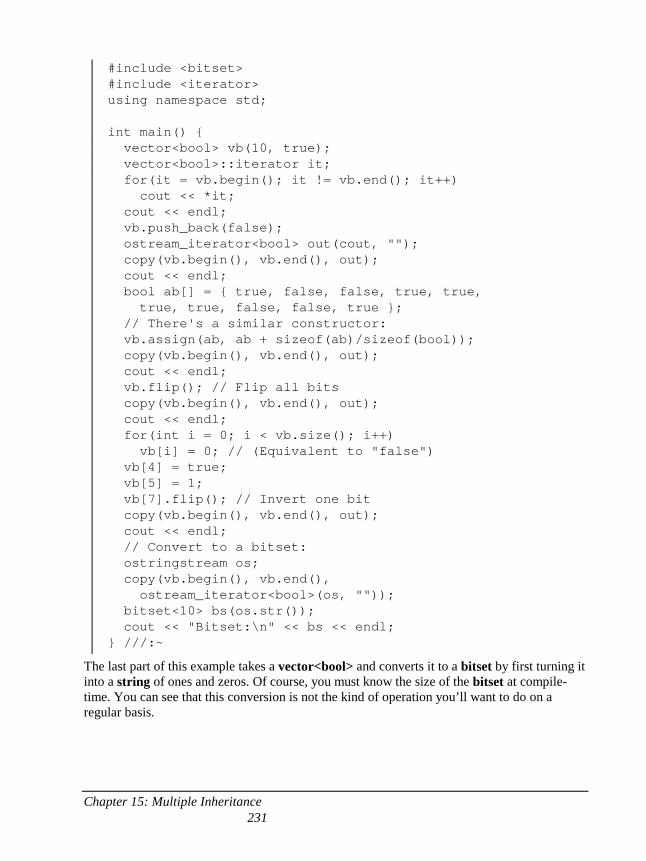
Chapter 15: Multiple Inheritance 231
#include <bitset> #include <iterator> using namespace std; int main() { vector<bool> vb(10, true); vector<bool>::iterator it; for(it = vb.begin(); it != vb.end(); it++) cout << *it; cout << endl; vb.push_back(false); ostream_iterator<bool> out(cout, ""); copy(vb.begin(), vb.end(), out); cout << endl; bool ab[] = { true, false, false, true, true, true, true, false, false, true }; // There's a similar constructor: vb.assign(ab, ab + sizeof(ab)/sizeof(bool)); copy(vb.begin(), vb.end(), out); cout << endl; vb.flip(); // Flip all bits copy(vb.begin(), vb.end(), out); cout << endl; for(int i = 0; i < vb.size(); i++) vb[i] = 0; // (Equivalent to "false") vb[4] = true; vb[5] = 1; vb[7].flip(); // Invert one bit copy(vb.begin(), vb.end(), out); cout << endl; // Convert to a bitset: ostringstream os; copy(vb.begin(), vb.end(), ostream_iterator<bool>(os, "")); bitset<10> bs(os.str()); cout << "Bitset:\n" << bs << endl; } ///:~
The last part of this example takes a vector<bool> and converts it to a bitset by first turning it into a string of ones and zeros. Of course, you must know the size of the bitset at compile-time. You can see that this conversion is not the kind of operation you’ll want to do on a regular basis.
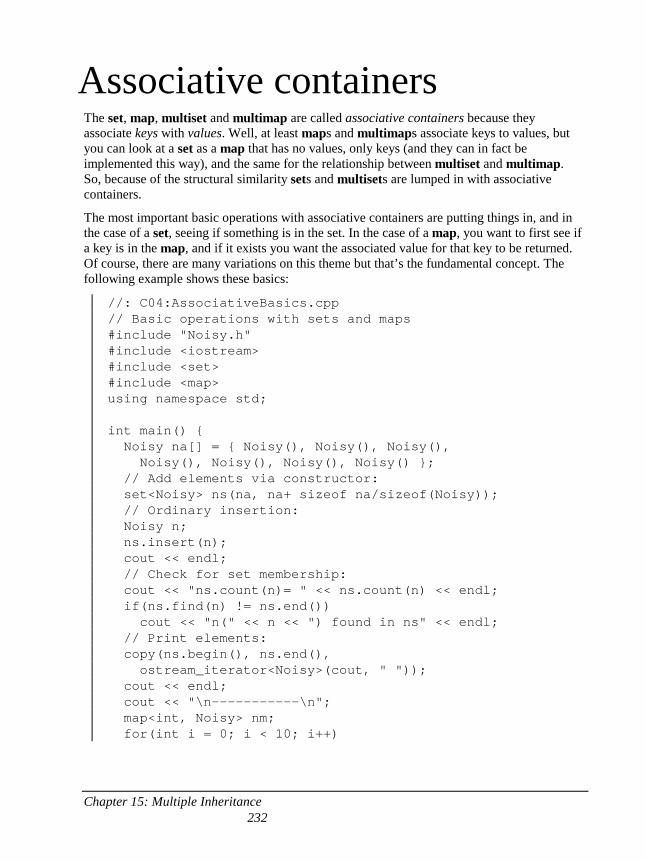
Chapter 15: Multiple Inheritance 232
Associative containers The set, map, multiset and multimap are called associative containers because they associate keys with values. Well, at least maps and multimaps associate keys to values, but you can look at a set as a map that has no values, only keys (and they can in fact be implemented this way), and the same for the relationship between multiset and multimap. So, because of the structural similarity sets and multisets are lumped in with associative containers.
The most important basic operations with associative containers are putting things in, and in the case of a set, seeing if something is in the set. In the case of a map, you want to first see if a key is in the map, and if it exists you want the associated value for that key to be returned. Of course, there are many variations on this theme but that’s the fundamental concept. The following example shows these basics:
//: C04:AssociativeBasics.cpp // Basic operations with sets and maps #include "Noisy.h" #include <iostream> #include <set> #include <map> using namespace std; int main() { Noisy na[] = { Noisy(), Noisy(), Noisy(), Noisy(), Noisy(), Noisy(), Noisy() }; // Add elements via constructor: set<Noisy> ns(na, na+ sizeof na/sizeof(Noisy)); // Ordinary insertion: Noisy n; ns.insert(n); cout << endl; // Check for set membership: cout << "ns.count(n)= " << ns.count(n) << endl; if(ns.find(n) != ns.end()) cout << "n(" << n << ") found in ns" << endl; // Print elements: copy(ns.begin(), ns.end(), ostream_iterator<Noisy>(cout, " ")); cout << endl; cout << "\n-----------\n"; map<int, Noisy> nm; for(int i = 0; i < 10; i++)
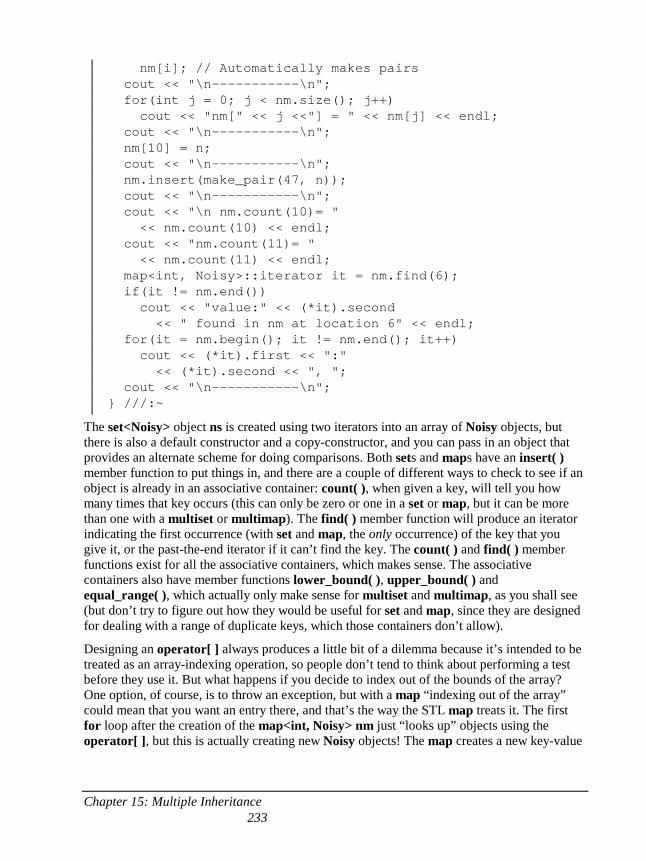
Chapter 15: Multiple Inheritance 233
nm[i]; // Automatically makes pairs cout << "\n-----------\n"; for(int j = 0; j < nm.size(); j++) cout << "nm[" << j <<"] = " << nm[j] << endl; cout << "\n-----------\n"; nm[10] = n; cout << "\n-----------\n"; nm.insert(make_pair(47, n)); cout << "\n-----------\n"; cout << "\n nm.count(10)= " << nm.count(10) << endl; cout << "nm.count(11)= " << nm.count(11) << endl; map<int, Noisy>::iterator it = nm.find(6); if(it != nm.end()) cout << "value:" << (*it).second << " found in nm at location 6" << endl; for(it = nm.begin(); it != nm.end(); it++) cout << (*it).first << ":" << (*it).second << ", "; cout << "\n-----------\n"; } ///:~
The set<Noisy> object ns is created using two iterators into an array of Noisy objects, but there is also a default constructor and a copy-constructor, and you can pass in an object that provides an alternate scheme for doing comparisons. Both sets and maps have an insert( ) member function to put things in, and there are a couple of different ways to check to see if an object is already in an associative container: count( ), when given a key, will tell you how many times that key occurs (this can only be zero or one in a set or map, but it can be more than one with a multiset or multimap). The find( ) member function will produce an iterator indicating the first occurrence (with set and map, the only occurrence) of the key that you give it, or the past-the-end iterator if it can’t find the key. The count( ) and find( ) member functions exist for all the associative containers, which makes sense. The associative containers also have member functions lower_bound( ), upper_bound( ) and equal_range( ), which actually only make sense for multiset and multimap, as you shall see (but don’t try to figure out how they would be useful for set and map, since they are designed for dealing with a range of duplicate keys, which those containers don’t allow).
Designing an operator[ ] always produces a little bit of a dilemma because it’s intended to be treated as an array-indexing operation, so people don’t tend to think about performing a test before they use it. But what happens if you decide to index out of the bounds of the array? One option, of course, is to throw an exception, but with a map “indexing out of the array” could mean that you want an entry there, and that’s the way the STL map treats it. The first for loop after the creation of the map<int, Noisy> nm just “looks up” objects using the operator[ ], but this is actually creating new Noisy objects! The map creates a new key-value
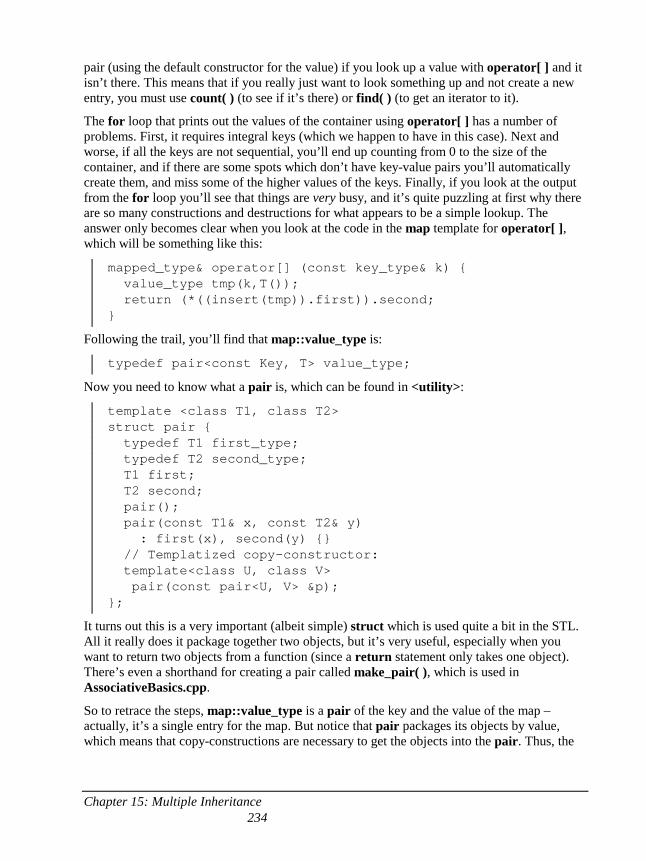
Chapter 15: Multiple Inheritance 234
pair (using the default constructor for the value) if you look up a value with operator[ ] and it isn’t there. This means that if you really just want to look something up and not create a new entry, you must use count( ) (to see if it’s there) or find( ) (to get an iterator to it).
The for loop that prints out the values of the container using operator[ ] has a number of problems. First, it requires integral keys (which we happen to have in this case). Next and worse, if all the keys are not sequential, you’ll end up counting from 0 to the size of the container, and if there are some spots which don’t have key-value pairs you’ll automatically create them, and miss some of the higher values of the keys. Finally, if you look at the output from the for loop you’ll see that things are very busy, and it’s quite puzzling at first why there are so many constructions and destructions for what appears to be a simple lookup. The answer only becomes clear when you look at the code in the map template for operator[ ], which will be something like this:
mapped_type& operator[] (const key_type& k) { value_type tmp(k,T()); return (*((insert(tmp)).first)).second; }
Following the trail, you’ll find that map::value_type is:
typedef pair<const Key, T> value_type;
Now you need to know what a pair is, which can be found in <utility>:
template <class T1, class T2> struct pair { typedef T1 first_type; typedef T2 second_type; T1 first; T2 second; pair(); pair(const T1& x, const T2& y) : first(x), second(y) {} // Templatized copy-constructor: template<class U, class V> pair(const pair<U, V> &p); };
It turns out this is a very important (albeit simple) struct which is used quite a bit in the STL. All it really does it package together two objects, but it’s very useful, especially when you want to return two objects from a function (since a return statement only takes one object). There’s even a shorthand for creating a pair called make_pair( ), which is used in AssociativeBasics.cpp.
So to retrace the steps, map::value_type is a pair of the key and the value of the map – actually, it’s a single entry for the map. But notice that pair packages its objects by value, which means that copy-constructions are necessary to get the objects into the pair. Thus, the
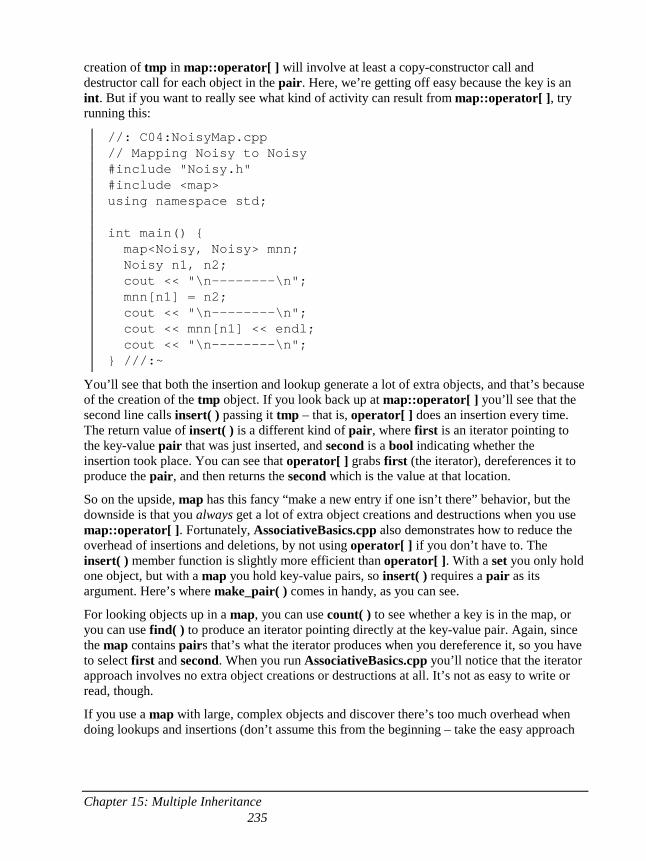
Chapter 15: Multiple Inheritance 235
creation of tmp in map::operator[ ] will involve at least a copy-constructor call and destructor call for each object in the pair. Here, we’re getting off easy because the key is an int. But if you want to really see what kind of activity can result from map::operator[ ], try running this:
//: C04:NoisyMap.cpp // Mapping Noisy to Noisy #include "Noisy.h" #include <map> using namespace std; int main() { map<Noisy, Noisy> mnn; Noisy n1, n2; cout << "\n--------\n"; mnn[n1] = n2; cout << "\n--------\n"; cout << mnn[n1] << endl; cout << "\n--------\n"; } ///:~
You’ll see that both the insertion and lookup generate a lot of extra objects, and that’s because of the creation of the tmp object. If you look back up at map::operator[ ] you’ll see that the second line calls insert( ) passing it tmp – that is, operator[ ] does an insertion every time. The return value of insert( ) is a different kind of pair, where first is an iterator pointing to the key-value pair that was just inserted, and second is a bool indicating whether the insertion took place. You can see that operator[ ] grabs first (the iterator), dereferences it to produce the pair, and then returns the second which is the value at that location.
So on the upside, map has this fancy “make a new entry if one isn’t there” behavior, but the downside is that you always get a lot of extra object creations and destructions when you use map::operator[ ]. Fortunately, AssociativeBasics.cpp also demonstrates how to reduce the overhead of insertions and deletions, by not using operator[ ] if you don’t have to. The insert( ) member function is slightly more efficient than operator[ ]. With a set you only hold one object, but with a map you hold key-value pairs, so insert( ) requires a pair as its argument. Here’s where make_pair( ) comes in handy, as you can see.
For looking objects up in a map, you can use count( ) to see whether a key is in the map, or you can use find( ) to produce an iterator pointing directly at the key-value pair. Again, since the map contains pairs that’s what the iterator produces when you dereference it, so you have to select first and second. When you run AssociativeBasics.cpp you’ll notice that the iterator approach involves no extra object creations or destructions at all. It’s not as easy to write or read, though.
If you use a map with large, complex objects and discover there’s too much overhead when doing lookups and insertions (don’t assume this from the beginning – take the easy approach
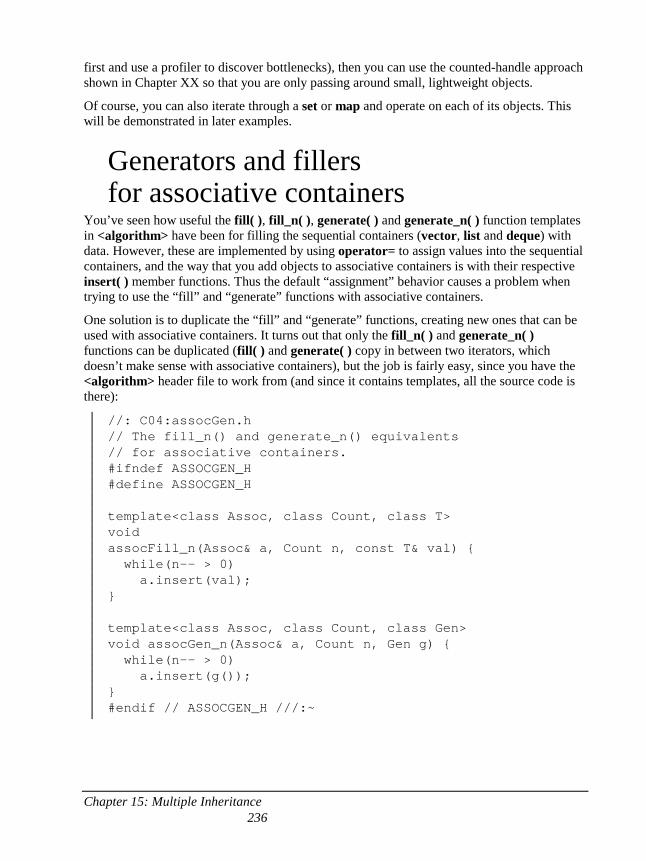
Chapter 15: Multiple Inheritance 236
first and use a profiler to discover bottlenecks), then you can use the counted-handle approach shown in Chapter XX so that you are only passing around small, lightweight objects.
Of course, you can also iterate through a set or map and operate on each of its objects. This will be demonstrated in later examples.
Generators and fillers for associative containers
You’ve seen how useful the fill( ), fill_n( ), generate( ) and generate_n( ) function templates in <algorithm> have been for filling the sequential containers (vector, list and deque) with data. However, these are implemented by using operator= to assign values into the sequential containers, and the way that you add objects to associative containers is with their respective insert( ) member functions. Thus the default “assignment” behavior causes a problem when trying to use the “fill” and “generate” functions with associative containers.
One solution is to duplicate the “fill” and “generate” functions, creating new ones that can be used with associative containers. It turns out that only the fill_n( ) and generate_n( ) functions can be duplicated (fill( ) and generate( ) copy in between two iterators, which doesn’t make sense with associative containers), but the job is fairly easy, since you have the <algorithm> header file to work from (and since it contains templates, all the source code is there):
//: C04:assocGen.h // The fill_n() and generate_n() equivalents // for associative containers. #ifndef ASSOCGEN_H #define ASSOCGEN_H template<class Assoc, class Count, class T> void assocFill_n(Assoc& a, Count n, const T& val) { while(n-- > 0) a.insert(val); } template<class Assoc, class Count, class Gen> void assocGen_n(Assoc& a, Count n, Gen g) { while(n-- > 0) a.insert(g()); } #endif // ASSOCGEN_H ///:~
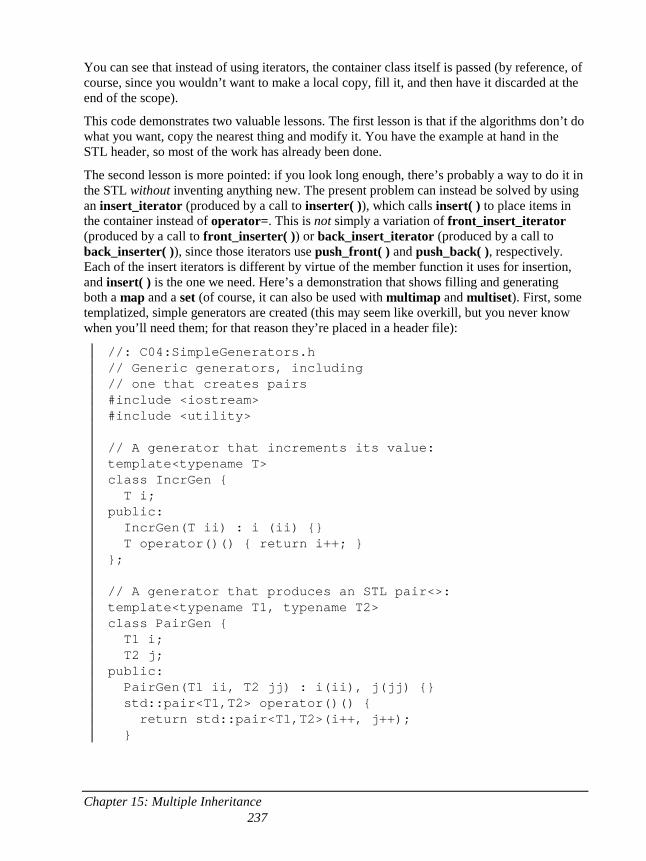
Chapter 15: Multiple Inheritance 237
You can see that instead of using iterators, the container class itself is passed (by reference, of course, since you wouldn’t want to make a local copy, fill it, and then have it discarded at the end of the scope).
This code demonstrates two valuable lessons. The first lesson is that if the algorithms don’t do what you want, copy the nearest thing and modify it. You have the example at hand in the STL header, so most of the work has already been done.
The second lesson is more pointed: if you look long enough, there’s probably a way to do it in the STL without inventing anything new. The present problem can instead be solved by using an insert_iterator (produced by a call to inserter( )), which calls insert( ) to place items in the container instead of operator=. This is not simply a variation of front_insert_iterator (produced by a call to front_inserter( )) or back_insert_iterator (produced by a call to back_inserter( )), since those iterators use push_front( ) and push_back( ), respectively. Each of the insert iterators is different by virtue of the member function it uses for insertion, and insert( ) is the one we need. Here’s a demonstration that shows filling and generating both a map and a set (of course, it can also be used with multimap and multiset). First, some templatized, simple generators are created (this may seem like overkill, but you never know when you’ll need them; for that reason they’re placed in a header file):
//: C04:SimpleGenerators.h // Generic generators, including // one that creates pairs #include <iostream> #include <utility> // A generator that increments its value: template<typename T> class IncrGen { T i; public: IncrGen(T ii) : i (ii) {} T operator()() { return i++; } }; // A generator that produces an STL pair<>: template<typename T1, typename T2> class PairGen { T1 i; T2 j; public: PairGen(T1 ii, T2 jj) : i(ii), j(jj) {} std::pair<T1,T2> operator()() { return std::pair<T1,T2>(i++, j++); }
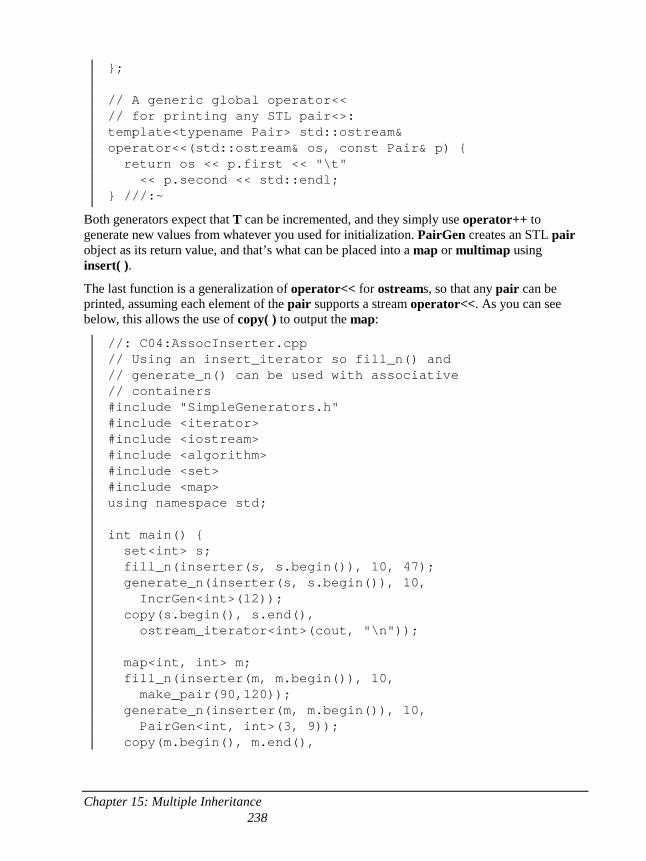
Chapter 15: Multiple Inheritance 238
}; // A generic global operator<< // for printing any STL pair<>: template<typename Pair> std::ostream& operator<<(std::ostream& os, const Pair& p) { return os << p.first << "\t" << p.second << std::endl; } ///:~
Both generators expect that T can be incremented, and they simply use operator++ to generate new values from whatever you used for initialization. PairGen creates an STL pair object as its return value, and that’s what can be placed into a map or multimap using insert( ).
The last function is a generalization of operator<< for ostreams, so that any pair can be printed, assuming each element of the pair supports a stream operator<<. As you can see below, this allows the use of copy( ) to output the map:
//: C04:AssocInserter.cpp // Using an insert_iterator so fill_n() and // generate_n() can be used with associative // containers #include "SimpleGenerators.h" #include <iterator> #include <iostream> #include <algorithm> #include <set> #include <map> using namespace std; int main() { set<int> s; fill_n(inserter(s, s.begin()), 10, 47); generate_n(inserter(s, s.begin()), 10, IncrGen<int>(12)); copy(s.begin(), s.end(), ostream_iterator<int>(cout, "\n")); map<int, int> m; fill_n(inserter(m, m.begin()), 10, make_pair(90,120)); generate_n(inserter(m, m.begin()), 10, PairGen<int, int>(3, 9)); copy(m.begin(), m.end(),
Chapter 15: Multiple Inheritance 239
ostream_iterator<pair<int,int> >(cout,"\n")); } ///:~
The second argument to inserter is an iterator, which actually isn’t used in the case of associative containers since they maintain their order internally, rather than allowing you to tell them where the element should be inserted. However, an insert_iterator can be used with many different types of containers so you must provide the iterator.
Note how the ostream_iterator is created to output a pair; this wouldn’t have worked if the operator<< hadn’t been created, and since it’s a template it is automatically instantiated for pair<int, int>.
The magic of maps An ordinary array uses an integral value to index into a sequential set of elements of some type. A map is an associative array, which means you associate one object with another in an array-like fashion, but instead of selecting an array element with a number as you do with an ordinary array, you look it up with an object! The example which follows counts the words in a text file, so the index is the string object representing the word, and the value being looked up is the object that keeps count of the strings.
In a single-item container like a vector or list, there’s only one thing being held. But in a map, you’ve got two things: the key (what you look up by, as in mapname[key]) and the value that results from the lookup with the key. If you simply want to move through the entire map and list each key-value pair, you use an iterator, which when dereferenced produces a pair object containing both the key and the value. You access the members of a pair by selecting first or second.
This same philosophy of packaging two items together is also used to insert elements into the map, but the pair is created as part of the instantiated map and is called value_type, containing the key and the value. So one option for inserting a new element is to create a value_type object, loading it with the appropriate objects and then calling the insert( ) member function for the map. Instead, the following example makes use of the aforementioned special feature of map: if you’re trying to find an object by passing in a key to operator[ ] and that object doesn’t exist, operator[ ] will automatically insert a new key-value pair for you, using the default constructor for the value object. With that in mind, consider an implementation of a word counting program:
//: C04:WordCount.cpp //{L} StreamTokenizer // Count occurrences of words using a map #include "StreamTokenizer.h" #include "../require.h" #include <string> #include <map> #include <iostream>
Chapter 15: Multiple Inheritance 240
#include <fstream> using namespace std; class Count { int i; public: Count() : i(0) {} void operator++(int) { i++; } // Post-increment int& val() { return i; } }; typedef map<string, Count> WordMap; typedef WordMap::iterator WMIter; int main(int argc, char* argv[]) { requireArgs(argc, 1); ifstream in(argv[1]); assure(in, argv[1]); StreamTokenizer words(in); WordMap wordmap; string word; while((word = words.next()).size() != 0) wordmap[word]++; for(WMIter w = wordmap.begin(); w != wordmap.end(); w++) cout << (*w).first << ": " << (*w).second.val() << endl; } ///:~
The need for the Count class is to contain an int that’s automatically initialized to zero. This is necessary because of the crucial line:
wordmap[word]++;
This finds the word that has been produced by StreamTokenizer and increments the Count object associated with that word, which is fine as long as there is a key-value pair for that string. If there isn’t, the map automatically inserts a key for the word you’re looking up, and a Count object, which is initialized to zero by the default constructor. Thus, when it’s incremented the Count becomes 1.
Printing the entire list requires traversing it with an iterator (there’s no copy( ) shortcut for a map unless you want to write an operator<< for the pair in the map). As previously mentioned, dereferencing this iterator produces a pair object, with the first member the key and the second member the value. In this case second is a Count object, so its val( ) member must be called to produce the actual word count.
Chapter 15: Multiple Inheritance 241
If you want to find the count for a particular word, you can use the array index operator, like this:
cout << "the: " << wordmap["the"].val() << endl;
You can see that one of the great advantages of the map is the clarity of the syntax; an associative array makes intuitive sense to the reader (note, however, that if “the” isn’t already in the wordmap a new entry will be created!).
A command-line argument tool A problem that often comes up in programming is the management of program arguments that you can specify on the command line. Usually you’d like to have a set of defaults that can be changed via the command line. The following tool expects the command line arguments to be in the form flag1=value1 with no spaces around the ‘=‘ (so it will be treated as a single argument). The ProgVal class simply inherits from map<string, string>:
//: C04:ProgVals.h // Program values can be changed by command line #ifndef PROGVALS_H #define PROGVALS_H #include <map> #include <iostream> #include <string> class ProgVals : public std::map<std::string, std::string> { public: ProgVals(std::string defaults[][2], int sz); void parse(int argc, char* argv[], std::string usage, int offset = 1); void print(std::ostream& out = std::cout); }; #endif // PROGVALS_H ///:~
The constructor expects an array of string pairs (as you’ll see, this allows you to initialize it with an array of char*) and the size of that array. The parse( ) member function is handed the command-line arguments along with a “usage” string to print if the command line is given incorrectly, and the “offset” which tells it which command-line argument to start with (so you can have non-flag arguments at the beginning of the command line). Finally, print( ) displays the values. Here is the implementation:
//: C04:ProgVals.cpp {O} #include "ProgVals.h" using namespace std; ProgVals::ProgVals(
Chapter 15: Multiple Inheritance 242
std::string defaults[][2], int sz) { for(int i = 0; i < sz; i++) insert(make_pair( defaults[i][0], defaults[i][1])); } void ProgVals::parse(int argc, char* argv[], string usage, int offset) { // Parse and apply additional // command-line arguments: for(int i = offset; i < argc; i++) { string flag(argv[i]); int equal = flag.find('='); if(equal == string::npos) { cerr << "Command line error: " << argv[i] << endl << usage << endl; continue; // Next argument } string name = flag.substr(0, equal); string value = flag.substr(equal + 1); if(find(name) == end()) { cerr << name << endl << usage << endl; continue; // Next argument } operator[](name) = value; } } void ProgVals::print(ostream& out) { out << "Program values:" << endl; for(iterator it = begin(); it != end(); it++) out << (*it).first << " = " << (*it).second << endl; } ///:~
The constructor uses the STL make_pair( ) helper function to convert each pair of char* into a pair object that can be inserted into the map. In parse( ), each command-line argument is checked for the existence of the telltale ‘=‘ sign (reporting an error if it isn’t there), and then is broken into two strings, the name which appears before the ‘=‘, and the value which appears after. The operator[ ] is then used to change the existing value to the new one.
Here’s an example to test the tool:
//: C04:ProgValTest.cpp //{L} ProgVals
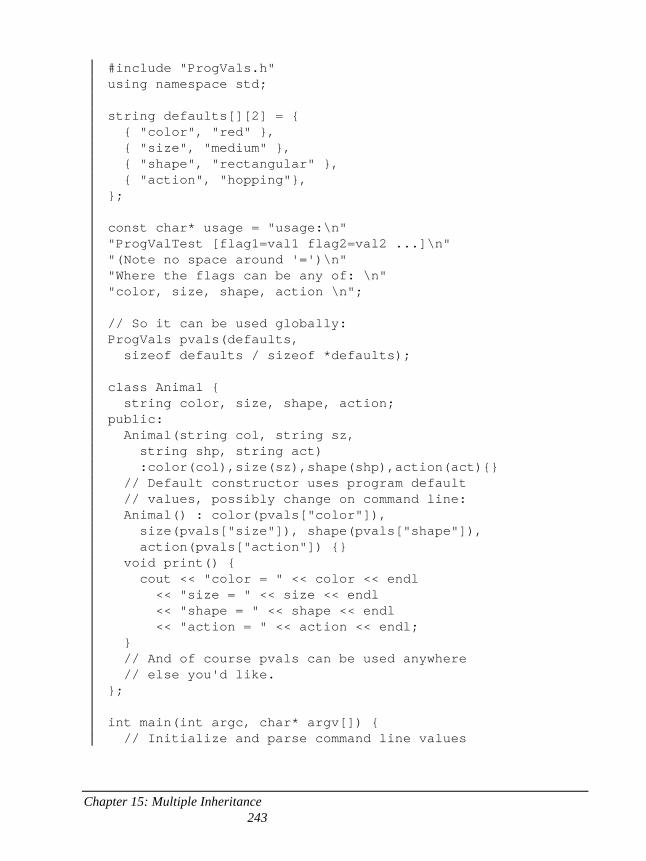
Chapter 15: Multiple Inheritance 243
#include "ProgVals.h" using namespace std; string defaults[][2] = { { "color", "red" }, { "size", "medium" }, { "shape", "rectangular" }, { "action", "hopping"}, }; const char* usage = "usage:\n" "ProgValTest [flag1=val1 flag2=val2 ...]\n" "(Note no space around '=')\n" "Where the flags can be any of: \n" "color, size, shape, action \n"; // So it can be used globally: ProgVals pvals(defaults, sizeof defaults / sizeof *defaults); class Animal { string color, size, shape, action; public: Animal(string col, string sz, string shp, string act) :color(col),size(sz),shape(shp),action(act){} // Default constructor uses program default // values, possibly change on command line: Animal() : color(pvals["color"]), size(pvals["size"]), shape(pvals["shape"]), action(pvals["action"]) {} void print() { cout << "color = " << color << endl << "size = " << size << endl << "shape = " << shape << endl << "action = " << action << endl; } // And of course pvals can be used anywhere // else you'd like. }; int main(int argc, char* argv[]) { // Initialize and parse command line values
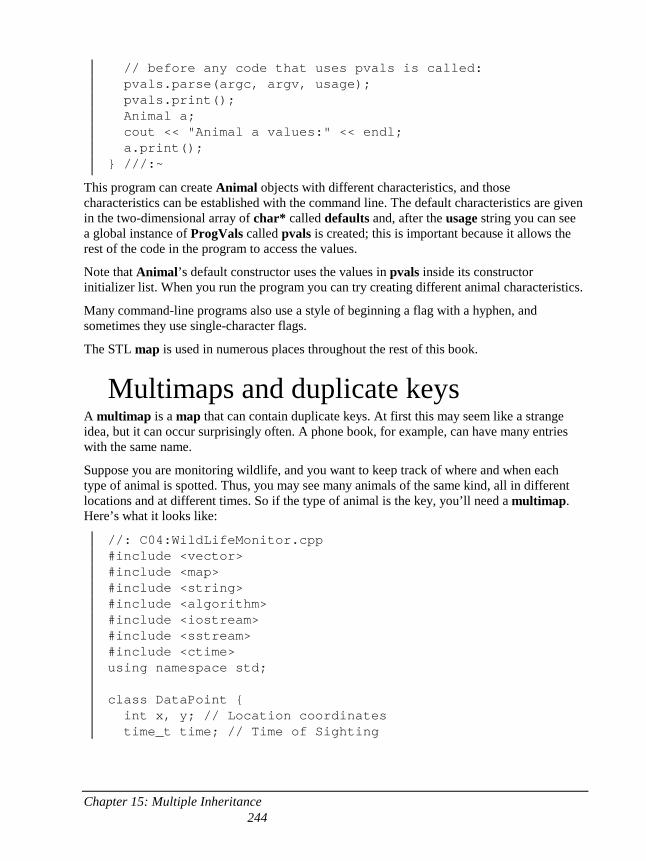
Chapter 15: Multiple Inheritance 244
// before any code that uses pvals is called: pvals.parse(argc, argv, usage); pvals.print(); Animal a; cout << "Animal a values:" << endl; a.print(); } ///:~
This program can create Animal objects with different characteristics, and those characteristics can be established with the command line. The default characteristics are given in the two-dimensional array of char* called defaults and, after the usage string you can see a global instance of ProgVals called pvals is created; this is important because it allows the rest of the code in the program to access the values.
Note that Animal’s default constructor uses the values in pvals inside its constructor initializer list. When you run the program you can try creating different animal characteristics.
Many command-line programs also use a style of beginning a flag with a hyphen, and sometimes they use single-character flags.
The STL map is used in numerous places throughout the rest of this book.
Multimaps and duplicate keys A multimap is a map that can contain duplicate keys. At first this may seem like a strange idea, but it can occur surprisingly often. A phone book, for example, can have many entries with the same name.
Suppose you are monitoring wildlife, and you want to keep track of where and when each type of animal is spotted. Thus, you may see many animals of the same kind, all in different locations and at different times. So if the type of animal is the key, you’ll need a multimap. Here’s what it looks like:
//: C04:WildLifeMonitor.cpp #include <vector> #include <map> #include <string> #include <algorithm> #include <iostream> #include <sstream> #include <ctime> using namespace std; class DataPoint { int x, y; // Location coordinates time_t time; // Time of Sighting
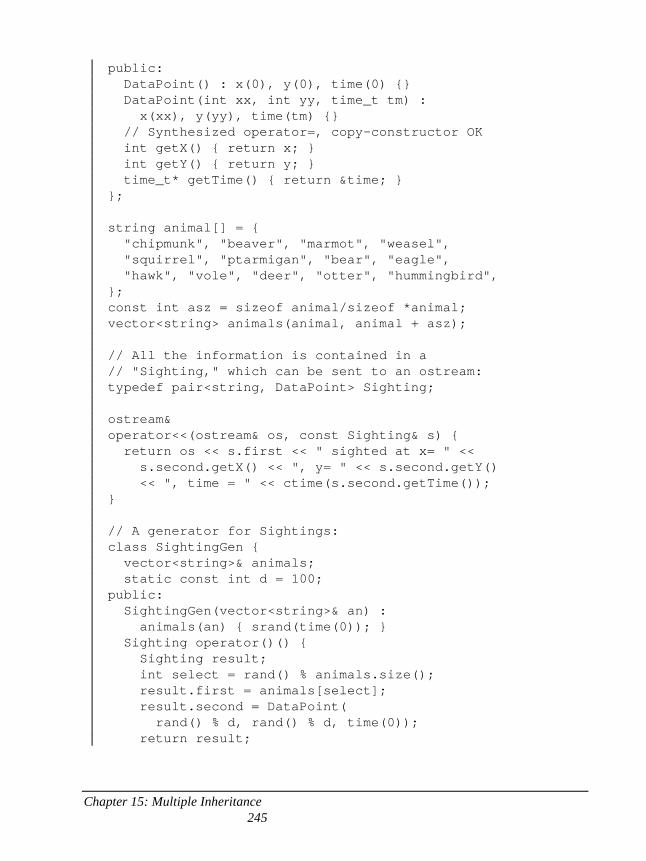
Chapter 15: Multiple Inheritance 245
public: DataPoint() : x(0), y(0), time(0) {} DataPoint(int xx, int yy, time_t tm) : x(xx), y(yy), time(tm) {} // Synthesized operator=, copy-constructor OK int getX() { return x; } int getY() { return y; } time_t* getTime() { return &time; } }; string animal[] = { "chipmunk", "beaver", "marmot", "weasel", "squirrel", "ptarmigan", "bear", "eagle", "hawk", "vole", "deer", "otter", "hummingbird", }; const int asz = sizeof animal/sizeof *animal; vector<string> animals(animal, animal + asz); // All the information is contained in a // "Sighting," which can be sent to an ostream: typedef pair<string, DataPoint> Sighting; ostream& operator<<(ostream& os, const Sighting& s) { return os << s.first << " sighted at x= " << s.second.getX() << ", y= " << s.second.getY() << ", time = " << ctime(s.second.getTime()); } // A generator for Sightings: class SightingGen { vector<string>& animals; static const int d = 100; public: SightingGen(vector<string>& an) : animals(an) { srand(time(0)); } Sighting operator()() { Sighting result; int select = rand() % animals.size(); result.first = animals[select]; result.second = DataPoint( rand() % d, rand() % d, time(0)); return result;
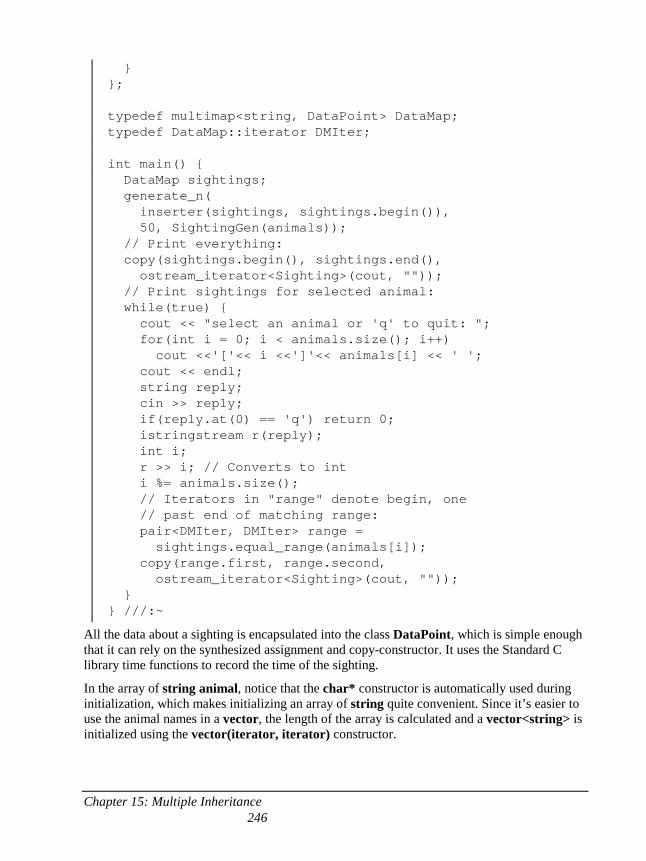
Chapter 15: Multiple Inheritance 246
} }; typedef multimap<string, DataPoint> DataMap; typedef DataMap::iterator DMIter; int main() { DataMap sightings; generate_n( inserter(sightings, sightings.begin()), 50, SightingGen(animals)); // Print everything: copy(sightings.begin(), sightings.end(), ostream_iterator<Sighting>(cout, "")); // Print sightings for selected animal: while(true) { cout << "select an animal or 'q' to quit: "; for(int i = 0; i < animals.size(); i++) cout <<'['<< i <<']'<< animals[i] << ' '; cout << endl; string reply; cin >> reply; if(reply.at(0) == 'q') return 0; istringstream r(reply); int i; r >> i; // Converts to int i %= animals.size(); // Iterators in "range" denote begin, one // past end of matching range: pair<DMIter, DMIter> range = sightings.equal_range(animals[i]); copy(range.first, range.second, ostream_iterator<Sighting>(cout, "")); } } ///:~
All the data about a sighting is encapsulated into the class DataPoint, which is simple enough that it can rely on the synthesized assignment and copy-constructor. It uses the Standard C library time functions to record the time of the sighting.
In the array of string animal, notice that the char* constructor is automatically used during initialization, which makes initializing an array of string quite convenient. Since it’s easier to use the animal names in a vector, the length of the array is calculated and a vector<string> is initialized using the vector(iterator, iterator) constructor.
Chapter 15: Multiple Inheritance 247
The key-value pairs that make up a Sighting are the string which names the type of animal, and the DataPoint that says where and when it was sighted. The standard pair template combines these two types and is typedefed to produce the Sighting type. Then an ostream operator<< is created for Sighting; this will allow you to iterate through a map or multimap of Sightings and print it out.
SightingGen generates random sightings at random data points to use for testing. It has the usual operator( ) necessary for a function object, but it also has a constructor to capture and store a reference to a vector<string>, which is where the aforementioned animal names are stored.
A DataMap is a multimap of string-DataPoint pairs, which means it stores Sightings. It is filled with 50 Sightings using generate_n( ), and printed out (notice that because there is an operator<< that takes a Sighting, an ostream_iterator can be created). At this point the user is asked to select the animal that they want to see all the sightings for. If you press ‘q’ the program will quit, but if you select an animal number, then the equal_range( ) member function is invoked. This returns an iterator (DMIter) to the beginning of the set of matching pairs, and one indicating past-the-end of the set. Since only one object can be returned from a function, equal_range( ) makes use of pair. Since the range pair has the beginning and ending iterators of the matching set, those iterators can be used in copy( ) to print out all the sightings for a particular type of animal.
Multisets You’ve seen the set, which only allows one object of each value to be inserted. The multiset is odd by comparison since it allows more than one object of each value to be inserted. This seems to go against the whole idea of “setness,” where you can ask “is ‘it’ in this set?” If there can be more than one of ‘it’, then what does that question mean?
With some thought, you can see that it makes no sense to have more than one object of the same value in a set if those duplicate objects are exactly the same (with the possible exception of counting occurrences of objects, but as seen earlier in this chapter that can be handled in an alternative, more elegant fashion). Thus each duplicate object will have something that makes it unique from the other duplicates – most likely different state information that is not used in the calculation of the value during the comparison. That is, to the comparison operation, the objects look the same but they actually contain some differing internal state.
Like any STL container that must order its elements, the multiset template uses the less template by default to determine element ordering. This uses the contained classes’ operator<, but you may of course substitute your own comparison function.
Consider a simple class that contains one element that is used in the comparison, and another that is not:
//: C04:MultiSet1.cpp // Demonstration of multiset behavior #include <iostream>
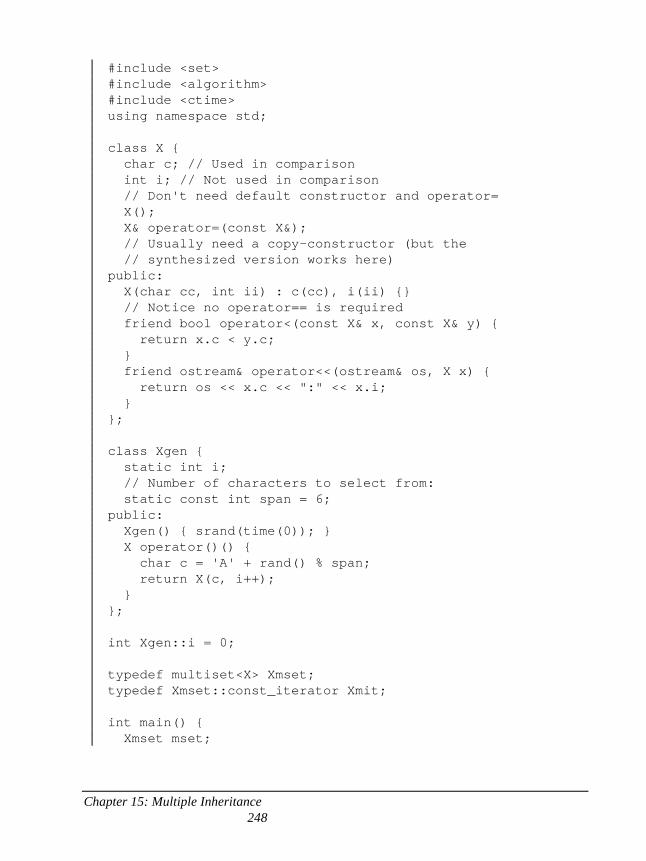
Chapter 15: Multiple Inheritance 248
#include <set> #include <algorithm> #include <ctime> using namespace std; class X { char c; // Used in comparison int i; // Not used in comparison // Don't need default constructor and operator= X(); X& operator=(const X&); // Usually need a copy-constructor (but the // synthesized version works here) public: X(char cc, int ii) : c(cc), i(ii) {} // Notice no operator== is required friend bool operator<(const X& x, const X& y) { return x.c < y.c; } friend ostream& operator<<(ostream& os, X x) { return os << x.c << ":" << x.i; } }; class Xgen { static int i; // Number of characters to select from: static const int span = 6; public: Xgen() { srand(time(0)); } X operator()() { char c = 'A' + rand() % span; return X(c, i++); } }; int Xgen::i = 0; typedef multiset<X> Xmset; typedef Xmset::const_iterator Xmit; int main() { Xmset mset;
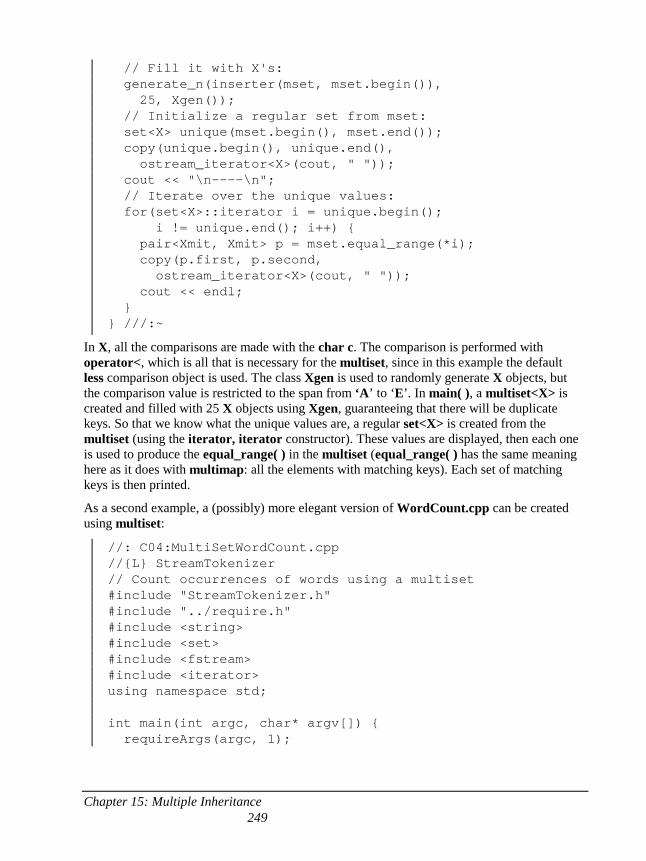
Chapter 15: Multiple Inheritance 249
// Fill it with X's: generate_n(inserter(mset, mset.begin()), 25, Xgen()); // Initialize a regular set from mset: set<X> unique(mset.begin(), mset.end()); copy(unique.begin(), unique.end(), ostream_iterator<X>(cout, " ")); cout << "\n----\n"; // Iterate over the unique values: for(set<X>::iterator i = unique.begin(); i != unique.end(); i++) { pair<Xmit, Xmit> p = mset.equal_range(*i); copy(p.first, p.second, ostream_iterator<X>(cout, " ")); cout << endl; } } ///:~
In X, all the comparisons are made with the char c. The comparison is performed with operator<, which is all that is necessary for the multiset, since in this example the default less comparison object is used. The class Xgen is used to randomly generate X objects, but the comparison value is restricted to the span from ‘A’ to ‘E’. In main( ), a multiset<X> is created and filled with 25 X objects using Xgen, guaranteeing that there will be duplicate keys. So that we know what the unique values are, a regular set<X> is created from the multiset (using the iterator, iterator constructor). These values are displayed, then each one is used to produce the equal_range( ) in the multiset (equal_range( ) has the same meaning here as it does with multimap: all the elements with matching keys). Each set of matching keys is then printed.
As a second example, a (possibly) more elegant version of WordCount.cpp can be created using multiset:
//: C04:MultiSetWordCount.cpp //{L} StreamTokenizer // Count occurrences of words using a multiset #include "StreamTokenizer.h" #include "../require.h" #include <string> #include <set> #include <fstream> #include <iterator> using namespace std; int main(int argc, char* argv[]) { requireArgs(argc, 1);
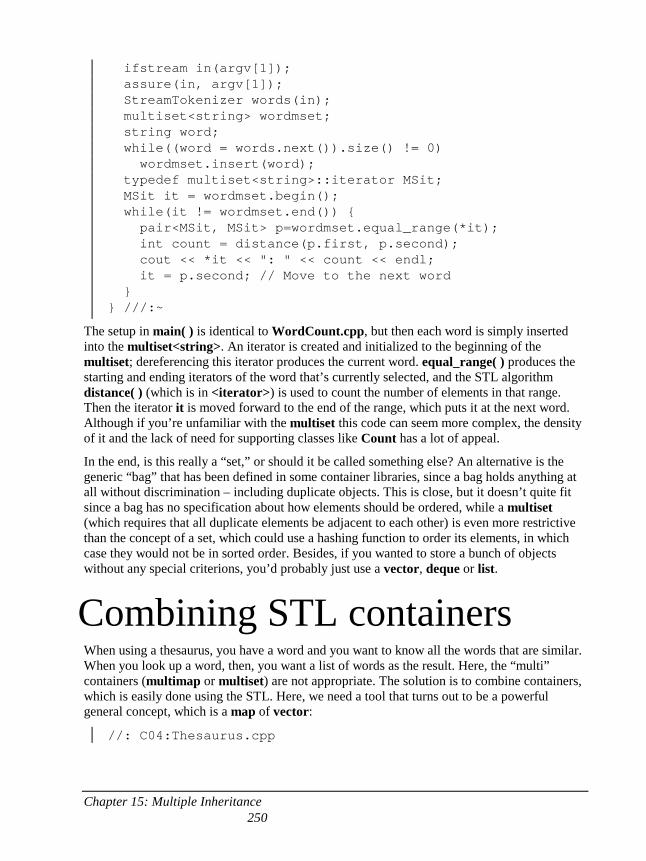
Chapter 15: Multiple Inheritance 250
ifstream in(argv[1]); assure(in, argv[1]); StreamTokenizer words(in); multiset<string> wordmset; string word; while((word = words.next()).size() != 0) wordmset.insert(word); typedef multiset<string>::iterator MSit; MSit it = wordmset.begin(); while(it != wordmset.end()) { pair<MSit, MSit> p=wordmset.equal_range(*it); int count = distance(p.first, p.second); cout << *it << ": " << count << endl; it = p.second; // Move to the next word } } ///:~
The setup in main( ) is identical to WordCount.cpp, but then each word is simply inserted into the multiset<string>. An iterator is created and initialized to the beginning of the multiset; dereferencing this iterator produces the current word. equal_range( ) produces the starting and ending iterators of the word that’s currently selected, and the STL algorithm distance( ) (which is in <iterator>) is used to count the number of elements in that range. Then the iterator it is moved forward to the end of the range, which puts it at the next word. Although if you’re unfamiliar with the multiset this code can seem more complex, the density of it and the lack of need for supporting classes like Count has a lot of appeal.
In the end, is this really a “set,” or should it be called something else? An alternative is the generic “bag” that has been defined in some container libraries, since a bag holds anything at all without discrimination – including duplicate objects. This is close, but it doesn’t quite fit since a bag has no specification about how elements should be ordered, while a multiset (which requires that all duplicate elements be adjacent to each other) is even more restrictive than the concept of a set, which could use a hashing function to order its elements, in which case they would not be in sorted order. Besides, if you wanted to store a bunch of objects without any special criterions, you’d probably just use a vector, deque or list.
Combining STL containers When using a thesaurus, you have a word and you want to know all the words that are similar. When you look up a word, then, you want a list of words as the result. Here, the “multi” containers (multimap or multiset) are not appropriate. The solution is to combine containers, which is easily done using the STL. Here, we need a tool that turns out to be a powerful general concept, which is a map of vector:
//: C04:Thesaurus.cpp
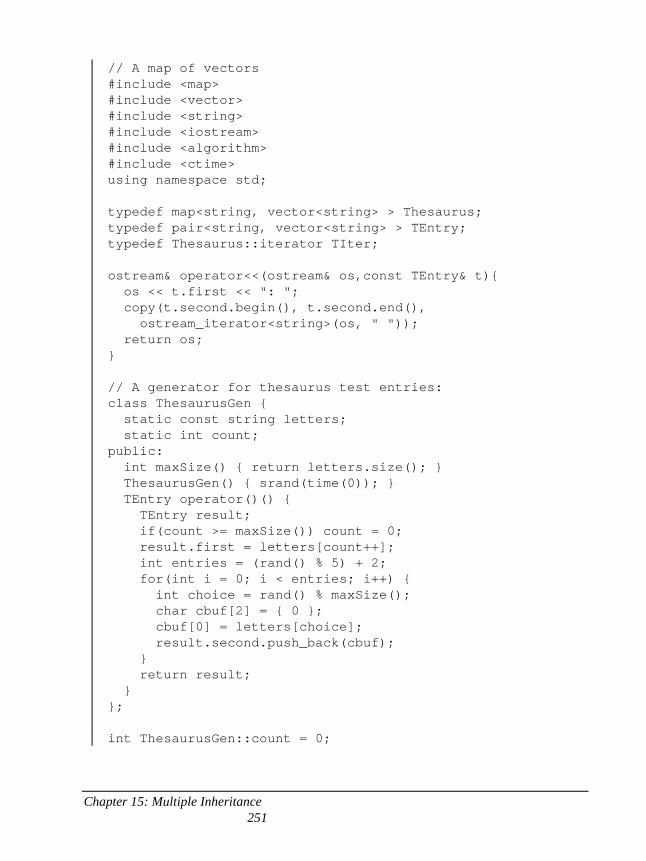
Chapter 15: Multiple Inheritance 251
// A map of vectors #include <map> #include <vector> #include <string> #include <iostream> #include <algorithm> #include <ctime> using namespace std; typedef map<string, vector<string> > Thesaurus; typedef pair<string, vector<string> > TEntry; typedef Thesaurus::iterator TIter; ostream& operator<<(ostream& os,const TEntry& t){ os << t.first << ": "; copy(t.second.begin(), t.second.end(), ostream_iterator<string>(os, " ")); return os; } // A generator for thesaurus test entries: class ThesaurusGen { static const string letters; static int count; public: int maxSize() { return letters.size(); } ThesaurusGen() { srand(time(0)); } TEntry operator()() { TEntry result; if(count >= maxSize()) count = 0; result.first = letters[count++]; int entries = (rand() % 5) + 2; for(int i = 0; i < entries; i++) { int choice = rand() % maxSize(); char cbuf[2] = { 0 }; cbuf[0] = letters[choice]; result.second.push_back(cbuf); } return result; } }; int ThesaurusGen::count = 0;
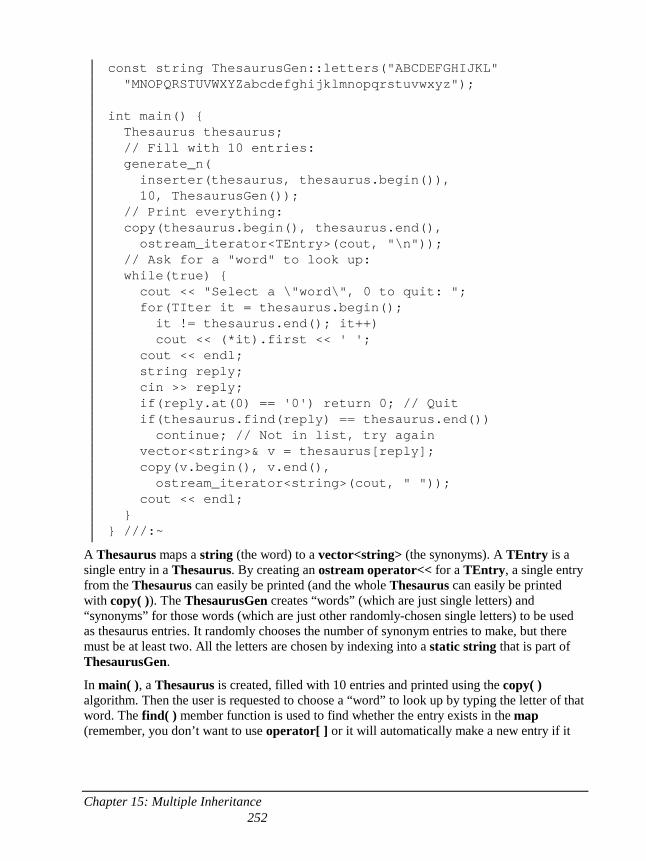
Chapter 15: Multiple Inheritance 252
const string ThesaurusGen::letters("ABCDEFGHIJKL" "MNOPQRSTUVWXYZabcdefghijklmnopqrstuvwxyz"); int main() { Thesaurus thesaurus; // Fill with 10 entries: generate_n( inserter(thesaurus, thesaurus.begin()), 10, ThesaurusGen()); // Print everything: copy(thesaurus.begin(), thesaurus.end(), ostream_iterator<TEntry>(cout, "\n")); // Ask for a "word" to look up: while(true) { cout << "Select a \"word\", 0 to quit: "; for(TIter it = thesaurus.begin(); it != thesaurus.end(); it++) cout << (*it).first << ' '; cout << endl; string reply; cin >> reply; if(reply.at(0) == '0') return 0; // Quit if(thesaurus.find(reply) == thesaurus.end()) continue; // Not in list, try again vector<string>& v = thesaurus[reply]; copy(v.begin(), v.end(), ostream_iterator<string>(cout, " ")); cout << endl; } } ///:~
A Thesaurus maps a string (the word) to a vector<string> (the synonyms). A TEntry is a single entry in a Thesaurus. By creating an ostream operator<< for a TEntry, a single entry from the Thesaurus can easily be printed (and the whole Thesaurus can easily be printed with copy( )). The ThesaurusGen creates “words” (which are just single letters) and “synonyms” for those words (which are just other randomly-chosen single letters) to be used as thesaurus entries. It randomly chooses the number of synonym entries to make, but there must be at least two. All the letters are chosen by indexing into a static string that is part of ThesaurusGen.
In main( ), a Thesaurus is created, filled with 10 entries and printed using the copy( ) algorithm. Then the user is requested to choose a “word” to look up by typing the letter of that word. The find( ) member function is used to find whether the entry exists in the map (remember, you don’t want to use operator[ ] or it will automatically make a new entry if it
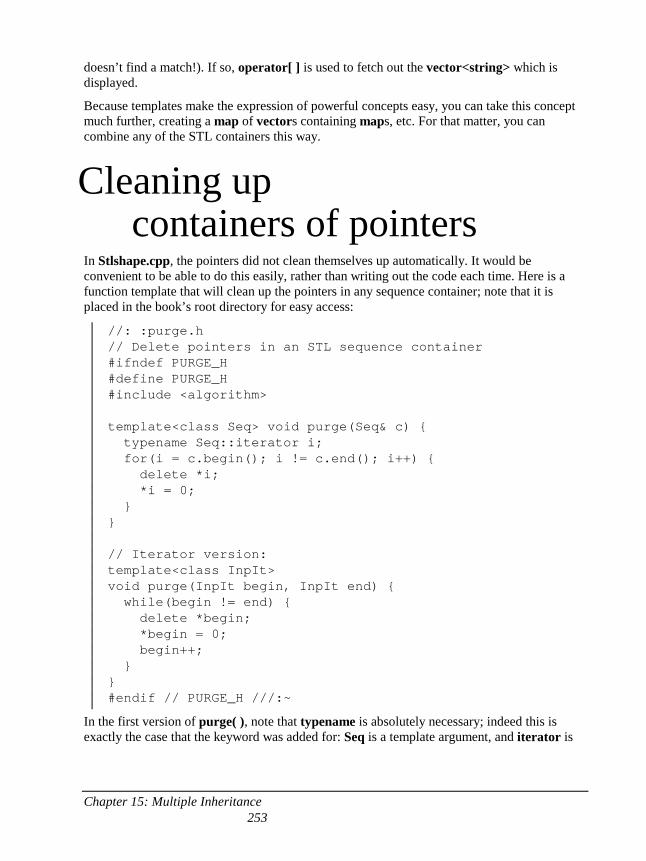
Chapter 15: Multiple Inheritance 253
doesn’t find a match!). If so, operator[ ] is used to fetch out the vector<string> which is displayed.
Because templates make the expression of powerful concepts easy, you can take this concept much further, creating a map of vectors containing maps, etc. For that matter, you can combine any of the STL containers this way.
Cleaning up containers of pointers
In Stlshape.cpp, the pointers did not clean themselves up automatically. It would be convenient to be able to do this easily, rather than writing out the code each time. Here is a function template that will clean up the pointers in any sequence container; note that it is placed in the book’s root directory for easy access:
//: :purge.h // Delete pointers in an STL sequence container #ifndef PURGE_H #define PURGE_H #include <algorithm> template<class Seq> void purge(Seq& c) { typename Seq::iterator i; for(i = c.begin(); i != c.end(); i++) { delete *i; *i = 0; } } // Iterator version: template<class InpIt> void purge(InpIt begin, InpIt end) { while(begin != end) { delete *begin; *begin = 0; begin++; } } #endif // PURGE_H ///:~
In the first version of purge( ), note that typename is absolutely necessary; indeed this is exactly the case that the keyword was added for: Seq is a template argument, and iterator is
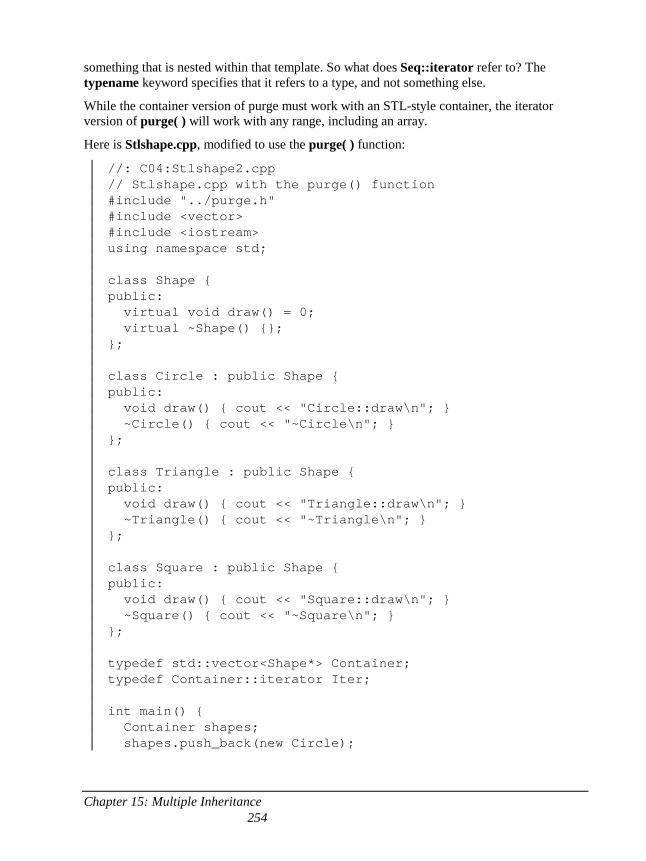
Chapter 15: Multiple Inheritance 254
something that is nested within that template. So what does Seq::iterator refer to? The typename keyword specifies that it refers to a type, and not something else.
While the container version of purge must work with an STL-style container, the iterator version of purge( ) will work with any range, including an array.
Here is Stlshape.cpp, modified to use the purge( ) function:
//: C04:Stlshape2.cpp // Stlshape.cpp with the purge() function #include "../purge.h" #include <vector> #include <iostream> using namespace std; class Shape { public: virtual void draw() = 0; virtual ~Shape() {}; }; class Circle : public Shape { public: void draw() { cout << "Circle::draw\n"; } ~Circle() { cout << "~Circle\n"; } }; class Triangle : public Shape { public: void draw() { cout << "Triangle::draw\n"; } ~Triangle() { cout << "~Triangle\n"; } }; class Square : public Shape { public: void draw() { cout << "Square::draw\n"; } ~Square() { cout << "~Square\n"; } }; typedef std::vector<Shape*> Container; typedef Container::iterator Iter; int main() { Container shapes; shapes.push_back(new Circle);
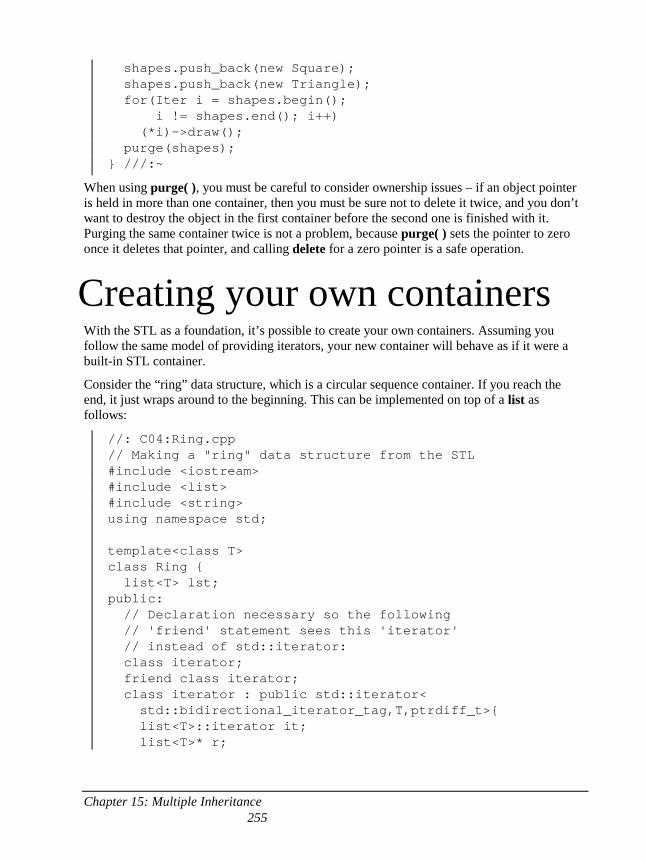
Chapter 15: Multiple Inheritance 255
shapes.push_back(new Square); shapes.push_back(new Triangle); for(Iter i = shapes.begin(); i != shapes.end(); i++) (*i)->draw(); purge(shapes); } ///:~
When using purge( ), you must be careful to consider ownership issues – if an object pointer is held in more than one container, then you must be sure not to delete it twice, and you don’t want to destroy the object in the first container before the second one is finished with it. Purging the same container twice is not a problem, because purge( ) sets the pointer to zero once it deletes that pointer, and calling delete for a zero pointer is a safe operation.
Creating your own containers With the STL as a foundation, it’s possible to create your own containers. Assuming you follow the same model of providing iterators, your new container will behave as if it were a built-in STL container.
Consider the “ring” data structure, which is a circular sequence container. If you reach the end, it just wraps around to the beginning. This can be implemented on top of a list as follows:
//: C04:Ring.cpp // Making a "ring" data structure from the STL #include <iostream> #include <list> #include <string> using namespace std; template<class T> class Ring { list<T> lst; public: // Declaration necessary so the following // 'friend' statement sees this 'iterator' // instead of std::iterator: class iterator; friend class iterator; class iterator : public std::iterator< std::bidirectional_iterator_tag,T,ptrdiff_t>{ list<T>::iterator it; list<T>* r;
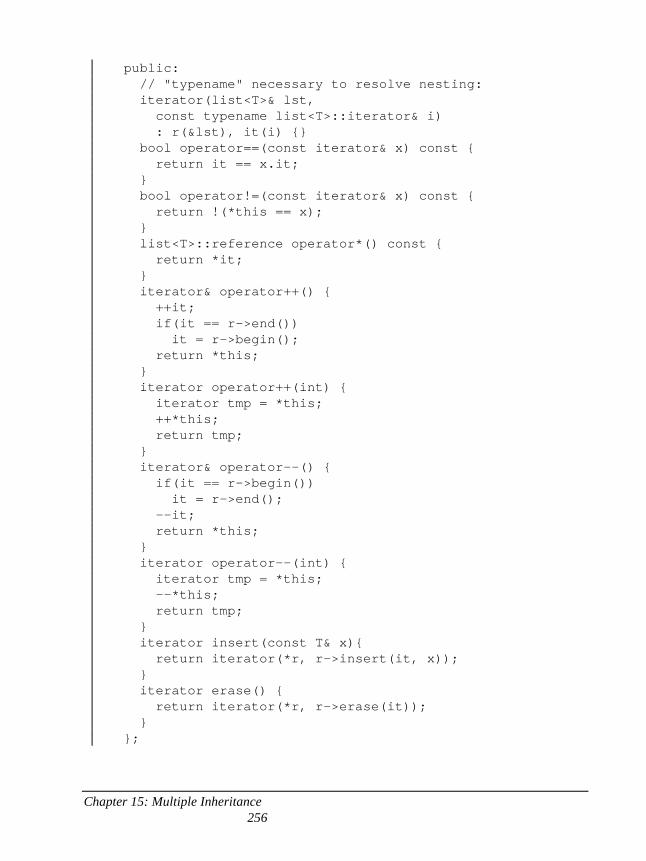
Chapter 15: Multiple Inheritance 256
public: // "typename" necessary to resolve nesting: iterator(list<T>& lst, const typename list<T>::iterator& i) : r(&lst), it(i) {} bool operator==(const iterator& x) const { return it == x.it; } bool operator!=(const iterator& x) const { return !(*this == x); } list<T>::reference operator*() const { return *it; } iterator& operator++() { ++it; if(it == r->end()) it = r->begin(); return *this; } iterator operator++(int) { iterator tmp = *this; ++*this; return tmp; } iterator& operator--() { if(it == r->begin()) it = r->end(); --it; return *this; } iterator operator--(int) { iterator tmp = *this; --*this; return tmp; } iterator insert(const T& x){ return iterator(*r, r->insert(it, x)); } iterator erase() { return iterator(*r, r->erase(it)); } };

Chapter 15: Multiple Inheritance 257
void push_back(const T& x) { lst.push_back(x); } iterator begin() { return iterator(lst, lst.begin()); } int size() { return lst.size(); } }; int main() { Ring<string> rs; rs.push_back("one"); rs.push_back("two"); rs.push_back("three"); rs.push_back("four"); rs.push_back("five"); Ring<string>::iterator it = rs.begin(); it++; it++; it.insert("six"); it = rs.begin(); // Twice around the ring: for(int i = 0; i < rs.size() * 2; i++) cout << *it++ << endl; } ///:~
You can see that the iterator is where most of the coding is done. The Ring iterator must know how to loop back to the beginning, so it must keep a reference to the list of its “parent” Ring object in order to know if it’s at the end and how to get back to the beginning.
You’ll notice that the interface for Ring is quite limited; in particular there is no end( ), since a ring just keeps looping. This means that you won’t be able to use a Ring in any STL algorithms that require a past-the-end iterator – which is many of them. (It turns out that adding this feature is a non-trivial exercise). Although this can seem limiting, consider stack, queue and priority_queue, which don’t produce any iterators at all!
Freely-available STL extensions
Although the STL containers may provide all the functionality you’ll ever need, they are not complete. For example, the standard implementations of set and map use trees, and although these are reasonably fast they may not be fast enough for your needs. In the C++ Standards Committee it was generally agreed that hashed implementations of set and map should have
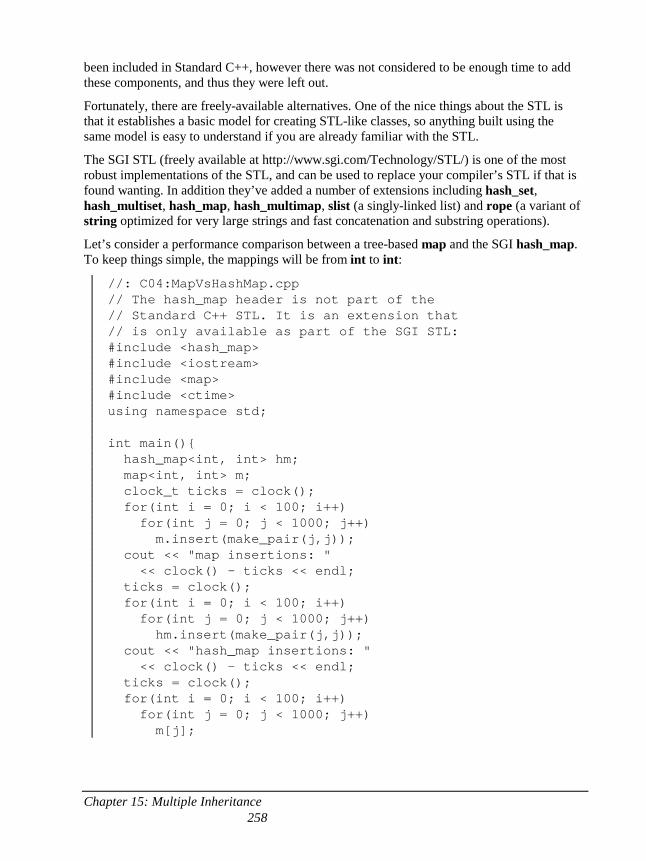
Chapter 15: Multiple Inheritance 258
been included in Standard C++, however there was not considered to be enough time to add these components, and thus they were left out.
Fortunately, there are freely-available alternatives. One of the nice things about the STL is that it establishes a basic model for creating STL-like classes, so anything built using the same model is easy to understand if you are already familiar with the STL.
The SGI STL (freely available at http://www.sgi.com/Technology/STL/) is one of the most robust implementations of the STL, and can be used to replace your compiler’s STL if that is found wanting. In addition they’ve added a number of extensions including hash_set, hash_multiset, hash_map, hash_multimap, slist (a singly-linked list) and rope (a variant of string optimized for very large strings and fast concatenation and substring operations).
Let’s consider a performance comparison between a tree-based map and the SGI hash_map. To keep things simple, the mappings will be from int to int:
//: C04:MapVsHashMap.cpp // The hash_map header is not part of the // Standard C++ STL. It is an extension that // is only available as part of the SGI STL: #include <hash_map> #include <iostream> #include <map> #include <ctime> using namespace std; int main(){ hash_map<int, int> hm; map<int, int> m; clock_t ticks = clock(); for(int i = 0; i < 100; i++) for(int j = 0; j < 1000; j++) m.insert(make_pair(j,j)); cout << "map insertions: " << clock() - ticks << endl; ticks = clock(); for(int i = 0; i < 100; i++) for(int j = 0; j < 1000; j++) hm.insert(make_pair(j,j)); cout << "hash_map insertions: " << clock() - ticks << endl; ticks = clock(); for(int i = 0; i < 100; i++) for(int j = 0; j < 1000; j++) m[j];
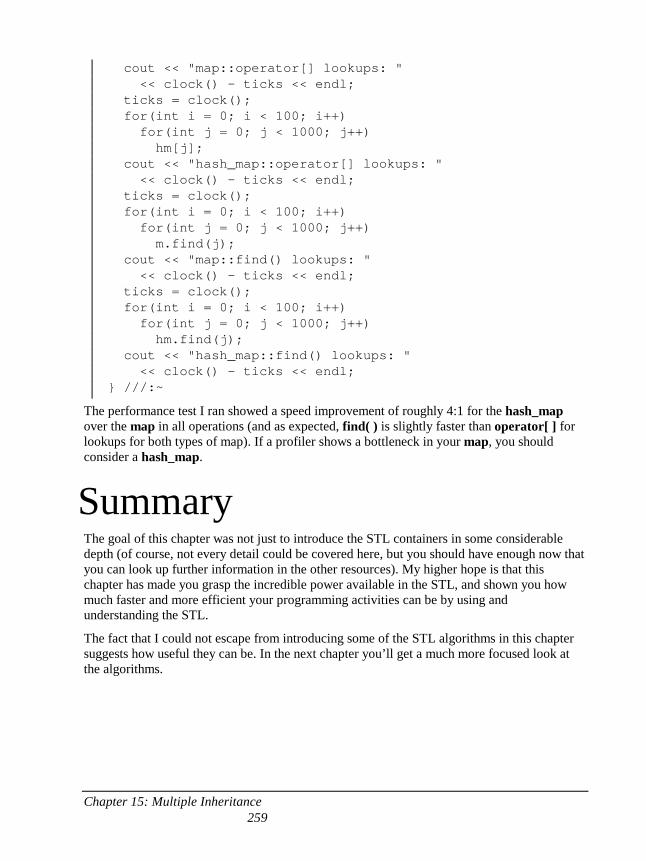
Chapter 15: Multiple Inheritance 259
cout << "map::operator[] lookups: " << clock() - ticks << endl; ticks = clock(); for(int i = 0; i < 100; i++) for(int j = 0; j < 1000; j++) hm[j]; cout << "hash_map::operator[] lookups: " << clock() - ticks << endl; ticks = clock(); for(int i = 0; i < 100; i++) for(int j = 0; j < 1000; j++) m.find(j); cout << "map::find() lookups: " << clock() - ticks << endl; ticks = clock(); for(int i = 0; i < 100; i++) for(int j = 0; j < 1000; j++) hm.find(j); cout << "hash_map::find() lookups: " << clock() - ticks << endl; } ///:~
The performance test I ran showed a speed improvement of roughly 4:1 for the hash_map over the map in all operations (and as expected, find( ) is slightly faster than operator[ ] for lookups for both types of map). If a profiler shows a bottleneck in your map, you should consider a hash_map.
Summary The goal of this chapter was not just to introduce the STL containers in some considerable depth (of course, not every detail could be covered here, but you should have enough now that you can look up further information in the other resources). My higher hope is that this chapter has made you grasp the incredible power available in the STL, and shown you how much faster and more efficient your programming activities can be by using and understanding the STL.
The fact that I could not escape from introducing some of the STL algorithms in this chapter suggests how useful they can be. In the next chapter you’ll get a much more focused look at the algorithms.
Chapter 15: Multiple Inheritance 260
Exercises 1. Create a set<char>, then open a file (whose name is provided on the
command line) and read that file in a char at a time, placing each char in the set. Print the results and observe the organization, and whether there are any letters in the alphabet that are not used in that particular file.
2. Create a kind of “hangman” game. Create a class that contains a char and a bool to indicate whether that char has been guessed yet. Randomly select a word from a file, and read it into a vector of your new type. Repeatedly ask the user for a character guess, and after each guess display the characters in the word that have been guessed, and underscores for the characters that haven’t. Allow a way for the user to guess the whole word. Decrement a value for each guess, and if the user can get the whole word before the value goes to zero, they win.
3. Modify WordCount.cpp so that it uses insert( ) instead of operator[ ] to insert elements in the map.
4. Modify WordCount.cpp so that it uses a multimap instead of a map. 5. Create a generator that produces random int values between 0 and 20. Use
this to fill a multiset<int>. Count the occurrences of each value, following the example given in MultiSetWordCount.cpp.
6. Change StlShape.cpp so that it uses a deque instead of a vector. 7. Modify Reversible.cpp so it works with deque and list instead of vector. 8. Modify Progvals.h and ProgVals.cpp so that they expect leading hyphens
to distinguish command-line arguments. 9. Create a second version of Progvals.h and ProgVals.cpp that uses a set
instead of a map to manage single-character flags on the command line (such as -a -b -c etc) and also allows the characters to be ganged up behind a single hyphen (such as -abc).
10. Use a stack<int> and build a Fibonacci sequence on the stack. The program’s command line should take the number of Fibonacci elements desired, and you should have a loop that looks at the last two elements on the stack and pushes a new one for every pass through the loop.
11. Open a text file whose name is provided on the command line. Read the file a word at a time (hint: use >>) and use a multiset<string> to create a word count for each word.
12. Modify BankTeller.cpp so that the policy that decides when a teller is added or removed is encapsulated inside a class.
13. Create two classes A and B (feel free to choose more interesting names). Create a multimap<A, B> and fill it with key-value pairs, ensuring that there are some duplicate keys. Use equal_range( ) to discover and print a
Chapter 15: Multiple Inheritance 261
range of objects with duplicate keys. Note you may have to add some functions in A and/or B to make this program work.
14. Perform the above exercise for a multiset<A>. 15. Create a class that has an operator< and an ostream& operator<<. The
class should contain a priority number. Create a generator for your class that makes a random priority number. Fill a priority_queue using your generator, then pull the elements out to show they are in the proper order.
16. Rewrite Ring.cpp so it uses a deque instead of a list for its underlying implementation.
17. Modify Ring.cpp so that the underlying implementation can be chosen using a template argument (let that template argument default to list).
18. Open a file and read it into a single string. Turn the string into a stringstream. Read tokens from the stringstream into a list<string> using a TokenIterator.
19. Compare the performance of stack based on whether it is implemented with vector, deque or list.
20. Create an iterator class called BitBucket that just absorbs whatever you send to it without writing it anywhere.
21. Create a template that implements a singly-linked list called SList. Provide a default constructor, begin( ) and end( ) functions (thus you must create the appropriate nested iterator), insert( ), erase( ) and a destructor.
22. (More challenging) Create a little command language. Each command can simply print its name and its arguments, but you may also want to make it perform other activities like run programs. The commands will be read from a file that you pass as an command-line argument, or from standard input if no file is given. Each command is on a single line, and lines beginning with ‘#’ are comments. A line begins with the one-word command itself, followed by any number of arguments. Commands and arguments are separated by spaces. Use a map that maps string objects (the name of the command) to object pointers. The object pointers point to objects of a base class Command that has a virtual execute(string args) function, where args contains all the arguments for that command (execute( ) will parse its own arguments from args). Each different type of command is represented by a class that is inherited from Command.
23. Add features to the above exercise so that you can have labels, if-then statements, and the ability to jump program execution to a label.

263
5: STL Algorithms The other half of the STL is the algorithms, which are templatized functions designed to work with the containers (or, as you will see, anything that can behave like a container, including arrays and string objects).
The STL was originally designed around the algorithms. The goal was that you use algorithms for almost every piece of code that you write. In this sense it was a bit of an experiment, and only time will tell how well it works. The real test will be in how easy or difficult it is for the average programmer to adapt. At the end of this chapter you’ll be able to decide for yourself whether you find the algorithms addictive or too confusing to remember. If you’re like me, you’ll resist them at first but then tend to use them more and more.
Before you make your judgment, however, there’s one other thing to consider. The STL algorithms provide a vocabulary with which to describe solutions. That is, once you become familiar with the algorithms you’ll have a new set of words with which to discuss what you’re doing, and these words are at a higher level than what you’ve had before. You don’t have to say “this loop moves through and assigns from here to there … oh, I see, it’s copying!” Instead, you say copy( ). This is the kind of thing we’ve been doing in computer programming from the beginning – creating more dense ways to express what we’re doing and spending less time saying how we’re doing it. Whether the STL algorithms and generic programming are a great success in accomplishing this remains to be seen, but that is certainly the objective.
Function objects A concept that is used heavily in the STL algorithms is the function object, which was introduced in the previous chapter. A function object has an overloaded operator( ), and the result is that a template function can’t tell whether you’ve handed it a pointer to a function or an object that has an operator( ); all the template function knows is that it can attach an argument list to the object as if it were a pointer to a function:
//: C05:FuncObject.cpp // Simple function objects #include <iostream> using namespace std;
Chapter 15: Multiple Inheritance 264
template<class UnaryFunc, class T> void callFunc(T& x, UnaryFunc f) { f(x); } void g(int& x) { x = 47; } struct UFunc { void operator()(int& x) { x = 48; } }; int main() { int y = 0; callFunc(y, g); cout << y << endl; y = 0; callFunc(y, UFunc()); cout << y << endl; } ///:~
The template callFunc( ) says “give me an f and an x, and I’ll write the code f(x).” In main( ), you can see that it doesn’t matter if f is a pointer to a function (as in the case of g( )), or if it’s a function object (which is created as a temporary object by the expression UFunc( )). Notice you can only accomplish this genericity with a template function; a non-template function is too particular about its argument types to allow such a thing. The STL algorithms use this flexibility to take either a function pointer or a function object, but you’ll usually find that creating a function object is more powerful and flexible.
The function object is actually a variation on the theme of a callback, which is described in the design patterns chapter. A callback allows you to vary the behavior of a function or object by passing, as an argument, a way to execute some other piece of code. Here, we are handing callFunc( ) a pointer to a function or a function object.
The following descriptions of function objects should not only make that topic clear, but also give you an introduction to the way the STL algorithms work.
Classification of function objects Just as the STL classifies iterators (based on their capabilities), it also classifies function objects based on the number of arguments that their operator( ) takes and the kind of value returned by that operator (of course, this is also true for function pointers when you treat them
Chapter 15: Multiple Inheritance 265
as function objects). The classification of function objects in the STL is based on whether the operator( ) takes zero, one or two arguments, and if it returns a bool or non-bool value.
Generator: Takes no arguments, and returns a value of the desired type. A RandomNumberGenerator is a special case.
UnaryFunction: Takes a single argument of any type and returns a value which may be of a different type.
BinaryFunction: Takes two arguments of any two types and returns a value of any type.
A special case of the unary and binary functions is the predicate, which simply means a function that returns a bool. A predicate is a function you use to make a true/false decision.
Predicate: This can also be called a UnaryPredicate. It takes a single argument of any type and returns a bool.
BinaryPredicate: Takes two arguments of any two types and returns a bool.
StrictWeakOrdering: A binary predicate that says that if you have two objects and neither one is less than the other, they can be regarded as equivalent to each other.
In addition, there are sometimes qualifications on object types that are passed to an algorithm. These qualifications are given in the template argument type identifier name:
LessThanComparable: A class that has a less-than operator<.
Assignable: A class that has an assignment operator= for its own type.
EqualityComparable: A class that has an equivalence operator== for its own type.
Automatic creation of function objects The STL has, in the header file <functional>, a set of templates that will automatically create function objects for you. These generated function objects are admittedly simple, but the goal is to provide very basic functionality that will allow you to compose more complicated function objects, and in many situations this is all you’ll need. Also, you’ll see that there are some function object adapters that allow you to take the simple function objects and make them slightly more complicated.
Here are the templates that generate function objects, along with the expressions that they effect.
Name Type Result produced by generated function object
plus BinaryFunction arg1 + arg2
minus BinaryFunction arg1 - arg2
multiplies BinaryFunction arg1 * arg2
Chapter 15: Multiple Inheritance 266
Name Type Result produced by generated function object
divides BinaryFunction arg1 / arg2
modulus BinaryFunction arg1 % arg2
negate UnaryFunction - arg1
equal_to BinaryPredicate arg1 == arg2
not_equal_to BinaryPredicate arg1 != arg2
greater BinaryPredicate arg1 > arg2
less BinaryPredicate arg1 < arg2
greater_equal BinaryPredicate arg1 >= arg2
less_equal BinaryPredicate arg1 <= arg2
logical_and BinaryPredicate arg1 && arg2
logical_or BinaryPredicate arg1 || arg2
logical_not UnaryPredicate !arg1
not1( ) Unary Logical !(UnaryPredicate(arg1))
not2( ) Binary Logical !(BinaryPredicate(arg1, arg2))
The following example provides simple tests for each of the built-in basic function object templates. This way, you can see how to use each one, along with their resulting behavior.
//: C05:FunctionObjects.cpp // Using the predefined function object templates // in the Standard C++ library // This will be defined shortly: #include "Generators.h" #include <algorithm> #include <vector> #include <iostream> #include <functional> using namespace std; template<typename T> void print(vector<T>& v, char* msg = "") { if(*msg != 0) cout << msg << ":" << endl;
Chapter 15: Multiple Inheritance 267
copy(v.begin(), v.end(), ostream_iterator<T>(cout, " ")); cout << endl; } template<typename Contain, typename UnaryFunc> void testUnary(Contain& source, Contain& dest, UnaryFunc f) { transform(source.begin(), source.end(), dest.begin(), f); } template<typename Contain1, typename Contain2, typename BinaryFunc> void testBinary(Contain1& src1, Contain1& src2, Contain2& dest, BinaryFunc f) { transform(src1.begin(), src1.end(), src2.begin(), dest.begin(), f); } // Executes the expression, then stringizes the // expression into the print statement: #define T(EXPR) EXPR; print(r, "After " #EXPR); // For Boolean tests: #define B(EXPR) EXPR; print(br,"After " #EXPR); // Boolean random generator: struct BRand { BRand() { srand(time(0)); } bool operator()() { return rand() > RAND_MAX / 2; } }; int main() { const int sz = 10; const int max = 50; vector<int> x(sz), y(sz), r(sz); // An integer random number generator: URandGen urg(max); generate_n(x.begin(), sz, urg); generate_n(y.begin(), sz, urg); // Add one to each to guarantee nonzero divide:

Chapter 15: Multiple Inheritance 268
transform(y.begin(), y.end(), y.begin(), bind2nd(plus<int>(), 1)); // Guarantee one pair of elements is ==: x[0] = y[0]; print(x, "x"); print(y, "y"); // Operate on each element pair of x & y, // putting the result into r: T(testBinary(x, y, r, plus<int>())); T(testBinary(x, y, r, minus<int>())); T(testBinary(x, y, r, multiplies<int>())); T(testBinary(x, y, r, divides<int>())); T(testBinary(x, y, r, modulus<int>())); T(testUnary(x, r, negate<int>())); vector<bool> br(sz); // For Boolean results B(testBinary(x, y, br, equal_to<int>())); B(testBinary(x, y, br, not_equal_to<int>())); B(testBinary(x, y, br, greater<int>())); B(testBinary(x, y, br, less<int>())); B(testBinary(x, y, br, greater_equal<int>())); B(testBinary(x, y, br, less_equal<int>())); B(testBinary(x, y, br, not2(greater_equal<int>()))); B(testBinary(x,y,br,not2(less_equal<int>()))); vector<bool> b1(sz), b2(sz); generate_n(b1.begin(), sz, BRand()); generate_n(b2.begin(), sz, BRand()); print(b1, "b1"); print(b2, "b2"); B(testBinary(b1, b2, br, logical_and<int>())); B(testBinary(b1, b2, br, logical_or<int>())); B(testUnary(b1, br, logical_not<int>())); B(testUnary(b1, br, not1(logical_not<int>()))); } ///:~
To keep this example small, some tools are created. The print( ) template is designed to print any vector<T>, along with an optional message. Since print( ) uses the STL copy( ) algorithm to send objects to cout via an ostream_iterator, the ostream_iterator must know the type of object it is printing, and therefore the print( ) template must know this type also. However, you’ll see in main( ) that the compiler can deduce the type of T when you hand it a vector<T>, so you don’t have to hand it the template argument explicitly; you just say print(x) to print the vector<T> x.
Chapter 15: Multiple Inheritance 269
The next two template functions automate the process of testing the various function object templates. There are two since the function objects are either unary or binary. In testUnary( ), you pass a source and destination vector, and a unary function object to apply to the source vector to produce the destination vector. In testBinary( ), there are two source vectors which are fed to a binary function to produce the destination vector. In both cases, the template functions simply turn around and call the transform( ) algorithm, although the tests could certainly be more complex.
For each test, you want to see a string describing what the test is, followed by the results of the test. To automate this, the preprocessor comes in handy; the T( ) and B( ) macros each take the expression you want to execute. They call that expression, then call print( ), passing it the result vector (they assume the expression changes a vector named r and br, respectively), and to produce the message the expression is “string-ized” using the preprocessor. So that way you see the code of the expression that is executed followed by the result vector.
The last little tool is a generator object that creates random bool values. To do this, it gets a random number from rand( ) and tests to see if it’s greater than RAND_MAX/2. If the random numbers are evenly distributed, this should happen half the time.
In main( ), three vector<int> are created: x and y for source values, and r for results. To initialize x and y with random values no greater than 50, a generator of type URandGen is used; this will be defined shortly. Since there is one operation where elements of x are divided by elements of y, we must ensure that there are no zero values of y. This is accomplished using the transform( ) algorithm, taking the source values from y and putting the results back into y. The function object for this is created with the expression:
bind2nd(plus<int>(), 1)
This uses the plus function object that adds two objects together. It is thus a binary function which requires two arguments; we only want to pass it one argument (the element from y) and have the other argument be the value 1. A “binder” does the trick (we will look at these next). The binder in this case says “make a new function object which is the plus function object with the second argument fixed at 1.”
Another of the tests in the program compares the elements in the two vectors for equality, so it is interesting to guarantee that at least one pair of elements is equivalent; in this case element zero is chosen.
Once the two vectors are printed, T( ) is used to test each of the function objects that produces a numerical value, and then B( ) is used to test each function object that produces a Boolean result. The result is placed into a vector<bool>, and when this vector is printed it produces a ‘1’ for a true value and a ‘0’ for a false value.
Binders It’s common to want to take a binary function object and to “bind” one of its arguments to a constant value. After binding, you get a unary function object.
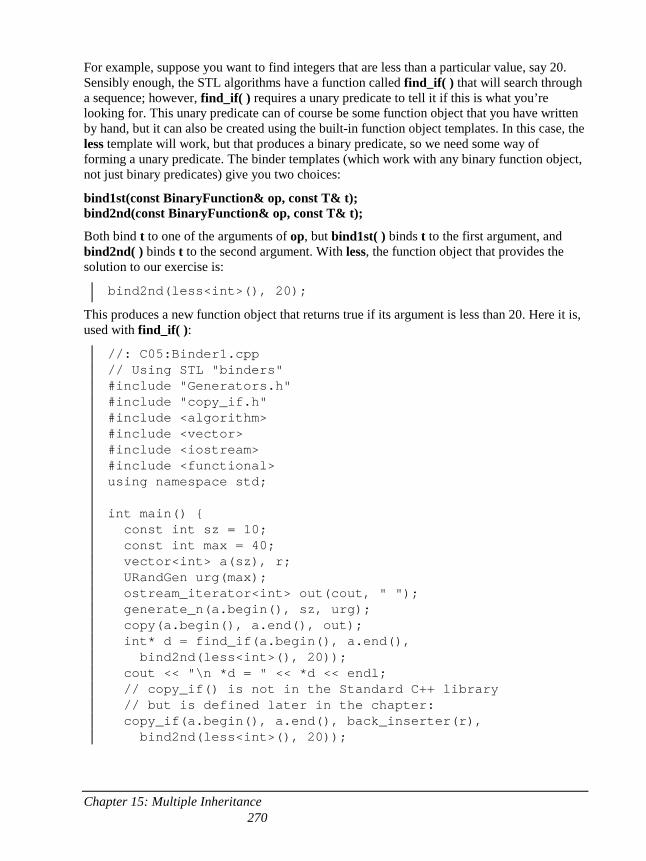
Chapter 15: Multiple Inheritance 270
For example, suppose you want to find integers that are less than a particular value, say 20. Sensibly enough, the STL algorithms have a function called find_if( ) that will search through a sequence; however, find_if( ) requires a unary predicate to tell it if this is what you’re looking for. This unary predicate can of course be some function object that you have written by hand, but it can also be created using the built-in function object templates. In this case, the less template will work, but that produces a binary predicate, so we need some way of forming a unary predicate. The binder templates (which work with any binary function object, not just binary predicates) give you two choices:
bind1st(const BinaryFunction& op, const T& t); bind2nd(const BinaryFunction& op, const T& t);
Both bind t to one of the arguments of op, but bind1st( ) binds t to the first argument, and bind2nd( ) binds t to the second argument. With less, the function object that provides the solution to our exercise is:
bind2nd(less<int>(), 20);
This produces a new function object that returns true if its argument is less than 20. Here it is, used with find_if( ):
//: C05:Binder1.cpp // Using STL "binders" #include "Generators.h" #include "copy_if.h" #include <algorithm> #include <vector> #include <iostream> #include <functional> using namespace std; int main() { const int sz = 10; const int max = 40; vector<int> a(sz), r; URandGen urg(max); ostream_iterator<int> out(cout, " "); generate_n(a.begin(), sz, urg); copy(a.begin(), a.end(), out); int* d = find_if(a.begin(), a.end(), bind2nd(less<int>(), 20)); cout << "\n *d = " << *d << endl; // copy_if() is not in the Standard C++ library // but is defined later in the chapter: copy_if(a.begin(), a.end(), back_inserter(r), bind2nd(less<int>(), 20));
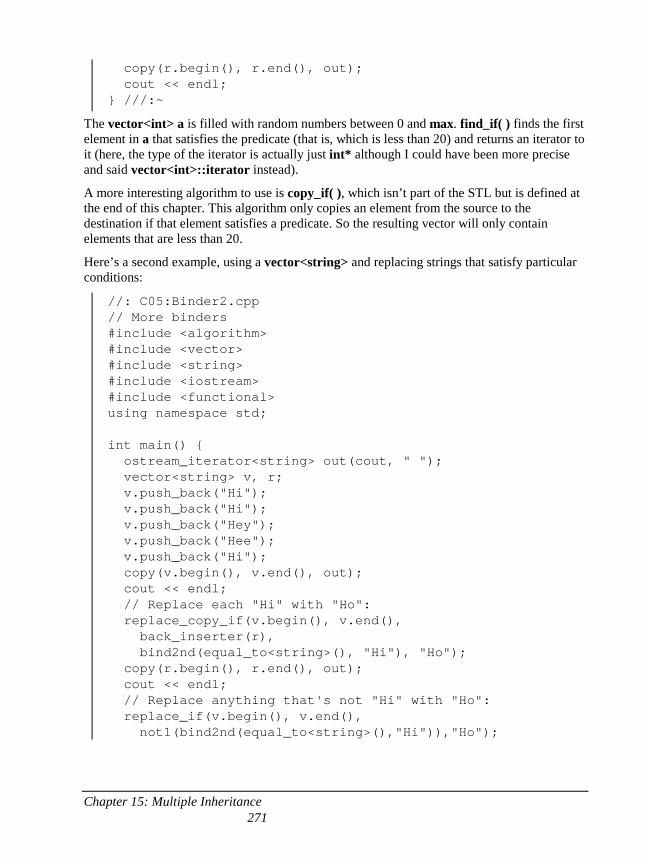
Chapter 15: Multiple Inheritance 271
copy(r.begin(), r.end(), out); cout << endl; } ///:~
The vector<int> a is filled with random numbers between 0 and max. find_if( ) finds the first element in a that satisfies the predicate (that is, which is less than 20) and returns an iterator to it (here, the type of the iterator is actually just int* although I could have been more precise and said vector<int>::iterator instead).
A more interesting algorithm to use is copy_if( ), which isn’t part of the STL but is defined at the end of this chapter. This algorithm only copies an element from the source to the destination if that element satisfies a predicate. So the resulting vector will only contain elements that are less than 20.
Here’s a second example, using a vector<string> and replacing strings that satisfy particular conditions:
//: C05:Binder2.cpp // More binders #include <algorithm> #include <vector> #include <string> #include <iostream> #include <functional> using namespace std; int main() { ostream_iterator<string> out(cout, " "); vector<string> v, r; v.push_back("Hi"); v.push_back("Hi"); v.push_back("Hey"); v.push_back("Hee"); v.push_back("Hi"); copy(v.begin(), v.end(), out); cout << endl; // Replace each "Hi" with "Ho": replace_copy_if(v.begin(), v.end(), back_inserter(r), bind2nd(equal_to<string>(), "Hi"), "Ho"); copy(r.begin(), r.end(), out); cout << endl; // Replace anything that's not "Hi" with "Ho": replace_if(v.begin(), v.end(), not1(bind2nd(equal_to<string>(),"Hi")),"Ho");
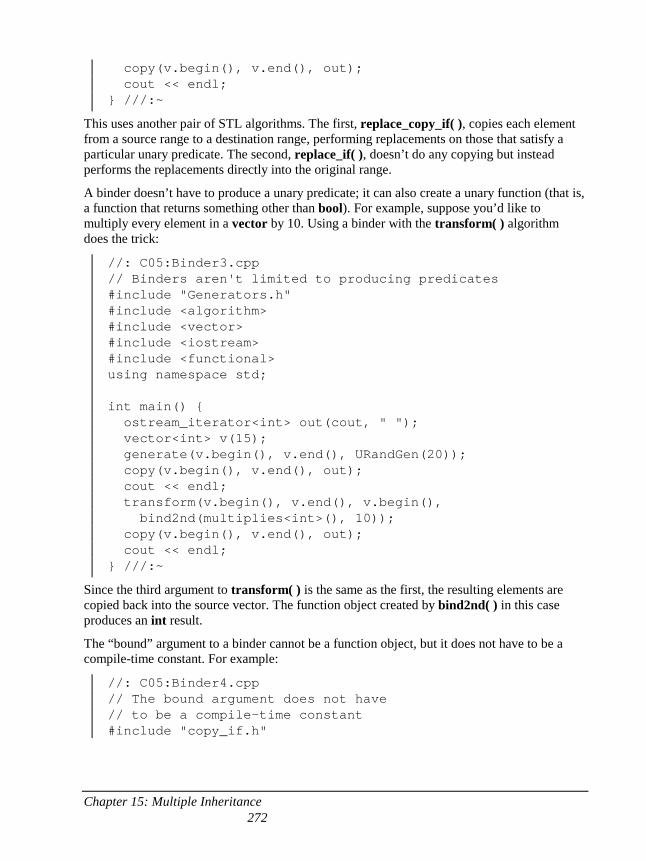
Chapter 15: Multiple Inheritance 272
copy(v.begin(), v.end(), out); cout << endl; } ///:~
This uses another pair of STL algorithms. The first, replace_copy_if( ), copies each element from a source range to a destination range, performing replacements on those that satisfy a particular unary predicate. The second, replace_if( ), doesn’t do any copying but instead performs the replacements directly into the original range.
A binder doesn’t have to produce a unary predicate; it can also create a unary function (that is, a function that returns something other than bool). For example, suppose you’d like to multiply every element in a vector by 10. Using a binder with the transform( ) algorithm does the trick:
//: C05:Binder3.cpp // Binders aren't limited to producing predicates #include "Generators.h" #include <algorithm> #include <vector> #include <iostream> #include <functional> using namespace std; int main() { ostream_iterator<int> out(cout, " "); vector<int> v(15); generate(v.begin(), v.end(), URandGen(20)); copy(v.begin(), v.end(), out); cout << endl; transform(v.begin(), v.end(), v.begin(), bind2nd(multiplies<int>(), 10)); copy(v.begin(), v.end(), out); cout << endl; } ///:~
Since the third argument to transform( ) is the same as the first, the resulting elements are copied back into the source vector. The function object created by bind2nd( ) in this case produces an int result.
The “bound” argument to a binder cannot be a function object, but it does not have to be a compile-time constant. For example:
//: C05:Binder4.cpp // The bound argument does not have // to be a compile-time constant #include "copy_if.h"
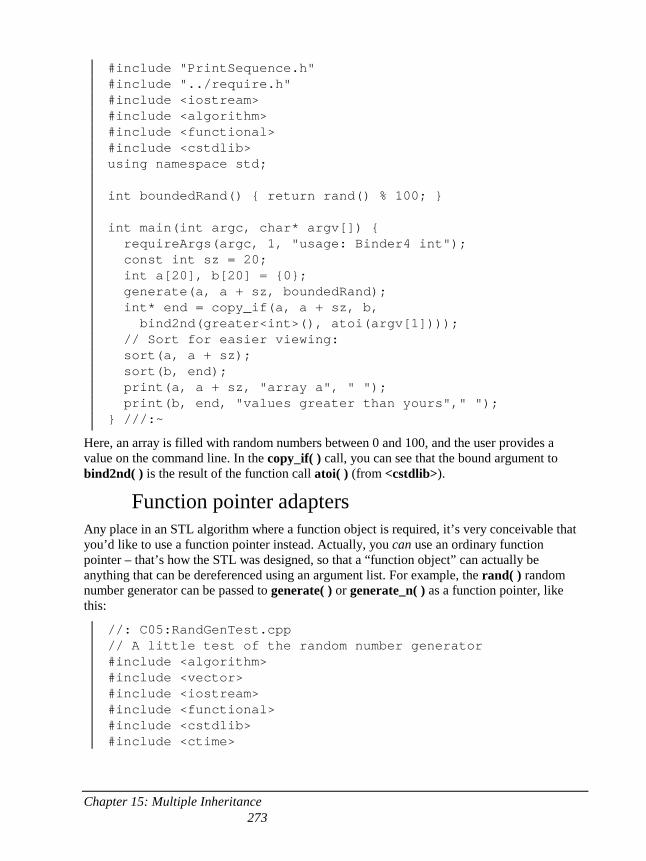
Chapter 15: Multiple Inheritance 273
#include "PrintSequence.h" #include "../require.h" #include <iostream> #include <algorithm> #include <functional> #include <cstdlib> using namespace std; int boundedRand() { return rand() % 100; } int main(int argc, char* argv[]) { requireArgs(argc, 1, "usage: Binder4 int"); const int sz = 20; int a[20], b[20] = {0}; generate(a, a + sz, boundedRand); int* end = copy_if(a, a + sz, b, bind2nd(greater<int>(), atoi(argv[1]))); // Sort for easier viewing: sort(a, a + sz); sort(b, end); print(a, a + sz, "array a", " "); print(b, end, "values greater than yours"," "); } ///:~
Here, an array is filled with random numbers between 0 and 100, and the user provides a value on the command line. In the copy_if( ) call, you can see that the bound argument to bind2nd( ) is the result of the function call atoi( ) (from <cstdlib>).
Function pointer adapters Any place in an STL algorithm where a function object is required, it’s very conceivable that you’d like to use a function pointer instead. Actually, you can use an ordinary function pointer – that’s how the STL was designed, so that a “function object” can actually be anything that can be dereferenced using an argument list. For example, the rand( ) random number generator can be passed to generate( ) or generate_n( ) as a function pointer, like this:
//: C05:RandGenTest.cpp // A little test of the random number generator #include <algorithm> #include <vector> #include <iostream> #include <functional> #include <cstdlib> #include <ctime>
Chapter 15: Multiple Inheritance 274
using namespace std; int main() { const int sz = 10000; int v[sz]; srand(time(0)); // Seed the random generator for(int i = 0; i < 300; i++) { // Using a naked pointer to function: generate(v, v + sz, std::rand); int count = count_if(v, v + sz, bind2nd(greater<int>(), RAND_MAX/2)); cout << (((double)count)/((double)sz)) * 100 << ' '; } } ///:~
The “iterators” in this case are just the starting and past-the-end pointers for the array v, and the generator is just a pointer to the standard library rand( ) function. The program repeatedly generates a group of random numbers, then it uses the STL algorithm count_if( ) and a predicate that tells whether a particular element is greater than RAND_MAX/2. The result is the number of elements that match this criterion; this is divided by the total number of elements and multiplied by 100 to produce the percentage of elements greater than the midpoint. If the random number generator is reasonable, this value should hover at around 50% (of course, there are many other tests to determine if the random number generator is reasonable).
The ptr_fun( ) adapters take a pointer to a function and turn it into a function object. They are not designed for a function that takes no arguments, like the one above (that is, a generator). Instead, they are for unary functions and binary functions. However, these could also be simply passed as if they were function objects, so the ptr_fun( ) adapters might at first appear to be redundant. Here’s an example where using ptr_fun( ) and simply passing the address of the function both produce the same results:
//: C05:PtrFun1.cpp // Using ptr_fun() for single-argument functions #include <algorithm> #include <vector> #include <iostream> #include <functional> using namespace std; char* n[] = { "01.23", "91.370", "56.661", "023.230", "19.959", "1.0", "3.14159" }; const int nsz = sizeof n / sizeof *n;
Chapter 15: Multiple Inheritance 275
template<typename InputIter> void print(InputIter first, InputIter last) { while(first != last) cout << *first++ << "\t"; cout << endl; } int main() { print(n, n + nsz); vector<double> vd; transform(n, n + nsz, back_inserter(vd), atof); print(vd.begin(), vd.end()); transform(n,n + nsz,vd.begin(), ptr_fun(atof)); print(vd.begin(), vd.end()); } ///:~
The goal of this program is to convert an array of char* which are ASCII representations of floating-point numbers into a vector<double>. After defining this array and the print( ) template (which encapsulates the act of printing a range of elements), you can see transform( ) used with atof( ) as a “naked” pointer to a function, and then a second time with atof passed to ptr_fun( ). The results are the same. So why bother with ptr_fun( )? Well, the actual effect of ptr_fun( ) is to create a function object with an operator( ). This function object can then be passed to other template adapters, such as binders, to create new function objects. As you’ll see a bit later, the SGI extensions to the STL contain a number of other function templates to enable this, but in the Standard C++ STL there are only the bind1st( ) and bind2nd( ) function templates, and these expect binary function objects as their first arguments. In the above example, only the ptr_fun( ) for a unary function is used, and that doesn’t work with the binders. So ptr_fun( ) used with a unary function in Standard C++ really is redundant (note that Gnu g++ uses the SGI STL).
With a binary function and a binder, things can be a little more interesting. This program produces the squares of the input vector d:
//: C05:PtrFun2.cpp // Using ptr_fun() for two-argument functions #include <algorithm> #include <vector> #include <iostream> #include <functional> #include <cmath> using namespace std; double d[] = { 01.23, 91.370, 56.661, 023.230, 19.959, 1.0, 3.14159 }; const int dsz = sizeof d / sizeof *d;
Chapter 15: Multiple Inheritance 276
int main() { vector<double> vd; transform(d, d + dsz, back_inserter(vd), bind2nd(ptr_fun(pow), 2.0)); copy(vd.begin(), vd.end(), ostream_iterator<double>(cout, " ")); cout << endl; } ///:~
Here, ptr_fun( ) is indispensable; bind2nd( ) must have a function object as its first argument and a pointer to function won’t cut it.
A trickier problem is that of converting a member function into a function object suitable for using in the STL algorithms. As a simple example, suppose we have the “shape” problem and would like to apply the draw( ) member function to each pointer in a container of Shape:
//: C05:MemFun1.cpp // Applying pointers to member functions #include "../purge.h" #include <algorithm> #include <vector> #include <iostream> #include <functional> using namespace std; class Shape { public: virtual void draw() = 0; virtual ~Shape() {} }; class Circle : public Shape { public: virtual void draw() { cout << "Circle::Draw()" << endl; } ~Circle() { cout << "Circle::~Circle()" << endl; } }; class Square : public Shape { public: virtual void draw() {
Chapter 15: Multiple Inheritance 277
cout << "Square::Draw()" << endl; } ~Square() { cout << "Square::~Square()" << endl; } }; int main() { vector<Shape*> vs; vs.push_back(new Circle); vs.push_back(new Square); for_each(vs.begin(), vs.end(), mem_fun(&Shape::draw)); purge(vs); } ///:~
The for_each( ) function does just what it sounds like it does: passes each element in the range determined by the first two (iterator) arguments to the function object which is its third argument. In this case we want the function object to be created from one of the member functions of the class itself, and so the function object’s “argument” becomes the pointer to the object that the member function is called for. To produce such a function object, the mem_fun( ) template takes a pointer to member as its argument.
The mem_fun( ) functions are for producing function objects that are called using a pointer to the object that the member function is called for, while mem_fun_ref( ) is used for calling the member function directly for an object. One set of overloads of both mem_fun( ) and mem_fun_ref( ) are for member functions that take zero arguments and one argument, and this is multiplied by two to handle const vs. non-const member functions. However, templates and overloading takes care of sorting all of that out; all you need to remember is when to use mem_fun( ) vs. mem_fun_ref( ).
Suppose you have a container of objects (not pointers) and you want to call a member function that takes an argument. The argument you pass should come from a second container of objects. To accomplish this, the second overloaded form of the transform( ) algorithm is used:
//: C05:MemFun2.cpp // Applying pointers to member functions #include <algorithm> #include <vector> #include <iostream> #include <functional> using namespace std; class Angle { int degrees;
Chapter 15: Multiple Inheritance 278
public: Angle(int deg) : degrees(deg) {} int mul(int times) { return degrees *= times; } }; int main() { vector<Angle> va; for(int i = 0; i < 50; i += 10) va.push_back(Angle(i)); int x[] = { 1, 2, 3, 4, 5 }; transform(va.begin(), va.end(), x, ostream_iterator<int>(cout, " "), mem_fun_ref(&Angle::mul)); cout << endl; } ///:~
Because the container is holding objects, mem_fun_ref( ) must be used with the pointer-to-member function. This version of transform( ) takes the start and end point of the first range (where the objects live), the starting point of second range which holds the arguments to the member function, the destination iterator which in this case is standard output, and the function object to call for each object; this function object is created with mem_fun_ref( ) and the desired pointer to member. Notice the transform( ) and for_each( ) template functions are incomplete; transform( ) requires that the function it calls return a value and there is no for_each( ) that passes two arguments to the function it calls. Thus, you cannot call a member function that returns void and takes an argument using transform( ) or for_each( ).
Any member function works, including those in the Standard libraries. For example, suppose you’d like to read a file and search for blank lines; you can use the string::empty( ) member function like this:
//: C05:FindBlanks.cpp // Demonstrate mem_fun_ref() with string::empty() #include "../require.h" #include <algorithm> #include <list> #include <string> #include <fstream> #include <functional> using namespace std; typedef list<string>::iterator LSI;
Chapter 15: Multiple Inheritance 279
LSI blank(LSI begin, LSI end) { return find_if(begin, end, mem_fun_ref(&string::empty)); } int main(int argc, char* argv[]) { requireArgs(argc, 1); ifstream in(argv[1]); assure(in, argv[1]); list<string> ls; string s; while(getline(in, s)) ls.push_back(s); LSI lsi = blank(ls.begin(), ls.end()); while(lsi != ls.end()) { *lsi = "A BLANK LINE"; lsi = blank(lsi, ls.end()); } string f(argv[1]); f += ".out"; ofstream out(f.c_str()); copy(ls.begin(), ls.end(), ostream_iterator<string>(out, "\n")); } ///:~
The blank( ) function uses find_if( ) to locate the first blank line in the given range using mem_fun_ref( ) with string::empty( ). After the file is opened and read into the list, blank( ) is called repeated times to find every blank line in the file. Notice that subsequent calls to blank( ) use the current version of the iterator so it moves forward to the next one. Each time a blank line is found, it is replaced with the characters “A BLANK LINE.” All you have to do to accomplish this is dereference the iterator, and you select the current string.
SGI extensions The SGI STL (mentioned at the end of the previous chapter) also includes additional function object templates, which allow you to write expressions that create even more complicated function objects. Consider a more involved program which converts strings of digits into floating point numbers, like PtrFun2.cpp but more general. First, here’s a generator that creates strings of integers that represent floating-point values (including an embedded decimal point):
//: C05:NumStringGen.h // A random number generator that produces // strings representing floating-point numbers
Chapter 15: Multiple Inheritance 280
#ifndef NUMSTRINGGEN_H #define NUMSTRINGGEN_H #include <string> #include <cstdlib> #include <ctime> class NumStringGen { const int sz; // Number of digits to make public: NumStringGen(int ssz = 5) : sz(ssz) { std::srand(std::time(0)); } std::string operator()() { static char n[] = "0123456789"; const int nsz = 10; std::string r(sz, ' '); for(int i = 0; i < sz; i++) if(i == sz/2) r[i] = '.'; // Insert a decimal point else r[i] = n[std::rand() % nsz]; return r; } }; #endif // NUMSTRINGGEN_H ///:~
You tell it how big the strings should be when you create the NumStringGen object. The random number generator is used to select digits, and a decimal point is placed in the middle.
The following program (which works with the Standard C++ STL without the SGI extensions) uses NumStringGen to fill a vector<string>. However, to use the Standard C library function atof( ) to convert the strings to floating-point numbers, the string objects must first be turned into char pointers, since there is no automatic type conversion from string to char*. The transform( ) algorithm can be used with mem_fun_ref( ) and string::c_str( ) to convert all the strings to char*, and then these can be transformed using atof:
//: C05:MemFun3.cpp // Using mem_fun() #include "NumStringGen.h" #include <algorithm> #include <vector> #include <string> #include <iostream> #include <functional>
Chapter 15: Multiple Inheritance 281
using namespace std; int main() { const int sz = 9; vector<string> vs(sz); // Fill it with random number strings: generate(vs.begin(), vs.end(), NumStringGen()); copy(vs.begin(), vs.end(), ostream_iterator<string>(cout, "\t")); cout << endl; const char* vcp[sz]; transform(vs.begin(), vs.end(), vcp, mem_fun_ref(&string::c_str)); vector<double> vd; transform(vcp,vcp + sz,back_inserter(vd), std::atof); copy(vd.begin(), vd.end(), ostream_iterator<double>(cout, "\t")); cout << endl; } ///:~
The SGI extensions to the STL contain a number of additional function object templates that accomplish more detailed activities than the Standard C++ function object templates, including identity (returns its argument unchanged), project1st and project2nd (to take two arguments and return the first or second one, respectively), select1st and select2nd (to take a pair object and return the first or second element, respectively), and the “compose” function templates.
If you’re using the SGI extensions, you can make the above program denser using one of the two “compose” function templates. The first, compose1(f1, f2), takes the two function objects f1 and f2 as its arguments. It produces a function object that takes a single argument, passes it to f2, then takes the result of the call to f2 and passes it to f1. The result of f1 is returned. By using compose1( ), the process of converting the string objects to char*, then converting the char* to a floating-point number can be combined into a single operation, like this:
//: C05:MemFun4.cpp // Using the SGI STL compose1 function #include "NumStringGen.h" #include <algorithm> #include <vector> #include <string> #include <iostream> #include <functional> using namespace std;
Chapter 15: Multiple Inheritance 282
int main() { const int sz = 9; vector<string> vs(sz); // Fill it with random number strings: generate(vs.begin(), vs.end(), NumStringGen()); copy(vs.begin(), vs.end(), ostream_iterator<string>(cout, "\t")); cout << endl; vector<double> vd; transform(vs.begin(), vs.end(), back_inserter(vd), compose1(ptr_fun(atof), mem_fun_ref(&string::c_str))); copy(vd.begin(), vd.end(), ostream_iterator<double>(cout, "\t")); cout << endl; } ///:~
You can see there’s only a single call to transform( ) now, and no intermediate holder for the char pointers.
The second “compose” function is compose2( ), which takes three function objects as its arguments. The first function object is binary (it takes two arguments), and its arguments are the results of the second and third function objects, respectively. The function object that results from compose2( ) expects one argument, and it feeds that argument to the second and third function objects. Here is an example:
//: C05:Compose2.cpp // Using the SGI STL compose2() function #include "copy_if.h" #include <algorithm> #include <vector> #include <iostream> #include <functional> #include <cstdlib> #include <ctime> using namespace std; int main() { srand(time(0)); vector<int> v(100); generate(v.begin(), v.end(), rand); transform(v.begin(), v.end(), v.begin(), bind2nd(divides<int>(), RAND_MAX/100)); vector<int> r; copy_if(v.begin(), v.end(), back_inserter(r),
Chapter 15: Multiple Inheritance 283
compose2(logical_and<bool>(), bind2nd(greater_equal<int>(), 30), bind2nd(less_equal<int>(), 40))); sort(r.begin(), r.end()); copy(r.begin(), r.end(), ostream_iterator<int>(cout, " ")); cout << endl; } ///:~
The vector<int> v is first filled with random numbers. To cut these down to size, the transform( ) algorithm is used to divide each value by RAND_MAX/100, which will force the values to be between 0 and 100 (making them more readable). The copy_if( ) algorithm defined later in this chapter is then used, along with a composed function object, to copy all the elements that are greater than or equal to 30 and less than or equal to 40 into the destination vector<int> r. Just to show how easy it is, r is sorted, and then displayed.
The arguments of compose2( ) say, in effect:
(x >= 30) && (x <= 40)
You could also take the function object that comes from a compose1( ) or compose2( ) call and pass it into another “compose” expression … but this could rapidly get very difficult to decipher.
Instead of all this composing and transforming, you can write your own function objects (without using the SGI extensions) as follows:
//: C05:NoCompose.cpp // Writing out the function objects explicitly #include "copy_if.h" #include <algorithm> #include <vector> #include <string> #include <iostream> #include <functional> #include <cstdlib> #include <ctime> using namespace std; class Rgen { const int max; public: Rgen(int mx = 100) : max(RAND_MAX/mx) { srand(time(0)); } int operator()() { return rand() / max; }
Chapter 15: Multiple Inheritance 284
}; class BoundTest { int top, bottom; public: BoundTest(int b, int t) : bottom(b), top(t) {} bool operator()(int arg) { return (arg >= bottom) && (arg <= top); } }; int main() { vector<int> v(100); generate(v.begin(), v.end(), Rgen()); vector<int> r; copy_if(v.begin(), v.end(), back_inserter(r), BoundTest(30, 40)); sort(r.begin(), r.end()); copy(r.begin(), r.end(), ostream_iterator<int>(cout, " ")); cout << endl; } ///:~
There are a few more lines of code, but you can’t deny that it’s much clearer and easier to understand, and therefore to maintain.
We can thus observe two drawbacks to the SGI extensions to the STL. The first is simply that it’s an extension; yes, you can download and use them for free so the barriers to entry are low, but your company may be conservative and decide that if it’s not in Standard C++, they don’t want to use it. The second drawback is complexity. Once you get familiar and comfortable with the idea of composing complicated functions from simple ones you can visually parse complicated expressions and figure out what they mean. However, my guess is that most people will find anything more than what you can do with the Standard, non-extended STL function object notation to be overwhelming. At some point on the complexity curve you have to bite the bullet and write a regular class to produce your function object, and that point might as well be the point where you can’t use the Standard C++ STL. A stand-alone class for a function object is going to be much more readable and maintainable than a complicated function-composition expression (although my sense of adventure does lure me into wanting to experiment more with the SGI extensions…).
As a final note, you can’t compose generators; you can only create function objects whose operator( ) requires one or two arguments.
Chapter 15: Multiple Inheritance 285
A catalog of STL algorithms This section provides a quick reference for when you’re searching for the appropriate algorithm. I leave the full exploration of all the STL algorithms to other references (see the end of this chapter, and Appendix XX), along with the more intimate details of complexity, performance, etc. My goal here is for you to become rapidly comfortable and facile with the algorithms, and I will assume you will look into the more specialized references if you need more depth of detail.
Although you will often see the algorithms described using their full template declaration syntax, I am not doing that here because you already know they are templates, and it’s quite easy to see what the template arguments are from the function declarations. The type names for the arguments provide descriptions for the types of iterators required. I think you’ll find this form is easier to read, while you can quickly find the full declaration in the template header file if for some reason you feel the need.
The names of the iterator classes describe the iterator type they must conform to. The iterator types were described in the previous chapter, but here is a summary:
InputIterator. You (or rather, the STL algorithm and any algorithms you write that use InputIterators) can increment this with operator++ and dereference it with operator* to read the value (and only read the value), but you can only read each value once. InputIterators can be tested with operator== and operator!=. That’s all. Because an InputIterator is so limited, it can be used with istreams (via istream_iterator).
OutputIterator. This can be incremented with operator++, and dereferenced with operator* to write the value (and only write the value), but you can only dereference/write each value once. OutputIterators cannot be tested with operator== and operator!=, however, because you assume that you can just keep sending elements to the destination and that you don’t have to see if the destination’s end marker has been reached. That is, the container that an OutputIterator references can take an infinite number of objects, so no end-checking is necessary. This requirement is important so that an OutputIterator can be used with ostreams (via ostream_iterator), but you’ll also commonly use the “insert” iterators insert_iterator, front_insert_iterator and back_insert_iterator (generated by the helper templates inserter( ), front_inserter( ) and back_inserter( )).
With both InputIterator and OutputIterator, you cannot have multiple iterators pointing to different parts of the same range. Just think in terms of iterators to support istreams and ostreams, and InputIterator and OutputIterator will make perfect sense. Also note that InputIterator and OutputIterator put the weakest restrictions on the types of iterators they will accept, which means that you can use any “more sophisticated” type of iterator when you see InputIterator or OutputIterator used as STL algorithm template arguments.
Chapter 15: Multiple Inheritance 286
ForwardIterator. InputIterator and OutputIterator are the most restricted, which means they’ll work with the largest number of actual iterators. However, there are some operations for which they are too restricted; you can only read from an InputIterator and write to an OutputIterator, so you can’t use them to read and modify a range, for example, and you can’t have more than one active iterator on a particular range, or dereference such an iterator more than once. With a ForwardIterator these restrictions are relaxed; you can still only move forward using operator++, but you can both write and read and you can write/read multiple times in each location. A ForwardIterator is much more like a regular pointer, whereas InputIterator and OutputIterator are a bit strange by comparison.
BidirectionalIterator. Effectively, this is a ForwardIterator that can also go backward. That is, a BidirectionalIterator supports all the operations that a ForwardIterator does, but in addition it has an operator--.
RandomAccessIterator. An iterator that is random access supports all the same operations that a regular pointer does: you can add and subtract integral values to move it forward and backward by jumps (rather than just one element at a time), you can subscript it with operator[ ], you can subtract one iterator from another, and iterators can be compared to see which is greater using operator<, operator>, etc. If you’re implementing a sorting routine or something similar, random access iterators are necessary to be able to create an efficient algorithm.
The names used for the template parameter types consist of the above iterator types (sometimes with a ‘1’ or ‘2’ appended to distinguish different template arguments), and may also include other arguments, often function objects.
When describing the group of elements that an operation is performed on, mathematical “range” notation will often be used. In this, the square bracket means “includes the end point” while the parenthesis means “does not include the end point.” When using iterators, a range is determined by the iterator pointing to the initial element, and the “past-the-end” iterator, pointing past the last element. Since the past-the-end element is never used, the range determined by a pair of iterators can thus be expressed as [first, last), where first is the iterator pointing to the initial element and last is the past-the-end iterator.
Most books and discussions of the STL algorithms arrange them according to side effects: non-mutating algorithms don’t change the elements in the range, mutating algorithms do change the elements, etc. These descriptions are based more on the underlying behavior or implementation of the algorithm – that is, the designer’s perspective. In practice, I don’t find this a very useful categorization so I shall instead organize them according to the problem you want to solve: are you searching for an element or set of elements, performing an operation on each element, counting elements, replacing elements, etc. This should help you find the one you want more easily.
Note that all the algorithms are in the namespace std. If you do not see a different header such as <utility> or <numerics> above the function declarations, that means it appears in <algorithm>.
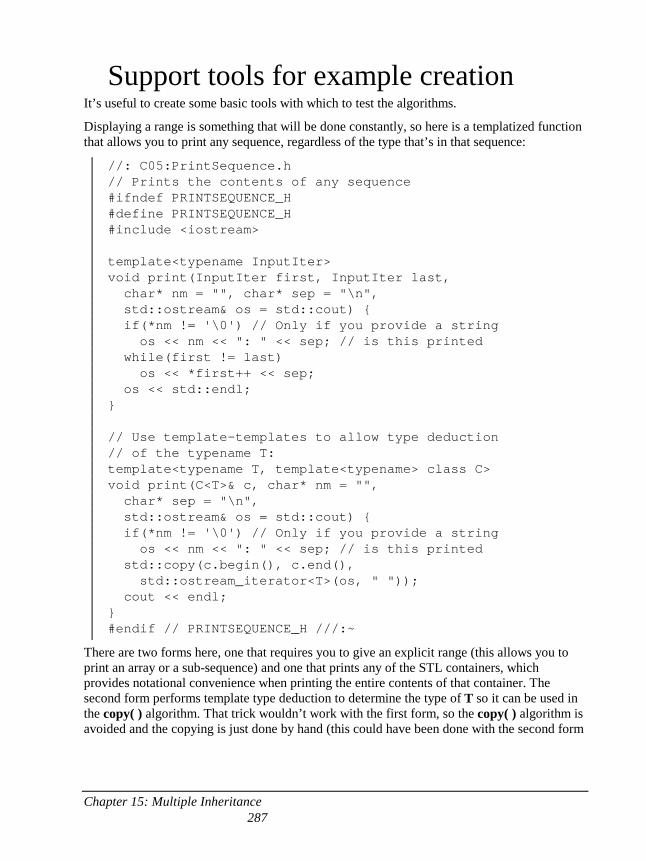
Chapter 15: Multiple Inheritance 287
Support tools for example creation It’s useful to create some basic tools with which to test the algorithms.
Displaying a range is something that will be done constantly, so here is a templatized function that allows you to print any sequence, regardless of the type that’s in that sequence:
//: C05:PrintSequence.h // Prints the contents of any sequence #ifndef PRINTSEQUENCE_H #define PRINTSEQUENCE_H #include <iostream> template<typename InputIter> void print(InputIter first, InputIter last, char* nm = "", char* sep = "\n", std::ostream& os = std::cout) { if(*nm != '\0') // Only if you provide a string os << nm << ": " << sep; // is this printed while(first != last) os << *first++ << sep; os << std::endl; } // Use template-templates to allow type deduction // of the typename T: template<typename T, template<typename> class C> void print(C<T>& c, char* nm = "", char* sep = "\n", std::ostream& os = std::cout) { if(*nm != '\0') // Only if you provide a string os << nm << ": " << sep; // is this printed std::copy(c.begin(), c.end(), std::ostream_iterator<T>(os, " ")); cout << endl; } #endif // PRINTSEQUENCE_H ///:~
There are two forms here, one that requires you to give an explicit range (this allows you to print an array or a sub-sequence) and one that prints any of the STL containers, which provides notational convenience when printing the entire contents of that container. The second form performs template type deduction to determine the type of T so it can be used in the copy( ) algorithm. That trick wouldn’t work with the first form, so the copy( ) algorithm is avoided and the copying is just done by hand (this could have been done with the second form
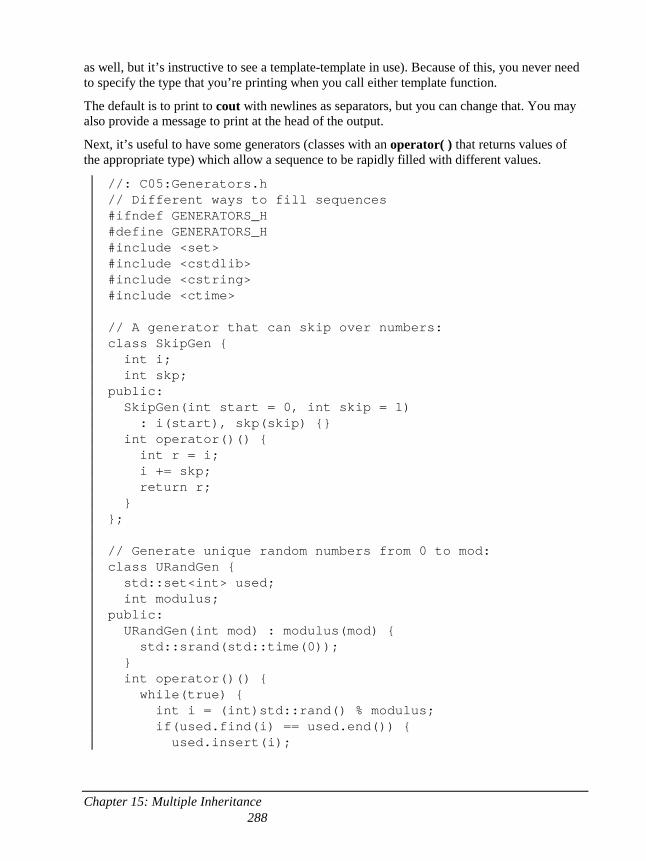
Chapter 15: Multiple Inheritance 288
as well, but it’s instructive to see a template-template in use). Because of this, you never need to specify the type that you’re printing when you call either template function.
The default is to print to cout with newlines as separators, but you can change that. You may also provide a message to print at the head of the output.
Next, it’s useful to have some generators (classes with an operator( ) that returns values of the appropriate type) which allow a sequence to be rapidly filled with different values.
//: C05:Generators.h // Different ways to fill sequences #ifndef GENERATORS_H #define GENERATORS_H #include <set> #include <cstdlib> #include <cstring> #include <ctime> // A generator that can skip over numbers: class SkipGen { int i; int skp; public: SkipGen(int start = 0, int skip = 1) : i(start), skp(skip) {} int operator()() { int r = i; i += skp; return r; } }; // Generate unique random numbers from 0 to mod: class URandGen { std::set<int> used; int modulus; public: URandGen(int mod) : modulus(mod) { std::srand(std::time(0)); } int operator()() { while(true) { int i = (int)std::rand() % modulus; if(used.find(i) == used.end()) { used.insert(i);
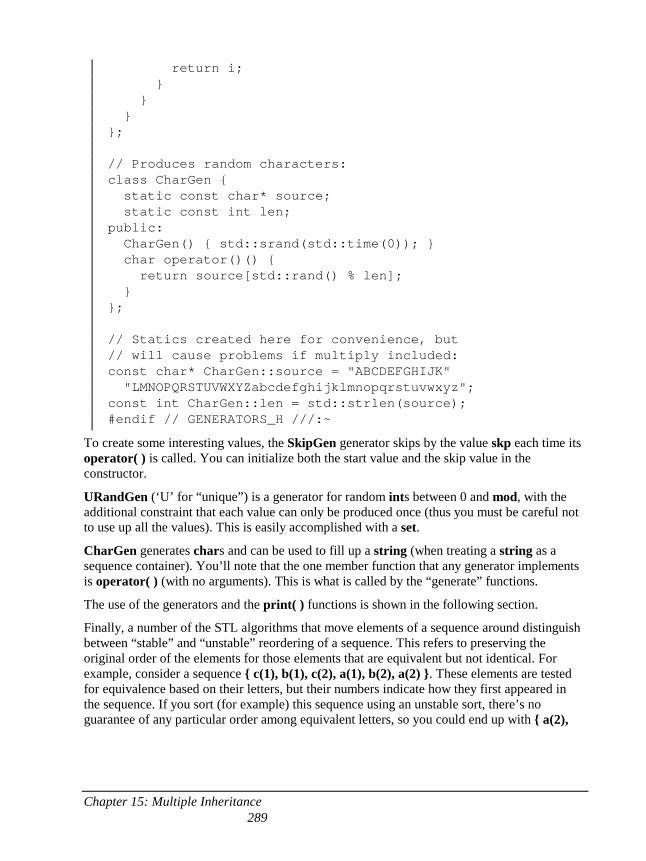
Chapter 15: Multiple Inheritance 289
return i; } } } }; // Produces random characters: class CharGen { static const char* source; static const int len; public: CharGen() { std::srand(std::time(0)); } char operator()() { return source[std::rand() % len]; } }; // Statics created here for convenience, but // will cause problems if multiply included: const char* CharGen::source = "ABCDEFGHIJK" "LMNOPQRSTUVWXYZabcdefghijklmnopqrstuvwxyz"; const int CharGen::len = std::strlen(source); #endif // GENERATORS_H ///:~
To create some interesting values, the SkipGen generator skips by the value skp each time its operator( ) is called. You can initialize both the start value and the skip value in the constructor.
URandGen (‘U’ for “unique”) is a generator for random ints between 0 and mod, with the additional constraint that each value can only be produced once (thus you must be careful not to use up all the values). This is easily accomplished with a set.
CharGen generates chars and can be used to fill up a string (when treating a string as a sequence container). You’ll note that the one member function that any generator implements is operator( ) (with no arguments). This is what is called by the “generate” functions.
The use of the generators and the print( ) functions is shown in the following section.
Finally, a number of the STL algorithms that move elements of a sequence around distinguish between “stable” and “unstable” reordering of a sequence. This refers to preserving the original order of the elements for those elements that are equivalent but not identical. For example, consider a sequence { c(1), b(1), c(2), a(1), b(2), a(2) }. These elements are tested for equivalence based on their letters, but their numbers indicate how they first appeared in the sequence. If you sort (for example) this sequence using an unstable sort, there’s no guarantee of any particular order among equivalent letters, so you could end up with { a(2),
Chapter 15: Multiple Inheritance 290
a(1), b(1), b(2), c(2), c(1) }. However, if you used a stable sort, it guarantees you will get { a(1), a(2), b(1), b(2), c(1), c(2) }.
To demonstrate the stability versus instability of algorithms that reorder a sequence, we need some way to keep track of how the elements originally appeared. The following is a kind of string object that keeps track of the order in which that particular object originally appeared, using a static map that maps NStrings to Counters. Each NString then contains an occurrence field that indicates the order in which this NString was discovered:
//: C05:NString.h // A "numbered string" that indicates which // occurrence this is of a particular word #ifndef NSTRING_H #define NSTRING_H #include <string> #include <map> #include <iostream> class NString { std::string s; int occurrence; struct Counter { int i; Counter() : i(0) {} Counter& operator++(int) { i++; return *this; } // Post-incr operator int() { return i; } }; // Keep track of the number of occurrences: typedef std::map<std::string, Counter> csmap; static csmap occurMap; public: NString() : occurrence(0) {} NString(const std::string& x) : s(x), occurrence(occurMap[s]++) {} NString(const char* x) : s(x), occurrence(occurMap[s]++) {} // The synthesized operator= and // copy-constructor are OK here friend std::ostream& operator<<( std::ostream& os, const NString& ns) { return os << ns.s << " ["
Chapter 15: Multiple Inheritance 291
<< ns.occurrence << "]"; } // Need this for sorting. Notice it only // compares strings, not occurrences: friend bool operator<(const NString& l, const NString& r) { return l.s < r.s; } // For sorting with greater<NString>: friend bool operator>(const NString& l, const NString& r) { return l.s > r.s; } // To get at the string directly: operator const std::string&() const {return s;} }; // Allocate static member object. Done here for // brevity, but should actually be done in a // separate cpp file: NString::csmap NString::occurMap; #endif // NSTRING_H ///:~
In the constructors (one that takes a string, one that takes a char*), the simple-looking initialization occurrence(occurMap[s]++) performs all the work of maintaining and assigning the occurrence counts (see the demonstration of the map class in the previous chapter for more details).
To do an ordinary ascending sort, the only operator that’s necessary is NString::operator<( ), however to sort in reverse order the operator>( ) is also provided so that the greater template can be used.
As this is just a demonstration class I am getting away with the convenience of putting the definition of the static member occurMap in the header file, but this will break down if the header file is included in more than one place, so you should normally relegate all static definitions to cpp files.
Filling & generating These algorithms allow you to automatically fill a range with a particular value, or to generate a set of values for a particular range (these were introduced in the previous chapter). The “fill” functions insert a single value multiple times into the container, while the “generate” functions use an object called a generator (described earlier) to create the values to insert into the container.
Chapter 15: Multiple Inheritance 292
void fill(ForwardIterator first, ForwardIterator last, const T& value); void fill_n(OutputIterator first, Size n, const T& value);
fill( ) assigns value to every element in the range [first, last). fill_n( ) assigns value to n elements starting at first.
void generate(ForwardIterator first, ForwardIterator last, Generator gen); void generate_n(OutputIterator first, Size n, Generator gen);
generate( ) makes a call to gen( ) for each element in the range [first, last), presumably to produce a different value for each element. generate_n( ) calls gen( ) n times and assigns each result to n elements starting at first.
Example The following example fills and generates into vectors. It also shows the use of print( ):
//: C05:FillGenerateTest.cpp // Demonstrates "fill" and "generate" #include "Generators.h" #include "PrintSequence.h" #include <vector> #include <algorithm> #include <string> using namespace std; int main() { vector<string> v1(5); fill(v1.begin(), v1.end(), "howdy"); print(v1, "v1", " "); vector<string> v2; fill_n(back_inserter(v2), 7, "bye"); print(v2.begin(), v2.end(), "v2"); vector<int> v3(10); generate(v3.begin(), v3.end(), SkipGen(4,5)); print(v3, "v3", " "); vector<int> v4; generate_n(back_inserter(v4),15, URandGen(30)); print(v4, "v4", " "); } ///:~
A vector<string> is created with a pre-defined size. Since storage has already been created for all the string objects in the vector, fill( ) can use its assignment operator to assign a copy of “howdy” to each space in the vector. To print the result, the second form of print( ) is used which simply needs a container (you don’t have to give the first and last iterators). Also, the default newline separator is replaced with a space.
Chapter 15: Multiple Inheritance 293
The second vector<string> v2 is not given an initial size so back_inserter must be used to force new elements in instead of trying to assign to existing locations. Just as an example, the other print( ) is used which requires a range.
The generate( ) and generate_n( ) functions have the same form as the “fill” functions except that they use a generator instead of a constant value; here, both generators are demonstrated.
Counting All containers have a method size( ) that will tell you how many elements they hold. The following two algorithms count objects only if they satisfy certain criteria.
IntegralValue count(InputIterator first, InputIterator last, const EqualityComparable& value);
Produces the number of elements in [first, last) that are equivalent to value (when tested using operator==).
IntegralValue count_if(InputIterator first, InputIterator last, Predicate pred);
Produces the number of elements in [first, last) which each cause pred to return true.
Example Here, a vector<char> v is filled with random characters (including some duplicates). A set<char> is initialized from v, so it holds only one of each letter represented in v. This set is used to count all the instances of all the different characters, which are then displayed:
//: C05:Counting.cpp // The counting algorithms #include "PrintSequence.h" #include "Generators.h" #include <vector> #include <algorithm> using namespace std; int main() { vector<char> v; generate_n(back_inserter(v), 50, CharGen()); print(v, "v", ""); // Create a set of the characters in v: set<char> cs(v.begin(), v.end()); set<char>::iterator it = cs.begin(); while(it != cs.end()) { int n = count(v.begin(), v.end(), *it); cout << *it << ": " << n << ", "; it++;
Chapter 15: Multiple Inheritance 294
} int lc = count_if(v.begin(), v.end(), bind2nd(greater<char>(), 'a')); cout << "\nLowercase letters: " << lc << endl; sort(v.begin(), v.end()); print(v, "sorted", ""); } ///:~
The count_if( ) algorithm is demonstrated by counting all the lowercase letters; the predicate is created using the bind2nd( ) and greater function object templates.
Manipulating sequences These algorithms allow you to move sequences around.
OutputIterator copy(InputIterator, first InputIterator last, OutputIterator destination);
Using assignment, copies from [first, last) to destination, incrementing destination after each assignment. Works with almost any type of source range and almost any kind of destination. Because assignment is used, you cannot directly insert elements into an empty container or at the end of a container, but instead you must wrap the destination iterator in an insert_iterator (typically by using back_inserter( ), or inserter( ) in the case of an associative container).
The copy algorithm is used in many examples in this book.
BidirectionalIterator2 copy_backward(BidirectionalIterator1 first, BidirectionalIterator1 last, BidirectionalIterator2 destinationEnd);
Like copy( ), but performs the actual copying of the elements in reverse order. That is, the resulting sequence is the same, it’s just that the copy happens in a different way. The source range [first, last) is copied to the destination, but the first destination element is destinationEnd - 1. This iterator is then decremented after each assignment. The space in the destination range must already exist (to allow assignment), and the destination range cannot be within the source range.
void reverse(BidirectionalIterator first, BidirectionalIterator last); OutputIterator reverse_copy(BidirectionalIterator first, BidirectionalIterator last, OutputIterator destination);
Both forms of this function reverse the range [first, last). reverse( ) reverses the range in place, while reverse_copy( ) leaves the original range alone and copies the reversed elements into destination, returning the past-the-end iterator of the resulting range.
ForwardIterator2 swap_ranges(ForwardIterator1 first1, ForwardIterator1 last1, ForwardIterator2 first2);
Chapter 15: Multiple Inheritance 295
Exchanges the contents of two ranges of equal size, by moving from the beginning to the end of each range and swapping each set of elements.
void rotate(ForwardIterator first, ForwardIterator middle, ForwardIterator last); OutputIterator rotate_copy(ForwardIterator first, ForwardIterator middle, ForwardIterator last, OutputIterator destination);
Swaps the two ranges [first, middle) and [middle, last). With rotate( ), the swap is performed in place, and with rotate_copy( ) the original range is untouched and the rotated version is copied into destination, returning the past-the-end iterator of the resulting range. Note that while swap_ranges( ) requires that the two ranges be exactly the same size, the “rotate” functions do not.
bool next_permutation(BidirectionalIterator first, BidirectionalIterator last); bool next_permutation(BidirectionalIterator first, BidirectionalIterator last, StrictWeakOrdering binary_pred); bool prev_permutation(BidirectionalIterator first, BidirectionalIterator last); bool prev_permutation(BidirectionalIterator first, BidirectionalIterator last, StrictWeakOrdering binary_pred);
A permutation is one unique ordering of a set of elements. If you have n unique elements, then there are n! (n factorial) distinct possible combinations of those elements. All these combinations can be conceptually sorted into a sequence using a lexicographical ordering, and thus produce a concept of a “next” and “previous” permutation. Therefore, whatever the current ordering of elements in the range, there is a distinct “next” and “previous” permutation in the sequence of permutations.
The next_permutation( ) and prev_permutation( ) functions re-arrange the elements into their next or previous permutation, and if successful return true. If there are no more “next” permutations, it means that the elements are in sorted order so next_permutation( ) returns false. If there are no more “previous” permutations, it means that the elements are in descending sorted order so previous_permutation( ) returns false.
The versions of the functions which have a StrictWeakOrdering argument perform the comparisons using binary_pred instead of operator<.
void random_shuffle(RandomAccessIterator first, RandomAccessIterator last); void random_shuffle(RandomAccessIterator first, RandomAccessIterator last RandomNumberGenerator& rand);
This function randomly rearranges the elements in the range. It yields uniformly distributed results. The first form uses an internal random number generator and the second uses a user-supplied random-number generator.
BidirectionalIterator partition(BidirectionalIterator first, BidirectionalIterator last, Predicate pred); BidirectionalIterator stable_partition(BidirectionalIterator first, BidirectionalIterator last, Predicate pred);
Chapter 15: Multiple Inheritance 296
The “partition” functions use pred to organize the elements in the range [first, last) so they are before or after the partition (a point in the range). The partition point is given by the returned iterator. If pred(*i) is true (where i is the iterator pointing to a particular element), then that element will be placed before the partition point, otherwise it will be placed after the partition point.
With partition( ), the order of the elements is after the function call is not specified, but with stable_parition( ) the relative order of the elements before and after the partition point will be the same as before the partitioning process.
Example This gives a basic demonstration of sequence manipulation:
//: C05:Manipulations.cpp // Shows basic manipulations #include "PrintSequence.h" #include "NString.h" #include "Generators.h" #include <vector> #include <string> #include <algorithm> using namespace std; int main() { vector<int> v1(10); // Simple counting: generate(v1.begin(), v1.end(), SkipGen()); print(v1, "v1", " "); vector<int> v2(v1.size()); copy_backward(v1.begin(), v1.end(), v2.end()); print(v2, "copy_backward", " "); reverse_copy(v1.begin(), v1.end(), v2.begin()); print(v2, "reverse_copy", " "); reverse(v1.begin(), v1.end()); print(v1, "reverse", " "); int half = v1.size() / 2; // Ranges must be exactly the same size: swap_ranges(v1.begin(), v1.begin() + half, v1.begin() + half); print(v1, "swap_ranges", " "); // Start with fresh sequence: generate(v1.begin(), v1.end(), SkipGen()); print(v1, "v1", " "); int third = v1.size() / 3;
Chapter 15: Multiple Inheritance 297
for(int i = 0; i < 10; i++) { rotate(v1.begin(), v1.begin() + third, v1.end()); print(v1, "rotate", " "); } cout << "Second rotate example:" << endl; char c[] = "aabbccddeeffgghhiijj"; const char csz = strlen(c); for(int i = 0; i < 10; i++) { rotate(c, c + 2, c + csz); print(c, c + csz, "", ""); } cout << "All n! permutations of abcd:" << endl; int nf = 4 * 3 * 2 * 1; char p[] = "abcd"; for(int i = 0; i < nf; i++) { next_permutation(p, p + 4); print(p, p + 4, "", ""); } cout << "Using prev_permutation:" << endl; for(int i = 0; i < nf; i++) { prev_permutation(p, p + 4); print(p, p + 4, "", ""); } cout << "random_shuffling a word:" << endl; string s("hello"); cout << s << endl; for(int i = 0; i < 5; i++) { random_shuffle(s.begin(), s.end()); cout << s << endl; } NString sa[] = { "a", "b", "c", "d", "a", "b", "c", "d", "a", "b", "c", "d", "a", "b", "c"}; const int sasz = sizeof sa / sizeof *sa; vector<NString> ns(sa, sa + sasz); print(ns, "ns", " "); vector<NString>::iterator it = partition(ns.begin(), ns.end(), bind2nd(greater<NString>(), "b")); cout << "Partition point: " << *it << endl; print(ns, "", " "); // Reload vector: copy (sa, sa + sasz, ns.begin());
Chapter 15: Multiple Inheritance 298
it = stable_partition(ns.begin(), ns.end(), bind2nd(greater<NString>(), "b")); cout << "Stable partition" << endl; cout << "Partition point: " << *it << endl; print(ns, "", " "); } ///:~
The best way to see the results of the above program is to run it (you’ll probably want to redirect the output to a file).
The vector<int> v1 is initially loaded with a simple ascending sequence and printed. You’ll see that the effect of copy_backward( ) (which copies into v2, which is the same size as v1) is the same as an ordinary copy. Again, copy_backward( ) does the same thing as copy( ), it just performs the operations in backward order.
reverse_copy( ), however, actually does created a reversed copy, while reverse( ) performs the reversal in place. Next, swap_ranges( ) swaps the upper half of the reversed sequence with the lower half. Of course, the ranges could be smaller subsets of the entire vector, as long as they are of equivalent size.
After re-creating the ascending sequence, rotate( ) is demonstrated by rotating one third of v1 multiple times. A second rotate( ) example uses characters and just rotates two characters at a time. This also demonstrates the flexibility of both the STL algorithms and the print( ) template, since they can both be used with arrays of char as easily as with anything else.
To demonstrate next_permutation( ) and prev_permutation( ), a set of four characters “abcd” is permuted through all n! (n factorial) possible combinations. You’ll see from the output that the permutations move through a strictly-defined order (that is, permuting is a deterministic process).
A quick-and-dirty demonstration of random_shuffle( ) is to apply it to a string and see what words result. Because a string object has begin( ) and end( ) member functions that return the appropriate iterators, it too may be easily used with many of the STL algorithms. Of course, an array of char could also have been used.
Finally, the partition( ) and stable_partition( ) are demonstrated, using an array of NString. You’ll note that the aggregate initialization expression uses char arrays, but NString has a char* constructor which is automatically used.
When partitioning a sequence, you need a predicate which will determine whether the object belongs above or below the partition point. This takes a single argument and returns true (the object is above the partition point) or false (it isn’t). I could have written a separate function or function object to do this, but for something simple, like “the object is greater than ‘b’”, why not use the built-in function object templates? The expression is:
bind2nd(greater<NString>(), "b")
And to understand it, you need to pick it apart from the middle outward. First,
greater<NString>()
Chapter 15: Multiple Inheritance 299
produces a binary function object which compares its first and second arguments:
return first > second;
and returns a bool. But we don’t want a binary predicate, and we want to compare against the constant value “b.” So bind2nd( ) says: create a new function object which only takes one argument, by taking this greater<NString>( ) function and forcing the second argument to always be “b.” The first argument (the only argument) will be the one from the vector ns.
You’ll see from the output that with the unstable partition, the objects are correctly above and below the partition point, but in no particular order, whereas with the stable partition their original order is maintained.
Searching & replacing All of these algorithms are used for searching for one or more objects within a range defined by the first two iterator arguments.
InputIterator find(InputIterator first, InputIterator last, const EqualityComparable& value);
Searches for value within a range of elements. Returns an iterator in the range [first, last) that points to the first occurrence of value. If value isn’t in the range, then find( ) returns last. This is a linear search, that is, it starts at the beginning and looks at each sequential element without making any assumptions about the way the elements are ordered. In contrast, a binary_search( ) (defined later) works on a sorted sequence and can thus be much faster.
InputIterator find_if(InputIterator first, InputIterator last, Predicate pred);
Just like find( ), find_if( ) performs a linear search through the range. However, instead of searching for value, find_if( ) looks for an element such that the Predicate pred returns true when applied to that element. Returns last if no such element can be found.
ForwardIterator adjacent_find(ForwardIterator first, ForwardIterator last); ForwardIterator adjacent_find(ForwardIterator first, ForwardIterator last, BinaryPredicate binary_pred);
Like find( ), performs a linear search through the range, but instead of looking for only one element it searches for two elements that are right next to each other. The first form of the function looks for two elements that are equivalent (via operator==). The second form looks for two adjacent elements that, when passed together to binary_pred, produce a true result. If two adjacent elements cannot be found, last is returned.
ForwardIterator1 find_first_of(ForwardIterator1 first1, ForwardIterator1 last1, ForwardIterator2 first2, ForwardIterator2 last2); ForwardIterator1 find_first_of(ForwardIterator1 first1, ForwardIterator1 last1, ForwardIterator2 first2, ForwardIterator2 last2, BinaryPredicate binary_pred);
Chapter 15: Multiple Inheritance 300
Like find( ), performs a linear search through the range. The first form finds the first element in the first range that is equivalent to any of the elements in the second range. The second form finds the first element in the first range that produces true when passed to binary_pred along with any of the elements in the second range. When a BinaryPredicate is used with two ranges in the algorithms, the element from the first range becomes the first argument to binary_pred, and the element from the second range becomes the second argument.
ForwardIterator1 search(ForwardIterator1 first1, ForwardIterator1 last1, ForwardIterator2 first2, ForwardIterator2 last2); ForwardIterator1 search(ForwardIterator1 first1, ForwardIterator1 last1, ForwardIterator2 first2, ForwardIterator2 last2 BinaryPredicate binary_pred);
Attempts to find the entire range [first2, last2) within the range [first1, last1). That is, it checks to see if the second range occurs (in the exact order of the second range) within the first range, and if so returns an iterator pointing to the place in the first range where the second range begins. Returns last1 if no subset can be found. The first form performs its test using operator==, while the second checks to see if each pair of objects being compared causes binary_pred to return true.
ForwardIterator1 find_end(ForwardIterator1 first1, ForwardIterator1 last1, ForwardIterator2 first2, ForwardIterator2 last2); ForwardIterator1 find_end(ForwardIterator1 first1, ForwardIterator1 last1, ForwardIterator2 first2, ForwardIterator2 last2, BinaryPredicate binary_pred);
The forms and arguments are just like search( ) in that it looks for the second range within the first range, but while search( ) looks for the first occurrence of the second range, find_end( ) looks for the last occurrence of the second range within the first.
ForwardIterator search_n(ForwardIterator first, ForwardIterator last, Size count, const T& value); ForwardIterator search_n(ForwardIterator first, ForwardIterator last, Size count, const T& value, BinaryPredicate binary_pred);
Looks for a group of count consecutive values in [first, last) that are all equal to value (in the first form) or that all cause a return value of true when passed into binary_pred along with value (in the second form). Returns last if such a group cannot be found.
ForwardIterator min_element(ForwardIterator first, ForwardIterator last); ForwardIterator min_element(ForwardIterator first, ForwardIterator last, BinaryPredicate binary_pred);
Returns an iterator pointing to the first occurrence of the smallest value in the range (there may be multiple occurrences of the smallest value). Returns last if the range is empty. The first version performs comparisons with operator< and the value r returned is such that *e < *r is false for every element e in the range. The second version compares using binary_pred and the value r returned is such that binary_pred (*e, *r) is false for every element e in the range.
Chapter 15: Multiple Inheritance 301
ForwardIterator max_element(ForwardIterator first, ForwardIterator last); ForwardIterator max_element(ForwardIterator first, ForwardIterator last, BinaryPredicate binary_pred);
Returns an iterator pointing to the first occurrence of the largest value in the range (there may be multiple occurrences of the largest value). Returns last if the range is empty. The first version performs comparisons with operator< and the value r returned is such that *r < *e is false for every element e in the range. The second version compares using binary_pred and the value r returned is such that binary_pred (*r, *e) is false for every element e in the range.
void replace(ForwardIterator first, ForwardIterator last, const T& old_value, const T& new_value); void replace_if(ForwardIterator first, ForwardIterator last, Predicate pred, const T& new_value); OutputIterator replace_copy(InputIterator first, InputIterator last, OutputIterator result, const T& old_value, const T& new_value); OutputIterator replace_copy_if(InputIterator first, InputIterator last, OutputIterator result, Predicate pred, const T& new_value);
Each of the “replace” forms moves through the range [first, last), finding values that match a criterion and replacing them with new_value. Both replace( ) and replace_copy( ) simply look for old_value to replace, while replace_if( ) and replace_copy_if( ) look for values that satisfy the predicate pred. The “copy” versions of the functions do not modify the original range but instead make a copy with the replacements into result (incrementing result after each assignment).
Example To provide easy viewing of the results, this example will manipulate vectors of int. Again, not every possible version of each algorithm will be shown (some that should be obvious have been omitted).
//: C05:SearchReplace.cpp // The STL search and replace algorithms #include "PrintSequence.h" #include <vector> #include <algorithm> #include <functional> using namespace std; struct PlusOne { bool operator()(int i, int j) { return j == i + 1; }
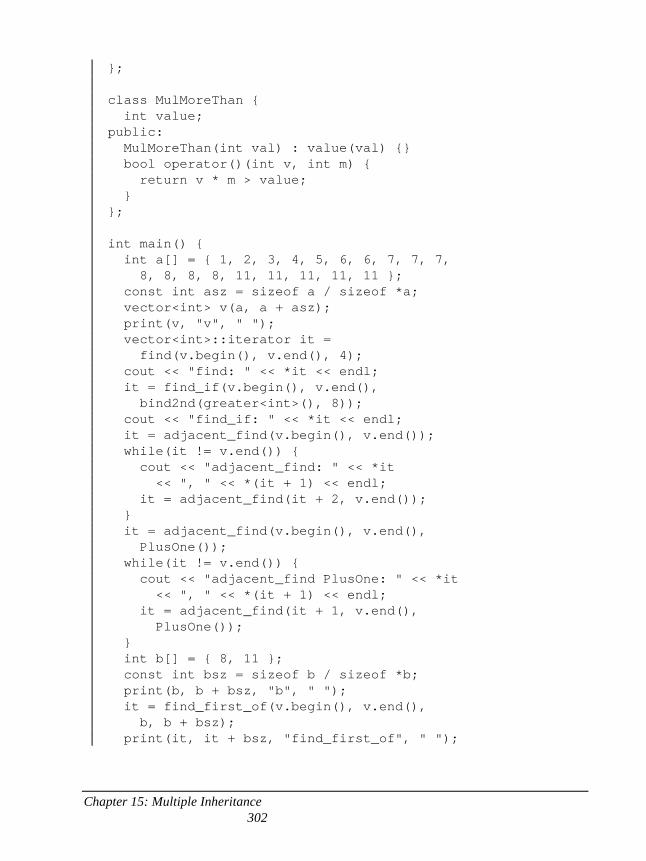
Chapter 15: Multiple Inheritance 302
}; class MulMoreThan { int value; public: MulMoreThan(int val) : value(val) {} bool operator()(int v, int m) { return v * m > value; } }; int main() { int a[] = { 1, 2, 3, 4, 5, 6, 6, 7, 7, 7, 8, 8, 8, 8, 11, 11, 11, 11, 11 }; const int asz = sizeof a / sizeof *a; vector<int> v(a, a + asz); print(v, "v", " "); vector<int>::iterator it = find(v.begin(), v.end(), 4); cout << "find: " << *it << endl; it = find_if(v.begin(), v.end(), bind2nd(greater<int>(), 8)); cout << "find_if: " << *it << endl; it = adjacent_find(v.begin(), v.end()); while(it != v.end()) { cout << "adjacent_find: " << *it << ", " << *(it + 1) << endl; it = adjacent_find(it + 2, v.end()); } it = adjacent_find(v.begin(), v.end(), PlusOne()); while(it != v.end()) { cout << "adjacent_find PlusOne: " << *it << ", " << *(it + 1) << endl; it = adjacent_find(it + 1, v.end(), PlusOne()); } int b[] = { 8, 11 }; const int bsz = sizeof b / sizeof *b; print(b, b + bsz, "b", " "); it = find_first_of(v.begin(), v.end(), b, b + bsz); print(it, it + bsz, "find_first_of", " ");
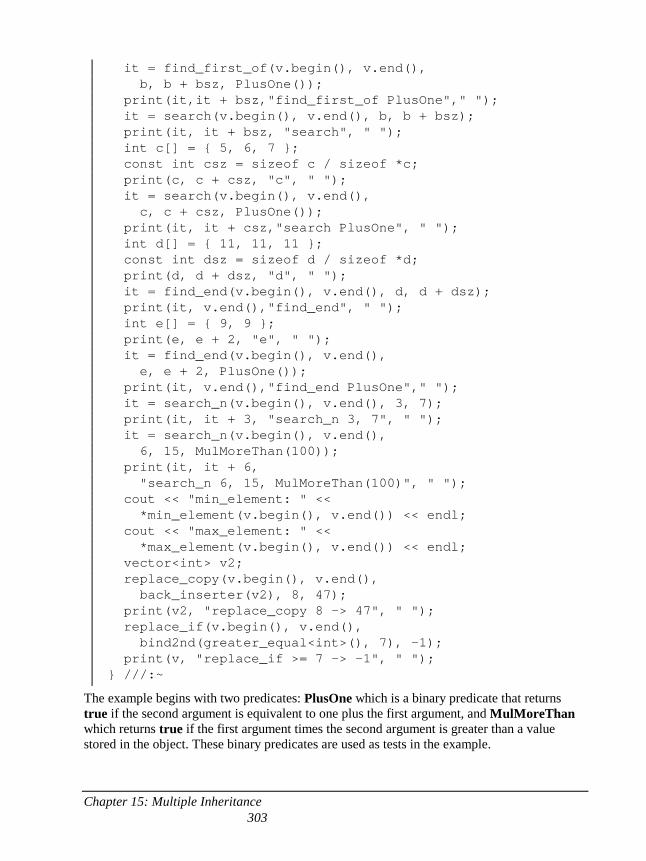
Chapter 15: Multiple Inheritance 303
it = find_first_of(v.begin(), v.end(), b, b + bsz, PlusOne()); print(it,it + bsz,"find_first_of PlusOne"," "); it = search(v.begin(), v.end(), b, b + bsz); print(it, it + bsz, "search", " "); int c[] = { 5, 6, 7 }; const int csz = sizeof c / sizeof *c; print(c, c + csz, "c", " "); it = search(v.begin(), v.end(), c, c + csz, PlusOne()); print(it, it + csz,"search PlusOne", " "); int d[] = { 11, 11, 11 }; const int dsz = sizeof d / sizeof *d; print(d, d + dsz, "d", " "); it = find_end(v.begin(), v.end(), d, d + dsz); print(it, v.end(),"find_end", " "); int e[] = { 9, 9 }; print(e, e + 2, "e", " "); it = find_end(v.begin(), v.end(), e, e + 2, PlusOne()); print(it, v.end(),"find_end PlusOne"," "); it = search_n(v.begin(), v.end(), 3, 7); print(it, it + 3, "search_n 3, 7", " "); it = search_n(v.begin(), v.end(), 6, 15, MulMoreThan(100)); print(it, it + 6, "search_n 6, 15, MulMoreThan(100)", " "); cout << "min_element: " << *min_element(v.begin(), v.end()) << endl; cout << "max_element: " << *max_element(v.begin(), v.end()) << endl; vector<int> v2; replace_copy(v.begin(), v.end(), back_inserter(v2), 8, 47); print(v2, "replace_copy 8 -> 47", " "); replace_if(v.begin(), v.end(), bind2nd(greater_equal<int>(), 7), -1); print(v, "replace_if >= 7 -> -1", " "); } ///:~
The example begins with two predicates: PlusOne which is a binary predicate that returns true if the second argument is equivalent to one plus the first argument, and MulMoreThan which returns true if the first argument times the second argument is greater than a value stored in the object. These binary predicates are used as tests in the example.
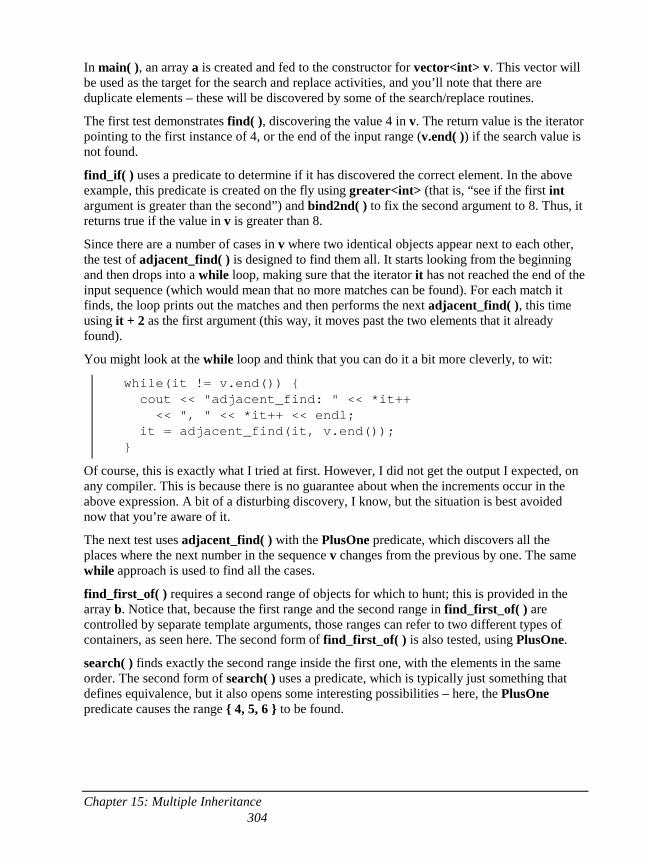
Chapter 15: Multiple Inheritance 304
In main( ), an array a is created and fed to the constructor for vector<int> v. This vector will be used as the target for the search and replace activities, and you’ll note that there are duplicate elements – these will be discovered by some of the search/replace routines.
The first test demonstrates find( ), discovering the value 4 in v. The return value is the iterator pointing to the first instance of 4, or the end of the input range (v.end( )) if the search value is not found.
find_if( ) uses a predicate to determine if it has discovered the correct element. In the above example, this predicate is created on the fly using greater<int> (that is, “see if the first int argument is greater than the second”) and bind2nd( ) to fix the second argument to 8. Thus, it returns true if the value in v is greater than 8.
Since there are a number of cases in v where two identical objects appear next to each other, the test of adjacent_find( ) is designed to find them all. It starts looking from the beginning and then drops into a while loop, making sure that the iterator it has not reached the end of the input sequence (which would mean that no more matches can be found). For each match it finds, the loop prints out the matches and then performs the next adjacent_find( ), this time using it + 2 as the first argument (this way, it moves past the two elements that it already found).
You might look at the while loop and think that you can do it a bit more cleverly, to wit:
while(it != v.end()) { cout << "adjacent_find: " << *it++ << ", " << *it++ << endl; it = adjacent_find(it, v.end()); }
Of course, this is exactly what I tried at first. However, I did not get the output I expected, on any compiler. This is because there is no guarantee about when the increments occur in the above expression. A bit of a disturbing discovery, I know, but the situation is best avoided now that you’re aware of it.
The next test uses adjacent_find( ) with the PlusOne predicate, which discovers all the places where the next number in the sequence v changes from the previous by one. The same while approach is used to find all the cases.
find_first_of( ) requires a second range of objects for which to hunt; this is provided in the array b. Notice that, because the first range and the second range in find_first_of( ) are controlled by separate template arguments, those ranges can refer to two different types of containers, as seen here. The second form of find_first_of( ) is also tested, using PlusOne.
search( ) finds exactly the second range inside the first one, with the elements in the same order. The second form of search( ) uses a predicate, which is typically just something that defines equivalence, but it also opens some interesting possibilities – here, the PlusOne predicate causes the range { 4, 5, 6 } to be found.
Chapter 15: Multiple Inheritance 305
The find_end( ) test discovers the last occurrence of the entire sequence { 11, 11, 11 }. To show that it has in fact found the last occurrence, the rest of v starting from it is printed.
The first search_n( ) test looks for 3 copies of the value 7, which it finds and prints. When using the second version of search_n( ), the predicate is ordinarily meant to be used to determine equivalence between two elements, but I’ve taken some liberties and used a function object that multiplies the value in the sequence by (in this case) 15 and checks to see if it’s greater than 100. That is, the search_n( ) test above says “find me 6 consecutive values which, when multiplied by 15, each produce a number greater than 100.” Not exactly what you normally expect to do, but it might give you some ideas the next time you have an odd searching problem.
min_element( ) and max_element( ) are straightforward; the only thing that’s a bit odd is that it looks like the function is being dereferenced with a ‘*’. Actually, the returned iterator is being dereferenced to produce the value for printing.
To test replacements, replace_copy( ) is used first (so it doesn’t modify the original vector) to replace all values of 8 with the value 47. Notice the use of back_inserter( ) with the empty vector v2. To demonstrate replace_if( ), a function object is created using the standard template greater_equal along with bind2nd to replace all the values that are greater than or equal to 7 with the value -1.
Comparing ranges These algorithms provide ways to compare two ranges. At first glance, the operations they perform seem very close to the search( ) function above. However, search( ) tells you where the second sequence appears within the first, while equal( ) and lexicographical_compare( ) simply tell you whether or not two sequences are exactly identical (using different comparison algorithms). On the other hand, mismatch( ) does tell you where the two sequences go out of sync, but those sequences must be exactly the same length.
bool equal(InputIterator first1, InputIterator last1, InputIterator first2); bool equal(InputIterator first1, InputIterator last1, InputIterator first2 BinaryPredicate binary_pred);
In both of these functions, the first range is the typical one, [first1, last1). The second range starts at first2, but there is no “last2” because its length is determined by the length of the first range. The equal( ) function returns true if both ranges are exactly the same (the same elements in the same order); in the first case, the operator== is used to perform the comparison and in the second case binary_pred is used to decide if two elements are the same.
bool lexicographical_compare(InputIterator1 first1, InputIterator1 last1 InputIterator2 first2, InputIterator2 last2); bool lexicographical_compare(InputIterator1 first1, InputIterator1 last1 InputIterator2 first2, InputIterator2 last2, BinaryPredicate binary_pred);
Chapter 15: Multiple Inheritance 306
These two functions determine if the first range is “lexicographically less” than the second (they return true if range 1 is less than range 2, and false otherwise. Lexicographical equality, or “dictionary” comparison, means that the comparison is done the same way we establish the order of strings in a dictionary, one element at a time. The first elements determine the result if these elements are different, but if they’re equal the algorithm moves on to the next elements and looks at those, and so on. until it finds a mismatch. At that point it looks at the elements, and if the element from range 1 is less than the element from range two, then lexicographical_compare( ) returns true, otherwise it returns false. If it gets all the way through one range or the other (the ranges may be different lengths for this algorithm) without finding an inequality, then range 1 is not less than range 2 so the function returns false.
If the two ranges are different lengths, a missing element in one range acts as one that “precedes” an element that exists in the other range. So {‘a’, ‘b’} lexicographically precedes {‘a’, ‘b’, ‘a’ }.
In the first version of the function, operator< is used to perform the comparisons, and in the second version binary_pred is used.
pair<InputIterator1, InputIterator2> mismatch(InputIterator1 first1, InputIterator1 last1, InputIterator2 first2); pair<InputIterator1, InputIterator2> mismatch(InputIterator1 first1, InputIterator1 last1, InputIterator2 first2, BinaryPredicate binary_pred);
As in equal( ), the length of both ranges is exactly the same, so only the first iterator in the second range is necessary, and the length of the first range is used as the length of the second range. Whereas equal( ) just tells you whether or not the two ranges are the same, mismatch( ) tells you where they begin to differ. To accomplish this, you must be told (1) the element in the first range where the mismatch occurred and (2) the element in the second range where the mismatch occurred. These two iterators are packaged together into a pair object and returned. If no mismatch occurs, the return value is last1 combined with the past-the-end iterator of the second range.
As in equal( ), the first function tests for equality using operator== while the second one uses binary_pred.
Example Because the standard C++ string class is built like a container (it has begin( ) and end( ) member functions which produce objects of type string::iterator), it can be used to conveniently create ranges of characters to test with the STL comparison algorithms. However, you should note that string has a fairly complete set of native operations, so you should look at the string class before using the STL algorithms to perform operations.
//: C05:Comparison.cpp // The STL range comparison algorithms #include "PrintSequence.h" #include <vector> #include <algorithm>
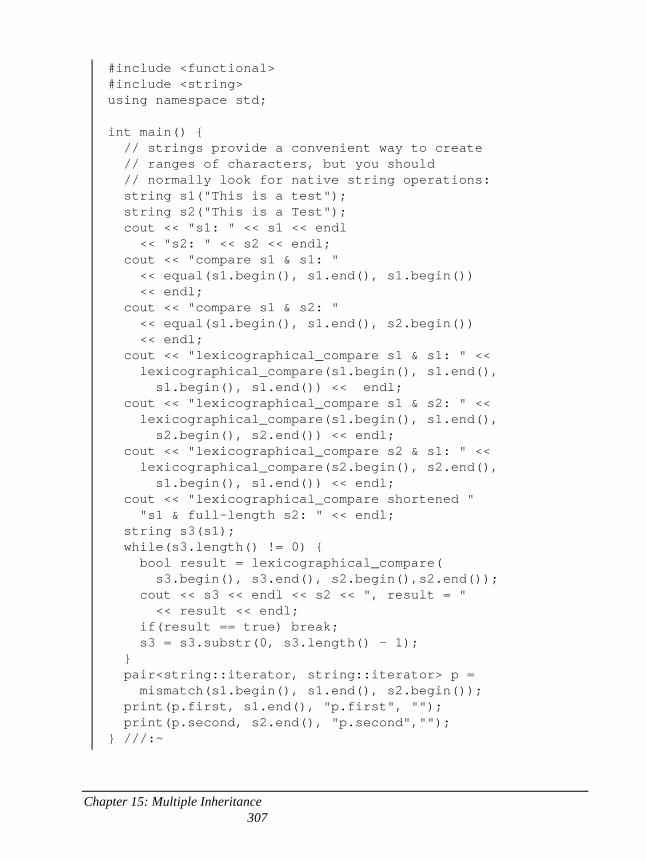
Chapter 15: Multiple Inheritance 307
#include <functional> #include <string> using namespace std; int main() { // strings provide a convenient way to create // ranges of characters, but you should // normally look for native string operations: string s1("This is a test"); string s2("This is a Test"); cout << "s1: " << s1 << endl << "s2: " << s2 << endl; cout << "compare s1 & s1: " << equal(s1.begin(), s1.end(), s1.begin()) << endl; cout << "compare s1 & s2: " << equal(s1.begin(), s1.end(), s2.begin()) << endl; cout << "lexicographical_compare s1 & s1: " << lexicographical_compare(s1.begin(), s1.end(), s1.begin(), s1.end()) << endl; cout << "lexicographical_compare s1 & s2: " << lexicographical_compare(s1.begin(), s1.end(), s2.begin(), s2.end()) << endl; cout << "lexicographical_compare s2 & s1: " << lexicographical_compare(s2.begin(), s2.end(), s1.begin(), s1.end()) << endl; cout << "lexicographical_compare shortened " "s1 & full-length s2: " << endl; string s3(s1); while(s3.length() != 0) { bool result = lexicographical_compare( s3.begin(), s3.end(), s2.begin(),s2.end()); cout << s3 << endl << s2 << ", result = " << result << endl; if(result == true) break; s3 = s3.substr(0, s3.length() - 1); } pair<string::iterator, string::iterator> p = mismatch(s1.begin(), s1.end(), s2.begin()); print(p.first, s1.end(), "p.first", ""); print(p.second, s2.end(), "p.second",""); } ///:~
Chapter 15: Multiple Inheritance 308
Note that the only difference between s1 and s2 is the capital ‘T’ in s2’s “Test.” Comparing s1 and s1 for equality yields true, as expected, while s1 and s2 are not equal because of the capital ‘T’.
To understand the output of the lexicographical_compare( ) tests, you must remember two things: first, the comparison is performed character-by-character, and second that capital letters “precede” lowercase letters. In the first test, s1 is compared to s1. These are exactly equivalent, thus one is not lexicographically less than the other (which is what the comparison is looking for) and thus the result is false. The second test is asking “does s1 precede s2?” When the comparison gets to the ‘t’ in “test”, it discovers that the lowercase ‘t’ in s1 is “greater” than the uppercase ‘T’ in s2, so the answer is again false. However, if we test to see whether s2 precedes s1, the answer is true.
To further examine lexicographical comparison, the next test in the above example compares s1 with s2 again (which returned false before). But this time it repeats the comparison, trimming one character off the end of s1 (which is first copied into s3) each time through the loop until the test evaluates to true. What you’ll see is that, as soon as the uppercase ‘T’ is trimmed off of s3 (the copy of s1), then the characters, which are exactly equal up to that point, no longer count and the fact that s3 is shorter than s2 is what makes it lexicographically precede s2.
The final test uses mismatch( ). In order to capture the return value, you must first create the appropriate pair p, constructing the template using the iterator type from the first range and the iterator type from the second range (in this case, both string::iterators). To print the results, the iterator for the mismatch in the first range is p.first, and for the second range is p.second. In both cases, the range is printed from the mismatch iterator to the end of the range so you can see exactly where the iterator points.
Removing elements Because of the genericity of the STL, the concept of removal is a bit constrained. Since elements can only be “removed” via iterators, and iterators can point to arrays, vectors, lists, etc., it is not safe or reasonable to actually try to destroy the elements that are being removed, and to change the size of the input range [first, last) (an array, for example, cannot have its size changed). So instead, what the STL “remove” functions do is rearrange the sequence so that the “removed” elements are at the end of the sequence, and the “un-removed” elements are at the beginning of the sequence (in the same order that they were before, minus the removed elements – that is, this is a stable operation). Then the function will return an iterator to the “new last” element of the sequence, which is the end of the sequence without the removed elements and the beginning of the sequence of the removed elements. In other words, if new_last is the iterator that is returned from the “remove” function, then [first, new_last) is the sequence without any of the removed elements, and [new_last, last) is the sequence of removed elements.
If you are simply using your sequence, including the removed elements, with more STL algorithms, you can just use new_last as the new past-the-end iterator. However, if you’re
Chapter 15: Multiple Inheritance 309
using a resizable container c (not an array) and you actually want to eliminate the removed elements from the container you can use erase( ) to do so, for example:
c.erase(remove(c.begin(), c.end(), value), c.end());
The return value of remove( ) is the new_last iterator, so erase( ) will delete all the removed elements from c.
The iterators in [new_last, last) are dereferenceable but the element values are undefined and should not be used.
ForwardIterator remove(ForwardIterator first, ForwardIterator last, const T& value); ForwardIterator remove_if(ForwardIterator first, ForwardIterator last, Predicate pred); OutputIterator remove_copy(InputIterator first, InputIterator last, OutputIterator result, const T& value); OutputIterator remove_copy_if(InputIterator first, InputIterator last, OutputIterator result, Predicate pred);
Each of the “remove” forms moves through the range [first, last), finding values that match a removal criterion and copying the un-removed elements over the removed elements (thus effectively removing them). The original order of the un-removed elements is maintained. The return value is an iterator pointing past the end of the range that contains none of the removed elements. The values that this iterator points to are unspecified.
The “if” versions pass each element to pred( ) to determine whether it should be removed or not (if pred( ) returns true, the element is removed). The “copy” versions do not modify the original sequence, but instead copy the un-removed values into a range beginning at result, and return an iterator indicating the past-the-end value of this new range.
ForwardIterator unique(ForwardIterator first, ForwardIterator last); ForwardIterator unique(ForwardIterator first, ForwardIterator last, BinaryPredicate binary_pred); OutputIterator unique_copy(InputIterator first, InputIterator last, OutputIterator result); OutputIterator unique_copy(InputIterator first, InputIterator last, OutputIterator result, BinaryPredicate binary_pred);
Each of the “unique” functions moves through the range [first, last), finding adjacent values that are equivalent (that is, duplicates) and “removing” the duplicate elements by copying over them. The original order of the un-removed elements is maintained. The return value is an iterator pointing past the end of the range that has the adjacent duplicates removed.
Because only duplicates that are adjacent are removed, it’s likely that you’ll want to call sort( ) before calling a “unique” algorithm, since that will guarantee that all the duplicates are removed.
The versions containing binary_pred call, for each iterator value i in the input range:
binary_pred(*i, *(i-1));
Chapter 15: Multiple Inheritance 310
and if the result is true then *(i-1) is considered a duplicate.
The “copy” versions do not modify the original sequence, but instead copy the un-removed values into a range beginning at result, and return an iterator indicating the past-the-end value of this new range.
Example This example gives a visual demonstration of the way the “remove” and “unique” functions work.
//: C05:Removing.cpp // The removing algorithms #include "PrintSequence.h" #include "Generators.h" #include <vector> #include <algorithm> #include <cctype> using namespace std; struct IsUpper { bool operator()(char c) { return isupper(c); } }; int main() { vector<char> v(50); generate(v.begin(), v.end(), CharGen()); print(v, "v", ""); // Create a set of the characters in v: set<char> cs(v.begin(), v.end()); set<char>::iterator it = cs.begin(); vector<char>::iterator cit; // Step through and remove everything: while(it != cs.end()) { cit = remove(v.begin(), v.end(), *it); cout << *it << "[" << *cit << "] "; print(v, "", ""); it++; } generate(v.begin(), v.end(), CharGen()); print(v, "v", ""); cit = remove_if(v.begin(), v.end(), IsUpper());
Chapter 15: Multiple Inheritance 311
print(v.begin(), cit, "after remove_if", ""); // Copying versions are not shown for remove // and remove_if. sort(v.begin(), cit); print(v.begin(), cit, "sorted", ""); vector<char> v2; unique_copy(v.begin(), cit, back_inserter(v2)); print(v2, "unique_copy", ""); // Same behavior: cit = unique(v.begin(), cit, equal_to<char>()); print(v.begin(), cit, "unique", ""); } ///:~
The vector<char> v is filled with randomly-generated characters and then copied into a set. Each element of the set is used in a remove statement, but the entire vector v is printed out each time so you can see what happens to the rest of the range, after the resulting endpoint (which is stored in cit).
To demonstrate remove_if( ), the address of the Standard C library function isupper( ) (in <cctype> is called inside of the function object class IsUpper, an object of which is passed as the predicate for remove_if( ). This only returns true if a character is uppercase, so only lowercase characters will remain. Here, the end of the range is used in the call to print( ) so only the remaining elements will appear. The copying versions of remove( ) and remove_if( ) are not shown because they are a simple variation on the non-copying versions which you should be able to use without an example.
The range of lowercase letters is sorted in preparation for testing the “unique” functions (the “unique” functions are not undefined if the range isn’t sorted, but it’s probably not what you want). First, unique_copy( ) puts the unique elements into a new vector using the default element comparison, and then the form of unique( ) that takes a predicate is used; the predicate used is the built-in function object equal_to( ), which produces the same results as the default element comparison.
Sorting and operations on sorted ranges There is a significant category of STL algorithms which require that the range they operate on be in sorted order.
There is actually only one “sort” algorithm used in the STL. This algorithm is presumably the fastest one, but the implementer has fairly broad latitude. However, it comes packaged in various flavors depending on whether the sort should be stable, partial or just the regular sort. Oddly enough, only the partial sort has a copying version; otherwise you’ll need to make your own copy before sorting if that’s what you want. If you are working with a very large number of items you may be better off transferring them to an array (or at least a vector, which uses an array internally) rather than using them in some of the STL containers.
Chapter 15: Multiple Inheritance 312
Once your sequence is sorted, there are many operations you can perform on that sequence, from simply locating an element or group of elements to merging with another sorted sequence or manipulating sequences as mathematical sets.
Each algorithm involved with sorting or operations on sorted sequences has two versions of each function, the first that uses the object’s own operator< to perform the comparison, and the second that uses an additional StrictWeakOrdering object’s operator( )(a, b) to compare two objects for a < b. Other than this there are no differences, so the distinction will not be pointed out in the description of each algorithm.
Sorting One STL container (list) has its own built-in sort( ) function which is almost certainly going to be faster than the generic sort presented here (especially since the list sort just swaps pointers rather than copying entire objects around). This means that you’ll only want to use the sort functions here if (a) you’re working with an array or a sequence container that doesn’t have a sort( ) function or (b) you want to use one of the other sorting flavors, like a partial or stable sort, which aren’t supported by list’s sort( ).
void sort(RandomAccessIterator first, RandomAccessIterator last); void sort(RandomAccessIterator first, RandomAccessIterator last, StrictWeakOrdering binary_pred);
Sorts [first, last) into ascending order. The second form allows a comparator object to determine the order.
void stable_sort(RandomAccessIterator first, RandomAccessIterator last); void stable_sort(RandomAccessIterator first, RandomAccessIterator last, StrictWeakOrdering binary_pred);
Sorts [first, last) into ascending order, preserving the original ordering of equivalent elements (this is important if elements can be equivalent but not identical). The second form allows a comparator object to determine the order.
void partial_sort(RandomAccessIterator first, RandomAccessIterator middle, RandomAccessIterator last); void partial_sort(RandomAccessIterator first, RandomAccessIterator middle, RandomAccessIterator last, StrictWeakOrdering binary_pred);
Sorts the number of elements from [first, last) that can be placed in the range [first, middle). The rest of the elements end up in [middle, last), and have no guaranteed order. The second form allows a comparator object to determine the order.
RandomAccessIterator partial_sort_copy(InputIterator first, InputIterator last, RandomAccessIterator result_first, RandomAccessIterator result_last); RandomAccessIterator partial_sort_copy(InputIterator first,
Chapter 15: Multiple Inheritance 313
InputIterator last, RandomAccessIterator result_first, RandomAccessIterator result_last, StrictWeakOrdering binary_pred);
Sorts the number of elements from [first, last) that can be placed in the range [result_first, result_last), and copies those elements into [result_first, result_last). If the range [first, last) is smaller than [result_first, result_last), then the smaller number of elements is used. The second form allows a comparator object to determine the order.
void nth_element(RandomAccessIterator first, RandomAccessIterator nth, RandomAccessIterator last); void nth_element(RandomAccessIterator first, RandomAccessIterator nth, RandomAccessIterator last, StrictWeakOrdering binary_pred);
Just like partial_sort( ), nth_element( ) partially orders a range of elements. However, it’s much “less ordered” than partial_sort( ). The only thing that nth_element( ) guarantees is that whatever location you choose will become a dividing point. All the elements in the range [first, nth) will be less than (they could also be equivalent to) whatever element ends up at location nth and all the elements in the range (nth, last] will be greater than whatever element ends up location nth. However, neither range is in any particular order, unlike partial_sort( ) which has the first range in sorted order.
If all you need is this very weak ordering (if, for example, you’re determining medians, percentiles and that sort of thing) this algorithm is faster than partial_sort( ).
Example The StreamTokenizer class from the previous chapter is used to break a file into words, and each word is turned into an NString and added to a deque<NString>. Once the input file is completely read, a vector<NString> is created from the contents of the deque. The vector is then used to demonstrate the sorting algorithms:
//: C05:SortTest.cpp //{L} ../C04/StreamTokenizer // Test different kinds of sorting #include "../C04/StreamTokenizer.h" #include "NString.h" #include "PrintSequence.h" #include "Generators.h" #include "../require.h" #include <algorithm> #include <fstream> #include <queue> #include <vector> #include <cctype> using namespace std;
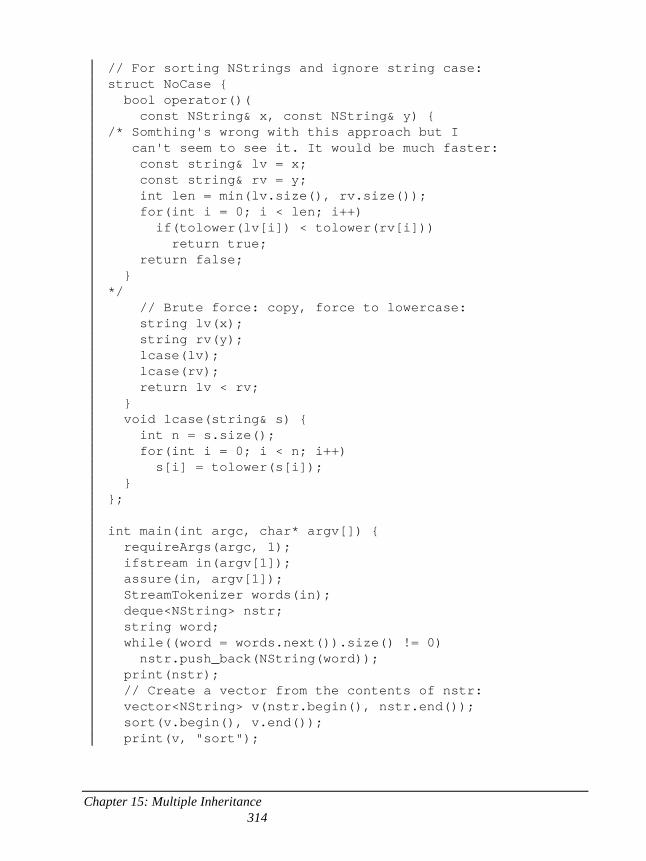
Chapter 15: Multiple Inheritance 314
// For sorting NStrings and ignore string case: struct NoCase { bool operator()( const NString& x, const NString& y) { /* Somthing's wrong with this approach but I can't seem to see it. It would be much faster: const string& lv = x; const string& rv = y; int len = min(lv.size(), rv.size()); for(int i = 0; i < len; i++) if(tolower(lv[i]) < tolower(rv[i])) return true; return false; } */ // Brute force: copy, force to lowercase: string lv(x); string rv(y); lcase(lv); lcase(rv); return lv < rv; } void lcase(string& s) { int n = s.size(); for(int i = 0; i < n; i++) s[i] = tolower(s[i]); } }; int main(int argc, char* argv[]) { requireArgs(argc, 1); ifstream in(argv[1]); assure(in, argv[1]); StreamTokenizer words(in); deque<NString> nstr; string word; while((word = words.next()).size() != 0) nstr.push_back(NString(word)); print(nstr); // Create a vector from the contents of nstr: vector<NString> v(nstr.begin(), nstr.end()); sort(v.begin(), v.end()); print(v, "sort");
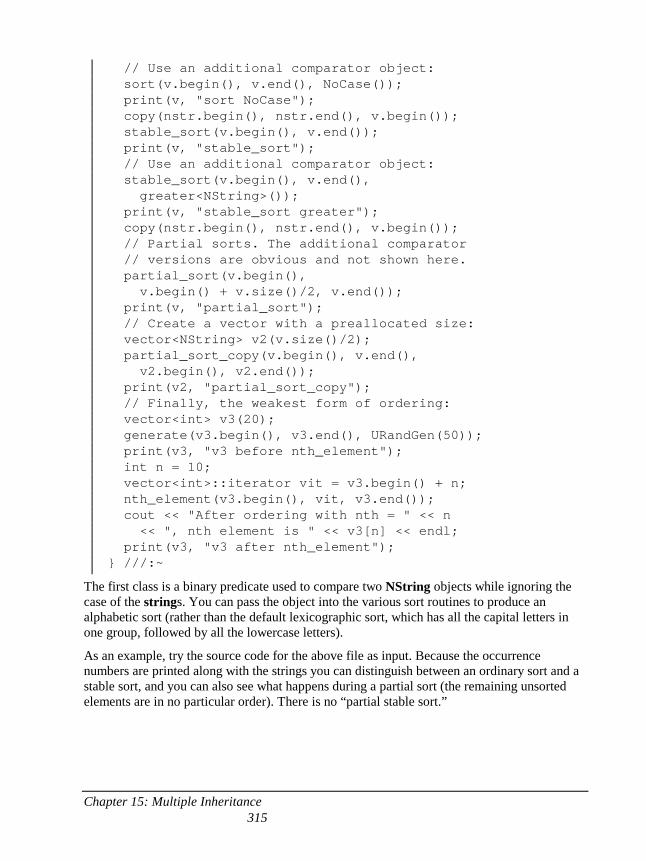
Chapter 15: Multiple Inheritance 315
// Use an additional comparator object: sort(v.begin(), v.end(), NoCase()); print(v, "sort NoCase"); copy(nstr.begin(), nstr.end(), v.begin()); stable_sort(v.begin(), v.end()); print(v, "stable_sort"); // Use an additional comparator object: stable_sort(v.begin(), v.end(), greater<NString>()); print(v, "stable_sort greater"); copy(nstr.begin(), nstr.end(), v.begin()); // Partial sorts. The additional comparator // versions are obvious and not shown here. partial_sort(v.begin(), v.begin() + v.size()/2, v.end()); print(v, "partial_sort"); // Create a vector with a preallocated size: vector<NString> v2(v.size()/2); partial_sort_copy(v.begin(), v.end(), v2.begin(), v2.end()); print(v2, "partial_sort_copy"); // Finally, the weakest form of ordering: vector<int> v3(20); generate(v3.begin(), v3.end(), URandGen(50)); print(v3, "v3 before nth_element"); int n = 10; vector<int>::iterator vit = v3.begin() + n; nth_element(v3.begin(), vit, v3.end()); cout << "After ordering with nth = " << n << ", nth element is " << v3[n] << endl; print(v3, "v3 after nth_element"); } ///:~
The first class is a binary predicate used to compare two NString objects while ignoring the case of the strings. You can pass the object into the various sort routines to produce an alphabetic sort (rather than the default lexicographic sort, which has all the capital letters in one group, followed by all the lowercase letters).
As an example, try the source code for the above file as input. Because the occurrence numbers are printed along with the strings you can distinguish between an ordinary sort and a stable sort, and you can also see what happens during a partial sort (the remaining unsorted elements are in no particular order). There is no “partial stable sort.”
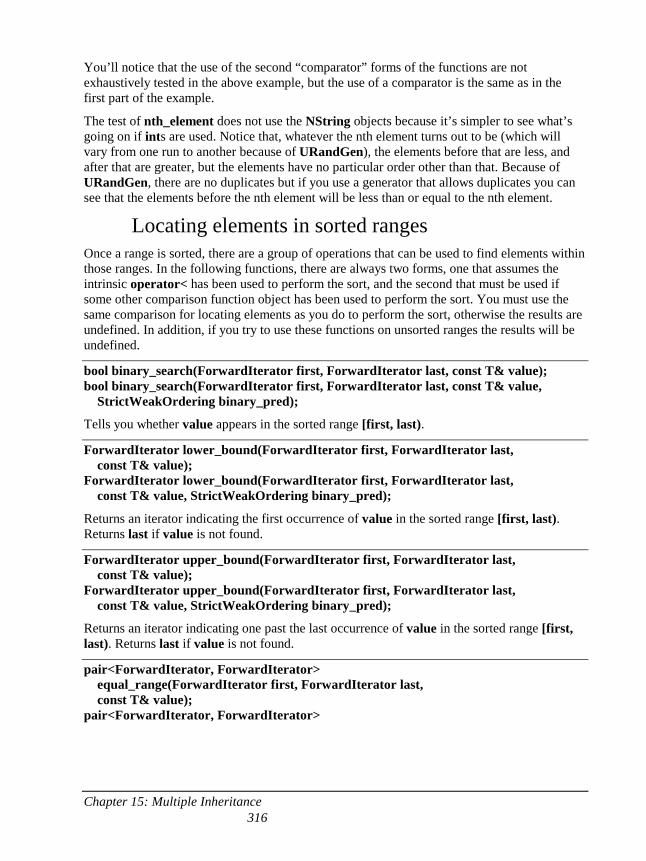
Chapter 15: Multiple Inheritance 316
You’ll notice that the use of the second “comparator” forms of the functions are not exhaustively tested in the above example, but the use of a comparator is the same as in the first part of the example.
The test of nth_element does not use the NString objects because it’s simpler to see what’s going on if ints are used. Notice that, whatever the nth element turns out to be (which will vary from one run to another because of URandGen), the elements before that are less, and after that are greater, but the elements have no particular order other than that. Because of URandGen, there are no duplicates but if you use a generator that allows duplicates you can see that the elements before the nth element will be less than or equal to the nth element.
Locating elements in sorted ranges Once a range is sorted, there are a group of operations that can be used to find elements within those ranges. In the following functions, there are always two forms, one that assumes the intrinsic operator< has been used to perform the sort, and the second that must be used if some other comparison function object has been used to perform the sort. You must use the same comparison for locating elements as you do to perform the sort, otherwise the results are undefined. In addition, if you try to use these functions on unsorted ranges the results will be undefined.
bool binary_search(ForwardIterator first, ForwardIterator last, const T& value); bool binary_search(ForwardIterator first, ForwardIterator last, const T& value, StrictWeakOrdering binary_pred);
Tells you whether value appears in the sorted range [first, last).
ForwardIterator lower_bound(ForwardIterator first, ForwardIterator last, const T& value); ForwardIterator lower_bound(ForwardIterator first, ForwardIterator last, const T& value, StrictWeakOrdering binary_pred);
Returns an iterator indicating the first occurrence of value in the sorted range [first, last). Returns last if value is not found.
ForwardIterator upper_bound(ForwardIterator first, ForwardIterator last, const T& value); ForwardIterator upper_bound(ForwardIterator first, ForwardIterator last, const T& value, StrictWeakOrdering binary_pred);
Returns an iterator indicating one past the last occurrence of value in the sorted range [first, last). Returns last if value is not found.
pair<ForwardIterator, ForwardIterator> equal_range(ForwardIterator first, ForwardIterator last, const T& value); pair<ForwardIterator, ForwardIterator>
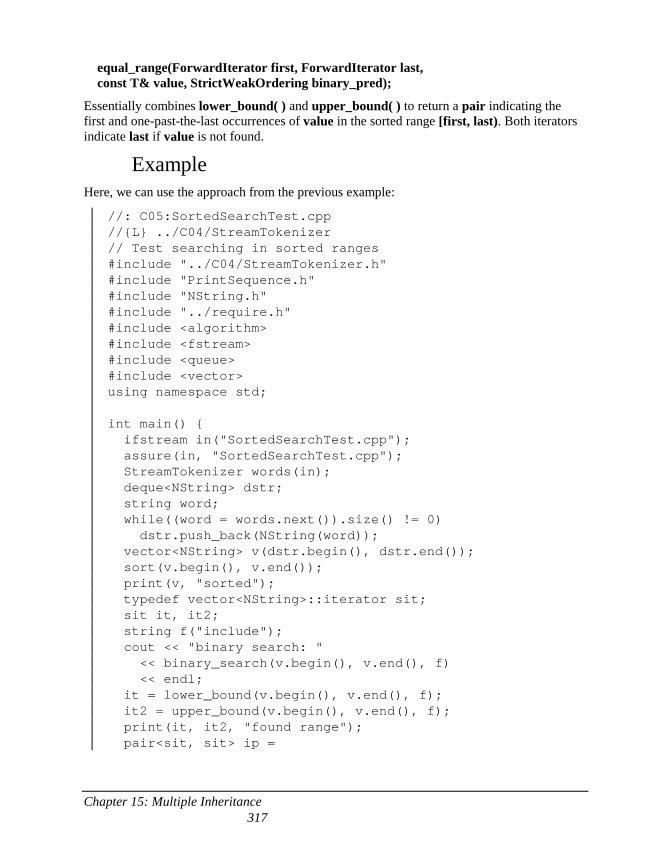
Chapter 15: Multiple Inheritance 317
equal_range(ForwardIterator first, ForwardIterator last, const T& value, StrictWeakOrdering binary_pred);
Essentially combines lower_bound( ) and upper_bound( ) to return a pair indicating the first and one-past-the-last occurrences of value in the sorted range [first, last). Both iterators indicate last if value is not found.
Example Here, we can use the approach from the previous example:
//: C05:SortedSearchTest.cpp //{L} ../C04/StreamTokenizer // Test searching in sorted ranges #include "../C04/StreamTokenizer.h" #include "PrintSequence.h" #include "NString.h" #include "../require.h" #include <algorithm> #include <fstream> #include <queue> #include <vector> using namespace std; int main() { ifstream in("SortedSearchTest.cpp"); assure(in, "SortedSearchTest.cpp"); StreamTokenizer words(in); deque<NString> dstr; string word; while((word = words.next()).size() != 0) dstr.push_back(NString(word)); vector<NString> v(dstr.begin(), dstr.end()); sort(v.begin(), v.end()); print(v, "sorted"); typedef vector<NString>::iterator sit; sit it, it2; string f("include"); cout << "binary search: " << binary_search(v.begin(), v.end(), f) << endl; it = lower_bound(v.begin(), v.end(), f); it2 = upper_bound(v.begin(), v.end(), f); print(it, it2, "found range"); pair<sit, sit> ip =
Chapter 15: Multiple Inheritance 318
equal_range(v.begin(), v.end(), f); print(ip.first, ip.second, "equal_range"); } ///:~
The input is forced to be the source code for this file because the word “include” will be used for a find string (since “include” appears many times). The file is tokenized into words that are placed into a deque (a better container when you don’t know how much storage to allocate), and left unsorted in the deque. The deque is copied into a vector via the appropriate constructor, and the vector is sorted and printed.
The binary_search( ) function only tells you if the object is there or not; lower_bound( ) and upper_bound( ) produce iterators to the beginning and ending positions where the matching objects appear. The same effect can be produced more succinctly using equal_range( ) (as shown in the previous chapter, with multimap and multiset).
Merging sorted ranges As before, the first form of each function assumes the intrinsic operator< has been used to perform the sort. The second form must be used if some other comparison function object has been used to perform the sort. You must use the same comparison for locating elements as you do to perform the sort, otherwise the results are undefined. In addition, if you try to use these functions on unsorted ranges the results will be undefined.
OutputIterator merge(InputIterator1 first1, InputIterator1 last1, InputIterator2 first2, InputIterator2 last2, OutputIterator result); OutputIterator merge(InputIterator1 first1, InputIterator1 last1, InputIterator2 first2, InputIterator2 last2, OutputIterator result, StrictWeakOrdering binary_pred);
Copies elements from [first1, last1) and [first2, last2) into result, such that the resulting range is sorted in ascending order. This is a stable operation.
void inplace_merge(BidirectionalIterator first, BidirectionalIterator middle, BidirectionalIterator last); void inplace_merge(BidirectionalIterator first, BidirectionalIterator middle, BidirectionalIterator last, StrictWeakOrdering binary_pred);
This assumes that [first, middle) and [middle, last) are each sorted ranges. The two ranges are merged so that the resulting range [first, last) contains the combined ranges in sorted order.
Example It’s easier to see what goes on with merging if ints are used; the following example also emphasizes how the algorithms (and my own print template) work with arrays as well as containers.
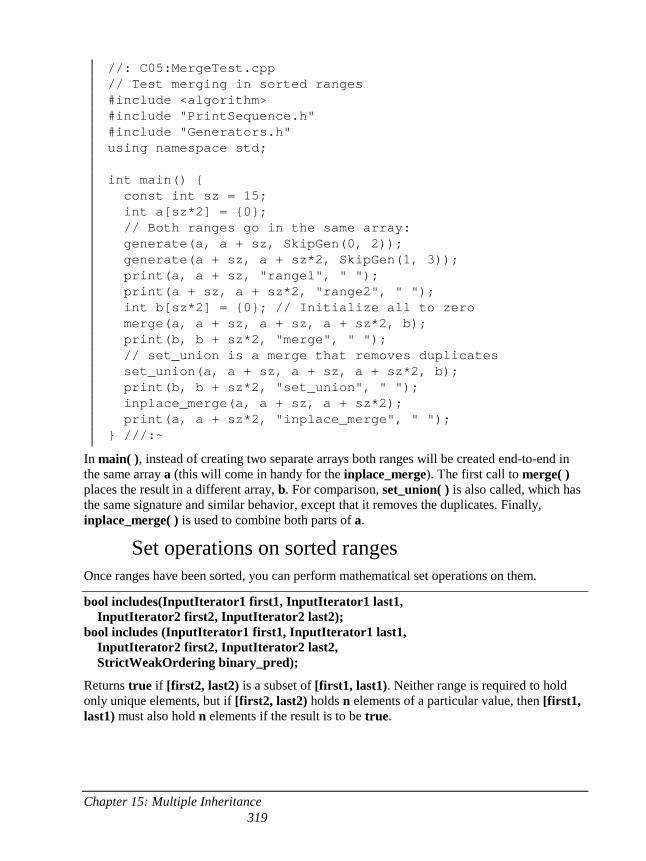
Chapter 15: Multiple Inheritance 319
//: C05:MergeTest.cpp // Test merging in sorted ranges #include <algorithm> #include "PrintSequence.h" #include "Generators.h" using namespace std; int main() { const int sz = 15; int a[sz*2] = {0}; // Both ranges go in the same array: generate(a, a + sz, SkipGen(0, 2)); generate(a + sz, a + sz*2, SkipGen(1, 3)); print(a, a + sz, "range1", " "); print(a + sz, a + sz*2, "range2", " "); int b[sz*2] = {0}; // Initialize all to zero merge(a, a + sz, a + sz, a + sz*2, b); print(b, b + sz*2, "merge", " "); // set_union is a merge that removes duplicates set_union(a, a + sz, a + sz, a + sz*2, b); print(b, b + sz*2, "set_union", " "); inplace_merge(a, a + sz, a + sz*2); print(a, a + sz*2, "inplace_merge", " "); } ///:~
In main( ), instead of creating two separate arrays both ranges will be created end-to-end in the same array a (this will come in handy for the inplace_merge). The first call to merge( ) places the result in a different array, b. For comparison, set_union( ) is also called, which has the same signature and similar behavior, except that it removes the duplicates. Finally, inplace_merge( ) is used to combine both parts of a.
Set operations on sorted ranges Once ranges have been sorted, you can perform mathematical set operations on them.
bool includes(InputIterator1 first1, InputIterator1 last1, InputIterator2 first2, InputIterator2 last2); bool includes (InputIterator1 first1, InputIterator1 last1, InputIterator2 first2, InputIterator2 last2, StrictWeakOrdering binary_pred);
Returns true if [first2, last2) is a subset of [first1, last1). Neither range is required to hold only unique elements, but if [first2, last2) holds n elements of a particular value, then [first1, last1) must also hold n elements if the result is to be true.

Chapter 15: Multiple Inheritance 320
OutputIterator set_union(InputIterator1 first1, InputIterator1 last1, InputIterator2 first2, InputIterator2 last2, OutputIterator result); OutputIterator set_union(InputIterator1 first1, InputIterator1 last1, InputIterator2 first2, InputIterator2 last2, OutputIterator result, StrictWeakOrdering binary_pred);
Creates the mathematical union of two sorted ranges in the result range, returning the end of the output range. Neither input range is required to hold only unique elements, but if a particular value appears multiple times in both input sets, then the resulting set will contain the larger number of identical values.
OutputIterator set_intersection (InputIterator1 first1, InputIterator1 last1, InputIterator2 first2, InputIterator2 last2, OutputIterator result); OutputIterator set_intersection (InputIterator1 first1, InputIterator1 last1, InputIterator2 first2, InputIterator2 last2, OutputIterator result, StrictWeakOrdering binary_pred);
Produces, in result, the intersection of the two input sets, returning the end of the output range. That is, the set of values that appear in both input sets. Neither input range is required to hold only unique elements, but if a particular value appears multiple times in both input sets, then the resulting set will contain the smaller number of identical values.
OutputIterator set_difference (InputIterator1 first1, InputIterator1 last1, InputIterator2 first2, InputIterator2 last2, OutputIterator result); OutputIterator set_difference (InputIterator1 first1, InputIterator1 last1, InputIterator2 first2, InputIterator2 last2, OutputIterator result, StrictWeakOrdering binary_pred);
Produces, in result, the mathematical set difference, returning the end of the output range. All the elements that are in [first1, last1) but not in [first2, last2) are placed in the result set. Neither input range is required to hold only unique elements, but if a particular value appears multiple times in both input sets (n times in set 1 and m times in set 2), then the resulting set will contain max(n-m, 0) copies of that value.
OutputIterator set_symmetric_difference(InputIterator1 first1, InputIterator1 last1, InputIterator2 first2, InputIterator2 last2, OutputIterator result); OutputIterator set_symmetric_difference(InputIterator1 first1, InputIterator1 last1, InputIterator2 first2, InputIterator2 last2, OutputIterator result, StrictWeakOrdering binary_pred);
Constructs, in result, the set containing:
• All the elements in set 1 that are not in set 2
• All the elements in set 2 that are not in set 1.
Neither input range is required to hold only unique elements, but if a particular value appears multiple times in both input sets (n times in set 1 and m times in set 2), then the resulting set
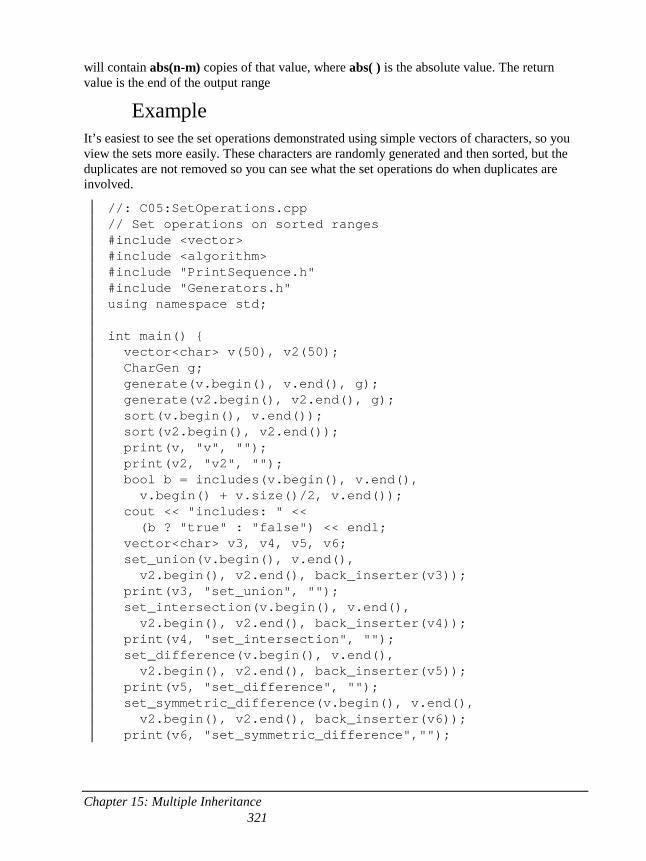
Chapter 15: Multiple Inheritance 321
will contain abs(n-m) copies of that value, where abs( ) is the absolute value. The return value is the end of the output range
Example It’s easiest to see the set operations demonstrated using simple vectors of characters, so you view the sets more easily. These characters are randomly generated and then sorted, but the duplicates are not removed so you can see what the set operations do when duplicates are involved.
//: C05:SetOperations.cpp // Set operations on sorted ranges #include <vector> #include <algorithm> #include "PrintSequence.h" #include "Generators.h" using namespace std; int main() { vector<char> v(50), v2(50); CharGen g; generate(v.begin(), v.end(), g); generate(v2.begin(), v2.end(), g); sort(v.begin(), v.end()); sort(v2.begin(), v2.end()); print(v, "v", ""); print(v2, "v2", ""); bool b = includes(v.begin(), v.end(), v.begin() + v.size()/2, v.end()); cout << "includes: " << (b ? "true" : "false") << endl; vector<char> v3, v4, v5, v6; set_union(v.begin(), v.end(), v2.begin(), v2.end(), back_inserter(v3)); print(v3, "set_union", ""); set_intersection(v.begin(), v.end(), v2.begin(), v2.end(), back_inserter(v4)); print(v4, "set_intersection", ""); set_difference(v.begin(), v.end(), v2.begin(), v2.end(), back_inserter(v5)); print(v5, "set_difference", ""); set_symmetric_difference(v.begin(), v.end(), v2.begin(), v2.end(), back_inserter(v6)); print(v6, "set_symmetric_difference","");
Chapter 15: Multiple Inheritance 322
} ///:~
After v and v2 are generated, sorted and printed, the includes( ) algorithm is tested by seeing if the entire range of v contains the last half of v, which of course it does so the result should always be true. The vectors v3, v4, v5 and v6 are created to hold the output of set_union( ), set_intersection( ), set_difference( ) and set_symmetric_difference( ), and the results of each are displayed so you can ponder them and convince yourself that the algorithms do indeed work as promised.
Heap operations The heap operations in the STL are primarily concerned with the creation of the STL priority_queue, which provides efficient access to the “largest” element, whatever “largest” happens to mean for your program. These were discussed in some detail in the previous chapter, and you can find an example there.
As with the “sort” operations, there are two versions of each function, the first that uses the object’s own operator< to perform the comparison, the second that uses an additional StrictWeakOrdering object’s operator( )(a, b) to compare two objects for a < b.
void make_heap(RandomAccessIterator first, RandomAccessIterator last); void make_heap(RandomAccessIterator first, RandomAccessIterator last, StrictWeakOrdering binary_pred);
Turns an arbitrary range into a heap. A heap is just a range that is organized in a particular way.
void push_heap(RandomAccessIterator first, RandomAccessIterator last); void push_heap(RandomAccessIterator first, RandomAccessIterator last, StrictWeakOrdering binary_pred);
Adds the element *(last-1) to the heap determined by the range [first, last-1). Yes, it seems like an odd way to do things but remember that the priority_queue container presents the nice interface to a heap, as shown in the previous chapter.
void pop_heap(RandomAccessIterator first, RandomAccessIterator last); void pop_heap(RandomAccessIterator first, RandomAccessIterator last, StrictWeakOrdering binary_pred);
Places the largest element (which is actually in *first, before the operation, because of the way heaps are defined) into the position *(last-1) and reorganizes the remaining range so that it’s still in heap order. If you simply grabbed *first, the next element would not be the next-largest element so you must use pop_heap( ) if you want to maintain the heap in its proper priority-queue order.
void sort_heap(RandomAccessIterator first, RandomAccessIterator last); void sort_heap(RandomAccessIterator first, RandomAccessIterator last, StrictWeakOrdering binary_pred);
Chapter 15: Multiple Inheritance 323
This could be thought of as the complement of make_heap( ), since it takes a range that is in heap order and turns it into ordinary sorted order, so it is no longer a heap. That means that if you call sort_heap( ) you can no longer use push_heap( ) or pop_heap( ) on that range (rather, you can use those functions but they won’t do anything sensible). This is not a stable sort.
Applying an operation to each element in a range
These algorithms move through the entire range and perform an operation on each element. They differ in what they do with the results of that operation: for_each( ) discards the return value of the operation (but returns the function object that has been applied to each element), while transform( ) places the results of each operation into a destination sequence (which can be the original sequence).
UnaryFunction for_each(InputIterator first, InputIterator last, UnaryFunction f);
Applies the function object f to each element in [first, last), discarding the return value from each individual application of f. If f is just a function pointer then you are typically not interested in the return value, but if f is an object that maintains some internal state it can capture the combined return value of being applied to the range. The final return value of for_each( ) is f.
OutputIterator transform(InputIterator first, InputIterator last, OutputIterator result, UnaryFunction f); OutputIterator transform(InputIterator1 first, InputIterator1 last, InputIterator2 first2, OutputIterator result, BinaryFunction f);
Like for_each( ), transform( ) applies a function object f to each element in the range [first, last). However, instead of discarding the result of each function call, transform( ) copies the result (using operator=) into *result, incrementing result after each copy (the sequence pointed to by result must have enough storage, otherwise you should use an inserter to force insertions instead of assignments).
The first form of transform( ) simply calls f( ) and passes it each object from the input range as an argument. The second form passes an object from the first input range and one from the second input range as the two arguments to the binary function f (note the length of the second input range is determined by the length of the first). The return value in both cases is the past-the-end iterator for the resulting output range.
Examples Since much of what you do with objects in a container is to apply an operation to all of those objects, these are fairly important algorithms and merit several illustrations.

Chapter 15: Multiple Inheritance 324
First, consider for_each( ). This sweeps through the range, pulling out each element and passing it as an argument as it calls whatever function object it’s been given. Thus for_each( ) performs operations that you might normally write out by hand. In Stlshape.cpp, for example:
for(Iter j = shapes.begin(); j != shapes.end(); j++) delete *j;
If you look in your compiler’s header file at the template defining for_each( ), you’ll see something like this:
template <class InputIterator, class Function> Function for_each(InputIterator first, InputIterator last, Function f) { while (first != last) f(*first++); return f; }
Function f looks at first like it must be a pointer to a function which takes, as an argument, an object of whatever InputIterator selects. However, the above template actually only says that you must be able to call f using parentheses and an argument. This is true for a function pointer, but it’s also true for a function object – any class that defines the appropriate operator( ). The following example shows several different ways this template can be expanded. First, we need a class that keeps track of its objects so we can know that it’s being properly destroyed:
//: C05:Counted.h // An object that keeps track of itself #ifndef COUNTED_H #define COUNTED_H #include <vector> #include <iostream> class Counted { static int count; char* ident; public: Counted(char* id) : ident(id) { count++; } ~Counted() { std::cout << ident << " count = " << --count << std::endl; } };
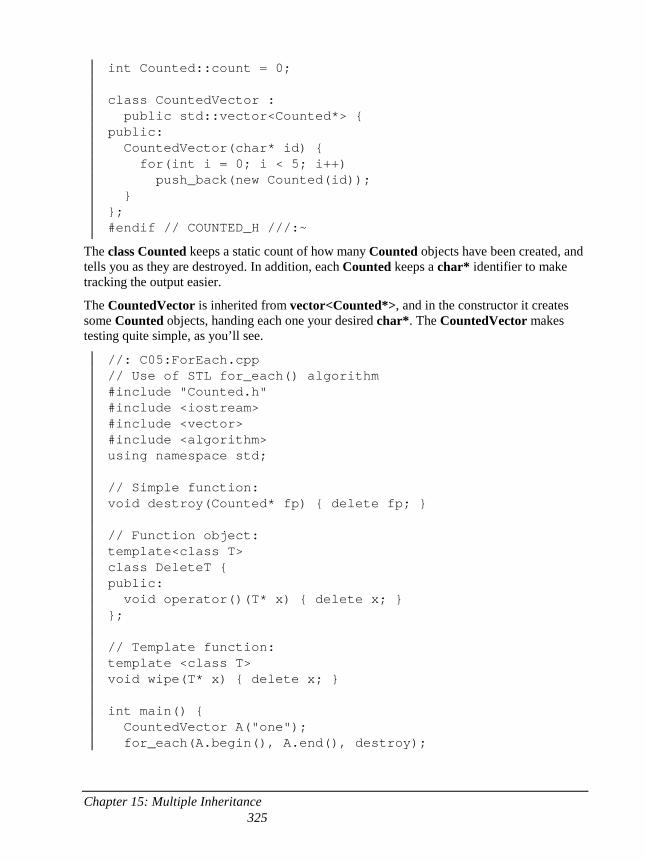
Chapter 15: Multiple Inheritance 325
int Counted::count = 0; class CountedVector : public std::vector<Counted*> { public: CountedVector(char* id) { for(int i = 0; i < 5; i++) push_back(new Counted(id)); } }; #endif // COUNTED_H ///:~
The class Counted keeps a static count of how many Counted objects have been created, and tells you as they are destroyed. In addition, each Counted keeps a char* identifier to make tracking the output easier.
The CountedVector is inherited from vector<Counted*>, and in the constructor it creates some Counted objects, handing each one your desired char*. The CountedVector makes testing quite simple, as you’ll see.
//: C05:ForEach.cpp // Use of STL for_each() algorithm #include "Counted.h" #include <iostream> #include <vector> #include <algorithm> using namespace std; // Simple function: void destroy(Counted* fp) { delete fp; } // Function object: template<class T> class DeleteT { public: void operator()(T* x) { delete x; } }; // Template function: template <class T> void wipe(T* x) { delete x; } int main() { CountedVector A("one"); for_each(A.begin(), A.end(), destroy);
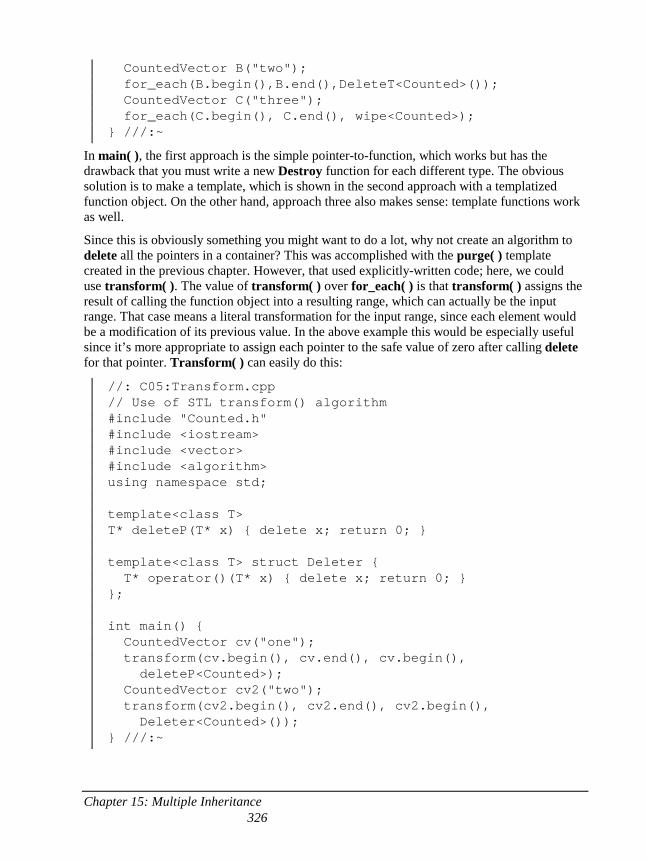
Chapter 15: Multiple Inheritance 326
CountedVector B("two"); for_each(B.begin(),B.end(),DeleteT<Counted>()); CountedVector C("three"); for_each(C.begin(), C.end(), wipe<Counted>); } ///:~
In main( ), the first approach is the simple pointer-to-function, which works but has the drawback that you must write a new Destroy function for each different type. The obvious solution is to make a template, which is shown in the second approach with a templatized function object. On the other hand, approach three also makes sense: template functions work as well.
Since this is obviously something you might want to do a lot, why not create an algorithm to delete all the pointers in a container? This was accomplished with the purge( ) template created in the previous chapter. However, that used explicitly-written code; here, we could use transform( ). The value of transform( ) over for_each( ) is that transform( ) assigns the result of calling the function object into a resulting range, which can actually be the input range. That case means a literal transformation for the input range, since each element would be a modification of its previous value. In the above example this would be especially useful since it’s more appropriate to assign each pointer to the safe value of zero after calling delete for that pointer. Transform( ) can easily do this:
//: C05:Transform.cpp // Use of STL transform() algorithm #include "Counted.h" #include <iostream> #include <vector> #include <algorithm> using namespace std; template<class T> T* deleteP(T* x) { delete x; return 0; } template<class T> struct Deleter { T* operator()(T* x) { delete x; return 0; } }; int main() { CountedVector cv("one"); transform(cv.begin(), cv.end(), cv.begin(), deleteP<Counted>); CountedVector cv2("two"); transform(cv2.begin(), cv2.end(), cv2.begin(), Deleter<Counted>()); } ///:~
Chapter 15: Multiple Inheritance 327
This shows both approaches: using a template function or a templatized function object. After the call to transform( ), the vector contains zero pointers, which is safer since any duplicate deletes will have no effect.
One thing you cannot do is delete every pointer in a collection without wrapping the call to delete inside a function or an object. That is, you don’t want to say something like this:
for_each(a.begin(), a.end(), ptr_fun(operator delete));
You can say it, but what you’ll get is a sequence of calls to the function that releases the storage. You will not get the effect of calling delete for each pointer in a, however; the destructor will not be called. This is typically not what you want, so you will need wrap your calls to delete.
In the previous example of for_each( ), the return value of the algorithm was ignored. This return value is the function that is passed in to for_each( ). If the function is just a pointer to a function, then the return value is not very useful, but if it is a function object, then that function object may have internal member data that it uses to accumulate information about all the objects that it sees during for_each( ).
For example, consider a simple model of inventory. Each Inventory object has the type of product it represents (here, single characters will be used for product names), the quantity of that product and the price of each item:
//: C05:Inventory.h #ifndef INVENTORY_H #define INVENTORY_H #include <iostream> #include <cstdlib> #include <ctime> class Inventory { char item; int quantity; int value; public: Inventory(char it, int quant, int val) : item(it), quantity(quant), value(val) {} // Synthesized operator= & copy-constructor OK char getItem() const { return item; } int getQuantity() const { return quantity; } void setQuantity(int q) { quantity = q; } int getValue() const { return value; } void setValue(int val) { value = val; } friend std::ostream& operator<<( std::ostream& os, const Inventory& inv) {
Chapter 15: Multiple Inheritance 328
return os << inv.item << ": " << "quantity " << inv.quantity << ", value " << inv.value; } }; // A generator: struct InvenGen { InvenGen() { std::srand(std::time(0)); } Inventory operator()() { static char c = 'a'; int q = std::rand() % 100; int v = std::rand() % 500; return Inventory(c++, q, v); } }; #endif // INVENTORY_H ///:~
There are member functions to get the item name, and to get and set quantity and value. An operator<< prints the Inventory object to an ostream. There’s also a generator that creates objects that have sequentially-labeled items and random quantities and values. Note the use of the return value optimization in operator( ).
To find out the total number of items and total value, you can create a function object to use with for_each( ) that has data members to hold the totals:
//: C05:CalcInventory.cpp // More use of for_each() #include "Inventory.h" #include "PrintSequence.h" #include <vector> #include <algorithm> using namespace std; // To calculate inventory totals: class InvAccum { int quantity; int value; public: InvAccum() : quantity(0), value(0) {} void operator()(const Inventory& inv) { quantity += inv.getQuantity(); value += inv.getQuantity() * inv.getValue(); } friend ostream&
Chapter 15: Multiple Inheritance 329
operator<<(ostream& os, const InvAccum& ia) { return os << "total quantity: " << ia.quantity << ", total value: " << ia.value; } }; int main() { vector<Inventory> vi; generate_n(back_inserter(vi), 15, InvenGen()); print(vi, "vi"); InvAccum ia = for_each(vi.begin(),vi.end(), InvAccum()); cout << ia << endl; } ///:~
InvAccum’s operator( ) takes a single argument, as required by for_each( ). As for_each( ) moves through its range, it takes each object in that range and passes it to InvAccum::operator( ), which performs calculations and saves the result. At the end of this process, for_each( ) returns the InvAccum object which you can then examine; in this case it is simply printed.
You can do most things to the Inventory objects using for_each( ). For example, if you wanted to increase all the prices by 10%, for_each( ) could do this handily. But you’ll notice that the Inventory objects have no way to change the item value. The programmers who designed Inventory thought this was a good idea, after all, why would you want to change the name of an item? But marketing has decided that they want a “new, improved” look by changing all the item names to uppercase; they’ve done studies and determined that the new names will boost sales (well, marketing has to have something to do …). So for_each( ) will not work here, but transform( ) will:
//: C05:TransformNames.cpp // More use of transform() #include "Inventory.h" #include "PrintSequence.h" #include <vector> #include <algorithm> #include <cctype> using namespace std; struct NewImproved { Inventory operator()(const Inventory& inv) { return Inventory(toupper(inv.getItem()), inv.getQuantity(), inv.getValue()); }
Chapter 15: Multiple Inheritance 330
}; int main() { vector<Inventory> vi; generate_n(back_inserter(vi), 15, InvenGen()); print(vi, "vi"); transform(vi.begin(), vi.end(), vi.begin(), NewImproved()); print(vi, "vi"); } ///:~
Notice that the resulting range is the same as the input range, that is, the transformation is performed in-place.
Now suppose that the sales department needs to generate special price lists with different discounts for each item. The original list must stay the same, and there need to be any number of generated special lists. Sales will give you a separate list of discounts for each new list. To solve this problem we can use the second version of transform( ):
//: C05:SpecialList.cpp // Using the second version of transform() #include "Inventory.h" #include "PrintSequence.h" #include <vector> #include <algorithm> #include <cstdlib> #include <ctime> using namespace std; struct Discounter { Inventory operator()(const Inventory& inv, float discount) { return Inventory(inv.getItem(), inv.getQuantity(), inv.getValue() * (1 - discount)); } }; struct DiscGen { DiscGen() { srand(time(0)); } float operator()() { float r = float(rand() % 10); return r / 100.0; } };
Chapter 15: Multiple Inheritance 331
int main() { vector<Inventory> vi; generate_n(back_inserter(vi), 15, InvenGen()); print(vi, "vi"); vector<float> disc; generate_n(back_inserter(disc), 15, DiscGen()); print(disc, "Discounts:"); vector<Inventory> discounted; transform(vi.begin(),vi.end(), disc.begin(), back_inserter(discounted), Discounter()); print(discounted, "discounted"); } ///:~
Discounter is a function object that, given an Inventory object and a discount percentage, produces a new Inventory with the discounted price. DiscGen just generates random discount values between 1 and 10 percent to use for testing. In main( ), two vectors are created, one for Inventory and one for discounts. These are passed to transform( ) along with a Discounter object, and transform( ) fills a new vector<Inventory> called discounted.
Numeric algorithms These algorithms are all tucked into the header <numeric>, since they are primarily useful for performing numerical calculations.
<numeric> T accumulate(InputIterator first, InputIterator last, T result); T accumulate(InputIterator first, InputIterator last, T result, BinaryFunction f);
The first form is a generalized summation; for each element pointed to by an iterator i in [first, last), it performs the operation result = result + *i, where result is of type T. However, the second form is more general; it applies the function f(result, *i) on each element *i in the range from beginning to end. The value result is initialized in both cases by resultI, and if the range is empty then resultI is returned.
Note the similarity between the second form of transform( ) and the second form of accumulate( ).
<numeric> T inner_product(InputIterator1 first1, InputIterator1 last1, InputIterator2 first2, T init); T inner_product(InputIterator1 first1, InputIterator1 last1, InputIterator2 first2, T init BinaryFunction1 op1, BinaryFunction2 op2);
Chapter 15: Multiple Inheritance 332
Calculates a generalized inner product of the two ranges [first1, last1) and [first2, first2 + (last1 - first1)). The return value is produced by multiplying the element from the first sequence by the “parallel” element in the second sequence, and then adding it to the sum. So if you have two sequences {1, 1, 2, 2} and {1, 2, 3, 4} the inner product becomes:
(1*1) + (1*2) + (2*3) + (2*4)
Which is 17. The init argument is the initial value for the inner product; this is probably zero but may be anything and is especially important for an empty first sequence, because then it becomes the default return value. The second sequence must have at least as many elements as the first.
While the first form is very specifically mathematical, the second form is simply a multiple application of functions and could conceivably be used in many other situations. The op1 function is used in place of addition, and op2 is used instead of multiplication. Thus, if you applied the second version of inner_product( ) to the above sequence, the result would be the following operations:
init = op1(init, op2(1,1)); init = op1(init, op2(1,2)); init = op1(init, op2(2,3)); init = op1(init, op2(2,4));
Thus it’s similar to transform( ) but two operations are performed instead of one.
<numeric> OutputIterator partial_sum(InputIterator first, InputIterator last, OutputIterator result); OutputIterator partial_sum(InputIterator first, InputIterator last, OutputIterator result, BinaryFunction op);
Calculates a generalized partial sum. This means that a new sequence is created, beginning at result, where each element is the sum of all the elements up to the currently selected element in [first, last). For example, if the original sequence is {1, 1, 2, 2, 3} then the generated sequence is {1, 1 + 1, 1 + 1 + 2, 1 + 1 + 1 + 2 + 2, 1 + 1 + 1 + 2 + 2 + 3}, that is, {1, 2, 4, 6, 9}.
In the second version, the binary function op is used instead of the + operator to take all the “summation” up to that point and combine it with the new value. For example, if you use multiplies<int>( ) as the object for the above sequence, the output is {1, 1, 2, 4, 12}. Note that the first output value is always the same as the first input value.
The return value is the end of the output range [result, result + (last - first) ).
<numeric> OutputIterator adjacent_difference(InputIterator first, InputIterator last, OutputIterator result); OutputIterator adjacent_difference(InputIterator first, InputIterator last, OutputIterator result, BinaryFunction op);
Chapter 15: Multiple Inheritance 333
Calculates the differences of adjacent elements throughout the range [first, last). This means that in the new sequence, the value is the value of the difference of the current element and the previous element in the original sequence (the first value is the same). For example, if the original sequence is {1, 1, 2, 2, 3}, the resulting sequence is {1, 1 – 1, 2 – 1, 2 – 2, 3 – 2}, that is: {1, 0, 1, 0, 1}.
The second form uses the binary function op instead of the – operator to perform the “differencing.” For example, if you use multiplies<int>( ) as the function object for the above sequence, the output is {1, 1, 2, 4, 6}.
The return value is the end of the output range [result, result + (last - first) ).
Example This program tests all the algorithms in <numeric> in both forms, on integer arrays. You’ll notice that in the test of the form where you supply the function or functions, the function objects used are the ones that produce the same result as form one so the results produced will be exactly the same. This should also demonstrate a bit more clearly the operations that are going on, and how to substitute your own operations.
//: C05:NumericTest.cpp #include "PrintSequence.h" #include <numeric> #include <algorithm> #include <iostream> #include <iterator> #include <functional> using namespace std; int main() { int a[] = { 1, 1, 2, 2, 3, 5, 7, 9, 11, 13 }; const int asz = sizeof a / sizeof a[0]; print(a, a + asz, "a", " "); int r = accumulate(a, a + asz, 0); cout << "accumulate 1: " << r << endl; // Should produce the same result: r = accumulate(a, a + asz, 0, plus<int>()); cout << "accumulate 2: " << r << endl; int b[] = { 1, 2, 3, 4, 1, 2, 3, 4, 1, 2 }; print(b, b + sizeof b / sizeof b[0], "b", " "); r = inner_product(a, a + asz, b, 0); cout << "inner_product 1: " << r << endl; // Should produce the same result: r = inner_product(a, a + asz, b, 0, plus<int>(), multiplies<int>());
Chapter 15: Multiple Inheritance 334
cout << "inner_product 2: " << r << endl; int* it = partial_sum(a, a + asz, b); print(b, it, "partial_sum 1", " "); // Should produce the same result: it = partial_sum(a, a + asz, b, plus<int>()); print(b, it, "partial_sum 2", " "); it = adjacent_difference(a, a + asz, b); print(b, it, "adjacent_difference 1"," "); // Should produce the same result: it = adjacent_difference(a, a + asz, b, minus<int>()); print(b, it, "adjacent_difference 2"," "); } ///:~
Note that the return value of inner_product( ) and partial_sum( ) is the past-the-end iterator for the resulting sequence, so it is used as the second iterator in the print( ) function.
Since the second form of each function allows you to provide your own function object, only the first form of the functions is purely “numeric.” You could conceivably do some things that are not intuitively numeric with something like inner_product( ).
General utilities Finally, here are some basic tools that are used with the other algorithms; you may or may not use them directly yourself.
<utility> struct pair; make_pair( );
This was described and used in the previous chapter and in this one. A pair is simply a way to package two objects (which may be of different types) together into a single object. This is typically used when you need to return more than one object from a function, but it can also be used to create a container that holds pair objects, or to pass more than one object as a single argument. You access the elements by saying p.first and p.second, where p is the pair object. The function equal_range( ), described in the last chapter and in this one, returns its result as a pair of iterators. You can insert( ) a pair directly into a map or multimap; a pair is the value_type for those containers.
If you want to create a pair, you typically use the template function make_pair( ) rather than explicitly constructing a pair object.
<iterator> distance(InputIterator first, InputIterator last);
Chapter 15: Multiple Inheritance 335
Tells you the number of elements between first and last. More precisely, it returns an integral value that tells you the number of times first must be incremented before it is equal to last. No dereferencing of the iterators occurs during this process.
<iterator> void advance(InputIterator& i, Distance n);
Moves the iterator i forward by the value of n (the iterator can also be moved backward for negative values of n if the iterator is also a bidirectional iterator). This algorithm is aware of bidirectional iterators, and will use the most efficient approach.
<iterator> back_insert_iterator<Container> back_inserter(Container& x); front_insert_iterator<Container> front_inserter(Container& x); insert_iterator<Container> inserter(Container& x, Iterator i);
These functions are used to create iterators for the given containers that will insert elements into the container, rather than overwrite the existing elements in the container using operator= (which is the default behavior). Each type of iterator uses a different operation for insertion: back_insert_iterator uses push_back( ), front_insert_iterator uses push_front( ) and insert_iterator uses insert( ) (and thus it can be used with the associative containers, while the other two can be used with sequence containers). These were shown in some detail in the previous chapter, and also used in this chapter.
const LessThanComparable& min(const LessThanComparable& a, const LessThanComparable& b); const T& min(const T& a, const T& b, BinaryPredicate binary_pred);
Returns the lesser of its two arguments, or the first argument if the two are equivalent. The first version performs comparisons using operator< and the second passes both arguments to binary_pred to perform the comparison.
const LessThanComparable& max(const LessThanComparable& a, const LessThanComparable& b); const T& max(const T& a, const T& b, BinaryPredicate binary_pred);
Exactly like min( ), but returns the greater of its two arguments.
void swap(Assignable& a, Assignable& b); void iter_swap(ForwardIterator1 a, ForwardIterator2 b);
Exchanges the values of a and b using assignment. Note that all container classes use specialized versions of swap( ) that are typically more efficient than this general version.
iter_swap( ) is a backwards-compatible remnant in the standard; you can just use swap( ).
Chapter 15: Multiple Inheritance 336
Creating your own STL-style algorithms
Once you become comfortable with the STL algorithm style, you can begin to create your own STL-style algorithms. Because these will conform to the format of all the other algorithms in the STL, they’re easy to use for programmers who are familiar with the STL, and thus become a way to “extend the STL vocabulary.”
The easiest way to approach the problem is to go to the <algorithm> header file and find something similar to what you need, and modify that (virtually all STL implementations provide the code for the templates directly in the header files). For example, an algorithm that stands out by its absence is copy_if( ) (the closest approximation is partition( )), which was used in Binder1.cpp at the beginning of this chapter, and in several other examples in this chapter. This will only copy an element if it satisfies a predicate. Here’s an implementation:
//: C05:copy_if.h // Roll your own STL-style algorithm #ifndef COPY_IF_H #define COPY_IF_H template<typename ForwardIter, typename OutputIter, typename UnaryPred> OutputIter copy_if(ForwardIter begin, ForwardIter end, OutputIter dest, UnaryPred f) { while(begin != end) { if(f(*begin)) *dest++ = *begin; begin++; } return dest; } #endif // COPY_IF_H ///:~
The return value is the past-the-end iterator for the destination sequence (the copied sequence).
Now that you’re comfortable with the ideas of the various iterator types, the actual implementation is quite straightforward. You can imagine creating an entire additional library of your own useful algorithms that follow the format of the STL.
Chapter 15: Multiple Inheritance 337
Summary The goal of this chapter, and the previous one, was to give you a programmer’s-depth understanding of the containers and algorithms in the Standard Template Library. That is, to make you aware of and comfortable enough with the STL that you begin to use it on a regular basis (or at least, to think of using it so you can come back here and hunt for the appropriate solution). It is powerful not only because it’s a reasonably complete library of tools, but also because it provides a vocabulary for thinking about problem solutions, and because it is a framework for creating additional tools.
Although this chapter and the last did show some examples of creating your own tools, I did not go into the full depth of the theory of the STL that is necessary to completely understand all the STL nooks and crannies to allow you to create tools more sophisticated than those shown here. I did not do this partially because of space limitations, but mostly because it is beyond the charter of this book; my goal here is to give you practical understanding that will affect your day-to-day programming skills.
There are a number of books dedicated solely to the STL (these are listed in the appendices), but the two that I learned the most from, in terms of the theory necessary for tool creation, were first, Generic Programming and the STL by Matthew H. Austern, Addison-Wesley 1999 (this also covers all the SGI extensions, which Austern was instrumental in creating), and second (older and somewhat out of date, but still quite valuable), C++ Programmer’s Guide to the Standard Template Library by Mark Nelson, IDG press 1995.
Exercises 1. Create a generator that returns the current value of clock( ) (in <ctime>).
Create a list<clock_t> and fill it with your generator using generate_n( ). Remove any duplicates in the list and print it to cout using copy( ).
2. Modify Stlshape.cpp from chapter XXX so that it uses transform( ) to delete all its objects.
3. Using transform( ) and toupper( ) (in <cctype>) write a single function call that will convert a string to all uppercase letters.
4. Create a Sum function object template that will accumulate all the values in a range when used with for_each( ).
5. Write an anagram generator that takes a word as a command-line argument and produces all possible permutations of the letters.
6. Write a “sentence anagram generator” that takes a sentence as a command-line argument and produces all possible permutations of the words in the sentence (it leaves the words alone, just moves them around).
7. Create a class hierarchy with a base class B and a derived class D. Put a virtual member function void f( ) in B such that it will print a message
Chapter 15: Multiple Inheritance 338
indicating that B’s f( ) has been called, and redefine this function for D to print a different message. Create a deque<B*> and fill it with B and D objects. Use for_each( ) to call f( ) for each of the objects in your deque.
8. Modify FunctionObjects.cpp so that it uses float instead of int. 9. Modify FunctionObjects.cpp so that it templatizes the main body of tests
so you can choose which type you’re going to test (you’ll have to pull most of main( ) out into a separate template function).
10. Using transform( ), toupper( ) and tolower( ) (in <ccytpe>), create two functions such that the first takes a string object and returns that string with all the letters in uppercase, and the second returns a string with all the letters in lowercase.
11. Create a container of containers of Noisy objects, and sort them. Now write a template for your sorting test (to use with the three basic sequence containers), and compare the performance of the different container types.
12. Write a program that takes as a command line argument the name of a text file. Open this file and read it a word at a time (hint: use >>). Store each word into a deque<string>. Force all the words to lowercase, sort them, remove all the duplicates and print the results.
13. Write a program that finds all the words that are in common between two input files, using set_intersection( ). Change it to show the words that are not in common, using set_symmetric_difference( ).
14. Create a program that, given an integer on the command line, creates a “factorial table” of all the factorials up to and including the number on the command line. To do this, write a generator to fill a vector<int>, then use partial_sum( ) with a standard function object.
15. Modify CalcInventory.cpp so that it will find all the objects that have a quantity that’s less than a certain amount. Provide this amount as a command-line argument, and use copy_if( ) and bind2nd( ) to create the collection of values less than the target value.
16. Create template function objects that perform bitwise operations for &, |, ^ and ~. Test these with a bitset.
17. Fill a vector<double> with numbers representing angles in radians. Using function object composition, take the sine of all the elements in your vector (see <cmath>).
18. Create a map which is a cosine table where the keys are the angles in degrees and the values are the cosines. Use transform( ) with cos( ) (in <cmath>) to fill the table.
19. Write a program to compare the speed of sorting a list using list::sort( ) vs. using std::sort( ) (the STL algorithm version of sort( )). Hint: see the timing examples in the previous chapter.
20. Create and test a logical_xor function object template to implement a logical exclusive-or.
Chapter 15: Multiple Inheritance 339
21. Create an STL-style algorithm transform_if( ) following the first form of transform( ) which only performs transformations on objects that satisfy a unary predicate.
22. Create an STL-style algorithm which is an overloaded version of for_each( ) that follows the second form of transform( ) and takes two input ranges so it can pass the objects of the second input range a to a binary function which it applies to each object of the first range.
23. Create a Matrix class which is made from a vector<vector<int> >. Provide it with a friend ostream& operator<<(ostream&, const Matrix&) to display the matrix. Create the following using the STL algorithms where possible (you may need to look up the mathematical meanings of the matrix operations if you don’t remember them): operator+(const Matrix&, const Matrix&) for Matrix addition, operator*(const Matrix&, const vector<int>&) for multiplying a matrix by a vector, and operator*(const Matrix&, const Matrix&) for matrix multiplication. Demonstrate each.
24. Templatize the Matrix class and associated operations from the previous example so they will work with any appropriate type.

341
Part 2: Advanced Topics
342
6: Multiple inheritance
The basic concept of multiple inheritance (MI) sounds simple enough.
[[[Notes:
1. Demo of use of MI, using Greenhouse example and different company’s greenhouse controller equipment.
2. Introduce concept of interfaces; toys and “tuckable” interface
]]]
You create a new type by inheriting from more than one base class. The syntax is exactly what you’d expect, and as long as the inheritance diagrams are simple, MI is simple as well.
However, MI can introduce a number of ambiguities and strange situations, which are covered in this chapter. But first, it helps to get a perspective on the subject.
Perspective Before C++, the most successful object-oriented language was Smalltalk. Smalltalk was created from the ground up as an OO language. It is often referred to as pure, whereas C++, because it was built on top of C, is called hybrid. One of the design decisions made with Smalltalk was that all classes would be derived in a single hierarchy, rooted in a single base class (called Object – this is the model for the object-based hierarchy). You cannot create a new class in Smalltalk without inheriting it from an existing class, which is why it takes a certain amount of time to become productive in Smalltalk – you must learn the class library before you can start making new classes. So the Smalltalk class hierarchy is always a single monolithic tree.
Classes in Smalltalk usually have a number of things in common, and always have some things in common (the characteristics and behaviors of Object), so you almost never run into a situation where you need to inherit from more than one base class. However, with C++ you can create as many hierarchy trees as you want. Therefore, for logical completeness the
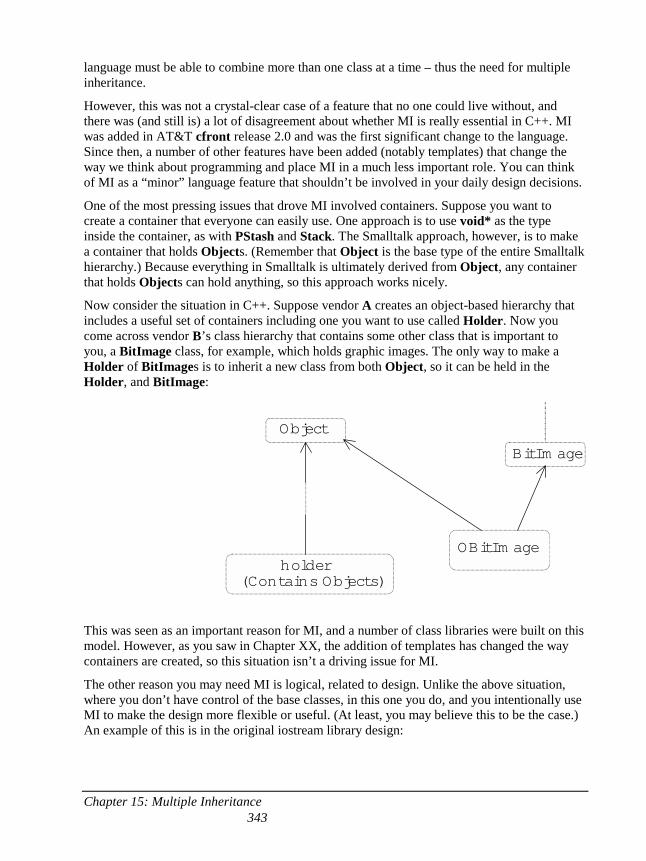
Chapter 15: Multiple Inheritance 343
language must be able to combine more than one class at a time – thus the need for multiple inheritance.
However, this was not a crystal-clear case of a feature that no one could live without, and there was (and still is) a lot of disagreement about whether MI is really essential in C++. MI was added in AT&T cfront release 2.0 and was the first significant change to the language. Since then, a number of other features have been added (notably templates) that change the way we think about programming and place MI in a much less important role. You can think of MI as a “minor” language feature that shouldn’t be involved in your daily design decisions.
One of the most pressing issues that drove MI involved containers. Suppose you want to create a container that everyone can easily use. One approach is to use void* as the type inside the container, as with PStash and Stack. The Smalltalk approach, however, is to make a container that holds Objects. (Remember that Object is the base type of the entire Smalltalk hierarchy.) Because everything in Smalltalk is ultimately derived from Object, any container that holds Objects can hold anything, so this approach works nicely.
Now consider the situation in C++. Suppose vendor A creates an object-based hierarchy that includes a useful set of containers including one you want to use called Holder. Now you come across vendor B’s class hierarchy that contains some other class that is important to you, a BitImage class, for example, which holds graphic images. The only way to make a Holder of BitImages is to inherit a new class from both Object, so it can be held in the Holder, and BitImage:
Object
holder(Contains Objects)
BitIm age
OBitIm age
This was seen as an important reason for MI, and a number of class libraries were built on this model. However, as you saw in Chapter XX, the addition of templates has changed the way containers are created, so this situation isn’t a driving issue for MI.
The other reason you may need MI is logical, related to design. Unlike the above situation, where you don’t have control of the base classes, in this one you do, and you intentionally use MI to make the design more flexible or useful. (At least, you may believe this to be the case.) An example of this is in the original iostream library design:
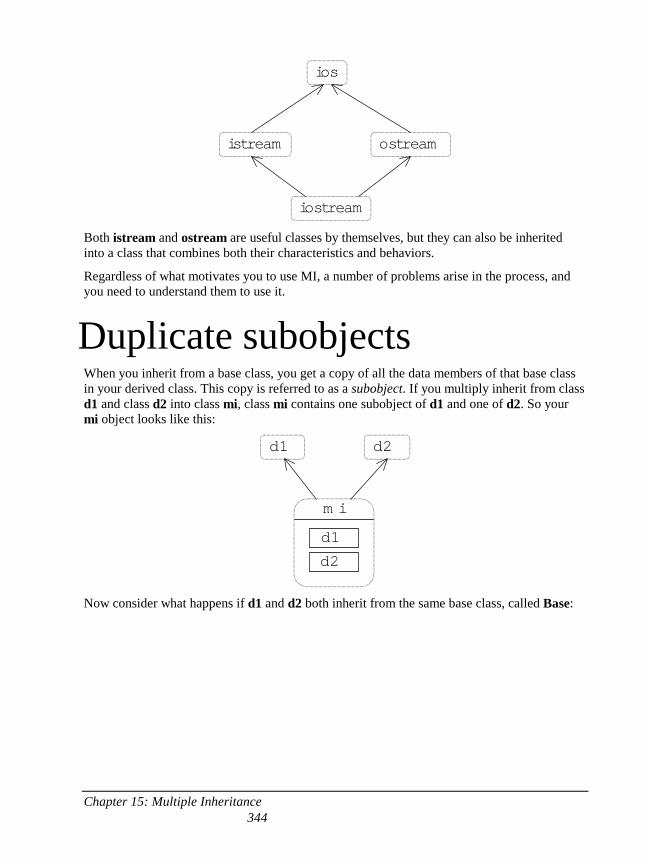
Chapter 15: Multiple Inheritance 344
ios
istream ostream
iostream
Both istream and ostream are useful classes by themselves, but they can also be inherited into a class that combines both their characteristics and behaviors.
Regardless of what motivates you to use MI, a number of problems arise in the process, and you need to understand them to use it.
Duplicate subobjects When you inherit from a base class, you get a copy of all the data members of that base class in your derived class. This copy is referred to as a subobject. If you multiply inherit from class d1 and class d2 into class mi, class mi contains one subobject of d1 and one of d2. So your mi object looks like this:
d1 d2
m i
d1
d2
Now consider what happens if d1 and d2 both inherit from the same base class, called Base:
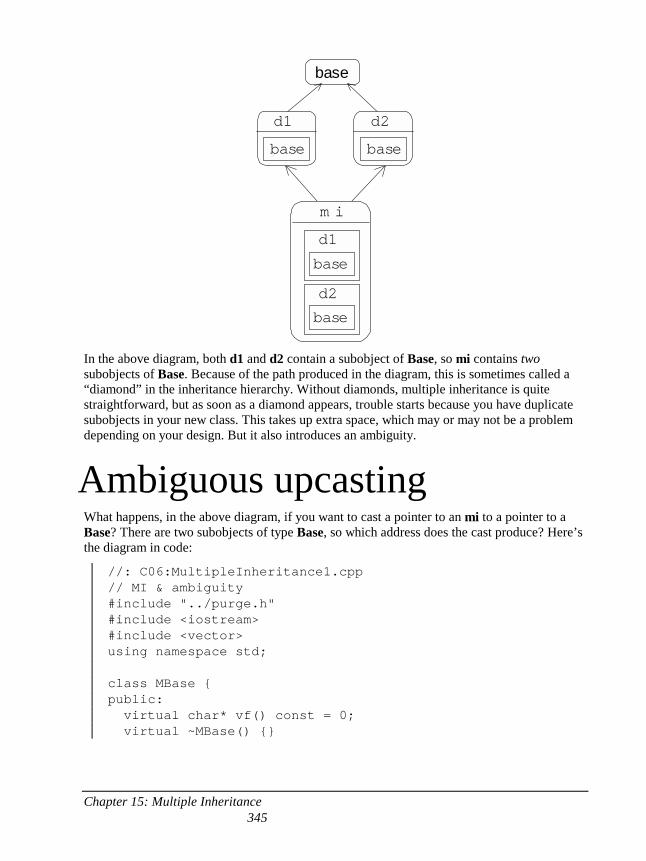
Chapter 15: Multiple Inheritance 345
m i
base
d1
base
d2
base
d1
base
d2
base
In the above diagram, both d1 and d2 contain a subobject of Base, so mi contains two subobjects of Base. Because of the path produced in the diagram, this is sometimes called a “diamond” in the inheritance hierarchy. Without diamonds, multiple inheritance is quite straightforward, but as soon as a diamond appears, trouble starts because you have duplicate subobjects in your new class. This takes up extra space, which may or may not be a problem depending on your design. But it also introduces an ambiguity.
Ambiguous upcasting What happens, in the above diagram, if you want to cast a pointer to an mi to a pointer to a Base? There are two subobjects of type Base, so which address does the cast produce? Here’s the diagram in code:
//: C06:MultipleInheritance1.cpp // MI & ambiguity #include "../purge.h" #include <iostream> #include <vector> using namespace std; class MBase { public: virtual char* vf() const = 0; virtual ~MBase() {}
Chapter 15: Multiple Inheritance 346
}; class D1 : public MBase { public: char* vf() const { return "D1"; } }; class D2 : public MBase { public: char* vf() const { return "D2"; } }; // Causes error: ambiguous override of vf(): //! class MI : public D1, public D2 {}; int main() { vector<MBase*> b; b.push_back(new D1); b.push_back(new D2); // Cannot upcast: which subobject?: //! b.push_back(new mi); for(int i = 0; i < b.size(); i++) cout << b[i]->vf() << endl; purge(b); } ///:~
Two problems occur here. First, you cannot even create the class mi because doing so would cause a clash between the two definitions of vf( ) in D1 and D2.
Second, in the array definition for b[ ] this code attempts to create a new mi and upcast the address to a MBase*. The compiler won’t accept this because it has no way of knowing whether you want to use D1’s subobject MBase or D2’s subobject MBase for the resulting address.
virtual base classes To solve the first problem, you must explicitly disambiguate the function vf( ) by writing a redefinition in the class mi.
The solution to the second problem is a language extension: The meaning of the virtual keyword is overloaded. If you inherit a base class as virtual, only one subobject of that class will ever appear as a base class. Virtual base classes are implemented by the compiler with pointer magic in a way suggesting the implementation of ordinary virtual functions.
Chapter 15: Multiple Inheritance 347
Because only one subobject of a virtual base class will ever appear during multiple inheritance, there is no ambiguity during upcasting. Here’s an example:
//: C06:MultipleInheritance2.cpp // Virtual base classes #include "../purge.h" #include <iostream> #include <vector> using namespace std; class MBase { public: virtual char* vf() const = 0; virtual ~MBase() {} }; class D1 : virtual public MBase { public: char* vf() const { return "D1"; } }; class D2 : virtual public MBase { public: char* vf() const { return "D2"; } }; // MUST explicitly disambiguate vf(): class MI : public D1, public D2 { public: char* vf() const { return D1::vf();} }; int main() { vector<MBase*> b; b.push_back(new D1); b.push_back(new D2); b.push_back(new MI); // OK for(int i = 0; i < b.size(); i++) cout << b[i]->vf() << endl; purge(b);
} ///:~
The compiler now accepts the upcast, but notice that you must still explicitly disambiguate the function vf( ) in MI; otherwise the compiler wouldn’t know which version to use.
Chapter 15: Multiple Inheritance 348
The "most derived" class and virtual base initialization
The use of virtual base classes isn’t quite as simple as that. The above example uses the (compiler-synthesized) default constructor. If the virtual base has a constructor, things become a bit strange. To understand this, you need a new term: most-derived class.
The most-derived class is the one you’re currently in, and is particularly important when you’re thinking about constructors. In the previous example, MBase is the most-derived class inside the MBase constructor. Inside the D1 constructor, D1 is the most-derived class, and inside the MI constructor, MI is the most-derived class.
When you are using a virtual base class, the most-derived constructor is responsible for initializing that virtual base class. That means any class, no matter how far away it is from the virtual base, is responsible for initializing it. Here’s an example:
//: C06:MultipleInheritance3.cpp // Virtual base initialization // Virtual base classes must always be // Initialized by the "most-derived" class #include "../purge.h" #include <iostream> #include <vector> using namespace std; class MBase { public: MBase(int) {} virtual char* vf() const = 0; virtual ~MBase() {} }; class D1 : virtual public MBase { public: D1() : MBase(1) {} char* vf() const { return "D1"; } }; class D2 : virtual public MBase { public: D2() : MBase(2) {} char* vf() const { return "D2"; } };
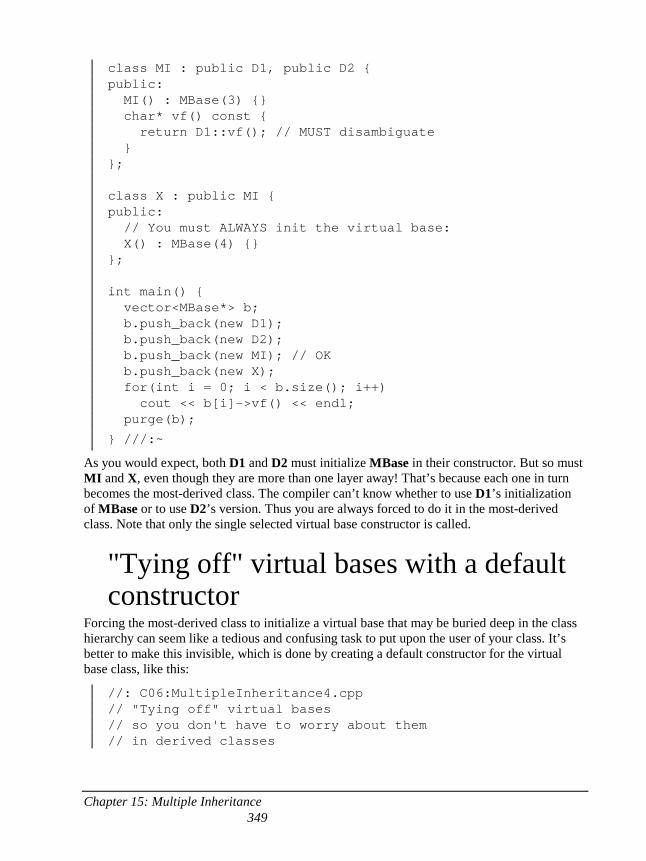
Chapter 15: Multiple Inheritance 349
class MI : public D1, public D2 { public: MI() : MBase(3) {} char* vf() const { return D1::vf(); // MUST disambiguate } }; class X : public MI { public: // You must ALWAYS init the virtual base: X() : MBase(4) {} }; int main() { vector<MBase*> b; b.push_back(new D1); b.push_back(new D2); b.push_back(new MI); // OK b.push_back(new X); for(int i = 0; i < b.size(); i++) cout << b[i]->vf() << endl; purge(b);
} ///:~
As you would expect, both D1 and D2 must initialize MBase in their constructor. But so must MI and X, even though they are more than one layer away! That’s because each one in turn becomes the most-derived class. The compiler can’t know whether to use D1’s initialization of MBase or to use D2’s version. Thus you are always forced to do it in the most-derived class. Note that only the single selected virtual base constructor is called.
"Tying off" virtual bases with a default constructor
Forcing the most-derived class to initialize a virtual base that may be buried deep in the class hierarchy can seem like a tedious and confusing task to put upon the user of your class. It’s better to make this invisible, which is done by creating a default constructor for the virtual base class, like this:
//: C06:MultipleInheritance4.cpp // "Tying off" virtual bases // so you don't have to worry about them // in derived classes
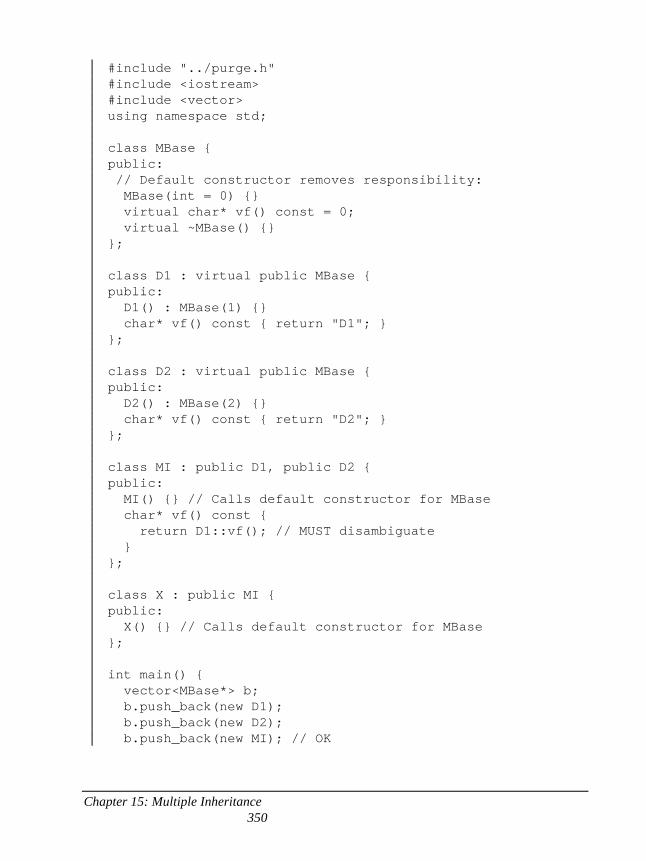
Chapter 15: Multiple Inheritance 350
#include "../purge.h" #include <iostream> #include <vector> using namespace std; class MBase { public: // Default constructor removes responsibility: MBase(int = 0) {} virtual char* vf() const = 0; virtual ~MBase() {} }; class D1 : virtual public MBase { public: D1() : MBase(1) {} char* vf() const { return "D1"; } }; class D2 : virtual public MBase { public: D2() : MBase(2) {} char* vf() const { return "D2"; } }; class MI : public D1, public D2 { public: MI() {} // Calls default constructor for MBase char* vf() const { return D1::vf(); // MUST disambiguate } }; class X : public MI { public: X() {} // Calls default constructor for MBase }; int main() { vector<MBase*> b; b.push_back(new D1); b.push_back(new D2); b.push_back(new MI); // OK
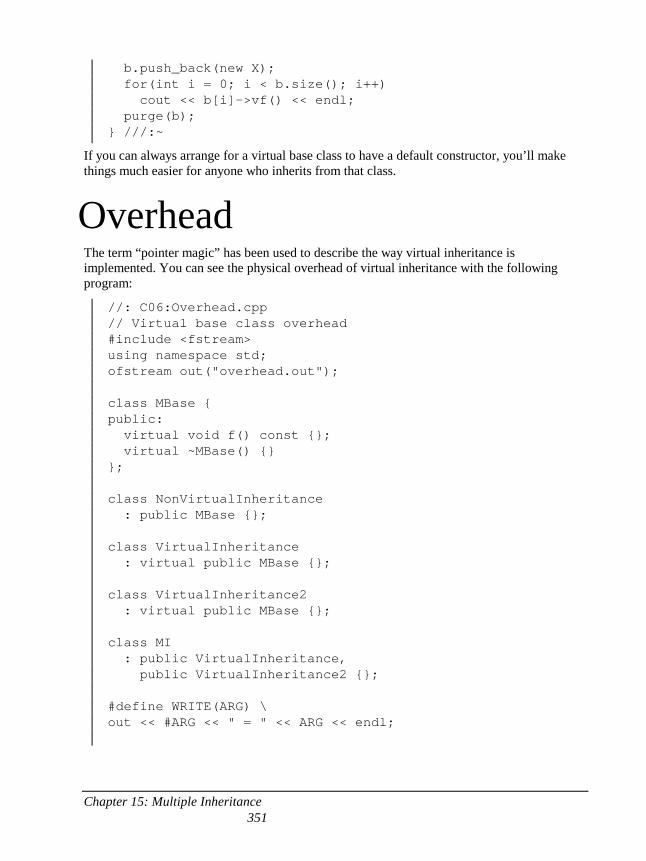
Chapter 15: Multiple Inheritance 351
b.push_back(new X); for(int i = 0; i < b.size(); i++) cout << b[i]->vf() << endl; purge(b); } ///:~
If you can always arrange for a virtual base class to have a default constructor, you’ll make things much easier for anyone who inherits from that class.
Overhead The term “pointer magic” has been used to describe the way virtual inheritance is implemented. You can see the physical overhead of virtual inheritance with the following program:
//: C06:Overhead.cpp // Virtual base class overhead #include <fstream> using namespace std; ofstream out("overhead.out"); class MBase { public: virtual void f() const {}; virtual ~MBase() {} }; class NonVirtualInheritance : public MBase {}; class VirtualInheritance : virtual public MBase {}; class VirtualInheritance2 : virtual public MBase {}; class MI : public VirtualInheritance, public VirtualInheritance2 {}; #define WRITE(ARG) \ out << #ARG << " = " << ARG << endl;
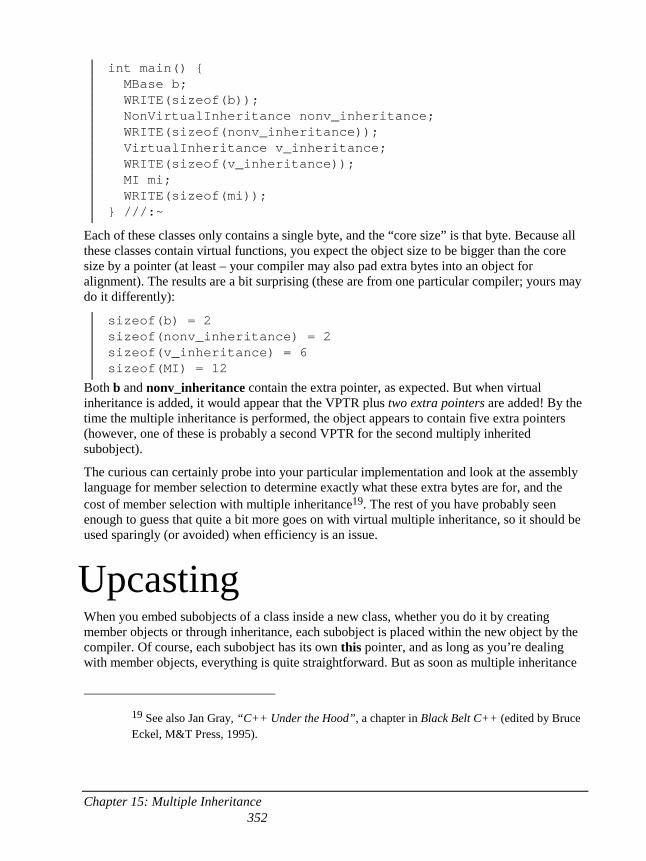
Chapter 15: Multiple Inheritance 352
int main() { MBase b; WRITE(sizeof(b)); NonVirtualInheritance nonv_inheritance; WRITE(sizeof(nonv_inheritance)); VirtualInheritance v_inheritance; WRITE(sizeof(v_inheritance)); MI mi; WRITE(sizeof(mi)); } ///:~
Each of these classes only contains a single byte, and the “core size” is that byte. Because all these classes contain virtual functions, you expect the object size to be bigger than the core size by a pointer (at least – your compiler may also pad extra bytes into an object for alignment). The results are a bit surprising (these are from one particular compiler; yours may do it differently):
sizeof(b) = 2 sizeof(nonv_inheritance) = 2 sizeof(v_inheritance) = 6 sizeof(MI) = 12
Both b and nonv_inheritance contain the extra pointer, as expected. But when virtual inheritance is added, it would appear that the VPTR plus two extra pointers are added! By the time the multiple inheritance is performed, the object appears to contain five extra pointers (however, one of these is probably a second VPTR for the second multiply inherited subobject).
The curious can certainly probe into your particular implementation and look at the assembly language for member selection to determine exactly what these extra bytes are for, and the cost of member selection with multiple inheritance19. The rest of you have probably seen enough to guess that quite a bit more goes on with virtual multiple inheritance, so it should be used sparingly (or avoided) when efficiency is an issue.
Upcasting When you embed subobjects of a class inside a new class, whether you do it by creating member objects or through inheritance, each subobject is placed within the new object by the compiler. Of course, each subobject has its own this pointer, and as long as you’re dealing with member objects, everything is quite straightforward. But as soon as multiple inheritance
19 See also Jan Gray, “C++ Under the Hood”, a chapter in Black Belt C++ (edited by Bruce Eckel, M&T Press, 1995).
Chapter 15: Multiple Inheritance 353
is introduced, a funny thing occurs: An object can have more than one this pointer because the object represents more than one type during upcasting. The following example demonstrates this point:
//: C06:Mithis.cpp // MI and the "this" pointer #include <fstream> using namespace std; ofstream out("mithis.out"); class Base1 { char c[0x10]; public: void printthis1() { out << "Base1 this = " << this << endl; } }; class Base2 { char c[0x10]; public: void printthis2() { out << "Base2 this = " << this << endl; } }; class Member1 { char c[0x10]; public: void printthism1() { out << "Member1 this = " << this << endl; } }; class Member2 { char c[0x10]; public: void printthism2() { out << "Member2 this = " << this << endl; } }; class MI : public Base1, public Base2 { Member1 m1;
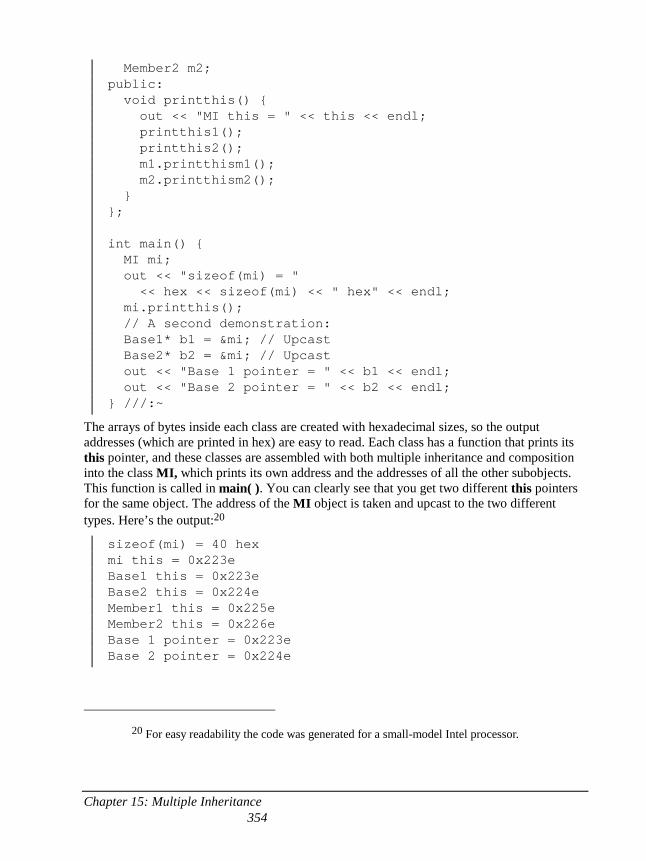
Chapter 15: Multiple Inheritance 354
Member2 m2; public: void printthis() { out << "MI this = " << this << endl; printthis1(); printthis2(); m1.printthism1(); m2.printthism2(); } }; int main() { MI mi; out << "sizeof(mi) = " << hex << sizeof(mi) << " hex" << endl; mi.printthis(); // A second demonstration: Base1* b1 = &mi; // Upcast Base2* b2 = &mi; // Upcast out << "Base 1 pointer = " << b1 << endl; out << "Base 2 pointer = " << b2 << endl; } ///:~
The arrays of bytes inside each class are created with hexadecimal sizes, so the output addresses (which are printed in hex) are easy to read. Each class has a function that prints its this pointer, and these classes are assembled with both multiple inheritance and composition into the class MI, which prints its own address and the addresses of all the other subobjects. This function is called in main( ). You can clearly see that you get two different this pointers for the same object. The address of the MI object is taken and upcast to the two different types. Here’s the output:20
sizeof(mi) = 40 hex mi this = 0x223e Base1 this = 0x223e Base2 this = 0x224e Member1 this = 0x225e Member2 this = 0x226e Base 1 pointer = 0x223e Base 2 pointer = 0x224e
20 For easy readability the code was generated for a small-model Intel processor.
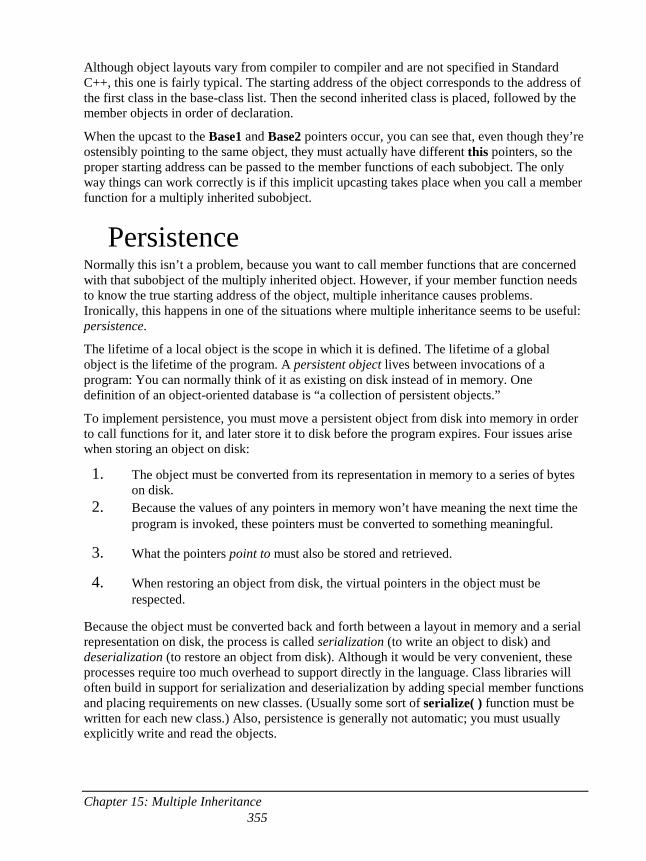
Chapter 15: Multiple Inheritance 355
Although object layouts vary from compiler to compiler and are not specified in Standard C++, this one is fairly typical. The starting address of the object corresponds to the address of the first class in the base-class list. Then the second inherited class is placed, followed by the member objects in order of declaration.
When the upcast to the Base1 and Base2 pointers occur, you can see that, even though they’re ostensibly pointing to the same object, they must actually have different this pointers, so the proper starting address can be passed to the member functions of each subobject. The only way things can work correctly is if this implicit upcasting takes place when you call a member function for a multiply inherited subobject.
Persistence Normally this isn’t a problem, because you want to call member functions that are concerned with that subobject of the multiply inherited object. However, if your member function needs to know the true starting address of the object, multiple inheritance causes problems. Ironically, this happens in one of the situations where multiple inheritance seems to be useful: persistence.
The lifetime of a local object is the scope in which it is defined. The lifetime of a global object is the lifetime of the program. A persistent object lives between invocations of a program: You can normally think of it as existing on disk instead of in memory. One definition of an object-oriented database is “a collection of persistent objects.”
To implement persistence, you must move a persistent object from disk into memory in order to call functions for it, and later store it to disk before the program expires. Four issues arise when storing an object on disk:
1. The object must be converted from its representation in memory to a series of bytes on disk.
2. Because the values of any pointers in memory won’t have meaning the next time the program is invoked, these pointers must be converted to something meaningful.
3. What the pointers point to must also be stored and retrieved.
4. When restoring an object from disk, the virtual pointers in the object must be respected.
Because the object must be converted back and forth between a layout in memory and a serial representation on disk, the process is called serialization (to write an object to disk) and deserialization (to restore an object from disk). Although it would be very convenient, these processes require too much overhead to support directly in the language. Class libraries will often build in support for serialization and deserialization by adding special member functions and placing requirements on new classes. (Usually some sort of serialize( ) function must be written for each new class.) Also, persistence is generally not automatic; you must usually explicitly write and read the objects.
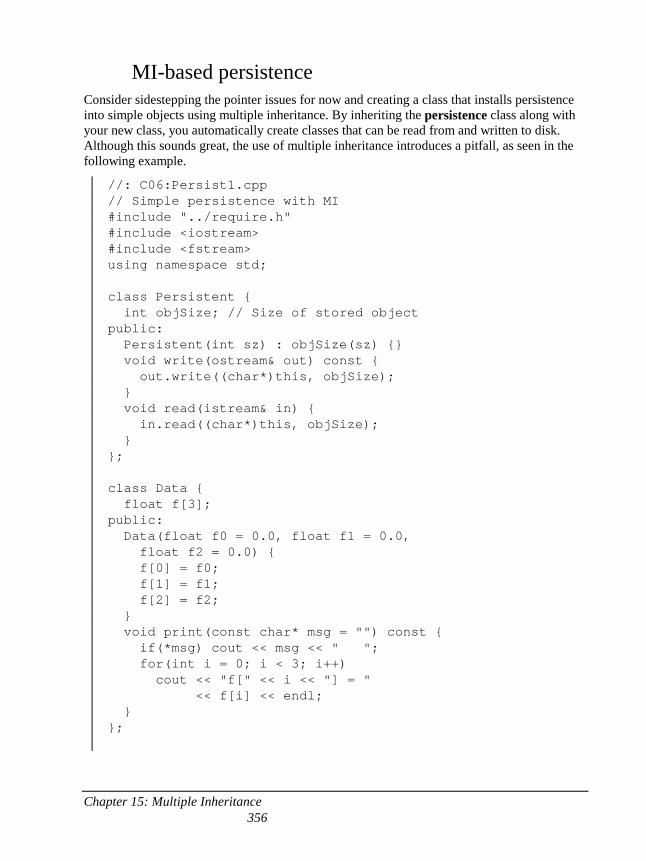
Chapter 15: Multiple Inheritance 356
MI-based persistence Consider sidestepping the pointer issues for now and creating a class that installs persistence into simple objects using multiple inheritance. By inheriting the persistence class along with your new class, you automatically create classes that can be read from and written to disk. Although this sounds great, the use of multiple inheritance introduces a pitfall, as seen in the following example.
//: C06:Persist1.cpp // Simple persistence with MI #include "../require.h" #include <iostream> #include <fstream> using namespace std; class Persistent { int objSize; // Size of stored object public: Persistent(int sz) : objSize(sz) {} void write(ostream& out) const { out.write((char*)this, objSize); } void read(istream& in) { in.read((char*)this, objSize); } }; class Data { float f[3]; public: Data(float f0 = 0.0, float f1 = 0.0, float f2 = 0.0) { f[0] = f0; f[1] = f1; f[2] = f2; } void print(const char* msg = "") const { if(*msg) cout << msg << " "; for(int i = 0; i < 3; i++) cout << "f[" << i << "] = " << f[i] << endl; } };
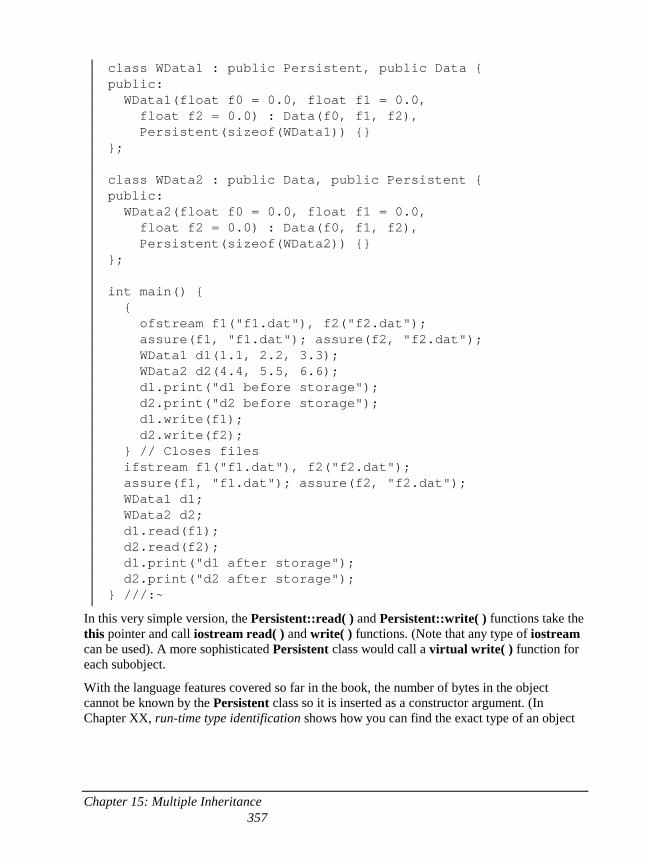
Chapter 15: Multiple Inheritance 357
class WData1 : public Persistent, public Data { public: WData1(float f0 = 0.0, float f1 = 0.0, float f2 = 0.0) : Data(f0, f1, f2), Persistent(sizeof(WData1)) {} }; class WData2 : public Data, public Persistent { public: WData2(float f0 = 0.0, float f1 = 0.0, float f2 = 0.0) : Data(f0, f1, f2), Persistent(sizeof(WData2)) {} }; int main() { { ofstream f1("f1.dat"), f2("f2.dat"); assure(f1, "f1.dat"); assure(f2, "f2.dat"); WData1 d1(1.1, 2.2, 3.3); WData2 d2(4.4, 5.5, 6.6); d1.print("d1 before storage"); d2.print("d2 before storage"); d1.write(f1); d2.write(f2); } // Closes files ifstream f1("f1.dat"), f2("f2.dat"); assure(f1, "f1.dat"); assure(f2, "f2.dat"); WData1 d1; WData2 d2; d1.read(f1); d2.read(f2); d1.print("d1 after storage"); d2.print("d2 after storage"); } ///:~
In this very simple version, the Persistent::read( ) and Persistent::write( ) functions take the this pointer and call iostream read( ) and write( ) functions. (Note that any type of iostream can be used). A more sophisticated Persistent class would call a virtual write( ) function for each subobject.
With the language features covered so far in the book, the number of bytes in the object cannot be known by the Persistent class so it is inserted as a constructor argument. (In Chapter XX, run-time type identification shows how you can find the exact type of an object

Chapter 15: Multiple Inheritance 358
given only a base pointer; once you have the exact type you can find out the correct size with the sizeof operator.)
The Data class contains no pointers or VPTR, so there is no danger in simply writing it to disk and reading it back again. And it works fine in class WData1 when, in main( ), it’s written to file F1.DAT and later read back again. However, when Persistent is second in the inheritance list of WData2, the this pointer for Persistent is offset to the end of the object, so it reads and writes past the end of the object. This not only produces garbage when reading the object from the file, it’s dangerous because it walks over any storage that occurs after the object.
This problem occurs in multiple inheritance any time a class must produce the this pointer for the actual object from a subobject’s this pointer. Of course, if you know your compiler always lays out objects in order of declaration in the inheritance list, you can ensure that you always put the critical class at the beginning of the list (assuming there’s only one critical class). However, such a class may exist in the inheritance hierarchy of another class and you may unwittingly put it in the wrong place during multiple inheritance. Fortunately, using run-time type identification (the subject of Chapter XX) will produce the proper pointer to the actual object, even if multiple inheritance is used.
Improved persistence A more practical approach to persistence, and one you will see employed more often, is to create virtual functions in the base class for reading and writing and then require the creator of any new class that must be streamed to redefine these functions. The argument to the function is the stream object to write to or read from.21 Then the creator of the class, who knows best how the new parts should be read or written, is responsible for making the correct function calls. This doesn’t have the “magical” quality of the previous example, and it requires more coding and knowledge on the part of the user, but it works and doesn’t break when pointers are present:
//: C06:Persist2.cpp // Improved MI persistence #include "../require.h" #include <iostream> #include <fstream> #include <cstring> using namespace std; class Persistent { public: virtual void write(ostream& out) const = 0;
21 Sometimes there’s only a single function for streaming, and the argument contains information about whether you’re reading or writing.

Chapter 15: Multiple Inheritance 359
virtual void read(istream& in) = 0; virtual ~Persistent() {} }; class Data { protected: float f[3]; public: Data(float f0 = 0.0, float f1 = 0.0, float f2 = 0.0) { f[0] = f0; f[1] = f1; f[2] = f2; } void print(const char* msg = "") const { if(*msg) cout << msg << endl; for(int i = 0; i < 3; i++) cout << "f[" << i << "] = " << f[i] << endl; } }; class WData1 : public Persistent, public Data { public: WData1(float f0 = 0.0, float f1 = 0.0, float f2 = 0.0) : Data(f0, f1, f2) {} void write(ostream& out) const { out << f[0] << " " << f[1] << " " << f[2] << " "; } void read(istream& in) { in >> f[0] >> f[1] >> f[2]; } }; class WData2 : public Data, public Persistent { public: WData2(float f0 = 0.0, float f1 = 0.0, float f2 = 0.0) : Data(f0, f1, f2) {} void write(ostream& out) const { out << f[0] << " " << f[1] << " " << f[2] << " "; }
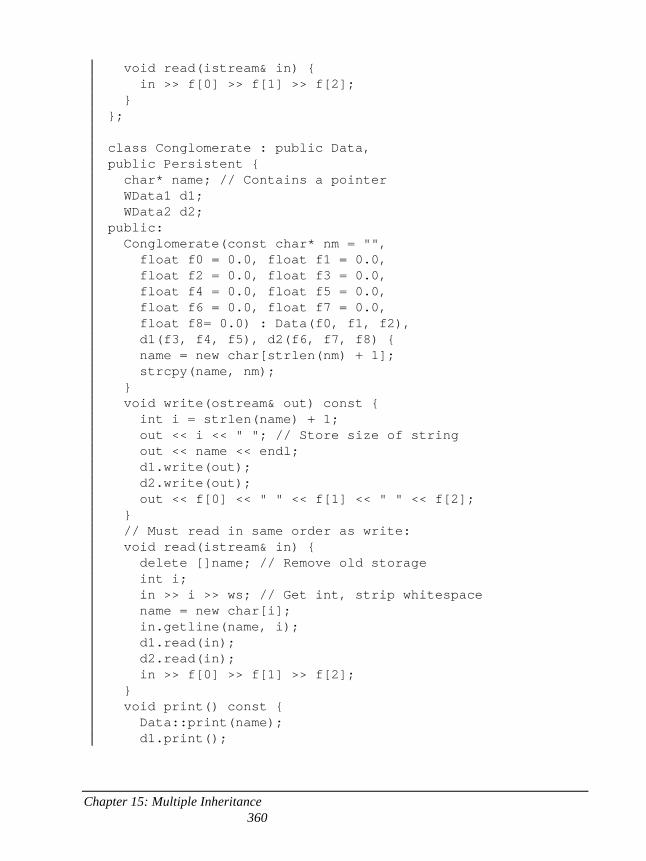
Chapter 15: Multiple Inheritance 360
void read(istream& in) { in >> f[0] >> f[1] >> f[2]; } }; class Conglomerate : public Data, public Persistent { char* name; // Contains a pointer WData1 d1; WData2 d2; public: Conglomerate(const char* nm = "", float f0 = 0.0, float f1 = 0.0, float f2 = 0.0, float f3 = 0.0, float f4 = 0.0, float f5 = 0.0, float f6 = 0.0, float f7 = 0.0, float f8= 0.0) : Data(f0, f1, f2), d1(f3, f4, f5), d2(f6, f7, f8) { name = new char[strlen(nm) + 1]; strcpy(name, nm); } void write(ostream& out) const { int i = strlen(name) + 1; out << i << " "; // Store size of string out << name << endl; d1.write(out); d2.write(out); out << f[0] << " " << f[1] << " " << f[2]; } // Must read in same order as write: void read(istream& in) { delete []name; // Remove old storage int i; in >> i >> ws; // Get int, strip whitespace name = new char[i]; in.getline(name, i); d1.read(in); d2.read(in); in >> f[0] >> f[1] >> f[2]; } void print() const { Data::print(name); d1.print();
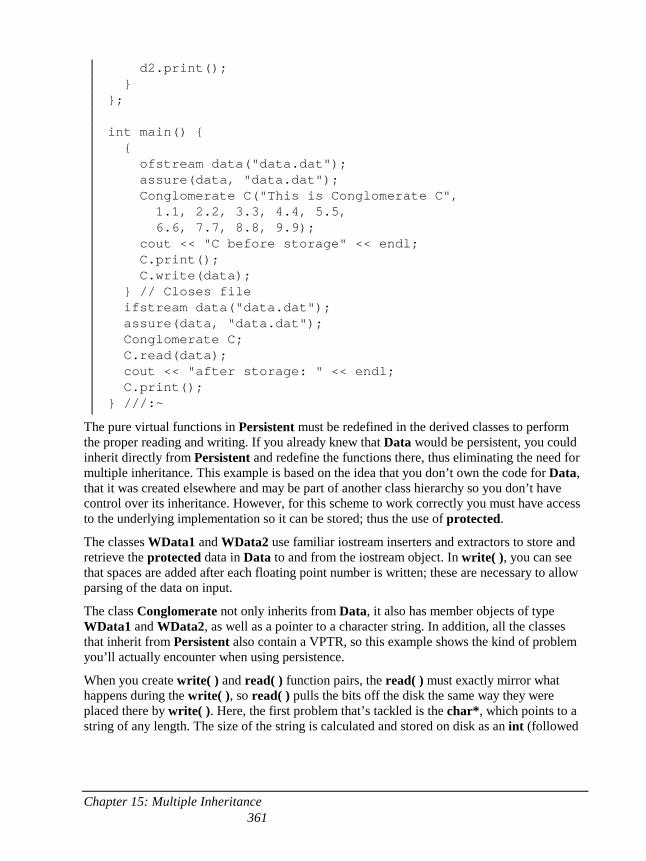
Chapter 15: Multiple Inheritance 361
d2.print(); } }; int main() { { ofstream data("data.dat"); assure(data, "data.dat"); Conglomerate C("This is Conglomerate C", 1.1, 2.2, 3.3, 4.4, 5.5, 6.6, 7.7, 8.8, 9.9); cout << "C before storage" << endl; C.print(); C.write(data); } // Closes file ifstream data("data.dat"); assure(data, "data.dat"); Conglomerate C; C.read(data); cout << "after storage: " << endl; C.print(); } ///:~
The pure virtual functions in Persistent must be redefined in the derived classes to perform the proper reading and writing. If you already knew that Data would be persistent, you could inherit directly from Persistent and redefine the functions there, thus eliminating the need for multiple inheritance. This example is based on the idea that you don’t own the code for Data, that it was created elsewhere and may be part of another class hierarchy so you don’t have control over its inheritance. However, for this scheme to work correctly you must have access to the underlying implementation so it can be stored; thus the use of protected.
The classes WData1 and WData2 use familiar iostream inserters and extractors to store and retrieve the protected data in Data to and from the iostream object. In write( ), you can see that spaces are added after each floating point number is written; these are necessary to allow parsing of the data on input.
The class Conglomerate not only inherits from Data, it also has member objects of type WData1 and WData2, as well as a pointer to a character string. In addition, all the classes that inherit from Persistent also contain a VPTR, so this example shows the kind of problem you’ll actually encounter when using persistence.
When you create write( ) and read( ) function pairs, the read( ) must exactly mirror what happens during the write( ), so read( ) pulls the bits off the disk the same way they were placed there by write( ). Here, the first problem that’s tackled is the char*, which points to a string of any length. The size of the string is calculated and stored on disk as an int (followed
Chapter 15: Multiple Inheritance 362
by a space to enable parsing) to allow the read( ) function to allocate the correct amount of storage.
When you have subobjects that have read( ) and write( ) member functions, all you need to do is call those functions in the new read( ) and write( ) functions. This is followed by direct storage of the members in the base class.
People have gone to great lengths to automate persistence, for example, by creating modified preprocessors to support a “persistent” keyword to be applied when defining a class. One can imagine a more elegant approach than the one shown here for implementing persistence, but it has the advantage that it works under all implementations of C++, doesn’t require special language extensions, and is relatively bulletproof.
Avoiding MI The need for multiple inheritance in Persist2.cpp is contrived, based on the concept that you don’t have control of some of the code in the project. Upon examination of the example, you can see that MI can be easily avoided by using member objects of type Data, and putting the virtual read( )and write( ) members inside Data or WData1 and WData2 rather than in a separate class. There are many situations like this one where multiple inheritance may be avoided; the language feature is included for unusual, special-case situations that would otherwise be difficult or impossible to handle. But when the question of whether to use multiple inheritance comes up, you should ask two questions:
1. Do I need to show the public interfaces of both these classes, or could one class be embedded with some of its interface produced with member functions in the new class?
2. Do I need to upcast to both of the base classes? (This applies when you have more than two base classes, of course.)
If you can’t answer “no” to both questions, you can avoid using MI and should probably do so.
One situation to watch for is when one class only needs to be upcast as a function argument. In that case, the class can be embedded and an automatic type conversion operator provided in your new class to produce a reference to the embedded object. Any time you use an object of your new class as an argument to a function that expects the embedded object, the type conversion operator is used. However, type conversion can’t be used for normal member selection; that requires inheritance.
Mixin types Rodents & pets(play)
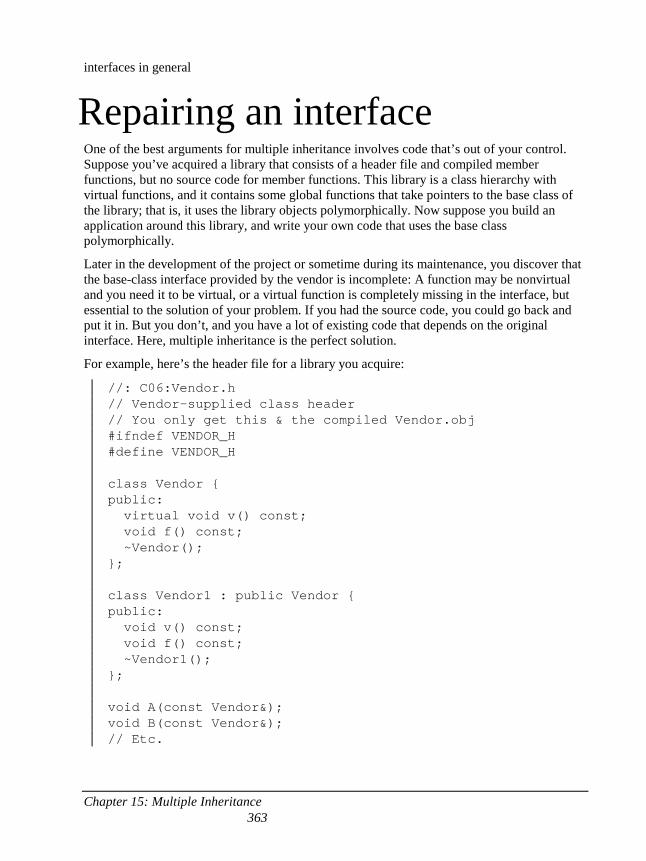
Chapter 15: Multiple Inheritance 363
interfaces in general
Repairing an interface One of the best arguments for multiple inheritance involves code that’s out of your control. Suppose you’ve acquired a library that consists of a header file and compiled member functions, but no source code for member functions. This library is a class hierarchy with virtual functions, and it contains some global functions that take pointers to the base class of the library; that is, it uses the library objects polymorphically. Now suppose you build an application around this library, and write your own code that uses the base class polymorphically.
Later in the development of the project or sometime during its maintenance, you discover that the base-class interface provided by the vendor is incomplete: A function may be nonvirtual and you need it to be virtual, or a virtual function is completely missing in the interface, but essential to the solution of your problem. If you had the source code, you could go back and put it in. But you don’t, and you have a lot of existing code that depends on the original interface. Here, multiple inheritance is the perfect solution.
For example, here’s the header file for a library you acquire:
//: C06:Vendor.h // Vendor-supplied class header // You only get this & the compiled Vendor.obj #ifndef VENDOR_H #define VENDOR_H class Vendor { public: virtual void v() const; void f() const; ~Vendor(); }; class Vendor1 : public Vendor { public: void v() const; void f() const; ~Vendor1(); }; void A(const Vendor&); void B(const Vendor&); // Etc.
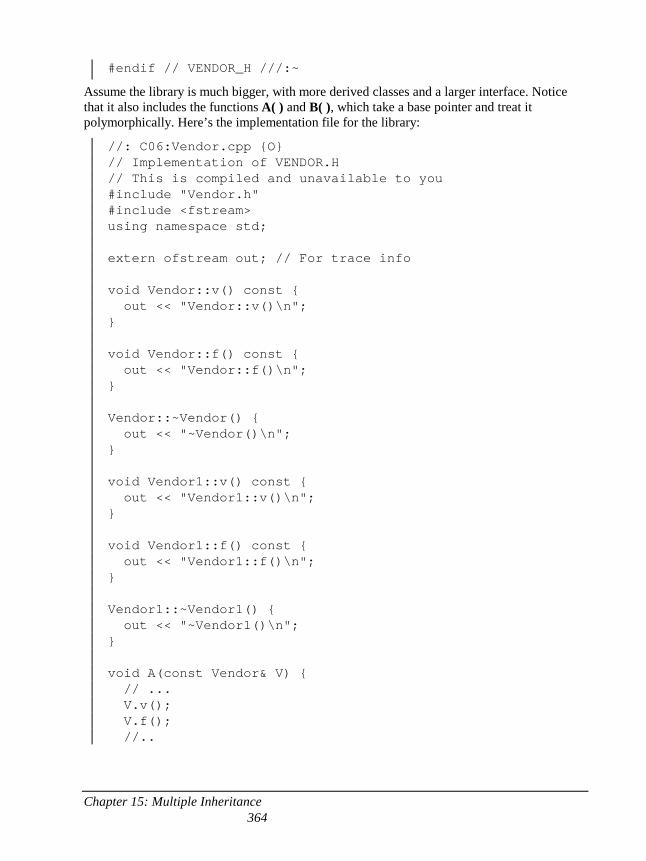
Chapter 15: Multiple Inheritance 364
#endif // VENDOR_H ///:~
Assume the library is much bigger, with more derived classes and a larger interface. Notice that it also includes the functions A( ) and B( ), which take a base pointer and treat it polymorphically. Here’s the implementation file for the library:
//: C06:Vendor.cpp {O} // Implementation of VENDOR.H // This is compiled and unavailable to you #include "Vendor.h" #include <fstream> using namespace std; extern ofstream out; // For trace info void Vendor::v() const { out << "Vendor::v()\n"; } void Vendor::f() const { out << "Vendor::f()\n"; } Vendor::~Vendor() { out << "~Vendor()\n"; } void Vendor1::v() const { out << "Vendor1::v()\n"; } void Vendor1::f() const { out << "Vendor1::f()\n"; } Vendor1::~Vendor1() { out << "~Vendor1()\n"; } void A(const Vendor& V) { // ... V.v(); V.f(); //..
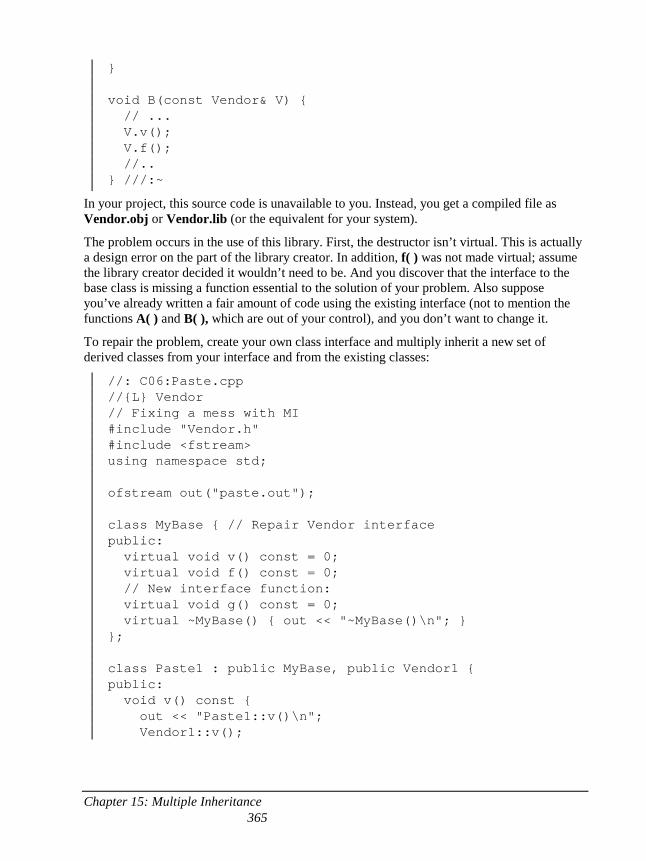
Chapter 15: Multiple Inheritance 365
} void B(const Vendor& V) { // ... V.v(); V.f(); //.. } ///:~
In your project, this source code is unavailable to you. Instead, you get a compiled file as Vendor.obj or Vendor.lib (or the equivalent for your system).
The problem occurs in the use of this library. First, the destructor isn’t virtual. This is actually a design error on the part of the library creator. In addition, f( ) was not made virtual; assume the library creator decided it wouldn’t need to be. And you discover that the interface to the base class is missing a function essential to the solution of your problem. Also suppose you’ve already written a fair amount of code using the existing interface (not to mention the functions A( ) and B( ), which are out of your control), and you don’t want to change it.
To repair the problem, create your own class interface and multiply inherit a new set of derived classes from your interface and from the existing classes:
//: C06:Paste.cpp //{L} Vendor // Fixing a mess with MI #include "Vendor.h" #include <fstream> using namespace std; ofstream out("paste.out"); class MyBase { // Repair Vendor interface public: virtual void v() const = 0; virtual void f() const = 0; // New interface function: virtual void g() const = 0; virtual ~MyBase() { out << "~MyBase()\n"; } }; class Paste1 : public MyBase, public Vendor1 { public: void v() const { out << "Paste1::v()\n"; Vendor1::v();
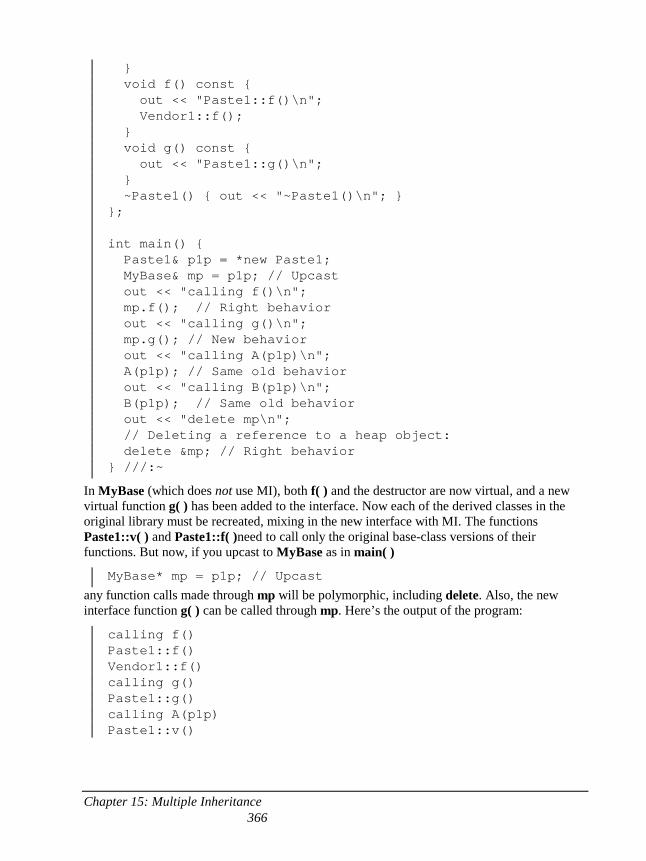
Chapter 15: Multiple Inheritance 366
} void f() const { out << "Paste1::f()\n"; Vendor1::f(); } void g() const { out << "Paste1::g()\n"; } ~Paste1() { out << "~Paste1()\n"; } }; int main() { Paste1& p1p = *new Paste1; MyBase& mp = p1p; // Upcast out << "calling f()\n"; mp.f(); // Right behavior out << "calling g()\n"; mp.g(); // New behavior out << "calling A(p1p)\n"; A(p1p); // Same old behavior out << "calling B(p1p)\n"; B(p1p); // Same old behavior out << "delete mp\n"; // Deleting a reference to a heap object: delete ∓ // Right behavior } ///:~
In MyBase (which does not use MI), both f( ) and the destructor are now virtual, and a new virtual function g( ) has been added to the interface. Now each of the derived classes in the original library must be recreated, mixing in the new interface with MI. The functions Paste1::v( ) and Paste1::f( )need to call only the original base-class versions of their functions. But now, if you upcast to MyBase as in main( )
MyBase* mp = p1p; // Upcast
any function calls made through mp will be polymorphic, including delete. Also, the new interface function g( ) can be called through mp. Here’s the output of the program:
calling f() Paste1::f() Vendor1::f() calling g() Paste1::g() calling A(p1p) Paste1::v()
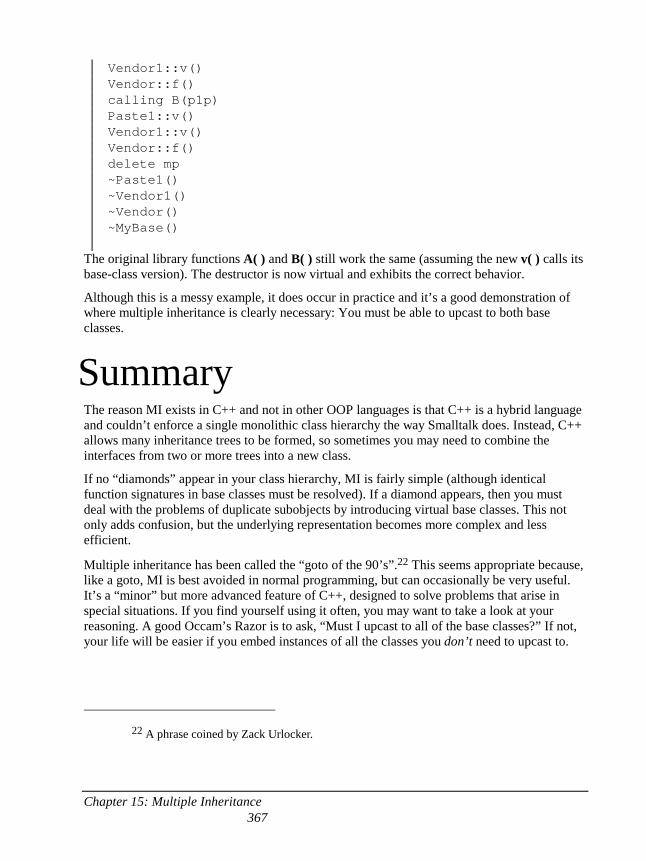
Chapter 15: Multiple Inheritance 367
Vendor1::v() Vendor::f() calling B(p1p) Paste1::v() Vendor1::v() Vendor::f() delete mp ~Paste1() ~Vendor1() ~Vendor() ~MyBase()
The original library functions A( ) and B( ) still work the same (assuming the new v( ) calls its base-class version). The destructor is now virtual and exhibits the correct behavior.
Although this is a messy example, it does occur in practice and it’s a good demonstration of where multiple inheritance is clearly necessary: You must be able to upcast to both base classes.
Summary The reason MI exists in C++ and not in other OOP languages is that C++ is a hybrid language and couldn’t enforce a single monolithic class hierarchy the way Smalltalk does. Instead, C++ allows many inheritance trees to be formed, so sometimes you may need to combine the interfaces from two or more trees into a new class.
If no “diamonds” appear in your class hierarchy, MI is fairly simple (although identical function signatures in base classes must be resolved). If a diamond appears, then you must deal with the problems of duplicate subobjects by introducing virtual base classes. This not only adds confusion, but the underlying representation becomes more complex and less efficient.
Multiple inheritance has been called the “goto of the 90’s”.22 This seems appropriate because, like a goto, MI is best avoided in normal programming, but can occasionally be very useful. It’s a “minor” but more advanced feature of C++, designed to solve problems that arise in special situations. If you find yourself using it often, you may want to take a look at your reasoning. A good Occam’s Razor is to ask, “Must I upcast to all of the base classes?” If not, your life will be easier if you embed instances of all the classes you don’t need to upcast to.
22 A phrase coined by Zack Urlocker.
Chapter 15: Multiple Inheritance 368
Exercises 1. These exercises will take you step-by-step through the traps of MI. Create a
base class X with a single constructor that takes an int argument and a member function f( ), that takes no arguments and returns void. Now inherit X into Y and Z, creating constructors for each of them that takes a single int argument. Now multiply inherit Y and Z into A. Create an object of class A, and call f( ) for that object. Fix the problem with explicit disambiguation.
2. Starting with the results of exercise 1, create a pointer to an X called px, and assign to it the address of the object of type A you created before. Fix the problem using a virtual base class. Now fix X so you no longer have to call the constructor for X inside A.
3. Starting with the results of exercise 2, remove the explicit disambiguation for f( ), and see if you can call f( ) through px. Trace it to see which function gets called. Fix the problem so the correct function will be called in a class hierarchy.

369
7: Exception handling
Improved error recovery is one of the most powerful ways you can increase the robustness of your code.
Unfortunately, it’s almost accepted practice to ignore error conditions, as if we’re in a state of denial about errors. Some of the reason is no doubt the tediousness and code bloat of checking for many errors. For example, printf( ) returns the number of characters that were successfully printed, but virtually no one checks this value. The proliferation of code alone would be disgusting, not to mention the difficulty it would add in reading the code.
The problem with C’s approach to error handling could be thought of as one of coupling – the user of a function must tie the error-handling code so closely to that function that it becomes too ungainly and awkward to use.
One of the major features in C++ is exception handling, which is a better way of thinking about and handling errors. With exception handling,
1. Error-handling code is not nearly so tedious to write, and it doesn't become mixed up with your "normal" code. You write the code you want to happen; later in a separate section you write the code to cope with the problems. If you make multiple calls to a function, you handle the errors from that function once, in one place.
2. Errors cannot be ignored. If a function needs to send an error message to the caller of that function, it “throws” an object representing that error out of the function. If the caller doesn’t “catch” the error and handle it, it goes to the next enclosing scope, and so on until someone catches the error.
This chapter examines C’s approach to error handling (such as it is), why it did not work very well for C, and why it won’t work at all for C++. Then you’ll learn about try, throw, and catch, the C++ keywords that support exception handling.
Error handling in C In most of the examples in this book, assert( ) was used as it was intended: for debugging during development with code that could be disabled with #define NDEBUG for the shipping
Chapter 16: Exception Handling 370
product. Runtime error checking uses the require.h functions developed in Chapter XX. These were a convenient way to say, “There’s a problem here you’ll probably want to handle with some more sophisticated code, but you don’t need to be distracted by it in this example.” The require.h functions may be enough for small programs, but for complicated products you may need to write more sophisticated error-handling code.
Error handling is quite straightforward in situations where you check some condition and you know exactly what to do because you have all the necessary information in that context. Of course, you just handle the error at that point. These are ordinary errors and not the subject of this chapter.
The problem occurs when you don’t have enough information in that context, and you need to pass the error information into a larger context where that information does exist. There are three typical approaches in C to handle this situation.
1. Return error information from the function or, if the return value cannot be used this way, set a global error condition flag. (Standard C provides errno and perror( ) to support this.) As mentioned before, the programmer may simply ignore the error information because tedious and obfuscating error checking must occur with each function call. In addition, returning from a function that hits an exceptional condition may not make sense.
2. Use the little-known Standard C library signal-handling system, implemented with the signal( ) function (to determine what happens when the event occurs) and raise( ) (to generate an event). Again, this has high coupling because it requires the user of any library that generates signals to understand and install the appropriate signal-handling mechanism; also in large projects the signal numbers from different libraries may clash with each other.
3. Use the nonlocal goto functions in the Standard C library: setjmp( ) and longjmp( ). With setjmp( ) you save a known good state in the program, and if you get into trouble, longjmp( ) will restore that state. Again, there is high coupling between the place where the state is stored and the place where the error occurs.
When considering error-handling schemes with C++, there’s an additional very critical problem: The C techniques of signals and setjmp/longjmp do not call destructors, so objects aren’t properly cleaned up. This makes it virtually impossible to effectively recover from an exceptional condition because you’ll always leave objects behind that haven’t been cleaned up and that can no longer be accessed. The following example demonstrates this with setjmp/longjmp:
//: C07:Nonlocal.cpp // setjmp() & longjmp() #include <iostream> #include <csetjmp>
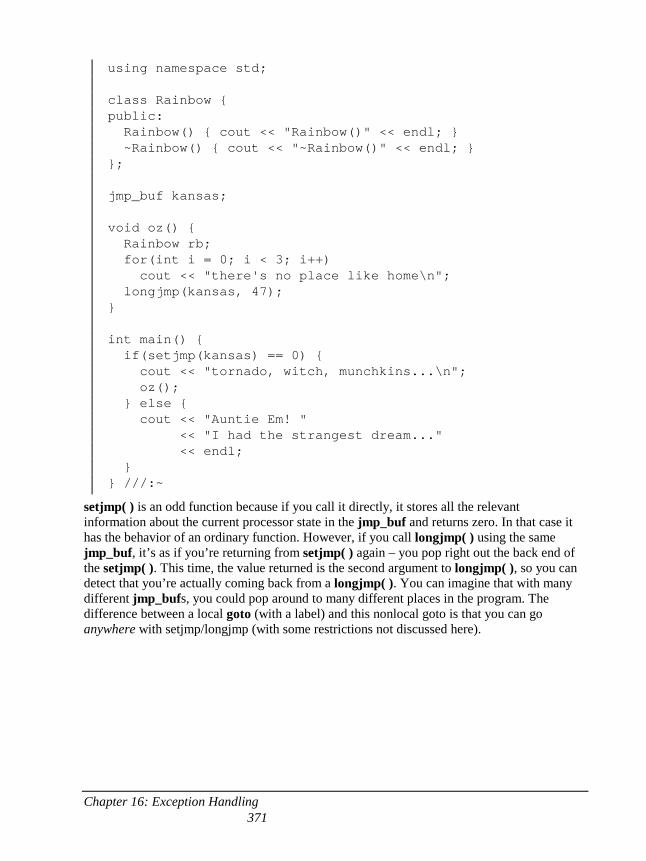
Chapter 16: Exception Handling 371
using namespace std; class Rainbow { public: Rainbow() { cout << "Rainbow()" << endl; } ~Rainbow() { cout << "~Rainbow()" << endl; } }; jmp_buf kansas; void oz() { Rainbow rb; for(int i = 0; i < 3; i++) cout << "there's no place like home\n"; longjmp(kansas, 47); } int main() { if(setjmp(kansas) == 0) { cout << "tornado, witch, munchkins...\n"; oz(); } else { cout << "Auntie Em! " << "I had the strangest dream..." << endl; } } ///:~
setjmp( ) is an odd function because if you call it directly, it stores all the relevant information about the current processor state in the jmp_buf and returns zero. In that case it has the behavior of an ordinary function. However, if you call longjmp( ) using the same jmp_buf, it’s as if you’re returning from setjmp( ) again – you pop right out the back end of the setjmp( ). This time, the value returned is the second argument to longjmp( ), so you can detect that you’re actually coming back from a longjmp( ). You can imagine that with many different jmp_bufs, you could pop around to many different places in the program. The difference between a local goto (with a label) and this nonlocal goto is that you can go anywhere with setjmp/longjmp (with some restrictions not discussed here).
Chapter 16: Exception Handling 372
The problem with C++ is that longjmp( ) doesn’t respect objects; in particular it doesn’t call destructors when it jumps out of a scope.23 Destructor calls are essential, so this approach won’t work with C++.
Throwing an exception If you encounter an exceptional situation in your code – that is, one where you don’t have enough information in the current context to decide what to do – you can send information about the error into a larger context by creating an object containing that information and “throwing” it out of your current context. This is called throwing an exception. Here’s what it looks like:
throw myerror(“something bad happened”);
myerror is an ordinary class, which takes a char* as its argument. You can use any type when you throw (including built-in types), but often you’ll use special types created just for throwing exceptions.
The keyword throw causes a number of relatively magical things to happen. First it creates an object that isn’t there under normal program execution, and of course the constructor is called for that object. Then the object is, in effect, “returned” from the function, even though that object type isn’t normally what the function is designed to return. A simplistic way to think about exception handling is as an alternate return mechanism, although you get into trouble if you take the analogy too far – you can also exit from ordinary scopes by throwing an exception. But a value is returned, and the function or scope exits.
Any similarity to function returns ends there because where you return to is someplace completely different than for a normal function call. (You end up in an appropriate exception handler that may be miles away from where the exception was thrown.) In addition, only objects that were successfully created at the time of the exception are destroyed (unlike a normal function return that assumes all the objects in the scope must be destroyed). Of course, the exception object itself is also properly cleaned up at the appropriate point.
In addition, you can throw as many different types of objects as you want. Typically, you’ll throw a different type for each different type of error. The idea is to store the information in the object and the type of object, so someone in the bigger context can figure out what to do with your exception.
23 You may be surprised when you run the example – some C++ compilers have extended longjmp( ) to clean up objects on the stack. This is nonportable behavior.
Chapter 16: Exception Handling 373
Catching an exception If a function throws an exception, it must assume that exception is caught and dealt with. As mentioned before, one of the advantages of C++ exception handling is that it allows you to concentrate on the problem you’re actually trying to solve in one place, and then deal with the errors from that code in another place.
The try block If you’re inside a function and you throw an exception (or a called function throws an exception), that function will exit in the process of throwing. If you don’t want a throw to leave a function, you can set up a special block within the function where you try to solve your actual programming problem (and potentially generate exceptions). This is called the try block because you try your various function calls there. The try block is an ordinary scope, preceded by the keyword try:
try { // Code that may generate exceptions }
If you were carefully checking for errors without using exception handling, you’d have to surround every function call with setup and test code, even if you call the same function several times. With exception handling, you put everything in a try block without error checking. This means your code is a lot easier to write and easier to read because the goal of the code is not confused with the error checking.
Exception handlers Of course, the thrown exception must end up someplace. This is the exception handler, and there’s one for every exception type you want to catch. Exception handlers immediately follow the try block and are denoted by the keyword catch:
try { // code that may generate exceptions } catch(type1 id1) { // handle exceptions of type1 } catch(type2 id2) { // handle exceptions of type2 } // etc...
Each catch clause (exception handler) is like a little function that takes a single argument of one particular type. The identifier (id1, id2, and so on) may be used inside the handler, just
Chapter 16: Exception Handling 374
like a function argument, although sometimes there is no identifier because it’s not needed in the handler – the exception type gives you enough information to deal with it.
The handlers must appear directly after the try block. If an exception is thrown, the exception-handling mechanism goes hunting for the first handler with an argument that matches the type of the exception. Then it enters that catch clause, and the exception is considered handled. (The search for handlers stops once the catch clause is finished.) Only the matching catch clause executes; it’s not like a switch statement where you need a break after each case to prevent the remaining ones from executing.
Notice that, within the try block, a number of different function calls might generate the same exception, but you only need one handler.
Termination vs. resumption There are two basic models in exception-handling theory. In termination (which is what C++ supports) you assume the error is so critical there’s no way to get back to where the exception occurred. Whoever threw the exception decided there was no way to salvage the situation, and they don’t want to come back.
The alternative is called resumption. It means the exception handler is expected to do something to rectify the situation, and then the faulting function is retried, presuming success the second time. If you want resumption, you still hope to continue execution after the exception is handled, so your exception is more like a function call – which is how you should set up situations in C++ where you want resumption-like behavior (that is, don’t throw an exception; call a function that fixes the problem). Alternatively, place your try block inside a while loop that keeps reentering the try block until the result is satisfactory.
Historically, programmers using operating systems that supported resumptive exception handling eventually ended up using termination-like code and skipping resumption. So although resumption sounds attractive at first, it seems it isn’t quite so useful in practice. One reason may be the distance that can occur between the exception and its handler; it’s one thing to terminate to a handler that’s far away, but to jump to that handler and then back again may be too conceptually difficult for large systems where the exception can be generated from many points.
The exception specification You’re not required to inform the person using your function what exceptions you might throw. However, this is considered very uncivilized because it means he cannot be sure what code to write to catch all potential exceptions. Of course, if he has your source code, he can hunt through and look for throw statements, but very often a library doesn’t come with sources. C++ provides a syntax to allow you to politely tell the user what exceptions this function throws, so the user may handle them. This is the exception specification and it’s part of the function declaration, appearing after the argument list.

Chapter 16: Exception Handling 375
The exception specification reuses the keyword throw, followed by a parenthesized list of all the potential exception types. So your function declaration may look like
void f() throw(toobig, toosmall, divzero);
With exceptions, the traditional function declaration
void f();
means that any type of exception may be thrown from the function. If you say
void f() throw();
it means that no exceptions are thrown from a function.
For good coding policy, good documentation, and ease-of-use for the function caller, you should always use an exception specification when you write a function that throws exceptions.
unexpected( ) If your exception specification claims you’re going to throw a certain set of exceptions and then you throw something that isn’t in that set, what’s the penalty? The special function unexpected( ) is called when you throw something other than what appears in the exception specification.
set_unexpected( ) unexpected( ) is implemented with a pointer to a function, so you can change its behavior. You do so with a function called set_unexpected( ) which, like set_new_handler( ), takes the address of a function with no arguments and void return value. Also, it returns the previous value of the unexpected( ) pointer so you can save it and restore it later. To use set_unexpected( ), you must include the header file <exception>. Here’s an example that shows a simple use of all the features discussed so far in the chapter:
//: C07:Except.cpp // Basic exceptions // Exception specifications & unexpected() #include <exception> #include <iostream> #include <cstdlib> #include <cstring> using namespace std; class Up {}; class Fit {}; void g(); void f(int i) throw (Up, Fit) {
Chapter 16: Exception Handling 376
switch(i) { case 1: throw Up(); case 2: throw Fit(); } g(); } // void g() {} // Version 1 void g() { throw 47; } // Version 2 // (Can throw built-in types) void my_unexpected() { cout << "unexpected exception thrown"; exit(1); } int main() { set_unexpected(my_unexpected); // (ignores return value) for(int i = 1; i <=3; i++) try { f(i); } catch(Up) { cout << "Up caught" << endl; } catch(Fit) { cout << "Fit caught" << endl; } } ///:~
The classes Up and Fit are created solely to throw as exceptions. Often exception classes will be this small, but sometimes they contain additional information so that the handlers can query them.
f( ) is a function that promises in its exception specification to throw only exceptions of type Up and Fit, and from looking at the function definition this seems plausible. Version one of g( ), called by f( ), doesn’t throw any exceptions so this is true. But then someone changes g( ) so it throws exceptions and the new g( ) is linked in with f( ). Now f( ) begins to throw a new exception, unbeknown to the creator of f( ). Thus the exception specification is violated.
The my_unexpected( ) function has no arguments or return value, following the proper form for a custom unexpected( ) function. It simply prints a message so you can see it has been called, then exits the program. Your new unexpected( ) function must not return (that is, you can write the code that way but it’s an error). However, it can throw another exception (you can even rethrow the same exception), or call exit( ) or abort( ). If unexpected( ) throws an
Chapter 16: Exception Handling 377
exception, the search for the handler starts at the function call that threw the unexpected exception. (This behavior is unique to unexpected( ).)
Although the new_handler( ) function pointer can be null and the system will do something sensible, the unexpected( ) function pointer should never be null. The default value is terminate( ) (mentioned later), but whenever you use exceptions and specifications you should write your own unexpected( ) to log the error and either rethrow it, throw something new, or terminate the program.
In main( ), the try block is within a for loop so all the possibilities are exercised. Note that this is a way to achieve something like resumption – nest the try block inside a for, while, do, or if and cause any exceptions to attempt to repair the problem; then attempt the try block again.
Only the Up and Fit exceptions are caught because those are the only ones the programmer of f( ) said would be thrown. Version two of g( ) causes my_unexpected( ) to be called because f( ) then throws an int. (You can throw any type, including a built-in type.)
In the call to set_unexpected( ), the return value is ignored, but it can also be saved in a pointer to function and restored later.
Better exception specifications? You may feel the existing exception specification rules aren’t very safe, and that
void f();
should mean that no exceptions are thrown from this function. If the programmer wants to throw any type of exception, you may think he or she should have to say
void f() throw(...); // Not in C++
This would surely be an improvement because function declarations would be more explicit. Unfortunately you can’t always know by looking at the code in a function whether an exception will be thrown – it could happen because of a memory allocation, for example. Worse, existing functions written before exception handling was introduced may find themselves inadvertently throwing exceptions because of the functions they call (which may be linked into new, exception-throwing versions). Thus, the ambiguity, so
void f();
means “Maybe I’ll throw an exception, maybe I won’t.” This ambiguity is necessary to avoid hindering code evolution.
Catching any exception As mentioned, if your function has no exception specification, any type of exception can be thrown. One solution to this problem is to create a handler that catches any type of exception. You do this using the ellipses in the argument list (á la C):
Chapter 16: Exception Handling 378
catch(...) { cout << "an exception was thrown" << endl; }
This will catch any exception, so you’ll want to put it at the end of your list of handlers to avoid pre-empting any that follow it.
The ellipses give you no possibility to have an argument or to know anything about the type of the exception. It’s a catch-all.
Rethrowing an exception Sometimes you’ll want to rethrow the exception that you just caught, particularly when you use the ellipses to catch any exception because there’s no information available about the exception. This is accomplished by saying throw with no argument:
catch(...) { cout << "an exception was thrown" << endl; throw; }
Any further catch clauses for the same try block are still ignored – the throw causes the exception to go to the exception handlers in the next-higher context. In addition, everything about the exception object is preserved, so the handler at the higher context that catches the specific exception type is able to extract all the information from that object.
Uncaught exceptions If none of the exception handlers following a particular try block matches an exception, that exception moves to the next-higher context, that is, the function or try block surrounding the try block that failed to catch the exception. (The location of this higher-context try block is not always obvious at first glance.) This process continues until, at some level, a handler matches the exception. At that point, the exception is considered “caught,” and no further searching occurs.
If no handler at any level catches the exception, it is “uncaught” or “unhandled.” An uncaught exception also occurs if a new exception is thrown before an existing exception reaches its handler – the most common reason for this is that the constructor for the exception object itself causes a new exception.
terminate( ) If an exception is uncaught, the special function terminate( ) is automatically called. Like unexpected( ), terminate is actually a pointer to a function. Its default value is the Standard C library function abort( ), which immediately exits the program with no calls to the normal
Chapter 16: Exception Handling 379
termination functions (which means that destructors for global and static objects might not be called).
No cleanups occur for an uncaught exception; that is, no destructors are called. If you don’t wrap your code (including, if necessary, all the code in main( )) in a try block followed by handlers and ending with a default handler (catch(...)) to catch all exceptions, then you will take your lumps. An uncaught exception should be thought of as a programming error.
set_terminate( ) You can install your own terminate( ) function using the standard set_terminate( ) function, which returns a pointer to the terminate( ) function you are replacing, so you can restore it later if you want. Your custom terminate( ) must take no arguments and have a void return value. In addition, any terminate( ) handler you install must not return or throw an exception, but instead must call some sort of program-termination function. If terminate( ) is called, it means the problem is unrecoverable.
Like unexpected( ), the terminate( ) function pointer should never be null.
Here’s an example showing the use of set_terminate( ). Here, the return value is saved and restored so the terminate( ) function can be used to help isolate the section of code where the uncaught exception is occurring:
//: C07:Terminator.cpp // Use of set_terminate() // Also shows uncaught exceptions #include <exception> #include <iostream> #include <cstdlib> using namespace std; void terminator() { cout << "I'll be back!" << endl; abort(); } void (*old_terminate)() = set_terminate(terminator); class Botch { public: class Fruit {}; void f() { cout << "Botch::f()" << endl; throw Fruit(); }
Chapter 16: Exception Handling 380
~Botch() { throw 'c'; } }; int main() { try{ Botch b; b.f(); } catch(...) { cout << "inside catch(...)" << endl; } } ///:~
The definition of old_terminate looks a bit confusing at first: It not only creates a pointer to a function, but it initializes that pointer to the return value of set_terminate( ). Even though you may be familiar with seeing a semicolon right after a pointer-to-function definition, it’s just another kind of variable and may be initialized when it is defined.
The class Botch not only throws an exception inside f( ), but also in its destructor. This is one of the situations that causes a call to terminate( ), as you can see in main( ). Even though the exception handler says catch(...), which would seem to catch everything and leave no cause for terminate( ) to be called, terminate( ) is called anyway, because in the process of cleaning up the objects on the stack to handle one exception, the Botch destructor is called, and that generates a second exception, forcing a call to terminate( ). Thus, a destructor that throws an exception or causes one to be thrown is a design error.
Function-level try blocks //: C07:FunctionTryBlock.cpp // Function-level try blocks #include <iostream> using namespace std; int main() try { throw "main"; } catch(const char* msg) { cout << msg << endl; } ///:~
Cleaning up Part of the magic of exception handling is that you can pop from normal program flow into the appropriate exception handler. This wouldn’t be very useful, however, if things weren’t
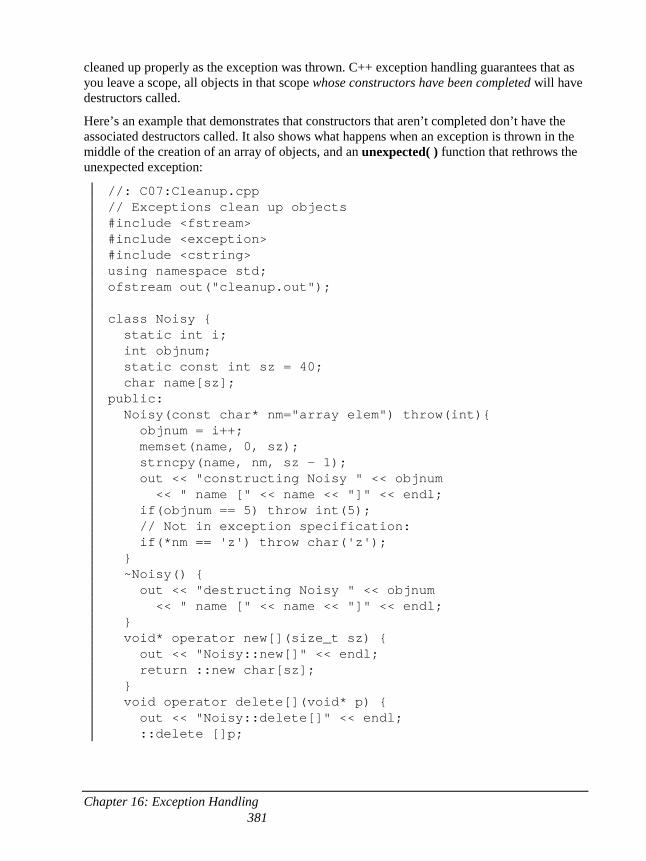
Chapter 16: Exception Handling 381
cleaned up properly as the exception was thrown. C++ exception handling guarantees that as you leave a scope, all objects in that scope whose constructors have been completed will have destructors called.
Here’s an example that demonstrates that constructors that aren’t completed don’t have the associated destructors called. It also shows what happens when an exception is thrown in the middle of the creation of an array of objects, and an unexpected( ) function that rethrows the unexpected exception:
//: C07:Cleanup.cpp // Exceptions clean up objects #include <fstream> #include <exception> #include <cstring> using namespace std; ofstream out("cleanup.out"); class Noisy { static int i; int objnum; static const int sz = 40; char name[sz]; public: Noisy(const char* nm="array elem") throw(int){ objnum = i++; memset(name, 0, sz); strncpy(name, nm, sz - 1); out << "constructing Noisy " << objnum << " name [" << name << "]" << endl; if(objnum == 5) throw int(5); // Not in exception specification: if(*nm == 'z') throw char('z'); } ~Noisy() { out << "destructing Noisy " << objnum << " name [" << name << "]" << endl; } void* operator new[](size_t sz) { out << "Noisy::new[]" << endl; return ::new char[sz]; } void operator delete[](void* p) { out << "Noisy::delete[]" << endl; ::delete []p;
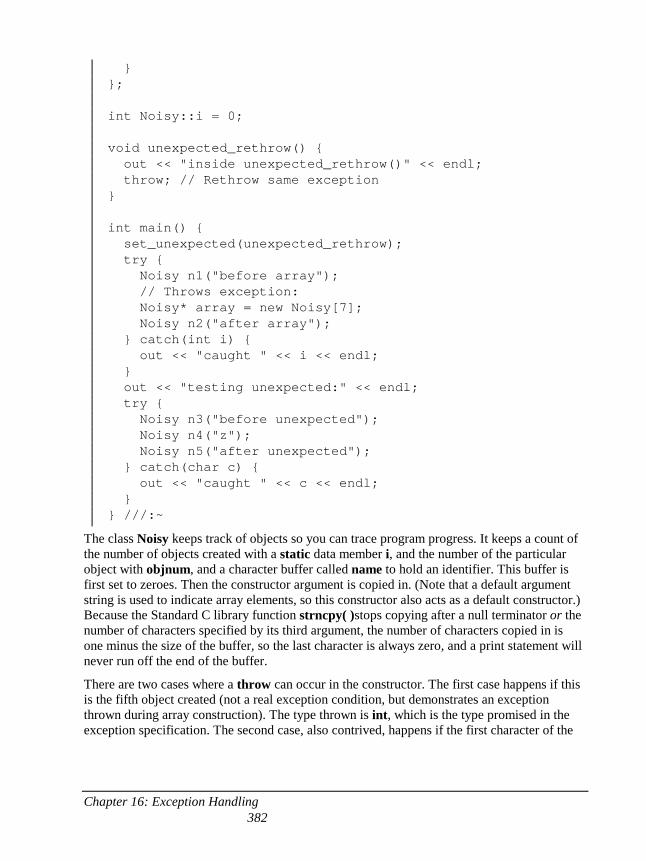
Chapter 16: Exception Handling 382
} }; int Noisy::i = 0; void unexpected_rethrow() { out << "inside unexpected_rethrow()" << endl; throw; // Rethrow same exception } int main() { set_unexpected(unexpected_rethrow); try { Noisy n1("before array"); // Throws exception: Noisy* array = new Noisy[7]; Noisy n2("after array"); } catch(int i) { out << "caught " << i << endl; } out << "testing unexpected:" << endl; try { Noisy n3("before unexpected"); Noisy n4("z"); Noisy n5("after unexpected"); } catch(char c) { out << "caught " << c << endl; } } ///:~
The class Noisy keeps track of objects so you can trace program progress. It keeps a count of the number of objects created with a static data member i, and the number of the particular object with objnum, and a character buffer called name to hold an identifier. This buffer is first set to zeroes. Then the constructor argument is copied in. (Note that a default argument string is used to indicate array elements, so this constructor also acts as a default constructor.) Because the Standard C library function strncpy( )stops copying after a null terminator or the number of characters specified by its third argument, the number of characters copied in is one minus the size of the buffer, so the last character is always zero, and a print statement will never run off the end of the buffer.
There are two cases where a throw can occur in the constructor. The first case happens if this is the fifth object created (not a real exception condition, but demonstrates an exception thrown during array construction). The type thrown is int, which is the type promised in the exception specification. The second case, also contrived, happens if the first character of the

Chapter 16: Exception Handling 383
argument string is ‘z’, in which case a char is thrown. Because char is not listed in the exception specification, this will cause a call to unexpected( ).
The array versions of new and delete are overloaded for the class, so you can see when they’re called.
The function unexpected_rethrow( ) prints a message and rethrows the same exception. It is installed as the unexpected( ) function in the first line of main( ). Then some objects of type Noisy are created in a try block, but the array causes an exception to be thrown, so the object n2 is never created. You can see the results in the output of the program:
constructing Noisy 0 name [before array] Noisy::new[] constructing Noisy 1 name [array elem] constructing Noisy 2 name [array elem] constructing Noisy 3 name [array elem] constructing Noisy 4 name [array elem] constructing Noisy 5 name [array elem] destructing Noisy 4 name [array elem] destructing Noisy 3 name [array elem] destructing Noisy 2 name [array elem] destructing Noisy 1 name [array elem] Noisy::delete[] destructing Noisy 0 name [before array] caught 5 testing unexpected: constructing Noisy 6 name [before unexpected] constructing Noisy 7 name [z] inside unexpected_rethrow() destructing Noisy 6 name [before unexpected] caught z
Four array elements are successfully created, but in the middle of the constructor for the fifth one, an exception is thrown. Because the fifth constructor never completes, only the destructors for objects 1–4 are called.
The storage for the array is allocated separately with a single call to the global new. Notice that even though delete is never explicitly called anywhere in the program, the exception-handling system knows it must call delete to properly release the storage. This behavior happens only with “normal” versions of operator new. If you use the placement syntax described in Chapter XX, the exception-handling mechanism will not call delete for that object because then it might release memory that was not allocated on the heap.
Finally, object n1 is destroyed, but not object n2 because it was never created.
In the section testing unexpected_rethrow( ), the n3 object is created, and the constructor of n4 is begun. But before it can complete, an exception is thrown. This exception is of type
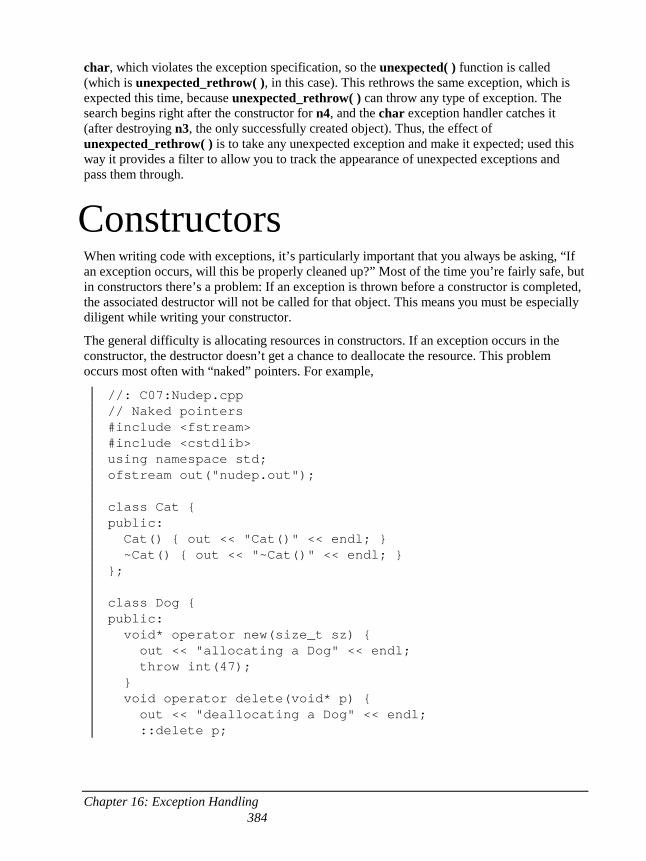
Chapter 16: Exception Handling 384
char, which violates the exception specification, so the unexpected( ) function is called (which is unexpected_rethrow( ), in this case). This rethrows the same exception, which is expected this time, because unexpected_rethrow( ) can throw any type of exception. The search begins right after the constructor for n4, and the char exception handler catches it (after destroying n3, the only successfully created object). Thus, the effect of unexpected_rethrow( ) is to take any unexpected exception and make it expected; used this way it provides a filter to allow you to track the appearance of unexpected exceptions and pass them through.
Constructors When writing code with exceptions, it’s particularly important that you always be asking, “If an exception occurs, will this be properly cleaned up?” Most of the time you’re fairly safe, but in constructors there’s a problem: If an exception is thrown before a constructor is completed, the associated destructor will not be called for that object. This means you must be especially diligent while writing your constructor.
The general difficulty is allocating resources in constructors. If an exception occurs in the constructor, the destructor doesn’t get a chance to deallocate the resource. This problem occurs most often with “naked” pointers. For example,
//: C07:Nudep.cpp // Naked pointers #include <fstream> #include <cstdlib> using namespace std; ofstream out("nudep.out"); class Cat { public: Cat() { out << "Cat()" << endl; } ~Cat() { out << "~Cat()" << endl; } }; class Dog { public: void* operator new(size_t sz) { out << "allocating a Dog" << endl; throw int(47); } void operator delete(void* p) { out << "deallocating a Dog" << endl; ::delete p;
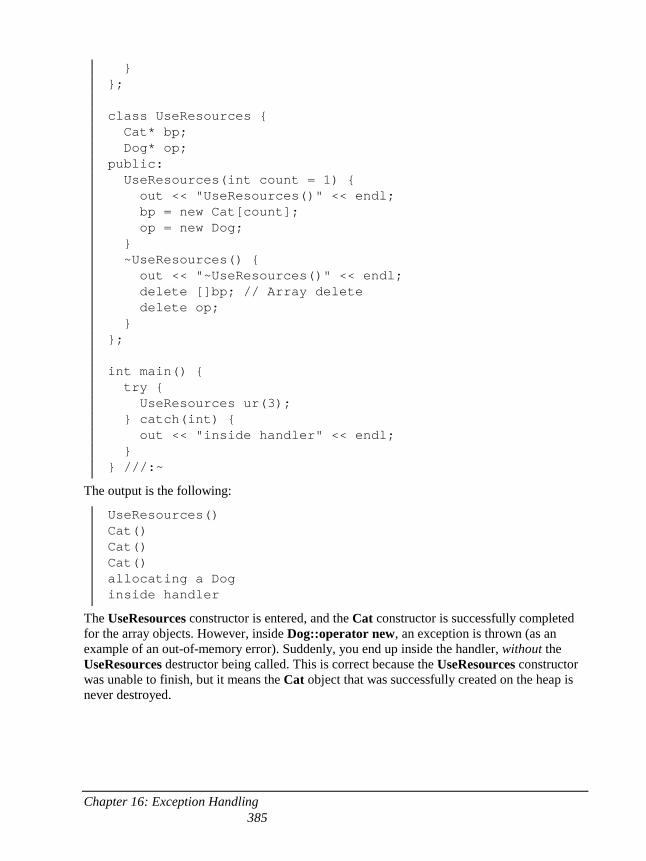
Chapter 16: Exception Handling 385
} }; class UseResources { Cat* bp; Dog* op; public: UseResources(int count = 1) { out << "UseResources()" << endl; bp = new Cat[count]; op = new Dog; } ~UseResources() { out << "~UseResources()" << endl; delete []bp; // Array delete delete op; } }; int main() { try { UseResources ur(3); } catch(int) { out << "inside handler" << endl; } } ///:~
The output is the following:
UseResources() Cat() Cat() Cat() allocating a Dog inside handler
The UseResources constructor is entered, and the Cat constructor is successfully completed for the array objects. However, inside Dog::operator new, an exception is thrown (as an example of an out-of-memory error). Suddenly, you end up inside the handler, without the UseResources destructor being called. This is correct because the UseResources constructor was unable to finish, but it means the Cat object that was successfully created on the heap is never destroyed.
Chapter 16: Exception Handling 386
Making everything an object To prevent this, guard against these “raw” resource allocations by placing the allocations inside their own objects with their own constructors and destructors. This way, each allocation becomes atomic, as an object, and if it fails, the other resource allocation objects are properly cleaned up. Templates are an excellent way to modify the above example:
//: C07:Wrapped.cpp // Safe, atomic pointers #include <fstream> #include <cstdlib> using namespace std; ofstream out("wrapped.out"); // Simplified. Yours may have other arguments. template<class T, int sz = 1> class PWrap { T* ptr; public: class RangeError {}; // Exception class PWrap() { ptr = new T[sz]; out << "PWrap constructor" << endl; } ~PWrap() { delete []ptr; out << "PWrap destructor" << endl; } T& operator[](int i) throw(RangeError) { if(i >= 0 && i < sz) return ptr[i]; throw RangeError(); } }; class Cat { public: Cat() { out << "Cat()" << endl; } ~Cat() { out << "~Cat()" << endl; } void g() {} }; class Dog { public: void* operator new[](size_t sz) {
Chapter 16: Exception Handling 387
out << "allocating an Dog" << endl; throw int(47); } void operator delete[](void* p) { out << "deallocating an Dog" << endl; ::delete p; } }; class UseResources { PWrap<Cat, 3> Bonk; PWrap<Dog> Og; public: UseResources() : Bonk(), Og() { out << "UseResources()" << endl; } ~UseResources() { out << "~UseResources()" << endl; } void f() { Bonk[1].g(); } }; int main() { try { UseResources ur; } catch(int) { out << "inside handler" << endl; } catch(...) { out << "inside catch(...)" << endl; } } ///:~
The difference is the use of the template to wrap the pointers and make them into objects. The constructors for these objects are called before the body of the UseResources constructor, and any of these constructors that complete before an exception is thrown will have their associated destructors called.
The PWrap template shows a more typical use of exceptions than you’ve seen so far: A nested class called RangeError is created to use in operator[ ] if its argument is out of range. Because operator[ ] returns a reference it cannot return zero. (There are no null references.) This is a true exceptional condition – you don’t know what to do in the current context, and you can’t return an improbable value. In this example, RangeError is very simple and assumes all the necessary information is in the class name, but you may also want to add a member that contains the value of the index, if that is useful.
Chapter 16: Exception Handling 388
Now the output is
Cat() Cat() Cat() PWrap constructor allocating a Dog ~Cat() ~Cat() ~Cat() PWrap destructor inside handler
Again, the storage allocation for Dog throws an exception, but this time the array of Cat objects is properly cleaned up, so there is no memory leak.
Exception matching When an exception is thrown, the exception-handling system looks through the “nearest” handlers in the order they are written. When it finds a match, the exception is considered handled, and no further searching occurs.
Matching an exception doesn’t require a perfect match between the exception and its handler. An object or reference to a derived-class object will match a handler for the base class. (However, if the handler is for an object rather than a reference, the exception object is “sliced” as it is passed to the handler; this does no damage but loses all the derived-type information.) If a pointer is thrown, standard pointer conversions are used to match the exception. However, no automatic type conversions are used to convert one exception type to another in the process of matching. For example,
//: C07:Autoexcp.cpp // No matching conversions #include <iostream> using namespace std; class Except1 {}; class Except2 { public: Except2(Except1&) {} }; void f() { throw Except1(); } int main() {
Chapter 16: Exception Handling 389
try { f(); } catch (Except2) { cout << "inside catch(Except2)" << endl; } catch (Except1) { cout << "inside catch(Except1)" << endl; } } ///:~
Even though you might think the first handler could be used by converting an Except1 object into an Except2 using the constructor conversion, the system will not perform such a conversion during exception handling, and you’ll end up at the Except1 handler.
The following example shows how a base-class handler can catch a derived-class exception:
//: C07:Basexcpt.cpp // Exception hierarchies #include <iostream> using namespace std; class X { public: class Trouble {}; class Small : public Trouble {}; class Big : public Trouble {}; void f() { throw Big(); } }; int main() { X x; try { x.f(); } catch(X::Trouble) { cout << "caught Trouble" << endl; // Hidden by previous handler: } catch(X::Small) { cout << "caught Small Trouble" << endl; } catch(X::Big) { cout << "caught Big Trouble" << endl; } } ///:~
Here, the exception-handling mechanism will always match a Trouble object, or anything derived from Trouble, to the first handler. That means the second and third handlers are never called because the first one captures them all. It makes more sense to catch the derived types
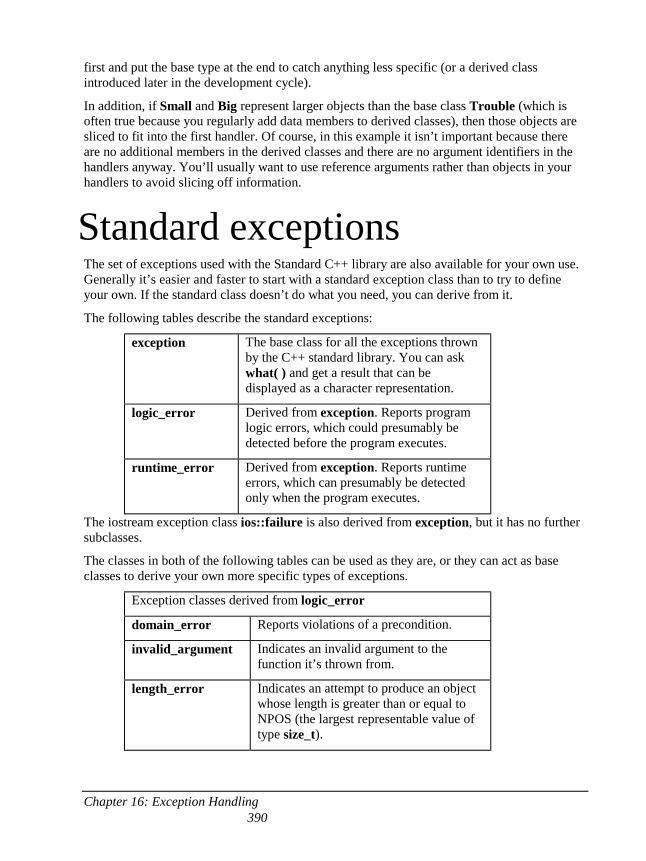
Chapter 16: Exception Handling 390
first and put the base type at the end to catch anything less specific (or a derived class introduced later in the development cycle).
In addition, if Small and Big represent larger objects than the base class Trouble (which is often true because you regularly add data members to derived classes), then those objects are sliced to fit into the first handler. Of course, in this example it isn’t important because there are no additional members in the derived classes and there are no argument identifiers in the handlers anyway. You’ll usually want to use reference arguments rather than objects in your handlers to avoid slicing off information.
Standard exceptions The set of exceptions used with the Standard C++ library are also available for your own use. Generally it’s easier and faster to start with a standard exception class than to try to define your own. If the standard class doesn’t do what you need, you can derive from it.
The following tables describe the standard exceptions:
exception The base class for all the exceptions thrown by the C++ standard library. You can ask what( ) and get a result that can be displayed as a character representation.
logic_error Derived from exception. Reports program logic errors, which could presumably be detected before the program executes.
runtime_error Derived from exception. Reports runtime errors, which can presumably be detected only when the program executes.
The iostream exception class ios::failure is also derived from exception, but it has no further subclasses.
The classes in both of the following tables can be used as they are, or they can act as base classes to derive your own more specific types of exceptions.
Exception classes derived from logic_error
domain_error Reports violations of a precondition.
invalid_argument Indicates an invalid argument to the function it’s thrown from.
length_error Indicates an attempt to produce an object whose length is greater than or equal to NPOS (the largest representable value of type size_t).
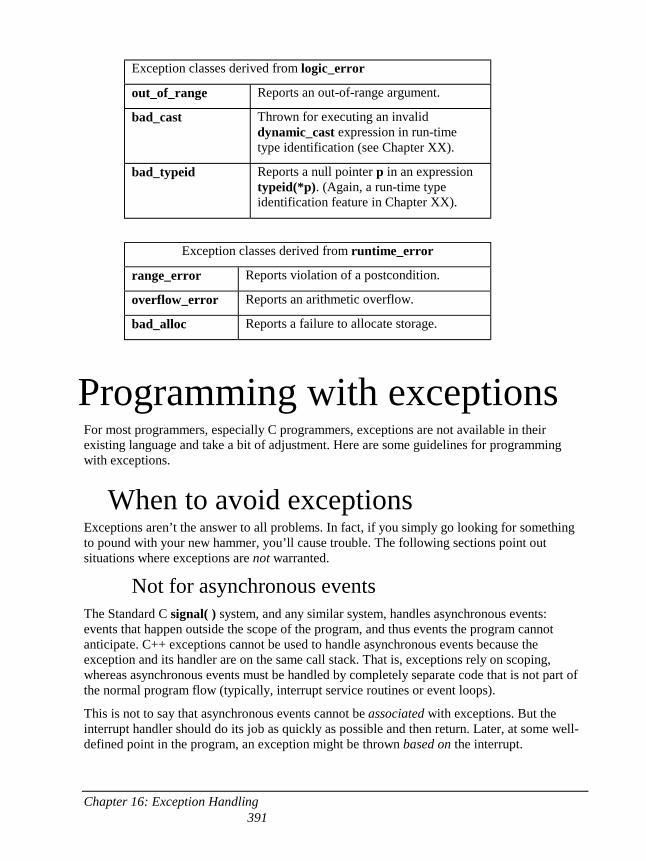
Chapter 16: Exception Handling 391
Exception classes derived from logic_error
out_of_range Reports an out-of-range argument.
bad_cast Thrown for executing an invalid dynamic_cast expression in run-time type identification (see Chapter XX).
bad_typeid Reports a null pointer p in an expression typeid(*p). (Again, a run-time type identification feature in Chapter XX).
Exception classes derived from runtime_error
range_error Reports violation of a postcondition.
overflow_error Reports an arithmetic overflow.
bad_alloc Reports a failure to allocate storage.
Programming with exceptions For most programmers, especially C programmers, exceptions are not available in their existing language and take a bit of adjustment. Here are some guidelines for programming with exceptions.
When to avoid exceptions Exceptions aren’t the answer to all problems. In fact, if you simply go looking for something to pound with your new hammer, you’ll cause trouble. The following sections point out situations where exceptions are not warranted.
Not for asynchronous events The Standard C signal( ) system, and any similar system, handles asynchronous events: events that happen outside the scope of the program, and thus events the program cannot anticipate. C++ exceptions cannot be used to handle asynchronous events because the exception and its handler are on the same call stack. That is, exceptions rely on scoping, whereas asynchronous events must be handled by completely separate code that is not part of the normal program flow (typically, interrupt service routines or event loops).
This is not to say that asynchronous events cannot be associated with exceptions. But the interrupt handler should do its job as quickly as possible and then return. Later, at some well-defined point in the program, an exception might be thrown based on the interrupt.
Chapter 16: Exception Handling 392
Not for ordinary error conditions If you have enough information to handle an error, it’s not an exception. You should take care of it in the current context rather than throwing an exception to a larger context.
Also, C++ exceptions are not thrown for machine-level events like divide-by-zero. It’s assumed these are dealt with by some other mechanism, like the operating system or hardware. That way, C++ exceptions can be reasonably efficient, and their use is isolated to program-level exceptional conditions.
Not for flow-of-control An exception looks somewhat like an alternate return mechanism and somewhat like a switch statement, so you can be tempted to use them for other than their original intent. This is a bad idea, partly because the exception-handling system is significantly less efficient than normal program execution; exceptions are a rare event, so the normal program shouldn’t pay for them. Also, exceptions from anything other than error conditions are quite confusing to the user of your class or function.
You’re not forced to use exceptions Some programs are quite simple, many utilities, for example. You may only need to take input and perform some processing. In these programs you might attempt to allocate memory and fail, or try to open a file and fail, and so on. It is acceptable in these programs to use assert( ) or to print a message and abort( ) the program, allowing the system to clean up the mess, rather than to work very hard to catch all exceptions and recover all the resources yourself. Basically, if you don’t need to use exceptions, you don’t have to.
New exceptions, old code Another situation that arises is the modification of an existing program that doesn’t use exceptions. You may introduce a library that does use exceptions and wonder if you need to modify all your code throughout the program. Assuming you have an acceptable error-handling scheme already in place, the most sensible thing to do here is surround the largest block that uses the new library (this may be all the code in main( )) with a try block, followed by a catch(...) and basic error message. You can refine this to whatever degree necessary by adding more specific handlers, but, in any case, the code you’re forced to add can be minimal.
You can also isolate your exception-generating code in a try block and write handlers to convert the exceptions into your existing error-handling scheme.
It’s truly important to think about exceptions when you’re creating a library for someone else to use, and you can’t know how they need to respond to critical error conditions.
Typical uses of exceptions Do use exceptions to
Chapter 16: Exception Handling 393
4. Fix the problem and call the function (which caused the exception) again.
5. Patch things up and continue without retrying the function.
6. Calculate some alternative result instead of what the function was supposed to produce.
7. Do whatever you can in the current context and rethrow the same exception to a higher context.
8. Do whatever you can in the current context and throw a different exception to a higher context.
9. Terminate the program.
10. Wrap functions (especially C library functions) that use ordinary error schemes so they produce exceptions instead.
11. Simplify. If your exception scheme makes things more complicated, then it is painful and annoying to use.
12. Make your library and program safer. This is a short-term investment (for debugging) and a long-term investment (for application robustness).
Always use exception specifications The exception specification is like a function prototype: It tells the user to write exception-handling code and what exceptions to handle. It tells the compiler the exceptions that may come out of this function.
Of course, you can’t always anticipate by looking at the code what exceptions will arise from a particular function. Sometimes the functions it calls produce an unexpected exception, and sometimes an old function that didn’t throw an exception is replaced with a new one that does, and you’ll get a call to unexpected( ). Anytime you use exception specifications or call functions that do, you should create your own unexpected( ) function that logs a message and rethrows the same exception.
Start with standard exceptions Check out the Standard C++ library exceptions before creating your own. If a standard exception does what you need, chances are it’s a lot easier for your user to understand and handle.
If the exception type you want isn’t part of the standard library, try to derive one from an existing standard exception. It’s nice for your users if they can always write their code to expect the what( ) function defined in the exception( ) class interface.
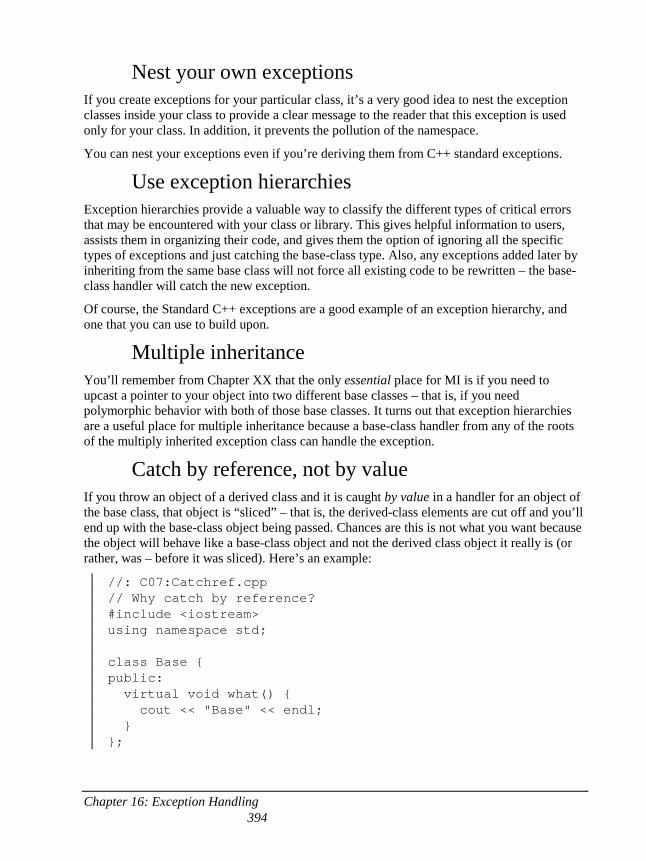
Chapter 16: Exception Handling 394
Nest your own exceptions If you create exceptions for your particular class, it’s a very good idea to nest the exception classes inside your class to provide a clear message to the reader that this exception is used only for your class. In addition, it prevents the pollution of the namespace.
You can nest your exceptions even if you’re deriving them from C++ standard exceptions.
Use exception hierarchies Exception hierarchies provide a valuable way to classify the different types of critical errors that may be encountered with your class or library. This gives helpful information to users, assists them in organizing their code, and gives them the option of ignoring all the specific types of exceptions and just catching the base-class type. Also, any exceptions added later by inheriting from the same base class will not force all existing code to be rewritten – the base-class handler will catch the new exception.
Of course, the Standard C++ exceptions are a good example of an exception hierarchy, and one that you can use to build upon.
Multiple inheritance You’ll remember from Chapter XX that the only essential place for MI is if you need to upcast a pointer to your object into two different base classes – that is, if you need polymorphic behavior with both of those base classes. It turns out that exception hierarchies are a useful place for multiple inheritance because a base-class handler from any of the roots of the multiply inherited exception class can handle the exception.
Catch by reference, not by value If you throw an object of a derived class and it is caught by value in a handler for an object of the base class, that object is “sliced” – that is, the derived-class elements are cut off and you’ll end up with the base-class object being passed. Chances are this is not what you want because the object will behave like a base-class object and not the derived class object it really is (or rather, was – before it was sliced). Here’s an example:
//: C07:Catchref.cpp // Why catch by reference? #include <iostream> using namespace std; class Base { public: virtual void what() { cout << "Base" << endl; } };
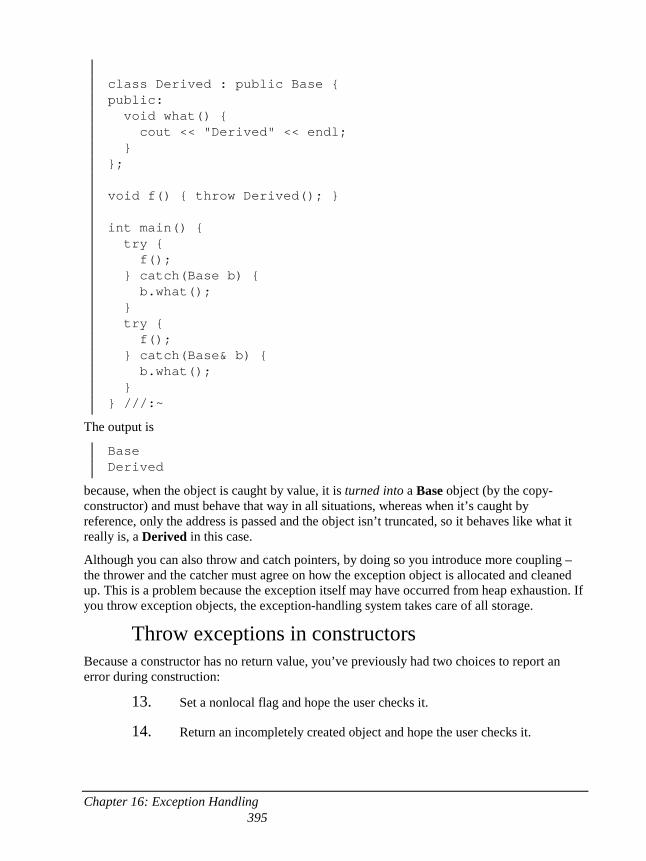
Chapter 16: Exception Handling 395
class Derived : public Base { public: void what() { cout << "Derived" << endl; } }; void f() { throw Derived(); } int main() { try { f(); } catch(Base b) { b.what(); } try { f(); } catch(Base& b) { b.what(); } } ///:~
The output is
Base Derived
because, when the object is caught by value, it is turned into a Base object (by the copy-constructor) and must behave that way in all situations, whereas when it’s caught by reference, only the address is passed and the object isn’t truncated, so it behaves like what it really is, a Derived in this case.
Although you can also throw and catch pointers, by doing so you introduce more coupling – the thrower and the catcher must agree on how the exception object is allocated and cleaned up. This is a problem because the exception itself may have occurred from heap exhaustion. If you throw exception objects, the exception-handling system takes care of all storage.
Throw exceptions in constructors Because a constructor has no return value, you’ve previously had two choices to report an error during construction:
13. Set a nonlocal flag and hope the user checks it.
14. Return an incompletely created object and hope the user checks it.
Chapter 16: Exception Handling 396
This is a serious problem because C programmers have come to rely on an implied guarantee that object creation is always successful, which is not unreasonable in C where types are so primitive. But continuing execution after construction fails in a C++ program is a guaranteed disaster, so constructors are one of the most important places to throw exceptions – now you have a safe, effective way to handle constructor errors. However, you must also pay attention to pointers inside objects and the way cleanup occurs when an exception is thrown inside a constructor.
Don’t cause exceptions in destructors Because destructors are called in the process of throwing other exceptions, you’ll never want to throw an exception in a destructor or cause another exception to be thrown by some action you perform in the destructor. If this happens, it means that a new exception may be thrown before the catch-clause for an existing exception is reached, which will cause a call to terminate( ).
This means that if you call any functions inside a destructor that may throw exceptions, those calls should be within a try block in the destructor, and the destructor must handle all exceptions itself. None must escape from the destructor.
Avoid naked pointers See Wrapped.cpp. A naked pointer usually means vulnerability in the constructor if resources are allocated for that pointer. A pointer doesn’t have a destructor, so those resources won’t be released if an exception is thrown in the constructor.
Overhead Of course it costs something for this new feature; when an exception is thrown there’s considerable runtime overhead. This is the reason you never want to use exceptions as part of your normal flow-of-control, no matter how tempting and clever it may seem. Exceptions should occur only rarely, so the overhead is piled on the exception and not on the normally executing code. One of the important design goals for exception handling was that it could be implemented with no impact on execution speed when it wasn’t used; that is, as long as you don’t throw an exception, your code runs as fast as it would without exception handling. Whether or not this is actually true depends on the particular compiler implementation you’re using.
Exception handling also causes extra information to be put on the stack by the compiler, to aid in stack unwinding.
Exception objects are properly passed around like any other objects, except that they can be passed into and out of what can be thought of as a special “exception scope” (which may just be the global scope). That’s how they go from one place to another. When the exception handler is finished, the exception objects are properly destroyed.
Chapter 16: Exception Handling 397
Summary Error recovery is a fundamental concern for every program you write, and it’s especially important in C++, where one of the goals is to create program components for others to use. To create a robust system, each component must be robust.
The goals for exception handling in C++ are to simplify the creation of large, reliable programs using less code than currently possible, with more confidence that your application doesn’t have an unhandled error. This is accomplished with little or no performance penalty, and with low impact on existing code.
Basic exceptions are not terribly difficult to learn, and you should begin using them in your programs as soon as you can. Exceptions are one of those features that provide immediate and significant benefits to your project.
Exercises 1. Create a class with member functions that throw exceptions. Within this
class, make a nested class to use as an exception object. It takes a single char* as its argument; this represents a description string. Create a member function that throws this exception. (State this in the function’s exception specification.) Write a try block that calls this function and a catch clause that handles the exception by printing out its description string.
2. Rewrite the Stash class from Chapter XX so it throws out-of-range exceptions for operator[].
3. Write a generic main( ) that takes all exceptions and reports them as errors. 4. Create a class with its own operator new. This operator should allocate 10
objects, and on the 11th “run out of memory” and throw an exception. Also add a static member function that reclaims this memory. Now create a main( ) with a try block and a catch clause that calls the memory-restoration routine. Put these inside a while loop, to demonstrate recovering from an exception and continuing execution.
5. Create a destructor that throws an exception, and write code to prove to yourself that this is a bad idea by showing that if a new exception is thrown before the handler for the existing one is reached, terminate( ) is called.
6. Prove to yourself that all exception objects (the ones that are thrown) are properly destroyed.
7. Prove to yourself that if you create an exception object on the heap and throw the pointer to that object, it will not be cleaned up.
8. (Advanced). Track the creation and passing of an exception using a class with a constructor and copy-constructor that announce themselves and provide as much information as possible about how the object is being
Chapter 16: Exception Handling 398
created (and in the case of the copy-constructor, what object it’s being created from). Set up an interesting situation, throw an object of your new type, and analyze the result.
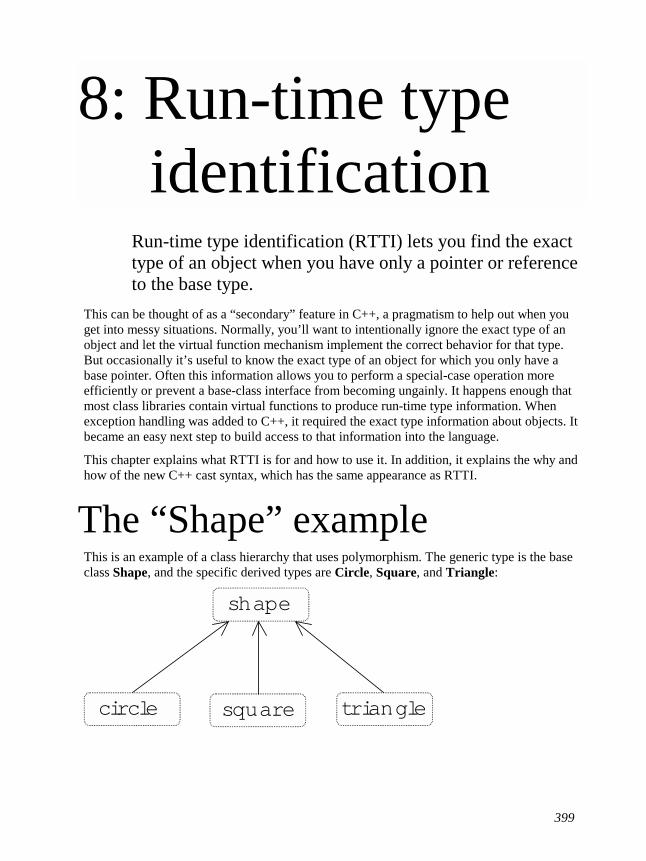
399
8: Run-time type identification
Run-time type identification (RTTI) lets you find the exact type of an object when you have only a pointer or reference to the base type.
This can be thought of as a “secondary” feature in C++, a pragmatism to help out when you get into messy situations. Normally, you’ll want to intentionally ignore the exact type of an object and let the virtual function mechanism implement the correct behavior for that type. But occasionally it’s useful to know the exact type of an object for which you only have a base pointer. Often this information allows you to perform a special-case operation more efficiently or prevent a base-class interface from becoming ungainly. It happens enough that most class libraries contain virtual functions to produce run-time type information. When exception handling was added to C++, it required the exact type information about objects. It became an easy next step to build access to that information into the language.
This chapter explains what RTTI is for and how to use it. In addition, it explains the why and how of the new C++ cast syntax, which has the same appearance as RTTI.
The “Shape” example This is an example of a class hierarchy that uses polymorphism. The generic type is the base class Shape, and the specific derived types are Circle, Square, and Triangle:
square
shape
circle triangle
Chapter 17: Run-Time Type Identification 400
This is a typical class-hierarchy diagram, with the base class at the top and the derived classes growing downward. The normal goal in object-oriented programming is for the bulk of your code to manipulate pointers to the base type (Shape, in this case) so if you decide to extend the program by adding a new class (rhomboid, derived from Shape, for example), the bulk of the code is not affected. In this example, the virtual function in the Shape interface is draw( ), so the intent is for the client programmer to call draw( ) through a generic Shape pointer. draw( ) is redefined in all the derived classes, and because it is a virtual function, the proper behavior will occur even though it is called through a generic Shape pointer.
Thus, you generally create a specific object (Circle, Square, or Triangle), take its address and cast it to a Shape* (forgetting the specific type of the object), and use that anonymous pointer in the rest of the program. Historically, diagrams are drawn as seen above, so the act of casting from a more derived type to a base type is called upcasting.
What is RTTI? But what if you have a special programming problem that’s easiest to solve if you know the exact type of a generic pointer? For example, suppose you want to allow your users to highlight all the shapes of any particular type by turning them purple. This way, they can find all the triangles on the screen by highlighting them. Your natural first approach may be to try a virtual function like TurnColorIfYouAreA( ), which allows enumerated arguments of some type color and of Shape::Circle, Shape::Square, or Shape::Triangle.
To solve this sort of problem, most class library designers put virtual functions in the base class to return type information about the specific object at runtime. You may have seen library member functions with names like isA( ) and typeOf( ). These are vendor-defined RTTI functions. Using these functions, as you go through the list you can say, “If you’re a triangle, turn purple.”
When exception handling was added to C++, the implementation required that some run-time type information be put into the virtual function tables. This meant that with a small language extension the programmer could also get the run-time type information about an object. All library vendors were adding their own RTTI anyway, so it was included in the language.
RTTI, like exceptions, depends on type information residing in the virtual function table. If you try to use RTTI on a class that has no virtual functions, you’ll get unexpected results.
Two syntaxes for RTTI There are two different ways to use RTTI. The first acts like sizeof( ) because it looks like a function, but it’s actually implemented by the compiler. typeid( ) takes an argument that’s an object, a reference, or a pointer and returns a reference to a global const object of type typeinfo. These can be compared to each other with the operator== and operator!=, and you can also ask for the name( ) of the type, which returns a string representation of the type name. Note that if you hand typeid( ) a Shape*, it will say that the type is Shape*, so if you
Chapter 17: Run-Time Type Identification 401
want to know the exact type it is pointing to, you must dereference the pointer. For example, if s is a Shape*,
cout << typeid(*s).name() << endl;
will print out the type of the object s points to.
You can also ask a typeinfo object if it precedes another typeinfo object in the implementation-defined “collation sequence,” using before(typeinfo&), which returns true or false. When you say,
if(typeid(me).before(typeid(you))) // ...
you’re asking if me occurs before you in the collation sequence.
The second syntax for RTTI is called a “type-safe downcast.” The reason for the term “downcast” is (again) the historical arrangement of the class hierarchy diagram. If casting a Circle* to a Shape* is an upcast, then casting a Shape* to a Circle* is a downcast. However, you know a Circle* is also a Shape*,and the compiler freely allows an upcast assignment, but you don’t know that a Shape* is necessarily a Circle*, so the compiler doesn’t allow you to perform a downcast assignment without using an explicit cast. You can of course force your way through using ordinary C-style casts or a C++ static_cast (described at the end of this chapter), which says, “I hope this is actually a Circle*, and I’m going to pretend it is.” Without some explicit knowledge that it is in fact a Circle, this is a totally dangerous thing to do. A common approach in vendor-defined RTTI is to create some function that attempts to assign (for this example) a Shape* to a Circle*, checking the type in the process. If this function returns the address, it was successful; if it returns null, you didn’t have a Circle*.
The C++ RTTI typesafe-downcast follows this “attempt-to-cast” function form, but it uses (very logically) the template syntax to produce the special function dynamic_cast. So the example becomes
Shape* sp = new Circle; Circle* cp = dynamic_cast<Circle*>(sp); if(cp) cout << "cast successful";
The template argument for dynamic_cast is the type you want the function to produce, and this is the return value for the function. The function argument is what you are trying to cast from.
Normally you might be hunting for one type (triangles to turn purple, for instance), but the following example fragment can be used if you want to count the number of various shapes.
Circle* cp = dynamic_cast<Circle*>(sh); Square* sp = dynamic_cast<Square*>(sh); Triangle* tp = dynamic_cast<Triangle*>(sh);
Of course this is contrived – you’d probably put a static data member in each type and increment it in the constructor. You would do something like that if you had control of the
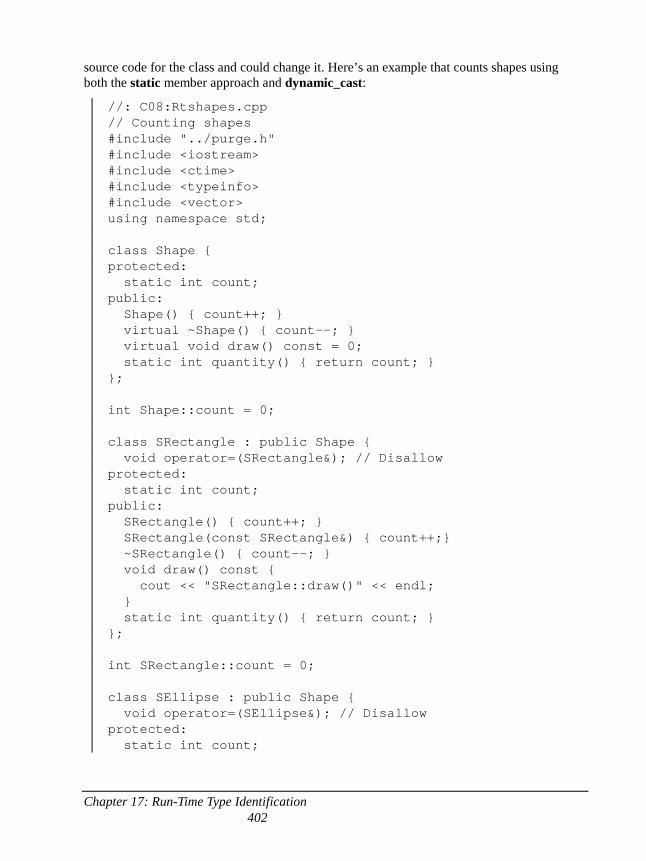
Chapter 17: Run-Time Type Identification 402
source code for the class and could change it. Here’s an example that counts shapes using both the static member approach and dynamic_cast:
//: C08:Rtshapes.cpp // Counting shapes #include "../purge.h" #include <iostream> #include <ctime> #include <typeinfo> #include <vector> using namespace std; class Shape { protected: static int count; public: Shape() { count++; } virtual ~Shape() { count--; } virtual void draw() const = 0; static int quantity() { return count; } }; int Shape::count = 0; class SRectangle : public Shape { void operator=(SRectangle&); // Disallow protected: static int count; public: SRectangle() { count++; } SRectangle(const SRectangle&) { count++;} ~SRectangle() { count--; } void draw() const { cout << "SRectangle::draw()" << endl; } static int quantity() { return count; } }; int SRectangle::count = 0; class SEllipse : public Shape { void operator=(SEllipse&); // Disallow protected: static int count;
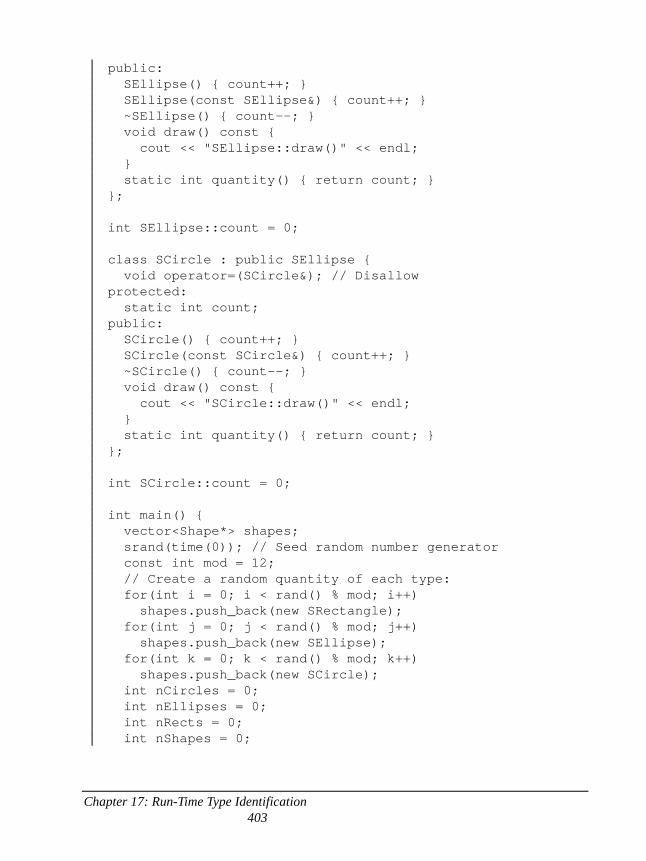
Chapter 17: Run-Time Type Identification 403
public: SEllipse() { count++; } SEllipse(const SEllipse&) { count++; } ~SEllipse() { count--; } void draw() const { cout << "SEllipse::draw()" << endl; } static int quantity() { return count; } }; int SEllipse::count = 0; class SCircle : public SEllipse { void operator=(SCircle&); // Disallow protected: static int count; public: SCircle() { count++; } SCircle(const SCircle&) { count++; } ~SCircle() { count--; } void draw() const { cout << "SCircle::draw()" << endl; } static int quantity() { return count; } }; int SCircle::count = 0; int main() { vector<Shape*> shapes; srand(time(0)); // Seed random number generator const int mod = 12; // Create a random quantity of each type: for(int i = 0; i < rand() % mod; i++) shapes.push_back(new SRectangle); for(int j = 0; j < rand() % mod; j++) shapes.push_back(new SEllipse); for(int k = 0; k < rand() % mod; k++) shapes.push_back(new SCircle); int nCircles = 0; int nEllipses = 0; int nRects = 0; int nShapes = 0;
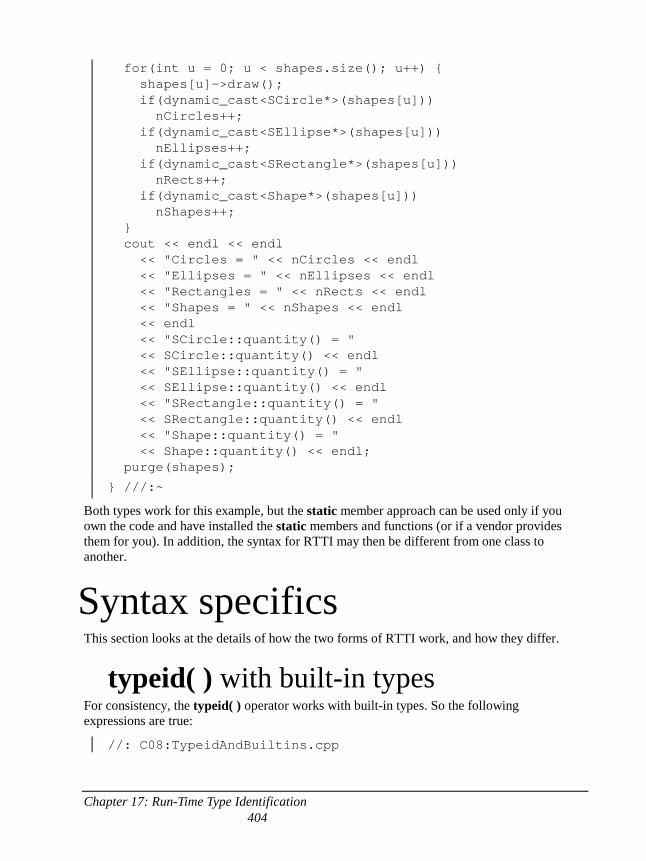
Chapter 17: Run-Time Type Identification 404
for(int u = 0; u < shapes.size(); u++) { shapes[u]->draw(); if(dynamic_cast<SCircle*>(shapes[u])) nCircles++; if(dynamic_cast<SEllipse*>(shapes[u])) nEllipses++; if(dynamic_cast<SRectangle*>(shapes[u])) nRects++; if(dynamic_cast<Shape*>(shapes[u])) nShapes++; } cout << endl << endl << "Circles = " << nCircles << endl << "Ellipses = " << nEllipses << endl << "Rectangles = " << nRects << endl << "Shapes = " << nShapes << endl << endl << "SCircle::quantity() = " << SCircle::quantity() << endl << "SEllipse::quantity() = " << SEllipse::quantity() << endl << "SRectangle::quantity() = " << SRectangle::quantity() << endl << "Shape::quantity() = " << Shape::quantity() << endl; purge(shapes);
} ///:~
Both types work for this example, but the static member approach can be used only if you own the code and have installed the static members and functions (or if a vendor provides them for you). In addition, the syntax for RTTI may then be different from one class to another.
Syntax specifics This section looks at the details of how the two forms of RTTI work, and how they differ.
typeid( ) with built-in types For consistency, the typeid( ) operator works with built-in types. So the following expressions are true:
//: C08:TypeidAndBuiltins.cpp
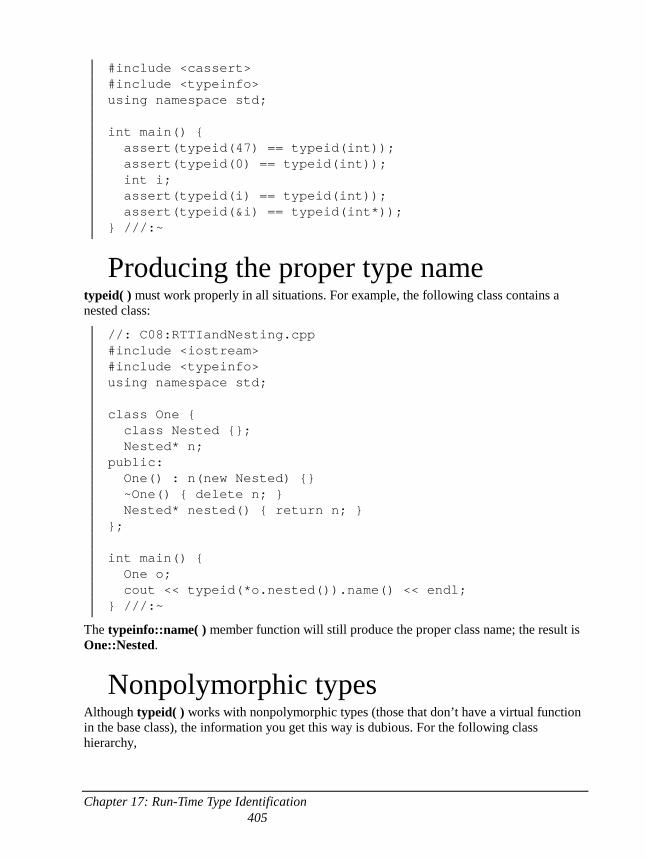
Chapter 17: Run-Time Type Identification 405
#include <cassert> #include <typeinfo> using namespace std; int main() { assert(typeid(47) == typeid(int)); assert(typeid(0) == typeid(int)); int i; assert(typeid(i) == typeid(int)); assert(typeid(&i) == typeid(int*)); } ///:~
Producing the proper type name typeid( ) must work properly in all situations. For example, the following class contains a nested class:
//: C08:RTTIandNesting.cpp #include <iostream> #include <typeinfo> using namespace std; class One { class Nested {}; Nested* n; public: One() : n(new Nested) {} ~One() { delete n; } Nested* nested() { return n; } }; int main() { One o; cout << typeid(*o.nested()).name() << endl; } ///:~
The typeinfo::name( ) member function will still produce the proper class name; the result is One::Nested.
Nonpolymorphic types Although typeid( ) works with nonpolymorphic types (those that don’t have a virtual function in the base class), the information you get this way is dubious. For the following class hierarchy,
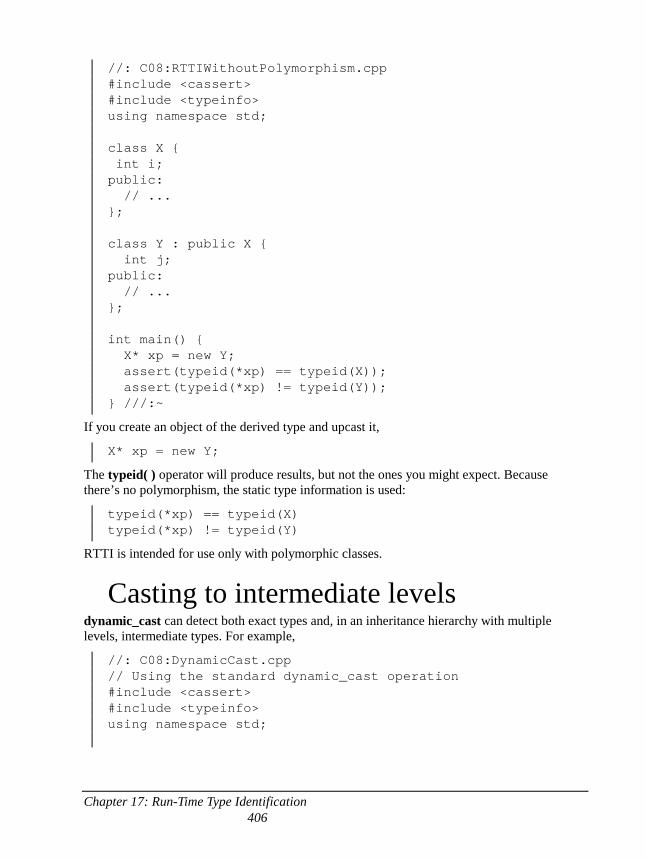
Chapter 17: Run-Time Type Identification 406
//: C08:RTTIWithoutPolymorphism.cpp #include <cassert> #include <typeinfo> using namespace std; class X { int i; public: // ... }; class Y : public X { int j; public: // ... }; int main() { X* xp = new Y; assert(typeid(*xp) == typeid(X)); assert(typeid(*xp) != typeid(Y)); } ///:~
If you create an object of the derived type and upcast it,
X* xp = new Y;
The typeid( ) operator will produce results, but not the ones you might expect. Because there’s no polymorphism, the static type information is used:
typeid(*xp) == typeid(X) typeid(*xp) != typeid(Y)
RTTI is intended for use only with polymorphic classes.
Casting to intermediate levels dynamic_cast can detect both exact types and, in an inheritance hierarchy with multiple levels, intermediate types. For example,
//: C08:DynamicCast.cpp // Using the standard dynamic_cast operation #include <cassert> #include <typeinfo> using namespace std;
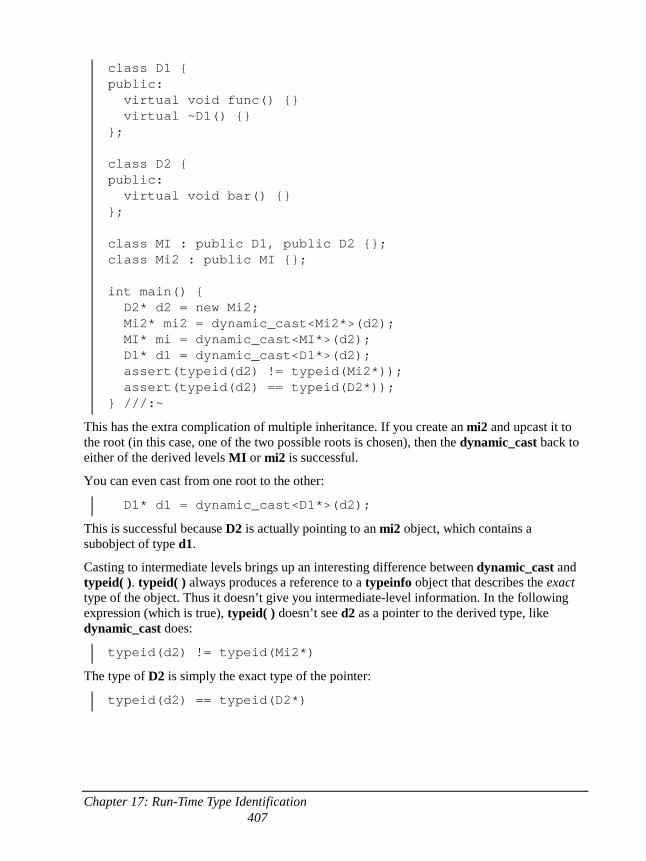
Chapter 17: Run-Time Type Identification 407
class D1 { public: virtual void func() {} virtual ~D1() {} }; class D2 { public: virtual void bar() {} }; class MI : public D1, public D2 {}; class Mi2 : public MI {}; int main() { D2* d2 = new Mi2; Mi2* mi2 = dynamic_cast<Mi2*>(d2); MI* mi = dynamic_cast<MI*>(d2); D1* d1 = dynamic_cast<D1*>(d2); assert(typeid(d2) != typeid(Mi2*)); assert(typeid(d2) == typeid(D2*)); } ///:~
This has the extra complication of multiple inheritance. If you create an mi2 and upcast it to the root (in this case, one of the two possible roots is chosen), then the dynamic_cast back to either of the derived levels MI or mi2 is successful.
You can even cast from one root to the other:
D1* d1 = dynamic_cast<D1*>(d2);
This is successful because D2 is actually pointing to an mi2 object, which contains a subobject of type d1.
Casting to intermediate levels brings up an interesting difference between dynamic_cast and typeid( ). typeid( ) always produces a reference to a typeinfo object that describes the exact type of the object. Thus it doesn’t give you intermediate-level information. In the following expression (which is true), typeid( ) doesn’t see d2 as a pointer to the derived type, like dynamic_cast does:
typeid(d2) != typeid(Mi2*)
The type of D2 is simply the exact type of the pointer:
typeid(d2) == typeid(D2*)
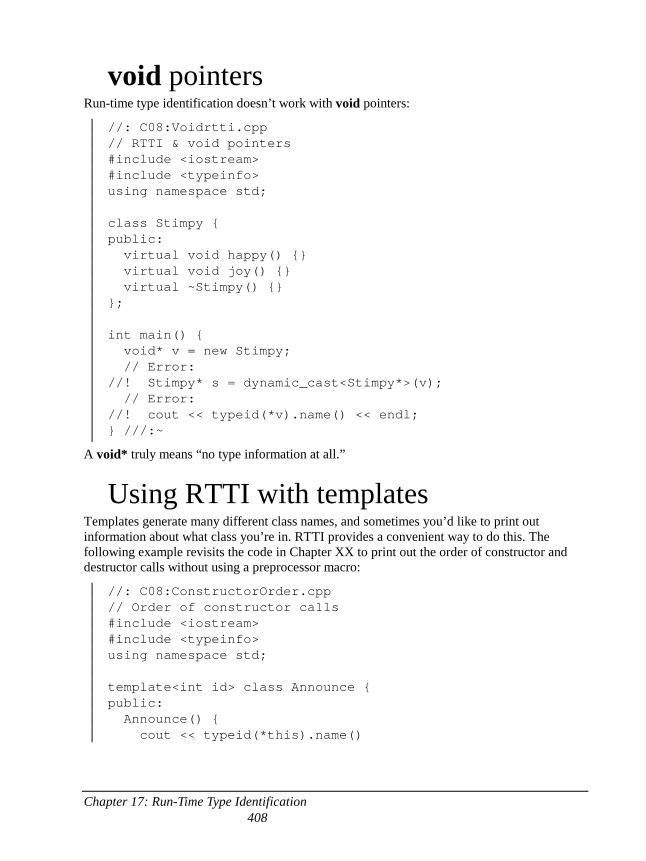
Chapter 17: Run-Time Type Identification 408
void pointers Run-time type identification doesn’t work with void pointers:
//: C08:Voidrtti.cpp // RTTI & void pointers #include <iostream> #include <typeinfo> using namespace std; class Stimpy { public: virtual void happy() {} virtual void joy() {} virtual ~Stimpy() {} }; int main() { void* v = new Stimpy; // Error: //! Stimpy* s = dynamic_cast<Stimpy*>(v); // Error: //! cout << typeid(*v).name() << endl; } ///:~
A void* truly means “no type information at all.”
Using RTTI with templates Templates generate many different class names, and sometimes you’d like to print out information about what class you’re in. RTTI provides a convenient way to do this. The following example revisits the code in Chapter XX to print out the order of constructor and destructor calls without using a preprocessor macro:
//: C08:ConstructorOrder.cpp // Order of constructor calls #include <iostream> #include <typeinfo> using namespace std; template<int id> class Announce { public: Announce() { cout << typeid(*this).name()
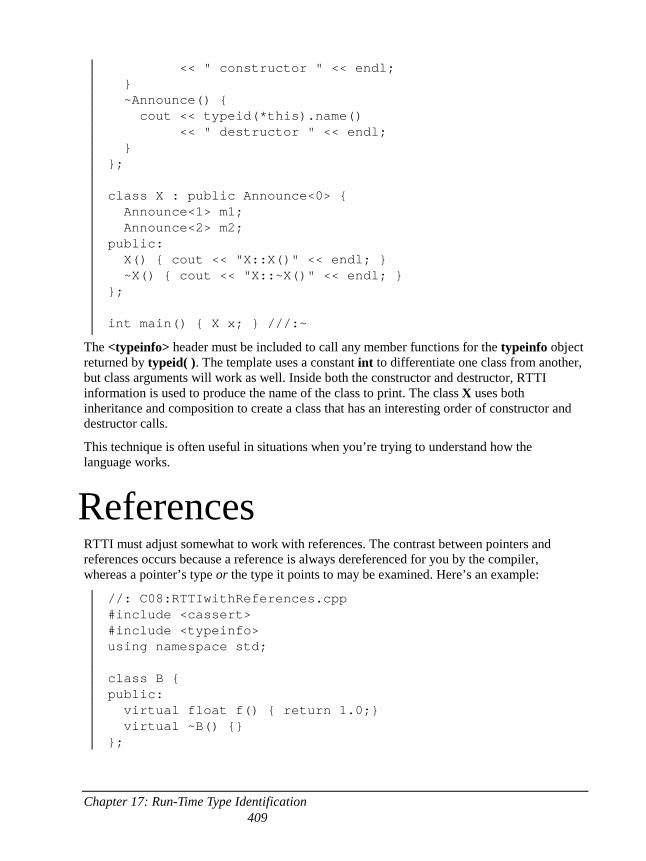
Chapter 17: Run-Time Type Identification 409
<< " constructor " << endl; } ~Announce() { cout << typeid(*this).name() << " destructor " << endl; } }; class X : public Announce<0> { Announce<1> m1; Announce<2> m2; public: X() { cout << "X::X()" << endl; } ~X() { cout << "X::~X()" << endl; } }; int main() { X x; } ///:~
The <typeinfo> header must be included to call any member functions for the typeinfo object returned by typeid( ). The template uses a constant int to differentiate one class from another, but class arguments will work as well. Inside both the constructor and destructor, RTTI information is used to produce the name of the class to print. The class X uses both inheritance and composition to create a class that has an interesting order of constructor and destructor calls.
This technique is often useful in situations when you’re trying to understand how the language works.
References RTTI must adjust somewhat to work with references. The contrast between pointers and references occurs because a reference is always dereferenced for you by the compiler, whereas a pointer’s type or the type it points to may be examined. Here’s an example:
//: C08:RTTIwithReferences.cpp #include <cassert> #include <typeinfo> using namespace std; class B { public: virtual float f() { return 1.0;} virtual ~B() {} };
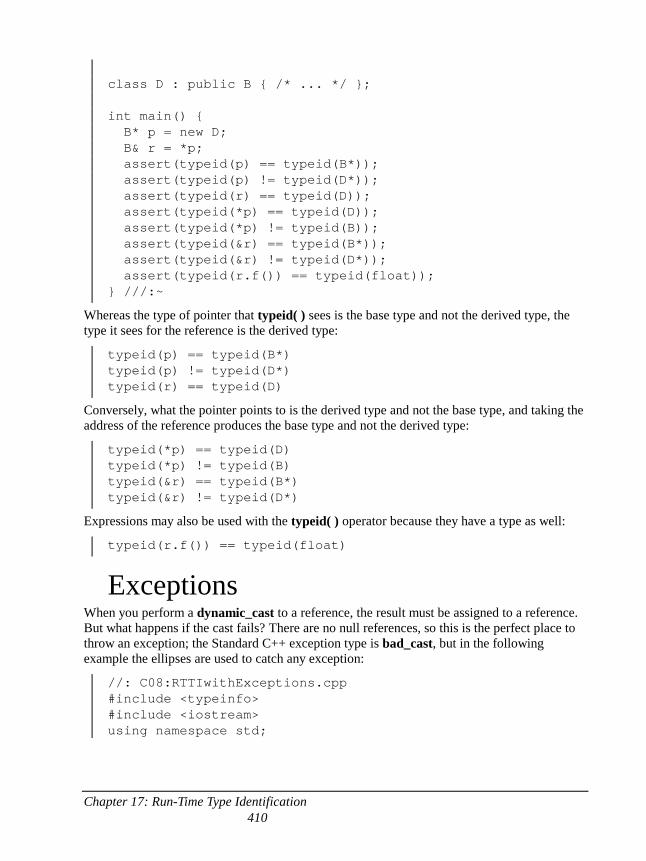
Chapter 17: Run-Time Type Identification 410
class D : public B { /* ... */ }; int main() { B* p = new D; B& r = *p; assert(typeid(p) == typeid(B*)); assert(typeid(p) != typeid(D*)); assert(typeid(r) == typeid(D)); assert(typeid(*p) == typeid(D)); assert(typeid(*p) != typeid(B)); assert(typeid(&r) == typeid(B*)); assert(typeid(&r) != typeid(D*)); assert(typeid(r.f()) == typeid(float)); } ///:~
Whereas the type of pointer that typeid( ) sees is the base type and not the derived type, the type it sees for the reference is the derived type:
typeid(p) == typeid(B*) typeid(p) != typeid(D*) typeid(r) == typeid(D)
Conversely, what the pointer points to is the derived type and not the base type, and taking the address of the reference produces the base type and not the derived type:
typeid(*p) == typeid(D) typeid(*p) != typeid(B) typeid(&r) == typeid(B*) typeid(&r) != typeid(D*)
Expressions may also be used with the typeid( ) operator because they have a type as well:
typeid(r.f()) == typeid(float)
Exceptions When you perform a dynamic_cast to a reference, the result must be assigned to a reference. But what happens if the cast fails? There are no null references, so this is the perfect place to throw an exception; the Standard C++ exception type is bad_cast, but in the following example the ellipses are used to catch any exception:
//: C08:RTTIwithExceptions.cpp #include <typeinfo> #include <iostream> using namespace std;
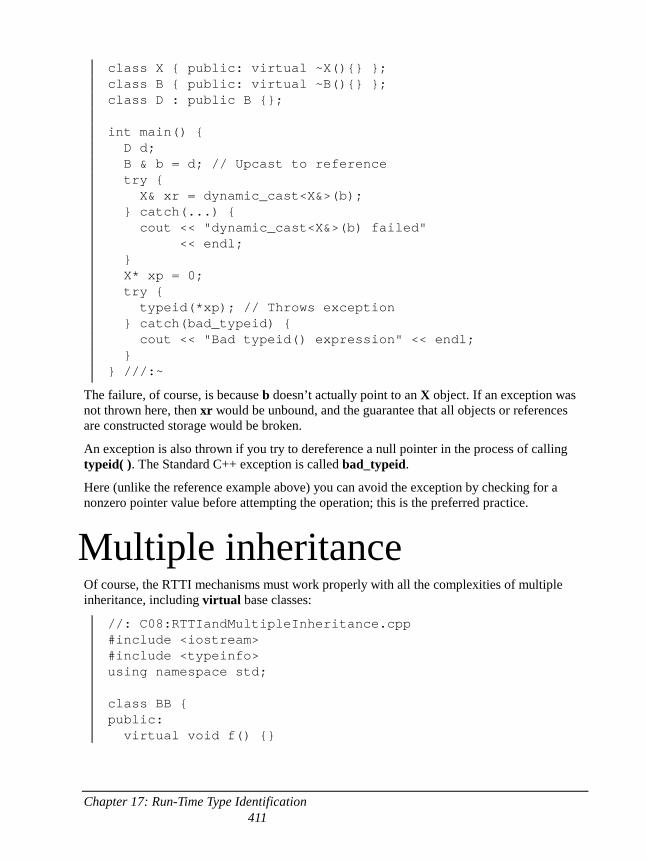
Chapter 17: Run-Time Type Identification 411
class X { public: virtual ~X(){} }; class B { public: virtual ~B(){} }; class D : public B {}; int main() { D d; B & b = d; // Upcast to reference try { X& xr = dynamic_cast<X&>(b); } catch(...) { cout << "dynamic_cast<X&>(b) failed" << endl; } X* xp = 0; try { typeid(*xp); // Throws exception } catch(bad_typeid) { cout << "Bad typeid() expression" << endl; } } ///:~
The failure, of course, is because b doesn’t actually point to an X object. If an exception was not thrown here, then xr would be unbound, and the guarantee that all objects or references are constructed storage would be broken.
An exception is also thrown if you try to dereference a null pointer in the process of calling typeid( ). The Standard C++ exception is called bad_typeid.
Here (unlike the reference example above) you can avoid the exception by checking for a nonzero pointer value before attempting the operation; this is the preferred practice.
Multiple inheritance Of course, the RTTI mechanisms must work properly with all the complexities of multiple inheritance, including virtual base classes:
//: C08:RTTIandMultipleInheritance.cpp #include <iostream> #include <typeinfo> using namespace std; class BB { public: virtual void f() {}
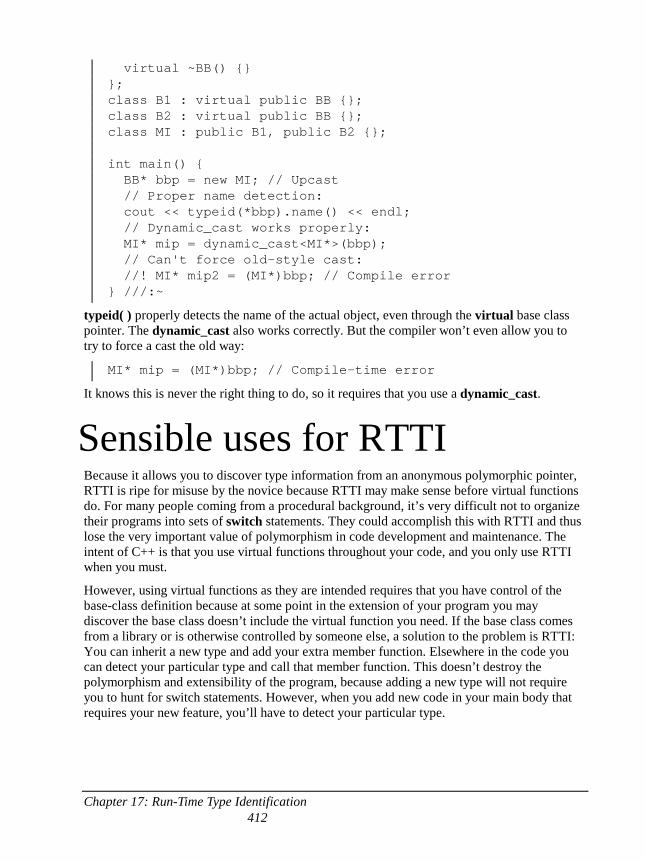
Chapter 17: Run-Time Type Identification 412
virtual ~BB() {} }; class B1 : virtual public BB {}; class B2 : virtual public BB {}; class MI : public B1, public B2 {}; int main() { BB* bbp = new MI; // Upcast // Proper name detection: cout << typeid(*bbp).name() << endl; // Dynamic_cast works properly: MI* mip = dynamic_cast<MI*>(bbp); // Can't force old-style cast: //! MI* mip2 = (MI*)bbp; // Compile error } ///:~
typeid( ) properly detects the name of the actual object, even through the virtual base class pointer. The dynamic_cast also works correctly. But the compiler won’t even allow you to try to force a cast the old way:
MI* mip = (MI*)bbp; // Compile-time error
It knows this is never the right thing to do, so it requires that you use a dynamic_cast.
Sensible uses for RTTI Because it allows you to discover type information from an anonymous polymorphic pointer, RTTI is ripe for misuse by the novice because RTTI may make sense before virtual functions do. For many people coming from a procedural background, it’s very difficult not to organize their programs into sets of switch statements. They could accomplish this with RTTI and thus lose the very important value of polymorphism in code development and maintenance. The intent of C++ is that you use virtual functions throughout your code, and you only use RTTI when you must.
However, using virtual functions as they are intended requires that you have control of the base-class definition because at some point in the extension of your program you may discover the base class doesn’t include the virtual function you need. If the base class comes from a library or is otherwise controlled by someone else, a solution to the problem is RTTI: You can inherit a new type and add your extra member function. Elsewhere in the code you can detect your particular type and call that member function. This doesn’t destroy the polymorphism and extensibility of the program, because adding a new type will not require you to hunt for switch statements. However, when you add new code in your main body that requires your new feature, you’ll have to detect your particular type.
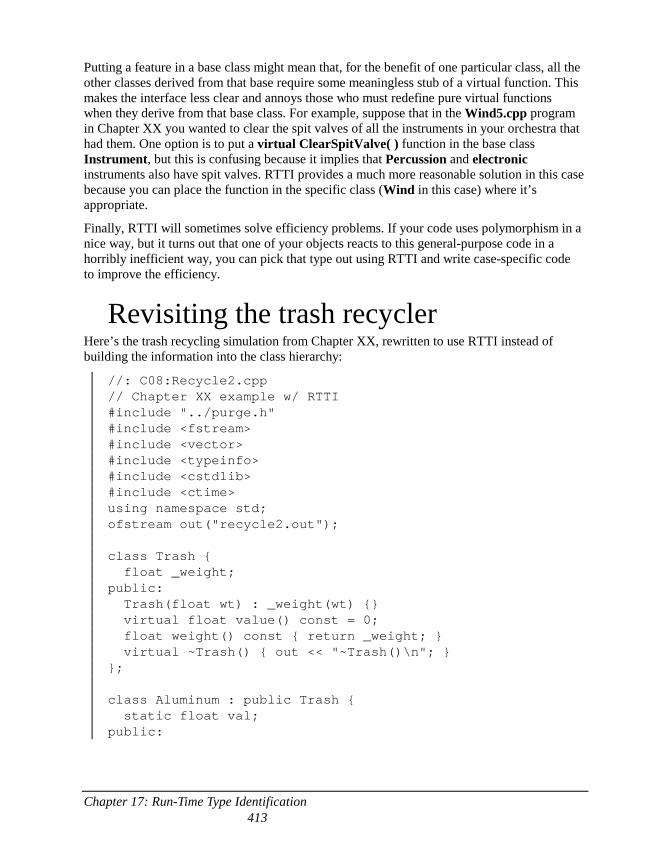
Chapter 17: Run-Time Type Identification 413
Putting a feature in a base class might mean that, for the benefit of one particular class, all the other classes derived from that base require some meaningless stub of a virtual function. This makes the interface less clear and annoys those who must redefine pure virtual functions when they derive from that base class. For example, suppose that in the Wind5.cpp program in Chapter XX you wanted to clear the spit valves of all the instruments in your orchestra that had them. One option is to put a virtual ClearSpitValve( ) function in the base class Instrument, but this is confusing because it implies that Percussion and electronic instruments also have spit valves. RTTI provides a much more reasonable solution in this case because you can place the function in the specific class (Wind in this case) where it’s appropriate.
Finally, RTTI will sometimes solve efficiency problems. If your code uses polymorphism in a nice way, but it turns out that one of your objects reacts to this general-purpose code in a horribly inefficient way, you can pick that type out using RTTI and write case-specific code to improve the efficiency.
Revisiting the trash recycler Here’s the trash recycling simulation from Chapter XX, rewritten to use RTTI instead of building the information into the class hierarchy:
//: C08:Recycle2.cpp // Chapter XX example w/ RTTI #include "../purge.h" #include <fstream> #include <vector> #include <typeinfo> #include <cstdlib> #include <ctime> using namespace std; ofstream out("recycle2.out"); class Trash { float _weight; public: Trash(float wt) : _weight(wt) {} virtual float value() const = 0; float weight() const { return _weight; } virtual ~Trash() { out << "~Trash()\n"; } }; class Aluminum : public Trash { static float val; public:
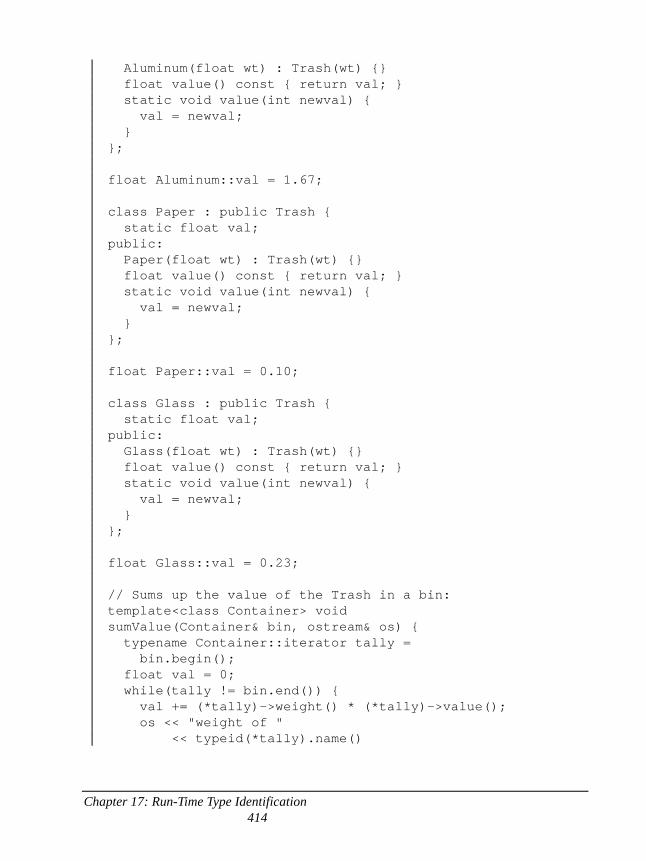
Chapter 17: Run-Time Type Identification 414
Aluminum(float wt) : Trash(wt) {} float value() const { return val; } static void value(int newval) { val = newval; } }; float Aluminum::val = 1.67; class Paper : public Trash { static float val; public: Paper(float wt) : Trash(wt) {} float value() const { return val; } static void value(int newval) { val = newval; } }; float Paper::val = 0.10; class Glass : public Trash { static float val; public: Glass(float wt) : Trash(wt) {} float value() const { return val; } static void value(int newval) { val = newval; } }; float Glass::val = 0.23; // Sums up the value of the Trash in a bin: template<class Container> void sumValue(Container& bin, ostream& os) { typename Container::iterator tally = bin.begin(); float val = 0; while(tally != bin.end()) { val += (*tally)->weight() * (*tally)->value(); os << "weight of " << typeid(*tally).name()
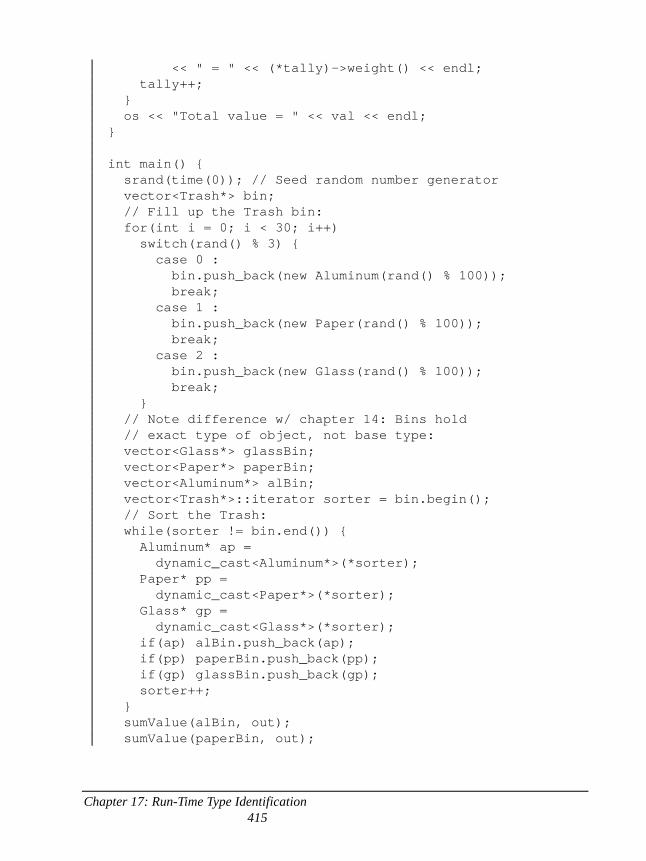
Chapter 17: Run-Time Type Identification 415
<< " = " << (*tally)->weight() << endl; tally++; } os << "Total value = " << val << endl; } int main() { srand(time(0)); // Seed random number generator vector<Trash*> bin; // Fill up the Trash bin: for(int i = 0; i < 30; i++) switch(rand() % 3) { case 0 : bin.push_back(new Aluminum(rand() % 100)); break; case 1 : bin.push_back(new Paper(rand() % 100)); break; case 2 : bin.push_back(new Glass(rand() % 100)); break; } // Note difference w/ chapter 14: Bins hold // exact type of object, not base type: vector<Glass*> glassBin; vector<Paper*> paperBin; vector<Aluminum*> alBin; vector<Trash*>::iterator sorter = bin.begin(); // Sort the Trash: while(sorter != bin.end()) { Aluminum* ap = dynamic_cast<Aluminum*>(*sorter); Paper* pp = dynamic_cast<Paper*>(*sorter); Glass* gp = dynamic_cast<Glass*>(*sorter); if(ap) alBin.push_back(ap); if(pp) paperBin.push_back(pp); if(gp) glassBin.push_back(gp); sorter++; } sumValue(alBin, out); sumValue(paperBin, out);
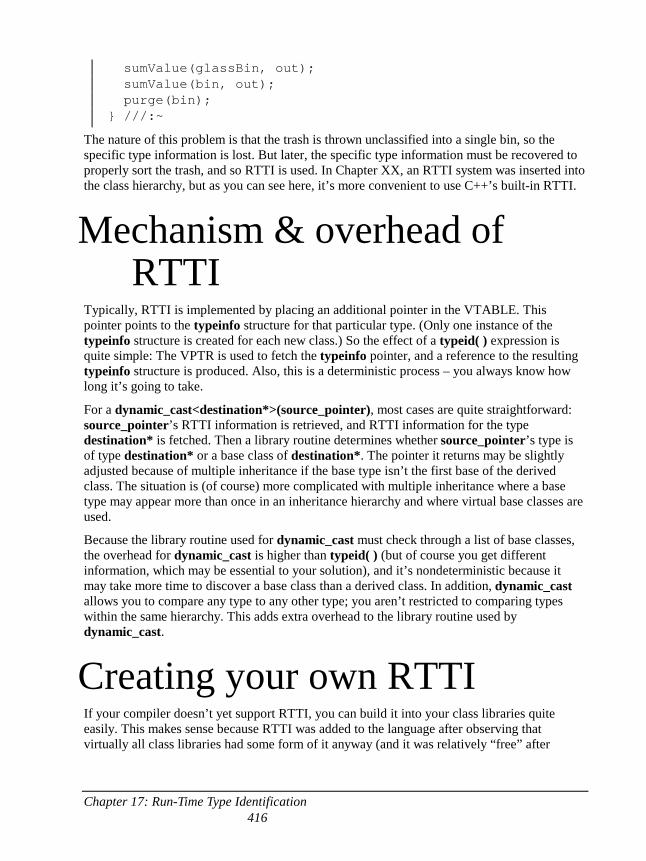
Chapter 17: Run-Time Type Identification 416
sumValue(glassBin, out); sumValue(bin, out); purge(bin); } ///:~
The nature of this problem is that the trash is thrown unclassified into a single bin, so the specific type information is lost. But later, the specific type information must be recovered to properly sort the trash, and so RTTI is used. In Chapter XX, an RTTI system was inserted into the class hierarchy, but as you can see here, it’s more convenient to use C++’s built-in RTTI.
Mechanism & overhead of RTTI
Typically, RTTI is implemented by placing an additional pointer in the VTABLE. This pointer points to the typeinfo structure for that particular type. (Only one instance of the typeinfo structure is created for each new class.) So the effect of a typeid( ) expression is quite simple: The VPTR is used to fetch the typeinfo pointer, and a reference to the resulting typeinfo structure is produced. Also, this is a deterministic process – you always know how long it’s going to take.
For a dynamic_cast<destination*>(source_pointer), most cases are quite straightforward: source_pointer’s RTTI information is retrieved, and RTTI information for the type destination* is fetched. Then a library routine determines whether source_pointer’s type is of type destination* or a base class of destination*. The pointer it returns may be slightly adjusted because of multiple inheritance if the base type isn’t the first base of the derived class. The situation is (of course) more complicated with multiple inheritance where a base type may appear more than once in an inheritance hierarchy and where virtual base classes are used.
Because the library routine used for dynamic_cast must check through a list of base classes, the overhead for dynamic_cast is higher than typeid( ) (but of course you get different information, which may be essential to your solution), and it’s nondeterministic because it may take more time to discover a base class than a derived class. In addition, dynamic_cast allows you to compare any type to any other type; you aren’t restricted to comparing types within the same hierarchy. This adds extra overhead to the library routine used by dynamic_cast.
Creating your own RTTI If your compiler doesn’t yet support RTTI, you can build it into your class libraries quite easily. This makes sense because RTTI was added to the language after observing that virtually all class libraries had some form of it anyway (and it was relatively “free” after

Chapter 17: Run-Time Type Identification 417
exception handling was added because exceptions require exact knowledge of type information).
Essentially, RTTI requires only a virtual function to identify the exact type of the class, and a function to take a pointer to the base type and cast it down to the more derived type; this function must produce a pointer to the more derived type. (You may also wish to handle references.) There are a number of approaches to implement your own RTTI, but all require a unique identifier for each class and a virtual function to produce type information. The following uses a static member function called dynacast( ) that calls a type information function dynamic_type( ). Both functions must be defined for each new derivation:
//: C08:Selfrtti.cpp // Your own RTTI system #include "../purge.h" #include <iostream> #include <vector> using namespace std; class Security { protected: static const int baseID = 1000; public: virtual int dynamic_type(int id) { if(id == baseID) return 1; return 0; } }; class Stock : public Security { protected: static const int typeID = baseID + 1; public: int dynamic_type(int id) { if(id == typeID) return 1; return Security::dynamic_type(id); } static Stock* dynacast(Security* s) { if(s->dynamic_type(typeID)) return (Stock*)s; return 0; } }; class Bond : public Security {
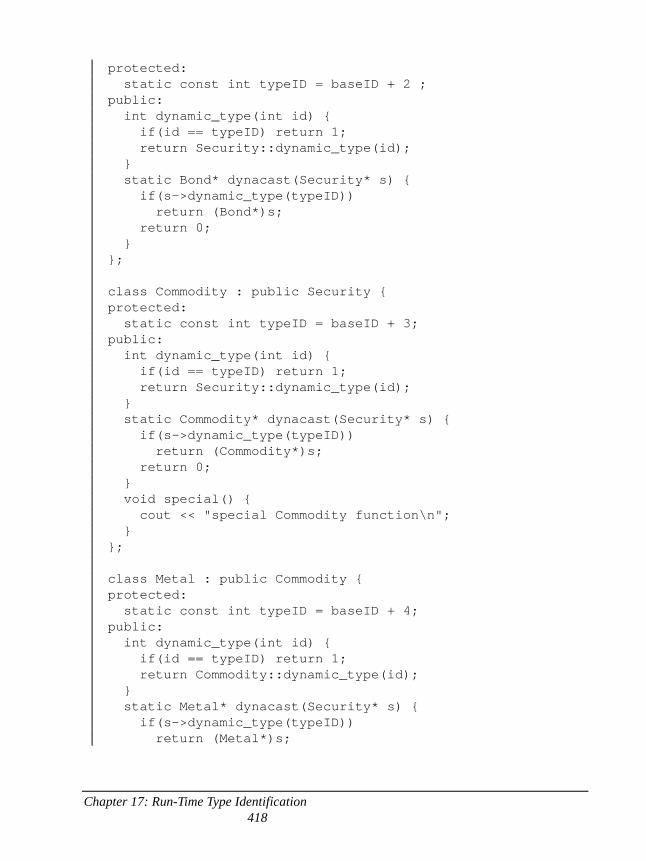
Chapter 17: Run-Time Type Identification 418
protected: static const int typeID = baseID + 2 ; public: int dynamic_type(int id) { if(id == typeID) return 1; return Security::dynamic_type(id); } static Bond* dynacast(Security* s) { if(s->dynamic_type(typeID)) return (Bond*)s; return 0; } }; class Commodity : public Security { protected: static const int typeID = baseID + 3; public: int dynamic_type(int id) { if(id == typeID) return 1; return Security::dynamic_type(id); } static Commodity* dynacast(Security* s) { if(s->dynamic_type(typeID)) return (Commodity*)s; return 0; } void special() { cout << "special Commodity function\n"; } }; class Metal : public Commodity { protected: static const int typeID = baseID + 4; public: int dynamic_type(int id) { if(id == typeID) return 1; return Commodity::dynamic_type(id); } static Metal* dynacast(Security* s) { if(s->dynamic_type(typeID)) return (Metal*)s;
Chapter 17: Run-Time Type Identification 419
return 0; } }; int main() { vector<Security*> portfolio; portfolio.push_back(new Metal); portfolio.push_back(new Commodity); portfolio.push_back(new Bond); portfolio.push_back(new Stock); vector<Security*>::iterator it = portfolio.begin(); while(it != portfolio.end()) { Commodity* cm = Commodity::dynacast(*it); if(cm) cm->special(); else cout << "not a Commodity" << endl; it++; } cout << "cast from intermediate pointer:\n"; Security* sp = new Metal; Commodity* cp = Commodity::dynacast(sp); if(cp) cout << "it's a Commodity\n"; Metal* mp = Metal::dynacast(sp); if(mp) cout << "it's a Metal too!\n"; purge(portfolio); } ///:~
Each subclass must create its own typeID, redefine the virtual dynamic_type( ) function to return that typeID, and define a static member called dynacast( ), which takes the base pointer (or a pointer at any level in a deeper hierarchy – in that case, the pointer is simply upcast).
In the classes derived from Security, you can see that each defines its own typeID enumeration by adding to baseID. It’s essential that baseID be directly accessible in the derived class because the enum must be evaluated at compile-time, so the usual approach of reading private data with an inline function would fail. This is a good example of the need for the protected mechanism.
The enum baseID establishes a base identifier for all types derived from Security. That way, if an identifier clash ever occurs, you can change all the identifiers by changing the base value. (However, because this scheme doesn’t compare different inheritance trees, an identifier clash is unlikely). In all the classes, the class identifier number is protected, so it’s directly available to derived classes but not to the end user.
This example illustrates what built-in RTTI must cope with. Not only must you be able to determine the exact type, you must also be able to find out whether your exact type is derived
Chapter 17: Run-Time Type Identification 420
from the type you’re looking for. For example, Metal is derived from Commodity, which has a function called special( ), so if you have a Metal object you can call special( ) for it. If dynamic_type( ) told you only the exact type of the object, you could ask it if a Metal were a Commodity, and it would say “no,” which is untrue. Therefore, the system must be set up so it will properly cast to intermediate types in a hierarchy as well as exact types.
The dynacast( ) function determines the type information by calling the virtual dynamic_type( ) function for the Security pointer it’s passed. This function takes an argument of the typeID for the class you’re trying to cast to. It’s a virtual function, so the function body is the one for the exact type of the object. Each dynamic_type( ) function first checks to see if the identifier it was passed is an exact match for its own type. If that isn’t true, it must check to see if it matches a base type; this is accomplished by making a call to the base class dynamic_type( ). Just like a recursive function call, each dynamic_type( ) checks against its own identifier. If it doesn’t find a match, it returns the result of calling the base class dynamic_type( ). When the root of the hierarchy is reached, zero is returned to indicate no match was found.
If dynamic_type( ) returns one (for “true”) the object pointed to is either the exact type you’re asking about or derived from that type, and dynacast( ) takes the Security pointer and casts it to the desired type. If the return value is false, dynacast( ) returns zero to indicate the cast was unsuccessful. In this way it works just like the C++ dynamic_cast operator.
The C++ dynamic_cast operator does one more thing the above scheme can’t do: It compares types from one inheritance hierarchy to another, completely separate inheritance hierarchy. This adds generality to the system for those unusual cases where you want to compare across hierarchies, but it also adds some complexity and overhead.
You can easily imagine how to create a DYNAMIC_CAST macro that uses the above scheme and allows an easier transition to the built-in dynamic_cast operator.
Explicit cast syntax Whenever you use a cast, you’re breaking the type system. 24 You’re telling the compiler that even though you know an object is a certain type, you’re going to pretend it is a different type. This is an inherently dangerous activity, and a clear source of errors.
Unfortunately, each cast is different: the name of the pretender type surrounded by parentheses. So if you are given a piece of code that isn’t working correctly and you know you want to examine all casts to see if they’re the source of the errors, how can you guarantee that you find all the casts? In a C program, you can’t. For one thing, the C compiler doesn’t always require a cast (it’s possible to assign dissimilar types through a void pointer without
24 See Josée Lajoie , “The new cast notation and the bool data type,” C++ Report, September, 1994 pp. 46-51.
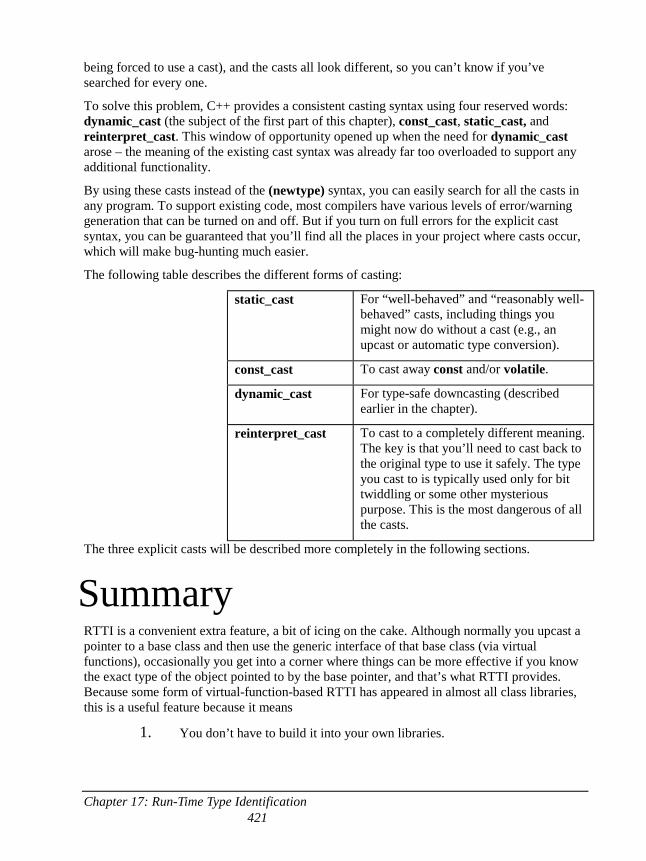
Chapter 17: Run-Time Type Identification 421
being forced to use a cast), and the casts all look different, so you can’t know if you’ve searched for every one.
To solve this problem, C++ provides a consistent casting syntax using four reserved words: dynamic_cast (the subject of the first part of this chapter), const_cast, static_cast, and reinterpret_cast. This window of opportunity opened up when the need for dynamic_cast arose – the meaning of the existing cast syntax was already far too overloaded to support any additional functionality.
By using these casts instead of the (newtype) syntax, you can easily search for all the casts in any program. To support existing code, most compilers have various levels of error/warning generation that can be turned on and off. But if you turn on full errors for the explicit cast syntax, you can be guaranteed that you’ll find all the places in your project where casts occur, which will make bug-hunting much easier.
The following table describes the different forms of casting:
static_cast For “well-behaved” and “reasonably well-behaved” casts, including things you might now do without a cast (e.g., an upcast or automatic type conversion).
const_cast To cast away const and/or volatile.
dynamic_cast For type-safe downcasting (described earlier in the chapter).
reinterpret_cast To cast to a completely different meaning. The key is that you’ll need to cast back to the original type to use it safely. The type you cast to is typically used only for bit twiddling or some other mysterious purpose. This is the most dangerous of all the casts.
The three explicit casts will be described more completely in the following sections.
Summary RTTI is a convenient extra feature, a bit of icing on the cake. Although normally you upcast a pointer to a base class and then use the generic interface of that base class (via virtual functions), occasionally you get into a corner where things can be more effective if you know the exact type of the object pointed to by the base pointer, and that’s what RTTI provides. Because some form of virtual-function-based RTTI has appeared in almost all class libraries, this is a useful feature because it means
1. You don’t have to build it into your own libraries.
Chapter 17: Run-Time Type Identification 422
2. You don’t have to worry whether it will be built into someone else’s library. 3. You don’t have the extra programming overhead of maintaining an RTTI
scheme during inheritance. 4. The syntax is consistent, so you don’t have to figure out a new one for each
library. While RTTI is a convenience, like most features in C++ it can be misused by either a naive or determined programmer. The most common misuse may come from the programmer who doesn’t understand virtual functions and uses RTTI to do type-check coding instead. The philosophy of C++ seems to be to provide you with powerful tools and guard for type violations and integrity, but if you want to deliberately misuse or get around a language feature, there’s nothing to stop you. Sometimes a slight burn is the fastest way to gain experience.
The explicit cast syntax will be a big help during debugging because casting opens a hole into your type system and allows errors to slip in. The explicit cast syntax will allow you to more easily locate these error entryways.
Exercises 1. Modify C16:AutoCounter.h in volume 1 of this book so that it becomes a
useful debugging tool. It will be used as a nested member of each class that you are interested in tracing. Turn AutoCounter into a template that takes the class name of the surrounding class as the template argument, and in all the error messages use RTTI to print out the name of the class.
2. Use RTTI to assist in program debugging by printing out the exact name of a template using typeid( ). Instantiate the template for various types and see what the results are.
3. Implement the function TurnColorIfYouAreA( ) described earlier in this chapter using RTTI.
4. Modify the Instrument hierarchy from Chapter XX by first copying Wind5.cpp to a new location. Now add a virtual ClearSpitValve( ) function to the Wind class, and redefine it for all the classes inherited from Wind. Instantiate a TStash to hold Instrument pointers and fill it up with various types of Instrument objects created using new. Now use RTTI to move through the container looking for objects in class Wind, or derived from Wind. Call the ClearSpitValve( ) function for these objects. Notice that it would unpleasantly confuse the Instrument base class if it contained a ClearSpitValve( ) function.
423
9: Building stable systems
Shared objects & reference counting
Reference-counted class hierarchies
Finding memory leaks 1. For array bounds checking, use the Array template in C16:Array3.cpp of Volume 1
for all arrays. You can turn off the checking and increase efficiency when you’re ready to ship. (This doesn’t deal with the case of taking a pointer to an array, though – perhaps that could be templatized somehow as well).
2. Use the C10:MemCheck (wrong chapter number) to guarantee that dynamic memory is released properly.
3. Check for non-virtual destructors in base classes.
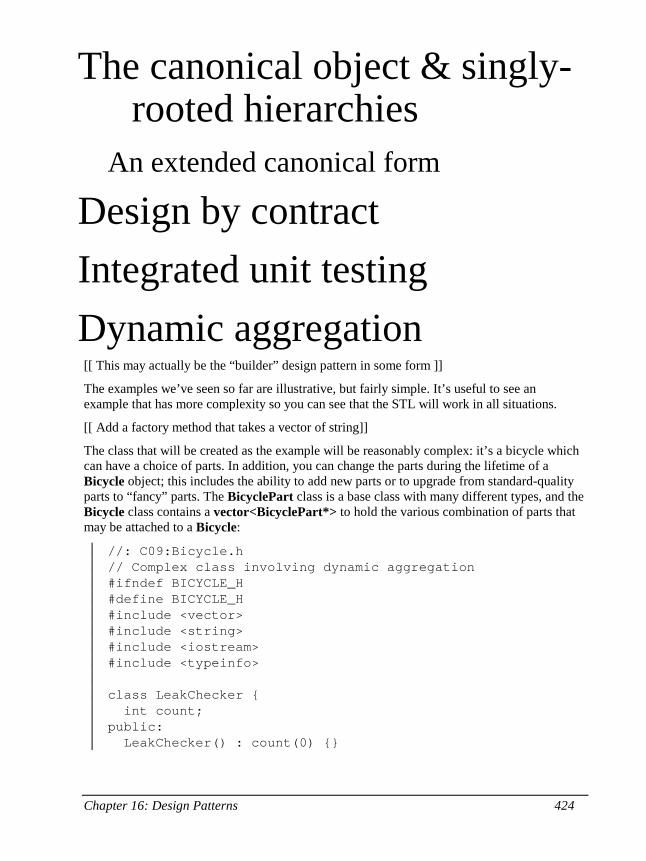
Chapter 16: Design Patterns 424
The canonical object & singly-rooted hierarchies
An extended canonical form
Design by contract Integrated unit testing Dynamic aggregation [[ This may actually be the “builder” design pattern in some form ]]
The examples we’ve seen so far are illustrative, but fairly simple. It’s useful to see an example that has more complexity so you can see that the STL will work in all situations.
[[ Add a factory method that takes a vector of string]]
The class that will be created as the example will be reasonably complex: it’s a bicycle which can have a choice of parts. In addition, you can change the parts during the lifetime of a Bicycle object; this includes the ability to add new parts or to upgrade from standard-quality parts to “fancy” parts. The BicyclePart class is a base class with many different types, and the Bicycle class contains a vector<BicyclePart*> to hold the various combination of parts that may be attached to a Bicycle:
//: C09:Bicycle.h // Complex class involving dynamic aggregation #ifndef BICYCLE_H #define BICYCLE_H #include <vector> #include <string> #include <iostream> #include <typeinfo> class LeakChecker { int count; public: LeakChecker() : count(0) {}
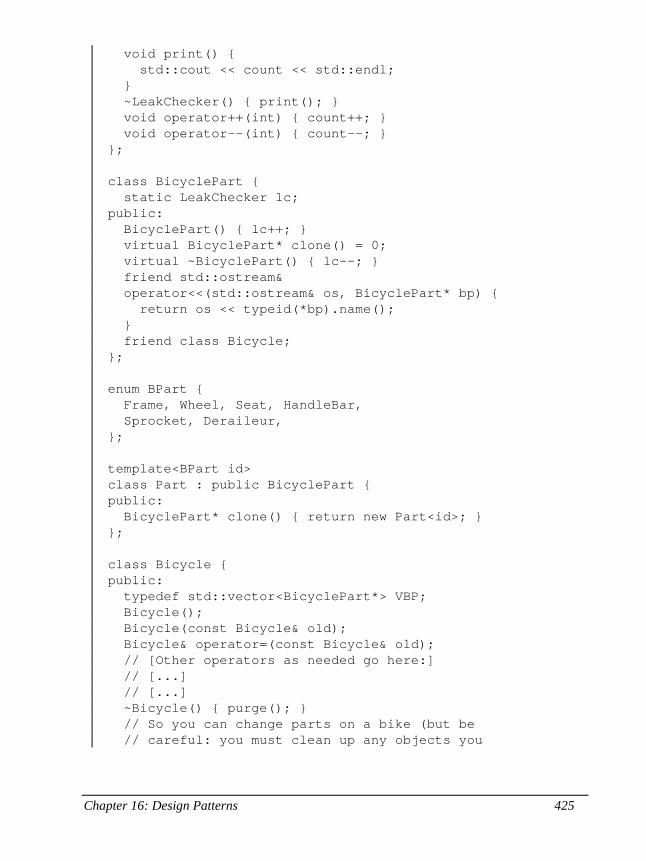
Chapter 16: Design Patterns 425
void print() { std::cout << count << std::endl; } ~LeakChecker() { print(); } void operator++(int) { count++; } void operator--(int) { count--; } }; class BicyclePart { static LeakChecker lc; public: BicyclePart() { lc++; } virtual BicyclePart* clone() = 0; virtual ~BicyclePart() { lc--; } friend std::ostream& operator<<(std::ostream& os, BicyclePart* bp) { return os << typeid(*bp).name(); } friend class Bicycle; }; enum BPart { Frame, Wheel, Seat, HandleBar, Sprocket, Deraileur, }; template<BPart id> class Part : public BicyclePart { public: BicyclePart* clone() { return new Part<id>; } }; class Bicycle { public: typedef std::vector<BicyclePart*> VBP; Bicycle(); Bicycle(const Bicycle& old); Bicycle& operator=(const Bicycle& old); // [Other operators as needed go here:] // [...] // [...] ~Bicycle() { purge(); } // So you can change parts on a bike (but be // careful: you must clean up any objects you
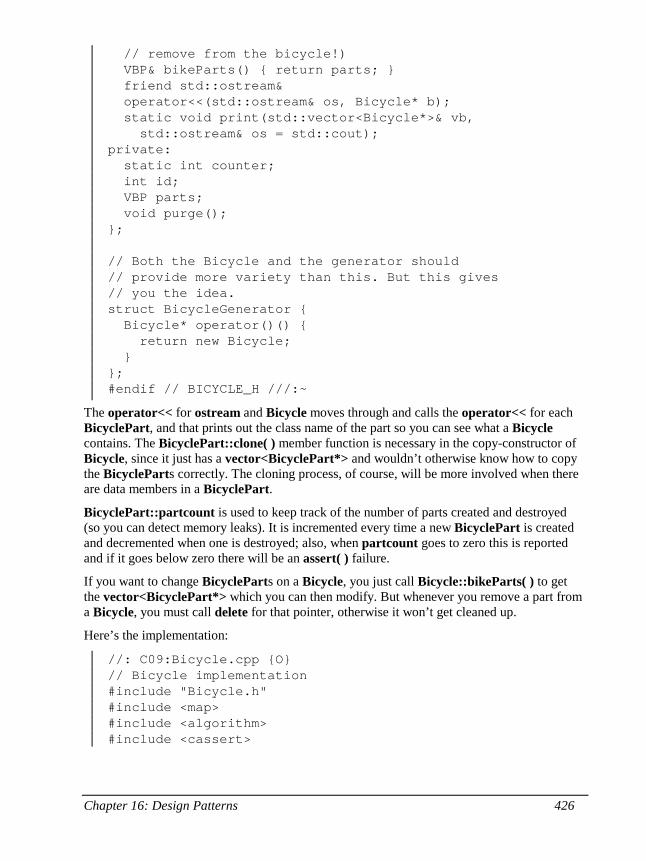
Chapter 16: Design Patterns 426
// remove from the bicycle!) VBP& bikeParts() { return parts; } friend std::ostream& operator<<(std::ostream& os, Bicycle* b); static void print(std::vector<Bicycle*>& vb, std::ostream& os = std::cout); private: static int counter; int id; VBP parts; void purge(); }; // Both the Bicycle and the generator should // provide more variety than this. But this gives // you the idea. struct BicycleGenerator { Bicycle* operator()() { return new Bicycle; } }; #endif // BICYCLE_H ///:~
The operator<< for ostream and Bicycle moves through and calls the operator<< for each BicyclePart, and that prints out the class name of the part so you can see what a Bicycle contains. The BicyclePart::clone( ) member function is necessary in the copy-constructor of Bicycle, since it just has a vector<BicyclePart*> and wouldn’t otherwise know how to copy the BicycleParts correctly. The cloning process, of course, will be more involved when there are data members in a BicyclePart.
BicyclePart::partcount is used to keep track of the number of parts created and destroyed (so you can detect memory leaks). It is incremented every time a new BicyclePart is created and decremented when one is destroyed; also, when partcount goes to zero this is reported and if it goes below zero there will be an assert( ) failure.
If you want to change BicycleParts on a Bicycle, you just call Bicycle::bikeParts( ) to get the vector<BicyclePart*> which you can then modify. But whenever you remove a part from a Bicycle, you must call delete for that pointer, otherwise it won’t get cleaned up.
Here’s the implementation:
//: C09:Bicycle.cpp {O} // Bicycle implementation #include "Bicycle.h" #include <map> #include <algorithm> #include <cassert>
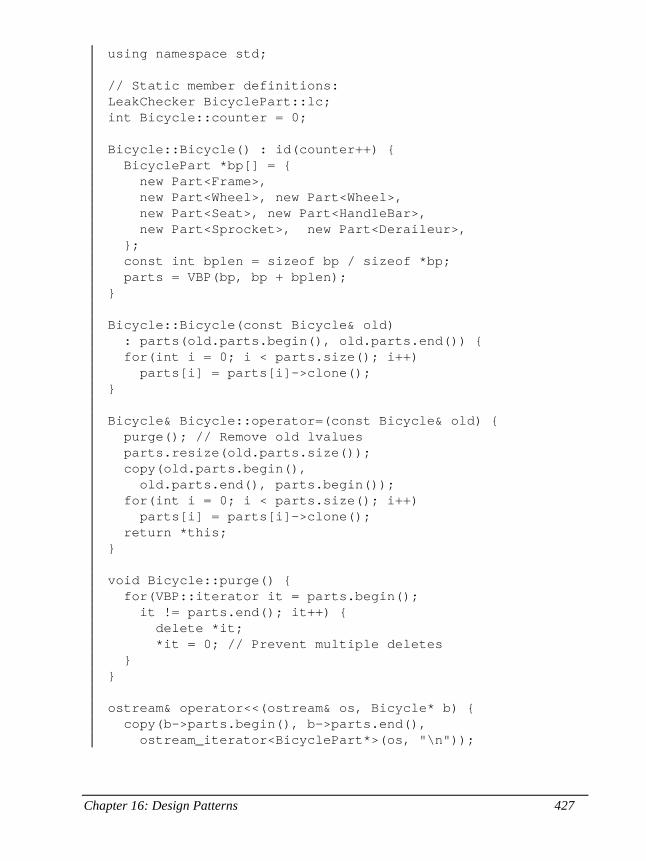
Chapter 16: Design Patterns 427
using namespace std; // Static member definitions: LeakChecker BicyclePart::lc; int Bicycle::counter = 0; Bicycle::Bicycle() : id(counter++) { BicyclePart *bp[] = { new Part<Frame>, new Part<Wheel>, new Part<Wheel>, new Part<Seat>, new Part<HandleBar>, new Part<Sprocket>, new Part<Deraileur>, }; const int bplen = sizeof bp / sizeof *bp; parts = VBP(bp, bp + bplen); } Bicycle::Bicycle(const Bicycle& old) : parts(old.parts.begin(), old.parts.end()) { for(int i = 0; i < parts.size(); i++) parts[i] = parts[i]->clone(); } Bicycle& Bicycle::operator=(const Bicycle& old) { purge(); // Remove old lvalues parts.resize(old.parts.size()); copy(old.parts.begin(), old.parts.end(), parts.begin()); for(int i = 0; i < parts.size(); i++) parts[i] = parts[i]->clone(); return *this; } void Bicycle::purge() { for(VBP::iterator it = parts.begin(); it != parts.end(); it++) { delete *it; *it = 0; // Prevent multiple deletes } } ostream& operator<<(ostream& os, Bicycle* b) { copy(b->parts.begin(), b->parts.end(), ostream_iterator<BicyclePart*>(os, "\n"));
Chapter 16: Design Patterns 428
os << "--------" << endl; return os; } void Bicycle::print(vector<Bicycle*>& vb, ostream& os) { copy(vb.begin(), vb.end(), ostream_iterator<Bicycle*>(os, "\n")); cout << "--------" << endl; } ///:~
Here’s a test:
//: C09:BikeTest.cpp //{L} Bicycle #include "Bicycle.h" #include <algorithm> using namespace std; int main() { vector<Bicycle*> bikes; BicycleGenerator bg; generate_n(back_inserter(bikes), 12, bg); Bicycle::print(bikes); } ///:~
Exercises 1. Create a heap compactor for all dynamic memory in a particular program.
This will require that you control how objects are dynamically created and used (do you overload operator new or does that approach work?). The typically heap-compaction scheme requires that all pointers are doubly-indirected (that is, pointers to pointers) so the “middle tier” pointer can be manipulated during compaction. Consider overloading operator-> to accomplish this, since that operator has special behavior which will probably benefit your heap-compaction scheme. Write a program to test your heap-compaction scheme.
429
10: Design patterns “… describes a problem which occurs over and over again in our environment, and then describes the core of the solution to that problem, in such a way that you can use this solution a million times over, without ever doing it the same way twice” – Christopher Alexander
This chapter introduces the important and yet non-traditional “patterns” approach to program design.
[[ Much of the prose in this chapter still needs work, but the examples all compile. Also, more patterns and examples are forthcoming ]]
Probably the most important step forward in object-oriented design is the “design patterns” movement, chronicled in Design Patterns, by Gamma, Helm, Johnson & Vlissides (Addison-Wesley 1995).25 That book shows 23 different solutions to particular classes of problems. In this chapter, the basic concepts of design patterns will be introduced along with examples. This should whet your appetite to read Design Patterns (a source of what has now become an essential, almost mandatory, vocabulary for OOP programmers).
The latter part of this chapter contains an example of the design evolution process, starting with an initial solution and moving through the logic and process of evolving the solution to more appropriate designs. The program shown (a trash recycling simulation) has evolved over time, and you can look at that evolution as a prototype for the way your own design can start as an adequate solution to a particular problem and evolve into a flexible approach to a class of problems.
The pattern concept Initially, you can think of a pattern as an especially clever and insightful way of solving a particular class of problems. That is, it looks like a lot of people have worked out all the angles of a problem and have come up with the most general, flexible solution for it. The problem could be one you have seen and solved before, but your solution probably didn’t have the kind of completeness you’ll see embodied in a pattern.
25 Conveniently, the examples are in C++.
Chapter 16: Design Patterns 430
Although they’re called “design patterns,” they really aren’t tied to the realm of design. A pattern seems to stand apart from the traditional way of thinking about analysis, design, and implementation. Instead, a pattern embodies a complete idea within a program, and thus it can sometimes appear at the analysis phase or high-level design phase. This is interesting because a pattern has a direct implementation in code and so you might not expect it to show up before low-level design or implementation (and in fact you might not realize that you need a particular pattern until you get to those phases).
The basic concept of a pattern can also be seen as the basic concept of program design: adding layers of abstraction. Whenever you abstract something you’re isolating particular details, and one of the most compelling motivations behind this is to separate things that change from things that stay the same. Another way to put this is that once you find some part of your program that’s likely to change for one reason or another, you’ll want to keep those changes from propagating other modifications throughout your code. Not only does this make the code much cheaper to maintain, but it also turns out that it is usually simpler to understand (which results in lowered costs).
Often, the most difficult part of developing an elegant and cheap-to-maintain design is in discovering what I call “the vector of change.” (Here, “vector” refers to the maximum gradient and not a container class.) This means finding the most important thing that changes in your system, or put another way, discovering where your greatest cost is. Once you discover the vector of change, you have the focal point around which to structure your design.
So the goal of design patterns is to isolate changes in your code. If you look at it this way, you’ve been seeing some design patterns already in this book. For example, inheritance could be thought of as a design pattern (albeit one implemented by the compiler). It allows you to express differences in behavior (that’s the thing that changes) in objects that all have the same interface (that’s what stays the same). Composition could also be considered a pattern, since it allows you to change – dynamically or statically – the objects that implement your class, and thus the way that class works. Normally, however, features that are directly supported by a programming language are not classified as design patterns.
You’ve also already seen another pattern that appears in Design Patterns: the iterator. This is the fundamental tool used in the design of the STL; it hides the particular implementation of the container as you’re stepping through and selecting the elements one by one. The iterator allows you to write generic code that performs an operation on all of the elements in a range without regard to the container that holds the range. Thus your generic code can be used with any container that can produce iterators.
The singleton Possibly the simplest design pattern is the singleton, which is a way to provide one and only one instance of an object:
//: C09:SingletonPattern.cpp #include <iostream> using namespace std;
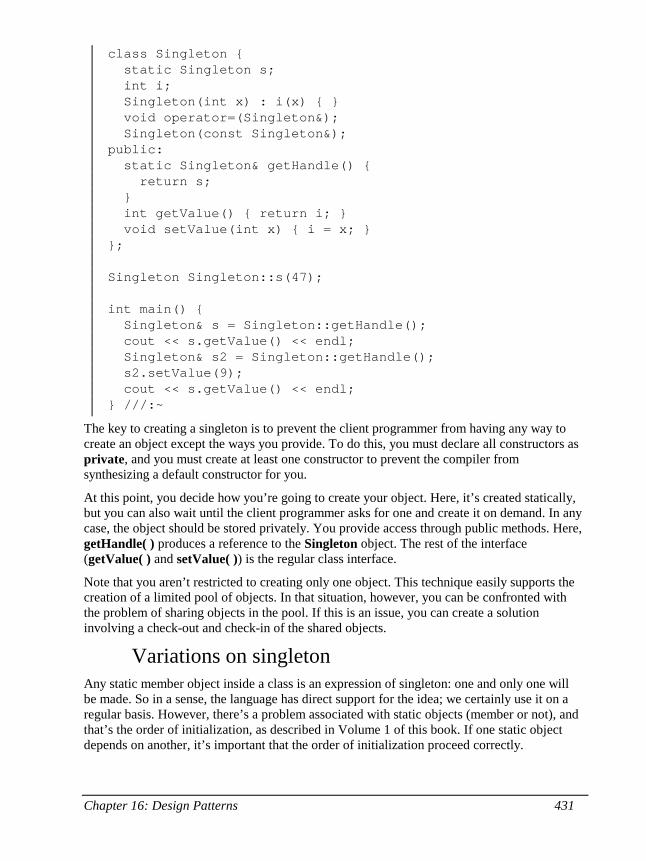
Chapter 16: Design Patterns 431
class Singleton { static Singleton s; int i; Singleton(int x) : i(x) { } void operator=(Singleton&); Singleton(const Singleton&); public: static Singleton& getHandle() { return s; } int getValue() { return i; } void setValue(int x) { i = x; } }; Singleton Singleton::s(47); int main() { Singleton& s = Singleton::getHandle(); cout << s.getValue() << endl; Singleton& s2 = Singleton::getHandle(); s2.setValue(9); cout << s.getValue() << endl; } ///:~
The key to creating a singleton is to prevent the client programmer from having any way to create an object except the ways you provide. To do this, you must declare all constructors as private, and you must create at least one constructor to prevent the compiler from synthesizing a default constructor for you.
At this point, you decide how you’re going to create your object. Here, it’s created statically, but you can also wait until the client programmer asks for one and create it on demand. In any case, the object should be stored privately. You provide access through public methods. Here, getHandle( ) produces a reference to the Singleton object. The rest of the interface (getValue( ) and setValue( )) is the regular class interface.
Note that you aren’t restricted to creating only one object. This technique easily supports the creation of a limited pool of objects. In that situation, however, you can be confronted with the problem of sharing objects in the pool. If this is an issue, you can create a solution involving a check-out and check-in of the shared objects.
Variations on singleton Any static member object inside a class is an expression of singleton: one and only one will be made. So in a sense, the language has direct support for the idea; we certainly use it on a regular basis. However, there’s a problem associated with static objects (member or not), and that’s the order of initialization, as described in Volume 1 of this book. If one static object depends on another, it’s important that the order of initialization proceed correctly.
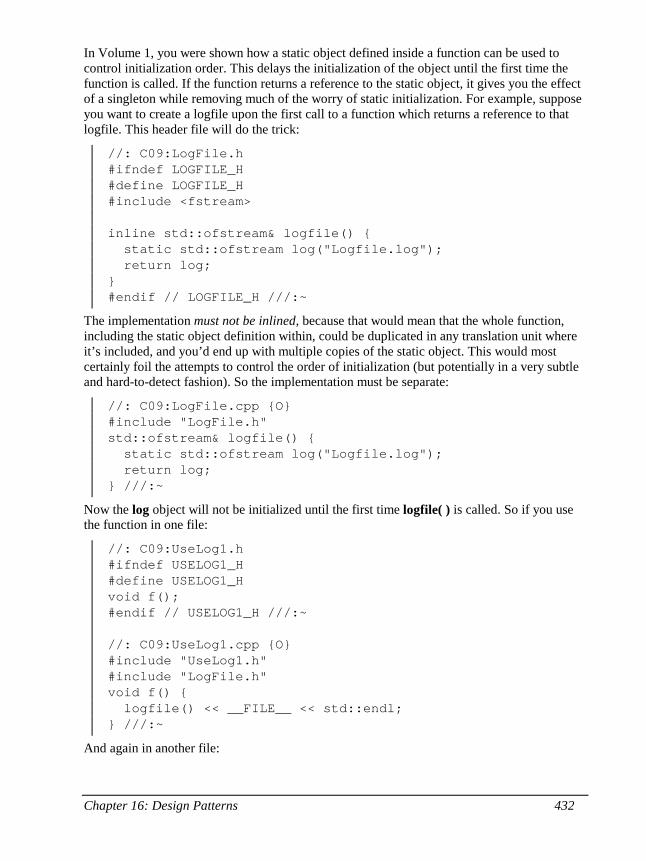
Chapter 16: Design Patterns 432
In Volume 1, you were shown how a static object defined inside a function can be used to control initialization order. This delays the initialization of the object until the first time the function is called. If the function returns a reference to the static object, it gives you the effect of a singleton while removing much of the worry of static initialization. For example, suppose you want to create a logfile upon the first call to a function which returns a reference to that logfile. This header file will do the trick:
//: C09:LogFile.h #ifndef LOGFILE_H #define LOGFILE_H #include <fstream> inline std::ofstream& logfile() { static std::ofstream log("Logfile.log"); return log; } #endif // LOGFILE_H ///:~
The implementation must not be inlined, because that would mean that the whole function, including the static object definition within, could be duplicated in any translation unit where it’s included, and you’d end up with multiple copies of the static object. This would most certainly foil the attempts to control the order of initialization (but potentially in a very subtle and hard-to-detect fashion). So the implementation must be separate:
//: C09:LogFile.cpp {O} #include "LogFile.h" std::ofstream& logfile() { static std::ofstream log("Logfile.log"); return log; } ///:~
Now the log object will not be initialized until the first time logfile( ) is called. So if you use the function in one file:
//: C09:UseLog1.h #ifndef USELOG1_H #define USELOG1_H void f(); #endif // USELOG1_H ///:~ //: C09:UseLog1.cpp {O} #include "UseLog1.h" #include "LogFile.h" void f() { logfile() << __FILE__ << std::endl; } ///:~
And again in another file:
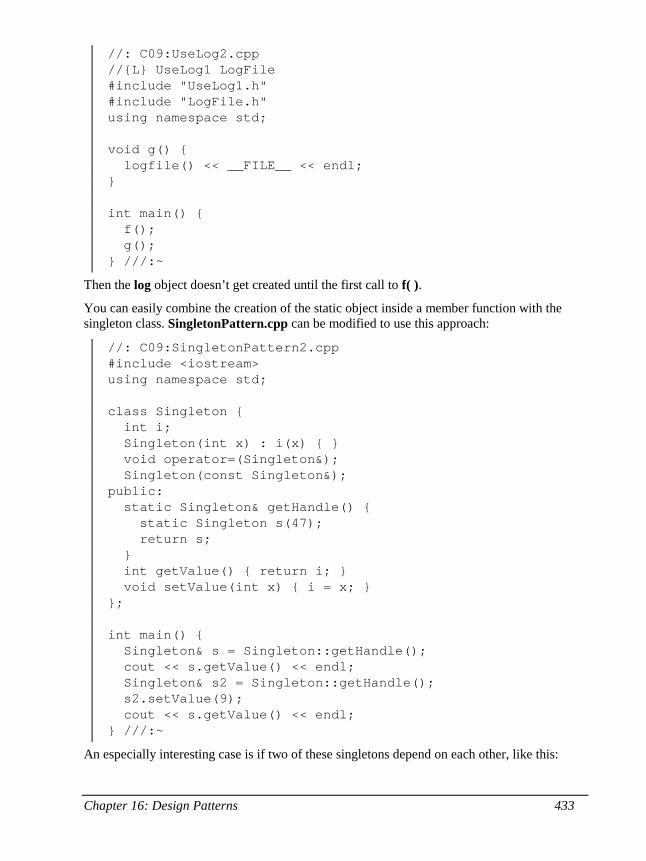
Chapter 16: Design Patterns 433
//: C09:UseLog2.cpp //{L} UseLog1 LogFile #include "UseLog1.h" #include "LogFile.h" using namespace std; void g() { logfile() << __FILE__ << endl; } int main() { f(); g(); } ///:~
Then the log object doesn’t get created until the first call to f( ).
You can easily combine the creation of the static object inside a member function with the singleton class. SingletonPattern.cpp can be modified to use this approach:
//: C09:SingletonPattern2.cpp #include <iostream> using namespace std; class Singleton { int i; Singleton(int x) : i(x) { } void operator=(Singleton&); Singleton(const Singleton&); public: static Singleton& getHandle() { static Singleton s(47); return s; } int getValue() { return i; } void setValue(int x) { i = x; } }; int main() { Singleton& s = Singleton::getHandle(); cout << s.getValue() << endl; Singleton& s2 = Singleton::getHandle(); s2.setValue(9); cout << s.getValue() << endl; } ///:~
An especially interesting case is if two of these singletons depend on each other, like this:
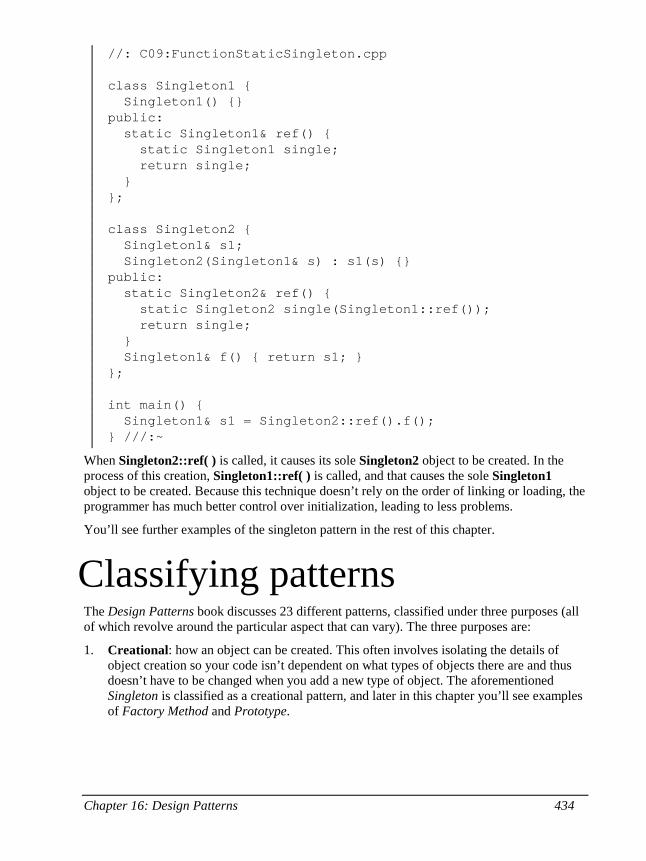
Chapter 16: Design Patterns 434
//: C09:FunctionStaticSingleton.cpp class Singleton1 { Singleton1() {} public: static Singleton1& ref() { static Singleton1 single; return single; } }; class Singleton2 { Singleton1& s1; Singleton2(Singleton1& s) : s1(s) {} public: static Singleton2& ref() { static Singleton2 single(Singleton1::ref()); return single; } Singleton1& f() { return s1; } }; int main() { Singleton1& s1 = Singleton2::ref().f(); } ///:~
When Singleton2::ref( ) is called, it causes its sole Singleton2 object to be created. In the process of this creation, Singleton1::ref( ) is called, and that causes the sole Singleton1 object to be created. Because this technique doesn’t rely on the order of linking or loading, the programmer has much better control over initialization, leading to less problems.
You’ll see further examples of the singleton pattern in the rest of this chapter.
Classifying patterns The Design Patterns book discusses 23 different patterns, classified under three purposes (all of which revolve around the particular aspect that can vary). The three purposes are:
1. Creational: how an object can be created. This often involves isolating the details of object creation so your code isn’t dependent on what types of objects there are and thus doesn’t have to be changed when you add a new type of object. The aforementioned Singleton is classified as a creational pattern, and later in this chapter you’ll see examples of Factory Method and Prototype.
Chapter 16: Design Patterns 435
2. Structural: designing objects to satisfy particular project constraints. These work with the way objects are connected with other objects to ensure that changes in the system don’t require changes to those connections.
3. Behavioral: objects that handle particular types of actions within a program. These encapsulate processes that you want to perform, such as interpreting a language, fulfilling a request, moving through a sequence (as in an iterator), or implementing an algorithm. This chapter contains examples of the Observer and the Visitor patterns.
The Design Patterns book has a section on each of its 23 patterns along with one or more examples for each, typically in C++ but sometimes in Smalltalk. This book will not repeat all the details of the patterns shown in Design Patterns since that book stands on its own and should be studied separately. The catalog and examples provided here are intended to rapidly give you a grasp of the patterns, so you can get a decent feel for what patterns are about and why they are so important.
[[ Describe different form of categorization, based on what you want to accomplish rather than the way the patterns look. More categories, but should result in easier-to-understand, faster selection ]]]
Features, idioms, patterns How things have gotten confused; conflicting pattern descriptions, naïve “patterns,” patterns are not trivial nor are they represented by features that are built into the language, nor are they things that you do almost all the time. Constructors and destructors, for example, could be called the “guaranteed initialization and cleanup design pattern.” This is an important and essential idea, but it’s built into the language.
Another example comes from various forms of aggregation. Aggregation is a completely fundamental principle in object-oriented programming: you make objects out of other objects [[ make reference to basic tenets of OO ]]. Yet sometimes this idea is classified as a pattern, which tends to confuse the issue. This is unfortunate because it pollutes the idea of the design pattern and suggest that anything that surprises you the first time you see it should be a design pattern.
Another misguided example is found in the Java language; the designers of the “JavaBeans” specification decided to refer to a simple naming convention as a design pattern (you say getInfo( ) for a member function that returns an Info property and setInfo( ) for one that changes the internal Info property; the use of the “get” and “set” strings is what they decided constituted calling it a design pattern).
Basic complexity hiding You’ll often find that messy code can be cleaned up by putting it inside a class. This is more than fastidiousness – if nothing else, it aids readability and therefore maintainability, and it can often lead to reusability.
Simple Veneer (façade, Adapter (existing system), Bridge (designed in),
Chapter 16: Design Patterns 436
Hiding types (polymorphism, iterators, proxy)
Hiding connections (mediator,)
Factories: encapsulating object creation
When you discover that you need to add new types to a system, the most sensible first step to take is to use polymorphism to create a common interface to those new types. This separates the rest of the code in your system from the knowledge of the specific types that you are adding. New types may be added without disturbing existing code … or so it seems. At first it would appear that the only place you need to change the code in such a design is the place where you inherit a new type, but this is not quite true. You must still create an object of your new type, and at the point of creation you must specify the exact constructor to use. Thus, if the code that creates objects is distributed throughout your application, you have the same problem when adding new types – you must still chase down all the points of your code where type matters. It happens to be the creation of the type that matters in this case rather than the use of the type (which is taken care of by polymorphism), but the effect is the same: adding a new type can cause problems.
The solution is to force the creation of objects to occur through a common factory rather than to allow the creational code to be spread throughout your system. If all the code in your program must go through this factory whenever it needs to create one of your objects, then all you must do when you add a new object is to modify the factory.
Since every object-oriented program creates objects, and since it’s very likely you will extend your program by adding new types, I suspect that factories may be the most universally useful kinds of design patterns.
As an example, let’s revisit the Shape system. One approach is to make the factory a static method of the base class:
//: C09:ShapeFactory1.cpp #include "../purge.h" #include <iostream> #include <string> #include <exception> #include <vector> using namespace std; class Shape { public: virtual void draw() = 0; virtual void erase() = 0; virtual ~Shape() {}
Chapter 16: Design Patterns 437
class BadShapeCreation : public exception { string reason; public: BadShapeCreation(string type) { reason = "Cannot create type " + type; } const char *what() const { return reason.c_str(); } }; static Shape* factory(string type) throw(BadShapeCreation); }; class Circle : public Shape { Circle() {} // Private constructor friend class Shape; public: void draw() { cout << "Circle::draw\n"; } void erase() { cout << "Circle::erase\n"; } ~Circle() { cout << "Circle::~Circle\n"; } }; class Square : public Shape { Square() {} friend class Shape; public: void draw() { cout << "Square::draw\n"; } void erase() { cout << "Square::erase\n"; } ~Square() { cout << "Square::~Square\n"; } }; Shape* Shape::factory(string type) throw(Shape::BadShapeCreation) { if(type == "Circle") return new Circle; if(type == "Square") return new Square; throw BadShapeCreation(type); } char* shlist[] = { "Circle", "Square", "Square", "Circle", "Circle", "Circle", "Square", "" }; int main() { vector<Shape*> shapes;
Chapter 16: Design Patterns 438
try { for(char** cp = shlist; **cp; cp++) shapes.push_back(Shape::factory(*cp)); } catch(Shape::BadShapeCreation e) { cout << e.what() << endl; return 1; } for(int i = 0; i < shapes.size(); i++) { shapes[i]->draw(); shapes[i]->erase(); } purge(shapes); } ///:~
The factory( ) takes an argument that allows it to determine what type of Shape to create; it happens to be a string in this case but it could be any set of data. The factory( ) is now the only other code in the system that needs to be changed when a new type of Shape is added (the initialization data for the objects will presumably come from somewhere outside the system, and not be a hard-coded array as in the above example).
To ensure that the creation can only happen in the factory( ), the constructors for the specific types of Shape are made private, and Shape is declared a friend so that factory( ) has access to the constructors (you could also declare only Shape::factory( ) to be a friend, but it seems reasonably harmless to declare the entire base class as a friend).
Polymorphic factories The static factory( ) method in the previous example forces all the creation operations to be focused in one spot, to that’s the only place you need to change the code. This is certainly a reasonable solution, as it throws a box around the process of creating objects. However, the Design Patterns book emphasizes that the reason for the Factory Method pattern is so that different types of factories can be subclassed from the basic factory (the above design is mentioned as a special case). However, the book does not provide an example, but instead just repeats the example used for the Abstract Factory. Here is ShapeFactory1.cpp modified so the factory methods are in a separate class as virtual functions:
//: C09:ShapeFactory2.cpp // Polymorphic factory methods #include "../purge.h" #include <iostream> #include <string> #include <exception> #include <vector> #include <map> using namespace std;
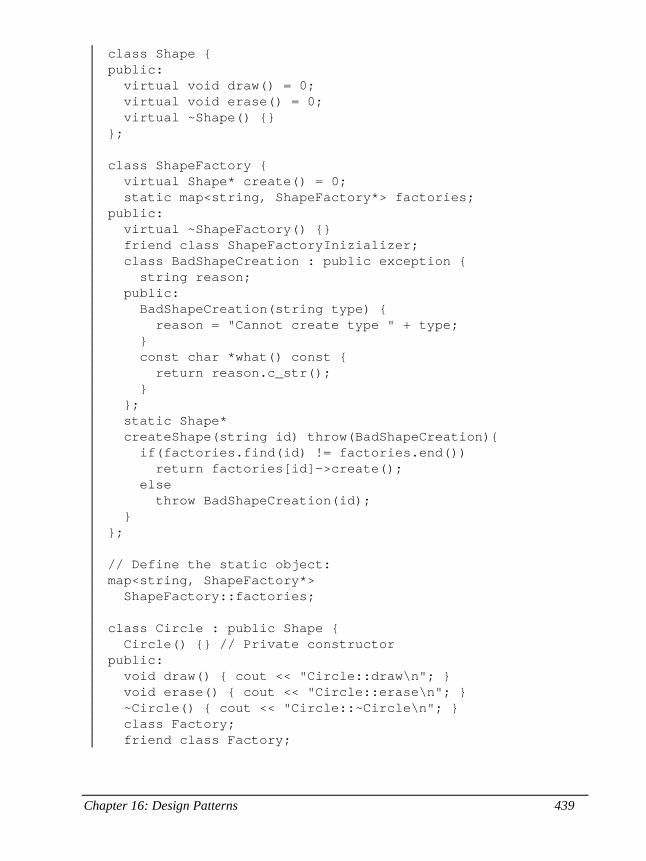
Chapter 16: Design Patterns 439
class Shape { public: virtual void draw() = 0; virtual void erase() = 0; virtual ~Shape() {} }; class ShapeFactory { virtual Shape* create() = 0; static map<string, ShapeFactory*> factories; public: virtual ~ShapeFactory() {} friend class ShapeFactoryInizializer; class BadShapeCreation : public exception { string reason; public: BadShapeCreation(string type) { reason = "Cannot create type " + type; } const char *what() const { return reason.c_str(); } }; static Shape* createShape(string id) throw(BadShapeCreation){ if(factories.find(id) != factories.end()) return factories[id]->create(); else throw BadShapeCreation(id); } }; // Define the static object: map<string, ShapeFactory*> ShapeFactory::factories; class Circle : public Shape { Circle() {} // Private constructor public: void draw() { cout << "Circle::draw\n"; } void erase() { cout << "Circle::erase\n"; } ~Circle() { cout << "Circle::~Circle\n"; } class Factory; friend class Factory;
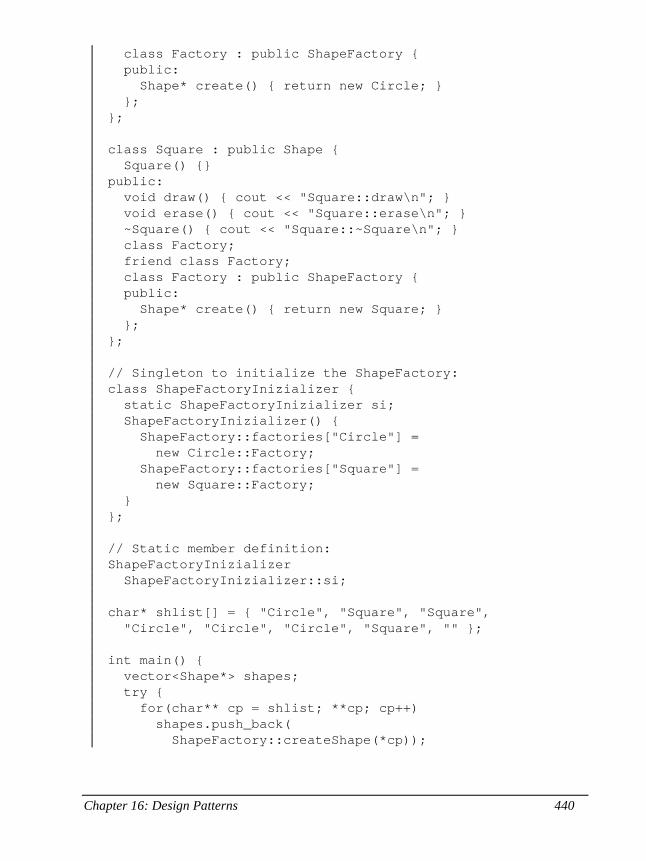
Chapter 16: Design Patterns 440
class Factory : public ShapeFactory { public: Shape* create() { return new Circle; } }; }; class Square : public Shape { Square() {} public: void draw() { cout << "Square::draw\n"; } void erase() { cout << "Square::erase\n"; } ~Square() { cout << "Square::~Square\n"; } class Factory; friend class Factory; class Factory : public ShapeFactory { public: Shape* create() { return new Square; } }; }; // Singleton to initialize the ShapeFactory: class ShapeFactoryInizializer { static ShapeFactoryInizializer si; ShapeFactoryInizializer() { ShapeFactory::factories["Circle"] = new Circle::Factory; ShapeFactory::factories["Square"] = new Square::Factory; } }; // Static member definition: ShapeFactoryInizializer ShapeFactoryInizializer::si; char* shlist[] = { "Circle", "Square", "Square", "Circle", "Circle", "Circle", "Square", "" }; int main() { vector<Shape*> shapes; try { for(char** cp = shlist; **cp; cp++) shapes.push_back( ShapeFactory::createShape(*cp));
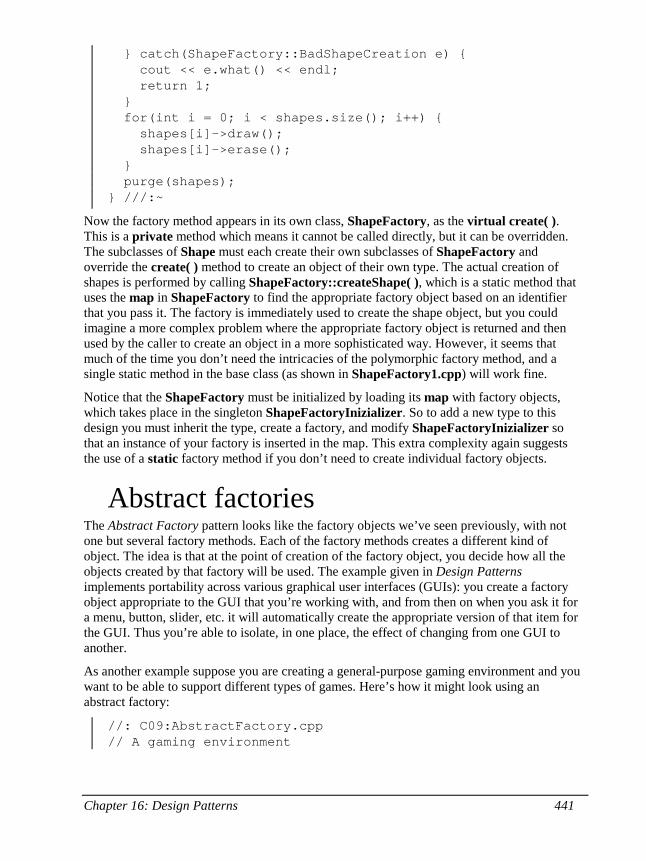
Chapter 16: Design Patterns 441
} catch(ShapeFactory::BadShapeCreation e) { cout << e.what() << endl; return 1; } for(int i = 0; i < shapes.size(); i++) { shapes[i]->draw(); shapes[i]->erase(); } purge(shapes); } ///:~
Now the factory method appears in its own class, ShapeFactory, as the virtual create( ). This is a private method which means it cannot be called directly, but it can be overridden. The subclasses of Shape must each create their own subclasses of ShapeFactory and override the create( ) method to create an object of their own type. The actual creation of shapes is performed by calling ShapeFactory::createShape( ), which is a static method that uses the map in ShapeFactory to find the appropriate factory object based on an identifier that you pass it. The factory is immediately used to create the shape object, but you could imagine a more complex problem where the appropriate factory object is returned and then used by the caller to create an object in a more sophisticated way. However, it seems that much of the time you don’t need the intricacies of the polymorphic factory method, and a single static method in the base class (as shown in ShapeFactory1.cpp) will work fine.
Notice that the ShapeFactory must be initialized by loading its map with factory objects, which takes place in the singleton ShapeFactoryInizializer. So to add a new type to this design you must inherit the type, create a factory, and modify ShapeFactoryInizializer so that an instance of your factory is inserted in the map. This extra complexity again suggests the use of a static factory method if you don’t need to create individual factory objects.
Abstract factories The Abstract Factory pattern looks like the factory objects we’ve seen previously, with not one but several factory methods. Each of the factory methods creates a different kind of object. The idea is that at the point of creation of the factory object, you decide how all the objects created by that factory will be used. The example given in Design Patterns implements portability across various graphical user interfaces (GUIs): you create a factory object appropriate to the GUI that you’re working with, and from then on when you ask it for a menu, button, slider, etc. it will automatically create the appropriate version of that item for the GUI. Thus you’re able to isolate, in one place, the effect of changing from one GUI to another.
As another example suppose you are creating a general-purpose gaming environment and you want to be able to support different types of games. Here’s how it might look using an abstract factory:
//: C09:AbstractFactory.cpp // A gaming environment

Chapter 16: Design Patterns 442
#include <iostream> using namespace std; class Obstacle { public: virtual void action() = 0; }; class Player { public: virtual void interactWith(Obstacle*) = 0; }; class Kitty: public Player { virtual void interactWith(Obstacle* ob) { cout << "Kitty has encountered a "; ob->action(); } }; class KungFuGuy: public Player { virtual void interactWith(Obstacle* ob) { cout << "KungFuGuy now battles against a "; ob->action(); } }; class Puzzle: public Obstacle { public: void action() { cout << "Puzzle\n"; } }; class NastyWeapon: public Obstacle { public: void action() { cout << "NastyWeapon\n"; } }; // The abstract factory: class GameElementFactory { public: virtual Player* makePlayer() = 0; virtual Obstacle* makeObstacle() = 0; };
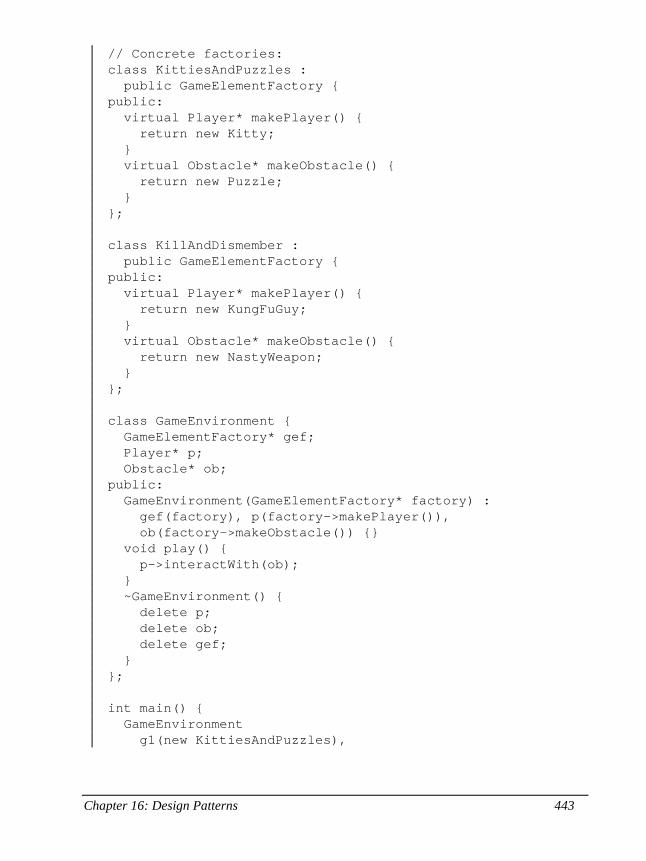
Chapter 16: Design Patterns 443
// Concrete factories: class KittiesAndPuzzles : public GameElementFactory { public: virtual Player* makePlayer() { return new Kitty; } virtual Obstacle* makeObstacle() { return new Puzzle; } }; class KillAndDismember : public GameElementFactory { public: virtual Player* makePlayer() { return new KungFuGuy; } virtual Obstacle* makeObstacle() { return new NastyWeapon; } }; class GameEnvironment { GameElementFactory* gef; Player* p; Obstacle* ob; public: GameEnvironment(GameElementFactory* factory) : gef(factory), p(factory->makePlayer()), ob(factory->makeObstacle()) {} void play() { p->interactWith(ob); } ~GameEnvironment() { delete p; delete ob; delete gef; } }; int main() { GameEnvironment g1(new KittiesAndPuzzles),
Chapter 16: Design Patterns 444
g2(new KillAndDismember); g1.play(); g2.play(); } ///:~
In this environment, Player objects interact with Obstacle objects, but there are different types of players and obstacles depending on what kind of game you’re playing. You determine the kind of game by choosing a particular GameElementFactory, and then the GameEnvironment controls the setup and play of the game. In this example, the setup and play is very simple, but those activities (the initial conditions and the state change) can determine much of the game’s outcome. Here, GameEnvironment is not designed to be inherited, although it could very possibly make sense to do that.
This also contains examples of Double Dispatching and the Factory Method, both of which will be explained later.
Virtual constructors One of the primary goals of using a factory is so that you can organize your code so you don’t have to select an exact type of constructor when creating an object. That is, you can say, “I don’t know precisely what type of object you are, but here’s the information: Create yourself.”
In addition, during a constructor call the virtual mechanism does not operate (early binding occurs). Sometimes this is awkward. For example, in the Shape program it seems logical that inside the constructor for a Shape object, you would want to set everything up and then draw( ) the Shape. draw( ) should be a virtual function, a message to the Shape that it should draw itself appropriately, depending on whether it is a circle, square, line, and so on. However, this doesn’t work inside the constructor, for the reasons given in Chapter XX: Virtual functions resolve to the “local” function bodies when called in constructors.
If you want to be able to call a virtual function inside the constructor and have it do the right thing, you must use a technique to simulate a virtual constructor (which is a variation of the Factory Method). This is a conundrum. Remember the idea of a virtual function is that you send a message to an object and let the object figure out the right thing to do. But a constructor builds an object. So a virtual constructor would be like saying, “I don’t know exactly what type of object you are, but build yourself anyway.” In an ordinary constructor, the compiler must know which VTABLE address to bind to the VPTR, and if it existed, a virtual constructor couldn’t do this because it doesn’t know all the type information at compile-time. It makes sense that a constructor can’t be virtual because it is the one function that absolutely must know everything about the type of the object.
And yet there are times when you want something approximating the behavior of a virtual constructor.
In the Shape example, it would be nice to hand the Shape constructor some specific information in the argument list and let the constructor create a specific type of Shape (a Circle, Square) with no further intervention. Ordinarily, you’d have to make an explicit call to the Circle, Square constructor yourself.
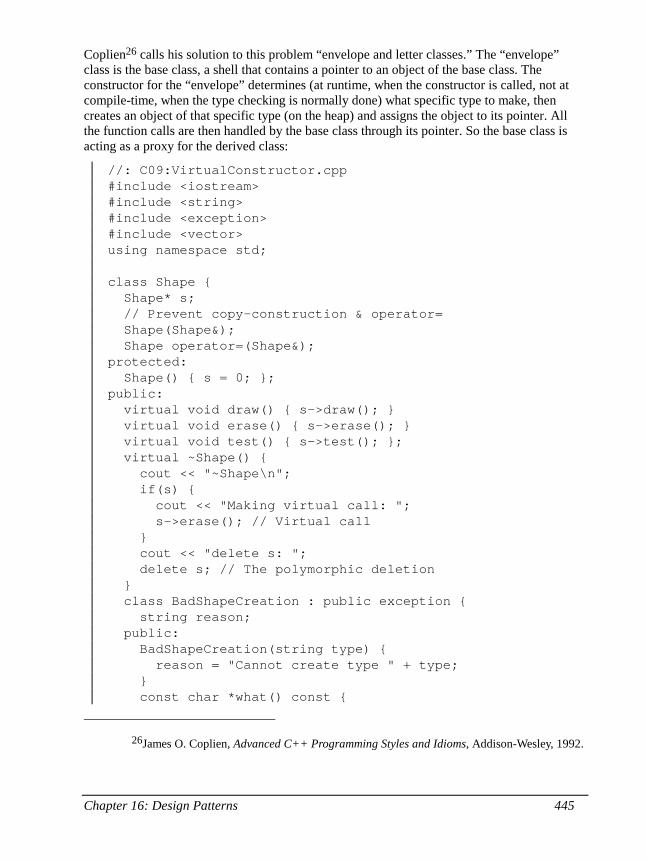
Chapter 16: Design Patterns 445
Coplien26 calls his solution to this problem “envelope and letter classes.” The “envelope” class is the base class, a shell that contains a pointer to an object of the base class. The constructor for the “envelope” determines (at runtime, when the constructor is called, not at compile-time, when the type checking is normally done) what specific type to make, then creates an object of that specific type (on the heap) and assigns the object to its pointer. All the function calls are then handled by the base class through its pointer. So the base class is acting as a proxy for the derived class:
//: C09:VirtualConstructor.cpp #include <iostream> #include <string> #include <exception> #include <vector> using namespace std; class Shape { Shape* s; // Prevent copy-construction & operator= Shape(Shape&); Shape operator=(Shape&); protected: Shape() { s = 0; }; public: virtual void draw() { s->draw(); } virtual void erase() { s->erase(); } virtual void test() { s->test(); }; virtual ~Shape() { cout << "~Shape\n"; if(s) { cout << "Making virtual call: "; s->erase(); // Virtual call } cout << "delete s: "; delete s; // The polymorphic deletion } class BadShapeCreation : public exception { string reason; public: BadShapeCreation(string type) { reason = "Cannot create type " + type; } const char *what() const {
26James O. Coplien, Advanced C++ Programming Styles and Idioms, Addison-Wesley, 1992.
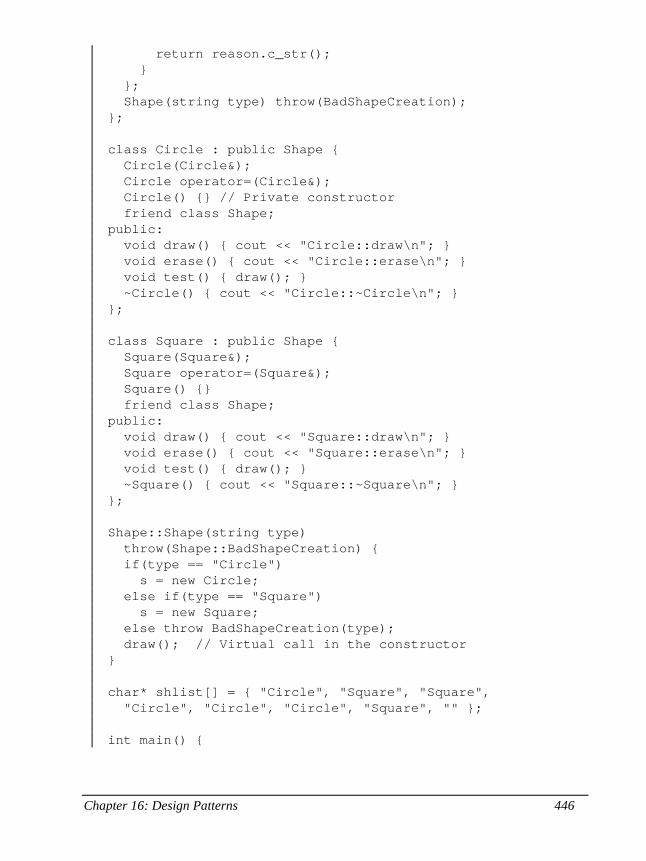
Chapter 16: Design Patterns 446
return reason.c_str(); } }; Shape(string type) throw(BadShapeCreation); }; class Circle : public Shape { Circle(Circle&); Circle operator=(Circle&); Circle() {} // Private constructor friend class Shape; public: void draw() { cout << "Circle::draw\n"; } void erase() { cout << "Circle::erase\n"; } void test() { draw(); } ~Circle() { cout << "Circle::~Circle\n"; } }; class Square : public Shape { Square(Square&); Square operator=(Square&); Square() {} friend class Shape; public: void draw() { cout << "Square::draw\n"; } void erase() { cout << "Square::erase\n"; } void test() { draw(); } ~Square() { cout << "Square::~Square\n"; } }; Shape::Shape(string type) throw(Shape::BadShapeCreation) { if(type == "Circle") s = new Circle; else if(type == "Square") s = new Square; else throw BadShapeCreation(type); draw(); // Virtual call in the constructor } char* shlist[] = { "Circle", "Square", "Square", "Circle", "Circle", "Circle", "Square", "" }; int main() {
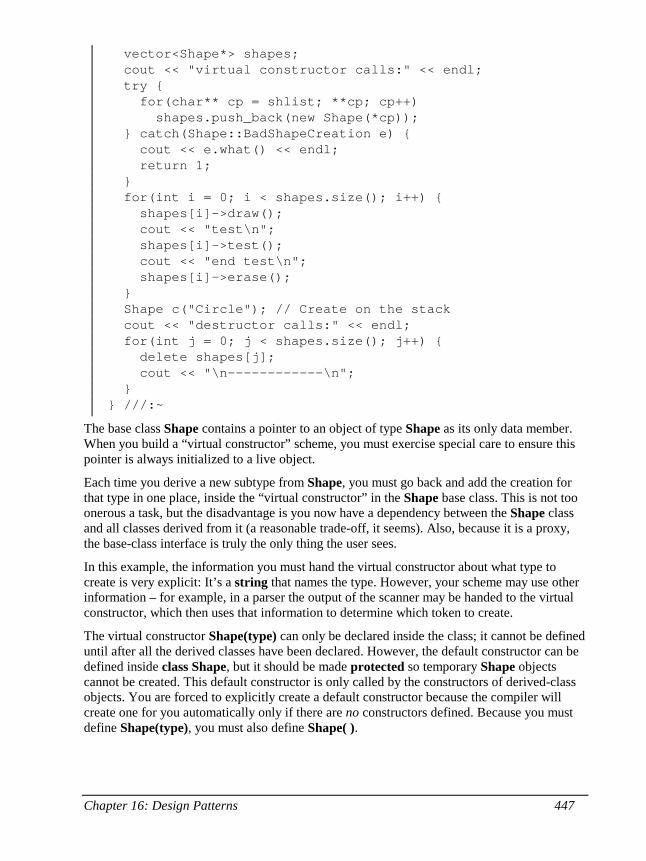
Chapter 16: Design Patterns 447
vector<Shape*> shapes; cout << "virtual constructor calls:" << endl; try { for(char** cp = shlist; **cp; cp++) shapes.push_back(new Shape(*cp)); } catch(Shape::BadShapeCreation e) { cout << e.what() << endl; return 1; } for(int i = 0; i < shapes.size(); i++) { shapes[i]->draw(); cout << "test\n"; shapes[i]->test(); cout << "end test\n"; shapes[i]->erase(); } Shape c("Circle"); // Create on the stack cout << "destructor calls:" << endl; for(int j = 0; j < shapes.size(); j++) { delete shapes[j]; cout << "\n------------\n"; } } ///:~
The base class Shape contains a pointer to an object of type Shape as its only data member. When you build a “virtual constructor” scheme, you must exercise special care to ensure this pointer is always initialized to a live object.
Each time you derive a new subtype from Shape, you must go back and add the creation for that type in one place, inside the “virtual constructor” in the Shape base class. This is not too onerous a task, but the disadvantage is you now have a dependency between the Shape class and all classes derived from it (a reasonable trade-off, it seems). Also, because it is a proxy, the base-class interface is truly the only thing the user sees.
In this example, the information you must hand the virtual constructor about what type to create is very explicit: It’s a string that names the type. However, your scheme may use other information – for example, in a parser the output of the scanner may be handed to the virtual constructor, which then uses that information to determine which token to create.
The virtual constructor Shape(type) can only be declared inside the class; it cannot be defined until after all the derived classes have been declared. However, the default constructor can be defined inside class Shape, but it should be made protected so temporary Shape objects cannot be created. This default constructor is only called by the constructors of derived-class objects. You are forced to explicitly create a default constructor because the compiler will create one for you automatically only if there are no constructors defined. Because you must define Shape(type), you must also define Shape( ).
Chapter 16: Design Patterns 448
The default constructor in this scheme has at least one very important chore – it must set the value of the s pointer to zero. This sounds strange at first, but remember that the default constructor will be called as part of the construction of the actual object – in Coplien’s terms, the “letter,” not the “envelope.” However, the “letter” is derived from the “envelope,” so it also inherits the data member s. In the “envelope,” s is important because it points to the actual object, but in the “letter,” s is simply excess baggage. Even excess baggage should be initialized, however, and if s is not set to zero by the default constructor called for the “letter,” bad things happen (as you’ll see later).
The virtual constructor takes as its argument information that completely determines the type of the object. Notice, though, that this type information isn’t read and acted upon until runtime, whereas normally the compiler must know the exact type at compile-time (one other reason this system effectively imitates virtual constructors).
Inside the virtual constructor there’s a switch statement that uses the argument to construct the actual (“letter”) object, which is then assigned to the pointer inside the “envelope.” At that point, the construction of the “letter” has been completed, so any virtual calls will be properly directed.
As an example, consider the call to draw( ) inside the virtual constructor. If you trace this call (either by hand or with a debugger), you can see that it starts in the draw( ) function in the base class, Shape. This function calls draw( ) for the “envelope” s pointer to its “letter.” All types derived from Shape share the same interface, so this virtual call is properly executed, even though it seems to be in the constructor. (Actually, the constructor for the “letter” has already completed.) As long as all virtual calls in the base class simply make calls to identical virtual function through the pointer to the “letter,” the system operates properly.
To understand how it works, consider the code in main( ). To fill the vector shapes, “virtual constructor” calls are made to Shape. Ordinarily in a situation like this, you would call the constructor for the actual type, and the VPTR for that type would be installed in the object. Here, however, the VPTR used in each case is the one for Shape, not the one for the specific Circle, Square, or Triangle.
In the for loop where the draw( ) and erase( ) functions are called for each Shape, the virtual function call resolves, through the VPTR, to the corresponding type. However, this is Shape in each case. In fact, you might wonder why draw( ) and erase( ) were made virtual at all. The reason shows up in the next step: The base-class version of draw( ) makes a call, through the “letter” pointer s, to the virtual function draw( ) for the “letter.” This time the call resolves to the actual type of the object, not just the base class Shape. Thus the runtime cost of using virtual constructors is one more virtual call every time you make a virtual function call.
In order to create any function that is overridden, such as draw( ), erase( ) or test( ), you must proxy all calls to the s pointer in the base class implementation, as shown above. This is because, when the call is made, the call to the envelope’s member function will resolve as being to Shape, and not to a derived type of Shape. Only when you make the proxy call to s will the virtual behavior take place. In main( ), you can see that everything works correctly, even when calls are made inside constructors and destructors.
Chapter 16: Design Patterns 449
Destructor operation The activities of destruction in this scheme are also tricky. To understand, let’s verbally walk through what happens when you call delete for a pointer to a Shape object – specifically, a Square – created on the heap. (This is more complicated than an object created on the stack.) This will be a delete through the polymorphic interface, as in the statement delete shapes[i] in main( ).
The type of the pointer shapes[i] is of the base class Shape, so the compiler makes the call through Shape. Normally, you might say that it’s a virtual call, so Square’s destructor will be called. But with the virtual constructor scheme, the compiler is creating actual Shape objects, even though the constructor initializes the letter pointer to a specific type of Shape. The virtual mechanism is used, but the VPTR inside the Shape object is Shape’s VPTR, not Square’s. This resolves to Shape’s destructor, which calls delete for the letter pointer s, which actually points to a Square object. This is again a virtual call, but this time it resolves to Square’s destructor.
With a destructor, however, C++ guarantees, via the compiler, that all destructors in the hierarchy are called. Square’s destructor is called first, followed by any intermediate destructors, in order, until finally the base-class destructor is called. This base-class destructor has code that says delete s. When this destructor was called originally, it was for the “envelope” s, but now it’s for the “letter” s, which is there because the “letter” was inherited from the “envelope,” and not because it contains anything. So this call to delete should do nothing.
The solution to the problem is to make the “letter” s pointer zero. Then when the “letter” base-class destructor is called, you get delete 0, which by definition does nothing. Because the default constructor is protected, it will be called only during the construction of a “letter,” so that’s the only situation where s is set to zero.
Your most common tool for hiding construction will probably be ordinary factory methods rather than the more complex approaches. The idea of adding new types with minimal effect on the rest of the system will be further explored later in this chapter.
Callbacks Decoupling code behavior
Chapter 16: Design Patterns 450
Functor/Command Strategy Observer
Like the other forms of callback, this contains a hook point where you can change code. The difference is in the observer’s completely dynamic nature. It is often used for the specific case of changes based on other object’s change of state, but is also the basis of event management. Anytime you want to decouple the source of the call from the called code in a completely dynamic way.
The observer pattern solves a fairly common problem: What if a group of objects needs to update themselves when some other object changes state? This can be seen in the “model-view” aspect of Smalltalk’s MVC (model-view-controller), or the almost-equivalent “Document-View Architecture.” Suppose that you have some data (the “document”) and more than one view, say a plot and a textual view. When you change the data, the two views must know to update themselves, and that’s what the observer facilitates.
There are two types of objects used to implement the observer pattern in the following code. The Observable class keeps track of everybody who wants to be informed when a change happens, whether the “state” has changed or not. When someone says “OK, everybody should check and potentially update themselves,” the Observable class performs this task by calling the notifyObservers( ) member function for each observer on the list. The notifyObservers( ) member function is part of the base class Observable.
There are actually two “things that change” in the observer pattern: the quantity of observing objects and the way an update occurs. That is, the observer pattern allows you to modify both of these without affecting the surrounding code.
There are a number of ways to implement the observer pattern, but the code shown here will create a framework from which you can build your own observer code, following the example. First, this interface describes what an observer looks like:
//: C09:Observer.h // The Observer interface #ifndef OBSERVER_H #define OBSERVER_H class Observable; class Argument {}; class Observer { public: // Called by the observed object, whenever // the observed object is changed:
Chapter 16: Design Patterns 451
virtual void update(Observable* o, Argument * arg) = 0; }; #endif // OBSERVER_H ///:~
Since Observer interacts with Observable in this approach, Observable must be declared first. In addition, the Argument class is empty and only acts as a base class for any type of argument you wish to pass during an update. If you want, you can simply pass the extra argument as a void*; you’ll have to downcast in either case but some folks find void* objectionable.
Observer is an “interface” class that only has one member function, update( ). This function is called by the object that’s being observed, when that object decides its time to update all it’s observers. The arguments are optional; you could have an update( ) with no arguments and that would still fit the observer pattern; however this is more general – it allows the observed object to pass the object that caused the update (since an Observer may be registered with more than one observed object) and any extra information if that’s helpful, rather than forcing the Observer object to hunt around to see who is updating and to fetch any other information it needs.
The “observed object” that decides when and how to do the updating will be called the Observable:
//: C09:Observable.h // The Observable class #ifndef OBSERVABLE_H #define OBSERVABLE_H #include "Observer.h" #include <set> class Observable { bool changed; std::set<Observer*> observers; protected: virtual void setChanged() { changed = true; } virtual void clearChanged(){ changed = false; } public: virtual void addObserver(Observer& o) { observers.insert(&o); } virtual void deleteObserver(Observer& o) { observers.erase(&o); } virtual void deleteObservers() { observers.clear(); } virtual int countObservers() {
Chapter 16: Design Patterns 452
return observers.size(); } virtual bool hasChanged() { return changed; } // If this object has changed, notify all // of its observers: virtual void notifyObservers(Argument* arg=0) { if(!hasChanged()) return; clearChanged(); // Not "changed" anymore std::set<Observer*>::iterator it; for(it = observers.begin(); it != observers.end(); it++) (*it)->update(this, arg); } }; #endif // OBSERVABLE_H ///:~
Again, the design here is more elaborate than is necessary; as long as there’s a way to register an Observer with an Observable and for the Observable to update its Observers, the set of member functions doesn’t matter. However, this design is intended to be reusable (it was lifted from the design used in the Java standard library). As mentioned elsewhere in the book, there is no support for multithreading in the Standard C++ libraries, so this design would need to be modified in a multithreaded environment.
Observable has a flag to indicate whether it’s been changed. In a simpler design, there would be no flag; if something happened, everyone would be notified. The flag allows you to wait, and only notify the Observers when you decide the time is right. Notice, however, that the control of the flag’s state is protected, so that only an inheritor can decide what constitutes a change, and not the end user of the resulting derived Observer class.
The collection of Observer objects is kept in a set<Observer*> to prevent duplicates; the set insert( ), erase( ), clear( ) and size( ) functions are exposed to allow Observers to be added and removed at any time, thus providing runtime flexibility.
Most of the work is done in notifyObservers( ). If the changed flag has not been set, this does nothing. Otherwise, it first clears the changed flag so repeated calls to notifyObservers( ) won’t waste time. This is done before notifying the observers in case the calls to update( ) do anything that causes a change back to this Observable object. Then it moves through the set and calls back to the update( ) member function of each Observer.
At first it may appear that you can use an ordinary Observable object to manage the updates. But this doesn’t work; to get an effect, you must inherit from Observable and somewhere in your derived-class code call setChanged( ). This is the member function that sets the “changed” flag, which means that when you call notifyObservers( ) all of the observers will, in fact, get notified. Where you call setChanged( ) depends on the logic of your program.
Now we encounter a dilemma. An object that should notify its observers about things that happen to it – events or changes in state – might have more than one such item of interest. For example, if you’re dealing with a graphical user interface (GUI) item – a button, say – the items of interest might be the mouse clicked the button, the mouse moved over the button, and
Chapter 16: Design Patterns 453
(for some reason) the button changed its color. So we’d like to be able to report all of these events to different observers, each of which is interested in a different type of event.
The problem is that we would normally reach for multiple inheritance in such a situation: “I’ll inherit from Observable to deal with mouse clicks, and I’ll … er … inherit from Observable to deal with mouse-overs, and, well, … hmm, that doesn’t work.”
The “interface” idiom The “inner class” idiom
Here’s a situation where we do actually need to (in effect) upcast to more than one type, but in this case we need to provide several different implementations of the same base type. The solution is something I’ve lifted from Java, which takes C++’s nested class one step further. Java has a built-in feature called inner classes, which look like C++’s nested classes, but they do two other things:
1. A Java inner class automatically has access to the private elements of the class it is nested within.
2. An object of a Java inner class automatically grabs the “this” to the outer class object it was created within. In Java, the “outer this” is implicitly dereferenced whenever you name an element of the outer class.
[[ Insert the definition of a closure ]]. So to implement the inner class idiom in C++, we must do these things by hand. Here’s an example:
//: C09:InnerClassIdiom.cpp // Example of the "inner class" idiom #include <iostream> #include <string> using namespace std; class Poingable { public: virtual void poing() = 0; }; void callPoing(Poingable& p) { p.poing(); } class Bingable { public: virtual void bing() = 0; }; void callBing(Bingable& b) {
Chapter 16: Design Patterns 454
b.bing(); } class Outer { string name; // Define one inner class: class Inner1; friend class Outer::Inner1; class Inner1 : public Poingable { Outer* parent; public: Inner1(Outer* p) : parent(p) {} void poing() { cout << "poing called for " << parent->name << endl; // Accesses data in the outer class object } } inner1; // Define a second inner class: class Inner2; friend class Outer::Inner2; class Inner2 : public Bingable { Outer* parent; public: Inner2(Outer* p) : parent(p) {} void bing() { cout << "bing called for " << parent->name << endl; } } inner2; public: Outer(const string& nm) : name(nm), inner1(this), inner2(this) {} // Return reference to interfaces // implemented by the inner classes: operator Poingable&() { return inner1; } operator Bingable&() { return inner2; } }; int main() { Outer x("Ping Pong"); // Like upcasting to multiple base types!: callPoing(x); callBing(x);
Chapter 16: Design Patterns 455
} ///:~
The example begins with the Poingable and Bingable interfaces, each of which contain a single member function. The services provided by callPoing( ) and callBing( ) require that the object they receive implement the Poingable and Bingable interfaces, respectively, but they put no other requirements on that object so as to maximize the flexibility of using callPoing( ) and callBing( ). Note the lack of virtual destructors in either interface – the intent is that you never perform object destruction via the interface.
Outer contains some private data (name) and it wishes to provide both a Poingable interface and a Bingable interface so it can be used with callPoing( ) and callBing( ). Of course, in this situation we could simply use multiple inheritance. This example is just intended to show the simplest syntax for the idiom; we’ll see a real use shortly. To provide a Poingable object without inheriting Outer from Poingable, the inner class idiom is used. First, the declaration class Inner says that, somewhere, there is a nested class of this name. This allows the friend declaration for the class, which follows. Finally, now that the nested class has been granted access to all the private elements of Outer, the class can be defined. Notice that it keeps a pointer to the Outer which created it, and this pointer must be initialized in the constructor. Finally, the poing( ) function from Poingable is implemented. The same process occurs for the second inner class which implements Bingable. Each inner class has a single private instance created, which is initialized in the Outer constructor. By creating the member objects and returning references to them, issues of object lifetime are eliminated.
Notice that both inner class definitions are private, and in fact the client programmer doesn’t have any access to details of the implementation, since the two access methods operator Poingable&( ) and operator Bingable&( ) only return a reference to the upcast interface, not to the object that implements it. In fact, since the two inner classes are private, the client programmer cannot even downcast to the implementation classes, thus providing complete isolation between interface and implementation.
Just to push a point, I’ve taken the extra liberty here of defining the automatic type conversion operators operator Poingable&( ) and operator Bingable&( ). In main( ), you can see that these actually allow a syntax that looks like Outer is multiply inherited from Poingable and Bingable. The difference is that the casts in this case are one way. You can get the effect of an upcast to Poingable or Bingable, but you cannot downcast back to an Outer. In the following example of observer, you’ll see the more typical approach: you provide access to the inner class objects using ordinary member functions, not automatic type conversion operations.
The observer example Armed with the Observer and Observable header files and the inner class idiom, we can look at an example of the observer pattern:
//: C09:ObservedFlower.cpp // Demonstration of "observer" pattern #include "Observable.h" #include <iostream> #include <vector>
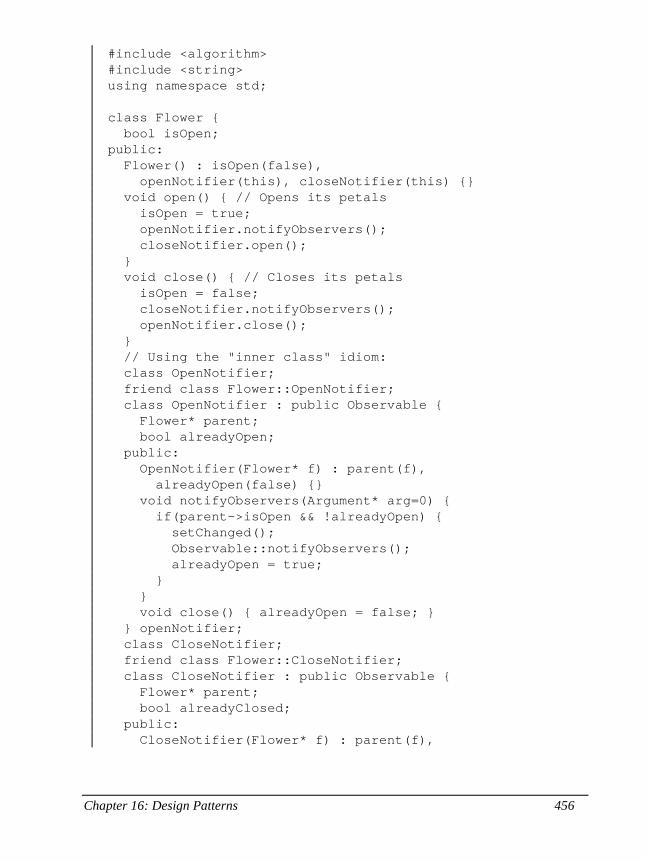
Chapter 16: Design Patterns 456
#include <algorithm> #include <string> using namespace std; class Flower { bool isOpen; public: Flower() : isOpen(false), openNotifier(this), closeNotifier(this) {} void open() { // Opens its petals isOpen = true; openNotifier.notifyObservers(); closeNotifier.open(); } void close() { // Closes its petals isOpen = false; closeNotifier.notifyObservers(); openNotifier.close(); } // Using the "inner class" idiom: class OpenNotifier; friend class Flower::OpenNotifier; class OpenNotifier : public Observable { Flower* parent; bool alreadyOpen; public: OpenNotifier(Flower* f) : parent(f), alreadyOpen(false) {} void notifyObservers(Argument* arg=0) { if(parent->isOpen && !alreadyOpen) { setChanged(); Observable::notifyObservers(); alreadyOpen = true; } } void close() { alreadyOpen = false; } } openNotifier; class CloseNotifier; friend class Flower::CloseNotifier; class CloseNotifier : public Observable { Flower* parent; bool alreadyClosed; public: CloseNotifier(Flower* f) : parent(f),
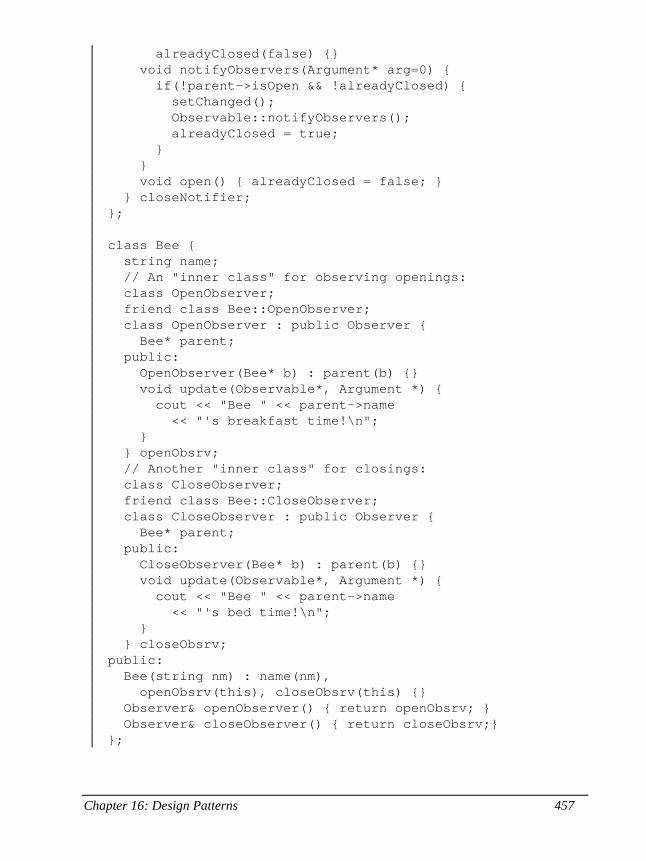
Chapter 16: Design Patterns 457
alreadyClosed(false) {} void notifyObservers(Argument* arg=0) { if(!parent->isOpen && !alreadyClosed) { setChanged(); Observable::notifyObservers(); alreadyClosed = true; } } void open() { alreadyClosed = false; } } closeNotifier; }; class Bee { string name; // An "inner class" for observing openings: class OpenObserver; friend class Bee::OpenObserver; class OpenObserver : public Observer { Bee* parent; public: OpenObserver(Bee* b) : parent(b) {} void update(Observable*, Argument *) { cout << "Bee " << parent->name << "'s breakfast time!\n"; } } openObsrv; // Another "inner class" for closings: class CloseObserver; friend class Bee::CloseObserver; class CloseObserver : public Observer { Bee* parent; public: CloseObserver(Bee* b) : parent(b) {} void update(Observable*, Argument *) { cout << "Bee " << parent->name << "'s bed time!\n"; } } closeObsrv; public: Bee(string nm) : name(nm), openObsrv(this), closeObsrv(this) {} Observer& openObserver() { return openObsrv; } Observer& closeObserver() { return closeObsrv;} };
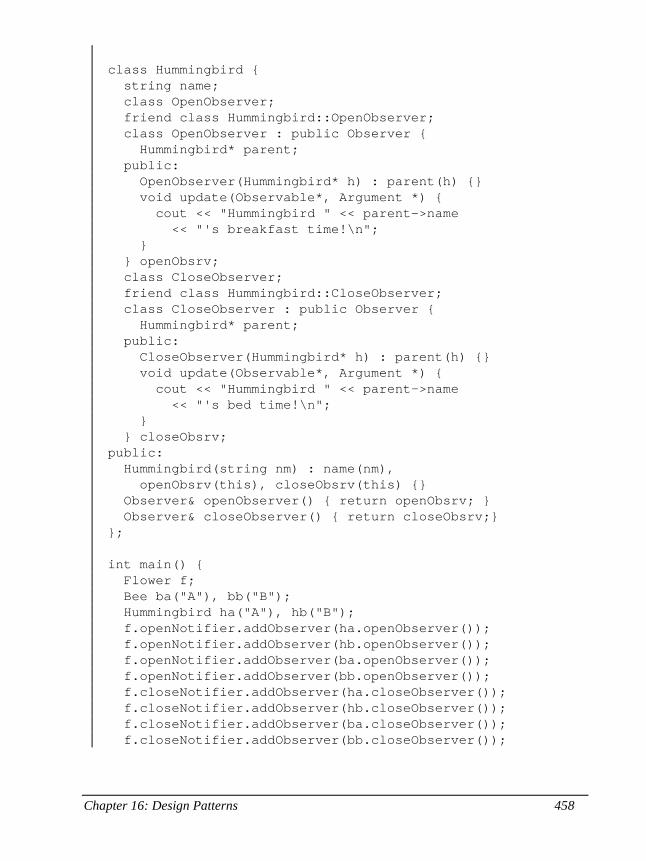
Chapter 16: Design Patterns 458
class Hummingbird { string name; class OpenObserver; friend class Hummingbird::OpenObserver; class OpenObserver : public Observer { Hummingbird* parent; public: OpenObserver(Hummingbird* h) : parent(h) {} void update(Observable*, Argument *) { cout << "Hummingbird " << parent->name << "'s breakfast time!\n"; } } openObsrv; class CloseObserver; friend class Hummingbird::CloseObserver; class CloseObserver : public Observer { Hummingbird* parent; public: CloseObserver(Hummingbird* h) : parent(h) {} void update(Observable*, Argument *) { cout << "Hummingbird " << parent->name << "'s bed time!\n"; } } closeObsrv; public: Hummingbird(string nm) : name(nm), openObsrv(this), closeObsrv(this) {} Observer& openObserver() { return openObsrv; } Observer& closeObserver() { return closeObsrv;} }; int main() { Flower f; Bee ba("A"), bb("B"); Hummingbird ha("A"), hb("B"); f.openNotifier.addObserver(ha.openObserver()); f.openNotifier.addObserver(hb.openObserver()); f.openNotifier.addObserver(ba.openObserver()); f.openNotifier.addObserver(bb.openObserver()); f.closeNotifier.addObserver(ha.closeObserver()); f.closeNotifier.addObserver(hb.closeObserver()); f.closeNotifier.addObserver(ba.closeObserver()); f.closeNotifier.addObserver(bb.closeObserver());
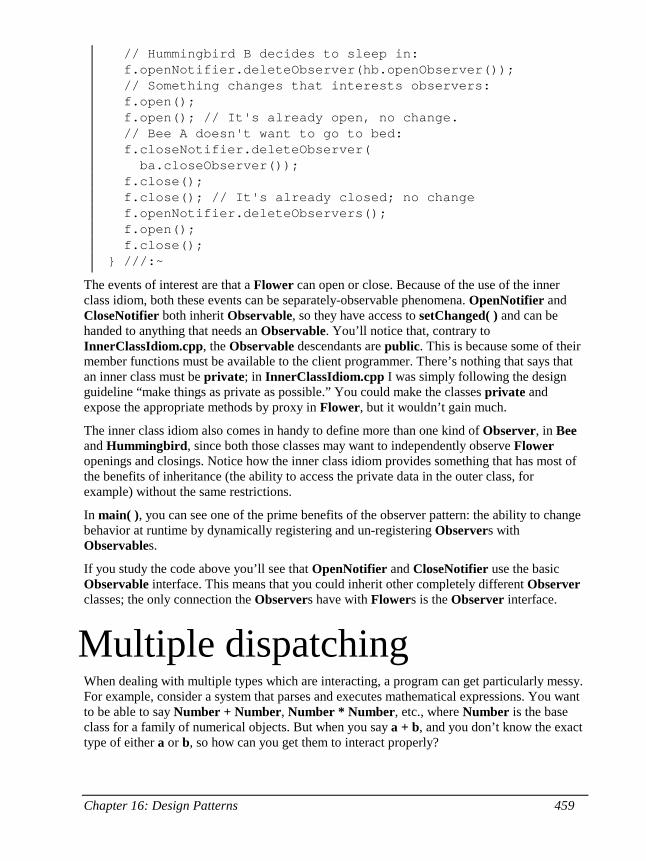
Chapter 16: Design Patterns 459
// Hummingbird B decides to sleep in: f.openNotifier.deleteObserver(hb.openObserver()); // Something changes that interests observers: f.open(); f.open(); // It's already open, no change. // Bee A doesn't want to go to bed: f.closeNotifier.deleteObserver( ba.closeObserver()); f.close(); f.close(); // It's already closed; no change f.openNotifier.deleteObservers(); f.open(); f.close(); } ///:~
The events of interest are that a Flower can open or close. Because of the use of the inner class idiom, both these events can be separately-observable phenomena. OpenNotifier and CloseNotifier both inherit Observable, so they have access to setChanged( ) and can be handed to anything that needs an Observable. You’ll notice that, contrary to InnerClassIdiom.cpp, the Observable descendants are public. This is because some of their member functions must be available to the client programmer. There’s nothing that says that an inner class must be private; in InnerClassIdiom.cpp I was simply following the design guideline “make things as private as possible.” You could make the classes private and expose the appropriate methods by proxy in Flower, but it wouldn’t gain much.
The inner class idiom also comes in handy to define more than one kind of Observer, in Bee and Hummingbird, since both those classes may want to independently observe Flower openings and closings. Notice how the inner class idiom provides something that has most of the benefits of inheritance (the ability to access the private data in the outer class, for example) without the same restrictions.
In main( ), you can see one of the prime benefits of the observer pattern: the ability to change behavior at runtime by dynamically registering and un-registering Observers with Observables.
If you study the code above you’ll see that OpenNotifier and CloseNotifier use the basic Observable interface. This means that you could inherit other completely different Observer classes; the only connection the Observers have with Flowers is the Observer interface.
Multiple dispatching When dealing with multiple types which are interacting, a program can get particularly messy. For example, consider a system that parses and executes mathematical expressions. You want to be able to say Number + Number, Number * Number, etc., where Number is the base class for a family of numerical objects. But when you say a + b, and you don’t know the exact type of either a or b, so how can you get them to interact properly?
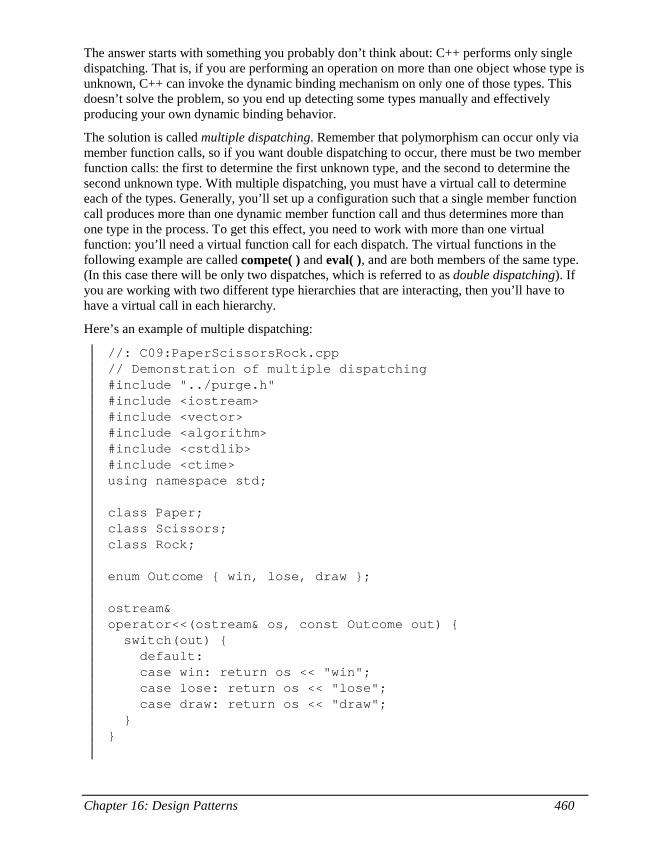
Chapter 16: Design Patterns 460
The answer starts with something you probably don’t think about: C++ performs only single dispatching. That is, if you are performing an operation on more than one object whose type is unknown, C++ can invoke the dynamic binding mechanism on only one of those types. This doesn’t solve the problem, so you end up detecting some types manually and effectively producing your own dynamic binding behavior.
The solution is called multiple dispatching. Remember that polymorphism can occur only via member function calls, so if you want double dispatching to occur, there must be two member function calls: the first to determine the first unknown type, and the second to determine the second unknown type. With multiple dispatching, you must have a virtual call to determine each of the types. Generally, you’ll set up a configuration such that a single member function call produces more than one dynamic member function call and thus determines more than one type in the process. To get this effect, you need to work with more than one virtual function: you’ll need a virtual function call for each dispatch. The virtual functions in the following example are called compete( ) and eval( ), and are both members of the same type. (In this case there will be only two dispatches, which is referred to as double dispatching). If you are working with two different type hierarchies that are interacting, then you’ll have to have a virtual call in each hierarchy.
Here’s an example of multiple dispatching:
//: C09:PaperScissorsRock.cpp // Demonstration of multiple dispatching #include "../purge.h" #include <iostream> #include <vector> #include <algorithm> #include <cstdlib> #include <ctime> using namespace std; class Paper; class Scissors; class Rock; enum Outcome { win, lose, draw }; ostream& operator<<(ostream& os, const Outcome out) { switch(out) { default: case win: return os << "win"; case lose: return os << "lose"; case draw: return os << "draw"; } }
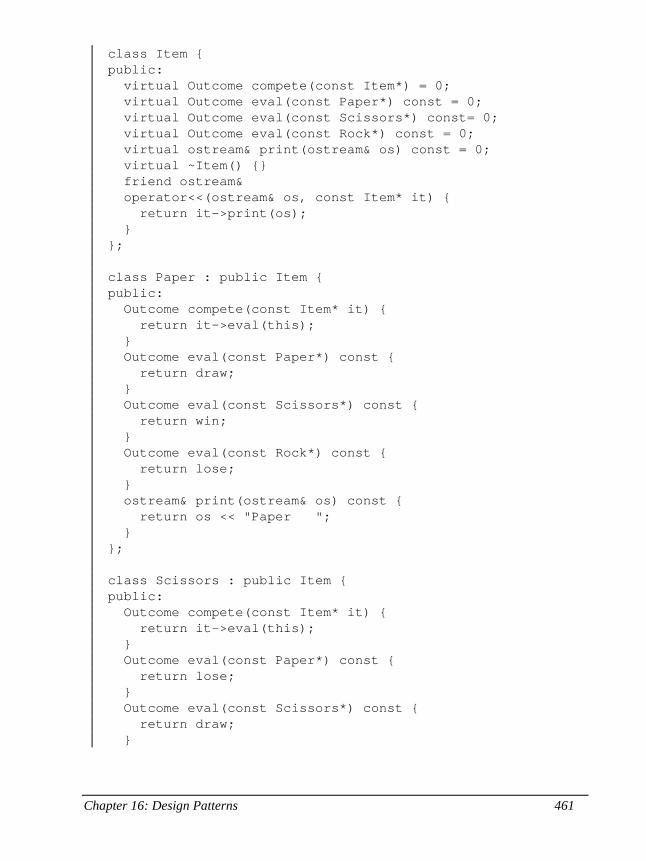
Chapter 16: Design Patterns 461
class Item { public: virtual Outcome compete(const Item*) = 0; virtual Outcome eval(const Paper*) const = 0; virtual Outcome eval(const Scissors*) const= 0; virtual Outcome eval(const Rock*) const = 0; virtual ostream& print(ostream& os) const = 0; virtual ~Item() {} friend ostream& operator<<(ostream& os, const Item* it) { return it->print(os); } }; class Paper : public Item { public: Outcome compete(const Item* it) { return it->eval(this); } Outcome eval(const Paper*) const { return draw; } Outcome eval(const Scissors*) const { return win; } Outcome eval(const Rock*) const { return lose; } ostream& print(ostream& os) const { return os << "Paper "; } }; class Scissors : public Item { public: Outcome compete(const Item* it) { return it->eval(this); } Outcome eval(const Paper*) const { return lose; } Outcome eval(const Scissors*) const { return draw; }
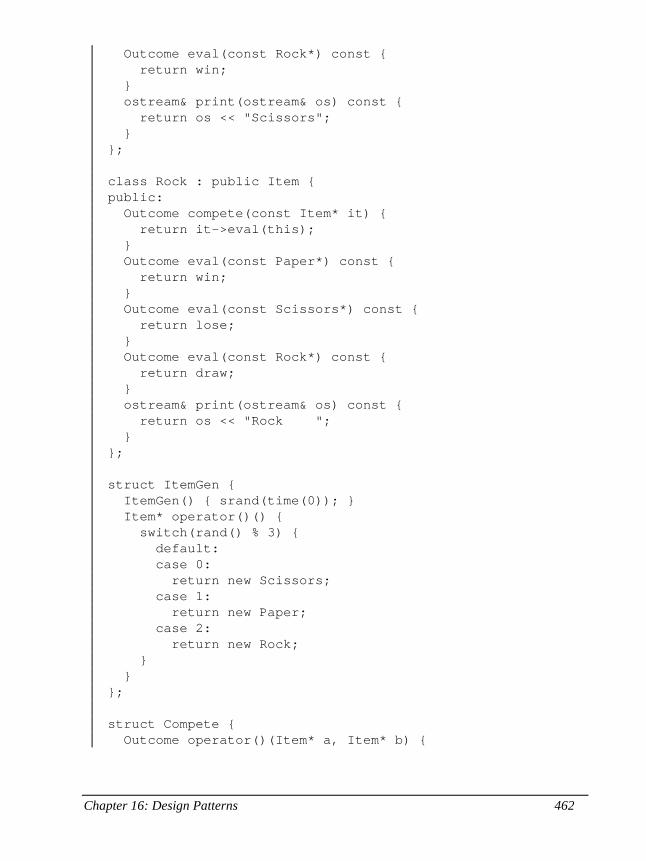
Chapter 16: Design Patterns 462
Outcome eval(const Rock*) const { return win; } ostream& print(ostream& os) const { return os << "Scissors"; } }; class Rock : public Item { public: Outcome compete(const Item* it) { return it->eval(this); } Outcome eval(const Paper*) const { return win; } Outcome eval(const Scissors*) const { return lose; } Outcome eval(const Rock*) const { return draw; } ostream& print(ostream& os) const { return os << "Rock "; } }; struct ItemGen { ItemGen() { srand(time(0)); } Item* operator()() { switch(rand() % 3) { default: case 0: return new Scissors; case 1: return new Paper; case 2: return new Rock; } } }; struct Compete { Outcome operator()(Item* a, Item* b) {

Chapter 16: Design Patterns 463
cout << a << "\t" << b << "\t"; return a->compete(b); } }; int main() { const int sz = 20; vector<Item*> v(sz*2); generate(v.begin(), v.end(), ItemGen()); transform(v.begin(), v.begin() + sz, v.begin() + sz, ostream_iterator<Outcome>(cout, "\n"), Compete()); purge(v); } ///:~
Visitor, a type of multiple dispatching The assumption is that you have a primary class hierarchy that is fixed; perhaps it’s from another vendor and you can’t make changes to that hierarchy. However, you’d like to add new polymorphic methods to that hierarchy, which means that normally you’d have to add something to the base class interface. So the dilemma is that you need to add methods to the base class, but you can’t touch the base class. How do you get around this?
The design pattern that solves this kind of problem is called a “visitor” (the final one in the Design Patterns book), and it builds on the double dispatching scheme shown in the last section.
The visitor pattern allows you to extend the interface of the primary type by creating a separate class hierarchy of type Visitor to virtualize the operations performed upon the primary type. The objects of the primary type simply “accept” the visitor, then call the visitor’s dynamically-bound member function.
//: C09:BeeAndFlowers.cpp // Demonstration of "visitor" pattern #include "../purge.h" #include <iostream> #include <string> #include <vector> #include <algorithm> #include <cstdlib> #include <ctime> using namespace std; class Gladiolus;
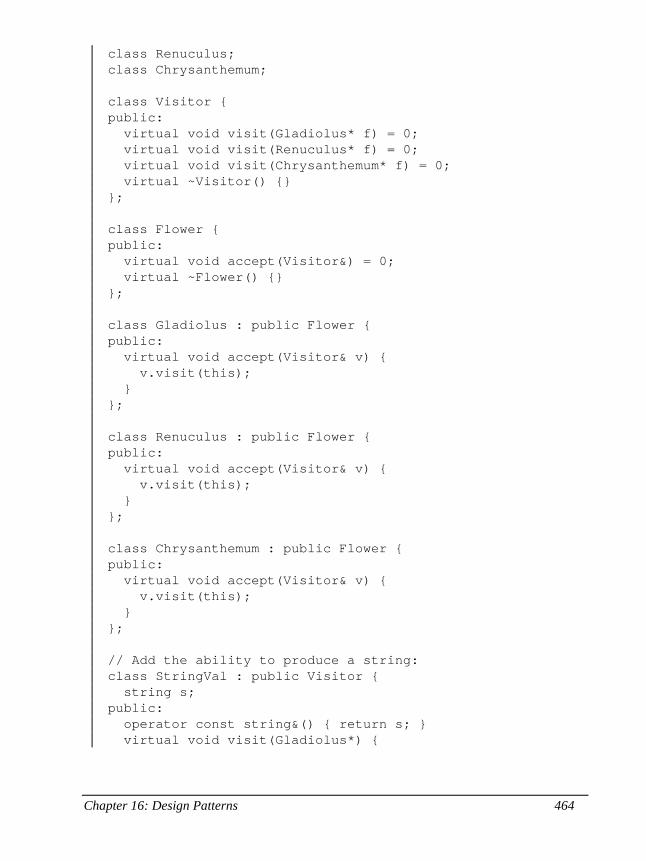
Chapter 16: Design Patterns 464
class Renuculus; class Chrysanthemum; class Visitor { public: virtual void visit(Gladiolus* f) = 0; virtual void visit(Renuculus* f) = 0; virtual void visit(Chrysanthemum* f) = 0; virtual ~Visitor() {} }; class Flower { public: virtual void accept(Visitor&) = 0; virtual ~Flower() {} }; class Gladiolus : public Flower { public: virtual void accept(Visitor& v) { v.visit(this); } }; class Renuculus : public Flower { public: virtual void accept(Visitor& v) { v.visit(this); } }; class Chrysanthemum : public Flower { public: virtual void accept(Visitor& v) { v.visit(this); } }; // Add the ability to produce a string: class StringVal : public Visitor { string s; public: operator const string&() { return s; } virtual void visit(Gladiolus*) {
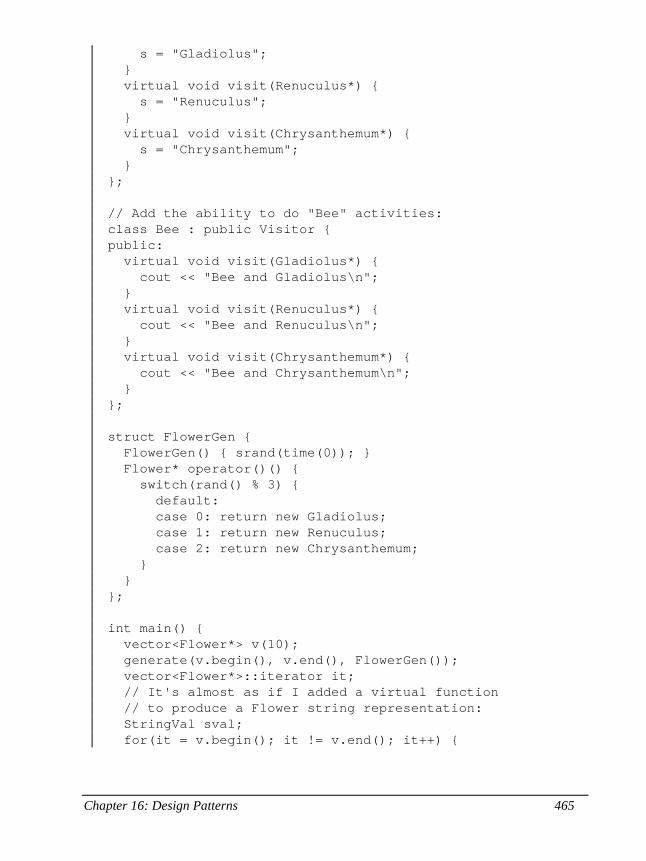
Chapter 16: Design Patterns 465
s = "Gladiolus"; } virtual void visit(Renuculus*) { s = "Renuculus"; } virtual void visit(Chrysanthemum*) { s = "Chrysanthemum"; } }; // Add the ability to do "Bee" activities: class Bee : public Visitor { public: virtual void visit(Gladiolus*) { cout << "Bee and Gladiolus\n"; } virtual void visit(Renuculus*) { cout << "Bee and Renuculus\n"; } virtual void visit(Chrysanthemum*) { cout << "Bee and Chrysanthemum\n"; } }; struct FlowerGen { FlowerGen() { srand(time(0)); } Flower* operator()() { switch(rand() % 3) { default: case 0: return new Gladiolus; case 1: return new Renuculus; case 2: return new Chrysanthemum; } } }; int main() { vector<Flower*> v(10); generate(v.begin(), v.end(), FlowerGen()); vector<Flower*>::iterator it; // It's almost as if I added a virtual function // to produce a Flower string representation: StringVal sval; for(it = v.begin(); it != v.end(); it++) {
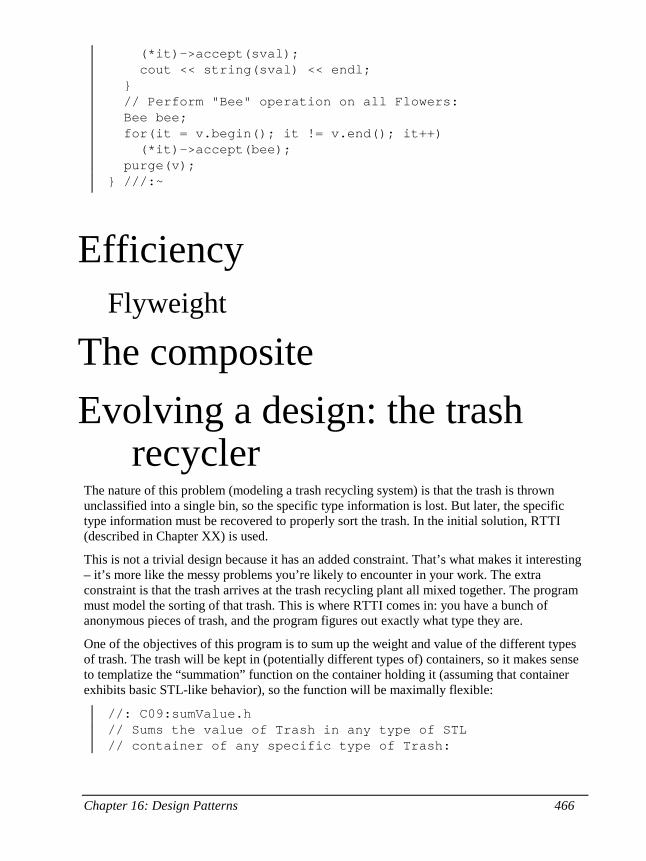
Chapter 16: Design Patterns 466
(*it)->accept(sval); cout << string(sval) << endl; } // Perform "Bee" operation on all Flowers: Bee bee; for(it = v.begin(); it != v.end(); it++) (*it)->accept(bee); purge(v); } ///:~
Efficiency Flyweight
The composite Evolving a design: the trash
recycler The nature of this problem (modeling a trash recycling system) is that the trash is thrown unclassified into a single bin, so the specific type information is lost. But later, the specific type information must be recovered to properly sort the trash. In the initial solution, RTTI (described in Chapter XX) is used.
This is not a trivial design because it has an added constraint. That’s what makes it interesting – it’s more like the messy problems you’re likely to encounter in your work. The extra constraint is that the trash arrives at the trash recycling plant all mixed together. The program must model the sorting of that trash. This is where RTTI comes in: you have a bunch of anonymous pieces of trash, and the program figures out exactly what type they are.
One of the objectives of this program is to sum up the weight and value of the different types of trash. The trash will be kept in (potentially different types of) containers, so it makes sense to templatize the “summation” function on the container holding it (assuming that container exhibits basic STL-like behavior), so the function will be maximally flexible:
//: C09:sumValue.h // Sums the value of Trash in any type of STL // container of any specific type of Trash:
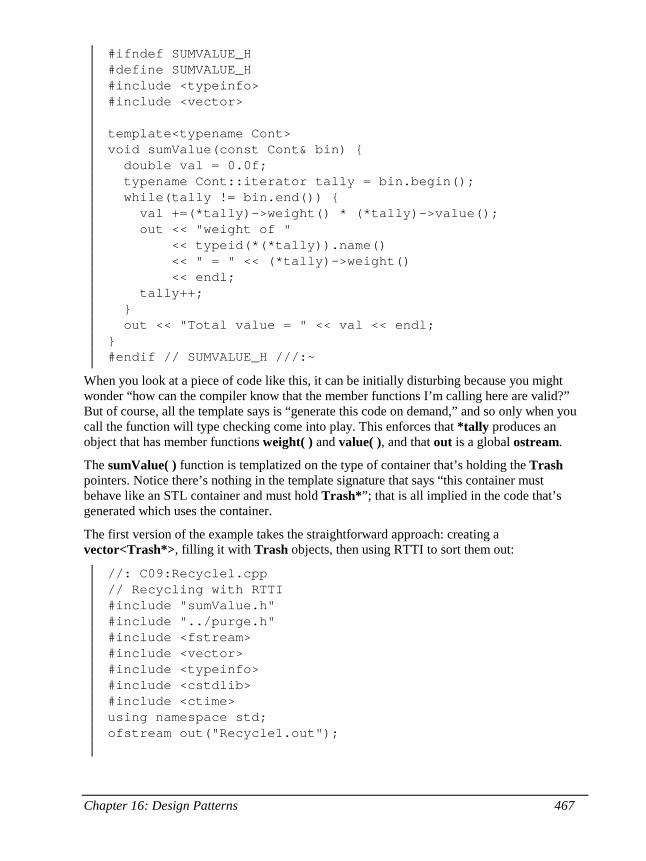
Chapter 16: Design Patterns 467
#ifndef SUMVALUE_H #define SUMVALUE_H #include <typeinfo> #include <vector> template<typename Cont> void sumValue(const Cont& bin) { double val = 0.0f; typename Cont::iterator tally = bin.begin(); while(tally != bin.end()) { val +=(*tally)->weight() * (*tally)->value(); out << "weight of " << typeid(*(*tally)).name() << " = " << (*tally)->weight() << endl; tally++; } out << "Total value = " << val << endl; } #endif // SUMVALUE_H ///:~
When you look at a piece of code like this, it can be initially disturbing because you might wonder “how can the compiler know that the member functions I’m calling here are valid?” But of course, all the template says is “generate this code on demand,” and so only when you call the function will type checking come into play. This enforces that *tally produces an object that has member functions weight( ) and value( ), and that out is a global ostream.
The sumValue( ) function is templatized on the type of container that’s holding the Trash pointers. Notice there’s nothing in the template signature that says “this container must behave like an STL container and must hold Trash*”; that is all implied in the code that’s generated which uses the container.
The first version of the example takes the straightforward approach: creating a vector<Trash*>, filling it with Trash objects, then using RTTI to sort them out:
//: C09:Recycle1.cpp // Recycling with RTTI #include "sumValue.h" #include "../purge.h" #include <fstream> #include <vector> #include <typeinfo> #include <cstdlib> #include <ctime> using namespace std; ofstream out("Recycle1.out");
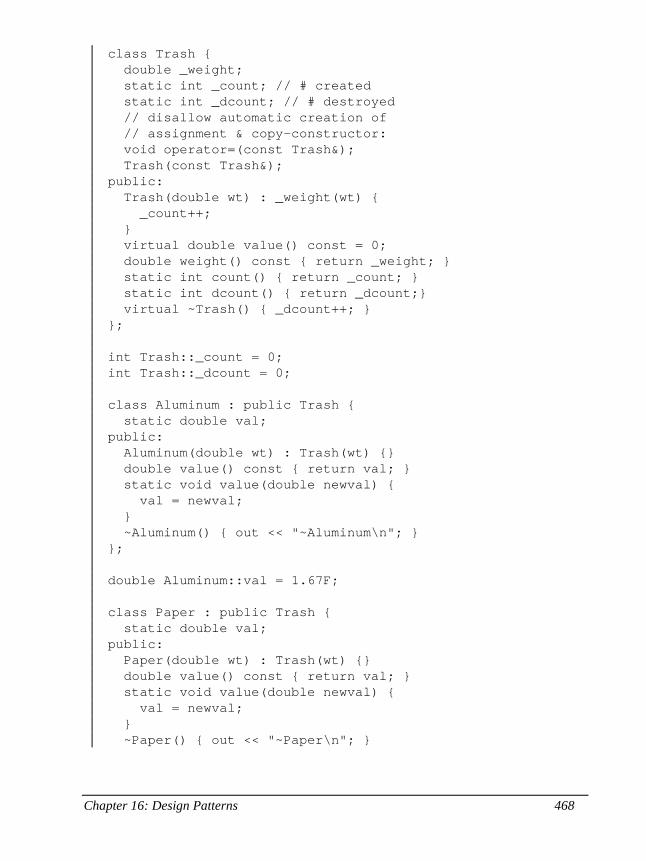
Chapter 16: Design Patterns 468
class Trash { double _weight; static int _count; // # created static int _dcount; // # destroyed // disallow automatic creation of // assignment & copy-constructor: void operator=(const Trash&); Trash(const Trash&); public: Trash(double wt) : _weight(wt) { _count++; } virtual double value() const = 0; double weight() const { return _weight; } static int count() { return _count; } static int dcount() { return _dcount;} virtual ~Trash() { _dcount++; } }; int Trash::_count = 0; int Trash::_dcount = 0; class Aluminum : public Trash { static double val; public: Aluminum(double wt) : Trash(wt) {} double value() const { return val; } static void value(double newval) { val = newval; } ~Aluminum() { out << "~Aluminum\n"; } }; double Aluminum::val = 1.67F; class Paper : public Trash { static double val; public: Paper(double wt) : Trash(wt) {} double value() const { return val; } static void value(double newval) { val = newval; } ~Paper() { out << "~Paper\n"; }
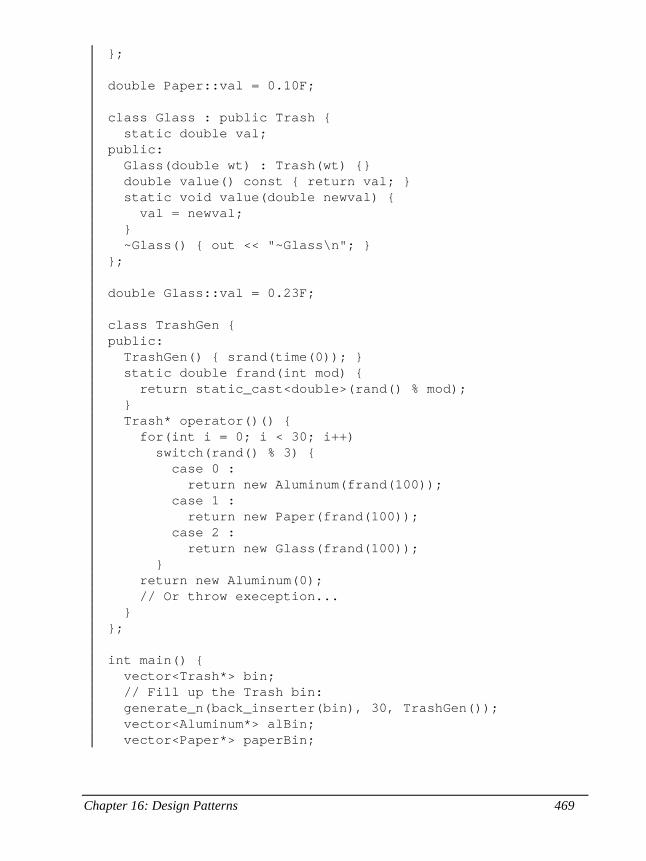
Chapter 16: Design Patterns 469
}; double Paper::val = 0.10F; class Glass : public Trash { static double val; public: Glass(double wt) : Trash(wt) {} double value() const { return val; } static void value(double newval) { val = newval; } ~Glass() { out << "~Glass\n"; } }; double Glass::val = 0.23F; class TrashGen { public: TrashGen() { srand(time(0)); } static double frand(int mod) { return static_cast<double>(rand() % mod); } Trash* operator()() { for(int i = 0; i < 30; i++) switch(rand() % 3) { case 0 : return new Aluminum(frand(100)); case 1 : return new Paper(frand(100)); case 2 : return new Glass(frand(100)); } return new Aluminum(0); // Or throw exeception... } }; int main() { vector<Trash*> bin; // Fill up the Trash bin: generate_n(back_inserter(bin), 30, TrashGen()); vector<Aluminum*> alBin; vector<Paper*> paperBin;
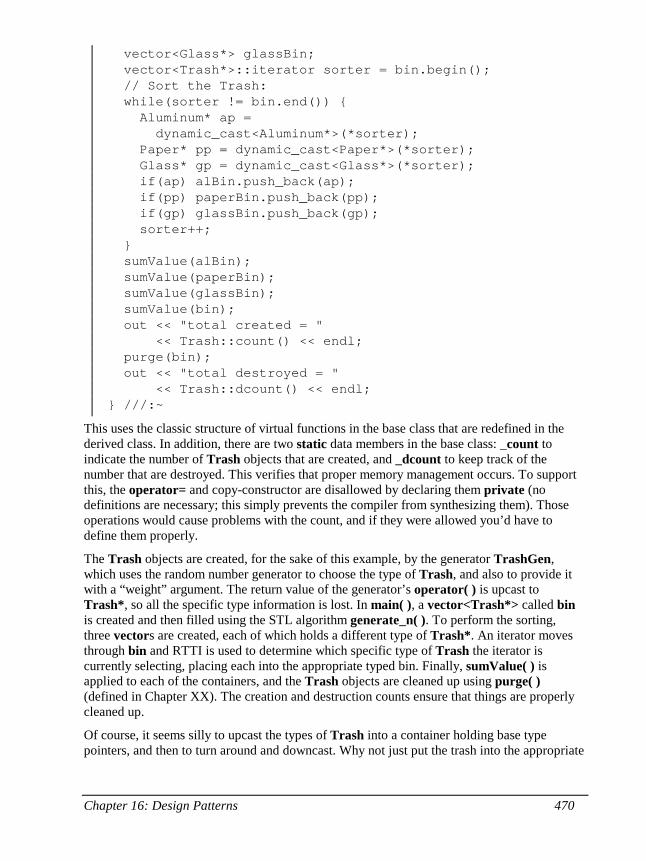
Chapter 16: Design Patterns 470
vector<Glass*> glassBin; vector<Trash*>::iterator sorter = bin.begin(); // Sort the Trash: while(sorter != bin.end()) { Aluminum* ap = dynamic_cast<Aluminum*>(*sorter); Paper* pp = dynamic_cast<Paper*>(*sorter); Glass* gp = dynamic_cast<Glass*>(*sorter); if(ap) alBin.push_back(ap); if(pp) paperBin.push_back(pp); if(gp) glassBin.push_back(gp); sorter++; } sumValue(alBin); sumValue(paperBin); sumValue(glassBin); sumValue(bin); out << "total created = " << Trash::count() << endl; purge(bin); out << "total destroyed = " << Trash::dcount() << endl; } ///:~
This uses the classic structure of virtual functions in the base class that are redefined in the derived class. In addition, there are two static data members in the base class: _count to indicate the number of Trash objects that are created, and _dcount to keep track of the number that are destroyed. This verifies that proper memory management occurs. To support this, the operator= and copy-constructor are disallowed by declaring them private (no definitions are necessary; this simply prevents the compiler from synthesizing them). Those operations would cause problems with the count, and if they were allowed you’d have to define them properly.
The Trash objects are created, for the sake of this example, by the generator TrashGen, which uses the random number generator to choose the type of Trash, and also to provide it with a “weight” argument. The return value of the generator’s operator( ) is upcast to Trash*, so all the specific type information is lost. In main( ), a vector<Trash*> called bin is created and then filled using the STL algorithm generate_n( ). To perform the sorting, three vectors are created, each of which holds a different type of Trash*. An iterator moves through bin and RTTI is used to determine which specific type of Trash the iterator is currently selecting, placing each into the appropriate typed bin. Finally, sumValue( ) is applied to each of the containers, and the Trash objects are cleaned up using purge( ) (defined in Chapter XX). The creation and destruction counts ensure that things are properly cleaned up.
Of course, it seems silly to upcast the types of Trash into a container holding base type pointers, and then to turn around and downcast. Why not just put the trash into the appropriate
Chapter 16: Design Patterns 471
receptacle in the first place? (indeed, this is the whole enigma of recycling). In this program it might be easy to repair, but sometimes a system’s structure and flexibility can benefit greatly from downcasting.
The program satisfies the design requirements: it works. This may be fine as long as it’s a one-shot solution. However, a good program will evolve over time, so you must ask: what if the situation changes? For example, cardboard is now a valuable recyclable commodity, so how will that be integrated into the system (especially if the program is large and complicated). Since the above type-check coding in the switch statement and in the RTTI statements could be scattered throughout the program, you’d have to go find all that code every time a new type was added, and if you miss one the compiler won’t help you.
The key to the misuse of RTTI here is that every type is tested. If you’re only looking for a subset of types because that subset needs special treatment, that’s probably fine. But if you’re hunting for every type inside a switch statement, then you’re probably missing an important point, and definitely making your code less maintainable. In the next section we’ll look at how this program evolved over several stages to become much more flexible. This should prove a valuable example in program design.
Improving the design The solutions in Design Patterns are organized around the question “What will change as this program evolves?” This is usually the most important question that you can ask about any design. If you can build your system around the answer, the results will be two-pronged: not only will your system allow easy (and inexpensive) maintenance, but you might also produce components that are reusable, so that other systems can be built more cheaply. This is the promise of object-oriented programming, but it doesn’t happen automatically; it requires thought and insight on your part. In this section we’ll see how this process can happen during the refinement of a system.
The answer to the question “What will change?” for the recycling system is a common one: more types will be added to the system. The goal of the design, then, is to make this addition of types as painless as possible. In the recycling program, we’d like to encapsulate all places where specific type information is mentioned, so (if for no other reason) any changes can be localized inside those encapsulations. It turns out that this process also cleans up the rest of the code considerably.
“Make more objects” This brings up a general object-oriented design principle that I first heard spoken by Grady Booch: “If the design is too complicated, make more objects.” This is simultaneously counterintuitive and ludicrously simple, and yet it’s the most useful guideline I’ve found. (You might observe that “make more objects” is often equivalent to “add another level of indirection.”) In general, if you find a place with messy code, consider what sort of class would clean things up. Often the side effect of cleaning up the code will be a system that has better structure and is more flexible.
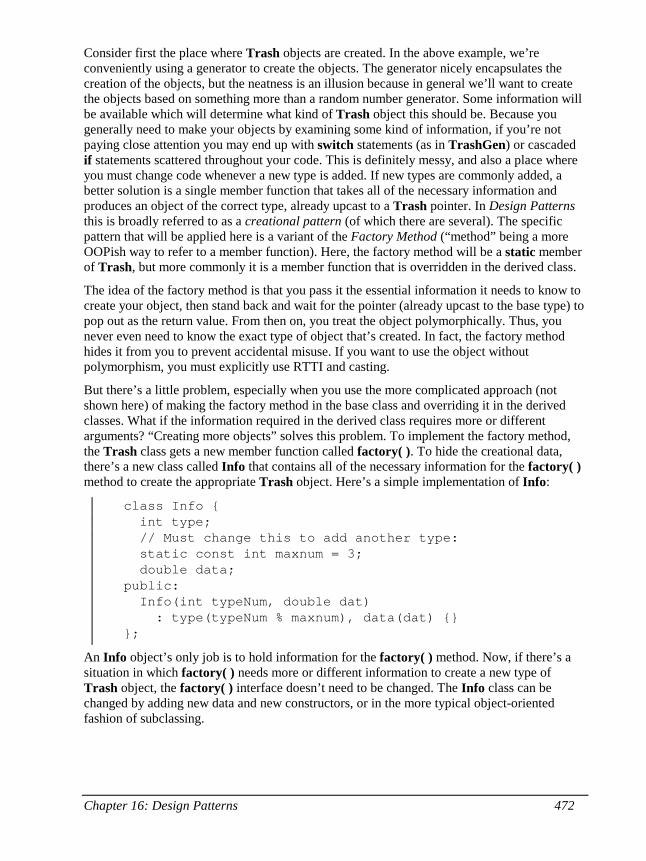
Chapter 16: Design Patterns 472
Consider first the place where Trash objects are created. In the above example, we’re conveniently using a generator to create the objects. The generator nicely encapsulates the creation of the objects, but the neatness is an illusion because in general we’ll want to create the objects based on something more than a random number generator. Some information will be available which will determine what kind of Trash object this should be. Because you generally need to make your objects by examining some kind of information, if you’re not paying close attention you may end up with switch statements (as in TrashGen) or cascaded if statements scattered throughout your code. This is definitely messy, and also a place where you must change code whenever a new type is added. If new types are commonly added, a better solution is a single member function that takes all of the necessary information and produces an object of the correct type, already upcast to a Trash pointer. In Design Patterns this is broadly referred to as a creational pattern (of which there are several). The specific pattern that will be applied here is a variant of the Factory Method (“method” being a more OOPish way to refer to a member function). Here, the factory method will be a static member of Trash, but more commonly it is a member function that is overridden in the derived class.
The idea of the factory method is that you pass it the essential information it needs to know to create your object, then stand back and wait for the pointer (already upcast to the base type) to pop out as the return value. From then on, you treat the object polymorphically. Thus, you never even need to know the exact type of object that’s created. In fact, the factory method hides it from you to prevent accidental misuse. If you want to use the object without polymorphism, you must explicitly use RTTI and casting.
But there’s a little problem, especially when you use the more complicated approach (not shown here) of making the factory method in the base class and overriding it in the derived classes. What if the information required in the derived class requires more or different arguments? “Creating more objects” solves this problem. To implement the factory method, the Trash class gets a new member function called factory( ). To hide the creational data, there’s a new class called Info that contains all of the necessary information for the factory( ) method to create the appropriate Trash object. Here’s a simple implementation of Info:
class Info { int type; // Must change this to add another type: static const int maxnum = 3; double data; public: Info(int typeNum, double dat) : type(typeNum % maxnum), data(dat) {} };
An Info object’s only job is to hold information for the factory( ) method. Now, if there’s a situation in which factory( ) needs more or different information to create a new type of Trash object, the factory( ) interface doesn’t need to be changed. The Info class can be changed by adding new data and new constructors, or in the more typical object-oriented fashion of subclassing.
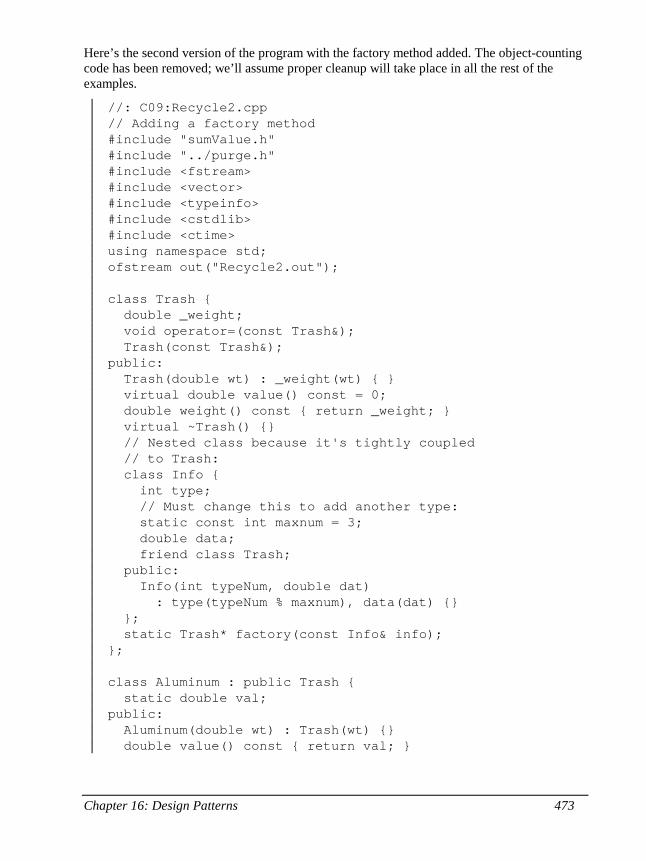
Chapter 16: Design Patterns 473
Here’s the second version of the program with the factory method added. The object-counting code has been removed; we’ll assume proper cleanup will take place in all the rest of the examples.
//: C09:Recycle2.cpp // Adding a factory method #include "sumValue.h" #include "../purge.h" #include <fstream> #include <vector> #include <typeinfo> #include <cstdlib> #include <ctime> using namespace std; ofstream out("Recycle2.out"); class Trash { double _weight; void operator=(const Trash&); Trash(const Trash&); public: Trash(double wt) : _weight(wt) { } virtual double value() const = 0; double weight() const { return _weight; } virtual ~Trash() {} // Nested class because it's tightly coupled // to Trash: class Info { int type; // Must change this to add another type: static const int maxnum = 3; double data; friend class Trash; public: Info(int typeNum, double dat) : type(typeNum % maxnum), data(dat) {} }; static Trash* factory(const Info& info); }; class Aluminum : public Trash { static double val; public: Aluminum(double wt) : Trash(wt) {} double value() const { return val; }
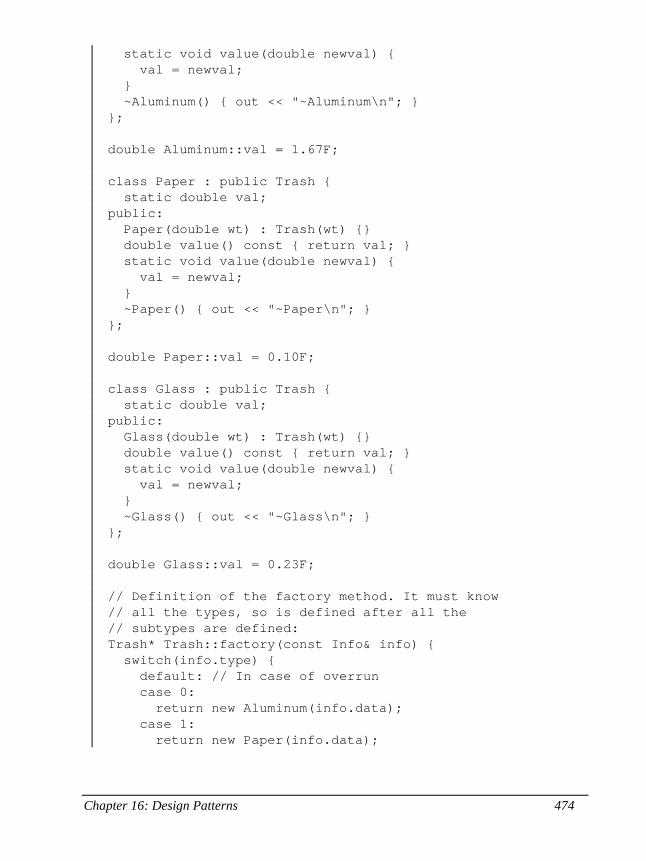
Chapter 16: Design Patterns 474
static void value(double newval) { val = newval; } ~Aluminum() { out << "~Aluminum\n"; } }; double Aluminum::val = 1.67F; class Paper : public Trash { static double val; public: Paper(double wt) : Trash(wt) {} double value() const { return val; } static void value(double newval) { val = newval; } ~Paper() { out << "~Paper\n"; } }; double Paper::val = 0.10F; class Glass : public Trash { static double val; public: Glass(double wt) : Trash(wt) {} double value() const { return val; } static void value(double newval) { val = newval; } ~Glass() { out << "~Glass\n"; } }; double Glass::val = 0.23F; // Definition of the factory method. It must know // all the types, so is defined after all the // subtypes are defined: Trash* Trash::factory(const Info& info) { switch(info.type) { default: // In case of overrun case 0: return new Aluminum(info.data); case 1: return new Paper(info.data);
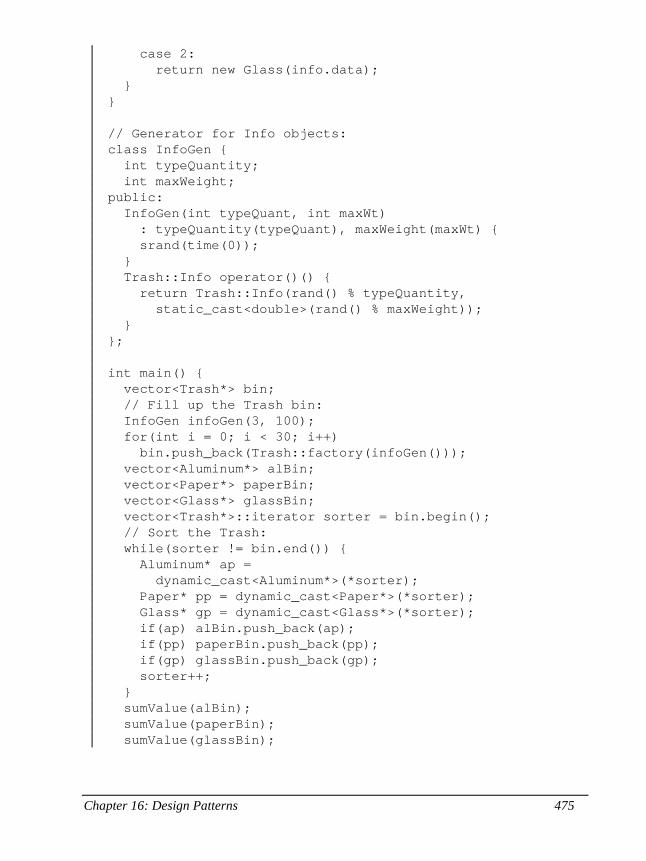
Chapter 16: Design Patterns 475
case 2: return new Glass(info.data); } } // Generator for Info objects: class InfoGen { int typeQuantity; int maxWeight; public: InfoGen(int typeQuant, int maxWt) : typeQuantity(typeQuant), maxWeight(maxWt) { srand(time(0)); } Trash::Info operator()() { return Trash::Info(rand() % typeQuantity, static_cast<double>(rand() % maxWeight)); } }; int main() { vector<Trash*> bin; // Fill up the Trash bin: InfoGen infoGen(3, 100); for(int i = 0; i < 30; i++) bin.push_back(Trash::factory(infoGen())); vector<Aluminum*> alBin; vector<Paper*> paperBin; vector<Glass*> glassBin; vector<Trash*>::iterator sorter = bin.begin(); // Sort the Trash: while(sorter != bin.end()) { Aluminum* ap = dynamic_cast<Aluminum*>(*sorter); Paper* pp = dynamic_cast<Paper*>(*sorter); Glass* gp = dynamic_cast<Glass*>(*sorter); if(ap) alBin.push_back(ap); if(pp) paperBin.push_back(pp); if(gp) glassBin.push_back(gp); sorter++; } sumValue(alBin); sumValue(paperBin); sumValue(glassBin);
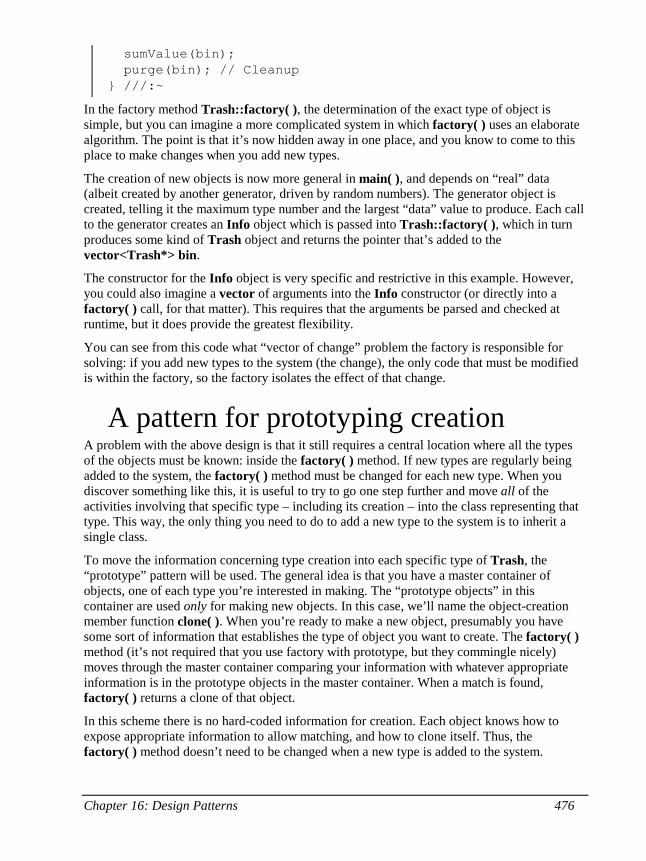
Chapter 16: Design Patterns 476
sumValue(bin); purge(bin); // Cleanup } ///:~
In the factory method Trash::factory( ), the determination of the exact type of object is simple, but you can imagine a more complicated system in which factory( ) uses an elaborate algorithm. The point is that it’s now hidden away in one place, and you know to come to this place to make changes when you add new types.
The creation of new objects is now more general in main( ), and depends on “real” data (albeit created by another generator, driven by random numbers). The generator object is created, telling it the maximum type number and the largest “data” value to produce. Each call to the generator creates an Info object which is passed into Trash::factory( ), which in turn produces some kind of Trash object and returns the pointer that’s added to the vector<Trash*> bin.
The constructor for the Info object is very specific and restrictive in this example. However, you could also imagine a vector of arguments into the Info constructor (or directly into a factory( ) call, for that matter). This requires that the arguments be parsed and checked at runtime, but it does provide the greatest flexibility.
You can see from this code what “vector of change” problem the factory is responsible for solving: if you add new types to the system (the change), the only code that must be modified is within the factory, so the factory isolates the effect of that change.
A pattern for prototyping creation A problem with the above design is that it still requires a central location where all the types of the objects must be known: inside the factory( ) method. If new types are regularly being added to the system, the factory( ) method must be changed for each new type. When you discover something like this, it is useful to try to go one step further and move all of the activities involving that specific type – including its creation – into the class representing that type. This way, the only thing you need to do to add a new type to the system is to inherit a single class.
To move the information concerning type creation into each specific type of Trash, the “prototype” pattern will be used. The general idea is that you have a master container of objects, one of each type you’re interested in making. The “prototype objects” in this container are used only for making new objects. In this case, we’ll name the object-creation member function clone( ). When you’re ready to make a new object, presumably you have some sort of information that establishes the type of object you want to create. The factory( ) method (it’s not required that you use factory with prototype, but they commingle nicely) moves through the master container comparing your information with whatever appropriate information is in the prototype objects in the master container. When a match is found, factory( ) returns a clone of that object.
In this scheme there is no hard-coded information for creation. Each object knows how to expose appropriate information to allow matching, and how to clone itself. Thus, the factory( ) method doesn’t need to be changed when a new type is added to the system.
Chapter 16: Design Patterns 477
The prototypes will be contained in a static vector<Trash*> called prototypes. This is a private member of the base class Trash. The friend class TrashPrototypeInit is responsible for putting the Trash* prototypes into the prototype list.
You’ll also note that the Info class has changed. It now uses a string to act as type identification information. As you shall see, this will allow us to read object information from a file when creating Trash objects.
//: C09:Trash.h // Base class for Trash recycling examples #ifndef TRASH_H #define TRASH_H #include <iostream> #include <exception> #include <vector> #include <string> class TypedBin; // For a later example class Visitor; // For a later example class Trash { double _weight; void operator=(const Trash&); Trash(const Trash&); public: Trash(double wt) : _weight(wt) {} virtual double value() const = 0; double weight() const { return _weight; } virtual ~Trash() {} class Info { std::string _id; double _data; public: Info(std::string ident, double dat) : _id(ident), _data(dat) {} double data() const { return _data; } std::string id() const { return _id; } friend std::ostream& operator<<( std::ostream& os, const Info& info) { return os << info._id << ':' << info._data; } }; protected: // Remainder of class provides support for // prototyping: static std::vector<Trash*> prototypes;
Chapter 16: Design Patterns 478
friend class TrashPrototypeInit; Trash() : _weight(0) {} public: static Trash* factory(const Info& info); virtual std::string id() = 0; // type ident virtual Trash* clone(const Info&) = 0; // Stubs, inserted for later use: virtual bool addToBin(std::vector<TypedBin*>&) { return false; } virtual void accept(Visitor&) {}; }; #endif // TRASH_H ///:~
The basic part of the Trash class remains as before. The rest of the class supports the prototyping pattern. The id( ) member function returns a string that can be compared with the id( ) of an Info object to determine whether this is the prototype that should be cloned (of course, the evaluation can be much more sophisticated than that if you need it). Both id( ) and clone( ) are pure virtual functions so they must be overridden in derived classes.
The last two member functions, addToBin( ) and accept( ), are “stubs” which will be used in later versions of the trash sorting problem. It’s necessary to have these virtual functions in the base class, but in the early examples there’s no need for them, so they are not pure virtuals so as not to intrude.
The factory( ) member function has the same declaration, but the definition is what handles the prototyping. Here is the implementation file:
//: C09:Trash.cpp {O} #include "Trash.h" using namespace std; Trash* Trash::factory(const Info& info) { vector<Trash*>::iterator it; for(it = prototypes.begin(); it != prototypes.end(); it++) { // Somehow determine the new type // to create, and clone one: if (info.id() == (*it)->id()) return (*it)->clone(info); } cerr << "Prototype not found for " << info << endl; // "Default" to first one in the vector: return (*prototypes.begin())->clone(info); } ///:~
Chapter 16: Design Patterns 479
The string inside the Info object contains the type name of the Trash to be created; this string is compared to the id( ) values of the objects in prototypes. If there’s a match, then that’s the object to create.
Of course, the appropriate prototype object might not be in the prototypes list. In this case, the return in the inner loop is never executed and you’ll drop out at the end, where a default value is created. It might be more appropriate to throw an exception here.
As you can see from the code, there’s nothing that knows about specific types of Trash. The beauty of this design is that this code doesn’t need to be changed, regardless of the different situations it will be used in.
Trash subclasses To fit into the prototyping scheme, each new subclass of Trash must follow some rules. First, it must create a protected default constructor, so that no one but TrashPrototypeInit may use it. TrashPrototypeInit is a singleton, creating one and only one prototype object for each subtype. This guarantees that the Trash subtype will be properly represented in the prototypes container.
After defining the “ordinary” member functions and data that the Trash object will actually use, the class must also override the id( ) member (which in this case returns a string for comparison) and the clone( ) function, which must know how to pull the appropriate information out of the Info object in order to create the object correctly.
Here are the different types of Trash, each in their own file.
//: C09:Aluminum.h // The Aluminum class with prototyping #ifndef ALUMINUM_H #define ALUMINUM_H #include "Trash.h" class Aluminum : public Trash { static double val; protected: Aluminum() {} friend class TrashPrototypeInit; public: Aluminum(double wt) : Trash(wt) {} double value() const { return val; } static void value(double newVal) { val = newVal; } std::string id() { return "Aluminum"; } Trash* clone(const Info& info) { return new Aluminum(info.data()); }
Chapter 16: Design Patterns 480
}; #endif // ALUMINUM_H ///:~
//: C09:Paper.h // The Paper class with prototyping #ifndef PAPER_H #define PAPER_H #include "Trash.h" class Paper : public Trash { static double val; protected: Paper() {} friend class TrashPrototypeInit; public: Paper(double wt) : Trash(wt) {} double value() const { return val; } static void value(double newVal) { val = newVal; } std::string id() { return "Paper"; } Trash* clone(const Info& info) { return new Paper(info.data()); } }; #endif // PAPER_H ///:~
//: C09:Glass.h // The Glass class with prototyping #ifndef GLASS_H #define GLASS_H #include "Trash.h" class Glass : public Trash { static double val; protected: Glass() {} friend class TrashPrototypeInit; public: Glass(double wt) : Trash(wt) {} double value() const { return val; } static void value(double newVal) { val = newVal; } std::string id() { return "Glass"; }
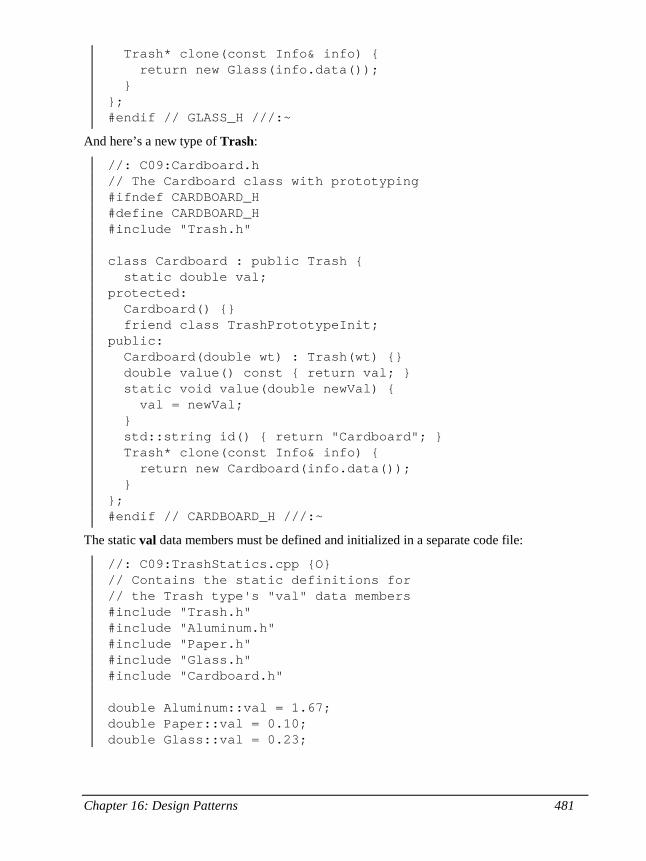
Chapter 16: Design Patterns 481
Trash* clone(const Info& info) { return new Glass(info.data()); } }; #endif // GLASS_H ///:~
And here’s a new type of Trash:
//: C09:Cardboard.h // The Cardboard class with prototyping #ifndef CARDBOARD_H #define CARDBOARD_H #include "Trash.h" class Cardboard : public Trash { static double val; protected: Cardboard() {} friend class TrashPrototypeInit; public: Cardboard(double wt) : Trash(wt) {} double value() const { return val; } static void value(double newVal) { val = newVal; } std::string id() { return "Cardboard"; } Trash* clone(const Info& info) { return new Cardboard(info.data()); } }; #endif // CARDBOARD_H ///:~
The static val data members must be defined and initialized in a separate code file:
//: C09:TrashStatics.cpp {O} // Contains the static definitions for // the Trash type's "val" data members #include "Trash.h" #include "Aluminum.h" #include "Paper.h" #include "Glass.h" #include "Cardboard.h" double Aluminum::val = 1.67; double Paper::val = 0.10; double Glass::val = 0.23;
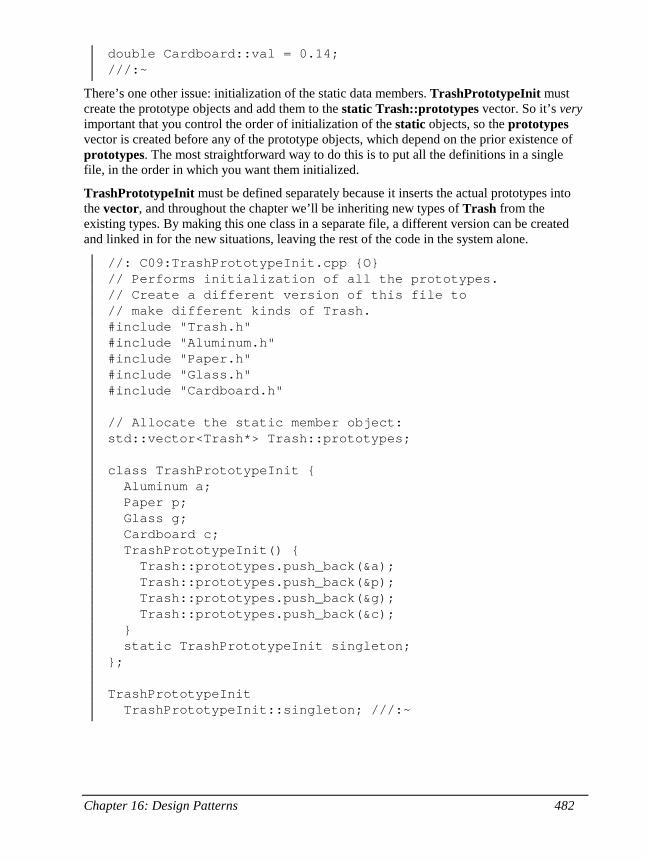
Chapter 16: Design Patterns 482
double Cardboard::val = 0.14; ///:~
There’s one other issue: initialization of the static data members. TrashPrototypeInit must create the prototype objects and add them to the static Trash::prototypes vector. So it’s very important that you control the order of initialization of the static objects, so the prototypes vector is created before any of the prototype objects, which depend on the prior existence of prototypes. The most straightforward way to do this is to put all the definitions in a single file, in the order in which you want them initialized.
TrashPrototypeInit must be defined separately because it inserts the actual prototypes into the vector, and throughout the chapter we’ll be inheriting new types of Trash from the existing types. By making this one class in a separate file, a different version can be created and linked in for the new situations, leaving the rest of the code in the system alone.
//: C09:TrashPrototypeInit.cpp {O} // Performs initialization of all the prototypes. // Create a different version of this file to // make different kinds of Trash. #include "Trash.h" #include "Aluminum.h" #include "Paper.h" #include "Glass.h" #include "Cardboard.h" // Allocate the static member object: std::vector<Trash*> Trash::prototypes; class TrashPrototypeInit { Aluminum a; Paper p; Glass g; Cardboard c; TrashPrototypeInit() { Trash::prototypes.push_back(&a); Trash::prototypes.push_back(&p); Trash::prototypes.push_back(&g); Trash::prototypes.push_back(&c); } static TrashPrototypeInit singleton; }; TrashPrototypeInit TrashPrototypeInit::singleton; ///:~
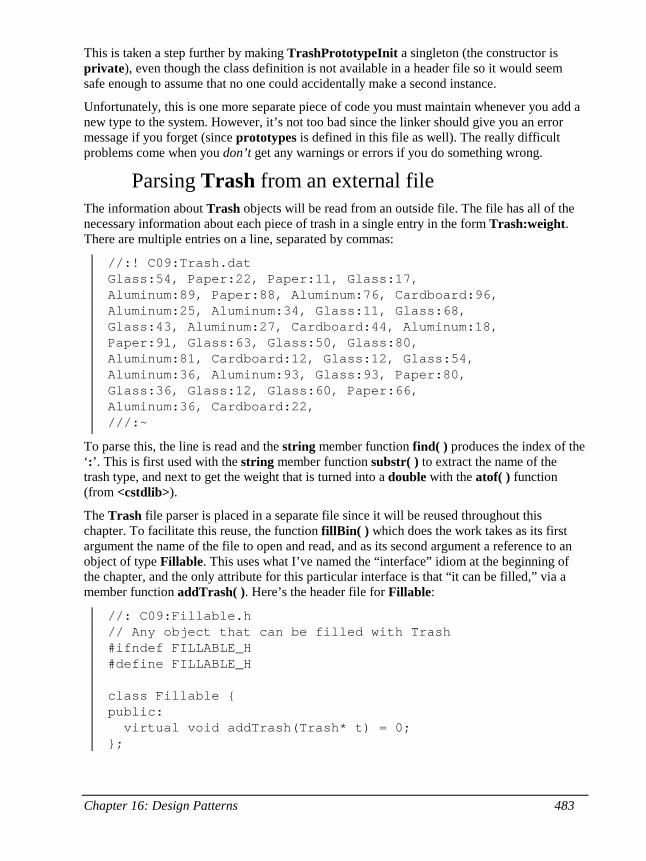
Chapter 16: Design Patterns 483
This is taken a step further by making TrashPrototypeInit a singleton (the constructor is private), even though the class definition is not available in a header file so it would seem safe enough to assume that no one could accidentally make a second instance.
Unfortunately, this is one more separate piece of code you must maintain whenever you add a new type to the system. However, it’s not too bad since the linker should give you an error message if you forget (since prototypes is defined in this file as well). The really difficult problems come when you don’t get any warnings or errors if you do something wrong.
Parsing Trash from an external file The information about Trash objects will be read from an outside file. The file has all of the necessary information about each piece of trash in a single entry in the form Trash:weight. There are multiple entries on a line, separated by commas:
//:! C09:Trash.dat Glass:54, Paper:22, Paper:11, Glass:17, Aluminum:89, Paper:88, Aluminum:76, Cardboard:96, Aluminum:25, Aluminum:34, Glass:11, Glass:68, Glass:43, Aluminum:27, Cardboard:44, Aluminum:18, Paper:91, Glass:63, Glass:50, Glass:80, Aluminum:81, Cardboard:12, Glass:12, Glass:54, Aluminum:36, Aluminum:93, Glass:93, Paper:80, Glass:36, Glass:12, Glass:60, Paper:66, Aluminum:36, Cardboard:22, ///:~
To parse this, the line is read and the string member function find( ) produces the index of the ‘:’. This is first used with the string member function substr( ) to extract the name of the trash type, and next to get the weight that is turned into a double with the atof( ) function (from <cstdlib>).
The Trash file parser is placed in a separate file since it will be reused throughout this chapter. To facilitate this reuse, the function fillBin( ) which does the work takes as its first argument the name of the file to open and read, and as its second argument a reference to an object of type Fillable. This uses what I’ve named the “interface” idiom at the beginning of the chapter, and the only attribute for this particular interface is that “it can be filled,” via a member function addTrash( ). Here’s the header file for Fillable:
//: C09:Fillable.h // Any object that can be filled with Trash #ifndef FILLABLE_H #define FILLABLE_H class Fillable { public: virtual void addTrash(Trash* t) = 0; };
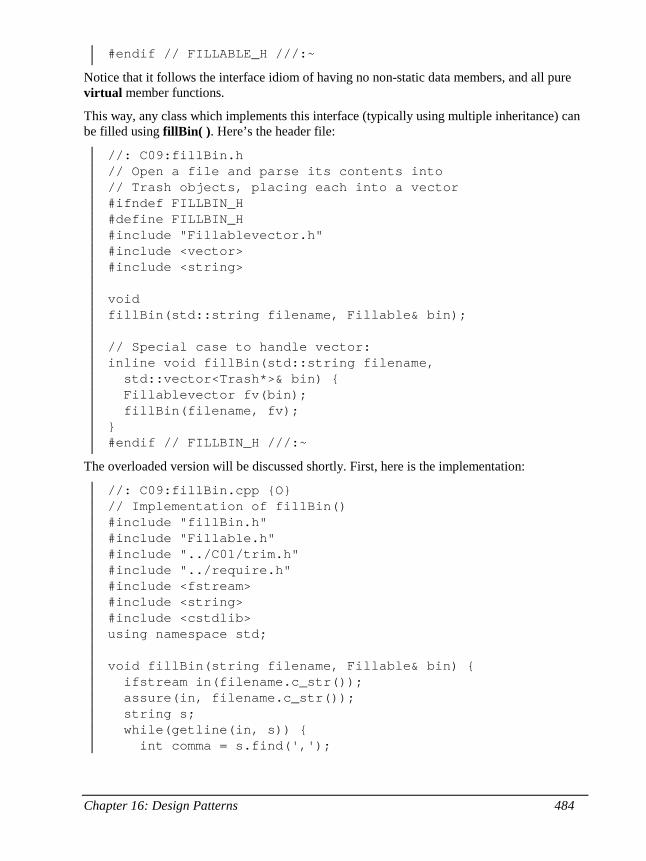
Chapter 16: Design Patterns 484
#endif // FILLABLE_H ///:~
Notice that it follows the interface idiom of having no non-static data members, and all pure virtual member functions.
This way, any class which implements this interface (typically using multiple inheritance) can be filled using fillBin( ). Here’s the header file:
//: C09:fillBin.h // Open a file and parse its contents into // Trash objects, placing each into a vector #ifndef FILLBIN_H #define FILLBIN_H #include "Fillablevector.h" #include <vector> #include <string> void fillBin(std::string filename, Fillable& bin); // Special case to handle vector: inline void fillBin(std::string filename, std::vector<Trash*>& bin) { Fillablevector fv(bin); fillBin(filename, fv); } #endif // FILLBIN_H ///:~
The overloaded version will be discussed shortly. First, here is the implementation:
//: C09:fillBin.cpp {O} // Implementation of fillBin() #include "fillBin.h" #include "Fillable.h" #include "../C01/trim.h" #include "../require.h" #include <fstream> #include <string> #include <cstdlib> using namespace std; void fillBin(string filename, Fillable& bin) { ifstream in(filename.c_str()); assure(in, filename.c_str()); string s; while(getline(in, s)) { int comma = s.find(',');
Chapter 16: Design Patterns 485
// Parse each line into entries: while(comma != string::npos) { string e = trim(s.substr(0,comma)); // Parse each entry: int colon = e.find(':'); string type = e.substr(0, colon); double weight = atof(e.substr(colon + 1).c_str()); bin.addTrash( Trash::factory( Trash::Info(type, weight))); // Move to next part of line: s = s.substr(comma + 1); comma = s.find(','); } } } ///:~
After the file is opened, each line is read and parsed into entries by looking for the separating comma, then each entry is parsed into its type and weight by looking for the separating colon. Note the convenience of using the trim( ) function from chapter 17 to remove the white space from both ends of a string. Once the type and weight are discovered, an Info object is created from that data and passed to the factory( ). The result of this call is a Trash* which is passed to the addTrash( ) function of the bin (which is the only function, remember, that a Fillable guarantees).
Anything that supports the Fillable interface can be used with fillBin( ). Of course, vector doesn’t implement Fillable, so it won’t work. Since vector is used in most of the examples, it makes sense to add the second overloaded fillBin( ) function that takes a vector, as seen previously in fillBin.h. But how to make a vector<Trash*> adapt to the Fillable interface, which says it must have an addTrash( ) member function? The key is in the word “adapt”; we use the adapter pattern to create a class that has a vector and is also Fillable.
By saying “is also Fillable,” the hint is strong (is-a) to inherit from Fillable. But what about the vector<Trash*>? Should this new class inherit from that? We don’t actually want to be making a new kind of vector, which would force everyone to only use our vector in this situation. Instead, we want someone to be able to have their own vector and say “please fill this.” So the new class should just keep a reference to that vector:
//: C09:Fillablevector.h // Adapter that makes a vector<Trash*> Fillable #ifndef FILLABLEVECTOR_H #define FILLABLEVECTOR_H #include "Trash.h" #include "Fillable.h" #include <vector>
Chapter 16: Design Patterns 486
class Fillablevector : public Fillable { std::vector<Trash*>& v; public: Fillablevector(std::vector<Trash*>& vv) : v(vv) {} void addTrash(Trash* t) { v.push_back(t); } }; #endif // FILLABLEVECTOR_H ///:~
You can see that the only job of this class is to connect Fillable’s addTrash( ) member function to vector’s push_back( ) (that’s the “adapter” motivation). With this class in hand, the overloaded fillBin( ) member function can be used with a vector in fillBin.h:
inline void fillBin(std::string filename, std::vector<Trash*>& bin) { Fillablevector fv(bin); fillBin(filename, fv); }
Notice that the adapter object fv only exists for the duration of the function call, and it wraps bin in an interface that works with the other fillBin( ) function.
This approach works for any container class that’s used frequently. Alternatively, the container can multiply inherit from Fillable. (You’ll see this later, in DynaTrash.cpp.)
Recycling with prototyping Now you can see the new version of the recycling solution using the prototyping technique:
//: C09:Recycle3.cpp //{L} TrashPrototypeInit //{L} fillBin Trash TrashStatics // Recycling with RTTI and Prototypes #include "Trash.h" #include "Aluminum.h" #include "Paper.h" #include "Glass.h" #include "fillBin.h" #include "sumValue.h" #include "../purge.h" #include <fstream> #include <vector> using namespace std; ofstream out("Recycle3.out"); int main() { vector<Trash*> bin; // Fill up the Trash bin:
Chapter 16: Design Patterns 487
fillBin("Trash.dat", bin); vector<Aluminum*> alBin; vector<Paper*> paperBin; vector<Glass*> glassBin; vector<Trash*>::iterator it = bin.begin(); while(it != bin.end()) { // Sort the Trash: Aluminum* ap = dynamic_cast<Aluminum*>(*it); Paper* pp = dynamic_cast<Paper*>(*it); Glass* gp = dynamic_cast<Glass*>(*it); if(ap) alBin.push_back(ap); if(pp) paperBin.push_back(pp); if(gp) glassBin.push_back(gp); it++; } sumValue(alBin); sumValue(paperBin); sumValue(glassBin); sumValue(bin); purge(bin); } ///:~
The process of opening the data file containing Trash descriptions and the parsing of that file have been wrapped into fillBin( ), so now it’s no longer a part of our design focus. You will see that throughout the rest of the chapter, no matter what new classes are added, fillBin( ) will continue to work without change, which indicates a good design.
In terms of object creation, this design does indeed severely localize the changes you need to make to add a new type to the system. However, there’s a significant problem in the use of RTTI that shows up clearly here. The program seems to run fine, and yet it never detects any cardboard, even though there is cardboard in the list of trash data! This happens because of the use of RTTI, which looks for only the types that you tell it to look for. The clue that RTTI is being misused is that every type in the system is being tested, rather than a single type or subset of types. But if you forget to test for your new type, the compiler has nothing to say about it.
As you will see later, there are ways to use polymorphism instead when you’re testing for every type. But if you use RTTI a lot in this fashion, and you add a new type to your system, you can easily forget to make the necessary changes in your program and produce a difficult-to-find bug. So it’s worth trying to eliminate RTTI in this case, not just for aesthetic reasons – it produces more maintainable code.
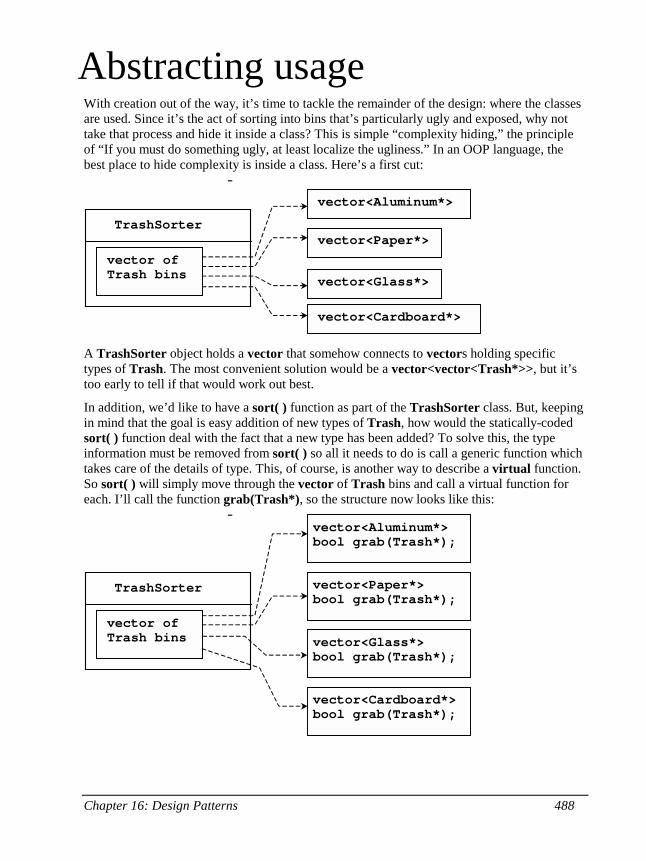
Chapter 16: Design Patterns 488
Abstracting usage With creation out of the way, it’s time to tackle the remainder of the design: where the classes are used. Since it’s the act of sorting into bins that’s particularly ugly and exposed, why not take that process and hide it inside a class? This is simple “complexity hiding,” the principle of “If you must do something ugly, at least localize the ugliness.” In an OOP language, the best place to hide complexity is inside a class. Here’s a first cut:
TrashSorter
vector<Aluminum*>
vector<Paper*>
vector<Glass*>
vector<Cardboard*>
vector ofTrash bins
A TrashSorter object holds a vector that somehow connects to vectors holding specific types of Trash. The most convenient solution would be a vector<vector<Trash*>>, but it’s too early to tell if that would work out best.
In addition, we’d like to have a sort( ) function as part of the TrashSorter class. But, keeping in mind that the goal is easy addition of new types of Trash, how would the statically-coded sort( ) function deal with the fact that a new type has been added? To solve this, the type information must be removed from sort( ) so all it needs to do is call a generic function which takes care of the details of type. This, of course, is another way to describe a virtual function. So sort( ) will simply move through the vector of Trash bins and call a virtual function for each. I’ll call the function grab(Trash*), so the structure now looks like this:
TrashSorter
vector<Aluminum*>bool grab(Trash*);
vector ofTrash bins
vector<Paper*>bool grab(Trash*);
vector<Glass*>bool grab(Trash*);
vector<Cardboard*>bool grab(Trash*);
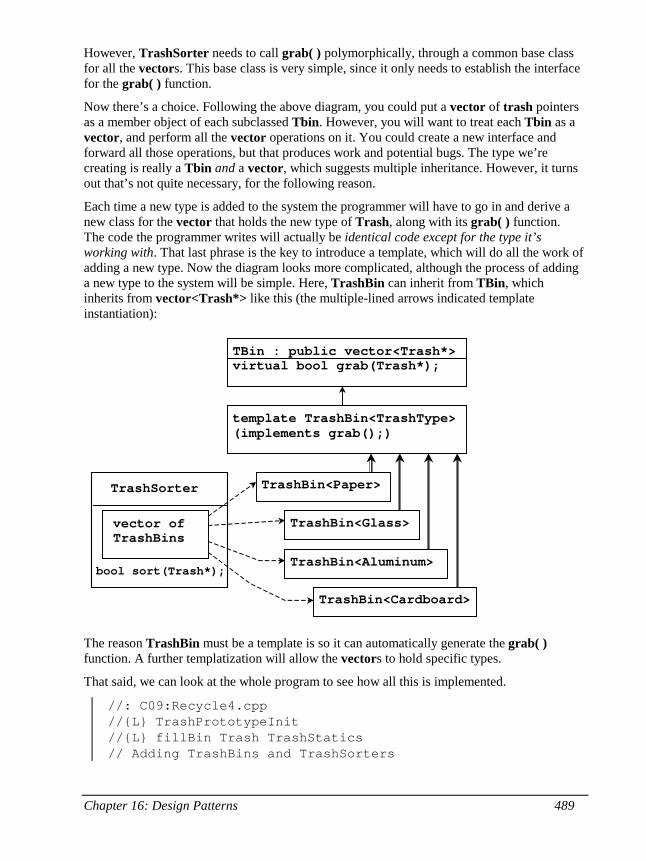
Chapter 16: Design Patterns 489
However, TrashSorter needs to call grab( ) polymorphically, through a common base class for all the vectors. This base class is very simple, since it only needs to establish the interface for the grab( ) function.
Now there’s a choice. Following the above diagram, you could put a vector of trash pointers as a member object of each subclassed Tbin. However, you will want to treat each Tbin as a vector, and perform all the vector operations on it. You could create a new interface and forward all those operations, but that produces work and potential bugs. The type we’re creating is really a Tbin and a vector, which suggests multiple inheritance. However, it turns out that’s not quite necessary, for the following reason.
Each time a new type is added to the system the programmer will have to go in and derive a new class for the vector that holds the new type of Trash, along with its grab( ) function. The code the programmer writes will actually be identical code except for the type it’s working with. That last phrase is the key to introduce a template, which will do all the work of adding a new type. Now the diagram looks more complicated, although the process of adding a new type to the system will be simple. Here, TrashBin can inherit from TBin, which inherits from vector<Trash*> like this (the multiple-lined arrows indicated template instantiation):
TrashSorter
TrashBin<Aluminum>
vector ofTrashBins
TrashBin<Paper>
TrashBin<Glass>
TrashBin<Cardboard>
bool sort(Trash*);
template TrashBin<TrashType>(implements grab();)
TBin : public vector<Trash*>virtual bool grab(Trash*);
The reason TrashBin must be a template is so it can automatically generate the grab( ) function. A further templatization will allow the vectors to hold specific types.
That said, we can look at the whole program to see how all this is implemented.
//: C09:Recycle4.cpp //{L} TrashPrototypeInit //{L} fillBin Trash TrashStatics // Adding TrashBins and TrashSorters
Chapter 16: Design Patterns 490
#include "Trash.h" #include "Aluminum.h" #include "Paper.h" #include "Glass.h" #include "Cardboard.h" #include "fillBin.h" #include "sumValue.h" #include "../purge.h" #include <fstream> #include <vector> using namespace std; ofstream out("Recycle4.out"); class TBin : public vector<Trash*> { public: virtual bool grab(Trash*) = 0; }; template<class TrashType> class TrashBin : public TBin { public: bool grab(Trash* t) { TrashType* tp = dynamic_cast<TrashType*>(t); if(!tp) return false; // Not grabbed push_back(tp); return true; // Object grabbed } }; class TrashSorter : public vector<TBin*> { public: bool sort(Trash* t) { for(iterator it = begin(); it != end(); it++) if((*it)->grab(t)) return true; return false; } void sortBin(vector<Trash*>& bin) { vector<Trash*>::iterator it; for(it = bin.begin(); it != bin.end(); it++) if(!sort(*it)) cerr << "bin not found" << endl; } ~TrashSorter() { purge(*this); }
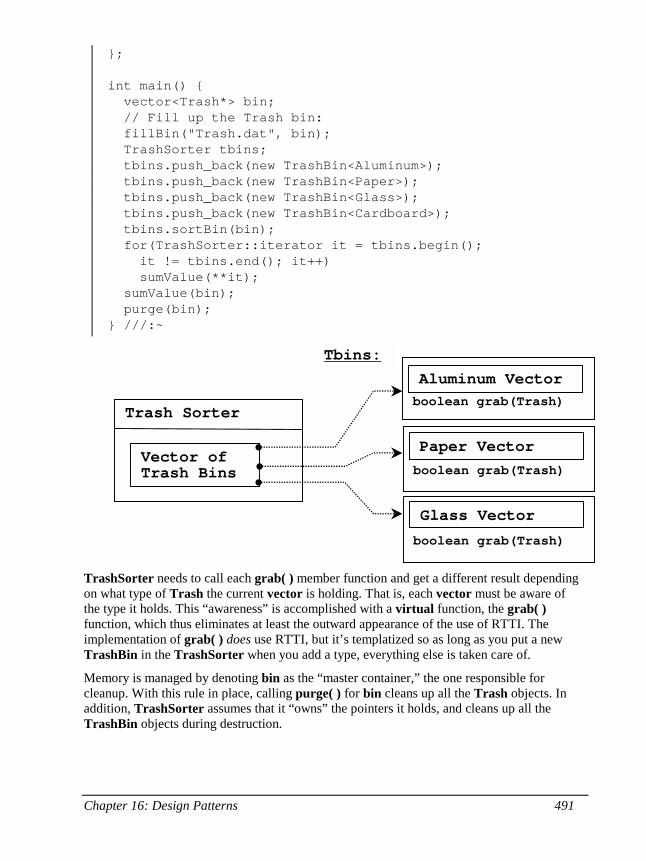
Chapter 16: Design Patterns 491
}; int main() { vector<Trash*> bin; // Fill up the Trash bin: fillBin("Trash.dat", bin); TrashSorter tbins; tbins.push_back(new TrashBin<Aluminum>); tbins.push_back(new TrashBin<Paper>); tbins.push_back(new TrashBin<Glass>); tbins.push_back(new TrashBin<Cardboard>); tbins.sortBin(bin); for(TrashSorter::iterator it = tbins.begin(); it != tbins.end(); it++) sumValue(**it); sumValue(bin); purge(bin); } ///:~
TrashSorter needs to call each grab( ) member function and get a different result depending on what type of Trash the current vector is holding. That is, each vector must be aware of the type it holds. This “awareness” is accomplished with a virtual function, the grab( ) function, which thus eliminates at least the outward appearance of the use of RTTI. The implementation of grab( ) does use RTTI, but it’s templatized so as long as you put a new TrashBin in the TrashSorter when you add a type, everything else is taken care of.
Memory is managed by denoting bin as the “master container,” the one responsible for cleanup. With this rule in place, calling purge( ) for bin cleans up all the Trash objects. In addition, TrashSorter assumes that it “owns” the pointers it holds, and cleans up all the TrashBin objects during destruction.
Trash Sorter
Vector of Trash Bins
boolean grab(Trash)
Paper Vector
boolean grab(Trash)
Aluminum Vector
boolean grab(Trash)
Glass Vector
Tbins:
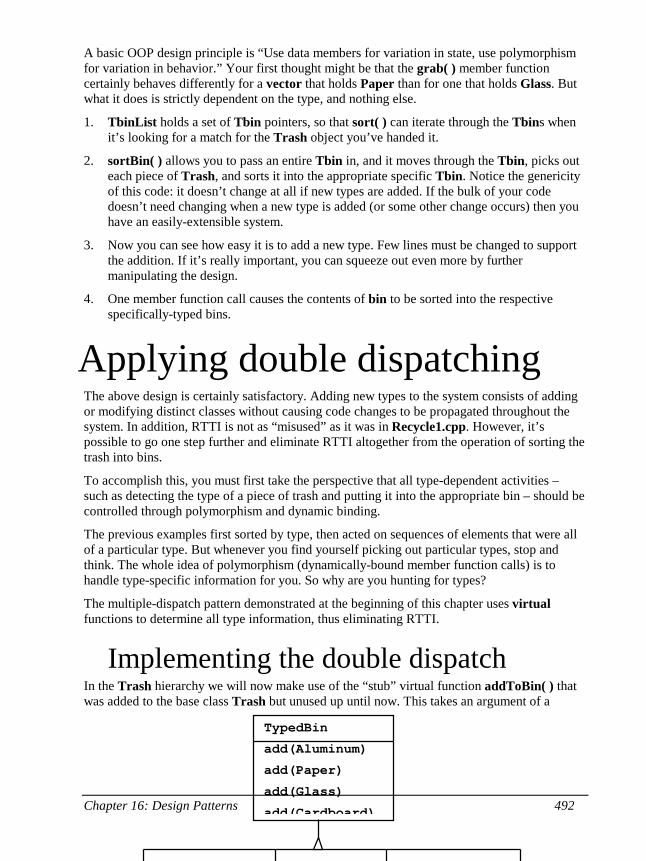
Chapter 16: Design Patterns 492
A basic OOP design principle is “Use data members for variation in state, use polymorphism for variation in behavior.” Your first thought might be that the grab( ) member function certainly behaves differently for a vector that holds Paper than for one that holds Glass. But what it does is strictly dependent on the type, and nothing else.
1. TbinList holds a set of Tbin pointers, so that sort( ) can iterate through the Tbins when it’s looking for a match for the Trash object you’ve handed it.
2. sortBin( ) allows you to pass an entire Tbin in, and it moves through the Tbin, picks out each piece of Trash, and sorts it into the appropriate specific Tbin. Notice the genericity of this code: it doesn’t change at all if new types are added. If the bulk of your code doesn’t need changing when a new type is added (or some other change occurs) then you have an easily-extensible system.
3. Now you can see how easy it is to add a new type. Few lines must be changed to support the addition. If it’s really important, you can squeeze out even more by further manipulating the design.
4. One member function call causes the contents of bin to be sorted into the respective specifically-typed bins.
Applying double dispatching The above design is certainly satisfactory. Adding new types to the system consists of adding or modifying distinct classes without causing code changes to be propagated throughout the system. In addition, RTTI is not as “misused” as it was in Recycle1.cpp. However, it’s possible to go one step further and eliminate RTTI altogether from the operation of sorting the trash into bins.
To accomplish this, you must first take the perspective that all type-dependent activities – such as detecting the type of a piece of trash and putting it into the appropriate bin – should be controlled through polymorphism and dynamic binding.
The previous examples first sorted by type, then acted on sequences of elements that were all of a particular type. But whenever you find yourself picking out particular types, stop and think. The whole idea of polymorphism (dynamically-bound member function calls) is to handle type-specific information for you. So why are you hunting for types?
The multiple-dispatch pattern demonstrated at the beginning of this chapter uses virtual functions to determine all type information, thus eliminating RTTI.
Implementing the double dispatch In the Trash hierarchy we will now make use of the “stub” virtual function addToBin( ) that was added to the base class Trash but unused up until now. This takes an argument of a
TypedBin
add(Aluminum)
add(Paper)
add(Glass)
add(Cardboard)
AluminumBin
add(Aluminum) CardboardBin
add(Cardboard) PaperBin
add(Paper) GlassBin
add(Glass)
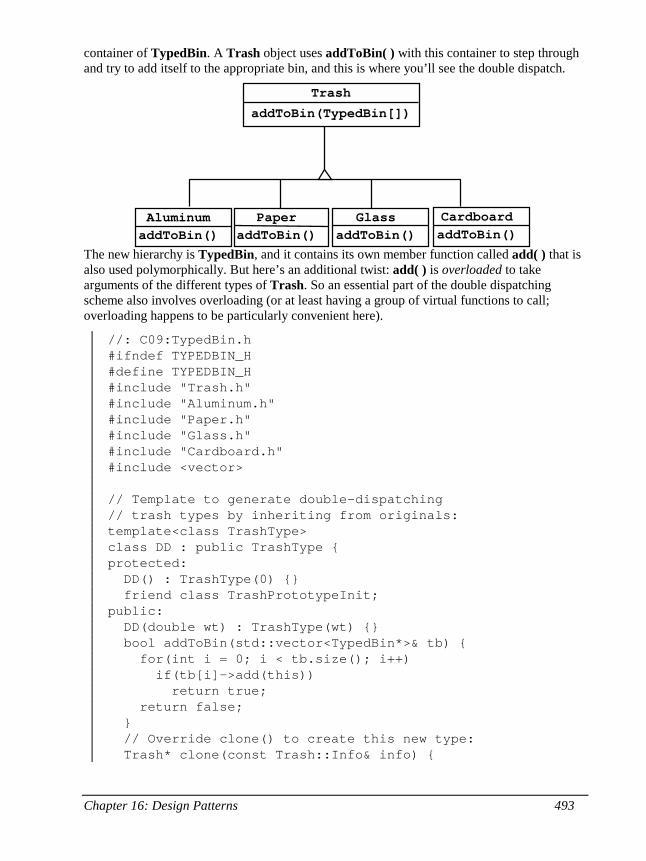
Chapter 16: Design Patterns 493
container of TypedBin. A Trash object uses addToBin( ) with this container to step through and try to add itself to the appropriate bin, and this is where you’ll see the double dispatch.
The new hierarchy is TypedBin, and it contains its own member function called add( ) that is also used polymorphically. But here’s an additional twist: add( ) is overloaded to take arguments of the different types of Trash. So an essential part of the double dispatching scheme also involves overloading (or at least having a group of virtual functions to call; overloading happens to be particularly convenient here).
//: C09:TypedBin.h #ifndef TYPEDBIN_H #define TYPEDBIN_H #include "Trash.h" #include "Aluminum.h" #include "Paper.h" #include "Glass.h" #include "Cardboard.h" #include <vector> // Template to generate double-dispatching // trash types by inheriting from originals: template<class TrashType> class DD : public TrashType { protected: DD() : TrashType(0) {} friend class TrashPrototypeInit; public: DD(double wt) : TrashType(wt) {} bool addToBin(std::vector<TypedBin*>& tb) { for(int i = 0; i < tb.size(); i++) if(tb[i]->add(this)) return true; return false; } // Override clone() to create this new type: Trash* clone(const Trash::Info& info) {
Trash
addToBin(TypedBin[])
Aluminum
addToBin()
Paper
addToBin()
Glass
addToBin()
Cardboard
addToBin()

Chapter 16: Design Patterns 494
return new DD(info.data()); } }; // vector<Trash*> that knows how to // grab the right type class TypedBin : public std::vector<Trash*> { protected: bool addIt(Trash* t) { push_back(t); return true; } public: virtual bool add(DD<Aluminum>*) { return false; } virtual bool add(DD<Paper>*) { return false; } virtual bool add(DD<Glass>*) { return false; } virtual bool add(DD<Cardboard>*) { return false; } }; // Template to generate specific TypedBins: template<class TrashType> class BinOf : public TypedBin { public: // Only overrides add() for this specific type: bool add(TrashType* t) { return addIt(t); } }; #endif // TYPEDBIN_H ///:~
In each particular subtype of Aluminum, Paper, Glass, and Cardboard, the addToBin( ) member function is implemented, but it looks like the code is exactly the same in each case. The code in each addToBin( ) calls add( ) for each TypedBin object in the array. But notice the argument: this. The type of this is different for each subclass of Trash, so the code is different. So this is the first part of the double dispatch, because once you’re inside this member function you know you’re Aluminum, or Paper, etc. During the call to add( ), this information is passed via the type of this. The compiler resolves the call to the proper overloaded version of add( ). But since tb[i] produces a pointer to the base type TypedBin,
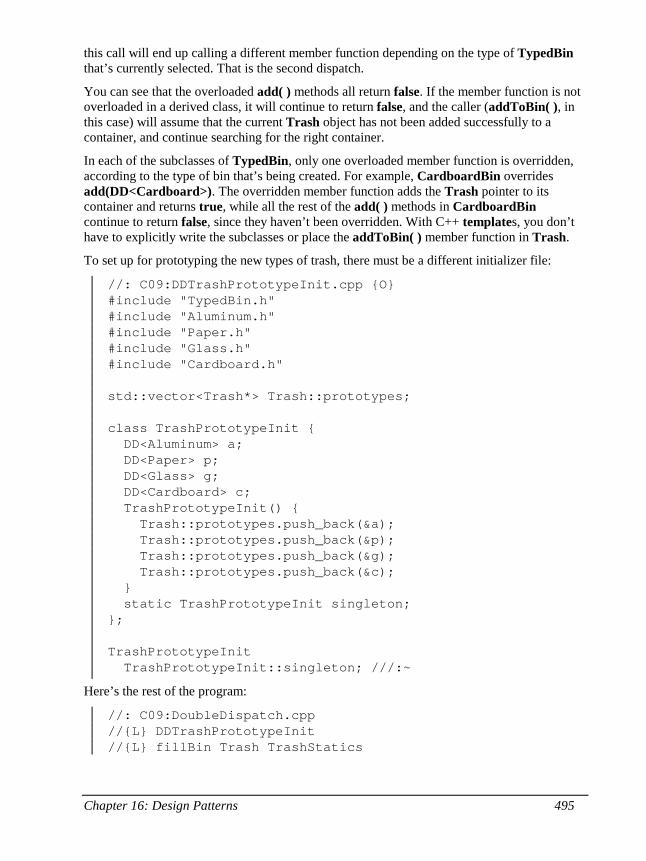
Chapter 16: Design Patterns 495
this call will end up calling a different member function depending on the type of TypedBin that’s currently selected. That is the second dispatch.
You can see that the overloaded add( ) methods all return false. If the member function is not overloaded in a derived class, it will continue to return false, and the caller (addToBin( ), in this case) will assume that the current Trash object has not been added successfully to a container, and continue searching for the right container.
In each of the subclasses of TypedBin, only one overloaded member function is overridden, according to the type of bin that’s being created. For example, CardboardBin overrides add(DD<Cardboard>). The overridden member function adds the Trash pointer to its container and returns true, while all the rest of the add( ) methods in CardboardBin continue to return false, since they haven’t been overridden. With C++ templates, you don’t have to explicitly write the subclasses or place the addToBin( ) member function in Trash.
To set up for prototyping the new types of trash, there must be a different initializer file:
//: C09:DDTrashPrototypeInit.cpp {O} #include "TypedBin.h" #include "Aluminum.h" #include "Paper.h" #include "Glass.h" #include "Cardboard.h" std::vector<Trash*> Trash::prototypes; class TrashPrototypeInit { DD<Aluminum> a; DD<Paper> p; DD<Glass> g; DD<Cardboard> c; TrashPrototypeInit() { Trash::prototypes.push_back(&a); Trash::prototypes.push_back(&p); Trash::prototypes.push_back(&g); Trash::prototypes.push_back(&c); } static TrashPrototypeInit singleton; }; TrashPrototypeInit TrashPrototypeInit::singleton; ///:~
Here’s the rest of the program:
//: C09:DoubleDispatch.cpp //{L} DDTrashPrototypeInit //{L} fillBin Trash TrashStatics
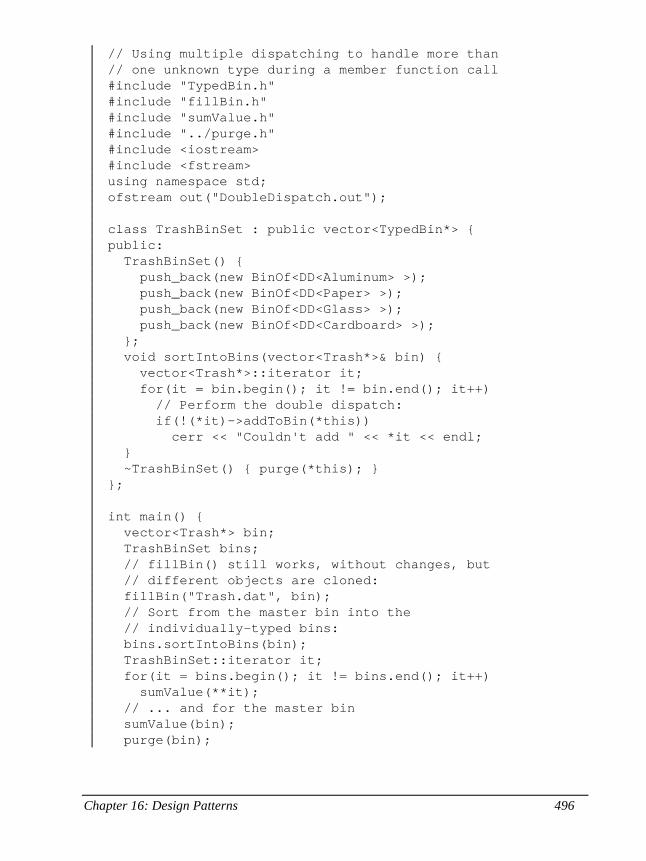
Chapter 16: Design Patterns 496
// Using multiple dispatching to handle more than // one unknown type during a member function call #include "TypedBin.h" #include "fillBin.h" #include "sumValue.h" #include "../purge.h" #include <iostream> #include <fstream> using namespace std; ofstream out("DoubleDispatch.out"); class TrashBinSet : public vector<TypedBin*> { public: TrashBinSet() { push_back(new BinOf<DD<Aluminum> >); push_back(new BinOf<DD<Paper> >); push_back(new BinOf<DD<Glass> >); push_back(new BinOf<DD<Cardboard> >); }; void sortIntoBins(vector<Trash*>& bin) { vector<Trash*>::iterator it; for(it = bin.begin(); it != bin.end(); it++) // Perform the double dispatch: if(!(*it)->addToBin(*this)) cerr << "Couldn't add " << *it << endl; } ~TrashBinSet() { purge(*this); } }; int main() { vector<Trash*> bin; TrashBinSet bins; // fillBin() still works, without changes, but // different objects are cloned: fillBin("Trash.dat", bin); // Sort from the master bin into the // individually-typed bins: bins.sortIntoBins(bin); TrashBinSet::iterator it; for(it = bins.begin(); it != bins.end(); it++) sumValue(**it); // ... and for the master bin sumValue(bin); purge(bin);
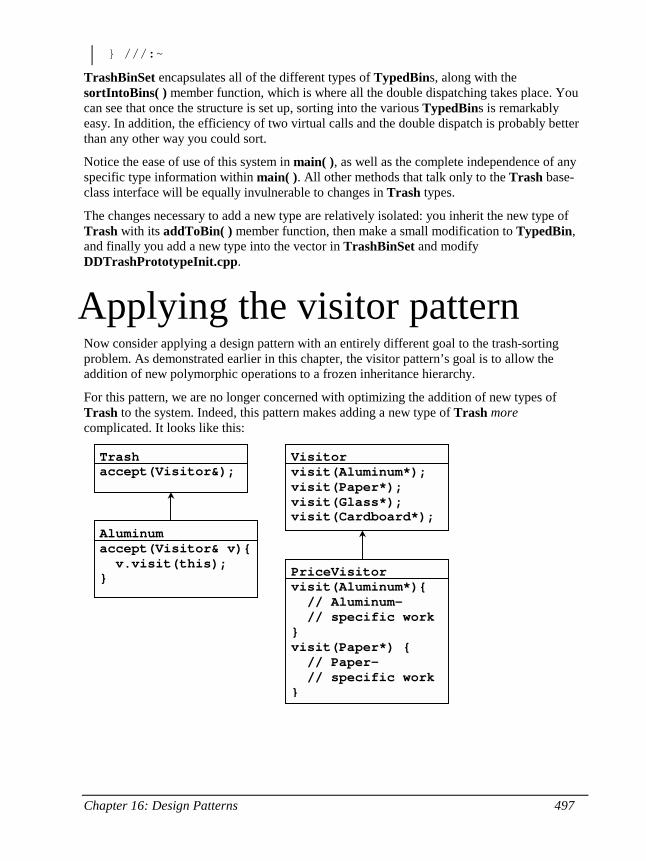
Chapter 16: Design Patterns 497
} ///:~
TrashBinSet encapsulates all of the different types of TypedBins, along with the sortIntoBins( ) member function, which is where all the double dispatching takes place. You can see that once the structure is set up, sorting into the various TypedBins is remarkably easy. In addition, the efficiency of two virtual calls and the double dispatch is probably better than any other way you could sort.
Notice the ease of use of this system in main( ), as well as the complete independence of any specific type information within main( ). All other methods that talk only to the Trash base-class interface will be equally invulnerable to changes in Trash types.
The changes necessary to add a new type are relatively isolated: you inherit the new type of Trash with its addToBin( ) member function, then make a small modification to TypedBin, and finally you add a new type into the vector in TrashBinSet and modify DDTrashPrototypeInit.cpp.
Applying the visitor pattern Now consider applying a design pattern with an entirely different goal to the trash-sorting problem. As demonstrated earlier in this chapter, the visitor pattern’s goal is to allow the addition of new polymorphic operations to a frozen inheritance hierarchy.
For this pattern, we are no longer concerned with optimizing the addition of new types of Trash to the system. Indeed, this pattern makes adding a new type of Trash more complicated. It looks like this:
Visitorvisit(Aluminum*);visit(Paper*);visit(Glass*);visit(Cardboard*);
Trashaccept(Visitor&);
Aluminumaccept(Visitor& v){ v.visit(this);} PriceVisitor
visit(Aluminum*){ // Aluminum- // specific work}visit(Paper*) { // Paper- // specific work}
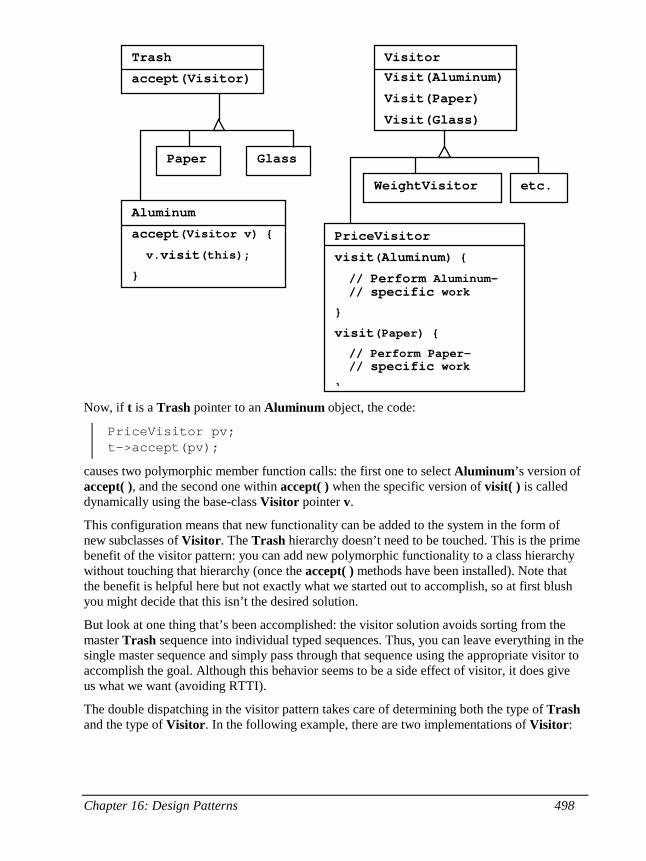
Chapter 16: Design Patterns 498
Now, if t is a Trash pointer to an Aluminum object, the code:
PriceVisitor pv; t->accept(pv);
causes two polymorphic member function calls: the first one to select Aluminum’s version of accept( ), and the second one within accept( ) when the specific version of visit( ) is called dynamically using the base-class Visitor pointer v.
This configuration means that new functionality can be added to the system in the form of new subclasses of Visitor. The Trash hierarchy doesn’t need to be touched. This is the prime benefit of the visitor pattern: you can add new polymorphic functionality to a class hierarchy without touching that hierarchy (once the accept( ) methods have been installed). Note that the benefit is helpful here but not exactly what we started out to accomplish, so at first blush you might decide that this isn’t the desired solution.
But look at one thing that’s been accomplished: the visitor solution avoids sorting from the master Trash sequence into individual typed sequences. Thus, you can leave everything in the single master sequence and simply pass through that sequence using the appropriate visitor to accomplish the goal. Although this behavior seems to be a side effect of visitor, it does give us what we want (avoiding RTTI).
The double dispatching in the visitor pattern takes care of determining both the type of Trash and the type of Visitor. In the following example, there are two implementations of Visitor:
Trash
accept(Visitor)
Aluminum
accept(Visitor v) {
v.visit(this);
}
Paper Glass
Visitor
Visit(Aluminum)
Visit(Paper)
Visit(Glass)
PriceVisitor
visit(Aluminum) {
// Perform Aluminum- // specific work
}
visit(Paper) {
// Perform Paper- // specific work
}
WeightVisitor etc.
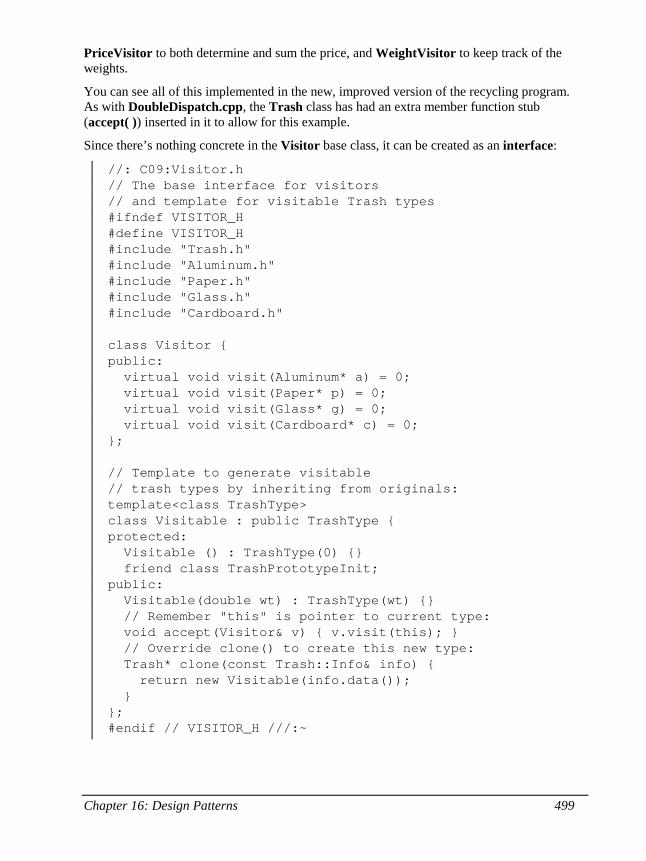
Chapter 16: Design Patterns 499
PriceVisitor to both determine and sum the price, and WeightVisitor to keep track of the weights.
You can see all of this implemented in the new, improved version of the recycling program. As with DoubleDispatch.cpp, the Trash class has had an extra member function stub (accept( )) inserted in it to allow for this example.
Since there’s nothing concrete in the Visitor base class, it can be created as an interface:
//: C09:Visitor.h // The base interface for visitors // and template for visitable Trash types #ifndef VISITOR_H #define VISITOR_H #include "Trash.h" #include "Aluminum.h" #include "Paper.h" #include "Glass.h" #include "Cardboard.h" class Visitor { public: virtual void visit(Aluminum* a) = 0; virtual void visit(Paper* p) = 0; virtual void visit(Glass* g) = 0; virtual void visit(Cardboard* c) = 0; }; // Template to generate visitable // trash types by inheriting from originals: template<class TrashType> class Visitable : public TrashType { protected: Visitable () : TrashType(0) {} friend class TrashPrototypeInit; public: Visitable(double wt) : TrashType(wt) {} // Remember "this" is pointer to current type: void accept(Visitor& v) { v.visit(this); } // Override clone() to create this new type: Trash* clone(const Trash::Info& info) { return new Visitable(info.data()); } }; #endif // VISITOR_H ///:~
Chapter 16: Design Patterns 500
As before, a different version of the initialization file is necessary:
//: C09:VisitorTrashPrototypeInit.cpp {O} #include "Visitor.h" std::vector<Trash*> Trash::prototypes; class TrashPrototypeInit { Visitable<Aluminum> a; Visitable<Paper> p; Visitable<Glass> g; Visitable<Cardboard> c; TrashPrototypeInit() { Trash::prototypes.push_back(&a); Trash::prototypes.push_back(&p); Trash::prototypes.push_back(&g); Trash::prototypes.push_back(&c); } static TrashPrototypeInit singleton; }; TrashPrototypeInit TrashPrototypeInit::singleton; ///:~
The rest of the program creates specific Visitor types and sends them through a single list of Trash objects:
//: C09:TrashVisitor.cpp //{L} VisitorTrashPrototypeInit //{L} fillBin Trash TrashStatics // The "visitor" pattern #include "Visitor.h" #include "fillBin.h" #include "../purge.h" #include <iostream> #include <fstream> using namespace std; ofstream out("TrashVisitor.out"); // Specific group of algorithms packaged // in each implementation of Visitor: class PriceVisitor : public Visitor { double alSum; // Aluminum double pSum; // Paper double gSum; // Glass double cSum; // Cardboard
Chapter 16: Design Patterns 501
public: void visit(Aluminum* al) { double v = al->weight() * al->value(); out << "value of Aluminum= " << v << endl; alSum += v; } void visit(Paper* p) { double v = p->weight() * p->value(); out << "value of Paper= " << v << endl; pSum += v; } void visit(Glass* g) { double v = g->weight() * g->value(); out << "value of Glass= " << v << endl; gSum += v; } void visit(Cardboard* c) { double v = c->weight() * c->value(); out << "value of Cardboard = " << v << endl; cSum += v; } void total(ostream& os) { os << "Total Aluminum: $" << alSum << "\n" << "Total Paper: $" << pSum << "\n" << "Total Glass: $" << gSum << "\n" << "Total Cardboard: $" << cSum << endl; } }; class WeightVisitor : public Visitor { double alSum; // Aluminum double pSum; // Paper double gSum; // Glass double cSum; // Cardboard public: void visit(Aluminum* al) { alSum += al->weight(); out << "weight of Aluminum = " << al->weight() << endl; }
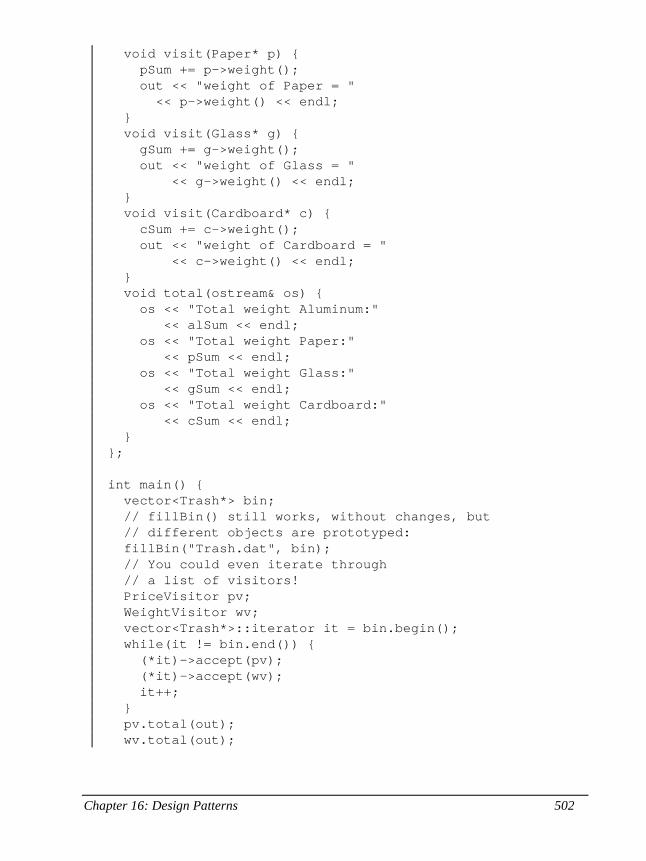
Chapter 16: Design Patterns 502
void visit(Paper* p) { pSum += p->weight(); out << "weight of Paper = " << p->weight() << endl; } void visit(Glass* g) { gSum += g->weight(); out << "weight of Glass = " << g->weight() << endl; } void visit(Cardboard* c) { cSum += c->weight(); out << "weight of Cardboard = " << c->weight() << endl; } void total(ostream& os) { os << "Total weight Aluminum:" << alSum << endl; os << "Total weight Paper:" << pSum << endl; os << "Total weight Glass:" << gSum << endl; os << "Total weight Cardboard:" << cSum << endl; } }; int main() { vector<Trash*> bin; // fillBin() still works, without changes, but // different objects are prototyped: fillBin("Trash.dat", bin); // You could even iterate through // a list of visitors! PriceVisitor pv; WeightVisitor wv; vector<Trash*>::iterator it = bin.begin(); while(it != bin.end()) { (*it)->accept(pv); (*it)->accept(wv); it++; } pv.total(out); wv.total(out);
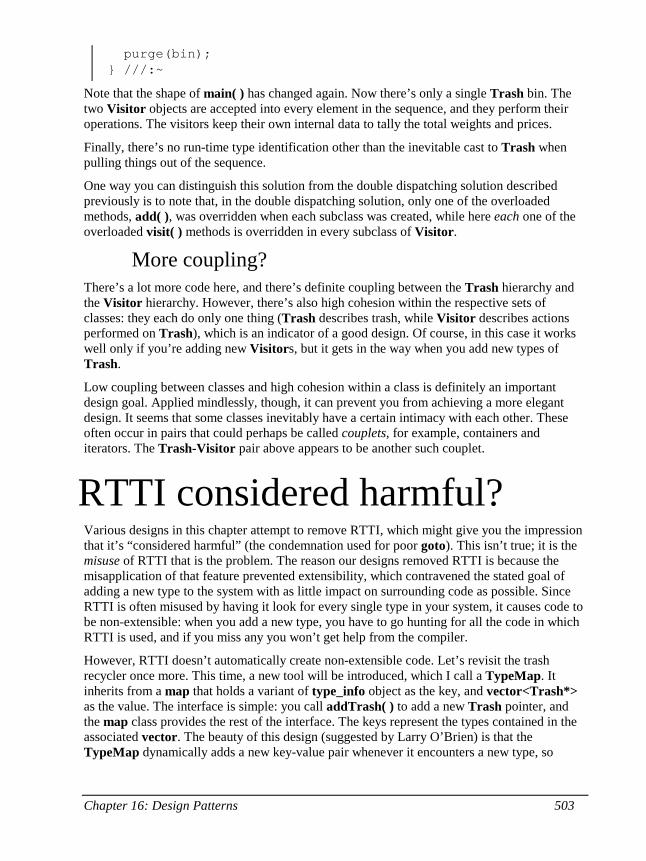
Chapter 16: Design Patterns 503
purge(bin); } ///:~
Note that the shape of main( ) has changed again. Now there’s only a single Trash bin. The two Visitor objects are accepted into every element in the sequence, and they perform their operations. The visitors keep their own internal data to tally the total weights and prices.
Finally, there’s no run-time type identification other than the inevitable cast to Trash when pulling things out of the sequence.
One way you can distinguish this solution from the double dispatching solution described previously is to note that, in the double dispatching solution, only one of the overloaded methods, add( ), was overridden when each subclass was created, while here each one of the overloaded visit( ) methods is overridden in every subclass of Visitor.
More coupling? There’s a lot more code here, and there’s definite coupling between the Trash hierarchy and the Visitor hierarchy. However, there’s also high cohesion within the respective sets of classes: they each do only one thing (Trash describes trash, while Visitor describes actions performed on Trash), which is an indicator of a good design. Of course, in this case it works well only if you’re adding new Visitors, but it gets in the way when you add new types of Trash.
Low coupling between classes and high cohesion within a class is definitely an important design goal. Applied mindlessly, though, it can prevent you from achieving a more elegant design. It seems that some classes inevitably have a certain intimacy with each other. These often occur in pairs that could perhaps be called couplets, for example, containers and iterators. The Trash-Visitor pair above appears to be another such couplet.
RTTI considered harmful? Various designs in this chapter attempt to remove RTTI, which might give you the impression that it’s “considered harmful” (the condemnation used for poor goto). This isn’t true; it is the misuse of RTTI that is the problem. The reason our designs removed RTTI is because the misapplication of that feature prevented extensibility, which contravened the stated goal of adding a new type to the system with as little impact on surrounding code as possible. Since RTTI is often misused by having it look for every single type in your system, it causes code to be non-extensible: when you add a new type, you have to go hunting for all the code in which RTTI is used, and if you miss any you won’t get help from the compiler.
However, RTTI doesn’t automatically create non-extensible code. Let’s revisit the trash recycler once more. This time, a new tool will be introduced, which I call a TypeMap. It inherits from a map that holds a variant of type_info object as the key, and vector<Trash*> as the value. The interface is simple: you call addTrash( ) to add a new Trash pointer, and the map class provides the rest of the interface. The keys represent the types contained in the associated vector. The beauty of this design (suggested by Larry O’Brien) is that the TypeMap dynamically adds a new key-value pair whenever it encounters a new type, so
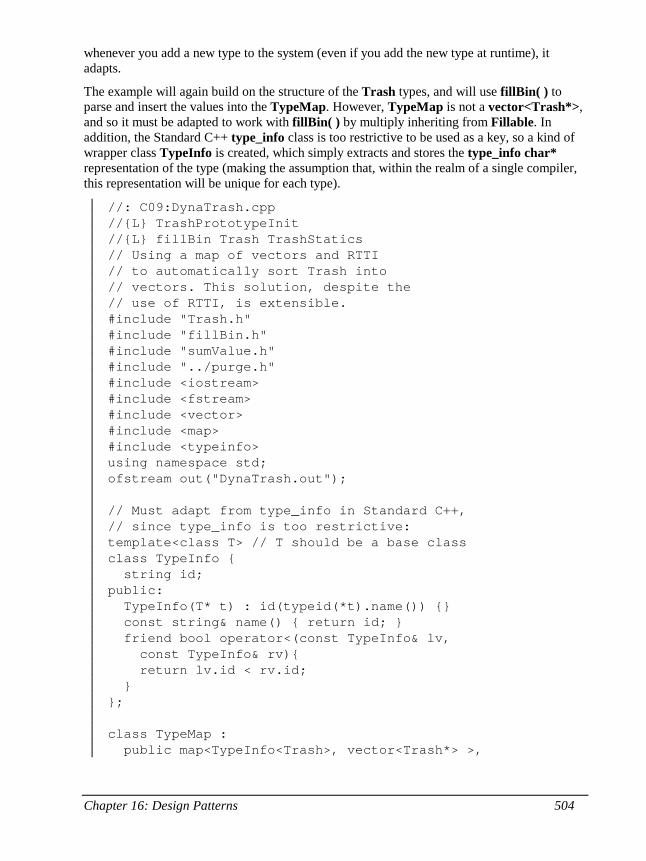
Chapter 16: Design Patterns 504
whenever you add a new type to the system (even if you add the new type at runtime), it adapts.
The example will again build on the structure of the Trash types, and will use fillBin( ) to parse and insert the values into the TypeMap. However, TypeMap is not a vector<Trash*>, and so it must be adapted to work with fillBin( ) by multiply inheriting from Fillable. In addition, the Standard C++ type_info class is too restrictive to be used as a key, so a kind of wrapper class TypeInfo is created, which simply extracts and stores the type_info char* representation of the type (making the assumption that, within the realm of a single compiler, this representation will be unique for each type).
//: C09:DynaTrash.cpp //{L} TrashPrototypeInit //{L} fillBin Trash TrashStatics // Using a map of vectors and RTTI // to automatically sort Trash into // vectors. This solution, despite the // use of RTTI, is extensible. #include "Trash.h" #include "fillBin.h" #include "sumValue.h" #include "../purge.h" #include <iostream> #include <fstream> #include <vector> #include <map> #include <typeinfo> using namespace std; ofstream out("DynaTrash.out"); // Must adapt from type_info in Standard C++, // since type_info is too restrictive: template<class T> // T should be a base class class TypeInfo { string id; public: TypeInfo(T* t) : id(typeid(*t).name()) {} const string& name() { return id; } friend bool operator<(const TypeInfo& lv, const TypeInfo& rv){ return lv.id < rv.id; } }; class TypeMap : public map<TypeInfo<Trash>, vector<Trash*> >,
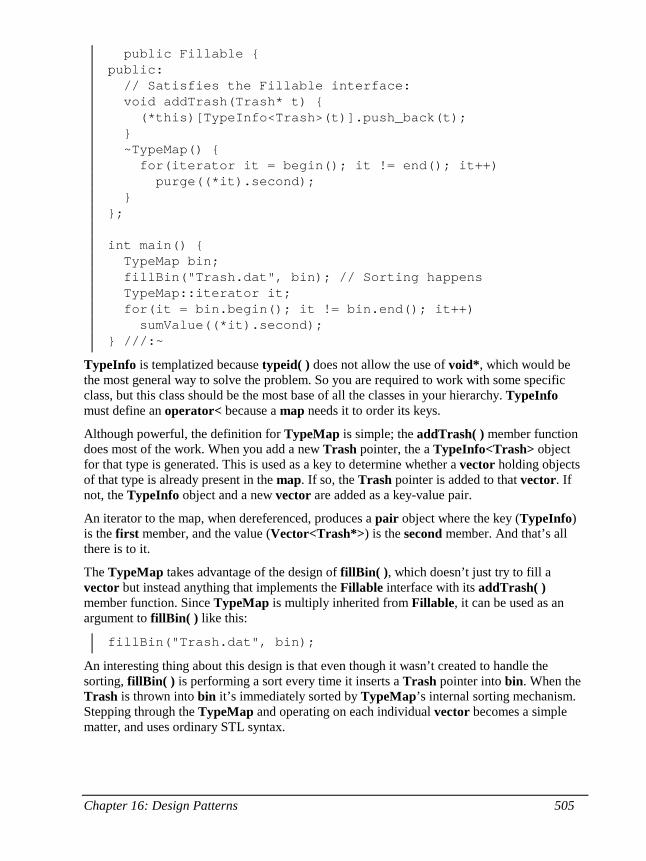
Chapter 16: Design Patterns 505
public Fillable { public: // Satisfies the Fillable interface: void addTrash(Trash* t) { (*this)[TypeInfo<Trash>(t)].push_back(t); } ~TypeMap() { for(iterator it = begin(); it != end(); it++) purge((*it).second); } }; int main() { TypeMap bin; fillBin("Trash.dat", bin); // Sorting happens TypeMap::iterator it; for(it = bin.begin(); it != bin.end(); it++) sumValue((*it).second); } ///:~
TypeInfo is templatized because typeid( ) does not allow the use of void*, which would be the most general way to solve the problem. So you are required to work with some specific class, but this class should be the most base of all the classes in your hierarchy. TypeInfo must define an operator< because a map needs it to order its keys.
Although powerful, the definition for TypeMap is simple; the addTrash( ) member function does most of the work. When you add a new Trash pointer, the a TypeInfo<Trash> object for that type is generated. This is used as a key to determine whether a vector holding objects of that type is already present in the map. If so, the Trash pointer is added to that vector. If not, the TypeInfo object and a new vector are added as a key-value pair.
An iterator to the map, when dereferenced, produces a pair object where the key (TypeInfo) is the first member, and the value (Vector<Trash*>) is the second member. And that’s all there is to it.
The TypeMap takes advantage of the design of fillBin( ), which doesn’t just try to fill a vector but instead anything that implements the Fillable interface with its addTrash( ) member function. Since TypeMap is multiply inherited from Fillable, it can be used as an argument to fillBin( ) like this:
fillBin("Trash.dat", bin);
An interesting thing about this design is that even though it wasn’t created to handle the sorting, fillBin( ) is performing a sort every time it inserts a Trash pointer into bin. When the Trash is thrown into bin it’s immediately sorted by TypeMap’s internal sorting mechanism. Stepping through the TypeMap and operating on each individual vector becomes a simple matter, and uses ordinary STL syntax.
Chapter 16: Design Patterns 506
As you can see, adding a new type to the system won’t affect this code at all, nor the code in TypeMap. This is certainly the smallest solution to the problem, and arguably the most elegant as well. It does rely heavily on RTTI, but notice that each key-value pair in the map is looking for only one type. In addition, there’s no way you can “forget” to add the proper code to this system when you add a new type, since there isn’t any code you need to add, other than that which supports the prototyping process (and you’ll find out right away if you forget that).
Summary Coming up with a design such as TrashVisitor.cpp that contains a larger amount of code than the earlier designs can seem at first to be counterproductive. It pays to notice what you’re trying to accomplish with various designs. Design patterns in general strive to separate the things that change from the things that stay the same. The “things that change” can refer to many different kinds of changes. Perhaps the change occurs because the program is placed into a new environment or because something in the current environment changes (this could be: “The user wants to add a new shape to the diagram currently on the screen”). Or, as in this case, the change could be the evolution of the code body. While previous versions of the trash-sorting example emphasized the addition of new types of Trash to the system, TrashVisitor.cpp allows you to easily add new functionality without disturbing the Trash hierarchy. There’s more code in TrashVisitor.cpp, but adding new functionality to Visitor is cheap. If this is something that happens a lot, then it’s worth the extra effort and code to make it happen more easily.
The discovery of the vector of change is no trivial matter; it’s not something that an analyst can usually detect before the program sees its initial design. The necessary information will probably not appear until later phases in the project: sometimes only at the design or implementation phases do you discover a deeper or more subtle need in your system. In the case of adding new types (which was the focus of most of the “recycle” examples) you might realize that you need a particular inheritance hierarchy only when you are in the maintenance phase and you begin extending the system!
One of the most important things that you’ll learn by studying design patterns seems to be an about-face from what has been promoted so far in this book. That is: “OOP is all about polymorphism.” This statement can produce the “two-year-old with a hammer” syndrome (everything looks like a nail). Put another way, it’s hard enough to “get” polymorphism, and once you do, you try to cast all your designs into that one particular mold.
What design patterns say is that OOP isn’t just about polymorphism. It’s about “separating the things that change from the things that stay the same.” Polymorphism is an especially important way to do this, and it turns out to be helpful if the programming language directly supports polymorphism (so you don’t have to wire it in yourself, which would tend to make it prohibitively expensive). But design patterns in general show other ways to accomplish the basic goal, and once your eyes have been opened to this you will begin to search for more creative designs.
Since the Design Patterns book came out and made such an impact, people have been searching for other patterns. You can expect to see more of these appear as time goes on. Here
Chapter 16: Design Patterns 507
are some sites recommended by Jim Coplien, of C++ fame (http://www.bell-labs.com/~cope), who is one of the main proponents of the patterns movement:
http://st-www.cs.uiuc.edu/users/patterns http://c2.com/cgi/wiki http://c2.com/ppr http://www.bell-labs.com/people/cope/Patterns/Process/index.html http://www.bell-labs.com/cgi-user/OrgPatterns/OrgPatterns http://st-www.cs.uiuc.edu/cgi-bin/wikic/wikic http://www.cs.wustl.edu/~schmidt/patterns.html http://www.espinc.com/patterns/overview.html
Also note there has been a yearly conference on design patterns, called PLOP, that produces a published proceedings. The third one of these proceedings came out in late 1997 (all published by Addison-Wesley).
Exercises 1. Using SingletonPattern.cpp as a starting point, create a class that manages
a fixed number of its own objects. Assume the objects are database connections and you only have a license to use a fixed quantity of these at any one time.
2. Create a minimal Observer-Observable design in two classes, without base classes and without the extra arguments in Observer.h and the member functions in Observable.h. Just create the bare minimum in the two classes, then demonstrate your design by creating one Observable and many Observers, and cause the Observable to update the Observers.
3. Change InnerClassIdiom.cpp so that Outer uses multiple inheritance instead of the inner class idiom.
4. Add a class Plastic to TrashVisitor.cpp. 5. Add a class Plastic to DynaTrash.cpp. 6. Explain how AbstractFactory.cpp demonstrates Double Dispatching and
the Factory Method. 7. Modify ShapeFactory2.cpp so that it uses an Abstract Factory to create
different sets of shapes (for example, one particular type of factory object creates “thick shapes,” another creates “thin shapes,” but each factory object can create all the shapes: circles, squares, triangles etc.).
8. Create a business-modeling environment with three types of Inhabitant: Dwarf (for engineers), Elf (for marketers) and Troll (for managers). Now create a class called Project that creates the different inhabitants and causes them to interact( ) with each other using multiple dispatching.
9. Modify the above example to make the interactions more detailed. Each Inhabitant can randomly produce a Weapon using getWeapon( ): a Dwarf uses Jargon or Play, an Elf uses InventFeature or
Chapter 16: Design Patterns 508
SellImaginaryProduct, and a Troll uses Edict and Schedule. You must decide which weapons “win” and “lose” in each interaction (as in PaperScissorsRock.cpp). Add a battle( ) member function to Project that takes two Inhabitants and matches them against each other. Now create a meeting( ) member function for Project that creates groups of Dwarf, Elf and Manager and battles the groups against each other until only members of one group are left standing. These are the “winners.”
10. Implement Chain of Responsibility to create an “expert system” that solves problems by successively trying one solution after another until one matches. You should be able to dynamically add solutions to the expert system. The test for solution should just be a string match, but when a solution fits, the expert system should return the appropriate type of problemSolver object. What other pattern/patterns show up here?
509
11: Tools & topics Tools created & used during the development of this book and various other handy things
The code extractor The code for this book is automatically extracted directly from the ASCII text version of this book. The book is normally maintained in a word processor capable of producing camera-ready copy, automatically creating the table of contents and index, etc. To generate the code files, the book is saved into a plain ASCII text file, and the program in this section automatically extracts all the code files, places them in appropriate subdirectories, and generates all the makefiles. The entire contents of the book can then be built, for each compiler, by invoking a single make command. This way, the code listings in the book can be regularly tested and verified, and in addition various compilers can be tested for some degree of compliance with Standard C++ (the degree to which all the examples in the book can exercise a particular compiler, which is not too bad).
The code in this book is designed to be as generic as possible, but it is only tested under two operating systems: 32-bit Windows and Linux (using the Gnu C++ compiler g++, which means it should compile under other versions of Unix without too much trouble). You can easily get the latest sources for the book onto your machine by going to the web site www.BruceEckel.com and downloading the zipped archive containing all the code files and makefiles. If you unzip this you’ll have the book’s directory tree available. However, it may not be configured for your particular compiler or operating system. In this case, you can generate your own using the ASCII text file for the book (available at www.BruceEckel.com) and the ExtractCode.cpp program in this section. Using a text editor, you find the CompileDB.txt file inside the ASCII text file for the book, edit it (leaving it the book’s text file) to adapt it to your compiler and operating system, and then hand it to the ExtractCode program to generate your own source tree and makefiles.
You’ve seen that each file to be extracted contains a starting marker (which includes the file name and path) and an ending marker. Files can be of any type, and if the colon after the comment is directly followed by a ‘!’ then the starting and ending marker lines are not reproduced in the generated file. In addition, you’ve seen the other markers {O}, {L}, and {T} that have been placed inside comments; these are used to generate the makefile for each subdirectory.
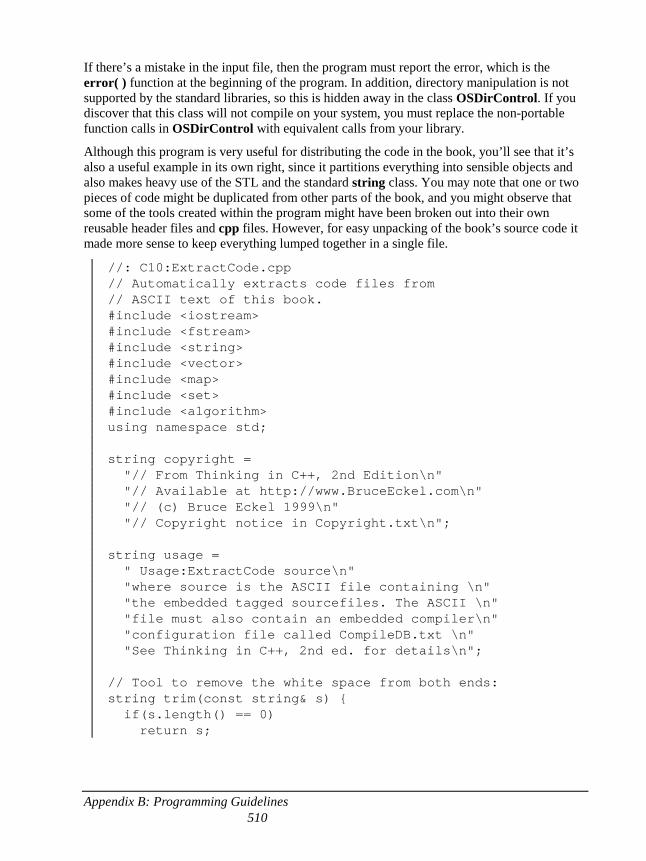
Appendix B: Programming Guidelines 510
If there’s a mistake in the input file, then the program must report the error, which is the error( ) function at the beginning of the program. In addition, directory manipulation is not supported by the standard libraries, so this is hidden away in the class OSDirControl. If you discover that this class will not compile on your system, you must replace the non-portable function calls in OSDirControl with equivalent calls from your library.
Although this program is very useful for distributing the code in the book, you’ll see that it’s also a useful example in its own right, since it partitions everything into sensible objects and also makes heavy use of the STL and the standard string class. You may note that one or two pieces of code might be duplicated from other parts of the book, and you might observe that some of the tools created within the program might have been broken out into their own reusable header files and cpp files. However, for easy unpacking of the book’s source code it made more sense to keep everything lumped together in a single file.
//: C10:ExtractCode.cpp // Automatically extracts code files from // ASCII text of this book. #include <iostream> #include <fstream> #include <string> #include <vector> #include <map> #include <set> #include <algorithm> using namespace std; string copyright = "// From Thinking in C++, 2nd Edition\n" "// Available at http://www.BruceEckel.com\n" "// (c) Bruce Eckel 1999\n" "// Copyright notice in Copyright.txt\n"; string usage = " Usage:ExtractCode source\n" "where source is the ASCII file containing \n" "the embedded tagged sourcefiles. The ASCII \n" "file must also contain an embedded compiler\n" "configuration file called CompileDB.txt \n" "See Thinking in C++, 2nd ed. for details\n"; // Tool to remove the white space from both ends: string trim(const string& s) { if(s.length() == 0) return s;
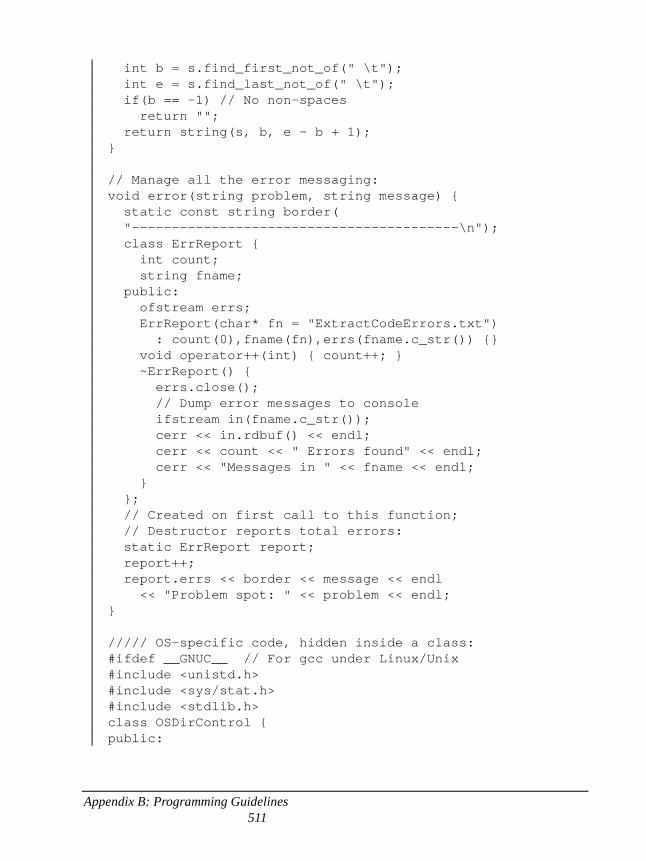
Appendix B: Programming Guidelines 511
int b = s.find_first_not_of(" \t"); int e = s.find_last_not_of(" \t"); if(b == -1) // No non-spaces return ""; return string(s, b, e - b + 1); } // Manage all the error messaging: void error(string problem, string message) { static const string border( "-----------------------------------------\n"); class ErrReport { int count; string fname; public: ofstream errs; ErrReport(char* fn = "ExtractCodeErrors.txt") : count(0),fname(fn),errs(fname.c_str()) {} void operator++(int) { count++; } ~ErrReport() { errs.close(); // Dump error messages to console ifstream in(fname.c_str()); cerr << in.rdbuf() << endl; cerr << count << " Errors found" << endl; cerr << "Messages in " << fname << endl; } }; // Created on first call to this function; // Destructor reports total errors: static ErrReport report; report++; report.errs << border << message << endl << "Problem spot: " << problem << endl; } ///// OS-specific code, hidden inside a class: #ifdef __GNUC__ // For gcc under Linux/Unix #include <unistd.h> #include <sys/stat.h> #include <stdlib.h> class OSDirControl { public:
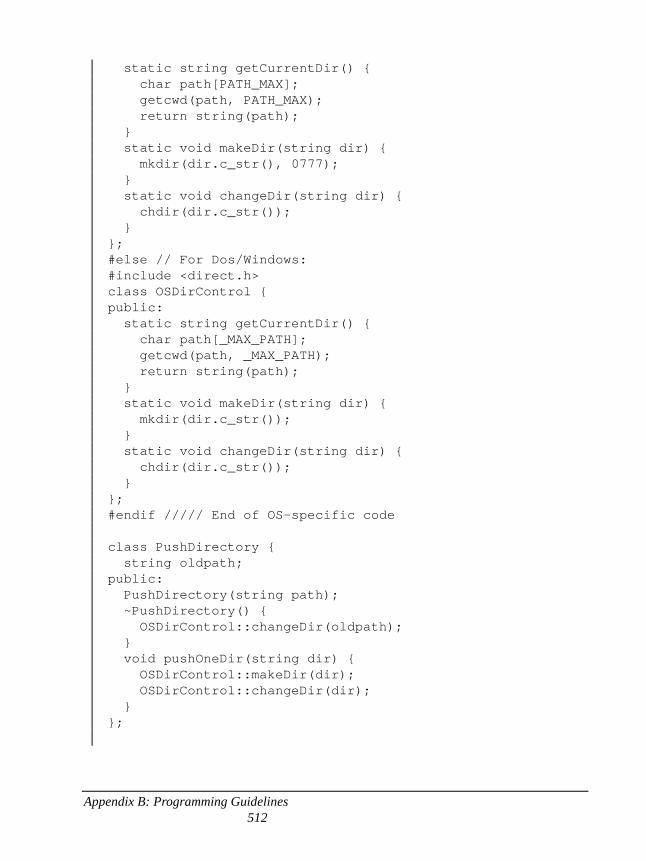
Appendix B: Programming Guidelines 512
static string getCurrentDir() { char path[PATH_MAX]; getcwd(path, PATH_MAX); return string(path); } static void makeDir(string dir) { mkdir(dir.c_str(), 0777); } static void changeDir(string dir) { chdir(dir.c_str()); } }; #else // For Dos/Windows: #include <direct.h> class OSDirControl { public: static string getCurrentDir() { char path[_MAX_PATH]; getcwd(path, _MAX_PATH); return string(path); } static void makeDir(string dir) { mkdir(dir.c_str()); } static void changeDir(string dir) { chdir(dir.c_str()); } }; #endif ///// End of OS-specific code class PushDirectory { string oldpath; public: PushDirectory(string path); ~PushDirectory() { OSDirControl::changeDir(oldpath); } void pushOneDir(string dir) { OSDirControl::makeDir(dir); OSDirControl::changeDir(dir); } };
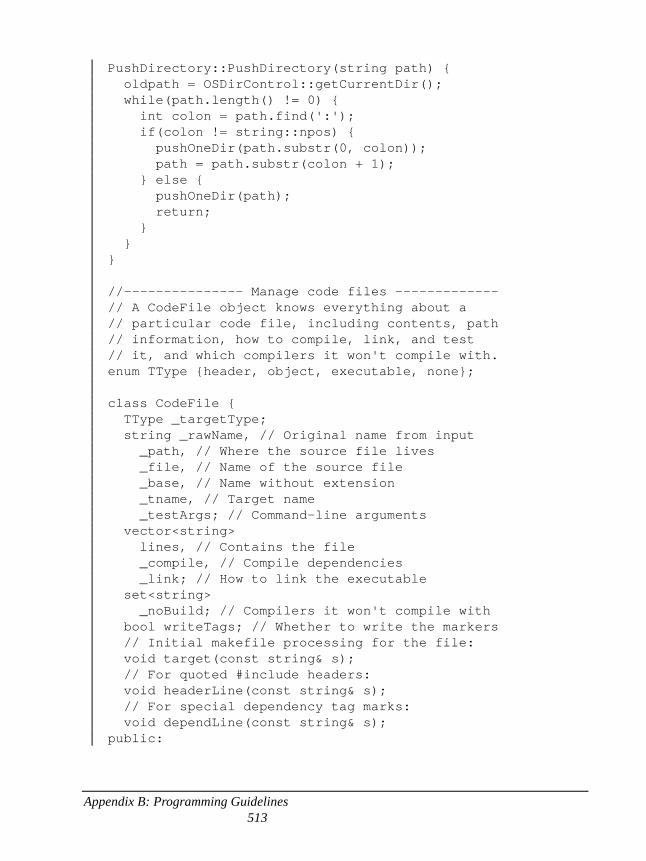
Appendix B: Programming Guidelines 513
PushDirectory::PushDirectory(string path) { oldpath = OSDirControl::getCurrentDir(); while(path.length() != 0) { int colon = path.find(':'); if(colon != string::npos) { pushOneDir(path.substr(0, colon)); path = path.substr(colon + 1); } else { pushOneDir(path); return; } } } //--------------- Manage code files ------------- // A CodeFile object knows everything about a // particular code file, including contents, path // information, how to compile, link, and test // it, and which compilers it won't compile with. enum TType {header, object, executable, none}; class CodeFile { TType _targetType; string _rawName, // Original name from input _path, // Where the source file lives _file, // Name of the source file _base, // Name without extension _tname, // Target name _testArgs; // Command-line arguments vector<string> lines, // Contains the file _compile, // Compile dependencies _link; // How to link the executable set<string> _noBuild; // Compilers it won't compile with bool writeTags; // Whether to write the markers // Initial makefile processing for the file: void target(const string& s); // For quoted #include headers: void headerLine(const string& s); // For special dependency tag marks: void dependLine(const string& s); public:
Appendix B: Programming Guidelines 514
CodeFile(istream& in, string& s); const string& rawName() { return _rawName; } const string& path() { return _path; } const string& file() { return _file; } const string& base() { return _base; } const string& targetName() { return _tname; } TType targetType() { return _targetType; } const vector<string>& compile() { return _compile; } const vector<string>& link() { return _link; } const set<string>& noBuild() { return _noBuild; } const string& testArgs() { return _testArgs; } // Add a compiler it won't compile with: void addFailure(const string& failure) { _noBuild.insert(failure); } bool compilesOK(string compiler) { return _noBuild.count(compiler) == 0; } friend ostream& operator<<(ostream& os, const CodeFile& cf) { copy(cf.lines.begin(), cf.lines.end(), ostream_iterator<string>(os, "")); return os; } void write() { PushDirectory pd(_path); ofstream listing(_file.c_str()); listing << *this; // Write the file } void dumpInfo(ostream& os); }; void CodeFile::target(const string& s) { // Find the base name of the file (without // the extension): int lastDot = _file.find_last_of('.'); if(lastDot == string::npos) {
Appendix B: Programming Guidelines 515
error(s, "Missing extension"); exit(1); } _base = _file.substr(0, lastDot); // Determine the type of file and target: if(s.find(".h") != string::npos || s.find(".H") != string::npos) { _targetType = header; _tname = _file; return; } if(s.find(".txt") != string::npos || s.find(".TXT") != string::npos || s.find(".dat") != string::npos || s.find(".DAT") != string::npos) { // Text file, not involved in make _targetType = none; _tname = _file; return; } // C++ objs/exes depend on their own source: _compile.push_back(_file); if(s.find("{O}") != string::npos) { // Don't build an executable from this file _targetType = object; _tname = _base; } else { _targetType = executable; _tname = _base; // The exe depends on its own object file: _link.push_back(_base); } } void CodeFile::headerLine(const string& s) { int start = s.find('\"'); int end = s.find('\"', start + 1); int len = end - start - 1; _compile.push_back(s.substr(start + 1, len)); } void CodeFile::dependLine(const string& s) { const string linktag("//{L} ");
Appendix B: Programming Guidelines 516
string deps = trim(s.substr(linktag.length())); while(true) { int end = deps.find(' '); string dep = deps.substr(0, end); _link.push_back(dep); if(end == string::npos) // Last one break; else deps = trim(deps.substr(end)); } } CodeFile::CodeFile(istream& in, string& s) { // If false, don't write begin & end tags: writeTags = (s[3] != '!'); // Assume a space after the starting tag: _file = s.substr(s.find(' ') + 1); // There will always be at least one colon: int lastColon = _file.find_last_of(':'); if(lastColon == string::npos) { error(s, "Missing path"); lastColon = 0; // Recover from error } _rawName = trim(_file); _path = _file.substr(0, lastColon); _file = _file.substr(lastColon + 1); _file =_file.substr(0,_file.find_last_of(' ')); cout << "path = [" << _path << "] " << "file = [" << _file << "]" << endl; target(s); // Determine target type if(writeTags){ lines.push_back(s + '\n'); lines.push_back(copyright); } string s2; while(getline(in, s2)) { // Look for specified link dependencies: if(s2.find("//{L}") == 0) // 0: Start of line dependLine(s2); // Look for command-line arguments for test: if(s2.find("//{T}") == 0) // 0: Start of line _testArgs = s2.substr(strlen("//{T}") + 1); // Look for quoted includes:
Appendix B: Programming Guidelines 517
if(s2.find("#include \"") != string::npos) { headerLine(s2); // Grab makefile info } // Look for end marker: if(s2.find("//" "/:~") != string::npos) { if(writeTags) lines.push_back(s2 + '\n'); return; // Found the end } // Make sure you don't see another start: if(s2.find("//" ":") != string::npos || s2.find("/*" ":") != string::npos) { error(s, "Error: new file started before" " previous file concluded"); return; } // Write ordinary line: lines.push_back(s2 + '\n'); } } void CodeFile::dumpInfo(ostream& os) { os << _path << ':' << _file << endl; os << "target: " << _tname << endl; os << "compile: " << endl; for(int i = 0; i < _compile.size(); i++) os << '\t' << _compile[i] << endl; os << "link: " << endl; for(int i = 0; i < _link.size(); i++) os << '\t' << _link[i] << endl; if(_noBuild.size() != 0) { os << "Won't build with: " << endl; copy(_noBuild.begin(), _noBuild.end(), ostream_iterator<string>(os, "\n")); } } //--------- Manage compiler information --------- class CompilerData { // Information about each compiler: vector<string> rules; // Makefile rules set<string> fails; // Non-compiling files string objExtension; // File name extensions
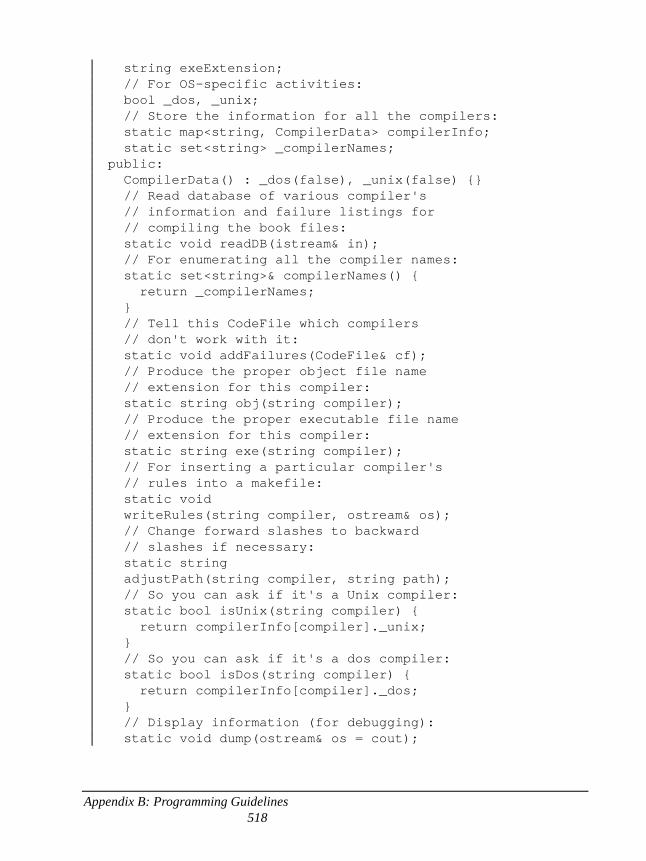
Appendix B: Programming Guidelines 518
string exeExtension; // For OS-specific activities: bool _dos, _unix; // Store the information for all the compilers: static map<string, CompilerData> compilerInfo; static set<string> _compilerNames; public: CompilerData() : _dos(false), _unix(false) {} // Read database of various compiler's // information and failure listings for // compiling the book files: static void readDB(istream& in); // For enumerating all the compiler names: static set<string>& compilerNames() { return _compilerNames; } // Tell this CodeFile which compilers // don't work with it: static void addFailures(CodeFile& cf); // Produce the proper object file name // extension for this compiler: static string obj(string compiler); // Produce the proper executable file name // extension for this compiler: static string exe(string compiler); // For inserting a particular compiler's // rules into a makefile: static void writeRules(string compiler, ostream& os); // Change forward slashes to backward // slashes if necessary: static string adjustPath(string compiler, string path); // So you can ask if it's a Unix compiler: static bool isUnix(string compiler) { return compilerInfo[compiler]._unix; } // So you can ask if it's a dos compiler: static bool isDos(string compiler) { return compilerInfo[compiler]._dos; } // Display information (for debugging): static void dump(ostream& os = cout);
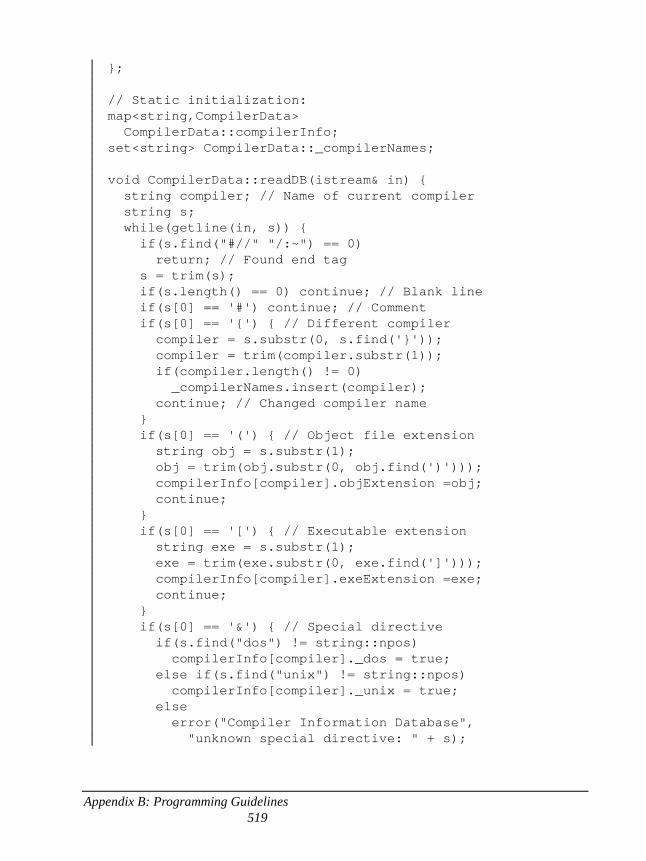
Appendix B: Programming Guidelines 519
}; // Static initialization: map<string,CompilerData> CompilerData::compilerInfo; set<string> CompilerData::_compilerNames; void CompilerData::readDB(istream& in) { string compiler; // Name of current compiler string s; while(getline(in, s)) { if(s.find("#//" "/:~") == 0) return; // Found end tag s = trim(s); if(s.length() == 0) continue; // Blank line if(s[0] == '#') continue; // Comment if(s[0] == '{') { // Different compiler compiler = s.substr(0, s.find('}')); compiler = trim(compiler.substr(1)); if(compiler.length() != 0) _compilerNames.insert(compiler); continue; // Changed compiler name } if(s[0] == '(') { // Object file extension string obj = s.substr(1); obj = trim(obj.substr(0, obj.find(')'))); compilerInfo[compiler].objExtension =obj; continue; } if(s[0] == '[') { // Executable extension string exe = s.substr(1); exe = trim(exe.substr(0, exe.find(']'))); compilerInfo[compiler].exeExtension =exe; continue; } if(s[0] == '&') { // Special directive if(s.find("dos") != string::npos) compilerInfo[compiler]._dos = true; else if(s.find("unix") != string::npos) compilerInfo[compiler]._unix = true; else error("Compiler Information Database", "unknown special directive: " + s);
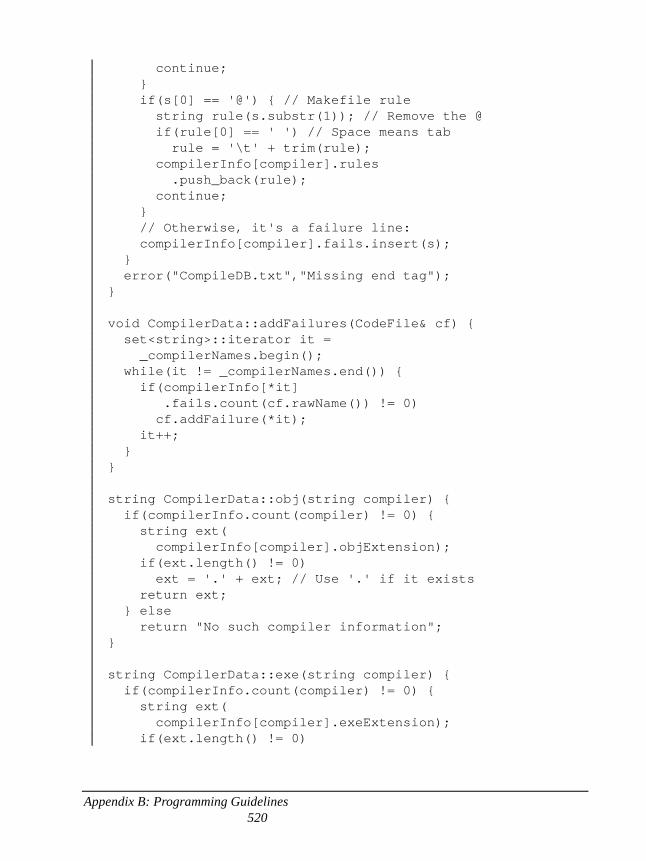
Appendix B: Programming Guidelines 520
continue; } if(s[0] == '@') { // Makefile rule string rule(s.substr(1)); // Remove the @ if(rule[0] == ' ') // Space means tab rule = '\t' + trim(rule); compilerInfo[compiler].rules .push_back(rule); continue; } // Otherwise, it's a failure line: compilerInfo[compiler].fails.insert(s); } error("CompileDB.txt","Missing end tag"); } void CompilerData::addFailures(CodeFile& cf) { set<string>::iterator it = _compilerNames.begin(); while(it != _compilerNames.end()) { if(compilerInfo[*it] .fails.count(cf.rawName()) != 0) cf.addFailure(*it); it++; } } string CompilerData::obj(string compiler) { if(compilerInfo.count(compiler) != 0) { string ext( compilerInfo[compiler].objExtension); if(ext.length() != 0) ext = '.' + ext; // Use '.' if it exists return ext; } else return "No such compiler information"; } string CompilerData::exe(string compiler) { if(compilerInfo.count(compiler) != 0) { string ext( compilerInfo[compiler].exeExtension); if(ext.length() != 0)
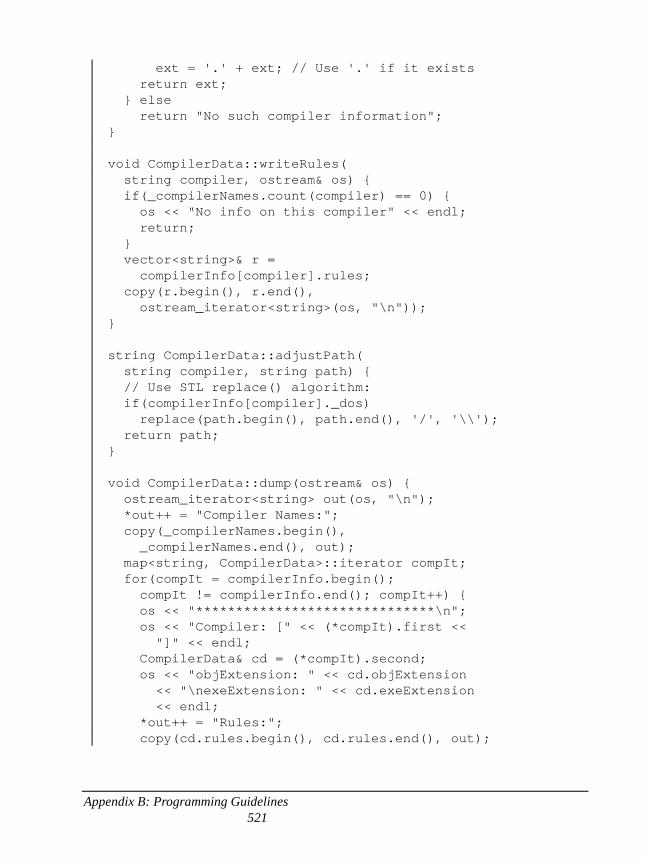
Appendix B: Programming Guidelines 521
ext = '.' + ext; // Use '.' if it exists return ext; } else return "No such compiler information"; } void CompilerData::writeRules( string compiler, ostream& os) { if(_compilerNames.count(compiler) == 0) { os << "No info on this compiler" << endl; return; } vector<string>& r = compilerInfo[compiler].rules; copy(r.begin(), r.end(), ostream_iterator<string>(os, "\n")); } string CompilerData::adjustPath( string compiler, string path) { // Use STL replace() algorithm: if(compilerInfo[compiler]._dos) replace(path.begin(), path.end(), '/', '\\'); return path; } void CompilerData::dump(ostream& os) { ostream_iterator<string> out(os, "\n"); *out++ = "Compiler Names:"; copy(_compilerNames.begin(), _compilerNames.end(), out); map<string, CompilerData>::iterator compIt; for(compIt = compilerInfo.begin(); compIt != compilerInfo.end(); compIt++) { os << "******************************\n"; os << "Compiler: [" << (*compIt).first << "]" << endl; CompilerData& cd = (*compIt).second; os << "objExtension: " << cd.objExtension << "\nexeExtension: " << cd.exeExtension << endl; *out++ = "Rules:"; copy(cd.rules.begin(), cd.rules.end(), out);
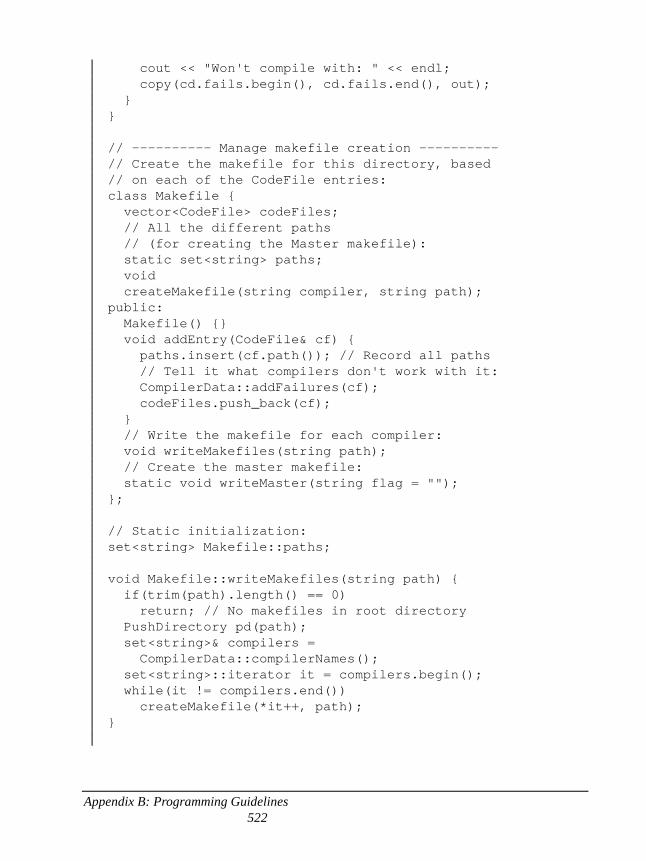
Appendix B: Programming Guidelines 522
cout << "Won't compile with: " << endl; copy(cd.fails.begin(), cd.fails.end(), out); } } // ---------- Manage makefile creation ---------- // Create the makefile for this directory, based // on each of the CodeFile entries: class Makefile { vector<CodeFile> codeFiles; // All the different paths // (for creating the Master makefile): static set<string> paths; void createMakefile(string compiler, string path); public: Makefile() {} void addEntry(CodeFile& cf) { paths.insert(cf.path()); // Record all paths // Tell it what compilers don't work with it: CompilerData::addFailures(cf); codeFiles.push_back(cf); } // Write the makefile for each compiler: void writeMakefiles(string path); // Create the master makefile: static void writeMaster(string flag = ""); }; // Static initialization: set<string> Makefile::paths; void Makefile::writeMakefiles(string path) { if(trim(path).length() == 0) return; // No makefiles in root directory PushDirectory pd(path); set<string>& compilers = CompilerData::compilerNames(); set<string>::iterator it = compilers.begin(); while(it != compilers.end()) createMakefile(*it++, path); }
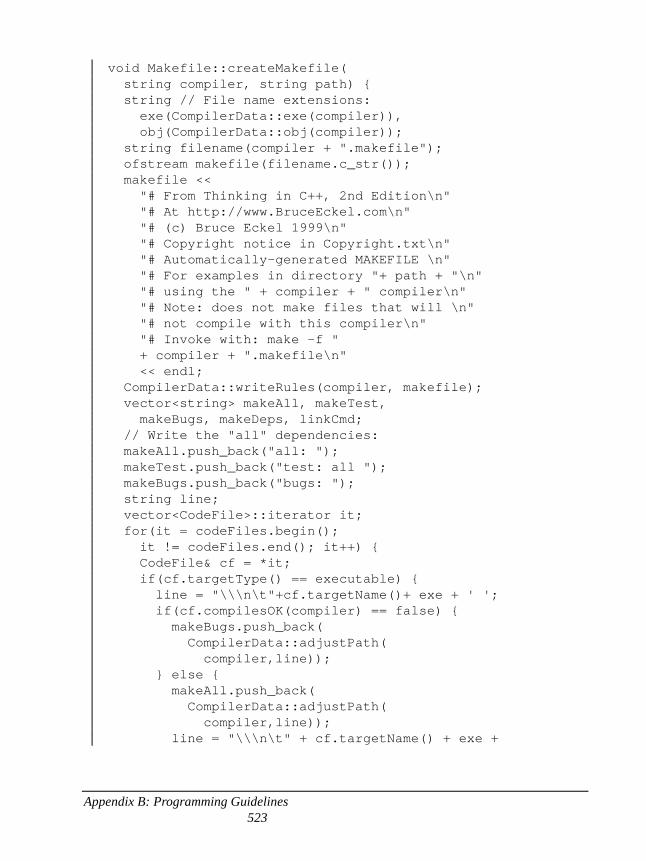
Appendix B: Programming Guidelines 523
void Makefile::createMakefile( string compiler, string path) { string // File name extensions: exe(CompilerData::exe(compiler)), obj(CompilerData::obj(compiler)); string filename(compiler + ".makefile"); ofstream makefile(filename.c_str()); makefile << "# From Thinking in C++, 2nd Edition\n" "# At http://www.BruceEckel.com\n" "# (c) Bruce Eckel 1999\n" "# Copyright notice in Copyright.txt\n" "# Automatically-generated MAKEFILE \n" "# For examples in directory "+ path + "\n" "# using the " + compiler + " compiler\n" "# Note: does not make files that will \n" "# not compile with this compiler\n" "# Invoke with: make -f " + compiler + ".makefile\n" << endl; CompilerData::writeRules(compiler, makefile); vector<string> makeAll, makeTest, makeBugs, makeDeps, linkCmd; // Write the "all" dependencies: makeAll.push_back("all: "); makeTest.push_back("test: all "); makeBugs.push_back("bugs: "); string line; vector<CodeFile>::iterator it; for(it = codeFiles.begin(); it != codeFiles.end(); it++) { CodeFile& cf = *it; if(cf.targetType() == executable) { line = "\\\n\t"+cf.targetName()+ exe + ' '; if(cf.compilesOK(compiler) == false) { makeBugs.push_back( CompilerData::adjustPath( compiler,line)); } else { makeAll.push_back( CompilerData::adjustPath( compiler,line)); line = "\\\n\t" + cf.targetName() + exe +
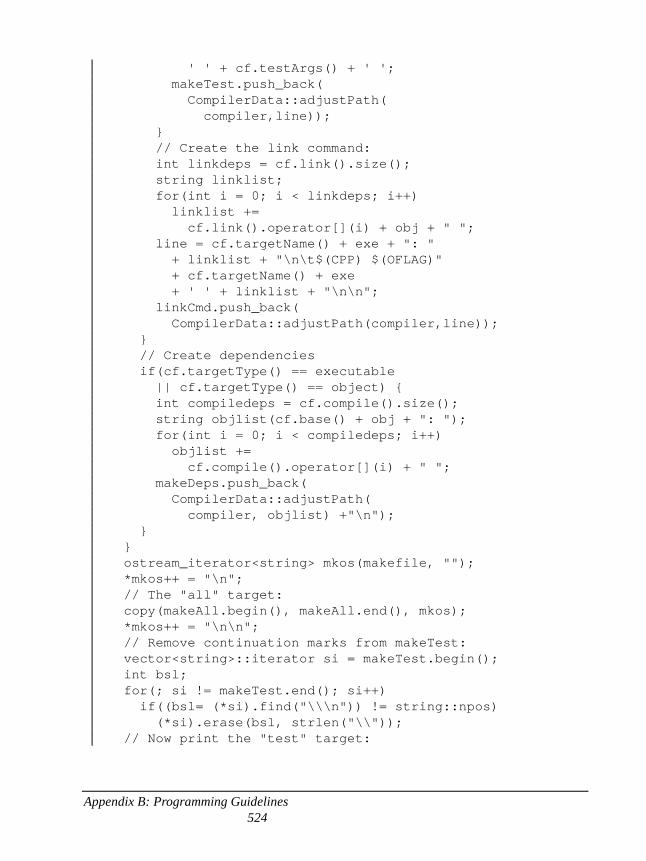
Appendix B: Programming Guidelines 524
' ' + cf.testArgs() + ' '; makeTest.push_back( CompilerData::adjustPath( compiler,line)); } // Create the link command: int linkdeps = cf.link().size(); string linklist; for(int i = 0; i < linkdeps; i++) linklist += cf.link().operator[](i) + obj + " "; line = cf.targetName() + exe + ": " + linklist + "\n\t$(CPP) $(OFLAG)" + cf.targetName() + exe + ' ' + linklist + "\n\n"; linkCmd.push_back( CompilerData::adjustPath(compiler,line)); } // Create dependencies if(cf.targetType() == executable || cf.targetType() == object) { int compiledeps = cf.compile().size(); string objlist(cf.base() + obj + ": "); for(int i = 0; i < compiledeps; i++) objlist += cf.compile().operator[](i) + " "; makeDeps.push_back( CompilerData::adjustPath( compiler, objlist) +"\n"); } } ostream_iterator<string> mkos(makefile, ""); *mkos++ = "\n"; // The "all" target: copy(makeAll.begin(), makeAll.end(), mkos); *mkos++ = "\n\n"; // Remove continuation marks from makeTest: vector<string>::iterator si = makeTest.begin(); int bsl; for(; si != makeTest.end(); si++) if((bsl= (*si).find("\\\n")) != string::npos) (*si).erase(bsl, strlen("\\")); // Now print the "test" target:
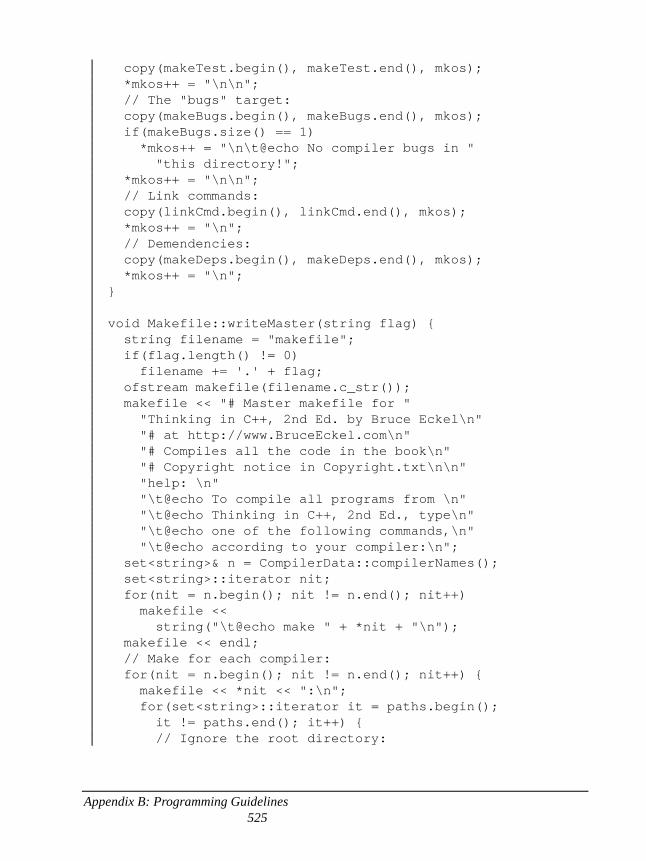
Appendix B: Programming Guidelines 525
copy(makeTest.begin(), makeTest.end(), mkos); *mkos++ = "\n\n"; // The "bugs" target: copy(makeBugs.begin(), makeBugs.end(), mkos); if(makeBugs.size() == 1) *mkos++ = "\n\t@echo No compiler bugs in " "this directory!"; *mkos++ = "\n\n"; // Link commands: copy(linkCmd.begin(), linkCmd.end(), mkos); *mkos++ = "\n"; // Demendencies: copy(makeDeps.begin(), makeDeps.end(), mkos); *mkos++ = "\n"; } void Makefile::writeMaster(string flag) { string filename = "makefile"; if(flag.length() != 0) filename += '.' + flag; ofstream makefile(filename.c_str()); makefile << "# Master makefile for " "Thinking in C++, 2nd Ed. by Bruce Eckel\n" "# at http://www.BruceEckel.com\n" "# Compiles all the code in the book\n" "# Copyright notice in Copyright.txt\n\n" "help: \n" "\t@echo To compile all programs from \n" "\t@echo Thinking in C++, 2nd Ed., type\n" "\t@echo one of the following commands,\n" "\t@echo according to your compiler:\n"; set<string>& n = CompilerData::compilerNames(); set<string>::iterator nit; for(nit = n.begin(); nit != n.end(); nit++) makefile << string("\t@echo make " + *nit + "\n"); makefile << endl; // Make for each compiler: for(nit = n.begin(); nit != n.end(); nit++) { makefile << *nit << ":\n"; for(set<string>::iterator it = paths.begin(); it != paths.end(); it++) { // Ignore the root directory:
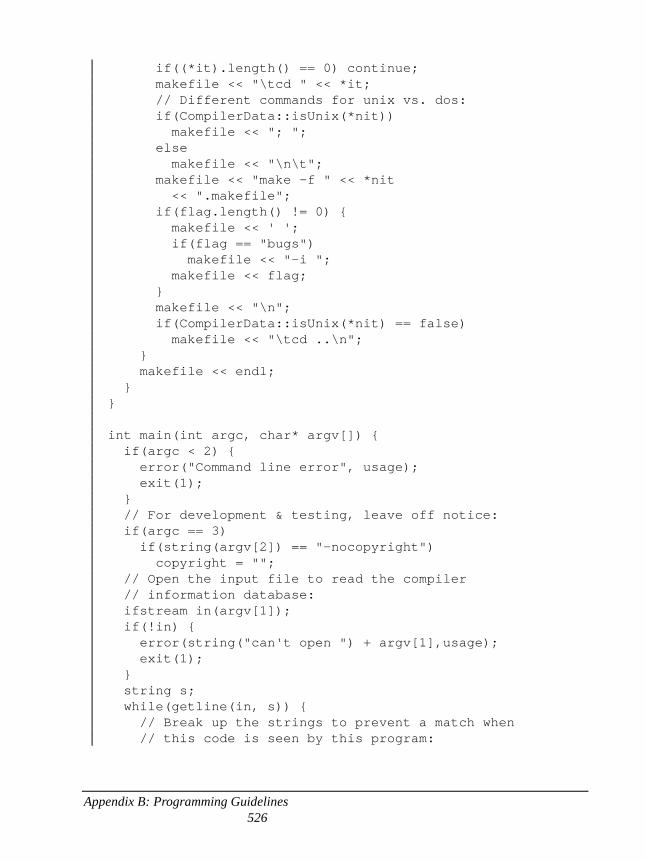
Appendix B: Programming Guidelines 526
if((*it).length() == 0) continue; makefile << "\tcd " << *it; // Different commands for unix vs. dos: if(CompilerData::isUnix(*nit)) makefile << "; "; else makefile << "\n\t"; makefile << "make -f " << *nit << ".makefile"; if(flag.length() != 0) { makefile << ' '; if(flag == "bugs") makefile << "-i "; makefile << flag; } makefile << "\n"; if(CompilerData::isUnix(*nit) == false) makefile << "\tcd ..\n"; } makefile << endl; } } int main(int argc, char* argv[]) { if(argc < 2) { error("Command line error", usage); exit(1); } // For development & testing, leave off notice: if(argc == 3) if(string(argv[2]) == "-nocopyright") copyright = ""; // Open the input file to read the compiler // information database: ifstream in(argv[1]); if(!in) { error(string("can't open ") + argv[1],usage); exit(1); } string s; while(getline(in, s)) { // Break up the strings to prevent a match when // this code is seen by this program:
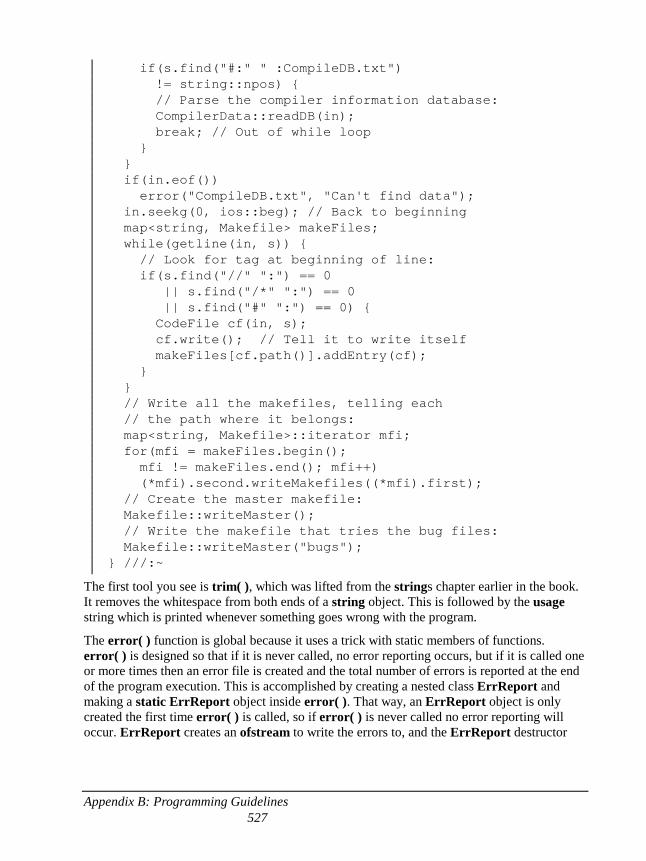
Appendix B: Programming Guidelines 527
if(s.find("#:" " :CompileDB.txt") != string::npos) { // Parse the compiler information database: CompilerData::readDB(in); break; // Out of while loop } } if(in.eof()) error("CompileDB.txt", "Can't find data"); in.seekg(0, ios::beg); // Back to beginning map<string, Makefile> makeFiles; while(getline(in, s)) { // Look for tag at beginning of line: if(s.find("//" ":") == 0 || s.find("/*" ":") == 0 || s.find("#" ":") == 0) { CodeFile cf(in, s); cf.write(); // Tell it to write itself makeFiles[cf.path()].addEntry(cf); } } // Write all the makefiles, telling each // the path where it belongs: map<string, Makefile>::iterator mfi; for(mfi = makeFiles.begin(); mfi != makeFiles.end(); mfi++) (*mfi).second.writeMakefiles((*mfi).first); // Create the master makefile: Makefile::writeMaster(); // Write the makefile that tries the bug files: Makefile::writeMaster("bugs"); } ///:~
The first tool you see is trim( ), which was lifted from the strings chapter earlier in the book. It removes the whitespace from both ends of a string object. This is followed by the usage string which is printed whenever something goes wrong with the program.
The error( ) function is global because it uses a trick with static members of functions. error( ) is designed so that if it is never called, no error reporting occurs, but if it is called one or more times then an error file is created and the total number of errors is reported at the end of the program execution. This is accomplished by creating a nested class ErrReport and making a static ErrReport object inside error( ). That way, an ErrReport object is only created the first time error( ) is called, so if error( ) is never called no error reporting will occur. ErrReport creates an ofstream to write the errors to, and the ErrReport destructor
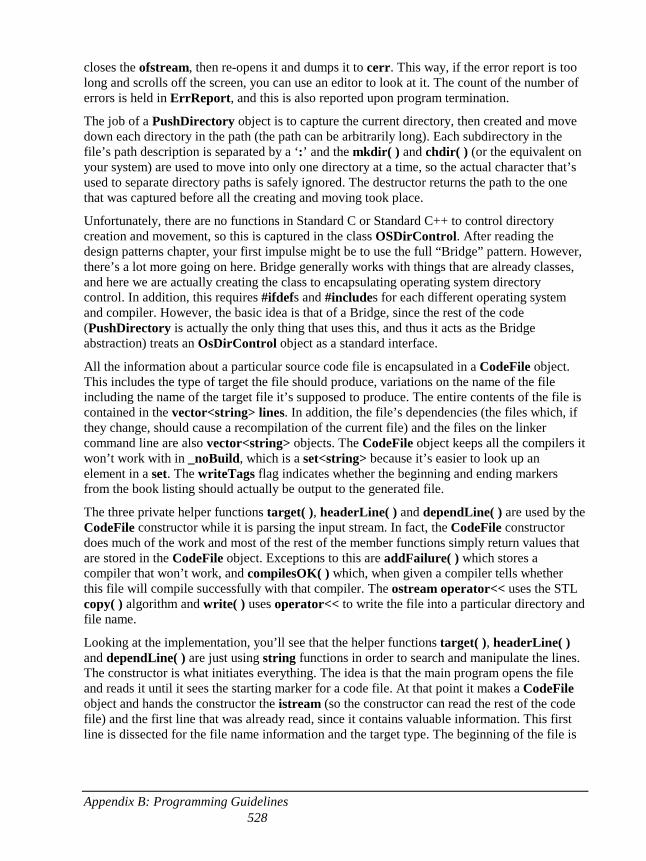
Appendix B: Programming Guidelines 528
closes the ofstream, then re-opens it and dumps it to cerr. This way, if the error report is too long and scrolls off the screen, you can use an editor to look at it. The count of the number of errors is held in ErrReport, and this is also reported upon program termination.
The job of a PushDirectory object is to capture the current directory, then created and move down each directory in the path (the path can be arbitrarily long). Each subdirectory in the file’s path description is separated by a ‘:’ and the mkdir( ) and chdir( ) (or the equivalent on your system) are used to move into only one directory at a time, so the actual character that’s used to separate directory paths is safely ignored. The destructor returns the path to the one that was captured before all the creating and moving took place.
Unfortunately, there are no functions in Standard C or Standard C++ to control directory creation and movement, so this is captured in the class OSDirControl. After reading the design patterns chapter, your first impulse might be to use the full “Bridge” pattern. However, there’s a lot more going on here. Bridge generally works with things that are already classes, and here we are actually creating the class to encapsulating operating system directory control. In addition, this requires #ifdefs and #includes for each different operating system and compiler. However, the basic idea is that of a Bridge, since the rest of the code (PushDirectory is actually the only thing that uses this, and thus it acts as the Bridge abstraction) treats an OsDirControl object as a standard interface.
All the information about a particular source code file is encapsulated in a CodeFile object. This includes the type of target the file should produce, variations on the name of the file including the name of the target file it’s supposed to produce. The entire contents of the file is contained in the vector<string> lines. In addition, the file’s dependencies (the files which, if they change, should cause a recompilation of the current file) and the files on the linker command line are also vector<string> objects. The CodeFile object keeps all the compilers it won’t work with in _noBuild, which is a set<string> because it’s easier to look up an element in a set. The writeTags flag indicates whether the beginning and ending markers from the book listing should actually be output to the generated file.
The three private helper functions target( ), headerLine( ) and dependLine( ) are used by the CodeFile constructor while it is parsing the input stream. In fact, the CodeFile constructor does much of the work and most of the rest of the member functions simply return values that are stored in the CodeFile object. Exceptions to this are addFailure( ) which stores a compiler that won’t work, and compilesOK( ) which, when given a compiler tells whether this file will compile successfully with that compiler. The ostream operator<< uses the STL copy( ) algorithm and write( ) uses operator<< to write the file into a particular directory and file name.
Looking at the implementation, you’ll see that the helper functions target( ), headerLine( ) and dependLine( ) are just using string functions in order to search and manipulate the lines. The constructor is what initiates everything. The idea is that the main program opens the file and reads it until it sees the starting marker for a code file. At that point it makes a CodeFile object and hands the constructor the istream (so the constructor can read the rest of the code file) and the first line that was already read, since it contains valuable information. This first line is dissected for the file name information and the target type. The beginning of the file is
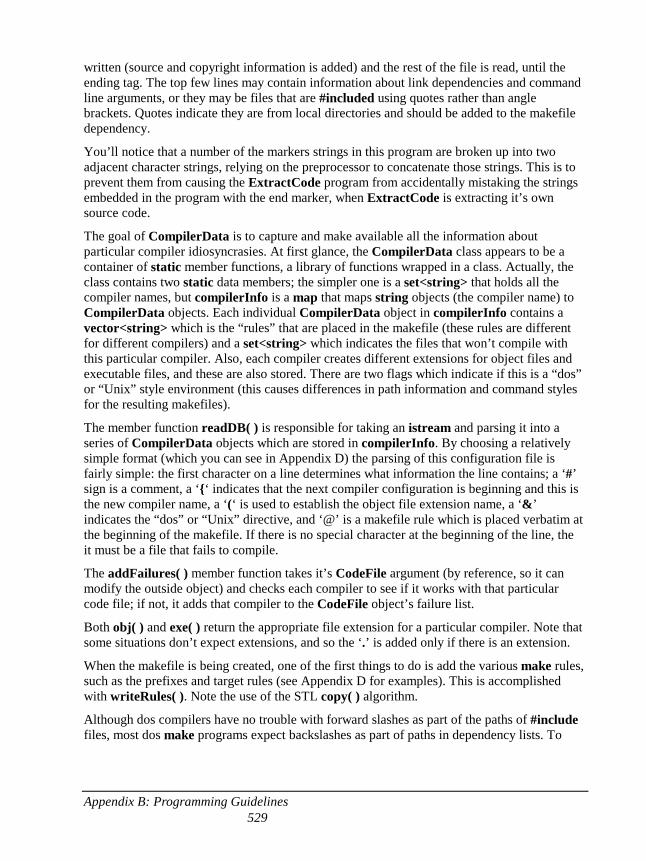
Appendix B: Programming Guidelines 529
written (source and copyright information is added) and the rest of the file is read, until the ending tag. The top few lines may contain information about link dependencies and command line arguments, or they may be files that are #included using quotes rather than angle brackets. Quotes indicate they are from local directories and should be added to the makefile dependency.
You’ll notice that a number of the markers strings in this program are broken up into two adjacent character strings, relying on the preprocessor to concatenate those strings. This is to prevent them from causing the ExtractCode program from accidentally mistaking the strings embedded in the program with the end marker, when ExtractCode is extracting it’s own source code.
The goal of CompilerData is to capture and make available all the information about particular compiler idiosyncrasies. At first glance, the CompilerData class appears to be a container of static member functions, a library of functions wrapped in a class. Actually, the class contains two static data members; the simpler one is a set<string> that holds all the compiler names, but compilerInfo is a map that maps string objects (the compiler name) to CompilerData objects. Each individual CompilerData object in compilerInfo contains a vector<string> which is the “rules” that are placed in the makefile (these rules are different for different compilers) and a set<string> which indicates the files that won’t compile with this particular compiler. Also, each compiler creates different extensions for object files and executable files, and these are also stored. There are two flags which indicate if this is a “dos” or “Unix” style environment (this causes differences in path information and command styles for the resulting makefiles).
The member function readDB( ) is responsible for taking an istream and parsing it into a series of CompilerData objects which are stored in compilerInfo. By choosing a relatively simple format (which you can see in Appendix D) the parsing of this configuration file is fairly simple: the first character on a line determines what information the line contains; a ‘#’ sign is a comment, a ‘{‘ indicates that the next compiler configuration is beginning and this is the new compiler name, a ‘(‘ is used to establish the object file extension name, a ‘&’ indicates the “dos” or “Unix” directive, and ‘@’ is a makefile rule which is placed verbatim at the beginning of the makefile. If there is no special character at the beginning of the line, the it must be a file that fails to compile.
The addFailures( ) member function takes it’s CodeFile argument (by reference, so it can modify the outside object) and checks each compiler to see if it works with that particular code file; if not, it adds that compiler to the CodeFile object’s failure list.
Both obj( ) and exe( ) return the appropriate file extension for a particular compiler. Note that some situations don’t expect extensions, and so the ‘.’ is added only if there is an extension.
When the makefile is being created, one of the first things to do is add the various make rules, such as the prefixes and target rules (see Appendix D for examples). This is accomplished with writeRules( ). Note the use of the STL copy( ) algorithm.
Although dos compilers have no trouble with forward slashes as part of the paths of #include files, most dos make programs expect backslashes as part of paths in dependency lists. To
Appendix B: Programming Guidelines 530
adjust for this, the adjustPath( ) function checks to see if this is a dos compiler, and if so it uses the STL replace( ) algorithm, treating the path string object as a container, to replace forward-slash characters with backward slashes.
The last class, Makefile, is used to create all the makefiles, including the master makefile that moves into each subdirectory and calls the other makefiles. Each Makefile contains a group of CodeFile objects, stored in a vector. You call addEntry( ) to put a new CodeFile into the Makefile; this also adds the failure list to the CodeFile. In addition, there is a static set<string> which contains all the different paths where all the different makefiles will be written; this is used to build the master makefile so it can call all the makefiles in all the subdirectories. The addEntry( ) function also updates this set of paths.
To write the makefile for a particular path (once the entire book file has been read), you call writeMakefiles( ) and hand it the path you want it to write the makefile for. This function simply iterates through all the compilers in compilers and calls createMakefile( ) for each one, passing it the compiler name and the path. The latter function is where the real work gets done. First the file name extensions are captured into local string objects, then the file name is created from the name of the compiler with “.makefile” concatenated (you can use a file with a name other than “makefile” by using the make -f flag). After writing the header comments and the rules for that particular compiler/operating-system combination (remember, these rules come from the compiler configuration file), a vector<string> is created to hold all the different regions of the makefile: the master target list makeAll, the testing commands makeTest, the dependencies makeDeps, and the commands for linking into executables linkCmd. The reason it’s necessary to have lists for these four regions is that each CodeFile object causes entries into each region, so the regions are built as the list of CodeFiles is traversed, and then finally each region is written in its proper order. This is the function which decides whether a file is going to be included, and also calls adjustPath( ) to conditionally change forward slashes to backward slashes.
To write the master makefile in writeMaster( ), the initial comments are written. The default target is called “help,” and it is used if you simply type make. This provides very simple help to the first time user, including the options for make that this makefile supports (that is, all the different compilers the makefile is set up for). Then it creates the list of commands for each compiler, which basically consists of: descending into a subdirectory, call make (recursively) on the appropriate makefile in that subdirectory, and then rising back up to the book’s root subdirectory. Makefiles in Unix and dos work very differently from each other in this situation: in Unix, you cd to the directory, followed by a semicolon and then the command you want to execute – returning to the root directory happens automatically. While in dos, you must cd both down and then back up again, all on separate lines. So the writeMaster( ) function must interrogate to see if a compiler is running under Unix and write different commands accordingly.
Because of the work done in designing the classes (and this was an iterative process; it didn’t just pop out this way), main( ) is quite straightforward to read. After opening the input file, the getline( ) function is used to read each input line until the line containing CompileDB.txt is found; this indicates the beginning of the compiler database listing. Once that has been
Appendix B: Programming Guidelines 531
parsed, seekg( ) is used to move the file pointer back to the beginning so all the code files can be extracted.
Each line is read and if one of the start markers is found in the line, a CodeFile object is created using that line (which has essential information) and the input stream. The constructor returns when it finishes reading its file, and at that point you can turn around and call write( ) for the code file, and it is automatically written to the correct spot (an earlier version of this program collected all the CodeFile objects first and put them in a container, then wrote one directory at a time, but the approach shown above has code that’s easier to understand and the performance impact is not really significant for a tool like this.
For makefile management, a map<string, Makefile> is created, where the string is the path where the makefile exists. The nice thing about this approach is that the Makefile objects will be automatically created whenever you access a new path, as you can see in the line
makeFiles[cf.path()].addEntry(cf);
then to write all the makefiles you simply iterate through the makeFiles map.
Debugging This section contains some tips and techniques which may help during debugging.
assert( ) The Standard C library assert( ) macro is brief, to the point and portable. In addition, when you’re finished debugging you can remove all the code by defining NDEBUG, either on the command-line or in code.
Also, assert( ) can be used while roughing out the code. Later, the calls to assert( ) that are actually providing information to the end user can be replaced with more civilized messages.
Trace macros Sometimes it’s very helpful to print the code of each statement before it is executed, either to cout or to a trace file. Here’s a preprocessor macro to accomplish this:
#define TRACE(ARG) cout << #ARG << endl; ARG
Now you can go through and surround the statements you trace with this macro. Of course, it can introduce problems. For example, if you take the statement:
for(int i = 0; i < 100; i++) cout << i << endl;
And put both lines inside TRACE( ) macros, you get this:
Appendix B: Programming Guidelines 532
TRACE(for(int i = 0; i < 100; i++)) TRACE( cout << i << endl;)
Which expands to this:
cout << "for(int i = 0; i < 100; i++)" << endl; for(int i = 0; i < 100; i++) cout << "cout << i << endl;" << endl; cout << i << endl;
Which isn’t what you want. Thus, this technique must be used carefully.
A variation on the TRACE( ) macro is this:
#define D(a) cout << #a "=[" << a << "]" << nl;
If there’s an expression you want to display, you simply put it inside a call to D( ) and the expression will be printed, followed by its value (assuming there’s an overloaded operator << for the result type). For example, you can say D(a + b). Thus you can use it anytime you want to test an intermediate value to make sure things are OK.
Of course, the above two macros are actually just the two most fundamental things you do with a debugger: trace through the code execution and print values. A good debugger is an excellent productivity tool, but sometimes debuggers are not available, or it’s not convenient to use them. The above techniques always work, regardless of the situation.
Trace file This code allows you to easily create a trace file and send all the output that would normally go to cout into the file. All you have to do is #define TRACEON and include the header file (of course, it’s fairly easy just to write the two key lines right into your file):
//: C10:Trace.h // Creating a trace file #ifndef TRACE_H #define TRACE_H #include <fstream> #ifdef TRACEON ofstream TRACEFILE__("TRACE.OUT"); #define cout TRACEFILE__ #endif #endif // TRACE_H ///:~
Here’s a simple test of the above file:
//: C10:Tracetst.cpp
Appendix B: Programming Guidelines 533
// Test of trace.h #include "../require.h" #include <iostream> #include <fstream> using namespace std; #define TRACEON #include "Trace.h" int main() { ifstream f("Tracetst.cpp"); assure(f, "Tracetst.cpp"); cout << f.rdbuf(); } ///:~
This also uses the assure( ) function defined earlier in the book.
Abstract base class for debugging In the Smalltalk tradition, you can create your own object-based hierarchy, and install pure virtual functions to perform debugging. Then everyone on the team must inherit from this class and redefine the debugging functions. All objects in the system will then have debugging functions available.
Tracking new/delete & malloc/free Common problems with memory allocation include calling delete for things you have malloced, calling free for things you allocated with new, forgetting to release objects from the free store, and releasing them more than once. This section provides a system to help you track these kinds of problems down.
To use the memory checking system, you simply link the obj file in and all the calls to malloc( ), realloc( ), calloc( ), free( ), new and delete are intercepted. However, if you also include the following file (which is optional), all the calls to new will store information about the file and line where they were called. This is accomplished with a use of the placement syntax for operator new (this trick was suggested by Reg Charney of the C++ Standards Committee). The placement syntax is intended for situations where you need to place objects at a specific point in memory. However, it allows you to create an operator new with any number of arguments. This is used to advantage here to store the results of the __FILE__ and __LINE__ macros whenever new is called:
//: C10:MemCheck.h // Memory testing system // This file is only included if you want to // use the special placement syntax to find

Appendix B: Programming Guidelines 534
// out the line number where "new" was called. #ifndef MEMCHECK_H #define MEMCHECK_H #include <cstdlib> // size_t // Use placement syntax to pass extra arguments. // From an idea by Reg Charney: void* operator new( std::size_t sz, char* file, int line); #define new new(__FILE__, __LINE__) #endif // MEMCHECK_H ///:~
In the following file containing the function definitions, you will note that everything is done with standard IO rather than iostreams. This is because, for example, the cout constructor allocates memory. Standard IO ensures against cyclical conditions that can lock up the system.
//: C10:MemCheck.cpp {O} // Memory allocation tester #include <cstdlib> #include <cstring> #include <cstdio> using namespace std; // MemCheck.h must not be included here // Output file object using cstdio // (cout constructor calls malloc()) class OFile { FILE* f; public: OFile(char* name) : f(fopen(name, "w")) {} ~OFile() { fclose(f); } operator FILE*() { return f; } }; extern OFile memtrace; // Comment out the following to send all the // information to the trace file: #define memtrace stdout const unsigned long _pool_sz = 50000L; static unsigned char _memory_pool[_pool_sz]; static unsigned char* _pool_ptr = _memory_pool;
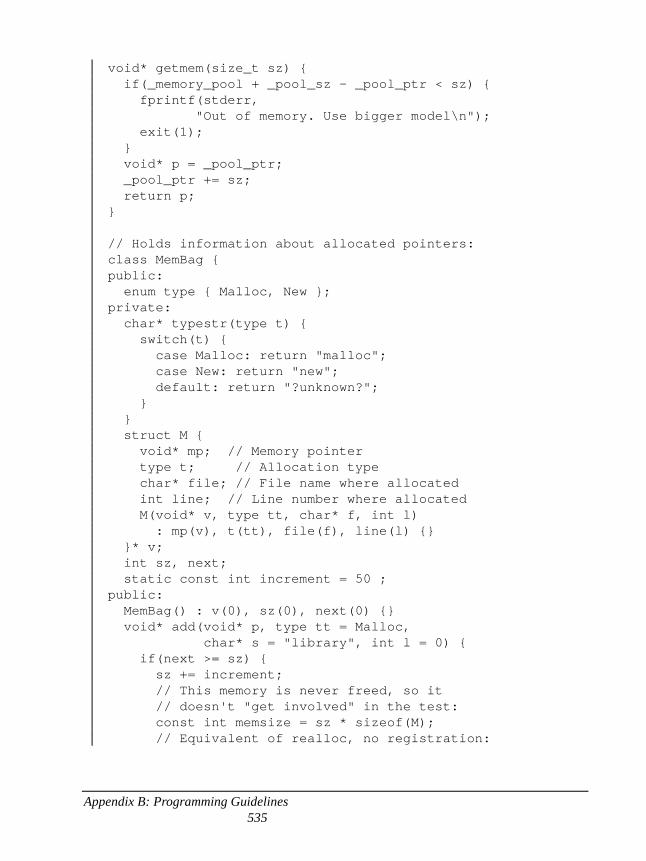
Appendix B: Programming Guidelines 535
void* getmem(size_t sz) { if(_memory_pool + _pool_sz - _pool_ptr < sz) { fprintf(stderr, "Out of memory. Use bigger model\n"); exit(1); } void* p = _pool_ptr; _pool_ptr += sz; return p; } // Holds information about allocated pointers: class MemBag { public: enum type { Malloc, New }; private: char* typestr(type t) { switch(t) { case Malloc: return "malloc"; case New: return "new"; default: return "?unknown?"; } } struct M { void* mp; // Memory pointer type t; // Allocation type char* file; // File name where allocated int line; // Line number where allocated M(void* v, type tt, char* f, int l) : mp(v), t(tt), file(f), line(l) {} }* v; int sz, next; static const int increment = 50 ; public: MemBag() : v(0), sz(0), next(0) {} void* add(void* p, type tt = Malloc, char* s = "library", int l = 0) { if(next >= sz) { sz += increment; // This memory is never freed, so it // doesn't "get involved" in the test: const int memsize = sz * sizeof(M); // Equivalent of realloc, no registration:
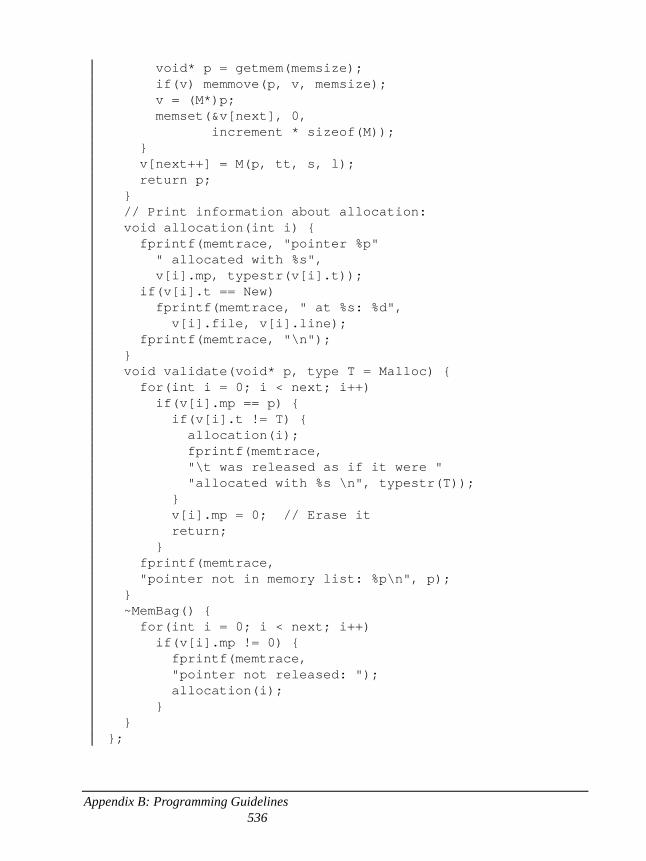
Appendix B: Programming Guidelines 536
void* p = getmem(memsize); if(v) memmove(p, v, memsize); v = (M*)p; memset(&v[next], 0, increment * sizeof(M)); } v[next++] = M(p, tt, s, l); return p; } // Print information about allocation: void allocation(int i) { fprintf(memtrace, "pointer %p" " allocated with %s", v[i].mp, typestr(v[i].t)); if(v[i].t == New) fprintf(memtrace, " at %s: %d", v[i].file, v[i].line); fprintf(memtrace, "\n"); } void validate(void* p, type T = Malloc) { for(int i = 0; i < next; i++) if(v[i].mp == p) { if(v[i].t != T) { allocation(i); fprintf(memtrace, "\t was released as if it were " "allocated with %s \n", typestr(T)); } v[i].mp = 0; // Erase it return; } fprintf(memtrace, "pointer not in memory list: %p\n", p); } ~MemBag() { for(int i = 0; i < next; i++) if(v[i].mp != 0) { fprintf(memtrace, "pointer not released: "); allocation(i); } } };
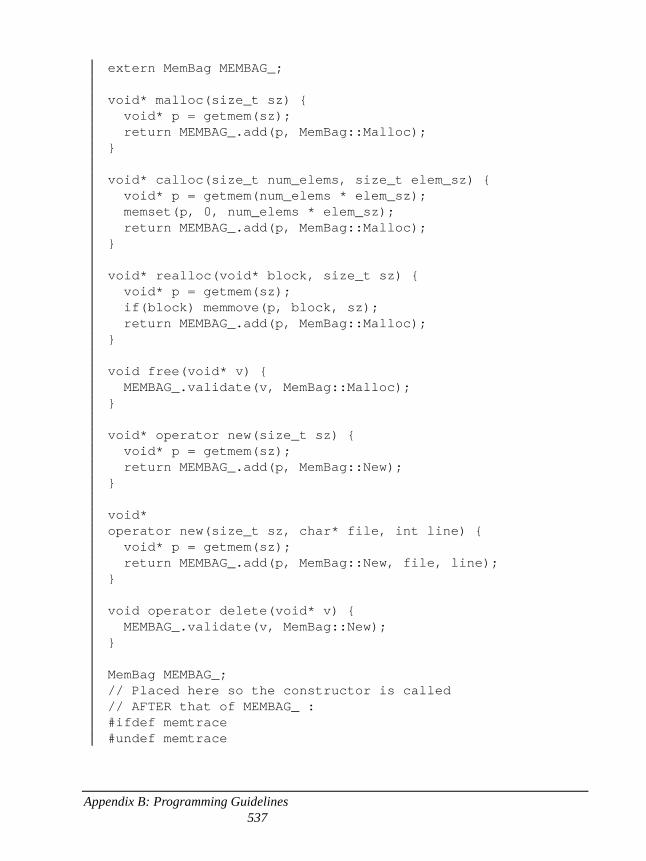
Appendix B: Programming Guidelines 537
extern MemBag MEMBAG_; void* malloc(size_t sz) { void* p = getmem(sz); return MEMBAG_.add(p, MemBag::Malloc); } void* calloc(size_t num_elems, size_t elem_sz) { void* p = getmem(num_elems * elem_sz); memset(p, 0, num_elems * elem_sz); return MEMBAG_.add(p, MemBag::Malloc); } void* realloc(void* block, size_t sz) { void* p = getmem(sz); if(block) memmove(p, block, sz); return MEMBAG_.add(p, MemBag::Malloc); } void free(void* v) { MEMBAG_.validate(v, MemBag::Malloc); } void* operator new(size_t sz) { void* p = getmem(sz); return MEMBAG_.add(p, MemBag::New); } void* operator new(size_t sz, char* file, int line) { void* p = getmem(sz); return MEMBAG_.add(p, MemBag::New, file, line); } void operator delete(void* v) { MEMBAG_.validate(v, MemBag::New); } MemBag MEMBAG_; // Placed here so the constructor is called // AFTER that of MEMBAG_ : #ifdef memtrace #undef memtrace
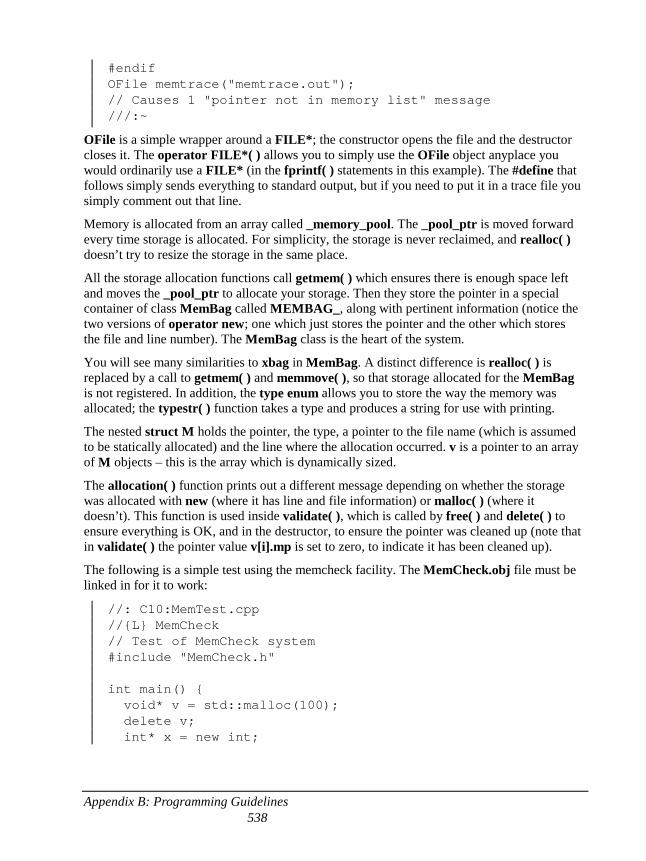
Appendix B: Programming Guidelines 538
#endif OFile memtrace("memtrace.out"); // Causes 1 "pointer not in memory list" message ///:~
OFile is a simple wrapper around a FILE*; the constructor opens the file and the destructor closes it. The operator FILE*( ) allows you to simply use the OFile object anyplace you would ordinarily use a FILE* (in the fprintf( ) statements in this example). The #define that follows simply sends everything to standard output, but if you need to put it in a trace file you simply comment out that line.
Memory is allocated from an array called _memory_pool. The _pool_ptr is moved forward every time storage is allocated. For simplicity, the storage is never reclaimed, and realloc( ) doesn’t try to resize the storage in the same place.
All the storage allocation functions call getmem( ) which ensures there is enough space left and moves the _pool_ptr to allocate your storage. Then they store the pointer in a special container of class MemBag called MEMBAG_, along with pertinent information (notice the two versions of operator new; one which just stores the pointer and the other which stores the file and line number). The MemBag class is the heart of the system.
You will see many similarities to xbag in MemBag. A distinct difference is realloc( ) is replaced by a call to getmem( ) and memmove( ), so that storage allocated for the MemBag is not registered. In addition, the type enum allows you to store the way the memory was allocated; the typestr( ) function takes a type and produces a string for use with printing.
The nested struct M holds the pointer, the type, a pointer to the file name (which is assumed to be statically allocated) and the line where the allocation occurred. v is a pointer to an array of M objects – this is the array which is dynamically sized.
The allocation( ) function prints out a different message depending on whether the storage was allocated with new (where it has line and file information) or malloc( ) (where it doesn’t). This function is used inside validate( ), which is called by free( ) and delete( ) to ensure everything is OK, and in the destructor, to ensure the pointer was cleaned up (note that in validate( ) the pointer value v[i].mp is set to zero, to indicate it has been cleaned up).
The following is a simple test using the memcheck facility. The MemCheck.obj file must be linked in for it to work:
//: C10:MemTest.cpp //{L} MemCheck // Test of MemCheck system #include "MemCheck.h" int main() { void* v = std::malloc(100); delete v; int* x = new int;
Appendix B: Programming Guidelines 539
std::free(x); new double; } ///:~
The trace file created in MemCheck.cpp causes the generation of one "pointer not in memory list" message, apparently from the creation of the file pointer on the heap. [[ This may not still be true – test it ]]
CGI programming in C++ The World-Wide Web has become the common tongue of connectivity on planet earth. It began as simply a way to publish primitively-formatted documents in a way that everyone could read them regardless of the machine they were using. The documents are created in hypertext markup language (HTML) and placed on a central server machine where they are handed to anyone who asks. The documents are requested and read using a web browser that has been written or ported to each particular platform.
Very quickly, just reading a document was not enough and people wanted to be able to collect information from the clients, for example to take orders or allow database lookups from the server. Many different approaches to client-side programming have been tried such as Java applets, JavaScript, and other scripting or programming languages. Unfortunately, whenever you publish something on the Internet you face the problem of a whole history of browsers, some of which may support the particular flavor of your client-side programming tool, and some which won’t. The only reliable and well-established solution27 to this problem is to use straight HTML (which has a very limited way to collect and submit information from the client) and common gateway interface (CGI) programs that are run on the server. The Web server takes an encoded request submitted via an HTML page and responds by invoking a CGI program and handing it the encoded data from the request. This request is classified as either a “GET” or a “POST” (the meaning of which will be explained later) and if you look at the URL window in your Web browser when you push a “submit” button on a page you’ll often be able to see the encoded request and information.
CGI can seem a bit intimidating at first, but it turns out that it’s just messy, and not all that difficult to write. (An innocent statement that’s true of many things – after you understand them.) A CGI program is quite straightforward since it takes its input from environment variables and standard input, and sends its output to standard output. However, there is some decoding that must be done in order to extract the data that’s been sent to you from the client’s web page. In this section you’ll get a crash course in CGI programming, and we’ll develop tools that will perform the decoding for the two different types of CGI submissions
27 Actually, Java Servlets look like a much better solution than CGI, but – at least at this writing – Servlets are still an up-and-coming solution and you’re unlikely to find them provided by your typical ISP.
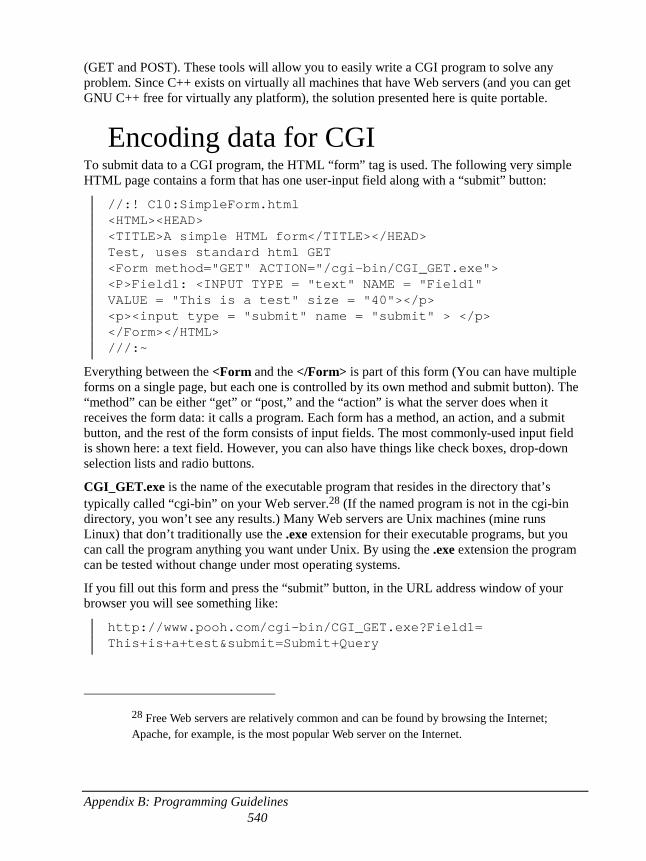
Appendix B: Programming Guidelines 540
(GET and POST). These tools will allow you to easily write a CGI program to solve any problem. Since C++ exists on virtually all machines that have Web servers (and you can get GNU C++ free for virtually any platform), the solution presented here is quite portable.
Encoding data for CGI To submit data to a CGI program, the HTML “form” tag is used. The following very simple HTML page contains a form that has one user-input field along with a “submit” button:
//:! C10:SimpleForm.html <HTML><HEAD> <TITLE>A simple HTML form</TITLE></HEAD> Test, uses standard html GET <Form method="GET" ACTION="/cgi-bin/CGI_GET.exe"> <P>Field1: <INPUT TYPE = "text" NAME = "Field1" VALUE = "This is a test" size = "40"></p> <p><input type = "submit" name = "submit" > </p> </Form></HTML> ///:~
Everything between the <Form and the </Form> is part of this form (You can have multiple forms on a single page, but each one is controlled by its own method and submit button). The “method” can be either “get” or “post,” and the “action” is what the server does when it receives the form data: it calls a program. Each form has a method, an action, and a submit button, and the rest of the form consists of input fields. The most commonly-used input field is shown here: a text field. However, you can also have things like check boxes, drop-down selection lists and radio buttons.
CGI_GET.exe is the name of the executable program that resides in the directory that’s typically called “cgi-bin” on your Web server.28 (If the named program is not in the cgi-bin directory, you won’t see any results.) Many Web servers are Unix machines (mine runs Linux) that don’t traditionally use the .exe extension for their executable programs, but you can call the program anything you want under Unix. By using the .exe extension the program can be tested without change under most operating systems.
If you fill out this form and press the “submit” button, in the URL address window of your browser you will see something like:
http://www.pooh.com/cgi-bin/CGI_GET.exe?Field1= This+is+a+test&submit=Submit+Query
28 Free Web servers are relatively common and can be found by browsing the Internet; Apache, for example, is the most popular Web server on the Internet.
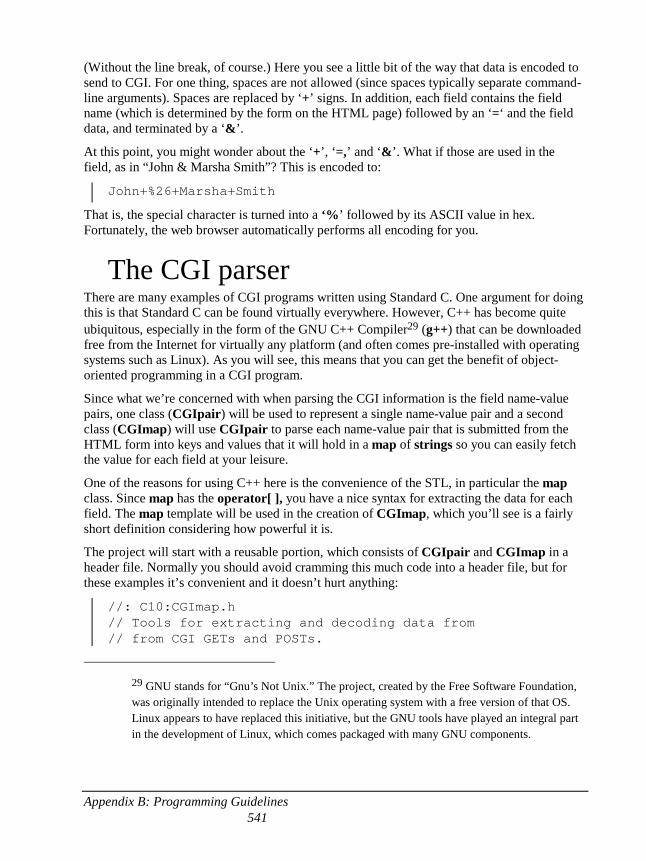
Appendix B: Programming Guidelines 541
(Without the line break, of course.) Here you see a little bit of the way that data is encoded to send to CGI. For one thing, spaces are not allowed (since spaces typically separate command-line arguments). Spaces are replaced by ‘+’ signs. In addition, each field contains the field name (which is determined by the form on the HTML page) followed by an ‘=‘ and the field data, and terminated by a ‘&’.
At this point, you might wonder about the ‘+’, ‘=,’ and ‘&’. What if those are used in the field, as in “John & Marsha Smith”? This is encoded to:
John+%26+Marsha+Smith
That is, the special character is turned into a ‘%’ followed by its ASCII value in hex. Fortunately, the web browser automatically performs all encoding for you.
The CGI parser There are many examples of CGI programs written using Standard C. One argument for doing this is that Standard C can be found virtually everywhere. However, C++ has become quite ubiquitous, especially in the form of the GNU C++ Compiler29 (g++) that can be downloaded free from the Internet for virtually any platform (and often comes pre-installed with operating systems such as Linux). As you will see, this means that you can get the benefit of object-oriented programming in a CGI program.
Since what we’re concerned with when parsing the CGI information is the field name-value pairs, one class (CGIpair) will be used to represent a single name-value pair and a second class (CGImap) will use CGIpair to parse each name-value pair that is submitted from the HTML form into keys and values that it will hold in a map of strings so you can easily fetch the value for each field at your leisure.
One of the reasons for using C++ here is the convenience of the STL, in particular the map class. Since map has the operator[ ], you have a nice syntax for extracting the data for each field. The map template will be used in the creation of CGImap, which you’ll see is a fairly short definition considering how powerful it is.
The project will start with a reusable portion, which consists of CGIpair and CGImap in a header file. Normally you should avoid cramming this much code into a header file, but for these examples it’s convenient and it doesn’t hurt anything:
//: C10:CGImap.h // Tools for extracting and decoding data from // from CGI GETs and POSTs.
29 GNU stands for “Gnu’s Not Unix.” The project, created by the Free Software Foundation, was originally intended to replace the Unix operating system with a free version of that OS. Linux appears to have replaced this initiative, but the GNU tools have played an integral part in the development of Linux, which comes packaged with many GNU components.

Appendix B: Programming Guidelines 542
#include <string> #include <vector> #include <iostream> using namespace std; class CGIpair : public pair<string, string> { public: CGIpair() {} CGIpair(string name, string value) { first = decodeURLString(name); second = decodeURLString(value); } // Automatic type conversion for boolean test: operator bool() const { return (first.length() != 0); } private: static string decodeURLString(string URLstr) { const int len = URLstr.length(); string result; for(int i = 0; i < len; i++) { if(URLstr[i] == '+') result += ' '; else if(URLstr[i] == '%') { result += translateHex(URLstr[i + 1]) * 16 + translateHex(URLstr[i + 2]); i += 2; // Move past hex code } else // An ordinary character result += URLstr[i]; } return result; } // Translate a single hex character; used by // decodeURLString(): static char translateHex(char hex) { if(hex >= 'A') return (hex & 0xdf) - 'A' + 10; else return hex - '0'; } };
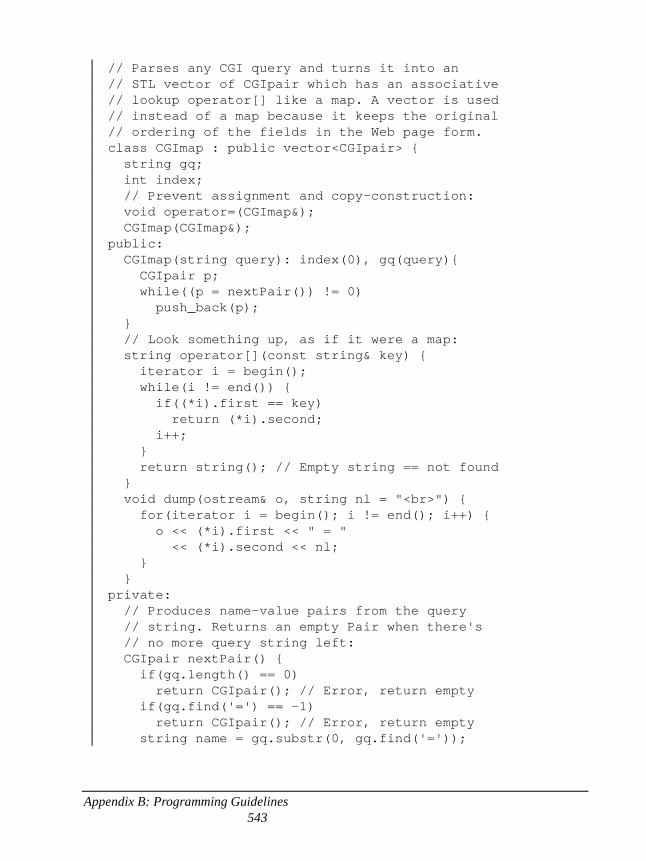
Appendix B: Programming Guidelines 543
// Parses any CGI query and turns it into an // STL vector of CGIpair which has an associative // lookup operator[] like a map. A vector is used // instead of a map because it keeps the original // ordering of the fields in the Web page form. class CGImap : public vector<CGIpair> { string gq; int index; // Prevent assignment and copy-construction: void operator=(CGImap&); CGImap(CGImap&); public: CGImap(string query): index(0), gq(query){ CGIpair p; while((p = nextPair()) != 0) push_back(p); } // Look something up, as if it were a map: string operator[](const string& key) { iterator i = begin(); while(i != end()) { if((*i).first == key) return (*i).second; i++; } return string(); // Empty string == not found } void dump(ostream& o, string nl = "<br>") { for(iterator i = begin(); i != end(); i++) { o << (*i).first << " = " << (*i).second << nl; } } private: // Produces name-value pairs from the query // string. Returns an empty Pair when there's // no more query string left: CGIpair nextPair() { if(gq.length() == 0) return CGIpair(); // Error, return empty if(gq.find('=') == -1) return CGIpair(); // Error, return empty string name = gq.substr(0, gq.find('='));
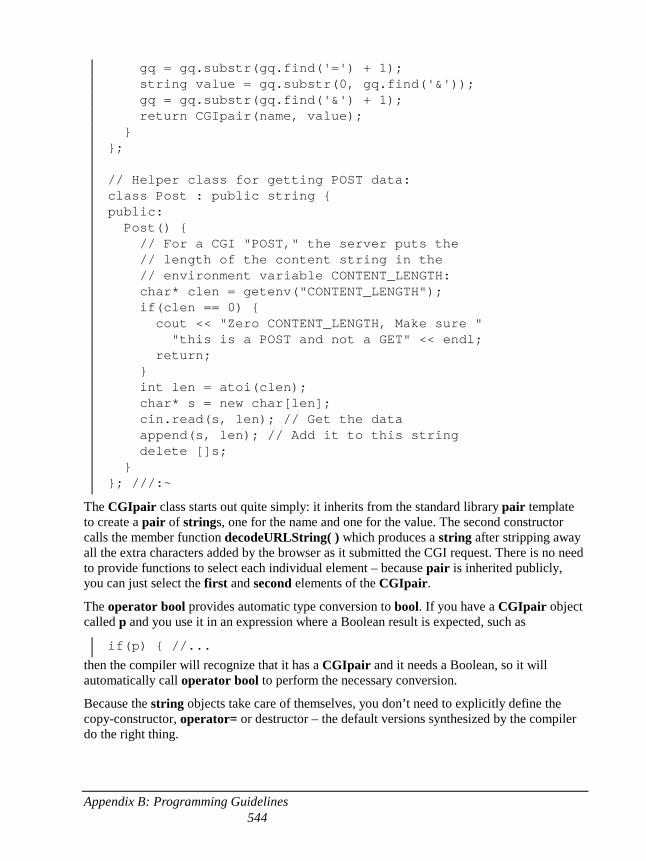
Appendix B: Programming Guidelines 544
gq = gq.substr(gq.find('=') + 1); string value = gq.substr(0, gq.find('&')); gq = gq.substr(gq.find('&') + 1); return CGIpair(name, value); } }; // Helper class for getting POST data: class Post : public string { public: Post() { // For a CGI "POST," the server puts the // length of the content string in the // environment variable CONTENT_LENGTH: char* clen = getenv("CONTENT_LENGTH"); if(clen == 0) { cout << "Zero CONTENT_LENGTH, Make sure " "this is a POST and not a GET" << endl; return; } int len = atoi(clen); char* s = new char[len]; cin.read(s, len); // Get the data append(s, len); // Add it to this string delete []s; } }; ///:~
The CGIpair class starts out quite simply: it inherits from the standard library pair template to create a pair of strings, one for the name and one for the value. The second constructor calls the member function decodeURLString( ) which produces a string after stripping away all the extra characters added by the browser as it submitted the CGI request. There is no need to provide functions to select each individual element – because pair is inherited publicly, you can just select the first and second elements of the CGIpair.
The operator bool provides automatic type conversion to bool. If you have a CGIpair object called p and you use it in an expression where a Boolean result is expected, such as
if(p) { //...
then the compiler will recognize that it has a CGIpair and it needs a Boolean, so it will automatically call operator bool to perform the necessary conversion.
Because the string objects take care of themselves, you don’t need to explicitly define the copy-constructor, operator= or destructor – the default versions synthesized by the compiler do the right thing.

Appendix B: Programming Guidelines 545
The remainder of the CGIpair class consists of the two methods decodeURLString( ) and a helper member function translateHex( ) which is used by decodeURLString( ). (Note that translateHex( ) does not guard against bad input such as “%1H.”) decodeURLString( ) moves through and replaces each ‘+’ with a space, and each hex code (beginning with a ‘%’) with the appropriate character. It’s worth noting here and in CGImap the power of the string class – you can index into a string object using operator[ ], and you can use methods like find( ) and substring( ).
CGImap parses and holds all the name-value pairs submitted from the form as part of a CGI request. You might think that anything that has the word “map” in it’s name should be inherited from the STL map, but map has it’s own way of ordering the elements it stores whereas here it’s useful to keep the elements in the order that they appear on the Web page. So CGImap is inherited from vector<CGIpair>, and operator[ ] is overloaded so you get the associative-array lookup of a map.
You can also see that CGImap has a copy-constructor and an operator=, but they’re both declared as private. This is to prevent the compiler from synthesizing the two functions (which it will do if you don’t declare them yourself), but it also prevents the client programmer from passing a CGImap by value or from using assignment.
CGImap’s job is to take the input data and parse it into name-value pairs, which it will do with the aid of CGIpair (effectively, CGIpair is only a helper class, but it also seems to make it easier to understand the code). After copying the query string (you’ll see where the query string comes from later) into a local string object gq, the nextPair( ) member function is used to parse the string into raw name-value pairs, delimited by ‘=‘ and ‘&’ signs. Each resulting CGIpair object is added to the vector using the standard vector::push_back( ). When nextPair( ) runs out of input from the query string, it returns zero.
The CGImap::operator[ ] takes the brute-force approach of a linear search through the elements. Since the CGImap is intentionally not sorted and they tend to be small, this is not too terrible. The dump( ) function is used for testing, typically by sending information to the resulting Web page, as you might guess from the default value of nl, which is an HTML “break line” token.
Using GET can be fine for many applications. However, GET passes its data to the CGI program through an environment variable (called QUERY_STRING), and operating systems typically run out of environment space with long GET strings (you should start worrying at about 200 characters). CGI provides a solution for this: POST. With POST, the data is encoded and concatenated the same way as with GET, but POST uses standard input to pass the encoded query string to the CGI program and has no length limitation on the input. All you have to do in your CGI program is determine the length of the query string. This length is stored in the environment variable CONTENT_LENGTH. Once you know the length, you can allocate storage and read the precise number of bytes from standard input. Because POST is the less-fragile solution, you should probably prefer it over GET, unless you know for sure that your input will be short. In fact, one might surmise that the only reason for GET is that it is slightly easier to code a CGI program in C using GET. However, the last class in
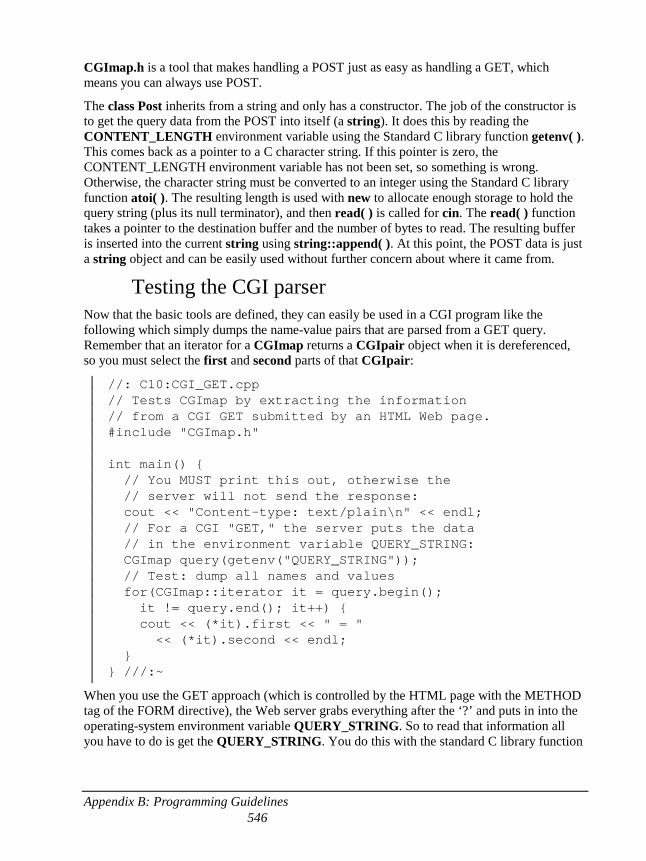
Appendix B: Programming Guidelines 546
CGImap.h is a tool that makes handling a POST just as easy as handling a GET, which means you can always use POST.
The class Post inherits from a string and only has a constructor. The job of the constructor is to get the query data from the POST into itself (a string). It does this by reading the CONTENT_LENGTH environment variable using the Standard C library function getenv( ). This comes back as a pointer to a C character string. If this pointer is zero, the CONTENT_LENGTH environment variable has not been set, so something is wrong. Otherwise, the character string must be converted to an integer using the Standard C library function atoi( ). The resulting length is used with new to allocate enough storage to hold the query string (plus its null terminator), and then read( ) is called for cin. The read( ) function takes a pointer to the destination buffer and the number of bytes to read. The resulting buffer is inserted into the current string using string::append( ). At this point, the POST data is just a string object and can be easily used without further concern about where it came from.
Testing the CGI parser Now that the basic tools are defined, they can easily be used in a CGI program like the following which simply dumps the name-value pairs that are parsed from a GET query. Remember that an iterator for a CGImap returns a CGIpair object when it is dereferenced, so you must select the first and second parts of that CGIpair:
//: C10:CGI_GET.cpp // Tests CGImap by extracting the information // from a CGI GET submitted by an HTML Web page. #include "CGImap.h" int main() { // You MUST print this out, otherwise the // server will not send the response: cout << "Content-type: text/plain\n" << endl; // For a CGI "GET," the server puts the data // in the environment variable QUERY_STRING: CGImap query(getenv("QUERY_STRING")); // Test: dump all names and values for(CGImap::iterator it = query.begin(); it != query.end(); it++) { cout << (*it).first << " = " << (*it).second << endl; } } ///:~
When you use the GET approach (which is controlled by the HTML page with the METHOD tag of the FORM directive), the Web server grabs everything after the ‘?’ and puts in into the operating-system environment variable QUERY_STRING. So to read that information all you have to do is get the QUERY_STRING. You do this with the standard C library function
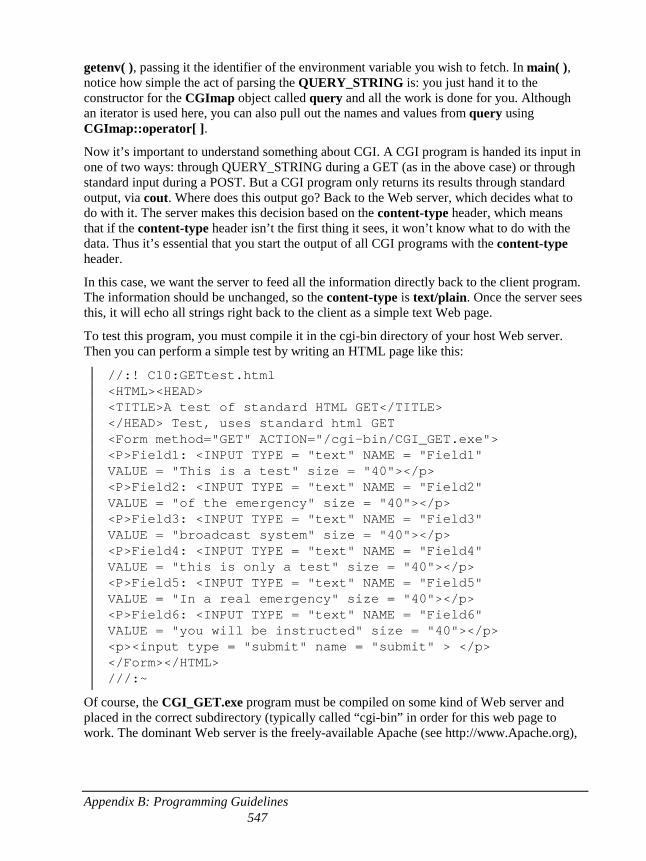
Appendix B: Programming Guidelines 547
getenv( ), passing it the identifier of the environment variable you wish to fetch. In main( ), notice how simple the act of parsing the QUERY_STRING is: you just hand it to the constructor for the CGImap object called query and all the work is done for you. Although an iterator is used here, you can also pull out the names and values from query using CGImap::operator[ ].
Now it’s important to understand something about CGI. A CGI program is handed its input in one of two ways: through QUERY_STRING during a GET (as in the above case) or through standard input during a POST. But a CGI program only returns its results through standard output, via cout. Where does this output go? Back to the Web server, which decides what to do with it. The server makes this decision based on the content-type header, which means that if the content-type header isn’t the first thing it sees, it won’t know what to do with the data. Thus it’s essential that you start the output of all CGI programs with the content-type header.
In this case, we want the server to feed all the information directly back to the client program. The information should be unchanged, so the content-type is text/plain. Once the server sees this, it will echo all strings right back to the client as a simple text Web page.
To test this program, you must compile it in the cgi-bin directory of your host Web server. Then you can perform a simple test by writing an HTML page like this:
//:! C10:GETtest.html <HTML><HEAD> <TITLE>A test of standard HTML GET</TITLE> </HEAD> Test, uses standard html GET <Form method="GET" ACTION="/cgi-bin/CGI_GET.exe"> <P>Field1: <INPUT TYPE = "text" NAME = "Field1" VALUE = "This is a test" size = "40"></p> <P>Field2: <INPUT TYPE = "text" NAME = "Field2" VALUE = "of the emergency" size = "40"></p> <P>Field3: <INPUT TYPE = "text" NAME = "Field3" VALUE = "broadcast system" size = "40"></p> <P>Field4: <INPUT TYPE = "text" NAME = "Field4" VALUE = "this is only a test" size = "40"></p> <P>Field5: <INPUT TYPE = "text" NAME = "Field5" VALUE = "In a real emergency" size = "40"></p> <P>Field6: <INPUT TYPE = "text" NAME = "Field6" VALUE = "you will be instructed" size = "40"></p> <p><input type = "submit" name = "submit" > </p> </Form></HTML> ///:~
Of course, the CGI_GET.exe program must be compiled on some kind of Web server and placed in the correct subdirectory (typically called “cgi-bin” in order for this web page to work. The dominant Web server is the freely-available Apache (see http://www.Apache.org),
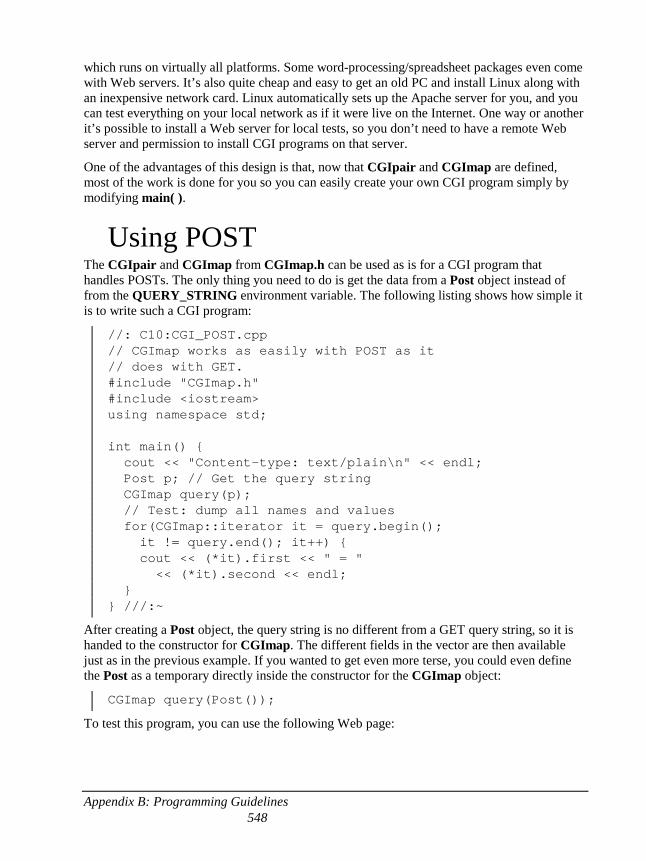
Appendix B: Programming Guidelines 548
which runs on virtually all platforms. Some word-processing/spreadsheet packages even come with Web servers. It’s also quite cheap and easy to get an old PC and install Linux along with an inexpensive network card. Linux automatically sets up the Apache server for you, and you can test everything on your local network as if it were live on the Internet. One way or another it’s possible to install a Web server for local tests, so you don’t need to have a remote Web server and permission to install CGI programs on that server.
One of the advantages of this design is that, now that CGIpair and CGImap are defined, most of the work is done for you so you can easily create your own CGI program simply by modifying main( ).
Using POST The CGIpair and CGImap from CGImap.h can be used as is for a CGI program that handles POSTs. The only thing you need to do is get the data from a Post object instead of from the QUERY_STRING environment variable. The following listing shows how simple it is to write such a CGI program:
//: C10:CGI_POST.cpp // CGImap works as easily with POST as it // does with GET. #include "CGImap.h" #include <iostream> using namespace std; int main() { cout << "Content-type: text/plain\n" << endl; Post p; // Get the query string CGImap query(p); // Test: dump all names and values for(CGImap::iterator it = query.begin(); it != query.end(); it++) { cout << (*it).first << " = " << (*it).second << endl; } } ///:~
After creating a Post object, the query string is no different from a GET query string, so it is handed to the constructor for CGImap. The different fields in the vector are then available just as in the previous example. If you wanted to get even more terse, you could even define the Post as a temporary directly inside the constructor for the CGImap object:
CGImap query(Post());
To test this program, you can use the following Web page:
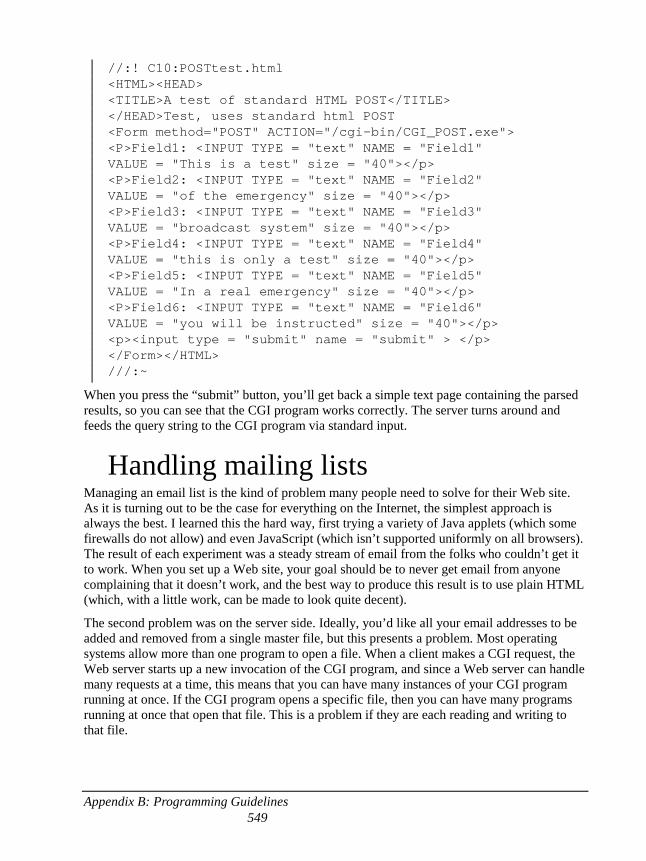
Appendix B: Programming Guidelines 549
//:! C10:POSTtest.html <HTML><HEAD> <TITLE>A test of standard HTML POST</TITLE> </HEAD>Test, uses standard html POST <Form method="POST" ACTION="/cgi-bin/CGI_POST.exe"> <P>Field1: <INPUT TYPE = "text" NAME = "Field1" VALUE = "This is a test" size = "40"></p> <P>Field2: <INPUT TYPE = "text" NAME = "Field2" VALUE = "of the emergency" size = "40"></p> <P>Field3: <INPUT TYPE = "text" NAME = "Field3" VALUE = "broadcast system" size = "40"></p> <P>Field4: <INPUT TYPE = "text" NAME = "Field4" VALUE = "this is only a test" size = "40"></p> <P>Field5: <INPUT TYPE = "text" NAME = "Field5" VALUE = "In a real emergency" size = "40"></p> <P>Field6: <INPUT TYPE = "text" NAME = "Field6" VALUE = "you will be instructed" size = "40"></p> <p><input type = "submit" name = "submit" > </p> </Form></HTML> ///:~
When you press the “submit” button, you’ll get back a simple text page containing the parsed results, so you can see that the CGI program works correctly. The server turns around and feeds the query string to the CGI program via standard input.
Handling mailing lists Managing an email list is the kind of problem many people need to solve for their Web site. As it is turning out to be the case for everything on the Internet, the simplest approach is always the best. I learned this the hard way, first trying a variety of Java applets (which some firewalls do not allow) and even JavaScript (which isn’t supported uniformly on all browsers). The result of each experiment was a steady stream of email from the folks who couldn’t get it to work. When you set up a Web site, your goal should be to never get email from anyone complaining that it doesn’t work, and the best way to produce this result is to use plain HTML (which, with a little work, can be made to look quite decent).
The second problem was on the server side. Ideally, you’d like all your email addresses to be added and removed from a single master file, but this presents a problem. Most operating systems allow more than one program to open a file. When a client makes a CGI request, the Web server starts up a new invocation of the CGI program, and since a Web server can handle many requests at a time, this means that you can have many instances of your CGI program running at once. If the CGI program opens a specific file, then you can have many programs running at once that open that file. This is a problem if they are each reading and writing to that file.
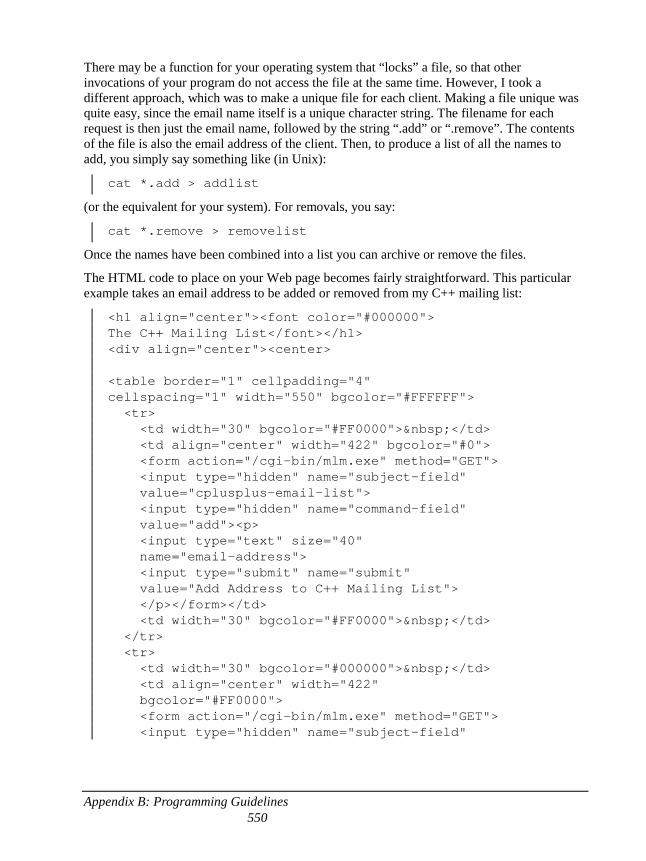
Appendix B: Programming Guidelines 550
There may be a function for your operating system that “locks” a file, so that other invocations of your program do not access the file at the same time. However, I took a different approach, which was to make a unique file for each client. Making a file unique was quite easy, since the email name itself is a unique character string. The filename for each request is then just the email name, followed by the string “.add” or “.remove”. The contents of the file is also the email address of the client. Then, to produce a list of all the names to add, you simply say something like (in Unix):
cat *.add > addlist
(or the equivalent for your system). For removals, you say:
cat *.remove > removelist
Once the names have been combined into a list you can archive or remove the files.
The HTML code to place on your Web page becomes fairly straightforward. This particular example takes an email address to be added or removed from my C++ mailing list:
<h1 align="center"><font color="#000000"> The C++ Mailing List</font></h1> <div align="center"><center> <table border="1" cellpadding="4" cellspacing="1" width="550" bgcolor="#FFFFFF"> <tr> <td width="30" bgcolor="#FF0000"> </td> <td align="center" width="422" bgcolor="#0"> <form action="/cgi-bin/mlm.exe" method="GET"> <input type="hidden" name="subject-field" value="cplusplus-email-list"> <input type="hidden" name="command-field" value="add"><p> <input type="text" size="40" name="email-address"> <input type="submit" name="submit" value="Add Address to C++ Mailing List"> </p></form></td> <td width="30" bgcolor="#FF0000"> </td> </tr> <tr> <td width="30" bgcolor="#000000"> </td> <td align="center" width="422" bgcolor="#FF0000"> <form action="/cgi-bin/mlm.exe" method="GET"> <input type="hidden" name="subject-field"
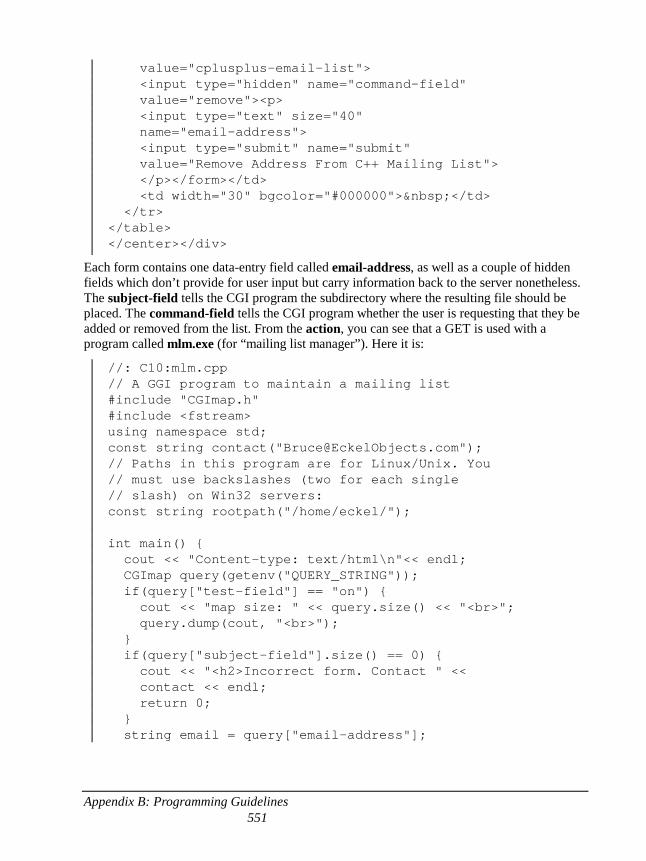
Appendix B: Programming Guidelines 551
value="cplusplus-email-list"> <input type="hidden" name="command-field" value="remove"><p> <input type="text" size="40" name="email-address"> <input type="submit" name="submit" value="Remove Address From C++ Mailing List"> </p></form></td> <td width="30" bgcolor="#000000"> </td> </tr> </table> </center></div>
Each form contains one data-entry field called email-address, as well as a couple of hidden fields which don’t provide for user input but carry information back to the server nonetheless. The subject-field tells the CGI program the subdirectory where the resulting file should be placed. The command-field tells the CGI program whether the user is requesting that they be added or removed from the list. From the action, you can see that a GET is used with a program called mlm.exe (for “mailing list manager”). Here it is:
//: C10:mlm.cpp // A GGI program to maintain a mailing list #include "CGImap.h" #include <fstream> using namespace std; const string contact("[email protected]"); // Paths in this program are for Linux/Unix. You // must use backslashes (two for each single // slash) on Win32 servers: const string rootpath("/home/eckel/"); int main() { cout << "Content-type: text/html\n"<< endl; CGImap query(getenv("QUERY_STRING")); if(query["test-field"] == "on") { cout << "map size: " << query.size() << "<br>"; query.dump(cout, "<br>"); } if(query["subject-field"].size() == 0) { cout << "<h2>Incorrect form. Contact " << contact << endl; return 0; } string email = query["email-address"];
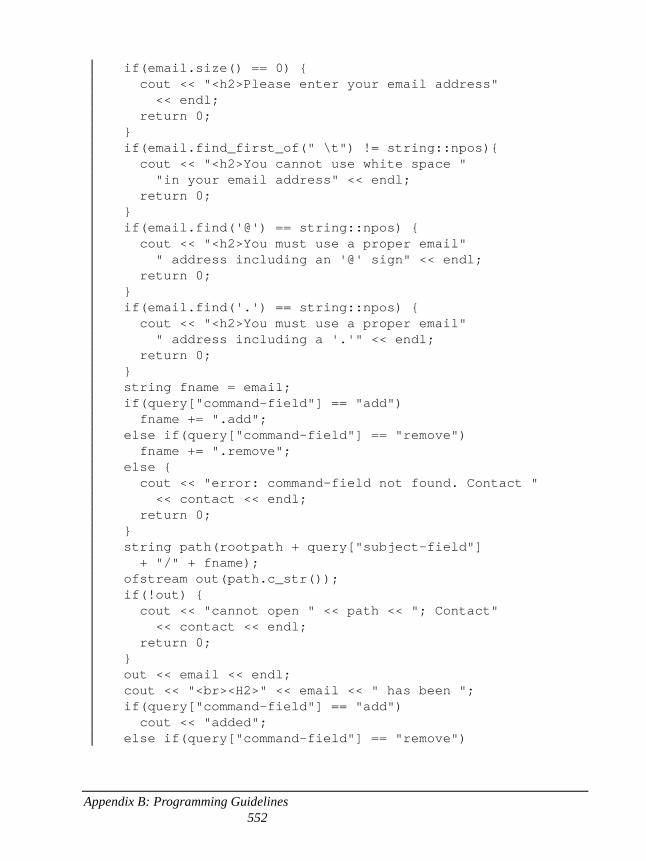
Appendix B: Programming Guidelines 552
if(email.size() == 0) { cout << "<h2>Please enter your email address" << endl; return 0; } if(email.find_first_of(" \t") != string::npos){ cout << "<h2>You cannot use white space " "in your email address" << endl; return 0; } if(email.find('@') == string::npos) { cout << "<h2>You must use a proper email" " address including an '@' sign" << endl; return 0; } if(email.find('.') == string::npos) { cout << "<h2>You must use a proper email" " address including a '.'" << endl; return 0; } string fname = email; if(query["command-field"] == "add") fname += ".add"; else if(query["command-field"] == "remove") fname += ".remove"; else { cout << "error: command-field not found. Contact " << contact << endl; return 0; } string path(rootpath + query["subject-field"] + "/" + fname); ofstream out(path.c_str()); if(!out) { cout << "cannot open " << path << "; Contact" << contact << endl; return 0; } out << email << endl; cout << "<br><H2>" << email << " has been "; if(query["command-field"] == "add") cout << "added"; else if(query["command-field"] == "remove")
Appendix B: Programming Guidelines 553
cout << "removed"; cout << "<br>Thank you</H2>" << endl; } ///:~
Again, all the CGI work is done by the CGImap. From then on it’s a matter of pulling the fields out and looking at them, then deciding what to do about it, which is easy because of the way you can index into a map and also because of the tools available for standard strings. Here, most of the programming has to do with checking for a valid email address. Then a file name is created with the email address as the name and “.add” or “.remove” as the extension, and the email address is placed in the file.
Maintaining your list Once you have a list of names to add, you can just paste them to end of your list. However, you might get some duplicates so you need a program to remove those. Because your names may differ only by upper and lowercase, it’s useful to create a tool that will read a list of names from a file and place them into a container of strings, forcing all the names to lowercase as it does:
//: C10:readLower.h // Read a file into a container of string, // forcing each line to lower case. #ifndef READLOWER_H #define READLOWER_H #include "../require.h" #include <iostream> #include <fstream> #include <string> #include <algorithm> #include <cctype> inline char downcase(char c) { using namespace std; // Compiler bug return tolower(c); } std::string lcase(std::string s) { std::transform(s.begin(), s.end(), s.begin(), downcase); return s; } template<class SContainer> void readLower(char* filename, SContainer& c) { std::ifstream in(filename);
Appendix B: Programming Guidelines 554
assure(in, filename); const int sz = 1024; char buf[sz]; while(in.getline(buf, sz)) // Force to lowercase: c.push_back(string(lcase(buf))); } #endif // READLOWER_H ///:~
Since it’s a template, it will work with any container of string that supports push_back( ). Again, you may want to change the above to the form readln(in, s) instead of using a fixed-sized buffer, which is more fragile.
Once the names are read into the list and forced to lowercase, removing duplicates is trivial:
//: C10:RemoveDuplicates.cpp // Remove duplicate names from a mailing list #include "readLower.h" #include "../require.h" #include <vector> #include <algorithm> using namespace std; int main(int argc, char* argv[]) { requireArgs(argc, 2); vector<string> names; readLower(argv[1], names); long before = names.size(); // You must sort first for unique() to work: sort(names.begin(), names.end()); // Remove adjacent duplicates: unique(names.begin(), names.end()); long removed = before - names.size(); ofstream out(argv[2]); assure(out, argv[2]); copy(names.begin(), names.end(), ostream_iterator<string>(out,"\n")); cout << removed << " names removed" << endl; } ///:~
A vector is used here instead of a list because sorting requires random-access which is much faster in a vector. (A list has a built-in sort( ) so that it doesn’t suffer from the performance that would result from applying the normal sort( ) algorithm shown above).
Appendix B: Programming Guidelines 555
The sort must be performed so that all duplicates are adjacent to each other. Then unique( ) can remove all the adjacent duplicates. The program also keeps track of how many duplicate names were removed.
When you have a file of names to remove from your list, readLower( ) comes in handy again:
//: C10:RemoveGroup.cpp // Remove a group of names from a list #include "readLower.h" #include "../require.h" #include <list> using namespace std; typedef list<string> Container; int main(int argc, char* argv[]) { requireArgs(argc, 3); Container names, removals; readLower(argv[1], names); readLower(argv[2], removals); long original = names.size(); Container::iterator rmit = removals.begin(); while(rmit != removals.end()) names.remove(*rmit++); // Removes all matches ofstream out(argv[3]); assure(out, argv[3]); copy(names.begin(), names.end(), ostream_iterator<string>(out,"\n")); long removed = original - names.size(); cout << "On removal list: " << removals.size() << "\n Removed: " << removed << endl; } ///:~
Here, a list is used instead of a vector (since readLower( ) is a template, it adapts). Although there is a remove( ) algorithm that can be applied to containers, the built-in list::remove( ) seems to work better. The second command-line argument is the file containing the list of names to be removed. An iterator is used to step through that list, and the list::remove( ) function removes every instance of each name from the master list. Here, the list doesn’t need to be sorted first.
Unfortunately, that’s not all there is to it. The messiest part about maintaining a mailing list is the bounced messages. Presumably, you’ll just want to remove the addresses that produce bounces. If you can combine all the bounced messages into a single file, the following program has a pretty good chance of extracting the email addresses; then you can use RemoveGroup to delete them from your list.

Appendix B: Programming Guidelines 556
//: C10:ExtractUndeliverable.cpp // Find undeliverable names to remove from // mailing list from within a mail file // containing many messages #include "../require.h" #include <cstdio> #include <string> #include <set> using namespace std; char* start_str[] = { "following address", "following recipient", "following destination", "undeliverable to the following", "following invalid", }; char* continue_str[] = { "Message-ID", "Please reply to", }; // The in() function allows you to check whether // a string in this set is part of your argument. class StringSet { char** ss; int sz; public: StringSet(char** sa, int sza):ss(sa),sz(sza) {} bool in(char* s) { for(int i = 0; i < sz; i++) if (strstr(s, ss[i]) != 0) return true; return false; } }; // Calculate array length: #define ALEN(A) ((sizeof A)/(sizeof *A)) StringSet starts(start_str, ALEN(start_str)),
Appendix B: Programming Guidelines 557
continues(continue_str, ALEN(continue_str)); int main(int argc, char* argv[]) { requireArgs(argc, 2, "Usage:ExtractUndeliverable infile outfile"); FILE* infile = fopen(argv[1], "rb"); FILE* outfile = fopen(argv[2], "w"); require(infile != 0); require(outfile != 0); set<string> names; const int sz = 1024; char buf[sz]; while(fgets(buf, sz, infile) != 0) { if(starts.in(buf)) { puts(buf); while(fgets(buf, sz, infile) != 0) { if(continues.in(buf)) continue; if(strstr(buf, "---") != 0) break; const char* delimiters= " \t<>():;,\n\""; char* name = strtok(buf, delimiters); while(name != 0) { if(strstr(name, "@") != 0) names.insert(string(name)); name = strtok(0, delimiters); } } } } set<string>::iterator i = names.begin(); while(i != names.end()) fprintf(outfile, "%s\n", (*i++).c_str()); } ///:~
The first thing you’ll notice about this program is that contains some C functions, including C I/O. This is not because of any particular design insight. It just seemed to work when I used the C elements, and it started behaving strangely with C++ I/O. So the C is just because it works, and you may be able to rewrite the program in more “pure C++” using your C++ compiler and produce correct results.
A lot of what this program does is read lines looking for string matches. To make this convenient, I created a StringSet class with a member function in( ) that tells you whether any of the strings in the set are in the argument. The StringSet is initialized with a constant two-dimensional of strings and the size of that array. Although the StringSet makes the code easier to read, it’s also easy to add new strings to the arrays.
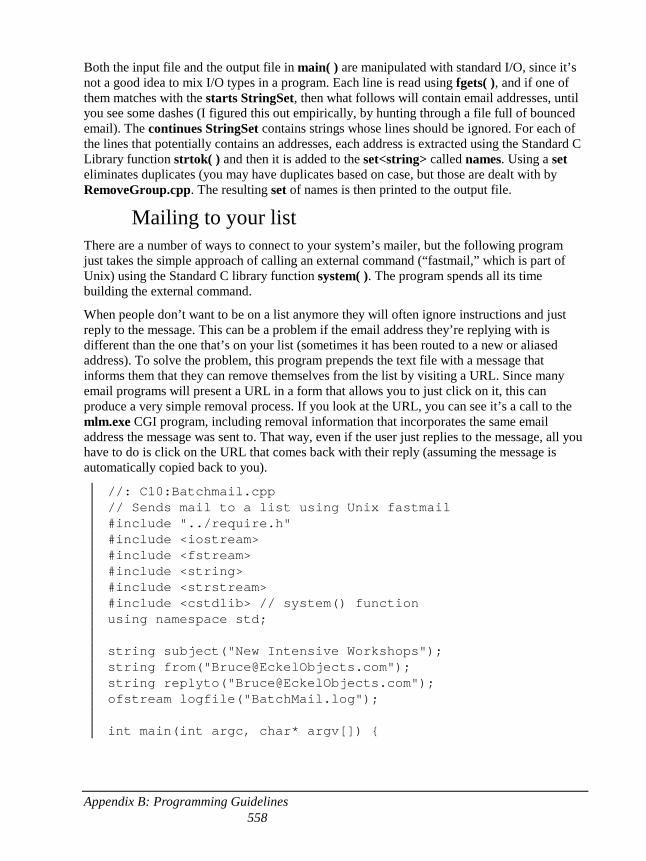
Appendix B: Programming Guidelines 558
Both the input file and the output file in main( ) are manipulated with standard I/O, since it’s not a good idea to mix I/O types in a program. Each line is read using fgets( ), and if one of them matches with the starts StringSet, then what follows will contain email addresses, until you see some dashes (I figured this out empirically, by hunting through a file full of bounced email). The continues StringSet contains strings whose lines should be ignored. For each of the lines that potentially contains an addresses, each address is extracted using the Standard C Library function strtok( ) and then it is added to the set<string> called names. Using a set eliminates duplicates (you may have duplicates based on case, but those are dealt with by RemoveGroup.cpp. The resulting set of names is then printed to the output file.
Mailing to your list There are a number of ways to connect to your system’s mailer, but the following program just takes the simple approach of calling an external command (“fastmail,” which is part of Unix) using the Standard C library function system( ). The program spends all its time building the external command.
When people don’t want to be on a list anymore they will often ignore instructions and just reply to the message. This can be a problem if the email address they’re replying with is different than the one that’s on your list (sometimes it has been routed to a new or aliased address). To solve the problem, this program prepends the text file with a message that informs them that they can remove themselves from the list by visiting a URL. Since many email programs will present a URL in a form that allows you to just click on it, this can produce a very simple removal process. If you look at the URL, you can see it’s a call to the mlm.exe CGI program, including removal information that incorporates the same email address the message was sent to. That way, even if the user just replies to the message, all you have to do is click on the URL that comes back with their reply (assuming the message is automatically copied back to you).
//: C10:Batchmail.cpp // Sends mail to a list using Unix fastmail #include "../require.h" #include <iostream> #include <fstream> #include <string> #include <strstream> #include <cstdlib> // system() function using namespace std; string subject("New Intensive Workshops"); string from("[email protected]"); string replyto("[email protected]"); ofstream logfile("BatchMail.log"); int main(int argc, char* argv[]) {
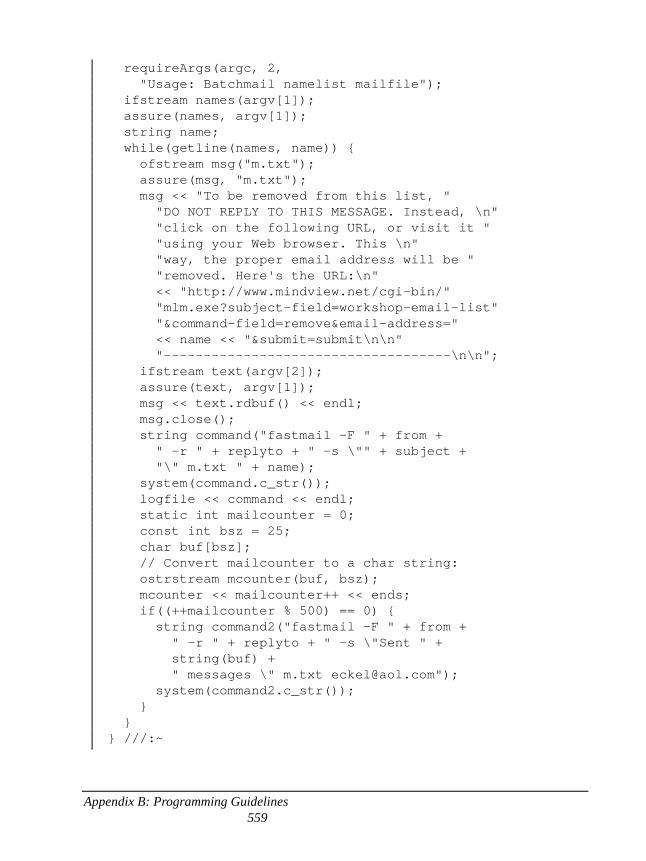
Appendix B: Programming Guidelines 559
requireArgs(argc, 2, "Usage: Batchmail namelist mailfile"); ifstream names(argv[1]); assure(names, argv[1]); string name; while(getline(names, name)) { ofstream msg("m.txt"); assure(msg, "m.txt"); msg << "To be removed from this list, " "DO NOT REPLY TO THIS MESSAGE. Instead, \n" "click on the following URL, or visit it " "using your Web browser. This \n" "way, the proper email address will be " "removed. Here's the URL:\n" << "http://www.mindview.net/cgi-bin/" "mlm.exe?subject-field=workshop-email-list" "&command-field=remove&email-address=" << name << "&submit=submit\n\n" "------------------------------------\n\n"; ifstream text(argv[2]); assure(text, argv[1]); msg << text.rdbuf() << endl; msg.close(); string command("fastmail -F " + from + " -r " + replyto + " -s \"" + subject + "\" m.txt " + name); system(command.c_str()); logfile << command << endl; static int mailcounter = 0; const int bsz = 25; char buf[bsz]; // Convert mailcounter to a char string: ostrstream mcounter(buf, bsz); mcounter << mailcounter++ << ends; if((++mailcounter % 500) == 0) { string command2("fastmail -F " + from + " -r " + replyto + " -s \"Sent " + string(buf) + " messages \" m.txt [email protected]"); system(command2.c_str()); } } } ///:~
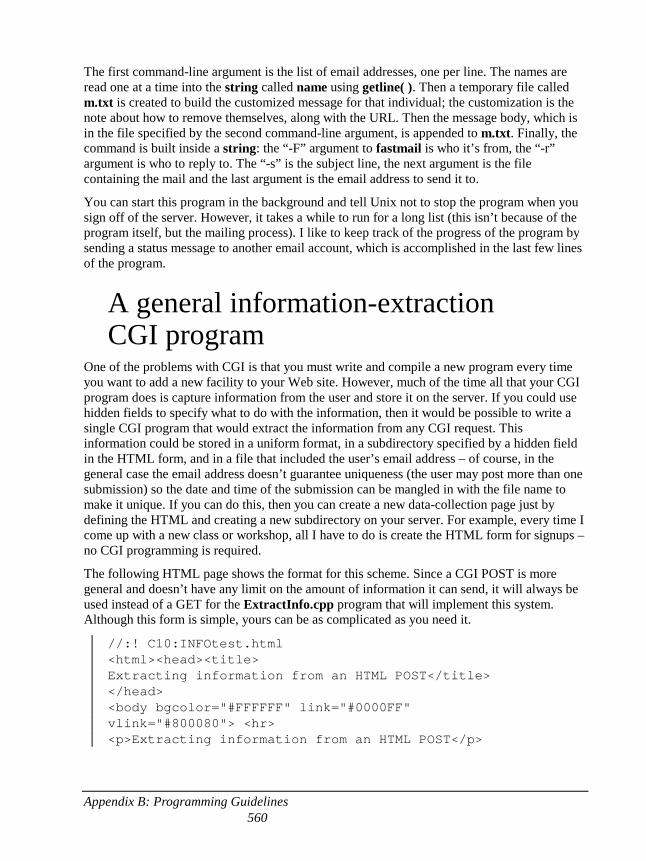
Appendix B: Programming Guidelines 560
The first command-line argument is the list of email addresses, one per line. The names are read one at a time into the string called name using getline( ). Then a temporary file called m.txt is created to build the customized message for that individual; the customization is the note about how to remove themselves, along with the URL. Then the message body, which is in the file specified by the second command-line argument, is appended to m.txt. Finally, the command is built inside a string: the “-F” argument to fastmail is who it’s from, the “-r” argument is who to reply to. The “-s” is the subject line, the next argument is the file containing the mail and the last argument is the email address to send it to.
You can start this program in the background and tell Unix not to stop the program when you sign off of the server. However, it takes a while to run for a long list (this isn’t because of the program itself, but the mailing process). I like to keep track of the progress of the program by sending a status message to another email account, which is accomplished in the last few lines of the program.
A general information-extraction CGI program
One of the problems with CGI is that you must write and compile a new program every time you want to add a new facility to your Web site. However, much of the time all that your CGI program does is capture information from the user and store it on the server. If you could use hidden fields to specify what to do with the information, then it would be possible to write a single CGI program that would extract the information from any CGI request. This information could be stored in a uniform format, in a subdirectory specified by a hidden field in the HTML form, and in a file that included the user’s email address – of course, in the general case the email address doesn’t guarantee uniqueness (the user may post more than one submission) so the date and time of the submission can be mangled in with the file name to make it unique. If you can do this, then you can create a new data-collection page just by defining the HTML and creating a new subdirectory on your server. For example, every time I come up with a new class or workshop, all I have to do is create the HTML form for signups – no CGI programming is required.
The following HTML page shows the format for this scheme. Since a CGI POST is more general and doesn’t have any limit on the amount of information it can send, it will always be used instead of a GET for the ExtractInfo.cpp program that will implement this system. Although this form is simple, yours can be as complicated as you need it.
//:! C10:INFOtest.html <html><head><title> Extracting information from an HTML POST</title> </head> <body bgcolor="#FFFFFF" link="#0000FF" vlink="#800080"> <hr> <p>Extracting information from an HTML POST</p>
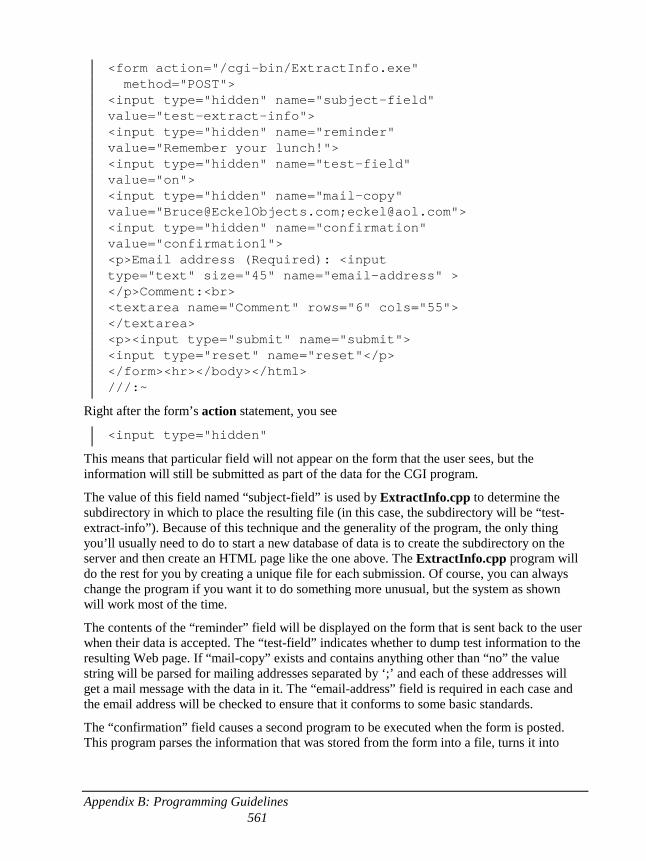
Appendix B: Programming Guidelines 561
<form action="/cgi-bin/ExtractInfo.exe" method="POST"> <input type="hidden" name="subject-field" value="test-extract-info"> <input type="hidden" name="reminder" value="Remember your lunch!"> <input type="hidden" name="test-field" value="on"> <input type="hidden" name="mail-copy" value="[email protected];[email protected]"> <input type="hidden" name="confirmation" value="confirmation1"> <p>Email address (Required): <input type="text" size="45" name="email-address" > </p>Comment:<br> <textarea name="Comment" rows="6" cols="55"> </textarea> <p><input type="submit" name="submit"> <input type="reset" name="reset"</p> </form><hr></body></html> ///:~
Right after the form’s action statement, you see
<input type="hidden"
This means that particular field will not appear on the form that the user sees, but the information will still be submitted as part of the data for the CGI program.
The value of this field named “subject-field” is used by ExtractInfo.cpp to determine the subdirectory in which to place the resulting file (in this case, the subdirectory will be “test-extract-info”). Because of this technique and the generality of the program, the only thing you’ll usually need to do to start a new database of data is to create the subdirectory on the server and then create an HTML page like the one above. The ExtractInfo.cpp program will do the rest for you by creating a unique file for each submission. Of course, you can always change the program if you want it to do something more unusual, but the system as shown will work most of the time.
The contents of the “reminder” field will be displayed on the form that is sent back to the user when their data is accepted. The “test-field” indicates whether to dump test information to the resulting Web page. If “mail-copy” exists and contains anything other than “no” the value string will be parsed for mailing addresses separated by ‘;’ and each of these addresses will get a mail message with the data in it. The “email-address” field is required in each case and the email address will be checked to ensure that it conforms to some basic standards.
The “confirmation” field causes a second program to be executed when the form is posted. This program parses the information that was stored from the form into a file, turns it into
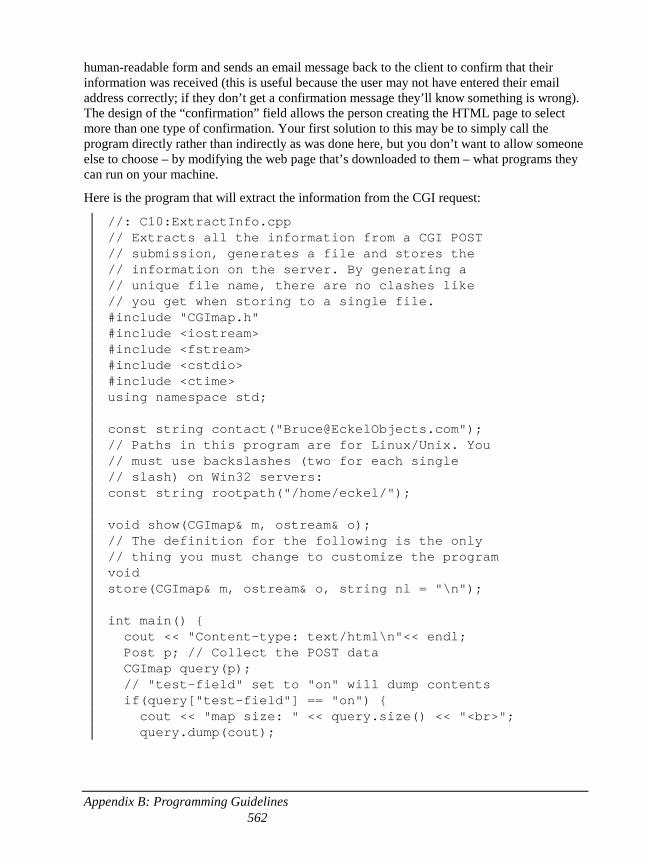
Appendix B: Programming Guidelines 562
human-readable form and sends an email message back to the client to confirm that their information was received (this is useful because the user may not have entered their email address correctly; if they don’t get a confirmation message they’ll know something is wrong). The design of the “confirmation” field allows the person creating the HTML page to select more than one type of confirmation. Your first solution to this may be to simply call the program directly rather than indirectly as was done here, but you don’t want to allow someone else to choose – by modifying the web page that’s downloaded to them – what programs they can run on your machine.
Here is the program that will extract the information from the CGI request:
//: C10:ExtractInfo.cpp // Extracts all the information from a CGI POST // submission, generates a file and stores the // information on the server. By generating a // unique file name, there are no clashes like // you get when storing to a single file. #include "CGImap.h" #include <iostream> #include <fstream> #include <cstdio> #include <ctime> using namespace std; const string contact("[email protected]"); // Paths in this program are for Linux/Unix. You // must use backslashes (two for each single // slash) on Win32 servers: const string rootpath("/home/eckel/"); void show(CGImap& m, ostream& o); // The definition for the following is the only // thing you must change to customize the program void store(CGImap& m, ostream& o, string nl = "\n"); int main() { cout << "Content-type: text/html\n"<< endl; Post p; // Collect the POST data CGImap query(p); // "test-field" set to "on" will dump contents if(query["test-field"] == "on") { cout << "map size: " << query.size() << "<br>"; query.dump(cout);
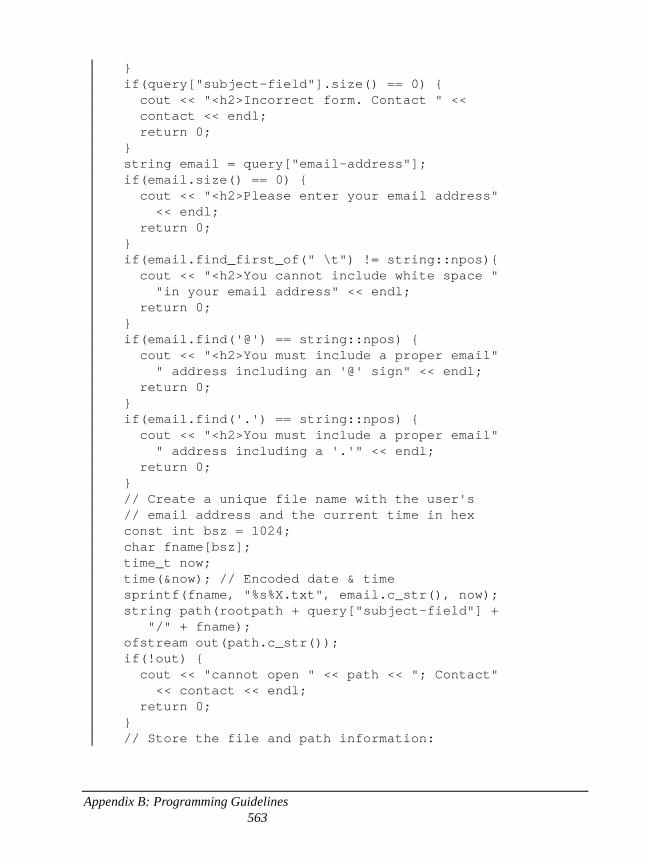
Appendix B: Programming Guidelines 563
} if(query["subject-field"].size() == 0) { cout << "<h2>Incorrect form. Contact " << contact << endl; return 0; } string email = query["email-address"]; if(email.size() == 0) { cout << "<h2>Please enter your email address" << endl; return 0; } if(email.find_first_of(" \t") != string::npos){ cout << "<h2>You cannot include white space " "in your email address" << endl; return 0; } if(email.find('@') == string::npos) { cout << "<h2>You must include a proper email" " address including an '@' sign" << endl; return 0; } if(email.find('.') == string::npos) { cout << "<h2>You must include a proper email" " address including a '.'" << endl; return 0; } // Create a unique file name with the user's // email address and the current time in hex const int bsz = 1024; char fname[bsz]; time_t now; time(&now); // Encoded date & time sprintf(fname, "%s%X.txt", email.c_str(), now); string path(rootpath + query["subject-field"] + "/" + fname); ofstream out(path.c_str()); if(!out) { cout << "cannot open " << path << "; Contact" << contact << endl; return 0; } // Store the file and path information:
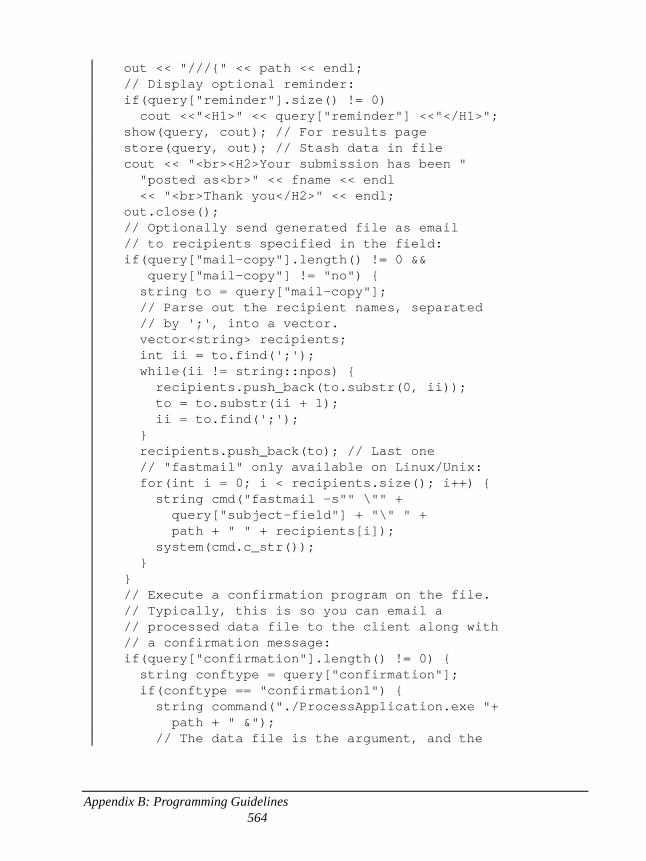
Appendix B: Programming Guidelines 564
out << "///{" << path << endl; // Display optional reminder: if(query["reminder"].size() != 0) cout <<"<H1>" << query["reminder"] <<"</H1>"; show(query, cout); // For results page store(query, out); // Stash data in file cout << "<br><H2>Your submission has been " "posted as<br>" << fname << endl << "<br>Thank you</H2>" << endl; out.close(); // Optionally send generated file as email // to recipients specified in the field: if(query["mail-copy"].length() != 0 && query["mail-copy"] != "no") { string to = query["mail-copy"]; // Parse out the recipient names, separated // by ';', into a vector. vector<string> recipients; int ii = to.find(';'); while(ii != string::npos) { recipients.push_back(to.substr(0, ii)); to = to.substr(ii + 1); ii = to.find(';'); } recipients.push_back(to); // Last one // "fastmail" only available on Linux/Unix: for(int i = 0; i < recipients.size(); i++) { string cmd("fastmail -s"" \"" + query["subject-field"] + "\" " + path + " " + recipients[i]); system(cmd.c_str()); } } // Execute a confirmation program on the file. // Typically, this is so you can email a // processed data file to the client along with // a confirmation message: if(query["confirmation"].length() != 0) { string conftype = query["confirmation"]; if(conftype == "confirmation1") { string command("./ProcessApplication.exe "+ path + " &"); // The data file is the argument, and the
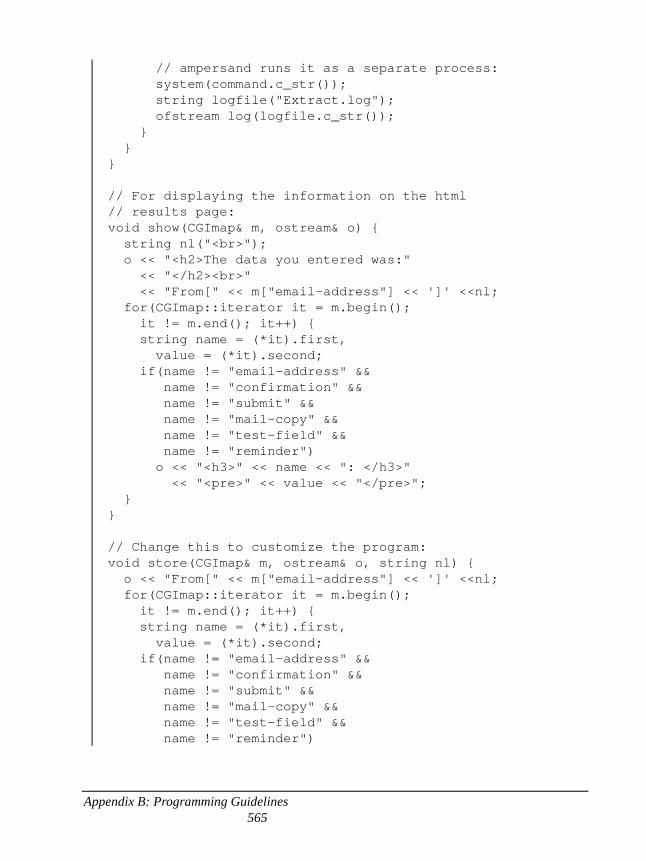
Appendix B: Programming Guidelines 565
// ampersand runs it as a separate process: system(command.c_str()); string logfile("Extract.log"); ofstream log(logfile.c_str()); } } } // For displaying the information on the html // results page: void show(CGImap& m, ostream& o) { string nl("<br>"); o << "<h2>The data you entered was:" << "</h2><br>" << "From[" << m["email-address"] << ']' <<nl; for(CGImap::iterator it = m.begin(); it != m.end(); it++) { string name = (*it).first, value = (*it).second; if(name != "email-address" && name != "confirmation" && name != "submit" && name != "mail-copy" && name != "test-field" && name != "reminder") o << "<h3>" << name << ": </h3>" << "<pre>" << value << "</pre>"; } } // Change this to customize the program: void store(CGImap& m, ostream& o, string nl) { o << "From[" << m["email-address"] << ']' <<nl; for(CGImap::iterator it = m.begin(); it != m.end(); it++) { string name = (*it).first, value = (*it).second; if(name != "email-address" && name != "confirmation" && name != "submit" && name != "mail-copy" && name != "test-field" && name != "reminder")
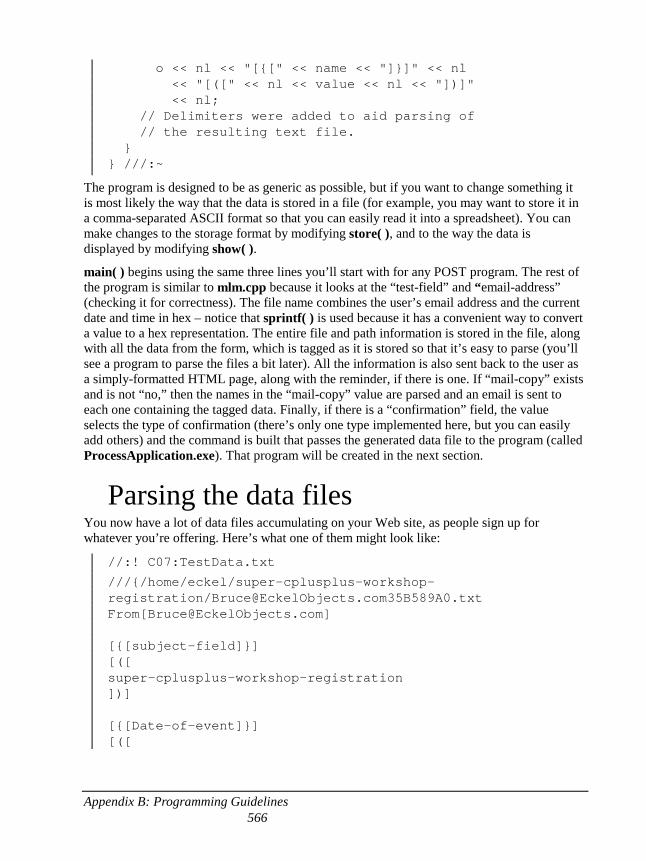
Appendix B: Programming Guidelines 566
o << nl << "[{[" << name << "]}]" << nl << "[([" << nl << value << nl << "])]" << nl; // Delimiters were added to aid parsing of // the resulting text file. } } ///:~
The program is designed to be as generic as possible, but if you want to change something it is most likely the way that the data is stored in a file (for example, you may want to store it in a comma-separated ASCII format so that you can easily read it into a spreadsheet). You can make changes to the storage format by modifying store( ), and to the way the data is displayed by modifying show( ).
main( ) begins using the same three lines you’ll start with for any POST program. The rest of the program is similar to mlm.cpp because it looks at the “test-field” and “email-address” (checking it for correctness). The file name combines the user’s email address and the current date and time in hex – notice that sprintf( ) is used because it has a convenient way to convert a value to a hex representation. The entire file and path information is stored in the file, along with all the data from the form, which is tagged as it is stored so that it’s easy to parse (you’ll see a program to parse the files a bit later). All the information is also sent back to the user as a simply-formatted HTML page, along with the reminder, if there is one. If “mail-copy” exists and is not “no,” then the names in the “mail-copy” value are parsed and an email is sent to each one containing the tagged data. Finally, if there is a “confirmation” field, the value selects the type of confirmation (there’s only one type implemented here, but you can easily add others) and the command is built that passes the generated data file to the program (called ProcessApplication.exe). That program will be created in the next section.
Parsing the data files You now have a lot of data files accumulating on your Web site, as people sign up for whatever you’re offering. Here’s what one of them might look like:
//:! C07:TestData.txt
///{/home/eckel/super-cplusplus-workshop-registration/[email protected] From[[email protected]] [{[subject-field]}] [([ super-cplusplus-workshop-registration ])] [{[Date-of-event]}] [([
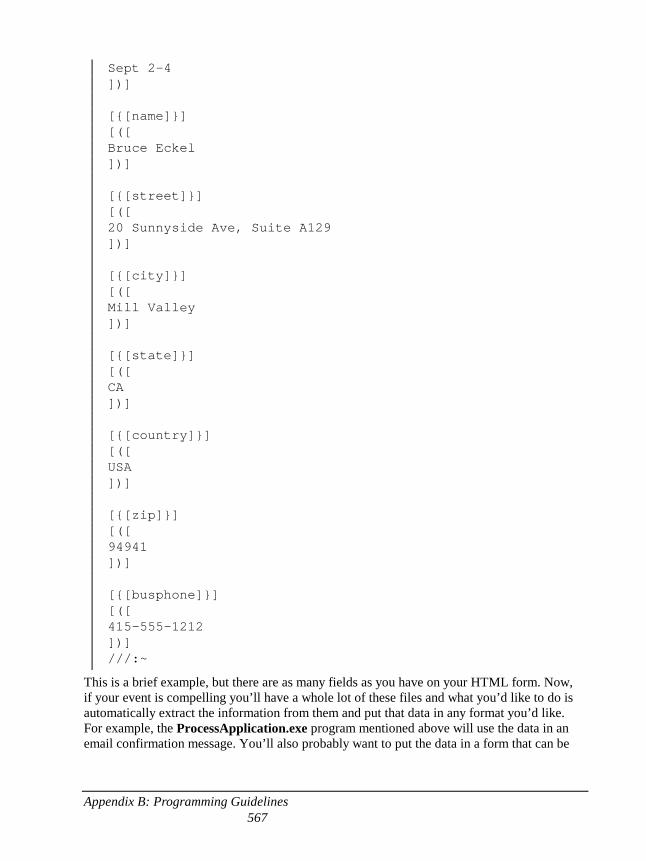
Appendix B: Programming Guidelines 567
Sept 2-4 ])] [{[name]}] [([ Bruce Eckel ])] [{[street]}] [([ 20 Sunnyside Ave, Suite A129 ])] [{[city]}] [([ Mill Valley ])] [{[state]}] [([ CA ])] [{[country]}] [([ USA ])] [{[zip]}] [([ 94941 ])] [{[busphone]}] [([ 415-555-1212 ])] ///:~
This is a brief example, but there are as many fields as you have on your HTML form. Now, if your event is compelling you’ll have a whole lot of these files and what you’d like to do is automatically extract the information from them and put that data in any format you’d like. For example, the ProcessApplication.exe program mentioned above will use the data in an email confirmation message. You’ll also probably want to put the data in a form that can be
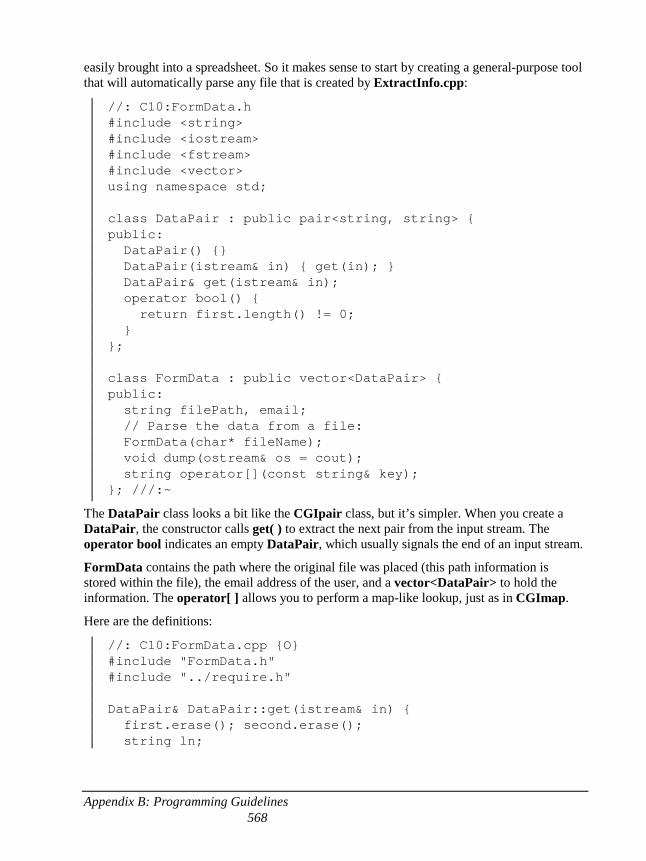
Appendix B: Programming Guidelines 568
easily brought into a spreadsheet. So it makes sense to start by creating a general-purpose tool that will automatically parse any file that is created by ExtractInfo.cpp:
//: C10:FormData.h #include <string> #include <iostream> #include <fstream> #include <vector> using namespace std; class DataPair : public pair<string, string> { public: DataPair() {} DataPair(istream& in) { get(in); } DataPair& get(istream& in); operator bool() { return first.length() != 0; } }; class FormData : public vector<DataPair> { public: string filePath, email; // Parse the data from a file: FormData(char* fileName); void dump(ostream& os = cout); string operator[](const string& key); }; ///:~
The DataPair class looks a bit like the CGIpair class, but it’s simpler. When you create a DataPair, the constructor calls get( ) to extract the next pair from the input stream. The operator bool indicates an empty DataPair, which usually signals the end of an input stream.
FormData contains the path where the original file was placed (this path information is stored within the file), the email address of the user, and a vector<DataPair> to hold the information. The operator[ ] allows you to perform a map-like lookup, just as in CGImap.
Here are the definitions:
//: C10:FormData.cpp {O} #include "FormData.h" #include "../require.h" DataPair& DataPair::get(istream& in) { first.erase(); second.erase(); string ln;

Appendix B: Programming Guidelines 569
getline(in,ln); while(ln.find("[{[") == string::npos) if(!getline(in, ln)) return *this; // End first = ln.substr(3, ln.find("]}]") - 3); getline(in, ln); // Throw away [([ while(getline(in, ln)) if(ln.find("])]") == string::npos) second += ln + string(" "); else return *this; } FormData::FormData(char* fileName) { ifstream in(fileName); assure(in, fileName); require(getline(in, filePath) != 0); // Should be start of first line: require(filePath.find("///{") == 0); filePath = filePath.substr(strlen("///{")); require(getline(in, email) != 0); // Should be start of 2nd line: require(email.find("From[") == 0); int begin = strlen("From["); int end = email.find("]"); int length = end - begin; email = email.substr(begin, length); // Get the rest of the data: DataPair dp(in); while(dp) { push_back(dp); dp.get(in); } } string FormData::operator[](const string& key) { iterator i = begin(); while(i != end()) { if((*i).first == key) return (*i).second; i++; } return string(); // Empty string == not found }
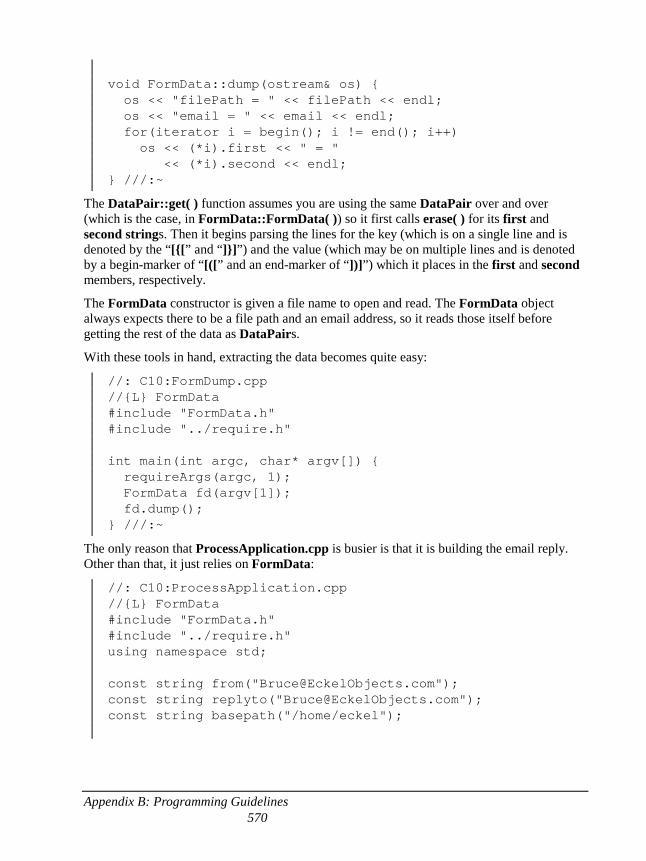
Appendix B: Programming Guidelines 570
void FormData::dump(ostream& os) { os << "filePath = " << filePath << endl; os << "email = " << email << endl; for(iterator i = begin(); i != end(); i++) os << (*i).first << " = " << (*i).second << endl; } ///:~
The DataPair::get( ) function assumes you are using the same DataPair over and over (which is the case, in FormData::FormData( )) so it first calls erase( ) for its first and second strings. Then it begins parsing the lines for the key (which is on a single line and is denoted by the “[{[” and “]}]”) and the value (which may be on multiple lines and is denoted by a begin-marker of “[([” and an end-marker of “])]”) which it places in the first and second members, respectively.
The FormData constructor is given a file name to open and read. The FormData object always expects there to be a file path and an email address, so it reads those itself before getting the rest of the data as DataPairs.
With these tools in hand, extracting the data becomes quite easy:
//: C10:FormDump.cpp //{L} FormData #include "FormData.h" #include "../require.h" int main(int argc, char* argv[]) { requireArgs(argc, 1); FormData fd(argv[1]); fd.dump(); } ///:~
The only reason that ProcessApplication.cpp is busier is that it is building the email reply. Other than that, it just relies on FormData:
//: C10:ProcessApplication.cpp //{L} FormData #include "FormData.h" #include "../require.h" using namespace std; const string from("[email protected]"); const string replyto("[email protected]"); const string basepath("/home/eckel");
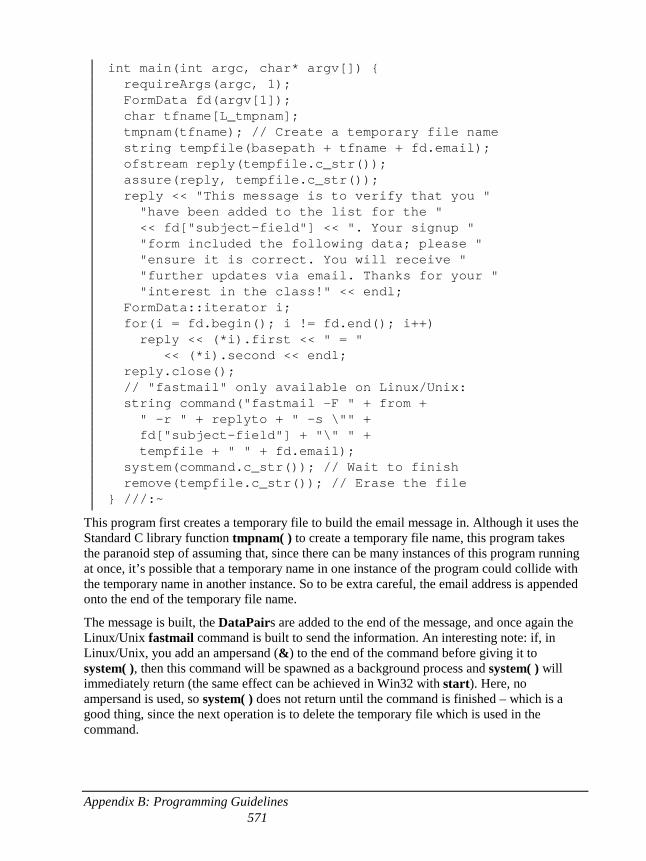
Appendix B: Programming Guidelines 571
int main(int argc, char* argv[]) { requireArgs(argc, 1); FormData fd(argv[1]); char tfname[L_tmpnam]; tmpnam(tfname); // Create a temporary file name string tempfile(basepath + tfname + fd.email); ofstream reply(tempfile.c_str()); assure(reply, tempfile.c_str()); reply << "This message is to verify that you " "have been added to the list for the " << fd["subject-field"] << ". Your signup " "form included the following data; please " "ensure it is correct. You will receive " "further updates via email. Thanks for your " "interest in the class!" << endl; FormData::iterator i; for(i = fd.begin(); i != fd.end(); i++) reply << (*i).first << " = " << (*i).second << endl; reply.close(); // "fastmail" only available on Linux/Unix: string command("fastmail -F " + from + " -r " + replyto + " -s \"" + fd["subject-field"] + "\" " + tempfile + " " + fd.email); system(command.c_str()); // Wait to finish remove(tempfile.c_str()); // Erase the file } ///:~
This program first creates a temporary file to build the email message in. Although it uses the Standard C library function tmpnam( ) to create a temporary file name, this program takes the paranoid step of assuming that, since there can be many instances of this program running at once, it’s possible that a temporary name in one instance of the program could collide with the temporary name in another instance. So to be extra careful, the email address is appended onto the end of the temporary file name.
The message is built, the DataPairs are added to the end of the message, and once again the Linux/Unix fastmail command is built to send the information. An interesting note: if, in Linux/Unix, you add an ampersand (&) to the end of the command before giving it to system( ), then this command will be spawned as a background process and system( ) will immediately return (the same effect can be achieved in Win32 with start). Here, no ampersand is used, so system( ) does not return until the command is finished – which is a good thing, since the next operation is to delete the temporary file which is used in the command.
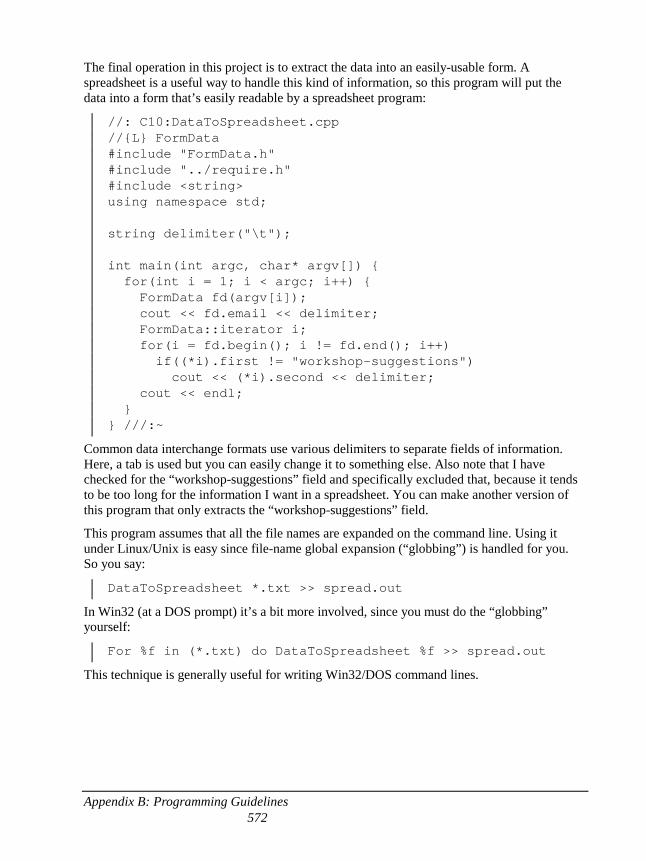
Appendix B: Programming Guidelines 572
The final operation in this project is to extract the data into an easily-usable form. A spreadsheet is a useful way to handle this kind of information, so this program will put the data into a form that’s easily readable by a spreadsheet program:
//: C10:DataToSpreadsheet.cpp //{L} FormData #include "FormData.h" #include "../require.h" #include <string> using namespace std; string delimiter("\t"); int main(int argc, char* argv[]) { for(int i = 1; i < argc; i++) { FormData fd(argv[i]); cout << fd.email << delimiter; FormData::iterator i; for(i = fd.begin(); i != fd.end(); i++) if((*i).first != "workshop-suggestions") cout << (*i).second << delimiter; cout << endl; } } ///:~
Common data interchange formats use various delimiters to separate fields of information. Here, a tab is used but you can easily change it to something else. Also note that I have checked for the “workshop-suggestions” field and specifically excluded that, because it tends to be too long for the information I want in a spreadsheet. You can make another version of this program that only extracts the “workshop-suggestions” field.
This program assumes that all the file names are expanded on the command line. Using it under Linux/Unix is easy since file-name global expansion (“globbing”) is handled for you. So you say:
DataToSpreadsheet *.txt >> spread.out
In Win32 (at a DOS prompt) it’s a bit more involved, since you must do the “globbing” yourself:
For %f in (*.txt) do DataToSpreadsheet %f >> spread.out
This technique is generally useful for writing Win32/DOS command lines.
Appendix B: Programming Guidelines 573
Summary Exercises
1. In ExtractInfo.cpp, change store( ) so it stores the data in comma-separated ASCII format
2. (This exercise may require a little research and ingenuity, but you’ll have a good idea of how server-side programming works when you’re done.) Gain access to a Web server somehow, even if you do so by installing a Web server that runs on your local machine (the Apache server is freely available from http://www.Apache.org and runs on most platforms). Install and test ExtractInfo.cpp as a CGI program, using INFOtest.html.
3. Create a program called ExtractSuggestions.cpp that is a modification of DataToSpreadsheet.cpp which will only extract the suggestions along with the name and email address of the person that made them.

575
A: Recommended reading
C Thinking in C: Foundations for Java & C++, by Chuck Allison (a MindView, Inc. Seminar on CD ROM, 1999, available at http://www.MindView.net). A course including lectures and slides in the foundations of the C Language to prepare you to learn Java or C++. This is not an exhaustive course in C; only the necessities for moving on to the other languages are included. An extra section covering features for the C++ programmer is included. Prerequisite: experience with a high-level programming language, such as Pascal, BASIC, Fortran, or LISP.
General C++ The C++ Programming Language, 3rd edition, by Bjarne Stroustrup (Addison-Wesley 1997). To some degree, the goal of the book that you’re currently holding is to allow you to use Bjarne’s book as a reference. Since his book contains the description of the language by the author of that language, it’s typically the place where you’ll go to resolve any uncertainties about what C++ is or isn’t supposed to do. When you get the knack of the language and are ready to get serious, you’ll need it.
C++ Primer, 3rd Edition, by Stanley Lippman and Josee Lajoie (Addison-Wesley 1998). Not that much of a primer anymore; it’s evolved into a thick book filled with lots of detail, and the one that I reach for along with Stroustrup’s when trying to resolve an issue. Thinking in C++ should provide a basis for understanding the C++ Primer as well as Stroustrup’s book.
C & C++ Code Capsules, by Chuck Allison (Prentice-Hall, 1998). Assumes that you already know C and C++, and covers some of the issues that you may be rusty on, or that you may not have gotten right the first time. This book fills in C gaps as well as C++ gaps.
The C++ ANSI/ISO Standard. This is not free, unfortunately (I certainly didn’t get paid for my time and effort on the Standards Committee – in fact, it cost me a lot of money). But at least you can buy the electronic form in PDF for only $18 at http://www.cssinfo.com.
576
Large Scale C++ (?) by John Lakos.
C++ Gems, Stan Lippman, editor. SIGS publications.
The Design & Evolution of C++, by Bjarne Stroustrup
My own list of books Not all of these are currently available.
Computer Interfacing with Pascal & C (Self-published via the Eisys imprint; only available via the Web site)
Using C++
C++ Inside & Out
Thinking in C++, 1st edition
Black Belt C++, the Master’s Collection (edited by Bruce Eckel) (out of print).
Thinking in Java, 2nd edition
Depth & dark corners Books that go more deeply into topics of the language, and help you avoid the typical pitfalls inherent in developing C++ programs.
Effective C++ and More Effective C++, by Scott Meyers.
Ruminations on C++ by Koenig & Moo.
The STL Design Patterns

577
B: Etc This appendix contains files from Volume 1 that are required to build the files in Volume 2.
//: :require.h // Test for error conditions in programs // Local "using namespace std" for old compilers #ifndef REQUIRE_H #define REQUIRE_H #include <cstdio> #include <cstdlib> #include <fstream> inline void require(bool requirement, const char* msg = "Requirement failed") { using namespace std; if (!requirement) { fputs(msg, stderr); fputs("\n", stderr); exit(1); } } inline void requireArgs(int argc, int args, const char* msg = "Must use %d arguments") { using namespace std; if (argc != args + 1) { fprintf(stderr, msg, args); fputs("\n", stderr); exit(1); } } inline void requireMinArgs(int argc, int minArgs, const char* msg = "Must use at least %d arguments") {
578
using namespace std; if(argc < minArgs + 1) { fprintf(stderr, msg, minArgs); fputs("\n", stderr); exit(1); } } inline void assure(std::ifstream& in, const char* filename = "") { using namespace std; if(!in) { fprintf(stderr, "Could not open file %s\n", filename); exit(1); } } inline void assure(std::ofstream& in, const char* filename = "") { using namespace std; if(!in) { fprintf(stderr, "Could not open file %s\n", filename); exit(1); } } #endif // REQUIRE_H ///:~
From Volume 1, Chapter 9:
//: C0A:Stack4.h // With inlines #ifndef STACK4_H #define STACK4_H #include "../require.h" class Stack { struct Link { void* data; Link* next; Link(void* dat, Link* nxt): data(dat), next(nxt) {} }* head;
579
public: Stack(){ head = 0; } ~Stack(){ require(head == 0, "Stack not empty"); } void push(void* dat) { head = new Link(dat, head); } void* peek() { return head->data; } void* pop(){ if(head == 0) return 0; void* result = head->data; Link* oldHead = head; head = head->next; delete oldHead; return result; } }; #endif // STACK4_H ///:~
//: C0A:Dummy.cpp // To give the makefile at least one target // for this directory int main() {} ///:~
580
Index abort( ), 394
Standard C library function, 380
abstraction
in program design, 432
adapting to usage in different countries, Standard C++ localization library, 25
ambiguity
in multiple inheritance, 347
ANSI/ISO C++ committee, 20
applicator, 100
applying a function to a container, 133
arguments
variable argument list, 67
assert( ), 394
atof( ), 82
atoi( ), 82
automatic type conversion
and exception handling, 390
awk, 103
bad( ), 73
bad_alloc, 24
Standard C++ library exception type, 393
bad_cast
and run-time type identification, 412
Standard C++ library exception type, 393
bad_typeid
run-time type identification, 413
Standard C++ library exception type, 393
badbit, 73
before( )
run-time type identification, 403
behavioral design patterns, 436
binary
printing, 101
bit_string
bit vector in the Standard C++ libraries, 25
bits
bit vector in the Standard C++ libraries, 25
bloat, preventing template bloat, 143
Booch, Grady, 473
book errors, reporting, 21
bubble sort, 143
buffering, iostream, 76
bytes, reading raw, 73
C
basic data types, 67
error handling in C, 371
localtime( ), Standard library, 115
581
rand( ), Standard library, 115
Standard C, 20
Standard C library function abort( ), 380
Standard C library function strncpy( ), 384
Standard C library function strtok( ), 201
standard I/O library, 89
Standard library macro toupper( ), 104
C++
ANSI/ISO C++ committee, 20
CGI programming in C++, 543
GNU C++ Compiler, 543
sacred design goals of C++, 68
Standard C++, 20
Standard string class, 69
Standard Template Library (STL)., 543
template, 496
calloc( ), 128
cast
casting away const and/or volatile, 423
dynamic_cast, 423
new cast syntax, 422
run-time type identification, casting to intermediate levels, 408
searching for, 423
catch, 375
catching any exception, 379
CGI
connecting Java to CGI, 541
crash course in CGI programming, 541
GET, 541
POST, 541, 547
programming in C++, 543
chaining, in iostreams, 70
change
vector of change, 432, 478
char* iostreams, 69
character
transforming strings to typed values, 82
class
class hierarchies and exception handling, 391
maintaining library source, 104
most-derived class, 350
nested class, and run-time type identification, 407
Standard C++ string, 69
virtual base classes, 348
wrapping, 63
cleaning up the stack during exception handling, 382
clear( ), 74, 117
command line
interface, 72
committee, ANSI/ISO C++, 20
compile time
error checking, 67
compiler error tests, 108
complex number class, 25
composition
and design patterns, 432
console I/O, 72
const
casting away const and/or volatile, 423
const_cast, 423
constructor
and exception handling, 383, 386, 397
default constructor, 449
default constructor synthesized by the compiler, 433
failing, 398
order of constructor and destructor calls, 410
582
private constructor, 433
simulating virtual constructors, 445
virtual base classes with a default constructor, 351
virtual functions inside constructors, 446
controlling
template instantiation, 144
conversion
automatic type conversions and exception handling, 390
Coplien, James, 446
couplet, 505
creating
manipulators, 100
creational design patterns, 436, 474
data
C data types, 67
database
object-oriented database, 357
datalogger, 111
decimal
dec in iostreams, 70
dec manipulator in iostreams, 95
formatting, 89
default
constructor, 449
default constructor
synthesized by the compiler, 433
delete, 85
overloading array new and delete, 385
deserialization, and persistence, 357
design
abstraction in program design, 432
and efficiency, 143
sacred design goals of C++, 68
design patterns, 431
behavioral, 436
creational, 436, 474
factory method, 474
observer, 451
prototype, 478, 488
structural, 436
vector of change, 432, 478
visitor, 465
destructor
and exception handling, 382, 398
order of constructor and destructor calls, 410
diamond
in multiple inheritance, 347
dispatching
double dispatching, 461, 500
multiple dispatching, 461
domain_error
Standard C++ library exception type, 393
double dispatching, 461, 500
downcast
type-safe downcast in run-time type identification, 403
dynamic_cast
and exceptions, run-time type identification, 412
difference between dynamic_cast and typeid( ), run-time type identification, 409
run-time type identification, 403
effectors, 101
efficiency
design, 143
run-time type identification, 415
ellipses, with exception handling, 379
583
endl, iostreams, 70, 96
ends, iostreams, 70, 83
enumeration, 107
eof( ), 73
eofbit, 73
errno, 372
error
compile-time checking, 67
error handling in C, 371
handling, iostream, 73
recovery, 371
reporting errors in book, 21
exception handling, 371
asynchronous events, 393
atomic allocations for safety, 388
automatic type conversions, 390
bad_alloc Standard C++ library exception type, 393
bad_cast Standard C++ library exception type, 393
bad_typeid, 413
bad_typeid Standard C++ library exception type, 393
catching any exception, 379
class hierarchies, 391
cleaning up the stack during a throw, 382
constructors, 383, 386
constructors, 397
destructors, 382, 398
domain_error Standard C++ library exception type, 393
dynamic_cast, run-time type identification, 412
ellipses, 379
exception handler, 375
exception hierarchies, 396
exception matching, 390
exception Standard C++ library exception type, 392
invalid_argument Standard C++ library exception type, 393
length_error Standard C++ library exception type, 393
logic_error Standard C++ library exception type, 392
multiple inheritance, 396
naked pointers, 386
object slicing and exception handling, 390, 392
operator new placement syntax, 385
out_of_range Standard C++ library exception type, 393
overflow_error Standard C++ library exception type, 393
overhead, 398
programming guidelines, 393
range_error Standard C++ library exception type, 393
references, 389, 396
re-throwing an exception, 380
run-time type identification, 402
runtime_error Standard C++ library exception type, 392
set_terminate( ), 381
set_unexpected( ), 377
specification, 376
Standard C++ library exception type, 392
Standard C++ library exceptions, 392
standard exception classes, 24
termination vs. resumption, 376
throwing & catching pointers, 397
throwing an exception, 374
typeid( ), 413
typical uses of exceptions, 394
uncaught exceptions, 380
unexpected( ), 377
unexpected, filtering exceptions, 386
584
extensible, 505
extensible program, 67
extractor, 69
factory method, 474
fail( ), 73
failbit, 73, 117
file
iostreams, 69, 72
FILE, stdio, 64
fill
width, precision, iostream, 91
filtering unexpected exceptions, 386
flags, iostreams format, 88
flush, iostreams, 70, 96
format flags, iostreams, 88
formatting
formatting manipulators, iostreams, 95
in-core, 81
iostream internal data, 88
output stream, 87
free( ), 85
freeze( ), 85
freezing a strstream, 85
fseek( ), 78
FSTREAM.H, 74
function
applying a function to a container, 133
function objects, 24
function templates, 126
member function template, 137
pointer to a function, 382
run-time type identification without virtual functions, 402, 407
GET, 541
get pointer, 79, 84, 117
get( ), 72, 75
overloaded versions, 73
with streambuf, 78
getline( ), 72, 75, 84
GNU C++ Compiler, 543
good( ), 73
goto
non-local goto, setjmp( ) and longjmp( ), 372
graphical user interface (GUI), 72
Grey, Jan, 354
GUI
graphical user interface, 72
handler, exception, 375
hex, 95
hex (hexadecimal) in iostreams, 70
hex( ), 90
hexadecimal, 89
hierarchy
object-based hierarchy, 344
I/O
C standard library, 89
console, 72
ifstream, 69, 74, 77
ignore( ), 75
implementation
limits, 24
in-core formatting, 81
indexOf( ), 485
inheritance
and design patterns, 432
585
multiple inheritance (MI), 344
multiple inheritance and run-time type identification, 409, 413, 418
templates, 139
input
line at a time, 72
inserter, 69
interface
command-line, 72
graphical user (GUI), 72
repairing an interface with multiple inheritance, 364
interpreter, printf( ) run-time, 66
invalid_argument
Standard C++ library exception type, 393
IOSTREAM.H, 74
iostreams
and Standard C++ library string class, 24
applicator, 100
automatic, 90
bad( ), 73
badbit, 73
binary printing, 101
buffering, 76
clear( ), 117
dec, 95
dec (decimal), 70
effectors, 101
endl, 96
ends, 70
eof( ), 73
eofbit, 73
error handling, 73
fail( ), 73
failbit, 73, 117
files, 72
fill character, 113
fixed, 97
flush, 70, 96
format flags, 88
formatting manipulators, 95
fseek( ), 78
get pointer, 117
get( ), 75
getline( ), 75
good( ), 73
hex, 95
hex (hexadecimal), 70
ignore( ), 75
internal, 97
internal formatting data, 88
ios::app, 83
ios::ate, 83
ios::basefield, 89
ios::beg, 79
ios::cur, 79
ios::dec, 90
ios::end, 79
ios::fill( ), 91
ios::fixed, 90
ios::flags( ), 88
ios::hex, 90
ios::internal, 91
ios::left, 90
ios::oct, 90
ios::out, 83
ios::precision( ), 91
ios::right, 90
ios::scientific, 90
ios::showbase, 89
586
ios::showpoint, 89
ios::showpos, 89
ios::skipws, 88
ios::stdio, 89
ios::unitbuf, 89
ios::uppercase, 89
ios::width( ), 91
left, 97
manipulators, creating, 100
newline, manipulator for, 100
noshowbase, 97
noshowpoint, 97
noshowpos, 97
noskipws, 97
nouppercase, 97
oct (octal), 70, 95
open modes, 76
precision( ), 113
rdbuf( ), 77
read( ), 117
read( ) and write( ), 359
resetiosflags, 98
right, 97
scientific, 97
seekg( ), 79
seeking in, 78
seekp( ), 79
setbase, 98
setf( ), 88, 113
setfill, 98
setiosflags, 98
setprecision, 98
setw, 98
setw( ), 113
showbase, 97
showpoint, 97
showpos, 97
skipws, 97
tellg( ), 78
tellp( ), 78
unit buffering, 89
uppercase, 97
width, fill and precision, 91
ws, 96
istream, 69
istringstreams, 69
istrstream, 69, 81
iterator, 432
keyword
catch, 375
Lajoie, Josée, 422
Lee, Meng, 151
length_error
Standard C++ library exception type, 393
library
C standard I/O, 89
maintaining class source, 104
standard template library (STL), 151
limits, implementation, 24
LIMITS.H, 103
line input, 72
localtime( ), 115
logic_error
Standard C++ library exception type, 392
longjmp( ), 372
maintaining class library source, 104
malloc( ), 85, 128
manipulator, 70
587
creating, 100
iostreams formatting, 95
member
member function template, 137
memory
a memory allocation system, 128
MI
multiple inheritance, 344
modes, iostream open, 76
modulus operator, 115
monolithic, 344
multiple dispatching, 461
multiple inheritance, 344
ambiguity, 347
and exception handling, 396
and run-time type identification, 409, 413, 418
and upcasting, 354
avoiding, 364
diamonds, 347
duplicate subobjects, 346
most-derived class, 350
overhead, 353
pitfall, 360
repairing an interface, 364
upcasting, 347
virtual base classes, 348
virtual base classes with a default constructor, 351
naked pointers, and exception handling, 386
namespace, 103
network programming
CGI POST, 547
CGI programming in C++, 543
connecting Java to CGI, 541
crash course in CGI programming, 541
new, 85
overloading array new and delete, 385
placement syntax, 385
newline, 100
non-local goto
setjmp( ) and longjmp( ), 372
notifyObservers( ), 451, 454
null references, 412
numerical operations
efficiency using the Standard C++ Numerics library, 25
object
object-based hierarchy, 344
object-oriented database, 357
object-oriented programming, 402
slicing, and exception handling, 390, 392
temporary, 103
Observable, 451
observer design pattern, 451
oct, 95
ofstream, 69, 74
open modes, iostreams, 76
operator
[], 389
<<, 69
>>, 69
modulus, 115
operator overloading sneak preview, 68
order
of constructor and destructor calls, 410
ostream, 69, 75
ostringstreams, 69
588
ostrstream, 69, 81, 107
out_of_range
Standard C++ library exception type, 393
output
stream formatting, 87
strstreams, 83
overflow_error
Standard C++ library exception type, 393
overhead
exception handling, 398
multiple inheritance, 353
overloading
array new and delete, 385
overview, chapters, 17
pair template class, 24
Park, Nick, 135
patterns, design patterns, 431
perror( ), 372
persistence, 360
persistent object, 357
pitfalls
in multiple inheritance, 360
pointer
finding exact type of a base pointer, 402
pointer to a function, 382
to member, 134
polymorphism, 414, 493, 508
POST, 541
CGI, 547
precision
width, fill, iostream, 91
precision( ), 113
preprocessor
stringizing, 93
printf( ), 66, 87
error code, 371
run-time interpreter, 66
private
constructor, 433
programming, object-oriented, 402
protected, 421
prototype, 478
design pattern, 488
put pointer, 78
raise( ), 372
rand( ), 115
RAND_MAX, 115
range_error
Standard C++ library exception type, 393
rapid development, 143
raw, reading bytes, 73
rdbuf( ), 77
read( ), 73, 117
iostream read( ) and write( ), 359
reading raw bytes, 73
realloc( ), 128
reference
and exception handling, 389, 396
and run-time type identification, 411
null references, 412
reinterpret_cast, 423
reporting errors in book, 21
resumption, 379
termination vs. resumption, exception handling, 376
re-throwing an exception, 380
589
root, 396
RTTI
misuse of RTTI, 489, 505
run-time interpreter for printf( ), 66
run-time type identification, 24, 360, 401
and efficiency, 415
and exception handling, 402
and multiple inheritance, 409, 413, 418
and nested classes, 407
and references, 411
and templates, 410
and upcasting, 402
and void pointers, 410
bad_cast, 412
bad_typeid, 413
before( ), 403
building your own, 418
casting to intermediate levels, 408
difference between dynamic_cast and typeid( ), 409
dynamic_cast, 403
mechanism & overhead, 418
misuse, 414
RTTI, abbreviation for, 402
shape example, 401
typeid( ), 402
typeid( ) and built-in types, 406
typeinfo, 402, 418
type-safe downcast, 403
vendor-defined, 402
VTABLE, 418
when to use it, 414
without virtual functions, 402, 407
runtime_error
Standard C++ library exception type, 392
Schwarz, Jerry, 101
sed, 103
seekg( ), 79
seeking in iostreams, 78
seekp( ), 79
serialization, 115
and persistence, 357
set
STL set class example, 152
set_new_handler, 24
set_terminate( ), 381
set_unexpected( )
exception handling, 377
setChanged( ), 454
setf( ), iostreams, 88, 113
setjmp( ), 372
setw( ), 113
shape
example, and run-time type identification, 401
signal( ), 372, 393
simulating virtual constructors, 445
singleton, 432
size
sizeof, 360
slicing
object slicing and exception handling, 390, 392
Smalltalk, 344
sort
bubble sort, 143
specification
exception, 376
standard
590
Standard C, 20
Standard C++, 20
Standard C++ libraries
algorithms library, 25
bit_string bit vector, 25
bits bit vector, 25
complex number class, 25
containers library, 25
diagnostics library, 24
general utilities library, 24
iterators library, 25
language support, 24
localization library, 25
numerics library, 25
standard exception classes, 24
standard library exception types, 392
standard template library (STL), 151
string class, 69
standard template library
operations on, with algorithms, 25
set class example, 152
static_cast, 423
stdio, 63
STDIO.H, 74
Stepanov, Alexander, 151
STL
C++ Standard Template Library, 543
standard template library, 151
storage
storage allocation functions for the STL, 24
str( ), strstream, 85
stream, 69
output formatting, 87
streambuf, 77
and get( ), 78
streampos, moving, 78
string
Standard C++ library string class, 69
transforming character strings to typed values, 82
String
indexOf( ), 485
substring( ), 485
stringizing, preprocessor, 93
strncpy( )
Standard C library function strncpy( ), 384
Stroustrup, Bjarne, 15
strstr( ), 108
strstream, 81, 108
automatic storage allocation, 84
ends, 83
freezing, 85
output, 83
str( ), 85
user-allocated storage, 81
zero terminator, 83
strtok( )
Standard C library function, 201
structural design patterns, 436
subobject
duplicate subobjects in multiple inheritance, 346
substring( ), 485
tellg( ), 78
tellp( ), 78
template
and inheritance, 139
and run-time type identification, 410
C++ Standard Template Library (STL), 543
591
controlling instantiation, 144
function templates, 126
in C++, 496
member function template, 137
preventing template bloat, 143
requirements of template classes, 141
standard template library (STL), 151
temporary
object, 103
terminate( ), 24
uncaught exceptions, 380
termination
vs. resumption, exception handling, 376
terminator
zero for strstream, 83
throwing an exception, 374
toupper( ), 104
transforming character strings to typed values, 82
try block, 375
tuple-making template function, 24
type
automatic type conversions and exception handling, 390
built-in types and typeid( ), run-time type identification, 406
finding exact type of a base pointer, 402
new cast syntax, 422
run-time type identification (RTTI), 401
type-safe downcast in run-time type identification, 403
typeid( )
and built-in types, run-time type identification, 406
and exceptions, 413
difference between dynamic_cast and typeid( ), run-time type identification, 409
run-time type identification, 402
typeinfo
run-time type identification, 402
structure, 418
TYPEINFO.H, 411
ULONG_MAX, 103
uncaught exceptions, 380
unexpected( ), 24
exception handling, 377
unit buffering, iostream, 89
Unix, 103
upcasting
and multiple inheritance, 347, 354
and run-time type identification, 402
Urlocker, Zack, 369
value
transforming character strings to typed values, 82
variable
variable argument list, 67
vector of change, 432, 478, 508
vendor-defined run-time type identification, 402
virtual
run-time type identification without virtual functions, 402, 407
simulating virtual constructors, 445
virtual base classes, 348
virtual base classes with a default constructor, 351
virtual functions inside constructors, 446
visitor pattern, 465
void
592
void pointers and run-time type identification, 410
volatile
casting away const and/or volatile, 423
VPTR, 360, 446
VTABLE, 446
and run-time type identification, 418
wrapping, class, 63
write( ), 73
iostream read( ) and write( ), 359
ws, 96
zero terminator, strstream, 83