Embed Size (px)
Citation preview

© Acism Software Private Limited, Pune, india
User FunctionalityUser FunctionalityStep by Step GuideStep by Step Guide
Acism Software Private Limited, India
Web: http://kommbox.comEmail: [email protected]: @kommboxFacebook: KommboxGoogle+: +Kommbox

© Acism Software Private Limited, Pune, india
Invitation A user receives an invitation email within 5
minutes after being added by the administrator.
In case the activation email is not received, contact your account administrator.
Click the activation link in that email. You will now set your password and your account will go from “Unverified” state to “Active” state.

© Acism Software Private Limited, Pune, india
Log in
Once your account is activated, you may log in to your account using your email id and password.
Clicking “Remember me” will remember you on the current computer (by storing a cookie) so that you can skip the login screen next time onwards.
Note: Your password is NOT stored in your cookie, which guards you against the cookie theft attack.

© Acism Software Private Limited, Pune, india
Dashboard
After login, you come to the dashboard. Notice the Header, Top Menu, Snippets area and
side menu. The side menu contains the list of kommboxes
that you have access to, the discussions and the tasks therein. The (+) sign in front of each will let you create a new discussion or tasks.
The top menu mainly consolidates highly useful views, apart from commonly needed functionality such as bookmarks and text search.
Top menu
Snippets area
Side menu
Header

© Acism Software Private Limited, Pune, india
Creating a Discussion
In the side menu, click the (+) sign in front of discussions under a kommbox to create the discussion in that kommbox..
Give a discussion title (it defines what this discussion is about), message subject, message body and optional attachment.
Select the message mood (from among signal colors – green, yellow and red)– Green – all well– Yellow – Concern– Red – Upset
Hit the “Save” button.
© Acism Software Private Limited, Pune, india
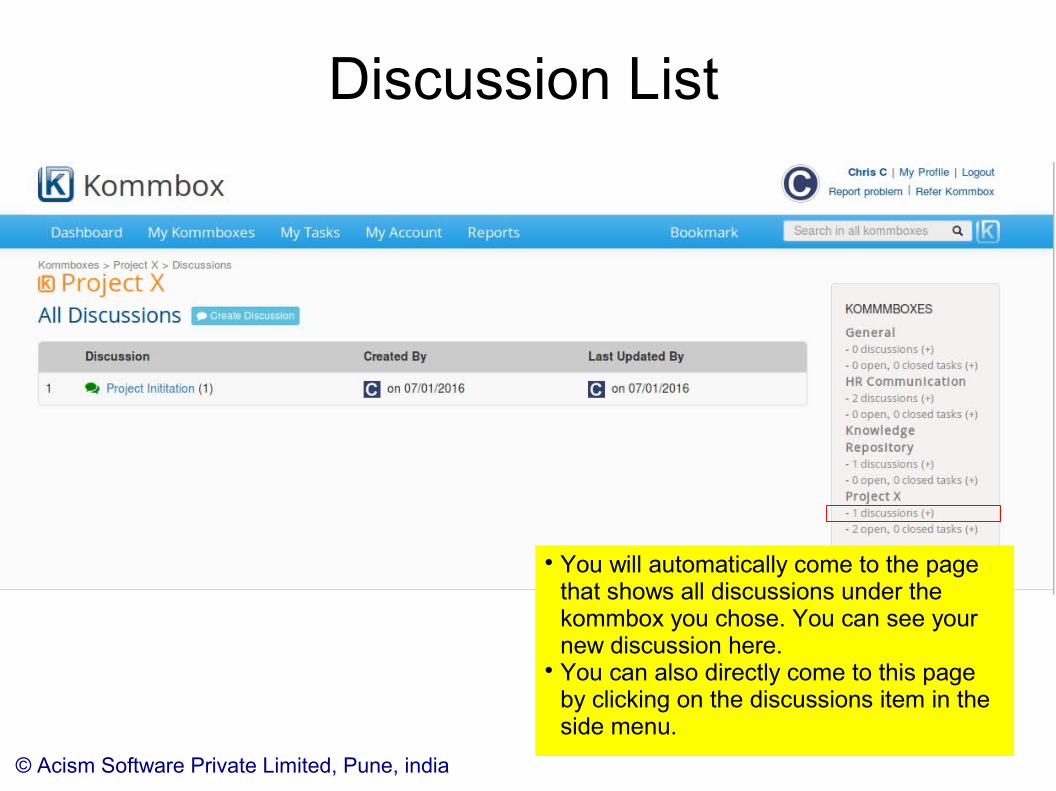
Discussion List
You will automatically come to the page that shows all discussions under the kommbox you chose. You can see your new discussion here.
You can also directly come to this page by clicking on the discussions item in the side menu.

© Acism Software Private Limited, Pune, india
Viewing the Discussion
Clicking on the discussion from the discussion list page brings you to the discussion page. You can use the “Post Reply” button to post a reply.

© Acism Software Private Limited, Pune, india
Replying to a Discussion
Set the message mood to yellow or red if you want to flag it for attention. The discussion will take the color of the latest message in it.

© Acism Software Private Limited, Pune, india
Creating a Task
Click (+) in front of tasks in the side menu to create a new task under a kommbox.
Select the kommbox. Set the task name, priority, start date, due date assignees and optionally the description and attachment while creating a task.
You can also set “Repeat” attribute to have this task recurring. (This task is used as a template and new tasks are created.)
Monthly recurrence has two options:– By date: ex. On 25th each month– By day: ex. On second Saturday
each month A task may be effort driven, in which case
you can add the estimated effort.

© Acism Software Private Limited, Pune, india
Task List
You will automatically come to the page that shows all tasks under the kommbox you chose. You can see your new task here.
You can come to this page directly from the side panel, by clicking the tasks link under the appropriate kommbox name.

© Acism Software Private Limited, Pune, india
Viewing/ Editing a Task
On the task page, you see the summary info of the task at the top, and the task log below it.
You can edit individual fields by clicking the edit icon in front of a field.
You may also add a task comment. The 'Log work' link will be enabled for you if you are an
assignee. All these updates to the task are seen in the task log. Issue indicators (shown as flames) show up
automatically to indicate certain issue with a task.

© Acism Software Private Limited, Pune, india
Logging Work
If you are an assignee of the task, you can log work against the task
When you log work, the task status will automatically change from “New” to “In progress”.
If you make the % progress as 100, then the status changes to “Completed”
© Acism Software Private Limited, Pune, india
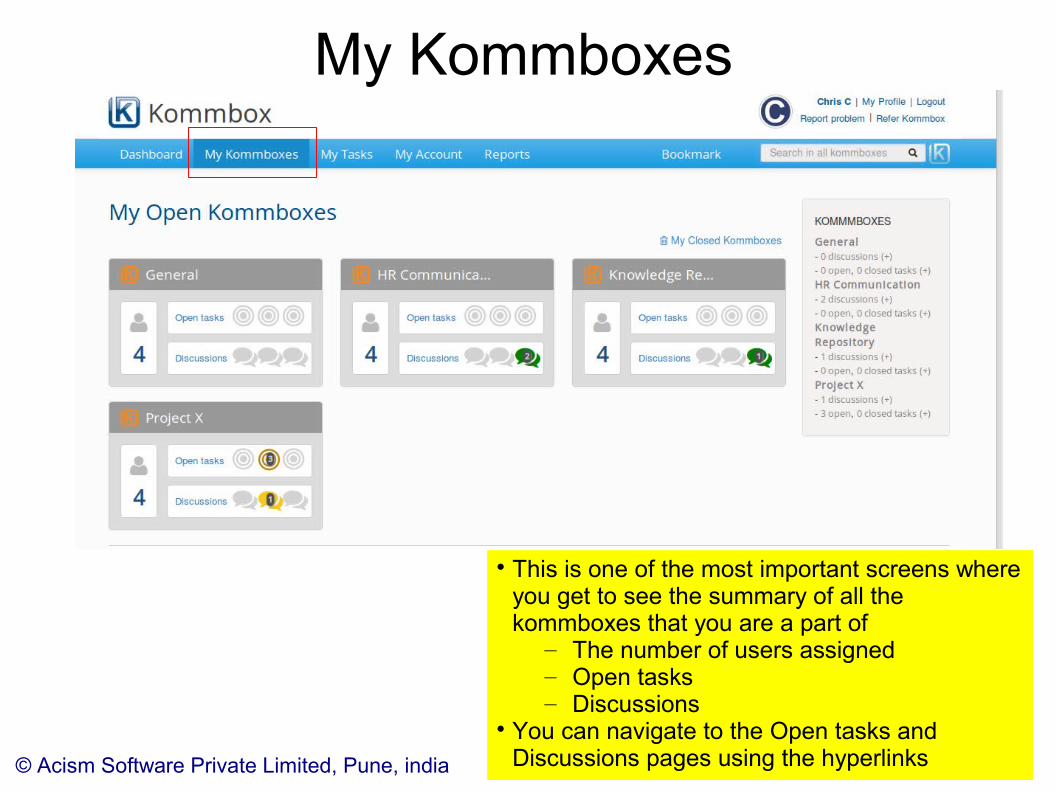
My Kommboxes
This is one of the most important screens where you get to see the summary of all the kommboxes that you are a part of– The number of users assigned– Open tasks– Discussions
You can navigate to the Open tasks and Discussions pages using the hyperlinks

© Acism Software Private Limited, Pune, india
My Tasks
This is another important screen as it shows all the tasks waiting on you across all kommboxes.
Below that, you see the tasks assigned by you (waiting on others or yourself)
Issue indicators are shown in front of the tasks when applicable.

© Acism Software Private Limited, Pune, india
Communication Report
On this screen you see all the task updates and discussion updates that happened during a particular period. (By default last 7 days, but you can change the period/ kommboxes)

© Acism Software Private Limited, Pune, india
Text SearchFrom the top menu bar → search all kommboxes (assigned to you)From the kommbox page → search within that kommbox Use “and”, “or” keywords to have multiple search terms. Use double quotes to group more than one word.

© Acism Software Private Limited, Pune, india
Secret Comment
Click on the lock icon against an update (in dashboard, task page or discussion page) to add a secret comment to the update. This update is visible only to selected roles and/or by user type (internal / external).

© Acism Software Private Limited, Pune, india
2 Way Email Integration
Kommbox sends out email notifications for task / discussion updates and also events such as being assigned to a kommbox.
Any attachments are not sent in the email notifications, thereby saving bandwidth. The email notifications sent by Kommbox has action buttons, using which you can
do certain actions like creating a task or discussion, replying to an existing task or discussion, logging work from within your email client itself.
The email notification contains the unique link of the task or message where appropriate, so that one can directly go to the corresponding page.
One cannot see the email ids of other users, although they may be on the same kommbox (unless one is admin). This prevents the possibility of email ids getting leaked through Kommbox to spamsters.

© Acism Software Private Limited, Pune, india
My ProfileGo to “My Profile” page to update your details, upload photo, social media settings. Set your google id here so that you can sign in using Google (from the login page) Set your notification settings to control which email notifications you receive.
© Acism Software Private Limited, Pune, india
Kommbox Admin
Some users may be designated as the Kommbox Admin (by the Account Admin). These users have some special privileges with respect to that Kommbox.
Deleting a discussion / message / task Editing a message Moving a message / task to another kommbox

© Acism Software Private Limited, Pune, india
Thank and Be Thanked
You can thank someone for an update by clicking the “Thank you” icon for that update (from Dashboard or some other pages too)
You get to see how many thanks you received, and from where (after clicking the snippet)
Note: You cannot thank yourself

© Acism Software Private Limited, Pune, india
Quick Reply
“Quick reply” is a shortcut available from the dashboard updates to add a reply. In a discussion, this reply becomes a new message. In a task, it becomes a task comment.

© Acism Software Private Limited, Pune, india
My Account
Account level summary and analytics

© Acism Software Private Limited, Pune, india
Kommbox Page
Kommbox level summary and analyticsYou can come to this page directly by clicking the kommbox name in the side panel.

© Acism Software Private Limited, Pune, india
User Page
User level summary and analyticsYou can come to this page by clicking the user name or profile picture on any page.

© Acism Software Private Limited, Pune, india
Linked Email
You may configure Kommbox to receive and send emails on behalf of a particular email id. Click “Linked Email” on the “My Profile” page to set it up.
You also need to configure rules to define which kommbox receives this email and how to evaluate whether to create a new discussion or append to existing one.
You will get an option to write to external users when replying to a discussion from within a kommbox which is mail linked.

© Acism Software Private Limited, Pune, india
Report a ProblemIf you encounter any problem, just report it to the Kommbox team.

© Acism Software Private Limited, Pune, india
Refer Kommbox
Refer Kommbox to your contacts by adding their email ids here. They will receive an email invitation on your behalf, containing a
customized sign up link. When they click on the sign up link, they will know you have
invited them. When they sign up, you will receive an email informing you of
the sign up and thanking you.
© Acism Software Private Limited, Pune, india
You are done!
We covered the user functionality briefly. If you face any issue, write to us at


![SAP HowTo Guide - Unlocking User SAPStar [User Guide]](https://img.pdfslide.us/doc/110x75/544ac849b1af9f7c4f8b4bd1/sap-howto-guide-unlocking-user-sapstar-user-guide.jpg)