Embed Size (px)
Citation preview
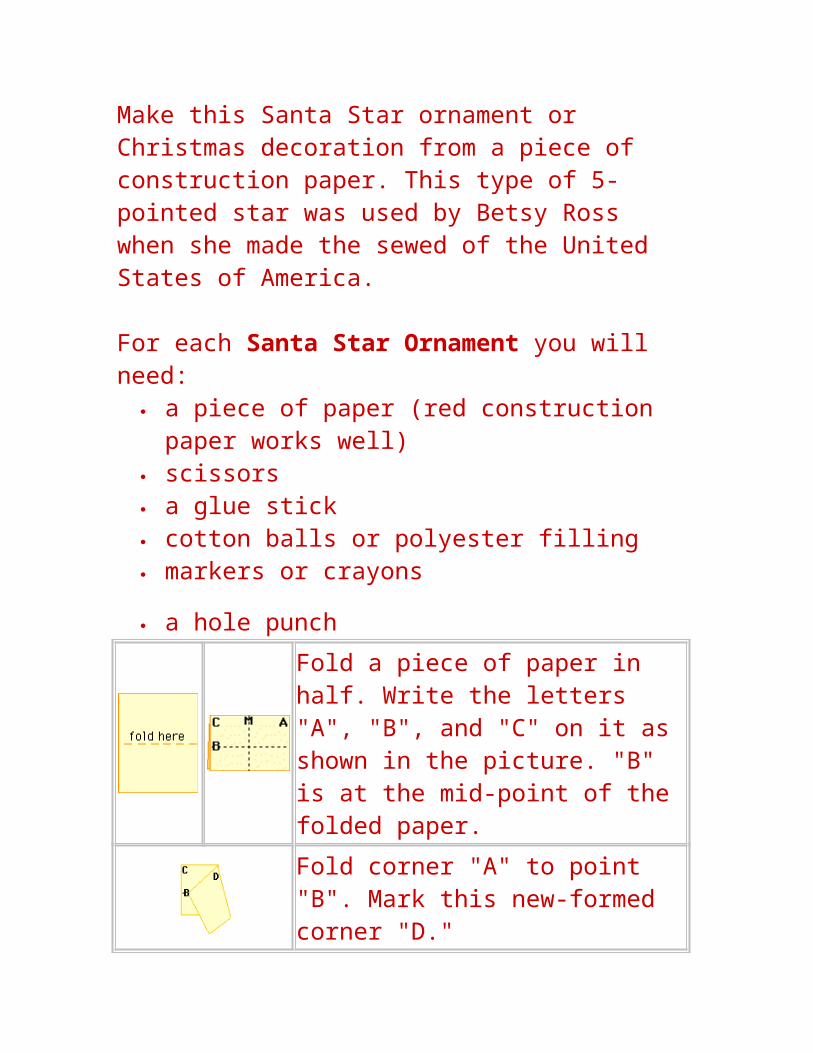
Make this Santa Star ornament or Christmas decoration from a piece of construction paper. This type of 5-pointed star was used by Betsy Ross when she made the sewed of the United States of America.
For each Santa Star Ornament you will need: a piece of paper (red construction paper works well) scissors a glue stick cotton balls or polyester filling markers or crayons
a hole punch
Fold a piece of paper in half. Write the letters "A", "B", and "C" on it as shown in the picture. "B" is at the mid-point of the folded paper.
Fold corner "A" to point "B". Mark this new-formed corner "D."
Fold corner "C" over the paper edge running from "B" to "D."
Fold along the dotted line.
Cut the paper along the dotted line.
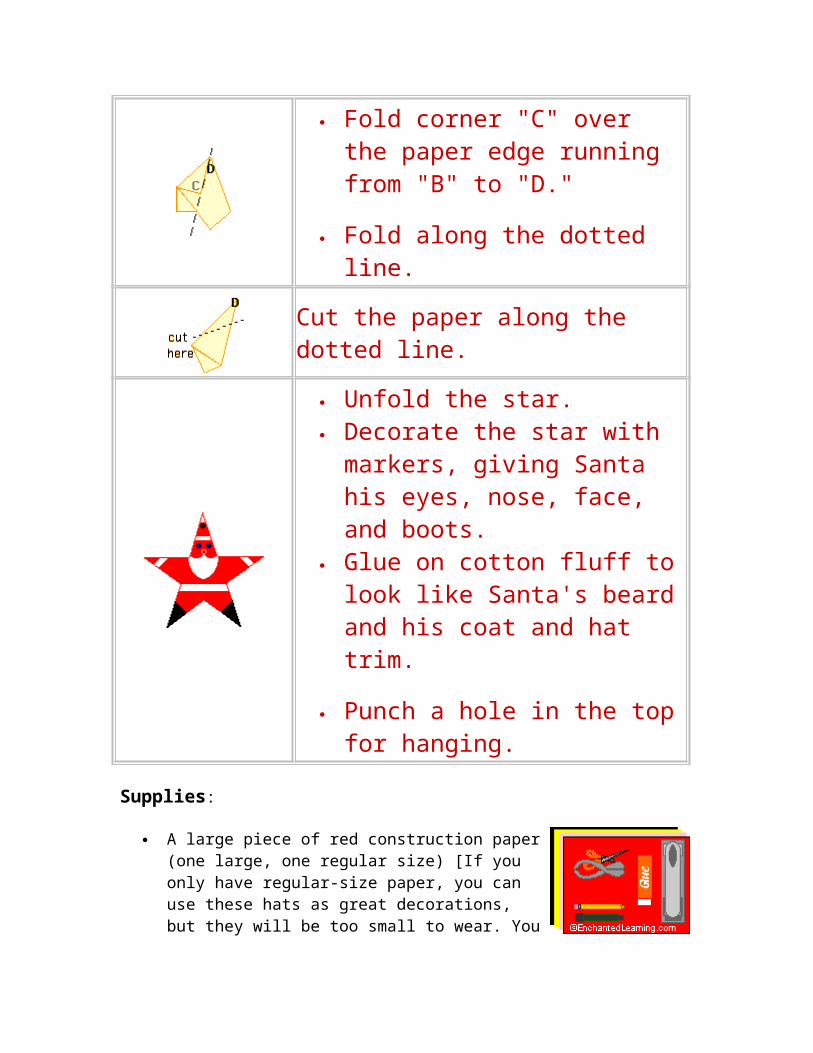
Unfold the star. Decorate the star with markers,
giving Santa his eyes, nose, face, and boots.
Glue on cotton fluff to look like Santa's beard and his coat and hat trim.
Punch a hole in the top for hanging.
Supplies:
A large piece of red construction paper (one large, one regular size) [If you only have regular-size paper, you can use these hats as great decorations, but they will be too small to wear. You can also use a brown paper bag to make the hat, coloring it with tempera paint.]
Small scraps of black, yellow, and pink paper A pencil Scissors Hole punch Red crayon or marker Stapler Glue
Cotton balls
Draw and cut out a half circle from a large piece of construction paper.
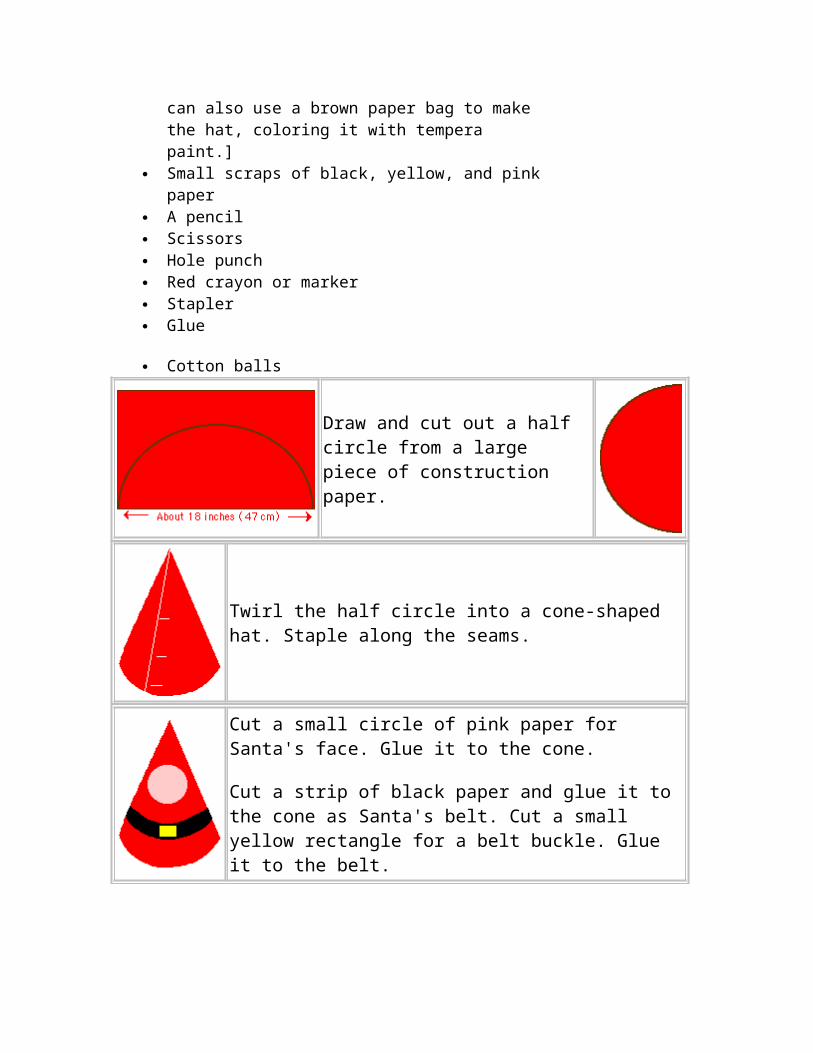
Twirl the half circle into a cone-shaped hat. Staple along the seams.
Cut a small circle of pink paper for Santa's face. Glue it to the cone.
Cut a strip of black paper and glue it to the cone as Santa's belt. Cut a small yellow rectangle for a belt buckle. Glue it to the belt.
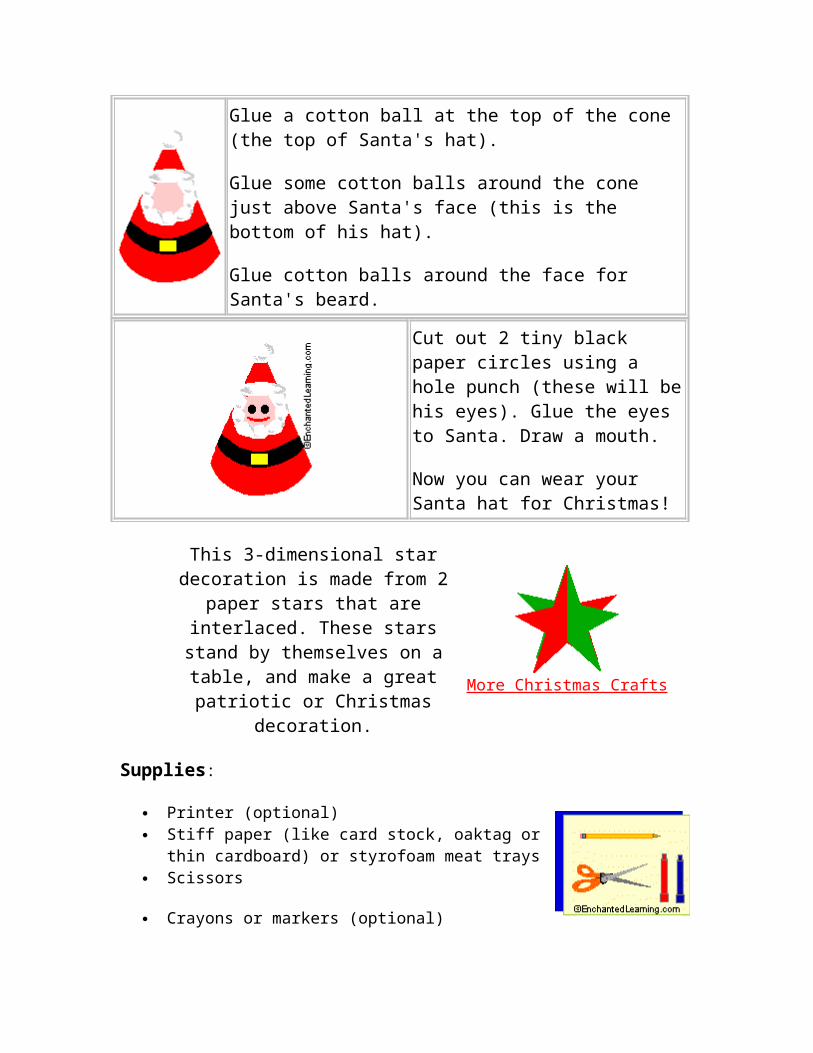
Glue a cotton ball at the top of the cone (the top of Santa's hat).
Glue some cotton balls around the cone just above Santa's face (this is the bottom of his hat).
Glue cotton balls around the face for Santa's beard.
Cut out 2 tiny black paper circles using a hole punch (these will be his eyes). Glue the eyes to Santa. Draw a mouth.
Now you can wear your Santa hat for Christmas!
This 3-dimensional star decoration is made from 2 paper stars that are interlaced. These stars stand by
themselves on a table, and make a great patriotic or Christmas decoration. More Christmas Crafts
Supplies:
Printer (optional) Stiff paper (like card stock, oaktag or thin cardboard) or
styrofoam meat trays Scissors
Crayons or markers (optional)
Two paper stars are needed to make one 3-dimensional star. Either draw two identical stars on a piece of stiff paper or print out the star template. To go to the template, click here.
Decorate the two stars (if you like) on both sides, then cut them out.
Make one slit in each star. On one star, the slit goes from an inner corner to the center point of the star; on the other star, the slit goes from an outer corner to the center point.
Slip the two stars together through the slits you just cut. For stability, you may have to tape the stars a bit where they meet at the slits.
You now have a great three-dimensional star decoration that stands by itself on a table.
Make a snowman that you can wear as a necklace or use as an

ornament.SUPPLIES NEEDED:
White glue (like Elmer's glue) Paper clip Waxed paper Scraps of construction paper: black, and orange A hole punch (for cutting eyes, and buttons) Scissors Googly eyes (from a craft store) - optional Tiny buttons - optional 2 very tiny twigs (for arms) String or yarn (for hanging it)
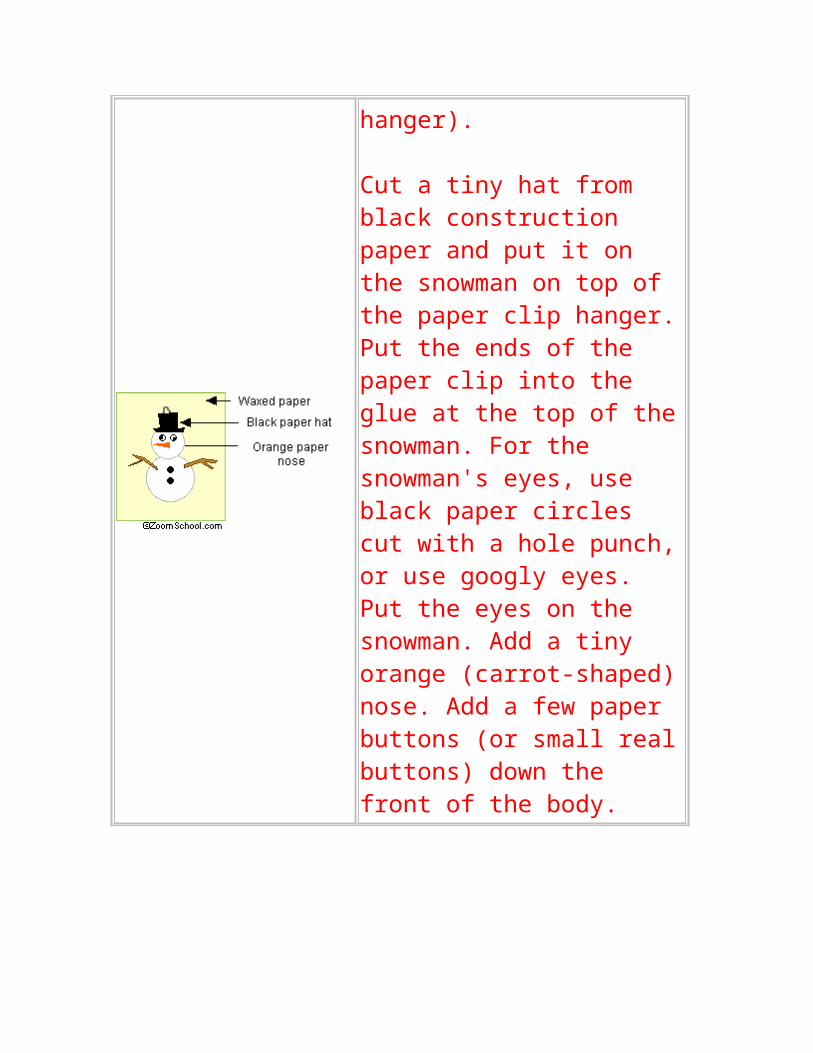
Working on waxed paper, spread 2 or 3 blobs of white glue in the shape of a snowman. Unfold a paper clip into a V-shape (to use as a hanger).
Cut a tiny hat from black construction paper and put it on the snowman on top of the paper clip hanger. Put the ends of the paper clip into the glue at the top of the snowman. For the snowman's eyes, use black paper circles cut with a hole punch, or use googly eyes. Put the eyes on the snowman. Add a tiny orange (carrot-shaped) nose. Add a few paper buttons (or small real buttons) down the front of the
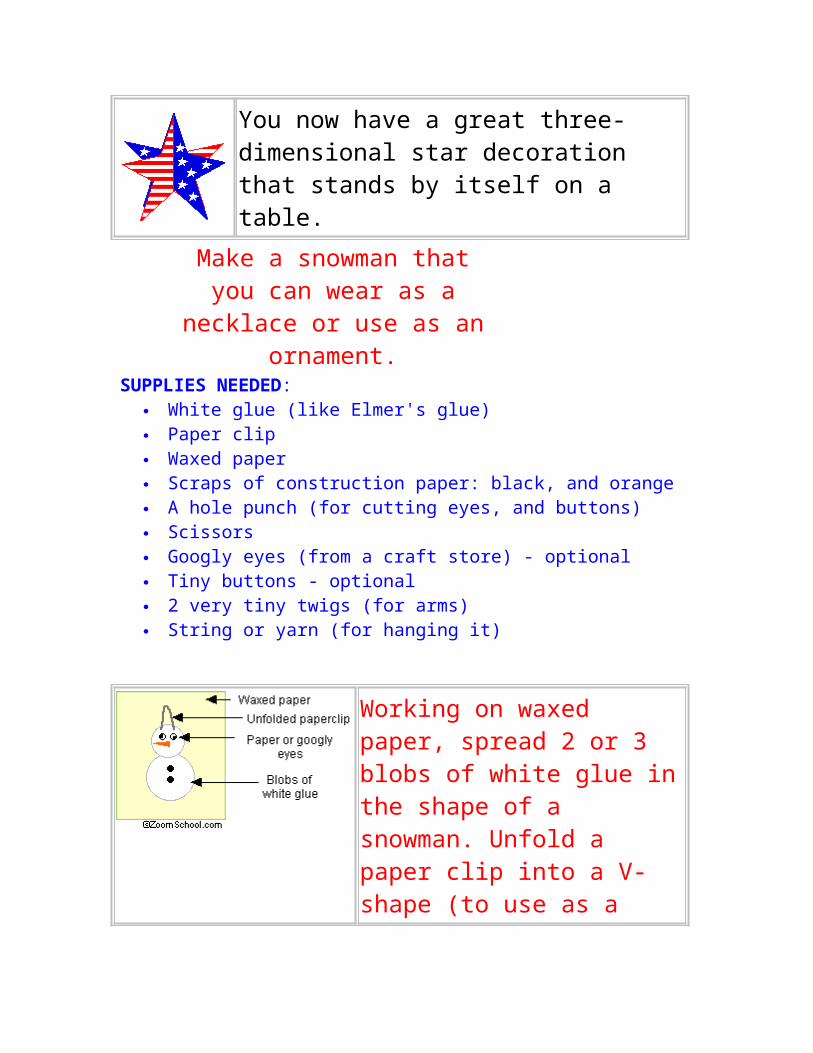
body.
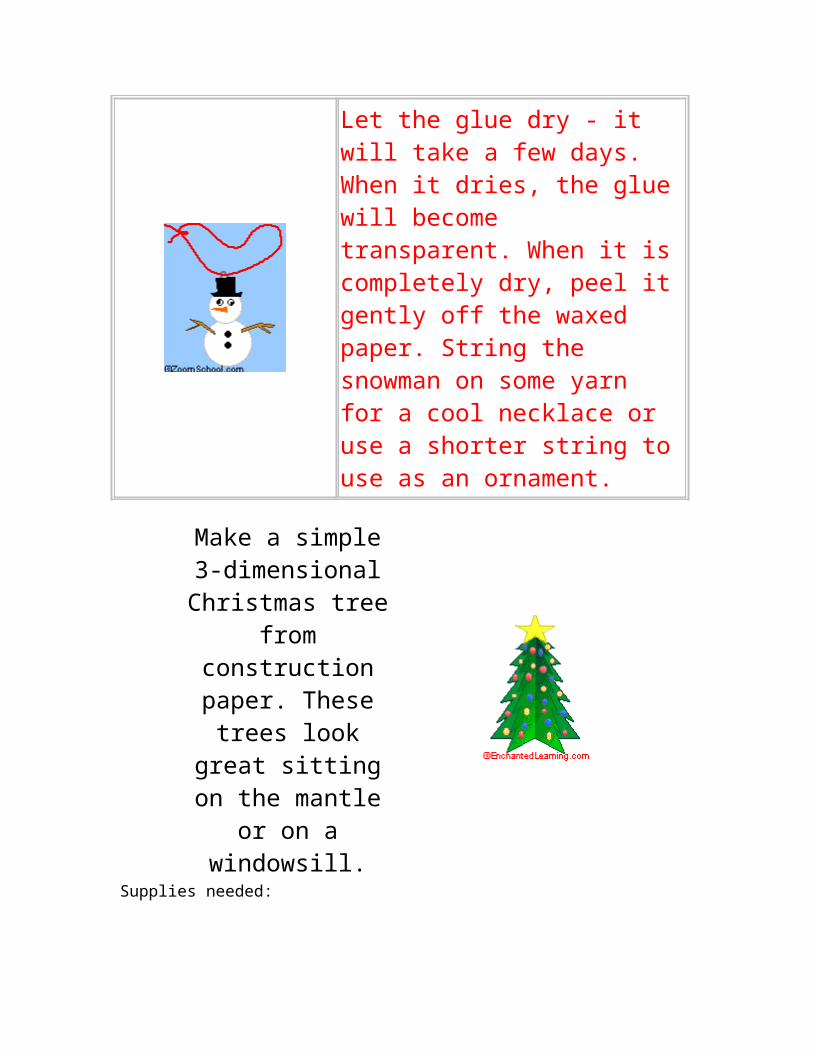
Let the glue dry - it will take a few days. When it dries, the glue will become transparent. When it is completely dry, peel it gently off the waxed paper. String the snowman on some yarn for a cool necklace or use a shorter string to use as an ornament.
Make a simple 3-dimensional
Christmas tree from construction paper.
These trees look great sitting on the mantle or on a windowsill.
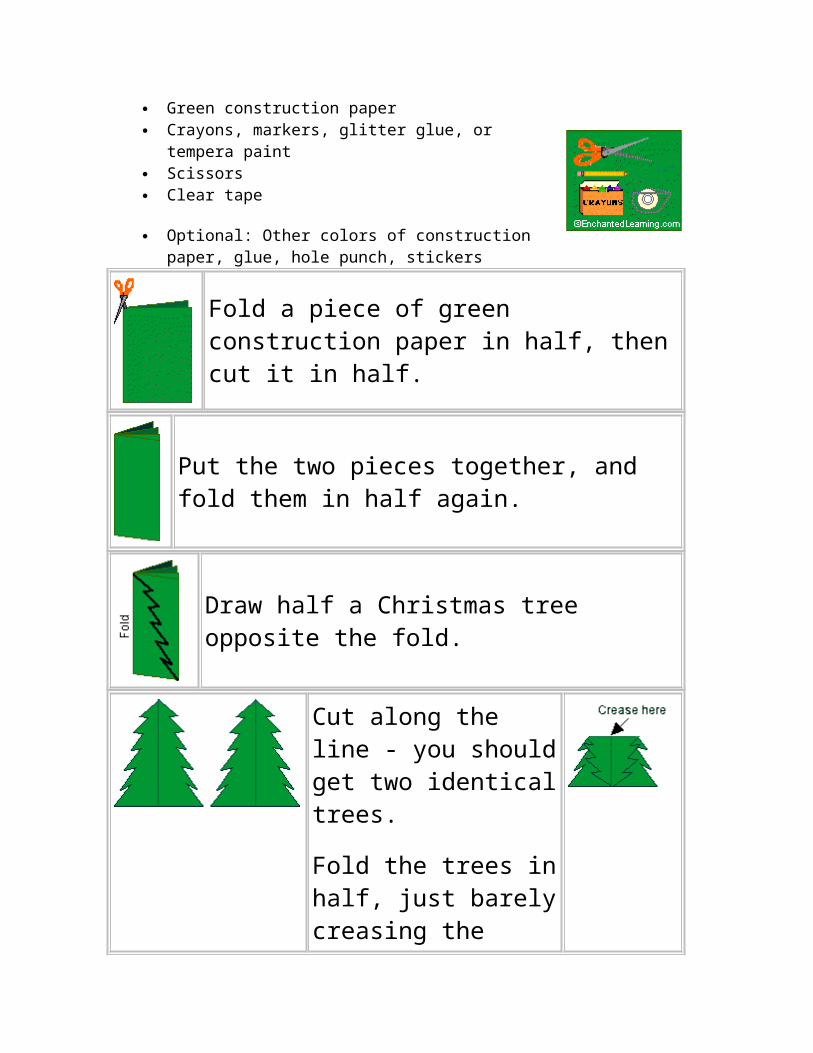
Supplies needed: Green construction paper Crayons, markers, glitter glue, or tempera paint Scissors Clear tape
Optional: Other colors of construction paper, glue, hole punch, stickers
Fold a piece of green construction paper in half, then cut it in half.
Put the two pieces together, and fold them in half again.
Draw half a Christmas tree opposite the fold.
Cut along the line - you should get two identical trees.
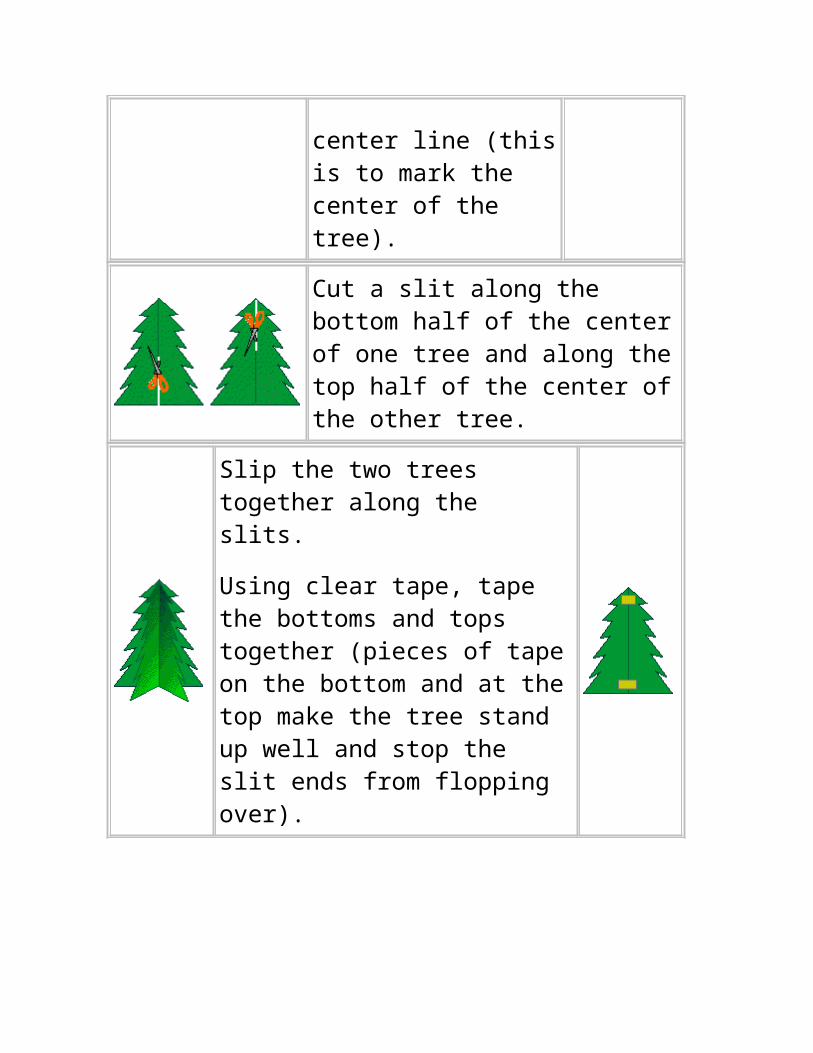
Fold the trees in half, just barely creasing the center line (this is to mark the center of the tree).
Cut a slit along the bottom half of the center of one tree and along the top half of the center of the other tree.
Slip the two trees together along the slits.
Using clear tape, tape the bottoms and tops together (pieces of tape on the bottom and at the top make the tree stand up well and stop the slit
ends from flopping over).
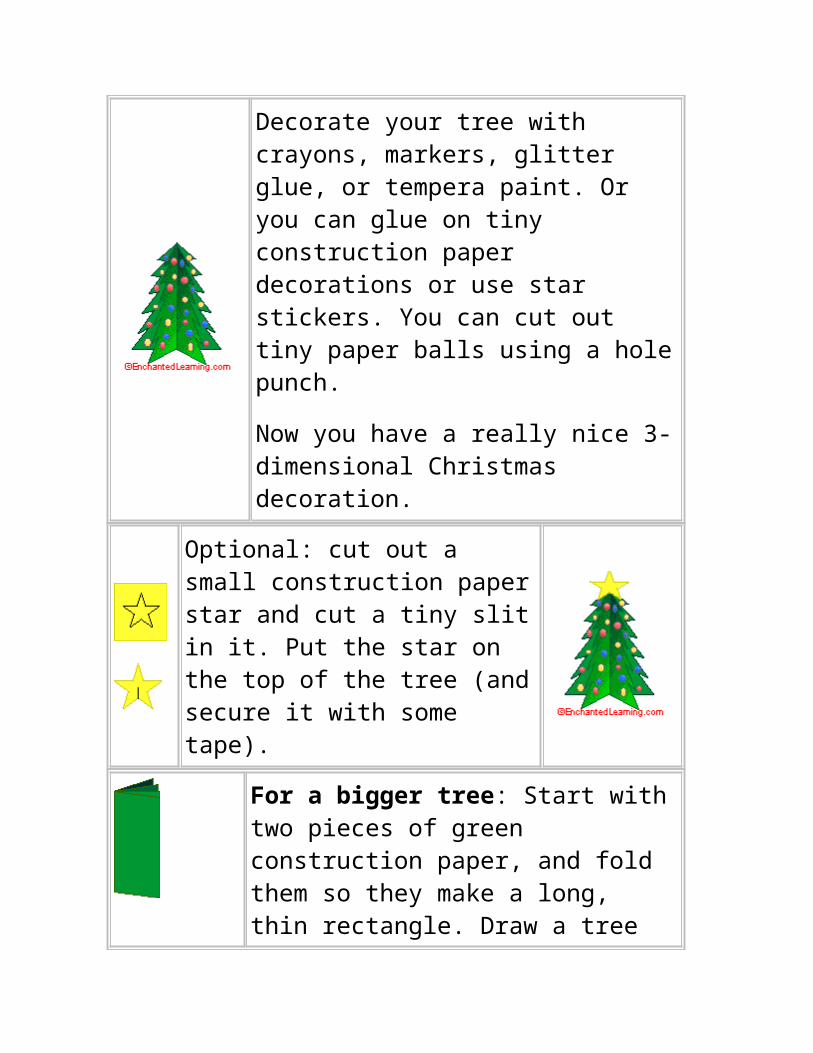
Decorate your tree with crayons, markers, glitter glue, or tempera paint. Or you can glue on tiny construction paper decorations or use star stickers. You can cut out tiny paper balls using a hole punch.
Now you have a really nice 3-dimensional Christmas decoration.
Optional: cut out a small construction paper star and cut a tiny slit in it. Put the star on the top of the tree (and secure it with some tape).
For a bigger tree: Start with two pieces of green construction paper, and fold them so they make a long, thin rectangle. Draw a tree opposite the fold. The rest of the instructions are the same.
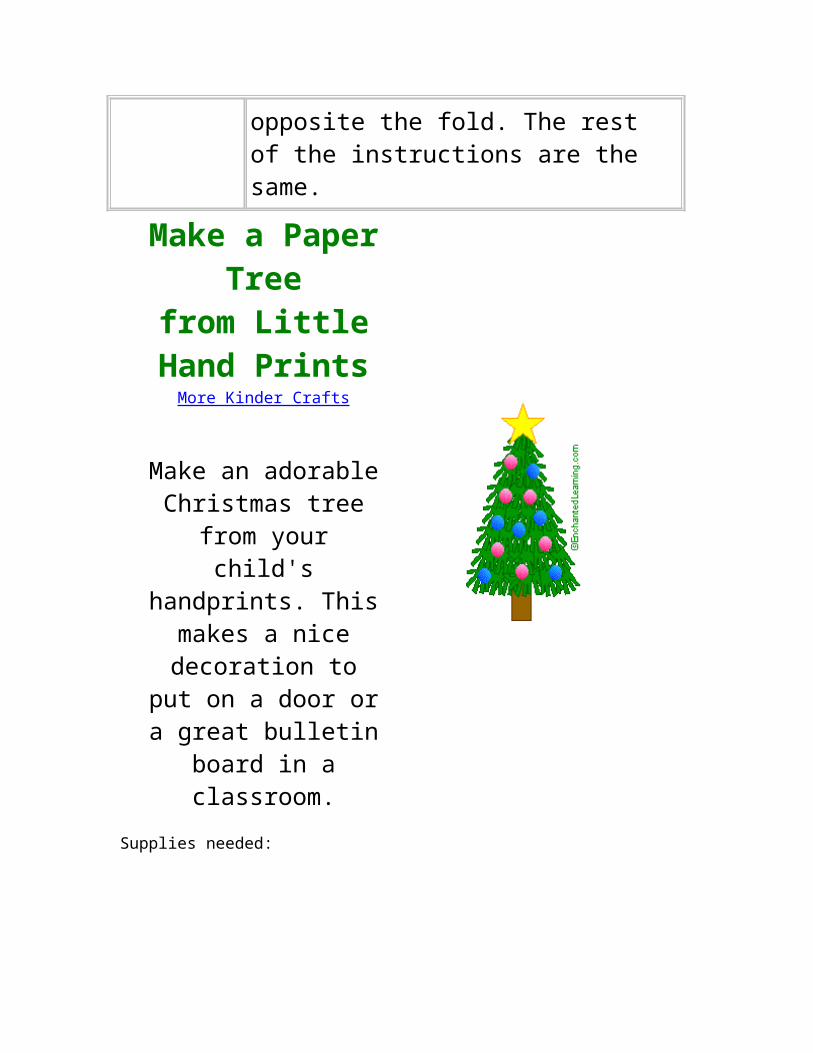
Make a Paper Tree
from Little Hand Prints
More Kinder Crafts
Make an adorable
Christmas tree from your child's handprints.
This makes a nice decoration to put on a door or a great bulletin board in a classroom.
Supplies needed:
A lot of green construction paper A piece of brown construction paper (for the tree trunk) A piece of yellow construction paper (for the star) A large piece of brown paper (or use another color) Pencil Scissors Glue
Optional: Glitter, glitter glue, or paper ornaments to glue on the tree
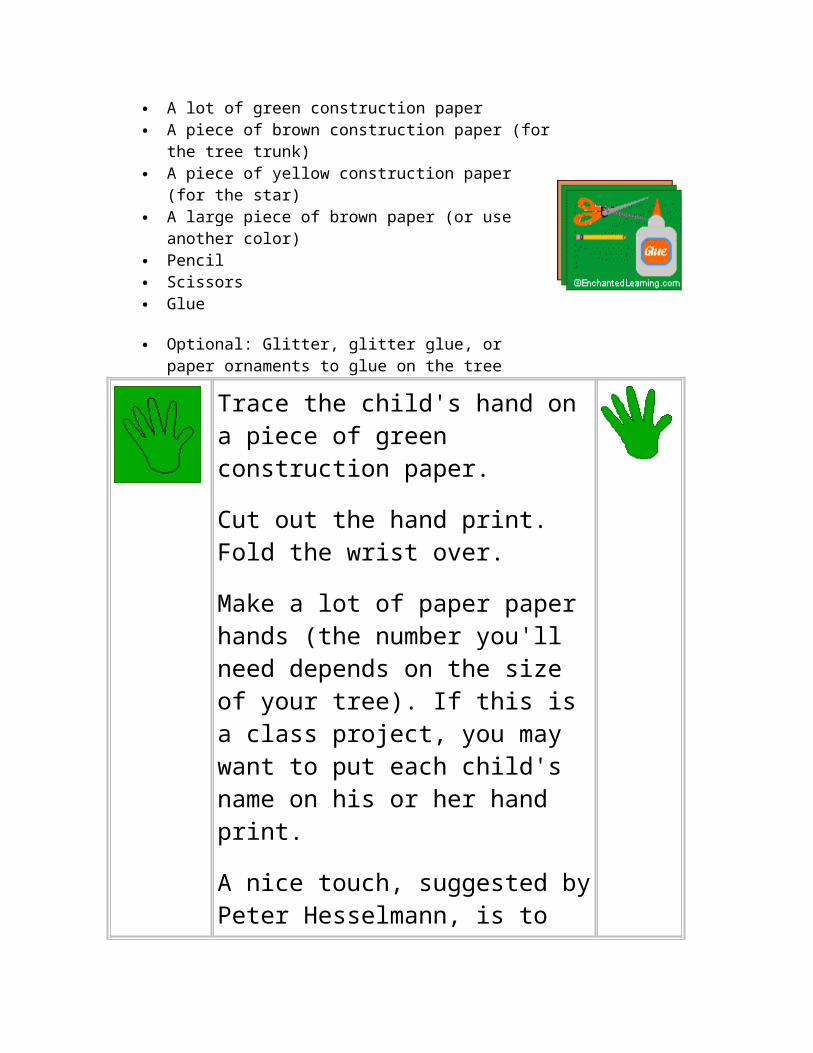
Trace the child's hand on a piece of green construction paper.
Cut out the hand print. Fold the wrist over.
Make a lot of paper paper hands (the number you'll need depends on the size of your tree). If this is a class project, you may want to put each child's name on his or her hand print.
A nice touch, suggested by Peter Hesselmann, is to have each child write a Christmas wish for themselves
on one paper hand, and a Christmas wish for the world on the other. Peter also did not tell his students why they were making the hands; he put the tree up, which surprised and delighted them. Peter also had the teachers and staff each write a wish for the world on a circular piece of construction paper - these were used for baubles on the tree.
Draw a tree shape on a large piece of paper.
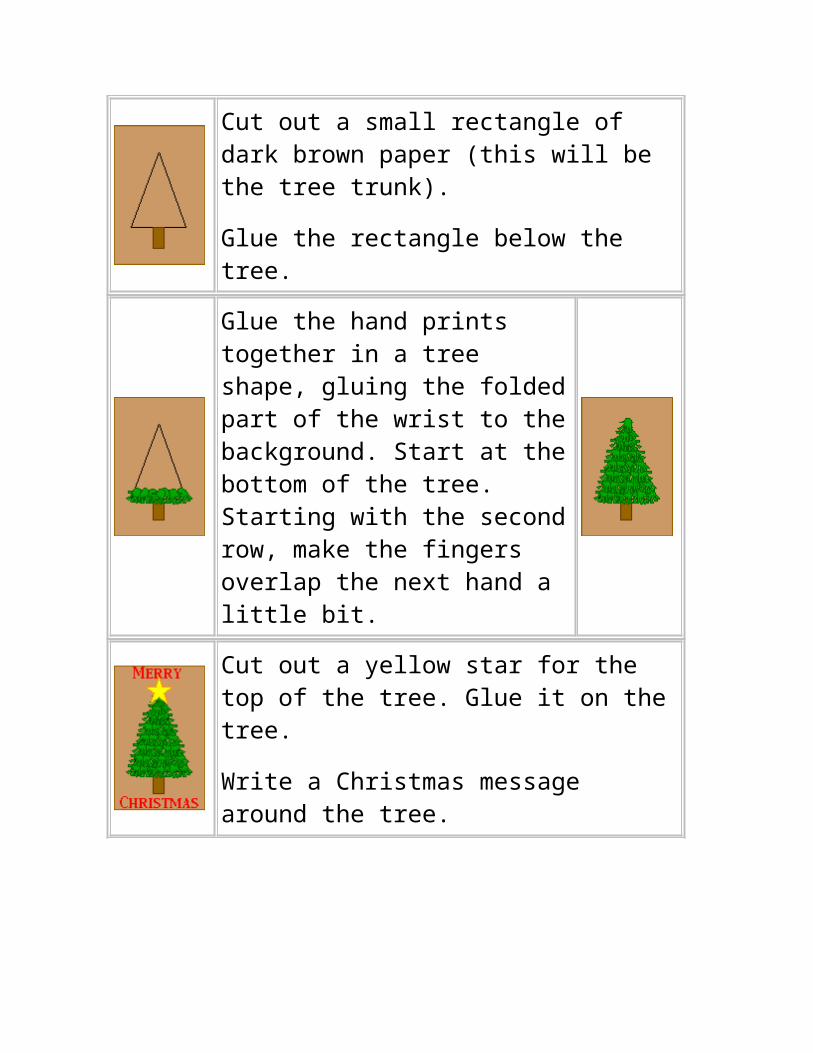
Cut out a small rectangle of dark brown paper (this will be the tree trunk).
Glue the rectangle below the tree.
Glue the hand prints together in a tree shape, gluing the folded part of the wrist to the background. Start at the bottom of the tree. Starting with the second row, make the fingers overlap the next hand a little bit.
Cut out a yellow star for the top of the tree. Glue it on the tree.
Write a Christmas message around the tree.
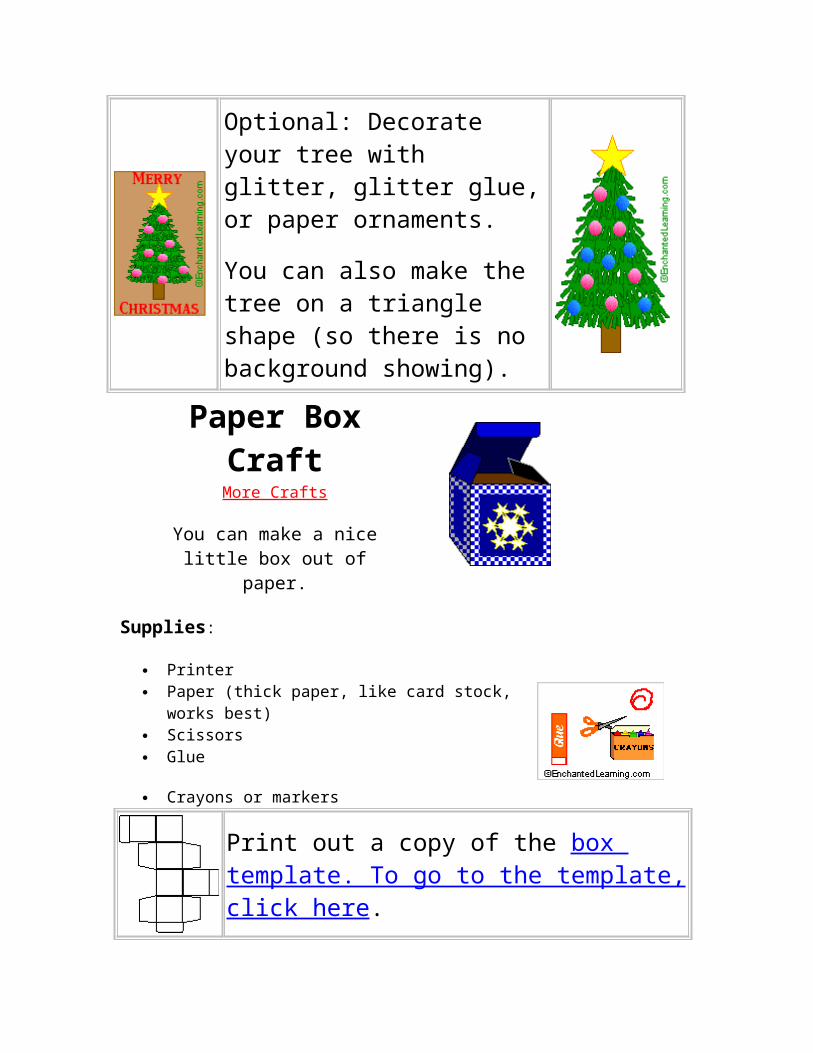
Optional: Decorate your tree with glitter, glitter glue, or paper ornaments.
You can also make the tree on a triangle shape (so there is no background showing).
Paper Box CraftMore Crafts
You can make a nice little box out of paper.
Supplies:
Printer Paper (thick paper, like card stock, works best) Scissors Glue
Crayons or markers
Print out a copy of the box template. To go to the template, click here.
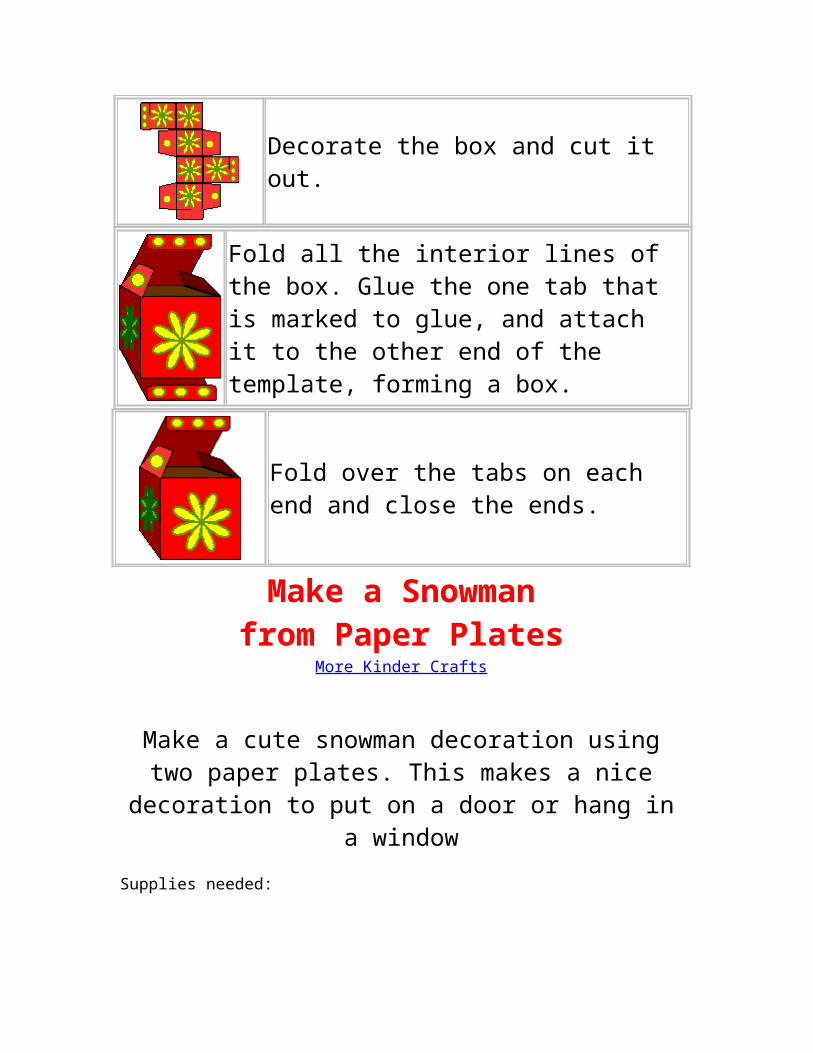
Decorate the box and cut it out.
Fold all the interior lines of the box. Glue the one tab that is marked to glue, and attach it to the other end of the template, forming a box.
Fold over the tabs on each end and close the ends.
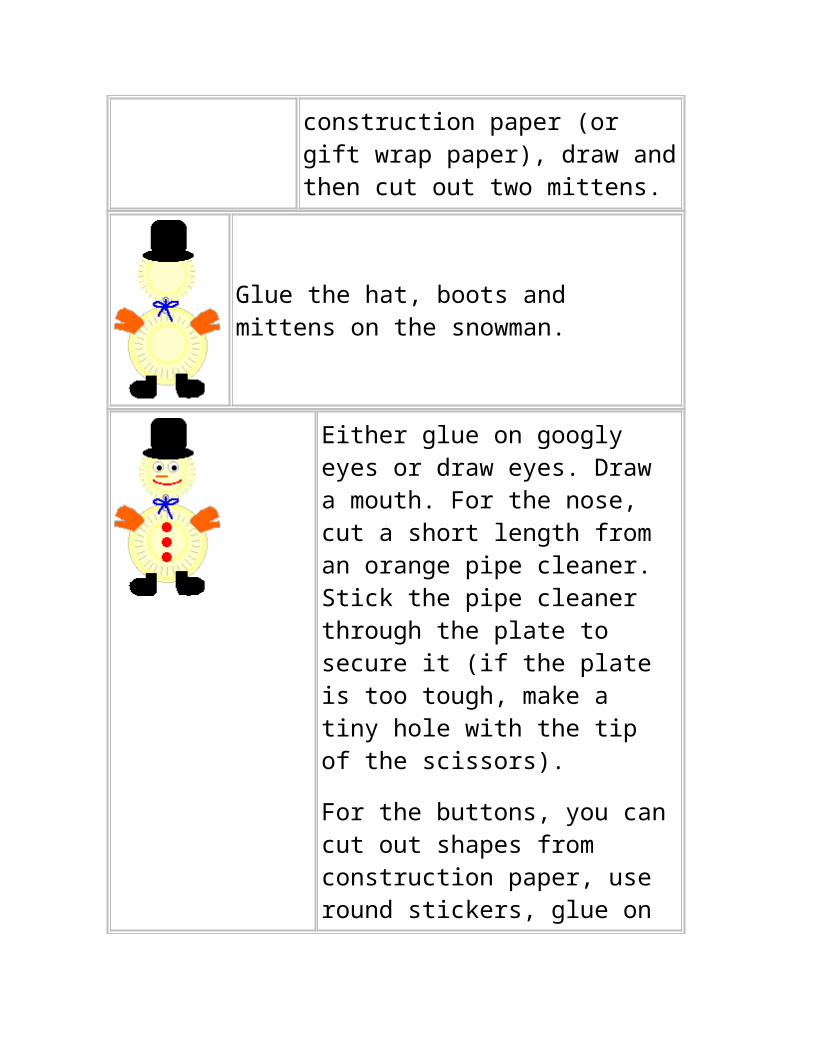
Make a Snowmanfrom Paper Plates
More Kinder Crafts
Make a cute snowman decoration using two paper plates. This makes a nice decoration to put on a door or hang in a
window
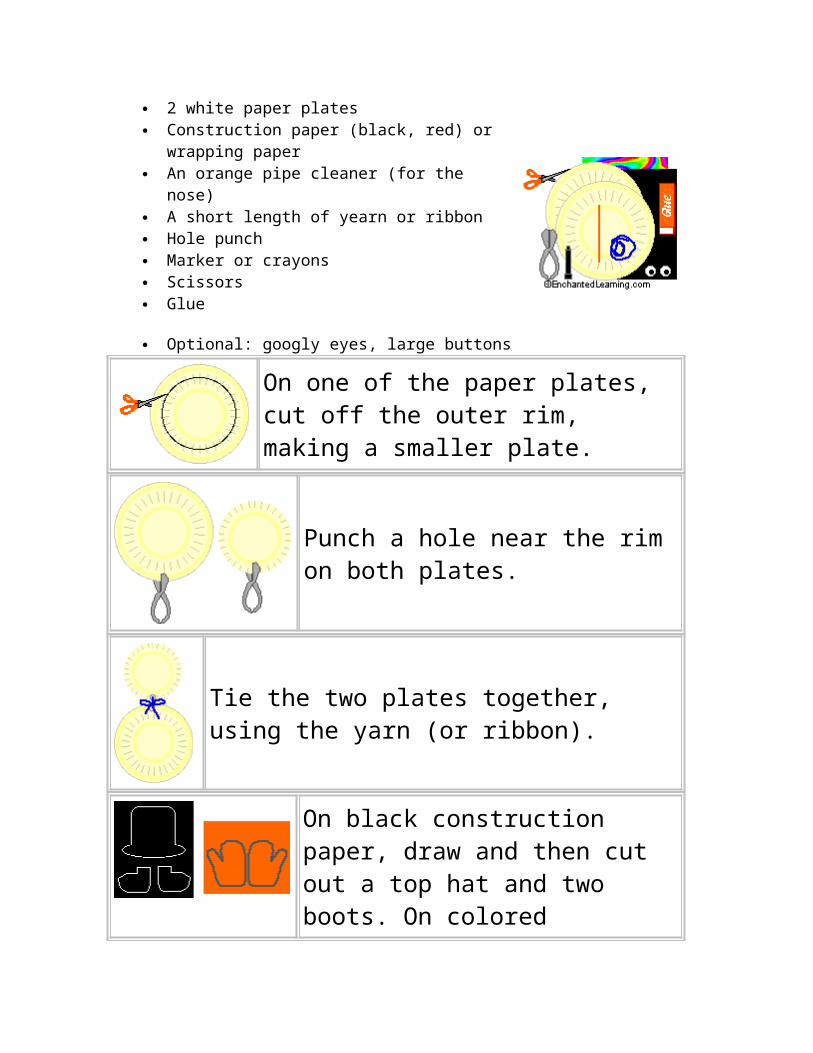
Supplies needed:
2 white paper plates Construction paper (black, red) or wrapping paper An orange pipe cleaner (for the nose) A short length of yearn or ribbon Hole punch Marker or crayons Scissors Glue
Optional: googly eyes, large buttons
On one of the paper plates, cut off the outer rim, making a smaller plate.
Punch a hole near the rim on both plates.
Tie the two plates together, using the yarn (or ribbon).
On black construction paper, draw and then cut out a top hat and two boots. On colored construction paper (or gift wrap paper), draw and then cut out two mittens.

Glue the hat, boots and mittens on the snowman.
Either glue on googly eyes or draw eyes. Draw a mouth. For the nose, cut a short length from an orange pipe cleaner. Stick the pipe cleaner through the plate to secure it (if the plate is too tough, make a tiny hole with the tip of the scissors).
For the buttons, you can cut out shapes from construction paper, use round stickers, glue on real buttons, or simply draw them.
You now have a cute snowman decoration!
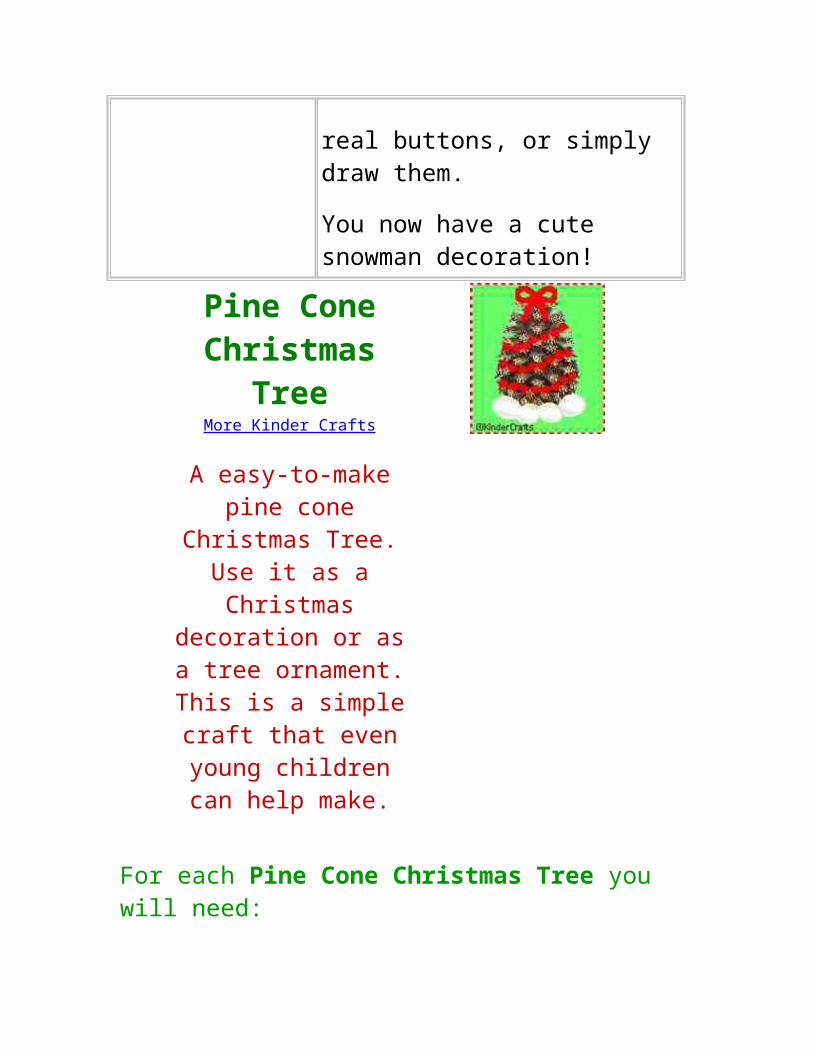
Pine Cone Christmas Tree
More Kinder Crafts
A easy-to-make pine cone Christmas Tree. Use it as a Christmas decoration or as a tree
ornament. This is a simple craft that even
young children can help make.
For each Pine Cone Christmas Tree you will need:
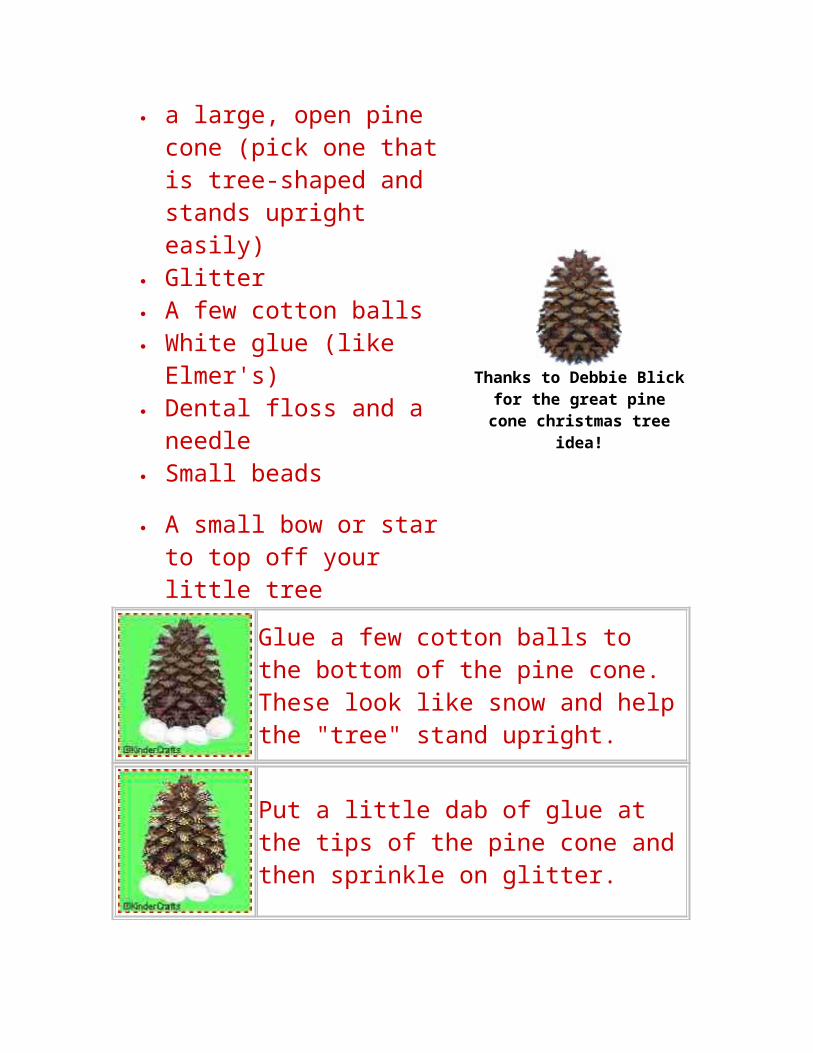
a large, open pine cone (pick one that is tree-shaped and stands upright easily)
Glitter A few cotton balls White glue (like Elmer's) Dental floss and a needle Small beads
A small bow or star to top off your little tree
Thanks to Debbie Blick for the great pine cone christmas tree
idea!
Glue a few cotton balls to the bottom of the pine cone. These look like snow and help the "tree" stand upright.
Put a little dab of glue at the tips of the pine cone and then sprinkle on glitter.
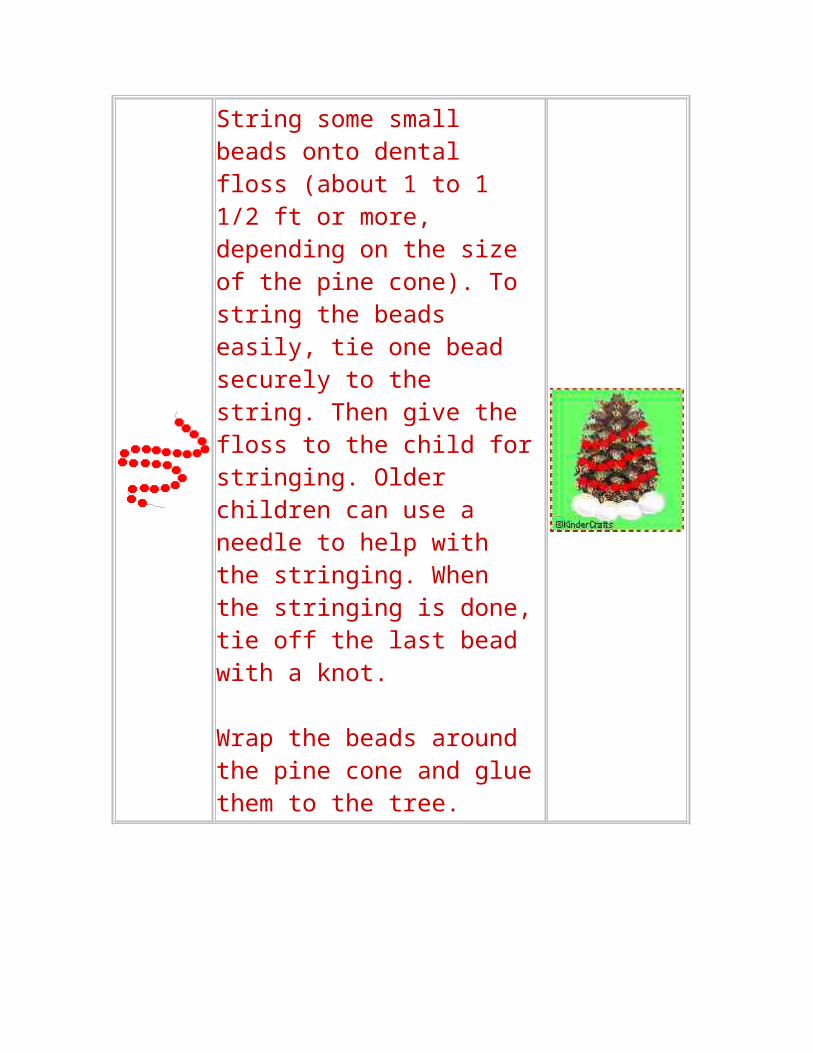
String some small beads onto dental floss (about 1 to 1 1/2 ft or more, depending on the size of the pine cone). To string the beads easily, tie one bead securely to the string. Then give the floss to the child for stringing. Older children can use a needle to help with the stringing. When the stringing is done, tie off the last bead with a knot.
Wrap the beads around the pine cone and glue them to the tree.
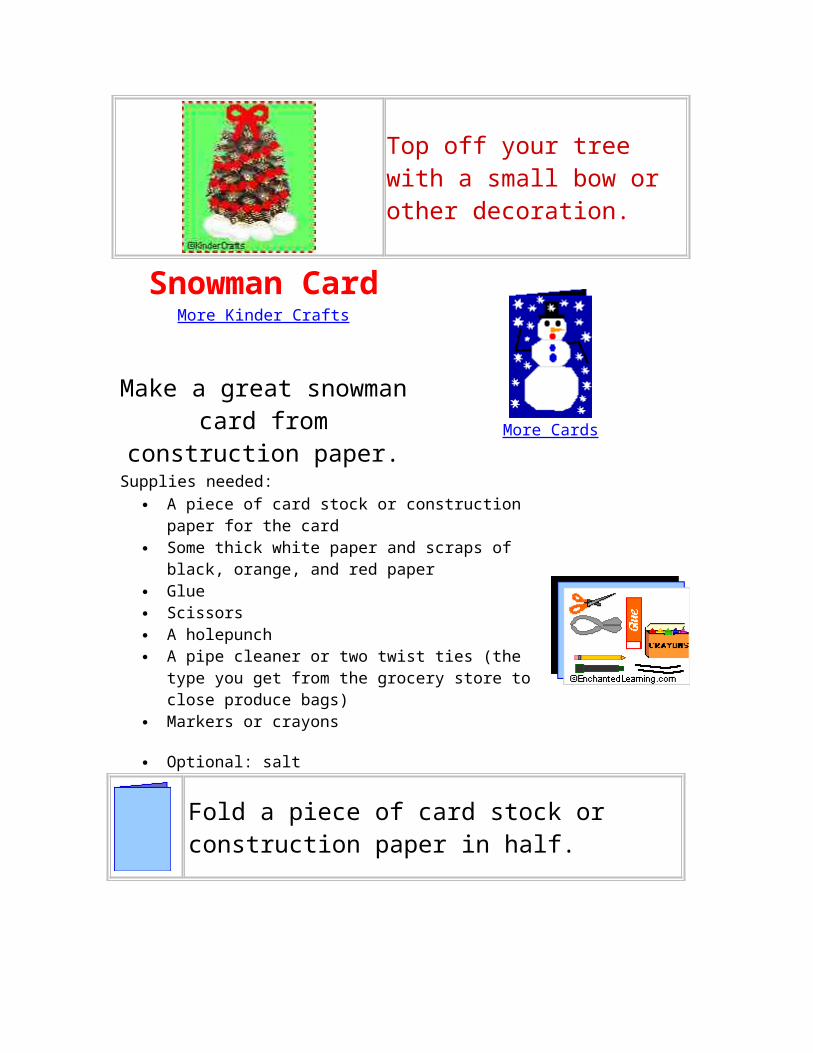
Top off your tree with a small bow or other decoration.
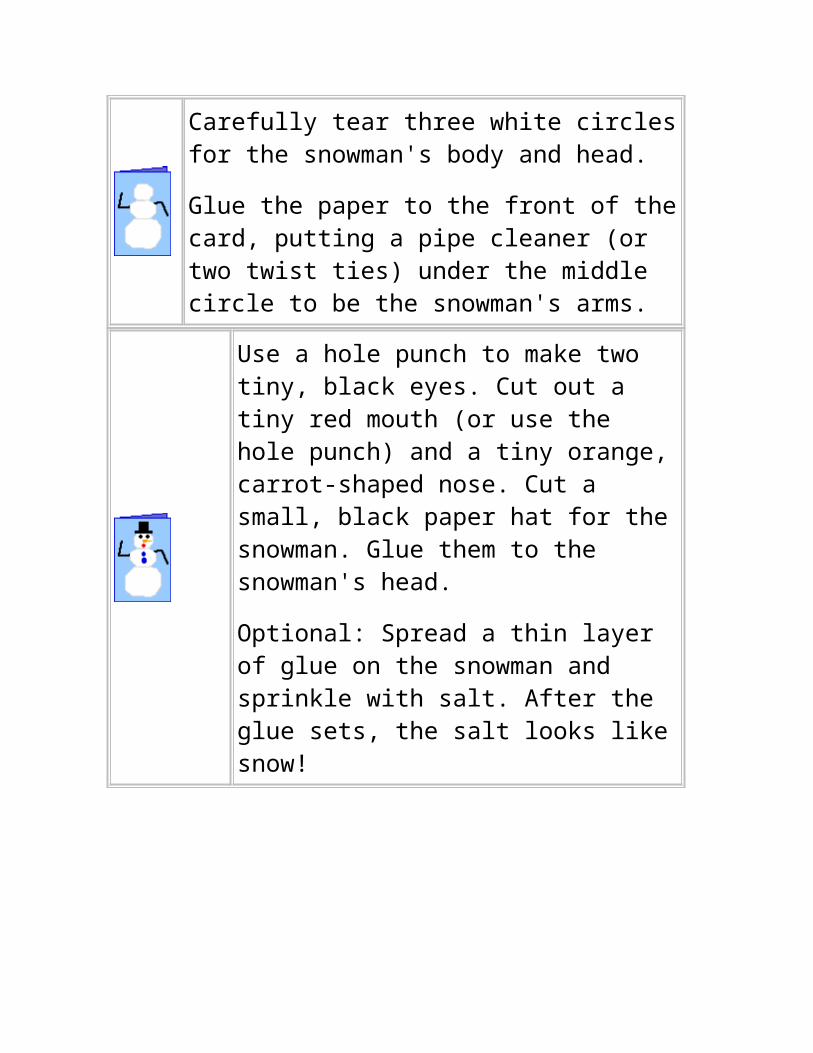
Snowman CardMore Kinder Crafts
Make a great snowman card from construction paper. More Cards
Supplies needed: A piece of card stock or construction paper for the card Some thick white paper and scraps of black, orange, and
red paper Glue Scissors A holepunch
A pipe cleaner or two twist ties (the type you get from the grocery store to close produce bags)
Markers or crayons
Optional: salt
Fold a piece of card stock or construction paper in half.
Carefully tear three white circles for the snowman's body and head.
Glue the paper to the front of the card, putting a pipe cleaner (or two twist ties) under the middle circle to be the snowman's arms.
Use a hole punch to make two tiny, black eyes. Cut out a tiny red mouth (or use the hole punch) and a tiny orange, carrot-shaped nose. Cut a small, black paper hat for the snowman. Glue them to the snowman's head.
Optional: Spread a thin layer of glue on the snowman and sprinkle with salt. After the glue sets, the salt looks like snow!
Christmas Tree Card
More Crafts
You can make a simple tree card for Christmas made from construction
paper. More Crafts
Supplies needed:
Printer Cardstock or other thick paper for the card
Construction paper for the tree and trunk (brown, green, and yellow)
Scissors
A marker or pen
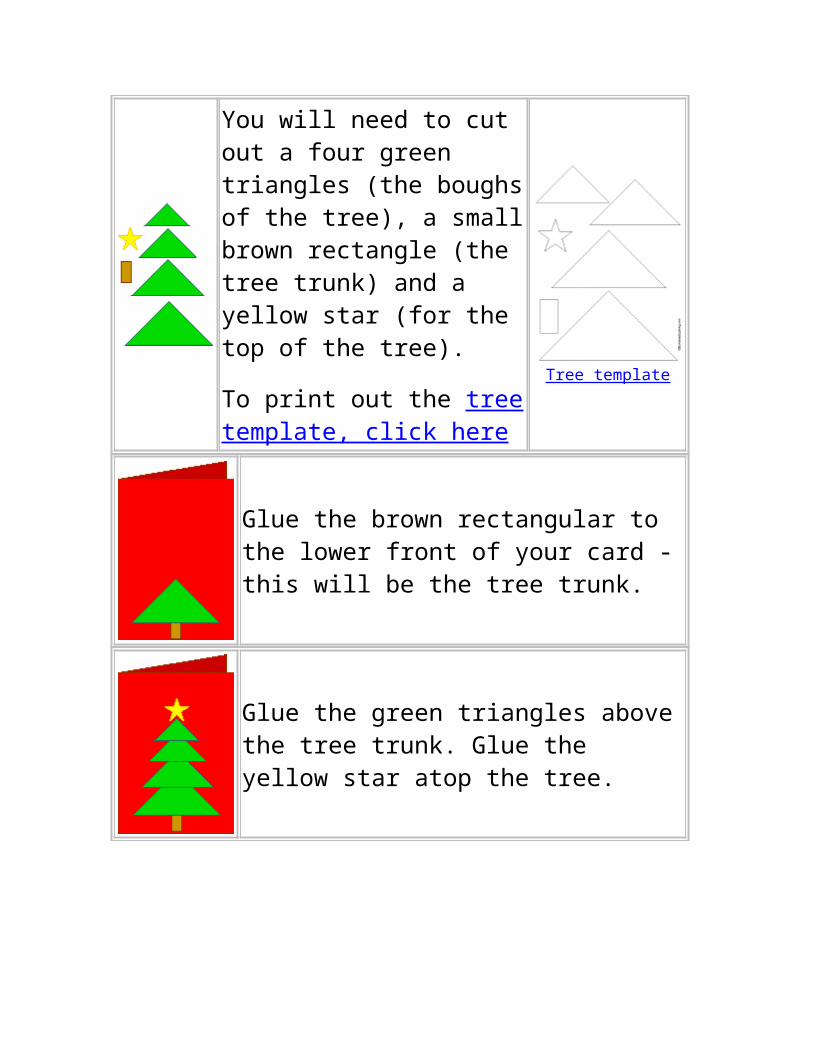
Fold a piece of cardstock or construction paper in half to form the card.
You will need to cut out a four green triangles (the boughs of the tree), a small brown rectangle (the tree trunk) and a yellow star (for the top of the tree).
To print out the tree template, click here Tree template
Glue the brown rectangular to the lower front of your card - this will be the tree trunk.
Glue the green triangles above the tree trunk. Glue the yellow star atop the tree.
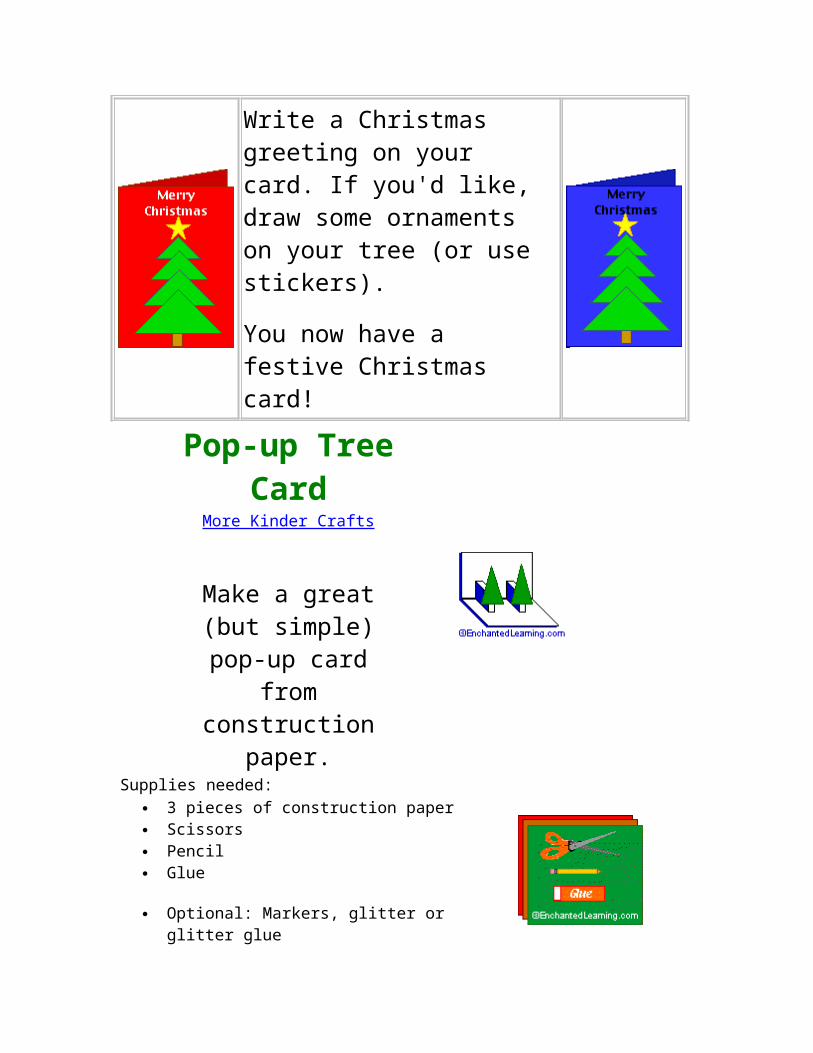
Write a Christmas greeting on your card. If you'd like, draw some ornaments on your tree (or use stickers).
You now have a festive Christmas card!
Pop-up Tree Card
More Kinder Crafts
Make a great (but simple) pop-up card from construction
paper. Supplies needed:
3 pieces of construction paper Scissors Pencil Glue
Optional: Markers, glitter or glitter glue
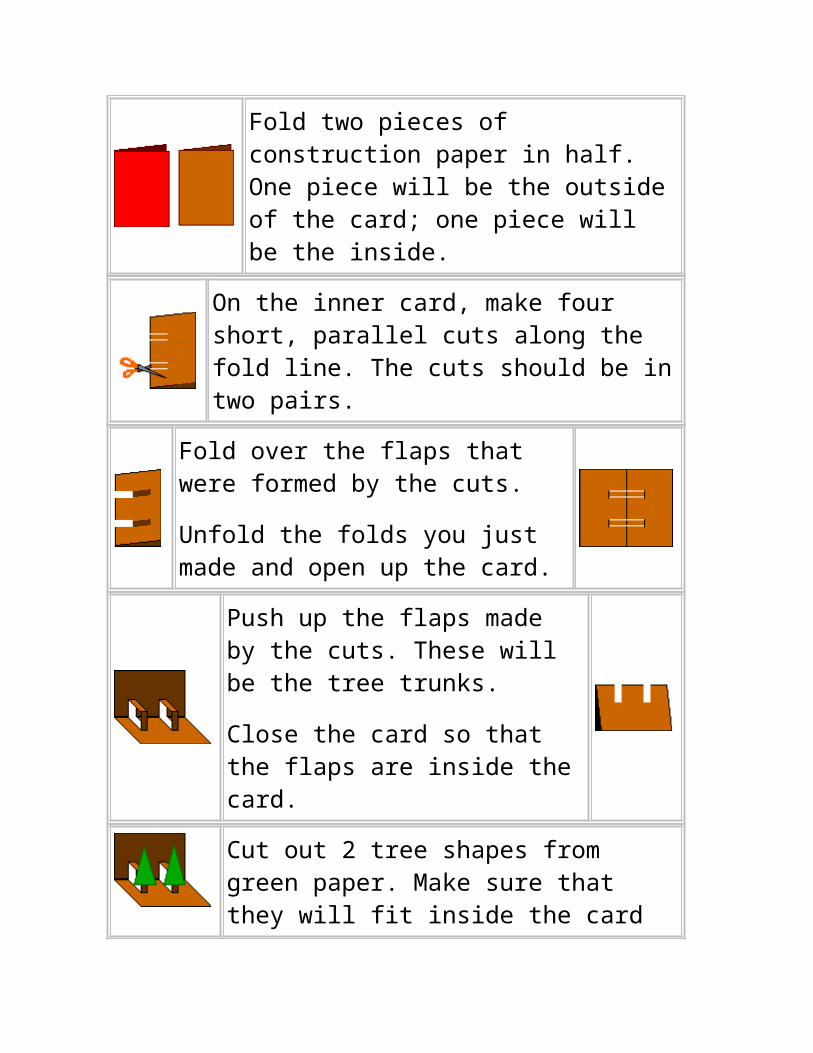
Fold two pieces of construction paper in half. One piece will be the outside of the card; one piece will be the inside.
On the inner card, make four short, parallel cuts along the fold line. The cuts should be in two pairs.
Fold over the flaps that were formed by the cuts.
Unfold the folds you just made and open up the card.
Push up the flaps made by the cuts. These will be the tree trunks.
Close the card so that the flaps are inside the card.
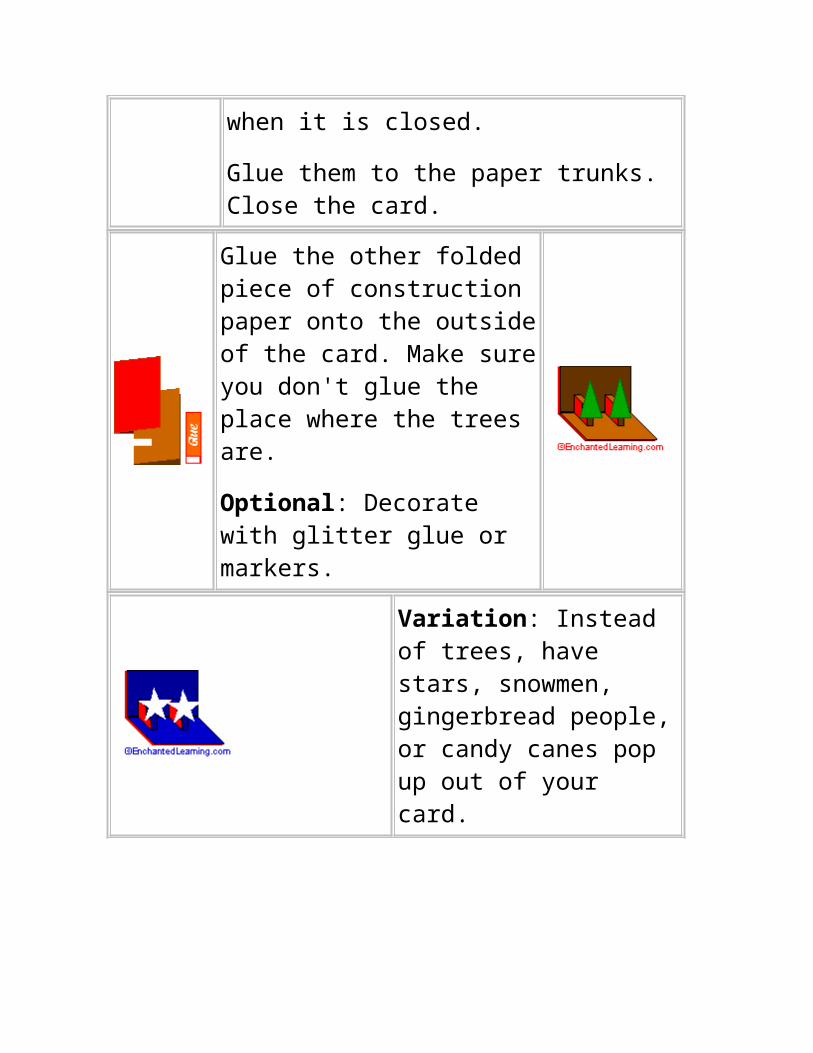
Cut out 2 tree shapes from green paper. Make sure that they will fit inside the card when it is closed.
Glue them to the paper trunks. Close the card.
Glue the other folded piece of construction paper onto the outside of the card. Make sure you don't glue the place where the trees are.
Optional: Decorate with glitter
glue or markers.
Variation: Instead of trees, have stars, snowmen, gingerbread people, or candy canes pop up out of your card.
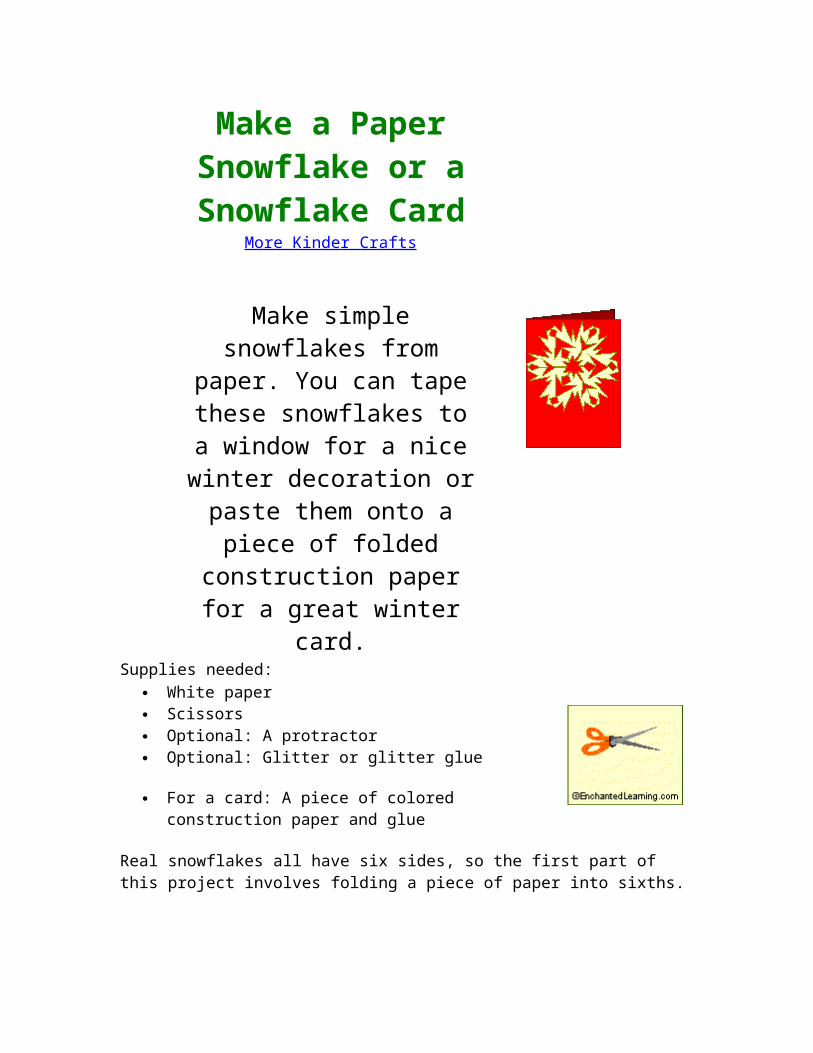
Make a Paper Snowflake or a
Snowflake CardMore Kinder Crafts
Make simple snowflakes from paper. You can tape these
snowflakes to a window for a nice winter decoration or paste
them onto a piece of folded construction paper for a great
winter card. Supplies needed:
White paper Scissors Optional: A protractor Optional: Glitter or glitter glue
For a card: A piece of colored construction paper and glue
Real snowflakes all have six sides, so the first part of this project involves folding a piece of paper into sixths.
Fold a piece of paper in half.
Fold over one side, then the other, to make two 60 degree folds. You can do this by eye, or you can use a protractor. This is a good exercise in geometry and measuring angles.
Cut off the edges of the paper in an arc - this makes a circle (if you were to unfold the paper).
Cut a lot of the paper away.
Unfold your snowflake carefully.
Optional: Decorate your snowflake with glitter or glitter glue.
Glue your snowflake onto a folded piece of construction paper for a great winter card.
Gingerbread House Card
More Crafts
You can make a cute gingerbread house card for Christmas made
from construction paper.More Crafts
Supplies needed:
Printer Brown cardstock or construction paper for the card Scissors
A white marker, crayon, or gel pen (a silver Sharpie works well)
Gingerbread house templatepdf version, click here
Using brown cardstock or construction paper, print out the gingerbread house template, click here -- or for a pdf version, click here - (templates for site members only). Or draw it yourself on the card.
Fold the piece of brown cardstock or construction paper in half to form the card.
Cut off the excess paper over the roof. Also cut two sides of the door (the right side and the top) so that it opens.
Using a white marker or crayon, decorate the door, windows, chimney, and edges of the gingerbread house.
Write a Christmas greeting on your card.
You now have a cute gingerbread house Christmas card!
Snowman Necklace or OrnamentMore Kinder Crafts
Make a snowman that you can wear as a necklace or use as an ornament.
SUPPLIES NEEDED: White glue (like Elmer's glue) Paper clip Waxed paper

Scraps of construction paper: black, and orange A hole punch (for cutting eyes, and buttons) Scissors Googly eyes (from a craft store) - optional Tiny buttons - optional 2 very tiny twigs (for arms) String or yarn (for hanging it)
Working on waxed paper, spread 2 or 3 blobs of white glue in the shape of a snowman. Unfold a paper clip into a V-shape (to use as a hanger).
Cut a tiny hat from black construction paper and put it on the snowman on top of the paper clip hanger. Put the ends of the paper clip into the glue at the top of the snowman. For the snowman's eyes, use black paper circles cut with a hole punch, or use googly eyes. Put the eyes on the snowman. Add a tiny orange (carrot-shaped) nose. Add a few paper buttons (or small real buttons) down the front of the body.
Let the glue dry - it will take a few days. When it dries, the glue will become transparent. When it is completely dry, peel it gently off the waxed paper. String the snowman on some yarn for a cool necklace or use a shorter string to use as an ornament.
Real Crystal Snowflake
More Kinder Crafts
Make an amazing snowflake from real crystal (borax). This is a beautiful project (and also
demonstrates some basic principles of chemistry).
Supplies needed: Wide mouthed jar 3 white pipe cleaners String Scissors Pencil Boiling water (have an adult do this part) Spoon Borax (called 20 Mule Team Borax Laundry Booster
- the product called Boraxo will NOT work)
Optional: blue food coloring
Make a giant snowflake frame from 3 white pipe cleaners and string. Twist the 3 pipe cleaners together in the center to make a 6-sided, spiky figure.
Make sure this figure fits inside the wide-
mouthed jar.
Tie the string around the pipe cleaners to look like a snowflake shape. Trim the excess string.
Tie a few inches of string to one of the pipe cleaners. Tie the other end of the string to a pencil, so that the snowflake will hang from the pencil and dangle inside the jar.
Take the snowflake out of the jar.
Pour boiling water into the jar (have an adult do this part).
Add the 20 Mule Team Borax Laundry Booster to the hot water in the jar.
Keep adding the Borax until you have a supersaturated solution (you will see undissolved Borax at the bottom of the jar). You'll have to add about 3 tablespoonfuls of the 20 Mule Team Borax Laundry Booster to each cup of hot water in the jar.
Optional: Add a few drops of blue food coloring for a bluish snowflake.
Hang the snowflake in the jar and wait at least overnight.
In the morning, your snowflake will be covered
with beautiful crystals.
As the supersaturated solution cools, the borax comes out of solution (less of the borax can dissolve in cool water) and forms crystals on the pipe cleaners and string.
You can do the same type of project using supersaturated sugar-water and a string, making edible rock candy (but the crystals take longer to form).
Paper Plate Angel
More Kinder Crafts
Turn a paper plate into a beautiful angel.
Supplies needed: a paper plate pencil scissors tape or stapler
crayons, paint, and/or markers for decoration
Draw a pattern like this on the underside of a paper plate.
Cut along the lines, discarding the dark section.
Decorate the angel.
Overlap the edges of the angel's skirt slightly and tape or staple it into place.
Brown Paper Christmas StockingMore Kinder Crafts
Make a great Christmas stocking from a brown paper grocery bag. You can hang it
from your mantle and stuff it with Christmas goodies.
Supplies needed: Thick brown paper (like grocery bag paper) or brown felt Pencil Scissors Glue A holepunch Yarn
Markers or crayons
Draw a large stocking on thick brown paper (or brown felt).
Cut out two copies of this stocking.
Glue the two stockings together around the edges (make sure you don't put any glue along the top opening).
Punch holes around the edges of the stocking.
Weave yarn in and out of the holes. Leave a loop of yarn at one end, and tie it in a knot.
Decorate your stocking with crayons, markers, stickers, construction paper cut-outs, or glitter.
http://www.enchantedlearning.com/Home.htmlhttp://www.usborne-quicklinks.com