Embed Size (px)
Citation preview

.
Brought To You By Christopher Sia www.MyPortraitDrawing.com
8 Easy Steps To Drawing A Portrait

Limits of Liability / Disclaimer of Warranty / Copyright: This book is protected under International Federal Copyright laws and Treaties. No part of this book or the related files may be reproduced, stored in a retrieval system or transmitted in any form, by any means (electronic, photocopying, recording, or otherwise) without the prior written permission of the author/publisher. The author and publisher of this information and have used their best efforts in preparing this tutorial. The author makes no representation or warranties with respect to the accuracy, applicability, fitness, or completeness of the contents of this tutorial. They disclaim any warranties (expressed or implied), merchantability, or fitness for any particular purpose. The author shall in no event be held liable for any loss or other damages, including but not limited to special, incidental, consequential, or other damages. Copyright © 2009 myportraitdrawing.com All Rights Reserved

Table of contents Introduction…………………………………………….…………………………………..………………………..1
Step1: Choose a Right Reference Picture…………………………………………………….………….2
Step2: Organize the position, outline and proportion of the features…………….........4
Copyright © 2009 myportraitdrawing.com All Rights Reserved
Step3: Eye drawing – Shading and Shadows…………………….…………………………………….12
Step4: Nose drawing – Shading and Shadows……………………………………………….……….20
Step5: Mouth drawing – Shading and Shadows…………………………………………….……….24
Step6: Ear Drawing – Shading and Shadows………………………………………………….……….29
Step7: Hair Drawing – Shading and Shadows………………………………………….……….......33
Step8: Face Drawing – Shading and Shadows…………………….………………………………....44

Copyright © 2009 myportraitdrawing.com All Rights Reserved Page1
Introduction
People are often of the view that drawing requires talent, effort and so on. Tome, one will be able to draw as long as he/she has the passion to do it. Imagination playsa major role in drawing but I will start off with a very basic method - i.e. drawing a portraitin a proper and simple manner. Regardless of whether you are a newbie or you have thebasics but feel like improving on your skills, 8 Easy Steps To Drawing A Portrait is definitelythe right choice for you.
As there are numerous art books in the market, it is important for me to tell youwhat is not in this e-book. 8 Easy Steps To Drawing A Portrait is not an e-book filled with boring and lengthy descriptions. The purpose of this book is to demonstrate how andwhat to start with in a portrait drawing. Your learning process will be made very mucheasier as you will be guided step-by-step with many illustrations to follow.
I recommend that you draw Step1 and Step2 on your first day and proceed withthe rest of the steps on each following day. Of course, if you have the extra time you may complete as many steps as you like in one day. Other than 2B and 4B pencils, you will notneed any other expensive pencil drawing material. Just focus and learn to draw first.
You know what, I will keep this short, move on and get started before it becomes just another boring and lengthy art book.

Step 1: Choose An Appropriate Reference Picture
Step 1: Choose An Appropriate Reference Picture
Copyright © 2009 myportraitdrawing.com All Rights Reserved Page 2
For the first step, I will show you on how to choose an appropriate picture to draw. Dont skip this step because choosing an appropriate picture is important. What do I mean by that? You might want to look for reference picture with good lighting because it will be easier to do the shading part which makes your drawing bring to life and looks more realistic.
Also, by choosing a black and white picture will be much easier. Look for a picture with close up face so that when you print it out, it would look clearer on the features and easier to draw. If u chose a picture of your friend, family or celebrity, use photo altering software to turn it into black and white. If you don’t have photo altering software, I would recommend you to download GIMP at www.gimp.org which is completely FREE!
As for now, I will give you an appropriate reference picture and you can just print it out in A4 size. You can get this picture in my bonus2 folder.
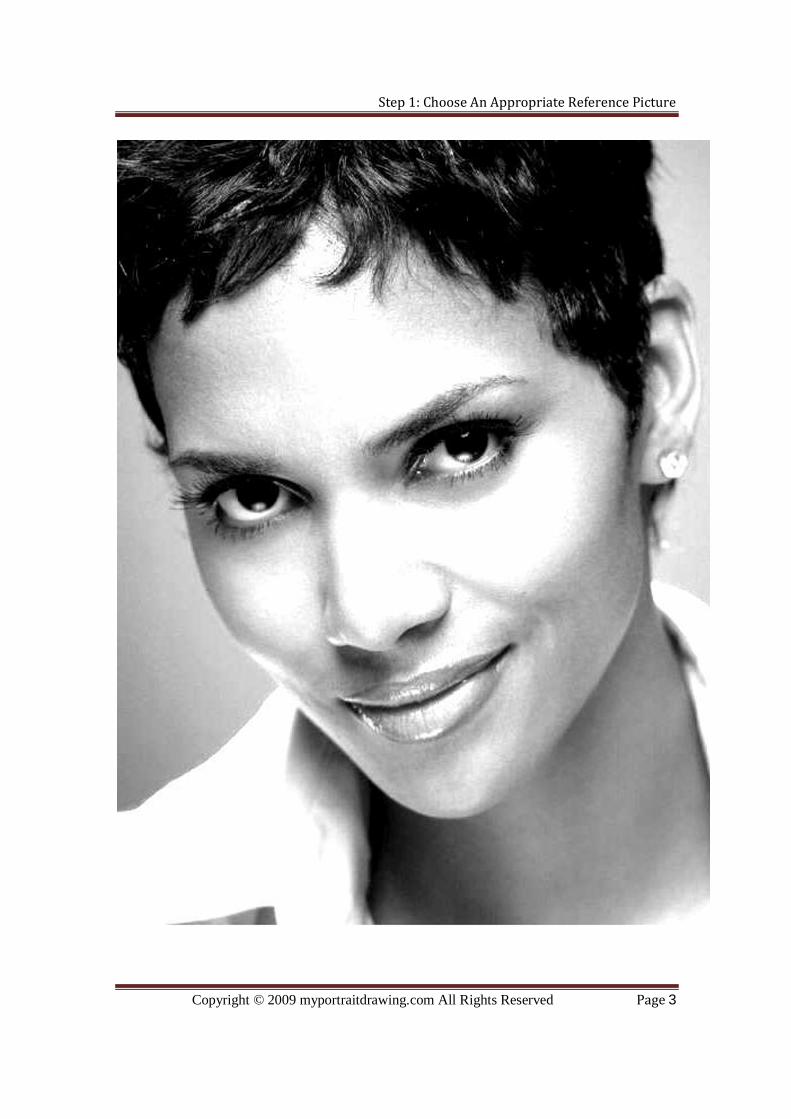
Step 1: Choose An Appropriate Reference Picture
Copyright © 2009 myportraitdrawing.com All Rights Reserved Page 3

Step 2: Organize the position, outline and proportion of the features. Get a 2B pencil, 4B pencil, eraser, ruler, sharpener and a blank A4 paper. The size of the drawing is going to be directly proportional to the picture. With these simple drawing tools with you, you can start to draw it right now.
First, start to draw grid on the picture. It should consist about 1 inch square. The reason for drawing the grid is to make sure the position of the features will be drawn accurately.
Check to make sure the grid of the picture and your paper are match. You can erase the grid as you draw along or you can erase it after finished your drawing.
Step 2: Organize the position, outline and proportion of the features
Copyright © 2009 myportraitdrawing.com All Rights Reserved Page 4
Draw the grids on your paper as well. Just draw it VERY LIGHTLY because the grid on your paper will be erased later. You are going to draw exactly what you see on everysquare.

Now, use a 2B pencil to follow the grid to draw the outline of the eyebrow.
Draw the outline of the eye.
Draw the outline of the nose.
Step 2: Organize the position, outline and proportion of the features
Copyright © 2009 myportraitdrawing.com All Rights Reserved Page 5

Draw the outline of the mouth.
Draw the outline of the face’s shape.
Step 2: Organize the position, outline and proportion of the features
Copyright © 2009 myportraitdrawing.com All Rights Reserved Page 6
Step 2: Organize the position, outline and proportion of the features
Copyright © 2009 myportraitdrawing.com All Rights Reserved Page 7
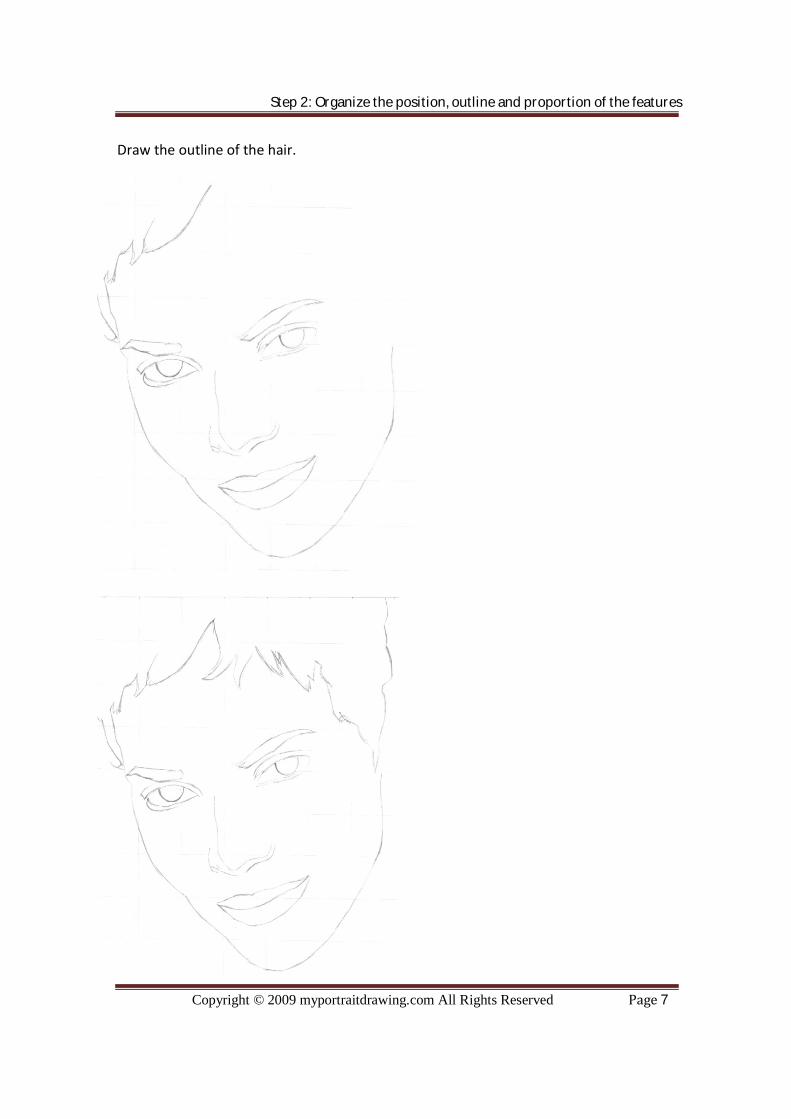
Draw the outline of the hair.

Draw the outline of the ear.
Step 2: Organize the position, outline and proportion of the features
Copyright © 2009 myportraitdrawing.com All Rights Reserved Page 8

Step 2: Organize the position, outline and proportion of the features
Copyright © 2009 myportraitdrawing.com All Rights Reserved Page 9
After finished drawing the outlines, your drawing should looks like this.

Now we’ve got the basics of the face started. In the following steps, you will learn on how to draw individual details of the face.
Before proceeding to the next step, I will show you hatching and cross-hatching that you will need to learn after drawing the outline. Hatching & cross hatching is one of a classical shading method. They play important roles to make a drawing become realistic. They affect the brightness of the overall drawing. Here are the examples.
Hatching Cross Hatching
You can make it smoother by adding…
more strokes more layers
Step 2: Organize the position, outline and proportion of the features
Copyright © 2009 myportraitdrawing.com All Rights Reserved Page 10

Don’t worry if your lines aren’t perfectly straight in the beginning. It usually needs a little practicing and patience but still your drawing can be nice too even if is not perfectly straight.
HERE IS THE KEY TO MAKE CONTRAST FOR YOUR DRAWING.
Make sure you compare the skin tones of the person in the reference picture because you don’t want your drawing to looks flat without any contrast. There are always darker tones and lighter tones. Compare tones with other tones and shade them correctly will give you the best result of contrast.
softly.
Step 2: Organize the position, outline and proportion of the features
Copyright © 2009 myportraitdrawing.com All Rights Reserved Page 11
Somehow if you realized your shading part is too dark, just use your eraser to press on it

Step 3: Eye Drawing – Shading and Shadows
The eye is the most expressive feature of the face and is key to capturing the likeness of your drawing. Many people start looking your drawing from the eyes then only to other parts. Indeed, the eyes are often the first part of a portrait that people notice. For this reason, most of the artists pay special emphasis to eyes. So, here’s the
Begin with left eye (our left side). Add shading on the eyebrow. Make sure you draw the lines upward. For drawing eyebrow, you must follow the lines of the eyebrow to draw.
Draw darker lines (4B pencil). Draw the eyelid (4B pencil).
Darken it but don’t press it too hard (4B pencil). Draw the darker areas (4B pencil).
Step 3: Eye Drawing - Shading and Shadows
tutorial on drawing eyes. (Look at all of the illustrations from left to right).
Copyright © 2009 myportraitdrawing.com All Rights Reserved Page 12
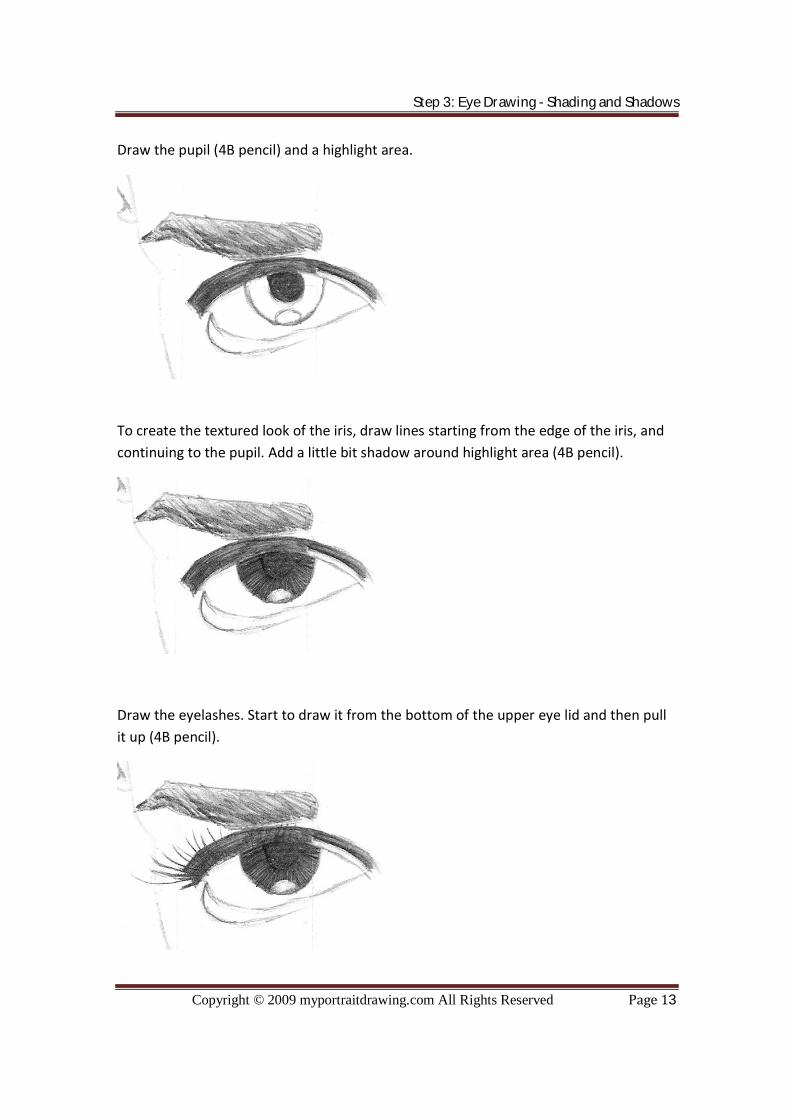
Draw the pupil (4B pencil) and a highlight area.
To create the textured look of the iris, draw lines starting from the edge of the iris, and continuing to the pupil. Add a little bit shadow around highlight area (4B pencil).
Draw the eyelashes. Start to draw it from the bottom of the upper eye lid and then pull it up (4B pencil).
Step 3: Eye Drawing - Shading and Shadows
Copyright © 2009 myportraitdrawing.com All Rights Reserved Page 13

Draw the shadow. Draw the eyelashes at the bottom.
Draw shadow for eyeball. Draw shadow at the right corner of the eyeball (4B pencil).
Add shading for lower eyelid.
Step 3: Eye Drawing - Shading and Shadows
Copyright © 2009 myportraitdrawing.com All Rights Reserved Page 14

Add shading for the overall eye and skin around it.
Do the same to right eye. Add shading on the eyebrow. Add lines (4B pencil).
Step 3: Eye Drawing - Shading and Shadows
Copyright © 2009 myportraitdrawing.com All Rights Reserved Page 15

Draw the darker areas (4B pencil). Draw the pupil (4B pencil) and the highlight
Draw lines starting from the edge of iris (4B pencil). Draw the eyelashes (4B
Step 3: Eye Drawing - Shading and Shadows
areas.
pencil).
Copyright © 2009 myportraitdrawing.com All Rights Reserved Page 16
Draw the eyelid (4B pencil). Darken it but don’t press it too hard (4B pencil).

Draw the eyelashes at the bottom(4B pencil). Draw shadow on right side of eyeball(4B).
Copyright © 2009 myportraitdrawing.com All Rights Reserved Page 17
Step 3: Eye Drawing - Shading and Shadows
Add shadow on eyeball and draw two tiny highlights. Add darker shadow beside highlight.
Add Shading on lower eyelid.

Add shading for the overall eye and the surrounding shadows.
Add shading between the eyes.
Step 3: Eye Drawing - Shading and Shadows
Copyright © 2009 myportraitdrawing.com All Rights Reserved Page 18

Step 3: Eye Drawing - Shading and Shadows
Copyright © 2009 myportraitdrawing.com All Rights Reserved Page 19
After finished shading for the eyes, your drawing should looks like this.
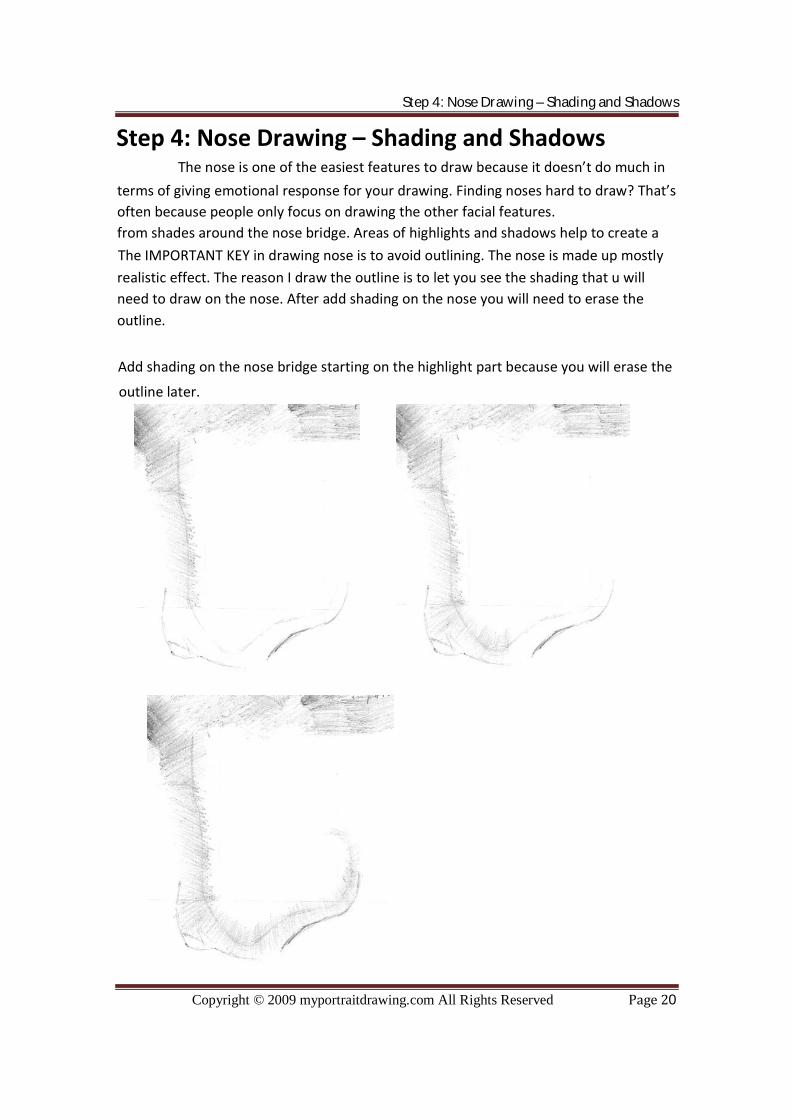
The nose is one of the easiest features to draw because it doesn’t do much in terms of giving emotional response for your drawing. Finding noses hard to draw? That’s often because people only focus on drawing the other facial features.
The IMPORTANT KEY in drawing nose is to avoid outlining. The nose is made up mostly from shades around the nose bridge. Areas of highlights and shadows help to create a
need to draw on the nose. After add shading on the nose you will need to erase the outline.
Add shading on the nose bridge starting on the highlight part because you will erase the
outline later.
Step 4: Nose Drawing – Shading and Shadows
realistic effect. The reason I draw the outline is to let you see the shading that u will
Step 4: Nose Drawing – Shading and Shadows
Copyright © 2009 myportraitdrawing.com All Rights Reserved Page 20

Draw nostril (4B pencil) and add shadow below it.
Draw darker areas. Now, erase the outline.
Step 4: Nose Drawing – Shading and Shadows
Copyright © 2009 myportraitdrawing.com All Rights Reserved Page 21

Draw the darker areas.
Add shadow below the nose.
Step 4: Nose Drawing – Shading and Shadows
Copyright © 2009 myportraitdrawing.com All Rights Reserved Page 22

Copyright © 2009 myportraitdrawing.com All Rights Reserved Page 23
After finished shading for the nose, your drawing should looks like this.
Step 4: Nose Drawing – Shading and Shadows
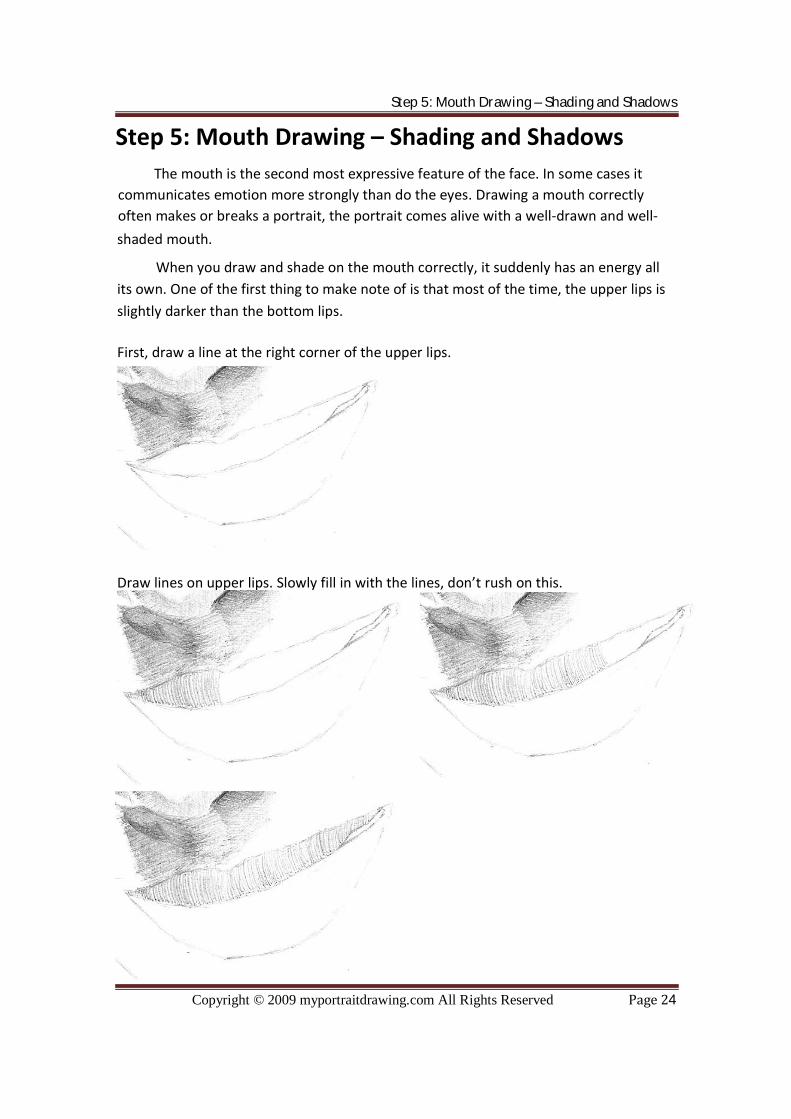
The mouth is the second most expressive feature of the face. In some cases it communicates emotion more strongly than do the eyes. Drawing a mouth correctly often makes or breaks a portrait, the portrait comes alive with a well-drawn and well-shaded mouth.
When you draw and shade on the mouth correctly, it suddenly has an energy all its own. One of the first thing to make note of is that most of the time, the upper lips is slightly darker than the bottom lips.
First, draw a line at the right corner of the upper lips.
Draw lines on upper lips. Slowly fill in with the lines, don’t rush on this.
Step 5: Mouth Drawing – Shading and Shadows Step 5: Mouth Drawing – Shading and Shadows
Copyright © 2009 myportraitdrawing.com All Rights Reserved Page 24

Erase the highlight areas. Draw the darker areas.
Darken it more to make it more obvious. Draw the line (4B pencil).
Draw the little highlight areas on left lower lips. Add shadow at the corner (4B pencil).
Step 5: Mouth Drawing – Shading and Shadows
Copyright © 2009 myportraitdrawing.com All Rights Reserved Page 25

Draw the lines on lower lips. Continue drawing lines on lower lips.
Erase for the highlight areas. Draw the shadow below the line.
Darken the darker areas on lower lips and add a little shading at the end of the line on right.
Step 5: Mouth Drawing – Shading and Shadows
Copyright © 2009 myportraitdrawing.com All Rights Reserved Page 26

Add shading below the mouth.
Step 5: Mouth Drawing – Shading and Shadows
Copyright © 2009 myportraitdrawing.com All Rights Reserved Page 27
Remember, you can use eraser to press on shading areas to make the tones look even.

Copyright © 2009 myportraitdrawing.com All Rights Reserved Page 28
Step 5: Mouth Drawing – Shading and ShadowsAfter finished shading for the mouth, your drawing should looks like this.

Step 6: Ear Drawing – Shading and Shadows
What I found when I read art books is that most of them skip the part on teaching ears drawing by covering the ears with long hair. And even if they did mention the ears, it’s very quick and doesn’t go into details.
Ears come in many shapes and sizes and are unique to each individual. For drawing ears, you will need to get the spacing between the parts right. Ears must have an outer edge, an inner edge and a hole leading to the ear drum.
Add shading on top of the ear. After that, erase the highlight areas.
Step 6: Ear Drawing - Shading and Shadows
Copyright © 2009 myportraitdrawing.com All Rights Reserved Page 29

Add shading inside. Darken the darker areas (4B pencil). Add shading inside the ear.
Add shading on the line.
Step 6: Ear Drawing - Shading and Shadows
Copyright © 2009 myportraitdrawing.com All Rights Reserved Page 30

Add shading from ear hole to earlobe.
Darken the darker areas. Draw ear ring. Add shading on the skin beside ear.
Step 6: Ear Drawing - Shading and Shadows
Copyright © 2009 myportraitdrawing.com All Rights Reserved Page 31

Step 6: Ear Drawing - Shading and Shadows
Copyright © 2009 myportraitdrawing.com All Rights Reserved Page 32
After finished shading for the ear, your drawing should looks like this.

Step 7: Hair Drawing – Shading and Shadows Drawing hair is important. Everything else might be perfect but if the hair looks like a bird’s nest or is flat then it will affect your entire drawing. Yes, drawing hair is complicated and frustrating, and often the results are terrible if only you go about it the right way, and do steps in the correct order.
You can’t draw every single strand that would be on a person’s head. But you do need to add enough distinct strands to give your drawing a clear texture and form of hair. Drawing hair correctly can change the look of your drawing dramatically.
I would recommend you to start from simpler hairstyles first then only to fancier hairstyles with curls.
Lay a stroke down, lift it and start again. DON’T simply drag it back and hoping to cover more space in less time. This only leads to messiness. Use a 4B pencil for drawing hair.
Step 7: Hair Drawing - Shading and Shadows
Copyright © 2009 myportraitdrawing.com All Rights Reserved Page 33

Start your stroke from the direction of the roots. DON’T start it from the ends of the hairs.
Continue drawing your stroke and be patience. It will be worth of time for doing this.
Step 7: Hair Drawing - Shading and Shadows
Copyright © 2009 myportraitdrawing.com All Rights Reserved Page 34

Continue drawing your stroke…
Step 7: Hair Drawing - Shading and Shadows
Copyright © 2009 myportraitdrawing.com All Rights Reserved Page 35

As you can see, it takes time to draw the hair. Continue drawing your stroke…
Step 7: Hair Drawing - Shading and Shadows
Copyright © 2009 myportraitdrawing.com All Rights Reserved Page 36

You’re almost there. Continue drawing your stroke…
Copyright © 2009 myportraitdrawing.com All Rights Reserved Page 37
Step 7: Hair Drawing - Shading and Shadows

Ok done!
Step 7: Hair Drawing - Shading and Shadows
Copyright © 2009 myportraitdrawing.com All Rights Reserved Page 38

Simple tips to make the hair looks more realistic: Draw little strands of hair on top of forehead with little lines.
Now here’s my favourite part which I like it the most. We will use eraser to make the highlight effect. Use eraser to press on the highlight area softly and pull it softly.
Step 7: Hair Drawing - Shading and Shadows
Copyright © 2009 myportraitdrawing.com All Rights Reserved Page 39

Use the edge of the eraser to perform highlights for tiny hair strands.
Do the same on the right side of the hair.
Step 7: Hair Drawing - Shading and Shadows
Copyright © 2009 myportraitdrawing.com All Rights Reserved Page 40
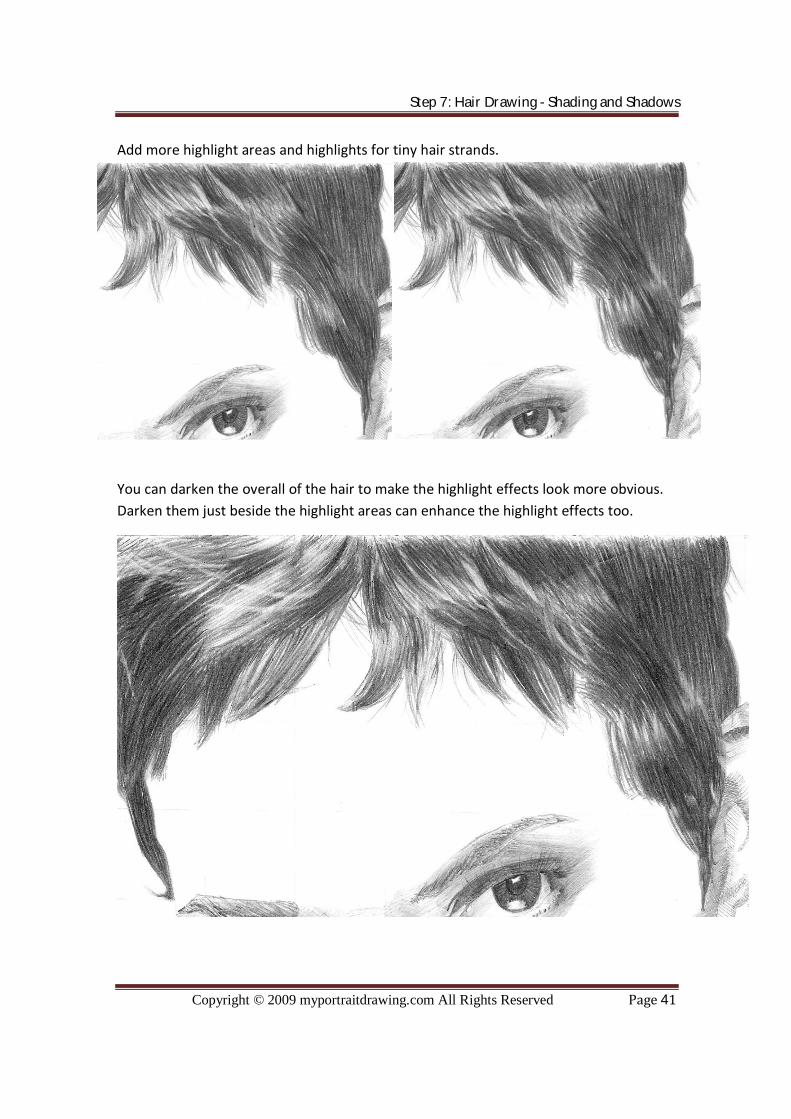
Add more highlight areas and highlights for tiny hair strands.
You can darken the overall of the hair to make the highlight effects look more obvious. Darken them just beside the highlight areas can enhance the highlight effects too.
Step 7: Hair Drawing - Shading and Shadows
Copyright © 2009 myportraitdrawing.com All Rights Reserved Page 41

Add shadow below the hair.
Step 7: Hair Drawing - Shading and Shadows
Copyright © 2009 myportraitdrawing.com All Rights Reserved Page 42

face.
Step 7: Hair Drawing - Shading and Shadows
Copyright © 2009 myportraitdrawing.com All Rights Reserved Page 43
Your drawing should looks like this now. In the last step, you will learn on how to draw the

Step 8: Face Drawing – Shading and Shadows This is the final step of this drawing portraits tutorial. The final step provides the finishing touches to shading the forehead, cheek, and jaw.
If you have completed this, I’m confident to say that you’ll be able to draw any portraits of your friends, family members or celebrities. You can see that the features are becoming realistic now. We only left the shading part on the face to complete the entire drawing and make it to become more realistic.
Add shading for the forehead.
Step 8: Face Drawing - Shading and Shadows
Copyright © 2009 myportraitdrawing.com All Rights Reserved Page 44

Step 8: Face Drawing - Shading and Shadows
Copyright © 2009 myportraitdrawing.com All Rights Reserved Page 45
Darken the darker areas.

Erase the edge of the shading if u think that the stroke is too long.
Darken the shadow beside left eye. Add shading on cheek.
Step 8: Face Drawing - Shading and Shadows
Copyright © 2009 myportraitdrawing.com All Rights Reserved Page 46

Add more shading below left eye. Darken the darker areas below left eye.
Darken the darker areas on the cheek. Add shading.
Step 8: Face Drawing - Shading and Shadows
Copyright © 2009 myportraitdrawing.com All Rights Reserved Page 47

Darken the darker areas.
Step 8: Face Drawing - Shading and Shadows
Copyright © 2009 myportraitdrawing.com All Rights Reserved Page 48

Add shading for the jaw.
Step 8: Face Drawing - Shading and Shadows
Copyright © 2009 myportraitdrawing.com All Rights Reserved Page 49
Darken the darker areas.

Add shading on the right side below the mouth.
Step 8: Face Drawing - Shading and Shadows
Copyright © 2009 myportraitdrawing.com All Rights Reserved Page 50
Add more shading on the jaw. Use eraser to erase highlight areas on the jaw

Add shading on the cheek.
Step 8: Face Drawing - Shading and Shadows
Copyright © 2009 myportraitdrawing.com All Rights Reserved Page 51

Darken the darker areas.
Add shading beside right eye to the cheek.
Step 8: Face Drawing - Shading and Shadows
Copyright © 2009 myportraitdrawing.com All Rights Reserved Page 52

Darken the darker areas.
You’ve finished drawing the face! Now, you can draw the outline of the neck and add shading on it.
Add shading on the neck.
Step 8: Face Drawing - Shading and Shadows
Copyright © 2009 myportraitdrawing.com All Rights Reserved Page 53

Darken the darker areas (4B pencil).
Step 8: Face Drawing - Shading and Shadows
Copyright © 2009 myportraitdrawing.com All Rights Reserved Page 54

Add more shading on the neck.
Darken the darker areas (4B pencil). Add more shading on the neck.
Step 8: Face Drawing - Shading and Shadows
Copyright © 2009 myportraitdrawing.com All Rights Reserved Page 55
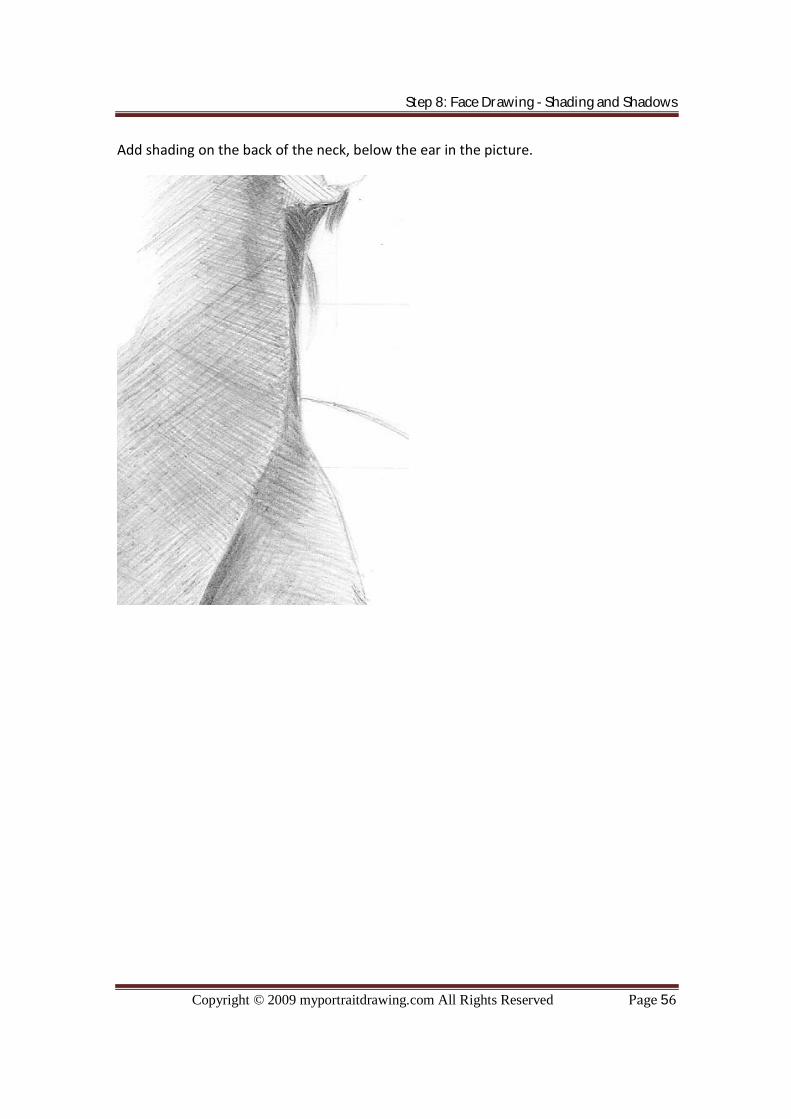
Add shading on the back of the neck, below the ear in the picture.
Step 8: Face Drawing - Shading and Shadows
Copyright © 2009 myportraitdrawing.com All Rights Reserved Page 56

Your drawing should looks like this right now.
Step 8: Face Drawing - Shading and Shadows
Copyright © 2009 myportraitdrawing.com All Rights Reserved Page 57

Congratulations! You have mastered the 8 Easy Steps To Drawing A Portrait! You can use the shading method that you’ve learnt to continue add shading on the shirt and background.
Remember, always look at the tones. Compare tones with other tones to define the darkness of your shading. The darker it is, the darker your shading should be. And
Erase the grid. Compare tones again and add darker shadings if is too light. This is the final result after final touch up and adding depth by drawing the background.
Step 8: Face Drawing - Shading and Shadows
Copyright © 2009 myportraitdrawing.com All Rights Reserved Page 58
the more u can observe the tones correctly, the more realistic your drawing is.

Step 8: Face Drawing - Shading and Shadows
Copyright © 2009 myportraitdrawing.com All Rights Reserved Page 59

Can you feel the pride of sharing your very own portrait drawing with everyone? If you can see improvement in your portrait drawing skill, please send a testimonial to me at [email protected], I would really appreciate it very much! J
To Your Drawing Success,
Christopher Sia
Copyright © 2009 myportraitdrawing.com All Rights Reserved Page 60
Founder of the 8 Easy Steps To Drawing A Portrait